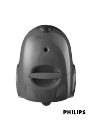
Philips FC8344 Manual de usuario
- Categoría
- Aspiradoras
- Tipo
- Manual de usuario
Este manual también es adecuado para


2

3
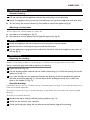
1 2 3 4
5 6 7 8
9 10 11 12
13 14 15 16
17 18 19 20

4


Important
Read these instructions for use carefully before using the appliance and save them for future
reference.
◗ Check if the voltage indicated on the appliance corresponds to the local mains voltage before
you connect the appliance.
◗ Do not use the appliance if the plug, the cord or the appliance itself is damaged.
◗ If the mains cord of this appliance is damaged, it must be replaced by Philips, a service centre
authorised by Philips or similarly qualified persons in order to avoid a hazard.
◗ Keep the appliance out of the reach of children.
◗ Never suck up water or any other liquid. Never suck up flammable substances and do not
suck up ashes until they are cold.
◗ Do not point the hose at the eyes or ears nor put it in your mouth when the vacuum
cleaner is switched on and the hose is connected to the vacuum cleaner.
◗ When the vacuum cleaner is used to suck up fine dust, the pores of the dustbag may become
clogged, causing the passage of air through the dustbag to become obstructed.As a result, the
dustbag-full indicator will indicate that the dustbag needs to be replaced. Even though the
dustbag may not be full, it must be replaced.
◗ Never use the appliance without the Motor Protection Filter.This could damage the motor
and shorten the life of the appliance.
◗ Only use Philips double-layer paper dustbags or the reusable dustbag provided.
Preparing for use
Hose
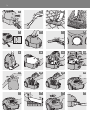
1 To connect the hose, push it into the appliance and turn it clockwise (fig. 1).
To disconnect the hose, turn it anticlockwise and pull it out of the appliance.
Tubes
1 Connect the tubes to each other and to the handgrip by inserting the narrow section into
the wider section while turning it a little.The tube with the clip is the lower tube (fig. 2).
You can connect the accessories in the same way.
Disconnect the accessories and tubes by pulling them and turning them a little.
Combi nozzle
The combi nozzle can be used on either carpets (with the brush strips folded in) or hard floors
(with the brush strips folded out):
1 Push the rocker switch on top of the combi nozzle with your foot to make the brush strips
for cleaning hard floors come out of the nozzle housing (fig. 3).
2 Push the rocker switch on the other side to make the brush strips disappear into the housing
(fig. 4).
Crevice tool
The crevice tool can be used to clean hard-to-reach places.
◗ To use the crevice tool, pull it out of the storage compartment at the rear of the vacuum
cleaner (fig. 5).
ENGLISH6

Using the appliance
Vacuum cleaning
1 Pull the cord out of the appliance and put the mains plug in the wall socket.
2 Switch the appliance on by pushing the on/off button on top of the appliance with your foot.
◗ You can carry the vacuum cleaner by the handle on top of the appliance (fig. 6).
Adjusting suction power
You can adjust the suction power by means of:
◗ the slide on the handgrip, or (fig. 7).
◗ the electronic suction power control (specific types only) (fig. 8).
Storage
1 Switch the appliance off and remove the mains plug from the wall socket.
2 Rewind the mains cord by pressing the cord rewind button.
3 Put the appliance in upright position and attach the lower tube to the appliance by means of
the clip (fig. 9).
Replacement
Replacing the dustbag
Replace the dustbag as soon as the 'dustbag full' indicator has changed colour permanently.
Always unplug the appliance before replacing the dustbag.
1 Open the cover (fig. 10).
2 Pull the dustbag holder towards you to unlock the dustbag (1) and lift the dustbag out of the
appliance (2) (fig. 11).
3 Put a new dustbag into the appliance. Position the opening of the dustbag directly opposite
the hose connection opening (1). Pull the front of the dustbag forwards until it locks into
place in the holder (2) (fig. 12).
Reusable dustbags
If provided, you can use the reusable dustbag instead of paper dustbags.The reusable dustbag can be
used and emptied repeatedly.
For removing and inserting the reusable dustbag, simply follow the instructions for replacing paper
dustbags.
To empty the reusable dustbag:
1 Remove the clip by sliding it off the dustbag sideways (fig. 13).
2 Shake out the contents into a dustbin.
3 Close the dustbag by sliding the clip back onto the bottom edge of the dustbag.
ENGLISH 7

Replacing filters
Always unplug the appliance before replacing the filters.
Motor Protection Filter
Replace the Motor Protection Filter when you insert the first of a new set of dustbags.
1 Open the cover and remove the dustbag (fig. 11).
2 Remove the filter holder by pulling it upwards at an angle (fig. 14).
3 Replace the filter and put the filter holder back into the appliance (fig. 15).
4 Put the dustbag back into the appliance (fig. 12).
Exhaust Filter
Replace the Exhaust Filter every 6 months.
1 Remove the grille at the back of the appliance (fig. 16).
2 Remove the filter holder (fig. 17).
3 Remove the old filter and place the new filter in the holder (fig. 18).
4 Put the filter holder back into the appliance with the filter facing the vacuum cleaner.
5 Put the grille back into the vacuum cleaner by first hooking the bottom edge into the
appliance and then pushing the grille towards the appliance until it locks into place with a
click (fig. 19).
Ordering dustbags and filters
If you have any difficulties obtaining dustbags, filters or other accessories for this appliance, please
contact the Philips Customer Care Centre in your country or consult the worldwide guarantee
leaflet.
- Philips double-layer paper dustbags are available under type number FC8046.
- A new Motor Protection Filter and a new Exhaust Filter are provided free of charge with each
new set of dustbags.
Guarantee & service
If you need information or if you have a problem, please visit the Philips website at www.philips.com
or contact the Philips Customer Care Centre in your country (you will find its phone number in the
worldwide guarantee leaflet). If there is no Customer Care Centre in your country, turn to your
local Philips dealer or contact the Service Department of Philips Domestic Appliances and Personal
Care BV.
Troubleshooting
1 Insufficient suction power
◗ Check if the dustbag needs to be replaced.
◗ Check if the filters need to be replaced.
◗ Check if the slide on the handgrip is closed.
◗ Check if the electronic suction power control is in maximum position (specific types only).
◗ Check if the nozzle, tube or hose is blocked up.To remove the obstruction, disconnect the
blocked-up item and connect it (as far as possible) the other way around. Switch the vacuum
cleaner on to force the air through the blocked-up item in opposite direction (fig. 20).
ENGLISH8

Importante
Lea atentamente estas instrucciones antes de empezar a utilizar el aparato y consérvelas por si
necesitara consultarlas en el futuro.
◗ Antes de conectar el aparato, compruebe que el voltaje indicado en el aparato se
corresponde con el voltaje de red local.
◗ No utilice el aparato si la clavija, el cable o el mismo aparato estuviera deteriorado.
◗ Si el cable de red de este aparato se deteriora, sólo puede ser sustituido por Philips, un
Servicio de Asistencia Técnica de Philips o por personal cualificado para evitar situaciones de
peligro.
◗ Mantenga el aparato fuera del alcance de los niños.
◗ No aspire nunca agua o cualquier otro líquido. No aspire nunca sustancias inflamables ni
cenizas hasta que estén frías.
◗ Cuando el aspirador esté conectado y la manguera esté montada en el aparato, no apunte
nunca con ésta a los ojos, los oídos o la boca.
◗ Cuando se utilice el aspirador para aspirar polvo fino, puede que los poros de la bolsa para el
polvo se obstruyan, haciendo que el aire no pueda llegar hasta la misma. Como resultado, el
indicador de bolsa llena indicará que es necesario sustituir la bolsa.Aunque no esté llena,
deberá sustituir la bolsa para el polvo.
◗ No use nunca el aparato sin el filtro protector del motor, ya que esto podría deteriorar el
motor y acortar la vida útil del aparato.
◗ Utilice únicamente bolsas con doble capa de papel de Philips o la bolsa reutilizable que se
suministra.
Cómo preparar el aparato
Manguera
1 Para conectar la manguera, encájela en el aparato y gírela en el sentido de las agujas del reloj
(fig. 1).
Para desconectar la manguera, gírela en sentido contrario a las agujas del reloj y sáquela del aparato.
Tubos
1 Conecte los tubos uno con otro y al mango introduciendo la sección más estrecha en la más
ancha a la vez que lo va girando un poco. El tubo con la brida es el tubo inferior (fig. 2).
Puede montar el resto de los accesorios del mismo modo.
Para quitar los accesorios y los tubos, tire de ellos y gírelos ligeramente.
Boquilla combinada
La boquilla combinada se puede utilizar tanto sobre alfombras (con la tira del cepillo hacia dentro)
como en suelos duros (con la tira del cepillo hacia fuera).
1 Empuje el conmutador situado en la parte superior de la boquilla combinada con el pie para
que salga de la carcasa de la boquilla la tira del cepillo para limpiar suelos duros (fig. 3).
2 Empuje el conmutador situado en el otro lado para hacer introducir de nuevo la tira del
cepillo en la carcasa (fig. 4).
Boquilla estrecha
La boquilla estrecha se puede utilizar para limpiar lugares de difícil acceso.
◗ Para utilizar la boquilla estrecha, sáquela del compartimento de almacenamiento situado en la
parte de atrás del aspirador (fig. 5).
ESPAÑOL 9

10
Cómo usar el aparato
Cómo aspirar
1 Saque el cable de red del aparato y enchúfelo a la red.
2 Conecte el aparato presionando, con el pie, el interruptor de marcha/parada (On/Off)
situado en la parte superior del aparato.
◗ Puede transportar el aspirador utilizando el asa que se encuentra en la parte superior del
mismo (fig. 6).
Cómo ajustar la potencia de succión
Puede regular la potencia de succión de las siguientes formas:
◗ con la corredera del mango, o (fig. 7).
◗ con el control electrónico de potencia de succión (sólo modelos específicos) (fig. 8).
Cómo guardar el aparato
1 Desconecte el aparato y desenchúfelo de la red.
2 Presionando el pedal del recogecable, recoja el cable de red.
3 Coloque el aparato en posición vertical y fije el tubo inferior al aparato utilizando la brida
(fig. 9).
Sustitución
Cómo sustituir la bolsa para el polvo
Cambie la bolsa en cuanto el indicador de 'bolsa llena' haya cambiado de color permanentemente.
Desenchufe siempre el aparato antes de sustituir la bolsa para el polvo.
1 Abra la cubierta (fig. 10).
2 Tire hacia usted del soporte de la bolsa para el polvo para desbloquear la bolsa (1) y saque la
bolsa del aparato (2) (fig. 11).
3 Ponga una bolsa nueva en el aparato. Coloque la abertura de la bolsa justo enfrente de la
abertura para conectar la manguera (1).Tire hacia delante de la parte delantera de la bolsa
hasta que encaje en el soporte (2) (fig. 12).
Bolsas para el polvo reutilizables
Si se incluye, puede usar la bolsa reutilizable en vez de las bolsas de papel. La bolsa reutilizable
puede usarse y vaciarse repetidas veces.
Para quitar e insertar la bolsa reutilizable, sólo tiene que seguir las instrucciones para sustituir las
bolsas de papel.
Para vaciar la bolsa reutilizable:
1 Retire la brida deslizándola lateralmente fuera de la bolsa (fig. 13).
2 Sacuda el contenido de la bolsa en la papelera.
3 Cierre la bolsa deslizando la brida hacia el borde inferior de la bolsa.
ESPAÑOL

11
Cómo sustituir el filtro
Antes de sustituir los filtros, desenchufe siempre el aparato.
Filtro protector del motor
Sustituyan el Filtro Protector del Motor cuando inserten la primera de las bolsas para el polvo de
un nuevo conjunto.
1 Abra la tapa y saque la bolsa para el polvo (fig. 11).
2 Saque el soporte del filtro tirando de él hacia arriba y en ángulo (fig. 14).
3 Sustituya el filtro y vuelva a colocar el soporte del filtro en el aparato (fig. 15).
4 Vuelva a colocar la bolsa para el polvo en el aparato (fig. 12).
Filtro del aire de salida
Sustituya el filtro del aire de salida cada 6 meses.
1 Saque la rejilla que hay en la parte trasera del aparato (fig. 16).
2 Saque el soporte del filtro (fig. 17).
3 Quite el filtro viejo y coloque un filtro nuevo en el soporte (fig. 18).
4 Vuelva a colocar el soporte del filtro en el aparato con el filtro mirando hacia el aspirador.
5 Vuelva a colocar la rejilla en el aspirador, enganchando primero el borde inferior en el
aparato e introduciendo después toda la rejilla hasta que encaje en su sitio con un clic (fig. 19).
Cómo pedir bolsas para el polvo y filtros
En el caso de que tenga dificultades para encontrar bolsas para el polvo, filtros u otros accesorios
para este aparato, póngase en contacto con el Servicio Philips de Atención al Cliente de su país o
consulte el folleto de garantía mundial.
- Las bolsas con doble capa de papel de Philips están disponibles con el número de modelo
FC8046.
- Se proporciona gratuitamente un nuevo filtro protector del motor y un nuevo filtro del aire de
salida con cada paquete nuevo de bolsas para el polvo.
Garantía y servicio
Si necesita información o si tiene algún problema, visite la página web de Philips en www.philips.com o
póngase en contacto con el Servicio Philips de Atención al Cliente de su país (hallará el número de
teléfono en el folleto de la Garantía Mundial). Si en su país no hay Servicio Philips de Atención al
Cliente, consulte a su distribuidor local Philips o póngase en contacto con el Service Department of
Philips Domestic Appliances and Personal Care BV.
Guía de resolución de problemas
1 Potencia de succión insuficiente
◗ Compruebe si hay que sustituir la bolsa para el polvo.
◗ Compruebe si hay que cambiar los filtros.
◗ Compruebe si la corredera del mango está cerrada.
◗ Compruebe que el control electrónico de potencia de succión está en la posición máxima
(sólo para modelos específicos).
◗ Compruebe si la boquilla, el tubo o la manguera están bloqueados. Para eliminar la
obstrucción, desconecte la pieza obstruida y conéctela al revés (todo lo que pueda). Ponga en
marcha el aspirador para forzar que el aire pase a través de la pieza obstruida en dirección
opuesta (fig. 20).
ESPAÑOL

◗
◗
◗
◗
◗
◗
◗
◗
◗
1
2
1
2
◗
12

1
2
◗
◗
◗
1
2
3
1
2
3
1
2
13

3
1
2
3
4
1
2
3
4
5
14

1
◗
◗
◗
◗
◗
15

◗
◗
◗
◗
◗
◗
◗
◗
◗
16

◗
◗
◗
◗
17

18

◗
◗
◗
◗
◗
19

20

21

www.philips.com
4222 003 30802
u
-
 1
1
-
 2
2
-
 3
3
-
 4
4
-
 5
5
-
 6
6
-
 7
7
-
 8
8
-
 9
9
-
 10
10
-
 11
11
-
 12
12
-
 13
13
-
 14
14
-
 15
15
-
 16
16
-
 17
17
-
 18
18
-
 19
19
-
 20
20
-
 21
21
-
 22
22


Philips FC8344 Manual de usuario
- Categoría
- Aspiradoras
- Tipo
- Manual de usuario
- Este manual también es adecuado para
en otros idiomas
- English: Philips FC8344 User manual
Artículos relacionados
-
Philips FC8390/01 Manual de usuario
-
-
Philips FC8620/03 Manual de usuario
-
Philips FC9050/01 Manual de usuario
-
Philips FC860803 Manual de usuario
-
Philips FC8204/01 Manual de usuario
-
Philips FC9304/01 Manual de usuario
-
Philips FC9162/01 Manual de usuario
-
-