Windmere AF-E8001-C Guía del usuario
- Categoría
- Pequeños electrodomésticos de cocina
- Tipo
- Guía del usuario

AF-E8001-C
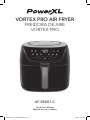
VORTEX PRO AIR FRYER
FREIDORA DE AIRE
VORTEX PRO
Use & Care Manual
Manual de uso y cuidado
AF-E8001-C_US_29896_ES_IB_A.indd 1AF-E8001-C_US_29896_ES_IB_A.indd 1 7/20/23 5:23 PM7/20/23 5:23 PM

2
3
PowerXL™ Vortex Pro Air Fryer
Appliance Specications
Model
Number
Supply
Power
Rated
Power Temperature Range
AF-E8001-C 120V ~60Hz 1700W 90° F–430° F
BEFORE YOU BEGIN
The PowerXL™ Vortex Pro Air Fryer will provide you
many years of delicious family meals and memories
around the dinner table. But before you begin, it’s
very important that you read this entire manual,
making certain that you are totally familiar with this
appliance’s operation and precautions.
AF-E8001-C_US_29896_ES_IB_A.indd 2AF-E8001-C_US_29896_ES_IB_A.indd 2 7/20/23 5:23 PM7/20/23 5:23 PM

2
3
IMPORTANT SAFEGUARDS 4
Parts & Accessories 7
Using the Control Panel 9
Instructions For Use 11
General Cooking Guidelines 14
Cleaning & Storage 16
Troubleshooting 17
Frequently Asked Questions 18
Table of Contents
AF-E8001-C_US_29896_ES_IB_A.indd 3AF-E8001-C_US_29896_ES_IB_A.indd 3 7/20/23 5:23 PM7/20/23 5:23 PM

4
5
• READ ALL INSTRUCTIONS.
• This appliance is not intended for use by persons
(including children) with reduced physical, sensory, or
mental capabilities or lack of experience and knowledge
unless they are given supervision or instruction
concerning use of the appliance by a person responsible
for their safety.
• Close supervision is necessary when any appliance is used
by or near children.
• Where to Use the Appliance
• DO NOT place on or near a hot gas or electric burner or in
a heated oven.
• DO NOT place your appliance on a cooktop, even if the
cooktop is cool, because you could
accidentally turn the cooktop on, causing
a fire, damaging the appliance, your
cooktop, and your home.
• DO NOT place or use this appliance near water.
• When cooking, DO NOT place the appliance against a
wall or within 5 inches of other appliances. DO NOT place
anything on top of the appliance.
• A fire may occur if this appliance is covered by or touching
flammable material, including curtains, draperies, walls,
and the like, when in operation.
• DO NOT use outdoors.
• DO NOT place the appliance in any container or small
confined space while the appliance is heated or in
operation.
• ALWAYS operate the appliance on a horizontal surface that
is level, stable, and noncombustible with adequate space
for airflow.
• Place a trivet or hot pad under the appliance before using
it.
• DO NOT operate any appliance if it has a damaged cord or
plug, if it is not working properly, or if it has been damaged
or dropped. Return the appliance to an authorized service
facility for examination, repair, or adjustment.
• This appliance should be serviced ONLY by qualified
service technicians. Contact Customer Service using the
information located on the back of this manual.
• NEVER immerse the main unit housing in water. If the
appliance falls or accidentally becomes immersed in
water, unplug from electrical outlet immediately. Do
not reach into liquid if the appliance is plugged in and
immersed.
• To protect against electrical shock, DO NOT immerse the
cord or plugs, or expose the electrical components to
water or other liquid.
• DO NOT plug in the power cord or operate the appliance
controls with wet hands.
• ALWAYS make sure the plug is attached to the appliance
first, and then plug the cord into the electrical outlet. To
disconnect, press the Power button to turn the appliance
off and then remove the plug from the electrical outlet.
• MAKE SURE the appliance is properly plugged into a
dedicated electrical outlet without any other appliances on
the same outlet.
• KEEP the appliance and its power cord out of the reach
of children when it is in operation or in the cooling down
process.
• NEVER plug the appliance into an outlet below the surface
where the appliance is placed.
• DO NOT let the power cord hang over the edge of a table or
counter or touch hot surfaces.
• DO NOT clean with metal scouring pads. Pieces can break
off the pad and touch electrical parts, creating risks of
electricshock.
• Operational Safety
• Should the appliance emit smoke, UNPLUG IMMEDIATELY
and wait for smoking to stop before handling the
appliance. Allow the appliance to cool and wipe excess oil
and grease from the appliance.
• Cooking appliances should be positioned in a stable
location with the handles (if any) positioned to avoid the
spillage of hot liquids.
• NEVER operate the appliance unattended.
• The use of accessory attachments not recommended by
the appliance manufacturer may cause injuries.
• Avoid touching moving parts.
Prevent Injuries! – Carefully Read All Instructions Before Use!
IMPORTANT SAFEGUARDS.
When using electrical appliances, basic safety precautions should always be followed to reduce
the risk of re, electric shock, and/or injury, including the following:
AF-E8001-C_US_29896_ES_IB_A.indd 4AF-E8001-C_US_29896_ES_IB_A.indd 4 7/20/23 5:23 PM7/20/23 5:23 PM

4
5
• UNPLUG the appliance from outlet when not in use
and before cleaning. ALLOW 30 minutes to cool before
handling, putting on or taking off parts, cleaning, or
storing.
• DO NOT cover the Air Intake Vent or Hot Air Outlet Vent
while the appliance is operating. Doing so will prevent
even cooking and may overheat or damage the appliance.
• When in operation, hot air and steam are
releasedthrough the Hot Air Outlet Vent. KEEPYOUR
HANDS AND FACE at a safe distance from the Hot Air
Outlet Vent and KEEPthe Vent clear ofobstructions.
• While cooking, the internal temperature of theappliance
reaches several hundred degreesFahrenheit. To avoid
personal injury, NEVER place hands inside the appliance
unless it is thoroughly cooled.
• The appliance’s outer surfaces and accessories may
become hot during use. WEAR OVEN MITTS when
handling the appliance during and after use and to protect
against hot steam and air released when opening the
appliance.
• DO NOT touch hot surfaces. Use handles orknobs.
• EXTREME CAUTION MUST BE USED when moving an
appliance containing hot oil or other hot liquids or when
removing accessories or disposing of hot grease. This
appliance is not intended for deep-frying foods.
• Oversized foods, metal foil packages, or utensils MUST
NOT be inserted in the appliance as they may create a risk
of fire or electric shock. DO NOT overfill the appliance.
• DO NOT store any materials, other than manufacturer-
recommended accessories, in this appliance when not
in use.
• DO NOT place any of the following materials in the
appliance: paper, cardboard, plastic.
• NEVER pour oil into the appliance or accessories. Fire and
personal injury could result.
• DO NOT use aerosol cooking sprays. These sprays will
build up on cookware and become difficult to remove
while reducing the nonstick cooking performance.
• DO NOT expose the appliance to corrosive chemicals or
vapors.
• DO NOT use sharp utensils with the appliance. These
implements can damage the appliance’s protective
non-stick coating.
• This appliance is for home use only. If the appliance is
used improperly or for professional or semi-professional
purposes or if it is not used according to the instructions
in the user manual, the guarantee becomes invalid and
Empower Brands, LLC will not be held liable for damages.
DO NOT use this appliance for anything other than its
intended use.
• Be sure the handle is assembled and fastened properly.
See " Attaching the Fry Basket Handle" section for
instructions.
• NEVER connect this appliance to an external timer switch
or separate remote-control system.
• When ready to start, plug the hardwired cord into a
electrical outlet. To disconnect, press the Power Button to
turn the appliance off and then remove the plug from the
electrical outlet.
• NEVER rest anything on the basket while it isopen.
• DO NOT leave the basket open for an extendedperiod.
• ALWAYS ensure that nothing is protruding out of the
appliance before closing the basket
• ALWAYS close the basket gently; NEVER slam the basket
closed. ALWAYS use the handle when opening and closing
the basket.
• NEVER operate the appliance with the basketopen.
• When the cooking time has completed, cooking will stop
and the fan will continue to run for 10–20 seconds to cool
down the appliance.
• The appliance is equipped with an internal microswitch
that automatically shuts down thefan and heating
element when the basket isremoved.
Prevent Injuries! – Carefully Read All Instructions Before Use!
IMPORTANT SAFEGUARDS.
When using electrical appliances, basic safety precautions should always be followed to reduce
the risk of re, electric shock, and/or injury, including the following:
SAVE THESE INSTRUCTIONS.
This product is for household use only.
AF-E8001-C_US_29896_ES_IB_A.indd 5AF-E8001-C_US_29896_ES_IB_A.indd 5 7/20/23 5:23 PM7/20/23 5:23 PM

6
7
POLARIZED PLUG
This appliance has a polarized plug (one blade is wider than the other). To reduce the risk
of electric shock, this plug is intended to t into a polarized outlet only one way. If the plug
does not t fully into the outlet, reverse the plug. If it still does not t, contact a qualied
electrician. Do not attempt to modify the plug in any way.
1. A short power-supply cord is provided to reduce the risk resulting from becoming
entangled in or tripping over a longer cord.
2. Longer detachable power-supply cords or extension cords are available and may be
used if care is exercised in their use.
3. If a longer detachable power-supply cord or extension cord is used:
a. The marked electrical rating of the cord set orextension cord should be at least as
great as the electrical rating of the appliance;
b. The cord should be arranged so that it will
not drape over the countertop or tabletop where it can be pulled on by children or
tripped over unintentionally.
ELECTRIC POWER
This appliance should be operated on a dedicated electrical outlet. If the electrical outlet is
overloaded with other appliances, your new appliance may not operate properly.
AUTOMATIC SHUT-OFF
The appliance has a built-in shut-off device that will automatically shut off the appliance when
the cooking time has completed. You can manually switch off the appliance by pressing the
Power Button. The fan will continue running for 10–20 seconds to cool down theappliance.
OVERHEATING PROTECTION
Should the inner temperature control system fail, the overheating protection system will be
activated and the appliance will not function. Should this happen, unplug the appliance. Allow
time for the appliance to cool completely before restarting or storing.
ELECTROMAGNETIC FIELDS
This appliance complies with all standards regarding electromagnetic elds. If handled
properly and according to the instructions in the user manual, the appliance is safe to use
based on scientic evidence available today.
AF-E8001-C_US_29896_ES_IB_A.indd 6AF-E8001-C_US_29896_ES_IB_A.indd 6 7/20/23 5:23 PM7/20/23 5:23 PM

6
7
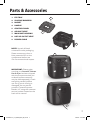
1. FRY TRAY
2. SILICONE BUMPERS*
3. BASKET
4. HANDLE
5. CONTROL PANEL
6. AIR INLET VENT
7. MAIN UNIT HOUSING
8. HOT AIR OUTLET VENT
9. POWER CABLE
NOTE: Unpack all listed
contents from the packaging.
Please remove any clear or
blue protective lm on the
components before use.
*Do not remove the bumpers.
IMPORTANT: Please make
sure that your PowerXL™ Vortex
Pro Air Fryer has been shipped
with the components that you
ordered (some accessories
may be sold separately). Check
everything carefully before
use. If any part is missing or
damaged, do not use this
product. Contact Empower
Brands, LLC using the customer
service number located on the
back of this manual.
2
1
4
8
9
3
7
4
5
6
3
Parts & Accessories
AF-E8001-C_US_29896_ES_IB_A.indd 7AF-E8001-C_US_29896_ES_IB_A.indd 7 7/20/23 5:23 PM7/20/23 5:23 PM

8
9
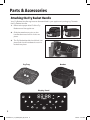
Attaching the Fry Basket Handle
Your Fry Basket Handle might come disassembled in your appliance’s packaging. To attach
the Fry Basket Handle:
1. Remove the paper label. Pull the Fry
Basket out of the appliance.
2. Slide the attachment point on the
handle downward until it clicks into
place.
3. The Fry Basket Handle should lock into
placeand should not detach once it is
locked into place.
Parts & Accessories
Fry Tray Basket
Display Panel
AF-E8001-C_US_29896_ES_IB_A.indd 8AF-E8001-C_US_29896_ES_IB_A.indd 8 7/20/23 5:23 PM7/20/23 5:23 PM

8
9
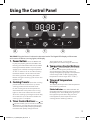
1. Power Button: Once the Basket and
Fry Tray are properly placed in the Main Unit
Housing, the Control Panel will be illuminated.
Pressing the Power Button once will set the
appliance to a default cooking temperature
of 375° F and time of 15 minutes. Pressing
the Power Button a second time will start
the cooking process. Pressing the Power
Button during the cooking cycle will turn the
appliance off.
2. Cooking Presets: Press the cooking
preset buttons to choose from up to ten
cooking presets. See the Preset Chart
for the cooking times and temperatures
associated with each preset. The running
lights on the Control Panel will illuminate
when the cooking cycle begins and will stay
illuminated for up to 20 seconds after the
cooking cycle is complete.
3. Timer Control Buttons: The and
symbols enable you to increase or decrease
cooking time 1minute at a time (30minutes
at a time for Dehydrate). Keeping the Button
held down will rapidly change the time.
Time control range: 1– 60 minutes
(Dehydrate time control range: 2–24 hours).
4. Temperature Control Buttons:
The and symbols enable you to increase
or decrease cooking temperature 5° F at
a time. Keeping a button held down will
rapidly change the temperature. Temperature
control range: 180° F–430° F (Dehydrate
temperature control range: 90° F–170° F).
5. Time and Temperature
Display:
This display will keep track of the temperature
and remaining cook time.
Shake Indicator: The shake Indicator will
illuminate when the cooking cycle has reached
its halfway point. This halfway timer gives you
the opportunity to shake or ip your food
in the appliance, which helps ensure even
cooking (see the “Shaking” section).
TO START: Plug the Power Cord into the electrical outlet. TheDigital LED Display will illuminate
and a series of dashes (running lights)will display.
Using The Control Panel
234
5
1
AF-E8001-C_US_29896_ES_IB_A.indd 9AF-E8001-C_US_29896_ES_IB_A.indd 9 7/20/23 5:23 PM7/20/23 5:23 PM

10
11
Using The Control Panel
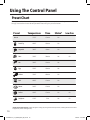
Preset Chart
Once you are familiar with the appliance, you may want to experiment with your own recipes.
Simply choose the time and temperature that suits your personal taste.
Preset Temperature Time Shake* Low Fan
Default 375° F 15 mins. Yes
French Fry 400° F 18 mins. Yes
Vegetable 380° F 8 mins. Yes
Bake 320° F 30 mins. No On
Fish 390° F 10 mins. No
Eggs 250° F 18 mins. No
Chicken 350° F 40 mins. Yes
Broil 400° F 12 mins. Yes
Reheat 240° F 12 mins. Yes
Defrost 180° F 15 mins. Yes On
Dehydrate 120° F 2 hrs. No On
*Shake Function Programming: Halfway through the cooking cycle, the appliance will beep ve times, indicating that food can be shaken
or ipped over (see the “Shaking” section).
AF-E8001-C_US_29896_ES_IB_A.indd 10AF-E8001-C_US_29896_ES_IB_A.indd 10 7/20/23 5:23 PM7/20/23 5:23 PM

10
11
Instructions for Use
1. Read all material, warning stickers, and labels.
2. Remove all packing materials, stickers, and
labels from the appliance.
3. Before initial use, wipe the inside and outside
of the appliance with a warm, moist cloth
and mild detergent. Handwash all cooking
accessories.
4. Place appliance on a heat-resistant surface
or use heat protection. Do not place the
appliance on a surface that is not heat
resistant. Ensure that the appliance is used
in an area with adequate air circulation. Do
not place on the stove top.
5. Before cooking food, preheat the appliance
for a few minutes to allow the appliance to
burn off the manufacturer’s protective coating
of oil. Wipe the appliance with warm, soapy
water and a dishcloth after this burn-in cycle.
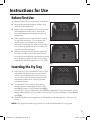
Inserting the Fry Tray
1. Place the Fry Tray in the Basket. The Fry Tray’s
adjustable tray height lets you place food
closer to the heating element for broiling.
You can also use it to make the total size of
the basket smaller when cooking smaller
quantities of food.
2. To raise the Fry Tray closer to the heating
element, position the edges of the Fry Tray
(see Fig. i) on the Fry Tray Holders (see Fig. j).
To use the Fry Tray on the bottom of the Basket, rotate the FryTray so that the Fry Tray‘s
edges slide past the Fry Tray Holder, and push the Fry Tray to the bottom of theBasket
(see Fig k).
3. Slide the Basket into the appliance. If the Basket is placed properly, it will click into
place.
NOTE: This appliance cooks using hot air. Do not ll the Basket with oil or frying fat.
Before First Use
Fig. i
Fig. j
Fig. k
AF-E8001-C_US_29896_ES_IB_A.indd 11AF-E8001-C_US_29896_ES_IB_A.indd 11 7/20/23 5:23 PM7/20/23 5:23 PM

12
13
1. Plug the appliance into a
dedicated electrical outlet.
2. Pull the Basket out of the appliance
and place the ingredients inside. Do
not touch the Basket directly
because the Basket becomes very
hot during operation. Only hold the
Basket by its handle. Insert the
Basket into the appliance.
NOTE: Always use the Fry Tray with
the Basket.
3. Press the Power Button. Set the
appropriate time and temperature
for the ingredients you are
cooking.
4. When the timer beeps ve times,
either the set cooking time has
elapsed or the appliance is
reminding you to shake your food
(see “Shaking” in “Instructions for
Use”). Pull the Basket out of the
appliance and place it on a heat-
resistant surface.
5. When removing food from the
basket, avoid contact with hot
excess oil or the hot drip tray. To
avoid being burned, use silicone-
tipped tongs or tip out the basket
contents carefully. The Fry Tray is
not secured and can fall out. Hot oil
can be inside the basket.
6. If the food is not fully cooked,
simply slide the Basket back into
the appliance and add a few
minutes to the cooking time.
7. The appliance is instantly ready for
preparing another batch.
Using the Appliance
Instructions for Use
AF-E8001-C_US_29896_ES_IB_A.indd 12AF-E8001-C_US_29896_ES_IB_A.indd 12 7/20/23 5:23 PM7/20/23 5:23 PM

12
13
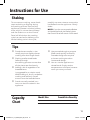
Shaking
Tips
• Foods that are smaller in size
usually require a slightly shorter
cooking time than larger foods.
• Shaking smaller-sized foods
halfway through
the cooking process ensures that
all the pieces are fried evenly.
• Adding a bit of vegetable oil to
breaded items
is suggested for a crispier result.
When adding oil, do so just before
cooking and add only a small
amount onto the breaded items.
• Snacks normally cooked in an
oven can also be cooked in the
appliance.
• Use premade dough to prepare
filled snacks quickly and easily.
Premade dough also requires
a shorter cooking time than
homemade dough.
• You can use the appliance to
reheat foods. Simply set the
temperature and time to however
warm you want your food.
To ensure even cooking, some foods
require shaking or ipping during
the cooking process. Some of this
appliance‘s presets include a halfway
timer, which is a timer that will beep
and the Shake icon on the Control
Panel will blink when the cooking
cycle has reached its halfway point.
At the halfway point in the cycle,
carefully use oven mitts to remove the
hot Basket from the appliance. Gently
shake.
NOTE: If you do not remove the Basket
and shake the food, the Shake light on
the Control Panel will remain illuminated.
Capacity
Chart
Model/Size French Fries Quantity
8-qt. 28 oz.
Instructions for Use
AF-E8001-C_US_29896_ES_IB_A.indd 13AF-E8001-C_US_29896_ES_IB_A.indd 13 7/20/23 5:23 PM7/20/23 5:23 PM

14
15
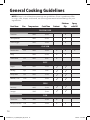
NOTE: Keep in mind that these settings are guidelines. Since ingredients differ
in origin, size, shape, and brand, we cannot guarantee the best settings for your
ingredients.
Food item Size Temperature Cook Time Preheat
Shake or
Flip
Spray
with Oil
FROZEN FOOD
French fries 400° F 18 min
Sweet potato fries 400° F 22 min
Chicken nuggets 400° F 14 min
CHICKEN
Breaded cutlets 6 oz 400° F 10 min
Wings 400° F 25 min
Chicken breast 6 oz 400° F 8 min
BEEF
Burgers 6 oz 400° F 10 min
Hot dogs 8 pc 375° F 5 min
NY strip steaks 8 oz 400° F 12 min
Meatballs, 1 inch 1.5 lb 375° F 10 min
PORK
Pork chops 400° F 12 min
Sausages 350° F 15 min
FISH
Salmon lets 6 oz 390° F 12 min
Shrimp (16–20 size) 12 oz 390° F 10 min
General Cooking Guidelines
AF-E8001-C_US_29896_ES_IB_A.indd 14AF-E8001-C_US_29896_ES_IB_A.indd 14 7/20/23 5:23 PM7/20/23 5:23 PM

14
15
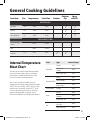
Food item Size Temperature Cook Time Preheat
Shake or
Flip
Spray
with Oil
VEGETABLES
Asparagus 1 lb 380° F 8 min
Broccoli 8 oz 380° F 8 min
Corn on the cob 2 pc 380° F 8 min
PREPARED FOOD
Hard boiled eggs,
shell on 250° F 18 min
Cake 320° F 20 min
Grilled cheese
sandwich 1 pc 375° F 6 min
Internal Temperature
Meat Chart
Food Type Internal Temp.*
Beef & Veal
Ground 160° F
Steaks, roasts:
medium 145° F
Steaks, roasts: rare 125° F
Chicken & Turkey
Breasts 165° F
Ground, stuffed 165° F
Whole bird, legs,
thighs, wings 165° F
Fish & Shellsh Any type 145° F
Lamb
Ground 160° F
Steaks, roasts:
medium 140° F
Steaks, roasts: rare 130° F
Pork
Chops, ground,
ribs, roasts 160° F
Fully cooked ham 140° F
Use this chart and a food thermometer
to ensure that meat, poultry, seafood,
and other cooked foods reach a safe
minimum internal temperature.
*For maximum food safety, the U.S.
Department of Agriculture recommends
165° F for all poultry; 160° F for ground
beef, lamb, and pork; and 145° F, with
a 3-minute resting period, for all other
types of beef, lamb, and pork. Also
review the USDA Food Safety Standards.
General Cooking Guidelines
AF-E8001-C_US_29896_ES_IB_A.indd 15AF-E8001-C_US_29896_ES_IB_A.indd 15 7/20/23 5:23 PM7/20/23 5:23 PM

16
17
Clean the appliance after each use. The
Basket and Fry Tray are coated with
a special nonstick surface. Never use
abrasive cleaning materials or utensils on
these surfaces.
1. Remove the Power Cable from the
electrical outlet and be certain the
appliance is thoroughly cooled
before cleaning.
2. Wipe the outside of the appliance
with a warm, moist cloth and mild
detergent.
3. Clean the Basket and Fry Tray, with hot
water, a mild detergent, and a
nonabrasive sponge. The Fry Tray is
dishwasher safe, but hand-washing is
recommended. For difcult-to-remove
food, soak in hot, soapy water for 10
minutes.
4. NOTE: If the Silicone Bumpers on
the Fry Tray need to be cleaned, they
can be removed and reattached.
To remove the bumpers, locate the
capped end of the bumper and push
the capped end off of the Fry Tray.
There will be some resistance, but
keep pushing until the bumper slide
off of the Fry Tray. To reattach the
bumper, slide each bumper onto the
slot on the Fry Tray.
5. Clean the inside of the appliance with
hot water, a mild detergent, and a
nonabrasive sponge.
6. If necessary, remove unwanted food
residue from the heating element with
a soft cleaning brush.
7. Rinse the appliance with a clean, damp
cloth. Use a clean, dry cloth to dry the
appliance interior. Do not leave
standing water in the appliance.
8. If any other service needs to be
performed, contact Customer Service
using the contact information on the
back of this manual.
Place the cooled, dry appliance in a clean, dry place.
Do not stack objects on top of the appliance.
Storage
Cleaning & Storage
AF-E8001-C_US_29896_ES_IB_A.indd 16AF-E8001-C_US_29896_ES_IB_A.indd 16 7/20/23 5:23 PM7/20/23 5:23 PM

16
17
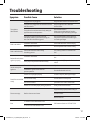
Symptom Possible Cause Solution
The appliance
does not work.
The appliance is not plugged in. Plug the Power Cable into an electrical outlet.
The appliance is plugged into an outlet that is shared
with other devices.
Plug the appliance into a dedicated
electrical outlet.
The appliance has not been turned on by setting the
preparation time and temperature.
Press the Power Button.
Select a time and temperature. Press the
Power Button again and cooking will begin.
The appliance might have been turned off.
If the Power button is pressed while cooking, the
Auto Shut-Off mode will be triggered.
Press the Power Button. Select a time and
temperature. Press the Power Button again
and cooking will begin.
Food is not cooked.
The Basket is overloaded. Use smaller batches for more even frying.
The temperature is set too low. Raise temperature and continue cooking.
Food is not fried evenly. Some foods need to be shaken during
the cooking process.
See “Shaking” section in “Instructions for
Use”.
Basket will not slide into
appliance properly.
The Basket is overloaded. Do not ll the Basket above the Maximum
line.
The Fry Tray is not placed in the Basket correctly. Gently push the Fry Tray into the Basket until
it clicks.
Smoke coming from
appliance.
Too much oil is being used. Wipe down to remove excess oil.
The Basket has grease residue from the
previous operation. Clean the Basket after each use.
French fries are not fried
evenly.
Potatoes are not prepped properly. Consult a recipe for potato type and prep.
Fries are not cut evenly. Cut fries thinner or reshape fries.
Fries are too crowded. Spread fries out or cook a smaller batch.
Potatoes are not rinsed properly during preparation. Pat dry to remove excess starch.
Fries are not crispy. Raw fries have too much water.
Dry potato sticks properly before misting oil.
Cut sticks smaller.
Add a bit more oil.
Error
E1 - Broken circuit of the thermal sensor
Call Customer Service at 1-973-287-5129
E2 - Short circuit of the thermal sensor
Troubleshooting
AF-E8001-C_US_29896_ES_IB_A.indd 17AF-E8001-C_US_29896_ES_IB_A.indd 17 7/20/23 5:23 PM7/20/23 5:23 PM

18
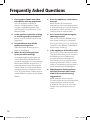
19
1. Can I prepare foods other than
fried dishes with my appliance?
You can prepare a variety of
dishes, including steaks, chops,
burgers, and baked goods. See
the PowerXL™ Vortex Pro Air Fryer
Recipe Guide.
2. Is the appliance good for making
or reheating soups and sauces?
Never cook or reheat liquids in the
appliance.
3. Is it possible to shut off the
appliance at any time?
Press the Power Button once or
remove theBasket.
4. What do I do if the appliance
shuts off while cooking?
As a safety feature, the appliance
has an Auto Shut-Off device that
prevents damage from overheating.
Remove the Basket and set it on a
heat-resistant surface. Remove the
Power Cable from the outlet. Allow
the appliance to cool down. Once
cool, plug the Power Cable into the
outlet. Restart by pressing the Power
Button.
5. Does the appliance need time to
heat up?
Most recipes do not require
preheating. If you are cooking from
a cold start and your recipe requires
preheating, add 3 minutes to the
cooking time tocompensate.
6. Can I check the food during the
cookingprocess?
You can remove the Basket at any
time while cooking is in progress.
During this time, you can shake the
contents in the Basket if needed to
ensure even cooking.
7. Is the appliance dishwasher safe?
Only the Fry Tray is dishwasher safe.
The appliance itself, which contains
the heating coil and electronics,
should never be submerged in
liquid of any kind or cleaned with
anything more than a warm, moist
cloth or nonabrasive sponge with a
small amount of mild detergent.
8. What happens if the appliance
still does not work after I have
tried all the troubleshooting
suggestions?
Never attempt a home repair.
Contact customer service and follow
the procedures set forth by the
guarantee. Failure to do so could
render your guarantee null and
void.
Frequently Asked Questions
AF-E8001-C_US_29896_ES_IB_A.indd 18AF-E8001-C_US_29896_ES_IB_A.indd 18 7/20/23 5:23 PM7/20/23 5:23 PM

18
19
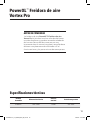
ANTES DE COMENZAR
La freidora de aire PowerXL™ Freidora de aire
Vortex Pro le brindará muchos años de deliciosas
comidas familiares y grandes recuerdos alrededor
de la mesa. Pero antes de comenzar, es muy
importante leer el manual completo, asegurándose
de estar completamente familiarizado con el
funcionamiento y las precauciones de este aparato.
PowerXL™ Freidora de aire
Vortex Pro
Especicaciones técnicas
Número
de modelo Alimentación eléctrica Potencia
nominal Escala de temperatura
AF-E8001-C 120V ~60Hz 1700W 90° F–430° F
AF-E8001-C_US_29896_ES_IB_A.indd 19AF-E8001-C_US_29896_ES_IB_A.indd 19 7/20/23 5:23 PM7/20/23 5:23 PM

20
21
Medidas de seguridad importantes 21
Piezas y accesorios 24
Uso del panel de control 26
Instrucciones de uso 29
Guías de cocción generales 32
Cuidado y limpieza 34
Resolución de problemas 35
Limpieza y almacenamiento 36
Tabla de contenidos
AF-E8001-C_US_29896_ES_IB_A.indd 20AF-E8001-C_US_29896_ES_IB_A.indd 20 7/20/23 5:23 PM7/20/23 5:23 PM

20
21
• LEA TODAS LAS INSTRUCCIONES.
• Este aparato no está diseñado para ser utilizado
por personas (incluidos los niños) con capacidades
físicas, sensoriales o mentales reducidas o con falta de
experiencia y conocimiento a menos que una persona
responsable de su seguridad los supervise o les dé
instrucciones sobre el uso del aparato.
• Todo electrodoméstico utilizado cerca de los niños o por
ellos mismos, requiere la supervisión directa de un adulto.
• Dónde utilizar el aparato
• NO coloque el aparato sobre o cerca de una hornilla
eléctrica o de gas caliente ni dentro de un horno caliente.
• NO coloque el aparato sobre una estufa,
aun cuando la estufa esté fría, ya que
podría encender accidentalmente
la estufa, provocando un incendio,
dañando el aparato, su estufa y su hogar.
• NO coloque ni utilice este aparato cerca del agua.
• Cuando cocine, NO coloque el aparato contra una pared
ni a menos de 5 pulgadas de otros aparatos. NO coloque
nada encima del aparato.
• Podría ocurrir un incendio si el aparato se cubre o toca
material inflamable, incluidas cortinas, paredes y similares
cuando esté en uso.
• NO lo utilice al aire libre.
• NO coloque el aparato en ningún contenedor o espacio
pequeño restringido mientras el aparato esté calentado
o funcionando.
• SIEMPRE utilice el aparato sobre una superficie horizontal
que esté nivelada, estable y no combustible con suficiente
espacio para el flujo de aire.
• Coloque un salvamanteles o almohadilla resistente al
calor debajo del aparato antes de utilizarlo.
• NO utilice ningún aparato con un cable o enchufe dañado,
o después de presentar un fallo en su funcionamiento o
haberse dañado o caído de manera alguna. Devuelva el
aparato a un centro de servicio autorizado para su revisión,
reparación o ajuste.
• Este aparato debe ser reparado SOLAMENTE por un
representante de servicio autorizado. Comuníquese
con el departamento de servicio al cliente, utilizando la
información que se encuentra en la parte posterior de
este manual.
• NUNCA sumerja la caja de la unidad principal en agua.
Si el aparato se cae o sumerge accidentalmente en el
agua, desenchúfelo inmediatamente del tomacorriente.
No introduzca la mano en líquidos para alcanzarlo si el
aparato está enchufado y sumergido.
• A fin de protegerse contra una descarga eléctrica,
NO isumerja el cable o los enchufes ni exponga los.
componentes eléctricos al agua u otros líquidos.
• NO enchufe el cable de alimentación ni opere los
controles del aparato con las manos mojadas.
• SIEMPRE conecte primero el enchufe al aparato, luego
enchufe el cable al tomacorriente. Para desconectar,
presione el botón de encendido para apagar el aparato y
después retire el enchufe del tomacorriente.
• ASEGÚRESE de que el aparato esté enchufado a un
tomacorriente independiente si ningún otro aparato
enchufado en el mismo tomacorriente.
• MANTENGA tel cable de alimentación fuera del alcance de
los niños cuando el aparato esté funcionando o en proceso
de enfriamiento.
• NUNCA enchufe el aparato a un tomacorriente debajo de
la superficie donde se coloca el aparato.
• NO permita que el cable de alimentación cuelgue del
borde de una mesa o mostrador ni que toque superficies
calientes.
• NO limpie con estropajos metálicos. Pedacitos de metal
podrían partirse y entrar en contacto con las piezas
eléctricas, creando un riesgo de descarga eléctrica.
• Seguridad de funcionamiento
• Si el aparato emitiera humo negro, DESENCHÚFELO
INMEDIATAMENTE y espere a que deje de emitir humo
antes de manejarlo. Deje que el aparato se enfríe y limpie
el exceso de aceite y grasa.
• Los aparatos de cocción deben colocarse sobre una
superficie estable con las asas (si existen) posicionadas de
manera que se evite los derrames de líquidos calientes.
• NUNCA opere el aparato sin supervisión.
• El uso de accesorios no recomendados por el fabricante
del aparato podría ocasionar lesiones personales.
• Evite tocar las piezas móviles.
Por favor lea este instructivo antes de usar el producto.
INSTRUCCIONES IMPORTANTES DE SEGURIDAD
Cuando se utilizan aparatos eléctricos, siempre se deben respetar las precauciones básicas
de seguridad para reducir el riesgo de incendio, descarga eléctrica, y/o lesiones personales,
incluyendo las siguientes:
AF-E8001-C_US_29896_ES_IB_A.indd 21AF-E8001-C_US_29896_ES_IB_A.indd 21 7/20/23 5:23 PM7/20/23 5:23 PM

22
23
Por favor lea este instructivo antes de usar el producto.
INSTRUCCIONES IMPORTANTES DE SEGURIDAD
Cuando se utilizan aparatos eléctricos, siempre se deben respetar las precauciones básicas
de seguridad para reducir el riesgo de incendio, descarga eléctrica, y/o lesiones personales,
incluyendo las siguientes:
• DESENCHUFE el aparato del tomacorriente cuando
no esté en uso y antes de limpiarlo. PERMITA que se
enfríe por 30 minutos antes de manipularlo, instalarle o
retirarles piezas, limpiarlo y almacenarlo.
• NO cubra la entrada de aire o salida de aire caliente
cuando el aparato esté funcionando. Si lo hace, impedirá
una cocción uniforme y podría dañar el aparato o causar
sobrecalentamiento.
• Cuando el aparato está funcionando, el aire caliente y
el vapor se escapan a través de la salida de aire caliente.
MANTENGA SUS MANOS Y LA CARA a una distancia
segura de la salida de aire caliente y MANTENGAla salida
de aire libre de obstrucciones.
• Durante la cocción, el aparato alcanza una temperatura
interna de unos cuantos cientos de grados Fahrenheit.
Para evitar lesión personal, NUNCA coloque las manos
dentro del aparato a menos que se haya enfriado
completamente.
• Las superficies exteriores del aparato y los accesorios
pueden calentarse durante el uso. USE GUANTES DE
HORNO para manipular el aparato durante y después del
uso, y para protegerse contra el vapor y aire caliente que
salen cuando se abre el aparato.
• NO toque superficies calientes. Utilices asas o perillas.
• SE DEBE TOMAR EXTREMA PRECAUCIÓN al mover un
aparato conteniendo aceite caliente u otros líquidos
calientes o cuando retire accesorios o deseche la grasa
caliente. Este aparato no está diseñado para freír
alimentos sumergidos en aceite.
• NO se debe introducir alimentos de gran tamaño,
paquetes de papel de aluminio o utensilios e en el
aparato, ya que pueden crear un riesgo de incendio o
descarga eléctrica. NO llene en exceso el aparato.
• NO almacene ningún material, que no sean los
recomendados por el fabricante, en el aparato cuando no
esté en uso.
• NO coloque ninguno de los siguientes materiales en el
aparato: papel, cartón, plástico.
• NUNCA vierta aceite en el aparato o sus accesorios. Esto
podría resultar en incendio y lesiones personales.
• NO utilice aerosoles para cocinar. Estos aerosoles se
acumularán en los utensilios de cocina y serán difíciles
de eliminar a la vez que reduce el rendimiento de la
superficie antiadherente.
• NO exponga el aparato a productos químicos corrosivos
o vapores.
• NO utilice utensilios afilados con el aparato. Estos pueden
dañar su capa protectora antiadherente.
• Este aparato es solo para uso doméstico. Si el aparato se
utiliza inadecuadamente o para propósitos profesionales
o semiprofesionales o si no se utiliza de acuerdo a las
instrucciones del manual del usuario, la garantía se
anulará y Empower Brands, LLC no será responsable por
los daños. NO utilice este aparato para ningún otro fin que
no sea el indicado.
• Asegúrese de que el mango esté montado y sujeto
correctamente. Consulte la sección "Cómo conectar el asa
de la cesta para freír" para obtener instrucciones.
• Este aparato no está diseñado para operar por medio de
un temporizador externo o control emoto.
• Los niños deben supervisarse para asegurar que ellos no
empleen los aparatos como juguete.
• NUNCA conecte este aparato a un interruptor de
temporizador externo o sistema de control remoto
separado.
• Cuando esté listo para utilizar el aparato, enchufe el cable
de alimentación a un tomacorriente. Para desconectar,
presione el botón de encendido para apagar el aparato y
luego retire el enchufe del tomacorriente.
• NUNCA rcoloque nada en la cesta mientras esté abierta.
• NO deje la cesta abierta durante un período prolongado.
• SIEMPRE easegúrese de que nada sobresalga del aparato
antes de cerrar la cesta.
• SIEMPRE cierre suavemente la cesta; NUNCA la cierre
bruscamente. SIEMPRE utilice el asa para abrir y cerrar la
cesta.
• NUNCA utilice su aparato con la cesta abierta.
• Cuando el tiempo de cocción haya terminado, la cocción
se detiene y el ventilador continúa funcionando por unos
10 a 20 segundos para enfriar el aparato.
• El aparato está equipado con un microinterruptor interno
que apaga automáticamente el ventilador y el elemento
de calentamiento al retirar la cesta.
AF-E8001-C_US_29896_ES_IB_A.indd 22AF-E8001-C_US_29896_ES_IB_A.indd 22 7/20/23 5:23 PM7/20/23 5:23 PM

22
23
CONSERVE ESTAS INSTRUCCIONES.
Este aparato eléctrico es para uso doméstico solamente.
ENCHUFE POLARIZADO
Este aparato tiene un enchufe polarizado (un contacto es más ancho que el otro). Para
reducir el riesgo de descarga eléctrica, este enchufe está diseñado para entrar en un
tomacorriente polarizado solo de una manera. Si el enchufe no entra completamente en el
tomacorriente, invierta el enchufe. Si aun no entra, consulte a un electricista calicado. NO
intente modicar el enchufe de manera alguna.
1. Un cable de alimentación corto es provisto para reducir los riesgos de enredarse o
tropezar con un cable más largo.
2. Existen cables de alimentación separables más largos o cables de extensión disponibles
y estos pueden ser utilizados si se toma el cuidado debido en su uso.
3. Si se utiliza un cable de alimentación separable o cable de extensión:
a. La clasicación eléctrica marcada del cable de alimentación separable o cable de
extensión debe ser, como mínimo, igual a la clasicación eléctrica del aparato.
b. El cable debe ser acomodado de manera que no cuelgue sobre el mostrador o la
mesa donde pueda ser halado por los niños o tropezarse sin darse cuenta.
NOTA: Si el cordón de alimentación es dañado, en América Latina debe sustituirse por
personal calicado o por el centro de servicio autorizado.
ENERGÍA ELÉCTRICA
Este aparato debe utilizarse en un tomacorriente independiente. Si el tomacorriente
está sobrecargado con otros electrodomésticos, su nuevo aparato podría no funcionar
correctamente.
FUNCIÓN DE APAGADO AUTOMÁTICO
Este aparato cuenta con un dispositivo integrado que apaga automáticamente el aparato
cuando el tiempo de cocción termina. Puede apagar manualmente el aparato presionando
el botón de encendido. El ventilador continuará funcionando durante 10 a 20 segundos para
enfriar el aparato.
PROTECCIÓN CONTRA SOBRECALENTAMIENTO
Si el sistema de control de temperatura interior fallara, el sistema de protección contra
sobrecalentamiento se activará y el aparato dejará de funcionar. Si esto sucediera, desenchufe
el aparato. Espere a que el aparato se enfríe completamente antes de reactivarlo o
almacenarlo.
CAMPOS ELECTROMAGNÉTICOS
Este aparato cumple con todas las normas relativas a los campos electromagnéticos. Si se
maneja adecuadamente y de acuerdo a las instrucciones del manual del usuario, el aparato es
seguro para utilizar según la evidencia cientíca disponible en la actualidad.
AF-E8001-C_US_29896_ES_IB_A.indd 23AF-E8001-C_US_29896_ES_IB_A.indd 23 7/20/23 5:23 PM7/20/23 5:23 PM

24
25
2
1
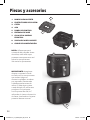
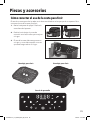
1. BANDEJA PARA FREÍR
2. PROTECTORES DE SILICÓN*
3. CESTA
4. ASA
5. PANEL DE CONTROL
6. ENTRADA DE AIRE
7. CAJA DE LA UNIDAD
PRINCIPAL
8. SALIDA DE AIRE CALIENTE
9. CABLE DE ALIMENTACIÓN 4
8
9
NOTA: UDesempaque el
contenido del paquete. Antes
de utilizar, retire toda capa
protectora transparente o azul
sobre los componentes.
*No retire los protectores.
IMPORTANTE: Asegúrese
de que su aparato ha sido
enviado con los componentes
que ordenó (algunos
accesorios pueden venderse
por separado). Revise todo
cuidadosamente antes de
utilizar. Si falta alguna pieza
o está dañada, no utilice este
producto. Comuníquese
con Empower Brands, LLC
utilizando el número de servicio
al cliente, localizado en la parte
posterior de este manual.
3
Piezas y accesorios
7
4
5
6
3
AF-E8001-C_US_29896_ES_IB_A.indd 24AF-E8001-C_US_29896_ES_IB_A.indd 24 7/20/23 5:23 PM7/20/23 5:23 PM

24
25
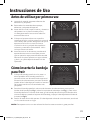
Cómo conectar el asa de la cesta para freír
El asa de su cesta para freír puede venir desensamblada en el empaque de su aparato. Para
conectar el asa de la cesta para freír:
1. Retire la etiqueta de papel. Deslice la
cesta fuera del aparato.
2. Deslice hacia abajo el punto de
conexión en el asa hasta que encaje en
su lugar.
3. El asa de la cesta debe asegurarse en
su lugar y no se debe separar una ves
que esté asegurada en su lugar.
Piezas y accesorios
Bandeja para freír Bandeja para freír
Panel de pantalla
AF-E8001-C_US_29896_ES_IB_A.indd 25AF-E8001-C_US_29896_ES_IB_A.indd 25 7/20/23 5:23 PM7/20/23 5:23 PM

26
27
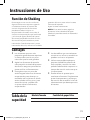
Uso del panel de control
234
5
1
AF-E8001-C_US_29896_ES_IB_A.indd 26AF-E8001-C_US_29896_ES_IB_A.indd 26 7/20/23 5:23 PM7/20/23 5:23 PM

26
27
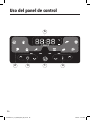
1. Botón de encendido: Una vez
que la cesta y la bandeja para freír estén
colocadas correctamente en la caja de la
unidad principal, se iluminará el panel de
control. Presione el botón de encendido
una vez para ajustar la unidad a una
temperatura de cocción predeterminada
de 375° F y un tiempo de cocción
de 15 minutos. Presione el botón de
encendido una segunda vez para iniciar
el proceso de cocción. Presione el botón
de encendido durante el ciclo de cocción
para apagar el aparato.
2. Funciones de cocción
predeterminadas: Presione
los botones de las funciones de
cocción predeterminadas para elegir
de hasta diez funciones de cocción
predeterminadas. Consulte la tabla
de ajustes predeterminados para los
tiempos de cocción y las temperaturas
asociadas con cada función
predeterminada. Las luces circulando
(guiones) en el panel de control se
iluminarán cuando el ciclo de cocción
comience y se mantendrán iluminadas
por 20 segundos después que el ciclo
de cocción termine.
3. Botones de control de tiempo:
Presione los símbolos y para
aumentar o reducir el tiempo de
cocción 1 minuto a la vez (30 minutos
a la vez para la función de deshidratar).
Mantenga presionado el botón para
cambiar rápidamente el tiempo de
cocción. La escala de control de tiempo
es 1 a 60 minutos (la escala de control
de tiempo para deshidratar es 2-24
horas).
4. Botones de control de
temperatura: Presione los
símbolos y para aumentar o reducir
la temperatura de cocción 5° F a la vez.
Mantenga presionado un botón para
cambiar rápidamente la temperatura.
La escala de control de temperatura es
180° F–430° F (la escala para deshidratar
es 90° F–170° F).
5. Pantalla de tiempo y
temperatura: Esta pantalla se
mantendrá al tanto de la temperatura y
el tiempo de cocción restante.
Indicador de la función de Shaking: El
indicador de agitar se iluminará cuando el
ciclo de cocción haya alcanzado la mitad de
su duración. Este temporizador a la mitad
le brinda la oportunidad de agitar o voltear
sus alimentos en el aparato, lo cual le ayuda
asegurar una cocción uniforme (consulte la
sección de “la función de Shaking”).
PARA COMENZAR: Enchufe el cable de alimentación a un tomacorriente. La pantalla led digital
se iluminará y una serie de guiones (luces circulando) aparecerán.
AF-E8001-C_US_29896_ES_IB_A.indd 27AF-E8001-C_US_29896_ES_IB_A.indd 27 7/20/23 5:23 PM7/20/23 5:23 PM

28
29
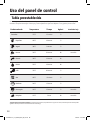
Tabla preestablecida
Una vez que esté familiarizado con el aparato, es posible que desee experimentar con sus propias
recetas. Simplemente elija el tiempo y la temperatura que se adapten a sus gustos personales.
*Programación de la función de Shaking: A mitad del ciclo de cocción, el aparato emite un bip por cinco veces, indicando que los alimentos pueden
agitarse o voltearse (consultar la sección de la función de “Shaking”).
Uso del panel de control
Predeterminado Temperatura Tiempo Agitar* Ventilador bajo
Por defecto 375° F 15 minutos. Si
Papas fritas 400° F 18 minutos. Si
Vegetal 380° F 8 minutos. Si
Hornear 320° F 30 minutos. No encendido
Pescado 390° F 10 minutos. No
Huevos 250° F 18 minutos. No
pollo 350° F 40 minutos. Si
Asar 400° F 12 minutos Si
Recalentar 240° F 12 minutos. Si
Descongelar 180° F 15 minutos. Si encendido
Dehydrate 120° F 2 horas. No encendido
AF-E8001-C_US_29896_ES_IB_A.indd 28AF-E8001-C_US_29896_ES_IB_A.indd 28 7/20/23 5:23 PM7/20/23 5:23 PM

28
29
1. Lea todo el material, etiquetas adhesivas de
advertencia y etiquetas.
2. Retire todos los materiales de empaque,
adhesivos y etiquetas del aparato.
3. Antes del uso inicial, limpie el interior y el exterior
del aparato con un paño húmedo y tibio y
un detergente suave. Lave a mano todos los
accesorios de cocina.
4. Coloque el aparato sobre una supercie
resistente al calor o utilice protección contra el
calor debajo del aparato. Asegúrese de que el
aparato se utilice en un área con buena
circulación de aire y alejado de supercies
calientes y materiales combustibles. No lo
coloque sobre una estufa.
5. Antes de cocinar los alimentos, precaliente el
aparato durante unos minutos para permitir
que se queme la capa protectora de aceite del
fabricante. Limpie el aparato con agua caliente
y jabón y un paño después de este ciclo de
quemado.
Cómo insertar la bandeja
para freír
1. Coloque la bandeja para freír en la cesta. La
altura ajustable de la bandeja para freír le
permite colocar sus alimentos más cercanos al
elemento de calentamiento para asar. También
puede utilizar la bandeja para reducir el tamaño
de la cesta cuando cocine cantidades más
pequeñas.
2. Para alzar la bandeja para freír más cerca el elemento de calentamiento, posicione los
bordes de la bandeja (ver Fig. i) sobre los soportes de la bandeja (ver Fig. j). ). Para utiliza
la bandeja de freír en el fondo de la cesta, gire la bandeja de manera que los bordes de la
misma se deslicen pasado el soporte de la bandeja y empuje la bandeja hasta el fondo de
la cesta (ver Fig k).
3. Deslice la cesta dentro del aparato. Si la bandeja está colocada correctamente, escuchará
un clic cuando cae en su lugar.
NOTA: Este aparato cocina con aire caliente. No llene la cesta con aceite ni grasa para freír.
Antes de utilizar por primera vez
Fig. i
Fig. j
Fig. k
Instrucciones de Uso
AF-E8001-C_US_29896_ES_IB_A.indd 29AF-E8001-C_US_29896_ES_IB_A.indd 29 7/20/23 5:23 PM7/20/23 5:23 PM

30
31
1. Enchufe el aparato a un
tomacorriente independiente.
2. Deslice la cesta fuera del aparato y
coloque los ingredientes adentro. No
toque la cesta directamente ya que
ésta se calienta durante el
funcionamiento. Solo sostenga la cesta
por su asa. Inserte la cesta en el
aparato.
NOTA: Siempre utilice la bandeja para
freír con la cesta.
3. Presione el botón de encender.
Ajuste el tiempo y la temperatura
de cocción adecuada para los
ingredientes que va a cocinar.
4. Cuando el temporizador emita cinco
bips, ya ha transcurrido el tiempo de
cocción seleccionado o el aparato le
está recordando que debe agitar sus
alimentos (consulte la función “agitar”
en la sección de “Instrucciones de
Uso”. Retire la cesta del aparato
y colóquela sobre una supercie
resistente al calor.
5. Cuando retire los alimentos de la
cesta, evite el contacto con el exceso
de aceite caliente o la bandeja
caliente. Para evitar quemaduras,
utilice pinzas con punta de silicón
o incline con cuidado el contenido
de la cesta para sacarlo. La bandeja
para freír no está asegurada y puede
caerse. Puede haber aceite caliente
dentro de la cesta.
6. Si los alimentos no están cocinados
completamente, simplemente deslice
la cesta dentro del aparato y añada
unos minutos al tiempo de cocción.
7. El aparato está listo instantáneamente
para preparar otro lote de alimentos.
Uso del aparato
Instrucciones de Uso
AF-E8001-C_US_29896_ES_IB_A.indd 30AF-E8001-C_US_29896_ES_IB_A.indd 30 7/20/23 5:23 PM7/20/23 5:23 PM

30
31
Función de Shaking
Consejos
• Los alimentos que son más
pequeños generalmente requieren
un tiempo de cocción un poco
más corto que los más grandes.
• Agitar los alimentos de tamaño
más pequeño a mitad del proceso
de cocción asegura que todas las
piezas se frían uniformemente.
• Se sugiere rociar un poco de
aceite vegetal sobre los alimentos
empanizados para obtener un
resultado más crujiente. Al añadir
aceite, añada solo un poco, justo
antes de cocinar y añada solo
un poco sobre los alimentos
empanizados.
• Los bocadillos que normalmente
se cocinan en el horno también se
pueden cocinar en el aparato.
• Utilice masa prefabricada para
preparar bocadillos rellenos de
forma rápida y sencilla. La masa
prefabricada también requiere un
tiempo de cocción más corto que
la masa casera.
• Puede utilizar el aparato para
recalentar alimentos. Simplemente
ajuste la temperatura y el tiempo
de cocción de acuerdo al nivel de
calentamiento que desea para sus
alimentos.
Para asegurar una cocción uniforme,
algunos alimentos requieren agitarse
o voltearse durante el proceso de
cocción. Algunas de las funciones
predeterminadas incluyen un
temporizador de medio recorrido, el
cual es un temporizador que le alertará
y el icono de agitar (Shake) del panel
de control parpadeará cuando el ciclo
de cocción haya alcanzado su punto
intermedio. Cuando alcance el punto
intermedio del ciclo, utilice con cuidado
guantes de horno para retirar la cesta
caliente del aparato.
Agite la cesta suavemente.
NOTA: Si no retira la cesta y agita los
alimentos, la luz indicadora de agitar
(Shake) en panel de control se mantendrá
iluminada.
Tabla de la
capacidad
Modelo/Tamaño Cantidad de papas fritas
8-cuartos. 28 onzas .
Instrucciones de Uso
AF-E8001-C_US_29896_ES_IB_A.indd 31AF-E8001-C_US_29896_ES_IB_A.indd 31 7/20/23 5:23 PM7/20/23 5:23 PM

32
33
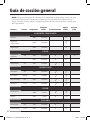
NOTA: Tenga en cuenta que la información en esta tabla se debe utilizar como una guía.
Los tiempos de cocción pueden variar. Dado que los ingredientes se diferencian en
origen, tamaño, forma y marca, no podemos garantizar los mejores ajustes a utilizar para
sus ingredientes.
Alimento Tamaño Temperatura
Tiempo de
cocción Precalentamiento
Agitar o
voltear
Rocíe con
aceite
ALIMENTOS CONGELADOS
Papas fritas 400° F 18 minutos
Papas fritas de
Camotes o batatas 400° F 22 minutos
Nuggets de pollo 400° F 14 minutos
POLLO
Pechugas nitas
empanizadas 6 oz 400° F 10 minutos
Alas 400° F 25 minutos
Pechuga de pollo 6 oz 400° F 8 minutos
CARNE DE RED
Hamburguesas 6 oz 400° F 10 minutos
Perros calientes 8 piezas 375° F 5 minutos
Bistecs estilo NY strip 8 oz 400° F 12 minutos
Albondigas, 1” 1.5 lb 375° F 10 minutos
CERDO
Chuletas de cerdo 400° F 12 min
Salchichas 350° F 15 min
PESCADO
Filetes de salmón 6 oz 390° F 12 minutos
Camarones (16-20) 12 oz 390° F 10 minutos
Guía de cocción general
AF-E8001-C_US_29896_ES_IB_A.indd 32AF-E8001-C_US_29896_ES_IB_A.indd 32 7/20/23 5:23 PM7/20/23 5:23 PM

32
33
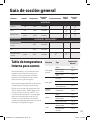
Alimento Tamaño Temperatura
Tiempo de
cocción Precalentamiento
Agitar o
voltear
Rocíe con
aceite
VEGETALES
Espárragos 1 lb 380° F 8 minutos
Brócoli 8 oz 380° F 8 minutos
Mazorca de maíz 2 piezas 380° F 8 minutos
ALIMENTOS PREPARADOS
Huevos hervidos, con
la cáscara 250° F 18 minutos
Torta 320° F 20 minutos
Sándwich de queso a
la plancha 1 piezas 375° F 6 minutos
Tabla de temperatura
interna para carnes
Alimento Tipo Temperatura
Interna*
Carne de red
y ternera
Molida 160° F
Bistecs, asados:
término medio 145° F
Bistecs, asados:
crudo 125° F
Pollo y pavo
Pechugas 165° F
Molido, relleno 165° F
Aves enteras, muslos,
contra muslos, alas 165° F
Pescado y
mariscos Cualquier tipo 145° F
Cordero
Molido 160° F
Bistec, asados:
término medio 140° F
Bistec, asados: crudo 130° F
Cerdo
Chuletas, molido,
costillas, asados 160° F
Jamón
completamente
cocinado
140° F
Utilice esta tabla y un termómetro para
asegurar que las carnes, las aves, los
mariscos y otros alimentos cocinados
alcancen una temperatura de cocción
interna mínima que sea segura.
*Para máxima seguridad de los alimentos,
el departamento de agricultura de los
EE.UU. recomienda una temperatura de
165° F para las aves; 160° F para carne
molida, cordero y cerdo; y 145° F, con
un período de reposo de 3 minutos para
todos los otros tipos de carne de red,
cordero y cerdo. También consulte las
normas de seguridad para alimentos de la
USDA (por sus siglas en inglés).
Guía de cocción general
AF-E8001-C_US_29896_ES_IB_A.indd 33AF-E8001-C_US_29896_ES_IB_A.indd 33 7/20/23 5:23 PM7/20/23 5:23 PM

34
35
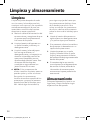
Limpie el aparato después de cada
uso. La cesta y la bandeja para freír
contienen una capa con una supercie
antiadherente especial. Nunca use
materiales o utensilios de limpieza
abrasivos en estas supercies
1. Retire el cable de alimentación del
tomacorriente y asegúrese de que
el aparato esté completamente
frío antes de limpiarlo.
2. Limpie el exterior del aparato con
un paño húmedo y caliente y un
detergente suave.
3. Limpie la cesta y la bandeja para
freír con agua caliente, un
detergente suave y una esponja no
abrasiva. La bandeja para freír es
apta para el lavaplatos, pero es
recomendado lavarla a mano. Para
alimentos difíciles de quitar,
sumérjala en agua caliente con
jabón durante 10 minutos.
4. NOTA: Si los protectores de
silicón necesitan limpieza, estos se
pueden quitar y volver a colocar:
Para quitar los protectores,
localice el extremo tapado de los
protectores y empuje el extremo
tapado fuera de la bandeja para
freír. Habrá algo de resistencia,
pero siga empujando hasta que
los protectores se deslicen fuera
de la bandeja para freír. Para
volver a conectar los protectores
de silicón, deslice cada protector
sobre la ranura de la bandeja para
freír.
5. Limpie el interior del aparato con
agua caliente, un detergente suave
y un paño o esponja no abrasiva.
6. Si es necesario, elimine los residuos
de alimentos no deseados con un
cepillo de limpieza suave.
7. Limpie el aparato con un paño
limpio y húmedo. Utilice un paño
limpio y seco para secar el interior
del aparato. No deje agua estancada
dentro del aparato.
8. Si necesitara algún otro servicio,
comuníquese con el departamento
de servicio al cliente, utilizando la
información de contacto que se
encuentra en la parte posterior de
este manual.
Limpieza
Coloque el aparato frío y seco en un
lugar seco y limpio. No apile ningún
objeto encima del aparato.
Almacenamiento
Limpieza y almacenamiento
AF-E8001-C_US_29896_ES_IB_A.indd 34AF-E8001-C_US_29896_ES_IB_A.indd 34 7/20/23 5:23 PM7/20/23 5:23 PM

34
35
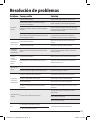
Problema Causa posible Solución
El aparato no
funciona.
El aparato no está enchufado. Enchufe el cable de alimentación a un tomacorriente.
El aparato está enchufado a un tomacorriente que está
conectado a otros dispositivos Enchufe el aparato a un tomacorriente independiente.
El aparato se encendió sin ajustar el tiempo y la temperatura
de cocción.
Presione el botón de encendido. Seleccione el tiempo y la
temperatura. Presione el botón de encendido una vez más
y el ciclo de cocción comenzará.
Es probable que haya apagado el aparato. Si presiona el botón
de encendido cuando el aparato está cocinando, se activará el
modo de apagado automático.
Presione el botón de encendido. Seleccione un tiempo
y una temperatura de cocción. Presione el botón de
encendido una vez más y el ciclo de cocción comenzará.
Los alimentos no
están cocinados.
La cesta está demasiado llena. Utilice lotes más pequeños para freír de manera más
uniforme.
La temperatura está muy baja. Aumente la temperatura y continue cocinando.
Los alimentos
no están fritos
uniformemente.
Algunos alimentos necesitan agitarse durante el proceso de
cocción.
Consulte “la función de agitar” (Shake) en la sección de
instrucciones de uso.
La cesta no
se desliza
correctamente
dentro del
aparato.
La cesta está demasiado llena. No llene la cesta por encima de la línea de nivel máximo.
La bandeja para freír no está colocada correctamente en la
cesta.
Empuje suavemente la bandeja para freír dentro de la
cesta hasta escuchar un clic.
Sale humo del
aparato.
Se utilizó demasiada cantidad de aceite. Limpie para eliminar el exceso de aceite.
La cesta tiene residuos de grasa del ciclo de cocción anterior. Limpie la cesta después de cada uso.
Las papas fritas
no se han frito
uniformemente.
Las papas no están preparadas correctamente. Consulte la receta para el tipo de papa y preparación.
Las papas no están cortadas uniformemente. Corte las papas más nas o cámbieles la forma..
Hay demasiadas papas. Separe las papas o cocine lotes más pequeños.
Las papas no se enjuagaron adecuadamente durante la
preparación..
Seque con una toalla de papel para eliminar el exceso
de almidón..
Las papas no están
crujientes. Las papas crudas contienen demasiada agua.
Seque los palitos de papas adecuadamente antes de
rociarles aceite.
Corte los palitos más pequeños.
Añada un poco más de aceite.
Error
E1 – Se rompió el circuito del sensor térmico.
Llame a servicio al cliente al 1-973-287-5129
E2 – Corte circuito del sensor térmico.
Resolución de problemas
AF-E8001-C_US_29896_ES_IB_A.indd 35AF-E8001-C_US_29896_ES_IB_A.indd 35 7/20/23 5:23 PM7/20/23 5:23 PM

36
37
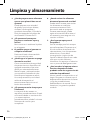
1. ¿Puedo preparar otros alimentos
que no sean platos fritos con mi
aparato?
Puede preparar una variedad
de platos, que incluyen bistecs,
chuletas, hamburguesas y
productos horneados. Consulte la
Guía de recetas de la freidora de
aire PowerXL™ Vortex Pro™.
2. ¿El aparato es bueno para
preparar o recalentar sopas y
salsas?
Nunca cocine ni recaliente líquidos
en el aparato.
3. Es posible apagar el aparato en
cualquier momento?
Presione el botón de encendido
una vez o retire la cesta.
4. ¿Qué hago si el aparato se apaga
durante la cocción?
Como característica de seguridad,
el aparato tiene un dispositivo de
apagado automático que evita
daños por sobrecalentamiento.
Retire la cesta y colóquela sobre
una supercie resistente al calor.
Permita que el aparato se enfríe.
Una vez que este frio, enchufe el
cable de alimentación al
tomacorriente. Reinicie con el
botón de encendido.
5. ¿El aparato necesita tiempo para
calentarse?
La mayoría de las recetas no
requieren precalentamiento. Si está
cocinando desde un comienzo frío
y su receta requiere
precalentamiento, añada 3 minutos
al tiempo de cocción para
compensar.
6. ¿Puedo revisar los alimentos
durante el proceso de cocción?
Puede retirar la cesta para revisar
los alimentos en cualquier
momento mientras el ciclo
de cocción está en progreso.
Durante este tiempo, puede
agitar el contenido de la cesta, si
es necesario, para asegurar una
cocción uniforme.
7. ¿Es el aparato apto para el
lavaplatos?
Solo la bandeja para freír es apta
para el lavaplatos. El aparato en sí,
el cual contiene el serpentín de
calentamiento y los componentes
electrónicos, nunca debe
sumergirse en ningún tipo de
líquido ni debe limpiarse con nada
más que un paño caliente y
húmedo o una esponja no abrasiva
con un poco de detergente suave.
8. ¿Qué sucede si el aparato aún no
funciona después de haber
probado todas las sugerencias de
solución de problemas?
Nunca intente una reparación en el
hogar. Póngase en contacto con el
departamento de servicio al cliente
y siga los procedimientos
establecidos en el manual. De no
hacerlo así, su garantía quedaría
anulada
Limpieza y almacenamiento
AF-E8001-C_US_29896_ES_IB_A.indd 36AF-E8001-C_US_29896_ES_IB_A.indd 36 7/20/23 5:23 PM7/20/23 5:23 PM

36
37
This device complies with part 15 of the FCC Rules. Operation is subject to the following
two conditions: (1) This device may not cause harmful interference, and (2) this device
must accept any interference received, including interference that may cause undesired
operation.
Changes or modifications not expressly approved by the party responsible for compliance
could void the user’s authority to operate this device.
NOTE: This equipment has been tested and found to comply with the limits for a Class
B digital device, pursuant to part 15 of the FCC Rules. These limits are designed to
provide reasonable protection against harmful interference in a residential installation.
This equipment generates, uses, and can radiate radio frequency energy and, if not
installed and used in accordance with the instructions, may cause harmful interference
to radio communications. However, there is no guarantee that interference will not occur
in a particular installation. If this equipment does cause harmful interference to radio
or television reception, which can be determined by turning the equipment off and on,
the user is encouraged to try to correct the interference by one or more of the following
measures:
– Reorient or relocate the receiving antenna.
– Increase the separation between the equipment and receiver.
– Connect the equipment into an outlet on a circuit different from that to which the
receiver is connected.
– Consult the dealer or an experienced radio/TV technician for help.
Este dispositivo cumple las disposiciones establecidas en la sección 15 de las normas de
la Comisión Federal de Comunicaciones (FCC por sus siglas en inglés). Su funcionamiento
es sujeto a dos condiciones: (1) este dispositivo no puede causar interferencias
perjudiciales, y (2) este dispositivo debe aceptar cualquier interferencia recibida,
incluyendo interferencias que puedan causar un funcionamiento inadecuado. Cambios o
modificaciones no aprobadas explícitamente por la parte responsable del cumplimiento
podría anular la autoridad del usuario a operar este dispositivo.
NOTA: Este producto ha sido probado y se ha determinado que cumple con los límites
requeridos para un dispositivo digital de Clase B, especificado en la sección 15 de las
normas de la Comisión Federal de Comunicaciones. Dichos límites se han establecido
con el fin de conceder un margen razonable de protección contra interferencias
perjudiciales en caso de instalaciones residenciales. Este producto genera, utiliza y
puede irradiar energía de radiofrecuencia y, si no se instala y utiliza de acuerdo con las
instrucciones, puede provocar una interferencia perjudicial en las comunicaciones por
radio. No obstante, no se garantiza que no se producirá interferencia perjudicial en una
instalación determinada. Si este producto causa una interferencia en la recepción de
radio o televisión, la cual puede determinarse encendiendo y apagando el producto, se
recomienda al usuario que trate de corregir la interferencia mediante una o más de las
siguientes medidas:
–Cambiar la orientación o posición de la antena receptora.
–Aumentar la separación entre el producto y el receptor.
– Enchufar el producto a un tomacorriente que pertenezca a un circuito diferente de aquel
en el que está conectado el receptor.
– Consultar al distribuidor o a un técnico con experiencia en radio y televisión para obtener
ayuda.
AF-E8001-C_US_29896_ES_IB_A.indd 37AF-E8001-C_US_29896_ES_IB_A.indd 37 7/20/23 5:23 PM7/20/23 5:23 PM

AF-E8001-C_US_29896_ES_IB_A.indd 38AF-E8001-C_US_29896_ES_IB_A.indd 38 7/20/23 5:23 PM7/20/23 5:23 PM

AF-E8001-C_US_29896_ES_IB_A.indd 39AF-E8001-C_US_29896_ES_IB_A.indd 39 7/20/23 5:23 PM7/20/23 5:23 PM

TM trademark of Empower Brands, LLC.
TM marca comercial por Empower Brands, LLC.
© 2023 Empower Brands, LLC. All rights reserved / Todos los derechos reservados.
Empower Brands, LLC, Middleton, WI 53562.
07/2023 29896
Made in China.
Fabricado en China.
T22-9003535-A
E/S
Sello del Distribuidor:
Fecha de compra:
Modelo:
VORTEX PRO AIR FRYER
FREIDORA DE AIRE
VORTEX PRO
AF-E8001-C_US_29896_ES_IB_A.indd 40AF-E8001-C_US_29896_ES_IB_A.indd 40 7/20/23 5:23 PM7/20/23 5:23 PM
-
 1
1
-
 2
2
-
 3
3
-
 4
4
-
 5
5
-
 6
6
-
 7
7
-
 8
8
-
 9
9
-
 10
10
-
 11
11
-
 12
12
-
 13
13
-
 14
14
-
 15
15
-
 16
16
-
 17
17
-
 18
18
-
 19
19
-
 20
20
-
 21
21
-
 22
22
-
 23
23
-
 24
24
-
 25
25
-
 26
26
-
 27
27
-
 28
28
-
 29
29
-
 30
30
-
 31
31
-
 32
32
-
 33
33
-
 34
34
-
 35
35
-
 36
36
-
 37
37
-
 38
38
-
 39
39
-
 40
40


Windmere AF-E8001-C Guía del usuario
- Categoría
- Pequeños electrodomésticos de cocina
- Tipo
- Guía del usuario
en otros idiomas
- English: Windmere AF-E8001-C User guide
Otros documentos
-
NuWave 36011 El manual del propietario
-
Bella 4.6QT Air Fryer Digital El manual del propietario
-
KALORIK AFO 52096 BK Manual de usuario
-
-
-
KALORIK MAXX Advance 26 Quart Digital Air Fryer Oven Manual de usuario
-
-
-
-