La página se está cargando ...

The CAMO Hidden Deck Fastening System is easy to use on
treated wood, hardwood, cedar, composite, or PVC deckboards.
The following instructions will share the simple installation
process to create a beautiful, fastener-free deck surface using
the CAMO Marksman Pro. It is important to note that this is a
system - CAMO Hidden Fasteners, CAMO Marksman™ Tools and
CAMO Driver Bits are engineered to work exclusively together.
Using other branded tools or guides, fasteners or bits will impair
performance and not produce the desired results.
Before beginning installation of your deck, you will need the
following:
– CAMO Hidden Fasteners
– CAMO Driver Bit (included with CAMO Hidden
Fasteners; Grooved Board Driver Bits are available
separately)
– CAMO Marksman Pro tool
– Drill (set drill speed to highest setting for maximum
driving efciency)
– Optional: L brackets or 2 ½” x #7 CAMO trim head
deck screws (for the board that abuts the
structure)
Adjust the CAMO Marksman Pro to t
the boards you are using. Loosen the
Thumb Dial at the rear of the tool to
adjust the Spacer Teeth to t the width
of your deckboards. The middle setting
ts most standard 5-1/4” - 5-3/4” solid or
grooved deckboards.
To begin deck installation, lay the rst board that abuts the
structure into position. If the abutting board runs parallel to the
house or other structure, it may be necessary to face fasten (see
options below). If so, we recommend using 2 ½” x #7 CAMO trim
head deck screws.
You can secure the board abutting the structure in several ways:
(1) When using CAMO Hidden Fasteners, lay the board abutting
the structure in place; at each joist, mark the location for the
CAMO fasteners that will be driven toward the structure on the
outside edge of the deckboard; pull the board away from the
structure and position the Marksman Pro on the desired mark at
one end of the board and load one CAMO deck screw into the
Screw Guide on the outside edge of the deckboard. Steady the
tool and pre-start the screw about ½” into the board. Now back
out the screw and squeeze the Trigger Handle to remove the
Marksman Pro. Continue this process the entire length of the
deckboard. Once you have reached the end of the board,
reposition the deckboard with the pre-started holes on the
OUTSIDE edge with the board snug to the structure. Now, re-drive
the CAMO deck screws into the board. Finish the deckboard by
face fastening the inside edge. We recommend using 2 ½” x #7
CAMO trim head deck screws.
(2) face fasten the rst board or board and a half
(3) avoid face fastening by using L brackets to fasten the abutted
board from below the deck to the joists.
Once you have secured the abutted board, proceed with installing
the remainder of the deckboards using the CAMO System. It is as
easy as Set, Load and Drive!
Beginning on one end of the
deckboard, squeeze the Trigger
Handle of the Marksman Pro and set
the tool over the deckboard. Release
the Trigger Handle allowing the
Spacer Teeth to contract and grip the
deckboard. A properly adjusted tool
clamps securely to the board. The
Tool Feet must be at on the surface of the board and the tool
centered over the joist.
With the CAMO Marksman Pro tool in place on the deckboard,
push the deckboard snugly against the previous board. The
Spacer Teeth automatically create a 3/16” gap between the
boards.
With the tool set on the board, place
one CAMO Hidden Fastener into the
Screw Guides on both ends of the
Marksman Pro tool. Note: if the tool is
not set on the deckboard, the screws
will slide out of the Screw Guides.
Set drill to highest speed. A high RPM
drill is recommended.
Begin on the outside edge at the end of
the unfastened deckboard (the edge
furthest away from the installed
deckboard or abutted board).
No pre-drilling is required.
The handle of the Marksman Pro is not intended to be
weight-bearing. Just steady the Marksman Pro and start drilling,
running the drill at full speed throughout. The CAMO screw is
designed to spin and auger out material for approximately ½ inch
to prevent splitting. Once the screw is started, you may gently
increase pressure and the screw will bite and drive home quickly.
Let the screw do the work. Forcing the screw can result in
mushrooming or splitting.
When the shoulder of the CAMO Driver Bit reaches the Screw
Guide, you are nished driving the screw. The depth of drive is
automatically set and you cannot over drive it.
Once you have fastened the rst screw on the outside edge,
repeat the same drive instructions on the inside edge of the board.
Continue this process down the length of the board until the entire
plank is installed. Do not skip any joists.
To ensure proper performance of the
CAMO Marksman Pro, it is important to
regularly check the Screw Guides for
deck material build-up. If material is
present, use the Clearing Tool to clear
the Screw Guides. If you are installing
IPE or other dense deck product, you
will want to perform this action more
frequently.
Butt Joints: Follow deckboard manufacturers’ suggested spacing
and fastening installation methods. It may be necessary to block
joist at the butt joint depending on the type of decking you are
installing.
45° Angle Installations: Position the Marksman Pro over the
edge of the high side of the joist so that the fastener remains
completely in joist when fully driven. You may nd marking the
deckboard where it intersects the joist useful. To do this, draw a
line where they intersect and position your Marksman tool so the
middle of the Screw Guide rests over the line. Proceed to drive
the screw in per above instructions. Repeat this process down
the length of the deckboard on both edges.
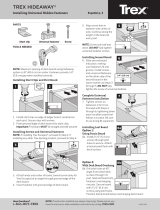
CAMO MARKSMAN PRO SCHEMATIC:
Adjusting the tool:
The board abutting the structure:
SET
Load
drive
ATTENTION:
To view an installation video or for more information visit
www.camofasteners.com or contact us at (800) 968-6245.
CAMOTM Hidden Deck Fastening System Installation Instructions – CAMO Marksman Pro™
It is important to be familiar with the Marksman Pro. This
tool is used to guide CAMO deck screws into the side of
the deckboard and down into the joist. It can be used on
any 5-1/4”- 5-3/4“ wide solid or grooved deckboard. No
pre-drilling is necessary, and the Marksman Pro provides
automatic 3/16” spacing between deckboards.
CAMO
TM
Marksman pro
1
Tool Handle
2
Trigger Handle
3
Screw Guides
4
Spacer Teeth
5
Tool Feet
6
7
Thumb Dial
CAMO Driver Bit
tm
tm
ESQUEMÁTICO DEL CAMO MARKSMAN PRO:
Ajuste de la herramienta:
Tabla que hace contacto con la estructura:
Prepare
Cargue
Atornille
ATENCIÓN:
Para ver un video de instalación o para más información visite
www.camofasteners.com o llámenos al (800) 968-6245
Sistema Invisible de Sujetadores de Plataforma CAMOTM Instrucciones de Instalación – CAMO Marksman Pro™
El Sistema Invisible de Sujetadores de Plataforma CAMO es fácil
de usar en madera tratada, madera dura, cedro, material
compuesto o tablas con PVC para plataformas. Las siguientes
instrucciones compartirán el proceso sencillo de instalación para
crear una supercie hermosa, sin sujetadores cuando usa la
CAMO Marksman Pro. Es importante notar que este es un
sistema – los Sujetadores Invisibles CAMO, las Herramientas
CAMO Marksman™ y las Brocas Impulsoras CAMO están
diseñadas para trabajar exclusivamente juntas. El uso de otras
herramientas o guías, sujetadores o brocas perjudicará el
rendimiento y no producirá los resultados deseados.
Antes de comenzar la instalación de su plataforma, usted
necesitará lo siguiente:
– Sujetadores invisibles CAMO
– Broca Impulsora CAMO (incluida con los
sujetadores invisibles CAMO; hay disponibles por
separado brocas impulsoras para tablas
ranuradas)
– Herramienta CAMO Marksman Pro
– Taladro (je el taladro a la más alta velocidad para
obtener la maxima eciencia de atornillamiento)
– Opcional: Soportes en L o tornillos CAMO de
2 ½ Pulg. x #7 de cabeza reducida para plataformas
(para la tabla que hace contacto con la estructura)
— NB
Ajuste la herramienta CAMO Marksman
Pro para que se acomode a las tablas
que está usando. Aoje el Dial del
Pulgar que está en la parte trasera de la
herramienta para ajustar los Dientes
Espaciadores para que se acomode al
ancho de las tablas de su plataforma. El
ajuste medio se acomoda a la mayoría
de las tablas estándar plataforma sólida o ranurada de 5-1/4 Pulg. -
5-3/4 Pulg. de ancho.
Para comenzar la instalación, coloque la primera tabla que hace
contacto con la estructura. Si la tabla que hace contacto va en
paralelo a la casa u otra estructura, puede ser necesario jarla por
su parte superior (vea las opciones de abajo). Si es así,
recomendamos usar tornillos CAMO de 2½ Pulg. x #7 de cabeza
reducida para plataformas.
Usted puede asegurar la primera tabla que hace contacto con la
estructura en diferentes formas:
(1) Cuando use los sujetadores invisibles CAMO, coloque la tabla
que hace contacto con la estructura; en cada viga, marque el lugar
para los sujetadores CAMO que se pondrán hacia la estructura en
el borde externo de la plataforma; retire la tabla de la estructura y
posicione la Marksman Pro en la marca deseada en un extremo de
la tabla y ponga un tornillo CAMO en la guía de tornillos en el
extremo externo de la plataforma. Mantenga rme la herramienta y
comience poniendo el tornillo a casi ½ pulgada en la tabla. Luego
saque el tornillo y apriete el Mango del Disparador para quitar la
Marksman Pro. Continue con este proceso por todo el largo de la
plataforma. Una vez que ha llegado al nal de la tabla, reposicione
la plataforma con los agujeros previamente hechos en el borde
EXTERNO con la tabla ajustada contra la estructura. Luego, atornille
de muevo los tornillos CAMO en la tabla. Termine la plataforma
sujetando la parte superior del borde interno. Recomendamos usar
tornillos CAMO de 2½ Pulg. x #7 de cabeza reducida para
plataformas.
(2) sujete ambos lados de la primera tabla y un lado de la segunda
tabla.
(3) evite sujetar la parte superior usando los soportes en L para
sujetar la tabla que hace contacto desde la parte inferior de la
plataforma a las vigas.
Una vez que ha asegurado la tabla que hace contacto, continúe con
la instalación de las tablas restantes usando el sistema CAMO. ¡Es
tan fácil como Preparar, Cargar y Atornillar!
Comience en un extremo de la tabla
de la plataforma, apriete el Mango del
Disparador del Marksman Pro y
prepare la herramienta sobre la tabla.
Aoje el Mango del Disparador
dejando que los Dientes Espaciadores
se contraigan y agarren la tabla de la
plataforma. Una herramienta
correctamente ajustada se agarra en forma segura a la tabla.
Las Patas de la Herramienta deben estar a ras con la supercie
de la tabla y la herramienta debe estar centrada sobre la viga.
Con la herramienta CAMO Marksman Pro en su sitio sobre la
tabla de la plataforma, empuje la tabla de la plataforma en forma
ajustada contra la tabla anterior. Los Dientes Espaciadores
crean automáticamente un espacio de 3/16 Pulg. entre las tablas.
Con la herramienta asentada en la tabla,
ponga un Sujetador Invisible CAMO en
las guías de tornillos en ambos extremos
de la herramienta Marksman Pro. Nota:
Si la herramienta no está asentada sobre
la tabla de la plataforma, los tornillos se
deslizarán hacia afuera de las guías de
tornillos.
Fije el taladro a la velocidad más alta.
Se recomienda un taladro a altas
RPM.
Comience en el borde externo en el
extremo de la tabla no sujetada a la
plataforma (el borde más lejano de la
tabla instalada o tabla que hace
contacto). No se requiere
pre-perforación.
El mando de la Marksman Pro no está diseñada para soportar su
peso. Tan solo estabilice la Marksman Pro y comience a taladrar,
usando el taladro a toda velocidad todo el tiempo. El tornillo
CAMO está diseñado a girar y a perforar el material por
aproximadamente ½ pulgada para prevenir rajaduras. Una vez
iniciado el tornillo, usted puede levemente incrementar la presión
y el tornillo entrará en su lugar rápidamente. Deje que el tornillo
haga el trabajo. Forzar el tornillo puede resultar en formación de
hongos o rajaduras.
Cuando el hombro de la broca impulsora CAMO llega a la guía de
tornillos, usted ha terminado poniendo el tornillo. La profundidad
de penetración se ja automáticamente y usted no puede hacer
que el tornillo entre demasiado.
Una vez que usted ha sujetado el primer tornillo en el borde
exterior, repita las mismas instrucciones en el borde interno de la
tabla. Continúe con este proceso hasta que se instale todo el
tablón. No se salte ninguna viga.
Para asegurar el correcto funciona-
miento de la CAMO Marksman Pro, es
importante checar con regularidad las
Guías de Tornillos por amontona-
miento de material de plataforma. Si
hay material, use la herramienta de
limpieza para limpiar la Guía de
Tornillos. Si usted está instalando IPE
u otro producto denso para plataformas, usted debe realizar esta
acción con más frecuencia.
Juntas a tope: Siga el método de espaciamiento y de instalación
de los sujetadores sugeridos por el fabricante de tablas para
plataformas. Puede ser necesario reforzar la viga en la junta a
tope dependiendo del tipo de plataforma que está instalando.
Instalaciones en ángulo de 45°: Ponga la Marksman Pro sobre el
borde del lado alto de la viga de manera que el sujetador
permanezca completamente en la viga cuando se lo meta por
completo. Usted puede darse cuenta que es útil marcar la tabla
donde se cruza con la viga. Para esto, trace una línea donde se
Cruzan y ponga la herramienta Marksman de forma que el centro
de la Guía de Tornillos descanse sobre la línea. Continúe
atornillando de acuerdo a las instrucciones indicadas arriba.
Repita este proceso a lo largo de la tabla en ambos bordes.
Es importante estar familiarizado con la Marksman Pro.
Esta herramienta se usa para poner los tornillos CAMO de
plataforma en la parte lateral de la plataforma y hacia
abajo hasta adentro de la viga. Se la puede usar con
cualquier tabla para plataforma sólida o ranurada de 5-1/4
Pulg. - 5-3/4 Pulg. de ancho. No es necesario pretaladrar y
la Marksman Pro ofrece un espaciamiento automático de
3/16 Pulg. entre las tablas de la plataforma.
CAMO
TM
Marksman pro
1
Mango de la Herramienta
2
Mango del Disparador
3
Guia del Tornillo
4
Dientes Espaciadores
5
Pata de la Herramienta
6
7
Dial del Pulgar
Broca Impulsora CAMO
TM
Transcripción de documentos
CAMO Hidden Deck Fastening System Installation Instructions – CAMO Marksman Pro™ Sistema Invisible de Sujetadores de Plataforma CAMO Instrucciones de Instalación – CAMO Marksman Pro™ TM The CAMO Hidden Deck Fastening System is easy to use on treated wood, hardwood, cedar, composite, or PVC deckboards. The following instructions will share the simple installation process to create a beautiful, fastener-free deck surface using the CAMO Marksman Pro. It is important to note that this is a system - CAMO Hidden Fasteners, CAMO Marksman™ Tools and CAMO Driver Bits are engineered to work exclusively together. Using other branded tools or guides, fasteners or bits will impair performance and not produce the desired results. Before beginning installation of your deck, you will need the following: – CAMO Hidden Fasteners – CAMO Driver Bit (included with CAMO Hidden Fasteners; Grooved Board Driver Bits are available separately) – CAMO Marksman Pro tool – Drill (set drill speed to highest setting for maximum driving efficiency) – Optional: L brackets or 2 ½” x #7 CAMO trim head deck screws (for the board that abuts the structure) CAMO MARKSMAN PRO SCHEMATIC: It is important to be familiar with the Marksman Pro. This tool is used to guide CAMO deck screws into the side of the deckboard and down into the joist. It can be used on any 5-1/4”- 5-3/4“ wide solid or grooved deckboard. No pre-drilling is necessary, and the Marksman Pro provides automatic 3/16” spacing between deckboards. (1) When using CAMO Hidden Fasteners, lay the board abutting the structure in place; at each joist, mark the location for the CAMO fasteners that will be driven toward the structure on the outside edge of the deckboard; pull the board away from the structure and position the Marksman Pro on the desired mark at one end of the board and load one CAMO deck screw into the Screw Guide on the outside edge of the deckboard. Steady the tool and pre-start the screw about ½” into the board. Now back out the screw and squeeze the Trigger Handle to remove the Marksman Pro. Continue this process the entire length of the deckboard. Once you have reached the end of the board, reposition the deckboard with the pre-started holes on the OUTSIDE edge with the board snug to the structure. Now, re-drive the CAMO deck screws into the board. Finish the deckboard by face fastening the inside edge. We recommend using 2 ½” x #7 CAMO trim head deck screws. Once you have secured the abutted board, proceed with installing the remainder of the deckboards using the CAMO System. It is as easy as Set, Load and Drive! tm tm pro SET Tool Handle 2 Trigger Handle 3 CAMO Driver Bit 4 Screw Guides TM 5 Spacer Teeth 6 Tool Feet 7 Thumb Dial Adjusting the tool: Adjust the CAMO Marksman Pro to fit the boards you are using. Loosen the Thumb Dial at the rear of the tool to adjust the Spacer Teeth to fit the width of your deckboards. The middle setting fits most standard 5-1/4” - 5-3/4” solid or grooved deckboards. Set drill to highest speed. A high RPM drill is recommended. Begin on the outside edge at the end of the unfastened deckboard (the edge furthest away from the installed deckboard or abutted board). No pre-drilling is required. You can secure the board abutting the structure in several ways: (3) avoid face fastening by using L brackets to fasten the abutted board from below the deck to the joists. 1 TM drive To begin deck installation, lay the first board that abuts the structure into position. If the abutting board runs parallel to the house or other structure, it may be necessary to face fasten (see options below). If so, we recommend using 2 ½” x #7 CAMO trim head deck screws. (2) face fasten the first board or board and a half CAMO Marksman The board abutting the structure: Beginning on one end of the deckboard, squeeze the Trigger Handle of the Marksman Pro and set the tool over the deckboard. Release the Trigger Handle allowing the Spacer Teeth to contract and grip the deckboard. A properly adjusted tool clamps securely to the board. The Tool Feet must be flat on the surface of the board and the tool centered over the joist. With the CAMO Marksman Pro tool in place on the deckboard, push the deckboard snugly against the previous board. The Spacer Teeth automatically create a 3/16” gap between the boards. Load With the tool set on the board, place one CAMO Hidden Fastener into the Screw Guides on both ends of the Marksman Pro tool. Note: if the tool is not set on the deckboard, the screws will slide out of the Screw Guides. The handle of the Marksman Pro is not intended to be weight-bearing. Just steady the Marksman Pro and start drilling, running the drill at full speed throughout. The CAMO screw is designed to spin and auger out material for approximately ½ inch to prevent splitting. Once the screw is started, you may gently increase pressure and the screw will bite and drive home quickly. Let the screw do the work. Forcing the screw can result in mushrooming or splitting. When the shoulder of the CAMO Driver Bit reaches the Screw Guide, you are finished driving the screw. The depth of drive is automatically set and you cannot over drive it. Once you have fastened the first screw on the outside edge, repeat the same drive instructions on the inside edge of the board. Continue this process down the length of the board until the entire plank is installed. Do not skip any joists. ATTENTION: To ensure proper performance of the CAMO Marksman Pro, it is important to regularly check the Screw Guides for deck material build-up. If material is present, use the Clearing Tool to clear the Screw Guides. If you are installing IPE or other dense deck product, you will want to perform this action more frequently. Butt Joints: Follow deckboard manufacturers’ suggested spacing and fastening installation methods. It may be necessary to block joist at the butt joint depending on the type of decking you are installing. 45° Angle Installations: Position the Marksman Pro over the edge of the high side of the joist so that the fastener remains completely in joist when fully driven. You may find marking the deckboard where it intersects the joist useful. To do this, draw a line where they intersect and position your Marksman tool so the middle of the Screw Guide rests over the line. Proceed to drive the screw in per above instructions. Repeat this process down the length of the deckboard on both edges. To view an installation video or for more information visit www.camofasteners.com or contact us at (800) 968-6245. El Sistema Invisible de Sujetadores de Plataforma CAMO es fácil de usar en madera tratada, madera dura, cedro, material compuesto o tablas con PVC para plataformas. Las siguientes instrucciones compartirán el proceso sencillo de instalación para crear una superficie hermosa, sin sujetadores cuando usa la CAMO Marksman Pro. Es importante notar que este es un sistema – los Sujetadores Invisibles CAMO, las Herramientas CAMO Marksman™ y las Brocas Impulsoras CAMO están diseñadas para trabajar exclusivamente juntas. El uso de otras herramientas o guías, sujetadores o brocas perjudicará el rendimiento y no producirá los resultados deseados. Antes de comenzar la instalación de su plataforma, usted necesitará lo siguiente: – Sujetadores invisibles CAMO – Broca Impulsora CAMO (incluida con los sujetadores invisibles CAMO; hay disponibles por separado brocas impulsoras para tablas ranuradas) – Herramienta CAMO Marksman Pro – Taladro (fije el taladro a la más alta velocidad para obtener la maxima eficiencia de atornillamiento) – Opcional: Soportes en L o tornillos CAMO de 2 ½ Pulg. x #7 de cabeza reducida para plataformas (para la tabla que hace contacto con la estructura) ESQUEMÁTICO DEL CAMO MARKSMAN PRO: Es importante estar familiarizado con la Marksman Pro. Esta herramienta se usa para poner los tornillos CAMO de plataforma en la parte lateral de la plataforma y hacia abajo hasta adentro de la viga. Se la puede usar con cualquier tabla para plataforma sólida o ranurada de 5-1/4 Pulg. - 5-3/4 Pulg. de ancho. No es necesario pretaladrar y la Marksman Pro ofrece un espaciamiento automático de 3/16 Pulg. entre las tablas de la plataforma. CAMO Marksman — NB TM TM pro Tabla que hace contacto con la estructura: (1) Cuando use los sujetadores invisibles CAMO, coloque la tabla que hace contacto con la estructura; en cada viga, marque el lugar para los sujetadores CAMO que se pondrán hacia la estructura en el borde externo de la plataforma; retire la tabla de la estructura y posicione la Marksman Pro en la marca deseada en un extremo de la tabla y ponga un tornillo CAMO en la guía de tornillos en el extremo externo de la plataforma. Mantenga firme la herramienta y comience poniendo el tornillo a casi ½ pulgada en la tabla. Luego saque el tornillo y apriete el Mango del Disparador para quitar la Marksman Pro. Continue con este proceso por todo el largo de la plataforma. Una vez que ha llegado al final de la tabla, reposicione la plataforma con los agujeros previamente hechos en el borde EXTERNO con la tabla ajustada contra la estructura. Luego, atornille de muevo los tornillos CAMO en la tabla. Termine la plataforma sujetando la parte superior del borde interno. Recomendamos usar tornillos CAMO de 2½ Pulg. x #7 de cabeza reducida para plataformas. (2) sujete ambos lados de la primera tabla y un lado de la segunda tabla. (3) evite sujetar la parte superior usando los soportes en L para sujetar la tabla que hace contacto desde la parte inferior de la plataforma a las vigas. Una vez que ha asegurado la tabla que hace contacto, continúe con la instalación de las tablas restantes usando el sistema CAMO. ¡Es tan fácil como Preparar, Cargar y Atornillar! Mango de la Herramienta 2 Mango del Disparador 3 Broca Impulsora CAMO 4 Guia del Tornillo 5 Dientes Espaciadores 6 Pata de la Herramienta 7 Dial del Pulgar Ajuste de la herramienta: Ajuste la herramienta CAMO Marksman Pro para que se acomode a las tablas que está usando. Afloje el Dial del Pulgar que está en la parte trasera de la herramienta para ajustar los Dientes Espaciadores para que se acomode al ancho de las tablas de su plataforma. El ajuste medio se acomoda a la mayoría de las tablas estándar plataforma sólida o ranurada de 5-1/4 Pulg. 5-3/4 Pulg. de ancho. Comience en un extremo de la tabla de la plataforma, apriete el Mango del Disparador del Marksman Pro y prepare la herramienta sobre la tabla. Afloje el Mango del Disparador dejando que los Dientes Espaciadores se contraigan y agarren la tabla de la plataforma. Una herramienta correctamente ajustada se agarra en forma segura a la tabla. Las Patas de la Herramienta deben estar a ras con la superficie de la tabla y la herramienta debe estar centrada sobre la viga. Con la herramienta CAMO Marksman Pro en su sitio sobre la tabla de la plataforma, empuje la tabla de la plataforma en forma ajustada contra la tabla anterior. Los Dientes Espaciadores crean automáticamente un espacio de 3/16 Pulg. entre las tablas. Cargue Con la herramienta asentada en la tabla, ponga un Sujetador Invisible CAMO en las guías de tornillos en ambos extremos de la herramienta Marksman Pro. Nota: Si la herramienta no está asentada sobre la tabla de la plataforma, los tornillos se deslizarán hacia afuera de las guías de tornillos. Fije el taladro a la velocidad más alta. Se recomienda un taladro a altas RPM. Comience en el borde externo en el extremo de la tabla no sujetada a la plataforma (el borde más lejano de la tabla instalada o tabla que hace contacto). No se requiere pre-perforación. Usted puede asegurar la primera tabla que hace contacto con la estructura en diferentes formas: Prepare 1 Atornille Para comenzar la instalación, coloque la primera tabla que hace contacto con la estructura. Si la tabla que hace contacto va en paralelo a la casa u otra estructura, puede ser necesario fijarla por su parte superior (vea las opciones de abajo). Si es así, recomendamos usar tornillos CAMO de 2½ Pulg. x #7 de cabeza reducida para plataformas. El mando de la Marksman Pro no está diseñada para soportar su peso. Tan solo estabilice la Marksman Pro y comience a taladrar, usando el taladro a toda velocidad todo el tiempo. El tornillo CAMO está diseñado a girar y a perforar el material por aproximadamente ½ pulgada para prevenir rajaduras. Una vez iniciado el tornillo, usted puede levemente incrementar la presión y el tornillo entrará en su lugar rápidamente. Deje que el tornillo haga el trabajo. Forzar el tornillo puede resultar en formación de hongos o rajaduras. Cuando el hombro de la broca impulsora CAMO llega a la guía de tornillos, usted ha terminado poniendo el tornillo. La profundidad de penetración se fija automáticamente y usted no puede hacer que el tornillo entre demasiado. Una vez que usted ha sujetado el primer tornillo en el borde exterior, repita las mismas instrucciones en el borde interno de la tabla. Continúe con este proceso hasta que se instale todo el tablón. No se salte ninguna viga. ATENCIÓN: Para asegurar el correcto funcionamiento de la CAMO Marksman Pro, es importante checar con regularidad las Guías de Tornillos por amontonamiento de material de plataforma. Si hay material, use la herramienta de limpieza para limpiar la Guía de Tornillos. Si usted está instalando IPE u otro producto denso para plataformas, usted debe realizar esta acción con más frecuencia. Juntas a tope: Siga el método de espaciamiento y de instalación de los sujetadores sugeridos por el fabricante de tablas para plataformas. Puede ser necesario reforzar la viga en la junta a tope dependiendo del tipo de plataforma que está instalando. Instalaciones en ángulo de 45°: Ponga la Marksman Pro sobre el borde del lado alto de la viga de manera que el sujetador permanezca completamente en la viga cuando se lo meta por completo. Usted puede darse cuenta que es útil marcar la tabla donde se cruza con la viga. Para esto, trace una línea donde se Cruzan y ponga la herramienta Marksman de forma que el centro de la Guía de Tornillos descanse sobre la línea. Continúe atornillando de acuerdo a las instrucciones indicadas arriba. Repita este proceso a lo largo de la tabla en ambos bordes. Para ver un video de instalación o para más información visite www.camofasteners.com o llámenos al (800) 968-6245-
 1
1
-
 2
2


En otros idiomas
- français: CAMO 0345100 Guide d'installation
- English: CAMO 0345100 Installation guide
Documentos relacionados


Otros documentos
-
Deckorators 353387 Guía de instalación
-
-
-
Fortress Building Products 242060809 Guía de instalación
-
DreamGEAR DG360-1717 El manual del propietario
-
JT Splatmaster Z200 El manual del propietario
-
 Fill-rite 820 Instrucciones de operación
-
Sunex Tools 8057CAMO Assembly Instructions Manual
-
Andis 67165 Ficha de datos
-
 Trex UNIVCOMBOCLIP01 Guía de instalación

