
LV
Front Surround System
(YAS-CU203+NS-WSW41)
Owner’s Manual
Manual de Instrucciones

i
En
• To assure the finest performance, please read this
manual carefully. Keep it in a safe place for future
reference.
• Install this unit in a well ventilated, cool, dry, clean
place - away from direct sunlight, heat sources,
vibration, dust, moisture, and/or cold. For proper
ventilation, allow the following minimum
clearances.
Sound bar: Top: 10 cm (4 in), Rear: 10 cm (4 in),
Sides: 10 cm (4 in)
Subwoofer: Top: 20 cm (8 in), Rear: 20 cm (8 in),
Sides: 20 cm (8 in)
• Locate this unit away from other electrical
appliances, motors, or transformers to avoid
humming sounds.
• Do not expose this unit to sudden temperature
changes from cold to hot, and do not locate this
unit in an environment with high humidity (i.e. a
room with a humidifier) to prevent condensation
inside this unit, which may cause an electrical
shock, fire, damage to this unit, and/or personal
injury.
• Avoid installing this unit where foreign objects
may fall onto this unit and/or this unit may be
exposed to liquid dripping or splashing. On the top
of this unit, do not place:
− Other components, as they may cause damage
and/or discoloration on the surface of this unit.
− Burning objects (i.e. candles), as they may cause
fire, damage to this unit, and/or personal injury.
− Containers with liquid in them, as they may fall
and liquid may cause electrical shock to the user
and/or damage to this unit.
• Do not cover this unit with a newspaper,
tablecloth, curtain, etc., in order not to obstruct
heat radiation. If the temperature inside this unit
rises, it may cause fire, damage to this unit, and/or
personal injury.
• Do not plug in this unit to a wall outlet until all
connections are complete.
• Do not operate this unit upside-down. It may
overheat, possibly causing damage.
• Do not use force on switches, knobs and/or cords.
• When disconnecting the power cable from the wall
outlet, grasp the plug; do not pull the cable.
• Do not clean this unit with chemical solvents; this
might damage the finish. Use a clean, dry cloth.
• Only voltage specified on this unit must be used.
Using this unit with a higher voltage than specified
is dangerous and may cause fire, damage to this
unit, and/or personal injury. Yamaha will not be
held responsible for any damage resulting from use
of this unit with a voltage other than specified.
• To prevent damage by lightning, keep the power
cable and outdoor antennas disconnected from a
wall outlet or the unit during a lightning storm.
• Do not attempt to modify or fix this unit. Contact
qualified Yamaha service personnel when any
service is needed. The cabinet should never be
opened for any reasons.
• When not planning to use this unit for long periods
of time (i.e. vacation), disconnect the AC power
plug from the wall outlet.
• Be sure to read the “Troubleshooting” section on
common operating errors before concluding that
this unit is faulty.
• Before moving this unit, press to set this unit in
standby mode, and disconnect the power supply
cable from the wall outlet.
• Condensation will form when the surrounding
temperature changes suddenly. Disconnect the
power supply cable from the outlet, then leave the
unit alone.
• Install this unit near the wall outlet and where the
AC power plug can be reached easily.
• Secure placement or installation is the owner’s
responsibility. Yamaha shall not be liable for any
accident caused by improper placement or
installation of speakers.
• Do not put a hand or foreign object into the port on
the subwoofer.
• When moving the subwoofer, do not hold the port,
as it may cause personal injury and/or damage to
this unit.
• Do not place a fragile object near the port of the
subwoofer. If the object falls as a result of the air
pressure, it may cause personal injury and/or
damage to the subwoofer and the object.
• Keep the product out of reach of children to avoid
them swallowing small parts.
Notes on remote controls and batteries
• Do not spill water or other liquids on the remote
control.
• Do not drop the remote control.
• Do not leave or store the remote control in the
following places:
− places of high humidity, such as near a bath
− places of high temperatures, such as near a
heater or a stove
− places of extremely low temperatures
− dusty places
• Do not expose the remote control sensor of this
unit to direct sunlight or lighting such as inverted
fluorescent lamps.
• If the batteries grow old, the effective operation
range of the remote control decreases
considerably. If this happens, replace the batteries
with two new ones as soon as possible.
• Do not use old batteries together with new ones.
• Do not use different types of batteries (such as
alkaline and manganese batteries) together. Read
the packaging carefully as these different types of
batteries may have the same shape and color.
• Exhausted batteries may leak. If the batteries have
leaked, dispose of them immediately. Avoid
touching the leaked material or letting it come into
contact with clothing, etc. Clean the battery
compartment thoroughly before installing new
batteries.
• Do not carry batteries in a pocket or purse with
metal objects like coins, etc.
• Do not throw away batteries with general house
waste. Dispose of them correctly in accordance
with your local regulations.
• Keep batteries away from children. If a battery is
accidentally swallowed, contact your doctor
immediately.
• When not planning to use the remote control for
long periods of time, remove the batteries from the
remote control.
• Do not charge or disassemble the supplied
batteries.
• The batteries shall not be exposed to excessive
heat such as sunshine, fire or like.
CAUTION: READ THIS BEFORE OPERATING YOUR UNIT.
WARNING
TO REDUCE THE RISK OF FIRE OR
ELECTRIC SHOCK, DO NOT EXPOSE THIS
UNIT TO RAIN OR MOISTURE.
As long as this unit is connected to the AC wall
outlet, it is not disconnected from the AC power
source even if you turn off this unit by . In this
state, this unit is designed to consume a very
small quantity of power.
(Power key)
Turns on the power of this unit or sets it to the
standby mode.
Do not use this unit within 22 cm (9 inches) of
persons with a heart pacemaker implant or
defibrillator implant.
Radio waves may affect electro-medical devices.
Do not use this unit near medical devices or
inside medical facilities.
The name plate is located on the bottom of the
unit.

1
En
Contents
Supplied items ...................................................................... 2
Features................................................................................. 3
Frequently asked questions................................................. 3
Part names and functions (sound bar/subwoofer) ............ 4
Installation ............................................................................ 5
Connections .......................................................................... 6
Operations............................................................................. 8
Listening to the sound from a Bluetooth device .............. 10
Settings................................................................................ 12
Programming the sound bar with the TV’s remote control
(TV’s remote control learning function)..................................................... 12
Sending the TV’s remote signal through the sound bar
(TV Remote Repeater function)......................................................................... 14
Setting the auto power standby function ................................................ 14
Initializing the sound bar ................................................................................ 14
Troubleshooting ................................................................. 15
Specifications...................................................................... 20
About this manual
NOTE
This indicates precautions for use of the product and its feature limitations.
HINT
This indicates supplementary explanations for better use.

2
En
Supplied items
Make sure you have received all of the following items.
How to use the remote control
Preparing the remote control
Peel off the protection sheet before use.
Operating range of the remote control
Remain within the operating range shown below.
Remote control
Sound bar (YAS-CU203)
Wireless subwoofer
(NS-WSW41)
Optical cable (1.5 m [4.9 ft])
Mounting template
* Using when attaching the sound bar to a wall
Stand x 2
(For sound bar)
Battery x 2
(AAA, R03, UM4)
Screw x 2
(For attaching
the stand)
Owner’s Manual
(This manual)
Remote control sensor
Within 6 m
(20 ft)

3
En
Features
Enjoy powerful and realistic sound from the front surround system
consisting of the sound bar and wireless subwoofer, and easy
installation and connection to TVs and other devices.
Frequently asked questions
The following section covers popular functions and frequently asked questions about the
sound bar.
•AIR SURROUND XTREME
Enjoy 7.1 channel surround sound, which creates a wide and deep soundstage, as
if speakers are set, not only on the front, but also on the left and right, and behind
the listener (p.9).
• Advanced Bass Extension Processing
Equipped with Yamaha’s original bass boost technology, this system reproduces
more powerful sound from the dedicated subwoofer (p.9).
• Bluetooth® connection
Content on a Bluetooth compatible smartphone, tablet, or computer can be played
back easily (p.10).
You can enjoy deep and fresh sound as close to the original by the Compressed
Music Enhancer. The sound bar is also compliant with the aptX codec, which
enables you to enjoy better sound from your smartphone.
• HOME THEATER CONTROLLER
You can operate the sound bar easily by installing the dedicated controlling
application “HOME THEATER CONTROLLER.”
• TV’s remote control learning function
Operate the sound bar with the TV’s remote control (p.12).
• TV Remote Repeater function
Enables the TV’s remote signal to pass through the sound bar. If the installed
sound bar blocks the TV’s remote sensor, the TV’s remote will not work. This
function provides a convenient solution (p.14).
•Clear voice
Makes voice sound (such as dialogues and narrations) clear (p.9).
•UniVolume
Maintains consistent sound volume when inputs or sound sources switch (p.9).
Q1
Can I operate the sound bar using the remote control of the TV?
Switching between the remote controls of the TV and sound bar is
inconvenient.
A1
Yes. You can control the sound bar using your TV’s remote control by the
“TV’s remote control learning” function (p.12).
This function is available only for the IR (infrared) remote control. Check your
TV’s remote control type.
Q2
The TV’s remote control does not work after the sound bar is installed in
front of the TV.
A2
If your TV’s remote control uses IR (infrared) signals, set the “TV Remote
Repeater” function to transmit the TV’s remote control signals from the sound
bar (p.14).
If your TV’s remote control uses radio waves, increase the distance between
the TV and sound bar.
Q3
Can I make voice sound more clearly?
A3
Yes. Dialogue in movies, TV news or sports programs, etc., can be made
clearer using the “clear voice” function (p.9).

4
En
Part names and functions (sound bar/subwoofer)
Sound bar (front panel)
A Indicators
Indicate the status of the sound bar. The indicators will dim automatically if no
operations are performed for 5 seconds. Refer to “Operations” (p.8 to 9) and
“Wireless connection with the subwoofer” (p.7) for the main functions of the
indicators.
B Remote control sensor
Receives infrared signals from the remote control of the sound bar (p.2).
C TV’s remote control sensor
Receives infrared signals from the TV’s remote control when the TV Remote
Repeater function is enabled (p.14).
D INPUT key
Selects an input source to be played back (p.8).
E MUTE key
Mutes the audio output. Press the key again to unmute (p.9).
F VOLUME (+/–) keys
Adjust the volume (p.8).
G (power) key
Turns on or off (standby) the sound bar (p.9).
HINT
• The sound bar may automatically turn off when the auto power standby function is enabled (p.14).
H Speakers
Sound bar (rear panel)
A TV input jack
For connecting to a TV with an optical cable (p.6).
B BD/DVD input jack
For connecting to a playback device, such as a Blu-ray Disc (BD) player, with a
coaxial digital cable (p.6).
C ANALOG input jacks
For connecting an external device with an RCA stereo cable (p.7).
D IR flasher for TV Remote Repeater
Transmits TV’s remote control signals received at the TV’s remote control sensor to
the TV (p.14).
Subwoofer (rear panel)
A STATUS indicator
Indicates the status of the subwoofer
(p.9).
B SUBWOOFER PAIRING button
For setting wireless connection
between the sound bar and
subwoofer (p.19).
C Port

5
En
Installation
Place the sound bar on a flat surface such as on top of a
TV cabinet.
Place the subwoofer to the outside of the sound bar.
To avoid echoes from the wall, face the front side of the
subwoofer slightly inward.
HINT
• If it is difficult to operate the TV, use the TV Remote Repeater
function (p.14) to transmit the TV’s remote control signal via sound
bar.
• When placing the sound bar across the bases of the TV, or when
changing the height of the sound bar, attach the supplied stands
with the stand attachment screws.
Attaching the sound bar to a wall
How to install on the wall
1 Attach the mounting template on a wall and mark
for the screw holes.
2 Remove the mounting template from the wall,
then install commercially available screws (as
illustrated below) at the points marked on the
wall.
3 Hang the sound bar on the screws.
Cautions
• Do not stack the sound bar/subwoofer and a BD player or other
device directly on each other. Doing so may cause a malfunction
due to vibrations.
• Do not hold the speaker portion (fabric part) on the front of the
subwoofer when moving it.
• The sound bar contains non-magnetic shielding speakers. Do not
place magnetically sensitive items (hard disk drive, etc.) near the
sound bar.
• Depending on your installation environment, it may be better to
connect the sound bar and external devices (such as a TV)
before installing the sound bar.
• Do not place the sound bar within 50 mm (2") of the TV.
• The subwoofer and sound bar communicate wirelessly. Do not
place objects that block wireless signals, such as metallic
furniture and devices, between the subwoofer and sound bar as
the wireless communication may be adversely affected.
• If the subwoofer is covered with a cloth or other object, the sound
volume is reduced. Install the subwoofer so that it is not hidden
behind a thick curtain, etc.
Cautions
• When installing the sound bar on a wall, all installation work must
be performed by a qualified contractor or dealer. The customer
must never attempt to perform this installation work. Improper or
inadequate installation could cause the sound bar to fall,
resulting in personal injury.
• Do not attach the sound bar to a wall that is made of weak
materials such as plaster or veneered woods. Doing so may
cause the sound bar to fall.
• Make sure you use commercially available screws that can
support the weight of the installation (specified in Step 2 on the
right). Using clamps other than specified screws, such as short
screws, nails, and two-sided tape, may cause the sound bar to
fall.
Cautions
• Fix the cables in place where they will not become loose. If your
foot or hand accidentally gets caught on a loose cable, the sound
bar may fall.
• Check that the sound bar is fixed securely after the installation.
Yamaha will bear no responsibility for any accidents caused by
improper installations.
Tapes or thumbtacks
Mounting template (supplied)
Screw
holes
7 to 8.5 mm
(1/4" to 5/16")
3 to 4 mm (1/8" to 3/16")
4 mm (#8)
20 mm (3/4")
or more
Mounting holes
on rear of sound bar

6
En
Connections
Power cable
To AC wall outlet
Sound bar (rear)
Optical cable
Coaxial digital cable
(commercially available)
Playback device (such as a BD player)
Set top box
OPTICAL OUTPUT
Coaxial digital
audio output
(orange)
TV
HINT
If your playback device has a coaxial digital
audio output, you can connect it to the BD/
DVD input of the sound bar with a coaxial
digital cable (commercially available).
Connect to a TV (or other peripheral device).
HINT
• If a setting to disable the speaker output is not available on your TV, you may disable it
by connecting headphones to the headphone jack on the TV. For details, refer to the
manuals of the TV.
• The TV and BD/DVD input jacks support the following audio signals.
− PCM (2 channel)
− Dolby Digital (up to 5.1 channel)
− DTS Digital Surround (up to 5.1 channel)
Cautions
• Make sure that the power cables of the sound bar and subwoofer are not connected
to AC wall outlets when you start making connections.
• Do not use excessive force when inserting the cable plug. Doing so may damage the
cable plug or terminal.
1 Connect the TV and sound bar with the optical
cable (supplied).
Remove the cap of the optical cable and check the
direction of the plug.
2 Connect the power cables of the sound bar and
subwoofer to AC wall outlets.
3 Set the TV as follows.
• Set the TV volume to minimum.
• Disable the TV built-in speaker output (if available).
HDMI cable (etc.)
Subwoofer (rear)
Power cable
To AC wall outlet

7
En
Analog connection of an external device (game
console)
You can connect an external device, such as a game console or TV that does not have
an optical output, to the ANALOG input jacks of the sound bar.
NOTE
• Make sure the left (L) and right (R) channels are connected correctly.
• Select the ANALOG key on the remote control for the input source.
Wireless connection with the subwoofer
When the power cables of the sound bar and subwoofer are connected to AC wall
outlets (p.6) and the sound bar is turned on, the sound bar and subwoofer are
connected automatically. When the connection is complete, the SUBWOOFER indicator
on the sound bar lights up and the sound bar is ready for playback.
HINT
• When the sound bar is turned on for the first time, if the SUBWOOFER indicator on the sound bar does not
light up, see “Pairing the sound bar and subwoofer manually” (p.19) and connect the sound bar and
subwoofer manually.
• Once connected, the sound bar operates with the same subwoofer from the next time it is turned on.
RCA stereo cable (etc.)
(commercially available)
Game console (etc.)
Subwoofer indicator: Lights up

8
En
Operations
Indicators
The indicators on the front panel flash or light up, to
indicate the operation and setting status.
In this manual, illustrations of the nine in-line indicators
are used for explanation.
: Off
: Lights up
: Flashes
(Example: When the STATUS indicator flashes and the TV indicator
lights up)
Input keys
Select an input source to be played back.
TV ....................TV audio
BD/DVD...........Audio from a device connected to
the BD/DVD input jack
ANALOG .........Audio from a device connected to
the ANALOG input jack
BLUETOOTH...Audio from a Bluetooth connected
device
The indicator for the selected input source lights up.
(Example: when TV is selected)
HINT
• To play audio of the playback device connected to the TV or
to watch videos of the playback device, set the TV’s input
source to the playback device.
• For details on Bluetooth connection, refer to “Listening to the
sound from a Bluetooth device” (p.10).
SUBWOOFER keys (+/–)
Adjust the volume of the subwoofer.
VOLUME keys (+/–)
Adjust the volume of the sound bar.
Volume down (–) Volume up (+)
Volume down (–) Volume up (+)
1
2
LEARN key
★
Sets the sound bar to the TV’s remote control
learning mode (p.12).
REPEATER key
★
Enables/disables the TV Remote Repeater
function (p.14).
3
Remote control signal transmitter
Transmits infrared signals.
★: Keys that require pressing for more than 3 seconds
BLUETOOTH STANDBY, SUBWOOFER PAIRING,
AUDIO DELAY, LEARN, REPEATER
★
★
★

9
En
(power) key
Turns on or off (standby) the sound bar.
The STATUS indicator on the sound bar
The STATUS indicator on the subwoofer
BLUETOOTH STANDBY key
★
Enables/disables the Bluetooth standby mode
(p.11).
SUBWOOFER PAIRING key
★
Performs pairing between the sound bar and
subwoofer (p.19).
Green (turned on)
Red (Bluetooth standby) (p.11)
Off (turned off)
Green (turned on)
Red (turned off)
SURROUND and STEREO keys
Switch between surround and stereo
(2 channel) playback. When surround playback is
selected, you can enjoy a realistic sound effect
using Yamaha’s exclusive AIR SURROUND
XTREME.
HINT
• When 2 channel stereo signals are played in surround,
the PLII indicator lights up.
Lights up (surround playback)
Off (stereo playback)
SURROUND
STEREO
Lights up (Dolby Pro Logic II)
4
5
BASS EXTENSION key
Enables/disables the bass extension function.
When this function is enabled, you can enjoy
powerful sound during surround playback through
Yamaha’s exclusive bass boost technology.
Flash 3 times (enabled), flash once (disabled)
MUTE key
Mutes the audio output. Press the key again
to unmute.
Flash (on mute)
7
6
CLEAR VOICE key
Enables/disables the clear voice function.
When this function is enabled, you can enjoy clear
voice sounds while watching movies, TV dramas,
news programs or sports programs.
UNIVOLUME key
Enables/disables the UniVolume function.
When this function is enabled, consistent volume is
maintained when inputs or sound sources switch.
HINT
• The UniVolume function is automatically disabled when
BLUETOOTH is selected as the input source.
AUDIO DELAY key
★
Adjusts the audio delay to synchronize the sound
with the video when the video image on the TV
may seem delayed with respect to the sound.
Follow the procedure below to adjust the audio delay.
1 Hold down the AUDIO DELAY key for more
than 3 seconds.
The left most indicator flashes.
2 Press the SUBWOOFER (+/–) key to adjust
the audio delay.
Pressing the SUBWOOFER (+) key delays the
audio output timing.
3 To finish the adjustment, press the AUDIO
DELAY key.
HINT
• The adjustment will be finished automatically if no
operations are performed for 20 seconds.
Flash 3 times (enabled), flash once (disabled)
Flash 3 times (enabled), flash once (disabled)
(–) (+)
Decoder indication
The sound bar supports the following audio signals. You
can check the type of the input audio signal by the color
of the indicator.
Green (Dolby Digital), Red (DTS Digital Surround)
Off (PCM)

10
En
Listening to the sound from a
Bluetooth device
You can play back wirelessly from Bluetooth devices, such as smartphones or digital
music players.
See also the operating manual of the Bluetooth device for more details.
Pairing a Bluetooth device with the sound bar
When connecting to a Bluetooth device for the first time, “pairing” between the device
and sound bar is required. “Pairing” is necessary for each Bluetooth device you use.
Once “pairing” with a device is completed, subsequent connection with that device will
not require “pairing.”
1 Press the BLUETOOTH key on the sound bar’s remote control to
select Bluetooth as the input source.
The BLUETOOTH indicator on the front panel lights up in green.
2 Turn on the Bluetooth function of the device to be paired, and
perform pairing.
The operation varies depending on the device. Refer to the operation manual of the
device.
3 Select “YAS-203 Yamaha” in the Bluetooth device list on the device.
If a passkey (PIN) is required, enter the number “0000.”
When pairing is completed, or a completion message appears on the device.
NOTE
• Perform pairing with the Bluetooth device and sound bar within 10 meters (33 ft) of each other.
• Up to eight Bluetooth devices can be paired with the sound bar. If a ninth device is paired, the oldest
pairing information is deleted.
• If pairing information for a device is deleted, to use that device again, pairing of the device is required
again.
• If a Bluetooth device is already connected to the sound bar, terminate that Bluetooth connection (p.11),
then perform pairing with the new device.
• Refer to “Bluetooth” (p.18) in “Troubleshooting” if pairing cannot be achieved.
Perform the following steps to use a Bluetooth device with the sound bar.
Bluetooth devices
Playing back audio from a Bluetooth device
on the sound bar
For the first Bluetooth
connection
Pairing a Bluetooth device
with the sound bar
For subsequent
Bluetooth connection
Lights up

11
En
Playing back audio from a Bluetooth device on the
sound bar
1 With the sound bar turned on, press the BLUETOOTH key on the
sound bar’s remote control to select Bluetooth as the input source.
The BLUETOOTH indicator on the front panel lights up in green.
2 Turn on the Bluetooth function of the device.
When Bluetooth connection is made correctly, the BLUETOOTH indicator of the
sound bar flashes 3 times.
3 Play back a song on the device.
NOTE
• Perform Bluetooth connection with the device and sound bar within 10 meters (33 ft) of each other.
• It may be necessary to select “YAS-203 Yamaha” in the Bluetooth device list again, in the event that a
connection problem occurs. You may have to change the output setting to output audio to the sound bar,
depending on the Bluetooth device you are using.
• Adjust the volume level of the Bluetooth device as required.
• If a Bluetooth device is already connected to the sound bar, terminate that Bluetooth connection, then
connect with the new device.
Terminating Bluetooth connection
Bluetooth connection is terminated in the following cases. When the sound bar is turned
on and the Bluetooth connection is terminated, the BLUETOOTH indicator flashes once.
• The Bluetooth function is turned off on the compatible device.
• The BLUETOOTH key on the sound bar’s remote control is pressed for more than 3 seconds.
• The sound bar is turned off.
Using the Bluetooth standby mode
The Bluetooth standby mode allows you to turn on (or off) the sound bar automatically,
that interlocked by the operation of the Bluetooth device.
1 With the sound bar turned on, hold down the BLUETOOTH STANDBY
key on the sound bar’s remote control for more than 3 seconds.
Holding down the BLUETOOTH STANDBY key for 3 seconds each time toggles the
mode between enabled and disabled.
When the Bluetooth standby mode is enabled and the sound bar is turned off, the
STATUS indicator lights up in red. (Bluetooth standby)
Using the HOME THEATER CONTROLLER application
By installing the dedicated free application “HOME THEATER CONTROLLER” to a
Bluetooth device, such as a smartphone, you can perform various operations easily and
conveniently with the Bluetooth device.
(Setting items: basic operation, sound-field, sound adjustments)
For details on “HOME THEATER CONTROLLER,” see the product information on our
website.
Lights up
Flashes 3 times
Functions available on Bluetooth devices with Bluetooth standby mode enabled
Power on interlock function (when the sound bar is turned off)
When Bluetooth connection is made on the device, the sound bar will turn on and will be ready to play
back sound from the device.
Power off interlock function (when the sound bar is turned on)
The sound bar will be turned off when Bluetooth connection is terminated on a Bluetooth device. (Only
when BLUETOOTH is selected as the input source.)
Flash 3 times (enabled), flash once (disabled)
Lights up (red)

12
En
Settings
Once you program the sound bar, you can control it with your TV’s remote control for
functions such as turning on/off the TV and sound bar simultaneously, or volume up/
down and muting/unmuting of the sound bar.
1 Turn off the TV.
2 Turn off the sound bar.
3 Hold down the LEARN key on the sound bar’s remote control for
more than 3 seconds to set the sound bar to the learning mode.
When the sound bar is in the learning mode, the indicators on the front panel flash
as shown below.
NOTE
• Steps 4 to 7 require only the TV’s remote control and the keys on the front panel of the sound bar.
The remote control of the sound bar is not necessary.
• If the sound bar has already learned functions, the following indicators light up.
Mute: BD/DVD, Volume (–): ANALOG, Volume (+): BLUETOOTH, Power: SURROUND
4 Teach the sound bar the “Mute” code of the TV’s remote control.
4-1 Press MUTE on the front panel of the sound bar.
4-2 While pointing your TV’s remote control at the remote control sensor, hold
down the mute key for more than 1 second twice or three times.
5 Teach the sound bar the “Volume (–)” code of the TV’s remote
control.
5-1 Press VOLUME (–) on the front panel of the sound bar.
5-2 While pointing your TV’s remote control at the remote control sensor, hold
down the volume (–) key for more than 1 second twice or three times.
Programming the sound bar with the TV’s remote
control (TV’s remote control learning function)
• This function is available only when your TV’s remote control uses IR (infrared) signal.
• An RF (Radio Frequency) remote control will not work.
• If you want to use a cable or satellite set top box’s remote control to operate the sound bar, use your
original TV’s IR (infrared) remote control to program the sound bar, then use the set top box’s remote
control to operate.
• If by changing the volume of the sound bar the TV’s volume also changes, set the TV’s volume to
minimum, or disable speaker output.
Result Bleep/buzzer Indicators
Successfully
learned
Once
Failed to learn
* Repeat from
Step 4-1.
Twice
Result Bleep/buzzer Indicators
Successfully
learned
Once
Failed to learn
* Repeat from
Step 5-1.
Twice
Approx. 30 cm (1 ft)
TV’s remote control
Hold down
(more than 1 second)
Release
(more than 1 second)
Hold down
(more than 1 second)
Release
(...)
Lights up
Flash
Lights up
Flash

13
En
6 Teach the sound bar the “Volume (+)” code of the TV’s remote control.
6-1 Press VOLUME (+) on the front panel of the sound bar.
6-2 While pointing your TV’s remote control at the remote control sensor, hold
down the volume (+) key for more than 1 second twice or three times.
7 Teach the sound bar the “Power” code of the TV’s remote control.
7-1 Press (power) on the front panel of the sound bar.
7-2 While pointing your TV’s remote control at the remote control sensor, hold
down the power key for more than 1 second twice or three times.
8 To finish the learning mode, press the LEARN key on the sound bar’s
remote control.
This completes the necessary settings. Now you can operate the sound bar with
the TV’s remote control’s mute key, volume keys, or power key.
HINT
• The learning mode will be finished automatically if no operations are performed for 5 minutes.
• Set the TV volume to minimum. When you turn up the volume of the sound bar with the TV’s remote
control, the volume of the TV may be turned up at the same time. In this case, follow Step 3 in
“Connections” (p.6) to change the TV setting.
• You can press the (power) key on the sound bar’s remote control to finish learning mode.
Clearing all programmed functions
1 With the sound bar turned off, hold down the LEARN key on the
sound bar’s remote control for more than 3 seconds (for entering the
learning mode).
When the sound bar is in the learning mode, the indicators on the front panel flash
as shown below.
2 Hold down INPUT on the front panel of the sound bar for more than 3
seconds.
If the clearing is completed, you will hear the bleep sound three times.
3 Press the LEARN key on the sound bar’s remote control.
Result Bleep/buzzer Indicators
Successfully
learned
Once
Failed to learn
* Repeat from
Step 6-1.
Twice
Result Bleep/buzzer Indicators
Successfully
learned
Once
Failed to learn
* Repeat from
Step 7-1.
Twice
Lights up
Flash
Lights up
Flash
Flashes in red (cleared)

14
En
When the TV Remote Repeater function is enabled, the sound bar relays the TV’s
remote signal received by the front sensor to the rear transmitter. This function should
be enabled when you place the sound bar in front of your TV and you cannot operate
your TV with the TV’s remote control.
1 Turn on the sound bar.
2 Hold down the REPEATER key on the sound bar’s remote control for
more than 3 seconds to enable/disable the TV Remote Repeater
function.
This completes the necessary settings. When the TV Remote Repeater function is
enabled, you can operate your TV from the TV’s remote control via the sound bar.
HINT
• The TV Remote Repeater function is disabled by default.
• If the power cable of the sound bar is connected to an AC wall outlet and when the TV Remote
Repeater function is enabled, the function is usable even when the sound bar is turned off.
• If you have made the sound bar learn the volume (+) operation (p.13), the volume of the TV may be
turned up when you turn up the volume of the sound bar with the TV’s remote control. In this case,
follow Step 3 in “Connections” (p.6) to change the TV setting.
• You can check the status of the TV Remote Repeater function by the SURROUND indicator when
turning on the sound bar.
By enabling the auto power standby function, you can avoid forgetting to turn off the
sound bar after use, or if you fall asleep while watching TV.
NOTE
• When the auto power standby function is enabled and one of the following conditions is met, the sound bar
will automatically turn off.
− No operation for 8 hours
− No audio input and no operations for 20 minutes when BLUETOOTH is selected as the input source.
1 With the sound bar turned off, hold down the MUTE key on the sound
bar’s remote control for more than 3 seconds to enable/disable the
auto power standby function.
You can check the status of the auto power standby function with the TV indicator
when turning on the sound bar.
HINT
• Initial setting varies depending on the country or region.
− U.K. and Europe models: enabled
− Other models: disabled
Follow the procedure below to initialize the sound bar.
1 Turn off the sound bar.
2 Hold down (power) on the front panel of the sound bar for more
than 3 seconds.
Sending the TV’s remote signal through the sound
bar (TV Remote Repeater function)
This function is available only when your TV’s remote control uses infrared signals.
IR flasher for TV Remote Repeater
TV’s remote control sensor
TV’s remote control
Flash 3 times (enabled), flash once (disabled)
Off (enabled), lights up (disabled)
Setting the auto power standby function
Initializing the sound bar
Off (enabled), lights up (disabled)
Flash (initialized)

15
En
Troubleshooting
Refer to the table below when the sound bar does not function properly. If the problem
you are experiencing is not listed below or if the instructions below do not help, turn off
the sound bar, disconnect the power cable, and contact the nearest authorized Yamaha
dealer or service center.
First, check the following:
A The power cables of the sound bar, subwoofer, TV and playback devices (such
as BD players) are connected to AC wall outlets securely.
B The sound bar, TV and playback devices (such as BD players) are turned on.
C The connectors of each cable are securely inserted in to jacks on each device.
Power and system
Audio
Problem Cause Remedy
The power turns
off suddenly.
The auto power standby function
worked.
When the auto power standby
function is enabled and one of the
following conditions is met, the
sound bar will automatically turn
off.
- No operation for 8 hours
- No audio input and no
operations for 20 minutes when
BLUETOOTH is selected as the
input source.
Turn on the sound bar again. To stop
the sound bar from turning off
automatically, disable the auto power
standby function (p.14).
The protection circuitry has been
activated. (The STATUS indicator
on the front panel of the sound
bar flashes.)
After confirming that all connections
are made properly, turn on the sound
bar again. If the power still turns off
suddenly or cannot be turned on,
unplug the power cable from the AC
wall outlet and contact the nearest
authorized Yamaha dealer or service
center.
Bluetooth connection is
terminated on a Bluetooth device
when the Bluetooth standby mode
is enabled.
Disable the Bluetooth standby mode
(p.11).
The power
cannot be turned
on.
The protection circuitry has been
activated three times
consecutively. (If you try to turn on
the power in this condition, the
STATUS indicator on the front
panel of the sound bar flashes.)
To protect the product, the power
cannot be turned on. Unplug the
power cable from the AC wall outlet
and contact the nearest authorized
Yamaha dealer or service center.
The sound bar is
not responding
correctly.
The internal microcomputer is
frozen, due to an external electric
shock (such as lightning or
excessive static electricity) or to a
drop in the power supply voltage.
Hold down (power) on the front
panel of the sound bar for more than
10 seconds to reboot it. (If the problem
persists, disconnect the power cable
from the AC wall outlet and plug it
again.)
The sound bar
operates by
itself.
Another Bluetooth device is being
operated nearby.
Terminate Bluetooth connection of the
sound bar (p.11).
TV’s 3D glasses
do not work.
The sound bar is blocking the 3D
glasses transmitter of your TV.
Check the position of the 3D glasses
transmitter of your TV and adjust the
position of the sound bar. Remove the
stands of the sound bar if they are
attached (p.5).
Problem Cause Remedy
No sound.
Another input source is selected. Select an appropriate input source
(p.8).
The mute function is activated. Cancel the mute function (p.9).
The volume is too low. Turn up the volume (p.8).
The power cables of the sound
bar and subwoofer are not
connected properly.
Make sure that power cables of the
sound bar and subwoofer are
connected to AC wall outlets securely
(p.6).

16
En
No sound is
coming from the
subwoofer. (The
SUBWOOFER
indicator on the
front panel of the
sound bar is
flashing.)
The subwoofer is not connected
to an AC wall outlet. (The
STATUS indicator on the
subwoofer is not lit.)
Plug in the power cable of the
subwoofer to an AC wall outlet.
The sound bar and subwoofer are
not connected due to a bad
wireless communication status.
(The STATUS indicator on the
subwoofer continues to be lit in
red or flash in green.)
Move the subwoofer closer to the
sound bar. If the situation does not
improve, move the subwoofer to a
location with better communication.
If the communication between the
sound bar and subwoofer is obstructed
by a metallic object or another object,
change the position of the sound bar
and subwoofer or change the
installation location of the subwoofer.
If there is a device (microwave oven,
wireless LAN, etc.) that emits radio
frequency signals, move the sound bar
and subwoofer away from the device.
The sound bar and subwoofer are
not paired. (The STATUS
indicator on the subwoofer is
flashing or lit in red.)
Perform the pairing between the sound
bar and subwoofer (p.19).
If the SUBWOOFER indicator on the
sound bar still does not light up in
green after the pairing is performed, a
malfunction might have occurred.
Unplug the power cables from the AC
wall outlets and contact the nearest
authorized Yamaha dealer or service
center.
The protection circuitry in the
subwoofer has been activated.
(The STATUS indicator on the
subwoofer is lit in orange.)
To protect the product, the power of
the subwoofer cannot be turned on.
Unplug the power cable from the AC
wall outlet and contact the nearest
authorized Yamaha dealer or service
center.
The sound from
the subwoofer is
interrupted. (The
SUBWOOFER
indicator on the
sound bar
flashes when the
sound is
interrupted.)
The connection between the
sound bar and subwoofer is
interrupted due to a bad wireless
communication status. (The
STATUS indicator on the
subwoofer flashes in green when
the sound is interrupted.)
Move the subwoofer closer to the
sound bar. If the situation does not
improve, move the subwoofer to a
location with better communication.
If the communication between the
sound bar and subwoofer is obstructed
by a metallic object or another object,
change the position of the sound bar
and subwoofer or change the
installation location of the subwoofer.
If there is a device (microwave oven,
wireless LAN, etc.) that emits radio
frequency signals, move the sound bar
and subwoofer away from the device.
No sound is
coming from the
subwoofer or the
sound is small.
(The
SUBWOOFER
indicator on the
sound bar is lit.)
The volume is too low. Turn up the volume of the subwoofer
(p.8).
The front side of the subwoofer is
blocked.
Clear the area around the front side
and the port of the subwoofer.
The playback source does not
contain low-frequency signals.
Play back a sound source containing
low-frequency signals, and confirm
that the sound is output from the
subwoofer.
The protection circuitry in the
subwoofer has been activated.
(The STATUS indicator on the
subwoofer is lit in orange.)
To protect the product, the power of
the subwoofer cannot be turned on.
Unplug the power cable from the AC
wall outlet and contact the nearest
authorized Yamaha dealer or service
center.
The volume
decreases when
the sound bar is
turned on.
The automatic volume adjustment
function worked. To prevent
excessive loudness, the sound
bar automatically controls its
volume within a certain level when
the sound bar is turned on.
If necessary, turn up the volume (p.8).
No surround
effect.
Stereo playback is selected. Select surround playback (p.9).
The volume is too low. Turn up the volume (p.8).
The TV or playback device is set
to output 2 channel audio (such
as PCM) only.
Change the digital audio output setting
on the TV or playback device to Dolby
Digital or BitStream.
The audio is output from the TV
built-in speakers.
Set the TV volume to minimum (p.6).
The playback source does not
contain surround audio.
Play back a source that contains audio
recorded in surround.
Noise is heard.
The sound bar is too close to
another digital or high-frequency
device.
Move those devices away from the
sound bar.

17
En
Remote control
Problem Cause Remedy
The sound bar
cannot be
controlled using
the remote
control.
The sound bar is out of the
operating range.
Use the remote control within the
operating range (p.2).
The batteries are weak. Replace with new batteries (p.2).
The remote control sensor of the
sound bar is exposed to direct
sunlight or strong lighting.
Adjust the lighting angle, or reposition
the sound bar.
The TV cannot
be controlled
using the TV’s
remote control.
The remote control sensor of the
TV is blocked by the sound bar.
Use the TV Remote Repeater function
(p.14) or remove the stands of the
sound bar if they are attached so that
the remote control sensor of the TV is
not blocked (p.5).
The TV cannot
be controlled by
using the TV
Remote Repeater
function.
The TV Remote Repeater
function is disabled.
Enable the TV Remote Repeater
function (p.14).
The TV’s remote control does not
use infrared signals. (Some
remote controls may not work
even if it uses infrared signals.)
The TV Remote Repeater function
cannot be used in this case. Adjust the
position of the sound bar so that the
remote control sensor of the TV is not
blocked by the sound bar and use the
TV’s remote control to operate the TV.
The sound bar and TV are too
close or too far from one another.
Move the sound bar away from the TV
more than 50 mm (2") (p.5).
If necessary, attach or remove the
stands of the sound bar to adjust
height for the IR flasher (for TV
Remote Repeater) of the sound bar
positioning in front of the remote
control sensor of the TV (p.5).
There is any obstacle (such as
cables) between the sound bar
and TV.
Remove the obstacle between the
sound bar and TV.
TV is not receiving the remote
control signal well since the
signals from the TV’s remote
control and IR flasher (for TV
Remote Repeater) of the sound
bar are interfering.
Disable the TV Remote Repeater
function (p.14).
The sound bar
does not learn
TV’s remote
control
operations.
The TV’s remote control key was
not held down long enough.
Hold down the key for more than 1
second twice or three times (p.12).
The TV’s remote control does not
use infrared signals. (Some
remote controls may not work
even if it uses infrared signals.)
The TV’s remote control learning
function cannot be used in this case.
Use the sound bar’s remote control to
operate the sound bar.
The position where you operated
the TV’s remote control is not
appropriate.
Operate the TV’s remote control at the
appropriate position (p.12).
The batteries of the TV’s remote
control are weak.
Replace with new batteries.
The remote control sensor of the
sound bar is exposed to direct
sunlight or strong lighting.
Adjust the lighting angle, or reposition
the sound bar.
The transmission of the remote
control signal was disturbed by
the TV screen light.
Turn off the TV and perform the
learning operation again (p.12).
Sound is coming
from the TV
when the sound
bar volume is
turned up with
the TV’s remote
control.
(when TV’s
remote control
learning function
is used)
Audio output is enabled on the
TV.
Change the TV setting to disable the
TV speaker output. If a setting to
disable the speaker output is not
available on your TV, try the following
methods.
- Connect headphones to the
headphone jack on the TV.
- Set the TV volume to minimum.
The power of the
sound bar and of
the TV switch in
the opposite
direction. (For
example, the TV
is turned off if
the sound bar is
turned on.)
(when TV’s
remote control
learning function
is used)
The power of the TV was on when
you performed the learning
operation.
Press the power key on the TV and
(power) on the front panel of the sound
bar to turn them on and then press the
power key on the TV’s remote control
to turn them off.

18
En
Bluetooth
Problem Cause Remedy
Cannot make the
sound bar paired
with the
Bluetooth
device.
Bluetooth is not selected as the
input source.
Select Bluetooth as the input source.
The device does not support
A2DP.
Perform pairing operations with a
device which supports A2DP.
A Bluetooth adaptor, etc., that you
want to pair with the sound bar
has a password other than
“0000.”
Use a Blu etooth adaptor, etc., whose
password is “0000.”
The sound bar and device are too
far apart.
Move the device closer to the sound
bar.
There is a device (microwave
oven, wireless LAN, etc.) that
outputs signals in the 2.4 GHz
frequency band nearby.
Move the sound bar away from the
device that is emitting radio frequency
signals.
Another Bluetooth device is
connected.
Terminate current Bluetooth
connection, and perform pairing with
the new device.
Cannot make a
Bluetooth
connection.
Another Bluetooth device is
connected.
The sound bar cannot make multiple
Bluetooth connections. Terminate
current Bluetooth connection, and
make connection for the desired
device.
More than nine devices are paired
and the oldest pairing information
is deleted.
Perform pairing again. The sound bar
can retain pairing information for up to
eight devices. When pairing a ninth
device, the oldest pairing information
will be deleted.
No sound is
produced or the
sound is
interrupted
during playback.
The Bluetooth connection of the
sound bar with the device is
disconnected.
Perform Bluetooth connection
operations again (p.10).
Bluetooth is not selected as the
input source.
Select Bluetooth as the input source.
The sound bar and device are too
far apart.
Move the device closer to the sound
bar.
There is a device (microwave
oven, wireless LAN, etc.) that
outputs signals in the 2.4 GHz
frequency band nearby.
Move the sound bar and subwoofer
away from the device that is emitting
radio frequency signals.
The device is not set to send
Bluetooth audio signals to the
sound bar.
Change the audio output setting and
connection setting on the device.
Playback on the device has not
been performed.
Perform playback on the device.
The device’s volume is set to
minimum.
Turn up the volume level.

19
En
Pairing the sound bar and subwoofer manually
1 With the sound bar turned on, hold down the SUBWOOFER PAIRING
key on the sound bar’s remote control for more than 3 seconds.
The SUBWOOFER indicator on the front panel of the sound bar flashes rapidly.
2 Within 30 seconds, push the SUBWOOFER PAIRING button on the
rear panel of the subwoofer for more than 3 seconds with a tapered
object such as a hairpin.
The STATUS indicator on the rear panel of the subwoofer flashes rapidly in green.
When pairing is complete and the sound bar and subwoofer are connected, the
SUBWOOFER indicator on the front panel of the sound bar lights up.
If the SUBWOOFER indicator on the sound bar does not light up even after
performing the above operation, see “Troubleshooting” (p.15).
HINT
• “Pairing” is the operation where the sound bar and subwoofer decide the device to connect to.

20
En
Specifications
* Specifications are subject to change without notice.
Item
Sound bar
(YAS-CU203)
Subwoofer
(NS-WSW41)
Amplifier
Section
Maximum Rated
Output Power
Front L/R 50 W x 2 ch Dynamic power 100 W
Speaker
Section
Type
Acoustic suspension type
(Non-magnetic shielding
type)
Advanced Yamaha
Active Servo Technology
(Magnetic shielding type)
Driver 5.5 cm (2-1/8") cone x 2 16 cm (6-1/2") cone
Frequency
Response
150 Hz to 22 kHz 35 Hz to 150 Hz
Impedance 6 Ω 5.5 Ω
Decoder
Supported audio
signal (TV, BD/
DVD)
PCM (2ch)
Dolby Digital
DTS Digital Surround
--
Input Jacks
Digital (Optical) 1 (TV) --
Digital (Coaxial) 1 (BD/DVD) --
Analog (RCA) 1 (ANALOG) --
Wireless
subwoofer
Frequency band 2.4 GHz
Transmission
range
10 m ([33 ft] without interference)
Bluetooth
Bluetooth
version
Ver. 2.1+EDR --
Supported
protocols
A2DP, SPP --
Supported
codecs
SBC, aptX --
Wireless output Bluetooth Class 2 --
Maximum
communication
distance
10 m ([33 ft] without
obstructions)
--
Supported
content
protection
method
SCMS-T --
General
Power Supply
U.S.A. and Canada
models: AC 120 V, 60 Hz
Taiwan model:
AC 110-120 V, 50/60 Hz
China model: AC 220 V,
50 Hz
Other models:
AC 220-240 V, 50/60 Hz
U.S.A. and Canada
models: AC 120 V, 60 Hz
U.K. and Europe models:
AC 230 V, 50 Hz
Taiwan model:
AC 110 V, 60 Hz
Korea model: AC 220 V,
60 Hz
China model: AC 220 V,
50 Hz
Australia model:
AC 240 V, 50 Hz
Asia model:
AC 220-240 V, 50/60 Hz
Power
Consumption
26 W 45 W
Standby Power
Consumption
0.4 W
U.S.A. and Canada
models: 1.4 W
U.K. and Europe models:
1.5 W
Korea and Taiwan
models: 1.2 W
China model: 1.3 W
Australia and Asia
models: 1.7 W
Bluetooth
standby power
consumption
0.5 W --
Dimensions
(W x H x D)
886 x 79 x 121 mm
(not including stands,
default state)
(34-7/8" x 3-1/8" x 4-3/4")
290 x 292 x 316 mm
(11-3/8" x 11-1/2" x
12-1/2")
886 x 94 x 121 mm
(including stands)
(34-7/8" x 3-5/8" x 4-3/4")
Thickness
excluding
speaker
protrusions
(thinnest part)
65 mm (2-1/2") --
Weight 2.9 kg (6.4 lbs) 8.1 kg (17.9 lbs)

21
En
This system is equipped with Yamaha’s AIR SURROUND XTREME virtual sound technology that achieves
superior positional, high-grade 7.1 channel surround sound using the sound bar and subwoofer.
The subwoofer of this system employs Yamaha’s exclusive bass control technology “Advanced Yamaha
Active Servo Technology II” and has achieved high-quality low-frequency sound playback.
“UniVolume” is a trademark of Yamaha Corporation.
Bluetooth is a registered trademark of the Bluetooth SIG and is used by Yamaha in accordance with a
license agreement.
Manufactured under license from Dolby Laboratories. Dolby, Pro Logic and the double-D symbol are
trademarks of Dolby Laboratories.
For DTS patents, see http://patents.dts.com. Manufactured under license from DTS Licensing Limited.
DTS, the Symbol, & DTS and the Symbol together are registered trademarks, and DTS Digital Surround is a
trademark of DTS, Inc. © DTS, Inc. All Rights Reserved.
© 2013 CSR plc and its group companies.
The aptX
®
mark and the aptX logo are trade marks of CSR plc or one of its group companies and may be
registered in one or more jurisdictions.
“Blu-ray Disc™”, “Blu-ray™”, and the logos are trademarks of the Blu-ray Disc Association.
Bluetooth
• Bluetooth is a technology for wireless communication between devices within an area
of about 10 meters (33 ft) employing the 2.4 GHz frequency band, a band which can
be used without a license.
Handling Bluetooth communications
• The 2.4 GHz band used by Bluetooth compatible devices is a radio band shared by
many types of equipment. While Bluetooth compatible devices use a technology
minimizing the influence of other components using the same radio band, such
influence may reduce the speed or distance of communications and in some cases
interrupt communications.
• The speed of signal transfer and the distance at which communications is possible
differs according to the distance between the communicating devices, the presence of
obstacles, radio wave conditions and type of equipment.
• Yamaha does not guarantee all wireless connections between this unit and devices
compatible with Bluetooth function.

i
Es
• Para asegurar el mejor rendimiento de este
aparato, lea atentamente este manual. Y luego
guárdelo en un lugar seguro para poder
consultarlo en el futuro en caso de ser necesario.
• Instale este sistema de sonido en un lugar bien
ventilado, fresco, seco y limpio, alejado de la luz
solar directa, fuentes de calor, vibraciones,
polvo, humedad y/o frío. Para conseguir una
ventilación adecuada, deje libres los siguientes
espacios, como mínimo:
Barra de sonido: Arriba: 10 cm, Atrás: 10 cm,
A los lados: 10 cm
Altavoz de ultragraves: Arriba: 20 cm, Atrás:
20 cm, A los lados: 20 cm
• Coloque este aparato lejos de otros aparatos
eléctricos, motores o transformadores, para
evitar así los ruidos de zumbido.
• No exponga este aparato a cambios bruscos de
temperaturas, del frío al calor, ni lo coloque en
lugares muy húmedos (una habitación con
deshumidificador, por ejemplo), para impedir así
que se forme condensación en su interior, lo que
podría causar una descarga eléctrica, un
incendio, daños en el aparato y/o lesiones a las
personas.
• Evite instalar este aparato en un lugar donde
puedan caerle encima objetos extraños y/o donde
quede expuesto al goteo o a la salpicadura de
líquidos. Encima de este aparato no ponga:
− Otros componentes, porque pueden causar
daños y/o decoloración en la superficie de este
aparato.
− Objetos con fuego (velas, por ejemplo), porque
pueden causar un incendio, daños en el aparato
y/o lesiones a las personas.
− Recipientes con líquidos, porque pueden
caerse y derramar el líquido, causando
descargas eléctricas al usuario y/o dañando el
aparato.
• No tape este aparato con un periódico, mantel,
cortina, etc. para no impedir el escape del calor.
Si aumenta la temperatura en el interior del
aparato, esto puede causar un incendio, daños en
el aparato y/o lesiones a las personas.
• No enchufe este aparato a una toma de corriente
hasta después de haber terminado todas las
conexiones.
• No ponga el aparato al revés. Podría recalentarse
y posiblemente causar daños.
• No utilice una fuerza excesiva con los
conmutadores, los controles y/o los cables.
• Cuando desconecte el cable de alimentación de
la toma de corriente, sujete la clavija y tire de
ella; no tire del propio cable.
• No limpie este aparato con disolventes químicos
porque podría estropear el acabado. Utilice un
paño limpio y seco para limpiar el aparato.
• Utilice solamente la tensión especificada en este
aparato. Utilizar el aparato con una tensión
superior a la especificada resulta peligroso y
puede producir un incendio, daños en el aparato
y/o lesiones a las personas. Yamaha no se hará
responsable de ningún daño debido al uso de este
aparato con una tensión diferente de la
especificada.
• Para impedir daños debidos a relámpagos,
desconecte el cable de alimentación y antenas
externas de la toma de corriente durante una
tormenta eléctrica.
• No intente modificar ni arreglar este aparato.
Póngase en contacto con el personal de servicio
Yamaha cualificado cuando necesite realizar
alguna reparación. La caja no deberá abrirse
nunca por ninguna razón.
• Cuando no piense utilizar este aparato durante
mucho tiempo (cuando se ausente de casa por
vacaciones, por ejemplo) desconecte el cable de
alimentación de la toma de corriente.
• Asegúrese de leer la sección “Resolución de
problemas” antes de dar por concluido que su
aparato está averiado.
• Antes de trasladar este aparato, pulse para
ponerlo en el modo de espera, y luego
desconecte el cable de alimentación de CA de la
toma de corriente.
• La condensación se formará cuando cambie de
repente la temperatura ambiental. Desconecte en
este caso el cable de alimentación de la toma de
corriente y no utilice el aparato.
• Instale este aparato cerca de la toma de CA y
donde se pueda alcanzar fácilmente la clavija de
alimentación.
• La colocación o la instalación seguras de la
unidad es responsabilidad del propietario.
Yamaha no se responsabilizará de ningún
accidente provocado por la colocación o
instalación incorrecta de los altavoces.
• No introduzca la mano ni ningún objeto extraño
en el puerto del altavoz de ultragraves.
• Al trasladar el altavoz de ultragraves, no lo
sujete por el puerto, ya que podría sufrir lesiones
y/o provocar daños en la unidad.
• No coloque objetos frágiles cerca del puerto del
altavoz de ultragraves. Si el objeto se cae a
consecuencia de la presión del aire, puede sufrir
lesiones y/o provocar daños en el altavoz de
ultragraves y en el objeto.
• Mantenga el producto lejos del alcance de los
niños, para evitar la ingestión accidental de
piezas pequeñas.
Observaciones sobre los mandos a
distancia y las pilas
• No derrame agua u otros líquidos en el mando a
distancia.
• No deje caer el mando a distancia.
• No deje ni guarde el mando a distancia en uno de
las siguientes lugares:
− lugares de humedad alta como, por ejemplo,
cerca de un baño
− lugares con temperaturas elevadas, por
ejemplo, cerca de una calefacción o estufa
− lugares con temperaturas demasiado bajas
− lugares polvorientos
• No exponga el sensor del mando a distancia de
esta unidad a la luz solar directa ni a iluminación
de focos fluorescentes invertidos.
• Si las pilas se agotan, el alcance operativo eficaz
del mando a distancia se reduce
considerablemente. Si esto sucediese, cambie las
pilas por dos nuevas tan pronto como sea
posible.
• No utilice pilas viejas y nuevas juntas.
• No utilice juntas pilas de tipos diferentes
(alcalinas de manganeso, por ejemplo). Lea
atentamente las instrucciones de la caja ya que
hay distintos tipos de pilas con la misma forma y
color.
• Las pilas gastadas pueden tener derrames. Si se
produce algún derrame en las pilas, deséchelas
inmediatamente. Evite tocar el líquido
derramado o que entre en contacto con la ropa,
etc. Ante de instalar pilas nuevas, limpie bien el
compartimento de las pilas.
• No guarde las pilas en el bolsillo ni en un bolso
junto con objetos metálicos, como monedas, etc.
• No arroje las pilas al cubo de la basura.
Deséchelas de acuerdo con la normativa local
aplicables.
• Mantenga las pilas alejadas de los niños. Si
alguien tragase una pila accidentalmente, acuda
a un médico de inmediato.
• Si no va a utilizar el mando a distancia durante
mucho tiempo, quítele las pilas.
• No cargue ni desmonte las pilas suministradas.
• Las baterías no deberán exponerse a un calor
excesivo como, por ejemplo, el que producen los
rayos del sol, el fuego y similares.
PRECAUCIÓN: LEER ESTAS INDICACIONES ANTES DE UTILIZAR EL PRODUCTO.
ADVERTENCIA
PARA REDUCIR EL RIESGO DE
INCENDIO O DESCARGA ELÉCTRICA, NO
EXPONGA ESTE APARATO A LA LLUVIA
NI A LA HUMEDAD.
Aunque usted apague esta unidad con , esta
unidad no se desconectará de la fuente de
alimentación de CA mientras esté conectada a
la toma de CA. En este estado, esta unidad ha
sido diseñada para que consuma una cantidad
de corriente muy pequeña.
(Tecla de encendido)
Enciende la unidad o la ajusta en modo de
espera.
No utilice la unidad a menos de 22 cm de
personas que tengan implantado un marcapasos
o un desfribiliador.
Las ondas de radio pueden afectar a los
dispositivos médicos electrónicos.
No utilice esta unidad cerca de dispositivos
médicos o en el interior de instalaciones
médicas.
La placa de identificación está colocada en la
parte inferior de la unidad.

1
Es
Índice
Elementos suministrados..................................................... 2
Funciones .............................................................................. 3
Preguntas frecuentes ........................................................... 3
Nombres de piezas y funciones (barra de sonido/altavoz
de ultragraves)...................................................................... 4
Instalación ............................................................................. 5
Conexiones............................................................................ 6
Funcionamiento.................................................................... 8
Escuchar sonido de un dispositivo Bluetooth................... 10
Ajustes ................................................................................. 12
Programar la barra de sonido con el mando a distancia del TV
(función de memorización de mando a distancia de TV).................... 12
Envío de la señal del mando a distancia del TV a través de la
barra de sonido (función de repetidor de mando a distancia
de TV)...................................................................................................................... 14
Configuración de la función de espera automática .............................. 14
Inicialización de la barra de sonido ............................................................. 14
Resolución de problemas................................................... 15
Especificaciones.................................................................. 20
Acerca de este manual
NOTA
Indica precauciones de uso del producto y sus limitaciones.
SUGERENCIA
Indica explicaciones complementarias para mejorar el uso.

2
Es
Elementos suministrados
Compruebe que ha recibido todos los elementos siguientes.
Cómo usar el mando a distancia
Preparación del mando a distancia
Retire la lámina de protección antes de usarlo.
Rango operativo del mando a distancia
No se aleje más allá del rango de funcionamiento descrito a continuación.
Mando a distancia
Barra de sonido (YAS-CU203)
Altavoz de
ultragraves
inalámbrico
(NS-WSW41)
Cable óptico (1,5 m)
Plantilla de montaje
* Se utiliza para montar la barra de sonido en la pared
Soporte x 2
(para la barra de
sonido)
Pilas x 2
(AAA, R03, UM4)
Tornillo x 2
(para fijar
el soporte)
Manual del propietario
(este manual)
Sensor del mando a
distancia
Menos de
6 m

3
Es
Funciones
Disfrute de un sonido potente y realista con el sistema envolvente
frontal formado por la barra de sonido y el altavoz de ultragraves
inalámbrico. Su instalación es sencilla y puede conectarlo a un televisor
y a otros dispositivos.
Preguntas frecuentes
El siguiente apartado aborda las funciones más habituales y las preguntas más
frecuentes sobre la barra de sonido.
•AIR SURROUND XTREME
Disfrute de un sonido envolvente de 7.1 canales, capaz de crear un entorno
acústico ancho y profundo, como si los altavoces estuvieran situados, no solo
delante del usuario, sino también a su izquierda, derecha y detrás (p.9).
• Advanced Bass Extension Processing
Provisto de la tecnología de potenciación de graves original de Yamaha, este sistema
puede reproducir un sonido más potente a través del altavoz de ultragraves (p.9).
•Conexión Bluetooth®
Reproduzca de la forma más sencilla los contenidos de un smartphone, una
tableta o un ordenador compatible con Bluetooth (p.10).
Disfrute de un sonido profundo y fresco, casi como el sonido original, con el
Compressed Music Enhancer. La barra de sonido también se ajusta a los requisitos del
códec aptX, que le permite disfrutar de un sonido de más calidad con su smartphone.
• HOME THEATER CONTROLLER
Puede controlar la barra de sonido de la forma más práctica instalando la
aplicación de control “HOME THEATER CONTROLLER”.
• Función de memorización de mando a distancia de TV
La barra de sonido se puede controlar con el mando a distancia del TV (p.12).
• Función de repetidor de mando a distancia de TV
Transfiere la señal del mando a distancia del TV a través de la barra de sonido. Si la
barra de sonido instalada bloquea el sensor del mando a distancia del TV, el mando a
distancia no funcionará. Esta función es la solución más práctica a este problema (p.14).
• Voz clara
Consiga unas voces con un sonido claro y nítido (por ejemplo, diálogos y
narraciones) (p.9).
•UniVolume
Mantiene un nivel de volumen constante al cambiar de entrada o fuente de sonido (p.9).
P1
¿Puedo controlar la barra de sonido utilizando el mando a distancia del
TV? Tener que utilizar tanto el mando a distancia del TV como el de la
barra de sonido es poco práctico.
R1
Sí. Puede controlar la barra de sonido a través del mando a distancia del TV
utilizando la “Función de memorización de mando a distancia de TV” (p.12).
Esta función solo está disponible en el caso del mando a distancia por
infrarrojos. Compruebe qué tipo de mando a distancia tiene su TV.
P2
El mando a distancia del TV no funciona después de instalar la barra de
sonido delante del TV.
R2
Si el mando a distancia del TV utiliza señales infrarrojas, configure la función
“Repetidor de mando a distancia de TV” para que transmita las señales del
mando a distancia del TV desde la barra de sonido (p.14).
Si el mando a distancia del TV usa ondas de radio, aumente la distancia
entre el TV y la barra de sonido.
P3
¿Es posible conseguir unas voces más claras?
R3
Sí. Es posible disfrutar de unos diálogos más claros en películas, noticias o
retransmisiones deportivas a través de la función “Voz clara” (p.9).

4
Es
Nombres de piezas y funciones (barra de sonido/altavoz de ultragraves)
Barra de sonido (panel delantero)
A Indicadores
Indican el estado de la barra de sonido. Los indicadores se atenúan
automáticamente si no se realiza ninguna operación en 5 segundos. Consulte
“Funcionamiento” (p.8 a 9) y “Conexión inalámbrica con el altavoz de ultragraves”
(p.7) para obtener información sobre las principales funciones de los indicadores.
B Sensor del mando a distancia
Recibe señales de infrarrojos del mando a distancia del aparato (p.2).
C Sensor del mando a distancia del TV
Recibe señales de infrarrojos del mando a distancia del TV cuando está habilitada la
función de repetidor de mando a distancia de TV (p.14).
D Tecla INPUT
Selecciona una fuente de entrada para su reproducción (p.8).
E Tecla MUTE
Silencia la salida de audio. Vuelva a pulsar la tecla para desactivar el silencio (p.9).
F Teclas VOLUME (+/–)
Ajustan el volumen (p.8).
G Tecla (encendido)
Enciende o apaga (espera) la barra de sonido (p.9).
SUGERENCIA
• La barra de sonido puede apagarse automáticamente cuando está habilitada la función de espera
automática (p.14).
H Altavoces
Barra de sonido (panel trasero)
A Toma de entrada TV
Para conectar el aparato al TV con un cable óptico (p.6).
B Toma de entrada BD/DVD
Para conectar el aparato a un dispositivo de reproducción, como un reproductor de
discos Blu-ray (BD), con un cable digital coaxial (p.6).
C Tomas de entrada ANALOG
Para conectar un dispositivo externo con un cable RCA estéreo (p.7).
D Luz IR para repetidor de mando a distancia de TV
Transmite al TV las señales del mando a distancia del TV recibidas en el sensor del
mando a distancia del TV (p.14).
Altavoz de ultragraves
(panel trasero)
A Indicador STATUS
Indica el estado del altavoz de
ultragraves (p.9).
B Botón SUBWOOFER PAIRING
Permite establecer la conexión
inalámbrica entre la barra de sonido
y el altavoz de ultragraves (p.19).
C Puerto

5
Es
Instalación
Ponga la barra de sonido sobre una superficie plana, por
ejemplo sobre la parte superior del armario de un TV.
Coloque el altavoz de ultragraves separado de la barra de sonido.
Para evitar ecos de la pared, coloque la parte frontal del
altavoz de ultragraves orientada ligeramente hacia dentro.
SUGERENCIA
• Si resulta complicado controlar el TV, utilice la función de repetidor
de mando a distancia de TV (p.14) para transmitir la señal del
mando a distancia del TV a través de la barra de sonido.
• Al colocar la barra de sonido en la base del TV o al modificar la
altura de la barra de sonido, instale los soportes suministrados con
los tornillos para la fijación de los soportes.
Montaje de la barra de sonido en la
pared
Cómo instalar en la pared
1 Fije a la pared la plantilla de montaje suministrada
y marque los orificios para los tornillos.
2 Quite la plantilla de montaje de la pared y coloque
los tornillos adecuados (según las ilustraciones
siguientes) en las marcas de la pared.
3 Cuelgue la barra de sonido en los tornillos.
Precauciones
• No coloque encima de la barra de sonido/altavoz de ultragraves
un reproductor de BD u otro dispositivo. Si lo hace, las
vibraciones podrían dar lugar a un mal funcionamiento.
• No sujete el altavoz de ultragraves por la zona frontal con el
altavoz (parte de tela) al trasladarlo.
• La barra de sonido contiene altavoces con blindaje no
magnético. No coloque objetos sensibles a campos magnéticos
(unidades de disco duro, etc.) cerca de la barra de sonido.
• En función del lugar de instalación, podría ser mejor conectar la
barra de sonido a los dispositivos externos, como un TV, antes
de instalar la barra de sonido.
• No coloque la barra de sonido a menos de 50 mm del TV.
• El altavoz de ultragraves y la barra de sonido se comunican de
forma inalámbrica. No coloque objetos que bloqueen las señales
inalámbricas, como muebles o dispositivos metálicos, entre el
altavoz de ultragraves y la barra de sonido, ya que pueden
perjudicar la comunicación inalámbrica.
• Si el altavoz de ultragraves está cubierto con una tela u otro
objeto, el volumen del sonido disminuirá. Instale el altavoz de
ultragraves en un lugar donde no quede oculto tras una cortina
gruesa, etc.
Precauciones
• Si la barra de sonido se instala en una pared, todo el trabajo de
instalación debe realizarlo un contratista o distribuidor cualificado. El
cliente nunca debe intentar realizar este trabajo de instalación. Una
instalación inadecuada o incorrecta podría provocar la caída de la
barra de sonido, lo que podría causar a su vez daños personales.
• No fije la barra de sonido a una pared que esté fabricada con
materiales débiles, tales como yeso o tableros chapados. Si lo
hace, la barra de sonido podría caerse.
• Utilice tornillos disponibles en el mercado que puedan soportar el
peso de la instalación, como se indica en el paso 2 de la
derecha. Si utiliza sistemas de sujeción que no sean los tornillos
especificados, tales como tornillos cortos, clavos o cinta de dos
caras, la barra de sonido podría caerse.
Precauciones
• Sujete los cables en un lugar en el que no puedan aflojarse. Si
se le engancha el pie o la mano de forma accidental en un cable
que esté suelto, la barra de sonido podría caerse.
• Después de instalar la barra de sonido, compruebe que está
instalada firmemente y con seguridad. Yamaha no será
responsable de los accidentes debidos a una instalación
incorrecta.
Cintas o chinchetas
Plantilla de montaje (suministrada)
Orificios
para
tornillos
De 7 a 8,5 mm
De 3 a 4 mm
4 mm (#8)
20 mm como
mínimo
Orificios de montaje
en la parte trasera de
la barra de sonido

6
Es
Conexiones
Cable de alimentación
A toma de CA
Barra de sonido (parte trasera)
Cable óptico
Cable digital coaxial
(disponible en el mercado)
Dispositivo de reproducción
(por ejemplo, reproductor de BD)
Descodificador
OPTICAL OUTPUT
Salida de audio
digital coaxial
(naranja)
TV
SUGERENCIA
Si el dispositivo de reproducción tiene una
salida de audio digital coaxial, puede
conectarlo a la entrada BD/DVD de la barra
de sonido con un cable digital coaxial
(disponible en el mercado).
Conecte a un TV (o a otro dispositivo periférico).
SUGERENCIA
• Si en su TV no se puede deshabilitar la salida de altavoz, podría deshabilitarla
conectando auriculares a la toma de auriculares del TV. Para obtener más información,
consulte el manual del TV.
• Las tomas de entrada TV y BD/DVD admiten las siguientes señales de audio.
− PCM (2 canales)
− Dolby Digital (hasta 5.1 canales)
− DTS Digital Surround (hasta 5.1 canales)
Precauciones
• Asegúrese de que los cables de alimentación de la barra de sonido y el altavoz de
ultragraves no estén conectados a las tomas de CA cuando empiece a realizar las
conexiones.
• No emplee demasiada fuerza al insertar el conector del cable. Si lo hace, podría
causar daños en el terminal o el conector del cable.
1 Conecte el TV y la barra de sonido con el cable
óptico (suministrado).
Quite el tapón del cable óptico y compruebe la dirección
del enchufe.
2 Conecte los cables de alimentación de la barra
de sonido y del altavoz de ultragraves a tomas
de CA.
3 Configure el TV de la forma descrita a
continuación:
• Ponga el volumen del TV al mínimo.
• Desactive la salida de altavoz integrado del TV (si la
hay).
Cable HDMI (etc.)
Altavoz de
ultragraves
(parte trasera)
Cable de
alimentación
A toma de CA

7
Es
Conexión analógica de un dispositivo externo
(videoconsola)
Puede conectar un dispositivo externo, como una videoconsola o un TV sin salida
óptica, a las tomas de entrada ANALOG de la barra de sonido.
NOTA
• Asegúrese de que los canales izquierdo (L) y derecho (R) se conectan correctamente.
• Seleccione la tecla ANALOG del mando a distancia como fuente de entrada.
Conexión inalámbrica con el altavoz de ultragraves
Cuando los cables de alimentación de la barra de sonido y el altavoz de ultragraves
están conectados a tomas de CA (p.6) y la barra de sonido está encendida, la barra de
sonido y el altavoz de ultragraves se conectan automáticamente. En el momento en que
se ha establecido la conexión, se enciende el indicador SUBWOOFER en la barra de
sonido y puede iniciarse la reproducción en la barra de sonido.
SUGERENCIA
• Al encender la barra de sonido por primera vez, si no se ilumina el indicador SUBWOOFER, consulte
“Emparejado manual de la barra de sonido y el altavoz de ultragraves” (p.19) y conecte la barra de sonido
y el altavoz de ultragraves manualmente.
• Cuando se haya establecido la conexión, la barra de sonido utilizará el mismo altavoz de ultragraves al
encenderla la próxima vez.
Cable RCA estéreo (etc.)
(disponible en el mercado)
Videoconsola (etc.)
Indicador SUBWOOFER: encendido

8
Es
Funcionamiento
Indicadores
Los indicadores del panel delantero parpadean o se
iluminan para indicar el funcionamiento y el estado de
los ajustes.
En este manual, se utilizan ilustraciones de los nueve
indicadores de estado para las explicaciones.
: apagado
: encendido
: parpadea
(Ejemplo: cuando el indicador STATUS parpadea y el indicador TV
está encendido)
Teclas de entrada
Seleccione una fuente de entrada para su
reproducción.
TV ....................Audio de TV
BD/DVD...........Audio de un dispositivo conectado
a la toma de entrada BD/DVD
ANALOG .........Audio de un dispositivo conectado
a la toma de entrada ANALOG
BLUETOOTH...Audio de un dispositivo Bluetooth
conectado
El indicador de la fuente de entrada seleccionada
se ilumina.
(Ejemplo: cuando TV está seleccionado)
SUGERENCIA
• Para reproducir el audio o ver vídeos del dispositivo
conectado al TV, establezca la fuente de entrada del TV en
el dispositivo de reproducción.
• Para obtener más información sobre la conexión Bluetooth,
consulte “Escuchar sonido de un dispositivo Bluetooth” (p.10).
Teclas SUBWOOFER (+/–)
Ajuste el volumen del altavoz de ultragraves.
Teclas VOLUME (+/–)
Ajuste el volumen de la barra de sonido.
Bajar volumen (–) Subir volumen (+)
Bajar volumen (–) Subir volumen (+)
1
2
Tecla LEARN
★
Pone la barra de sonido en modo de memorización
de mando a distancia de TV (p.12).
Tecla REPEATER
★
Activa o desactiva la función de repetidor de
mando a distancia de TV (p.14).
3
Transmisor de señal del mando a distancia
Transmite señales infrarrojas.
★: teclas que deben pulsarse durante más de 3
segundos
BLUETOOTH STANDBY, SUBWOOFER PAIRING,
AUDIO DELAY, LEARN, REPEATER
★
★
★

9
Es
Tecla (encendido)
Enciende o apaga (espera) la barra de sonido.
El indicador STATUS en la barra de sonido
El indicador STATUS en el altavoz de ultragraves
Tecla BLUETOOTH STANDBY
★
Activa/desactiva el modo de espera Bluetooth
(p.11).
Tecla SUBWOOFER PAIRING
★
Realiza el emparejado entre la barra de sonido y
el altavoz de ultragraves (p.19).
Verde (encendido)
Rojo (Bluetooth en espera) (p.11)
Desactivado (apagado)
Verde (encendido)
Rojo (apagado)
Teclas SURROUND y STEREO
Puede cambiar de reproducción envolvente a
estéreo (2 canales), y viceversa. Si está
seleccionada la reproducción envolvente, puede
obtener un efecto de sonido real con AIR
SURROUND XTREME, exclusivo de Yamaha.
SUGERENCIA
• Si se reproducen en modo envolvente señales estéreo de 2
canales, se ilumina el indicador PLII.
Se ilumina (reproducción
envolvente)
Apagado (reproducción
estéreo)
SURROUND
STEREO
Se ilumina (Dolby Pro Logic II)
4
5
Tecla BASS EXTENSION
Activa/desactiva la función de ampliación de
graves. Con esta función activada, puede disfrutar
de un sonido más profundo durante la
reproducción envolvente gracias a la tecnología
de potenciación de graves exclusiva de Yamaha.
Parpadea tres veces (habilitado), parpadea una vez (deshabilitado)
Tecla MUTE
Silencia la salida de audio. Vuelva a pulsar la
tecla para desactivar el silencio.
Parpadea (en silencio)
7
6
Tecla CLEAR VOICE
Activa o desactiva la función de claridad de voz.
Cuando está función está activada, es más claro
el sonido de las voces de películas, series de TV,
programas de noticias y deportes, etc.
Tecla UNIVOLUME
Activa o desactiva la función UniVolume.
Con esta función activada, se mantiene un nivel de volumen
constante al cambiar de entrada o fuente de sonido.
SUGERENCIA
• La función UniVolume se desactiva automáticamente si se
selecciona BLUETOOTH como fuente de entrada.
Tecla AUDIO DELAY
★
Ajusta el retardo de audio para sincronizar el
sonido con la imagen si la imagen de vídeo del TV
parece tener retardo respecto al sonido.
Realice los pasos siguientes para ajustar el retardo de audio.
1 Mantenga pulsada el botón AUDIO DELAY
durante más de 3 segundos.
Parpadea el indicador situado más a la izquierda.
2 Pulse el botón SUBWOOFER (+/–) para
ajustar el nivel de retardo de audio.
Al pulsar el botón SUBWOOFER (+) se retarda
la salida del audio.
3 Pulse el botón AUDIO DELAY para finalizar
el ajuste.
SUGERENCIA
• El ajuste terminará automáticamente si no se realiza
ninguna operación en más de 20 segundos.
Parpadea tres veces (habilitado), parpadea una vez (deshabilitado)
Parpadea tres veces (habilitado), parpadea una vez (deshabilitado)
(–) (+)
Indicación de decodificador
La barra de sonido admite las siguientes señales de
audio. Puede comprobar el tipo de señal de audio de
entrada por el color del indicador.
Verde (Dolby Digital), Rojo (DTS Digital Surround)
Apagado (PCM)

10
Es
Escuchar sonido de un
dispositivo Bluetooth
Puede reproducir contenidos de dispositivos Bluetooth, como smartphones o
reproductores de música digitales, de forma inalámbrica.
Consulte también el manual de instrucciones del dispositivo Bluetoot h para obtener
más información.
Emparejado de un dispositivo
Bluetooth
con la barra de sonido
Cuando se conecta a un dispositivo Bluetooth por primera vez, el “emparejado” entre el
dispositivo y la barra de sonido es un proceso obligatorio. El “emparejado” debe
realizarse con cada dispositivo Bluetooth utilizado.
Cuando haya realizado el “emparejado” con un dispositivo, ya no tendrá que repetirlo la
próxima vez que establezca la conexión con el mismo dispositivo.
1 Pulse el botón BLUETOOTH en el mando a distancia de la barra de
sonido para seleccionar Bluetooth como fuente de entrada.
El indicador BLUETOOTH del panel delantero se iluminará en verde.
2 Active la función Bluetooth del dispositivo que desee emparejar y
lleve a cabo el emparejado.
La operación varía en función del dispositivo. Consulte el manual de instrucciones del dispositivo.
3 Seleccione “YAS-203 Yamaha” en la lista de dispositivos Bluetooth
del dispositivo.
Si le pide una contraseña (PIN), introduzca el número “0000”.
Cuando ha finalizado el emparejado, aparece o un mensaje de confirmación en
el dispositivo.
NOTA
• Lleve a cabo el emparejado con el dispositivo Bluetooth y la barra de sonido dejando una distancia entre
ellos de no más de 10 metros.
• Se pueden emparejar hasta ocho dispositivos Bluetooth con la barra de sonido. Si se quiere emparejar un
noveno dispositivo, se eliminará la información del emparejado más antiguo.
• Si se elimina la información de emparejado de un dispositivo, cuando quiera volver a usar dicho
dispositivo, deberá volver a realizar el proceso de emparejado.
• Si ya hay conectado un dispositivo Bluetooth a la barra de sonido, finalice la conexión Bluetooth (p.11) y
lleve a cabo el emparejado con el nuevo dispositivo.
• Consulte “Bluetooth” (p.18) en “Resolución de problemas” si no consigue realizar el emparejado.
Siga estos pasos para utilizar un dispositivo Bluetooth con la barra de sonido.
Dispositivos Bluetooth
Reproducción del audio desde un dispositivo Bluetooth
en la barra de sonido
Para la primera
conexión Bluetooth
Emparejado de un dispositivo
Bluetooth con la barra de sonido
Para conexiones
Bluetooth posteriores
Se ilumina

11
Es
Reproducción del audio desde un dispositivo
Bluetooth en la barra de sonido
1 Con la barra de sonido encendida, pulse el botón BLUETOOTH en el
mando a distancia de la barra de sonido para seleccionar Bluetooth
como fuente de entrada.
El indicador BLUETOOTH del panel delantero se iluminará en verde.
2 Active la función Bluetooth del dispositivo.
Cuando se establezca correctamente la conexión Bluetooth, el indicador
BLUETOOTH de la barra de sonido parpadeará 3 veces.
3 Reproduzca una canción en el dispositivo.
NOTA
• Establezca la conexión Bluetooth con el dispositivo y la barra de sonido dejando una distancia entre ellos
de no más de 10 metros.
• Tal vez deba seleccionar “YAS-203 Yamaha” en la lista de dispositivos Bluetooth otra vez en caso de que
tenga problemas con la conexión. Quizá tenga que cambiar el ajuste de salida al audio de salida de la
barra de sonido en función del dispositivo Bluetooth que esté utilizando.
• Ajuste el nivel del volumen del dispositivo Bluetooth si es necesario.
• Si ya hay conectado un dispositivo Bluetooth a la barra de sonido, finalice la conexión Bluetooth y realice
la conexión con el nuevo dispositivo.
Finalización de la conexión Bluetooth
La conexión Bluetoot h se finaliza en los siguientes casos. Cuando la barra de sonido está
encendida y se finaliza la conexión Bluetoot h, el indicador BLUETOOTH parpadea una vez.
• La función Bluetooth está apagada en el dispositivo compatible.
• Se pulsa el botón BLUETOOTH del mando a distancia de la barra de sonido durante más de 3 segundos.
• La barra de sonido se apaga.
Uso del modo de espera Bluetooth
El modo de espera Bluetooth permite activar (o desactivar) la barra de sonido
automáticamente, todo combinado con el funcionamiento del dispositivo Bluetooth.
1 Con la barra de sonido apagada, mantenga pulsado el botón
BLUETOOTH STANDBY en el mando a distancia de la barra de
sonido durante más de 3 segundos.
Mantener pulsada la tecla BLUETOOTH STANDBY durante más de 3 segundos
activa y desactiva el modo.
Cuando el modo de espera Bluetooth está activado y la barra de sonido está
apagada, el indicador STATUS se ilumina en rojo. (Bluetooth en espera)
Uso de la aplicación HOME THEATER CONTROLLER
Si instala la aplicación gratuita “HOME THEATER CONTROLLER” en un dispositivo
Bluetooth, por ejemplo, un smartphone, puede realizar distintas operaciones fácilmente
y con comodidad con su dispositivo Bluetooth.
(Opciones de configuración: funcionamiento básico, campo de sonido, ajustes de
sonido)
Para obtener más información sobre “HOME THEATER CONTROLLER”, consulte la
información del producto que encontrará en nuestro sitio web.
Se ilumina
Parpadea 3 veces
Funciones disponibles en dispositivos Bluetooth con el modo de espera Bluetooth activado
Función de encendido de interbloqueo (cuando la barra de sonido está apagada)
Cuando se realiza la conexión Bluetooth en el dispositivo, la barra de sonido se enciende y está lista para
reproducir sonido desde el dispositivo.
Función de apagado de interbloqueo (cuando la barra de sonido está encendida)
La barra de sonido se apaga cuando la conexión Bluetooth finaliza en un dispositivo Bluetooth. (Solo
cuando BLUETOOTH está seleccionado como fuente de entrada.)
Parpadea tres veces (habilitado), parpadea una vez (deshabilitado)
Se ilumina (rojo)

12
Es
Ajustes
Una vez programada la barra de sonido, puede usar el mando a distancia del TV para
controlar sus funciones, como encender y apagar el TV y la barra de sonido a la vez o
subir y bajar el volumen o activar o desactivar el silenciamiento de la barra de sonido.
1 Apague el TV.
2 Apague la barra de sonido.
3 Mantenga pulsado más de tres segundos el botón LEARN del mando
a distancia de la barra de sonido para poner la barra de sonido en
modo de memorización.
Cuando la barra de sonido está en modo de memorización, los indicadores del
panel delantero parpadean como se muestra a continuación.
NOTA
• Los pasos del 4 al 7 requieren usar solo el mando a distancia del TV y las teclas del panel delantero
de la barra de sonido. El mando a distancia de la barra de sonido no es necesario.
• Si la barra de sonido ya dispone de funciones memorizadas, se iluminarán los siguientes
indicadores.
Silencio: BD/DVD, Volumen (–): ANALOG, Volumen (+): BLUETOOTH, Alimentación: SURROUND
4 Memorice en la barra de sonido el código de “Silencio” del mando a
distancia del TV.
4-1 Pulse MUTE en el panel delantero de la barra de sonido.
4-2 Apuntando el mando a distancia del TV hacia el sensor del mando a distancia,
mantenga pulsado el botón de silencio durante más de 1 segundo dos o tres veces.
5 Memorice en la barra de sonido el código de “Volumen (–)” del
mando a distancia del TV.
5-1 Pulse VOLUME (–) en el panel delantero de la barra de sonido.
5-2 Apuntando el mando a distancia del TV hacia el sensor del mando a distancia,
mantenga pulsado el botón de volumen (–) durante más de 1 segundo dos o tres veces.
Programar la barra de sonido con el mando a
distancia del TV (función de memorización de
mando a distancia de TV)
• Esta función solo está disponible si el mando a distancia del TV utiliza señales infrarrojas.
• Un mando a distancia por radiofrecuencia (RF) no funcionará en este caso.
• Si desea usar un mando a distancia de un descodificador de televisión por cable o satélite para controlar
la barra de sonido, utilice el mando a distancia por infrarrojos original del TV para programar la barra de
sonido y, a continuación, utilice el mando a distancia del descodificador para realizar las operaciones.
• Si al modificar el volumen de la barra de sonido también cambia el volumen del TV, ajuste el volumen
del TV al mínimo o desactive la salida de los altavoces.
Resultado
Pitido/zumbido
Indicadores
Memorización
correcta
Una vez
Memorización
no realizada
* Repita el
proceso desde
el paso 4-1.
Dos veces
Resultado
Pitido/zumbido
Indicadores
Memorización
correcta
Una vez
Memorización
no realizada
* Repita el
proceso desde
el paso 5-1.
Dos veces
Aprox. 30 cm
Mando a distancia del TV
Mantener pulsado
(más de 1 segundo)
Soltar
(más de 1 segundo)
Mantener pulsado
(más de 1 segundo)
Soltar
(...)
Se ilumina
Parpadeo
Se ilumina
Parpadeo

13
Es
6 Memorice en la barra de sonido el código de “Volumen (+)” del
mando a distancia del TV.
6-1 Pulse VOLUME (+) en el panel delantero de la barra de sonido.
6-2 Apuntando el mando a distancia del TV hacia el sensor del mando a
distancia, mantenga pulsado el botón de volumen (+) durante más de
1 segundo dos o tres veces.
7 Memorice en la barra de sonido el código de “Encendido” del mando
a distancia del TV.
7-1 Pulse (encendido) en el panel delantero de la barra de sonido.
7-2 Apuntando el mando a distancia del TV hacia el sensor del mando a
distancia, mantenga pulsado el botón de encendido durante más de
1 segundo dos o tres veces.
8 Para finalizar el modo de memorización, pulse el botón LEARN en el
mando a distancia de la barra de sonido.
Así se han llevado a cabo todos los ajustes necesarios. Ahora puede controlar la
barra de sonido con los botones de silencio, de encendido o de volumen del mando
a distancia del TV.
SUGERENCIA
• El modo de memorización terminará automáticamente si no se realiza ninguna operación en más de
5 minutos.
• Ponga el volumen del TV al mínimo. Cuando suba el volumen de la barra de sonido con el mando a
distancia del TV, el volumen de este podría subir también. En ese caso, realice el paso 3 de
“Conexiones” (p.6) para cambiar el ajuste del TV.
• Puede pulsar el botón (encendido) del mando a distancia de la barra de sonido para salir del
modo de memorización.
Borrado de todas las funciones programadas
1 Con la barra de sonido apagada, mantenga pulsado el botón LEARN
en el mando a distancia de la barra de sonido durante más de
3 segundos (para acceder al modo de memorización).
Cuando la barra de sonido está en modo de memorización, los indicadores del
panel delantero parpadean como se muestra a continuación.
2 Mantenga pulsado más de 3 segundos INPUT en el panel delantero
de la barra de sonido.
Si se realiza todo el borrado, se oirán tres pitidos.
3 Pulse el botón LEARN en el mando a distancia de la barra de sonido.
Resultado
Pitido/zumbido
Indicadores
Memorización
correcta
Una vez
Memorización
no realizada
* Repita el
proceso desde
el paso 6-1.
Dos veces
Resultado
Pitido/zumbido
Indicadores
Memorización
correcta
Una vez
Memorización
no realizada
* Repita el
proceso desde
el paso 7-1.
Dos veces
Se ilumina
Parpadeo
Se ilumina
Parpadeo
Parpadea en rojo (borrado)

14
Es
Si la función de repetidor de mando a distancia de TV está activada, la barra de sonido
transfiere la señal del mando a distancia del TV recibida en el sensor frontal al
transmisor posterior. Esta función tendría que estar activada al colocar la barra de
sonido delante del TV y no podrá controlar el TV sin el mando a distancia del TV.
1 Encienda la barra de sonido.
2 Mantenga pulsado más de tres segundos el botón REPEATER en el
mando a distancia de la barra de sonido para habilitar o deshabilitar
la función de repetidor de mando a distancia de TV.
Así se han llevado a cabo todos los ajustes necesarios. Cuando está habilitada la
función de repetidor de mando a distancia de TV, puede controlar el TV con el
mando a distancia a través de la barra de sonido.
SUGERENCIA
• La función de repetidor de mando a distancia de TV está deshabilitada de forma predeterminada.
• Si el cable de alimentación de la barra de sonido se conecta a una toma de corriente de CA y si la
función de repetidor de mando a distancia de TV está activada, la función se puede usar incluso con
la barra de sonido apagada.
• Si ha memorizado en la barra de sonido el funcionamiento del volumen (+) (p.13), el volumen del TV
podría subir cuando suba el volumen de la barra de sonido con el mando a distancia del TV. En ese
caso, realice el paso 3 de “Conexiones” (p.6) para cambiar el ajuste del TV.
• Puede comprobar el estado de la función de repetidor de mando a distancia de TV con el indicador
SURROUND al encender la barra de sonido.
Si activa la función de espera automática, por fin podrá olvidarse de apagar la barra de
sonido después de usarla, aunque se quede dormido delante del TV.
NOTA
• Con la función de espera automática activada y si se cumple una de las condiciones siguientes, la barra de
sonido se apagará automáticamente.
− No se ha realizado ninguna operación en 8 horas.
− No se recibe audio ni se realizan operaciones en 20 minutos con BLUETOOTH seleccionado como
fuente de entrada.
1 Con la barra de sonido apagada, mantenga pulsado el botón MUTE
en el mando a distancia de la barra de sonido durante más de
3 segundos para activar/desactivar la función de espera automática.
Puede comprobar el estado de la función de espera automática con el indicador del
TV al encender la barra de sonido.
SUGERENCIA
• La configuración inicial varía en función del país o la región.
− Modelos para Reino Unido y Europa: habilitado
− Resto de modelos: deshabilitado
Realice el procedimiento siguiente para inicializar la barra de sonido.
1 Apague la barra de sonido.
2 Mantenga pulsado más de tres segundos (encendido) en la parte
delantera de la barra de sonido.
Envío de la señal del mando a distancia del TV a
través de la barra de sonido (función de repetidor
de mando a distancia de TV)
Esta función solo está disponible si el mando a distancia del TV utiliza señales infrarrojas.
Luz IR para repetidor de mando a distancia de TV
Sensor del mando a
distancia del TV
Mando a distancia del TV
Parpadea tres veces (habilitado), parpadea una vez (deshabilitado)
Apagado (habilitado), se ilumina (deshabilitado)
Configuración de la función de espera automática
Inicialización de la barra de sonido
Apagado (habilitado), se ilumina (deshabilitado)
Parpadea (inicializado)

15
Es
Resolución de problemas
Consulte la tabla inferior cuando la barra de sonido no funcione correctamente. Si el
problema que tiene no aparece en la lista a continuación, o si las instrucciones no le
sirven de ayuda, apague la barra de sonido, desenchufe el cable de alimentación y
póngase en contacto con un centro Yamaha de atención al cliente o concesionario
autorizado.
En primer lugar, compruebe lo siguiente:
A Los cables de alimentación de la barra de sonido, el altavoz de ultragraves, el
TV y los dispositivos de reproducción (como reproductores BD) están bien
conectados a tomas de CA.
B La barra de sonido, el TV y los dispositivos de reproducción (como
reproductores BD) están encendidos.
C Los conectores de cada cable están insertados con seguridad en las tomas de
cada dispositivo.
Alimentación y sistema
Audio
Problema Causa Solución
El equipo se
apaga de
repente.
La función de espera automática
ha funcionado correctamente.
Con la función de espera
automática activada y si se
cumple una de las condiciones
siguientes, la barra de sonido se
apagará automáticamente.
- No se ha realizado ninguna
operación en 8 horas.
- No se recibe audio ni se
realizan operaciones en
20 minutos con BLUETOOTH
seleccionado como fuente de
entrada.
Vuelva a encender la barra de sonido.
Para impedir que la barra de sonido se
apague automáticamente, desactive la
función de espera automática (p.14).
Se han activado los circuitos de
protección. (El indicador STATUS
del panel delantero de la barra de
sonido parpadea.)
Después de comprobar que todas las
conexiones son correctas, vuelva a
encender la barra de sonido. Si el
equipo sigue apagándose de repente
o no se enciende, desenchufe el cable
de alimentación de la toma de CA y
póngase en contacto con su
distribuidor o centro de servicio
Yamaha más cercano.
Se ha finalizado una conexión
Bluetooth en un dispositivo
Bluetooth con el modo de espera
Bluetooth activado.
Desactive el modo de espera
Bluetooth (p.11).
La unidad no se
puede encender.
Se han activado los circuitos de
protección tres veces seguidas.
(Si intenta encender la unidad en
estas condiciones, el indicador
STATUS del panel delantero de la
barra de sonido parpadeará.)
Para proteger el producto, no es
posible encenderlo en estas
condiciones. Desenchufe el cable de
alimentación de la toma de CA y
póngase en contacto con su
distribuidor o centro de servicio
Yamaha más cercano.
La barra de
sonido no
responde
correctamente.
El microprocesador interno se ha
bloqueado debido a una descarga
eléctrica externa (como un rayo o
electricidad estática excesiva) o a
una caída del voltaje de la fuente
de alimentación.
Mantenga pulsado más de diez
segundos (encendido) en la parte
delantera de la barra de sonido para
que se vuelva a encender. Si el
problema persiste, desconecte el
cable de alimentación de la toma de
CA y vuelva a enchufarlo.
La barra de
sonido empieza
a funcionar sola.
Se está usando otro dispositivo
Bluetooth cerca.
Finalice la conexión Bluetooth de la
barra de sonido (p.11).
Las gafas 3D del
TV no funcionan.
La barra de sonido bloquea el
transmisor de las gafas 3D del
TV.
Compruebe la posición del transmisor
de la gafas 3D del TV y ajuste la
posición de la barra de sonido. Retire
los soportes de la barra de sonido si
están instalados (p.5).
Problema Causa Solución
No hay sonido.
Está seleccionada otra fuente de
entrada.
Seleccione una fuente de entrada
adecuada (p.8).
Está activada la función de
silencio.
Cancele la función de silencio (p.9).
El volumen está demasiado bajo. Suba el volumen (p.8).
Los cables de alimentación de la
barra de sonido y del altavoz de
ultragraves no están bien
conectados.
Asegúrese de que los cables de
alimentación de la barra de sonido y el
altavoz de ultragraves estén
conectados correctamente a las tomas
de CA (p.6).

16
Es
No se emite
sonido desde el
altavoz de
ultragraves. (El
indicador
SUBWOOFER
del panel
delantero de la
barra de sonido
parpadea.)
El altavoz de ultragraves no está
conectado a una toma de CA. (El
indicador STATUS del altavoz de
ultragraves no está encendido.)
Conecte el cable de alimentación del
altavoz de ultragraves a una toma de
CA.
La barra de sonido y el altavoz de
ultragraves no están conectados
a causa de una mala
comunicación inalámbrica. (El
indicador STATUS del altavoz de
ultragraves continúa encendido
en rojo o parpadea en verde.)
Acerque el altavoz de ultragraves a la
barra de sonido. Si la situación no
mejora, coloque el altavoz de
ultragraves en un lugar con mejor
comunicación.
Si la comunicación entre la barra de
sonido y el altavoz de ultragraves está
obstruida por un objeto metálico u otro
objeto, cambie la posición de la barra
de sonido y el altavoz de ultragraves o
busque otro lugar de instalación para
el altavoz de ultragraves.
Si hay un dispositivo (horno
microondas, LAN inalámbrica, etc.)
que emita señales de radiofrecuencia,
aleje la barra de sonido y el altavoz de
ultragraves del dispositivo.
La barra de sonido y el altavoz de
ultragraves no están
emparejados. (El indicador
STATUS del altavoz de
ultragraves parpadea o está
encendido en rojo.)
Realice el emparejado entre la barra
de sonido y el altavoz de ultragraves
(p.19).
Si el indicador SUBWOOFER de la
barra de sonido sigue sin encenderse
en verde después de realizar el
emparejado, hay un problema de
funcionamiento. Desenchufe los
cables de alimentación de las tomas
de CA y póngase en contacto con su
distribuidor o centro de servicio
Yamaha más cercano.
Se han activado los circuitos de
protección del altavoz de
ultragraves. (El indicador
STATUS del altavoz de
ultragraves está encendido en
naranja.)
Para proteger el producto, no es
posible encender el altavoz de
ultragraves en estas condiciones.
Desenchufe el cable de alimentación
de la toma de CA y póngase en
contacto con su distribuidor o centro
de servicio Yamaha más cercano.
El sonido del
altavoz de
ultragraves se
escucha con
interrupciones.
(El indicador
SUBWOOFER de
la barra de
sonido parpadea
cuando se
interrumpe el
sonido.)
La conexión entre la barra de
sonido y el altavoz de ultragraves
se interrumpe a causa de una
mala comunicación inalámbrica.
(El indicador STATUS del altavoz
de ultragraves parpadea en verde
cuando se interrumpe el sonido.)
Acerque el altavoz de ultragraves a la
barra de sonido. Si la situación no
mejora, coloque el altavoz de
ultragraves en un lugar con mejor
comunicación.
Si la comunicación entre la barra de
sonido y el altavoz de ultragraves está
obstruida por un objeto metálico u otro
objeto, cambie la posición de la barra
de sonido y el altavoz de ultragraves o
busque otro lugar de instalación para
el altavoz de ultragraves.
Si hay un dispositivo (horno
microondas, LAN inalámbrica, etc.)
que emita señales de radiofrecuencia,
aleje la barra de sonido y el altavoz de
ultragraves del dispositivo.
El altavoz de
ultragraves no
emite ningún
sonido o el nivel
de sonido es
muy bajo. (El
indicador
SUBWOOFER de
la barra de
sonido está
encendido.)
El volumen está demasiado bajo. Suba el volumen del altavoz de
ultragraves (p.8).
La parte frontal del altavoz de
ultragraves está bloqueada.
Despeje la zona alrededor de la parte
frontal y el puerto del altavoz de
ultragraves.
La fuente de reproducción no
contiene señales de baja
frecuencia.
Reproduzca una fuente de sonido con
señales de baja frecuencia y
compruebe que se emite sonido desde
el altavoz de ultragraves.
Se han activado los circuitos de
protección del altavoz de
ultragraves. (El indicador
STATUS del altavoz de
ultragraves está encendido en
naranja.)
Para proteger el producto, no es
posible encender el altavoz de
ultragraves en estas condiciones.
Desenchufe el cable de alimentación
de la toma de CA y póngase en
contacto con su distribuidor o centro
de servicio Yamaha más cercano.
El volumen se
reduce cuando
se enciende la
barra de sonido.
Se ha activado la función de
ajuste automático del volumen.
Para impedir que el volumen sea
demasiado alto, la barra de
sonido ajusta automáticamente
su volumen en un nivel
determinado al encenderse.
Si es necesario, suba el volumen
(p.8).

17
Es
Mando a distancia
No hay efecto
envolvente.
Está seleccionada la
reproducción en estéreo.
Seleccione la reproducción envolvente
(p.9).
El volumen está demasiado bajo. Suba el volumen (p.8).
El TV o el dispositivo de
reproducción está ajustado para
emitir solo audio de 2 canales
(como PCM).
Cambie el ajuste de la salida de audio
digital del TV o el dispositivo de
reproducción por Dolby Digital o
BitStream.
El audio se emite desde los
altavoces integrados del TV.
Ponga el volumen del TV al mínimo
(p.6).
La fuente de reproducción no
contiene audio envolvente.
Reproduzca una fuente que contenga
audio grabado en el modo envolvente.
Se oye ruido.
La barra de sonido está
demasiado cerca de otro
dispositivo digital o de alta
frecuencia.
Aleje el dispositivo de la barra de
sonido.
Problema Causa Solución
La barra de
sonido no se
puede controlar
por medio del
mando a
distancia.
La barra de sonido se encuentra
fuera del rango operativo.
Utilice el mando a distancia dentro del
rango operativo (p.2).
Las pilas están casi agotadas. Sustitúyalas por pilas nuevas (p.2).
El sensor del mando a distancia
de la barra de sonido está
expuesto a la luz solar directa o a
una luz intensa.
Ajuste el ángulo de iluminación o
vuelva a colocar la barra de sonido.
El TV no se
puede controlar
por medio de su
mando a
distancia.
La barra de sonido bloquea el
sensor del mando a distancia del
TV.
Utilice la función de repetidor de
mando a distancia de TV (p.14) o quite
los soportes de la barra de sonido si
están instalados para que el sensor
del mando a distancia del TV no esté
bloqueado (p.5).
El TV no se
puede controlar
por medio de la
función de
repetidor de
mando a
distancia de TV.
La función de repetidor de mando
a distancia de TV está
deshabilitada.
Habilite la función de repetidor de
mando a distancia de TV (p.14).
El mando a distancia del TV no
usa señales infrarrojas. Algunos
mandos a distancia podrían no
funcionar aunque utilicen señales
infrarrojas.
En ese caso, no se puede usar la
función de repetidor de mando a
distancia de TV. Ajuste la posición de
la barra de sonido de forma que no
bloquee el sensor del mando a
distancia del TV y use el mando a
distancia del TV para controlar el TV.
La barra de sonido y el TV están
demasiado juntos o demasiado
separados.
Aleje la barra de sonido del TV más de
50 mm (p.5).
Si es necesario, ponga o quite los
soportes de la barra de sonido para
ajustar la altura de la luz IR (del
repetidor de mando a distancia de TV)
de la barra de sonido situada delante
del sensor del mando a distancia del
TV (p.5).
Hay algún obstáculo, por ejemplo
cables, entre la barra de sonido y
el TV.
Quite el obstáculo que pueda haber.
El TV no recibe correctamente la
señal del mando a distancia, ya
que se producen interferencias
entre las señales del mando a
distancia del TV y la luz IR (del
repetidor de mando a distancia de
TV) de la barra de sonido.
Deshabilite la función de repetidor de
mando a distancia de TV (p.14).

18
Es
Bluetooth
La barra de
sonido no
memoriza las
operaciones del
mando a
distancia del TV.
El botón del mando a distancia
del TV no se mantuvo pulsado el
tiempo suficiente.
Mantenga la tecla pulsada más de
1 segundo dos o tres veces (p.12).
El mando a distancia del TV no
usa señales infrarrojas. Algunos
mandos a distancia podrían no
funcionar aunque utilicen señales
infrarrojas.
En ese caso, no se puede usar la
función de memorización del mando a
distancia de TV. Utilice el mando a
distancia de la barra de sonido para
controlar la barra de sonido.
La posición desde la que ha
utilizado el mando a distancia del
TV no es adecuada.
Utilice el mando a distancia del TV
desde una posición adecuada (p.12).
Las pilas del mando a distancia
del TV están bajas.
Sustitúyalas por pilas nuevas.
El sensor del mando a distancia
de la barra de sonido está
expuesto a la luz solar directa o a
una luz intensa.
Ajuste el ángulo de iluminación o
vuelva a colocar la barra de sonido.
La luz de la pantalla del TV ha
interferido con la transmisión de
la señal del mando a distancia.
Apague el TV y vuelva a realizar la
operación de memorización (p.12).
Se oye sonido
desde el TV
cuando se sube
el volumen de la
barra de sonido
con el mando a
distancia del TV.
(Cuando se usa
la función de
memorización
del mando a
distancia de TV)
La salida de audio está activada
en el TV.
Cambie el ajuste del TV para
deshabilitar la salida por los altavoces
del TV. Si su TV no permite hacerlo,
pruebe uno de los métodos siguientes.
- Conecte unos auriculares a la toma
correspondiente del TV.
- Ponga el volumen del TV al mínimo.
La barra de
sonido y el TV se
encienden y
apagan en
sentido
contrario. (Por
ejemplo, el TV se
apaga si se
enciende la barra
de sonido.)
(Cuando se usa
la función de
memorización
del mando a
distancia de TV)
El TV estaba encendido la última
vez que realizó la operación de
memorización.
Pulse el botón de encendido del TV y
(encendido) en el panel delantero
de la barra de sonido para encender
ambos dispositivos y, a continuación,
pulse el botón de encendido del
mando a distancia del TV para
apagarlos.
Problema Causa Solución
No es posible
emparejar la
barra de sonido
con el
dispositivo
Bluetooth.
Bluetooth no está seleccionado
como fuente de entrada.
Seleccione Bluetooth como fuente de
entrada.
El dispositivo no admite A2DP. Lleve a cabo el emparejado con un
dispositivo que admita A2DP.
Un adaptador Bluetooth, etc. que
quiera emparejar con la barra de
sonido tiene una contraseña
distinta de “0000”.
Utilice un adaptador Bluetooth, etc.
cuya contraseña sea “0000”.
La barra de sonido y el dispositivo
están demasiado lejos.
Acerque el dispositivo a la barra de
sonido.
Hay señales de salida de un
dispositivo (horno microondas,
LAN inalámbrica, etc.) en la
banda de frecuencia de 2,4 GHz
cerca.
Aleje la barra de sonido del dispositivo
que está emitiendo las señales de
frecuencia de radio.
Hay otro dispositivo Bluetooth
conectado.
Finalice la conexión Bluetooth actual y
lleve a cabo el emparejado con el
nuevo dispositivo.
No es posible
establecer una
conexión
Bluetooth.
Hay otro dispositivo Bluetooth
conectado.
La barra de sonido no puede
establecer múltiples conexiones
Bluetooth. Finalice la conexión
Bluetooth actual y establezca la
conexión nueva con el dispositivo que
desee.
Hay más de nueve dispositivos
emparejados y la información de
emparejado más antigua se ha
eliminado.
Vuelva a realizar el emparejado. La
barra de sonido puede conservar la
información de emparejado de hasta
ocho dispositivos. Cuando se
empareja un noveno dispositivo, la
información de emparejado más
antigua se elimina.

19
Es
Emparejado manual de la barra de sonido y el altavoz de
ultragraves
1 Con la barra de sonido apagada, mantenga pulsado el botón
SUBWOOFER PAIRING en el mando a distancia de la barra de
sonido durante más de 3 segundos.
El indicador SUBWOOFER del panel delantero de la barra de sonido parpadea
rápido.
2 En los 30 segundos siguientes, presione el botón SUBWOOFER
PAIRING en el panel trasero del altavoz de ultragraves durante más
de 3 segundos con un objeto afilado como un clip.
El indicador STATUS del panel trasero del altavoz de ultragraves parpadea rápido
en verde.
Cuando ha terminado el proceso de emparejado y la barra de sonido y el altavoz
de ultragraves están conectados, se enciende el indicador SUBWOOFER del panel
delantero de la barra de sonido.
Si el indicador SUBWOOFER de la barra de sonido no se enciende después de
realizar estos pasos, consulte “Resolución de problemas” (p.15).
SUGERENCIA
• El “emparejado” es la operación que permite a la barra de sonido y al altavoz de ultragraves decidir
a qué dispositivo se conectan.
No se produce
sonido o el
sonido se
interrumpe
durante la
reproducción.
La conexión Bluetooth de la barra
de sonido con el dispositivo se ha
cancelado.
Vuelva a realizar el proceso de
conexión Bluetooth (p.10).
Bluetooth no está seleccionado
como fuente de entrada.
Seleccione Bluetooth como fuente de
entrada.
La barra de sonido y el dispositivo
están demasiado lejos.
Acerque el dispositivo a la barra de
sonido.
Hay señales de salida de un
dispositivo (horno microondas,
LAN inalámbrica, etc.) en la
banda de frecuencia de 2,4 GHz
cerca.
Aleje la barra de sonido y el altavoz de
ultragraves del dispositivo que emite
las señales de radiofrecuencia.
El dispositivo no está configurado
para enviar señales de audio
Bluetooth a la barra de sonido.
Cambie la configuración de la salida
de audio y el ajuste de conexión en el
dispositivo.
No se puede realizar la
reproducción en el dispositivo.
Realice la reproducción en el
dispositivo.
El volumen del dispositivo está
ajustado en el mínimo.
Suba el nivel del volumen.

20
Es
Especificaciones
* Las especificaciones están sujetas a cambios sin previo aviso.
Elemento
Barra de sonido
(YAS-CU203)
Altavoz de ultragraves
(NS-WSW41)
Sección de
amplificador
Potencia de
salida nominal
máxima
Delantero L/R 50 W x
2 canales
Potencia dinámica
100 W
Sección de
altavoz
Tipo
Tipo de suspensión
acústica (Tipo de
blindaje no magnético)
Advanced Yamaha
Active Servo Technology
(Tipo de blindaje
magnético)
Controlador 2 conos de 5,5 cm Cono de 16 cm
Respuesta de
frecuencia
De 150 Hz a 22 kHz De 35 Hz a 150 Hz
Impedancia 6 Ω 5,5 Ω
Descodificador
Señal de audio
admitida (TV, BD/
DVD)
PCM (2 canales)
Dolby Digital
DTS Digital Surround
--
Tomas de
entrada
Digital (Óptica) 1 (TV) --
Digital (Coaxial) 1 (BD/DVD) --
Analógica (RCA) 1 (ANALOG) --
Altavoz de
ultragraves
inalámbrico
Banda de
frecuencia
2,4 GHz
Rango de
transmisión
10 m (sin interferencias)
Bluetooth
Versión de
Bluetooth
Ver. 2.1+EDR --
Protocolos
admitidos
A2DP, SPP --
Códecs
admitidos
SBC, aptX --
Salida
inalámbrica
Bluetooth Clase 2 --
Distancia
máxima de
comunicación
10 m (sin obstáculos) --
Método de
protección de
contenidos
admitido
SCMS-T --
General
Alimentación
eléctrica
Modelos de EE.UU. y
Canadá: 120 V de CA,
60 Hz
Modelo de Taiwán:
110-120 V de CA,
50/60 Hz
Modelo de China: 220 V
de CA, 50 Hz
Otros modelos:
220-240 V de CA,
50/60 Hz
Modelos de EE.UU. y
Canadá: 120 V de CA,
60 Hz
Modelos de Reino Unido
y Europa: 230 V de CA,
50 Hz
Modelo de Taiwán: 110 V
de CA, 60 Hz
Modelo de Corea: 220 V
de CA, 60 Hz
Modelo de China: 220 V
de CA, 50 Hz
Modelo de Australia:
240 V de CA, 50 Hz
Modelo de Asia:
220-240 V de CA,
50/60 Hz
Consumo 26 W 45 W
Consumo en
espera
0,4 W
Modelos de EE.UU. y
Canadá: 1,4 W
Modelos de Reino Unido
y Europa: 1,5 W
Modelos de Corea y
Taiwán: 1,2 W
Modelo de China: 1,3 W
Modelos de Australia y
Asia: 1,7 W
Consumo en
espera de
Bluetooth
0,5 W --
Dimensiones
(Anchura x
Altura x
Profundidad)
886 x 79 x 121 mm
(sin soportes, estado
original)
290 x 292 x 316 mm
886 x 94 x 121 mm
(con los soportes)
Grosor sin las
partes salientes
del altavoz (parte
más fina)
65 mm --
Peso 2,9 kg 8,1 kg

21
Es
Este sistema incorpora la tecnología acústica virtual AIR SURROUND XTREME de Yamaha, que permite
disfrutar de un sonido envolvente posicional de alta calidad con 7.1 canales utilizando la barra de sonido y el
altavoz de ultragraves.
El altavoz de ultragraves de este sistema utiliza la exclusiva tecnología de control de graves de Yamaha
“Advanced Yamaha Active Servo Technology II”, que destaca por sus excelentes resultados en la
reproducción de sonidos de baja frecuencia.
“UniVolume” es una marca comercial de Yamaha Corporation.
Bluetooth es una marca registrada de Bluetooth SIG y Yamaha la utiliza de acuerdo con un contrato de
licencia.
Fabricado con la licencia de Dolby Laboratories. Dolby, Pro Logic y el símbolo de la doble D son marcas
comerciales de Dolby Laboratories.
Para obtener información sobre las patentes de DTS, consulte http://patents.dts.com. Fabricado con la
licencia de DTS Licensing Limited.
DTS, el símbolo y DTS y el símbolo en su conjunto son marcas comerciales registradas y DTS Digital
Surround es una marca comercial de DTS, Inc. © DTS, Inc. Todos los derechos reservados.
© 2013 CSR plc y las empresas de su grupo.
La marca aptX
®
y el logotipo de aptX son marcas comerciales de CSR plc o una de las empresas de su
grupo y pueden estar registrados en una o varias jurisdicciones.
“Blu-ray Disc™”, “Blu-ray™” y los logotipos son marcas comerciales de la Blu-ray Disc Association.
Bluetooth
• Bluetooth es una tecnología para comunicación inalámbrica entre dispositivos dentro
de un área aproximada de 10 meters a través de la banda de frecuencia de 2,4 GHz,
una banda que se puede usar sin necesidad de licencia.
Gestión de las comunicaciones Bluetooth
• La banda de 2,4 GHz utilizada por los dispositivos Bluetooth compatibles es una
banda de radio que muchos otros equipos también utilizan. Aunque los dispositivos
Bluetooth compatibles utilizan una tecnología que reduce al mínimo la influencia de
otros componentes que puedan estar usando la misma banda de radio, esta influencia
inevitablemente puede reducir la velocidad o la distancia de las comunicaciones y, en
algunos casos, interrumpir la comunicación.
• La velocidad de transferencia de la señal y la distancia a la que es posible la
comunicación varía en función de la distancia entre los dispositivos comunicantes, la
presencia de obstáculos, las condiciones de las ondas de radio y el tipo de
equipamiento.
• Yamaha no garantiza el funcionamiento de todas las conexiones inalámbricas entre
esta unidad y otros dispositivos compatibles con Bluetooth.

i
Zh
•
要确保最好的性能,请仔细阅读此手册。
请将它保存在安全的地方以备将来参考。
•
请将本音响系统安装在通风良好、阴凉、
干燥、干净的位置
—
远离直射阳光、热
源、振动、灰尘、潮湿和
/
或寒冷。为确
保正常通风,至少需要以下空间。
条形音箱:顶部:
10 cm
,
背面:
10 cm
,侧面:
10 cm
超低音扬声器:顶部:
20 cm
,
背面:
20 cm
,侧面:
20 cm
• 请将本机远离其它电子设备、马达
或变压器以避免嗡嗡声。
• 请勿使本机经受于从冷到热的突然温度
改变,勿将本机放置于高湿度的环境中
(例如有加湿器的房间)以防止本机内
部发生结露,否则可能导致触电、火
灾,损害本机,和 / 或人体伤害。
• 请避免在外部物体可能落入本机的地方
或本机可能遭遇液体滴落或飞溅的地方
安装本机。在本机的顶部,请勿放置:
−其它组件机,因为它们可能对本机
表面造成损坏和 / 或导致变色。
−
燃烧物体 (例如蜡烛),因为它们可能导致
火灾,对本机造成损害和
/
或造成人体伤害。
−
内部装有液体的容器,因为它们可能会摔
落并且液体可能引起用户触电损坏本机。
• 为了不阻断热量散发,请勿使用报
纸、桌布、窗帘等遮盖本机。如果
本机内的温度升高,可能会引起火
灾,损坏本机和 / 或导致人体伤害。
• 在所有的连接完成之前请勿将本机
插头插入墙上插座。
• 请勿上下倒置操作本机。它可能过
热,并极有可能导致损坏。
•
请勿在开关、旋钮和
/
或导线上用力。
• 当将电源线从墙上插座断开时,请
抓住插头;请勿拖拉导线。
• 请勿使用化学溶剂清洁本机;这可能
损坏机壳涂层。请使用洁净的干布。
•
只能使用本机规定的电压。在本机上
使用比规定值高的电压是危险的并可
能导致火灾,损坏本机和
/
或造成人体
伤害。
Yamaha
将不对由于在本机上使
用非规定电压而造成的任何损害负责。
• 为了避免雷击造成损坏,在雷电期
间,将电源导线从墙壁上的电源插
座拔下,也将天线从本机上拔下。
• 请勿尝试修改或修理本机。当需要
任何维修时请联系专业 Yamaha 维
修人员。不能以任何理由打开机壳。
• 当准备长时间 (例如休假)不使用本机
时,请将交流电源线从墙上插座断开。
•
对通常的操作错误,在断定本机出故障
之前,请务必先阅读
“
故障排除
”
一节。
• 在搬动本机之前,请按 以将本机
设置为待机模式,并将交流电源插
头从墙上插座断开。
• 如果环境温度剧烈变化,就可能形
成结露。从插座上拔下电源插头,
将本机搁置一旁。
• 将本机靠近交流电源插座安装以便
交流电源的接插。
• 安全放置或安装是用户的责任。由
于扬声器的不当放置或安装造成的
意外事故, Yamaha 概不负责。
•
请勿将手或异物放到超低音扬声器的插孔上。
•
移动超低音扬声器时,请勿握住插孔,
因为这会导致人员受伤和
/
或损坏本机。
• 请勿将易碎的物体放到超低音扬声
器的插孔附近。如果物体因空气压
力而坠落,可能会导致人员受伤和 /
或令超低音扬声器和此物体损坏。
• 请将本产品放置在儿童无法触及的
地方,以免儿童误食小零件。
遥控器和电池注意事项
• 切勿将水或其它液体溅到遥控器上。
• 切勿失手跌落遥控器。
• 切勿在以下场所搁置或存放遥控器:
−高湿度,例如淋浴附近
−高温度,例如加热器或炉子附近
−极低温度
−多尘的地方
• 切勿让遥控器受到强光照射,尤其
是变频荧光灯。
•
如果电池用久了,则遥控器的有效操作范围
会明显缩小。此时,请尽快更换两节新电池。
• 请勿混用新旧电池。
• 请勿混用不同类型的电池 (例如碱
性电池和锰电池)。因为这些类型不
同的电池的形状和颜色可能相同,
所以请仔细阅读包装上的说明。
• 电量耗尽的电池可能会漏液。如果电
池漏液,请立即丢弃。请勿触摸漏出
的液体,也不要让其接触衣物等。安
装新电池以前,请彻底清洁电池舱。
• 携带时请勿将电池放在装有硬币等
金属物体的口袋或钱包中。
• 请勿将电池与普通家庭垃圾一起丢
弃;请根据当地法规正确丢弃。
• 请将电池远离儿童放置。如果不慎
误吞电池,请立即就医治疗。
• 当打算长时间不使用遥控器时,请
将电池从遥控器内取出。
• 请勿对附带的电池进行充电或拆解。
•
电池不能置于高热环境
,
比如火或直射日光等。
注意:在操作本机之前请阅读此部分。
警告
为了减小火灾或电击的风险,不要将
本机暴露在雨中或放置在潮湿的地方。
只要本机连接在电源插座上,即使
您使用 按钮关闭了本机,机器与
交流电源的连接也没有切断。在这
种状态,本机仅消耗微小电力。
(电源键)
打开本机电源,或将其设定为待机模式。
不能在装有心脏起搏器或去纤颤器
的人员附近 22 cm 以内使用本机。
无线电波可能影响到电子医学设
备。请不要在医学设备附近或在医
疗机构内使用本机。
铭牌位于本机的底部。

1
Zh
目录
附带的物品............................................................................. 2
功能 ........................................................................................ 3
常见问题 ................................................................................ 3
部件名称和功能 (条形音箱 / 超低音扬声器).................... 4
安装 ........................................................................................ 5
连接 ........................................................................................ 6
操作 ........................................................................................ 8
聆听来自 Bluetooth 装置的声音......................................... 10
设置 ...................................................................................... 12
使用电视遥控器对条形音箱进行编程
(电视遥控器学习功能)............................................................................... 12
通过条形音箱发送电视遥控信号 (电视遥控中继器功能)......... 14
设定自动电源待机功能.................................................................................. 14
初始化条形音箱 ................................................................................................ 14
故障排除 .............................................................................. 15
规格 ...................................................................................... 19
关于本手册
注
这表示与本产品的使用及其功能限制有关的注意事项。
提示
这表示为方便使用而提供的补充说明。

2
Zh
附带的物品
确保您收到了以下所有物品。
如何使用遥控器
准备遥控器
使用前撕下保护膜。
遥控器的操作范围
保持在以下所示的操作范围内。
遥控器
条形音箱 (YAS-CU203)
无线超低音扬声器
(NS-WSW41)
光纤缆线 (1.5 m)
安装模板
* 将条形音箱安装在墙壁上时使用
底座 x 2
(用于条形音箱)
电池 x 2
(AAA, R03, UM4)
螺丝 x 2
(用于安装底座)
使用说明书
(本说明书)
遥控传感器
6 m 以内

3
Zh
功能
欣赏由条形音箱和无线超低音扬声器组成的前置环绕声系统带来的强劲逼真的
音效,以及与电视和其他设备的简易安装和连接。
常见问题
以下部分涵盖关于条形音箱的常用功能和常见问题。
•AIR SURROUND XTREME
欣赏 7.1 声道环绕声,创建宽广深厚的声级,仿佛扬声器不仅位于前方,
还位于左右两侧,以及聆听者的身后 (第 9 页)。
• 高级的低音扩展处理
借助 Yamaha 独创的低音增强技术,此系统可用专业的超低音扬声器再现
更加强劲的低音 (第 9 页)。
• Bluetooth® 连接
可轻松播放 Bluetooth 兼容智能手机、平板电脑或计算机上的内容 (第 10
页)。
您可以通过压缩音乐增强器欣赏接近原创的深厚清新的声音。条形音箱也
与 aptX 编解码器兼容,可让您欣赏到更好的来自智能手机的声音。
• HOME THEATER CONTROLLER
通过安装专用控制应用程序 “HOME THEATER CONTROLLER”,可以轻
松操作条形音箱。
• 电视机遥控器学习功能
使用电视机遥控器操作条形音箱 (第 12 页)。
• 电视遥控中继器功能
使电视遥控信号穿过条形音箱。如果所安装的条形音箱阻挡电视机遥控传
感器,电视机遥控器将不工作。此功能提供方便的解决方案 (第 14 页)。
• 语音清晰
能让语音声音 (如对话和解说)变清晰 (第 9 页)。
•UniVolume
当输入或音源切换时,保持一致音量 (第 9 页)。
Q1
是否能使用电视机的遥控器操作条形音箱?在电视机和条形音箱的遥
控器之间切换不方便。
A1
是。您可以通过 “ 电视机遥控器学习 ” 功能 (第 12 页)使用电视机
的遥控器控制条形音箱。
此功能仅适用于 IR (红外线)遥控器。请检查您电视机的遥控器类
型。
Q2
条形音箱安装到电视机前面后,电视机的遥控器不起作用。
A2
如果电视遥控器使用 IR (红外线)信号,设定 “ 电视遥控中继器 ” 功
能传输来自条形音箱的电视遥控信号 (第 14 页)。
如果电视遥控器使用无线电波,请增加电视和条形音箱之间的距离。
Q3
是否可以使语音更加清晰?
A3
是。通过 “ 清晰语音 ” 功能 (第 9 页)可让电影、电视新闻或体育等
节目中的对话更加清晰。

4
Zh
部件名称和功能 (条形音箱 / 超低音扬声器)
条形音箱 (前面板)
A指示灯
指示条形音箱的状态。如果 5 秒钟未执行任何操作,指示灯将自动变暗。有
关指示灯的主要功能,请参阅 “ 操作 ” (第 8 至 9 页)和 “ 与超低音扬声器
的无线连接 ” (第 7 页)。
B遥控传感器
接收条形音箱遥控器的红外线信号 (第 2 页)。
C电视机遥控传感器
在启用电视遥控中继器功能时,接收电视遥控器的红外线信号 (第 14
页)。
DINPUT 键
选择要播放的输入源 (第 8 页)。
EMUTE 键
关闭音频输出。再按此键取消静音 (第 9 页)。
FVOLUME (+/–)键
调节音量 (第 8 页)。
G (电源)键
打开或关闭 (待机)条形音箱 (第 9 页)。
提示
• 当自动电源待机功能启用时,条形音箱可能会自动关闭 (第 14 页)。
H扬声器
条形音箱 (后面板)
ATV 输入插孔
用于通过光纤缆线连接电视机 (第 6 页)。
BBD/DVD 输入插孔
用于通过同轴数字缆线连接 Blu-ray Disc (BD)播放机等播放装置 (第 6
页)。
CANALOG 输入插孔
用于通过 RCA 立体声缆线连接外部装置 (第 7 页)。
D用于电视遥控中继器的 IR 闪烁器
将电视遥控传感器上接收到的电视遥控器信号传输到电视机 (第 14 页)。
超低音扬声器 (后面板)
ASTATUS 指示灯
指示超低音扬声器的状态
(第 9 页)。
BSUBWOOFER PAIRING按钮
用于设置条形音箱和超低音扬声
器之间的无线连接 (第 18 页)。
C插孔

5
Zh
安装
将条形音箱置于平坦的表面,如电视柜上。
将超低音扬声器放到条形音箱外侧。
若要避免墙壁的回声,将超低音扬声器的正面稍微向内。
提示
• 如果难以操作电视,使用电视遥控中继器 (第 14 页)通过条形音
箱传输电视遥控信号。
• 将条形音箱穿过电视底座时,或要改变条形音箱的高度时,用底座
安装螺丝安装附带的底座。
将条形音箱安装在墙壁上
如何在墙壁上安装
1 将安装模板按在墙上,然后标出螺丝孔的位置。
2 从墙上取下安装模板,然后在墙上标记的点位安
装市售的螺丝 (如下图所示)。
3 将条形音箱挂在螺丝上。
注意
• 请勿直接互相堆叠条形音箱 / 超低音扬声器和
BD 播放机或其他装置。这样做可能引起振动,
从而导致故障。
• 请勿在移动超低音扬声器时握住扬声器的正面
部分 (织物部件)。
• 条形音箱内含非磁屏蔽扬声器。请勿在条形音
箱附近放置磁敏感物品 (硬盘驱动器等)。
•
在安装条形音箱之前先连接条形音箱和外部装置
(如电视)可能会更好,具体取决于您的安装环境。
• 请勿将条形音箱放置在离电视机 50 mm 以内。
• 超低音扬声器和条形音箱以无线方式通信。请
勿在超低音扬声器和条形音箱之间放置金属家
具和装置等屏蔽无线信号的物体,因为无线通
信可能会受到负面影响。
•
如果用布或其他物体盖住超低音扬声器,音量会减小。
安装超低音扬声器时,请勿将其藏在厚挂帘等物体之后。
注意
• 若要将条形音箱安装在墙上,所有安装作业必
须由专业施工人员或经销商进行。消费者切勿
尝试自行安装。安装错误或安装不当会造成条
形音箱掉落,导致人员受伤。
• 切勿将条形音箱安装在石膏或胶合板等低强度
材料制成的墙体上。否则可能导致条形音箱掉
落。
• 确保使用能承受安装重量的市售螺丝 (在右侧
步骤 2 中指定)。使用短螺丝、钉子和双面胶
等非指定螺丝固定件,可能会导致条形音箱掉
落。
注意
• 将缆线固定在不会散开的位置。如果您的脚或
手意外绊到散开的缆线,则条形音箱可能掉
落。
• 安装完条形音箱后,请检查其是否牢固固定。
因不当安装造成的任何事故, Yamaha 概不负
责。
胶带或图钉
安装模板 (附带)
螺丝孔
7 至 8.5 mm
3 至 4 mm
4 mm (#8)
20 mm 或更长
安装孔位于条形
音箱后部

6
Zh
连接
电源线
至交流电源插座
条形音箱 (后部)
光纤缆线
同轴数字缆线 (市售)
播放装置 (如 BD 播放机)
机顶盒
OPTICAL OUTPUT
同轴数字音频输出
(橙色)
电视机
提示
如果播放装置有同轴数字音频输出,可以用同
轴数字缆线 (市售)将其连接至条形音箱的
BD/DVD 输入。
连接到电视机 (或其他外部装置)。
提示
• 如果电视机上没有禁用扬声器输出设置,则可以将耳机连接到电视机的耳机插孔来禁用
扬声器输出。有关详情,请参阅电视机使用说明书。
•TV和 BD/DVD 输入插孔支持以下音频信号。
− PCM(双声道)
− Dolby Digital (最多 5.1 声道)
− DTS Digital Surround (最多 5.1 声道)
注意
• 确保开始连接时条形音箱和超低音扬声器的电源线未连接至
交流电源插座。
• 插入缆线插头时切勿用力过大。否则可能损坏缆线插头或端
子。
1 使用光纤缆线 (附带)连接电视机和条形音
箱。
取下光纤缆线的盖帽,然后检查插头的方向。
2 将条形音箱和超低音扬声器的电源线连接至交
流电源插座。
3 按如下所示设置电视机。
• 将电视机音量设定至最小。
• 禁用电视机内置扬声器输出 (如果有此功能)。
HDMI 缆线 (等)
超低音扬声器 (后部)
电源线
至交流电源插座

7
Zh
外部装置 (游戏机)的模拟连接
您可以将游戏机或电视机等没有光纤输出的外部装置连接到条形音箱的
ANALOG 输入插孔。
注
• 确保正确连接左 (L)和右 (R)声道。
• 按遥控器上的 ANALOG 键选择输入源。
与超低音扬声器的无线连接
当条形音箱和超低音扬声器的电源线连接至交流电源插座 (第 6 页)且开启条
形音箱时,条形音箱和超低音扬声器将自动连接。连接完成后,条形音箱上的
SUBWOOFER 指示灯将点亮,条形音箱准备播放。
提示
• 当第一次开启条形音箱时,如果条形音箱上的 SUBWOOFER 指示灯未点亮,请参阅 “ 手动配对条形音箱和
超低音扬声器 ” (第 18 页),并手动连接条形音箱和超低音扬声器。
• 连接后,下一次开启时条形音箱将与相同的超低音扬声器一起运行。
RCA 立体声缆线 (等)
(市售)
游戏机 (等)
超低音扬声器指示灯:点亮

8
Zh
操作
指示灯
前面板上的指示灯闪烁或点亮,表示操作和设置状
态。
在本说明书中,使用一排 9 个指示灯的图示进行说
明。
:熄灭
:点亮
:闪烁
(示例:当 STATUS 指示灯闪烁且 TV 指示灯点亮时)
输入键
选择要播放的输入源。
TV........... 电视音频
BD/DVD ..... 连接到BD/DVD输入插孔的装
置输出的音频
ANALOG .... 连接到 ANALOG 输入插孔的
装置输出的音频
BLUETOOTH
... 从 Bluetooth 连接的装置输出
的音频
所选输入源的指示灯点亮。
(示例:选择电视机时)
提示
• 若要播放与电视机连接的播放装置的音频,或观看播放装置
的视频,请将电视机的输入源设为该播放装置。
• 有关 Bluetooth 连接的详情,请参阅 “ 聆听来自 Bluetooth 装
置的声音 ” (第 10 页)。
SUBWOOFER 键(+/-)
调节超低音扬声器的音量。
VOLUME 键(+/-)
调节条形音箱的音量。
降低音量 (-) 提高音量 (+)
降低音量 (-) 提高音量 (+)
1
2
LEARN 键
★
将条形音箱设为电视遥控器学习模式
(第 12 页)。
REPEATER 键
★
启用 / 禁用电视遥控中继器功能
(第 14 页)。
3
遥控器信号发射器
发出红外线信号。
★:需要按住超过 3 秒的键
BLUETOOTH STANDBY、 SUBWOOFER
PAIRING、 AUDIO DELAY、 LEARN、
REPEATER
★
★
★

9
Zh
(电源)键
打开或关闭 (待机)条形音箱。
条形音箱上的 STATUS 指示灯
超低音扬声器上的 STATUS 指示灯
BLUETOOTH STANDBY 键
★
启用 / 禁用 Bluetooth 待机模式 (第 11 页)。
SUBWOOFER PAIRING 键
★
执行条形音箱和超低音扬声器之间的配对
(第 18 页)。
绿色 (打开)
红色 (Bluetooth 待机)(第 11 页)
熄灭 (关闭)
绿色 (打开)
红色 (关闭)
SURROUND 和 STEREO 键
在环绕声和立体声 (双声道)播放之间
切换。选择环绕声播放时,您可使用
Yamaha 独有的 AIR SURROUND XTREME
欣赏逼真的音效。
提示
• 以环绕声播放双声道立体声信号时, PLII 指示灯将点亮。
点亮 (环绕声播放)
熄灭 (立体声播放)
SURROUND
STEREO
点亮 (Dolby Pro Logic II)
4
5
BASS EXTENSION 键
启用 / 禁用低音扩展功能。启用此功能
后,可以通过 Yamaha 专用的低音增强技术
在环绕音播放期间欣赏强劲的低音。
闪烁 3 次 (已启用),闪烁 1 次 (已禁用)
MUTE 键
关闭音频输出。再按此键取消静音。
闪烁 (静音中)
7
6
CLEAR VOICE 键
启用 / 禁用清晰语音功能。
启用此功能后,您可在观看电影、电视剧、
新闻节目或体育节目时欣赏到清晰的声音。
UNIVOLUME 键
启用 / 禁用 UniVolume 功能。
当此功能启用时,如果输入或音源切换,将
会保持一致的音量。
提示
• 选择 BLUETOOTH 作为输入源时,将自动禁用 UniVolume
功能。
AUDIO DELAY 键
★
当电视上的视频图像相对于声音好像有延迟
时,调节音频延迟使声音和视频同步。
按照下列操作调节音频延迟。
1 按住 AUDIO DELAY 键 3 秒以上。
最左侧的指示灯将闪烁。
2 按 SUBWOOFER (+/–)键调节音频延
迟。
按 SUBWOOFER (+)键将延迟音频输出
时间。
3 若要结束调节,请按 AUDIO DELAY 键。
提示
• 如果 20 秒内未执行任何操作,则调节将自动结束。
闪烁 3 次 (已启用),闪烁 1 次 (已禁用)
闪烁 3 次 (已启用),闪烁 1 次 (已禁用)
(–)(+)
解码器指示
条形音箱支持以下音频信号。您可以通过指示灯的
颜色查看输入音频信号的类型。
绿色 (Dolby Digital),红色 (DTS Digital Surround)
熄灭 (PCM)

10
Zh
聆听来自 Bluetooth 装置的声音
可以从智能手机或数字音乐播放机等 Bluetooth 装置以无线的方式播放。
更多详情,还请参阅 Bluetooth 装置的使用说明书。
Bluetooth 装置与条形音箱配对
首次连接 Bluetooth 装置时,装置与条形音箱之间需要进行 “ 配对 ”。对于使用
的每个 Bluetooth 装置都必须 “ 配对 ”。
一旦完成与装置的 “ 配对 ”,以后与该装置的连接将无需 “ 配对 ”。
1 按条形音箱遥控器上的 BLUETOOTH 键,选择 Bluetooth 作为输入
源。
前面板上的 BLUETOOTH 指示灯将点亮绿色。
2 打开要配对装置的 Bluetooth 功能,执行配对。
操作视装置而异。请参阅装置的使用说明书。
3 在装置上 Bluetooth 装置列表中选择 “YAS-203 Yamaha”。
如果需要密码 (PIN),请输入数字 “0000”。
完成配对时,装置上出现 或完成消息。
注
• 请在彼此相距 10 米范围内执行 Bluetooth 装置与条形音箱的配对。
• 条形音箱最多可以与八个 Bluetooth 装置配对。如果与第九个装置配对,将删除最早的配对信息。
• 如果删除了某装置的配对信息,要再次使用该装置,则需要重新配对。
• 如果已有 Bluetooth 装置连接到条形音箱,请终止 Bluetooth 连接 (第 11 页),然后执行与新装置的配
对。
• 如果无法实现配对,请参阅 “ 故障排除 ” 中的 “Bluetooth” (第 17 页)。
执行以下步骤将 Bluetooth 装置与条形音箱配合使用。
Bluetooth 装置
在条形音箱上播放 Blue tooth 装置的音频
对于首次 Bluetooth 连接
Bluetooth 装置与条形音箱配对
对于随后 Bluetooth 连接
点亮

11
Zh
在条形音箱上播放 Bluetooth 装置的音频
1 在条形音箱打开电源的情况下,按条形音箱遥控器上的
BLUETOOTH 键,选择 Bluetooth 作为输入源。
前面板上的 BLUETOOTH 指示灯将点亮绿色。
2 打开装置的 Bluetooth 功能。
正确建立 Bluetooth 连接后,条形音箱的 BLUETOOTH 指示灯闪烁 3 次。
3 在装置上播放歌曲。
注
• 请在彼此相距 10 米范围内执行装置与条形音箱的 Bluetooth 连接。
• 如果发生连接问题,可能需要再次选择 Bluetooth 装置列表中的 “YAS-203 Yamaha”。可能必须更改输出设
置才能将音频输出到条形音箱,具体取决于您使用的 Bluetooth 装置。
• 根据需要调节 Bluetooth 装置的音量。
• 如果已有 Bluetooth 装置连接到条形音箱,请终止该 Bluetooth 连接,然后建立与新装置的连接。
终止 Bluetooth 连接
在以下情况下, Bluetooth 连接将终止。当条形音箱开启且 B luetooth 连接终止
时, BLUETOOTH 指示灯将闪烁一次。
• 兼容装置上的 Bluetooth 功能关闭。
• 按住条形音箱遥控器上的 BLUETOOTH 键 3 秒以上。
• 条形音箱关闭。
使用 Bluetooth 待机模式
Bluetooth 待机模式支持自动打开 (或关闭)条形音箱,该操作与 Bluetooth
装置操作联动。
1 在条形音箱打开电源的情况下,按住条形音箱遥控器上的
BLUETOOTH STANDBY 键 3 秒以上。
每按住 BLUETOOTH STANDBY 键 3 秒一次,将在启用和禁用之间切换
模式。
启用 Bluetooth 待机模式且条形音箱关闭时, STATUS 指示灯点亮红色。
(Bluetooth 待机)
使用 HOME THEATER CONTROLLER 应用程序
通过将专用的免费应用程序 “HOME THEATER CONTROLLER” 安装到
Bluetooth 装置 (如智能手机),您可以用 Bluetooth 装置轻松便捷地执行各种
操作。
(设置项目:基本操作、声场、声音调节)
有关 “HOME THEATER CONTROLLER” 的详情,请参阅网站上的产品信息。
点亮
闪烁 3 次
启用 Bluetooth 待机模式时 Bluetooth 装置上可用的功能
开机联动功能 (当条形音箱关闭时)
装置上建立 Bluetooth 连接时,将打开条形音箱并准备播放来自该装置的声音。
关机联动功能 (当条形音箱打开时)
终止 Bluetooth 装置上的 Bluetooth 连接时,将关闭条形音箱。(仅当选择
BLUETOOTH 作为输入源时。)
闪烁 3 次 (已启用),闪烁 1 次 (已禁用)
点亮 (红色)

12
Zh
设置
对条形音箱进行编程后,即可使用电视机的遥控器控制其功能,如同时打开 /
关闭电视机和条形音箱,或调高 / 调低条形音箱的音量和使其静音 / 取消静音。
1 关闭电视机。
2 关闭条形音箱。
3 按住条形音箱遥控器上的 LEARN键 3 秒以上,将条形音箱设置为学
习模式。
当条形音箱进入学习模式后,前面板上的指示灯将按如下所示闪烁。
注
• 步骤 4 至 7 仅需要电视遥控器和条形音箱前面板上的按键。不需要条形音箱遥控器。
• 如果条形音箱已经学习了功能,以下指示灯将点亮。
静音:BD/DVD,音量 (-): ANALOG,音量 (+):BLUETOOTH,电源:SURROUND
4 教条形音箱获得电视遥控器的 “ 静音 ” 代码。
4-1 按条形音箱前面板上的 MUTE。
4-2 将电视遥控器对准遥控传感器,同时按住静音键 1 秒以上两次或三次。
5 教条形音箱获得电视遥控器的 “ 音量 (–) ” 代码。
5-1 按条形音箱前面板上的 VOLUME (–)。
5-2 将电视遥控器对准遥控传感器,同时按住音量 (–)键 1 秒以上两次或三
次。
使用电视遥控器对条形音箱进行编程 (电视遥控器
学习功能)
• 此功能仅当电视遥控器使用 IR (红外线)信号时可用。
•RF(射频)遥控器将不起作用。
• 如果想要使用有线或卫星机顶盒的遥控器操作条形音箱,请使用原电视机 IR
(红外线)遥控器对条形音箱进行编程,然后使用机顶盒的遥控器操作。
• 如果改变条形音箱的音量,电视机的音量也改变,请将电视机的音量设定
到最小,或禁用扬声器输出。
测定结果 哔哔声
/
嗡嗡声 指示灯
学习成功 一次
学习失败
* 从步骤 4-1 开
始重复上述操
作。
两次
测定结果 哔哔声
/
嗡嗡声 指示灯
学习成功 一次
学习失败
* 从步骤 5-1 开
始重复上述操
作。
两次
约 30 cm
电视机遥控器
按住
(1 秒以上)
放开
(1 秒以上)
按住
(1 秒以上)
放开
(...)
点亮
闪烁
点亮
闪烁

13
Zh
6 教条形音箱获得电视遥控器的 “ 音量 (+) ” 代码。
6-1 按条形音箱前面板上的 VOLUME (+)。
6-2 将电视遥控器对准遥控传感器,同时按住音量 (+)键 1 秒以上两次或三
次。
7 教条形音箱获得电视遥控器的 “ 电源 ” 代码。
7-1 按条形音箱前面板上的 (电源)。
7-2 将电视遥控器对准遥控传感器,同时按住电源键 1 秒以上两次或三次。
8 若要结束学习模式,请按条形音箱遥控器上的 LEARN 键。
至此即完成所需设置。现在您就可以使用电视遥控器的静音键、音量键或
电源键操作条形音箱了。
提示
• 如果 5 分钟未执行任何操作,学习模式将自动结束。
• 将电视机音量设定至最小。当使用电视遥控器增大条形音箱的音量时,可能会同时增大电视机音量。
在这种情况下,请按照 “ 连接 ” (第 6 页)中的步骤 3 更改电视机设置。
• 您可以按条形音箱遥控器上的 (电源)键来结束学习模式。
清除所有编程功能
1 条形音箱关闭时,按住条形音箱遥控器上的 LEARN 键 3 秒以上(进
入学习模式)。
当条形音箱进入学习模式后,前面板上的指示灯将按如下所示闪烁。
2 按住条形音箱前面板上的 INPUT 3 秒以上。
清除完成时,您将听到三声提示音。
3 按条形音箱遥控器上的 LEARN 键。
测定结果 哔哔声
/
嗡嗡声 指示灯
学习成功 一次
学习失败
* 从步骤 6-1 开
始重复上述操
作。
两次
测定结果 哔哔声
/
嗡嗡声 指示灯
学习成功 一次
学习失败
* 从步骤 7-1 开
始重复上述操
作。
两次
点亮
闪烁
点亮
闪烁
红灯闪烁 (已清除)

14
Zh
当启用电视遥控中继器功能时,条形音箱将前传感器接收到的电视遥控信号传
达到后发射器。将条形音箱置于电视机前且无法使用电视机的遥控器操作电视
机时,应启用此功能。
1 打开条形音箱。
2 按住条形音箱遥控器上的REPEATER键3秒以上,启用/禁用电视遥
控中继器功能。
至此即完成所需设置。启用电视遥控中继器功能后,即可使用电视机遥控
器,通过条形音箱操作电视机。
提示
• 电视遥控中继器功能默认设置为禁用。
• 如果条形音箱电源线连至交流电源插座,并启用了电视遥控中继器功能,则即使在条形音箱关闭时,
此功能也可用。
• 如果已让条形音箱学习了音量 (+)操作 (第 13 页),则在使用电视机遥控器调高条形音箱的音量
时,可能会同时调高电视机的音量。在这种情况下,请按照 “ 连接 ” (第 6 页)中的步骤 3 更改电视
机设置。
• 打开条形音箱时,您可通过 SURROUND 指示灯查看电视遥控中继器功能的状态。
通过启用自动电源待机功能,可以避免使用后或观看电视时睡着后忘记关闭条
形音箱。
注
• 当启用自动电源待机功能且满足以下条件之一时,条形音箱将自动关闭。
−8小时未操作
− 当选择 BLUETOOTH 作为输入源时 20 分钟没有音频输入且没有操作。
1 条形音箱关闭时,按住条形音箱遥控器上的 MUTE 键 3 秒以上启用 /
禁用自动电源待机功能。
打开条形音箱时,您可通过电视指示灯查看自动电源待机功能的状态。
提示
• 初始设定因国家或地区而异。
− 英国和欧洲机型:启用
− 其他机型:禁用
按照下列步骤初始化条形音箱。
1 关闭条形音箱。
2 按住条形音箱前面板上的 (电源) 3 秒以上。
通过条形音箱发送电视遥控信号 (电视遥控中继器
功能)
此功能仅当电视机遥控器使用红外线信号时可用。
用于电视遥控中继器的 IR 闪烁器
电视机遥控传感器
电视机遥控器
闪烁 3 次 (已启用),闪烁 1 次 (已禁用)
熄灭 (已启用),点亮 (已禁用)
设定自动电源待机功能
初始化条形音箱
熄灭 (已启用),点亮 (已禁用)
闪烁 (初始化完成)

15
Zh
故障排除
当条形音箱工作不正常时,请参阅下表。如果您遇到的问题没有列在下面,或
下面给出的指导不起作用,请关闭条形音箱,断开电源线,并联络距离您最近
的 Yamaha 授权的经销商或服务中心。
首先,请检查以下内容:
A 条形音箱、超低音扬声器、电视机和播放装置 (如 BD 播放机)的电源线是
否已牢固连接至交流电源插座。
B 是否已打开条形音箱、电视机和播放装置 (如 BD 播放机)。
C 每条缆线的接头是否已牢固地插入每台装置的插孔中。
电源和系统
音频
问题 原因 解决措施
电源突然关闭。
自动电源待机功能工作。
当启用自动电源待机功能且满足以
下条件之一时,条形音箱将自动关
闭。
-8小时未操作
- 当选择 BLUETOOTH 作为输入
源时 20 分钟没有音频输入且没
有操作。
再次打开条形音箱。若要使条形音箱停
止自动关闭,请禁用自动电源待机功能
(第 14 页)。
已激活了保护电路。(条形音箱前
面板上的 STATUS 指示灯闪烁。)
确认所有连接正确建立后,重新打开条
形音箱。如果电源仍然突然关闭或无法
打开,请从交流电源插座中拔出电源线
插头,然后联络距离您最近的 Yamaha
授权的经销商或服务中心。
当 Bluetooth 待机模式启用时,
Bluetooth 设备上的 Bluetooth 连
接终止。
禁用 Bluetooth 待机模式
(第 11 页)。
无法打开电源。
已连续三次激活了保护电路。(如
果这种情况下仍试图打开电源,条
形音箱前面板上的 STATUS 指示
灯将闪烁。)
出于保护产品的目的,您将无法打开电
源。请从交流电源插座中拔出电源线插
头,然后联络距离您最近的 Yamaha
授权的经销商或服务中心。
条形音箱没有正确
反应。
内部微电脑因外部电击 (例如闪
电或过量静电)或电源电压较低而
突然停止工作。
按住条形音箱前面板上的 (电源)
10 秒以上以重新启动。(如果问题仍
然存在,请将电源线从交流电源插座中
断开,然后重新插入。)
条形音箱自动操
作。
附近有人在操作其他 Bluetooth 装
置。
终止条形音箱的 Bluetooth 连接
(第 11 页)。
电视机的 3D 眼镜
没有效果。
条形音箱阻挡了电视机的 3D 眼镜
发射器。
检查电视机 3D 眼镜发射器的位置,然
后调节条形音箱的位置。拆下条形音箱
的底座 (如有安装)(第 5 页)。
问题 原因 解决措施
无声音。
选择了其他输入源。 请选择合适的输入源 (第 8 页)。
启用了静音功能。 取消静音功能 (第 9 页)。
音量太小。 调高音量 (第 8 页)。
条形音箱和超低音扬声器的电源线
连接不正确。
确保条形音箱和超低音扬声器的电源线
已牢固连接至交流电源插座
(第 6 页)。
超低音扬声器没有
声音。(条形音箱
前面板上的
SUBWOOFER 指
示灯闪烁。)
超低音扬声器未连接至交流电源插
座。(超低音扬声器上的 STATUS
指示灯未点亮。)
将超低音扬声器的电源线插入交流电源
插座。
由于无线通信状态不佳,未连接条
形音箱和超低音扬声器。(超低音
扬声器上的 STATUS 指示灯红灯
继续点亮或绿灯闪烁。)
将超低音扬声器移到距条形音箱更近的
地方。如果情形没有改善,将超低音扬
声器移到通信更佳的位置。
如果有金属或其他物体阻碍了条形音箱
和超低音扬声器之间的通信,更改条形
音箱和超低音扬声器的位置,或更改超
低音扬声器的安装位置。
如果存在发射射频信号的装置 (微波
炉、无线 LAN 等),将条形音箱和超
低音扬声器远离这些装置。
条形音箱和超低音扬声器未配对。
(超低音扬声器上的 STATUS 指
示灯闪烁或红灯点亮。)
执行条形音箱和超低音扬声器之间的配
对(第18 页)。
如果执行配对后条形音箱上的
SUBWOOFER 指示灯仍然未绿色点
亮,可能出现故障。请从交流电源插座
中拔出电源线插头,然后联络距离您最
近的 Yamaha 授权的经销商或服务中
心。
已激活了超低音扬声器的保护电
路。(超低音扬声器上的 STATUS
指示灯橙色点亮。)
出于保护产品的目的,无法打开超低音
扬声器的电源。请从交流电源插座中拔
出电源线插头,然后联络距离您最近的
Yamaha 授权的经销商或服务中心。
超低音扬声器的声
音中断。(当声音
被中断时,条形音
箱上的
SUBWOOFER 指
示灯闪烁。)
由于无线通信状态不佳,条形音箱
和超低音扬声器之间的连接断开。
(当声音被中断时,超低音扬声器
上的 STATUS 指示灯绿色闪烁。)
将超低音扬声器移到距条形音箱更近的
地方。如果情形没有改善,将超低音扬
声器移到通信更佳的位置。
如果有金属或其他物体阻碍了条形音箱
和超低音扬声器之间的通信,更改条形
音箱和超低音扬声器的位置,或更改超
低音扬声器的安装位置。
如果存在发射射频信号的装置 (微波
炉、无线 LAN 等),将条形音箱和超
低音扬声器远离这些装置。

16
Zh
遥控器
超低音扬声器不发
音或声音小。(条
形音箱上的
SUBWOOFER 指
示灯点亮。)
音量太小。 调高超低音扬声器的音量 (第 8 页)。
超低音扬声器的正面被挡。 清理超低音扬声器正面和插孔周围的区
域。
播放源不包含低频信号。 播放含低频信号的音源,并确认超低音
扬声器输出声音。
已激活了超低音扬声器的保护电
路。(超低音扬声器上的 STATUS
指示灯橙色点亮。)
出于保护产品的目的,无法打开超低音
扬声器的电源。请从交流电源插座中拔
出电源线插头,然后联络距离您最近的
Yamaha 授权的经销商或服务中心。
打开条形音箱时,
音量降低。
自动音量调节功能工作。为了防止
音量过大,在打开条形音箱时,条
形音箱会自动将其音量控制在特定
音量范围内。
请根据需要调高音量 (第 8 页)。
无环绕声效果。
选择了立体声播放。 选择环绕声播放 (第 9 页)。
音量太小。 调高音量 (第 8 页)。
电视机或播放装置设为仅输出双声
道音频 (如 PCM)。
将电视机或播放装置上的数字音频输出
设置更改为 Dolby Digital 或
BitStream。
音频从电视机内置扬声器输出。 将电视机音量设定至最小 (第 6 页)。
播放源不包含环绕音频。 播放以环绕音录制音频的音源。
可听见噪音。
条形音箱离另一个数字或高频装置
太近。
将这些装置从条形音箱旁移走。
问题 原因 解决措施
使用遥控器无法控
制条形音箱。
条形音箱不在操作范围内。 请在操作范围内使用遥控器
(第 2 页)。
电池电力微弱。 更换新电池 (第 2 页)。
条形音箱的遥控传感器暴露在直射
阳光或强光下。
调节光线角度或重新摆放条形音箱。
使用电视机遥控器
无法控制电视机。
条形音箱阻挡了电视机的遥控传感
器。
请使用电视遥控中继器功能
(第 14 页)或拆下条形音箱的底座
(如有安装),使电视机的遥控传感器
不再被挡 (第 5 页)。
使用电视遥控中继
器功能无法控制电
视。
禁用了电视遥控中继器功能。 启用电视遥控中继器功能
(第 14 页)。
电视机遥控器不是使用红外线信
号。(某些遥控器即使是使用红外
线信号,也可能无法工作。)
在此情况下无法使用电视遥控中继器功
能。调整条形音箱的位置,使电视机的
遥控传感器不会被条形音箱阻挡,并且
使用电视机遥控器操作电视机。
条形音箱和电视机之间离得太近或
太远。
将条形音箱远离电视 50 mm 以上
(第 5 页)。
如有必要,安装或拆下条形音箱的底座
以调节位于电视机遥控传感器前方的条
形音箱的 IR 闪烁器 (用于电视遥控中
继器)的高度 (第 5 页)。
条形音箱和电视机之间有障碍物
(如缆线)。
移除条形音箱与电视机之间的障碍物。
由于来自电视机遥控器和条形音箱
的 IR 闪烁器 (用于电视遥控中继
器)的信号干扰,因此电视机遥控
信号接收不良。
禁用电视遥控中继器功能
(第 14 页)。
条形音箱未学习电
视机遥控器操作。
按住电视机遥控器键的时间太短。 按住相应的键 1 秒以上两次或三次
(第 12 页)。
电视机遥控器不是使用红外线信
号。(某些遥控器即使是使用红外
线信号,也可能无法工作。)
在此情况下,无法使用电视机遥控器学
习功能。使用条形音箱的遥控器操作条
形音箱。
操作电视机遥控器的位置不正确。 在正确的位置操作电视机遥控器
(第 12 页)。
电视机遥控器的电池电力微弱。 更换新电池。
条形音箱的遥控传感器暴露在直射
阳光或强光下。
调节光线角度或重新摆放条形音箱。
电视屏幕光线干扰了遥控器信号的
发射。
关闭电视,然后再次执行学习操作
(第 12 页)。

17
Zh
Bluetooth
使用电视机遥控器
调高条形音箱音量
时,声音从电视机
输出。
(使用电视机遥控
器学习功能时)
电视机上启用了音频输出。 将电视机设置更改为禁用电视机扬声器
输出。如果电视机没有禁用扬声器输出
的设置,请尝试下列方法。
- 将耳机连接到电视机的耳机插孔。
- 将电视机音量设定至最小。
条形音箱电源与电
视机电源的切换方
向相反。(例如,
如果打开条形音
箱,则会关闭电视
机。)
(使用电视机遥控
器学习功能时)
电视机的电源在执行学习操作时是
打开的。
分别按电视机的电源键和条形音箱前面
板上的 (电源)打开电源,然后按电
视遥控器上的电源键关闭电源。
问题 原因 解决措施
条形音箱无法与
Bluetooth 装置配
对。
未选择 Bluetooth 作为输入源。 选择 Bluetooth 作为输入源。
装置不支持 A2DP。与支持A2DP 的装置执行配对操作。
要与条形音箱配对的 Bluetooth 适
配器等的密码不是 “0000”。
使用密码为 “0000” 的 Bluetoo th 适配
器等。
条形音箱和装置离得太远。 将装置移到距条形音箱更近的地方。
附近有装置 (微波炉、无线 LAN
等)输出 2.4 GHz 频带的信号。
将条形音箱远离正在发射射频信号的装
置。
连接了其他 Bluetooth 装置。 终止当前 Bluetooth 连接,然后执行与
新装置的配对。
无法建立
Bluetooth 连接。
连接了其他 Bluetooth 装置。 条形音箱无法建立多个 Bluetooth 连
接。终止当前 Bluetooth 连接,然后为
所需装置建立连接。
与九个以上装置配对,并且最早的
配对信息已删除。
重新执行配对。条形音箱可以最多保留
八个装置的配对信息。与第九个装置配
对时,将删除最早的配对信息。
播放过程中没有声
音或声音受到干
扰。
条形音箱与装置的 Bluetooth 连接
已断开。
再次执行 Bluetooth 连接操作
(第 10 页)。
未选择 Bluetooth 作为输入源。 选择 Bluetooth 作为输入源。
条形音箱和装置离得太远。 将装置移到距条形音箱更近的地方。
附近有装置 (微波炉、无线 LAN
等)输出 2.4 GHz 频带的信号。
将条形音箱和超低音扬声器远离正在发
射射频信号的装置。
该装置未设置为发送 Bluetooth 音
频信号到条形音箱。
更改装置上的音频输出设置和连接设
置。
该装置未在播放。 在装置上进行播放。
装置的音量设置至最小。 调高音量。

18
Zh
手动配对条形音箱和超低音扬声器
1 在条形音箱打开电源的情况下,按住条形音箱遥控器上的
SUBWOOFER PAIRING 键 3 秒以上。
条形音箱前面板上的 SUBWOOFER 指示灯快速闪烁。
2 在 30 秒内,用束发夹等锥形物体按超低音扬声器后面板上的
SUBWOOFER PAIRING 按钮 3 秒以上。
超低音扬声器后面板上的 STATUS 指示灯以绿色快速闪烁。
配对完成且连接了条形音箱和超低音扬声器时,条形音箱前面板上的
SUBWOOFER 指示灯点亮。
即使在执行上述操作后,条形音箱上的 SUBWOOFER 指示灯未点亮,请
参阅 “ 故障排除 ” (第 15 页)。
提示
•“配对 ” 是条形音箱和超低音扬声器决定设备连接到何处的操作。

19
Zh
规格
* 规格若有变更,恕不另行通知。
项目
条形音箱
(YAS-CU203)
超低音扬声器
(NS-WSW41)
放大器部分 最大额定输出功率 前置左 / 右 50 W x 2 声道 动态功率 100 W
扬声器部分
类型 声悬浮型 (非磁屏蔽型)
Advanced Yamaha
Active Servo Technology
(磁屏蔽型)
驱动单元 5.5 cm 锥形 x 2 16 cm 锥形
频率响应 150 Hz 至 22 kHz 35 Hz 至 150 Hz
阻抗
6 Ω 5.5 Ω
解码器
支持的音频信号
(TV, BD/DVD)
PCM (双声道)
Dolby Digital
DTS Digital Surround
--
输入插孔
数字 (光纤) 1 (TV)
--
数字 (同轴) 1 (BD/DVD)
--
模拟 (RCA) 1 (ANALOG)
--
无线超低音
扬声器
频带
2.4 GHz
发射范围 10 m (无干扰)
Bluetooth
Bluetooth 版本
Ver.2.1+EDR --
支持的协议 A2DP, SPP
--
支持的编解码器 SBC, aptX
--
无线输出
Bluetooth Class 2 --
最长通讯距离 10 m (无障碍物)
--
支持的内容保护方法
SCMS-T --
一般
电源
美国和加拿大型号:
AC 120 V, 60 Hz
台湾型号:
AC 110-120 V,50/60 Hz
中国型号:
AC 220 V, 50 Hz
其他型号:
AC 220-240 V,50/60 Hz
美国和加拿大型号:
AC 120 V, 60 Hz
英国和欧洲型号:
AC 230 V, 50 Hz
台湾型号:
AC 110 V, 60 Hz
韩国型号:
AC 220 V, 60 Hz
中国型号:
AC 220 V, 50 Hz
澳洲型号:
AC 240 V, 50 Hz
亚洲型号:
AC 220-240 V,50/60 Hz
功耗
26 W 45 W
待机功耗
0.4 W
美国和加拿大型号:
1.4 W
英国和欧洲型号:1.5 W
韩国和台湾型号:1.2 W
中国型号:1.3 W
澳洲和亚洲型号:1.7 W
Bluetooth 待机功耗
0.5 W --
尺寸
(宽 x 高 x 深)
886 x 79 x 121 mm
(默认状态不包括底座)
290 x 292 x 316 mm
886 x 94 x 121 mm
(包括底座)
不含扬声器突出物的
厚度 (最薄部分)
65 mm --
重量
2.9 kg 8.1 kg

20
Zh
本系统采用了 Yamaha 的 AIR SURROUND XTREME 虚拟声技术,使用条形音箱和超低音扬声器实现了出
色定位的高等级 7.1 声道环绕音。
本系统的超低音扬声器采用 Yamaha 专用的低音控制技术 “Advanced Yamaha Active Servo Technology II”,
且达到了高品质的低频声音回放。
“UniVolume” 是 Yamaha Corporation 的商标。
Bluetooth 是 Bluetooth SIG 的注册商标,依照许可协议被 Yamaha 使用。
经 Dolby Laboratories 授权生产。 Dolby、 Pro Logic 和双 D 标识均为 Dolby Laboratories 的商标。
关于 DTS 专利,请参阅 http://patents.dts.com。由 DTS Licensing Limited 授权制造。
DTS、符号以及 DTS 加符号是注册商标, DTS Digital Surround 是 DTS, Inc. 的商标。 © DTS, Inc. 保留所有
权利。
© 2013 CSR plc 和其集团公司。
aptX
®
标志和 aptX 标识是 CSR plc 或其集团公司之一的商标,可能在一个或多个管辖区域中注册。
“Blu-ray Disc™”、 “Blu-ray™” 和标识是 Blu-ray Disc Association 的商标。
Bluetooth
• Bluetooth 是在一定区域 (约 10 米)内的设备之间,采用 2.4 GHz 频带,进
行无线通信的一项技术,此频带使用无需许可。
处理 Bluetooth 通信
• Bluetooth 兼容装置使用的 2.4 GHz 频带是由许多类型的设备共享的无线电频
带。当 Bluetooth 兼容装置使用某种技术,来降低使用相同无线电频带的其他
装置的影响时,这种影响可能会降低通信速度或缩短通信距离,有时候会干
扰通信。
• 根据通信装置之间的距离、存在的障碍物、无线电波状态和设备类型而定,
信号传输速度和可通信距离会有不同。
• Yamaha 不保证本机与兼容 B luetooth 功能的装置之间的所有无线连接。

21
Zh
○:表示该有毒有害物质在该部件所有均质材料中的含量均在 SJ/T11363-2006
标准规定的限量要求以下。
×:表示该有毒有害物质至少在该部件的某一均质材料中的含量超出
SJ/T11363-2006 标准规定的限量要求。
无线低音炮
■ 使用频率:2400 - 2483.5 MHz
■ 等效全向辐射功率 (EIRP):≤ 10 mW
■ 频率容限:±75 kHz
Bluetooth
■ 使用频率:2.4 - 2.4835 GHz
■ 等效全向辐射功率 (EIRP):≤ 20 dBm
■ 最大功率谱密度:≤ 20 dBm / MHz (EIRP)
■ 载频容限:20 ppm
■ 帯外发射功率 (在 2.4 - 2.4835GHz 頻段以外) ≤ -80 dBm / Hz (EIRP)
■ 杂散发射 (辐射)功率 (对应载波 ±2.5 倍信道带宽以外):
≤ -36 dBm / 100 kHz (30 - 1000 MHz)
≤ -33 dBm / 100 kHz (2.4 - 2.4835 GHz)
≤ -40 dBm / 1 MHz (3.4 - 3.53 GHz)
≤ -40 dBm / 1 MHz (5.725 - 5.85 GHz)
≤ -30 dBm / 1 MHz (其它 1 - 12.75 GHz)
• 不得擅自更改发射频率、加大发射功率 (包括额外加装射频功率放大器),
不得擅自外接天线或改用其它发射天线;
• 使用时不得对各种合法的无线电通信业务产生有害干扰;一旦发现有干扰
现象时,应立即停止使用,并采取措施消除干扰后方可继续使用;
• 使用微功率无线电设备,必须忍受各种无线电业务的干扰或工业、科学及
医疗应用设备的辐射干扰;
• 不得在飞机和机场附近使用。
部件名称
有毒有害物质或元素
铅 (pb) 汞 (Hg) 镉 (Cd)
六价铬
(Cr(VI))
多溴联苯
(PBB)
多溴二苯醚
(PBDE)
电路板 × ○ ○ ○ ○ ○
外壳箱体 × ○ ○ ○ ○ ○
扬声器单元 × ○ ○ ○ ○ ○
该标记附加在出售到中华人民共和国的电子信息产品上。
环形中的数字表示的是环境保护使用期限的年数。
10

© 2014 Yamaha Corporation Printed in Indonesia ZM98620
-
 1
1
-
 2
2
-
 3
3
-
 4
4
-
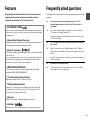 5
5
-
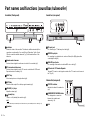 6
6
-
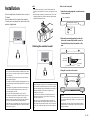 7
7
-
 8
8
-
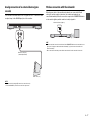 9
9
-
 10
10
-
 11
11
-
 12
12
-
 13
13
-
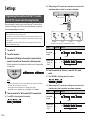 14
14
-
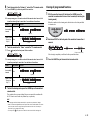 15
15
-
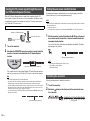 16
16
-
 17
17
-
 18
18
-
 19
19
-
 20
20
-
 21
21
-
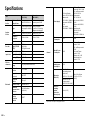 22
22
-
 23
23
-
 24
24
-
 25
25
-
 26
26
-
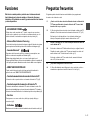 27
27
-
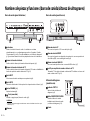 28
28
-
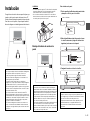 29
29
-
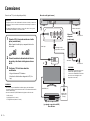 30
30
-
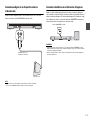 31
31
-
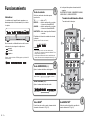 32
32
-
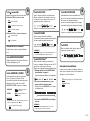 33
33
-
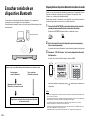 34
34
-
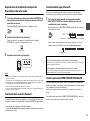 35
35
-
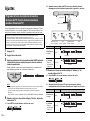 36
36
-
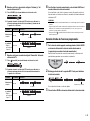 37
37
-
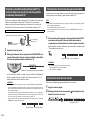 38
38
-
 39
39
-
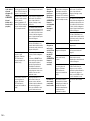 40
40
-
 41
41
-
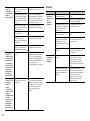 42
42
-
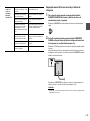 43
43
-
 44
44
-
 45
45
-
 46
46
-
 47
47
-
 48
48
-
 49
49
-
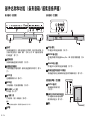 50
50
-
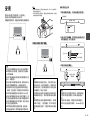 51
51
-
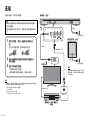 52
52
-
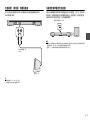 53
53
-
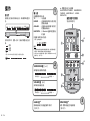 54
54
-
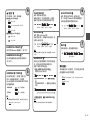 55
55
-
 56
56
-
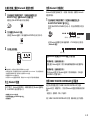 57
57
-
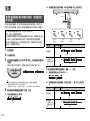 58
58
-
 59
59
-
 60
60
-
 61
61
-
 62
62
-
 63
63
-
 64
64
-
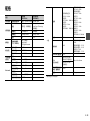 65
65
-
 66
66
-
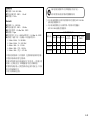 67
67
-
 68
68


en otros idiomas
- English: Yamaha YAS-203 Owner's manual
Artículos relacionados
-
Yamaha YAS-105 El manual del propietario
-
-
Yamaha SRT-700 El manual del propietario
-
Yamaha YAS-93 El manual del propietario
-
-
-
-
-
-
Yamaha YAS-101 El manual del propietario