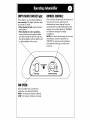
Whirlpool AD50LJ2 El manual del propietario
- Tipo
- El manual del propietario

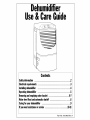
Dehumidifier
Use&CareGuide
Contents
Safetyinformation ...
ElectTicalrequirements......
Installingdehumidifier.........
0peratJngdehumidifier........................
Removingandemptyingwaterbucket.............
Waterlevelfloatandautomaticshutoff............
Caringforyourdehumidifier......................
lllllllllllllllllllll
lllllllllllllll
lllllllllllllll
i.. llll B2
ill lllll3
lllll4
llll d_
.... 6-7
lllll8
lllll9
Ifyouneedassistanceorservice...................... 10-11
Part No. 1183900 Rev.A

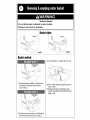
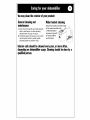
Your safety and the safety of others
are very important•
We have provided many important safety messages in this manual and on
your appliance. Always read and obey all safety messages.
This is the safety alert symbol.
This symbol alerts you to potential hazards that can kill or hurt you
and others.
All safety messages will follow the safety alert symbol and either the word
"DANGER" or '"WARNING." These words mean:
You can be killed or seriously injured if you don't immediately follow
instructions.
You can be killed or seriously injured if you don't follow instructions.
All safety messages will tell you what the potential hazard is, tell you how to
reduce the chance of injury, and tell you what can happen if the instructions
are not followed.
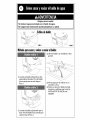
IMPORTANT SAFETY INSTRUCTIONS
WARNING --To reduce the risk of fire, electrical shock, injury or
sickness when using your dehumidifier, follow these basic precautions:
• Plug into a grounded 3 prong
outlet.
• Do not remove ground prong.
• Do not use an adapter.
• Do not use an extension cord.
• Unplug dehumidifier before
servicing.
• Do not drink water collected in the
water bucket.
-- SAVE THESE INSTRUCTIONS --
It is your responsibility to:
• Install the dehumidifier according to the Installation Instructions.
• Connect the dehumidifier only to the proper kind of outlet, with the correct
electrical supply and ground. See "Electrical requirements," page 3.

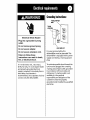
Electrical Shock Hazard
Plug into a grounded 3 prong
outlet.
Do not remove ground prong.
Do not use an adapter.
Do not use an extension cord.
Failure to follow these
instructions can result in death,
fire, or electrical shock.
A 115-volt (103.5 min., 126.5 max.),
60-Hz, AC-only, 15- or 20-ampere fused
and properly grounded electrical
supply is required. A time-delay fuse or
time-delay circuit breaker is
recommended. Use a separate circuit to
connect only the dehumidifier.
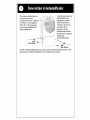
Groundinginstruclions:
3,,_ongground-type
o_tlet ".,.,....,...
3-pr0ng
groundplug
\
powersupplycord
For your personal safety, this
dehumidifier must be grounded.This
dehumidifier is equipped with a power
supply cord having a 3-prong ground
plug.
To minimize possible shock hazard, the
cord must be plugged into a mating
3-prong ground-type outlet, grounded
in accordance with local codes and
ordinances. If a mating outlet is not
available, it is the personal
responsibility and obligation of the
customer to have the properly
grounded outlet installed by a qualified
electrician.

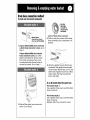
Good air circulation is needed
for best performance--allow
at least 12-18 inches (30.5 -
45.7 cm) of air space on all
sides of the dehumidifier.
Keep all outside doors,
windows and other
openings closed when
operating dehumidifier.
Humid outdoor air will
increase dehumidifier
workload.
(30.5-45.7cm)
(30.5-45.7cm)
Install dehumidifier on a level floor strong enough to support the
dehumidifier with a full bucket of water.

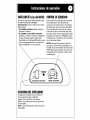
EMPTY/ADJUSTBUCKETlight:
If this light is on, the dehumidifier is
not running. This light indicates that
you need to check:
• If the bucket is full, empty bucket
and replace.
• If the bucket is not in position,
remove bucket and replace. Make
sure the bucket fits all the way into
the dehumidifier and the light isoff,
DRYNESSCONTROL:
This controls the amount of moisture in
the room.Turn th_ control knob
clockwise for more drying.Turn the
control knob counterclockwise for less
drying.Turn control knob to "NORMAL"
to maintain average humidity
conditions.
NOTE: Forthe first few days of use,turn
the Dryness Control clockwise to
"DRYEST"toremove extra moisture
from the furnishings aswell asthe
room air.
FANSPEED:
Some models:this controls fan
operation. Use desired setting.
HIGH - for faster moisture removal.
LOW- for slower moisture removal.

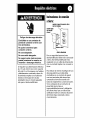
Sickness Hazard
Do not drink water collected in water bucket.
Doing so can result in sickness.
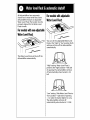
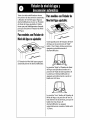
Bucketstyles:
_/style 1
Bucketmethod:
2. Carry bucket to a large sink or tub.
f
1. Use both side handles to lift bucket.
Pull bucket forward and remove.
Go to Step 2.
J
J
1. Lift bucket from bottom. Pull bucket
forward and remove.Go to Step 2.
3. Pour water through opening into a
sinkor tub.
4. Replace bucket completely and
check that EMPTYIADJUST BUCKET
light is off.

Drainhoseconnedionmethod:
(to drainwaterfrombucketcontinuously)
1. If your dehumidifier does not have
a drain hose connector cover, go to
Step 2.
If your dehumidifier has a drain
hose connector cover, use a flat-
blade screwdriver to remove cover
from drain connector.Turn cover
counterclockwise. Discard cover. It
cannot be reused. Go to Step 2.
.Do Not
"" domage
outside or
connection
will leak.
center of drain hose connector
2. Drill out only the center of the drain
hose connector. Use a minimum I/4"
drill bit.
3. Attach a garden hose to drain hose
connector.The garden hose should
not be longer than 8 feet (2.4 m). Run
other end of garden hose into a floor
drain. Check that the hose lies flat
and in the drain.
Tousethebucketwithoutthegardenhose:
For bucket style 1:
Use agarden hose cap to seal the drain
hose connector.
1. Slide offthe drain hose connector
cover. Go to Step 2.
For bucket style 2:
Use agarden hose cap to seal the drain
hose connector.
Replace drain hose connector cover.

Alldehumidifiershaveautomatic
shutoffandawaterlevelfloat.Some
dehumidifiersfeatureanadjustable
WaterLevelFloat.Thebucketmustbe
properlyalignedfortheWaterLevel
Floattowork.
Formodelswithnon-adjustable
WaterLevelFloat
The Water Level Float will shut offthe
dehumidifier automatically.
Formodelswithadjustable
WaterLevelFloat:
You can set the adjustable Water Level
Float at the "high" or "low" position. Both
settings will turn off the dehumidifier
automatically.
"High" setting: Water Level Float is
preset to the "high" position--left side
of opening.The dehumidifier will shut
off automatically when bucket is 3/4
full.
"Low" setting: Slide Water Level Float to
"low" position--right side of opening
-- to make the bucket lighter to carry.
The dehumidifier will shut off
automatically when bucket is I/2 full.

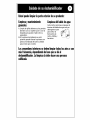
Youmaycleantheexteriorofyourproduct:
Generalcleaningand
maintenance
I. Dust the front grille and side panels
with a soft brush or the dusting
attachment of your vacuum.
2. If cabinet paint chips, you can touch
up the paint with a good grade
enamel paint to prevent rust.
Waterbucketcleaning
Every few weeks, rinse the inside
of the water bucket with__
a mild detergent _:_/ _\
to prevent growth /_/ _
of mold, mildew /_ _'_
and bacteria.
Interiorcoilsshouldbecleanedeveryyear,ormoreoften,
dependingondehumidifierusage.Cleaningshouldbedonebya
qualifiedperson.

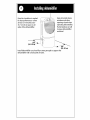
If youneedserviceorcallwithaquestion,havethisinformationready:
Model number
Serial number
Purchase date
Phone number
Store
Model and serial numbers are located on the wall behind the water bucket.
1.Beforecallingfor
assistance...
Performance problems often result
from little things you can find and fix
yourself without tools of any kind.
Dehumidifier will not run:
• Is unit plugged into a live circuit with
proper voltage?
• Is unit turned on?
• Is water bucket installed properly?
• Does water bucket need emptying?
• Has a house fuse blown or circuit
breaker tripped?
Unit runs but does not dehumidify:
• Is unit in defrost cycle? (Provided on
some models.)
Normal operating sounds:
When your dehumidifier is operating
normally, you will hear sounds such as:
• Compressor sounds--the compressor
can be loud.This is normal.
•"Clicking"sounds--can be heard when
the unit or compressor turns off and
on, and when the Automatic Shutoff
Switch is working.
• Air movement from the fan.
Normal operating conditions:
• Unit will put out heat.
2.Ifyouneedassistancein
theU.S.A....
Call your local dealer or the Whirlpool
Consumer Assistance Center toll-free
at 1-800-253-I 301. When requesting
assistance, please provide model
number, serial number, date of
purchase, and acomplete description
of the problem.This information is
needed to better respond to your
request.
If you need further assistance, you can
write to:
Consumer Assistance Center
clo Correspondence Dept.
2000 North M-63
Benton Harbor, M149022-2692
Please include a daytime phone
number in your correspondence.

3.Ifyouneedassistanceor
serviceinCanada...
Contact the dealer from whom you
purchased your appliance, or call the
Consumer Assistance Centre toll free,
8:30 a.m. - 6:00 p.m. (EST),
at 1-800-461-5681.
OR
Contact your nearest direct service
branch or authorized servicing outlet
to service your appliance. (See list
below.)
NOTE:When asking for help or
service:
Pleaseprovide a detailed description
of the problem, your appliance's
complete model and serial numbers,
and the purchase date.This
information will help us respond
properly to your request.
Direct service branches:
BRITISH
COLUMBIA 1-800-665-6788
ALBERTA 1-800-661-6291
ONTARIO
Ottawa area 1-800-267-3456
(except 807 area code)
Outsidethe Ottawaarea 1-800-807-6777
MANITOBA,
SASKATCHEWAN
and807areacodein
ONTARIO 1-800-665-1683
QUEBEC Montreal
(except South Shore) 1-800-361-3032
SouthShoreMontreal 1-800-361-0950
QuebecCity 1-800-361-1523
Sherbrooke 1-800-567-6966
ATLANTIC
PROVINCES 1-800-565-1598
If you need further assistance, you can
write to:
Consumer Relations Department
Inglis Limited
1901 Minnesota Court
Mississauga, Ontario LSN 3A7
Pleaseinclude a daytime phone
number in your correspondence.

PaR NO.1183900 Rev. A 2/02
©2002 All rights reserved Printed in U,SA.

deusoy
cuidadodel
deshumidificador
Contenido
Informaci6ndeseguridad....................
Requisitosel_ctricos.............
C6moinstalareldeshumidificador...
Instruccionesdeoperaci6n........
C6mosacaryvaciarelbaldedeagua...........
Flotadordeniveldelaguaydesconexi6nautom,_tica.
lllllllllll
lllllllllll
lllllllllll
ill llli2
ill llll3
ill llll4
ill llll5
...... 6-7
ill llll8
Cuidadodesudeshumidificador........................ 9
Sinecesitaayudaoserviciot_cnico 10-11
lllllllllllllllllll
Parte No. 1183900 Rev. A

Su seguridad y la seguridad de los
demds es muy importante.
Hemos incluido muchos mensajes importantes de seguridad en este
manual y en su etectrodom6stico. Lea y obedezca siempre todos los
mensajes de seguridad.
1_ ste es et simbolo de advertencia de seguridad.
Este simbolo le llama la atenci6n sobre peligros potenciales que
pueden ocasionar la muerte o una lesi6n a usted y a los demos.
Todos los mensajes de seguridad iran a continuaci6n det simbolo de
advertencia de seguridad y de la palabra "PELIGRO" o "ADVERTENCIA".
Estas palabras significan:
Si no sigue las instrucciones de inmediato, usted puede morir o sufrir una
lesibn grave.
Si no sigue las instrucciones, usted puede morir o sufrir una lesi6n grave.
Todos los mensajes de seguridad le dir_n et peligro potencial, le dir_n
c6mo reducir las posibilidades de sufrir una lesi6n y Io que puede suceder
si no se siguen las instrucciones.
INSTRUCCIONES IMPORTANTES DE SEGURIDAD
ADVERTENCIA - Para reducir el riesgo de incendio, descarga
el_ctrica, lesibn o enfermedad al usar su deshumidificador, siga
estas precauciones b_sicas:
• Ench_feto en un contacto de
pared de conexi6n a tierra con
tres terminales.
• No quite la terminal para conexi6n
a tierra.
• No use adaptador.
• No use cable alargador.
• Desenchufe el deshumidificador
antes de darle mantenimiento o
servicio.
• No tome el agua acumulada en el
balde.
-- GUARDE ESTAS INSTRUCCIONES --
Es su responsabilidad:
• Instalar et deshumidificador de acuerdo con las instrucciones de instalaciSn.
• Enchufar el deshumidificador enicamente en el tipo de contacto de pared
adecuado, con la alimentaci6n etectrica y la conexiSn a tierra correctas. Vea
"Requisitos el6ctricos" en la pagina 3.

Peligro de descarga el6ctrica
EnchQfelo en un contacto de
}ared de conexibn a tierra con
tres terminales.
No quite la terminal para
conexibn a tierra.
No use adaptador.
No use cable alargador.
No seguir estas instrucciones
}uede ocasionar la muerte, un
incendio o descarga el6ctrica.
Se requiere una alimentacidn el_ctrica
de 115 volt. (103.5 min, 126.5 mfix),60
HZ, s61o CA, o 20 amperes, con fusibles
y debidamente conectada a tierra. Se
recomienda emplear un a fusible de
retardo o interruptor de circuito
retardador. Use un circuito separado
s61o para el deshumidificador.
Instruccionesdeconexi6n
atierra:
contactodeparedde€oae_na_rra
contresterminales
enchufebipolar
concogexi_
a_erra-
r,_ledealimntaciGn
Para su seguridad personal, este
deshumidificador debe estar conectado
a tierra. Este deshumidificador est_
equipado con un cable de alimentaci6n
con un enchufe tripolar con conexiOn a
tierra.
Para reducir al minimo el peligro de una
descarga el_ctrica, el cable debe
enchufarse en un contacto de pared
con tres terminales, del mismo tipo,
conectado a tierra de acuerdo con
todos los reglamentos y normas locales.
Si no se dispone de un contacto de
pared del mismo tipo, es
responsabilidad personal y obligaci6n
del cliente hacer que un electricista
calificado instale un contacto de pared
del mismo tipo, conectado a tierra
correctamente.

Paramejorrendimiento,se
necesitaunabuena
circulaci6ndeaire--dejepor
Iomenos12-18pulgadas
(30.5-45.7cm)deespacio
paraelairealrededordel
deshumidificador.
F
Cuando est_ usando el
deshumidificador,
mantenga cerradas
todas las puertas y
ventanas que dan al
exterior, y otras
aberturas. El aire
h_medo del exterior
aumentar_ la carga de
trabajo del
deshumidificador.
(30.5-45.7cm)
Instale el deshumidificador en un piso a nivel Io suficientemente fuerte como
para soportar el deshumidificador con el balde de agua lleno.

VACIE/PJUSTElaluzdelBALDE:
Siesta luz est_ encendida, significa que
el deshumidificador no est8
funcionando. Esta luz indica que usted
debe revisar:
• Si el balde est8 lleno debe vaciarlo y
volverlo a colocar.
• Si el balde no est_ bien colocado,
s_quelo y vuelva a colocarlo. Aseg_rese
de que el balde quede totalmente
insertado en el deshumidificador y que
la luz est_ apagada; de Io contrario, el
deshumidificador no funcionar_.
CONTROLDESEQUEDAD:
Esto controla la cantidad de humedad
en la habitaciOn.Gire la perilla de
control en el sentido de las manecillas
del reloj para que haya m_s sequedad.
Gire la perilla de control en elsentido
contrario al de lasmanecillas del reloj
para que haya menos sequedad. Ponga
la perilla de control en "NORMAL"para
mantener lascondiciones de humedad
en un t_rmino medio.
NOTA: durante los primeros dias de
uso, gire el Control de Sequedad en el
sentido de las manecillas del reloj hasta
"MAS SECO"para eliminar el exceso de
humedad de los muebles y del aire de
la habitaciOn.
/
CONTROLDESEQUEDAD
VELOCIDADDELVENTILADOR:
En algunos modelos: esto controla el
funcionamiento del ventilador.
Seleccione la posici6n que desee.
ALTO - para eliminaci6n m_s r_pida de
la humedad.
BAJO - para eliminaci6n m_s lenta de la
humedad.

Peligro para la salud
No beba el agua acumulada en el balde de agua.
No seguir esta instruccibn puede perjudicar su salud.
Estilosdebalde:/
esUlo 1
M_todoparasacaryvolveravaciarelbalde:
2. Lleve al baide a un sumidero o tina
grande.
1. Levante el balde utilizando lasdos
agarraderas laterales.Tiredel balde
hacia usted, para sacarlo.Vaya al
Paso2.
3.Vierta agua por el orificio en un
sumidero o tina.
4.Vuelva a colocar el balde comple-
tamente y verifique que la luz de
VAC|E/AJUSTEELBALDEest_
apagada.
I. Levante el balde sujet&ndolo por la
base.Tire del balde hacia usted, para
sacarlo.Vaya al Paso2.

M tododeconexi6ndela
mangueradedesagiie:
(parasacaraguadelbaidecon#nuamente.)
_ tapa del conector
II de la manguera de
H_ J""" desagite (no en
Smodelos)
1. Si su deshumidificador no tiene una
tapa del conector de la manguera
de desag(ie, vaya al Paso 2.
Si su deshumidificaclor tiene una
tapa clel conector de la manguera
de desag(ie, use un destomillador de
hoja plana para quitar la tapa del
conector de desagtie. Gire la tapa en
el sentido contrario al de las
manecillas del reloj. Deseche la tapa.
No puede usarse de nuevo.Vaya al
Paso 2.
1. Deslice la tapa del conector de la
manguera de desagtie para sacarla.
Vaya al Paso 2.
_. . .. NO do_e el
" exterior poro
que Io conexi6n
no tengo fugos.
/
Centro del conector de Io monguero
de desagOe
2. Perfore unicamente el centro del
conector de la manguera de desagtie.
Use una broca de 1/4" como minimo.
3. Coloque una manguera de patio en
el conector de la manguera de
desagLie. La manguera no debe tener
una Iongitud mayor de 8 pies (2.4 m).
Haga pasar el otro extremo de la
manguera de patio por un desagLie
de piso.Verifique que la manguera
est_ plana yen el desagtie.
Parausarelbaldesinlamangueradepatio:
Para balde estilo 1:
Use un casquete de manguera de patio
para seller el conector de la manguera
de desag0e.
Para balde estilo 2:
Use un casquete de manguera de patio
para sellar el conector de la manguera
de desag Lie.
Vuelva a colocar la tapa del conector de
la manguera de desag0e.

Todoslosdeshumidificadorestienen
mecanismodedesconexi6nautom_tica
yflotadordeniveldelagua.Algunos
deshumidificadorestienenunFlotador
deNiveldelAguaajustable.Elbalde
tienequeestardebidamentealineado
paraquefuncioneelFlotadordeNivel
delAgua.
ParamodelosconFlotadorde
NiveldelAguanoajustable:
El Flotador de Nivel del Agua apagar_
autom_ticamente el deshumidificador.
ParamodelosconFlotadorde
NiveldelAguaajustable:
Usted puede poner el Flotador de Nivel
del Agua en lasposiciones de"high"
(alto) o"Iow" (bajo). Ambas posiciones
apagar_n autom_ticamente el
deshumidificador.
La posici6n "High": el Flotador de Nivel
del Agua est_ preseleccionado en la
posici6n de"high';al lado izquierdo de
la abertura. El deshumidificador se
apagar_ autom_ticamente cuando el
balde est_ 3/4 lleno.
La posici6n "Low": deslice el Flotador de
Nivel del Agua a la posici6n de"low'_al
lado derecho de la abertura, para que el
balde est_ m_s liviano. El
deshumidificador se apagar_
autom_ticamente cuando el balde est_
I/2 lleno.

Ustedpuedelimpiarlaparteexteriordesuproducto:
Limpiezaymantenimiento
generales
1. Limpie la rejilla delantera y los paneles
laterales con un cepiHo suave o con Ja
boquilla para quitar el polvo de su
aspkadora.
2. Si la pintura del gabinete se est_
picando, puede retocar la pintura con
pintura esmaltada de buena calidad
para evitar que se oxide.
Limpiezadelbaldedeagua
Cada ciertas semanas, enjuague el
interior del balde de agua con un
detergente suave
para evitar la
formad6n de
moho, mildiu y
bactefias.
Losserpentinesinterioressedebenlimpiartodoslosa_osocon
m_isfrecuencia,dependiendodelusoquesed_al
deshumidificador.Lalimpiezaladebehacerunapersona
calificada.

Sinecesitaservici0t_cnic00Ilamarparahaceralgunapregunta,tengalista
estainf0rmaci6n:
Ndmero del modelo
Ndmero de serie
Fecha de compra
Ndmero de teldfono
Tienda
El numero del modelo y el numero de serie est_n ubicados en la pared detr_s del
balde de agua.
1.AntesdeIlamarpara
s01icitarayuda...
Los problemas de funcionamiento con
frecuencia se deben a peque_as cosas
que usted mismo puede Iocalizar y
arreglar sin necesidad de herramientas.
El deshumidificador no funciona:
• LEst_ enchufada la unidad en un
circuito activo con el debido voltaje?
• LEst_ encendida la unidad?
• LEst_ instalado debidamente el balde
de agua?
• LNecesita vaciar el balde de agua?
• LSe quem6 un fusible o se dispar6 el
interruptor de circuito?
La unidad funciona pero no
deshumidifica:
• LSe encuentra la unidad en el ciclo de
descongelaci6n? (provisto en algunos
modelos).
Sonidos normales de operaci6n:
Cuando su deshumidificador funciona
normalmente, usted oir_ sonidos tales
como:
• Sonidos del compresor--el compresor
puede sonar muy alto. Esto es normal.
• Ruidos secos ("clic")--se pueden oir
cuando la unidad o el compresor se
apaga y se enciende y cuando el
Interruptor Autom_tico de Apagado
est_ funcionando.
• Movimiento de aire proveniente del
ventilador.
Condiciones normales de
funcionamiento"
• La unidad generar_ calor.
2.Sinecesitaayudaen10s
EE.UU.....
Llame al distribuidor de su Iocalidad o
Ilame gratis al Centro de Ayuda al
Consumidor de Whirlpool al 1-800-253-
1301. Cuando flame para pedir ayuda,
tenga listos el numero del modelo, el
numero de serie, la fecha de compra y
una descripci6n completa del
problema. Esta informaciOn es necesaria
para poder atenderle mejor.
Si necesita m_s ayuda, puede escribir a:
Consumer Assistance Center
c/o Correspondence Dept.
2000 North M-63
Benton Harbor, M149022-2692
Incluya por favor en su correspondencia
un n_mero de tel_fono en el que se le
pueda encontrar durante el dia.

3.Sinecesitaayudao
serviciot cnicoen
Canad i...
Contacte al distribuidor que le vendi6
su aparato, o flame gratis al Centro de
Ayuda al Consumidor,
de 8:30 a.m. a 6:00 p.m. (EST),
al 1-800-461-5681.
0
Contacte a la sucursal de servicio
directo o al centro de servicio
autorizado m_s cercano para reparar
o darle mantenimiento a su aparato.
(Vea la lista abajo).
NOTA:cuando solicite ayuda o
servicio: D_ por favor una descripci6n
detallada del problema, el numero
del modelo y el numero de serie
completos de su aparato y lafecha de
compra. EstainformaciOn nos
ayudar_ a atenderle mejor.
Sucursales de servicio directo:
COLIJMBIA
BRITANICA 1-800-665-6788
ALBERTA 1-800-661-6291
ONTARIO
_rea de Ottawa 1-800-267-3456
(excepto cbdigo de drea 807)
Fueradeliirea de Ottawa1-800-807-6777
MANITOBA,
SASKATCHEWAN
y c6digo de drea 807 en
ONTARIO 1-800-665-1683
QUEBEC Montreal
(excepto South Shore) 1-800-361-3032
SouthShoreMontreal 1-800-361-0950
QuebecCity 1-800-361-1523
Sherbrooke 1-800-567-6966
PROVINCIAS
ATLANTICAS 1-800-565-1598
Si necesita m_s ayuda, puede escribir a:
Consumer Relations Department
Inglis Limited
1901 Minnesota Court
Mississauga, Ontario LSN 3A7
Incluya por favor en su correspondencia
un numero de tel_fono en el que se le
pueda encontrar durante el dia.

PaRe NO. 1183900 Rev. A 2/02
©2002 Todos los derechos reservados Impreso en los EE.UU.
-
 1
1
-
 2
2
-
 3
3
-
 4
4
-
 5
5
-
 6
6
-
 7
7
-
 8
8
-
 9
9
-
 10
10
-
 11
11
-
 12
12
-
 13
13
-
 14
14
-
 15
15
-
 16
16
-
 17
17
-
 18
18
-
 19
19
-
 20
20
-
 21
21
-
 22
22
-
 23
23
-
 24
24


Whirlpool AD50LJ2 El manual del propietario
- Tipo
- El manual del propietario
En otros idiomas
- English: Whirlpool AD50LJ2 Owner's manual
Documentos relacionados
-
Whirlpool DH25J0 El manual del propietario
-
Whirlpool AD40USL4 El manual del propietario
-
-
-
-
-
-
-