
OWNER’S MANUAL
AIR CONDITIONER
Please read this manual carefully before operating
your set and retain it for future reference.
P/NO:MFL67445123
www.lg.com
SP121CN
US0
SP121HN
NT0
TYPE:WALL MOUNTED
MODELS
SP121HN
US0
SP122CN
NT0
SP091CN
US0
SP121CN
NT0
SP122CN
US0
SP122HN
NT0
SP091CN
NT0
SP122HN
US0
ENGLISH
ESPAÑOL

2 Room Air Conditioner
Room Air Conditioner Owner’s Manual
TABLE OF CONTENTS
Display Luminosity(Optional) ..............14
......................15
To Cancle The Timer Setting...............15
Sleep Mode .........................................15
......................
Jet Cool
...............................................17
Forced Operation.................................17
E. Maintenance and Service..................18
Indoor Unit...........................................18
Outdoor Unit ........................................20
Operation Tips!....................................20
Self-Diagnosis Function ......................20
Troubleshooting Tips!
Save time and money!.........................21
Call the service immediately in the
following situations ..............................21
Spec sheet...........................................22
A. Safety Precautions ..............................3
B. Electrical Safety...................................6
Temporary Use of an Adapter ...............6
Temporary Use of an Extension Cord ...6
Symbols used in this Manual.................6
C. Product Introduction...........................7
Indoor Units ...........................................7
Operation Indication Lamps ..................8
Outdoor Unit ..........................................8
D. Operating Instructions........................9
How to insert the Batteries ....................9
Wireless Remote Controller
Maintenance..........................................9
Operating Method..................................9
Wireless Remote Controller
Operation Mode...................................12
.....13
Air Circulation Operation
.....................14
Auto Clean Operation..........................14
Cooling Only Model ..........................10
Wireless Remote Controller
Heat Pump Model .............................11
Airflow Direction Control
16
Auto Operation.....................................13
Healthy Dehumidification Operation
Timer Setting Operation
Setting the Current Time......................14
FOR YOUR RECORDS
Write the model and serial numbers here:
You’ll find many answers to common problems in the
Inside you will find many helpful hints on how to use
You can find them on a label on the side of each unit.
Model #
Serial #
Dealer's Name
Date Purchased
Staple your receipt to this page in the event you need
it to prove date of purchase or for warranty issues.
READ THIS MANUAL
and maintain your air conditioner properly. Just a little
preventive care on your part can save you a great deal
of time and money over the life of your air conditioner.
chart of troubleshooting tips. If you review our chart of
Troubleshooting Tips
for service at all.
first, you may not need to call
PRECAUTION
• Contact the authorized service technician for
repair or maintenance of this unit.
• Contact the installer for installation of this unit.
• The air conditioner is not intended for use by
young children or invalids without supervision.
• Young children should be supervised to ensure
that they do not play with the air conditioner.
• When the power cord is to be replaced,
replacement work shall be performed by
authorized personnel only using only genuine
replacement parts.
• This appliance is not intended for use by persons
(including children) with reduced physical,sen-
sory or mental capabilities, or lack of experience
and knowledge, unless they have been given su-
pervision or instruction concerning use of the
appliance by a person responsible for their safety.
Children should be supervised to ensure that they
do not play with the appliance.
WARNING: Before accessing the terminals, all
power circuits must be disconnected.
WARNING: Fixed installations will incorporate
disconnect means in accordance with
installation rules.
WARNING: This device will not be accessible to
public.
WARNING: The appliance must be installed in
accordance with national regulations
for electrical installations.

Plug in the power plug properly.
Otherwise, it will cause electric shock or fire due to heat generation or electric shock.
Do not operate or stop the unit by inserting or pulling out the power plug.
Do not operate with wet hands or in damp environment.
Do not direct airflow at room occupants only.
Do not allow water to run into electric parts.
Do not use the socket if it is loose or damaged.
Do not open the entrance during operation.
Always perform grounding work.
Always install air leakage breaker and a dedicated switching board.
Unplug the unit if strange sounds,smell,or smoke comes from it.
It will cause electric shock or fire due to heat generation.
In the supply cord is damaged, it must be replaced by the manufacturer or its service agent or a similarly
Do not damage or use an unspecified power cord.
It will cause electric shock or fire.
It will cause electric shock or fire due to heat generation.
It may cause electric shock.
It may cause failure of machine or electric shock.
No grounding may cause electric shock.
No installation may cause fire and electric shock accident.
It may cause fire and electric shock accident.
It may cause fire and electric shock.
It may cause electric shock.
This could damage your health.
Do not modify power cord length or share the outlet with other appliances.
quallfied order to avoid a hazard.(Y Attachment)
ENGLISH

There is risk of fire or electric shock.
Avoid personal injury.
It may cause corrosion on the product.
A bad connection may cause water leakage.
Install the drain hose to ensure that the condensed water is drained away properly.
Do not use the telephone or turn switches on or off. There is risk of explosion or fire.
product on.
Two or more peopie must lift and transport the product.
Do not install the product where it will be exposed to sea wind (salt spray) directly.
Do not place ANYTHING on the power cable.
Do not plug or unplug the power supply plug to turn the unit ON/OFF.
When flammable gas leaks, turn off the gas and open a window for ventilation before turn the
Harsh detergent may also cause failure of product, fire, or electronic shock.
Do not use harsh detergent that causes corrosion or damage on the unit.
For inner cleaning, contact an Authorized Service Center or a dealer.
Indoor/outdoor wiring connections must be secured tightly and the cable should be routed properly
so that there is no force pulling the cable from the connection terminals.
Safely dispose off the packing materials. Like screws, nails, batteries, broken things etc after
Improper or loose connections can cause heat generation or fire.
Make sure to check that the power cable plug is not dirty, loose or broken and then only insert the
Children may play with them and cause injury.
Incorrect refrigerant used can prevent the normal operation of the unit.
Don’t use a power cord, a plug or a loose socket which is damaged.
Otherwise it may cause a fire or electrical shock.
Do not touch, operate, or repair the product with wet hands. Hold the plug by hand when taking out.
Do not place a heater or other heating appliances near the power cable.
Do not allow water to run into electric parts.Install the unit away from water sources.
Do not store or use or even allow flammable gas or combustibles near the product.
Do not use the product in a tightly closed space for a long time. Perform ventilaion regularly.
Do not open the front grille of the product during operation. (Do not touch the electrostatic filter, if
If strange sounds, smell or smoke comes from product. Immediately turn the breaker off or
Be sure to check the refrigerant to the used. Please read the label on the product.
Dirty, loose or broken power plug can cause electric shock or fire.
plug completely.
installation or svc and then tear away and thraw away the plastic packaging bags.
There is risk of electric shock or fire.
There is risk of fire and electric shock.
There is risk of electric shock or fire.
There is risk of electric shock.
There is risk of product damage or failure, or unintended operation.
There is risk of fire or electric shock.
There is risk of fire or electric shock.
This could result in personal injury and product damage.
Take care to ensure that nobody especially kids could step on or fall onto the outdoor unit.
Take care to ensure that power cable could not be pulled out or damaged during operation.
breaker.
When the product is not to be used for a long time, disconnect the power supply plug or turn off the
element etc.
Turn the main power off and unplug the unit when cleaning or repairing the product.
There is risk of fire, failure of the product, or electric shock.
There is risk of fire.
There is risk of physical injury, electric shock, or product failure.
the unit is so equipped.)
disconnect the power supply cable.
Ventilate the product room from time to time when operating it together with a stove, or heating
Oxygen deficiency could occur and hence harm your health.
Oxygen deficiency can occur and hence harm your health.

It may cause a problem for your neighbors and hence dispute.
Low refrigerant levels may cause failure of product.
There is risk of damage or loss of property.
It may cause product failure.
Do not touch the metal parts of the product when removing the air filter.
Do not step on or put anyting on the product. (outdoor units)
Always insert the filter securely after cleaning. Clean the filter every two weeks or more often if
Be cautious when unpacking and installing the product.
If the refrigerant gas leaks during the repair, do not touch the leakaing refrigerant gas.
There is risk of fire, electric shock, or damage to the plastic parts of the product.
There is risk of personal injury.
necessary.
There is risk of personal injury and failure of product.
There are sharp and moving parts that could cause personal injury.
A dirty filter reduces the efficiency.
Sharp edges could cause injury.
Do not tilt the unit when removing or uninstalling it.
Do not mix air or gas other than the specified refrigerant used in the system.
The refrigernat gas can cause frostbite (cold burn)
The condensed water inside can spill.
damage or injury.
Replace the all batteries in the remote control with new ones of the same type. Do not mix old and
accordance with local and national standards.
If the refrigerant gas leaks during the installation, ventilate the area immediately.
Dismantling the unit, treatment of the refrigerant oil and eventual parts should be done in
If air enters the refrigerant system, an excessiveiy high pressure results, causing equipment
Otherwise it can be harmfull for your health.
There is risk of fire or product failure.
There may bum or explode.
Moisture may condense and wet or damage furniture.
This could harm to your health.
It is not sanitary and could cause serious health issues.
Be careful and avoid personal injury.
WARNING: Before accessing the terminals, all power circuits must be disconnected.
WARNING: This device will not be accessible to public.
WARNING: The appliance must be installed in accordance with national regulations for electrical
installations.
The chemicals in batteries could cause burns or other health hazards.
use the remote if the batteries have leaked.
window is left open.
Do not expose your skin or kids or plants to the cool or hot air draft.
Do not drink the water drained from the product.
Use a firm stool or ladder when cleaning, maintaining or repairing the product at an height.
Do not let the air conditioner run for a long time when the humidity is very high and a door or a
If the liquid from the batteries gets onto your skin or clothes, wash it well with clean water. Do not
new batteries or different types of batteries.
Do not recharge or disassemble the batteries. Do not dispose off batteries in a fire.
Do not insert hands or other objects through the air inlet or outlet while the product is operating.
consumer air conditioner, not a precision refrigeration system.
Do not block the inlet or outlet of air flow.
Use a soft cloth to clean. Do not use harsh detergents, solvents or splashing water etc.
Do not use the product for special purposes, such as preserving foods, works of art, etc. It is a
Always check for gas (refrigerant) leakage after installation or repair of product.
To avoid vibration or noise.
the neighborhoods.
Do not install the product where the noise or hot air from the outdoor unit could damage or disturb
Keep level even when installing the product.
ENGLISH

6 Room Air Conditioner
Electrical Safety
Electrical Safety
• This appliance must be properly grounded.
To minimize the risk of electric shock, you must alway plug into a grounded oulet.
• Do not cut or remove the grounding prong from the power plug.
• Attaching the adapter ground terminal to the wall receptacle cover screw does not ground the appliance
unless the cover screw is metal and not insulated, and the wall receptacle is grounded through the
house wiring.
• If you have any doubt whether the air conditioner is properly grounded, have the wall receptacle and
circuit checked by a qualified electrician.
We strongly discourage the use of an adapter due to potential safety hazards. For temporary connections,
use only a genuine adapter, available from most local hardware stores. Ensure that the large slot in the
adapter is aligned with the large slot in the receptacle for a proper polarity connection.
To disconnect the power cord from the adapter, use one hand on each to avoid damaging the ground
terminal. Avoid frequently unplugging the power cord as this can lead to eventual ground terminal damage.
• Never use the appliance with a broken adapter.
We strongly discourage the use of an extension cord due to potential safety hazards.
Temporary Use of an Adapter
Temporary Use of an Extension Cord
This symbol alerts you to the risk of electric shock.
This symbol alerts you to hazards that may cause harm to the
air conditioner.
This symbol indicates special notes.
NOTE
Symbols used in this Manual
This appliance should be installed in accordance with national wiring regulations. This guide acts as a
guide to help to explain product features.

Owner's Manual 7
Here is a brief introduction of the indoor and outdoor units. Please see the information specific to your
indoor unit type.
Product Introduction
Product Introduction
Standard Split Type
Art Cool Type Wide
Display panel LED indicators
Indoor Units
ENGLISH
Art Cool Deluxe(Type 1)
Display panel LED indicators
Signal receiver
Front panel
Air discharge
Power cord
ON/OFF button
Plasma filter
Air inlet
Air filter
Art Cool Deluxe(Type 2)
Display panel LCD indicators
Signal receiver
Front panel
Air discharge
ON/OFF button
Power cord
Plasma filter
Air inlet
Air filter
Air Inlet
Signal Receptor
ON/OFF Button
Front Panel
Air Filter

8 Room Air Conditioner
Product Introduction
Air intake vents
Air outlet vents
Connecting
wires
Refrigerant pipes
Drain hose
Base plate
On/Off
: Lights up during the system operation, error code and auto restart setting.
Sleep mode : Lights up during sleep mode auto operation.(non-Inverter Model)
Plasma : The function illustrates its dynamic mode by using a multiple lighting system.
Timer
: Lights up during timer operation.(non-Inverter Model)
Lights up during timer operation or sleep mode auto operation (Inverter Model only)
Defrost mode
Power Display : Indicates the setting temperature and operation mode.
: Lights up during defrost mode or hot start operation (Heat pump model only)
: Lights up during outdoor unit operation. (Cooling model only)
Outdoor unit
operation
OUT
DOOR
! Hot start operation: Stops the indoor fan in heating operation for minutes to prevent cold air from blowing out
from unit.
! In defrost mode unit stops heating operation for few minutes to remove formation of ice on the heat
exchanger coils to maintain the efficiency.
Operation
mode
Shape of
display
Setting
temperature
Standard Too hot Hot Cold Too cold
Jet
Cool/Heat
Test
operation
Auto
clean
Comfortable
Auto operation mode
Cooling, heating,
Dehumidification
Mode
Energy-saving
cooling mode
Outdoor Unit
Operation Indication Lamps

Owner's Manual 9
Operating Instructions
How to insert the Batteries
Wireless Remote Controller Maintenance
1. Remove the battery cover by pulling it according to the arrow
direction.
2. Insert new batteries making sure that the (+) and (-) of battery are
installed correctly.
3. Reattach the cover by sliding it back into position.
1. Always use/replace both batteries of same type.
2. If the system is not to be used for a long time, remove the
batteries to save their working life.
3. If the display screen of remote controller starts, fading replace
both of the batteries.
4. Use 2 AAA(1.5 volt) batteries.
NOTE
1. Choose a suitable place where its safe & easy
to reach.
2. Fix the holder to wall etc with the supplied
screws firmly.
3. Slide the remote controller inside the holder.
1. Remote controller should never be exposed to
direct sunlight.
2. Signal transmitter & receiver should always be
clean for proper communication. Use a soft
cloth to clean them.
3. In case some other appliances also get
operated with remote control, change their
position or consult your serviceman.
1. The signal receiver is inside the unit.
2.
Aim the remote controller towards the unit to operate it.
There should not be any blockage in between.
NOTE
Operating Instructions
Operating Method
ENGLISH

Operating Instructions
Cooling Operation
Auto Operation or Auto Changeover
Operation Mode
ROOM TEMPERATURE SETTING BUTTONS
Used to select the room temperature.
RESET BUTTON
Used prior to resetting time.
LED LUMINOSITY BUTTON (OPTIONAL)
Used to adjust LED luminosity.
JET COOL BUTTON
Used to start or stop the speed cooling.
The Jet Cool operates fan in super high speed
in cooling mode.
SLEEP MODE AUTO BUTTON
Used to set sleep mode auto operation.
AIR CIRCULATION BUTTON
Used to circulate the room air without cooling or heating.
10
13
7
16
8
2
9
Flip-up door
(opened)
Wireless Remote Controller (Cooling Only Model)
The controls will look like the following.
Healthy Dehumidification Operation
ROOM TEMPERATURE CHECKING BUTTON
Used to check the room temperature.
AUTO CLEAN BUTTON
Used to set auto clean.
AUTO CLEAN
OPERATION MODE SELECTION BUTTON
Used to select the operation mode.
INDOOR FAN SPEED SELECTION BUTTON
Used to select fan speed in four steps low, medium,
high and natural wind.
HORIZONTAL VANE CONTROL BUTTON
Used to set the desired vertical airflow direction.
ON/OFF BUTTON
Used to turn off/on the unit.
TIME SETTING BUTTONS
Used to adjust the time.
ON/OFF TIMER BUTTONS
Used to set the time of starting and stopping operation.
ON
OFF
TIMER SET/CANCEL BUTTON
Used to set and to cancel the timer operation.
SET
CANCEL
2nd F BUTTON
Used prior to using modes printed in blue at the bottom
of buttons.
Signal transmitter
ON
OFF
CANCEL
AUTO CLEAN
SET
1
3
15
4
11
14
5
6
1
2
Room Air Conditioner10
To use the functions printed in blue at the bottom of the buttons press 2
nd
F button first and then the required function
button. Pressing the 2
nd
F button activates the blue printed function of the respective button. To cancel the function
press the 2nd F button again else it will automatically cancel if remains idle after 10 seconds.
NOTE

Operating Instructions
ROOM TEMPERATURE CHECKING BUTTON
Used to check the room temperature.
AUTO CLEAN BUTTON
Used to set auto clean.
AUTO CLEAN
INDOOR FAN SPEED SELECTION BUTTON
Used to select fan speed in four steps low, medium,
high and natural wind.
HORIZONTAL VANE CONTROL BUTTON
Used to set the desired vertical airflow direction.
To use the functions printed in blue at the bottom of the buttons press 2
nd
F button first and then the required function
button. Pressing the 2
nd
F button activates the blue printed function of the respective button. To cancel the function
press the 2nd F button again else it will automatically cancel if remains idle after 10 seconds.
ON/OFF BUTTON
Used to turn off/on the unit.
ROOM TEMPERATURE SETTING BUTTONS
Used to select the room temperature.
OPERATION MODE SELECTION BUTTON
Used to select the operation mode.
TIME SETTING BUTTONS
Used to adjust the time.
ON/OFF TIMER BUTTONS
Used to set the time of starting and stopping operation.
ON
OFF
TIMER SET/CANCEL BUTTON
Used to set and to cancel the timer operation.
SET
CANCEL
RESET BUTTON
Used prior to resetting time.
LED LUMINOSITY BUTTON (OPTIONAL)
Used to adjust LED luminosity.
JET COOL BUTTON
Used to start or stop the speed cooling.
The Jet Cool operates fan in super high speed
in cooling mode.
SLEEP MODE AUTO BUTTON
Used to set sleep mode auto operation.
AIR CIRCULATION BUTTON
Used to circulate the room air without cooling or heating.
2nd F BUTTON
Used prior to using modes printed in blue at the bottom
of buttons.
Cooling Operation
Auto Operation or Auto Changeover
Healthy Dehumidification Operation
Heating Operation
Operation Mode
The controls will look like the following.
ENGLISH
Signal transmitter
ON
OFF
CANCEL
AUTO CLEAN
SET
1
3
15
4
10
13
7
16
8
2
9
13
11
14
5
6
12
Flip-up door
(opened)
NOTE
Wireless Remote Controller (Heat Pump Model)
Owner's Manual 11
ENGLISH
ENGLISH

Operating Instructions
Healthy
Dehumidification
Open the cover of the remote controller and press the operation mode button. Each time
the button is pressed, the operation mode is shifted in the direction of the arrow.
2
(For Heating Model)
Open the cover of the remote controller and press the operation mode button. Each time
the button is pressed, the operation mode is shifted in the direction of the arrow.
(For Cooling Model)
Heating
(Heat pump model only)
Cooling Auto Operation
Cooling
Healthy
Dehumidification
Auto Operation
Press the ON/OFF BUTTON to Turn on the unit
The unit will respond with a beep.
For cooling or heating operation set the desired indoor
temperature by pressing the ROOM TEMPERATURE
SETTING BUTTONS.
For cooling the temperature can be set within 18°C~30°C and
for heating the temperature range is 16°C~30°C.
Set the fan speed with the remote controller.
You can select the fan speed in four steps : low, medium, high and natural wind by
pressing the INDOOR FAN SPEED SELECTION BUTTON
Each time the button is pressed, the fan speed mode is shifted in the direction of the
arrow.
1
3
4
Natural wind
For fresher feeling, press the INDOOR FAN SPEED SELECTION BUTTON and set to Natural wind mode.
In this mode, the wind blows like a natural breeze by automatically changing fan speed.
Step1(Low) Step2(Medium) Step3(High)Natural Wind
Operation Mode
Room Air Conditioner12

If you select the dehumidification mode on the OPERATION MODE
SELECTION BUTTON, the product starts to run the dehumidification
function.
It automatically sets the room temperature and airflow volume to the best
condition for dehumidification, based on the sensed current room temperature.
In this case, however, the setting temperature is not displayed on the remote
controller and you are not able to control the room temperature either.
During the healthy dehumidification function, the fan speed is automatically set
according to the optimization algorithm responding to the current room
temperature status, so that the room condition is kept healthy and comfortable
even in the very humid season.
Healthy Dehumidification Operation
During Healthy Dehumidification Operation
Operating Instructions
<For Cooling Model>
The temperature and fan speed are automatically set by the electronic controls based on
the actual room temperature.
If you feel hot or cold, press TEMPERATURE SETTING buttons for more cooling or
heating effect.
You cannot switch the indoor fan speed. It has already been set by the Auto Operation
Mode rule.
Auto Operation
Code Feel
Cold
Slightly cool
Neutral
Slightly warm
Warm
Please select the code
as per your requirement.
You can set desired temperature and indoor fan speed.
Setting Temp. Range : 18~30°C.
: You can not set the actual setting temperature and the fan
speed in this operation mode. But you can use the Auto swing
in this operation. If the system is not operating as desired,
switch manually to another mode
NOTE
<For Heating Model>
13Owner’s Manual
ENGLISH
ENGLISH

Operating Instructions
During Auto Clean fuction, only ON/OFF button, Plasma button, Auto Clean
button is used. During this operation, 'Cooling Lamp' lights up.
Display LuminosityOptional
The unit display luminosity can be adjusted by using the remote controller.
Open the cover of the remote controller and press the LED LUMINOSITY BUTTON.
Display LED will be off. Press the button again to set bright display.
During Auto Clean Operation, moistures left in indoor units after cooling operation or healthy
dehumidification operation can be removed.
Select Auto Clean Operation by the function setting button( ).
Now whenever the unit is turned off, the indoor fan is still running for
about 30 minutes internally without cooling or dehumidification
operation. This function dries up any remains of moisture & cleans
the unit internally. If you push the Auto Clean button again, this function is
cancelled.
NOTE
Auto Clean Operation
AUTO CLEAN
AUTO CLEAN
This operation circulates the air without cooling or heating.
It can be activated by pressing the AIR CIRCULATION BUTTON.
Once the air circulation is activated you can select the fan speed by
pressing the INDOOR FAN SPEED SELECTION BUTTON.
Air Circulation Operation
Room Air Conditioner14
Time can be set only when you press the RESET BUTTON.
Having replacing the batteries, you should press the RESET BUTTON to reset the time.
Press the ON/OFF BUTTON.
Press 2
nd
F button and check if icon is on.
Check the indicator for a.m. and p.m.
NOTE
Setting the Current Time
2
Press the TIME SETTING BUTTONS until the desired time is set.
3
Press the TIMER SET/CANCEL BUTTON.
4
1
CANCEL
SET

To cancel the timer setting
• The sleep mode will operate indoor fan at super low speed in cooling mode and at low speed in heating
mode for pleasant sleep.
In cooling mode or healthy dehumidification mode:
The setting temperature will rise automatically two times by 1°C over next consecutive 30 minutes
(Maximum 2°C) for a comfortable sleep. This will be the final setting temperature as long as sleep mode is
functioning.
NOTE
Press the SLEEP MODE AUTO BUTTON to set the time when you want the unit to stop
automatically. The timer is programmed in one-hour increments by pressing the
SLEEP MODE AUTO BUTTON 1 to 7 times. The sleep mode is available for 1 to 7 hours.
Sleep Mode Operation
Timer Setting Operation
1
Make sure to set current time correctly on the display of the remote controller..
2
Press 2nd F button.
3
Press the ON/OFF TIMER BUTTONS to turn timer on or off.
4
Press the TIME SETTING BUTTONS until the desired time is set.
5
To set the selected time, press the TIMER SET BUTTON aiming the remote
controller at the signal receiver.
Description
Button on the
Remote Controller
ON
OFF
CANCEL
SET
Check if icon is off.
Press the TIMER CANCEL BUTTON aiming the remote controller at the signal receiver.
(The timer lamp on the air conditioner and the display will go off.)
CANCEL
SET
Delay off timer Delay on timer Delay off and on timer Delay on and off timer
Select one of the following four types of operation.
NOTE
Operating Instructions
15Owner’s Manual
ENGLISH

The up/down airflow (Vertical airflow) can be adjusted by using the remote controller.
1. Press the START/STOP BUTTON to start the unit.
2. Press CHAOS SWING BUTTON.
3. The louvers will swing up & down automatically.
4. To stop the louver at a desired angle, press again.
Vertical / Horizontal Airflow Direction Control (Optional)
• By pressing the CHAOS SWING BUTTON the horizontal air flow direction is changed automatically based on the chaos
algorithm to distribute the air in the room evenly and at the same time to make the human body feel most comfortable as if
enjoying natural breeze.
• Always use the remote controller to adjust the up and down air flow direction. Manually moving the vertical air flow
direction louver by hand could damage the mechanism.When the unit is shut off, the up/down airflow direction louver will
close the air outlet vent of the system.
NOTE
Operating Instructions
Room Air Conditioner16

Forced operation
Forced operation is used when the remote controller can't be used. The operation will be started if the ON/OFF
button is pressed. If you want to stop the operation, re-press the button.
Test operation
During the TEST OPERATION, the unit operates in cooling mode at high speed fan, regardless of room temperature
and resets in 18 minutes.
During test operation, if remote controller signal is received, the unit operates as remote controller
sets.
If you want to use this operation, Press and hold the ON/OFF button for 3~5 seconds, then the buzzer sound 1
'beep'. If you want to stop the operation, re-press the button.
Jet Cool
Jet cool function can be used to cool the room quickly in hot summer. When this
function is turned on, the air conditioner runs in cooling operation mode with super
high fan speed and 18°C setting temperature for 30 minutes for fast and effective
cooling.
You can activate this operation by pressing the JET COOL BUTTON.
To change from jet cool mode to high fan speed cooling mode, press the
JET COOL BUTTON or
INDOOR FAN SPEED SELECTOR BUTTON or the
ROOM TERPERATURE SETTING BUTTON again.
Heat pump Model
Cooling Model
Room Temp. ≥ 24°C 21°C ≤ Room Temp. < 24°C Room Temp. < 21°C
Operating mode Cooling Cooling Healthy Dehumidification Heating
Indoor FAN Speed
High High High High
Setting Temperature
22°C 22°C 23°C 24°C
Operating Instructions
17Owner’s Manual
ENGLISH
ON/OFF
button

Maintenance and Service
Indoor Unit
Before performing any maintenance, turn off the main power to the system, disconnect the circuit breaker and
unplug the power cord.
Clean the unit with a soft dry cloth. Do not use bleach or abrasives.
Never use any of these
• Water hotter than 40°C. It may cause deformation and discoloration.
• Volatile substances. They may damage the surface of the air conditioner.
Air Filters
The air filters behind the front panel / grill should be checked and
cleaned once in every 2 weeks or more often if necessary. To
remove the filters see the self explanatory diagrams for each
model type. Clean the filters with a vacuum cleaner or warm
soapy water. If dirt is not easily removed, wash with a solution of
detergent in luke warm water. Dry well in shade after washing and
reinstall the filters back in place.
Plasma Filters (Optional)
The plasma filters behind the air filter should be checked and
cleaned once in every 3 months or more often if necessary. To
remove the filters see the self explanatory diagrams for each
model type. Clean the filters with a vacuum cleaner. If it is dirty
wash it with water and dry well in shade an install back in place.
G
a
s
o
l
i
n
e
P
o
w
d
e
r
18 Room Air Conditioner
Maintenance and Service
• Do not washed the 3M filter with water, because the filter can be damaged.
MULTI Protection Filter
The multi protection filter behind the air filter should be checked and
cleaned once in every 1 month or more often if necessary. To remove the
filters see the self explanatory diagrams for each model type. Clean the filters with
a vacuum cleaner. Do not wash the multi protection filter with water, because the filter
can be damaged. And then insert the filter into original position.
•
•
•
We suggest changing multi protection filter every 6 months.
The location of the filters may differ, depending on the model.
If you need more filters,please contract the LG service center
(refer to the warranty card,)
•
Pull out the multi protection filter from the separately packed plastic bag.
Installation of new multi protection filter
•
Insert the multi protection filter into the case.
•
Multi protection filter is installed with 3M Mark front.

1. Deluxe (Type 1):
Open the upside of the panel and lift it up as shown. The hooks of the panel will come off. Remove the
air filters. Then pull out the plasma filter
2. Deluxe (Type 2):
Open the front panel as shown.
Then pull the filter tab slightly forward to remove the air filter.
After removing the air filter remove the plasma and deodorizer filter by slightly pulling forward.
After cleaning and drying well reinstall the filters in their original position.
Front panel
Panel hook
Plasma filter
Plasma filter
Front panel
3. Standard Split Type : Two different methods to open the front panel based on types of air
conditioner as below ;
Type 1: Open the front panel as shown.
Then pull the filter tab slightly forward to remove the air filter.
After removing the air filter remove the plasma and 3M multi protection filter by slightly pulling
forward.
How to use the front panel
1. Front panel closing
Move the link upward and close the front panel.
2. Front panel removing
Raise the link up to hook hanger and remove
front panel forward.
Plasma filter
(optional)
MULTI
protection filter
Owner's Manual 19
Maintenance and Service
ENGLISH
Removal of Filters
Don't touch this plasma filter within 10 seconds after opening the inlet grille, it may cause an electric shock.

Outdoor Unit
The heat exchanger coils and panel vents of the outdoor unit should be checked regularly.
If clogged with dirt or soot, the heat exchanger
and panel vents may be professionally steam cleaned.
Dirty or clogged coils will reduce the operating efficiency of the system and cause higher operating costs.
NOTE
Operation Tips!
Self-Diagnosis Function
Error Display LED ( )
Check Point
• Indoor room temperature thermistor open/short.!
• Indoor pipe temperature thermistor open/short.
(once)
3 sec 3 sec 3 sec
This unit has an inbuilt error diagnosis capability. Unit LED( ) will blink in case if thermistor fails.
Please contact your serviceman/dealer in such a situation
Do not overcool the room.
This is not good for the health and
wastes electricity.
Keep blinds or curtains
closed.
Do not let direct sunshine enter
the room when the air conditioner
is in operation.
Keep the room temperature
uniform.
Adjust the vertical and horizontal
airflow direction to ensure a
uniform temperature in the room.
Make sure that the
doors and windows
are shut thight.
Avoid opening doors and
windows as much as
possible to keep the cool
air in the room.
Clean the air filter
regularly.
Blockages in the air filter
reduce the airflow and
lower cooling and
dehumidifying effects.
Clean at least once every
two weeks.
Ventilate the room
occasionally.
Since windows are kept
closed, it is a good idea
to open them and
ventilate the room now
and ten.
Use high fan speed
for effective and fast
cooling.
The unit gives its rated
cooling capacity when the
fan speed is high.
Don't touch this plasma filter within 10 seconds after opening the inlet grille, it may cause an electric shock.
Type 2: Pull the front panel from both sides as shown.
Then pull the filter tab slightly forward to remove the filter. After removing the air filter remove
the plasma and triple deodorizer filter by slightly pulling forward.
Plasma filter
Deodorizer
filter
20 Room Air Conditioner
Maintenance and Service

Troubleshooting Tips! Save time and money!
The air conditioner may be operating abnormally when:
Problem
The air conditioner is
unplugged.
The fuse is blown/circuit
breaker is tripped.
Power failure.
High or low voltage.
Airflow is restricted.
The air filter is dirty.
The room may have been hot.
Cold air is escaping.
Check the temperature settings.
There might be any heating
source in the room.
Air
conditioner
does not start
Air
conditioner
does not cool
as it should
• Make sure the air conditioner plug is
pushed completely into the outlet.
• Check the house fuse/circuit breaker box
and replace the fuse or reset the breaker.
• If power failure occurs, turn the mode
control to OFF.
When power is restored, wait 3 minutes to
restart the air conditioner to prevent
tripping of the compressor overload.
• If the voltage is unusually very high or low
the circuit Breaker will trip.
• Make sure there are no curtains, blinds, or
furniture blocking the front of the air
conditioner.
• Clean the filter at least every 2 weeks.
See the Maintenance and Service section.
• When the air conditioner is first turned on,
you need to allow time for the room to cool
down.
• Check for open furnace floor registers and
cold air returns.
• Make sure they are correct.
• Check and remove such source or turn it
off while using the air conditioner.
What To DoPossible Causes
1. Anything abnormal such as burning smell, loud noise etc. happen. Stop the unit and
turn the breaker off. Never try to repair by yourself or restart the system in such cases.
2. Main power cord is too hot or damaged.
3. Error code is generated by self diagnosis.
4. Water leaks from indoor unit even if the humidity is low.
5. Any switch, breaker (safety, earth) or fuse fails to work properly
User must carry routine checkup & cleaning to avoid unit’s poor performance.
In case of special situation, the job must be carried out by service person only.
Owner's Manual 21
Maintenance and Service
Call the service immediately in the following situations
ENGLISH

SPEC SHEET :
22 Room Air Conditioner
Maintenance and Service
INPUT CURRENT INPUT CURRENT
SP091CN NT0
115 V
~
920W 8,5A
SP091CN US0
115 V
~
920W 8,5A
SP121CN NT0
115 V
~
1 178W
1 178W
1 127W
1 150W
1 150W
1 127W
1 192W
1 192W
1 125W
1 125W
10,7A
SP121CN US0
115 V
~
10,7A -
-
-
-
-
-
-
-
SP121HN NT0
115 V
~
10,3A
10,4A
SP121HN US0
115 V
~
10,3A
SP122CN NT0
220 V
~
5,2A - -
SP122CN US0
220 V
~
5,2A - -
SP122HN NT0
220 V
~
5,4A 1 200W 5,5A
SP122HN US0
220 V
~
5,4A 1 200W 5,5A
MODEL VOLTAGE
COOLING HEATING
10,4A

www.lg.com
SP121CN
US0
SP121HN
NT0
SP121HN
US0
SP122CN
NT0
SP091CN
US0
SP121CN
NT0
SP122CN
US0
SP122HN
NT0
SP091CN
NT0
SP122HN
US0
ESPAÑOL

Manual del propietario del aire acondicionado
CONTENIDO
............................
Funionamiento Forzado...................................
Configuració de la hora actual.........................
deshumidificacion sana...................................13
Operación ajuste del temporizador..................15
Cancelación de ajuste del temporizador..........15
Operación Modo reposo ..................................
A. Precauciones de seguridad .........................3
B. Seguridad eléctrica........................................6
Uso temporal de un adaptador........................6
Uso temporal de un alargador
de alimentación ...............................................6
Símbolos utilizados en este manual................6
C. Presentación del producto............................7
Unidades interiores .........................................7
Indicadores luminosos de funcionamiento.......8
Unidad exterior ................................................8
D. Instrucciones de funcionamiento.................9
Inserción de pilas ............................................9
Mantenimiento del mando a distancia
inalámbrico.......................................................9
Método de funcionamiento...............................9
Mando a distancia inalámbrico
Modo funcionamiento......................................12
Funcionamiento automático ...........................13
Funcionamiento de
Operación circulación de aire
.........................14
Operación Limpieza automático
.....................
Del enfriamiento por chorro de aire frio...........
E. Mantenimiento y servicio .............................
Unidad interior ................................................
Unidad exterior ...............................................
Sugerencias ....................................................
Función de auto-diagnóstico ..........................
Consejos de solución de averías
¡Ahorre tiempo y dinero!..................................21
Solicite servicio inmediatamente en las
siguientes circunstancias.................................21
Especificaciones..............................................22
(Modelo sólo enfriamiento).............................10
Mando a distancia inalámbrico.......................11
Control de dirección vertical/horizontal
del flujo de aire (Opcional)
14
Luminosidad de pantalla (Opcional) ...............
14
14
15
16
17
17
18
18
20
20
20
2 Aire acondicionado
PARA SUS ARCHIVOS
Escriba el número de modelo y el de serie aquí:
Nº de modelo
Nº de serie
Podrá encontrarlos en una etiqueta en el lateral de cada unidad.
Nombre del distribuidor
Fecha de compra
Adjunte y grape su recibo a esta página en casi de necesitar
probar la fecha de compra o por motivos de la garantía.
LEA ESTE MANUAL
Dentro encontrará muchas sugerencias útiles sobre el uso y
mantenimiento corrector del aire acondicionado. Apenas
unos simples cuidados preventivos de su parte pueden
ahorrarle mucho tiempo y dinero a lo largo de la vida útil de
su aire acondicionado. Encontrará muchas respuestas a los
problemas comunes en el gráfico de sugerencias para la
solución de averías. Si examina antes su tabla de
Sugerencias para la solución de averías, puede que no
necesite llamar al servicio técnico.
PRECAUCIÓN
• Entre en contacto con un técnico de servicio autorizado
para realizar la reparación o el mantenimiento de esta.
• Entre en contacto con el instalador para la instalación
de esta unidad.
• El aire acondicionado no está diseñado para su uso por
niños pequeños o personas discapacitadas sin
supervisión.
• Los niños pequeños deben estar supervisados para
asegurarse que no juegan con el aire acondicionado.
• Si el cordon de alimentacion es danado, este debe de
sustituirse por un cordon o ensamble especial
disponible por parte del fabricante o su agente de
servicio autorizado.
•
Este aparato no se destina para utilizarse por personas
(incluyendo niños) cuyas capacidades físi-cas, sensoriales
o mentales sean diferentes o estén reducidas,o carezcan
de experiencia o conocimiento, a menos que dichas
personas reciban una supervisión o capacitación para el
funcionamiento del aparato por una persona responsable
de su seguridad.
Los niños deben supervisarse para asegurar que ellos
no empleen los aparatos como juguete.
ADVERTENCIA: Antes de acceder a las terminales, todos
los circuitos de alimentación deben desconectarse.
ADVERTENCIA: Deben incorporarse medios de desconexión
a la instalación fija de acuerdo con las reglas
de instalación.
ADVERTENCIA: Este aparato no es accesible al público
en general .
ADVERTENCIA: El aparato debe instalarse de acuerdo
a las regulaciones nacionales para instalaciones
eléctricas.

ESPAÑOL

Para realizar una limpieza interna, contacte a un Centro de Servicio Autorizado o a un distribuidor.
No utilice detergentes duros que pueden causar corrosión o daño a la unidad.
El detergente duro también puede ocasionar fallas al producto, fuego o descarga eléctrica.

ESPAÑOL
ADVERTENCIA: Antes de acceder a las terminales, todos los circuitos de alimentación deben desconectarse.
ADVERTENCIA: Este aparato no es accesible al público en general.
ADVERTENCIA: El aparato debe instalarse de acuerdo a las regulaciones nacionales para instalaciones eléctricas.

6 Aire acondicionado
Seguridad eléctrica
Seguridad eléctrica
• Este pequeño electrodoméstico debe estar correctamente puesto a tierra.
Para reducir al mínimo el riesgo de descargas eléctricas, siempre deberá enchufar la unidad en una toma con
puesta a tierra.
• No corte ni quite la clavija de puesta a tierra del enchufe de alimentación.
• Fijar el terminal de puesta a tierra del adaptador al tornillo de la tapa de la toma de pared no pondrá a tierra la
unidad a menos que el tornillo de la tapa sea metálico y no esté aislado, y la toma de pared esté puesta a tierra a
través del cableado de la casa.
• Si tiene alguna duda sobre si el aire acondicionado está puesto a tierra correctamente, solicite a un electricista
cualificado que revise la toma de pared y el circuito.
Desaconsejamos firmemente el uso de un adaptador debido a los potenciales peligros de seguridad. En conexiones
temporales, utilice únicamente un adaptador original, disponible en la mayoría de sus almacenes locales de ferretería.
Asegúrese que la ranura grande del adaptador esté alineada con la ranura grande de la toma para realizar una
conexión correcta de la polaridad.
Para desconectar el cable de alimentación del adaptador, coloque una mano en cada uno para evitar dañar la clavija
de puesta a tierra. Evite desenchufar con frecuencia el cable de alimentación, ya que esto podría provocar daños
eventuales a la clavija de puesta a tierra.
• No utilice nunca la unidad con un adaptador roto.
Desaconsejamos firmemente el uso de un alargador de alimentación debido a los potenciales peligros de
seguridad.
Uso temporal de un adaptador
Uso temporal de un alargador de alimentación
Este símbolo le alerta del riesgo de descarga eléctrica.
Este símbolo le alerta de los peligros que pueden causar daños al
aire acondicionado.
Este símbolo indica notas especiales.
NOTA
Símbolos utilizados en este manual
Este pequeño electrodoméstico debe instalarse conforme a las normativas nacionales de cableado
eléctrico. Este manual actúa como guía para ayudar a explicar las características de producto.

Manual del propietario 7
A continuación encontrará una breve presentación de las unidades de interior y exterior.
Por favor, consulte la información específica relativa al tipo de su unidad interior.
Presentación del producto
Presentación del producto
Tipo Split estándar (unidad separada)
Indicadores LED en el panel de visualización
Unidades interiores
ESPAÑOL
Art Cool Delux (Tipo 1)
Indicadores LED en el panel de visualización
Art Cool Delux (Tipo 2)
Indicadores LCD en el panel de visualización
Receptor de señal
Panel frontal
Salida de aire
Receptor de señal
Panel frontal
Salida de aire
Cable de alimentación
Cable de
alimentación
Botón ON/OFF
(encendido/apagado)
Botón ON/OFF
(encendido/apagado)
Filtro de plasma
Filtro de plasma
Entrada de aire
Entrada de aire
Filtro de aire
Filtro de aire
Tipo Art Cool Wide
Entrada de aire
Receptor de señal
Botón ON/OFF (encendido/apagado)
Rejilla frontal
Filtro de aire

8 Aire acondicionado
Presentación del producto
Orificios de entrada de aire
Orificios de salida de aire
Cables de conexión
Conductos de refrigerante
Manguera de drenaje
Placa base
Encendido/
apagado
: Se encenderá durante el funcionamiento del sistema, en caso de código de error
y ajuste de reinicio automático.
Modo reposo : Se enciende durante el funcionamiento automático del modo reposo.(Modelo no inversor)
Plasma : La función ilustra su modo dinámico utilizando un sistema de iluminación múltiple.
Temporizador : Se enciende durante el funcionamiento del temporizador.(Modelo no inversor)
Se ilumina durante el funcionamiento del temporizador o el funcionamiento automático
del modo de reposo (Sólo el modelo inversor)
Modo
descongelación
: Se enciende durante el modo descongelación o el & Arranque en caliente
(Sólo modelo bomba de calor).
: Se enciende durante el funcionamiento al aire libre de la unidad.
(Sólo modelo de enfriamiento).
Funcionamiento
de unidad exterior
OUT
DOOR
Pantalla digital : Indica la temperatura y el modo de funcionamiento configurado.
! Arranque en caliente : Cesa, durante algunos minutos, el funcionamiento del ventilador interior en la función
de calefacción para evitar que el aire frío se escape de la unidad.
! En modo descongelación la unidad cesa su funcionamiento de calefacción durante diez minutos a fin de
eliminar cualquier formación de hielo en las bobinas del intercambiador de calor y mantener así su nivel de
eficacia.
Modo de
funcionamiento
Forma de la
pantalla
Configuración
de temperatura
Estándar
Demasiado
caliente
Calor Frío
Demasiado
frío
Enfriamiento por
chorro de aire
frío/caliente
Comprobación
del
funcionamiento
Limpieza
automática
Comodidad
Modo de funcionamiento automático
Modo enfriamien-
to, calefacción,
deshumidificación
Energy-saving
cooling mode
Unidad exterior
Indicadores luminosos de funcionamiento

Manual del propietario 9
Instrucciones de funcionamiento
Inserción de pilas
Mantenimiento del mando a distancia inalámbrico
1. Desmonte la tapa de la batería tirando de ella en la dirección de
la flecha.
2. Inserte las nuevas pilas asegurándose de que los signos (+) y (-)
de la pila están instalados correctamente.
3. Monte de nuevo la tapa deslizándola nuevamente en posición.
1. Utilice/Sustituya siempre ambas pilas por otras del mismo tipo.
2. Si no piensa utilizar el sistema durante un largo período de
tiempo, retire las pilas a fin de extender su vida útil.
3. Si la información en la pantalla del mando a distancia
comenzara a desvanecerse, sustituya ambas pilas.
4. Utilice 2 pilas AAA (1,5 voltios)
NOTA
1.
Seleccione para éste un lugar seguro y de fácil acceso.
2. Fije el soporte a la pared mediante los tornillos
incluidos.
3. Deslice el mando a distancia en su soporte.
1. El mando a distancia nunca debe ser
expuesto a la luz directa del sol.
2. Debe mantener siempre limpio el
transmisor/receptor de señal a fin de asegurar
una correcta comunicación. Emplee un paño
suave para limpiarlo.
3. Si el mando a distancia opera además otros
equipos, cambie su posición o consulte al
técnico de servicio.
1.
El receptor de señal se encuentra en el interior de la unidad.
2. Apunte a la unidad con el mando a distancia a fin
de ponerla en funcionamiento. No deben existir
obstáculos entre ambos.
NOTA
Instrucciones de funcionamiento
Método de funcionamiento
ESPAÑOL

ESPAÑOL
BOTÓN CALEFACCIÓN (OPCIONAL)
(No disponible en todos los modelos)
BOTÓN JET COOL (enfriamiento rápido)
Utilizado para iniciar o parar la velocidad de enfriamiento. (Opera el
ventilador en velocidad súper rá pida en modo enfriamiento)
BOTÓN DEL MODO REPOSO
Utilizado para configurar el funcionamiento automático del modoreposo.
BOTÓN DE 2 FUNCIÓN
Utilizado antes del uso de modos impresos en azul en la parte
inferior de los botones.
a
a
BOTÓN
ON/OFF
Utilizado para encender/apagar la unidad.
Modo funcionamiento
Modo enfriamiento
Funcionamiento autom
á
tico
Funcionamiento de deshumidificaci
ó
n sana
Modo funcionamiento
BOTÓN DE CIRCULACIÓN DE AIR
Utilizado para hacer circular el aire del cuarto sin enfriarlo nicalentarlo.
BOTONES DE AJUSTE DE LA TEMPERATURA
AMBIENTE
Utilizados para configurar la temperatura ambiente.
BOTÓN DE COMPROBACIÓN DE TEMPERATURA AMBIENTE
Utilizado para comprobar la temperatura ambiente.
BOTÓN DE LIMPIEZA AUTOMÁTICA (OPCIONAL)
Utilizado para configurar el modo de limpieza automática.
En ciertos modelos este botón cuenta con una 2 función del control
deluminosidad del LED.
AUTO CLEAN
BOTÓN DE SELECCIÓN DEL MODO DE FUNCIONAMIENTO
Utilizado para seleccionar el modo de funcionamiento.
BOTONES DE CONFIGURACIÓN HORARIA
Utilizados para ajustar la hora.
BOTONES DE ENCENDIDO/APAGADO DEL TEMPORIZADOR
Utilizados para configurar el tiempo de inicio y cese del funcionamiento.
ON
OFF
BOTÓN DE CONFIGURACIÓN/CANCELACIÓN DEL
TEMPORIZADOR
Utilizado para establecer y cancelar el funcionamiento del temporizador.
SET
CANCEL
BOTÓN RESET
Utilizado antes del tiempo de restablecimiento.
BOTÓN SELECTOR DE VELOCIDAD DEL VENTILADOR
INTERIOR
Utilizado para seleccionar la velocidad del ventilador en cuatro pasos:
bajo, medio, alto y CAOS.
BOTÓN DE CONTROL DE DIRECCIÓN DEL FLUJO DE AIRE
HORIZONTAL (OPCIONAL)
Utilizado para configurar la dirección horizontal deseada del flujo deaire.
Instrucciones de funcionamiento
Los controles serán idénticos a los siguientes.
presione de nuevo el botón 2ndF; de lo contrario cancelará automáticamente si la unidad permanece en ralentí tras 10 segundos.
los botones. Presionar el botón 2ndF activa la función impresa en azul en la base del botón respectivo. Para cancelar la función,
Presione primero el botón 2ndF y después el botón de función deseado a fin de utilizar las funciones impresas en azul en la base de
NOTA
10 Aire acondicionado
Transmisor de señal
ON
OFF
CANCEL
AUTO CLEAN
SET
1
3
15
4
10
13
7
16
8
2
9
11
14
5
Puerta apertura
independiente tipo
“Flip-up!(abierta)”
6
12
Mando a distancia inalámbrico ( Modelo sólo enfriamiento)

BOTÓN CALEFACCIÓN (OPCIONAL)
(No disponible en todos los modelos)
BOTÓN JET COOL (enfriamiento rápido)
Utilizado para iniciar o parar la velocidad de enfriamiento. (Opera el
ventilador en velocidad súper rá pida en modo enfriamiento)
BOTÓN DEL MODO REPOSO
Utilizado para configurar el funcionamiento automático del modoreposo.
BOTÓN DE 2 FUNCIÓN
Utilizado antes del uso de modos impresos en azul en la parte
inferior de los botones.
a
a
BOTÓN DE CIRCULACIÓN DE AIR
Utilizado para hacer circular el aire del cuarto sin enfriarlo nicalentarlo.
BOTONES DE AJUSTE DE LA TEMPERATURA
AMBIENTE
Utilizados para configurar la temperatura ambiente.
BOTÓN DE SELECCIÓN DEL MODO DE FUNCIONAMIENTO
Utilizado para seleccionar el modo de funcionamiento.
Transmisor de señal
BOTÓN
ON/OFF
Utilizado para encender/apagar la unidad.
BOTÓN SELECTOR DE VELOCIDAD DEL VENTILADOR
INTERIOR
Utilizado para seleccionar la velocidad del ventilador en cuatro pasos:
bajo, medio, alto y CAOS.
BOTÓN DE COMPROBACIÓN DE TEMPERATURA AMBIENTE
Utilizado para comprobar la temperatura ambiente.
BOTÓN DE LIMPIEZA AUTOMÁTICA (OPCIONAL)
Utilizado para configurar el modo de limpieza automática.
En ciertos modelos este botón cuenta con una 2 función del control
deluminosidad del LED.
AUTO CLEAN
BOTONES DE CONFIGURACIÓN HORARIA
Utilizados para ajustar la hora.
BOTONES DE ENCENDIDO/APAGADO DEL TEMPORIZADOR
Utilizados para configurar el tiempo de inicio y cese del funcionamiento.
ON
OFF
BOTÓN DE CONFIGURACIÓN/CANCELACIÓN DEL
TEMPORIZADOR
Utilizado para establecer y cancelar el funcionamiento del temporizador.
SET
CANCEL
BOTÓN RESET
Utilizado antes del tiempo de restablecimiento.
BOTÓN DE CONTROL DE DIRECCIÓN DEL FLUJO DE AIRE
HORIZONTAL (OPCIONAL)
Utilizado para configurar la dirección horizontal deseada del flujo deaire.
Instrucciones de funcionamiento
Los controles serán idénticos a los siguientes.
presione de nuevo el botón 2ndF; de lo contrario cancelará automáticamente si la unidad permanece en ralentí tras 10 segundos.
los botones. Presionar el botón 2ndF activa la función impresa en azul en la base del botón respectivo. Para cancelar la función,
Presione primero el botón 2ndF y después el botón de función deseado a fin de utilizar las funciones impresas en azul en la base de
Sólo modelo bomba de calorMando a distancia inalámbrico
ON
OFF
CANCEL
AUTO CLEAN
SET
1
3
15
4
10
13
7
16
8
2
9
11
14
5
Puerta apertura
independiente tipo
“Flip-up!(abierta)”
Funcionamiento autom
á
tico o cambio autom
ático
Funcionamiento de deshumidificaci
ó
n sana
Modo funcionamiento
Modo funcionamiento
6
12
Funcionamiento de calefacci
ón
Modelo enfriamiento
Modelo bomba de calor
NOTA
11
Manual del propietario
ESPAÑOL

Modo funcionamiento
Presione el botón Start/Stop para encender la unidad.
La unidad responderá con una señal sonora
Establezca la temperatura interior deseada, para la operación
de enfriamiento o calefacción presionando los BOTONES DE
AJUSTE DE TEMPERATURA AMBIENTE. La temperatura de
enfriamiento debe establecerse entre los 18 °C y los 30°C y,
para la calefacción, entre los 16 °C y los 30 °C
Establezca la velocidad del ventilador mediante el mando a distancia. Usted puede
seleccionar la velocidad del ventilador en cuatro pasos: bajo, medio, alto y CAOS.
Cada vez que presione el botón, cambiar el modo de velocidad del ventilador.
1
3
4
Viento natural
La velocidad del
ventilador es baja.
La velocidad del
ventilador es media.
La velocidad del
ventilador es alta.
Deshumidificación!
sana
Deshumidificación!
sana
Cambio!
automático
Abra la puerta del mando a distancia y presione el botón modo de funcionamiento.
Cada vez que presione el botón, el modo de funcionamiento cambiará en la dirección
2
de la flecha. ( Sólo modelo bomba de calor)
Abra la puerta del mando a distancia y presione el botón modo de funcionamiento.
Cada vez que presione el botón, el modo de funcionamiento cambiará en la dirección
de la flecha. ( Sólo modelo de enfriamiento)
Calefacción!
(S
ó
lo el modelo bomba de calor)
Enfriamiento Cambio!
automático
Enfriamiento
Viento natural
Modo funcionamiento
Para lograr una sensación más fresca, presione el BOTÓN SELECTOR DE VELOCIDAD DEL VENTILADOR
INTERIOR y configure el modo
Viento natural.
En este modo, el viento sopla como una brisa natural cambiando automátticamente la velocidad del ventilador según
Instrucciones de funcionamiento
12 Aire acondicionado

En este caso, sin embargo, la temperatura establecida no se muestra en el
mando a distancia y usted tampoco podrá controlar la temperatura ambiente.
Durante el funcionamiento de la deshumidificación sana
Si selecciona el modo deshumidificación mediante el BOTÓN DE
SELECCIÓNDEL MODO DE FUNCIONAMIENTO, el producto activará
la función de deshumidificación. Establece automáticamente la temperatura
ambiente y el volumen del flujo de aire a las mejores condiciones para la
deshumidificación,basándose en la temperatura ambiente actual detectada.
Durante la función de deshumidificación sana el volumen del flujo de aire se
establece automáticamente según el algoritmo de optimización que responde
al estado actual de la temperatura ambiente, para mantener las condiciones
del cuarto sanas y confortables incluso en estaciones muy húmedas.
Funcionamiento de deshumidificación sana
Instrucciones de funcionamiento
Neutral
No podrá establecer la temperatura de ajuste actual y la velocidad del
ventilador interior en este modo de funcionamiento. Aunque puede
utilizar el cambio Chaos en esta operación.Si el sistema no está
funcionando según lo deseado, cambie manualmente a otro modo.
NOTA
<Para modelos de refrigeración>
La temperatura y la velocidad del ventilador se configura automáticamente con los controles electrónicos
basándose en la temperatura real de la sala. Si tiene calor o frío, pulse los botones de CONFIGURACIÓN
DE TEMPERATURA para aumentar el efecto de calor o frío. No se puede cambiar la velocidad del
ventilador de interior. Ya ha sido configurada por el Modo de operación automática.
Código
Sensación
Frío
Ligeramente fresco
Ligeramente cálido
Calor
Seleccione el código
según sus requisitos.
Puede seleccionar la temperatura y la velocidad de ventilador de interior que
desee. Configuración de temperatura Rango: 18-30°C
<Para modelos de calefacción>
Funcionamiento automático
13
Manual del propietario
ESPAÑOL

Durante la función de limpieza automática, podrá eliminarse la humedad que aún permanezca en las
unidades interiores tras el enfriamiento o deshumidificación sana.
Presione el BOTÓN LIMPIEZA AUTOMÁTICA para activar esta
función.( ) Ahora, siempre que la unidad esté apagada, el
ventilador interior continuará en deshumidificar. Igualmente
permanecerá cerrada la rejilla.Esto eliminará cualquier humedad
existente y limpiará internamente la unidad.Si presionara, de nuevo, el
BOTÓN LIMPIEZA AUTOMÁTICA durante su ejecución, la función sería
cancelada.
Durante la función de limpieza automática, sólo podrá utilizar el BOTÓN
ON/OFF, BOTÓN PLASMA y el BOTÓN LIMPIEZA AUTOMÁTICA.
NOTA
Operación Limpieza automática
AUTO CLEAN
AUTO CLEAN
Instrucciones de funcionamiento
Esta operación hace circular el aire del cuarto sin enfriarlo ni calentarlo.
Puede ser activado presionando el BOTÓN CIRCULACIÓN DE AIRE.
Una vez activada la circulación de aire, usted podrá seleccionar la
velocidad del aire presionando el BOTÓN SELECTOR DE VELOCIDAD
DEL VENTILADOR INTERIOR.
Operación circulación de aire
14 Aire acondicionado
La hora sólo puede configurarse al presionar el BOTÓN RESET. Si ha cambiado las pilas,
deberá presionar el BOTÓN RESET para restablecer la hora. Presione el botón ON/OFF.
Presione el botón 2ndF y compruebe si el icono está encendido.
Compruebe el indicador de A.M. y P.M.
NOTA
Configuración de la hora actual
2
Presione los BOTONES DE CONFIGURACIÓN HORARIA hasta establecer
la hora deseada.
3
Presione el BOTÓN CONFIGURACIÓN HORARIA/CANCELAR.
4
1
CANCEL
SET
La luminosidad de la pantalla de la unidad puede ajustarse usando el control remoto.
Abra la cubierta del control remoto y pulse el botón LED LUMINOSITY (LUMINOSIDAD DE LED).
La pantalla estará oscura. Pulse el botón de nuevo para configurar el brillo de la pantalla.
Luminosidad de pantalla (Opcional)

Cancelación de ajuste del temporizador
•
El modo reposo operará el ventilador interior a baja velocidad en modo enfriamiento, y a velocidad media en modo calefacción para
lograr un descanso agradable.
En modo enfriamiento o modo de deshumidificación sana:
La temperatura de ajuste aumentará automáticamente, dos veces, en incrementos de 1°C durante los siguientes 30 minutos
(y de 2°C durante 1 hora) para lograr un descanso agradable. A partir de ahora ésta será la temperatura final siempre que el
modo reposo permanezca en funcionamiento.
NOTA
Presione el BOTÓN MODO REPOSO AUTOMÁTICO para configurar la hora a la que desea que la unidad se
apague automáticamente.El temporizador se programa en incrementos de una hora presionando el BOTÓN
MODO REPOSO AUTOMÁTICO de 1 a 7 veces. El modo reposo est disponible de 1 a 7 horas.
Operación Modo reposo
Operación ajuste del temporizador
1
Asegúrese de ajustar correctamente la hora actual en la pantalla del mando a
distancia.
2
Presione el botón 2 F.
3
Presione los BOTONES DE TEMPORIZADOR ENCENDIDO/APAGADO
para encender o apagar el temporizador.
4
Presione los BOTONES DE CONFIGURACIÓN HORARIA hasta establecer
la hora deseada.
5
Para establecer el tiempo seleccionado, presione los BOTONES DE AJUSTE
DEL TEMPORIZADOR mientras apunta al receptor de señal con el mando a
distancia.
Description
Button on the
Remote Controller
ON
OFF
CANCEL
SET
Compruebe si el icono está inactivo.
Presione el BOTÓN DE CANCELACIÓN DEL TEMPORIZADOR apuntando al receptor de señal con
el mando a distancia. (Se apagará la luz del temporizador del aire acondicionado y la pantalla.)
CANCEL
SET
Desactivación retardada
del temporizador
Activación retardada
del temporizador
Desactivación y activación
retardada del temporizador
Activación y desactivación
retardada del temporizador
Seleccione uno de los siguientes cuatro tipos de funcionamiento.
NOTA
a
Instrucciones de funcionamiento
1
Manual del propietario
ESPAÑOL

Control de dirección vertical/horizontal del flujo de aire (Opcional)
• Si presiona el BOTÓN CHAOS SWING, la dirección horizontal del flujo de aire cambiará automáticamente basándose en el
algoritmo chaos para distribuir uniformemente el aire del cuarto y al mismo tiempo hacer que el cuerpo humano se sienta
más cómodo, como si disfrutara de una brisa natural.
• Utilice siempre el mando a distancia para ajustar la dirección arriba/abajo del flujo de aire. Mover manualmente la pala
vertical de dirección del flujo de aire podría dañar el mecanismo. Al apagar la unidad, la pala de dirección arriba/abajo del
flujo de aire cerrará el orificio de salida de aire del sistema.
Instrucciones de funcionamiento
16 Aire acondicionado
NOTA
El flujo de aire arriba/abajo (flujo de aire vertical) puede ajustarse mediante el mando a distancia.
1. Presione el BOTÓN START/STOP para iniciar la unidad.
2. Presione el BOTÓN CHAOS SWING.
3. Las rejillas oscilan automáticamente hacia arriba y abajo.
4. Presione de nuevo para fijar la rejilla en el ángulo deseado

Operación de prueba
Durante la OPERACIÓN DE PRUEBA, la unidad opera en el modo de refrigeración con el ventilador de alta velocidad, sin tener
encuenta la temperatura y restaura en 18 minutos. Durante la operación de prueba, si se recibe la señal del control remoto, la unidad
opera como fije el control remoto.Si desea utilizar esta operación, abra hacia arriba el panel delantero y mantenga presionado el botón
ON/OFF durante 3-5 segundos. Después se emitirá un pitido 1 "beep".Si desea detener la operación, vuelva a presionar el botón.
Del enfriamiento por chorro de aire frío
Funcionamiento Forzado
Procedimientos pare el funcionamiento cuando no se puede utilizar el control remoto. La unidad se pone en
marcha cuando se pulsa este botón.Si desea pararla, pulse el botón de nuevo.
La función de chorro de aire frío puede ser empleada para enfriar rápidamente un cuarto
en un día caluroso. Cuando esta función esté activa, el aire acondicionado funcionará en
modo operación de enfriamiento, con una velocidad ultrarrápida del ventilador y una
temperatura de 18ºC durante 30 minutos a fin de lograr un enfriamiento rápido y eficaz.
Podrá activar este funcionamiento presionando el BOTÓN JET COOL
(enfriamiento por chorro de aire).Para cambiar del modo enfriamiento por
chorro de aire al modo enfriamiento por velocidad alta del ventilador,
presione de nuevo el BOTÓN JET COOL o BOTÓN SELECTOR DE
VELOCIDAD DEL VENTILADOR INTERIOR o el BOTÓN DE AJUSTE DE
TEMPERATURA AMBIENTE.
Alta Alta Alta
-
<
-
21°C 21°C24°C
Modelo de bomba de calor
Temperatura de la habitación <
Modelo de
enfriamiento
Temperatura de la habitación
24°C
>
22°C 22°C 23°C 24°C
temp. habit. <
°
Modo de funcionamiento
Enfriamiento Enfriamiento Deshumidificación saludable Calentamiento
Velocidad de VENTILADOR interior
Alta
Seleccionar la temperatura
Instrucciones de funcionamiento
17
Manual del propietario
ESPAÑOL
Botón
ON/OFF

18 Aire acondicionado
Mantenimiento y servicio
Mantenimiento y servicio
Unidad interior
Antes de realizar labores de mantenimiento, desconecte la alimentación del sistema, cierre el interruptor y
desenchufe el cable de alimentación.
Limpie la unidad con un paño seco y suave. No utilice lejía o sustancias abrasivas.
No utilice nunca los siguientes elementos:
• Agua caliente por encima de los 40°C Podría causar la deformación y/o
decoloración de la unidad.
• Sustancias volátiles. Podrían dañar la superficie del aire ac
• No limpie el filtro 3M con agua, podría dañarse.
ondicionado.
Filtros de aire
Los filtros de aire tras el panel/rejilla frontal deberán revisarse y limpiarse una vez
cada 2 semanas o más a menudo si es necesario. Consulte los diagramas auto-
explicativos para cada tipo de modelo a fin de saber cómo retirar los filtros. Limpie los
filtros con una aspiradora o con agua templada y jabonosa. Si la suciedad aún
resulta notable, lave el producto con una solución de detergente y agua templada.
Déjelos secar a la sombra y vuelva a instalar los filtros en su lugar, una vez secos.
Filtros de plasma (Opcional)
Los filtros de plasma tras el filtro de aire deberán revisarse y limpiarse una vez cada 3
meses o más a menudo si fuera necesario. Consulte los diagramas auto-explicativos
para cada tipo de modelo a fin de saber cómo retirar los filtros. Limpie los filtros con
una aspiradora. Si la suciedad aún resulta notable, lave el producto con agua
templada y déjelos secar a la sombra y vuelva a instalarlos en su lugar.
G
a
s
o
l
i
n
e
P
o
w
d
e
r
Filtro multi protección
Se debería comprobar y limpiar el filtro multiprotección ubicado
tras el filtro de aire una vez al mes o más si necesario.A fin de retirar
los filtros, véase los diagramas auto-explicativos para cada tipo de
modelo.Limpie los filtros con un aspirador.No limpie el filtro multi
protección con agua, podría dañarse.E introduzca el filtro en su posición original.
•
•
•
Sugerimos que sustituya el filtro multi protección cada 6 meses.
La ubicación del filtro puede ser diferente dependiendo del modelo.
Si necesita más filtros, por favor, contacte con el centro de servicio de LG.
(refiérase a la carta de garantía,)
•
Extraiga el filtro multi protección de la bolsa de plástico embalada aparte.
Instalación de un nuevo filtro multi protección
•
Introduzca el filtro multi protección dentro de la caja.
•
El filtro multi protección se instala con la marca 3M delante.

1. Tipo Deluxe (Tipo 1):
Abra la parte superior del panel e inclínelo como se muestra. Los ganchos del panel se desprenderán.
Desmonte los filtros de aire. A continuación, extraiga el filtro de plasma.
2. Tipo Deluxe (Tipo 2):
Abra el panel frontal como se muestra.
A continuación, extraiga levemente hacia delante la lengüeta del filtro a fin de desmontar el filtro de aire.
Tras desmontar el filtro de aire, retire el filtro de plasma y el desodorante extrayéndolo levemente hacia delante.
Una vez finalidad su limpieza y secado, vuelva a instalar los filtros en su posición
original.
Panel frontal
Panel frontal
Gancho
de panel
Filtro de plasma
Filtro de plasma
3. Tipo Split estándar : Existen dos métodos para abrir el panel delantero, según el tipo de aire
acondicionado, como se explica a continuación:
Tipo 1:
Abra el panel frontal como se muestra.
A continuación, extraiga levemente hacia delante la lengüeta del filtro a fin de desmontar el filtro de aire.
Tras desmontar el filtro de aire, retire el filtro de plasma y el desodorante extrayéndolo levemente hacia
delante.
Filtro de plasma
(opcional)
Instrucciones de uso del panel frontal
1. Cierre del panel frontal
Desplace la articulación de unión hacia arriba y
cierre el panel frontal.
2. Desmontaje del panel frontal
Eleve la articulación de unión para enganchar
el soporte, y desmonte el panel frontal hacia
delante.
Manual del propietario 19
Mantenimiento y servicio
ESPAÑOL
Desmontaje de filtros
descargas eléctricas.
No toque el filtro plasma en los 10 segundos siguientes a la apertura de la rejilla de entrada, podría causar
Filtro multi
protección
!

No toque el filtro plasma en los 10 segundos siguientes a la apertura de la rejilla de entrada, podría causar
descargas eléctricas.
Unidad exterior
Debe revisar habitualmente las bobinas del intercambiador de calor y los orificios del panel de la unidad exterior.
Si están obstruidos con suciedad u hollín, el intercambiador de calor y los orificios del panel pueden limpiarse
profesionalmente con vapor.
Tener las bobinas sucias u obstruidas reduce la eficacia de funcionamiento del sistema y causa importantes gastos de funcionamiento.
NOTA
Sugerencias
Función de auto-diagnóstico
LED ( ) de muestra de error
Punto de control
• Termistor de temperatura ambiente interior
abierto/cortocircuitado.!
• Termistor de temperatura de los conductos
interiores abierto/cortocircuitado.
(una vez)
3 s 3 s 3 s
Esta unidad tiene una prestación incorporada de diagnóstico de error. El LED ( ) de la unidad
parpadeará en caso de avería del termistor.
Si experimentara estas condiciones, por favor, contacte con su técnico/distribuidor
No enfríe demasiado el
habitáculo.
Esto no es sano para su salud y
además representa un derroche
de electricidad.
Mantenga cerradas cortinas
y persianas.
No permita que la luz directa del
sol entre en el habitáculo mientras
el aire acondicionado se
encuentre en funcionamiento.
Mantenga uniforme la
temperatura del habitáculo.
Ajuste la dirección del flujo de
aire vertical y horizontal para
asegurar una temperatura
uniforme en todo el habitáculo.
Asegúrese que las
puertas y ventanas
estén bien cerradas.
En lo posible, vite abrir
puertas y ventanas para
mantener el aire frío en el
interior del habitáculo.
Limpie el filtro de aire
con regularidad.
Las obstrucciones en el filtro
de aire reducen el flujo de
aire y reduce los efectos de
enfriamiento y
deshumidificación. Límpielo
al menos cada dos semanas.
Ventile el habitáculo
ocasionalmente.
Como las ventanas
permanecen cerradas,
es buena idea abrirlas
para ventilar el cuarto de
vez en cuando.
Configure el ventilador
a alta velocidad para
lograr un enfriamiento
rápido y eficaz.
Cuando la velocidad del
ventilador sea alta, la
unidad proporcionará su
capacidad nominal de
enfriamiento.
Tipo 2:
Extraiga el panel delantero de ambos lados, como se muestra.
A continuación, tire levemente hacia delante de la lengüeta del filtro a fin de extraerlo. Una vez extraído el filtro
de aire, retire el de plasma y el triple desodorante tirando con cuidado hacia delante.
Filtro de plasma
Filtro!
desodorante
20 Aire acondicionado
Mantenimiento y servicio

Solicite servicio inmediatamente en las siguientes circunstancias
Consejos de solución de averías ¡Ahorre tiempo y dinero!
El aire acondicionado puede funcionar de forma poco normal cuando:
Problema
El aire acondicionado está
desenchufado.
El fusible está fundido/el interruptor
está activado.
Caída de tensión.
Alto o baja voltaje
El flujo de aire está restringido.
El filtro de aire está sucio
El cuarto puede haber estado muy
caliente.
El aire frío se escapa.
Compruebe los ajustes de
temperatura.
Puede existir otra fuente de calor en
el cuarto.
El aire
acondicionad
o no se inicia
El aire
acondicionad
o no enfría
como debería
• Asegúrese que el aire acondicionado esté
enchufado completamente en la salida.
• Compruebe el fusible/interruptor y sustituya el
interruptor o reinicio el interruptor.
• Si experimenta una caída de tensión, apague el
modo de control.
Cuando se restablezca la tensión, espere 3
minutos para reiniciar el aire acondicionado y
evitar la desconexión de sobrecarga del
compresor.
• Si la tensión fuera inusualmente muy alta o muy
baja, el interruptor se desconectaría.
• Asegúrese que no existen cortinas, persianas o
mobiliario bloqueando la parte frontal del aire
acondicionado.
• Limpie el filtro al menos cada 2 semanas.
Consulte la sección Servicio y Mantenimiento.
• Al encender por primera vez el aire
acondicionado, necesitará dejar pasar un
tiempo hasta que el cuarto se enfríe.
• Revise los registros de calor abierto y los
retornos de aire frío.
• Asegúrese de que sean correctos.
• Compruebe la existencia y retire tal fuente, o
desconéctela durante el uso del aire
acondicionado.
Qué hacerCausas probables
1. Toda condición fuera de lo común, como el olor a quemado, ruidos, etc..
No intente nunca reparar la unidad usted mismo, oreiniciar el sistema en tales casos.
2. El cable principal de alimentación está demasiado caliente o dañado.
3. Se genera un código de error mediante el auto-diagnóstico.
4. Fugas de agua en la unidad interior incluso con un nivel de humedad ínfimo.
5. Todos los interruptores (de seguridad, puesta a tierra) o fusibles sufren averías y, por ende, no
funcionan correctamente.
El usuario debe realizar comprobaciones y labores de limpieza a fin de eliminar el riesgo de
un mal funcionamiento.
Manual del propietario 21
Mantenimiento y servicio
ESPAÑOL

22 Aire acondicionado
Mantenimiento y servicio
ESPECIFICACIONES:
SP091CN NT0
115 V
~
920W 8,5A
SP091CN US0
115 V
~
920W 8,5A
SP121CN NT0
115 V
~
1 178W
1 178W
1 127W
1 150W
1 150W
1 127W
1 192W
1 192W
1 125W
1 125W
10,7A
SP121CN US0
115 V
~
10,7A -
-
-
-
-
-
-
-
SP121HN NT0
115 V
~
10,3A
10,4A
SP121HN US0
115 V
~
10,3A
SP122CN NT0
220 V
~
5,2A - -
SP122CN US0
220 V
~
5,2A - -
SP122HN NT0
220 V
~
5,4A 1 200W 5,5A
SP122HN US0
220 V
~
5,4A 1 200W 5,5A
MODEL VOLTAGE
10,4A
CONSUMO CORR ENTE
REFRIGERACION
I CONSUMO CORRIENTE
CALEFACCION

LG ELECTRONICS MEXICO,S.A. DE C.V.
Sor Juana Inés de la Cruz No. 555
Tlalnepantla de Baz,Estado de México C.P. 54033
Sin Costo:01800-3471919
Pagina Web:http://www.lg.com.mx/
Col. San Lorenzo Industrial
Tel
é
fono:(55)5321-1919
-
 1
1
-
 2
2
-
 3
3
-
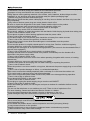 4
4
-
 5
5
-
 6
6
-
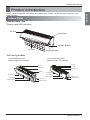 7
7
-
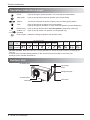 8
8
-
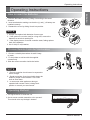 9
9
-
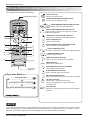 10
10
-
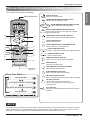 11
11
-
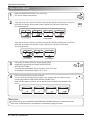 12
12
-
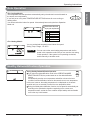 13
13
-
 14
14
-
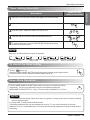 15
15
-
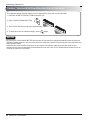 16
16
-
 17
17
-
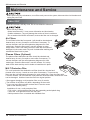 18
18
-
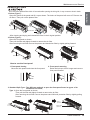 19
19
-
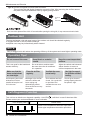 20
20
-
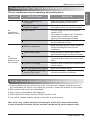 21
21
-
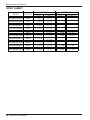 22
22
-
 23
23
-
 24
24
-
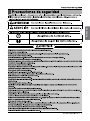 25
25
-
 26
26
-
 27
27
-
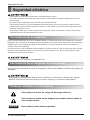 28
28
-
 29
29
-
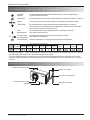 30
30
-
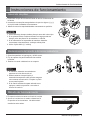 31
31
-
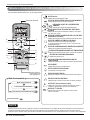 32
32
-
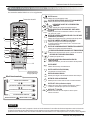 33
33
-
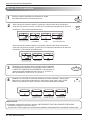 34
34
-
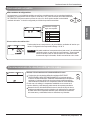 35
35
-
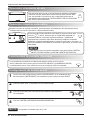 36
36
-
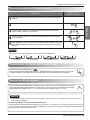 37
37
-
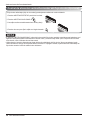 38
38
-
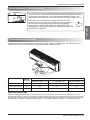 39
39
-
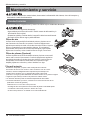 40
40
-
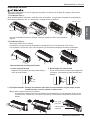 41
41
-
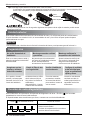 42
42
-
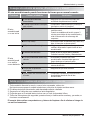 43
43
-
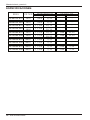 44
44
-
 45
45


LG SP122CN Manual de usuario
- Tipo
- Manual de usuario
en otros idiomas
- English: LG SP122CN User manual
Artículos relacionados
-
LG A122HR Manual de usuario
-
-
-
-
-
LG SP242CN El manual del propietario
-
-
LG MC12AHR Manual de usuario
-
LG PQWRHQ0FDB.ENCXLEU El manual del propietario
-