Yamaha DTX402K El manual del propietario
- Categoría
- Tambores musicales
- Tipo
- El manual del propietario
Este manual también es adecuado para

Owner’s Manual
ELECTRONIC DRUM KIT
DTX402K
DTX432K
DTX452K
EN

DTX402K DTX432K DTX452K Owner’s Manual
S-1
For Instrument
This product utilizes batteries or an external power supply (adapter).
DO NOT connect this product to any power supply or adapter other
than one described in the manual, on the name plate, or specifically
recommended by Yamaha.
WARNING:
Do not place this product in a position where anyone
could walk on, trip over, or roll anything over power or connecting cords of
any kind. The use of an extension cord is not recommended! If you must
use an extension cord, the minimum wire size for a 25’ cord (or less) is 18
AWG. NOTE: The smaller the AWG number, the larger the current han-
dling capacity. For longer extension cords, consult a local electrician.
This product should be used only with the components supplied or; a
cart, rack, or stand that is recommended by Yamaha. If a cart, etc., is
used, please observe all safety markings and instructions that accom-
pany the accessory product.
SPECIFICATIONS SUBJECT TO CHANGE:
The information contained in this manual is believed to be correct at
the time of printing. However, Yamaha reserves the right to change or
modify any of the specifications without notice or obligation to update
existing units.
This product, either alone or in combination with an amplifier and
headphones or speaker/s, may be capable of producing sound levels
that could cause permanent hearing loss. DO NOT operate for long
periods of time at a high volume level or at a level that is uncomfort-
able. If you experience any hearing loss or ringing in the ears, you
should consult an audiologist.
IMPORTANT: The louder the sound, the shorter the time period before
damage occurs.
Some Yamaha products may have benches and / or accessory mount-
ing fixtures that are either supplied with the product or as optional
accessories. Some of these items are designed to be dealer assem-
bled or installed. Please make sure that benches are stable and any
optional fixtures (where applicable) are well secured BEFORE using.
Benches supplied by Yamaha are designed for seating only. No other
uses are recommended.
NOTICE:
Service charges incurred due to a lack of knowledge relating to how a
function or effect works (when the unit is operating as designed) are
not covered by the manufacturer’s warranty, and are therefore the
owners responsibility. Please study this manual carefully and consult
your dealer before requesting service.
ENVIRONMENTAL ISSUES:
Yamaha strives to produce products that are both user safe and envi-
ronmentally friendly. We sincerely believe that our products and the
production methods used to produce them, meet these goals. In keep-
ing with both the letter and the spirit of the law, we want you to be
aware of the following:
Battery Notice:
This product MAY contain a small non-rechargeable battery which (if
applicable) is soldered in place. The average life span of this type of
battery is approximately five years. When replacement becomes nec-
essary, contact a qualified service representative to perform the
replacement.
This product may also use “household” type batteries. Some of these
may be rechargeable. Make sure that the battery being charged is a
rechargeable type and that the charger is intended for the battery
being charged.
When installing batteries, never mix old batteries with new ones, and
never mix different types of batteries. Batteries MUST be installed cor-
rectly. Mismatches or incorrect installation may result in overheating
and battery case rupture.
Warning:
Do not attempt to disassemble, or incinerate any battery. Keep all bat-
teries away from children. Dispose of used batteries promptly and as
regulated by the laws in your area. Note: Check with any retailer of
household type batteries in your area for battery disposal information.
Disposal Notice:
Should this product become damaged beyond repair, or for some rea-
son its useful life is considered to be at an end, please observe all
local, state, and federal regulations that relate to the disposal of prod-
ucts that contain lead, batteries, plastics, etc. If your dealer is unable
to assist you, please contact Yamaha directly.
NAME PLATE LOCATION:
The name plate is located on the bottom of the product. The model
number, serial number, power requirements, etc., are located on this
plate. You should record the model number, serial number, and the
date of purchase in the spaces provided below and retain this manual
as a permanent record of your purchase.
Model
Serial No.
Purchase Date
PLEASE KEEP THIS MANUAL
SPECIAL MESSAGE SECTION
92-BP (bottom)
COMPLIANCE INFORMATION STATEMENT (DECLARATION OF CONFORMITY PROCEDURE)
Responsible Party : Yamaha Corporation of America
Address : 6600 Orangethorpe Ave., Buena Park, Calif. 90620
Telephone : 714-522-9011
Type of Equipment : Electronic Drum Kit
Model Name : DTX402K, DTX432K, DTX452K
This device complies with Part 15 of the FCC Rules.
Operation is subject to the following two conditions:
1) this device may not cause harmful interference, and
2) this device must accept any interference received including interference that may cause undesired operation.
See user manual instructions if interference to radio reception is suspected.
* This applies only to products distributed by YAMAHA CORPORATION OF AMERICA. (FCC DoC)

S-2
DTX402K DTX432K DTX452K Owner’s Manual
For AC adaptor and Instrument
1. IMPORTANT NOTICE: DO NOT MODIFY THIS
UNIT!
This product, when installed as indicated in the instructions
contained in this manual, meets FCC requirements. Modifi-
cations not expressly approved by Yamaha may void your
authority, granted by the FCC, to use the product.
2. IMPORTANT: When connecting this product to accesso-
ries and/or another product use only high quality shielded
cables. Cable/s supplied with this product MUST be used.
Follow all installation instructions. Failure to follow instruc-
tions could void your FCC authorization to use this product
in the USA.
3. NOTE: This product has been tested and found to comply
with the requirements listed in FCC Regulations, Part 15 for
Class “B” digital devices. Compliance with these require-
ments provides a reasonable level of assurance that your
use of this product in a residential environment will not
result in harmful interference with other electronic devices.
This equipment generates/uses radio frequencies and, if
not installed and used according to the instructions found in
the users manual, may cause interference harmful to the
operation of other electronic devices. Compliance with FCC
regulations does not guarantee that interference will not
occur in all installations. If this product is found to be the
source of interference, which can be determined by turning
the unit “OFF” and “ON”, please try to eliminate the problem
by using one of the following measures:
Relocate either this product or the device that is being
affected by the interference.
Utilize power outlets that are on different branch (circuit
breaker or fuse) circuits or install AC line filter/s.
In the case of radio or TV interference, relocate/reorient the
antenna. If the antenna lead-in is 300 ohm ribbon lead,
change the lead-in to co-axial type cable.
If these corrective measures do not produce satisfactory
results, please contact the local retailer authorized to dis-
tribute this type of product. If you can not locate the appro-
priate retailer, please contact Yamaha Corporation of
America, Electronic Service Division, 6600 Orangethorpe
Ave, Buena Park, CA90620
The above statements apply ONLY to those products dis-
tributed by Yamaha Corporation of America or its subsidiar-
ies.
* This applies only to products distributed by YAMAHA CORPORATION OF AMERICA. (class B)
FCC INFORMATION (U.S.A.)

DTX402K DTX432K DTX452K Owner’s Manual
S-3
OBSERVERA!
Apparaten kopplas inte ur växelströmskällan (nätet) så länge som den ar ansluten till vägguttaget, även om själva apparaten
har stängts av.
ADVARSEL: Netspændingen til dette apparat er IKKE afbrudt, sålænge netledningen sidder i en stikkontakt, som er tændt
— også selvom der er slukket på apparatets afbryder.
VAROITUS: Laitteen toisiopiiriin kytketty käyttökytkin ei irroita koko laitetta verkosta.
For AC adaptor
This device complies with Part 15 of the FCC Rules. Operation is subject to the fol-
lowing two conditions:
(1) this device may not cause harmful interference, and (2) this device must accept
any interference received, including interference that may cause undesired operation.
(can_b_02)
CAN ICES-3 (B)/NMB-3(B)
Explanation of Graphical Symbols
The lightning flash with arrowhead symbol
within an equilateral triangle is intended to
alert the user to the presence of uninsulated
“dangerous voltage” within the product’s
enclosure that may be of sufficient magni-
tude to constitute a risk of electric shock to
persons.
The exclamation point within an equilateral
triangle is intended to alert the user to the
presence of important operating and mainte-
nance (servicing) instructions in the litera-
ture accompanying the product.
IMPORTANT SAFETY INSTRUCTIONS
1 Read these instructions.
2 Keep these instructions.
3 Heed all warnings.
4 Follow all instructions.
5 Do not use this apparatus near water.
6 Clean only with dry cloth.
7 Do not block any ventilation openings. Install in accor-
dance with the manufacturer’s instructions.
8 Do not install near any heat sources such as radiators,
heat registers, stoves, or other apparatus (including
amplifiers) that produce heat.
9 Do not defeat the safety purpose of the polarized or
grounding-type plug. A polarized plug has two blades
with one wider than the other. A grounding type plug
has two blades and a third grounding prong. The wide
blade or the third prong are provided for your safety. If
the provided plug does not fit into your outlet, consult
an electrician for replacement of the obsolete outlet.
10 Protect the power cord from being walked on or
pinched particularly at plugs, convenience recepta-
cles, and the point where they exit from the apparatus.
11 Only use attachments/accessories specified by the
manufacturer.
12 Use only with the cart, stand, tri-
pod, bracket, or table specified
by the manufacturer, or sold with
the apparatus. When a cart is
used, use caution when moving
the cart/apparatus combination
to avoid injury from tip-over.
13 Unplug this apparatus during
lightning storms or when unused for long periods of
time.
14 Refer all servicing to qualified service personnel. Ser-
vicing is required when the apparatus has been dam-
aged in any way, such as power-supply cord or plug is
damaged, liquid has been spilled or objects have
fallen into the apparatus, the apparatus has been
exposed to rain or moisture, does not operate nor-
mally, or has been dropped.
(UL60065_03)
CAUTION: TO REDUCE THE RISK OF
ELECTRIC SHOCK, DO NOT REMOVE
COVER (OR BACK). NO USER-SERVICEABLE
PARTS INSIDE. REFER SERVICING TO
QUALIFIED SERVICE PERSONNEL.
CAUTION
RISK OF ELECTRIC SHOCK
DO NOT OPEN
WARNING
TO REDUCE THE RISK OF FIRE OR ELECTRIC SHOCK, DO NOT EXPOSE THIS APPARATUS TO RAIN OR MOISTURE.

DTX402K DTX432K DTX452K Owner’s Manual
3
Contents
PRECAUTIONS ............................................ 4
Welcome....................................................... 7
About the Manuals ...................................... 7
Printed Manual .................................................. 7
Digital Manual (PDF)......................................... 7
Setup
First Steps.................................................... 8
Package Contents ....................................... 9
Assembly Guide ........................................ 12
Setting Up for Sound ................................ 21
Connecting the Power ..................................... 21
Connecting Headphones or Speakers ............ 21
Connecting a Music Player ............................. 21
Turning On the Drum Module.......................... 22
Turning Off the Drum Module.......................... 22
Auto Power-Off ................................................ 22
Restoring the Default Settings
(Factory Reset)........................................... 22
Panel Controls & Functions ..................... 23
Control Panel .................................................. 23
Bottom Panel................................................... 24
Top Panel ........................................................ 24
Basic Techniques
Playing Techniques................................... 25
Snare Pad ....................................................... 25
Hi-hat Cymbal ................................................. 25
Crash Cymbal ................................................. 25
Performing with
a Selected Music Category..................... 26
Selecting a Music Category ............................ 26
Adjusting Kit Sensitivity................................... 26
Performing with a Song................................... 27
Adjusting the Song Volume............................. 27
Adjusting the Volume of Muted Drum Parts .... 28
Importing a MIDI song .................................... 28
Using the Metronome ............................... 29
Starting and Stopping the Metronome ............ 29
Adjusting the Metronome Volume ................... 29
Confirming Tempo........................................... 29
Adjusting the Tempo ....................................... 30
Other Settings ................................................. 30
Practicing in Training Mode ...................... 31
Before Training ................................................ 31
Detailed Training settings ................................31
After Training ...................................................31
Switching to a different exercise ...................... 31
1. RHYTHM GATE ........................................... 32
2. RHYTHM GATE........................................... 32
3. DYNAMIC GATE..........................................33
4. SONG PART GATE .....................................34
5. SONG SCORE GATE.................................. 35
6. MEASURE BREAK ..................................... 36
7. CHANGE UP ............................................... 37
8. PART MUTE................................................ 38
9. FAST BLAST ............................................... 39
10. RECORDER..............................................40
Advanced Techniques
Setting Parameters using Menu Mode..... 41
Basic Menu Mode Procedure .......................... 41
z Metronome Settings.................................... 42
x Kit Settings.................................................. 43
c MIDI Settings .............................................. 45
v Hi-hat Settings ............................................46
b Trigger Settings...........................................48
n Training Settings ......................................... 51
m Other Settings.............................................53
Integrating Separately
Sold Accessories.....................................57
For DTX402K Owners ..................................... 57
For DTX432K & DTX452K Owners ................. 57
Connecting to a Computer........................58
Installing the Yamaha Steinberg USB Driver ... 58
MIDI-related Reference ................................... 58
Reference
Troubleshooting.........................................59
Data List .....................................................62
Specifications ............................................64
Index ...........................................................65

DTX402K DTX432K DTX452K Owner’s Manual
4
PRECAUTIONS
PLEASE READ CAREFULLY BEFORE PROCEEDING
Please keep this manual in a safe and handy place for future reference.
WARNING
• This AC adaptor is designed for use with only Yamaha electronic
instruments. Do not use for any other purpose.
• Indoor use only. Do not use in any wet environments.
CAUTION
• When setting up, make sure that the AC outlet is easily accessible. If
some trouble or malfunction occurs, immediately turn off the power
switch of the instrument and disconnect the AC adaptor from the outlet.
When the AC adaptor is connected to the AC outlet, keep in mind that
electricity is flowing at the minimum level, even if the power switch is
turned off. When you are not using the instrument for a long time, make
sure to unplug the power cord from the wall AC outlet.
WARNING
Always follow the basic precautions listed below to avoid the possibility of serious injury or even death from electrical
shock, short-circuiting, damages, fire or other hazards. These precautions include, but are not limited to, the
following:
• Do not place the power cord near heat sources such as heaters or
radiators. Also, do not excessively bend or otherwise damage the cord,
or place heavy objects on it.
• Only use the voltage specified as correct for the instrument. The
required voltage is printed on the name plate of the instrument.
• Use the specified adaptor (page 64) only. Using the wrong adaptor can
result in damage to the instrument or overheating.
• Check the electric plug periodically and remove any dirt or dust which
may have accumulated on it.
• Under no circumstances should any of the components of this product
be taken apart or customized. Doing so could result in electric shock,
fire, injury, or malfunction.
• Do not expose the instrument to rain, use it near water or in damp or
wet conditions, or place on it any containers (such as vases, bottles or
glasses) containing liquids which might spill into any openings. If any
liquid such as water seeps into the instrument, turn off the power
immediately and unplug the power cord from the AC outlet. Then have
the instrument inspected by qualified Yamaha service personnel.
• Never insert or remove an electric plug with wet hands.
• Do not put burning items, such as candles, on the unit. A burning item
may fall over and cause a fire.
• When one of the following problems occur, immediately turn off the
power switch and disconnect the electric plug from the outlet. Then
have the device inspected by Yamaha service personnel.
- The power cord or plug becomes frayed or damaged.
- It emits unusual smells or smoke.
- Some object has been dropped into the instrument.
- There is a sudden loss of sound during use of the instrument.
For AC adaptor
For Instrument
Power supply/AC adaptor
Assembly
Water warning
Fire warning
If you notice any abnormality
DMI-5 1/2

DTX402K DTX432K DTX452K Owner’s Manual
5
CAUTION
Always follow the basic precautions listed below to avoid the possibility of physical injury to you or others, or damage
to the instrument or other property. These precautions include, but are not limited to, the following:
• Do not connect the instrument to an electrical outlet using a multiple-
connector. Doing so can result in lower sound quality, or possibly
cause overheating in the outlet.
• When removing the electric plug from the instrument or an outlet,
always hold the plug itself and not the cord. Pulling by the cord can
damage it.
• Remove the electric plug from the outlet when the instrument is not to
be used for extended periods of time, or during electrical storms.
• Read carefully the attached documentation explaining the assembly
process. Failure to assemble the instrument in the proper sequence
might result in damage to the instrument or even injury.
• Do not place hands or feet under a foot switch or foot pedal. Doing so
could result in injury.
• Do not use the electronic drum kit’s rack to hold acoustic drums. Doing
so could cause clamps to break and the drums to fall off, which in turn
could lead to injury.
• Mind your fingers when adjusting clamps. Fingers can easily be caught
and crushed if care is not taken during this operation.
• Be careful with the tips of supports, arms, screws, and the like. Fingers
can easily be injured by sharp tips if these components are not handled
carefully.
• Do not sit or stand on the rack. Doing so could cause it to fall over or
break, possibly causing injury.
• Be careful with the holders for cymbal and tom pads as they have sharp
tips. In order to avoid injury, therefore, you should take special care
whenever handling these components.
• Be careful with the anti-slip stoppers on kick pads and foot pedals as
they have sharp tips. In order to avoid injury, therefore, you should take
special care whenever handling these components.
• Securely tighten fixing nuts and other fasteners. In addition, be sure to
immediately tighten any nuts that have come loose. If this precaution is
not observed, pads may fall off or the rack may collapse or fall over,
possibly causing injury.
• Take care when setting up cables. If anyone were to trip on a cable, the
instrument could topple over and cause injury.
• Do not place the instrument in an unstable position where it might
accidentally fall over.
• The flooring material (wooden floor, etc.) may be damaged if the
instrument is placed directly on the floor. We recommend that you
place it on carpet or the like.
• Before moving the instrument, remove all connected cables, to prevent
damage to the cables or injury to anyone who might trip over them.
• When setting up the product, make sure that the AC outlet you are
using is easily accessible. If some trouble or malfunction occurs,
immediately turn off the power switch and disconnect the plug from the
outlet. Even when the power switch is turned off, electricity is still
flowing to the product at the minimum level. When you are not using
the product for a long time, make sure to unplug the power cord from
the wall AC outlet.
• Use only the stand/rack specified for the instrument. When attaching it,
use the provided screws only. Failure to do so could cause damage to
the internal components or result in the instrument falling over.
• Before connecting the instrument to other electronic components, turn
off the power for all components. Before turning the power on or off for
all components, set all volume levels to minimum.
• Be sure to set the volumes of all components at their minimum levels
and gradually raise the volume controls while playing the instrument to
set the desired listening level.
• Avoid contact with grease. Grease is applied to pedals as a lubricant,
which may attach to your clothes when carrying or setting up them.
• Do not insert a finger or hand in any gaps on the instrument.
• Never insert or drop paper, metallic, or other objects into the gaps on
the panel. This could cause physical injury to you or others, damage to
the instrument or other property, or operational failure.
• Do not rest your weight on, or place heavy objects on the instrument,
and do not use excessive force on the buttons, switches or connectors.
• Do not use the instrument/device or headphones for a long period of
time at a high or uncomfortable volume level, since this can cause
permanent hearing loss. If you experience any hearing loss or ringing
in the ears, consult a physician.
Always turn the power off when the instrument is not in use.
Even when the [ ] (Standby/On) switch is in standby status (all lamps are off), electricity is still flowing to the instrument at the minimum level.
When you are not using the instrument for a long time, make sure you unplug the power cord from the wall AC outlet.
Power supply/AC adaptor
Assembly
Location
Connections
Handling caution
Yamaha cannot be held responsible for damage caused by improper use or modifications to the instrument, or data that is lost or destroyed.
DMI-5 2/2

DTX402K DTX432K DTX452K Owner’s Manual
6
NOTICE
To avoid the possibility of malfunction/damage to the prod-
uct, damage to data, or damage to other property, follow
the notices below.
Handling and Maintenance
• Do not use the instrument in the vicinity of a TV, radio,
stereo equipment, mobile phone, or other electric
devices. Otherwise, the instrument, TV, or radio may
generate noise.
When you use the instrument along with an applica-
tion on your smart device such as a smartphone or
tablet, we recommend that you set “Airplane Mode” to
on on that device in order to avoid noise caused by
communication.
• Do not expose the instrument to excessive dust or
vibrations, or extreme cold or heat (such as in direct
sunlight, near a heater, or in a car during the day) to
prevent the possibility of panel disfiguration, damage
to the internal components or unstable operation.
• Do not place vinyl, plastic or rubber objects on the
instrument, since this might discolor the panel.
Maintenance
• When cleaning the drum module, use a soft and dry/
slightly damp cloth. Do not use paint thinners, sol-
vents, alcohol, cleaning fluids, or chemical-impreg-
nated wiping cloths.
• When cleaning the pads, avoid cleaning products that
contain organic solvents, paint thinner, and alcohol as
they can cause discoloration and/or warping. Instead,
we recommend that you remove dust using a soft dry
cloth or wipe clean with a moist, tightly-wrung-out
cloth. If a pad is very dirty, wipe the dirt away using a
cloth moistened with a neutral detergent solution and
tightly wrung out. Following this, wipe away the deter-
gent solution using a cloth soaked in water and tightly
wrung out.
Information
About copyrights
• Copying of the commercially available musical data
including but not limited to MIDI data and/or audio
data is strictly prohibited except for your personal use.
• This product incorporates and bundles contents in
which Yamaha owns copyrights or with respect to
which Yamaha has license to use others’ copyrights.
Due to copyright laws and other relevant laws, you are
NOT allowed to distribute media in which these con-
tents are saved or recorded and remain virtually the
same or very similar to those in the product.
* The contents described above include a computer program,
Accompaniment Style data, MIDI data, WAVE data, voice
recording data, a score, score data, etc.
* You are allowed to distribute medium in which your perfor-
mance or music production using these contents is
recorded, and the permission of Yamaha Corporation is not
required in such cases.
About this manual
• The illustrations and LCD screens as shown in this
manual are for instructional purposes only, and may
appear somewhat different from those on your instru-
ment.
• Apple, iTunes, Mac, Macintosh, iPhone, iPad, iPod
touch and Lightning are trademarks of Apple Inc.,
registered in the U.S. and other countries.
• IOS is a trademark or registered trademark of Cisco
in the U.S. and other countries and is used under
license.
• The company names and product names in this man-
ual are the trademarks or registered trademarks of
their respective companies.
(bottom_en_01)
The model number, serial number, power requirements, etc., may be found on or near the name plate, which is at the
bottom of the unit. You should note this serial number in the space provided below and retain this manual as a perma-
nent record of your purchase to aid identification in the event of theft.
Model No.
Serial No.

DTX402K DTX432K DTX452K Owner’s Manual
7
Welcome
Thank you for purchasing this Yamaha product.
To get the most out of your DTX402 series Electronic Drum Kit, be sure to read this
Owner’s Manual carefully. And after reading through this manual, be sure to store it in
a safe place so that you can refer back to it again as needed.
About the Manuals
The following manuals are provided for using the DTX402K, DTX432K, and DTX452K. These manuals
are intended for users of the DTX402K, DTX432K, and DTX452K.
Owner’s Manual (this book)
Describes how to assemble your electronic drum kit and get it set up for playing.
Describes the basic techniques used when operating and playing the electronic drum kit.
Describes the setting of parameters and other more advanced modes of use.
Describes troubleshooting techniques and contains other reference materials.
MIDI Reference Manual
This provides MIDI-related reference information.
Drum Scores
This provides drum scores for preset songs of the drum module.
iPhone/iPad Connection Manual
Describes how to connect smart devices such as an iPhone and iPad.
The digital format manuals listed above can be obtained from the Yamaha Downloads web page. To do so, go to the
web page using the following URL, enter your drum kit name in the “Model Name” field, and then click “Search.”
Printed Manual
Digital Manual (PDF)
Yamaha Downloads: https://download.yamaha.com/
After accessing the Support website (and clicking on “Manual Library”), enter the appropriate model name.
Setup
Basic Techniques
Advanced Techniques
Reference

Setup
8
DTX402K DTX432K DTX452K Owner’s Manual
First Steps
1
2
3
4
Open the box and confirm that all parts are present
and correct.
Assemble the parts.
• The assembly process is described in detail on pages 9 through
20.
Make the necessary connections.
• Connect the pads to the drum module using the cables provided.
See page 20.
• Connect the AC adaptor to the drum module and turn on the
module.
See page 21.
Play your electronic drum kit.
• Basic techniques used when operating and playing the electronic
drum kit are described in the Basic Techniques section (pages 25
to 40).
• More complex methods are described in the Advanced Tech-
niques section (pages 41 to 56).
Setup

Setup
9
DTX402K DTX432K DTX452K Owner’s Manual
Package Contents
After opening up the package containing your electronic drum kit, please verify that all of the follow-
ing parts are present.
DTX402K
Rack (Large)
Stopper
Rack (Small)
Hi-hat holder Cymbal holders (×2)
No Stopper
Cymbal/hi-hat pads (×2) Crash cymbal pad Drum module
Sensor (bumps)
HH40 Hi-hat controller KU100 Kick unit Nine-channel snake cable
Drum key Cable bands (×2) AC adaptor
* May not be included depending on
your area. Check with your Yamaha
dealer.
Owner’s Manual (this booklet)

Package Contents
10
Setup
DTX402K DTX432K DTX452K Owner’s Manual
DTX432K
HH65
Hi-hat controller
KP65
Kick pad
FP6110A
Foot pedal
Nine-channel snake cable Drum key Cable bands (×2)
Rack (Large)
Stopper
Rack (Small)
Hi-hat holder Cymbal holders (×2)
No Stopper
Cymbal/hi-hat pads (×2) Crash cymbal pad Drum module
Sensor (bumps)
AC adaptor
* May not be included
depending on your area.
Check with your Yamaha
dealer.
Owner’s Manual
(this booklet)

Package Contents
11
Setup
DTX402K DTX432K DTX452K Owner’s Manual
DTX452K
Rack (Small) TP70S Snare pad
S wing bolt
HH65
Hi-hat controller
KP65
Kick pad
FP6110A
Foot pedal
Nine-channel snake cable Drum key Cable bands (×2)
Cymbal/hi-hat pads (×2) Crash cymbal pad Drum module
Sensor (bumps)
AC adaptor
* May not be included
depending on your area.
Check with your Yamaha
dealer.
Owner’s Manual
(this booklet)
Rack (Large)
Stopper
Hi-hat holder Cymbal holders (×2)
No Stopper

Setup
12
DTX402K DTX432K DTX452K Owner’s Manual
Assembly Guide
Fully assembled drum kit (DTX452K shown)
CAUTION
• Choose a flat, hard surface on which to assemble your electronic drum kit.
• Take care to avoid mixing up parts or assembling them in the wrong direction. In addition,
the assembly steps should be completed one at a time in the order described.
• The assistance of at least one other person will be required when assembling the elec-
tronic drum kit.
• Once a piece has been assembled, be sure to tighten the corresponding key bolts.
• To disassemble your electronic drum kit, carry out the assembly sequence in reverse.
Step 8
Step 7
Step 6
Step 4
Step 3Step 2
Step 12
Step 9
Step 10
Step 5
Step 9
Step 1
Step 12Step 11

Assembly Guide
13
Setup
DTX402K DTX432K DTX452K Owner’s Manual
Standing up the Large rack
1. Stand up the Large rack with the rear of the tom pads facing towards you as shown in the figure.
2. Loosen the key bolt using the drum key.
3. Pull the shorter leg towards you.
Standing up the Small rack
1. Stand up the Small rack as shown in the figure and support it by hand.
2. Loosen the key bolt.
3. Open the lower pipe approximately 70° as shown in the Top view.
For the DTX452K, the snare pad will be attached to the Small rack in the following step.
Step 1
Rack (Large)
To ms
Step 2
Rack (Small)
70°
Top view

Assembly Guide
14
Setup
DTX402K DTX432K DTX452K Owner’s Manual
Assembling the rack
1. Loosen the key bolt on the rack (Large) and turn the joint around before sliding the Small rack (in the next step).
2. Slide the Small rack fully back into the joint in Step 1.
3. Open the left and right legs as shown in the Top view.
4. Tighten the one and five s key bolts to secure the entire rack.
Attaching the snare pad
1. Take the snare pad and the S wing bolt and lightly tighten the S wing bolt. (Five or six turns is sufficient.)
2. Place the snare pad on the hexagonal rod and slide it fully back. Then tighten the S wing bolt to secure the snare pad in
place.
3. Loosen the key bolt and adjust the angle of the snare pad. When finished, retighten the key bolt to secure the snare
pad in place.
For the DTX452K, the snare pad will be attached to the Small rack in the following step.
CAUTION
The rack may topple over and cause injury if the left and right legs are opened too wide.
The pads will be rotated into place in a later step.
Step 3
Rack (Small)
110 °
Top view
Rack (Large)
Joint
110 °
NOTE
Step 4
For DTX452K
S wing bolt
Hexagonal rodSnare pad

Assembly Guide
15
Setup
DTX402K DTX432K DTX452K Owner’s Manual
Rotating the pads into place
Step 5 applies to each of the four pads.
Step 5 applies to each of the three tom pads. For adjusting the snare pad, see .
1. Loosen the key bolt on each of the pads.
2. Rotate the pads to positions where they will be easy to play. (If necessary, refer to the picture of the properly assembled kit
on page 12.)
3. Tighten each of the key bolts to secure the pads in place.
Attaching the hi-hat holder
1. Loosen the two key bolts in the back of the snare part.
2. Insert the hi-hat holder into the back of the snare part as shown in the figure.
• When correctly inserted, the tip of the hi-hat holder will protrude slightly from the bottom of the snare part.
• When correctly oriented, the hi-hat holder will be horizontal to the snare part as shown in the Top view.
3. Tighten the two key bolts to secure the hi-hat holder.
For DTX402K and DTX432K
For DTX452K
For the snare pad, you can also adjust the angle of the joint which supports the snare pad by loosening the s key bolt.
The hi-hat holder and the other two cymbal holders seem similar, but are actually different.
Only the hi-hat holder has a washer and stopper.
Step 5
Step 4
Snare pad
NOTE
Step 6
Hi-hat holder
Stopper
Top view
Washer

Assembly Guide
16
Setup
DTX402K DTX432K DTX452K Owner’s Manual
Attaching the hi-hat pad
Adjusting the position of the hi-hat stopper
1. Loosen the key bolt on the stopper, which is located at the top of the hi-hat holder.
2. Adjust the position of the stopper until it is straight in the back (as shown in the illustration) from your playing position.
3. Tighten the key bolt to secure the stopper.
Assembling the hi-hat pad
1. Remove the wing nut, the washer, and the upper felt pad from
the hi-hat holder. (Do not remove the lower felt pad.)
2. Place the hi-hat pad, which does NOT have a sticker labeled
“CRASH,” on the hi-hat holder with the stopper also passing
through the hole provided.
3. Replace the felt pad removed in Step 1 above the hi-hat pad.
4. Replace the washer removed in Step 1 above the felt pad.
5. Tighten the wing nut to secure the hi-hat pad in place.
Attaching the drum module
1. Loosen the key bolt on the back left of the rack and turn the joint around before sliding the sliding the drum module (in
the next step).
2. Loosen the s key bolt and slide the drum module fully back into the joint in Step 1.
3. Tighten the and s key bolts to secure the drum module in place.
Step 7
Playing position
Stopper
Wing nut
Felt pad
Hi-hat pad
Hi-hat holder
Stopper
Washer
Felt pad
Step 8

Assembly Guide
17
Setup
DTX402K DTX432K DTX452K Owner’s Manual
Attaching the cymbal holders
1. Loosen the four key bolts at the ends of the tom 1/2 part.
2. Insert the cymbal holders into the ends of the top 1/2 part. Then adjust the angles of the cymbal holders until they are ori-
ented as shown in the figure.
• When correctly inserted, the tips of the cymbal holders will protrude slightly from the bottom of the tom part.
• When correctly oriented, the cymbal holders will bend in the back from your playing position.
3. Tighten the four key bolts to secure the cymbal holders in place.
Assembling the cymbal pads
1. Remove the wing nut and the upper felt pad from the cymbal holder. (Do
not remove the lower felt pad.)
2. Place the cymbal pad on the cymbal holder, with the holder passing
through the central hole.
3. Replace the felt pad removed in Step 1 above the cymbal pad.
4. Tighten the wing nut to secure the cymbal pad in place.
The two cymbal holders are identical.
The crash cymbal, which has the sticker labeled “CRASH” on the rear side and has some bumps on the front side, is
for the left.
The normal cymbal, which is identical with the hi-hat cymbal, is for the right.
Step 9
Playing position
NOTE
Step 10
Sensor (bumps)
Wing nut
Felt pad
Felt pad
Cymbal holder
Cymbal pad

Assembly Guide
18
Setup
DTX402K DTX432K DTX452K Owner’s Manual
Assembling the kick pad
1. Remove the four wing bolts, spring washers, and flat washers from the kick pad, and arrange each set
nearby in the disassembled condition.
2. Assemble the base to the kick pad as shown below, and then from the base side, assemble the wing
bolts, spring washers, and flat washers removed in
Step 1 in order to secure it in place.
3. Insert the connecting rods into the holes in the holder of the foot pedal as shown below.
4. Slide the beater into the hole until the tip protrudes approximately 15 mm from the rear, and then tighten the beater bolt
using the drum key.
5. Turn the foot pedal’s T-bolt counter-clockwise to loosen it.
6. Fit the raised section at the front of the kick pad holder into the foot-pedal’s assembly bracket.
7. Turn the foot pedal’s T-bolt clock wise to secure the parts together.
8. Operate the pedal and confirm whether the beater head strikes the kick pad near the center. If not, adjust the length of the
beater or move it left or right as required.
Step 11
For DTX432K and DTX452K
Kick pad
Wing bolt
Spring washer
Flat washer
Base
Kick pad
Kick pad
Foot pedal
Holder
Connecting rod
Connecting rod
Drum key Beater
Beater bolt
T-bolt
Assembly bracket Raised section T-bolt
Beater head

Assembly Guide
19
Setup
DTX402K DTX432K DTX452K Owner’s Manual
Positioning the hi-hat controller and kick drum
Arrange the hi-hat controller and the kick drum parts or kick unit as shown in the figure.
Fine-tuning the positions of the pads and the drum module
Sit on your stool (sold separately) and adjust the positions of the pads and the drum module to your liking.
IMPORTANT
The hi-hat controller and the kick unit from the DTX402K are almost identical in appearance. They
can be told apart by the sticker on the base section.
CAUTION
• Be sure to always retighten any key bolt after you have finished adjusting the corresponding part.
• Before moving on to the next step, ensure that all key bolts have been tightened.
Step 12
DTX402K DTX432K, DTX452K
KickHi-hat controller Hi-hat controller
Kick drum parts
Step 13

Assembly Guide
20
Setup
DTX402K DTX432K DTX452K Owner’s Manual
Connecting the pads to the drum module
1. Insert the mini plugs* at one end of the nine-channel snake cable into the correct trigger input jacks (SNARE to KICK/
PAD) on the drum module. (*: The smaller set of plugs.)
2. Insert the nine-channel snake cable’s standard plugs* into the jacks in the corresponding pads. (*: The larger set of plugs.)
3. Wrap the cables for the snare pads, the tom pads, and the cymbal/hi-hat pads around the cord clip to prevent them from
being pulled out.
4. Using the cable bands, secure the cables to the kit rack at the positions in the figure above.
Congratulations—You have finished assembling your electronic drum kit!
Setup for Left-handed Drummers
Assemble the drum kit referring to the illustration.
Two of the joints should be placed differently from this setup for right-
handed drummers.
The sticker on each of the snake cable’s plugs indicates the name of the corresponding pad.
For the kick pad KP65 in the DTX432K and DTX452K, use the OUT>DTX jack. No sound will be played when the PAD>IN jack is
used.
Excessive bending can damage the cables. Ensure, therefore, that they are not bent at an extreme angle when wrapped around the
cord clip.
Step 14
RIDE
SNR
HH
KICK
HHC
TOM3
TOM2 TOM1
CR
KICK
HHC
RIDESNRHH
KICKHHCHHCRRIDETOM3TOM2TOM1SNR
TOM2TOM1CR TOM3 KICK HHC
DTX402K
Trigger input jacks on the drum module
Nine-channel snake cable
NOTE
NOTE
NOTICE
Fully assembled drum kit (DTX452K shown)
Right-handed Left-handed

Setup
21
DTX402K DTX432K DTX452K Owner’s Manual
Setting Up for Sound
1. Ensure that your drum module is turned off (i.e., none
of the buttons are lit).
2. Insert the AC adaptor’s DC plug into the
[ ] connector on the bottom panel of
the module.
3. Hook the AC adaptor cord around the cord clip to pre-
vent it from being accidentally pulled out.
4. Plug the adaptor’s AC power cord into an AC wall
socket or another electrical outlet.
Your drum module does not have built-in speakers. In order
to hear it, therefore, you will need to connect headphones or
monitor speakers via the [PHONES/OUTPUT] standard
stereo-audio jack. You can adjust the output volume using
the [VOLUME] buttons on the control panel.
You can connect a portable music player or another similar
source of audio to your drum module via the [AUX IN]
(auxiliary input) stereo mini-jack. This makes it possible
to play along with your favorite tunes.
Connecting the Power
CAUTION
Excessive bending can damage the AC adaptor cord
and create a fire hazard. Ensure, therefore, that the
power cord is not bent at an extreme angle when
wrapped around the clip.
WARNING
• Use the specified AC adaptor (page 64) only. Using
the wrong AC adaptor can result in damage to the
instrument or overheating.
• When using the AC adaptor with a removable plug,
make sure to keep the plug attached to the AC adap-
tor. Using the plug alone can cause electric shock or
fire.
• Never touch the metallic section when attaching the
plug. To avoid electric shock, short circuit or dam-
age, also be careful that there is no dust between the
AC adaptor and plug.
Cord clip AC adaptor cord
Slide the plug as
indicated
Plug
The shape of the plug
differs depending on
your area.
Connecting Headphones or Speakers
The [PHONES/OUTPUT] jack is a stereo connector. You can con-
nect a 1/4" mono-audio jack to it, but in such a case, please be
sure to set the output to mono using the Stereo/Mono parameter
from Menu Mode (page 55).
CAUTION
To prevent hearing loss, avoid using headphones at a
high volume for extended periods of time.
Connecting a Music Player
• Whenever connecting other devices, ensure that the cables you
use have plugs that match the input or output connectors on
those devices.
• Before making connections, furthermore, you should also turn
the volume on the other devices fully down.
• When all connections have been made, use each device’s vol-
ume controller to balance its output with that of the drum mod-
ule.
NOTE
NOTICE
1/8" stereo-mini
to stereo-mini
cable
Portable music player,
etc.
Standard 1/4"
mono-audio jack
Powered speakers
or
Standard 1/4"
stereo-audio
jack
Headphones

Setting Up for Sound
22
Setup
DTX402K DTX432K DTX452K Owner’s Manual
1. If you have connected your drum module to other audio
devices such as powered speakers, ensure that the vol-
ume on all other devices is turned down fully.
2. Press the [ ] (Standby/On) button.
The drum module will turn on and its buttons will light
up.
1. If you have connected your drum module to other audio
equipment, ensure that the volume on all other devices
is turned down fully.
2. Press the [ ] (Standby/On) button.
The drum module will turn off and all button lights will
go out.
The Auto Power-Off function automatically turns off the
drum module after a certain period of inactivity. This helps
to save energy should you forget to turn it off yourself.
Setting the Auto Power-Off Function
You can set the amount of time that the Auto Power-Off
function will wait before turning off the drum module. For
details, see the description of the Auto Power-Off Time
parameter from Menu Mode (page 54).
Quickly disabling Auto Power-Off
To quickly disable the Auto Power-Off function, turn on the
drum module while holding down the number button [1].
The function will remain off until you set a new Auto
Power-Off time.
Straight out of the box, your drum module already contains
a wide range of pre-programmed drum kits and songs.
These default settings—collectively known as the Factory
Reset—can be conveniently restored at any time if you have
accidentally overwritten them or wish to delete all of your
own settings. To do so, use the Factory Reset function as
follows.
1. Press the [ ] (Standby/On) button and verify that
the drum module turns off.
2. Turn on the drum module while holding down the
VOLUME[+] button and the VOLUME[–] button.
The drum module’s lights will flash and the Factory
Reset will be restored.
Turning On the Drum Module
Connect the hi-hat controller before turning on the drum
module. Please do not turn the drum module on with the hi-
hat controller depressed. The drum module can not identify
the type of pedal properly and it causes that the kick may
produce much smaller sound than expected.
Turning Off the Drum Module
The drum module automatically stores all current settings
before it turns off. For this reason, please do not unplug the
AC adaptor until all button lights have gone out.
Auto Power-Off
The drum module automatically stores all current settings before
it turns off.
NOTE
NOTICE
NOTE
• In certain modes of operation, the Auto Power-Off function will
not turn off the drum module when the set time has elapsed. We
recommend, therefore, that you always turn off the drum module
manually when you are finished using it.
• If you expect the drum module to be inactive for a certain length
of time while connected to other audio equipment, we recom-
mend that you turn the volume on the other equipment fully
down. Alternatively, you can disable the Auto Power-Off function
to ensure that the drum module stays on.
• Settings for the Auto Power-Off function do not represent exact
times and there may be some variation.
• By default, the Auto Power-Off time is set to 30 minutes.
Restoring the Default Settings
(Factory Reset)
When you restore the Factory Reset as described below, any
changes you have made to parameters will be lost. Before pro-
ceeding, therefore, you should ensure that they contain no irre-
placeable settings.
NOTICE
NOTE
Hold
NOTICE
Hold

Setup
23
DTX402K DTX432K DTX452K Owner’s Manual
Panel Controls & Functions
Drum module
z Mode switch
• Press this switch to switch Play Mode and Training
Mode. (pages 26, 31)
• Hold down this switch to select Menu Mode. (page 41)
x [DRUM ON/OFF] button (page 28)
Use this button to mute and unmute drum parts from a
practice drum pattern.
c [] button
• Use this button to start and stop songs. (page 27)
• In Training Mode, it is also used to start and stop train-
ing sessions. (page 31)
v [ ] (metronome) button (page 29)
• Use this button to start and stop the built-in metro-
nome.
• In Training Mode, it is also used to start and stop train-
ing sessions.
b [TEMPO] buttons (page 30)
Use these buttons to increase or decrease the tempo in
steps of one BPM.
*: In Menu Mode, it is also used to increase or decrease set-
tings.
n [VOLUME] buttons (page 26)
Use these buttons to adjust the overall volume of the
drum module. Press the [+] button to increase it and the
[–] button to decrease it.
m [ ] (Standby/On) button (page 22)
Use this button to turn the drum module on and off.
, Number buttons
• Use these buttons to select music categories and train-
ing types. (pages 27, 31)
• They are also used to enter a tempo directly. (page 30)
• In Menu Mode, they are used to select settings. (page
41)
• Also in Menu Mode, they are used to enter setting val-
ues directly. (page 41)
Control Panel
z
x
c
v
b
n
m
,

Panel Controls & Functions
24
Setup
DTX402K DTX432K DTX452K Owner’s Manual
. [USB TO HOST] terminal (page 58)
Connect a computer or smart device such as an iPhone or
iPad to send and receive digital signals (audio and
MIDI).
Additional parts are required for connecting an iPhone
or iPad. For more information, refer to “iPhone/iPad
Connection Manual” (PDF).
⁄0 [AUX IN] jack (page 21)
The Auxiliary Input stereo mini-jack is used to input
audio from an external source. For example, you can use
this jack to connect a portable music player or another
similar device and play along with your favorite tunes.
⁄1 [PHONES/OUTPUT] jack (page 21)
Use this standard stereo-audio jack to connect head-
phones, an amplifier, a mixer, or other similar equip-
ment.
⁄2 Cord clip (page 21)
Wrap the AC adaptor cord around this clip to prevent
accidental unplugging during use.
⁄3 [ ] connector (page 21)
Use this connector for the AC adaptor that came with
your drum module.
⁄4 Trigger input jacks (page 20)
Use these jacks to connect the snare, tom, and cymbal
pads.
⁄5 [HI-HAT CTL] jack (page 20)
The Hi-hat Control jack is used to connect a hi-hat con-
troller.
⁄6 [KICK/PAD] jack (page 20)
Use this jack to connect a kick pad or pedal. By connect-
ing a KP65, you can add another pad using the PAD >
IN jack on the KP65 (page 57).
Bottom Panel
. ⁄0 ⁄1 ⁄2 ⁄3
Top Panel
⁄5 ⁄6⁄4

Basic Techniques
25
DTX402K DTX432K DTX452K Owner’s Manual
Playing Techniques
If using a TP70S Snare Pad with the DTX452K, you will be
able to produce three distinct sounds (i.e., head, open rim,
and closed rim) depending on where you strike it, much the
same as if you were playing an acoustic snare.
Head shots
Hitting the main surface of the pad produces a head shot
sound.
Open rim shots
Hitting the open-rim zone produces an open rim-shot
sound.
Closed rim shots (cross sticking)
Hitting the closed-rim zone produces a closed rim-shot
sound.
Open/close
• You can produce an open hi-hat sound by striking the
hi-hat pad with the hi-hat controller’s pedal not
depressed.
• You can produce a closed hi-hat sound by striking the
hi-hat pad with the hi-hat controller’s pedal depressed.
• If using an HH65 Hi-hat Controller with the
DTX432K and DTX452K, you can operate the pedal
to recreate the sound of a closing hi-hat.
Foot closed
You can depress the hi-hat controller’s pedal to create a
foot-close sound without having to strike the hi-hat pad.
Hi-hat splash
Depressing the hi-hat controller’s pedal and then imme-
diately releasing it produces a hi-hat splash sound.
Choke
You can immediately mute a sound by choking (pinch-
ing) the cymbal’s edge with your hand after hitting the
cymbal. The Choke function only works when you
grasp in the sensor area.
Snare Pad
Closed rim shots
(Rim 2)
Head shotsOpen rim shots (Rim 1)
Hi-hat Cymbal
If using an HH40 Hi-hat Controller with the DTX402K, the
velocity is fixed regardless of how strongly or softly the hi-hat
controller’s pedal is depressed. For adjusting the fixed veloc-
ity value, see the description of the Foot Close Velocity
parameter from Menu Mode (page 47).
Crash Cymbal
NOTE
Sensor (bumps)
Basic Techniques

Basic Techniques
26
DTX402K DTX432K DTX452K Owner’s Manual
Performing with a Selected Music Category
The drum module comes with ten different music categories. When you select a music category, the
corresponding “kit” (referring to a full set of drum-sound assignments for all of the pads) and song
will be automatically selected.
1. Press the Mode switch to turn the “PLAY” light on
(Play Mode).
2. Select a music category by pressing the corresponding
number button [1] to [10].
The selected number button will light up and the corre-
sponding drum or percussion kit will be automatically
selected.
3. Play the pads and see how the kit sounds.
Using the following procedure, you can change the sensitiv-
ity of a kit—that is, how the drum sounds change depending
on how hard you strike the pads. Sensitivity can be adjusted
to ten different levels.
While holding the Mode switch, press either the VOL-
UME[+] or VOLUME[–] button.
• Each time you press the VOLUME[+] button, you
increase the sensitivity by one level. This means that
louder sounds can be more easily produced with softer
drumming.
• Each time you press the VOLUME[–] button, you
decrease the sensitivity by one level. This means that
louder sounds can only be produced by drumming hard.
Selecting a Music Category
For detailed information on the ten preset music categories,
see the Data List section (page 62).
2
1
NOTE
Adjusting Kit Sensitivity
• The selected sensitivity is common to the drum module’s ten
kits.
• If you wish to set sensitivities on an individual pad basis, see the
descriptions of the Trigger Settings parameters from Menu Mode
(page 48).
Hold
More
sensitive pads
Less
sensitive pads
More sensitive
pads
Less sensitive
pads
NOTE

Performing with a Selected Music Category
27
Basic Techniques
DTX402K DTX432K DTX452K Owner’s Manual
1. Press the Mode switch to turn the “PLAY” light on.
2. Select a music category by pressing the corresponding
number button [1] to [10].
The selected number button will light up and the corre-
sponding song will be automatically selected.
3. Press the [ ] button to start the song.
4. Play the pads with the song.
5. To stop the song, press the [ ] button once again.
While holding the [] button, press either the VOL-
UME[+] or VOLUME[–] button.
• Each time you press the VOLUME[+] button, you
increase the song volume by one.
• Each time you press the VOLUME[–] button, you
decrease the song volume by one.
Performing with a Song
The score (PDF) is available at the Yamaha website:
https://download.yamaha.com/
After accessing the Support website (and clicking on “Man-
ual Library”), enter the appropriate model name.
If you wish to mute the programmed drum parts and hear
only the song parts, press the [DRUM ON/OFF] button. To
unmute the drum parts, press the [DRUM ON/OFF] button
once again.
2
1
NOTE
NOTE
Adjusting the Song Volume
The set volume is common to the drum module’s ten songs.
Hold
Higher song
volume
Lower song
volume
NOTE

Performing with a Selected Music Category
28
Basic Techniques
DTX402K DTX432K DTX452K Owner’s Manual
If you press the [DRUM ON/OFF] button while playing a
song, the drum parts from the song will be muted—that is,
their volume will be reduced to zero. If, however, you would
like the drum parts to be slightly audible in this type of situ-
ation, you can adjust the muted volume as described below.
1. Press the [ ] button to start the song.
2. Press the [DRUM ON/OFF] button to mute the drum
parts.
The button is unlit when the drum part is muted, and is
lit when the drum part is played (not muted).
3. While holding the [DRUM ON/OFF] button, press
either the VOLUME[+] or VOLUME[–] button.
• -Each time you press the VOLUME[+] button, you
increase the volume of the muted drums by one.
• Each time you press the VOLUME[–] button, you
decrease the volume of the muted drums by one.
By pressing the [DRUM ON/OFF] button once again, you
can unmute the drum parts and restore their normal vol-
umes.
Using apps compatible with the drum module, you can eas-
ily import a MIDI song on your drum module.
For details on compatible smart devices and applications,
refer to the web page below.
For more information on how to connect, refer to the
“iPhone/iPad Connection Manual” (PDF) on the web page
below.
https://download.yamaha.com/
After accessing the Support website (and clicking on
“Manual Library”), enter the appropriate model name.
Adjusting the Volume of Muted Drum
Parts
Hold
Maximum
muted volume
Minimum
muted volume
Importing a MIDI song
• For deleting the imported MIDI song, see the description of the
Delete Song parameter from Menu Mode (page 55).
• To eliminate the risk of interference due to noise by your smart
device when used in combination with the drum module, turn on
the Airplane Mode and then turn on Wi-Fi.
Be sure to place your smart device on a stable surface to prevent
it from falling over and being damaged.
NOTE
NOTICE

Basic Techniques
29
DTX402K DTX432K DTX452K Owner’s Manual
Using the Metronome
Playing your electronic drum kit along with the built-in metronome is a great way to perfect your
rhythm.
• Press the [] button to turn on the metronome.
• Press the [] button once again to turn it off.
To adjust the volume of the metronome, press and hold the
[] button, and then press either the VOLUME[+] or
VOLUME[–] button.
• Each time you press the VOLUME[+] button, you
increase the metronome volume by one.
• Each time you press the VOLUME[–] button, you
decrease the metronome volume by one.
Whenever necessary, you can confirm the drum module’s
current tempo from the flashing pattern of the number but-
ton lights and the voice guidance.
The larger the value, the faster the tempo becomes.
Press either the TEMPO[+] or TEMPO[–] button once.
Or
Press and hold the [] button.
Each digit of the tempo will be flashed in sequence.
Example:
When the tempo is 108 BPM, the number button lights will
flash [1][0][8].
Starting and Stopping the Metronome
Adjusting the Metronome Volume
Hold
Higher metro-
nome volume
Lower metro-
nome volume
Confirming Tempo
If you wish to turn off the voice guidance function, see 7-1. Voice
Guidance Volume (page 53).
NOTE

Using the Metronome
30
Basic Techniques
DTX402K DTX432K DTX452K Owner’s Manual
The following three methods are available when you want to
change the tempo.
Increasing or decreasing using the
TEMPO[+] or TEMPO[–] button
• Each time you press the TEMPO[+] button, you
increase the metronome BPM by one.
• Each time you press the TEMPO[–] button, you
decrease the metronome BPM by one.
Directly inputting a BPM using the number
buttons
1. While holding the [ ] button, enter the BPM using
the number buttons.
The drum module will speak the input tempo to you
(in English).
Example: Setting a tempo of 138 BPM
Press the number buttons in the sequence
[1][3][8].
2. After entering all necessary digits, remove your fin-
ger from the [ ] button.
The drum module will speak the new tempo to you
(in English).
Tapping the tempo on the pads
1. While holding the [ ] button, strike a pad at least
three times at the desired tempo.
2. Remove your finger from the [ ] button.
The drum module will speak the new tempo to you
(in English).
The following metronome-related settings can be made in
Menu Mode. For details, see the description of the Metro-
nome Settings parameter group from Menu Mode (page 42).
• Metronome pattern
• Metronome length in beats
• Metronome sound
• Number-button lighting pattern when using the metro-
nome
Adjusting the Tempo
Increasing or decreasing using the TEMPO[+]
or TEMPO[–] button
Directly inputting a BPM using the number
buttons
Tapping the tempo on the pads
• The drum module supports tempos between 30 and 300 BPM.
• If you select a different song (page 27) after adjusting the tempo,
the selected song’s tempo will be used for the metronome.
NOTE
Hold
• Number button [10] is used to enter the value zero. You
cannot use it to enter the number ten.
Example: Setting a tempo of 110 BPM
Press the number buttons in the sequence
[1][1][10].
You cannot do this by pressing [1][10].
• There is no need to enter a zero first in order to set a
two-digit tempo.
Example:
To set a tempo of 72 BPM, simply press the num-
ber buttons in the sequence [7][2]. You do not
need to press [10][7][2].
• Whenever the drum module is speaking the tempo, you
can enter a new tempo directly using the number but-
tons but without having to hold down the [ ] button.
Instead of using a pad, you can also tap the tempo by
pressing the TEMPO[+] or TEMPO[–] button at least
three times.
Other Settings
NOTE
Hold
NOTE

Basic Techniques
31
DTX402K DTX432K DTX452K Owner’s Manual
Practicing in Training Mode
With ten different types of training available, you can learn how to play drums and master them in an
enjoyable way.
Before starting, please select your desired music category.
1. Press the Mode switch to turn the “PLAY” light on.
2. Select a music category by pressing the corresponding
number button.
You can make detailed settings for Training, such as the
practice timer and the difficulty level in Menu Mode (page
41).
For the following training exercises, the drum module eval-
uates your ability on a scale of one to ten and displays the
results using the number buttons.
• Rhythm Gate • Song Score Gate
• Dynamic Gate • Change Up
Number button [10] represents the highest score, while
number button [1] represents the lowest. In addition, the
Voice Guidance announces the results of scoring using the
five levels shown below. Try your best to get a high score!
To start a different exercise, you need to
reenter the training mode.
1. Press the Mode switch to turn the
“PLAY” light on (Play Mode).
2. Press the Mode switch again to turn the
“TRAINING” light on (Training Mode).
Basic training
Working on your rhythm:
Rhythm Gate (2 types) . . . . . . . . . . . . page 32
Measure Break . . . . . . . . . . . . . . . . . . page 36
Change Up . . . . . . . . . . . . . . . . . . . . . page 37
Playing with dynamics:
Dynamic Gate . . . . . . . . . . . . . . . . . . . page 33
Playing as fast as you can:
Fast Blast. . . . . . . . . . . . . . . . . . . . . . . page 39
Practicing by parts:
Part Mute. . . . . . . . . . . . . . . . . . . . . . . page 38
Recording your play:
Recorder . . . . . . . . . . . . . . . . . . . . . . . page 40
Advanced training
— Going on to mastery after Basic training! —
Playing along with a song:
Song Part Gate . . . . . . . . . . . . . . . . . . page 34
Song Score Gate. . . . . . . . . . . . . . . . . page 35
Before Training
Detailed Training settings
2
1
After Training
Switching to a different exercise
Better scores
Try again Great
Fantastic
Good Excellent

Practicing in Training Mode
32
Basic Techniques
DTX402K DTX432K DTX452K Owner’s Manual
1. RHYTHM GATE
2. RHYTHM GATE
1. Press the Mode switch to turn the “TRAINING” light
on (Training Mode).
2. Press number button [1] or [2] to select Rhythm Gate.
[1] is for a sixteenth-note rhythm exercise and [2] is for
a triplet rhythm exercise.
The [] button and [] button flash, indicating
that the exercise is on standby.
3. If you press the [ ] button, the current song will be
used for the exercise. If you press the [ ] button, the
metronome will be used.
4. Play the pads as rhythmically “tight” as you can along
with the song or the metronome.
5. To end the exercise, press the button used to start it in
Step 3.
Your score will be displayed. (For details, see page 31.)
Working on your rhythm:
• • • • • • • • • • • • • • • • • • • • • • • • • • • • • • • • • • • • • • • • • • • • • • • • • • • • • • • • • • • • • • • • • • • • • • • • •
1. RHYTHM GATE, 2. RHYTHM GATE
Rhythm Gate is an exercise for improving your timing along with a song or the metronome. When you strike with
perfect timing, the number buttons [5] and [6] flash together. When you strike too early or too late, no sound is
produced. Using Rhythm Gate can greatly help you improve your sense of rhythm!
Struck early Struck late
Perfect Timing
(flash together)
Sound produced (half-lit)
Timing of current strike (flashes)
When the “TRAINING” light is ON, press the Mode switch to
turn on the “PLAY” button, and then press the Mode switch
again to turn on the “TRAINING” light.
Please change the beats of the metronome, as needed.
Procedure
NOTE
or
or
NOTE
TIPS
• Pressing the number buttons [2] to [9] while the
exercise is on standby or during the exercise allows
you to adjust the sensitivity to your timing accuracy
in striking the pads and making sound. The nar-
rower the range, the higher the difficulty level.
• The direction of the timing indicators for showing
“too slow” to “too fast” can be reversed. (Menu
Mode “Rhythm Gate indicator flipped”; page 52.)
• The exercise time can be adjusted. (Menu Mode
“Timer”; page 51.)
• You can set whether the pads produce sound
whenever they are struck or only when they are
struck exactly in time. (Menu Mode “Ignore Timing”;
page 51.)
Press [2] or [9].
Press [3] or [8].
Press [4] or [7].
Press [5] or [6].
Easy
Difficulty
level
Hard
1 2 3 4 5 6 7 8 9 10
12345678 910
12345678 910
12345678 910

Practicing in Training Mode
33
Basic Techniques
DTX402K DTX432K DTX452K Owner’s Manual
3. DYNAMIC GATE
1. Press the Mode switch to turn the “TRAINING” light
on.
2. Press number button [3] to select Dynamic Gate.
The [ ] button flashes, indicating that the exercise
is on standby.
3. Strike the desired pad for practicing.
4. Press number buttons [1] or [10] to select the level.
[1] to [3] is “weak,” [4] to [7] is “normal,” and [8] to
[10] is “strong.”
The number buttons in the selected level become half
lit.
5. Press the [] button to start the exercise.
6. Strike the pad you chose in Step 4 with proper dynam-
ics.
7. To end the exercise, press the [ ] button.
Your score will be displayed. (For details, see page 31.)
Playing with dynamics:
• • • • • • • • • • • • • • • • • • • • • • • • • • • • • • • • • • • • • • • • • • • • • • • • • • • • • • • • • • • • • • • • • • • • • • • • •
3. DYNAMIC GATE
Dynamic Gate is an exercise for playing pads with proper dynamics. Your aim is to control three levels: Weak,
Normal and Strong. When you strike with the wrong dynamics, it will not produce any sound. How accurately you
strike with the proper dynamics is evaluated at the end of the exercise. Once you master Dynamic Gate, you will
be a skillful drummer at controlling dynamics depending on the situation!
Strength of current strike (flashes)
Weak Normal Strong
When the “TRAINING” light is ON, press the Mode switch to
turn on the “PLAY” button, and then press the Mode switch
again to turn on the “TRAINING” light.
Procedure
NOTE
Weak Normal Strong
TIPS
• The range of the dynamics can be adjusted. (Menu
Mode “Dynamic Gate Low Limit” and “Dynamic
Gate High Limit”; page 52.)
• The exercise time can be adjusted. (Menu Mode
“Timer”; page 51.)

Practicing in Training Mode
34
Basic Techniques
DTX402K DTX432K DTX452K Owner’s Manual
4. SONG PART GATE
1. Press the Mode switch to turn the “TRAINING” light
on.
2. Press number button [4] to select Song Part Gate.
The [ ] button flashes, indicating that the exercise
is on standby.
3. Press the corresponding number button to select the
way to practice
.
4. Press the [ ] button to start the
exercise.
The song will be played.
5. Play the practice drum pattern on the
pads.
6. To end the exercise, press the [] button.
Your score will be announced by the voice guidance after
every time the practice drum pattern is repeated. The total
score is not evaluated after ending the exercise.
Playing along with a song:
• • • • • • • • • • • • • • • • • • • • • • • • • • • • • • • • • • • • • • • • • • • • • • • • • • • • • • • • • • • • • • • • • • • • • • • • •
4. SONG PART GATE
Song Part Gate is an advanced exercise for playing actual
drum patterns along with a part of a song. For example,
you can practice just the fill-in part in the song, or only the
hand parts of the basic drum pattern of the song. Before
working on Song Part Gate, it would be better to master
the other basic training programs. Then once you master
Song Part Gate, you can confidently work on Song Score
Gate (page 35) for playing the entire song!
The score (PDF) is available at the Yamaha website:
https://download.yamaha.com/
After accessing the Support website (and clicking on “Man-
ual Library”), enter the appropriate model name.
NOTE
When the “TRAINING” light is ON, press the Mode switch to
turn on the “PLAY” button, and then press the Mode switch
again to turn on the “TRAINING” light.
The available exercises may differ depending on the current
music category. For details, refer to the Score (PDF).
Procedure
NOTE
NOTE
Scoring
TIPS
• The music category can be changed (by holding
down the corresponding number button).
• The volume of the practice pattern can be adjusted.
(While holding down the [ ] button, press the
VOLUME[+]/[–] button.)
• You can mute specific parts of the practice drum
pattern.
- The mute settings are effective while the [DRUM
ON/OFF] button is half-lit.
- While the song is being played, strike the pad
corresponding to the part you wish to mute. The
selected part will be muted.
- If the pad corresponding to the muted drum part
is not struck for certain period of time, it will be
automatically unmuted.
- Press the [DRUM ON/OFF] button (so that it is
fully lit) to end the mute settings.
• The exercise time can be adjusted. (Menu Mode
“Timer”; page 51.)
• The difficulty of the exercise can be adjusted.
(Menu Mode “Difficulty Level”; page 51.)
• You can set whether the pads produce sound
whenever they are struck or only when they are
struck exactly in time. (Menu Mode “Ignore Timing”;
page 51.)

Practicing in Training Mode
35
Basic Techniques
DTX402K DTX432K DTX452K Owner’s Manual
5. SONG SCORE GATE
1. Press the Mode switch to turn the “TRAINING” light
on.
2. Press number button [5] to select Song Score Gate.
The [ ] button flashes, indicating that the exercise
is on standby.
3. Press the [ ] button to start the exercise.
4. Play the drum pattern on the pads.
After you play the entire song, your score will be dis-
played. (For details, see page 31.)
5. To stop the exercise, press the [ ] button.
When you stop the exercise before the end of the song,
the score for your exercise will not be shown.
Playing along with a song:
• • • • • • • • • • • • • • • • • • • • • • • • • • • • • • • • • • • • • • • • • • • • • • • • • • • • • • • • • • • • • • • • • • • • • • • • •
5. SONG SCORE GATE
Song Score Gate is a final exercise for playing actual
drum patterns along with an entire song. Before work-
ing on Song Score Gate, we recommend that you first
master Song Part Gate (page 34) as much as possi-
ble—and get you on your way to be a great drummer!
The score (PDF) is available at the Yamaha website:
https://download.yamaha.com/
After accessing the Support website (and clicking on
“Manual Library”), enter the appropriate model name.
NOTE
When the “TRAINING” light is ON, press the Mode switch to
turn on the “PLAY” button, and then press the Mode switch
again to turn on the “TRAINING” light.
Procedure
NOTE
TIPS
• You can change the music category (by pressing a
corresponding number key).
• The volume of the song can be adjusted. (While
holding down the [ ] button, press the VOL-
UME[+]/[–] button.)
• You can mute specific parts of the practice drum
pattern.
- The mute settings are effective while the [DRUM
ON/OFF] button is half-lit.
- While the song is being played, strike the pad
corresponding to the part you wish to mute. The
selected part will be muted.
- If the pad corresponding to the muted drum part
is not struck for certain period of time, it will be
automatically unmuted.
- Press the [DRUM ON/OFF] button (so that it is
fully lit) to end the mute settings.
• The difficulty of the exercise can be adjusted.
(Menu Mode “Difficulty Level”; page 51.)
• You can set whether the pads produce sound
whenever they are struck or only when they are
struck exactly in time. (Menu Mode “Ignore Timing”;
page 51.)

Practicing in Training Mode
36
Basic Techniques
DTX402K DTX432K DTX452K Owner’s Manual
6. MEASURE BREAK
1. Press the Mode switch to turn the “TRAINING” light
on.
2. Press number button [6] to select Measure Break.
The [] button flashes, indicating that the exercise is
on standby.
3. Press the [ ] button to start the exercise.
Four measures will be repeatedly played back. (The first
to third measures are with the metronome and the fourth
measure is without the metronome.) The number button
flashes along with playback of the corresponding mea-
sure.
4. Play the pads.
5. To end the exercise, press the [] button.
How exactly you strike the first beat of the measure after the
break will be announced by the voice guidance after every
four measures are repeated. The total score is not evaluated
after ending the exercise.
Working on your rhythm:
• • • • • • • • • • • • • • • • • • • • • • • • • • • • • • • • • • • • • • • • • • • • • • • • • • • • • • • • • • • • • • • • • • • • • • • • •
6. MEASURE BREAK
Measure Break is an exercise for keeping a steady tempo without the metronome. How accurately you strike the
first beat of the measure after the break is evaluated. Once you master Measure Break, you can keep a steady
tempo even after breaks or fill ins.
Evaluate
the first beat
With Metronome (fully-lit) Without Metronome (half-lit)
When the “TRAINING” light is ON, press the Mode switch to
turn on the “PLAY” button, and then press the Mode switch
again to turn on the “TRAINING” light.
Procedure
NOTE
Scoring
TIPS
• The total number of measures can be changed to
any number from 2 to 10.
While the exercise is on standby or during the exer-
cise, hold down the number button until the key is
half-lit.
For example, to repeat ten measures, hold down
the number button [10] until the number button [10]
is half-lit.
• The number of measures with the metronome clicks
can be changed.
While the exercise is on standby or during the exer-
cises, press the number button corresponding to
the number of measures you would like to set. Keep
in mind, however, that the last measure of this exer-
cise is always set to be without the metronome.
For example, by pressing the number button [6]
while the total number of measures is set to 10,
measures 1 to 6 are counted with the metronome,
and measures 7 to 10 are without the metronome.
• The exercise time can be adjusted. (Menu Mode
“Timer”; page 51.)

Practicing in Training Mode
37
Basic Techniques
DTX402K DTX432K DTX452K Owner’s Manual
7. CHANGE UP
1. Press the Mode switch to turn the “TRAINING” light
on.
2. Press number button [7] to select Change Up.
The [ ] button flashes, indicating that the exercise
is on standby.
3. Press the [ ] button to start the exercise.
The practice rhythm and the metronome start to play,
and the rhythm changes after every two measures.
4. Play the practice rhythm on the pads.
5. To end the exercise, press the [] button.
Your score will be displayed. (For details, see page 31.)
Working on your rhythm:
• • • • • • • • • • • • • • • • • • • • • • • • • • • • • • • • • • • • • • • • • • • • • • • • • • • • • • • • • • • • • • • • • • • • • • • • •
7. CHANGE UP
Change Up is an exercise for playing seven different rhythms that change every two measures. How well you
maintain good timing along with the rhythms is evaluated. Try your best to keep a steady tempo—even when the
rhythms change!
33 6
Rhythm
When the “TRAINING” light is ON, press the Mode switch to
turn on the “PLAY” button, and then press the Mode switch
again to turn on the “TRAINING” light.
Procedure
NOTE
TIPS
• The volume of the practice rhythm can be adjusted.
(While holding down the [ ] button, press the
VOLUME[+]/[–] button.)
• The practice rhythm can be muted. (Press the
[DRUM ON/OFF] button. To unmute, press it
again.)
• You can skip among the seven rhythms as you
practice by pressing the corresponding number
button while the exercise is on standby or during
the exercise, as shown in the example below. The
number button corresponding to the rhythm to be
skipped is half lit.
• By default, each rhythm changes after every two
measures. The number of measures can be
changed by pressing [10] several times. (Four mea-
sures when [10] is half lit, one measure when [10] is
fully lit, and two measures (default) when [10] is off.)
• The exercise time can be adjusted. (Menu Mode
“Timer”; page 51.)
• The difficulty of the exercise can be adjusted.
(Menu Mode “Difficulty Level”; page 51.)
• You can set whether the pads produce sound
whenever they are struck or only when they are
struck exactly in time. (Menu Mode “Ignore Timing”;
page 51.)
33 6

Practicing in Training Mode
38
Basic Techniques
DTX402K DTX432K DTX452K Owner’s Manual
8. PART MUTE
1. Press the Mode switch to turn the “TRAINING” light
on.
2. Press number button [8] to select Part Mute.
The [ ] button flashes, indicating that the exercise
is on standby.
3. To mute drum parts/instrument parts, press the corre-
sponding number buttons [1] to [5] or [9] to [10]. The
number button of the muted part will be turned off (see
illustration above). To unmute, press the number but-
ton again. The number button lights up.
4. Press the [ ] button to start the exercise.
5. Play along the song on the pads.
6. To end the exercise, press the [] button.
Practicing by parts:
• • • • • • • • • • • • • • • • • • • • • • • • • • • • • • • • • • • • • • • • • • • • • • • • • • • • • • • • • • • • • • • • • • • • • • • • •
8. PART MUTE
Part Mute is an exercise which you can mute any or all of the drum parts (such as snare and kick) and the instru-
ment parts (non-drum parts) from a song. You can select the drum parts/instrument parts to be muted by pressing
the corresponding number buttons. Part Mute can be useful in many ways—for example, for practicing only the
snare part of a rhythm, or for tightening up your rhythm section skills by practicing only with a bass guitar sound.
Keep in mind that this exercise is not scored.
Hi-hat Kick Cymbal Other song parts
Bass part Snare Tom
Drum parts
(off) (off)
When the “TRAINING” light is ON, press the Mode switch to
turn on the “PLAY” button, and then press the Mode switch
again to turn on the “TRAINING” light.
Procedure
NOTE
TIPS
Drum parts can be muted by striking the pads.
- Press the [DRUM ON/OFF] button (so that it is
half-lit).
- Strike the pad corresponding to the part from the
practice drum pattern you wish to mute. The
selected part will be muted and the corresponding
number button will be half lit.
- If the pad corresponding to the muted drum part is
not struck for certain period of time, it will be auto-
matically unmuted and the corresponding number
button will light up.
- Press the [DRUM ON/OFF] button (so that it is
fully lit) to end the mute settings.
If the part is already muted (the corresponding number but-
ton is turned off), the pad remains muted.
NOTE

Practicing in Training Mode
39
Basic Techniques
DTX402K DTX432K DTX452K Owner’s Manual
9. FAST BLAST
1. Press the Mode switch to turn the “TRAINING” light
on.
2. Press number button [9] to select Fast Blast.
The [ ] button flashes, indicating that the exercise
is on standby.
3. Press the [ ] button to start the exercise.
The timer will start when you strike the first pad.
4. Strike pads as fast as possible.
When the training has ended, your score will be dis-
played.
5. To stop the exercise, press the [ ] button.
For example, if your score was 480, the number buttons
would flash [4] – [8] – [10].
• Your score will be announced by the voice guidance (in
English) as well.
• To check your score once again, press any of the num-
ber buttons [1] to [10].
Playing as fast as you can:
• • • • • • • • • • • • • • • • • • • • • • • • • • • • • • • • • • • • • • • • • • • • • • • • • • • • • • • • • • • • • • • • • • • • • • • • •
9. FAST BLAST
Fast Blast is an exercise for striking pads as fast as possible within a time limit (60 seconds). The half lit number
buttons indicates the remaining time. The exercise ends when the number buttons are all turned off. The number
of times you have struck will be shown by using the number buttons and also announced by the voice guidance.
Try practicing your fast drumming skills as if it were a game!
(half-lit)
When the “TRAINING” light is ON, press the Mode switch to
turn on the “PLAY” button, and then press the Mode switch
again to turn on the “TRAINING” light.
Procedure
NOTE
Scoring
TIPS
The time limit can be adjusted. (Menu Mode “Fast
Blast Timer”; page 53.)

Practicing in Training Mode
40
Basic Techniques
DTX402K DTX432K DTX452K Owner’s Manual
10. RECORDER
1. Press the Mode switch to turn the “TRAINING” light
on.
2. Press number button [10] to select Recorder.
The [ ] button flashes, indicating that recording is
set to standby.
3. Play the pad, and the recording starts automatically.
4. When you finish your performance, leave all pads with-
out striking for certain period of time.
The recording will be automatically stopped and the
recorded performance will be played back.
5. To end the exercise, press the Mode switch.
Recording your play:
• • • • • • • • • • • • • • • • • • • • • • • • • • • • • • • • • • • • • • • • • • • • • • • • • • • • • • • • • • • • • • • • • • • • • • • • •
10. RECORDER
Recorder allows you to easily record your performances. You can
use those recordings not only for listening back and checking your
progress, but also for playing along with yourself! Keep in mind
that this training is not scored.
When the “TRAINING” light is ON, press the Mode switch to
turn on the “PLAY” button, and then press the Mode switch
again to turn on the “TRAINING” light.
Procedure
NOTE
TIPS
• You can record your performance along with a
song. (Press the [ ] button while recording is
set to standby.)
• You can listen to the metronome click while record-
ing your performance. (Press the [] button while
recording is set to standby.)
• You can stop the playback of the recording by
pressing any number button. If you press any
number button again, the recording will be played
back from the beginning.
• The recorded performance is deleted when you exit
from the Training Mode.
• The beat setting for recording is “4 beats,” and can-
not be changed.

Advanced Techniques
41
DTX402K DTX432K DTX452K Owner’s Manual
Setting Parameters using Menu Mode
Menu Mode is used to set drum-module parameters and functions, which are arranged into the follow-
ing seven groups.
1. Hold down the Mode switch to turn the “PLAY” and
“TRAINING” on (Menu Mode).
2. Press the number button corresponding to the group
containing the parameter you wish to set. (Parameter
groups are shown in the hierarchical list on the left.) To
select “1-2. Beats,” for example, press the number but-
tons in the order [1][2].
• When the setting value is less than 10
The number button of the current setting will be fully lit
and the selectable number buttons will be half-lit.
• When the setting value is more than 10
The number buttons flash continuously to indicate the
current setting. For example, when the current setting is
40, the number button lights will flash [4][10].
3. Enter the new setting.
• When the setting value is less than 10
Select a new setting using the corresponding number
button.
• When the setting value is more than 10
Press the TEMPO[+]/[–] button to increase and
decrease the setting values. If you take no action for a
while, the setting is automatically stored.
z Metronome Settings
1-1. Pattern ............................................................ Page 42
1-2. Beats.............................................................. Page 42
1-3. Sound............................................................. Page 42
1-4. Number Button Lighting Pattern ..................... Page 43
x Kit Settings
2-1. Pad Sound...................................................... Page 43
2-2. Pad Volume.................................................... Page 43
2-3. Pad Tuning..................................................... Page 44
2-4. Double Bass Drum......................................... Page 44
2-5. Reverb ........................................................... Page 44
c MIDI Settings
3-1. Local Control .................................................. Page 45
3-2. Note Number ................................................. Page 45
v Hi-hat Settings
4-1. Clutch Position................................................ Page 46
4-2. Splash Sensitivity........................................... Page 46
4-3. Foot Close Position........................................ Page 46
4-4. Foot Close Velocity ........................................ Page 47
4-5. Kick Velocity................................................... Page 47
b Trigger Settings
5-1. Pad Velocity Curve ......................................... Page 48
5-2. Crosstalk........................................................ Page 49
5-3. Snare Pad Type ............................................. Page 49
5-4. Pedal Type ..................................................... Page 50
5-5. Gain ............................................................... Page 50
5-6. Minimum Level............................................... Page 50
n Training Settings
6-1. Timer .............................................................. Page 51
6-2. Difficulty Level................................................ Page 51
6-3. Ignore Timing................................................. Page 51
6-4. Rhythm Gate Indicator Flipped ...................... Page 52
6-5. Dynamic Gate Low Limit ................................ Page 52
6-6. Dynamic Gate High Limit ............................... Page 52
6-7. Fast Blast Timer.............................................. Page 53
m Other Settings
7-1. Voice Guidance Volume.................................. Page 53
7-2. Operation Sound Volume ............................... Page 53
7-3. USB Audio Output Settings ............................ Page 54
7-4. USB Audio Output Gain ................................. Page 54
7-5. Auto Power-Off Time....................................... Page 54
7-6. Stereo/Mono................................................... Page 55
7-7. Initialize Kit...................................................... Page 55
7-8. Delete Song.................................................... Page 55
7-9. Revert to Last Power On ................................ Page 56
7-10. Factory Reset ............................................... Page 56
Basic Menu Mode Procedure
When the setting value is more than 10, you can also use the
number buttons to directly set parameters with numerical val-
ues. To enter the value 105, for example, press the number
buttons in the order [1][10][5]. [10] is used to enter the
value zero. You cannot use [10] to enter the number ten.
Selectable Settings
Current Setting
NOTE
Advanced Techniques

Setting Parameters using Menu Mode
42
Advanced Techniques
DTX402K DTX432K DTX452K Owner’s Manual
1-1. Pattern
You can set one of eight patterns for the drum module’s
metronome.
1. Hold down the Mode switch to activate Menu Mode.
2. Press number button [1] to select the Metronome Set-
tings parameter group.
3. Press number button [1] to select the Pattern parame-
ter.
4. Select a new metronome pattern using the correspond-
ing number button [1] to [8].
1-2. Beats
You can set the metronome to between 1 and 9 beats in
length.
1. Hold down the Mode switch to activate Menu Mode.
2. Press number button [1] to select the Metronome Set-
tings parameter group.
3. Press number button [2] to select the Beats parameter.
4. Select a new metronome length in beats using the corre-
sponding number button [1] to [9].
1-3. Sound
You can set the sound played by the metronome to, for
example, a standard click sound, a cowbell, a drumsticks
sound, or a spoken count.
1. Hold down the Mode switch to activate Menu Mode.
2. Press number button [1] to select the Metronome Set-
tings parameter group.
3. Press number button [3] to select the Sound parameter.
z Metronome Settings
Steps:
Hold down the Mode switch [1] [1] Setting
Number
button
Setting
[1]
[2]
[3]
[4]
[5]
3-2 Son Clave
[6]
2-3 Son Clave
[7]
3-2 Rumba Clave
[8]
2-3 Rumba Clave
Setting
3 3 3 3
Steps:
Hold down the Mode switch [1] [2] Setting
Number button Setting
[1] 1 beat
[2] 2 beats
[3] 3 beats
[4] 4 beats
[5] 5 beats
[6] 6 beats
[7] 7 beats
[8] 8 beats
[9] 9 beats
Steps:
Hold down the Mode switch [1] [3] Setting
Setting
Setting

Setting Parameters using Menu Mode
43
Advanced Techniques
DTX402K DTX432K DTX452K Owner’s Manual
4. Select a new metronome sound using the corresponding
number button [1] to [7].
1-4. Number Button Lighting Pattern
You can have number buttons [1] to [10] light up when play-
ing the metronome in Play Mode. Use the following proce-
dure to set the buttons’ lighting pattern.
1. Hold down the Mode switch to activate Menu Mode.
2. Press number button [1] to select the Metronome Set-
tings parameter group.
3. Press number button [4] to select the Number Button
Lighting Pattern parameter.
4. Select a new lighting pattern using the corresponding
number button [1] to [3].
2-1. Pad Sound
You can change the sounds assigned to the current kit’s
pads. This makes it very easy to create your own unique
kits.
1. Hold down the Mode switch to activate Menu Mode.
2. Press number button [2] to select the Kit Settings
parameter group.
3. Press number button [1] to select the Pad Sound
parameter.
4. Strike a pad to select it.
5. Enter a new drum-sound number using the TEMPO[+]/
[–] buttons. For a list of sounds and numbers, see the
Voice List (page 62).
2-2. Pad Volume
You can adjust the volume of the kit’s pads.
1. Hold down the Mode switch to activate Menu Mode.
2. Press number button [2] to select the Kit Settings
parameter group.
3. Press number button [2] to select the Pad Volume
parameter.
4. Strike a pad to select it.
5. Enter a new volume using the TEMPO[+]/[–] buttons.
Number button Setting
[1] Metronome click 1
[2] Metronome click 2
[3] Cowbell
[4] Drumsticks
[5] Claves
[6] Spoken count 1
[7] Spoken count 2 (with measure number)
Steps:
Hold down the Mode switch [1] [4] Setting
Number button Setting
[1] Off (no lighting)
[2] Pattern 1
[3] Pattern 2
Setting
x Kit Settings
Steps:
Hold down the Mode switch [2] [1] Setting
Setting
1 to 287
Steps:
Hold down the Mode switch [2] [2] Setting
Setting
0 to 127
Setting
Setting

Setting Parameters using Menu Mode
44
Advanced Techniques
DTX402K DTX432K DTX452K Owner’s Manual
2-3. Pad Tuning
You can adjust the panning of the current kit’s pads.
1. Hold down the Mode switch to activate Menu Mode.
2. Press number button [2] to select the Kit Settings
parameter group.
3. Press number button [3] to select the Pad Panning
parameter.
4. Strike a pad to select it.
5. Enter a new tuning setting using the TEMPO[+]/[–]
buttons in 25 cent steps. The “cent” is a unit of measure
for musical intervals. 100 cents make up a semitone. A
value of 64 corresponds to normal pitch (0 cents).
2-4. Double Bass Drum
You can easily configure the drum module to produce a kick
drum sound when you operate the pedal connected to the
[HI-HAT CONTROL] trigger input jack. This convenient
function provides support for double bass drumming tech-
niques.
1. Hold down the Mode switch to activate Menu Mode.
2. Press number button [2] to select the Kit Settings
parameter group.
3. Press number button [4] to select the Double Bass
Drum parameter.
4. Set the parameter using number button [1] or [2]. The
available settings are as follows.
2-5. Reverb
Reverb effects add a warm ambience to sounds, simulating
the complex reflections of actual performance spaces, such
as a concert hall or a small club. Use the following proce-
dure to select a reverb effect for the current kit.
1. Hold down the Mode switch to activate Menu Mode.
2. Press number button [2] to select the Kit Settings
parameter group.
3. Press number button [5] to select the Reverb parame-
ter.
4. Select a reverb effect using the corresponding number
button [1] to [10].
Steps:
Hold down the Mode switch [2] [3] Setting
Setting
16 (-1200 cents) to 64 (0 cent) to 112 (+1200 cents)
Steps:
Hold down the Mode switch [2] [4] Setting
Setting
Setting
Number button Setting
[1] Off
[2] On
• While the Double Bass Drum function is enabled, you will be
unable to use the hi-hat controller plugged into the [HI-HAT
CONTROL] trigger input jack to simulate opening and closing of
the hi-hat.
• If using an HH40 Hi-hat Controller, you can adjust the kick veloc-
ity. For details, see 4-5. Kick Velocity (page 47).
Steps:
Hold down the Mode switch [2] [5] Setting
Number button Setting
[1] Off
[2] Hall
[3] Studio
[4] Room 1
[5] Room 2
[6] Stage
[7] Small Stage
[8] Plate
[9] Early Reflection
[10] Gate Reverb
NOTE
Setting

Setting Parameters using Menu Mode
45
Advanced Techniques
DTX402K DTX432K DTX452K Owner’s Manual
3-1. Local Control
The Local Control parameter determines whether or not the
drum module’s internal tone generator will produce sounds
in response to playing of the pads or of songs. Normally,
this parameter is set to “On”, meaning that pads and songs
will generate sounds. When “Off” is selected, the tone gen-
erator is essentially disconnected from the pads and songs,
which will be unable to generate any sound. An “Off” set-
ting can prove highly useful when you wish to record your
drum performances as MIDI data on a sequencer or using
DAW software.
1. Hold down the Mode switch to activate Menu Mode.
2. Press number button [3] to select the MIDI Settings
parameter group.
3. Press number button [1] to select the Local Control
parameter.
4. Set the parameter using number button [1] or [2]. The
available settings are as follows.
3-2. Note Number
You can set the MIDI note number that is output when each
of the pads is played.
1. Hold down the Mode switch to activate Menu Mode.
2. Press number button [3] to select the MIDI Settings
parameter group.
3. Press number button [2] to select the Note Number
parameter.
4. Strike a pad to select it.
5. Enter a new note number using the TEMPO[+]/[–] but-
tons.
c MIDI Settings
Steps:
Hold down the Mode switch [3] [1] Setting
Number
button
Setting Description
[1] Off
The internal tone generator does
not respond to pads and songs.
[2] On
The internal tone generator
responds to pads and songs.
• The drum module’s internal tone generator will continue to
respond to received MIDI data when Local Control is turned off.
• The drum module will continue to output drum performances as
MIDI data when Local Control is turned off.
Setting
NOTE
Steps:
Hold down the Mode switch [3] [2] Setting
Setting
0 to 127
Note number settings are relevant only when you have connected
your drum module to a computer. For more details, refer to the
MIDI Reference Manual (PDF).
Setting
NOTE

Setting Parameters using Menu Mode
46
Advanced Techniques
DTX402K DTX432K DTX452K Owner’s Manual
4-1. Clutch Position
You can simulate the effect of changing the hi-hat’s clutch
position. The smaller the setting, the quicker an open hi-hat
sound will decay.
1. Hold down the Mode switch to activate Menu Mode.
2. Press number button [4] to select the Hi-hat Settings
parameter group.
3. Press number button [1] to select the Clutch Position
parameter.
4. Enter a new clutch position using the TEMPO[+]/[–]
buttons.
4-2. Splash Sensitivity
You can set the degree of sensitivity for detecting hi-hat foot
splashes. The higher the value, the easier it will be to pro-
duce a foot-splash sound with the hi-hat controller. High
values may, however, result in splash sounds being uninten-
tionally produced when, for example, you operate the hi-hat
controller lightly as you keep time. It is a good idea, there-
fore, to set this parameter to “Off” if you do not want to play
foot splashes.
1. Hold down the Mode switch to activate Menu Mode.
2. Press number button [4] to select the Hi-hat Settings
parameter group.
3. Press number button [2] to select the Splash Sensitiv-
ity parameter.
4. Enter a new splash sensitivity using the TEMPO[+]/[–]
buttons.
4-3. Foot Close Position
You can adjust the position at which the hi-hat switches
from open to closed when you operate the hi-hat controller.
The lower the value, the smaller the virtual opening between
the top and bottom hi-hats. Larger values increase the size
of the gap between the top and bottom cymbals, and this can
prevent foot close or foot splash sounds from being pro-
duced when you operate the pedal.
1. Hold down the Mode switch to activate Menu Mode.
2. Press number button [4] to select the Hi-hat Settings
parameter group.
3. Press number button [3] to select the Foot Close Posi-
tion parameter.
4. Enter a new foot close position using the TEMPO[+]/
[–] buttons.
v Hi-hat Settings
Steps:
Hold down the Mode switch [4] [1] Setting
Setting
0 to 64
Steps:
Hold down the Mode switch [4] [2] Setting
Setting
Setting
Setting
0 to 127
Set this parameter to [0] in order to turn off foot splashes.
Steps:
Hold down the Mode switch [4] [3] Setting
This parameter only has an effect when you are
using an HH65 Hi-hat Controller.
Setting
0 to 32
NOTE
Setting

Setting Parameters using Menu Mode
47
Advanced Techniques
DTX402K DTX432K DTX452K Owner’s Manual
4-4. Foot Close Velocity
You can adjust the velocity (or power) of foot-close sounds
produced using the hi-hat controller.
1. Hold down the Mode switch to activate Menu Mode.
2. Press number button [4] to select the Hi-hat Settings
parameter group.
3. Press number button [4] to select the Foot Close
Velocity parameter.
4. Enter a new velocity using the TEMPO[+]/[–] buttons.
4-5. Kick Velocity
You can adjust the velocity (or power) of kick sounds pro-
duced using the hi-hat controller. In order for the Kick
Velocity parameter to have an effect, Double Bass Drum
must be set to “On” for the current kit (page 44).
1. Hold down the Mode switch to activate Menu Mode.
2. Press number button [4] to select the Hi-hat Settings
parameter group.
3. Press number button [5] to select the Kick Velocity
parameter.
4. Enter a new velocity using the TEMPO[+]/[–] buttons.
Steps:
Hold down the Mode switch [4] [4] Setting
This parameter only has an effect when you are
using an HH40 Hi-hat Controller.
Setting
1 to 127
Setting
Steps:
Hold down the Mode switch [4] [5] Setting
This parameter only has an effect when you are
using an HH40 Hi-hat Controller.
Setting
1 to 127
Setting

Setting Parameters using Menu Mode
48
Advanced Techniques
DTX402K DTX432K DTX452K Owner’s Manual
5-1. Pad Velocity Curve
You can select a velocity curve for individual pads. A veloc-
ity curve determines how the velocity (or power) of a sound
is affected by how hard you strike the pad.
1. Hold down the Mode switch to activate Menu Mode.
2. Press number button [5] to select the Trigger Settings
parameter group.
3. Press number button [1] to select the Pad Velocity
Curve parameter.
4. Strike a pad to select it.
5. Enter a new velocity curve setting using the
TEMPO[+]/[–] buttons.
b Trigger Settings
Steps:
Hold down the Mode switch [5] [1] Setting
Setting
1 to 25
Setting
1
2
3
4
5
6
7
8
9
10
Velocit y
Trigger input level
Velocity
Trigger input level
11
12
13
14
15
16
17
18
19
20
23
24
25
22
21
Velocity
Trigger input level
Velocit y
Trigger input level
Velocity
Trigger input level

Setting Parameters using Menu Mode
49
Advanced Techniques
DTX402K DTX432K DTX452K Owner’s Manual
5-2. Crosstalk
The term “crosstalk” refers to the output of spurious trigger
signals from a pad other than the one that was stuck as a
result of vibration or interference between pads. You can
adjust the Crosstalk parameter for individual pads to prevent
this phenomenon from occurring.
1. Hold down the Mode switch to activate Menu Mode.
2. Press number button [5] to select the Trigger Settings
parameter group.
3. Press number button [2] to select the Crosstalk param-
eter.
4. Strike a pad to select it.
5. Enter a new setting (%) using the TEMPO[+]/[–] but-
tons. Larger values are more effective in preventing
crosstalk; however, they can also make it difficult to
play pads simultaneously during light drumming.
5-3. Snare Pad Type
You can specify the type of snare pad connected to your
drum module.
1. Hold down the Mode switch to activate Menu Mode.
2. Press number button [5] to select the Trigger Settings
parameter group.
3. Press number button [3] to select the Snare Pad Type
parameter.
4. Select a new snare pad type using the corresponding
number button [1] to [6].
Steps:
Hold down the Mode switch [5] [2] Setting
Setting
0 to 99
Setting
Steps:
Hold down the Mode switch [5] [3] Setting
Number button Setting
[1]
Automatic identification
(only for [2] and [3])
[2] TP70S
[3]
Snare pad that comes with DX402K/
DTX432K
[4] XP-series pad
[5] TP70S reversed
[6] XP-series pad reversed
• When set to [1], the drum module will automatically identify the
type of snare pad that came with your electronic drum kit when it
is turned on. If you then press and hold number button [1], the
drum module will flash number button [2] or [3] to indicate the
result of automatic identification.
• Whenever you change the type of snare connected to the drum
module, please update this setting using the corresponding
number button [2] to [4]. For example, when you use the XP-
series pad, select [4].
• You can use setting [5] or [6] to switch (or reverse) the drum
sounds assigned to Rim 1 and Rim 2. This makes it easier for
left-handed drummers to configure their electronic drum kit.
Setting
NOTE

Setting Parameters using Menu Mode
50
Advanced Techniques
DTX402K DTX432K DTX452K Owner’s Manual
5-4. Pedal Type
Use the following parameter to specify the types of pedals
(i.e., hi-hat controller and kick) connected to your drum
module.
1. Hold down the Mode switch to activate Menu Mode.
2. Press number button [5] to select the Trigger Settings
parameter group.
3. Press number button [4] to select the Pedal Types
parameter.
4. Select a new pedal type combination using the corre-
sponding number button [1] to [5].
5-5. Gain
You can set the gain level for trigger signals output from
individual pads. The higher the gain setting, the louder the
sounds produced by light drumming.
1. Hold down the Mode switch to activate Menu Mode.
2. Press number button [5] to select the Trigger Settings
parameter group.
3. Press number button [5] to select the Gain parameter.
4. Strike a pad to select it.
5. Enter a new gain level using the TEMPO[+]/[–] but-
tons.
5-6. Minimum Level
When the strength with which you strike a pad is no more
than this level, the pad will not output a trigger signal in
response and no sound will be produced.
1. Hold down the Mode switch to activate Menu Mode.
2. Press number button [5] to select the Trigger Settings
parameter group.
3. Press number button [6] to select the Minimum Level
parameter.
4. Strike a pad to select it.
5. Enter a new setting (%) using the TEMPO[+]/[–] but-
tons.
Steps:
Hold down the Mode switch [5] [4] Setting
Number
button
Setting
Hi-hat controller Kick pedal
[1] Automatic identification (only for [2] and [3])
[2] HH65 KP65
[3] HH40 KU100
[4] HH40 KP65
[5] HH65 KU100
• This parameter can normally be set to [1] (automatic identifica-
tion).
• When set to [1], the drum module will automatically identify the
type of pedal that came with your electronic drum kit when it is
turned on.
If you then press and hold number button [1], the drum module
will flash number button [2] or [3] to indicate the result of auto-
matic identification.
• Connect the hi-hat controller before turning on the drum module.
Please do not turn the drum module on with the hi-hat controller
depressed. The drum module can not identify the type of pedal
properly and it causes that the kick may produce much smaller
sound than expected.
• Whenever you change the type of hi-hat controller or kick pedal
connected to the drum module, please update this setting using
the corresponding number button [2] to [5].
Setting
NOTE
Steps:
Hold down the Mode switch [5] [5] Setting
Setting
1 to 127
Steps:
Hold down the Mode switch [5] [6] Setting
Setting
0 to 99 (%)
Setting
Setting

Setting Parameters using Menu Mode
51
Advanced Techniques
DTX402K DTX432K DTX452K Owner’s Manual
6-1. Timer
You can set the practice time for the following exercises in
Training Mode.
• Rhythm Gate
• Dynamic Gate
• Song Part Gate
• Measure Break
• Change Up
The timer begins counting at the start of an exercise, and
when the set time is reached, it automatically ends the exer-
cise.
1. Hold down the Mode switch to activate Menu Mode.
2. Press the number button [6] to select the Training Set-
tings.
3. Press the number button [1] to select Timer.
4. Select your preferred practice time using the number
button [1] to [10].
6-2. Difficulty Level
You can set the level of training difficulty for the following
exercises.
• Song Part Gate
• Song Score Gate
•Change Up
1. Hold down the Mode switch to activate Menu Mode.
2. Press the number button [6] to select the Training Set-
tings.
3. Press the number button [2] to select Difficulty Level.
4. Select your preferred difficulty level using the number
button [1] to [5]. The higher the level, the more diffi-
cult the training.
6-3. Ignore Timing
For the following trainings, you can set whether the pads
produce sound whenever they are struck or only when they
are struck exactly in time.
• Rhythm Gate
• Song Part Gate
• Song Score Gate
•Change Up
1. Hold down the Mode switch to activate Menu Mode.
2. Press the number button [6] to select the Training Set-
tings.
3. Press the number button [3] to select Ignore Timing.
n Training Settings
Steps:
Hold down the Mode switch [6] [1] Setting
Number button Settings
[1] Off
[2] 30 seconds
[3] 60 seconds
[4] 90 seconds
[5] 120 seconds
[6] 150 seconds
[7] 180 seconds
[8] 300 seconds
[9] 480 seconds
[10] 600 seconds
Setting
Steps:
Hold down the Mode switch [6] [2] Setting
Setting
1 to 5
Steps:
Hold down the Mode switch [6] [3] Setting
Setting
Setting

Setting Parameters using Menu Mode
52
Advanced Techniques
DTX402K DTX432K DTX452K Owner’s Manual
4. Select the setting for each drum pad using the number
buttons [1] to [5]. When set to producing a sound, the
pad will produce a sound whenever they are struck.
When set not to producing a sound, only pads played
exactly in time will produce a sound.
6-4. Rhythm Gate Indicator Flipped
For Rhythm Gate (page 32), the time indicator using the
number buttons can be reversed, according to your prefer-
ence. In the normal mode, “fast” is on the left. In the reverse
mode, “fast” is on the right.
1. Hold down the Mode switch to activate Menu Mode.
2. Press the number button [6] to select the Training Set-
tings.
3. Press the number button [4] to select Rhythm Gate
Indicator Flipped.
4. Select the mode using the number button [1] or [2].
6-5. Dynamic Gate Low Limit
For Dynamic Gate (page 33), you can set the low limit (the
threshold value between “Weak” and “Normal”).
1. Hold down the Mode switch to activate Menu Mode.
2. Press the number button [6] to select the Training Set-
tings.
3. Press the number button [5] to select Dynamic Gate
Low Limit.
4. Set the threshold value using the TEMPO[+]/[–] but-
tons.
6-6. Dynamic Gate High Limit
For Dynamic Gate (page 33), you can set the high limit (the
threshold value between “Normal” and “Strong”).
1. Hold down the Mode switch to activate Menu Mode.
2. Press the number button [6] to select the Training Set-
tings.
3. Press the number button [6] to select Dynamic Gate
High Limit.
4. Set the threshold value using the TEMPO[+]/[–] but-
tons.
Number button Settings
[1] Hi-Hat
[2] Snare
[3] Kick
[4] Tom
[5] Cymbal
Steps:
Hold down the Mode switch [6] [4] Setting
Number
button
Settings Description
[1]
Normal
mode
[2]
Reverse
mode
Produce a sound (fully lit)
Not producing a sound (half lit)
Setting
1 2 3 4 5 6 7 8 9 10
Fast Slow
1 2 3 4 5 6 7 8 9 10
Slow Fast
Steps:
Hold down the Mode switch [6] [5] Setting
Setting
2 to 99
This setting may be automatically fixed so as not to exceed the
setting value of Dynamic Gate High Limit.
Steps:
Hold down the Mode switch [6] [6] Setting
Setting
2 to 99
This setting may be automatically fixed so as not to be below the
setting value of Dynamic Gate Low Limit.
Setting
NOTE
Setting
NOTE

Setting Parameters using Menu Mode
53
Advanced Techniques
DTX402K DTX432K DTX452K Owner’s Manual
6-7. Fast Blast Timer
You can set the practice timer for Fast Blast (page 39). The
timer begins counting at the start of an exercise, and when
the set time is reached, it automatically ends the exercise.
1. Hold down the Mode switch to activate Menu Mode.
2. Press the number button [6] to select the Training Set-
tings.
3. Press the number button [7] to select Fast Blast Timer.
4. Select your preferred practice time using the number
button [1] to [10].
7-1. Voice Guidance Volume
1. Hold down the Mode switch to activate Menu Mode.
2. Press the number button [7] to select the Other Set-
tings.
3. Press the number button [1] to select Voice Guidance
Vo l u m e .
4. Set your preferred volume using the number button [1]
to [10].
7-2. Operation Sound Volume
1. Hold down the Mode switch to activate Menu Mode.
2. Press the number button [7] to select the Other Set-
tings.
3. Press the number button [2] to select Operation Sound
Vo l u m e .
4. Set your preferred volume using the number button [1]
to [10].
Steps:
Hold down the Mode switch [6] [7] Setting
Number button Settings
[1] Off
[2] 10 seconds
[3] 30 seconds
[4] 60 seconds
[5] 90 seconds
[6] 120 seconds
[7] 180 seconds
[8] 300 seconds
[9] 480 seconds
[10] 600 seconds
Setting
m Other Settings
Steps:
Hold down the Mode switch [7] [1] Setting
Setting
1 to 10
Setting this parameter to [1] turns off the Voice Guidance.
Steps:
Hold down the Mode switch [7] [2] Setting
Setting
1 to 10
Setting this parameter to [1] turns off the Operation Sound.
Setting
NOTE
Setting
NOTE

Setting Parameters using Menu Mode
54
Advanced Techniques
DTX402K DTX432K DTX452K Owner’s Manual
7-3. USB Audio Output Settings
You can set whether the USB audio input is sent to the USB
out or not. When set to “Output,” the audio data input from
a PC (for example) is mixed with your pad performance and
they are sent together to the USB out. When set to “Not out-
put,” only your pad performance is sent to the USB out,
even if the audio data is input and played from the PC.
1. Hold down the Mode switch to activate Menu Mode.
2. Press the number button [7] to select the Other Set-
tings.
3. Press the number button [3] to select USB Audio Out-
put Settings.
4. Select the parameter using the number button [1] or
[2].
7-4. USB Audio Output Gain
When USB Audio Output Setting is set to “Output,” you can
set the output gain level.
1. Hold down the Mode switch to activate Menu Mode.
2. Press the number button [7] to select the Other Set-
tings.
3. Press the number button [4] to select USB Audio Out-
put Gain.
4. Select the gain level using the number button [1] to
[5].
7-5. Auto Power-Off Time
You can set the time until the Auto Power-Off function
(page 22) activates or you can disable this function.
1. Hold down the Mode switch to activate Menu Mode.
2. Press the number button [7] to select the Other Set-
tings.
3. Press the number button [5] to select Auto Power-Off
Time.
4. Set a time or disable this function using the number
button [1] to [7].
Steps:
Hold down the Mode switch [7] [3] Setting
Number button Setting
[1] Not output
[2] Output
Steps:
Hold down the Mode switch [7] [4] Setting
Number button Setting
[1] -12 dB
[2] -6 dB
[3] 0 dB
[4] +6 dB
[5] +12 dB
Setting
Setting
Steps:
Hold down the Mode switch [7] [5] Setting
Number button Setting
[1] Auto Power-Off disabled
[2] 5 minutes
[3] 10 minutes
[4] 15 minutes
[5] 30 minutes (default)
[6] 60 minutes
[7] 120 minutes
Setting

Setting Parameters using Menu Mode
55
Advanced Techniques
DTX402K DTX432K DTX452K Owner’s Manual
7-6. Stereo/Mono
You can set the [PHONES/OUTPUT] jack to output either
mono or stereo sound. We recommend that you select the
Mono setting if connecting a standard mono-audio cable to
this jack in order to use your drum module with external
speakers, a mixer, or other similar equipment.
1. Hold down the Mode switch to activate Menu Mode.
2. Press the number button [7] to select the Other Set-
tings.
3. Press the number button [6] to select Stereo/Mono.
4. Select Stereo/Mono using the number button [1] or
[2].
7-7. Initialize Kit
You can restore a drum kit’s default settings used for a spe-
cific music category.
1. Press the Mode switch to turn the “PLAY” light on.
2. Select a music category you wish to initialize the corre-
sponding kit using the number button [1] to [10].
3. Hold down the Mode switch to activate Menu Mode.
4. Press the number button [7] to select the Other Set-
tings.
5. Press the number button [7] to select Initialize Kit.
• The number button [1] will light up.
6. Press the number button [1].
• The number button will start to flash.
• If you do not wish to proceed with initialization, press
the Mode switch now to exit Menu Mode.
7. Press the number button [1].
• The kit will be initialized.
7-8. Delete Song
You can delete an imported MIDI song on the drum module.
1. Hold down the Mode switch to activate Menu Mode.
2. Press the number button [7] to select the Other Set-
tings.
3. Press the number button [8] to select Delete Song.
• The number button [1] will light up.
4. Press the number button [1].
• The number button will start to flash.
• If you do not wish to proceed with deletion, press the
Mode switch now to exit Menu Mode.
5. Press the number button [1].
• The song will be deleted.
Steps:
Hold down the Mode switch [7] [6] Setting
Number button Setting
[1] Stereo
[2] Mono
When you initialize a kit, all of the changes you have made to it
will be lost. Before proceeding, therefore, you should ensure that
the kit contains no irreplaceable settings.
Steps:
Hold down the Mode switch [7] [7] [1] [1]
Setting
NOTICE
Steps:
Hold down the Mode switch [7] [8] [1] [1]
You cannot restore a deleted song. Before proceeding, therefore,
you should ensure that the song contains no irreplaceable data.
NOTICE

Setting Parameters using Menu Mode
56
Advanced Techniques
DTX402K DTX432K DTX452K Owner’s Manual
7-9. Revert to Last Power On
You can return all settings of drum kits, songs, and Menu
Mode to the settings they had when you last turned on the
drum module.
1. Hold down the Mode switch to activate Menu Mode.
2. Press the number button [7] to select the Other Set-
tings.
3. Press the number button [9] to select Revert to Last
Power On.
• The number button [1] will light up.
4. Press the number button [1].
• The number button will start to flash.
• If you do not wish to proceed with initialization, press
the Mode switch now to exit Menu Mode.
5. Press the number button [1].
• The settings will be initialized.
7-10. Factory Reset
You can return all settings of drum kits, songs, and Menu
Mode to their default settings.
1. Hold down the Mode switch to activate Menu Mode.
2. Press the number button [7] to select the Other Set-
tings.
3. Press the number button [10] to select Factory Reset.
• The number button [1] will light up.
4. Press the number button [1].
• The number button will start to flash.
• If you do not wish to proceed with initialization, press
the Mode switch now to exit Menu Mode.
5. Press the number button [1].
• The settings will be initialized.
You can also restore the Factory Reset by turning on the
drum module with the VOLUME[+] and [–] buttons held
down (page 22).
Steps:
Hold down the Mode switch [7] [9] [1] [1]
• When you reset settings as described below, any changes you
have made to them since last turning on the drum module will be
lost. Before proceeding, therefore, you should ensure that they
contain no irreplaceable settings.
• After importing or deleting a song and then changing any set-
tings, using the “Revert to Last Power On” procedure does not
restore the settings they had when you last turn on the drum
module. It only restores the state before the import or delete
operation.
NOTICE
Steps:
Hold down the Mode switch [7] [10] [1] [1]
When you reset settings as described below, any changes you
have made to them will be lost. Before proceeding, therefore, you
should ensure that they contain no irreplaceable settings.
NOTICE

Advanced Techniques
57
DTX402K DTX432K DTX452K Owner’s Manual
Integrating Separately Sold Accessories
As described below, you can add various accessories* to your electronic drum kit for an even more
enjoyable drumming experience. (*: Sold separately)
Please note that these optional external pads were up-to-date as of printing of this manual. Details
regarding any subsequently released models will be made available via the following web site.
https://www.yamaha.com/dtx/
By upgrading the KU100 Kick Unit and/or the hi-hat con-
troller included as part of the DTX402K, you can make your
electronic drum kit feel much closer to the real thing.
When you upgrade your KU100 to a KP65, you will need a
foot pedal to play the new kick pad.
When using a KP65, you can add pads such as a PCY95AT
Cymbal Pad. (For details, refer to “Adding a PCY95AT
Cymbal Pad” under “For DTX432K & DTX452K Own-
ers.”)
Replacing the KU100 Kick Unit with a KP65
Kick Pad
1. Assemble the KP65 Kick Pad. For details, see Step 11
on page 18.
2. Turn off the drum module.
The KP65 Kick Pad must be connected with the drum
module turned off.
3. Disconnect the cable from the KU100 and plug it into
the [OUT > DTX] jack on the back on the KP65.
4. Turn on the drum module.
5. Set the kick type to “KP65”. For more details, see the
description of the Pedal Types parameter from Menu
Mode (page 50).
6. Play the KP65 Kick Pad.
Replacing the bundled hi-hat controller
with an HH65 Hi-hat Controller
1. Turn off the drum module.
The HH65 Hi-hat Controller must be connected with
the drum module turned off.
2. Disconnect the cable from the bundled hi-hat controller
and plug it into the [OUTPUT] jack on the HH65.
3. Turn on the drum module.
4. Set the hi-hat controller type to “HH65”. For more
details, see the description of the Pedal Types parameter
from Menu Mode (page 50).
5. Play the HH65 Hi-hat Controller.
Adding a PCY95AT Cymbal Pad
1. Turn off the drum module.
The PCY95AT Cymbal Pad must be connected with the
drum module turned off.
2. Using the cable that came with the cymbal pad, connect
it to the [PAD > IN] jack on the KP65 Kick Pad.
3. Turn on the drum module.
4. Play the newly added cymbal pad.
For DTX402K Owners
For DTX432K & DTX452K Owners

Advanced Techniques
58
DTX402K DTX432K DTX452K Owner’s Manual
Connecting to a Computer
Connecting the drum module to a computer or a smart device such as iPhone/iPad using a USB cable
lets you send and receive audio or MIDI data. This section explains how to connect the drum module
and the computer.
Precautions when using the [USB TO HOST]
terminal
When connecting the computer to the [USB TO HOST]
terminal, make sure to observe the following points. Failing
to do so risks freezing the computer and corrupting or losing
the data.
If the computer or the drum module freezes, restart the
application software or the computer OS, or turn the power
to the drum module off and then on again.
To use audio data with a Windows computer, you need to
install the Yamaha Steinberg USB Driver.
1. Download the latest Yamaha Steinberg USB Driver
from the following URL.
https://download.yamaha.com/
After accessing the Support website (and clicking on
“Firmware/Software”), enter the appropriate model
name.
Press the [ (driver name)] button, download and
open the file.
2. Install the Yamaha Steinberg USB Driver on your com-
puter.
For more information, please refer to the Yamaha Stein-
berg USB Driver Installation Guide.
Information related to MIDI and creating music with a com-
puter, is provided in the MIDI Reference Manual. The MIDI
Reference Manual (PDF) is available for download at the
following web page.
https://download.yamaha.com/
After accessing the Support website (and clicking on
“Manual Library”), enter the appropriate model
name.
USB cable is not included.
NOTE
[USB TO HOST] terminal
(bottom panel)
Computer
USB cable
Drum module
USB terminal
• Use an A-B type USB cable. Also, make sure the cable is less
than 3 meters long. USB 3.0 cables cannot be used.
• Before connecting a computer to the [USB TO HOST] terminal,
disable any power-saving mode of the computer (such as sus-
pend, sleep, or standby).
• Before turning the power to the drum module on/off or plugging/
unplugging the USB cable to/from the [USB TO HOST] terminal,
quit any open application software on the computer.
• Please wait at least six seconds between turning the drum mod-
ule on/off and connecting or disconnecting the USB cable.
Installing the Yamaha Steinberg USB
Driver
When you use a macOS computer or when you use a Windows
computer only to handle MIDI data, installation of the Yamaha
Steinberg USB Driver is not required.
NOTICE
NOTE
• Information on system requirements is provided on the
above web page.
• For improvement, the Yamaha Steinberg USB Driver may
be upgraded without notice. For details and the most up-to-
date information, please visit the above website.
MIDI-related Reference
NOTE

Reference
59
DTX402K DTX432K DTX452K Owner’s Manual
Troubleshooting
Some problems may be solved by restoring the default settings (Factory Reset). If the following
instructions do not work, we recommend the Factory Reset (See page 22).
No sound is produced when a pad is struck, or the volume is lower than expected.
Check connections as follows.
• Ensure that the pads are properly connected to the drum module’s trigger input jacks.
• Ensure that headphones or speaker are properly connected to the [PHONES/OUTPUT] jack (not the [AUX IN]
jack) on the drum module.
• Ensure that the amplifier and/or speakers connected to the drum module are turned on and are not set to the low-
est possible volume.
• If you are using a KP65 Kick Pad, try adjusting its Level dial.
• Ensure that the cables you are using are in good condition.
•
Ensure that an HH40 Hi-hat Controller is properly connected to the [HI-HAT CTL] jack and a KU100 Kick Unit is
connected to the [KICK/PAD] jack on the drum module (page 57).
Check the drum module’s settings as follows.
• Ensure that the drum module’s volume is not turned fully down. Also when directly inputting the volume with
numerical values by using the number buttons, try pressing the number buttons in rapid succession. (See page
41)
• Adjust the following parameters from Menu Mode.
- Pad Volume (See page 43)
- Gain (See page 50)
- Pad Velocity Curve (See page 48)
- Crosstalk (See page 49)
- Snare Pad Type (See page 49)
- Pedal Type (See page 50)
- Local Control (See page 45)
If kick sounds are not produces as expected, try the following.
• Low notes may not be produced depending on the particular headphones you are using. If necessary, try different
headphones.
•
If you are using a KU100 Kick Unit, connect an HH40 hi-hat controller before turning on the drum module. Please
do not turn the drum module on with the HH40 depressed. The drum module cannot identify the type of pedal
properly and it causes that the kick may produce much smaller sound than expected.
If you cannot play foot closed hi-hat sounds, try the following.
• Ensure that you are operating the hi-hat controller in a firm and full manner.
• Ensure that the Double Bass Drum parameter from Menu Mode is set to “Off”. (See page 44)
• If you are using an HH65 Hi-hat Controller, set the Foot Close Position parameter from Menu Mode to a small
value. (See page 46)
For DTX402K
For DTX402K
Reference

Troubleshooting
60
Reference
DTX402K DTX432K DTX452K Owner’s Manual
Sounds or volumes are not as expected.
If hi-hat splash sounds are not produced as expected, try the following.
• Adjust the Splash Sensitivity parameter from Menu Mode. (See page 46)
If it is difficult to produce closed hi-hat sounds with an HH65 Hi-hat Controller, try the following.
• Adjust the Foot Close Position parameter from Menu Mode. (See page 46)
If it is difficult to produce louder and quieter foot-closed hi-hat sounds, try the following.
• Ensure that the Pedal Type parameter from Menu Mode is set correctly. (See page 50)
•
If you are using an HH40 Hi-hat Controller, the velocity is fixed regardless of how strongly or softly the HH40 is
depressed. Adjust the Foot Close Velocity parameter from Menu Mode. (See page 47)
If pads are producing only sounds at very high volumes (i.e., high velocities), try the following.
• Adjust the sensitivity of the drum kit. (See page 26)
• Adjust the Gain parameter from Menu Mode. High settings will result in loud drum sounds. (See page 50)
• Adjust the Pad Velocity Curve parameter from Menu Mode. (See page 48)
• Ensure that you are using only the recommended Yamaha pads. (Products from other manufacturers can output
excessively large signals.)
If the volumes of drum sounds produced by the various pads are poorly balanced, proceed as follows.
• Adjust the Pad Volume parameter from Menu Mode for each pad. (See page 43)
• Ensure that the Stereo/Mono parameter from Menu Mode is set correctly. (See page 55)
If the drum module’s volume is not well balanced with that of the device connected to the [AUX IN] jack
(such as a portable music player), proceed as follows.
• Ensure that the volume of the connected device is set to a suitable level. (See page 21)
If the volume of your drumming is not well balanced with that of a drum-module song, proceed as follows.
• Adjust the song volume. (See page 27)
If you notice double triggering, crosstalk, or skipped sounds (as described below), proceed as fol-
lows.
Double triggering—i.e., multiple sounds are produced in response to a single strike:
• If the pad or drum trigger in question features a controller for adjusting output or sensitivity, turn it down.
• Ensure that the Pad Type parameter from Menu Mode is set correctly. (See page 49)
• Ensure that the Gain parameter from Menu Mode is not set too high. (See page 50)
Crosstalk—i.e., a sound is produced by a pad other than the one that was struck:
• Adjust the following parameters from Menu Mode.
- Gain (See page 50)
- Minimum Level (See page 50)
- Crosstalk (See page 49)
Skipped sounds—i.e., a pad does not produce a sound (usually during rolls or fills):
• Adjust the Crosstalk parameter from Menu Mode to a suitable level for each affected pad. (See page 49)
For DTX402K

Reference
Troubleshooting
61
DTX402K DTX432K DTX452K Owner’s Manual
* You can also find troubleshooting tips in the MIDI Reference Manual (PDF). (See page 58)
Other common questions
How do I make the drum module store it settings?
• The drum module automatically stores its settings whenever you turn it off using the [ ] (Standby/On) button.
(See page 22)
How do I reset all of the drum module’s parameters to their default settings?
• You can restore default settings using the Factory Reset function. (See page 22)
How do I reset all of the drum module’s parameters to the settings they had when I last turned it on?
• You can do this using the Revert to Last Power On function. (See page 56)
How do I reset only a desired drum kit to the default setting?
• Initialize the kit from Menu Mode. (See page 55)
How do I stop the drum module turning off while I’m using it?
• Disable the Auto Power-Off function. (See page 22)
How do I turn off the voice guidance or the operation sound?
• Adjust the Voice Guidance Volume parameter (page 53) or the Operation Sound Volume (page 53) to [1].
If choke function does not work, try the following.
• Ensure that you are using a crash cymbal pad with sensor. (See page 17)

Reference
62
DTX402K DTX432K DTX452K Owner’s Manual
Data List
Music Category List
Voice List
Number Music category Song description Kit description
1 POP1 8-beat Pops A versatile kit suitable for Pops.
2 POP2 16-beat Pops A kit that simulates gated-reverb drum sounds.
3 ROCK1 8-beat Rock A kit with powerful sounds suitable for rock music.
4ROCK2
Rock tune with a swung
rhythm
Another kit with different characteristics also suitable for rock
music.
5METAL
A heavy metal song using
two bass drums
A kit with a bass drum assigned to a hi-hat controller. Useful
for a double bass setup.
6 FUNK Up-tempo funk A kit with a distinctive hi-pitched snare drum.
7 HIPHOP Modern Hip hop A kit with a common setup for Modern Hip hop.
8 EDM Electronic dance music A kit with a common setup for electronic dance music.
9 JAZZ 4-beat Jazz A kit with small diameter drums. Suitable for jazz.
10 LATIN Salsa, a type of Latin music A kit with various Latin percussion sounds.
Kick
1 MapleC 22
2Big Gate
3Rock
4 Vtg50s 22
5 Vtg70s 24
6Metal
7BirchC 22
8Jazz
9 HipHop 1
10 HipHop 2
11 HipHop 3
12 HipHop 4
13 HipHop 5
14 HipHop 6
15 HipHop 7
16 HipHop 8
17 HipHop 9
18 EDM
19 T8-1
20 T8-2
21 T8-3
22 T8-4
23 T9-1
24 T9-2
25 T9 Hard
26 ElecComp
27 Break 1
28 Break 2
29 DNB 1
30 DNB 2
Snare
31 MapleCustm
32 Big Gate
33 Rock
34 Vintage50s
35 Vintage70s
36 Metal
37 BirchCustm
38 Jazz
39 HipHop 1
40 HipHop 2
41 EDM
42 T8
43 T9
44 Analog
45 Gate 1
46 Gate 2
47 Gate 3
48 Electro 1
49 Electro 2
50 Electro 3
51 Electro 4
52 Break
53 DNB
54 Clap 1
55 Clap 2
56 Clap 3
57 Clap 4
58 Clap 5
59 Clap 6
60 Clap 7
61 Clap 8
62 Clap 9
63 Clap 10
64 Clap 11
65 Clap 12
66 Clap 13
67 Clap 14
68 Snap 1
69 Snap 2
70 Snap 3
Tom
71 MapleC H
72 MapleC M
73 MapleC L
74 Big Ga te H
75 Big Gate M
76 Big Gate L
77 Rock H
78 Rock M
79 Rock L
80 Vintg50s H
81 Vintg50s M
82 Vintg50s L
83 Vintg70s H
84 Vintg70s M
85 Vintg70s L
86 Metal H
87 Metal M
88 Metal L
89 BirchC H
90 BirchC M
91 BirchC L
92 Jazz H
93 Jazz M
94 Jazz L
95 Gate H
96 Gate M
97 Gate L
98 Electro H
99 Electro M
100 Electro L
101 T8-1 H
102 T8-1 M
103 T8-1 L
104 T8-2 H
105 T8-2 M
106 T8-2 L
107 T9-1 H
108 T9-1 M
109 T9-1 L
110 Syn H
111 Syn M
112 Syn L
Cymbal
113 DarkRd20-1
114 DarkRd20-2
115 VtgRd 22
116 WarmRd 20
117 JazzRd 22
118 SzRide 20
119 Briliant16
120 Briliant18
121 Vivid 17
122 Bright 18
123 Dark 18
124 Vintage 16
125 Vintage 18
126 Jazz 18
127 SzCrash 20
128 Splash 1
129 Splash 2
130 China
131 Trash
132 ElecRide 1
133 ElecRide 2
134 ElecRide 3
135 ElecShaker
136 T8 Ride
137 T9 Ride
138 ElecCym 1
139 ElecCym 2
140 ElecCym 3
141 ElecCym 4
142 T8 Crash
143 T9 Crash
144 SynCrash 1
145 SynCrash 2
146 HipHopCr 1
147 HipHopCr 2
148 HipHopCr 3
149 HipHopCr 4
150 HipHopCr 5
151 RevCym 1
152 RevCym 2

Reference
Data List
63
DTX402K DTX432K DTX452K Owner’s Manual
Hi-Hat
153 Briliant14
154 Dark 14
155 Vintage 14
156 Bright 14
157 Jazz 14
158 R&B 1
159 R&B 2
160 Electro 1
161 Electro 2
162 Electro 3
163 Electro 4
164 T8
165 T9
166 HipHop 1
167 HipHop 2
168 DNB
Percussion
169 Cajion Mt
170 Cajion Slp
171 Cajion Lo
172 Cajion Ft
173 PndeiroTap
174 PndeiroOp
175 PndeiroShk
176 PndeiroSld
177 Claves
178 Conga H Sw
179 Conga L Sw
180 BongoH Sw
181 BongoL Sw
182 Cowbell1Sw
183 Cowbell 2
184 Cowbell 3
185 Shaker Op
186 Shaker Cl
187 Timbales H
188 Timbales L
189 Vibraslap
190 Surdo Sw
191 Tambarin 1
192 Tambarin 2
193 Maracas
194 TriangleOp
195 TriangleMt
196 GuiroShort
197 GuiroLong
198 Agogo H
199 Agogo L
200 WoodBlockH
201 WoodBlockL
202 Caxixi Hit
203 Whistle S
204 Whistle L
205 Djambe Lo
206 Djambe Op
207 Djambe Slp
208 Djambe Mt
209 TalkDr Op
210 PotDrum Op
211 Dundun Op
212 Dundun Cl
213 Darbuka Op
214 Darbuka Sl
215 Darbuka Mt
216 Sangban Op
217 Kenkeni Op
218 AfricanBlH
219 AfricanBlL
220 Tombak Op
221 Daf Open
222 Daf Slap
223 Daf Mute
224 Riq Open
225 Riq Slap
226 Riq Shake
227 Riq Hit
228 Sagat Op
229 Sagat Cl
230 Sagat Sw
231 Tabla Na
232 Bayan Ge
233 Dhol RH Op
234 Dhol RH Cl
235 Dhol LH Op
236 Dhol LH Cl
237 KanjiraHit
238 KanjiraSlp
239 KanjiraShk
240 ZangGu
241 ZangGu Rim
242 BianGu
243 BianGu Rim
244 BianGuHand
245 TangGu
246 TangGu Rim
247 PaiGu 1
248 PaiGu 2
249 PaiGu 3
250 XiaoBo Opn
251 XiaoBo Cls
252 DaBo Opn
253 DaBo Cls
254 XiaoLuo
255 ZhongLuo
256 FengLuo
257 ShangNao 1
258 ShangNao 2
259 Qing H
260 Qing L
261 Taiko Don
262 Taiko Ka
263 KoTaik1Ten
264 KoTaik1Tsu
265 KoTaik2Ten
266 KoTaik2Tsu
267 TsuzumiPon
268 TsuzumiBnd
269 OokawaChon
270 Temple Blk
271 KontikiKon
272 Kontiki Ki
273 Atari Kon
274 Atari Chi
275 Ainote 1
276 Ainote 2
277 GranCasaOp
278 Castanet
279 SleighBel
280 WindChime
281 HandCym Op
282 HandCym Mt
283 FingrCymOp
284 RibonCrash
285 Timpani
286 Tamtam
287 Latin HH

Reference
64
DTX402K DTX432K DTX452K Owner’s Manual
Specifications
Drum module
* The contents of this manual apply to the latest specifications as of the publishing date.
To obtain the latest manual, access the Yamaha website then download the manual file.
Since specifications, equipment or separately sold accessories may not be the same in every locale, please check with your Yamaha
dealer.
Tone generator
Ty pe AWM 2
Maximum polyphony 64 notes
Voices
Drum and percussion: 287
Keyboard: 128
Drum kits 10 (all of which may be edited and overwritten)
Songs 10
Reverb 9 types
Metronome
Tempo 30 to 300 BPM (Tap Tempo and Voice Guidance functions)
Beats 1/4 to 9/4
Other
Jacks and terminals
SNARE (mini stereo audio)
TOM1 (mini mono audio)
TOM2 (mini mono audio)
TOM3 (mini mono audio)
RIDE (mini mono audio)
CRASH (mini stereo audio)
HI-HAT (mini mono audio)
HI-HAT CTL (mini stereo audio)
KICK/PAD (mini stereo audio)
USB TO HOST (type B)
AUX IN (mini stereo audio)
PHONES/OUTPUT (standard stereo audio)
DC IN
Power consumption 5 W
AC adaptor PA-130 (or an equivalent recommended by Yamaha)
Dimensions and weight
269 (W) × 147 (D) × 39 (H) mm, 0.5 kg
10-9/16"(W) × 5-13/16" (D) × 1-9/16" (H), 1 lb 2 oz

65
DTX402K DTX432K DTX452K Owner’s Manual
Index
Symbols
[] connector.................24
[] (metronome) button..................23
[ ] button ..................................23
[] (Standby/On) button ................. 23
[AUX IN] jack ................................... 24
[DRUM ON/OFF] button .................. 23
[HI-HAT CTL] jack ...........................24
[KICK/PAD] jack ..............................24
[PHONES/OUTPUT] jack ................24
[TEMPO] buttons.............................23
[USB TO HOST] terminal ..........24, 58
[VOLUME] buttons ..........................23
A
AC adaptor ...................... 9, 10, 11, 21
Auto Power-Off................................22
B
Beats ...............................................42
Bottom Panel...................................24
C
Cable bands ....................9, 10, 11, 20
CHANGE UP ................................... 37
Choke ..............................................25
Click.................................................29
Close ...............................................25
Closed rim shots..............................25
Computer.........................................58
Control Panel...................................23
Cord clip ..........................................21
Crash cymbal pad .................9, 10, 11
Cross sticking ..................................25
Crosstalk .........................................49
Cymbal holders .....................9, 10, 11
Cymbal/hi-hat pads ...............9, 10, 11
D
Delete Song.....................................55
Difficulty Level ................................. 51
Double Bass Drum .......................... 44
Drum key ...............................9, 10, 11
Drum module.........................9, 10, 11
DYNAMIC GATE ............................. 33
F
Factory Reset ............................22, 56
FAST BLAST...................................39
Foot closed......................................25
FP6110A ...................................10, 11
G
Gain ................................................ 50
H
Head shots...................................... 25
Headphones.................................... 21
HH40 Hi-hat controller ...................... 9
HH65 Hi-hat controller .. 10, 11, 25, 57
Hi-hat holder ......................... 9, 10, 11
Hi-hat splash ................................... 25
K
Kick Unit.......................................... 57
Kit.................................................... 26
KP65 ................................... 10, 11, 57
KU100 Kick unit ................................ 9
M
MEASURE BREAK ......................... 36
Menu Mode ............................... 23, 41
Metronome...................................... 29
MIDI Reference............................... 58
MIDI Reference Manual .................... 7
MIDI Settings .................................. 45
Mode switch .................................... 23
Music category list .......................... 62
Music Player ................................... 21
Mute ................................................ 28
N
Nine-channel snake cable..... 9, 10, 11
Number buttons .............................. 23
O
Open ............................................... 25
Open rim shots................................ 25
P
PART MUTE ................................... 38
Pattern ............................................ 42
PCY95AT ........................................ 57
Play Mode ................................. 23, 26
R
RECORDER ................................... 40
Revert to Last Power On................. 56
RHYTHM GATE.............................. 32
Rim.................................................. 25
S
S wing bolt ...................................... 11
Score .............................................. 31
Sensitivity........................................ 26
Separately Sold Accessories .......... 57
Snare Pad....................................... 25
Song ............................................... 27
SONG PART GATE........................ 34
SONG SCORE GATE..................... 35
Speakers......................................... 21
T
Tap tempo....................................... 30
Tempo............................................. 29
Toms............................................... 13
Top Panel ....................................... 24
TP70S Snare pad ..................... 11, 25
Training Mode........................... 23, 31
Trigger input jacks .......................... 24
V
Voice guidance ......................... 29, 53
Voice list ......................................... 62
Y
Yamaha Steinberg USB Driver ....... 58
Reference

66
DTX402K DTX432K DTX452K Owner’s Manual
(weee_eu_en_02)
Information for users on collection and disposal of old equipment:
This symbol on the products, packaging, and/or accompanying documents means that used
electrical and electronic products should not be mixed with general household waste.
For proper treatment, recovery and recycling of old products, please take them to applicable col-
lection points, in accordance with your national legislation.
By disposing of these products correctly, you will help to save valuable resources and prevent any
potential negative effects on human health and the environment which could otherwise arise from
inappropriate waste handling.
For more information about collection and recycling of old products, please contact your local
municipality, your waste disposal service or the point of sale where you purchased the items.
For business users in the European Union:
If you wish to discard electrical and electronic equipment, please contact your dealer or supplier
for further information.
Information on Disposal in other Countries outside the European Union:
This symbol is only valid in the European Union. If you wish to discard these items, please con-
tact your local authorities or dealer and ask for the correct method of disposal.

67
DTX402K DTX432K DTX452K Owner’s Manual

68
DTX402K DTX432K DTX452K Owner’s Manual
LIMITED WARRANTY ON YAMAHA DRUMS, HARDWARE AND ACCESSORY PRODUCTS
Thank you for selecting a YAMAHA product. YAMAHA products are designed and manufactured to provide a high level of defect-free performance. Yamaha Corporation
of America (“YAMAHA”) is proud of the experience and craftsmanship that goes into each and every YAMAHA product. YAMAHA sells its products through a network of
reputable, specially authorized dealers and is pleased to offer you, the Original Owner, the following Limited Warranty, which applies only to products that have been (1)
directly purchased from YAMAHA’s authorized dealers in the fifty states of the USA and District of Columbia (the “Warranted Area”) and (2) used exclusively in the
Warranted Area. YAMAHA suggests that you read the Limited Warranty thoroughly, and invites you to contact your authorized YAMAHA dealer or YAMAHA Customer
Service if you have any questions.
THIS WARRANTY COVERS THE LISTED PRODUCTS AGAINST DEFECTS IN MATERIALS OR WORKMANSHIP.
Warranty Term
Duration of Warranty from Date of
Type of Product Purchase by or for the Original Owner
Acoustic Drum Shells, Finish, Drum Hardware, Freestanding Hardware, Pedals, Hardware Accessories 5 Years
Electronic Drums Modules, Pads, Accessories, Hardware, Pedals 1 Year
Coverage: YAMAHA will, at its option, repair or replace the product covered by this warranty if it becomes defective, malfunctions or otherwise fails to conform with this
warranty under normal use and service during the term of this warranty, without charge for labor or materials. Repairs may be performed using new or refurbished parts
that meet or exceed YAMAHA specifications for new parts. If YAMAHA elects to replace the product, the replacement may be a reconditioned unit. You will be
responsible for any installation or removal charges and for any initial shipping charges if the product(s) must be shipped for warranty service. However, YAMAHA will
pay the return shipping charges to any destination within the USA if the repairs are covered by the warranty. This warranty does not cover (a) damage, deterioration or
malfunction resulting from accident, negligence, misuse, abuse, improper installation or operation or failure to follow instructions according to the Owner’s Manual for
this product; any shipment of the product (claims must be presented to the carrier); repair or attempted repair by anyone other than YAMAHA or an authorized YAMAHA
Service Center; (b) any unit which has been altered or on which the serial number has been defaced, modified or removed; (c) normal wear and any periodic
maintenance; (d) deterioration due to perspiration, corrosive atmosphere or other external causes such as extremes in temperature or humidity; (e) damages
attributable to power line surge or related electrical abnormalities, lightning damage or acts of God; or (f) RFI/EMI (Interference/noise) caused by improper grounding or
the improper use of either certified or uncertified equipment, if applicable. Any evidence of alteration, erasing or forgery of proof-of-purchase documents will cause this
warranty to be void. This warranty covers only the Original Owner and is not transferable.
In Order to Obtain Warranty Service: Warranty service will only be provided for defective products within the Warranted Area. Contact your local authorized YAMAHA
dealer who will advise you of the procedures to be followed. If this is not successful, contact YAMAHA at the address, telephone number or website shown below.
YAMAHA may request that you send the defective product to a local authorized YAMAHA Servicer or authorize return of the defective product to YAMAHA for repair. If
you are uncertain as to whether a dealer has been authorized by YAMAHA, please contact YAMAHA’s Service Department at the number shown below, or check
Yamaha’s website at http://usa.yamaha.com. Product(s) shipped for service should be packed securely and must be accompanied by a detailed explanation of the
problem(s) requiring service, together with the original or a machine reproduction of the bill of sale or other dated, proof-of-purchase document describing the product,
as evidence of warranty coverage. Should any product submitted for warranty service be found ineligible therefore, an estimate of repair cost will be furnished and the
repair will be accomplished only if requested by you and upon receipt of payment or acceptable arrangement for payment.
Limitation of Implied Warranties and Exclusion of Damages: ANY IMPLIED WARRANTIES, INCLUDING WARRANTIES OF MERCHANTABILITY AND FITNESS FOR A
PARTICULAR PURPOSE SHALL BE LIMITED IN DURATION TO THE APPLICABLE P
ERIOD OF TIM
E SET FORTH ABOVE. YAMAHA SHALL NOT BE RESPONSIBLE FOR
INCIDENTAL OR CONSEQUENTIAL DAMAGES OR FOR DAMAGES BASED UPON INCONVENIENCE, LOSS OF USE, DAMAGE TO ANY OTHER EQUIPMENT OR OTHER
ITEMS AT THE SITE OF USE OR INTERRUPTION OF PERFORMANCES OR ANY CONSEQUENCES. YAMAHA’S LIABILITY FOR ANY DEFECTIVE PRODUCT IS LIMITED TO
REPAIR OR REPLACEMENT OF THE PRODUCT, AT YAMAHA’S OPTION. SOME STATES DO NOT ALLOW LIMITATIONS ON HOW LONG AN IMPLIED WARRANTY LASTS
OR THE EXCLUSION OR LIMITATION OF INCIDENTAL OR CONSEQUENTIAL DAMAGES, SO THE ABOVE LIMITATION OR EXCLUSION MAY NOT APPLY TO YOU. This
Warranty gives you specific legal rights, and you may also have other rights which vary from state to state. This is the only express warranty applicable to the product
specified herein; Yamaha neither assumes nor authorizes anyone to assume for it any other express warranty.
If you have any questions about service received or if you need assistance in locating an authorized YAMAHA Servicer, please contact:
CUSTOMER SERVICE
Yamaha Corporation of America
6600 Orangethorpe Avenue, Buena Park, California 90620-1373
Telephone: 800-854-1569 • http://usa.yamaha.com
Do not return any product to the above address without a written Return Authorization issued by YAMAHA.
Drums
Limited
Warranty

69
DTX402K DTX432K DTX452K Owner’s Manual
CANADA
Yamaha Canada Music Ltd.
135 Milner Avenue, Toronto, Ontario M1S 3R1, Canada
Tel: +1-416-298-1311
U.S.A.
Yamaha Corporation of America
6600 Orangethorpe Avenue, Buena Park, CA 90620, U.S.A.
Tel: +1-714-522-9011
MEXICO
Yamaha de México, S.A. de C.V.
Av. Insurgentes Sur 1647 Piso 9, Col. San José Insurgentes,
Delegación Benito Juárez, México, D.F., C.P. 03900, México
Tel: +52-55-5804-0600
BRAZIL
Yamaha Musical do Brasil Ltda.
Rua Fidêncio Ramos, 302 – Cj 52 e 54 – Torre B – Vila
Olímpia – CEP 04551-010 – São Paulo/SP, Brazil
Tel: +55-11-3704-1377
ARGENTINA
Yamaha Music Latin America, S.A., Sucursal Argentina
Olga Cossettini 1553, Piso 4 Norte,
Madero Este-C1107CEK,
Buenos Aires, Argentina
Tel: +54-11-4119-7000
PANAMA AND OTHER LATIN
AMERICAN COUNTRIES/
CARIBBEAN COUNTRIES
Yamaha Music Latin America, S.A.
Edif. Torre Banco General, F7, Urb. Marbella,
Calle 47 y Aquilino de la Guardia, Panama,
P.O.Box 0823-05863, Panama, Rep.de Panama
Tel: +507-269-5311
THE UNITED KINGDOM/IRELAND
Yamaha Music Europe GmbH (UK)
Sherbourne Drive, Tilbrook, Milton Keynes,
MK7 8BL, U.K.
Tel: +44-1908-366700
GERMANY
Yamaha Music Europe GmbH
Siemensstrasse 22-34, 25462 Rellingen, Germany
Tel: +49-4101-303-0
SWITZERLAND/LIECHTENSTEIN
Yamaha Music Europe GmbH, Branch
Switzerland in Thalwil
Seestrasse 18a, 8800 Thalwil, Switzerland
Tel: +41-44-3878080
AUSTRIA/CROATIA/
CZECH REPUBLIC
/
HUNGARY/ROMANIA/SLOVAKIA/SLOVENIA
Yamaha Music Europe GmbH, Branch Austria
Schleiergasse 20, 1100 Wien, Austria
Tel: +43-1-60203900
POLAND
Yamaha Music Europe GmbH
Sp.z o.o. Oddział w Polsce
ul. Wielicka 52, 02-657 Warszawa, Poland
Tel: +48-22-880-08-88
BULGARIA
Dinacord Bulgaria LTD.
Bul.Iskarsko Schose 7 Targowski Zentar Ewropa
1528 Sofia, Bulgaria
Tel: +359-2-978-20-25
MALTA
Olimpus Music Ltd.
Valletta Road, Mosta MST9010, Malta
Tel: +356-2133-2093
NETHERLANDS/BELGIUM/
LUXEMBOURG
Yamaha Music Europe, Branch Benelux
Clarissenhof 5b, 4133 AB Vianen, The Netherlands
Tel: +31-347-358040
FRANCE
Yamaha Music Europe
7 rue Ambroise Croizat, Zone d'activités de Pariest,
77183 Croissy-Beaubourg, France
Tel: +33-1-6461-4000
ITALY
Yamaha Music Europe GmbH, Branch Italy
Via Tinelli N.67/69 20855 Gerno di Lesmo (MB), Italy
Tel: +39-039-9065-1
SPAIN/PORTUGAL
Yamaha Music Europe GmbH Ibérica, Sucursal en España
Ctra. de la Coruña km. 17,200, 28231
Las Rozas de Madrid, Spain
Tel: +34-91-639-88-88
GREECE
Philippos Nakas S.A. The Music House
19th klm. Leof. Lavriou 190 02 Peania – Attiki, Greece
Tel: +30-210-6686260
SWEDEN
Yamaha Music Europe GmbH Germany filial
Scandinavia
JA Wettergrensgata 1, 400 43 Göteborg, Sweden
Tel: +46-31-89-34-00
DENMARK
Yamaha Music Denmark,
Fillial of Yamaha Music Europe GmbH, Tyskland
Generatorvej 8C, ST. TH., 2860 Søborg, Denmark
Tel: +45-44-92-49-00
FINLAND
F-Musiikki Oy
Antaksentie 4
FI-01510 Vantaa, Finland
Tel: +358 (0)96185111
NORWAY
Yamaha Music Europe GmbH Germany -
Norwegian Branch
Grini Næringspark 1, 1332 Østerås, Norway
Tel: +47-6716-7800
ICELAND
Hljodfaerahusid Ehf.
Sidumula 20
IS-108 Reykjavik, Iceland
Tel: +354-525-5050
CYPRUS
Nakas Music Cyprus Ltd.
Nikis Ave 2k
1086 Nicosia
Tel: + 357-22-511080
Major Music Center
21 Ali Riza Ave. Ortakoy
P.O.Box 475 Lefkoşa, Cyprus
Tel: (392) 227 9213
RUSSIA
Yamaha Music (Russia) LLC.
Room 37, entrance 7, bld. 7, Kievskaya street, Moscow,
121059, Russia
Tel: +7-495-626-5005
OTHER EUROPEAN COUNTRIES
Yamaha Music Europe GmbH
Siemensstrasse 22-34, 25462 Rellingen, Germany
Tel: +49-4101-303-0
Yama h a Mu s ic G u lf F Z E
JAFZA-16, Office 512, P.O.Box 17328,
Jebel Ali FZE, Dubai, UAE
Tel: +971-4-801-1500
TURKEY
Yamaha Music Europe GmbH
Merkezi Almanya Türkiye İstanbul Şubesi
Maslak Meydan Sodak, Spring Giz Plaza Bagimsiz Böl.
No:3, Sariyer Istanbul, Turkey
Tel: +90-212-999-8010
ISRAEL
RBX International Co., Ltd.
P.O Box 10245, Petach-Tikva, 49002
Tel: (972) 3-925-6900
OTHER COUNTRIES
Yama h a Mu s ic G u lf F Z E
JAFZA-16, Office 512, P.O.Box 17328,
Jebel Ali FZE, Dubai, UAE
Tel: +971-4-801-1500
THE PEOPLE’S REPUBLIC OF CHINA
Yamaha Music & Electronics (China) Co., Ltd.
2F, Yunhedasha, 1818 Xinzha-lu, Jingan-qu,
Shanghai, China
Tel: +86-400-051-7700
HONG KONG
Tom Lee Music Co., Ltd.
11/F., Silvercord Tower 1, 30 Canton Road,
Tsimshatsui, Kowloon, Hong Kong
Tel: +852-2737-7688
INDIA
Yamaha Music India Private Limited
P-401, JMD Megapolis, Sector-48, Sohna Road,
Gurgaon-122018, Haryana, India
Tel: +91-124-485-3300
INDONESIA
PT. Yamaha Musik Indonesia (Distributor)
Yamaha Music Center Bldg. Jalan Jend. Gatot Subroto Kav.
4, Jakarta 12930, Indonesia
Tel: +62-21-520-2577
KOREA
Yamaha Music Korea Ltd.
8F, Dongsung Bldg. 21, Teheran-ro 87-gil, Gangnam-gu,
Seoul, 06169, Korea
Tel: +82-2-3467-3300
MALAYSIA
Yamaha Music (Malaysia) Sdn. Bhd.
No.8, Jalan Perbandaran, Kelana Jaya, 47301
Petaling Jaya, Selangor, Malaysia
Tel: +60-3-78030900
SINGAPORE
Yamaha Music (Asia) Private Limited
Block 202 Hougang Street 21, #02-00,
Singapore 530202, Singapore
Tel: +65-6740-9200
TAI WAN
Yamaha Music & Electronics Taiwan Co., Ltd.
2F., No.1, Yuandong Rd., Banqiao Dist.,
New Taipei City 22063, Taiwan (R.O.C.)
Tel: +886-2-7741-8888
THAILAND
Siam Music Yamaha Co., Ltd.
3, 4, 15, 16th Fl., Siam Motors Building,
891/1 Rama 1 Road, Wangmai,
Pathumwan, Bangkok 10330, Thailand
Tel: +66-2215-2622
VIETNAM
Yamaha Music Vietnam Company Limited
15th Floor, Nam A Bank Tower, 201-203 Cach Mang Thang
Tam St., Ward 4, Dist.3,
Ho Chi Minh City, Vietnam
Tel: +84-28-3818-1122
OTHER ASIAN COUNTRIES
http://asia.yamaha.com
AUSTRALIA
Yamaha Music Australia Pty. Ltd.
Level 1, 80 Market Street, South Melbourne,
VIC 3205 Australia
Tel: +61-3-9693-5111
NEW ZEALAND
Music Works LTD
P.O.BOX 6246 Wellesley, Auckland 4680,
New Zealand
Tel: +64-9-634-0099
COUNTRIES AND TRUST
TERRITORIES IN PACIFIC OCEAN
http://asia.yamaha.com
NORTH AMERICA
CENTRAL & SOUTH AMERICA
EUROPE
AFRICA
MIDDLE EAST
ASIA
OCEANIA
For details of products, please contact your nearest Yamaha representative or the
authorized distributor listed below.
Pour plus de détails sur les produits, veuillez-vous adresser à Yamaha ou au
distributeur le plus proche de vous figurant dans la liste suivante.
Die Einzelheiten zu Produkten sind bei Ihrer unten aufgeführten Niederlassung und
bei Yamaha Vertragshändlern in den jeweiligen Bestimmungsländern erhältlich.
Para detalles sobre productos, contacte su tienda Yamaha más cercana o el
distribuidor autorizado que se lista debajo.
DMI23
Head Office/Manufacturer: Yamaha Corporation 10-1, Nakazawa-cho, Naka-ku, Hamamatsu, 430-8650, Japan
(For European Countries) Importer: Yamaha Music Europe GmbH Siemensstrasse 22-34, 25462 Rellingen, Germany

Manual Development Group
©2018 Yamaha Corporation
Published 11/2018 POMA*.*-**B0
ZZ03340
Yamaha web site
https://www.yamaha.com/
Yamaha Downloads
https://download.yamaha.com/
-
 1
1
-
 2
2
-
 3
3
-
 4
4
-
 5
5
-
 6
6
-
 7
7
-
 8
8
-
 9
9
-
 10
10
-
 11
11
-
 12
12
-
 13
13
-
 14
14
-
 15
15
-
 16
16
-
 17
17
-
 18
18
-
 19
19
-
 20
20
-
 21
21
-
 22
22
-
 23
23
-
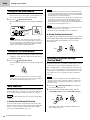 24
24
-
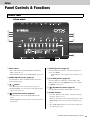 25
25
-
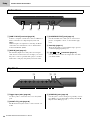 26
26
-
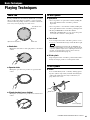 27
27
-
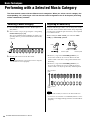 28
28
-
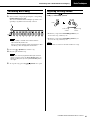 29
29
-
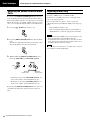 30
30
-
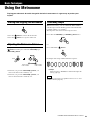 31
31
-
 32
32
-
 33
33
-
 34
34
-
 35
35
-
 36
36
-
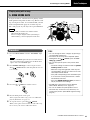 37
37
-
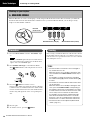 38
38
-
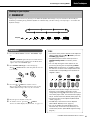 39
39
-
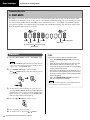 40
40
-
 41
41
-
 42
42
-
 43
43
-
 44
44
-
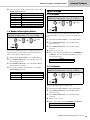 45
45
-
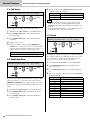 46
46
-
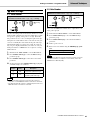 47
47
-
 48
48
-
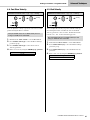 49
49
-
 50
50
-
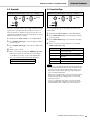 51
51
-
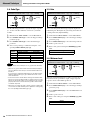 52
52
-
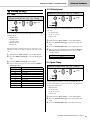 53
53
-
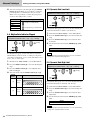 54
54
-
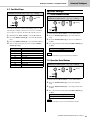 55
55
-
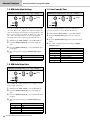 56
56
-
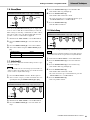 57
57
-
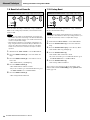 58
58
-
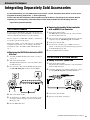 59
59
-
 60
60
-
 61
61
-
 62
62
-
 63
63
-
 64
64
-
 65
65
-
 66
66
-
 67
67
-
 68
68
-
 69
69
-
 70
70
-
 71
71
-
 72
72


Yamaha DTX402K El manual del propietario
- Categoría
- Tambores musicales
- Tipo
- El manual del propietario
- Este manual también es adecuado para
En otros idiomas
- français: Yamaha DTX402K Le manuel du propriétaire
- italiano: Yamaha DTX402K Manuale del proprietario
- English: Yamaha DTX402K Owner's manual
- Deutsch: Yamaha DTX402K Bedienungsanleitung
- русский: Yamaha DTX402K Инструкция по применению
- Nederlands: Yamaha DTX402K de handleiding
- português: Yamaha DTX402K Manual do proprietário
- dansk: Yamaha DTX402K Brugervejledning
- polski: Yamaha DTX402K Instrukcja obsługi
- čeština: Yamaha DTX402K Návod k obsluze
- svenska: Yamaha DTX402K Bruksanvisning
- 日本語: Yamaha DTX402K 取扱説明書
- Türkçe: Yamaha DTX402K El kitabı
- suomi: Yamaha DTX402K Omistajan opas
- română: Yamaha DTX402K Manualul proprietarului
Documentos relacionados
-
Yamaha DTX430K El manual del propietario
-
-
-
-
Yamaha PSR-E263 El manual del propietario
-
-
Yamaha PSRE263 Manual de usuario
-
Yamaha PSR-E253 Manual de usuario
-
Yamaha DD-12 El manual del propietario
-