Zanussi ZDF22002XA Manual de usuario
- Categoría
- Lavaplatos
- Tipo
- Manual de usuario


SAFETY INFORMATION
Before the installation and use of the appliance, carefully read the
supplied instructions. The manufacturer is not responsible for any
injuries or damages that are the result of incorrect installation or
usage. Always keep the instructions in a safe and accessible
location for future reference.
CHILDREN AND VULNERABLE PEOPLE SAFETY
• This appliance can be used by children aged from 8 years and
above and persons with reduced physical, sensory or mental
capabilities or lack of experience and knowledge if they have
been given supervision or instruction concerning the use of the
appliance in a safe way and understand the hazards involved.
• Do not let children play with the appliance.
• Keep detergents away from children.
• Keep children and pets away from the appliance when the door
is open.
• Children shall not carry out cleaning and user maintenance of
the appliance without supervision.
GENERAL SAFETY
• This appliance is intended to be used in household and similar
applications such as:
– farm houses; staff kitchen areas in shops, offices and other
working environments;
– by clients in hotels, motels, bed & breakfast and other
residential type environments.
• Do not change the specification of this appliance.
• The operating water pressure (minimum and maximum) must be
between 0.5 (0.05) / 8 (0.8) bar (MPa)
• Obey the maximum number of 13 place settings.
• If the supply cord is damaged, it must be replaced by the
manufacturer, its Authorised Service Centre or similarly
qualified persons in order to avoid a hazard.
2

• Put the cutlery in the cutlery basket with the sharp ends
pointing down or put them in the cutlery drawer in a horizontal
position with the sharp edges down.
• Do not leave the appliance with the open door unattended to
avoid stepping accidentally onto it.
• Before any maintenance operation, deactivate the appliance
and disconnect the mains plug from the socket.
• Do not use high pressure water sprays and/or steam to clean
the appliance.
• If the appliance has ventilation openings in the base, they must
not be covered e.g. by a carpet.
• The appliance is to be connected to the water mains using the
new supplied hose-sets. Old hose sets must not be reused.
SAFETY INSTRUCTIONS
INSTALLATION
• Remove all the packaging.
• Do not install or use a damaged appliance.
• Do not install or use the appliance where the
temperature is less than 0 °C.
• Follow the installation instruction supplied with
the appliance.
ELECTRICAL CONNECTION
WARNING! Risk of fire and electrical
shock.
• The appliance must be earthed.
• Make sure that the parameters on the rating
plate are compatible with the electrical ratings
of the mains power supply.
• Always use a correctly installed shockproof
socket.
• Do not use multi-plug adapters and extension
cables.
• Make sure not to cause damage to the mains
plug and to the mains cable. Should the mains
cable need to be replaced, this must be carried
out by our Authorised Service Centre.
• Connect the mains plug to the mains socket
only at the end of the installation. Make sure that
there is access to the mains plug after the
installation.
• Do not pull the mains cable to disconnect the
appliance. Always pull the mains plug.
• This appliance complies with the E.E.C.
Directives.
• Only for UK and Ireland. The appliance has a 13
amp mains plug. If it is necessary to change the
fuse in the mains plug, use fuse: 13 amp ASTA
(BS 1362).
WATER CONNECTION
• Do not cause damage to the water hoses.
• Before connection to new pipes, pipes not used
for a long time, where repair work has been
carried out or new devices fitted (water meters,
etc.), let the water flow until it is clean and clear.
• Ensure that there are no visible water leaks
during and after the first use of the appliance.
• If the water inlet hose is damaged, immediately
close the water tap and disconnect the mains
plug from the mains socket. Contact the
Authorised Service Centre to replace the water
inlet hose.
USE
• Do not sit or stand on the open door.
• Dishwasher detergents are dangerous. Obey
the safety instructions on the detergent
packaging.
• Do not drink and play with the water in the
appliance.
• Do not remove the dishes from the appliance
until the programme is complete. Some
detergent may remain on the dishes.
• The appliance can release hot steam if you open
the door while a programme operates.
3

• Do not put flammable products or items that are
wet with flammable products in, near or on the
appliance.
SERVICE
• Contact the Authorised Service Centre to repair
the appliance. We recommend only the use of
original spare parts.
• When you contact the Authorised Service
Centre, ensure that you have the following
information that is available on the rating plate.
Model :
PNC :
Serial Number :
DISPOSAL
WARNING! Risk of injury or
suffocation.
• Disconnect the appliance from the mains
supply.
• Cut off the mains cable and discard it.
• Remove the door catch to prevent children and
pets to get closed in the appliance.
4

EASY START
1 2 3
456
1
On/off indicator
2
Programme marker
3
Indicators
4
Start button
5
Delay button
6
Programme knob
INDICATORS
End indicator.
Salt indicator. It is always off while the programme operates.
Rinse aid indicator. It is always off while the programme operates.
5

PROGRAMMES
Programme
Degree of soil
Type of load
Programme phases
Consumption values
1)
Duration
(min)
Energy
(kWh)
Water
(l)
2)
Normal soil
Crockery and
cutlery
• Prewash
• Wash 50 °C
• Rinses
• Dry
222 1.039 11
Heavy soil
Crockery, cut-
lery, pots and
pans
• Prewash
• Wash 70 °C
• Rinses
• Dry
155 -
170
1.5 - 1.7 14-15
Normal soil
Crockery and
cutlery
• Prewash
• Wash 65 °C
• Rinses
• Dry
130 -
140
1.4 - 1.6 15-17
3)
Fresh soil
Crockery and
cutlery
• Wash 60 °C
or 65 °C
• Rinses
30 0.8 10
4)
All • Prewash 14 0.1 5
1) The pressure and the temperature of the water, the variations of the mains supply, the options and the
quantity of dishes can change the values.
2) With this programme you have the most efficient use of water and energy consumption for crockery and
cutlery with normal soil. (This is the standard programme for test institutes).
3) With this programme you can wash a load with fresh soil. It gives good washing results in a short time.
4) Use this programme to quickly rinse the dishes. this prevents the remaining food to bond on the dishes
and bad odours to come out from the appliance. Do not use detergent with this programme.
INFORMATION FOR TEST INSTITUTES
For all the necessary information for test
performance, send an email to:
Write down the product number (PNC) that is on
the rating plate.
6

SETTINGS
ADJUSTING THE WATER SOFTENER
5x
6x
The programme marker must be in position.
1. Press and hold and simultaneously turn the knob counterclockwise until the programme marker is in
position.
2. Release when and Delay start to flash.
• The current setting is indicated by the number of flashes of the indicator (e.g. 5 flashes +
pause + 5 flashes... = level 5.
3. Press to change the setting. Each pressing of the programme button increases the level number.
After reaching level 10, the count starts again from level 1.
4. Turn the knob to to confirm the setting.
THE WATER HARDNESS TABLE
German degrees
(°dH)
French degrees
(°fH)
mmol/l Clarke degrees
Water softener
level
47 -50 84 - 90 8.4 - 9.0 58 - 63 10
43 - 46 76 - 83 7.6 - 8.3 53 - 57 9
37 - 42 65 - 75 6.5 - 7.5 46 - 52 8
29 - 36 51 - 64 5.1 - 6.4 36 - 45 7
23 - 28 40 - 50 4.0 - 5.0 28 - 35 6
19 - 22 33 - 39 3.3 - 3.9 23 - 27
5
1)
15 - 18 26 - 32 2.6 - 3.2 18 - 22 4
11 - 14 19 - 25 1.9 - 2.5 13 - 17 3
7

German degrees
(°dH)
French degrees
(°fH)
mmol/l Clarke degrees
Water softener
level
4 - 10 7 - 18 0.7 - 1.8 5 - 12 2
<4 <7 <0.7 < 5
1
2)
1) Factory setting
2) Do not use salt at this level.
ACTIVATING AIRDRY
AirDry improves the drying results with less energy consumption.
By default, AirDry is activated with all programmes excluding
(if applicable) but it is possible to
deactivate it.
While the drying phase operates, the device opens the appliance door. The door is then kept
ajar.
8

The programme marker must be in position.
1. Press and hold and simultaneously turn the knob counterclockwise until the programme marker is in
position.
2. Release when and Delay start to flash.
3. Turn the knob counterclockwise until the programme marker is in position.
• The indicator is on = AirDry is activated.
4. Press to change the setting.
• The indicator is off = AirDry is deactivated.
5. Turn the knob to to confirm the setting.
CAUTION! If children have access to the appliance, it is advised to deactivate AirDry as
opening the door may pose a danger.
BEFORE FIRST USE
1. Make sure that the current level of the
water softener agrees with the hardness
of the water supply. If not, adjust the level
of the water softener.
2. Fill the salt container.
3. Fill the rinse aid dispenser.
4. Open the water tap.
5. Start a programme to remove any processing
residuals that can still be inside the appliance.
Do not use detergent and do not load the
baskets.
After starting a programme, it may take up to 5
minutes for the appliance to recharge the resin in
the water softener. It seems that the appliance is
not working. The washing phase starts only after
this procedure is completed. The procedure is
repeated periodically.
ADDING SALT
Before the first use, put one litre of water in the salt container.
9

CAUTION!
Water and salt can come out of the salt container during filling. To prevent corrosion, start a programme
immediately after filling the salt container.
ADDING RINSE AID
2
1
4
3
2
1
The rinse aid helps to dry the dishes without streaks and stains. It is automatically released during the hot
rinse phase.
DAILY USE
1. Open the water tap.
2. Set the correct programme for the type of load
and the degree of soil.
Make sure that the appliance is in Programme
selection mode.
• If the salt indicator is on, fill the salt
container.
• If the rinse aid indicator is on, fill the rinse
aid dispenser.
3. Load the baskets.
4. Add the detergent.
5. Start the programme.
ADDING DETERGENT
2
1
2
0
3
0
A
B
If the programme has a prewash phase, put a small quantity of detergent also in compartment B.
10

ADDING MULTI-TABLETS
2
1
2
0
3
0
• Do not fill the salt container and the rinse aid dispenser.
• Set the rinse aid dispenser to the lowest position.
PROGRAMME SELECTION MODE
The appliance must be in Programme selection mode to start a programme. If the control panel does not
show this condition, do the Reset.
Press and hold simultaneously Delay and
until the appliance is in programme selection mode.
RESET
With Reset you can cancel the running programme or the delay start. The appliance goes back to the
Programme selection mode.
STARTING A PROGRAMME
11

1. Open the water tap and close the door.
2. Select a programme.
3. Press .
OPTION DELAY
With this option you can postpone the start of a programme by 3 hours.
1. Set the programme.
2. Press
.
3. Press to start the countdown.
When the countdown is completed, the programme starts.
OPENING THE DOOR WHILE THE
APPLIANCE OPERATES
Opening the door while a programme is running
stops the appliance. It may affect the energy
consumption and the programme duration. After
closing the door, the appliance continues from the
point of interruption.
If the door is opened for more than 30
seconds during the drying phase, the
running programme ends. It does not
happen if the door is opened by AirDry
function.
Do not try to close the appliance door
within 2 minutes after AirDry
automatically opens it, as this may
cause damage to the appliance.
If, afterwards, the door is closed for
another 3 minutes, the running
programme ends.
12

AT THE END OF THE PROGRAMME
5 min
The indicator is on. After 5 minutes of non-use, the appliance enters standby mode and all the
indicators are off. It decreases energy consumption.
1. Turn the knob to .
2. Close the tap.
HINTS AND TIPS
GENERAL
The following hints will ensure optimal cleaning and
drying results in daily use and also help to protect
the environment.
• Remove larger residues of food from the dishes
into the waste bin.
• Do not pre-rinse dishes by hand. When needed,
use the prewash programme (if available) or
select a programme with a prewash phase.
• Always use the whole space of the baskets.
• When loading the appliance, make sure that the
dishes can be completely reached and washed
by the water released from the spray arm
nozzles. Make sure that items do not touch or
cover each other.
• You can use dishwasher detergent, rinse aid
and salt separately or you can use the multi-
tablets (e.g. ''3in1'', ''4in1'', ''All in 1''). Follow the
instructions written on the packaging.
• Select the programme according to the type of
load and degree of soil. With the ECO
programme you have the most efficient use of
water and energy consumption for crockery and
cutlery with normal soil.
THE WATER SOFTENER
The water softener removes minerals from the
water supply, which would have a detrimental effect
on the washing results and on the appliance.
The higher the content of these minerals, the harder
your water is. Water hardness is measured in
equivalent scales.
The water softener should be adjusted according to
the hardness of the water in your area. Your local
water authority can advise you on the hardness of
the water in your area. It is important to set the right
level of the water softener to assure good washing
results.
USING SALT, RINSE AID AND DETERGENT
• Only use salt, rinse aid and detergent for
dishwasher. Other products can cause damage
to the appliance.
• In areas with hard and very hard water we
recommend to use plain dishwasher detergent
(powder, gel, tablets containing no additional
agents), rinse aid and salt separately for optimal
cleaning and drying results.
• At least once a month run the appliance with the
use of appliance cleaner which is particularly
suitable for this purpose.
13

• Detergent tablets do not fully dissolve with short
programmes. To prevent detergent residues on
the tableware, we recommend that you use the
tablets with long programmes.
• Do not use more than the correct quantity of
detergent. Refer to the instructions on the
detergent packaging.
WHAT TO DO IF YOU WANT TO STOP USING
MULTI-TABLETS
Before you start to use separately detergent, salt
and rinse aid do the following procedure.
1. Set the highest level of the water softener.
2. Make sure that the salt and rinse aid containers
are full.
3. Start the shortest programme with a rinsing
phase. Do not add detergent and do not load
the baskets.
4. When the programme is completed, adjust the
water softener according to the water hardness
in your area.
5. Adjust the released quantity of rinse aid.
LOADING THE BASKETS
• Only use the appliance to wash items that are
dishwasher-safe.
• Do not put in the appliance items made of
wood, horn, aluminium, pewter and copper.
• Do not put in the appliance items that can
absorb water (sponges, household cloths).
• Remove remaining food from the items.
• Make soft the remaining burned food on the
items.
• Put hollow items (cups, glasses and pans) with
the opening down.
• Make sure that cutlery and dishes do not bond
together. Mix spoons with other cutlery.
• Make sure that glasses do not touch other
glasses.
• Put small items in the cutlery basket.
• Put light items in the upper basket. Make sure
that the items do not move.
• Make sure that the spray arm can move freely
before you start a programme.
BEFORE STARTING A PROGRAMME
Make sure that:
• The filters are clean and correctly installed.
• The cap of the salt container is tight.
• The spray arms are not clogged.
• There is dishwasher salt and rinse aid (unless
you use multi- tablets).
• The position of the items in the baskets is
correct.
• The programme is applicable for the type of load
and for the degree of soil.
• The correct quantity of detergent is used.
UNLOADING THE BASKETS
1. Let the tableware cool down before you
remove it from the appliance. Hot items can be
easily damaged.
2. First remove items from the lower basket, then
from the upper basket.
At the end of the program water can
still remain on the sides and on the
door of the appliance.
TROUBLESHOOTING
If the appliance does not start or it stops during
operation, before you contact an Authorised
Service Centre, check if you can solve the problem
by yourself with the help of the information in the
table.
WARNING! Repairs not properly done
may result in serious risk to the safety
of the user. Any repairs must be
performed by qualified personnel.
With some problems the end indicator flashes
intermittently indicating a malfunction.
The majority of problems that can occur can
be solved without the need to contact an
Authorised Service Centre.
14

Problem and alarm code Possible cause and solution
You cannot activate the appliance. • Make sure that the mains plug is connected to the
mains socket.
• Make sure that there is no damaged fuse in the fuse
box.
The programme does not start. • Make sure that the appliance door is closed.
• Press .
• If the delay start is set, cancel the setting or wait for
the end of the countdown.
• The appliance has started the procedure to re-
charge the resin inside the water softener. The dura-
tion of the procedure is approximately 5 minutes.
The appliance does not fill with water.
• The end indicator flashes 1 time inter-
mittently.
• The indicator flashes continuously.
• Make sure that the water tap is open.
• Make sure that the pressure of the water supply is
not too low. For this information, contact your local
water authority.
• Make sure that the water tap is not clogged.
• Make sure that the filter in the inlet hose is not clog-
ged.
• Make sure that the inlet hose has no kinks or bends.
The appliance does not drain the water.
• The end indicator flashes 2 times inter-
mittently.
• The indicator flashes continuously.
• Make sure that the sink spigot is not clogged.
• Make sure that the drain hose has no kinks or
bends.
The anti-flood device is on.
• The end indicator flashes 3 times inter-
mittently.
• The indicator flashes continuously.
• Close the water tap and contact an Authorised
Service Centre.
The appliance stops and starts more
times during operation.
• It is normal. It provides optimal cleaning results and
energy savings.
The program lasts too long. • If the delayed start option is set, cancel the delay
setting or wait for the end of the countdown.
Small leak from the appliance door. • The appliance is not levelled. Loosen or tighten the
adjustable feet (if applicable).
• The appliance door is not centred on the tub. Adjust
the rear foot (if applicable).
The appliance door is difficult to close. • The appliance is not levelled. Loosen or tighten the
adjustable feet (if applicable).
• Parts of the tableware are protruding from the bas-
kets.
Rattling/knocking sounds from inside the
appliance.
• The tableware is not properly arranged in the bas-
kets. Refer to basket loading leaflet.
• Make sure that the spray arms can rotate freely.
15

Problem and alarm code Possible cause and solution
The appliance trips the circuit-beaker. • The amperage is insufficient to supply simultaneous-
ly all the appliances in use. Check the socket am-
perage and the capacity of the meter or turn off one
of the appliances in use.
• Internal electrical fault of the appliance. Contact an
Authorised Service Centre.
Refer to "Before first use", "Daily
use", or "Hints and tips" for other
possible causes.
Once you have checked the appliance, press . If
the problem occurs again, contact an Authorised
Service Centre.
For alarm codes not described in the table, contact
an Authorised Service Centre.
THE WASHING AND DRYING RESULTS ARE NOT SATISFACTORY
Problem Possible cause and solution
Poor washing results. • Refer to "Daily use", "Hints and tips" and basket loading
leaflet.
• Use more intensive washing programmes.
• Clean spray arm jets and filter. Refer to "Care and Clean-
ing".
Poor drying results. • Tableware has been left for too long inside a closed appli-
ance.
• There is no rinse aid or the dosage of rinse aid is not enough.
Set the rinse aid dispenser to a higher level.
• Plastic items may need to be towel dried.
• For the best drying performance activate AirDry.
• We recommend to always use rinse aid, even in combination
with multi-tablets.
There are whitish streaks or blu-
ish layers on glasses and dishes.
• The release quantity of rinse aid is too much. Adjust the rinse
aid level to a lower level.
• The quantity of detergent is too much.
There are stains and dry water
drops on glasses and dishes.
• The released quantity of rinse aid is not sufficient. Adjust the
rinse aid level to a higher level.
• The quality of the rinse aid can be the cause.
The dishes are wet. • For the best drying performance activate AirDry.
• The programme does not have a drying phase or has a drying
phase with low temperature.
• The rinse aid dispenser is empty.
• The quality of the rinse aid can be the cause.
• The quality of the multi-tablets can be the cause. Try a differ-
ent brand or activate the rinse aid dispenser and use rinse
aid and multi-tablets together.
16

Problem Possible cause and solution
The interior of the appliance is
wet.
• This is not a defect of the appliance. it is caused by the hu-
midity in the air that condenses on the walls.
Unusual foam during washing. • Use the detergent for dishwashers only.
• There is a leak in the rinse aid dispenser. Contact an Author-
ised Service Centre.
Traces of rust on cutlery. • There is too much salt in the water used for washing. Refer to
"The water softener".
• Silver and stainless steel cutlery were placed together. Avoid
to put silver and stainless steel items close together.
There are residues of detergent
in the dispenser at the end of the
programme.
• The detergent tablet got stuck in the dispenser and therefore
was not completely washed away by water.
• Water cannot wash away the detergent from the dispenser.
Make sure that the spray arm is not blocked or clogged.
• Make sure that items in the baskets do not impede the lid of
the detergent dispenser from opening.
Odours inside the appliance. • Refer to "Internal cleaning".
Limescale deposits on the table-
ware, on the tub and on the in-
side of the door.
• The level of salt is low, check the refill indicator.
• The cap of the salt container is loose.
• Your tap water is hard. Refer to "The water softener".
• Even using multi-functional tabs use salt and set regeneration
of the water softener. Refer to "The water softener".
• If lime scale deposits still remain, clean the appliance with
appliance cleaners which are particularly suitable for this pur-
pose.
• Try different detergent.
• Contact the detergent manufacturer.
Dull, discoloured or chipped ta-
bleware.
• Make sure that only dishwasher-safe items are washed in the
appliance.
• Load and unload the basket carefully. Refer to basket loading
leaflet.
• Place delicate items in the upper basket.
Refer to "Before first use", "Daily
use" or "Hints and tips" for other
possible causes.
CARE AND CLEANING
WARNING! Before maintenance,
deactivate the appliance and
disconnect the mains plug from the
main socket.
Dirty filters and clogged spray arms
decrease the washing results. Make a
check regularly and, if necessary,
clean them.
17

CLEANING THE FILTERS
B
A
C
• Make sure that there are no residues of food or soil in or around the edge of the sump.
• Put back in place the flat filter (C). Make sure that it is correctly positioned under the 2 guides.
• Reassemble the filters (A) and (B).
• Put back the filter (A) in the flat filter (C). Turn it clockwise until it locks.
An incorrect position of the filters can cause bad washing results and damage to the
appliance
CLEANING THE SPRAY ARMS
Do not remove the spray arms. If the holes in the
spray arms are clogged, remove remaining parts of
soil with a thin pointed object.
EXTERNAL CLEANING
• Clean the appliance with a moist soft cloth.
• Only use neutral detergents.
• Do not use abrasive products, abrasive cleaning
pads or solvents.
INTERNAL CLEANING
• Carefully clean the appliance, including the
rubber gasket of the door, with a soft damp
cloth.
• If you regularly use short duration programmes,
these can leave deposits of grease and
limescale inside the appliance. To prevent this,
we recommend to run long duration
programmes at least 2 times per month.
• To maintain the performance of your appliance
at its best, we recommend to use monthly a
specific cleaning product for dishwashers.
Follow carefully the instructions on the
packaging of the product.
TECHNICAL INFORMATION
Dimensions Width / height / depth (mm) 600 / 850 / 625
Electrical connection
1) Voltage (V) 220 - 240
Frequency (Hz) 50
Water supply pressure Min. / max. bar (MPa) 0.5 (0.05) / 8 (0.8)
Water supply
Cold water or hot water
2) max 60 °C
18

Capacity Place settings 13
Power consumption Left-on mode (W) 5.0
Power consumption Off-mode (W) 0.50
1) Refer to the rating plate for other values.
2) If the hot water comes from alternative source of energy, (e.g. solar panels, aeolian energy), use the hot
water supply to decrease energy consumption.
RATING PLATE
Mod. ... ... ...
Prod. No. ... ... ...
Ser. No. ...
INFORMATION FOR TEST INSTITUTES
For all the necessary information for test
performance, send an email to:
Write down the product number (PNC) that is on
the rating plate.
ENVIRONMENTAL CONCERNS
Recycle materials with the symbol . Put the
packaging in relevant containers to recycle it. Help
protect the environment and human health by
recycling waste of electrical and electronic
appliances. Do not dispose of appliances marked
with the symbol with the household waste.
Return the product to your local recycling facility or
contact your municipal office.
19

БЕЗБЕДНОСНЕ ИНФОРМАЦИЈЕ
Пре инсталације и коришћења уређаја, пажљиво
прочитајте приложено упутство. Произвођач није
одговоран за било какве повреде или штете које су
резултат неисправне инсталације или употребе. Чувајте
упутство за употребу на безбедном и приступачном месту
за будуће коришћење.
БЕЗБЕДНОСТ ДЕЦЕ И ОСЕТЉИВИХ ОСОБА
• Овај уређај могу да користе деца старија од 8 година и
особе са смањеним физичким, чулним или менталним
способностима, kao особе којима недостају искуство и
знање, уколико им се обезбеди надзор или им се дају
упутства у вези са употребом уређаја на безбедан начин
и уколико схватају могуће опасности.
• Немојте дозволити деци да се играју уређајем.
• Детерџенте држите ван домашаја деце.
• Децу и кућне љубимце држите подаље од уређаја док су
његова врата отворена.
• Деца не смеју да обављају чишћење и корисничко
одржавање уређаја без надзора.
ОПШТЕ МЕРЕ БЕЗБЕДНОСТИ
• Овај уређај је намењен за коришћење у домаћинствима
и сличним окружењима, као што су:
– куће на фармама; кухиње за особље у продавницама,
канцеларијама и другим радним окружењима;
– од стране клијената у хотелима, мотелима,
пансионима и другим окружењима стационарног типа;
• Не мењајте спецификацију овог уређаја.
• Радни притисак воде (минимум и максимум) мора бити
између 0.5 (0.05) / 8 (0.8) бара (МPа)
• Поштујте максималан број од 13 места подешавања.
• Уколико је кабл за напајање оштећен, њега мора да
замени произвођач, његов Овлашћени сервисни центар
20

или лица сличне квалификације, како би се избегла
опасност.
• Прибор за јело са оштрим врховима ставите у корпу за
прибор за јело тако да врхови буду окренути надоле или
хоризонтално положени.
• Не остављајте уређај без надзора ако су му врата
отворена како бисте избегли да их случајно нагазите.
• Пре било каквог поступка одржавања уређаја, искључите
га и извадите утикач кабла за напајање из зидне
утичнице.
• Не чистите уређај распршивачима воде нити паром под
високим притиском.
• Ако уређај има отворе за вентилацију у постољу, они не
смеју бити прекривени нпр. тепихом.
• Уређај треба да се повеже на довод воде помоћу новог
приложеног црева. Старо црево се не сме поново
користити.
БЕЗБЕДНОСНА УПУТСТВА
ИНСТАЛАЦИЈА
• Уклоните амбалажу.
• Немојте да монтирате или користите
оштећен уређај.
• Немојте монтирати или користити уређај на
местима на којима је температура нижа од
0 °C.
• Придржавајте се упутства за монтирање
које сте добили уз уређај.
СТРУЈНИ ПРИКЉУЧАК
УПОЗОРЕЊЕ! Постоји ризик од
пожара и електричног удара.
• Уређај мора да буде уземљен.
• Уверите се да су параметри на плочици са
техничким карактеристикама компатибилни
са одговарајућим параметрима електричне
мреже за напајање.
• Користите искључиво правилно
инсталирану утичницу, отпорну на ударце.
• Не користите адаптере за вишеструке
утикаче и продужне каблове.
• Проверите да нисте оштетили главно
напајање и кабл за напајање. Уколико
струјни кабл треба да се замени, то треба
да обави наш овлашћени сервисни центар.
• Прикључите главни кабл за напајање на
зидну утичницу тек на крају инсталације.
Водите рачуна да постоји приступ мрежном
утикачу након инсталације.
• Немојте да вучете мрежни кабл да бисте
искључили уређај. Кабл искључите тако
што ћете извући утикач из утчнице.
• Овај уређај је усклађен са директивама
Европске уније.
• Само за Велику Британију и Ирску. Уређај
има мрежни утикач од 13 ампера. Ако је
потребно да се промени осигурач у
утичници, користите осигурач: 13 amp
ASTA (BS 1362).
ПРИКЉУЧИВАЊЕ ВОДЕ
• Немојте оштетити црева за воду.
• Пре прикључења на нове цеви, или цеви
које нису коришћене дуже време, или где је
вршена поправка или монтирани нови
уређаји (водомери, итд.), пустите воду да
истече док не буде чиста и бистра.
• Уверите се да не постоји видљиво цурење
воде током и након прве употребе уређаја.
21

• Уколико је црево за довод воде оштећено,
одмах затворите славину за воду и
искључите кабл за напајање из утичнице.
Обратите се Овлашћеном сервисном
центру да бисте заменили црево за довод
воде.
УПОТРЕБА
• Немојте седати нити стајати на отворена
врата.
• Детерџенти за машину за прање посуђа су
опасни. Поштујте упутства о безбедности
са паковања детерџента.
• Немојте да пијете нити да се играте са
водом у уређају.
• Не уклањајте посуђе из уређаја пре него
што се програм заврши. На посуђу могу
остати трагови детерџента.
• Уређај може да испусти врелу пару ако
отворите врата док је програм у току.
• Запаљиве материје или предмете
натопљене запаљивим материјама немојте
стављати унутар и поред уређаја или на
њега.
СЕРВИСИРАЊЕ
• Обратите се Овлашћеном сервисном
центру ради поправљања уређаја.
Препоручујемо вам да користите
искључиво оригиналне резервне делове.
• Када се обратите Овлашћеном сервисном
центру, проверите да ли имате податке које
су наведени на плочици са техничким
карактеристикама.
Moдел:
Бр. производа (PNC):
Серијски број (Serial Number):
ОДЛАГАЊЕ
УПОЗОРЕЊЕ! Постоји могућност
од повређивања или гушења.
• Одвојте кабл за напајање уређаја од
мрежног напајања.
• Одсеците кабл за напајање и баците га у
смеће.
• Уклоните ручицу од врата да бисте
спречили да се деца и кућни љубимци
затворе у уређају.
22

ЛАКИ СТАРТ
1 2 3
456
1
Индикатор за укључивање/искључивање
2
Показивач програма
3
Индикатори
4
Дугме за старт
5
Дугме за одлагање
6
Дугме за избор програма
ИНДИКАТОРИ
Индикатор који означава крај.
Индикатор за со. Увек је искључен док је програм активан.
Индикатор средства за испирање. Увек је искључен док је програм активан.
23

ПРОГРАМИ
Програм
Степен запрља‐
ности
Врста пуњења
Фазе програма
Вредности потрошње
1)
Трајање
(мин)
Потрошња
електричне
енергије
(kWh)
Вода
(л)
2)
Нормалан сте‐
пен запрљано‐
сти
Судови и при‐
бор за јело
• Претпрање
• Прање 50 °C
• Испирања
• Сушење
222 1.039 11
Висок степен
запрљаности
Посуђе, при‐
бор за јело,
лонци и тига‐
њи
• Претпрање
• Прање 70 °C
• Испирања
• Сушење
155 - 170 1.5 - 1.7 14-15
Нормалан сте‐
пен запрљано‐
сти
Судови и при‐
бор за јело
• Претпрање
• Прање 65 °C
• Испирања
• Сушење
130 - 140 1.4 - 1.6 15-17
3)
Свежа запр‐
љаност
Судови и при‐
бор за јело
• Прање 60 °C
или 65 °C
• Испирања
30 0.8 10
4)
Све • Претпрање 14 0.1 5
1) Притисак и температура воде, промене у напону, опције и количина посуђа могу да измене
ове вредности.
2) Са овим програмом постижете најефикаснију потрошњу воде и електичне енергије за посуђе
и прибор за јело који су нормално запрљани. (Ово је стандардни програм за институте за тести‐
рање).
3) Са овим програмом можете опрати свеже запрљано посуђе. Овај програм даје добре резул‐
тате прања за кратко време.
4) Користите овај програм за брзо испирање посуђа. То спречава задржавање остатака хране
на посуђу и ширење непријатних мириса из уређаја. За овај програм не користите детерџент.
ИНФОРМАЦИЈЕ ЗА ИНСТИТУТЕ ЗА
ТЕСТИРАЊЕ
За све потребне информације у вези са
учинком током тестирања, пошаљите мејл на:
Запишите број производа (PNC) који се налази
на плочици са техничким карактеристикама.
24

ПОДЕШАВАЊА
ПОДЕШАВАЊЕ ОМЕКШИВАЧА ВОДЕ
5x
6x
Показивач програма мора да буде на положају .
1. Притисните и држите и истовремено окрените дугме за избор програма супротно од
кретања казаљке на сату док показивач програма не буде на положају
.
2. Пустите када и Delay почну да трепере.
• Број трептаја индикатора показује тренутно подешавање
(нпр. 5 трептаја + пауза + 5
трептаја... = ниво 5.
3. Притисните да бисте променили подешавање. Сваким притиском на програмско дугме
повећава се број нивоа. Након што се достигне ниво 10, бројач почиње поново од нивоа 1.
4. Дугме за избор програма окрените у положај
да бисте потврдили подешавање.
ТАБЕЛА ТВРДОЋЕ ВОДЕ
Немачки степе‐
ни
(°dH)
Француски степени
(°fH)
mmol/l
Енглески степени
(Clarke)
Ниво омекшивача
воде
47 -50 84 - 90 8.4 - 9.0 58 - 63 10
43 - 46 76 - 83 7.6 - 8.3 53 - 57 9
37 - 42 65 - 75 6.5 - 7.5 46 - 52 8
29 - 36 51 - 64 5.1 - 6.4 36 - 45 7
23 - 28 40 - 50 4.0 - 5.0 28 - 35 6
19 - 22 33 - 39 3.3 - 3.9 23 - 27
5
1)
15 - 18 26 - 32 2.6 - 3.2 18 - 22 4
25

Немачки степе‐
ни
(°dH)
Француски степени
(°fH)
mmol/l
Енглески степени
(Clarke)
Ниво омекшивача
воде
11 - 14 19 - 25 1.9 - 2.5 13 - 17 3
4 - 10 7 - 18 0.7 - 1.8 5 - 12 2
<4 <7 <0.7 < 5
1
2)
1) Фабричко подешавање
2) Не користите со на овом нивоу.
AIRDRY АКТИВИРАЊЕ
AirDry побољшава резултате сушења уз мању потрошњу електричне енергије.
Према подразумеваним подешавањима, AirDry се активира са свим програмима изузев са
(ако је применљиво) али може да се деактивира.
Док је активна фаза сушења, уређај сам отвара врата машине. Врата потом остају
отшкринута.
26

Показивач програма мора да буде на положају .
1. Притисните и држите
и истовремено окрените дугме за избор програма супротно од
кретања казаљке на сату док показивач програма не буде на положају .
2. Пустите када и Delay почну да трепере.
3. Окрените дугме за избор програма супротно од смера кретања казаљки на сату све док
показивач програма не буде на положају
.
• Индикатор је укључен = AirDry је активирано.
4. Притисните
да бисте променили подешавање.
• Индикатор је искључен = AirDry је деактивирано.
5. Дугме за избор програма окрените у положај да бисте потврдили подешавање.
ОПРЕЗ Уколико деца имају приступ уређају, препоручује се да се деактивира AirDry
јер отварање врата може да представља опасност.
ПРЕ ПРВЕ УПОТРЕБЕ
1. Проверите да ли је тренутни ниво
омекшивача воде у складу са тврдоћом
воде у вашој области. Ако није,
подесите ниво омекшивача воде.
2. Напуните посуду за со.
3. Сипајте средство за испирање у преграду.
4. Одврните славину за воду.
5. Започните програм да уклоните било
какве остатке обраде који још увек могу
бити у уређају. Немојте користити
детерџент и немојте препунити корпе.
Након покретања програма, може проћи и до 5
минута док уређај допуни смолу у омекшивачу
воде. Изгледа као да уређај не ради. Фаза
прања започиње искључиво након што се ова
операција заврши. Овак поступак се понавља
периодично.
ДОДАВАЊЕ СОЛИ
Пре прве употребе сипајте један литар воде у посуду за со.
27

ОПРЕЗ
Вода и со могу да исцуре из посуде за со када је пуните. Да бисте спречили корозију, покрените
програм одмах пошто завршите са досипањем соли у посуду.
ДОДАВАЊЕ СРЕДСТВА ЗА ИСПИРАЊЕ
2
1
4
3
2
1
Средство за испирање помаже да се посуђе осуши тако да на њему не остану пруге и мрље.
Оно се аутоматски испушта за време фазе врућег испирања.
СВАКОДНЕВНА УПОТРЕБА
1. Одврните славину за воду.
2. Подесите одговарајући програм прања, у
зависности од типа уноса и степена
запрљаности судова.
Уверите се да се уређај налази у режиму
избора програма.
• Уколико је индикатор за со укључен,
напуните посуду за со.
• Уколико је индикатор средства за
испирање укључен, напуните дoзатор
за средство за испирање.
3. Напуните корпе.
4. Додајте детерџент.
5. Покрените програм.
ДОДАВАЊЕ ДЕТЕРЏЕНТА
2
1
2
0
3
0
A
B
Уколико програм има фазу претпрања, ставите мало детерџента и у преграду B.
28

ДОДАВАЊЕ МУЛТИ ТАБЛЕТА
2
1
2
0
3
0
• Не пуните посуду за со и дозатор за средство за испирање.
• Подесите дозатор за средство за испирање на најнижи положај.
РЕЖИМ ЗА ИЗБОР ПРОГРАМА
Уређај мора да буде у режиму за избор програма да би се неки програм активирао. Уколико се
на контролној табли не приказује ово стање, притисните Reset.
Истовремено притисните и задржите Delay и док је уређај у режиму за избор програма.
RESET
Избором опције Reset (ресетовање) можете отказати програм који је у току или одложити старт.
Уређај се враћа у режим избора програма.
ПОКРЕТАЊЕ ПРОГРАМА
29

1. Отворите славину за хладну воду и затворите врата.
2. Изаберите програм.
3. Притисните .
ОПЦИЈА DELAY
Овом опцијом можете одложити почетак програма за 3 сата.
1. Подесите програм.
2. Притисните .
3. Притисните
да бисте покренули одбројавање.
Када се одбројавање заврши, програм се покреће.
ОТВАРАЊЕ ВРАТА ДОК УРЕЂАЈ РАДИ
Ако отворите врата док је неки програм прања
у току, уређај престаје да ради. Ово може
утицати на потрошњу енергије и на трајање
програма. Када затворите врата, уређај
наставља са радом од тренутка када је
прекинут.
Ако су врата отворена дуже од 30
секунди током фазе сушења,
програм који је у току ће се
угасити. Ово се не дешава ако се
врата отворе помоћу функције
AirDry.
30

Не покушавајте да затворите
врата уређаја у року од 2 минута
након што их AirDry аутоматски
отвори, јер ово може да доведе до
оштећења уређаја.
Ако су, након тога, врата
затворена још 3 минута, текући
програм се завршава.
НА КРАЈУ ПРОГРАМА
5 min
Индикатор је укључен. Након 5 минута некоришћења, уређај улази у режим приправности и
сви индикатори су угашени. Овако се смањује потрошња енергије.
1. Дугме за избор програма окрените у положај .
2. Заврните славину.
КОРИСНИ САВЕТИ
ОПШТЕ
Следећи савети ће обезбедити оптималне
резултате чишћења и сушења у свакодневној
употреби и, такође, помоћи у заштити животне
средине.
• Уклоните веће остатке хране са судова и
баците у канту за смеће.
• Немојте претходно испирати судове ручно.
По потреби, користите програм претпрања
(ако постоји) или изаберите програм са
фазом претпрања.
• Увек користите цео простор корпи.
• Када пуните уређај, уверите се да вода
ослобођена из крака са млазницама може
потпуно да дохвати и опере посуђе. Водите
рачуна да се посуђе не додирује или
прекрива међусобно.
• Можете користити детерџент за машину за
прање посуђа, средство за испирање и со
одвојено или можете користити мулти
таблете (нпр. „3 у 1“, „4 у 1“, „Све у
једном“). Пратите упутства написана на
паковању.
• Изаберите програм према типу уноса и
степену запрљаности. Са ECO (еко)
програмом се постиже најефикаснија
потрошња воде и електричне енергије
приликом прања посуђа и прибора за јело
који су умерено запрљани.
ОМЕКШИВАЧ ВОДЕ
Омекшивач воде уклања минерале из воде,
који би имали штетно дејство на резултате
прања и на сам уређај.
31

Што је већи садржај минерала, то је вода
тврђа. Тврдоћа воде се мери еквивалентном
скалом.
Омекшивач воде треба применити према
тврдоћи воде у вашем крају. Ваш локални
снабдевач водом може да вас посаветује у
вези са тврдоћом воде у вашем крају. Важно
је да се подеси тачан ниво омекшивача воде
да би се обезбедили добри резултати прања.
КОРИШЋЕЊЕ СОЛИ, СРЕДСТВА ЗА
ИСПИРАЊЕ И ДЕТЕРЏЕНТА
• Користите искључиво со, средство за
испирање и детерџент за машину за прање
посуђа. Остали производи могу оштетити
уређај.
• У крајевима са тврдом и изузетно тврдом
водом препоручујемо коришћење обичног
детерџента без додатака (прашак, гел и
таблете без додатних агенаса), средства
за испирање и соли за оптималне
резултате чишћења и сушења.
• Барем једном месечно пустите уређај да
ради уз употребу средства за чишћење
уређаја које је нарочито подесно за ову
намену.
• Детерџент у виду таблета се не раствара
потпуно код програма који кратко трају. Да
на кухињском посуђу не буде заосталог
детерџента, препоручујемо коришћење
таблета које се користе код програма који
дуго трају.
• Не употребљавајте више од прописане
количине детерџента. Погледајте упутства
на паковању детерџента.
ШТА ЧИНИТИ АКО ЖЕЛИТЕ ДА ПРЕКИНЕТЕ
ДА КОРИСТИТЕ МУЛТИ ТАБЛЕТЕ
Пре него што почнете одвојено да користите
детерџент, со и средство за испирање
урадите следеће:
1. Подесите највећи ниво омекшивача воде.
2. Проверите да ли су посуде за со и
средство за испирање пуне.
3. Покрените најкраћи програм који има фазу
испирања. Немојте додавати детерџент и
немојте препунити корпе.
4. По завршетку програма, подесите
омекшивач воде према тврдоћи воде у
вашем крају.
5. Подесите количину средства за испирање.
ПУЊЕЊЕ КОРПИ
• Уређај користите искључиво за прање
посуђа које се може прати у машини за
прање посуђа.
• У уређај немојте стављати посуђе од
дрвета, рогова, алуминијума, калаја и
бакра.
• Не стављајте у уређај предмете који могу
да апсорбују воду (сунђере, кухињске
крпе).
• Уклоните остатке хране са посуђа.
• Размекшајте остатке загореле хране на
посуђу.
• Посуђе, као што су шоље, чаше и тигањи,
поставите са отвором окренутим надоле.
• Водите рачуна да се прибор за јело и
посуђе међусобно не закаче. Помешајте
кашике и остали прибор за јело.
• Водите рачуна да се чаше не додирују.
• Мале предмете ставите у корпу за прибор
за јело.
• Лагано посуђе ставите у горњу корпу.
Проверите да посуђе не може да се
помера.
• Проверите да ли крак са млазницама може
слободно да се окреће пре покретања
програма.
ПРЕ ПОКРЕТАЊА ПРОГРАМА
Проверите следеће:
• Филтери су чисти и правилно су
монтирани.
• Поклопац посуде за со је добро затворен.
• Млазнице нису запушене.
• Сипана је со за машину за прање посуђа и
средство за испирање (осим ако не
користите више таблета).
• Посуђе у корпама је исправно постављено.
• Програм одговара типу уноса и степену
запрљаности.
• Користи се одговарајућа количина
детерџента.
ПРАЖЊЕЊЕ КОРПИ
1. Оставите да се стоно посуђе охлади пре
него што га извадите из уређаја. Врући
судови могу лако да се оштете.
2. Прво извадите посуђе из доње корпе, а
затим из горње.
На крају програма вода може и
даље остати са стране и на
вратима уређаја.
32

РЕШАВАЊЕ ПРОБЛЕМА
Ако уређај не почиње са радом или се
зауставља у току рада, пре него што позовете
Овлашћени сервисни центар, проверите да ли
сами можете да решите проблем уз помоћ
информација у табели.
УПОЗОРЕЊЕ! Неисправно
обављене поправке могу да
изазову озбиљне ризике по
безбедност корисника. Све
поправке мора да обави
искључиво квалификовано
особље.
Код неких проблема индикатор краја програма
трепери наизменично указујући на квар.
Већина проблема који могу да се јаве се
може решити без потребе за
контактирањем овлашћеног сервисног
центра.
Проблем и шифра аларма Могући узрок и решење
Не можете да укључите уређај. • Проверите да ли је мрежни утикач прикључен у
мрежну утичницу.
• Проверите да ли у кутији са осигурачима има
оштећених осигурача.
Програм се не покреће. • Проверите да ли су врата на уређају затворе‐
на.
• Притисните .
• Ако је подешен одложени старт, откажите под‐
ешавање или сачекајте да се заврши одброја‐
вање.
• Уређај је започео поступак поновног испирања
са омекшивачем воде. Трајање поступка је око
пет минута.
Уређај се не пуни водом.
• Индикатор краја програма трепери
једном, испрекидано.
• Индикатор трепери непрекидно.
• Уверите се да је славина за воду отворена.
• Проверите да притисак воде није исувише ни‐
зак. Ове информације потражите у локалној
надлежној служби водовода.
• Проверите да славина за воду није запушена.
• Проверите да филтер на цреву за довод воде
није запушен.
• Проверите да доводно црево није увијено или
савијено.
Уређај не одводи воду.
• Индикатор краја програма трепери
два пута, испрекидано.
• Индикатор трепери непрекидно.
• Проверите да сливник испод лавабоа није за‐
пушен.
• Проверите да ли се одводно црево негде уви‐
ло или савило.
Уређај за заштиту од поплаве је акти‐
виран.
• Индикатор краја програма трепери
три пута, испрекидано.
• Индикатор трепери непрекидно.
• Затворите славину за воду и обратите се
Овлашћеном сервисном центру.
33

Проблем и шифра аларма Могући узрок и решење
Уређај се зауставља и покреће више
пута у току рада.
• То је нормално. То обезбеђује оптималне ре‐
зултате чишћења и уштеду енергије.
Време трајања програма је сувише
дуго.
• Ако је подешен одложени старт, откажите од‐
лагање или сачекајте да се заврши одбројава‐
ње.
Мало цури из врата уређаја. • Уређај није нивелисан. Олабавите или затегни‐
те подесиве ножице (уколико је то могуће).
• Врата уређаја нису центрирана на бубњу. Под‐
есите задње ножице (уколико је то могуће).
Врата уређаја се тешко затварају. • Уређај није нивелисан. Олабавите или затегни‐
те подесиве ножице (уколико је то могуће).
• Делови посуђа вире из корпи.
Из уређаја се чују звукови звецкања/
лупања.
• Посуђе у корпама није правилно распоређено.
Погледајте брошуру о пуњењу корпе.
• Проверите да ли краци са млазницама несме‐
тано ротирају.
Уређај активира прекидач елек‐
тричног кола.
• Ампеража је недовољна за истовремено снаб‐
девање струјом свих апарата у употреби. Про‐
верите амперажу утичнице и капацитет броји‐
ла или искључите један од уређаја који се ко‐
ристи.
• Унутрашњи електрични квар уређаја. Контакти‐
рајте овлашћени сервисни центар.
Погледајте одељке „Пре прве
употребе“, „Свакодневна
употреба“ или „Напомене и
савети“ за друге могуће узроке.
Када завршите са провером уређаја,
притисните . Уколико се проблем поново
јави, контактирајте овлашћени сервисни
центар.
За проблеме који нису наведени у табели
обратите се овлашћеном сервисном центру.
НИСТЕ ЗАДОВОЉНИ РЕЗУЛТАТИМА ПРАЊА И СУШЕЊА
Проблем Могући узрок и решење
Лоши резултати прања. • Погледајте одељак „Свакодневна употреба“, „Напо‐
мене и савети“ и брошуру о пуњењу корпе.
• Користите интензивније програме прања.
• Очистите кракове са млазницама и филтер. Погледајте
одељак „Одржавање и чишћење“.
34

Проблем Могући узрок и решење
Лоши резултати сушења. • Стоно посуђе је остављено сувише дуго у затвореном
уређају.
• Нема средства за испирање или је његова доза недо‐
вољна. Подесите дозатор средства за испирање на ви‐
ши ниво.
• Пластични предмети морају да се осуше крпом.
• За најбољи учинак сушења активирајте AirDry.
• Препоручујемо да увек користите средство за испира‐
ње, чак и у комбинацији са мулти таблетама.
На стаклу и посуђу постоје
беличасти трагови или плав‐
касти слојеви.
• Ослобођена је превелика количина средства за испи‐
рање. Подесите нижи ниво средства за испирање.
• Има превише детерџента.
Постоје флеке и осушене ка‐
пи воде на чашама и посуђу.
• Ослобођена количина средства за испирање није до‐
вољна. Подесите виши ниво средства за испирање.
• Узрок томе може да буде квалитет средства за испира‐
ње.
Посуђе је мокро. • За најбољи учинак сушења активирајте AirDry.
• Програм нема фазу сушења или има фазу сушења са
ниском температуром.
• Дозатор за средство за испирање је празан.
• Узрок томе може да буде квалитет средства за испира‐
ње.
• Узрок томе може да буде квалитет мулти таблета.
Испробајте неку другу марку или активирајте дозатор
за средство за испирање и користите средство за испи‐
рање заједно са мулти таблетама.
Унутрашњост уређаја је мо‐
кра.
• Ово није квар уређаја. Узрок томе је влажност у вазду‐
ху која се кондензује на зидовима.
Необична пена током прања. • Користите искључиво детерџент за машину за прање
судова.
• Постоји цурење у дозатору за средство за испирање.
Контактирајте овлашћени сервисни центар.
Трагови рђе на прибору за је‐
ло.
• Превише је соли у води која се користи за прање. По‐
гледајте одељак „Омекшивач воде“.
• Сребрни прибор за јело и онај од нерђајућег челика су
стављени заједно. Избегавајте да предмете од сребра
и нерђајућег челика стављате једне поред других.
На крају програма у дозатору
има преосталог детерџента.
• Таблета детерџента се заглавила у дозатору и зато је
вода није потпуно испрала.
• Вода не може да испере детерџент из дозатора. Про‐
верите да ли је крак са млазницама блокиран или
зачепљен.
• Проверите да ли предмети у корпи не ометају отвара‐
ње поклопца дозатора детерџента.
Непријатни мириси унутар
уређаја.
• Погледајте одељак „Унутрашње чишћење“.
35

Проблем Могући узрок и решење
Наслаге каменца на посуђу,
на бубњу машине и на уну‐
трашњој страни врата.
• Ниво соли је низак, проверите индикатор за допуњава‐
ње.
• Поклопац посуде за со је лабав.
• Вода из водовода је тврда. Погледајте одељак „Омек‐
шивач воде“.
• Чак и ако користите мулти таблете, користите со и под‐
есите регенерацију омекшивача воде. Погледајте оде‐
љак „Омекшивач воде“.
• Ако се наслаге каменца и даље задрже, очистите уре‐
ђај средствима на чишћење која су посебно погодна за
ову намену.
• Покушајте да користите други детерџент.
• Обратите се произвођачу детерџента.
Посуђе без сјаја, промењене
боје или окрњено.
• Водите рачуна да у уређају перете само посуђе које је
безбедно за машинско прање.
• Пажљиво напуните и испразните корпу. Погледајте
брошуру о пуњењу корпе.
• Осетљиво посуђе ставите у горњу корпу.
Погледајте одељак „Пре прве
употребе“, „Свакодневна
употреба“ или „Напомене и
савети“ за друге могуће узроке.
НЕГА И ЧИШЋЕЊЕ
УПОЗОРЕЊЕ! Пре одржавања
уређаја, искључите га и извуците
утикач из зидне утичнице.
Прљави филтери и зачепљени
краци са млазницама утичу лоше
на резултате прања. Редовно их
проверавајте и, уколико је
потребно, очистите их.
ЧИШЋЕЊЕ ФИЛТЕРА
B
A
36

C
• Уверите се да нема остатака хране или прљавштине унутар или око ивица корита мотора.
• Вратите на место равни филтер (C). Уверите се да је исправно постављен унутар две
вођице.
• Монтирајте филтере (A) и (B).
• Вратите филтер (A) у равни филтер (C). Окрените га у смеру кретања казаљке на сату док не
кликне.
Неправилан положај филтера може да изазове лоше резултате прања, као и да
оштети уређај
ЧИШЋЕЊЕ КРАКА СА МЛАЗНИЦАМА
Не уклањајте краке са млазницама. Уколико
се отвори на крацима са млазницама запуше,
уклоните остатке прљавштине помоћу танког
шиљатог предмета.
СПОЉАШЊЕ ЧИШЋЕЊЕ
• Уређај чистите влажном, меком крпом.
• У ту сврху користите искључиво неутралне
детерџенте.
• Немојте да користите абразивне
производе, абразивне сунђере или
раствараче.
УНУТАРЊЕ ЧИШЋЕЊЕ
• Пажљиво чистите уређај, укључујући и
гумени заптивач врата, меком влажном
крпом.
• Уколико редовно користите програме који
кратко трају, унутар уређаја може доћи до
накупљања масноће и каменца. Да бисте
то спречили, препоручујемо вам да барем
2 пута месечно користите програм који дуго
траје.
• Да бисте одржали уређај у најбољој радној
форми, препоручујемо вам да једном
месечно употребите одређено средство за
чишћење машина за прање судова.
Пажљиво пратите упутства која се налазе
на паковању производа.
ТЕХНИЧКЕ ИНФОРМАЦИЈЕ
Димензије Тежина / висина / дубина
(мм)
600 / 850 / 625
Прикључивање струје
1)
Напон (V) 220 - 240
Фреквенција (Нz) 50
Притисак довода воде Мин./макс. полуга (MPa) 0.5 (0.05) / 8 (0.8)
Довод воде Хладна вода или топла во‐
да
2)
највише 60 °C
Капацитет Подешавања места 13
37

Потрошња електричне енер‐
гије
Режим „Оставити ук‐
ључено“ (W)
5.0
Потрошња електричне енер‐
гије
Режим „Искључено“ (W) 0.50
1) Погледајте плочицу са техничким карактеристикама за остале вредности.
2) Уколико топла вода долази из алтернативног извора енергије, (нпр. соларни панели, извори
који енергију производе помоћу ветра), користите топлу воду да бисте смањили потрошњу елек‐
тричне енергије.
ПЛОЧИЦА СА ТЕХНИЧКИМ
КАРАКТЕРИСТИКАМА
Mod. ... ... ...
Prod. No. ... ... ...
Ser. No. ...
ИНФОРМАЦИЈЕ ЗА ИНСТИТУТЕ ЗА
ТЕСТИРАЊЕ
За све потребне информације у вези са
учинком током тестирања, пошаљите мејл на:
Запишите број производа (PNC) који се налази
на плочици са техничким карактеристикама.
ЕКОЛОШКА ПИТАЊА
Рециклирајте материјале са симболом .
Паковање одложите у одговарајуће контејнере
ради рециклирања. Помозите у заштити
животне средине и људског здравља као и у
рециклирању отпадног материјала од
електронских и електричних уређаја. Уређаје
обележене симболом немојте бацати
заједно са смећем. Производ вратите у
локални центар за рециклирање или се
обратите општинској канцеларији.
38

INFORMACIÓN SOBRE SEGURIDAD
Antes de instalar y utilizar el aparato, lea atentamente las
instrucciones facilitadas. El fabricante no se hace responsable de
lesiones o daños producidos como resultado de una instalación o
un uso incorrectos: Conserve siempre estas instrucciones en
lugar seguro y accesible para futuras consultas.
SEGURIDAD DE NIÑOS Y PERSONAS VULNERABLES
• Este aparato puede ser utilizado por niños de 8 años en
adelante y personas cuyas capacidades físicas, sensoriales o
mentales estén disminuidas o que carezcan de la experiencia y
conocimientos suficientes para manejarlo, siempre que cuenten
con las instrucciones o la supervisión sobre el uso del
electrodoméstico de forma segura y comprendan los riesgos.
• No deje que los niños jueguen con el aparato.
• Mantenga los detergentes fuera del alcance de los niños.
• Mantenga a los niños y mascotas alejados del aparato cuando
la puerta se encuentre abierta.
• La limpieza y mantenimiento de usuario del aparato no podrán
ser realizados por niños sin supervisión.
SEGURIDAD GENERAL
• Este aparato está concebido para utilizarse en aplicaciones
domésticas y similares, tales como:
– granjas; áreas de cocina para el personal en tiendas, oficinas
y otros entornos de trabajo;
– por clientes en hoteles, moteles, pensiones y otros entornos
de tipo residencial.
• No cambie las especificaciones de este aparato.
• La presión de agua de funcionamiento (mínima y máxima) debe
estar entre 0.5 (0.05) / 8 (0.8) bares (MPa)
• Respete el máximo número de ajustes de lugar de 13 .
• Si el cable eléctrico sufre algún daño, el fabricante, su servicio
técnico autorizado o un profesional cualificado tendrán que
cambiarlo para evitar riesgos.
39

• Coloque los cubiertos en el cesto para cubiertos con el filo
hacia abajo o colóquelos en la bandeja de cubiertos en
posición horizontal con el filo hacia abajo.
• No deje el aparato con la puerta abierta para evitar tropezar
accidentalmente con ella.
• Antes de proceder con cualquier operación de mantenimiento,
apague el aparato y desconecte el enchufe de la red.
• No utilice pulverizadores de agua a alta presión ni vapor para
limpiar el aparato.
• Si el aparato tiene orificios de ventilación en la base, no deben
cubrirse, por ejemplo con una alfombra.
• El aparato debe conectarse a la toma de agua utilizando los
nuevos juegos de tubos suministrados. No se deben reutilizar
los juegos de tubos antiguos.
INSTRUCCIONES DE SEGURIDAD
INSTALACIÓN
• Retire todo el embalaje.
• No instale ni utilice un aparato dañado.
• No instale ni utilice el aparato en lugares con
temperaturas inferiores a 0 ºC.
• Siga las instrucciones de instalación
suministradas con el aparato.
CONEXIÓN ELÉCTRICA
ADVERTENCIA! Riesgo de incendios
y descargas eléctricas.
• El aparato debe conectarse a tierra.
• Asegúrese de que los parámetros de la placa
de características son compatibles con los
valores eléctricos del suministro eléctrico.
• Utilice siempre una toma con aislamiento de
conexión a tierra correctamente instalada.
• No utilice adaptadores de enchufes múltiples ni
cables prolongadores.
• Asegúrese de no provocar daños en el enchufe
ni en el cable de red. Si es necesario cambiar el
cable de alimentación del aparato, debe hacerlo
el centro de servicio técnico autorizado.
• Conecte el enchufe a la toma de corriente
únicamente cuando haya terminado la
instalación. Asegúrese de tener acceso al
enchufe del suministro de red una vez finalizada
la instalación.
• No desconecte el aparato tirando del cable de
conexión a la red. Tire siempre del enchufe.
• Este aparato cumple las directivas CEE.
• Sólo para el R.U. e Irlanda. El aparato tiene un
enchufe de 13 amp. Si es necesario cambiar el
fusible del enchufe de alimentación, utilice un
fusible: 13 amp ASTA (BS 1362).
CONEXIÓN DE AGUA
• No provoque daños en los tubos de agua.
• Antes de conectar a nuevas tuberías o tuberías
que no se hayan usado durante mucho tiempo,
o donde se hayan realizado trabajos o se hayan
conectado dispositivos nuevos (contadores de
agua, por ejemplo), deje correr el agua hasta
que esté limpia.
• Asegúrese de que no haya fugas de agua
visibles durante y después del primer uso del
aparato.
• Si la manguera de entrada de agua está
dañada, cierre la llave de agua y quite
inmediatamente el enchufe de la toma de
corriente. Póngase en contacto con el centro
servicio técnico autorizado para cambiar la
manguera de entrada de agua.
USO DEL APARATO
• No se siente ni se ponga de pie sobre la puerta
abierta.
• Los detergentes para lavavajillas son peligrosos.
Siga las instrucciones de seguridad del envase
de detergente.
40

• No beba agua procedente del aparato ni juegue
con ella.
• No retire la vajilla del aparato hasta que finalice
el programa. Puede quedar algo de detergente
en los platos.
• El aparato puede liberar vapor caliente si abre la
puerta durante un programa.
• No coloque productos inflamables ni objetos
mojados con productos inflamables dentro,
cerca o encima del aparato.
ASISTENCIA
• Póngase en contacto con el centro de servicio
técnico autorizado para reparar el aparato. Le
recomendamos que utilice solamente recambios
originales.
• Cuando se ponga en contacto con el servicio
técnico autorizado, tenga a mano la información
siguiente de la placa de características.
Modelo:
PNC (número de producto):
Número de serie:
DESECHO
ADVERTENCIA! Existe riesgo de
lesiones o asfixia.
• Desconecte el aparato de la red.
• Corte el cable de conexión a la red y deséchelo.
• Retire el pestillo de la puerta para evitar que los
niños y las mascotas queden encerrados en el
aparato.
41

INICIO FÁCIL
1 2 3
456
1
Indicador de encendido/apagado
2
Indicador de programa
3
Indicadores
4
Tecla de Inicio
5
Tecla de inicio diferido
6
Selector de programas
INDICADORES
Indicador de fin.
Indicador de sal. Siempre está apagado mientras el programa está en funcionamiento.
Indicador de abrillantador. Siempre está apagado mientras el programa está en funcio-
namiento.
42

PROGRAMAS
Programa
Grado de sucie-
dad
Tipo de carga
Fases del programa
Valores de consumo
1)
Duración
(min)
Energía
(kWh)
Agua
(l)
2)
Suciedad nor-
mal
Vajilla y cubier-
tos
• Prelavado
• Lavado a 50
ºC
• Aclarados
• Secado
222 1.039 11
Suciedad inten-
sa
Vajilla, cubier-
tos, cacerolas y
sartenes
• Prelavado
• Lavado a 70
ºC
• Aclarados
• Secado
155 -
170
1.5 - 1.7 14-15
Suciedad nor-
mal
Vajilla y cubier-
tos
• Prelavado
• Lavado a 65
ºC
• Aclarados
• Secado
130 -
140
1.4 - 1.6 15-17
3)
Suciedad re-
ciente
Vajilla y cubier-
tos
• Lavado a 60
°C o 65 °C
• Aclarados
30 0.8 10
4)
Todo • Prelavado 14 0.1 5
1) La presión y temperatura del agua, las variaciones del suministro de energía, las opciones y la cantidad
de platos pueden alterar los valores.
2) Con este programa se consigue el uso más eficaz del agua y consumo de energía para vajillas y cubier-
tos con suciedad normal. (Este es el programa estándar para institutos de pruebas.)
3) Con este programa puede lavar una carga con suciedad reciente. Ofrece buenos resultados de lavado
en poco tiempo.
4) Utilice este programa para aclarar rápidamente la vajilla y evitar que los restos de comida se peguen a
los platos y se formen olores en el aparato. No utilice detergente con este programa.
INFORMACIÓN PARA LOS INSTITUTOS DE
PRUEBAS
Para obtener toda la información necesaria para la
prueba de rendimiento, envíe un correo electrónico
a:
Anote el número de producto (PNC) que aparece
en la placa de características.
43

AJUSTES
AJUSTE DEL DESCALCIFICADOR DE AGUA
5x
6x
El indicador de programa debe estar en la posición .
1. Mantenga pulsado y gire al mismo tiempo el mando hacia la izquierda hasta que el indicador de
programa esté en la posición .
2. Suelte cuando y Delay empiecen a parpadear.
• El ajuste actual se indica mediante el número de parpadeos del indicador (ejemplo: 5
parpadeos + pausa + 5 parpadeos = nivel 5).
3. Pulse para cambiar el ajuste. Cada vez que pulsa la tecla de programa aumenta el número de nivel.
Después del nivel 10 se vuelve a empezar desde el nivel 1.
4. Gire el selector hasta para confirmar el ajuste.
TABLA DE DUREZA DEL AGUA
Grados alema-
nes
(°dH)
Grados franceses
(°fH)
mmol/l Grados Clarke
Nivel del descalci-
ficador del agua
47 -50 84 - 90 8.4 - 9.0 58 - 63 10
43 - 46 76 - 83 7.6 - 8.3 53 - 57 9
37 - 42 65 - 75 6.5 - 7.5 46 - 52 8
29 - 36 51 - 64 5.1 - 6.4 36 - 45 7
23 - 28 40 - 50 4.0 - 5.0 28 - 35 6
19 - 22 33 - 39 3.3 - 3.9 23 - 27
5
1)
15 - 18 26 - 32 2.6 - 3.2 18 - 22 4
44

Grados alema-
nes
(°dH)
Grados franceses
(°fH)
mmol/l Grados Clarke
Nivel del descalci-
ficador del agua
11 - 14 19 - 25 1.9 - 2.5 13 - 17 3
4 - 10 7 - 18 0.7 - 1.8 5 - 12 2
<4 <7 <0.7 < 5
1
2)
1) Ajuste de fábrica
2) No utilice sal en este nivel.
ACTIVACIÓN DE AIRDRY
AirDry mejora el resultado de secado con menos consumo de energía.
Por defecto, AirDry se activa con todos los programas excepto (en su caso) pero es posible
desactivarla.
Mientras se realiza la fase de secado, el dispositivo abre la puerta del aparato. La puerta se
mantiene entreabierta.
45

El indicador de programa debe estar en la posición .
1. Mantenga pulsado y gire al mismo tiempo el mando hacia la izquierda hasta que el indicador de
programa esté en la posición
.
2. Suelte cuando y Delay empiecen a parpadear.
3. Gire el selector hacia la izquierda hasta que el indicador de programa coincida con .
• El indicador encendido = AirDry se ha activado.
4. Pulse para cambiar el ajuste.
• El indicador apagado = AirDry se ha desactivado.
5. Gire el selector hasta para confirmar el ajuste.
PRECAUCIÓN! Si algún niño tiene acceso al aparato, se recomienda desactivar AirDry, ya
que la apertura de la puerta puede suponer un peligro.
ANTES DEL PRIMER USO
1. Asegúrese de que el nivel actual del
descalcificador coincide con la dureza de
su suministro de agua. De lo contrario,
ajuste el nivel del descalcificador de
agua.
2. Llene el depósito de sal.
3. Llene el dosificador de abrillantador.
4. Abra la llave de paso.
5. Inicie un programa para eliminar todos los
restos de procesamiento que pueda haber en
el aparato. No utilice detergente ni cargue los
cestos.
Después de iniciar un programa, el aparato puede
tardar hasta 5 minutos en recargar la resina del
descalcificador. Parece que el aparato no funciona.
La fase de lavado empieza solo después de que
termine este proceso. El proceso se repite
periódicamente.
ADICIÓN DE LA SAL
Antes del primer uso, vierta un litro de agua en el depósito de sal.
46

PRECAUCIÓN!
El agua y la sal pueden salirse del depósito de sal durante el llenado. Para evitar la corrosión, inicie un
programa inmediatamente después de llenar el depósito de sal.
AÑADIR ABRILLANTADOR
2
1
4
3
2
1
El abrillantador permite que la vajilla se seque sin rayas ni franjas. Se libera automáticamente durante la
fase de aclarado con agua caliente.
USO DIARIO
1. Abra la llave de paso.
2. Ajuste el programa correcto para el tipo de
carga y el grado de suciedad.
Asegúrese de que el aparato se encuentra en
modo de selección de Programa.
• Si el indicador de sal está encendido, llene
el depósito.
• Si el indicador de abrillantador está
encendido, llene el dosificador de
abrillantador.
3. Cargue los cestos.
4. Añada el detergente.
5. Inicie el programa.
ADICIÓN DEL DETERGENTE
2
1
2
0
3
0
A
B
Si el programa tiene una fase de prelavado, ponga también una pequeña cantidad de detergente en el
compartimento B.
47

ADICIÓN DE PASTILLAS MÚLTIPLES
2
1
2
0
3
0
• No llene el depósito de sal ni el dosificador de abrillantador.
• Ajuste el dosificador de abrillantador en la posición más baja.
MODO DE SELECCIÓN DE PROGRAMA
El aparato debe estar en modo de selección de programa para iniciar un programa. Si el panel de control
no muestra esta condición, pulse Reset.
Mantenga pulsadas simultáneamente Delay y
hasta que el aparato se encuentre en el modo de
selección de programa.
RESET
Con Reset puede cancelar el programa en ejecución o el inicio diferido. El aparato vuelve al modo de
selección de programa.
48

INICIO DE UN PROGRAMA
1. Abra el grifo del agua y cierre la puerta.
2. Seleccione un programa.
3. Pulse .
OPCIÓN DELAY
Con esta opción puede retrasar el inicio de un programa 3 horas.
1. Ajuste el programa.
2. Pulse
.
3. Pulse para iniciar la cuenta atrás.
El programa se pone en marcha cuando termina la cuenta atrás.
49

APERTURA DE LA PUERTA MIENTRAS ESTÁ
FUNCIONANDO EL APARATO
Si abre la puerta mientras se realiza un programa, el
aparato se detiene. Puede afectar al consumo de
energía y a la duración del programa. Cuando
cierre la puerta, el aparato continuará a partir del
punto de interrupción.
Si la puerta se abre más de 30
segundos durante la fase de secado,
el programa en funcionamiento se
termina. Esto no sucede si la puerta se
abre mediante la función AirDry.
No intente cerrar la puerta del aparato
durante 2 minutos después de que
AirDry la abra automáticamente,
porque puede causar daños en el
aparato.
Si, después, la puerta está cerrada
otros 3 minutos, el programa en curso
termina.
AL FINAL DEL PROGRAMA
5 min
Se enciende el indicador . Tras 5 minutos sin utilizarlo, el aparato entra en modo de espera y todos los
indicadores se apagan. El consumo de energía se reduce.
1. Gire el selector hasta .
2. Cierre el grifo.
CONSEJOS
GENERAL
Los consejos siguientes le aseguran un resultado
de limpieza de secado óptimo en el uso diario y
también le ayudan a proteger el medio ambiente.
• Tire los residuos de alimentos de mayor tamaño
de los platos a la basura.
• No enjuague los platos a mano. Si es necesario,
utilice el programa de prelavado (en su caso) o
seleccione un programa con fase de prelavado.
• Aproveche siempre todo el espacio de los
cestos
• Al cargar el aparato, asegúrese de que los
platos quedan totalmente al alcance de las
boquillas del brazo aspersor para lavarse con el
agua que expulsan. Asegúrese de que los
objetos no se tocan entre sí ni se cubren unos a
otros.
• Puede utilizar detergente para lavavajillas,
abrillantador y sal por separado o pastillas
múltiples (p. ej. ''3en1'', ''4en1'', ''Todo en 1'').
Siga las instrucciones que aparecen en el
envoltorio.
• Seleccione el programa según el tipo de carga
y el grado de suciedad. Con el programa ECO
se consigue el uso más eficaz del agua y
50

consumo de energía para vajillas y cubiertos
con suciedad normal.
DESCALCIFICADOR DE AGUA
El descalcificador elimina minerales del suministro
de agua, ya que podrían afectar o deteriorar el
funcionamiento del aparato.
Cuanto mayor sea el contenido de dichos
minerales, más dura será el agua La dureza del
agua se mide en escalas equivalentes.
El descalcificador de agua debe ajustarse en
función de la dureza que presente el agua de su
zona. La empresa local de suministro de agua
puede indicarle el grado de dureza de la misma Es
muy importante ajustar el nivel de descalcificador
para obtener un buen resultado de lavado.
UTILIZACIÓN DE SAL, ABRILLANTADOR Y
DETERGENTE
• Utilice únicamente sal, abrillantador y
detergente para el lavavajillas. El aparato podría
dañarse con otros productos.
• En las zonas con agua dura y muy dura, se
recomienda usar solo detergente para
lavavajillas (polvo, gel, pastillas que no
contengan agentes adicionales), abrillantador y
sal por separado para unos resultados de
limpieza y secado óptimos.
• Al menos una vez al mes, realice un ciclo con un
limpiador de aparatos domésticos,
especialmente apropiados para este fin.
• Las pastillas de detergente no se disuelven
completamente con programas cortos. Para
evitar restos de detergente en la vajilla, se
recomienda usar pastillas de detergente con los
programas largos.
• No utilice más cantidad de detergente de la
recomendada. Consulte las instrucciones del
envase del detergente.
QUÉ HACER SI DESEA DEJAR DE USAR
PASTILLAS MÚLTIPLES
Antes de volver a utilizar por separado detergente,
sal y abrillantador, realice el procedimiento
siguiente.
1. Ajuste el nivel más alto de descalcificador.
2. Asegúrese de llenar el depósito de sal y
abrillantador.
3. Inicie el programa más corto con una fase de
aclarado. No añada detergente ni cargue los
cestos.
4. Cuando termine el programa, ajuste el
descalcificador según la dureza del agua de su
zona.
5. Ajuste la cantidad de abrillantador.
CARGA DE LOS CESTOS
• Utilice el aparato exclusivamente para lavar
utensilios aptos para lavavajillas.
• No coloque en el aparato utensilios de madera,
cuerno, aluminio, peltre o cobre.
• No coloque en el aparato objetos que puedan
absorber agua (esponjas, paños de limpieza,
etc.).
• Elimine los restos de comida de los platos.
• Ablande los restos de comida adheridos a la
vajilla.
• Coloque los objetos huecos (por ejemplo, tazas,
vasos, cazuelas) boca abajo.
• Asegúrese de que los cubiertos y los platos no
se adhieran entre sí. Mezcle las cucharas con
otros cubiertos.
• Asegúrese de que los vasos no chocan entre sí
• Coloque los objetos pequeños en el cesto de
cubiertos.
• Coloque los objetos ligeros en el cesto
superior. Asegúrese de que los objetos no se
mueven.
• Antes de iniciar un programa, compruebe que el
brazo aspersor gira sin obstrucción.
ANTES DEL INICIO DE UN PROGRAMA
Compruebe que:
• Los filtros están limpios y bien instalados.
• La tapa del depósito de sal está apretada.
• Los brazos aspersores no están obstruidos.
• Hay abrillantador y sal para lavavajillas (a menos
que utilice pastillas múltiples).
• La posición de los objetos en los cestos es
correcta.
• El programa es adecuado para el tipo de carga
y el grado de suciedad.
• Se utiliza la cantidad correcta de detergente.
DESCARGA DE LOS CESTOS
1. Deje enfriar la vajilla y cristalería antes de
retirarla del aparato. Los artículos calientes son
sensibles a los golpes.
2. Vacíe primero el cesto inferior y a continuación
el superior.
Al final del programa puede haber
restos de agua en los laterales y en la
puerta del aparato.
51

SOLUCIÓN DE PROBLEMAS
Si el aparato no se pone en marcha o se detiene
durante el funcionamiento, antes de ponerse en
contacto con el servicio técnico compruebe si
puede resolver el problema con ayuda de la
información de la tabla.
ADVERTENCIA! Las reparaciones
incorrectas pueden acarrar riesgos
graves para la seguridad del usuario.
Todas las reparaciones debe llevarlas
a cabo personal cualificado.
Con algunos problemas, el indicador de fin
parpadea para mostrar un fallo.
La mayoría de los problemas que pueden
surgir se resuelven sin necesidad de ponerse
en contacto con el Centro de servicio
técnico.
Problema y código de alarma Causa y soluciones posibles
No se puede encender el aparato. • Asegúrese de que el enchufe esté conectado a la
toma de corriente.
• Asegúrese de que no hay ningún fusible dañado en
la caja de fusibles.
El programa no se pone en marcha. • Asegúrese de que la puerta del aparato esté cerra-
da.
• Pulse .
• Si se ha ajustado el inicio diferido, cancele el ajuste
o espere hasta el final de la cuenta atrás.
• El aparato ha iniciado el proceso de recarga de resi-
na dentro del descalcificador de agua. La duración
total del proceso es de aproximadamente 5 minutos.
El aparato no carga agua.
• El indicador de fin parpadea 1 vez de
forma intermitente.
• El indicador parpadea continua-
mente.
• Compruebe que el grifo esté abierto.
• Asegúrese de que la presión del agua no sea dema-
siado baja. Solicite información a la compañía local
de suministro de agua.
• Compruebe que el grifo no esté obstruido.
• Asegúrese de que el filtro de la manguera de entra-
da no está obstruido.
• Asegúrese de que la manguera de entrada no esté
doblada ni retorcida.
El aparato no desagua.
• El indicador de finalización parpadea 2
veces de forma intermitente.
• El indicador parpadea continua-
mente.
• Compruebe que el desagüe no esté obstruido.
• Asegúrese de que el tubo de desagüe no esté do-
blado ni retorcido.
El dispositivo contra inundación se ha
puesto en marcha.
• El indicador de finalización parpadea 3
veces de forma intermitente.
• El indicador parpadea continua-
mente.
• Cierre el grifo y póngase en contacto con el Centro
de servicio técnico.
52

Problema y código de alarma Causa y soluciones posibles
El aparato se detiene y se pone en mar-
cha más veces durante el funcionamiento.
• Esto es correcto. Proporciona resultados de limpie-
za óptimos y ahorra energía.
El programa dura demasiado. • Si se ha ajustado la opción de inicio diferido, cance-
le el retardo o espere hasta el final de la cuenta
atrás.
Pequeña fuga en la puerta del aparato. • El aparato no está nivelado. Afloje o apriete las pa-
tas ajustables (en su caso).
• La puerta del aparato no está centrada en la cuba.
Ajuste la pata trasera (en su caso).
Cuesta cerrar la puerta del aparato. • El aparato no está nivelado. Afloje o apriete las pa-
tas ajustables (en su caso).
• Hay partes de la vajilla que sobresalen de los ces-
tos.
Sonidos de traqueteo o golpeteo dentro
del aparato.
• La vajilla no está colocada correctamente en los
cestos. Consulte el folleto sobre carga del cesto.
• Asegúrese de que los brazos aspersores pueden
rotar libremente.
El aparato dispara el disyuntor. • No hay amperaje suficiente para todos los aparatos
que están en funcionamiento. Compruebe el ampe-
raje de la caja de enchufe y la capacidad del medi-
dor o apague alguno de los aparatos que esté usan-
do.
• Fallo eléctrico interno del aparato. Póngase en con-
tacto con un servicio técnico autorizado.
Consulte otras posibles causas en
"Antes del primer uso", "Uso
diario" o "Consejos".
Después de comprobar el aparato, pulse . Si el
problema se vuelve a producir, póngase en
contacto con un Centro de servicio técnico.
Para los códigos de alarma no descritos en la tabla,
póngase en contacto con un Centro de servicio
técnico.
LOS RESULTADOS DEL LAVADO Y EL SECADO NO SON SATISFACTORIOS
Problema Causa y soluciones posibles
Mal resultado de lavado. • Consulte "Uso diario", "Consejos" y el folleto sobre cómo
cargar el cesto.
• Utilice programas de lavado más intensos.
• Limpie las boquillas del brazo aspersor y el filtro. Consulte
"Mantenimiento y limpieza".
53

Problema Causa y soluciones posibles
Malos resultados de secado. • Se ha dejado la vajilla demasiado tiempo dentro del aparato
cerrado.
• No hay abrillantador o la dosificación del abrillantador es in-
suficiente. Ajuste el dosificador de abrillantador en un nivel
más alto.
• Los objetos de plástico deben secarse con un paño.
• Para obtener el mejor rendimiento de secado, active AirDry.
• Recomendamos que siempre utilice abrillantador, incluso en
combinación con tabletas múltiples.
Hay rayas o películas azuladas
en vasos y platos.
• La dosificación del abrillantador es demasiado alta. Ajuste
más bajo el nivel de abrillantador.
• La cantidad de detergente es demasiada.
Hay manchas y gotas de agua en
vajilla y cristalería.
• La dosificación del abrillantador es insuficiente. Ajuste más
alto el nivel de abrillantador.
• La calidad del abrillantador podría ser la causa.
La vajilla está mojada. • Para obtener el mejor rendimiento de secado, active AirDry.
• El programa no tiene una fase de secado o la tiene con una
temperatura baja.
• El dosificador de abrillantador está vacío.
• La calidad del abrillantador podría ser la causa.
• La calidad de las tabletas de detergente podría ser la causa.
Pruebe con una marca diferente o active el dosificador del
abrillantador y utilice éste junto con las tabletas de detergen-
te.
El interior del aparato está moja-
do.
• Esto no es un defecto del aparato, se debe a que la hume-
dad del aire se condensa en las paredes.
Espuma inusual durante el lava-
do.
• Utilice solo detergentes adecuados para lavavajillas.
• Hay una fuga en el dosificador de abrillantador. Póngase en
contacto con un servicio técnico autorizado.
Rastros de óxido en los cubier-
tos.
• Hay demasiada sal en el agua de lavado. Consulte "El des-
calcificador de agua".
• Se han mezclado cubiertos de plata y acero inoxidable. No
ponga juntos los cubiertos de plata y acero inoxidable.
Quedan restos de detergente en
el dosificador al final del progra-
ma.
• La pastilla de detergente se ha quedado pegada en el dosifi-
cador y no se ha disuelto totalmente en el agua.
• El agua no puede disolver el detergente que hay en el dosifi-
cador. Compruebe que el brazo aspersor superior no esté
bloqueado o atascado.
• Asegúrese de que los objetos de los cestos no impiden que
se abra la tapa del dosificador de detergente.
Olores en el interior del aparato. • Consulte "Limpieza interna".
54

Problema Causa y soluciones posibles
Depósitos calcáreos en la vajilla,
la cuba y el interior de la puerta.
• El nivel de sal es bajo, consulte el indicador de rellenado.
• La tapa del depósito de sal está suelta.
• El agua del grifo es dura. Consulte "El descalcificador de
agua".
• Aunque emplee pastillas múltiples, use sal y ajuste la regene-
ración del descalcificador de agua. Consulte "El descalcifi-
cador de agua".
• Si sigue habiendo depósitos de cal, utilice limpiadores para
aparatos domésticos, que son especialmente apropiados pa-
ra este fin.
• Pruebe con otro detergente.
• Contacte con el fabricante del detergente.
Vajilla mate, descolorida o agrie-
tada.
• Asegúrese de lavar en el aparato únicamente objetos aptos
para lavavajillas.
• Cargue y descargue con cuidado el cesto. Consulte el folleto
sobre carga del cesto.
• Coloque los objetos delicados en el cesto superior.
Consulte otras posibles causas en
"Antes del primer uso", "Uso
diario" o "Consejos".
MANTENIMIENTO Y LIMPIEZA
ADVERTENCIA! Antes de proceder
con el mantenimiento, apague el
aparato y desconecte el enchufe de la
red.
Los filtros sucios y los brazos
aspersores obstruidos reducen la
calidad del lavado. Revíselos
periódicamente y, si es necesario,
límpielos.
LIMPIEZA DE LOS FILTROS
B
A
55

C
• Asegúrese de que no haya restos de comida ni suciedad alrededor del borde del sumidero.
• Vuelva a colocar el filtro plano (C). Asegúrese de que esté bien colocado bajo las 2 guías.
• Vuelva a montar los filtros (A) y (B).
• Vuelva a colocar el filtro (A) en el filtro plano (C). Gírelo hacia la derecha hasta que encaje.
Una posición incorrecta de los filtros puede dañar el aparato y provocar resultados de lavado
no satisfactorios.
LIMPIEZA DE LOS BRAZOS ASPERSORES
No retire los brazos aspersores. Si los orificios de
los brazos aspersores se taponan, retire la
suciedad restante con un objeto afilado.
LIMPIEZA DEL EXTERIOR
• Limpie el aparato con un paño suave
humedecido.
• Utilice solo detergentes neutros.
• No utilice productos abrasivos, estropajos duros
ni disolventes.
LIMPIEZA DEL INTERIOR
• Limpie cuidadosamente el aparato, incluida la
junta de goma de la puerta, con un paño
húmedo.
• Si normalmente utiliza programas de corta
duración, estos pueden dejar depósitos de
grasa y sarro en el interior del aparato. Para
evitarlo, se recomienda utilizar programas de
larga duración al menos dos veces al mes.
• Para mantener el funcionamiento óptimo del
aparato, se recomienda utilizar un producto
específico de limpieza mensual para lavavajillas.
Siga atentamente las instrucciones del envase
del producto.
INFORMACIÓN TÉCNICA
Medidas Ancho / alto / fondo (mm) 600 / 850 / 625
Conexión eléctrica
1) Voltaje (V) 220 - 240
Frecuencia (Hz) 50
Presión del suministro de agua Mín. / máx. bares (MPa) 0.5 (0.05) / 8 (0.8)
Suministro de agua
Agua fría o caliente
2) máx. 60 °C
Capacidad Cubiertos 13
Consumo de potencia Modo encendido (W) 5.0
Consumo de potencia Modo apagado (W) 0.50
1) Consulte los demás valores en la placa de características.
2) Si el agua caliente procede de una fuente de energía alternativa (por ejemplo, paneles solares, energía
eólica), utilice la toma de agua caliente para reducir el consumo de energía.
56

PLACA DE CARACTERÍSTICAS
Mod. ... ... ...
Prod. No. ... ... ...
Ser. No. ...
INFORMACIÓN PARA LOS INSTITUTOS DE
PRUEBAS
Para obtener toda la información necesaria para la
prueba de rendimiento, envíe un correo electrónico
a:
Anote el número de producto (PNC) que aparece
en la placa de características.
ASPECTOS MEDIOAMBIENTALES
Recicle los materiales con el símbolo . Coloque
el material de embalaje en los contenedores
adecuados para su reciclaje. Ayude a proteger el
medio ambiente y la salud pública, así como a
reciclar residuos de aparatos eléctricos y
electrónicos. No deseche los aparatos marcados
con el símbolo junto con los residuos
domésticos. Lleve el producto a su centro de
reciclaje local o póngase en contacto con su
oficina municipal.
57
*

58

59

WWW.ZANUSSI.COM/SHOP
156912961-A-392017
-
 1
1
-
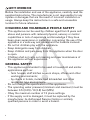 2
2
-
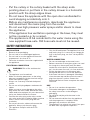 3
3
-
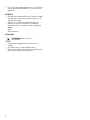 4
4
-
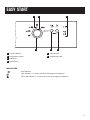 5
5
-
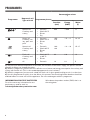 6
6
-
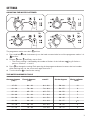 7
7
-
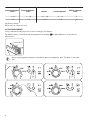 8
8
-
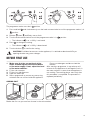 9
9
-
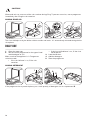 10
10
-
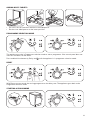 11
11
-
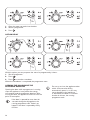 12
12
-
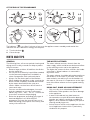 13
13
-
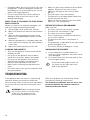 14
14
-
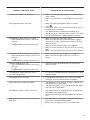 15
15
-
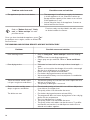 16
16
-
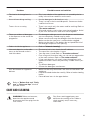 17
17
-
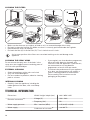 18
18
-
 19
19
-
 20
20
-
 21
21
-
 22
22
-
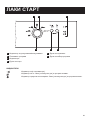 23
23
-
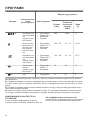 24
24
-
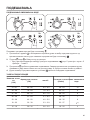 25
25
-
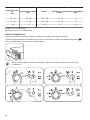 26
26
-
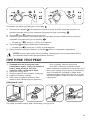 27
27
-
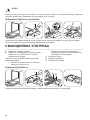 28
28
-
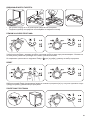 29
29
-
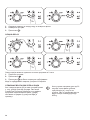 30
30
-
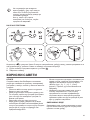 31
31
-
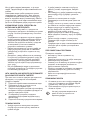 32
32
-
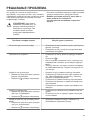 33
33
-
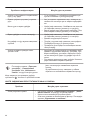 34
34
-
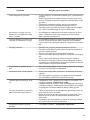 35
35
-
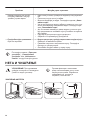 36
36
-
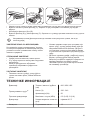 37
37
-
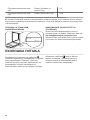 38
38
-
 39
39
-
 40
40
-
 41
41
-
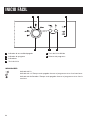 42
42
-
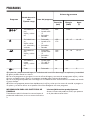 43
43
-
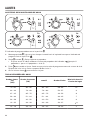 44
44
-
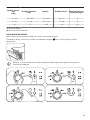 45
45
-
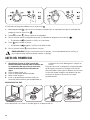 46
46
-
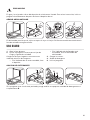 47
47
-
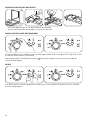 48
48
-
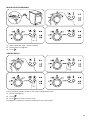 49
49
-
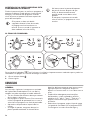 50
50
-
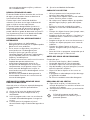 51
51
-
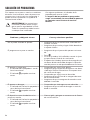 52
52
-
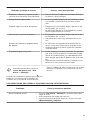 53
53
-
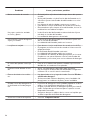 54
54
-
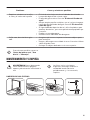 55
55
-
 56
56
-
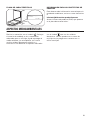 57
57
-
 58
58
-
 59
59
-
 60
60


Zanussi ZDF22002XA Manual de usuario
- Categoría
- Lavaplatos
- Tipo
- Manual de usuario
en otros idiomas
- English: Zanussi ZDF22002XA User manual