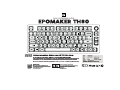
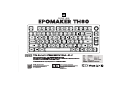
EPOMAKER TH80 Wired Mechanical Gaming Keyboard Guía del usuario
- Tipo
- Guía del usuario


TECHNICAL ASSISTANCE
REPLACING KEYCAPS AND SWITCHES
For technical assistance, please email to
support@epomaker.com with your purchase
order number and a detailed description of
your issue.
We normally respond to enquiries within 24 hours.
WARRANTY
EPOMAKER’s Warranty covers any factory defects that might
affect the proper functionality of your purchase. It doesn’t
cover any damage that may occur from normal wear and tear.
If your product is defective we will send you a replacement
unit. Replacement units might require you to send the
defective unit back to Epomaker.
We provide a 1 year warranty for our products when bought
from our website (EPOMAKER.com). Your item will not be
covered by your 1 year warranty if the inspection shows any
sign of modification or changes unsupported by the original
product, these include: Changing internal components,
Assembling and reassembling the product, Replacing
Batteries, etc.
We will ONLY cover the item if it is bought from our official
stores. You do not have a warranty with us if you bought the
item from another reseller or likewise. Please contact the store
that you bought your product from to resolve issues.
COMMUNITY FORUMS
https://discord.gg/2q3Z7C2
Join our community and learn together with
other keyboard enthusiasts.
EN
https://www.reddit.com/user/epomaker/
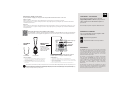
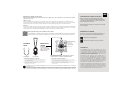
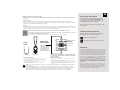
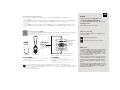
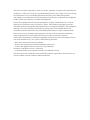
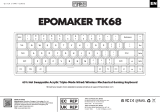
North-facing Logo
Switch Shaft
The Switch Puller tool aligns Vertically to the Switch to
unclip the plastic securing the switch to the plate.
Example of a switch
as seen from top
after you remove the
keycap to prepare for
switch removal.
Mechanical
Switch
Switch Puller Keycap Puller
For a full guide on how to remove keycaps and switches scan the QR Code or type in your browser:
https://epomaker.com/blogs/guides/diy-guide-how-to-remove-and-replace-your-mechanical-keyboard-switches
Included
Tools
1. Grab your Switch Removal Tool and align the gripping teeth vertically (on the
Y-Axis) at the center of the switch, as shown in the example graphic above.
2. Grab the switch with the Switch Puller and apply pressure until the switch
releases itself from the plate.
3. Using firm but gentle force pull the switch away from the keyboard using a
vertical motion.
Remove Switches
1. Check that all the switch metallic pins are perfectly straight and clean.
2. Align the switch vertically to have the Gateron logo facing north. The pins should align
themselves to the keyboard PBC.
3. Press the switch down until you hear a click. This means your switch clips have attached
themselves to the keyboard plate.
4. Inspect the switch to ensure it’s properly attached to your keyboard, and test it.
Install Switches
Note: If the key doesn’t work its possible you may have bent one of the switches while installing it. Pull the switch out and repeat the process.
Pins may be damaged beyond repair and need replacement if this process is not done correctly. Never apply excessive force when replacing
keycaps or switches. If you cannot remove or install keycaps or switches please contact customer service as soon as possible to avoid
damage to the keyboard due to operating errors.
KEYBOARD WAKE UP/SLEEP
• If your keyboard is sleeping press any key to wake it up, it will remember the last device connected.
• Wireless 2.4GHz
When you turn your keyboard on a green light will show to tell you wireless has properly connected.
If the keyboard shows no signs of working in your device try pairing it again by repeating the steps indicated in the Wireless
2.4GHz Pairing Instructions.
• Bluetooth
When you turn your keyboard on a blue light will show to tell you bluetooth has properly connected to the last device (1 2 or 3).
If the keyboard shows no signs of working in your device try pairing it again by repeating the steps indicated in the Bluetooth
Pairing Instructions.


TECHNISCHE UNTERSTÜTZUNG
REPLACING KEYCAPS AND SWITCHES
Wenn Sie technische Unterstützung benötigen,
senden Sie bitte eine E-Mail an support@epomaker.
com mit Ihrer Bestellnummer und einer detaillierten
Beschreibung Ihres Problems.
Wir beantworten Anfragen normalerweise innerhalb
von 24 Stunden.
GARANTIE
Die EPOMAKER-Garantie deckt alle Werksfehler ab, die die
ordnungsgemäße Funktion Ihres Produkts beeinträchtigen könnten.
Sie deckt keine Schäden ab, die durch normalen Verschleiß
entstehen können. Wenn Ihr Produkt defekt ist, schicken wir Ihnen
ein Ersatzgerät. Für ein Ersatzgerät müssen Sie das defekte Gerät
möglicherweise an Epomaker zurückschicken.
Wir gewähren 1 Jahr Garantie auf unsere Produkte, wenn sie
über unsere Website (EPOMAKER.com) gekauft wurden. Die
1-Jahres-Garantie für Ihr Produkt erlischt, wenn bei der Inspektion
Anzeichen für Modifikationen oder Änderungen festgestellt
werden, die nicht durch das Originalprodukt unterstützt werden, z.
B: Austausch interner Komponenten, Zusammenbau und erneuter
Zusammenbau des Produkts, Austausch von Batterien usw.
Wir übernehmen NUR die Kosten für den Artikel, wenn er in unseren
offiziellen Geschäften gekauft wurde. Sie haben keine Garantie bei
uns, wenn Sie den Artikel bei einem anderen Wiederverkäufer oder
ähnlichem gekauft haben. Bitte wenden Sie sich an das Geschäft, in
dem Sie Ihr Produkt gekauft haben, um Probleme zu lösen.
COMMUNITY-FOREN
https://discord.gg/2q3Z7C2
Treten Sie unserer Gemeinschaft bei und lernen Sie
gemeinsam mit anderen Keyboard-Enthusiasten.
DE
https://www.reddit.com/user/epomaker/
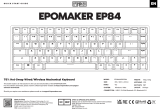
North-facing Logo
Switch Shaft
The Switch Puller tool aligns Vertically to the Switch to
unclip the plastic securing the switch to the plate.
Example of a switch
as seen from top
after you remove the
keycap to prepare for
switch removal.
Mechanical
Switch
Switch Puller Keycap Puller
For a full guide on how to remove keycaps and switches scan the QR Code or type in your browser:
https://epomaker.com/blogs/guides/diy-guide-how-to-remove-and-replace-your-mechanical-keyboard-switches
Included
Tools
1. Pak uw schakelaarverwijderingsgereedschap en lijn de grijptanden verticaal
(op de Y-as) uit op het midden van de schakelaar, zoals weergegeven in de
voorbeeldafbeelding hierboven.
2. Pak de schakelaar vast met de schakelaar-trekker en oefen druk uit totdat de
schakelaar zichzelf losmaakt van de plaat.
3. Trek de schakelaar met een stevige maar zachte kracht met een verticale
beweging weg van het toetsenbord.
Toetsenbordschakelaars verwijderen
1. Controleer of alle metalen pinnen van de schakelaar perfect recht en schoon zijn.
2. Lijn de schakelaar verticaal uit, zodat het Gateron-logo naar het noorden wijst. De pinnen
moeten op één lijn staan met de PBC van het toetsenbord.
3. Druk de schakelaar omlaag tot u een klik hoort. Dit betekent dat de clips van de
schakelaar zich aan de toetsenbordplaat hebben bevestigd.
4. Controleer de schakelaar om er zeker van te zijn dat hij goed aan uw toetsenbord is
bevestigd en test hem.
Toetsenbordschakelaars installeren
Opmerking: Als de sleutel niet werkt, is het mogelijk dat u een van de schakelaars verbogen hebt tijdens de installatie. Trek de schakelaar eruit
en herhaal het proces.
Als dit proces niet correct wordt uitgevoerd, kunnen de pennen onherstelbaar beschadigd raken en moeten ze worden vervangen. Oefen nooit
overmatige kracht uit bij het vervangen van toetskapjes of schakelaars. Als u de toetskapjes of schakelaars niet kunt verwijderen of installeren,
neem dan zo snel mogelijk contact op met de klantenservice om schade aan het toetsenbord als gevolg van bedieningsfouten te voorkomen.
KEYBOARD WAKE UP/SLEEP
• Wenn Ihre Tastatur im Ruhezustand ist, drücken Sie eine beliebige Taste, um sie aufzuwecken. Sie merkt sich das zuletzt
angeschlossene Gerät.
• Wireless 2.4GHz
Wenn Sie Ihre Tastatur einschalten, leuchtet ein grünes Licht auf, um anzuzeigen, dass die drahtlose Verbindung korrekt
hergestellt wurde. Wenn die Tastatur keine Anzeichen zeigt, dass sie mit Ihrem Gerät funktioniert, versuchen Sie, sie erneut zu
koppeln, indem Sie die in den Anweisungen für die kabellose 2,4-GHz-Kopplung angegebenen Schritte wiederholen.
• Bluetooth
Wenn Sie die Tastatur einschalten, leuchtet ein blaues Licht auf, um anzuzeigen, dass die Bluetooth-Verbindung mit dem letzten
Gerät (1, 2 oder 3) korrekt hergestellt wurde. Wenn die Tastatur nicht mit Ihrem Gerät funktioniert, versuchen Sie, sie erneut zu
koppeln, indem Sie die in den Bluetooth-Kopplungsanweisungen angegebenen Schritte wiederholen.


SOPORTE TÉCNICO
REEMPLAZAR TECLAS Y SWITCHES
Para obtener asistencia técnica, envíe un
correo electrónico a support@epomaker.com
con su número de pedido y una descripción
detallada de su problema.
Normalmente respondemos a las consultas en menos de
24 horas.
GARANTÍA
La garantía de EPOMAKER cubre cualquier defecto de fábrica
que pueda afectar al correcto funcionamiento de su compra. No
cubre ningún daño que pueda ocurrir por el desgaste normal. Si su
producto es defectuoso, le enviaremos una unidad de reemplazo.
Las unidades de reemplazo pueden requerir que usted envíe la
unidad defectuosa de vuelta a Epomaker.
Ofrecemos una garantía de 1 año para nuestros productos cuando
se compran en nuestra página web (EPOMAKER.com). Su artículo
no estará cubierto por su garantía de 1 año si la inspección muestra
cualquier signo de modificación o cambios no soportados por el
producto original, estos incluyen: Cambio de componentes internos,
Montaje y remontaje del producto, Sustitución de baterías, etc.
SÓLO cubriremos el artículo si es comprado en nuestras tiendas
oficiales. Usted no tiene una garantía con nosotros si usted compró
el artículo de otro revendedor o de la misma manera. Por favor,
póngase en contacto con la tienda en la que compró el producto
para resolver los problemas.
COMUNIDAD
https://discord.gg/2q3Z7C2
Únase a nuestra comunidad y aprenda junto
a otros entusiastas del teclado.
ES
https://www.reddit.com/user/epomaker/
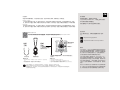
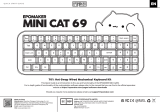
North-facing Logo
Switch Shaft
La herramienta de extracción de interruptores se alinea
verticalmente con el interruptor para soltar el plástico que
asegura el interruptor a la placa.
Ejemplo de un
interruptor visto
desde arriba después
de quitar la tecla para
preparar la extracción
del interruptor.
Interruptor
Mecánico
Switch Puller Keycap Puller
Para una guía completa sobre cómo quitar las tapas de las teclas y los interruptores, escanee el
código QR o escriba en su navegador:
https://epomaker.com/blogs/guides/diy-guide-how-to-remove-and-replace-your-mechanical-keyboard-switches
Herramientas
Incluidas
1. Agarre su Herramienta de Extracción de Interruptores y alinee los dientes de
agarre verticalmente (en el eje Y) en el centro del interruptor, como se muestra en
el ejemplo del gráfico anterior.
2. Agarre el interruptor con el extractor de interruptores y aplique presión hasta que
el interruptor se libere de la placa.
3. Utilizando una fuerza firme pero suave, tire del interruptor para separarlo del
teclado con un movimiento vertical.
Quitar Interruptor
1. Compruebe que todas las clavijas metálicas del interruptor están perfectamente rectas
y limpias.
2. Alinee el interruptor verticalmente para que el logotipo de Gateron esté orientado hacia el
norte. Los pines deben alinearse con el PBC del teclado.
3. Presione el interruptor hacia abajo hasta que oiga un clic. Esto significa que los clips del
interruptor se han unido a la placa del teclado.
4. Inspeccione el interruptor para asegurarse de que está bien unido a su teclado, y
pruébelo.
Instalar Interruptor
Note: If the key doesn’t work its possible you may have bent one of the switches while installing it. Pull the switch out and repeat the process.
Pins may be damaged beyond repair and need replacement if this process is not done correctly. Never apply excessive force when replacing
keycaps or switches. If you cannot remove or install keycaps or switches please contact customer service as soon as possible to avoid
damage to the keyboard due to operating errors.
DESPERTAR EL TECLADO
• Si tu teclado está en reposo pulsa cualquier tecla para despertarlo, recordará el último dispositivo conectado.
• Wireless 2.4GHz
Cuando encienda el teclado, una luz verde le indicará que la conexión inalámbrica se ha realizado correctamente. Si el
teclado no muestra signos de funcionar en su dispositivo, intente emparejarlo de nuevo repitiendo los pasos indicados en las
instrucciones de emparejamiento inalámbrico de 2,4 GHz.
• Bluetooth
Al encender el teclado se mostrará una luz azul que le indicará que el bluetooth se ha conectado correctamente al último
dispositivo (1 2 o 3). Si el teclado no muestra signos de funcionar en su dispositivo intente emparejarlo de nuevo repitiendo los
pasos indicados en las instrucciones de emparejamiento Bluetooth.


ASSISTANCE TECHNIQUE
REMPLACEMENT DES CAPUCHONS DE TOUCHES ET DES INTERRUPTEURS
Pour obtenir une assistance technique, veuillez
envoyer un courriel à support@epomaker.com
en indiquant votre numéro de commande et une
description détaillée de votre problème.
Nous répondons normalement aux demandes dans
les 24 heures.
GARANTIE
La garantie d’EPOMAKER couvre tous les défauts d’usine qui
pourraient affecter le bon fonctionnement de votre achat. Elle
ne couvre pas les dommages qui pourraient résulter d’une usure
normale. Si votre produit est défectueux, nous vous enverrons
une unité de remplacement. Les unités de remplacement peuvent
nécessiter que vous renvoyiez l’unité défectueuse à Epomaker.
Nous offrons une garantie d’un an pour nos produits achetés
sur notre site Internet (EPOMAKER.com). Votre article ne sera
pas couvert par la garantie d’un an si l’inspection montre tout
signe de modification ou de changement non pris en charge par
le produit d’origine : Le changement de composants internes,
l’assemblage et le réassemblage du produit, le remplacement
des piles, etc.
Nous ne couvrirons l’article que s’il a été acheté dans nos
magasins officiels. Vous ne bénéficiez pas de notre garantie si
vous avez acheté l’article auprès d’un autre revendeur ou de
la même manière. Veuillez contacter le magasin où vous avez
acheté votre produit pour résoudre les problèmes.
FORUMS COMMUNAUTAIRES
https://discord.gg/2q3Z7C2
Rejoignez notre communauté et apprenez
avec d’autres passionnés de clavier.
FR
https://www.reddit.com/user/epomaker/
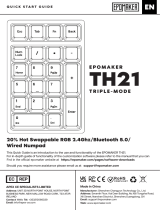
North-facing Logo
Switch Shaft
L’outil d’extraction de l’interrupteur s’aligne verticalement
sur l’interrupteur pour déclipser le plastique qui fixe l’inter-
rupteur à la plaque.
Exemple d’un commu-
tateur vu du dessus
après avoir retiré le
capuchon de touche
pour préparer le re-
trait du commutateur.
Mécanique
Interrupteur
Switch Puller Keycap Puller
Pour un guide complet sur la façon de retirer les capuchons de clavier et les interrupteurs, scannez
le code QR ou tapez dans votre navigateur :
https://epomaker.com/blogs/guides/diy-guide-how-to-remove-and-replace-your-mechanical-keyboard-switches
Inclus
Outils
1. Saisissez votre outil d’extraction d’interrupteur et alignez les dents de préhension
verticalement (sur l’axe Y) au centre de l’interrupteur, comme indiqué dans
l’exemple de graphique ci-dessus.
2. Saisissez l’interrupteur avec l’extracteur d’interrupteur et exercez une pression
jusqu’à ce que l’interrupteur se détache de la plaque.
3. En utilisant une force ferme mais douce, éloignez l’interrupteur du clavier en
effectuant un mouvement vertical.
Retirer les interrupteurs
1. Vérifiez que toutes les broches métalliques de l’interrupteur sont parfaitement droites
et propres.
2. Alignez le commutateur verticalement pour que le logo Gateron soit orienté vers le nord.
Les broches doivent s’aligner sur le PBC du clavier.
3. Appuyez sur le commutateur jusqu’à ce que vous entendiez un clic. Cela signifie que les
clips de votre interrupteur se sont fixés à la plaque du clavier.
4. Inspectez le commutateur pour vous assurer qu’il est correctement fixé à votre clavier,
puis testez-le.
Installer les interrupteurs
Remarque : si la clé ne fonctionne pas, il est possible que vous ayez plié l’un des interrupteurs lors de son installation. Retirez l’interrupteur et
répétez le processus.
Si cette opération n’est pas effectuée correctement, les goupilles peuvent être endommagées au point d’être irréparables et doivent être
remplacées. N’appliquez jamais une force excessive lorsque vous remplacez les capuchons de touches ou les commutateurs. Si vous ne
parvenez pas à retirer ou à installer des capuchons ou des commutateurs, contactez le service clientèle dès que possible afin d’éviter
d’endommager le clavier en raison d’erreurs de manipulation. éviter d’endommager le clavier en raison d’erreurs de manipulation.
RÉVEIL/VEILLE DU CLAVIER
• Si votre clavier est en sommeil, appuyez sur n’importe quelle touche pour le réveiller, il se souviendra du dernier appareil
connecté.
• Wireless 2.4GHz
Lorsque vous allumez votre clavier, un voyant vert s’allume pour vous indiquer que la connexion sans fil est correcte. Si le
clavier ne montre aucun signe de fonctionnement dans votre appareil, essayez de le jumeler à nouveau en répétant les étapes
indiquées dans les instructions de jumelage sans fil 2,4GHz.
• Bluetooth
Lorsque vous allumez votre clavier, une lumière bleue s’affiche pour vous indiquer que le Bluetooth s’est correctement connecté
au dernier appareil (1 2 ou 3). Si le clavier ne montre aucun signe de fonctionnement dans votre appareil, essayez de le coupler à
nouveau en répétant les étapes indiquées dans les instructions de couplage Bluetooth.


https://discord.gg/2q3Z7C2
JA
https://www.reddit.com/user/epomaker/
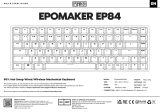
North-facing Logo
Switch Shaft
Switch Puller Keycap Puller


ದൔۗ
ๅഘᲫଌى
ইᵱದൔۗ҅᧗ݎኪৼᮒկᛗ
VXSSRUW#HSRPDNHUFRP҅ଚᴫӤጱᨻᦈ
ܔݩᳯ᷌ጱᧇᕡൈᬿ̶
౯ժ᭗ଉࣁੜٖັᧃ֢ڊᒼ̶॔
כץ
(320$.(5 ԅࢩૡܯګ᭜ᗌᵅᛘ෫ဩֵአԾߝ
ྋଉۑᚆጱఘ٭׀כץ๐ۓ̶כץ๐ۓӧ۱ೡࢩྋ
ଉֵአᘒ᭜౮ጱᐃഖඳᵑ̶ইጱԾߝํګ᭜ᗌ
ᵅ҅౯ժݢզԅੀᭆ๊ഘԾߝ̶ࣁੀᭆ๊ഘߝڹ҅
ݢᚆᵱᥝਖ਼ಅᨻԣጱඳᵑߝੀࢧᕳ౯ժ̶
ԭࣁ౯ժጱᗑᒊӤᨻԣጱԾߝҁ(SRPDNHUFRP҂
౯ժԅٌ׀ଙጱכץ๐ۓ̶ইࣁ༄ၥݎሿ҅ํձ
֜ᭃᤒกጱԾߝᕪᬦԧදᤰ᧣ෆ҅ڞጱԾߝ
ਖ਼ӧٚՁํכץ๐ۓ̶ʼnදᤰӨ᧣ෆŊ۱ೡ֕ӧᴴԭզ
ӥఘ٭ғๅഘٖ᮱ᵭ᮱կ̵ೆᤰᕟᤰԾߝ̵ๅഘኪ
ᒵ̶
౯ժՐԅ౯ժጱਥොମᱻᨻԣጱԾߝ׀כץ๐
ۓ̶౯ժ෫ဩԅٌ՜Ⴠ᭲ᨻԣጱԾߝ׀כץ๐
ۓ̶᧗ᘶᔮᨻԣԾߝጱମᱻჀ᭲ԅᥴ٬ᳯ̶᷌
ᐒ܄ᦞࣚ
https://discord.gg/2q3Z7C2
ےف౯ժጱᐒ܄҅Өٌ՜ᲫፏᆽঅᘏӞ᩸
ԟ̶.
CN
https://www.reddit.com/user/epomaker/
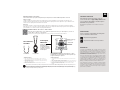
ᶎݻ۹ොጱຽப
ى
ىૡٍ࣮ፗٵى҅զຂਖ਼ىࢴਧࣁӤ
ጱयා̶
Ӥᶎکጱىጱֺ
ৼ҅ฎࣁ֦ܬӥᲫଌٵ
॓ೆܬىԏݸ̶
༁
ى
ىێ ᰬۺଌڊ
ىԭই֜ೆᴻᲫଌىጱਠෆܖ҅᧗ಚൈ45ᎱࣁၨᥦӾᬌف̶
KWWSVHSRPDNHUFRPEORJVJXLGHVGL\JXLGHKRZWRUHPRYHDQGUHSODFH\RXUPHFKDQLFDONH\ERDUGVZLWFKHV
۱ೡ
ૡٍ
೭֦᩸ጱىೆᴻૡٍ҅ਖ਼ಬݐἸ࣮ፗҁࣁ<Ӥ҂ٵىጱӾஞ҅ইӤᶎጱᐏֺࢶ
ಅᐏ̶
አىಬ֘ى҅ଚෞےܴێ҅ፗکىӤ᯽නڊ̶
ֵአࣙਧ֕Ⴥጱێᰁ҅զ࣮ፗᬩۖጱොୗਖ਼ىᐶᲫፏ̶
ᑏᴻى
༄ັಅํىጱᰂંᰒᚕฎވਠقᒟፗଗٳ̶
ਖ਼ى࣮ፗἶֵ҅*DWHURQጱຽப๖۹̶ᰒᚕଫӨᲫፏጱ3%&ἶ̶
ೲӥى҅ፗک֦ލک߃࢜Ӟ̶्ᬯޱ፳֦ጱى४ৼ૪ᕪᬳളکԧᲫፏӤ̶
༄ັى҅ᏟכਙྋᏟࣈᬳളک֦ጱᲫፏӤ҅ଚၥᦶਙ̶
ਞᤰى
ဳғইຎᰬۺӧૡ֢҅ݢᚆฎ֦ࣁਞᤰٌӾӞӻى୦ԧ̶ىڊ҅᯿॔ᬯӻᬦᑕ̶
ইຎᬯӻᬦᑕ؉ӧྋᏟ҅ᲀᰓݢᚆտഖࣕ҅෫ဩץ॔҅ᵱᥝๅഘ̶ๅഘᲫଌى҅ڔۯᬦଶአێ̶
ๅഘᲫଌى҅ڔۯᬦଶአێ̶ইຎ෫ဩೆܬਞᤰᲫଌى҅᧗ੱளᘶᔮਮ๐Ոާ҅զعࢩ֢०ᘒᛘᲫፏഖ̶ࣕ
զعࢩ֢ᲙᘒഖࣕᲫፏ̶
ࢧᬳᐏ
ŎᲫፏᘏ፻፦ࠏᯯݸ҅ݝࣁ୮ڹᦡ॓ᬰᤈࢧᬳҔࢧᬳӧ౮ۑڞᬰف፻፦҅ೲᲫࠏᯯݸ҅տᖀᖅࢧᬳ̶
Ŏ:LUHOHVV*+]
*ࢧᬳᬦᑕᖖᜋᐏᅌౌᳬ҅ᬳӤݸᐏᅌଉՄ6҅ࢧᬳᬦᑕӾೲӥೲᲫݢզᳩࢧᬳᳵ҅զຂೲᲫ᩸ᓒ6ٖ҅ࢧᬳ०
ᨳ҅ᐏᅌᆡᅋ҅Ძፏᬰف፻፦҅ইํᯈ౮ۑݸེٚᬰفᎱཛྷୗ҅Ꮁ०ᨳݸ҅Ძፏᬰف፻፦֕տכኸ๋ݸӞེᎱ౮ۑහഝ
Ŏ%OXHWRRWK
᠗ᇌࢧᬳᬦᑕ᠗ᜋᐏᅌౌᳬ҅ᬳӤݸᐏᅌଉՄ6҅ࢧᬳᬦᑕӾೲӥೲᲫݢզᳩࢧᬳᳵ҅զຂೲᲫ᩸ᓒ6ٖ҅ࢧᬳ०
ᨳ҅ᐏᅌᆡᅋ҅Ძፏᬰف፻፦҅ইํᯈ౮ۑݸེٚᬰفᯈཛྷୗ҅ᯈ०ᨳݸ҅Ძፏᬰف፻፦֕տכኸ๋ݸӞེᯈ౮ۑහഝҔ

7KLV GHYLFH FRPSOLHV ZLWK SDUW RI WKH )&& 5XOHV 2SHUDWLRQ LV VXEMHFW WR WKH IROORZLQJ WZR
FRQGLWLRQV WKLV GHYLFH PD\ QRW FDXVH KDUPIXO LQWHUIHUHQFH DQG WKLV GHYLFH PXVW DFFHSW
DQ\ LQWHUIHUHQFH UHFHLYHG LQFOXGLQJ LQWHUIHUHQFH WKDW PD\ FDXVH XQGHVLUHG RSHUDWLRQ
$Q\ FKDQJHV RU PRGLILFDWLRQV QRW H[SUHVVO\ DSSURYHG E\ WKH SDUW\ UHVSRQVLEOH IRU FRPSOLDQFH
FRXOG YRLG WKH XVHUV DXWKRULW\ WR RSHUDWH WKH HTXLSPHQW
127( 7KLV HTXLSPHQW KDV EHHQ WHVWHG DQG IRXQG WR FRPSO\ ZLWK WKH OLPLWV IRU D&ODVV%
GLJLWDO GHYLFH SXUVXDQW WR 3DUW RI WKH )&& 5XOHV 7KHVH OLPLWV DUH GHVLJQHG WR SURYLGH
UHDVRQDEOH SURWHFWLRQ DJDLQVW KDUPIXO LQWHUIHUHQFH LQ D UHVLGHQWLDO LQVWDOODWLRQ 7KLV HTXLSPHQW
JHQHUDWHV XVHV DQG FDQ UDGLDWH UDGLR IUHTXHQF\ HQHUJ\ DQG LI QRW LQVWDOOHG DQG XVHG LQ
DFFRUGDQFH ZLWK WKH LQVWUXFWLRQV PD\ FDXVH KDUPIXO LQWHUIHUHQFH WR UDGLR FRPPXQLFDWLRQV
+RZHYHU WKHUH LV QR JXDUDQWHH WKDW LQWHUIHUHQFH ZLOO QRW RFFXU LQ D SDUWLFXODU LQVWDOODWLRQ
,I WKLV HTXLSPHQW GRHV FDXVH KDUPIXO LQWHUIHUHQFH WR UDGLR RU WHOHYLVLRQ UHFHSWLRQ
ZKLFK FDQ EH GHWHUPLQHG E\ WXUQLQJ WKH HTXLSPHQW RII DQG RQ WKH XVHU LV HQFRXUDJHG WR WU\ WR
FRUUHFW WKH LQWHUIHUHQFH E\ RQH RU PRUH RI WKH IROORZLQJ PHDVXUHV
5HRULHQW RU UHORFDWH WKH UHFHLYLQJ DQWHQQD
,QFUHDVH WKH VHSDUDWLRQ EHWZHHQ WKH HTXLSPHQW DQG UHFHLYHU
&RQQHFW WKH HTXLSPHQW LQWR DQ RXWOHW RQ D FLUFXLW GLIIHUHQW
IURP WKDW WR ZKLFK WKH UHFHLYHU LV FRQQHFWHG
&RQVXOW WKH GHDOHU RU DQ H[SHULHQFHG UDGLR79 WHFKQLFLDQ IRU KHOS
7KH GHYLFH KDV EHHQ HYDOXDWHG WR PHHW JHQHUDO 5) H[SRVXUH UHTXLUHPHQW 7KH GHYLFH FDQ EH
XVHG LQ SRUWDEOH H[SRVXUH FRQGLWLRQ ZLWKRXW UHVWULFWLRQ
-
 1
1
-
 2
2
-
 3
3
-
 4
4
-
 5
5
-
 6
6
-
 7
7
-
 8
8
-
 9
9
-
 10
10
-
 11
11
-
 12
12
-
 13
13
-
 14
14
-
 15
15
-
 16
16
-
 17
17
-
 18
18
-
 19
19


EPOMAKER TH80 Wired Mechanical Gaming Keyboard Guía del usuario
- Tipo
- Guía del usuario
En otros idiomas
Documentos relacionados
-
 EPOMAKER EP84 Manual de usuario
-
EPOMAKER TH96 Instrucciones de operación
-
EPOMAKER TH96 Pro Guía del usuario
-
 EPOMAKER Mini Cat 69 Guía del usuario
-
 EPOMAKER Th21 Triple-Mode Numpad Guía del usuario
-
 EPOMAKER TK68 Guía del usuario
-
 EPOMAKER EP84 Wired and Wireless Mechanical Keyboard Guía del usuario
-
EPOMAKER ECLAIR Guía del usuario
-
 EPOMAKER RT100 98 Key Layout or Hot Plug Wired or Wireless Mechanical Keyboard Guía del usuario
-
EPOMAKER TH21 Guía del usuario


