Samsung RF267AABP/XAA-00 Manual de usuario
- Tipo
- Manual de usuario

user manual
the possibilities
Thank you for purchasing your Samsung product.
To receive more complete service,
please register your product at
www. samsu ng.com/reg ister

KEY FEATURES OF YOUR NEW REFRIGERATOR
Your Samsung French Door Refrigerator comes equipped with various innovative storage and energy-efficient
features.
,, Twin Cooling System
The Refrigerator ancrFreezer have separate evaporators. Due to this independent cooling system,
the Freezer and Refrigerator cool more efficiently.
Additionally, this separate air flow system prevents food odor of one compartment from seeping into
other compartments.
,, Cool Select Pantry_ TM (RF267)
The Cool Select pantry lM is a full-width drawer with adjustable temperature control.
,, Bigger & Wider Space
The wide shelf area and pantry provide enough space for larger items like a pizza box, etc.
The wide freezer drawer also provides enough space for 2-8 turkeys.
,, Secure Auto Close
The Secure Auto Close feature will automatically close a door that is slightly open.
,, Compact Ice Maker
The Ice maker can dispense cubed or crushed ice.
,, Digital Display and Temperature Control
,, Water Filtration System
,, Door Alarm
A helpful beeper alerts you if door is ajar.
,, Tilting Pocket
The TiltTng pocket can be used to store up to a 16" pizza.
,, Auto Pull Out Drawer
The upper drawer in the freezer comes out automatically as you just open the freezer door.
,, Easy Handle
Freezer door can be opened with less effort.
,, Energy Star
Energy star labeled this product could save your energy costs.
For easy future reference, write the model and
serial number down which can be found on the left
side of the refrigerator.
Model #
Serial #
2 Features

S f ty fornq
SAFETY INFORMATION
Before using your new Samsung French Door Refrigerator,please readthis manual thoroughly
to ensure that you know how to safely and efficiently operate the features and functions that your
new appliance offers.
Becausethe following instruction covers various models, the characteristics of your Refrigerator
may differ slightly from the Refrigerator described in this manual. Ifyou have any question, contact
us at 1-800-SAMSUNG or find help and information online at www.samsung.com.
What the icons and signs in this user manual mean '
Z_ Hazards or unsafe practices that may result in severe personal injury or death.
WARNING
Hazards or unsafe practices that may result in minor personal injury or property
CAUTION damage.
To reduce the risk of fire, explosion, electric shock, or personal injury when using your
CAUTION refrigerator, follow these basic safety precautions:
Do NOT attempt.
Do NOT disassemble.
[_) Do NOT touch.
Follow directions explicitly.
Unplug the power plug from the wall socket.
Make sure the machine is grounded to prevent electric shock.
Call the service center for help.
These warning signs are here to prevent injury to you and others.
Please follow them explicitly
Keep this manual in a safe place for future reference.
SEVEREWARNING SIGNS
Do not plug several appliances into the same power receptacle.
• Largeappliances draw a lot of power.Powering morethan one appliance or machine from a single power source
could cause overheatingand cause a fire.
Make sure that the power plug is not kinked or damaged by the back of the Refrigerator.
A damaged power plug may overheat and cause a fire.
Do not spray water directly into or on the outside of the Refrigerator/Freezer drawer.
Water could get into the interior machine parts and cause electric shock.
Do not use aerosols near the Refrigerator.
Aerosols used near the Refrigerator may cause an explosion or fire.
Safety Inforrration 3

Safe nforrnat on
J
Do not put undue stress on the power cord or place heavy articles on it.
• Placing heavy articles on the power cord create the risk of explosion or fire.
Do not insert the power plug with wet hands.
It may cause electric shock.
Do not put a container filled with water on the Refrigerator.
If it spills, it may cause fire or electric shock.
Do not install the Refrigerator in a damp place or water closed places.
Wet and/or deteriorated insulation of the internal electrical parts may cause electric shock or fire.
Do not store volatile, flammable or high evaporating substances in the refrigerator.
Storing benzene, thinner, alcohol, ether, LP gas, dryice, and other such products may cause explosions.
@
Do not disassemble or repair the Refrigerator by yourself.
You run the risk of fire, appliance malfunctions and/or personal injury. Call your nearest service center for
help from a qualified service technician.
Unplug the Refrigerator before changing the interior light.
Changing the light while the Refrigerator is plugged in may cause electric shock.
If you wish to dispose of the Refrigerator, remove the doors and seals before throwing
it away.
The doors(and their seals) can entrap a child if they climb into the Refrigerator.
Make sure that the doors are off, and ensure that no one is suffocated by being locked inside.
%
The Refrigerator must be safely grounded
Always make sure that you have grounded the Refrigerator before attempting to investigate or repair any
part of the appliance. Power leakages can cause severe electric shock.
Never use gas pipes, telephone lines or other potential lightning attractors as an
electrical ground.
Improper use of the grounding plug can result in a risk of electric shock. If it is necessary to use an
extension cord to power the Refrigerator, use only a3-wire extension cord that has a 3-blade ground
plug and a 3-slot receptacle that will accept the plug on the appliance. The marked rating of the extention
cord should be AC 115V-120V, 10A, or more. Additionally, if a grounding adapter is used, make sure the
receptacle box is also fully grounded.
4 Safety Inforrration

CAUTION SIGNS
Use good judgment when filling the Refrigerator with food and drinks.
• In an overfull Refrigerator, heavy, fragile, bulky or breakable items may fall out and cause personal injury
and/or damage to surrounding objects.
Do not put bottles or glass containers in the Freezer drawer.
When the contents freeze and then expand, the glass may break and cause personal injury or leave
dangerous glass shards in the Freezer.
If the electrical wall socket is loose, do not insert the power plug.
There is a risk of electric shock or fire. Have the plug looked at by a licensed electrician.
Never unplug your Refrigerator by pulling on the power cord.
Always grip the power cord firmly and pull straight out from the outlet. Yanking or pulling on the power
cord may cause a short-circuit, fire and/or electric shock.
A damaged power cord must be replaced by the manufacturer, a certified service agent or qualified
service personnel.
Do not store articles on the top of the appliance.
When you open or close the door, the articles may fall and cause personal injury and/or damage to
surrounding objects.
Do not store pharmaceutical products, scientific materials and temperature-sensitive
products in the refrigerator.
Products that require exact temperature controls should not be stored in the Refrigerator.
Z_ Do not allow children to climb, stand or hang on shelves and handles of the
cAunONRefrigerator.They could damage the Refrigerator and seriously injure themselves.
Do not sit on the freezer door. The door may break.
Do not allow children to climb into the freezer basket.
If you notice a chemical or burning plastic smell or see smoke, unplug the Refrigerator
immediately and contact your Samsung Electronics Service Center.
®
After your Refrigerator is in operation, do not touch the cold surfaces in the Freezer
compartment. Particularly when hands are damp or wet, skin may adhere to these
extremely cold surfaces.
Skin may stick to the surface and you may get frostbite.
Do not put your hands under the appliance.
• Any sharp edges may cause personal injury.
Safety Info_rration 5

Never put fingers or other objects into the water dispenser hole or ice chute.
• It may cause personal injury and/or material damage.
If the Refrigerator will not be used for a long period of time (for example, over several
months), unplug the power from the wall.
Over time, deterioration in the power cord insulation may cause fire.
Do not use a wet or damp cloth when cleaning the plug.
Remove any dust or foreign matter from the power plug pins.
A Dirty power plug can increase the risk of fire.
If the Refrigerator is disconnected from the power supply, you should wait for at least
five minutes before plugging it back in.
Do not place the equipment directly in sunlight.
The appliance must be positioned for easy access to power source.
If the power cord is damaged, it must be replaced by the manufacturer, a certified
service agent or qualified service personnel.
If you have a long vacation planned, empty the Refrigerator and turn it off.
Wipe excess moisture from the inside and leave the doors open to keep odor and mold from developing.
Service Warranty and Modification
Any changes or modifications performed by a 3rd party on this finished appliance is not covered under
Samsung warranty service, nor can Samsung be responsible for safety issues that result from 3rd party
modifications.
A Children can get trapped inside Refrigerators.
cAuT_°NBeforeyou throw away your old Refrigerator or Freezer,make sure that you;
Take off the doors.
Leave all shelves in places so that children may not easily climb inside and shut the door while they are
inside.
Thisapplianceisnot intendedfor useby smallchildrenor infirmpersonswithoutcapable,adult
supervision.Smallchildrenshouldbesupervisedwhenusingthe appliance.
6 Safety Inforrration

Content
SETTING UP YOUR FRENCH
DOOR REFRIGERATOR
OPERATING YOUR SAMSUNG
FRENCH DOOR REFRIGERATOR
_f
TROUBLESHOOTING
08 Getting ready to install the refrigerator
09 Removing the refrigerator doors
11 Disassemble the freezer drawer
12 Reattaching the refrigerator doors
14 Assemble the freezer drawer
15 Adjusting the doors
15 Adjusting the support for extension shelf
16 Making minor adjustments between doors
17 Adjusting the freezer drawer level
18 Checking the water dispenser line
19 Installing the water line
21 Using the control panel
22 Using the digital display
23 Controlling the temperature
24 Using the ice and cold water dispenser
26 Parts and Features(RF267)
27 Parts and Features(RF26V)
28 Storing food
29 Using the Cool Select Pantry TM
29 Using the tilting pocket
30 Removing the refrigerator accessories
31 Using the doors
32 Removing the freezer accessories
33 Cleaning the refrigerator
34 Changing the interior lights
35 Changing the water filter
40 Troubleshooting
..............i I
WIRING DIAGRAM
41 Wiring diagram
WARRANTY 42 Warranty
Z/fi ' '

GETTING READY TO INSTALL THE REFRIGERATOR
Congratulations on your purchase of the Samsung French Door Refrigerator. We hope you enjoy the state-of-art
features and efficiencies that this new appliance offers.
Selecting the best location for the Refrigerator
• A location with easy access to the water supply.
• A location without direct exposure to sunlight.
A location with level (or nearly level) flooring.
A location with enough space for the Refrigerator doors to open easily.
Allow sufficient space for air circulation of the internal cooling system.
If the Refrigerator does not have enough space, the internal cooling
system may not work properly.
If your refrigerator has an ice maker, allow extra space at the back for the water line connections. When you install
the refrigerator next to a fixed wall, minimum clearance is 3 3A" (95mm) between the refrigerator and wall to allow
the door to swing open.
First thing! Make sure that you can easily move your Refrigerator to its final location by measuring doorways
(both width and height), thresholds, ceilings, stairways, etc.
The following chart details the exact height and depth of Samsung French Door Refrigerator.
Capacity(Cu.Ft)
Dimension(inch)
CaseHeight
Depth
Width (A)
with Hinge (B)
without Hinge(C)
with Door (D)
without Door (E)
26
35 s4
70
68 %
35 %
29 ½
°1
• Allow clearance to the right, left, back and top when installing. This will help reduce power
consumption and keep your energy bills lower.
• Do not install the Refrigerator where the temperature will go below 50 °F (10 °C).
When moving your refrigerator
To prevent floor damage be sure the front levelling legs are
in the up position (above the floor). Refer to 'Levelling the
refrigerator' in the manual.
To protect the finish of the flooring, place the protection
sheet such as packing carton under the refrigerator.
Screwdriver
Z_ When installing, servicing or cleaning behind the refrigerator,
CAUTIONbe sure to pull the unit straight out and push back in straight
after finishing.
8 Settng Up

SETTING UP THE REFRIGERATOR
Now that you have your new Refrigerator installed in place, you are ready to set up and enjoy the features and functions of
the appliance. By completing the following steps, your Refrigerator should be fully operational.
1. Place the Refrigerator in an appropriate location with reasonable clearance between the wall and the
Refrigerator. Refer to installation instructions in this manual.
2. Once the Refrigerator is plugged in, make sure the interior light comes on when you open the doors.
3. Set the Temperature control to the coldest temperature and wait for an hour. The Freezer will get slightly chilled
and the motor will run smoothly.
4. After powering the Refrigerator, it will take a few hours to reach the appropriate temperature. You can store
food and drinks in the Refrigerator after the temperature is sufficiently cool.
[_ Check the accessory list below.
Waterfilter Hexwrench Fastener
(DA29-00002B) (DA80-00002C) (DA60-00143B)
Compressinfitting Compressionnut
(DA62-00305A) (DA74-00070B)
REMOVING THE REFRIGERATOR DOORS
If the Refrigerator is too large to pass through your doorway easily, you can remove the refrigerator doors.
Tools you will need
Philips screwdriver
Flat-blade screwdriver
10mm Socket Wrench
Pliers
Allen wrench(3/16")
Disassemble the Refrigerator doors
1. With the door opened, remove the Top Table cap
((_) with a Flat head screwdriver, and close the
door.
Remove the 3 screws holding down the Top Table
and remove the Top Table((_).
?
?
?
Settng Up 9

2. Disconnect two connectors ({_}) at
each side of the top cap and the one
connector(@) on left side door. Remove
the tube (l_}) with pressing the dark gray
color part (_}) of the water line coupler.
Z_ If a red clip is on the coupler, it must be removed
CAUTIONbefore removing the tube.
3. Remove the three hex head bolts(_}) attached
to the upper left and right door hinges with a
Wrench(10mm).
With a Philips head screwdriver, remove the ground
screw(G ) attached to the upper left and right door
hinges.
Remove the upper left and right door hinges(G ).
%
4. Lift the door straight up to remove.
5. With a Philips head screwdriver, remove the two
screws(_) attached to the lower left and right
door hinges.
With an Allen Wrench(3/16"), remove the two hex
head bolts([_}) attached to the lower left and right
door hinges.
Remove the lower left and right door hinges([_).
_¢_ / /
10 settng up

DISASSEMBLE THE FREEZER DRAWER
1. Take out the upper drawer by lifting it up.
\
2. Remove the tilting pocket(_}) by pulling on both brackets(_})
upward at the same time.
3. Take out the lower basket(G ) by lifting the basket up from
rail system.
4. Remove four 10mm hex-head bolts from both sides.
5. Lift the freezer door up from the rails.
se,1:tr_gup 11

REATTACHING THE REFRIGERATOR DOORS
Assemble the Refrigerator doors
1. Reattach the lower left and right door hinges(@).
With a Philips head screwdriver, insert and tighten the
two screws((_) into the lower left and right door hinges.
With a Allen Wrench(3/16"), insert and tighten the two hex
head bolts([_) into the lower left and right door hinges.
@
2. Place the hole in the bottom of the door over the lower
hinge(@).
Be careful not to miss the hinge cap because it can
be easily taken off.
@
3. Insert the upper hinges((_L}) into the holes at the top
of the doors.
With a Wrench(10mm), insert and tighten the 3 hex
head bolts((7_) into the upper left and right door
hinges.
With a Philips head screwdriver, insert and tighten
the ground screw((_) into the upper left and right
door hinges.
®
12 Setting Up

REATTACHING THE REFRIGERATOR DOORS
4. Connect the water line ({_) and then insert a
clip on the coupler with pulling tube.
Connect the one connector(@) on left side
door and two connectors (_) at each side
of the top cap.
_The clip is enveloped inside of the top cap.
Z_ The water line (l_) must be fully inserted to the marked line to prevent
CAUTIONwater leakage from the dispenser.
5. Position the Top Table({_)) in place.
With a Philips head screwdriver, insert and tighten the 3
screws into the Top Table. With the door opened, reinsert
the Top Table cap([_) and close the doors.
[_ When reattaching the top table, make sure that the
wires are not pressed or damaged by the top table.
Setti_g Up 13

ASSEMBLE THE FREEZER DRAWER
1. Pull out the rails to the full length on each side of the cabinet evenly.
2. Hang the freezer door front onto open slots on the sides.
3. Tighten four lOmm hex-head screws completely.
4. With the drawer pulled out fully, insert the lower basket (_}) into
the rail system.
5. Hook the ends of the tilting pocket (_) into both brackets (_),
and push down until they lock into place.
6. Insert the upper drawer.
14 Setting Up

ADJUSTING THE DOORS
Now that the doors are back on the Refrigerator, you want to make sure the Refrigerator is level so that you can
make final adjustments. If the Refrigerator is not level, it will not be possible to get the doors perfectly even.
When the Left door is lower than the Right door.
Insert a flat-blade screwdriver into a notch on the left control lever, turn it clockwise or counter-clockwise
to level the left door.
Control Lever
Screwdriver
When the Left door is higher than the Right door.
Insert a flat-blade screwdriver into a notch on the right control lever, turn it clockwise or counter-clockwise
to level the right door.
Control Lever
Screwdriver
_We do not recommend making small adjustments with the control lever, Instead, refer to the next page for the
best way to make minor adjustments to the doors,
ADJUSTING THE SUPPORT FOR EXTENSION SHELF(RF26V)
1. Remove the extension shelf.
2. Press the [_} hook and lower
down the _3_movable supporter.
3. Hang the extension shelf at the
lower position.
Settisg Up 15

MAKING MINOR ADJUSTMENTS BETWEEN DOORS
Remember a level Refrigerator is necessary for getting the doors perfectly even. If you need help, review the
previous section on leveling the Refrigerator.
When the left
door is lower
than the right
door.
!
Adju,_
Adjustment
part
!
When the left
door ishigher
than the right
door.
1. If you open the drawer ([_), you can see the lower hinge ({_).
2. Insert the supplied hex wrench (_}) into the shaft ((_}}) of the lower hinge.
3. Please adjust the height by turning the hex wrench (_}) clockwise( ) or counter-clockwise( ).
%
_when you turn the hex wrench counter-clockwise( ), the door will move up.
1. After adjusting the doors, please insert the supplied fastener-ring (_) using a pair of pliers ((_}) in the
gap between the hinge-grommet ({_) and the lower hinge(_}). The number of fastener-rings you'll need
to insert depends on the gap.
_Two fastener-rings are enclosed with the refrigerator.
The thickness of each fastener-ring is 0.04 inch.
16 Setting Up

ADJUSTING THE FREEZER DRAWER LEVEL
Adjustment part
FreezerDrawer
1. Locate the height-adjuster (_) in the freezer drawer.
Unscrew the four Phillips screws (_) slightly to loosen the door.
2. Loosen the controller screw(_}) with a Phillips
screwdriver.
3. Find the best level to align the door slope.
J
@
Example) The slope is about 2mm (0.08inch) as shown below.
Slope __
Reference __
plane
- Rotate the Height Adjuster to +2.0 to reduce the door
slope.
Setti_g Up 17

CHECKING THE WATER DISPENSER LINE
A water dispenser is one of the helpful features on your new Samsung Refrigerator. To help promote better
health, the Samsung water filter removes unwanted particles from your water. However, it does not sterilize or
destroy microorganisms. You may need to purchase a water purifying system to do that.
In order for the ice maker to operate properly, a water pressure of 20-125 psi (pound per square inch) is
required.
Under normal conditions, a 170 cc (5.75 oz.) paper cup can be filled in 10 seconds.
If the Refrigerator is installed in an area with low water pressure (below 20psi), you can install a booster pump to
compensate for the low pressure.
Make sure the water storage tank inside the Refrigerator is properly filled. To do this, press the water dispenser
lever until the water runs from the water outlet.
_ Water line installation kits are available at extra cost from your dealer. We recommend using a water supply kit that
contains copper tubing.
Connecting to the water supply line
1. First, shut off the main water supply line and turn the ice-maker off.
2. Locate the nearest cold, drinking water line.
3. After connecting the water supply to the water filter, turn your main water supply back on and flush four
or more gallons into a bucket to clear and prime the water filter.
Cold water line
1ii pipec,amp
_Water line installation kit
18 Setting Up

INSTALLING THE WATER LINE
Connecting the water line to the Refrigerator.
There are several items that you need to purchase to complete this connection. You
may find these items sold as a kit at your local hardware store.
o1/4" compression nut
, plastic tubing
, copper tubing
ferrule
Refrigerator
Compression nut
Plastic tubing (_) (1/4") (Supplied) @
(Supplied) t
Compression fitting
(Supplied)
: _ '! [ _ Bulb
Ferrule_ i i H i
(Not supplied) i _ ; , __ i
Compression nut (_
(1/4") (Not supplied)
Copper tubing or Plastic tubing (_
(Not supplied) (Not supplied)
Household water line
1. Slip the compression nut @ through the supplied plastic tubing @.
2. Tighten the compression nut @ onto the 1/4" compression fitting.
- If you are using copper tubing, slip the compression nut _ (not included) and ferrule (not included) on
copper tubing (not included) as shown.
- If you are using plastic tubing (_, insert the molded end(Bulb) of the plastic tubing (_ into the
compression fitting.
CAUTION'_ DO not use without the molded end(Bulb) of the plastic tubing (_.
3. Tighten the compression nut (_ onto the compression fitting. Do not over-tighten the compression nut (_.
4. Turn water on and check for any leakage.
[_} Only connect the water line to a drinkable water source.
If you have to repair or disassemble the water line, cut off 1/4" of the plastic tubing to make sure you get a snug,
leak-free connection.
Installing the water filter.
1. Remove the water filter cover((_)
2. Remove the fixed cap by turning it counter clockwise.
Keep the cap in a safe place for later use if you don't
use the filter.
3. Remove the water filter from the box and put a
replacement indicator sticker on the filter as shown.
Place a sticker on the filter that dates six months in
the future. For example, if you install the water filter in
March, put the "SEP" sticker on the filter to remind you
to replace it in September. That way you'll know when
it is time to replace the filter. Normally, a filter life is
about 6 months.
% %
Sticker
(month indicator)
Setti-_g Up 19

4. Remove the filter cap and insert the filter into the filter
housing.
5. Slowly turn the water filter 90 ° clockwise to align with the
printing mark on the cover, locking the filter in position.
Make sure to align the water filter label mark with center of
cover filter printing as illustrated. Remember, do not over-
tighten.
i Jlj
.....Separation
of red cap,
Turn until the
labels are aligned,
(_You should remove the right side upper glass shelf before installing water filters.
®
Removing any residual matter inside the water supply line after
installing the water filter.
1. Turn ON the main water supply & turn OFF the valve to the water supply line.
2. Run water through the dispenser until the water runs clear (approx. 6-7
minutes). This will clean the water supply system and remove air from the lines.
3. Additional flushing may be required in some households.
4. Open the Refrigerator door and make sure there are no water leaks coming
from the water filter.
Be sure to flush the dispenser thoroughly, otherwise water may drip from the dispenser.
This means that there is still air in the line.
®
iii/
Reverse Osmosis Water Supply
IMPORTANT • The pressure of the water supply coming out of a reverse osmosis system going to the
water inlet valve of the refrigerator needs to be between 35 and 120 psi (241 and 827 kPa).
If a reverse osmosis water filtration system is connected to your cold water supply, the water pressure to
the reverse osmosis system needs to be a minimum of 40 to 60 psi (276 to 414 kPa.)
If the water pressure to the reverse osmosis system is less than 40 to 60 psi (276 to 414 kPa):
,, Check to see whether the sediment filter in the reverse osmosis system is blocked. Replace the filter if
necessary.
,, Allow the storage tank on the reverse osmosis system to refill after heavy usage.
,, If your refrigerator has a water filter, it may further reduce the water pressure when used in conjunction
with a reverse osmosis system. Remove the water filter.
If you have questions about your water pressure, call a licensed, qualified plumber.
20 Setti-_g Up

Opor tng r
E)z r Refracts.tot
USING THE CONTROL PANEL
3U G rench
Forbetter energyefficiency,pressthe Energy Saver button. Ifcondensation occurs on the doors,
turn the Energy Saver function off.
Pressthe Freezer / Power Freeze button to set the Freezerto your desiredtemperature,
Youcan setthe temperaturebetween 8°F and -14°F
Pressand hold the Freezer / Power Freeze Button for 3 seconds,to speed up the time neededto
freeze products inthe Freezer, It can be helpfulif you needto quicklyfreezeeasilyspoiled itemsor if
the temperature in the Freezerhas warmeddramatically(Forexample,ifthe door was leftopen),
Pressthe Ice/Water button to selectthe ice or water function. Youcan select water or the types of
ice(cube/crushedice),
After makinga selection,pressthe dispenserlever.
Pressthe Alarm/Lighting button to turn offthe door open alarm,Initiallythe Alarm is setto on.
ifyou press andhold theAlarm/Lighting button for 3 seconds, the DispenserLEDLampwill stay on.
Pressthe Fridge / Power Cool button to set the fridge to yourdesired temperature,
Youcan setthe temperature between 34°F and 46°K
Pressand hold the Fridge / Power Cool button for 3 seconds, to speed upthe time neededto cool
products inthe Refrigerator,Itcan be helpfulifyou needto quickly cool easilyspoiled items or if the
temperature in the fridge haswarmed dramatically(Forexample, ifthe door was left open).
Pressthe Ice Off / Lock button to turn the ice makingfunction off.
ifyou press andhold the Ice Off / Lock button for 3 seconds, theDisplayand Dispenserwill be locked.

USING THE DIGITAL DISPLAY
"FreezerTemp" indicatesthe current Freezertemperature.
"Fridge Temp" indicatesthe current Refrigerator temperature.
When not in use the Display will turn off, this is normal.
Power Freeze @
This icon will light up when you activate the "Power Freeze" feature. "Power Freeze" is great when you
need a lot of ice.
When you have enough ice, just press the button again to cancel the "Power Freeze" mode.
If you select "Power Freeze", the inside temperature of the Freezer will decrease for about two and a half
hours.
Cubed ice _, Crushed ice _._, Water
Enjoy cubed or crushed ice by selecting your preference from the digital control panel. If you don't
need ice, turn the feature off to save on water and energy consumption. The Ice type light indicates the
type of ice(or no ice) that is currently chosen.
Power Cool (_)
This icon will light up when you activate the "Power Cool" button. For a quick fridge cool down, use
"Power Cool".
If you select "Power Cool", the inside temperature of the Fridge will decrease for about two and a half
hours.
L.-'.:.-'I
Filter Indicator o
When the filter indicator light is on, it is time to change the filter. Typically this happens about
every 6 months.
The filter Indicator will be Blue when you initially insert the water filter.
The filter Indicator will be Light Pink when you have used your water filter for 5 months.
The filter Indicator will be Red when you have used your water filter for 6 months.
After removing the old water filter and installing a new one (see page 33 for instructions on how to do
this), reset the indicator by pressing and holding the "ice/Water" button for 3 seconds.
Cooling Off Mode ("OF & OF" code on the display)
This function is for store display refrigerators. It is not for customer use.
Z_ In Cooling Off Mode, the refrigerator works but doesn't make cool air. To cancel this mode,
CAUT_ONpressthe Power Freeze and Freezer buttons at the same time for 3 seconds until a "Ding-dong"
sound is heard and the unit will now cool.

Thisiconwilllightupwhenyouactivatethe"EnergySaver"functionisautomaticallysetto"ON"whenpoetis
suppliedtotheRefrigerator.Ifcondensationoccursonthedoors,turntheEnergySaverfunctionoff.
Lighting :8:,,,
This icon will light up when you activate the "Lighting" feature. In this case, the dispenser light(under the
display) will be on constantly. If you would like the dispenser light to come on only when using the dispenser,
turn the "Lighting" feature off.
Alarm @)
This icon will light up when you activate the "Alarm" feature. The door alarm will sound if any door is open for
more than 3 minutes. The beeping stops when you close the door. Initially the Alarm is set to on.
Ice Off
This icon will light up when you activate the "Ice Off" feature. In this case, the ice will not be produced.
Lock
This icon will light up when you activate the "Lock" feature. In this case, you won't to be able to use the
control panel. If you press and hold the Ice Off / Lock button for 3 seconds, you will be able to use the
control panel again.
CONTROLLING THE TEMPERATURE
Basic Temperature of Freezer and Refrigerator Compartments
The basic temperature and/or recommended temperature of Freezer and Refrigerator Compartments
are -2°F and 38°F respectively.
If the temperature of Freezer and Refrigerator Compartments are too high or low, adjust the
temperature manually.
Controlling the Freezer temperature
The Freezer temperature can be set between 8°F and -14°F to suit your particular needs. Press the
Freezer button repeatedly until the desired temperature is shown in the temperature display. Keep in
mind that foods like ice cream may melt at 4°R
The temperaturedisplaywillmovesequentiallyfrom-14°F to 8°F.Whenthe displayreaches8°F,itwillbegin againat-14°R
Five seconds after the new temperature is set, the display will again show the actual current freezer
temperature until the new temperature is reached.
Controlling the Refrigerator temperature
The Refrigerator temperature can be set between 46°F and 34°F as your particular needs. Press the
Fridge button repeatedly until the desired temperature is shown in the temperature display.
The temperature control process for the Fridge works just like the Freezer process.
Press the Fridge button to set your desired temperature. After a few seconds, the Fridge will begin
adjusting towards the newly set temperature. This will be reflected in the digital display.
_The temperature of the Freezer or the Refrigerator may rise when you open the doors too frequently, or if a
large amount of warm or hot food is placed in either side.
This may cause the digital display to blink. Once the Freezer and Refrigerator temperature return to their
normal set temperatures, the blinking will stop.
Ifthe blinking continues, you may need to "reset" the Refrigerator. Try unplugging the appliance, wait for
around 10 minutes and then plug the power cord back in.

USING THE ICE AND COLD WATER DISPENSER
Press the Ice / Water button to select the type of you want
Using the Ice Dispenser
Place a glass underneath the ice dispenser and push gently against the dispenser lever with your glass.
Make sure the glass is in line with the dispenser to prevent the ice from bouncing out.
Z_ If the Freezer door is left open for a long time, condensation may form or the ice
CAUTIONinside the Ice-Maker may clump. Please close the door as soon as possible.
The Ice Dispenser may eject only a few ice cubes if there is not enough ice in the
Ice-Maker.
Use the Ice Dispenser when there is enough ice. PUSH
If the Freezer door is open for a long time or a lot of ice is dispensed at once,
condensation may trickle down the Dispenser lever. ' I
I
Using the Water dispenser
Place a glass underneath the water outlet and push gently against the water dispenser lever with your
glass. Make sure the glass is in line with the dispenser to prevent the water from splashing out.
If you have just installed the Refrigerator or just installed a new water filter, pour out the first
six glassfuls of water to flush out impurities in the water supply system. Make sure water flows
cleanly before drinking.
Z_ Whenyou do not usethewater dispenserfor 2-3 days(especiallyduring the summer),the dispensedwater may havea
CAUTIONfunny smellor taste. Ifthis occurs, we recommendthat you discardthe first 1-2 glassesfor bettertasting water.
Using the Ice Off Function
When selecting the Ice Off mode, remove all ice cubes from the bucket.
If you are not using the ice dispenser the ice cubes may clump together.
Pull the lock lever forward to throw away ice cubes or remove clumped ice
from the bucket. Push the bucket back until you hear a click.
CAUTION
Ifyou havea longvacation or businesstrip, closethe water valveandshut offthe water supply to the Refrigerator.This
will help preventaccidentalleakages.
Donot put yourfingers,hands or anyother unsuitableobjects in the chute or ice-makerbucket.
- It may resultin personalinjuryor materialdamage.
Neverputyour fingeror anyother objects inthe dispenseropening.
- It maycause injury.
Donot disassemblethe IceMaker personally.It may cause disorder.
Donot wash or spray the icebucket with water.
Just wipe itwith a dry cloth. Inorder to operatethe ice makerproperly,water pressureof 138-862 Kpa isrequired.
®
Water clouding phenomenon
All water provided to refrigerators flows through the core filter which isan alkaline water filter. In this process,
the pressure in the water that has flowed out of the filter gets increased, and oxygen and nitrogen become
saturated. When this water flows out in the air,the pressure plummets and the oxygen and nitrogen get
supersaturated so that they turn into gas bubbles. The water could look misty due to these oxygen bubbles.
The water may look temporarily cloudy due to these oxygen bubbles. After a few seconds, the water will
look clear.

Oper tng r
F fra r .tor
rench
IGEPAODUGTION
Normal Use
To fill ice bucket to maximum capacity after installation, make sure to do the
following steps.
1, Allow your refrigerator to operate and cool down for 24 hours (or 1 full day).
2. Waiting 24 hours will allow your ice maker to cool properly.
3. Dispense 4 to 6 ice cubes into the glass.
4. After 8 and 16 hours, dispense a full glass of ice at each time.
Whenever all ice is used at one time, the above step 3 and 4 must be repeated (before dispense the
first 4 to 6 ice cubes, it needs waiting 8 hours). This will replenish the ice cubes and ensure maximum
ice production.
/_ Test button
CAUTIONIn case ice doesn't come out, pull out the ice bucket and press test button
located on the right side of ice maker.
®
Please wait 1 second before removing the cup after dispensing water to
prevent spills. Do not pull out the lever dispenser after taking out ice or
water. It comes back automatically. Ice is made in cubes. When you select
"Crushed", the icemaker grinds the ice cubes into crushed ice.
Z_ When you dump the ice from the ice bucket, you should press the
CAUTIONdispenser lever once with 'ICE CUBED' or 'CRUSHED' function ON to
get new ice faster after replacing the ice bucket in the refrigerator.
/ ii i,'_ii

{}poratng
F
SU O F onchDoo
PARTSAND FEATURES(RF267)
Use this page to become more familiar with the parts and features of the Refrigerator.
Light
Auto Door Closer
Ice-Maker
Ill HI
Foldable-Shelf /
Slide-Shelf
Vertical Hinged
Section
_} Vegetable & Fruit
Drawers _iiii I
/
Dairy
Compartment
I_ Water Filter
I!
Slide-Shelf _}
II Egg Container@
Door Bins _}
I Quick-Space
Glass Shelf
Cool Select
J PantryTM@
FZ Ice-Maker
Ice Bucket
Tilting Pocket
i_i?? ..................._:DDC__ _ Light
_._i .................................................................................................................Auto PullOut Drawer @
FreezerDrawer Bin (_
When closing the door, make sure the Vertical Hinged Section is in the correct position to avoid scratching
the other door.
If the Vertical Hinged Section is reversed, put it back to the right position and close the door.
Moisture may occur at times on the Vertical Hinged Section.
The door handle may become loose over time.
If this happens, tighten the bolts found on the inside of the door.
If you close one door with a lot of force, the other door may open.

PARTSAND FEATURES(RF26V)
Use this page to become more familiar with the parts and features of the Refrigerator.
Light
Ice-Maker
Vertical Hinged
Section'
Deli Drawer
{s}Vegetable& Fruit
Drawers
ii
,,'"/_..................ii ii' .... ....................................
DairyCompartment _}
Water Filter
Extension-Shelf El
Door Bins@
Egg Container
@Tilting Pocket
Light
Auto Pull Out Drawer{71
FreezerDrawer Bin {9}

STORING FOOD
The Samsung French Door Refrigerator has been designed to provide you with maximum space saving
features and functions. Here are some of the customized compartments we have created to keep your food
fresher longer. In order to further prevent odor from seeping into the ice compartment, stored food should be
wrapped securely and as airtight as possible.
STORING FOOD IN THE REFRIGERATOR
Can be usedto store smalldairyitems like butteror margarine,yogurt or
cream cheese bricks
Designedto becrack-resistant the shelvescan be usedto store alltypes offood
and drinks.Circularmarkson the glasssurface area normalphenomenon
and can usuallybewiped cleanwith adamp cloth.
Best placeto keepeggs.
Placethe containeron the shelffor easy access.
Usedto preservethe freshnessofyour stored vegetablesand fruits.
This drawerhas beenspecificallydesignedto control the levelof humidity
withinthe compartment. Keepvegetablesandfruits separate if possible.
Can be usedfor largepartytrays, dell items,pizza, beveragesor
miscellaneousitems.
Do not place any largearticlesof food underthe lamp in the Refrigerator.An airsensor is located nearthe lamp and ifthe sensor
is blocked, your Refrigeratormay become too cold. PleaseplaceVegetableand Fruitsin the Vegetableand Fruitsdrawersto avoid
freezingthem. Ifthe foods in your Refrigeratorbecome frozen,pleasesetthe temperaturehigher.
STORING FOOD IN THE FREEZER DRAWER
Bestuse to store meatsor dry foods. Storedfood shouldbe placedin a
container or wrapped securelyusingfoil or other suitablewrapping materials.
Can be usedfor smallpackages offrozen food.
Youcan also storea 16"pizza.
Can be usedto store meat and dry foods.
Storedfood shouldbe placedin acontainer or wrapped securely
using foil or othersuitablewrapping materials.
[_ Bottlesshouldbe stored tightlytogether so that they do not tip and fallout whenthe Refrigeratordoor isopened.
lfyou plan to go away for a long time, empty the Refrigerator and turn it off. Wipe the excess moisture from
the inside of the appliance and leave the doors open. This helps keep odor and mold from developing.

USING THE COOL SELECT PANTRYTM (RF267)
The Cool Select Pantry TM is a full-width drawer with adjustable
temperature control. This pantry can be used for large party
trays, deli items, pizza, beverages or miscellaneous items.
There is a temperature control which can adjust the amount of
cold air allowed into the pantry.
The control is located on the right side of the pantry.
Selection Button
,
When "Deli" is selected, the temperature of the pantry can
be kept around 41 °F(5°C). This feature helps keep food
fresh for a long time.
Pantry temperature can be maintained under recommended
temperature setting(Freezer:-2°F, Fridge:38°F)
2. When "Fresh" is selected, the temperature of the pantry
can be kept around 38°F(3°C). This feature helps keep food
fresh for a longer time.
Pantry temperature can be maintained under recommended
temperature setting (Freezer : -2°F, Fridge : 38°F)
.
When "Chilled" is selected, the temperature of the pantry
can be kept around 34°F(1 °C). This feature also helps keep
meat or fish fresh for a longer time.
Pantry temperature can be maintained under recommended
temperature setting (Freezer : -2°F, Fridge : 38°F)
Dell
•pineapple
•lemon
•avocado
•potato
®
Fresh Chilled
cucumbers •steaks
apples • hard cheeses
oranges •cold cuts
grapes • bacon
zucchinis • hot dogs
corn
Fruits and vegetables may be damaged when the "chilled" mode is set.
Do not store lettuce or other leafy produce in this pantry.
Z_ Do not store glass bottles in this pantry. If they are frozen, they can break and cause personal injury.
CAUTION
USING THE TILTING POCKET
The Tilting Pocket can be used to store up to a 16" pizza if you
place it shown in the illustration.

Operatng ur
l)D r F efreerator
G Fren
REMOVING THE REFRIGERATOR ACCESSORIES
1. Door Bins & Dairy Compartment
To remove - Simply lift the bin up and pull straight out,
To relocate - Slide it in above the desired location and push down
until it stops.
Injury may occur if the door bins are not firmly assembled.
CAUTIONDOnot allow children to play with bins. Sharp corners of the bins
may cause injury.
Do not adjust a bin full of foods.
2. Tempered Glass Shelves
To remove - Tilt up the front of the shelf in the direction
shown (_) and lift it up vertically (_).
Pull the shelf out.
To relocate -
Tilt the front of the shelf up and guide the
shelf hooks into the slots at a desired height.
Then lower the front of the shelf so that the
hooks can drop into the slots.
Z_ The Tempered Glass shelves are heaw.
CAUTIONUse special care when removing them.
..... }}::i:-:>
b
3. Vegetable & Fruit Drawers
To remove - Pull the drawer out to full extension.
Tilt up the front of drawer and pull straight out.
To relocate - Insert the drawer into the frame railsand push back into
place.
Z_ The glass shelf over the drawer is not firmly secured. Be careful
CAUTIONwhen lifting.
Do not open the drawer while the pantry is open.
It may cause scratch or breakage to it's cover.
4. Deli Drawer (RF26V)
To remove - Pull the Dell Drawer out to the stop position
Lift the Dell Drawer up and past the stop.

5. Cool Select Pantry TM (RF267)
To remove the pantry - Pull the pantry out to full extension.
Tilt up the front side of pantry and
pull straight out.
To relocate the pantry - Push the rails to the back of the
Refrigerator. Place the drawer onto
the rails and slide the pantry back
until it is in place.
To remove the divider - Pull the pantry completely out to full extension and raise the front side of the
divider to unhook it from the rear wall of the pantry, then lift the divider out.
To relocate the divider - Hook the back of the divider over the rear wall of the pantry and push the
divider down.
C
C
C
C
C
C
(
USING THE DOORS
The Refrigerator doors ensures that the doors close all the way and are securely sealed.
When the Refrigerator door is only partially open, it will automatically close. The door will stay open when opened more than
around 3 Inches.

Operatng ur
3oz r F efra rator
<.J
G French
REMOVING THE FREEZER ACCESSORIES
1. Tilting Pocket
To remove - Pull the brackets([!)) upward until you hear a
clicking sound and remove the pocket
To replace - Hook the ends of the pocket into both brackets
(_) and push down until it locks into place.
<
2. Auto Pull out Drawer
To remove - Pull the drawer out to full extension.
Tilt up rear of drawer and lift straight out.
To relocate - Place the drawer onto the rails by tilting it up.
Lower the drawer into place until it is horizontal
and slide the drawer in.
3. Freezer Drawer Bin
To remove the drawer - Pull the drawer out fully. Tilt up the rear
of the bin and lift it out to remove.
To relocate the drawer - Place the bin into the rail assembly.
To remove the divider - Pull the divider straight up.
To relocate the divider - Hook the top corners of divider(G)
over the hole of the bin(_}).
/k
CAUTION
Do not allow baby or children go inside the drawer bin. They could
damage the Refrigerator and seriously injure themselves. Do not sit on
the Freezer door. The door may break. Do not allow children to climb
into the Freezer basket.
Z_ If you remove the divider to clean the basket bin, you must reinstall the
WARNINGdivider using 2 screws after cleaning to prevent children from getting
trapped inside the basket.

CLEANING THE REFRIGERATOR
Caring for your Samsung French Door Refrigerator prolongs the life of your appliance and helps
keep it odor and germ-free.
Cleaning the Interior
Clean the inside walls and accessories with a mild
detergent and then wipe dry with a soft cloth. You can
remove the drawers and shelves for a more thorough
cleaning. Just make sure to dry drawers and shelves
before putting them back into place.
Cleaning the Exterior
Wipe the digital panel and display panel with a clean,
soft cloth. Spray water onto the cleaning cloth instead
of spraying directly on the surface of the Refrigerator.
It helps ensure an even distribution of moisture to the
surface. The doors, handles and cabinet surfaces should
be cleaned with a mild detergent and then wiped dry with
a soft cloth. To keep your appliance looking its best, the
exterior should be polished once or twice a year.
,/_ Do not use Benzene, Thinner or Clorox for cleaning. They may
CA"_ONdamage the surface of the appliance and may cause fire.
L
Z_ Printed letters on the display may be erased if the stainless cleaner
CAUTIONis applied directly to the area where the letters are printed.
Cleaning the Ice/Water Dispenser
Push down one end of the tray dispenser and remove it.
Wipe the Ice / Water Dispenser with a clean and soft cloth.
Cleaning the Rubber door seals
If the rubber door seals are dirty, the doors may not close
properly, and the Refrigerator will not operate efficiently.
Keep the door seals free of grit or grime by cleaning the
doors with a mild detergent and damp cloth. Wipe dry
with a clean, soft cloth.
Z_ Do not spray the Refrigerator with water while it is plugged in, as it may cause an electric shock.
CAUTIONDOnot clean the Refrigerator with benzene, thinner or car detergent due to risk of fire.
Cleaning behind the Refrigerator
To keep cords and exposed parts free of dust and dirt accumulation, vacuum behind the appliance
once or twice a year.
A
'.ZL& Do not remove the back cover. Doing so may cause an electric shock.
CAUTION

Operatng ur
l)D r F efreera.tor
Yren
CHANGING THE INTERIOR LIGHTS
A Before changing any of interior lights, unplug the Refrigerator from the power supply. If you are unsure
CA"U'_'ONabout changing the lights after reading through these directions, contact your service center for help.
Replacement bulbs for both freezer and fridge are available from your local home improvement or
electronics store. Use replacement bulbs with size E26, maximum 60 watts.
Changing the Interior Lights in the Refrigerator
1. Unplug the power cord from the outlet.
2. Pull the shield down while pushing it backwards to remove it.
3. Turn the bulb counterclockwise.
4. Assembly is the reverse order of disassembly.
Changing the Interior Lights in the Freezer Drawer
1. Unplug the power cord from the outlet.
2. Pull drawer out to full extension.
3. Pull the shield down while pushing it backwards to remove it.
4. Turn the bulb counterclockwise.
5. Assembly is the reverse order of disassembly.
Z_ Do not place your fingers inside the cover. The lamp may be hot.
CAUTION

CHANGING THE WATER FILTER
The "Filter Indicator" light letsyou know when it is time to change your water filter cartridge. To
give you preparation time to get a new filter,the red light will come on just before the capacity
of the current filter runs out. Changing the filter on time provides you with the freshest, cleanest
water from your fridge.
1. Take a new water filter and put a month indicator sticker on the filter as shown.
The date on the sticker must be six months from the current date. For example, if you are replacing
the water filter in March, put the "SEP" (September) sticker on the filter to remind you to replace in
September. Normal filter life is about every 6 months.
2. Remove the new filter's protective cap and remove the old filter.
3. Position and insert the new filter into the filter housing.
Slowly turn the water filter clockwise to align with the printing mark on the cover, locking the filter in
position. Make sure to align the water filter label mark with the center of cover filter printing as illustrated.
Remember, do not over-tighten.
® ®
Cover filter
(month
indicator)
//
J /
Turn until the
labels are aligned.
4. Once you have completed this process, press and hold the Ice / Water button for 3 seconds to reset
the filter schedule.
5. Lastly, run about six glassfuls of water through water dispenser to clean the water supply system.
Make sure that water flows clearly again before drinking.
Be sure to flush the dispenser thoroughly otherwise water may drip from the dispenser.
This means that there is still air in the line.
Do NOT use the water or ice dispenser without a water filter cartridge because the water line may
become blocked.
Ordering replacement Water Filter
For replacement waster filter you can visit your local service center or contact the Samsung Parts distributor.
Be sure the replacement water filter has the SAMSUNG logo on the box and the water filter.
Link: http://www.samsungparts.com

Operatng ur
l)D r F efreerator
WATER FILTER CHART
Fren
Performance Data Sheet For Samsung Model DA97=06317A
Using Replacement Cartridge DA29-00003G
This system has been tested according to NSF/ANSI Standards 42 and 53 for the reduction of the substances listed below.
The concentration of the indicated substances in water entering the system was reduced to a concentration less than or
equal to the permissible limit for water leaving the system, as specifi ed in NSF/ANSI 42 and 53.
System tested and certifi ed by NSF International against NSF/ANSI Standard 42 for
the reduction of Chlorine Taste and Odor, Particulate Class I, and against NSF/ANSI
Standard 53 for the reduction of Cysts, Turbidity, Lead, Asbestos, Benzene, Carbofuran,
p-Dichlorobenzene and Mercury.
To a capacity of 300 gallons (1,136 liters).
Note that while the testing was performed under standard laboratory conditions, actual performance may vary.
Max,
NSFSpecified Average Permissible NSFReduction
Contaminant AverageInfluent InfluentChallenge Average% ProductWater NSFTest
Reduction Concentration ConcentrationUnits Reduction Concentration ProductWater Requirements
applytoeachrow Concentration
Chlorinetaste
2.1mg/L 2.0mg/L+10% 97.6 0.05mg/L NA >50% J-00029741
andodor
Particulate
10,566,666 Atleast10,000
ClassIParticlesize' pt/mL particles/mL 98.4 171,833pts/mL NA >85% J-00029739
<0.5t0<1um
Cysts* 127,500cysts/L Minimum50,000
cysts/L 99.99 <1cyst/L NA >99.95% J-00031000
Turbidity 10.5 11+1NTU 98.6 0.15NTU 0.5NTU >0.5NTU J-00033223
Lead@pH6.5 153ug/L 0.15+10% 99.3 <1ug/L 0.010mg/L 10ug/L J-00039590
Lead@pH8.5 155ug/L 0.15+10% >99.4 <1ug/L 0.010mg/L 10ug/L J-00039591
Mercury@pH
6.5 5.97ug/L 0.006+10% 96.6 <0.2ug/L 0.002mg/L 2 ug/L J-00039589
Mercury@pH 6.29ug/L 0.006+10% 88.9 0.7ug/L 0.002mg/L 2 ug/L J-00039586
8.5
107to 108fibers
Asbestos 140MFL >99 <0.17MFL NA 99% J-00029743
>um inlength
Benzene 13.88ug/L 0.015+10% 96.4 <0.5ug/L 0.005mg/L <5 ug/L J-0029751
Carbofuran 79.6ug/L 0.190mg/L 98.7 1ug/L 0.001mg/L <40ug/L J-00029750
o-Dichloroben-
237.5ug/L 0.225+10% 99.8 0.525ug/L 0.075mg/L <75ug/L J-00029749
zene
* Based on the use of Cq/ptosporidium parvum oocysts

WATER FILTER CERTIFICATION
State of California
Department of Public Health
Water Treatment Device
Certificate Number
04-1660
Date Issued: July 7, 2004
Date Revised: June 2, 2008
Trademark/Model Designation
Samsung DA61-00159A-B
Samsung DA97-06317A
Manufacturer: Cuno Incorporated
........ Re_placement Elements
DA29-00003
DA29-00003G
The water treatmenl
116830 of the He_
certificate
the following health
to Section
Microbiological contaminants and Turbidity
Cysts
Turbidity
Organic Contaminants
Rated Service Capacity: 300 gal Rated Service Flow: 0.5 gpm
Conditions of Certification:
Do not use where water is microbiotogically unsafe or with water of unknown quality, except that systems certified for
cyst reduction may be used on disinfected waters that may contain filterable cysts.

Operatng ur
Door Refraerator
FOOD STORAGE TIPS
Fren
DAIRY PRODUCTS
Butter 2-3 Weeks 6-9 Months Wrap or covertightly.
Check datecode. Mostmilk and similarproducts aresold in date-coded
Milk 1-2Weeks Notrecommended cartons that indicatea products's peak freshness. Re-sealwith cap or
wraptightly. Donot returnunused protionsto oroginalcontainer.
CreamCheese, cheese
food, and cheese
spread
HardCheese(un-
opened)
HardCheese(opened)
Cottage Cheese
Cream
Sour Cream
Cream Dips (opened)
Yogurt
FrozenYogurt
2-4 Weeks
3-4 Months
2 Months
10-15 Days
7-10 Days
2 Weeks
1Week
10-14 Days
na
Notrecommended
6 Months
Notrecommended
Notrecommended
2 Months
Notrecommended
Notrecommended
Notrecommended
2 Months
Check datecode. Keepallcheesetightly packed in moistureproof wrap
Check datecode. Mostyogurt, creams,andsimilar products aresold in
date-coded cartons that indicateaproduct's peak freshness. Re-sealor
covertightly. Do not return unused portionsto originalcontainer.
Check datecode. Keepcovered.
EGGS
Check datecode. Store eggs in coldest part of refrigeratorand intheir
Eggs (uncooked) 3-4 Weeks Notrecommended
originalcontainer.
Eggs (cooked) 1weeks Notrecommended Store incoveredcontainer
Leftoveregg dishes 3-4 Days Notrecommended Store in coveredcontainer
FRESH FRUITS
Apples
Bananas
Peaches,Melons,
Pears,Avocados
Berriesand Cherries
Apricots
Grapes
Pineapple(un-cut)
Pineapple(cut)
Citrus
Juice
FrozenJuice
1Month
2-4 Days
3-5 Days
2-3 Days
3-5 Days
2-5 Days
2-3 Days
5-7 Days
1-2Weeks
6 Days
Thawing only
Notrecommended
Notrecommended
Notrecommended
12 Months
Notrecommended
na
Notrecommended
6-12 Months
Notrecommended
Notrecommended
12 Months
Ifstoring inrefrigerator,do not wash fruitbeforestoring. Store inmois-
ture resistantbags or containers.Wrap cut fruits. Somefruitsdarken
when refrigerated.
Store uncovered.
Check datecode and re-sealin originalcontainer. Do notreturn unused
portionsto originalcontainer.
Check datecode. Donot re-freeze.

Fish
FattyFish(mackerel,
trout, salmon)
LeanFish(cod, flounder,
etc)
Frozenor Breaded
1-2 Days 2-3 Months
1-2 Days 6 Months
na 3 Months
Keepin originalwrapper andstore in coldest part of refrigerator.Pack-
age invapor-proof and moistureproof wrap for freezer.Freezeat 0°R
Thaw in refrigeratoror Check datecode. Freezein originalpackaging.
Sheflfish
Shrimp(uncooked) 12 Months
Crab 10 Months
Cooked Fishor Shellfish 3 Months
1-2 Days
3-5 Days
2-3 Days
Tofreeze package in vapor-proof andmoisture-proof container.
Fresh, Uncooked
Chops
Ground
Roast
Bacon
Sausage
Steak
Poultry
Lunch meat
Cooked
Meat
Poultry
Ham
2-4 Days
1 Day
2-4 Days
1-2 Weeks
1-2 Days
2-4 Days
1 Day
3-5 Days
6-12 Months
3-4 Months
6-12 Months
1-2 Months
1-2 Months
6-9 Months
12 Months
1Month
Check date code for use. Storein coldest partof refrigeratorinoriginal
packaging. Add more packagingin moisture-proofandvapor-proof
container forfreezing.Recommended refrigeratortemperature33°Fto
36°Fand freezertemperature0°Fto 2°F
2-3 Days
2-3 Days
1-2 weeks
2-3 Months
4-5 Months
1-2 Months
Check date code for use. Storein coldest partof regrigeratorin original
packaging. Package in moisture-proofand vapor-proof container for
freezing.
Sources:
American Meat Institute Foundation. 1994. Yellow pages: answers to predictable questions consumers ask about meat and poultry.
American Meat Institute Food Marketing Institute. 1999. The food keeper. Food Marketing Institute, Washington, D.C. Freeland-Graves,
J.H. and G.C. Peckham. 1996. Foundations of food preparation, 6th ed. Prentice-Hall, Inc. Englewood Cliffs, NJ. Hillers, V.N. 1993. Stor-
ing foods at home. Washington State University Cooperative Extension, Pullman, WA. Publ. EB 1205.
National Restaurant Association. 2001. Be cool-chill out! Refrigerate promptly. National Restaurant Association Education FoundationlAs
International Food Safety Council, Washington, D.C. USDA. 1997. Basics for handling food safely. U.S. Department of Agriculture, Food
Safety and Inspection Service, Washington, D.C.

eshoot ng
, Check that the power plug is properly connected.
, Is the temperature control on the display panel set to the correct temperature?
Try setting it to a lower temperature.
, Is the Refrigerator in direct sunlight or located near a heat source?
• Is the back of the Refrigerator too close to the wall and therefore keeping air from
circulation?
• Is the temperature control on the display set to the correct temperature?
Try setting it to a warmer temperature.
• Is the temperature in the room too low?
• Did you store the food with high water content in the coldest part of the Refrigerator?
Try moving those items into the body of the Refrigerator instead of keeping them in the
Cool Select PantryTM.
, Check that the Refrigerator is leveland stable.
, Is the back of the Refrigerator too close to the wall and therefore keeping air from
circulating?
, Was anything dropped behind or under the Refrigerator?
• A "ticking" sound is heard from inside the Refrigerator.It is normal and occurs because
various accessories are contracting or expanding according to the temperature of the
Refrigerator interior.
, Some heat is normal as anti-condensators are installed in the vertical hingedsection of
the Refrigerator to prevent condensation.
• Is the Refrigerator door ajar? Condensation can occur when you leavethe door open for
a long time.
, Did you wait for 12 hours after installation of the water supply line before making ice?
, Is the water line connected and the shut-off valve opened?
• Did you manuallystop the ice making function?
• Is the Freezertemperature too warm? Try setting the Freezertemperature lower.
• This is normal. The bubbling comes from the Refrigerator coolant liquid circulating
through the Refrigerator.
• Check for spoiled food.
• Foods with strong odors(for example, fish) should be tightly covered.
• Clean out your Freezer periodically and throw away any spoiled or suspicious food.
, Is the air vent blocked? Remove any obstructions so aircan circulate freely.
• Allow sufficient space between the foods stored for efficient air circulation.
• Is the Freezerdrawer closed properly?
, Is the water line connected and the shut-off valve opened?
, Has the water supply line tubing been crushed or kinked?
Make sure the tubing is free and clear of any obstruction.
• Is the water tank frozen because the Refrigerator temperature is too low?
Tryselecting a warmer setting on the main display panel.

SAMSUNG REFRIGERATOR (26 CUBIC FEET AND LARGER CAPACITY)
LIMITED WARRANTY TO ORIGINAL PURCHASER
This Samsung brand product, as supplied and distributed by Samsung Electronics America, Inc. (Samsung)
and delivered new, in the original carton to the original consumer purchaser, is warranted by Samsung against
manufacturing defects in materials and workmanship for a limited warranty period of:
One (1) Year Parts and Labor on Refrigerator
Five (5) Years Parts and Labor on Sealed Refrigeration System Only*
(*Compressor, evaporator, condenser, drier, connecting tubing)
This limited warranty begins on the original date of purchase, and is valid only on products purchased and
used in the United States. To receive warranty service, the purchaser must contact Samsung for problem
determination and service procedures. Warranty service can only be performed by a Samsung authorized
service center. The original dated bill of sale must be presented upon request as proof of purchase to Samsung
or Samsung authorized service center.
Samsung will repair or replace any part found to be defective, at our option and at no charge as stipulated
herein, with new or reconditioned parts during the limited warranty period specified above. All replaced parts
and products become the property of Samsung and must be returned to Samsung. Replacement parts and
products assume the remaining original warranty, or ninety (90) days, whichever is longer.
In-home service will be provided during the warranty labor period subject to availability within the contiguous
United States. In-home service is not available in all areas. To receive in-home service, the product must be
unobstructed and accessible from floor level to service personnel. If during in-home service repair cannot be
completed, it may be necessary to remove, repair and return the product. If in-home service is unavailable,
Samsung may elect, at our option, to provide for transportation of our choice to and from a Samsung
authorized service center. Otherwise, transportation to and from the Samsung authorized service center is the
responsibility of the purchaser.
This limited warranty covers manufacturing defects in materials and workmanship encountered in normal,
noncommercial use of this product, and shall not apply to the following, including, but not limited to: damage
which occurs in shipment; delivery and installation; applications and uses for which this product was not
intended; altered product or serial numbers; cosmetic damage or exterior finish; accidents, abuse, neglect, fire,
water, lightning or other acts of nature; use of products, equipment, systems, utilities, services, parts, supplies,
accessories, applications, installations, repairs, external plumbing and leaks, external wiring, circuit breakers,
fuses or connectors not supplied and authorized by Samsung, or which damage this product or result in service
problems; incorrect electrical line voltage, fluctuations and surges; customer adjustments and failure to follow
operating instructions, cleaning, maintenance and environmental instructions that are covered and prescribed in
the instruction book; loss of food due to spoilage; consumable items including filters and light bulbs.

THEREARENOEXPRESSWARRANTIESOTHERTHANTHOSELISTEDANDDESCRIBEDABOVE,AND
NOWARRANTIESWHETHEREXPRESSORIMPLIED,INCLUDING,BUTNOTLIMITEDTO,ANYIMPLIED
WARRANTIESOFMERCHANTABILITYORFITNESSFORAPARTICULARPURPOSE,SHALLAPPLY
AFTERTHEEXPRESSWARRANTYPERIODSSTATEDABOVE,ANDNOOTHEREXPRESSWARRANTY
ORGUARANTYGIVENBYANYPERSON,FIRMORCORPORATIONWITHRESPECTTOTHISPRODUCT
SHALLBEBINDINGONSAMSUNG.SAMSUNGSHALLNOTBELIABLEFORLOSSOFREVENUEOR
PROFITS,FAILURETOREALIZESAVINGSOROTHERBENEFITS,ORANYOTHERSPECIAL,INCIDENTAL
ORCONSEQUENTIALDAMAGESCAUSEDBYTHEUSE,MISUSEORINABILITYTOUSETHISPRODUCT,
REGARDLESSOFTHELEGALTHEORYONWHICHTHECLAIMISBASED,ANDEVENIFSAMSUNG
HASBEENADVISEDOFTHEPOSSIBILITYOFSUCHDAMAGES.NORSHALLRECOVERYOFANYKIND
AGAINSTSAMSUNGBEGREATERINAMOUNTTHANTHEPURCHASEPRICEOFTHEPRODUCTSOLDBY
SAMSUNGANDCAUSINGTHEALLEGEDDAMAGEWITHOUTLIMITINGTHEFOREGOING,PURCHASER
ASSUMESALLRISKANDLIABILITYFORLOSS,DAMAGEORINJURYTOPURCHASERANDPURCHASER'S
PROPERTYANDTOOTHERSANDTHEIRPROPERTYARISINGOUTOFTHEUSE,MISUSEORINABILITYTO
USETHISPRODUCTSOLDBYSAMSUNGNOTCAUSEDDIRECTLYBYTHENEGLIGENCEOFSAMSUNG.
THISLIMITEDWARRANTYSHALLNOTEXTENDTOANYONEOTHERTHANTHEORIGINALPURCHASER
OFTHISPRODUCT,ISNONTRANSFERABLEANDSTATESYOUREXCLUSIVEREMEDY.
Somestatesdo notallowlimitationsonhowlonganimpliedwarrantylasts,ortheexclusionorlimitationof
incidentalorconsequentialdamages,sotheabovelimitationsor exclusionsmaynotapplytoyou.Thiswarranty
givesyouspecificlegalrights,andyoumayalsohaveotherrights,whichvaryfromstatetostate.
Toobtainwarrantyservice,pleasecontactSamsungat:
SAMSUNGCUSTOMERCARECENTER
SamsungElectronicsAmerica,Inc.400ValleyRoadSuite201Mt.Arlington,NJ07956
1-800-SAMSUNG(1-800-726-7864)andwww.samsung.com


las posibilidades
Gracias pot adquinr un producto Samsung.
Para recib_r un servicio mas completo,
registre su producto en
www. samsu ng.com/reg ister

CARACTERiSTICAS PRINCIPALES DE SU NUEVO REFRIGERADOR
Su refrigerador Samsung de tres puertas esta equipado con Multiples caracteristicas innovadoras de
almacenamiento y eficiencia energetica.
o Sistema de doble enfriamiento
El refrigerador y la nevera disponen de evaporadores independientes. Gracias a este sistema de
enfriamiento, la nevera y el refrigerador refrigeran de forma mas eficiente. Ademas, este sistema
de flujo de aire independiente evita que los olores de los alimentos situados en uno de los
compartimentos penetren en el resto.
o Cool Select Pantry TM (RF267)
El Cool Select Pantry es una gaveta de ancho completo que dispone de control de temperatura
ajustable.
,, Espacio m&s grande y.ancho
Las zonas de parilla ancha y _lespensa proporcionan suficiente espacio para articulos mas grandes,
como cajas de pizza, etc.
La charo/a desplazable de la nevera proporciona espacio suficiente para 2 o 3 pavos.
o Cierre autom_tico de sequridad
El cierre automatico de seguridacTcerrara de forma automatica una puerta entreabierta.
,, M&quina de hielo compacta
La maquina de hielo puede dispensar cubitos o hielo picado.
o Pantalla de visualizaci6n y control de temperatura digital
o Sistema de filtrado de agua
o Alarma de.puerta
Una alarma awsara cuando la puerta quede entreabierta.
o Compartimento inclinable
El compartimento inclinable puede usarse para almacenar una pizza de 40,6 cm (16").
o Auto sacar del cajon
caj6n de la parte superior en FRECEL sale automaticamente pot abrir la puerta de FRECEL
o Gaveta de extracci6n autom&tica
La gaveta superior de la nevera se despliega y sale automaticamente al abrir la puerta del
compartimento.
,, Tirador simple
La puerta de la nevera puede abrirse con menos esfuerzo.
o Energy. Star
La etiqueta Energy star de este producto puede hacer que ahorre en su factura de electricidad.
Para facilitar futuras consultas, escriba el modelo
y el n0mero de serie a continuaci6n, que podra
encontrar en el lateral izquierdo del refrigerador.
N° de modelo
N° de serie

INFORMACION DE SEGURIDAD
Antes de usar su nuevo refrigerador Samsung de tres puertas, lea este manual para asegurarse
de que sabe cOmo usar de forma segura y eficaz, las caracter[sticas y funciones que ofrece su
nuevo electrodomestico.
Como las siguientes instrucciones de funcionamiento estan destinadas a varios modelos, las
caracter[sticas de su refrigerador pueden diferir ligeramente de las descritas en este manual. Si
tiene cualquier pregunta, pOngaseen contacto con nosotros en el 1-800-SAMSUNG o busque
ayuda e informaciOnonline en www.samsung.com.
Significado de los iconos y sefiales usadas en este manual de usuario:
Z_ Practicas peligrosas o inseguras que pueden ocasionar lesiones fisieas graves o
ADVERTENClApeligro de muerte.
. Practicas peligrosas o inseguras que pueden ocasionar lesiones fisicas leves o daOos
PRECAUC_ONmateriales.
Para reducir el riesgo de incendio, explosion, choque electrico o lesiones fisicas, cumpla
PRECAUC_ONestas precauciones basicas de seguridad al usar su refrigerador:
NO intentar.
NO desmontar.
[_ NO tocar.
Cumplir expresamente las instrucciones.
Desenchufar el cable de alimentaciOn de la toma de pared.
Asegurarse de que la maquina esta conectada a tierra para evitar choques electricos.
Ponerse en contacto con el servicio tecnico para obtener ayuda.
Estas se6ales de advertencia existen para prevenir lesiones personales o a terceros.
Cumplalas explicitamente
Guarde este manual en lugar seguro para futuras consultas.
SENALES DE ADVERTENCIA GRAVE
No enchufe varios electrodomOsticos en la misma toma de pared.
• Los grandes electrodomesticos consumen mucha energia. Suministrar energia amas de un
electrodomestico o maquina a traves de una Onicatoma de energia podria ocasionar recalentamiento y
provocar un incendio.
AsegQrese de que el tomacorriente no quede doblado o daSado por la parte posterior
del refrigerador.
® Un cable de alimentaci0n dafiado puede recalentarse y provooar un incendio.
No vaporice agua directamente en el interior o exterior de la gaveta del refrigerador/
nevera.
El agua podria entrar en el interior de las piezas de la maquina, ocasionando choques electricos.
inforrracOn de sef_uridad 3

nformac (in de sea(Jrdad
@
@
@
No use aerosoles cerca del refrigerador.
• El uso de aerosoles en las proximidades del refrigerador puede provocar una explosion o un incendio.
No someta a esfuerzos indebidos el cable de alimentaci6n ni coloque articulos
pesados sobre 61.
• Colocar articulos pesados sobre el cable de alimentacion genera un riesgo de explosion e incendio.
No enchufe el cable de alimentaci6n con las manos h_medas.
Podria ser causa de choque el@trico.
No introduzca un recipiente Ileno de agua en el refrigerador.
Si se derramase, podrian ocasionarse incendios o choques el@tricos.
No instale el refrigerador en lugares h_medos o cerca de la presencia de agua.
La humedad o un aislamiento deteriorado de las partes el@tricas internas, puede ocasionar choques
el@tricos o incendios.
No almacene sustancias volAtiles ni inflamables en el refrigerador.
El almacenaje de benceno, disolvente, alcohol, eter, gas licuado y otros productos similares puede
provocar explosiones.
No desmonte o repare el refrigerador usted mismo.
Corre el riesgo de provocar un incendio, averias en el electrodomestico o lesiones fisicas. Pongase en
contacto con su centro de asistencia mas cercano para obtener ayuda de un t@nico de servicio calificado.
Desenchufe el refrigerador antes de reemplazar el foco interior.
Reemplazar el foco mientras el refrigerador esta enchufado puede ocasionar un choque el@trico.
Si desea desechar el refrigerador, retire las puertas y los sellos antes de tirarlo.
Las puertas (y sus sellos) pueden atrapar a un nifio que se introduzca en el refrigerador.
Aseg0rese de que las puertas est@ anuladas y de que nadie ha quedado atrapado dentro.
El refrigerador debe set conectado a tierra por seguridad.
Aseg0rese siempre de haber conectado a tierra el refrigerador antes de intentar examinar o reparar
cualquier pieza del electrodomestico. Las fugas de corriente pueden ocasionar choques el@tricos graves.
No use nunca conductos de gas, lineas de tel_fono u otros captadores potenciales de
rayos como puesta a tierra.
Un uso incorrecto del conector de puesta a tierra puede ocasionar riesgo de choque el@trico. Si fuese
necesario usar una alargadera para el suministro el@trico del refrigerador, use 0nicamente una extension
de 3 cables que disponga de un conector de 3 clavijas con toma de tierra y una toma el@trica de 3
ranuras que acepte el conector del electrodomestico. El regimen indicado de la extension debe ser de 115
V-120 V de CA, 10 A o superior. Adicionalmente, si se usa un adaptador de puesta a tierra, aseg0rese de
que la caja de la toma el@trica tambi@ disponga de conexion completa a tierra.
4 InforrraciOn de segundad

SENALES DE PRECAUClON
Use el sentido comQn al Ilenar el refrigerador de alimentos y bebidas.
• En un refrigerador Ileno en exceso, los articulos pesados, fragiles, voluminosos o delicados podrian caer
ocasionando lesiones fisicas o da_os a los objetos adyacentes.
No introduzca botellas o envases de cristal en la gaveta de la nevera.
• AI congelarse el contenido y expandirse, el cristal podria romperse, provocando lesiones fisicas o Ilenando
la nevera de peligrosos fragmentos robs de cristal.
Si la toma de pared estuviera suelta, no conecte el cable de alimentaci6n.
Existe riesgo de choque electrico o incendio. Solicite que un electricista autorizado revise el tomacorriente.
No desenchufe su refrigerador tirando del cable de alimentaci6n.
Sujete siempre el tomacorriente firmemente y tire de 61para extraerlo de la pared. Forzar o tirar del cable de
alimentacion puede ocasionar un cortocircuito, incendio o choque electrico.
Un cable de alimentacion da5ado, debe ser reemplazado por el fabricante, un tecnico de servicio
certificado o por personal de servicio calificado.
No almacene articulos sobre la parte superior del electrodom6stico.
AI abrir o cerrar la puerta, dichos articulos pueden caer, ocasionando lesiones fisicas o da5ando los objetos
adyacentes.
No almacene en el refrigerador productos farmac6uticos, material cientifico o
productos sensibles a la temperatura.
Los productos que precisan controles de temperatura estrictos no deben almacenarse en el refrigerador.
Z_ No permita a los niSos subir, sentarse o colgarse de las parilla o jaladeras del
p,EcAuc,o,refrigerador. Estas acciones podrian daSar el refrigerador y herir gravemente a los
niSos. No se apoye en la puerta de la nevera. La puerta podria romperse. No permita
que los niSos se suban dentro de la gaveta de la nevera.
@
Si percibe olor a quimicos o a pl&stico quemado o ve humo, desenchufe
inmediatamente el refrigerador y p6ngase en contacto con su centro de asistencia
Samsung Electronics.
®
Una vez que su refdgerador est6 en funcionamiento, no toque las superficies frias del
compartimento de la nevera. La piel podria adherirse a estas superficies muy frias
especialmente con las manos h_medas o mojadas.
La piel podria adherirse a la superficie y congelarsele.
No introduzca las manos bajo el electrodom6stico.
Los bordes afilados podrian ocasionar lesiones fisicas.
No introduzca nunca los dedos u otros objetos en la abertura del dispensador de agua
InforrraciOn de seguridad 5

nformac (in de see(Jrdad
ni en el conducto de hielo.
• Hacerlo puede ocasionar lesiones fisicas o da_os materiales.
Si el refrigerador no va a ser usado durante un perlodo de tiempo prolongado (por
ejemplo, durante varios meses), desenchufe el cable de alimentaciOn de la toma de
pared.
• Con el tiempo, el deterioro del aislamiento del cable de alimentaci6n puede ocasionar un incendio.
No use paSos mojados o hQmedos para limpiar el tomacorriente.
Elimine cualquier resto de polvo o materiales extraSos de las clavijas del
tomacorriente.
• Un tomacorriente sucio puede incrementar el riesgo de incendio.
®
A
PRECAUCION
Si desconectase el refrigerador del suministro elOctrico, deber& esperar al menos
cinco minutos para volver a enchufarlo.
No sitQe el equipo en lugares expuestos a la luz directa del sol.
El electrodomOstico debe colocarse de forma que permita un acceso fAcil a la fuente
de alimentaciOn.
Si el cable de alimentaciOn estuviera daSado, debe ser reemplazado por el fabricante,
un tOcnico de servicio certificado o por personal de servicio calificado.
Si planea unas largas vacaciones, vacie el refrigerador y descon@telo.
• Limpie el exceso de humedad del interior y deje las puertas abiertas para impedir la proliferacion de olores
y roche.
Garantia de servicio y modificaci6n
Cualquier cambio o modificacion realizada por terceros sobre este electrodomestico acabado, no esta
cubierta por el servicio de garantia de Samsung ni seran responsabilidad de Samsung las cuestiones
relativas a la seguridad resultantes de dichas modificaciones realizadas por terceros.
Los niSos pueden quedar atrapados en el interior de los refrigeradores.
Antes de desechar su vbjo refrigerador o nevera,asegOresede los sigubnte:
Desmonte las puertas.
Deje todas las parilla colocadas en su lugar para que los ni_os no puedan acceder al interior y cerrar la
puerta mientras permanecen dentro.
®
Este electrodomestico no ha sido dise_ado para el uso de ni_os peque_os o personas
discapacitadas sinsupervision adulta. Los ni_os peque_os deben estar supervisados al usar el
electrodomestico.
6 InforrraciOn de seguridad

INSTALACION DE SU
REFRIGERADOR DE TRES PUERTAS
FUNCIONAMIENTO DEL
REFRIGERADOR
SAMSUNG DE TRES PUERTAS
_f
SOLUCION DE PROBLEMAS
08 Preparativos para instalar el refrigerador
09 Desmontaje de las puertas del refrigerador
11 Desmontaje de la gaveta de la nevera
12 Montaje de las puertas de la nevera
14 Montaje de la gaveta de la nevera
15 Ajuste de las puertas
15 Ajuste del soporte para la parilla ajustable
16 Realizacion de ajustes menores entre puertas
17 Ajuste del nivel de la gaveta de la nevera
18 Chequeo de la toma del dispensador de agua
19 Instalaci0n de la toma del dispensador de agua
21 Uso del panel de control
22 Uso de la pantalla de visualizaci0n digital
23 Control detemperatura
24 Uso del dispensador de hielo y agua fr[a.
26 Partesy funciones(RF267)
27 Partesy funciones(RF26V)
28 Almacenaje de alimentos
29 Uso del Cool select pantry TM
29 Uso del compartimento inclinable
30 Desmontaje de los accesorios del refrigerador
31 Uso de puertas
32 Desmontaje de los accesorios de la nevera
33 Limpieza del refrigerador
34 Reemplazo del foco interior
35 Reemplazo del filtro de agua
40 Soluci0n de problemas
..............i I
DIAGRAMA DE CONEXION
41 Diagrama de conexi0n
GARANT|A 42 Garanfia
£/! ' '

PREPARATIVOS PARA INSTALAR EL REFRIGERADOR
Felicidades por la adquisiciOn de su refrigerador Samsung de tres puertas. Esperamos que disfrute de las
caracteristicas y rendimiento de alta tecnologia que este nuevo electrodomestico tiene que ofrecer.
Selecci6n del mejor emplazamiento para el refrigerador
• [JRemplazamiento de f_tcilacceso para el suministro de agua.
• Un emplazamiento sin exposiciOn directa a la luz solar.
Un emplazamiento que tenga el piso nivelado (o casi nivelado).
Un emplazamiento con suficiente espacio para que las puertas del
refrigerador puedan abrirse con facilidad.
Deje suficiente espacio para la circulaciOn del aire del sistema de enfriamiento
interno. Si el refrigerador no dispone de suficiente espacio, el sistema de
refrigeraciOn interna puede no funcionar correctamente.
Si su refrigerador dispone de una maquina de hielo, deje mas espacio libre en la parte
posterior para las conexiones de la toma de agua. AI instalar su refrigerador junto a
una pared fija, debe dejarse un espacio libre minimo de 3 3A" (95 mm) entre el refrigerador y la pared, para permitir
la apertura de la puerta.
Antes que nada: asegOrese de poder mover fa.cilmente su refrigerador hasta su posiciOn final, midiendo puertas
de entrada (ancho y alto), umbrales, techos, escaleras, etc.
El siguiente cuadro especifica la altura y ancho exactos del refrigerador Samsung de tres puertas.
Dimensiones
(pulgadas)
Capacidad (pies cObicos)
Ancho (A)
Altura de lacaja
Profundidad
con bisagra (B)
sin bisagra (C)
con puerta (D)
sin puerta (E)
26
35 3_
70
68 %
35 %
29 ½
®
,, Mantenga despejado el lado derecho, izquierdo, posterior y superior durante la instalaciOn.
Esto ayudara, a reducir el consumo de energia y mantener una factura electrica mas baja.
No instale el refrigerador en un ernplazamiento donde la ternperatura pueda set inferior a
10 ° C (50 ° F).
AI desplazar el refrigerador
Para evitar daflos en el piso, aseg0rese de que los pies
de nivelaci6n frontales estan en su posiciOn mas elevada
(pot encima del piso). Examine la secciOn "NivelaciOn del
refrigerador" del manual.
Para proteger el acabado del piso, coloque una la.mina de
protecciOn, como carton de embalaje, bajo el refrigerador, destornillador
PRECAUClON
AI proceder a labores de instalaci6n, servicio o limpieza en la
parte trasera del refrigerador, asegOrese de tirar de la unidad
en linea recta hacia fuera y empujarla hacia atras igualmente
en linea recta, al finalizar.
8 Instaiaci0n

AJUSTE DEL REFRIGERADOR
Ahora que tiene su nuevo refrigerador instalado yen su sitio, esta preparado para ajustarlo y disfrutar de todas las
caracteristicas y funciones de las que dispone el electrodomestico. Completando los siguientes pasos, su refrigerador
debera estar totalmente operativo.
1. Coloque el refrigerador en una situacion apropiada, con una distancia libre razonable entre la pared y el
electrodomestico. Examine las instrucciones de instalacion de este manual.
2. Una vez enchufado el refrigerador, aseg0rese de que el foco interior se ilumina al abrir las puertas.
3. Ajuste el control en la temperatura mas fria y espere una hora. La nevera debera enfriarse ligeramente y el
motor funcionar suavemente.
4. Tras poner en funcionamiento el refrigerador, har_tnfalta varias horas para alcanzar la temperatura asignada.
Puede introducir alimentos y bebidas en el refrigerador una vez la temperatura sea suficientemente fria.
Chequee la siguiente lista de accesorios.
Dispositivode
Filtrodeagua LlaveAllen sujeciOn
(DA29-00002B) (DA80-00002C) (DA60-00143B)
Racordecompre- Tuercadecom-
siOn presiOn
(DA62-00305A) (DA74-00070B)
DESMONTAJE DE LAS PUERTAS DEL REFRIGERADOR
Si el refrigerador es demasiado grande para que pase facilmente por la entrada, puede desmontar las puertas
del refrigerador.
Herramientas necesarias _ .
Destornillador Philips Llave tubular de 10 Llave Allen (Smm)
mm
Destornillador de cabeza Alicates
plana
Desmontaje de las puertas del refrigerador
1. Con la puerta abierta, retire la tapa superior del cuadro
((_) mediante el destornillador de cabeza plana y
cierre la puerta. Extraiga los 3 pernos sujetando la
parte superior del cuadro y retirela (@).

2. Desconectelosdosconectores(l_)
situadosacadaladodelatapasuperior
y elconector(@)situadosobrelapuerta
delladoizquierdo.Retireeltubo(_})
apretandolapartedecolorgrisoscuro(
I_) delacopladordelalineadeagua.
,/_ Si el acoplador incluye una abrazadera roja,
P,EcAuc_6Ndebera retirarla antes de retirar el tubo.
3. Extraiga los 3 pernos hexagonales (l_) que se
encuentran fijados a las bisagras superiores de la puerta
izquierda y derecha con una Ilave Allen (10 mm). Con
un destornillador de cabeza Philips, extraiga el perno
de puesta a tierra (1_) que se encuentra fijado a las
bisagras superiores de la puerta izquierda y derecha.
Retire las bisagras superiores de la puerta izquierda y
derecha (_).
%
4. Levante la puerta hacia arriba para extraerla.
5. Con un destornillador de cabeza Philips, extraiga los
2 pernos (_) fijados a las bisagras inferiores de la
puerta izquierda y derecha.
Con ayuda de una Ilave Allen (5mm), extraiga los
dos pernos de cabeza hexagonal (_}) fijados en la
parte inferior de las bisagras de la puerta izquierda y
derecha.
Retire las bisagras inferiores de la puerta izquierda y
derecha (1_).
_¢_ / /

MONTAR LA GAVETA DE LA NEVERA
1. Extraer la gaveta superior incline Io mas posible hacia arriba.
\
2. Extraiga el compartimento inclinable ((_}) tirando hacia arriba de los
soportes (1_) al mismo tiempo.
3. Saque la cesta inferior (_) levantandola del sistema de
deles.
4. Retire cuatro pernos de cabeza hexagonal de 10 mm de
ambos lados.
5. Levante la puerta de la nevera de los rieles.

i /
MONTAJE DE LAS PUERTAS DEL REFRIGERADOR
Montaje de las puertas del refrigerador
1. Coloque las bisagras inferiores de la puerta izquierda y
derecha (@).
Con un destornillador de cabeza Philips, inserte los
2 tornillos (l_) fijados en las bisagras inferiores de la
puerta izquierda y derecha.
Con ayuda de una Ilave Allen (5mm), introduzca y
apriete los dos pernos de cabeza hexagonal (l_) en las
bisagras inferiores izquierda y derecha de la puerta.
@
@
2. Haga coincidir el orificio de la base de la puerta con la
bisagra inferior (@).
Asegurese de no perder la tapa de la bisagra que
es muy facil de quitar.
@
,
Introduzca las bisagras superiores (%) en los
orificios situados en la parte superior de las
puertas.
Con ayuda de una Ilave tubular (10 mm),
introduzca y apriete los 3 pernos de cabeza
hexagonal (l_) en las bisagras superiores de la
puerta izquierda y derecha.
Con la ayuda de un destornillador de cabeza
Philips, introduzca y apriete el perno de puesta a
tierra (_) en las bisagras superiores de la puerta
izquierda y derecha.
®

MONTAJE DE LAS PUERTAS DEL REFRIGERADOR
4. Conecte la linea de agua ((_) y, a
continuaciOn, inserte la abrazadera en el
acoplador tirando del tubo.
Fije el conector (1_) situado en la puerta
del lado izquierdo y los dos conectores ((_)
situados a cada lado de la tapa superior.
®
La abrazadera se encuentra en el
superior.
ubo de la
ubo del
dispensador
a puerta
/_ La linea de agua (_) debe insertarse completamente en la linea
pREcAuc_6Nmarcada para evitar fugas de agua del dispensador
Line
5. Sit0e el cuadro superior (1_) en su lugar.
Con la ayuda de un destornillador Phillips, introduzca y
apriete los 3 pernos del cuadro superior.
Con la puerta abierta, vuelva a introducir la tapa del cuadro i
superior ((_) y cierre las puertas.
@AI volver a montar el cuadro superior, aseg0rese de
que este no comprima o daBe los cables.

MONTAR LA GAVETA DE LA NEVERA
1. Extraiga de forma uniforme los deles de cada lado de la carcasa por completo.
2. Sujete el frontal de la puerta de la nevera sobre los
orificios abiertos de los lados.
3. Apriete por completo los cuatro pernos de cabeza hexagonal.
4. Con la gaveta extraida pot completo, introduzca la cesta inferior (
[_) en el sistema de rieles.
Orificio
5. Enganche los extremos del compartimento inclinable (_) dentro
de los soportes ((_) y empuje hacia abajo hasta situarlo en su
lugar.
6. insertar la gaveta superior

AJUSTE DE LAS PUERTAS
Ahora que las puertas estan aseguradas en el refrigerador, necesitara verificar que este nivelado, para Io que
puede realizar ajustes finales. Si el refrigerador no esta nivelado, sera imposible conseguir que las puertas se
igualen de forma uniforme.
Cuando la puerta izquierda est6 m&s baja que la derecha.
Introduzca un destornillador piano dentro de una ranura del pie de nivelaci6n izquierdo y girelo en sentido
horatio u antihorario para nivelar la puerta izquierda.
Pie de nivelacibn
Destornillador
Cuando la puerta izquierda est6 m&s alta que la derecha.
Introduzca un destornillador piano dentro de una ranura del pie de nivelaci6n derecho y girelo en sentido
Del reloj 6 manecillas del reloj para nivelar la puerta derecha.
Pie de nivelaci6n
Destornillador
_ ecomendamos no realizar pequenos ajustes en los pies de nivelaci6n.
En lugar de eso, examine la siguiente pagina para descubrir la mejor forma de realizar ajustes menores en las
puertas.
AJUSTE DEL SOPORTE PARA LA PARILLAS AJUSTABLE (RF26V)
1. Extraiga la parillas ajustable.
2. Pulse el enganche _ y baje el
soporte mOvil _.
3. Sujete la parillas ajustable en su
posici6n mas baja.

i /
REALIZACION DE AJUSTES MENORES ENTRE PUERTAS
Recuerde que es necesario que el refrigerador este nivelado para Iograr que las puertas esten igualadas de
forma uniforme.
Si necesita ayuda, revise las secciones anteriores relativas a la nivelaci6n del refrigerador.
Cuando la
puerta izquierda 1
este mas baja
que la derecha.
Pi_
}
Pieza de
ajuste
!
Cuando
la puerta
izquierda este
m_.salta que la
derecha.
1. Si abre la gaveta ({_), podra ver la bisagra inferior (_}).
2. Introduzca la Ilave Allen incluida ({_) dentro del eje (@) de la bisagra inferior.
3. Ajuste la altura girando la Ilave Allen (_}) en sentido horario ( ) o antihorario ( ).
%
AI girar la Ilave Allen en sentido antihorario ( ), la puerta se desplazara hacia arriba.
1. Tras ajustar las puertas, introduzca el anillo de sujeci6n incluido ([_) usando un alicate ([_) en el hueco
entre el anillo de la bisagra (_}) y la bisagra inferior ({_). El n0mero de anillos de sujeci6n a insertar
dependera del hueco.
Con el refrigerador se incluyen dos anillos de sujeciOn.
El grosor de cada anillo de sujeci0n es de 1 mm (0,04 pulgadas).

AJUSTE DEL NIVEL DE LA GAVETA DE LA NEVERA
Piezade ajuste
Gaveta de la nevera
1. Localice el regulador de altura (_) en la gaveta de la nevera.
Desatornille parcialmente los cuatro Pernos Phillips (_) para aflojar la puerta.
2. Afloje el perno de control (_) con un
destornillador Phillips.
3. Busque el mejor nivel de ajuste para la inclinaci6n de la puerta.
J
]
Ejemplo) La inclinaci6n es de es de 2 mm(0,08 pulgadas)
aproximadamente, como se indica a continuaci6n.
Inclinaci6n __
Piano de __
referencia
- Gire el ajuste de aJtura a +2,0 para reducir la inclinaci6n de
Japuerta.

i /
CHEQUEO DE LA TOMA DE AGUA DEL DISPENSADOR
Un dispensador es s61o una de las caracteristicas utiles de su nuevo refrigerador Samsung. Para fomentar una
mejor salud, el filtro de agua Samsung elimina particulas no deseadas del agua. Sin embargo, no esteriliza ni
destruye microorganismos. Para Iograr esto ultimo, debe adquirir un sistema purificador de agua.
Para que la maquina de hielo funcione correctamente, es necesaria una presi6n de agua de 20-125 psi (libras
por pulgada cuadrada)
En condiciones normales, un vaso de papel de 170 cc (5,75 onzas) debe poder Ilenarse en 10 segundos.
Si la zona de instalaci6n del refrigerador dispone de una presi6n baja de agua (por debajo de 20 psi), puede
instalar una bomba auxiliar para compensar la falta de presi6n.
Asegurese de que el dep0sito de almacenamiento de agua situado en el interior del refrigerador este
adecuadamente Ileno. Para hacerlo, pulse la palanca del dispensador de agua hasta que el liquido salga a
traves de la salida.
® En su distribuidor encontrara disponibles kits de instalaci0n para la toma de agua por un costo adicional.
Recomendamos usar un kit de suministro de agua que contenga tubos de cobre.
Conexi6n de la toma de suministro de agua
1. Primero, corte la toma de suministro de agua principal y apague la maquina de hielo.
2. Localice la toma de agua fria potable mas cercana.
3. Tras conectar el suministro al filtro de agua, vuelva a dejar el suministro principal como estaba y
descarque unos 3 litros para eliminar impurezas y cebar el filtro de agua.
Toma de agua fria
_z._ Abrazadera
__ para tubos
o,o, o
de

INSTALACION DE LA TOMA DE AGUA DEL DISPENSADOR
Conexi6n de la toma de agua al refrigerador
Debera adquirir varios elementos para realizar esta conexi6n. Podra encontrar estos elementos a la venta
en forma de kit, en su ferreteria habitual.
oTuercadec0mpresi6nde1A"
,tubo de plastico
tubo de cobre
• ferula
Refrigerador
Tubo.op,,st,oo
(A)(incluido) 't
[_ Racor de compresi6n
(incluido)
• ;:" " _"J"_"i[ ..... "i Bulbo
Tuerca de compresi6n (B)
(1/4") (no incluido)
Tubo de cobre o Tubo de pl&stico (B)
(no incluido) (no incluido)
Toma de agua de la vivienda
i!i!
1. Deslice la tuerca de compresi6n (A) a traves del tubo de plastico suministrado (A)
2. Apriete la tuerca de compresi6n (B) sobre el racor de compresi6n de 1/4".
- Siesta usando tubo de cobre, deslice la tuerca de compresi6n (B) (no incluida) y la ferula (no incluida)
pot el tubo de cobre (no incluido) como se indic&
- Si esta usando conductos de plastico (B), introduzca el extremo moldeado (bulbo) del tubo (B) dentro
del racor de compresi6n.
Z_ No usar sin el extremo moldeado (bulbo) de la tuberia de plastico (B).
PREOAUCiON
3. Apriete la tuerca de compresi0n (B) sobre el racor de compresi0n. No force la tuerca de compresi0n (B).
4. Abra el suministro de agua y realice un chequeo en busca de fugas.
Conecte la toma de agua sOlo a una fuente de agua potable.
Si debe reparar o desmontar la toma de agua, corte 6,35 mm (1/4") del tubo de plastico para garantizar una
conexi6n ajustada y sin fugas.
instalaci6n dei fiitro de agua.
1. Retire la tapa del filtro de agua ((_)
2. Retire la tapa fija girandola en sentido manecillas del
reloj. Guarde la tapa en un lugar seguro para usarla en
caso de no usar filtro.
3. Retire el filtro de agua de la caja y coloque una
etiqueta adhesiva indicadora de reemplazo sobre el
filtro como se indic& Coloque una etiqueta adhesiva
sobre el filtro de recordatorio, para seis meses
despues. Pot ejemplo, si instala el filtro de agua en
matzo, coloque la etiqueta "SEP" sobre el filtro para
recordarle que debe reemplazar en septiembre. De
esta forma, sabra cuando debe reemplazar el filtro.
Normalmente, un filtro dispone de una vida Otil de
unos 6 meses.
(indicador de mes

4. Retire la tapa del filtro e introd0zcalo en su alojamiento.
5. Gire lentamente el filtro de agua 90° en sentido En sentido
del reloj para alinearlo con la marca impresa situada en la
cubierta, bloqueando el filtro en su posici6n. Aseg0rese
de alinear la marca de la etiqueta del filtro de agua con
el centro de la impresi6n de la cubierta del filtro como se
indica en la ilustraci6n. Recuerde, no Io fuerce.
//'
Retirar la
tapa roja,
Gire hasta que las
etiquetas esten
alineadas,
@ Debera retirar la anacena de cristal superior del lado derecho, antes de proceder a la instalaciOn de filtros de agua.
Eliminaci6n de cualquier sustancia residual del interior de la
toma de suministro de agua tras la instalaci6n del filtro de agua.
1. Abra el suministro de agua principal y cierre la valvula de la toma de suministro
de agua.
2. Deje cotter el agua a traves del dispensador hasta que salga transparente (6-7
minutos aprox.). Limpiara el sistema de suministro de agua y eliminara aire de
los conductos.
3. En algunos hogares podria necesitarse una descarga mayor.
4. Abra la puerta del refrigerador y aseg0rese de que no existen fugas de agua
procedentes del filtro.
Aseg0rese de enjuagar a fondo el dispensador, de Io contrario el agua podria gotear.
Esto significa que a0n queda aire en la toma.
®
iii;
Suministro de agua por 6smosis inversa
IMPORTANTE • La presi6n de! suministro de agua procedente de un sistema de 6smos_s inversa dirigida
hacia la valvula de entrada de agua del refrigerador debe encontrarse entre 35 y 120 psi (241 y 827 kPa).
Si se conecta un sistema de filtrado de agua pot 6smosis inversa a su suministro de agua fria, la presi6n del
agua a dicho sistema debe contar con un minimo de 40 a 60 psi (276 a 414 kPa).
Si la presi6n del agua hacia al sistema de 6smosis inversa esta pot debajo de 40 a 60 psi (276 a 414 kPa):
,, Chequear si el filtro de sedimentos del sistema de 6smosis inversa esta obstruido. Reemplace el filtro si
fuera necesario.
,, Permita que el dep6sito de almacenamiento del sistema de 6smosis inversa vuelva a Ilenarse tras un uso
exigente.
,, Si su refrigerador dispone de un filtro de agua, este podria reducir a0n mas la presi6n de agua al usarse
junto con un sistema de 6smosis inversa. Desmonte el filtro de agua.
Si tiene alguna duda respecto a la presi6n de agua disponible, p6ngase en contacto con un fontanero
cualificado y autorizado.

unconarnento de refr erador
USO DEL PANEL DE CONTROL
Paramejorarel rendimientoenergetico, pulseelbot6n Energy Saver (Ahorrode energia),
Si se produjesecondensaci6nen laspuertas, desactivela funci6n Energy Saver.
Pulseel bot6n Freezer / Power Freeze (Nevera / Congelaci6n r_pida) para ajustar la neveraala
temperatura deseada, Puedeajustar latemperatura entre 340Fy 460 F Mantengapulsadoel bot6n
Freezer / Power Freeze (Nevera / Congelaci6n r_pida) durante 3 segundos paraacelerarel
tiempo necesariopara congelar productos en la nevera,Puede ser 0tilsinecesitacongelar rb.pidamente
articulos quese estropeendeprisa o si la temperaturade la neverafuesemuy alta (porejemplo,si la
puertase ha dejado abierta),
Pulseel bot6n Ice/Water (Hielo/Agua) paraescoger lafunci6n de hielo oagua, Puedeescogeragua
o los distintostipos de hielo(cubitos/hielo picado),
Trasrealizarunaselecci6n,pulse lapalancadel dispensador.
Pulseel bot6n Alarm/Lighting (Alarma/lluminaci6n) para desactivarla alarma de puerta abierta,
Inicialmentelaalarmaestb.activada, Si mantienepulsado el bot6n Alarm/Lighting (Alarms/
Iluminaci6n} durante 3segundos, la iluminaci6nLEDdel dispensadorpermanecera,encendida.
Pulseel bot6n Fridge / Power Cool (Refrigerador / Enfriamiento r_pido) paraajustarel refrigerador
a latemperatura deseada, Puede ajustarlatemperatura entre1,1° ©y 7,8° C (340Fy 460F),
Mantengapulsado el bot6n Fridge / Power Cool (Refrigerador / Enfriamiento r_pido) durante 3
segundos para acelerareltiempo necesarioparaenfriarproductos en el refrigerador.
Puedeser 0tilsi necesitaenfriarrb.pidamentearticulos que se estropeendeprisao si la temperatura del
refrigeradorfuese muyalta (porejemplo, si la puertase hadejado abierta).
Pulseel bot6n Ice Off / Lock (Hielo desac. / Bloquear) paradesconectar la funci6nde elaboraci6n
de hielo,Si mantienepulsado elbot6n Ice Off / Lock (Hielo desac. / BIoquear) durante 3 segundos,
lapantalla devisualizaci6ny eldispensadorquedara.nbloqueados.
Func onam ento 21

USO DE LA PANTALLA DIGITAL
"FreezerTemp" (Temp.de la nevera)indica la temperatura actual en la nevera.
"Fridge Temp" (Temp.del refrigerador) indica la temperatura actual en el refrigerador,
La pantalla de visualizaciOnse apagara cuando no se use, Esto es normal.
Congelaci6n r_.pida @
Este icono se iluminara al activar la funci0n "Power Freeze" (Congelaci0n rapida). "Power Freeze"
(Congelaci0n rapida) es fantastico para esos momentos en los que necesita disponer de una gran cantidad
de hielo. Cuando tenga suficiente, simplemente pulse de nuevo el bot0n para cancelar el modo "Power
Freeze" (Congelaci0n rapida). Si escoge "Power Freeze" (Congelaci0n rapida), la temperatura interior del
refrigerador descendera en dos horas y media aproximadamente.
Cubitos _, hielo picado _._, agua
Disfrute de cubitos o hielo picado escogiendolo mediante el panel de control digital. Si no necesita
hielo, desactive la funciOn para ahorrar agua y energia. La luz de tipo de hielo indica el tipo escogido
(o si esta desactivado) actualmente.
Enfriamiento r_pido @
Este icono se iluminara al activar la funcion mediante el bot0n "Power Cool" (Enfriamiento rapido).
Use "Power Cool" (Enfriamiento rapido) para enfriar rapidamente el refrigerador.
Si escoge "Power Cool" (Enfriamiento rapido), la temperatura interior del refrigerador descendera en dos
horas y media aproximadamente.
L.-'."."I
indicador del filtro o
Cuando la luz del indicador del filtro se ilumine, es el momento de cambiar el filtro.
Normalmente esto sucede cada 6 meses aproximadamente.
Cuando introduzca el filtro de agua, el indicador del filtro se ilumina en azul al principio.
El indicador del filtro pasara a iluminarse en purpura tras 5 meses de uso.
El indicador del filtro pasara a iluminarse en rojo cuando Io Ileve usando 6 meses.
Tras extraer el viejo filtro de agua e instalar el nuevo (examine la pagina 33 para obtener las
instrucciones), reinicie el indicador manteniendo pulsado el botOn "Ice/Water" (Hblo/Agua) durante 3
segundos.
Modo de enfriamiento desactivado (c6digo "OF & OF" en la pantalla de visualizaci6n)
Esta funciOn se usa para refrigeradores de muestra en tiendas. No para uso domestico.
Z_ Con la funciOn Modo de enfriamiento desactivado, el refrigerador funciona pero no enfria el
p.EcAuc,0,aire. Para cancelar este modo, pulse al mismo tiempo los botones Power Freeze y Freeze
(CongelaciOn rapida y Nevera) durante 3 segundos hasta oir un "Ding-dong" y la unidad ya
enfriara.
22 Func onarr ento

FunoonamonIo do refrgerador
Ahorro de energia :D2
Este icono se iluminara al activar la funoiOn "Energy Saver" (Ahorro de energia) que se establece automaticamente
en "ON" conectar el refrigerador. Si se produjese condensaciOn en las puertas, desactive la funoiOn Ahorro de
energia.
Iluminaci6n ;8,-
Este icono se iluminara al activar la funcion "Lighting" (lluminacion). En este caso, la luz del dispensador
(bajo la pantalla) permanecera encendida constantemente. Si desea que la luz del dispensador se ilumine
solo cuando este usandose, desactive la funcion "Lighting" (lluminacion).
Alarma _))
Este icono se iluminara al activar la funcion "Alarm" (Alarma). La alarma de puerta sonata si se deja
abierta cualquier puerta durante mas de 3 minutos. El aviso sonoro se detendra cuando cierre la puerta.
Inicialmente la alarma esta activada.
Hielo desactivado o_
Este icono se iluminara al activar la funcion "Ice Off" (Hielo desac.). En este caso, no se elaborara hielo.
Bloquear
Este icono se iluminara al activar la funcion "Lock" (Bloquear). En este estado, no podra usar el panel de
control. Si mantiene pulsado el boton Ice Off / Lock (Hielo desac. / Bloquear) durante 3 segundos, podra
usar de nuevo el panel de control.
CONTROL DE LA TEMPERATURA
Temperatura b_.sica de los compartimentos de la nevera y el refrigerador
La temperatura basica o recomendada para los compartimentos de la nevera y el refrigerador es de -190 C
(-2° F)y 30C (380 F)respectivamente. Si la temperatura de los compartimentos de la nevera y el refrigerador es
demasiado alta o baja, ajuste la temperatura manualmente.
Control de la temperatura de la nevera
La temperatura de la nevera debe estar ajustada entre -13° C y -26° C (8° F y -14° F) para adaptarse a sus
necesidades particulares. Pulse el bot0n Freezer (Nevera) varias veces hasta que latemperatura deseada
aparezca en la pantalla de visualizaci0n. Tenga en cuenta que alimentos como el helado pueden derretirse a -16°
C (4° F).La pantalla de visualizacion de temperatura se movera secuencialmente de -26° C a -13° C (-140 F a
80 F).Cuando la pantalla de visualizaci0n alcance los -13° C (80 F), Io hark de nuevo a los -26° C (-14° F). Cinco
segundos despues de que la nueva temperatura se ajuste, en pantalla se mostrara de nuevo latemperatura actual
de la nevera.
Control de la temperatura del refrigerador
La temperatura del refrigerador debe estar ajustada entre 8° C y 1° C (460 Fy 340 F)para adaptarse a sus
necesidades particulares. Pulse el bot0n Fridge (Refrigerador) varias veces hasta que la temperatura deseada
aparezca en la pantalla de visualizaci0n. El proceso de control de temperatura para el refrigerador funciona de
la misma forma que el de la nevera. Pulse el boton Fridge (Refrigerador) para ajustar la temperatura deseada.
Pasados unos segundos, el refrigerador se encaminara hacia la temperatura recientemente ajustada. Lo que se
reflejara en la pantalla de visualizaci0n digital.
La temperatura de la nevera o el refrigerador puede aumentar debido a una apertura frecuente de las
puertas o a la introducciOn, en cualquiera de ellos, de una gran cantidad de alimentos calientes.
Esto puede provocar que la pantalla de visualizaciOn parpadee. Una vez que la nevera y el refrigerador
vuelven a sus temperaturas normales de ajuste, el parpadeo cesara.
Si continua parpadeando, puede set necesario "reiniciar" el refrigerador. Pruebe desenchufando el
electrodomestico, esperando unos 10 minutos y volviendolo a enchufar.
Func ona_Teno 23

USO DEL DISPENSADOR DE HIELO Y AGUA FRiA
Pulse el bot6n Ice / Water (Hielo / Agua) para escoger el tipo de hielo que desea.
Uso del dispensador de hielo
Coloque un vaso bajo el dispensador de hielo y pulse, con 61,la palanca del dispensador cuidadosamente.
Aseg0rese de que el vaso se encuentra en linea con el dispensador para evitar que el hielo salte.
Z_ Si se deja lapuerta de la neveraabiertaduranteun periodo detiempo prolongado,puede
PRECAUC_6,formarsecondensaciono el hielodel interiorde la maquinade hieloconglomerarse.
Cierrelaspuertastan pronto como seaposible. Eldispensador de hielopuede expulsar
sOlovarioscubitos si no haysuficientehieloen la maquina. Useel dispensadorcuando
dispongade suficientehielo.
Si la puerta de la neverapermanecieseabiertaduranteun periodo de tiempo prolongadoo
si fuese dispensadaunagran cantidad de hielode una vez,podrian producirsegoteos por l
condensacion bajolapalancadel dispensador.
Uso del dispensador de agua
Coloque un vaso bajo la salida de agua y pulse, con el, la palanca del dispensador cuidadosamente.
Aseg0rese de que el vaso se encuentra en linea con el dispensador para evitar que el agua salpique.
Si acaba de instalar el refrigerador o un nuevo filtro de agua, deseche los seis primeros vasos de agua
para eliminar las impurezas del sistema de suministro de agua. AsegOrese de que el flujo de agua es
transparente antes de comenzar a consumirla.
Z_ Cuando no useel dispensador de agua durante2 6 3 dias (especialmenteduranteel verano),elaguadispensada
PRECAUC_6,podr[apresentaroloreso saboresextra5os. Siesto ocurre, recomendamosque desechelos primeros 16 2 vasos de
agua para mejorarsusabor.
Uso de la funci6n Ice Off (Hielo desac.)
AI escoger el modo Ice Off (Hielo desac.), retire todos los cubitos
del dep6sito. Si no usa el dispensador de hielo, los cubitos pueden
adherirse unos a otros. Tire de la palanca de bloqueo hacia adelante
para desechar cubitos o extraer el hielo aglomerado del deposito. Pulse el
deposito hacia atras hasta escuchar un clic.
/k
PRECAUCION
EMPUJAR
Siva a tomarse unas vacaciones o realizar un viaje de negocios de larga duraci6n, cierre la valvula de agua
y corte el suministro del refrigerador. Esto ayudara a evitar fugas accidentales.
No introduzca los dedos, manos ni ning0n otto objeto inadecuado en el conducto de salida o en el dep6sito
de la maquina de hielo.
- Hacerlo puede ocasionar lesiones fisicas o danos materiales.
No introduzca los dedos ni ning0n otto objeto en la salida del dispensador.
- Podria ocasionar lesiones.
No desmonte la maquina de hielo. Podria desajustarse.
No salpique o rode agua en el dep6sito de hielo.
Simplemente limpielo con un pano seco. Para que la maquina de hielo funcione correctamente, es
necesaria una presi6n de agua de 138 a 862 kPa.
[_ Fen6meno de enturbamiento del agua
Toda el agua suministrada a los refrigeradores pasa a traves del filtro principal, que es un filtro de agua
alcalino. En este proceso, la presi6n del agua que ha pasado pot el filtro aumenta y el agua se satura de
oxigeno y nitr6geno. Cuando el agua fluye de nuevo al aire, la presiOn se reduce y el oxigeno y el nitr6geno
quedan supersaturados, pot Io que se transforman en burbujas de gas. El agua podria adquirir un aspecto
turbio debido a estas burbujas de oxigeno. El agua podria adquirir, temporalmente, un aspecto turbio
debido a estas burbujas de oxigeno. Pasados unos segundos, el agua volvera a set transparente.
24 Funcionam ento

Funoonarnento do refrgerador
ELABORACION DE HIELO
Uso normal
Para Ilenar el depOsito de hielo a su maxima capacidad tras la instalaciOn,
aseg0rese de seguir los pasos expuestos a continuaciOn.
1. Permita que su refrigerador funcione y enfr[e durante 24 horas (o durante 1
d[a completo).
2. Una espera de 24 horas permitira que su maquina de hielo enfr[e de forma
adecuada.
3. Dispense de 4 a 6 cubitos de hielo dentro del vaso.
4. Transcurridas 8 y 16 horas, dispense un vaso entero de cubitos cada vez.
Cada vez que se use todo el hielo de una vez, deben repetirse los pasos 3 y 4 anteriores (antes
de dispensar los primeros 4 a 6 cubitos de hielo, es necesario esperar 8 horas). Esto permitira el
reabastecimiento de cubitos, garantizando una elaboraci0n de hielo maxima.
Bot6n de prueba
PRECAUC_0NEn caso de que el hielo no salga, extraiga la cubierta de la maquina de hielo
y pulse el bot0n de prueba situado en la maquina.
®
Tras dispensar agua, espere 1 segundo antes de retirar el vaso para evitar
derrames. No tire de la palanca del dispensador una vez obtenido hielo o
agua. Volvera automaticamente a su posici0n. El hielo se elabora en cubitos.
AI escoger "Crushed" (Hielo picado), la maquina de hielo tritura los cubitos
para conseguir hielo picado.
Z_ Cuando vacie la cubeta de hielos, usted debe presionar una vez
PRECAUO_0Nla palanca del dispensador de hielos con la funci0n "ice cubed" o
"crushed" en posici0n ON para obtener hielo rapidamente despues
de colocar nuevamente la cubeta de hielos en el refrigerador
Func onarr eno 25

Funconamontodoc
FOfFgoF doF
PARTESY FUNCiONES (RF267)
Use esta pagina para famiiiarizarse con ias partes y funciones dei refrigerador.
Luz
Cierre automatico
de puerta
Maquina de hielo
Ill
Parilla plegable /
Parilla deslizante
SecciOn con
bisagras vertical -
_]} Gaveta para fruta
y verdura
INI l/
_iiii I
/
Compartimento
para Bcteos (_
Filtro de agua
Parilladeslizante
Huevera(_
Compartimentos
de puerta
Parilla de cristal de
compartimentaciOn
rapida
Cool Select
J PantryTM@
Maquina de hielo
Deposito de hielo
(_ Compartimento
inclinable
Compartimento de la
gaveta de la nevera (_
jl
AI cerrar la puerta, asegOrese de que la secciOn con bisagras vertical se encuentra en posiciOn correcta
para evitar arafiazos en la otra puerta.
Si la secciOn con bisagras vertical esta al reves, devuelvala a su posiciOn correcta y cierre la puerta.
En algunas ocasiones se puede producir humedad en la secciOn con bisagras vertical.
El tirador de la puerta puede aflojarse con el paso del tiempo.
Si esto ocurre, apriete los pemos que se encuentran en la parte interior de la puerta.
Si cierra la puerta mediante una fuerza excesiva, pueden abrirse las otras puertas.
26 Func onarr ento

PARTESY FUNCIONES (RF26V)
Use esta pagina para familiarizarse con las partes y funciones del refrigerador.
Luz
Seccion con
bisagras vertical,
Gaveta para
charcuteria
@Gaveta para fruta y
verdura
,,'"/_..................ii ii' .... ....................................
Compartimento para
lacteos{1}
Filtro de agua
Parillaajustable_}
Compartimentos de
puerta_}
Huevera @
Compartimento
inclinable
Luz
Gaveta de extraccion
automatica ItT}
Compartimento de la
gaveta de la nevera@
Funconarr eno 27

ALMACENAJE DE ALIMENTOS
El refrigerador Samsung de tres puertas ha sido disefiado para proporcionarle caracteristicas y funciones de
ahorro maximo de espacio. Aqui tiene algunos de los compartimentos personalizados que hemos creado para
mantener sus alimentos frescos durante periodos de tiempo mas largos. Para evitar la penetraciOn de olores en
el interior del compartimento del hielo, los alimentos almacenados deberan ser envueltos adecuadamente, tan
hermeticos como sea posible.
ALMACENAJE DE ALIMENTOS EN EL REFRIGERADOR
Puede usarsepara almacenarpequeflos articulosb.cteoscomo
mantequillao margarina,yoghurt odados de crema de queso.
Disefladospara soportararticulos grandesy voluminososcomo botellas _-_(_
de leche uotras botellaso recipientesde grandes dimensiones.
Con diseflo anti-rotura, lasparillapueden usarsepara almacenartodo tipo
de alimentosy bebidas.Las mamas circulatesen lasuperficie de cristal
representanunfenOmenonormal que puede limpiarseamenudo con un
patio humedo,
El mejor lugarpara guardarhuevos.
Coloque la hueverasobre laparillapara accederDcilmente.
Usado para mantenerfrescassus frutasy verduras almacenadas.Esta
gaveta hasido especificamentediseflada para controlar el nivelde
humedad dentrodel compartimento. Si es posible,mantengaseparadas
verdurasy frutas.
Puede usarsecomo bandejagrande para fiestas, delicatessen,pizza,
bebidas o articulosdiversos.
No coloque articulos de grandes dimensiones bajo el foco del refrigerador. Hay un sensor ubicado en las proximidades
del foco y, si dicho sensor fuese bloqueado, su refrigerador podria enfriarse demasiado. Coloque verduras y frutas en
la gaveta que tienen asignado para evitar que se congelen. Si los alimentos se congelasen en su refrigerador, ajustelo a
una temperatura ma.salta.
ALMACENAJE DE ALIMENTOS EN LA GAVETADE LA NEVERA
Lamejor elecciOnpara almacenarcarnes oalimentos secos. Losalimentos
almacenadosdebera.nenvolverseadecuadamenteusando papelde aluminio
u otros materialeso envasesaptos como envoltorio.
Puedenusarsepara paquetes pequefloso alimentos congelados.
Tambbn puede introducir unapizzade 16".
Puedeusarsepara almacenarcamey alimentos secos. Losalimentos
almacenadosdebera.nenvolverseadecuadamenteusando papelde
aluminiou otros materialeso envasesaptos como envoltorio.
[_Las unas junto a para que no se golpeen y caigan puerta
botellas deberan almacenarse otras al abrir la del
refrigerador.
Si tiene planeado ausentarse durante un perfodo de tiempo prolongado, vacfe el refrigerador y apaguelo.
Limpie el exceso de humedad del interior del electrodomestico y deje las puertas abiertas. Esto ayuda a
evitar la proliferaciOn de olores y moho.
28 F:uncon_}_FFerlto

USO DEL COOL SELECT PANTRYTM (RF267)
El Cool Select Pantry TM es una gaveta de ancho completo
que dispone de control de temperatura ajustable. Este
compartimento puede usarse como bandeja grande para
fiestas, delicatessen, pizza, bebidas o artfculos diversos.
Dispone de un control de temperatura que puede ajustar la
cantidad de aire frio que entra en el compartimento.
El control se encuentra situado en la cara derecha del
compartimento.
Bot6n de selecci6n
1. AI escoger "Dell", la temperatura del compartimento se mantiene
entorno a 5° C (41° F). Esta funciOn ayuda a mantener los alimentos
frescos durante un periodo de tiempo mas prolongado.
La temperatura del compartimento puede mantenerse por debajo
del ajuste de temperatura recomendado (Nevera: -19° C (- 2° F),
refrigerador: 3° C (38° F))
2. AI escoger "Fresh", la temperatura del compartimento se mantiene
entorno a 3° C (38° F). Esta funciOn ayuda a mantener los alimentos
frescos durante un periodo de tiempo mas prolongado. La
temperatura del compartimento puede mantenerse por debajo
del ajuste de temperatura recomendado (Nevera: -19° C (- 2° F),
refrigerador: 3° C (38° F)).
3. AI escoger "Chilled", la temperatura del compartimento se mantiene
entorno a 1° C (34° F). Esta funciOn tambien ayuda a mantener
carnes y pescados frescos durante un periodo de tiempo mas
prolongado. La temperatura del compartimento puede mantenerse
pot debajo del ajuste de temperatura recomendado (Nevera: -19° C
(- 2° F),refrigerador: 3° C (38° F)).
Dell Fresh (Fresco)
•pifla pepinos
•limon manzanas
•aguacate naranjas
•patata uvas
calabacines
maiz
®
Chilled (Helado)
• bistec
•quesos curados
•embutidos
•Tocino
• Hot-dog
/k
PRECAU¢I6N lesiones fisicas.
Las frutas y verduras pueden daSarse al escoger el modo "chilled" (helado).
No guarde lechuga u otros productos similares en este compartimento.
No almacene botellas de cristal en este compartimento. Si se congelasen, podrian romperse y provocar
USO DEL COMPARTIMENTO INCLINABLE
El compartimento inclinado puede usarse para almacenar
pizzas de hasta 16" (406 mm) si la guarda como se indica
en la ilustraci6n.
Func onam ento 29

Funoon rn onto do rofrget, dot
DESMONTAJE DE LOS ACCESORIOS DEL REFRIGERADOR
1. Compartimento de puerta y para lacteos
Para
Para
PRECAUCION
desmontarlo - Simplemente levantelo y extraigalo directamente.
volver a montarlo - Deslfcelo sobre el emplazamiento deseado y
presione hasta encajarlo en posicion.
Si los compartimentos de la puerta no estan montados de forma
firme, pueden producirse lesiones.No permita a los ni_os jugar con
los compartimentos. Las esquinas afiladas de los compartimentos
pueden provocar lesiones.
No monte un compartimento Ileno de alimentos.
2. Parilla de cristal templado
Para desmontarlas - Incline hacia arriba la parte frontal de la parilla,
en sentido (1_}) y levantela en sentido ([_}).
Extraiga la parilla.
Para volver a montarlas - Incline hacia arriba la parte frontal de la
parilla y gufe sus ganchos sobre las ranuras,
a la altura deseada. A continuaci0n, haga
descender la parte frontal de la parilla de tal
forma que los ganchos puedan entrar en las
ranuras correspondientes.
Z_ Las parilla de cristal templado son pesadas.
PRECAUC_6NPonga especial atenci0n al desmontarlas.
..... ::::i:-:>
8}
3. Gaveta para fruta y verdura
Para extraerla - Retire la gaveta todo Io posible. Incline hacia arriba
la parte frontal de la gaveta y extraigalo directamente
hacia fuera.
Paravolver a colocarla - Introduzca lagaveta en los deles del marco y
empt}jela hacia atras hasta su posici0n.
La parilla de cristal sobre la gaveta no esta firmemente asegurada.
PRECAUC_6NTenga cuidado al levantar.
No abra la gaveta mientras el compartimento Cool Select
PantryTM esta abierto. Hacerlo puede provocar que se ara_e o se
rompa su cubierta.
4. Gaveta para Carnes fdas (RF26V)
Para extraerlo - Tire de la gaveta para Carnes frias hasta su
posiciOn de parada, levantela y pase dicha
posiciOn.
30 Func onarr ento

5. Cool Sebct Pantry TM (RF267)
Para extraer el compartimento - Extraiga toda la extension
de la gaveta. Incline hacia
arriba la cara frontal
del compartimento y
extr4_igalo directamente
hacia fuera.
Para volver a colocar el compartimento - Empuje los
rieles hacia la parte posterior del
refrigerador. Coloque la gaveta
dentro de los rieles y deslice el
compartimento hasta su lugar.
Para retirar la divisi6n - Tire por completo del compartimento en toda su extensi6n y levante la
cara frontal de la divisi6n para desengancharla de la parte posterior de la
pared del compartimento y, a continuaci6n, lev4_ntelo.
Para volver a colocar la divisi6n - Enganche la parte de atr4_sde la divisi6n sobre la parte posterior
de la pared del compartimento y, a continuaci6n, empuje hacia
abajo la divisi6n.
USO DE LAS PUERTAS
Las puertas del refrigerador garantizan el cbrre y selbdo compbto del m_smo.
Cuando la puerta del refrigerador esta sOlo parcialmente abbrta, se cerrara automaticamente. La puerta
permanecera como esta si se deja abierta mas de 7,6 cm (3 pulgadas).
Func onarr eno 31

Funoonamonto do rofrget, dot
DESMONTAJE DE LOS ACCESORIOS DE LA NEVERA
1. Compartimento inclinable
Para desmontarlo - Tire hacia arriba de los soportes
(1_) hasta que oiga el "clic" y retire el
compartimento.
Para volver a montarlo- Enganche los extremos del
compartimento en ambos soportes
(1_) y empuje hacia abajo hasta
que encaje en su lugar.
2. Gaveta de extracciOn autom&tica
Para extraerla - Retire la gaveta todo Io posible. Incline hacia
la parte posterior de la gaveta y elevela
directamente.
Para volver a colocarla - SitOe la gaveta dentro de los deles
inclinandola hacia arriba. Haga
descender la gaveta hasta que se
encuentre en posicion horizontal y
deslicela hacia dentro.
3. Compartimento de la gaveta de la nevera
Para extraerlo- Retire la gaveta todo Io posible. Incline la parte
posterior del compartimento y lev_tntelopara
extraerlo.
Para volver a colocarlo- Introduzca el compartimento dentro de los
rieles de montaje.
Para quitar la division- Tire de la division hacia arriba.
Para volver a colocar la division - Enganche las esquinas superiores
de la division en el hueco del
compartimento.
Z_ Si quiere remover el divisor para limpiar la gaveta inferior,
PRECAUC_ONsolamente reinstale el divisor usando dos tornillos despues de
limpiar para prevenir que los niSos ingresen a esta gaveta.
Z_ No permitaque los bebeso niSosingresenen lagavetainferior.EIIospodran
PRECAUC_ONdanarsegravementeas'i mismos o daSarelrefrigerador.No usecomo
asiento la puertadel congelado, la puertapuede romperse.No permitaque
losnoSosse trepene ingresenal compartimiento delcongelador
32 Funcionam ento

LIMPIEZA DEL REFRIGERADOR
Los cuidados de su refrigerador Samsung de tres puertas prolongaran suvida Otily ayudaran a
mantenerlo libre de olores y germenes.
Limpieza del interior
Limpie las paredes interiores y los accesorios con un detergente
suave y, a continuacion, enjuague y seque con un patio suave.
Puede extraer las gavetas y las parilla para Ilevar a cabo una
limpieza minuciosa. Simplemente asegOrese de secar gavetas y
parilla antes de volverlos a colocar en su sitio.
Limpieza del exterior
Limpie el panel digital y el panel de la pantalla de visualizacion
con un patio limpio y seco. Pulverice agua sobre el patio de
limpieza en lugar de hacerlo directamente sobre la superficie del
refrigerador. Esto ayuda a asegurar una distribucion uniforme
de la humedad sobre la superficie. La superficie de las puertas,
tiradores y carcasa deberan limpiarse con un detergente suave
y secarse, a continuacion, con un patio seco. Para mantener
su electrodomestico como el primer d[a, el exterior debera
abrillantarse una o dos veces al aflo.
No use benceno, disolvente o Clorox TM para realizar la limpieza.
PRECAUC_ONPueden daSar la superfioie del eleotrodomestico y provooar un
incendio.
Las letras impresas en la pantalla de visualizaciOn podrian borrarse
PRECAUC_ONsi el limpiador de acero inoxidable es aplicado directamente sobre
la zona donde se encuentran dichas letras.
Limpieza del dispensador de Hielo/Agua
Tire de un extremo de la bandeja del dispensador y extraigala.
Limpie el dispensador de hielo/agua con un patio limpio y suave.
Limpieza de los sellos de goma de la puerta
Si los sellos de goma estan sucios, las puertas pueden no cerrar
adecuadamente y el refrigerador no funcionar de forma eficiente.
Mantenga las puertas libres de polvo y suciedad limpiandolas con
detergente suave y un patio hOmedo. Sequela con un patio limpio y
suave.
,6,
PRECAUClON
No pulverice el refrigerador con agua mientras este enchufado ya que podria ocasionar un choque
electrico.
Pot riesgo de incendio, no limpie el refrigerador con benceno, disolvente o detergente para vehfculos.
Limpieza detr_.s del refrigerador
Para mantener cables y partes expuestas libres de polvo y acumulacion de suciedad, aspire la parte
tracera del electrodomestico una o dos veces al aflo.
No desmonte la cubierta de atras. Hacerlo podrfa ocasionar un choque
electrico.
PRECAUClON
Funcionarr ien o 33

Funoon rn onto do refrgerador
REEMPLAZO DE FOCOS INTERIORES
Antes de reemplazar cualquier foco interior, desenchufe el refrigerador de la toma de pared. Si no esta
PREOAUC_ONseguro de c0mo reemplazar los focos tras leer estas instrucciones, p0ngase en contacto con su centro
de asistencia para obtener ayuda.
En ferreteria tienda de electr0nica mas estan focos de la
SU O
cercana, disponibles repuesto
para
nevera
y el refrigerador. Use focos de repuesto de tama_o E26 y un maximo de 60 vatios.
Reemplazo de los focos interiores del refrigerador
1. Desenchufe el cable de alimentaci0n de la toma de corriente.
2. Tire de la protecci0n hacia abajo mientras la empuja hacia atras para extraerla.
3. Gire el foco en sentido en sentido contrario las manecillas del reloj.
4. El montaje se realizara en el orden inverso al desmontaje.
Reemplazo de los focos interiores de la gaveta de la nevera
1. Desenchufe el cable de alimentaci0n de la toma de corriente.
2. Extraiga la gaveta todo Io posible.
3. Tire de la protecci0n hacia abajo mientras la empuja hacia atras
para extraerla.
4. Gire el foco en sentido en sentido contrario las manecillas del reloj.
5. El montaje se realizara en el orden inverso al desmontaje.
No introduzca los dedos dentro de la cubierta.
PRECAUC_ONEl foco podria estar caliente.
34 Func onarr ento

REEMPLAZO DEL FILTRO DE AGUA
La luz del "indicador de filtro" le permite saber cuando ha Ilegado el momento de cambiar
el cartucho del filtro de agua. Para que tenga tiempo de conseguir un filtro nuevo, la luz roja
aparecer_ justo antes de que la capacidad del filtro actual se agote. Cambiar el filtro a tiempo le
permitir_ obtener agua m_sfresca y pura de su refrigerador.
1. Tome un filtro de agua nuevo y coloque una etiqueta adhesiva indicadora de mes sobre el filtro como
se indica. La fecha del adhesivo debe indicar seis meses a partir de la fecha actual. Pot ejemplo, si
ha reemplazado el filtro de agua en matzo, coloque la etiqueta "SEP" (septiembre) sobre el filtro para
recordarle que debe reemplazarlo en dicho mes. Normalmente, la vida 0til del filtro es de unos 6 meses.
2. Retire la tapa de protecci0n del nuevo filtro y extraiga el antiguo.
3. Coloque e introduzca el nuevo filtro en su alojamiento. Gire lentamente el filtro de agua en sentido
horatio para alinearlo con la marca impresa situada en la cubierta, bloqueando el filtro en su posicion.
AsegOrese de alinear la marca de la etiqueta del filtro de agua con el centro de la impresion de la
cubierta del filtro como se indica en la ilustraci0n. Recuerde no Io force.
Cubierta del filtro
® ®
Gire hasta que las
etiquetas esten
(indicador de alineadas.
mes)
4. Una vez completado el proceso, mantenga pulsado el boton Ice / Water (Hielo / Agua) durante 3
segundos para reiniciar el programa del filtro.
5. Pot 01timo, descarque seis vasos de agua aproximadamente a traves del dispensador para limpiar el
sistema de suministro de agua. Aseg0rese de que el flujo de agua es transparente antes de comenzar a
consumirla.
r_ Aseg0rese de enjuagar a fondo el dispensador, de Io contrario el agua podria gotear. Esto significa que
aun queda aire en la toma.
NO use eldispensador de agua o hielo sin un cartucho de filtro de agua instalado, ya que la toma de
agua podria bloquearse.
Pedido de filtros de agua de repuesto
Para reemplazar el filtro del agua, puede visitar su servicio tecnico habitual o ponerse en contacto con el
distribuidor de recambios de Samsung. AsegOrese de que el filtro de agua de repuesto dispone del Iogotipo
SAMSUNG en la caja yen el propio filtro.
Enlace: http://www.samsungparts.com
Fu]c onam ento 35

Funoon rn onto do refrgerador
CUADRO DEL FILTRO DE AGUA
Hoja de datos de rendimiento para el modelo DA97=06317A de Samsung
Uso del cartucho de repuesto DA29-00003G
Este sistema ha sido probado seg0n los estandares 42 y 53 de la NSF/ANSI para la reducci0n de las sustancias que se
enumeran a continuaci0n. La concentracion de las sustancias indicadas en la entrada de agua del sistema fue reducida
a una concentracion inferior o igual al limite permitido para la salida de agua del sistema, tal y como especifican en los
estandares 42 y 53 de la NSF/ANSI.
El sistema probado y certificado por la NSF Internacional relativo al estandar 42 de la NSF/
ANSI para la reduccion del sabor y olor a cloro, partfculas de clase Iy relativo al estandar
53 de la NSF/ANSI para la reduccion de quistes, turbiedad, plomo, amianto, benceno,
Carbofuran, p-diclorobenceno y mercurio.
Para una capacidad de 300 galones (1 136 litros).
Tenga en cuenta que como la prueba se realizo bajo las condiciones estandar del laboratorio, el rendimiento real podria variar.
Reducci6nde
contaminantes
Concentraci6n
mediade
entrada
NSFSpecified
InfluentChallenge
ConcentrationUnits
applytoeachrow
Reducci6n
media(%)
Concentraci6n
mediadel
productoen
agua
Max,
concentraci6n
permitidadel
productoen
agua
Exigenciasde
reducci6nde la
NSF
Pruebade la
NSF
Saboryolora 2.1mg/L 2.0mg/L+10% 97.6 0.05mg/L Noaplicable > 50% J-00029741
cloro
Particubsdedase
I,tamaS0delasparticu- 10,566,666 AImenos10,000 98.4 171,833pts/mL Noaplicable >85% J-00029739
bs:<0,5a<lum pt/mL particulas/mL
127,500 Minimo50,000
Quistes* quistes/L quistes/L 99.99 <1quiste/L Noaplicable >99.95% J-00031000
Turbiedad 10.5 11+1NTU 98.6 0.15NTU 0.5NTU >0.5NTU J-00033223
Plomo:pH6,5 153ug/L 0.15+10% 99.3 <1ug/L 0.010mg/L 10ug/L J-00039590
Plomo:pH8,5 155ug/L 0.15+10% >99.4 <1ug/L 0.010mg/L 10ug/L J-00039591
Mercurio:pH6,5 5.97ug/L 0.006+10% 96.6 <0.2ug/L 0.002mg/L 2 ug/L J-00039589
Mercurio:pH8,5 6.29ug/L 0.006+10% 88.9 0.7ug/L 0.002mg/L 2 ug/L J-00039586
107a108fibras
Amianto 140MFL >um deIongitud >99 <0.17MFL Noaplicable 99% J-00029743
Benceno 13.88ug/L 0.015+10% 96.4 <0.5ug/L 0.005mg/L <5 ug/L J-0029751
Carbofuran 79.6ug/L 0.190mg/L 98.7 1ug/L 0.001mg/L <40ug/L J-00029750
o-diclorobenceno 237.5ug/L 0.225+10% 99.8 0.525ug/L 0.075mg/L <75ug/L J-00029749
* Basados en el uso de ooquistes de Cq/ptosporidium parvum
36 Func onarr ento

CONSEJOS QTILESPARA EL ALMACENAJE DE ALIMENTOS
RRODUCTOS LACTEOS
Mantequilla 2-3 semanas 6-9 meses Envuelvalao tb.pelahermeticamente.
Chequeelafecha. Lamayoriade la lechey productos similaressevenden
Leche 1-2 semanas No recomendado encajasde cartonfechadasque indicanel periodode ma.ximafrescura
de unproducto.Vuelvaa cerrarhermeticamentemediantetapao envolto-
rio. Nodevuelvael producto noconsumido alrecipienteoriginal.
2-4 semanas No recomendado
Quesoencrema,derivados
delquesoy quesopara
untar
Quesocurado (sinabrir)
Quesocurado (abierto)
Quesofresco
Nata
Cremaagria
SalsaDip (abierta)
Yogur
Yogurcongelado
3-4 meses
2 meses
10-15 dias
7-10 dias
2 semanas
1semanas
10-14 dias
6 meses
No recomendado
No recomendado
2 meses
No recomendado
No recomendado
No recomendado
Chequeelafecha. Mantengatodos los quesosguardados hermetica-
mente en unenvoltoriocon protecciOncontra la humedad.
Checkdate code. Mostyogurt,creams, andsimilarproducts aresold in
date-coded cartons that indicatea product's peak freshness.Re-sealor
covertightly. Do not return unused portionsto originalcontainer.
Checkdate code. Keepcovered.
na 2 meses
HUEVOS
Chequeelafecha. Guardelos huevosen laparte ma.sfria del refrigera-
Huevos(frescos) 3-4 semanas Norecomendado dot y dentro de su envaseoriginal.
Huevos(cocinados) 1semanas No recomendado Guardeenenvasecon tapa.
Sobrasde platos 3-4 dias No recomendado Guardeenenvasecon tapa.
con huevo
FRUTA FRESCA
Manzanas
PDtanos
Melocotones,melones,
peras, aguacates
Bayasy cerezas
Albaricoques
Uvas
Piha(sincortar)
Piha(cortada)
Citricos
No lavela fruta antesde introducirlaen el refrigerador.
Gua.rdelaen bolsas o recipientesresistentesa la humedad. Envuelvala
fruta cortada.
Algunas frutasse ponen negrasal introducirlasen elrefrigerador.
1meses
2-4 dias
3-5 dias
2-3 dias
3-5 dias
2-5 dias
2-3 dias
5-7 dias
1-2 semanas
6dias
SOlopara
descongelar
No recomendado
No recomendado
No recomendado
12 meses
No recomendado
n/a
No recomendado
6-12 meses
No recomendado
No recomendado
Gua.rdelossin cubrir.
Chequeelafechay vuelva acerrar surecipienteoriginal. No devuelvael
Zumo producto no consumidoal recipienteoriginal.
Zumo congelado 12 meses Chequeelafecha. Novuelva acongelarlo.
Func onarr eno 37'

Funoon rn onto do rofrgerador
PESCADO Y MARISCO
Pescado
Pescado azul(caballa,
trucha, salmon)
Pescado blanco (ba-
calao,lenguado, etc.)
Congeladoo empanado
Marisco
1-2dias 2-3meses
1-2dias 6 meses
n/a 3meses
Mantengaloen su envoltoriooriginale introduzcaloen laparte masfria
del refrigerador.IntrodLizcaloen plastico para congelados con protec-
ciOncontra el vapor y la humedad. Congeleloa0° F(-18° C). Desconge-
leloen el refrigeradoro bajo chorrode agua.
Gambas (crudas) 1-2dias 12meses
Cangrejo 3-5 dias 10meses Paracongelarlos, introduzcalosen un recipientecon protecci6n contra el
Pescado o marisco vapor y la humedad.
2-3 dias 3 meses
congelado
CARNE .................................................
Fresca, cruda
Chuletas
Picada
Costillas
BacOn
Salchicha
Bistec
Aves
Charcuteria
2-4 dias
1dia
2-4 dias
1-2semanas
1-2dias
2-4 dias
1dia
3-5 dias
6-12 meses
3-4 meses
6-12 meses
1-2meses
1-2meses
6-9 meses
12meses
1meses
Chequeela fechapara usarla.Gu_trdelaen laparte mas fria del refrig-
erador,ensu envaseoriginal.Introduzcalaen un recipienteextraque
dispongade protecciOncontra lahumedad y elvapor paracongelarla.
Temperaturarecomendada parael refrigerador:de 33°Fa 36°F(0°Ca
2°C),y para laheladera:de 0°Ca2°F(-18°C a -17°C)
Cocinada
Carne
Aves
JamOn
2-3 dias
2-3 dias
1-2semanas
2-3 meses
4-5 meses
1-2meses
Chequeela fechapara usarla.Gua.rdelaen laparte ma.sfria del refrigera-
dot,en su envaseoriginal.Introduzcalaen un recipientequedisponga
de protecciOncontra la humedad y el vapor para congelarla.
Fuentes:
American Meat Institute Foundation. 1994. P_tginasamarillas: respuestas a las preguntas m_tsfrecuentes acerca de carnes y
aves. American Meat Institute Food Marketing Institute. 1999. The food keeper. Food Marketing Institute, Washington, D.C.
F reeland-Graves, J.H. y G.C. Peckham. 1996. Foundations of food preparation, @ ed. Prentice-Hall, Inc. Englewood Cliffs,
NJ. Hillers, V.N. 1993. Storing foods at home. Washington State University Cooperative Extension, Pullman, WA. Publ. EB
1205. National Restaurant Association. 2001. Be cool-chill out! Refrigerate promptly. National Restaurant Association Educa-
tion FoundationlAs International Food Safety Council, Washington, D.C. USDA. 1997. Basics for handling food safely. U.S.
Department of Agriculture, Food Safety and Inspection Service, Washington, D.C.
38 Func onarr ento

/
, Verifiqueque la toma de alimentacion este correctamente conectada.
, _,Estaajustado en la temperatura correcta el control de temperatura del panel de
visualizacion? Intente ajustarlo a una temperatura inferior.
, _,Estainstalado el refrigerador bajo la luz directa del sol o junto a una fuente de calor?
• _,Estala parte posterior del refrigerador demasiado pegada a la pared y, por tanto,
impidiendo la circulaci0n del aire?
, _,Estaajustado en la temperatura correcta el control de temperatura del panel de
visualizacion? Intente ajustarlo a una temperatura mas alta.
, _,Esmuy baja la temperatura de la estancia?
• _,Haintroducido alimentos con un alto contenido de agua en la parte mas fria del
refrigerador? Intente mover estos articulos dentro del cuerpo del refrigerador en lugar de
guardarlos en la gaveta Cool Select PantryTM.
, Verifiqueque el refrigerador esta nivelado y es estable.
, _,Estala parte posterior del refrigerador demasiado pegada a la pared y, por tanto,
impidiendo la circulaci0n del aire?
, _,Hacafdo algo en la parte posterior o bajo el refrigerador?
• Se oyen sonidos repetitivos procedentes del interior del refrigerador. Es normal y ocurre
debido a que varios accesorios se contraen y expanden en base a la temperatura del
interior del refrigerador.
, Es normal que se produzca algo de calor ya que lossistemas anticondensacion
estan instalados en la seccion con bisagras vertical del refrigerador para evitar dicho
fenomeno.
• _,Estaentreabierta la puerta del refrigerador? Puede producirse condensacion cuando la
puerta permanece abierta durante un perfodo de tiempo prolongado.
, _,Haesperado las 12 horas posteriores a la instalacion de la toma de abastecimiento de
agua antes de elaborar hielo?
, _,Estaconectada la toma de agua y lavalvula de corte abierta?
, _,Detuvomanualmente el funcionamiento de la maquina de hielo?
• _,Esdemasiado alta la temperatura de la nevera? Intente ajustar latemperatura de la
nevera a un nivelinferior.
• Esto se considera normal. El borboteo procede de la circulacion del liquido de
refrigeracion a traves del refrigerador.
• Verifiqueque no existen alimentos estropeados.
, Los alimentos con un olor fuerte (por ejemplo, pescados) deben cubrirse
herm(_,ticamente.
• Limpie periodicamente su nevera chequeando y desechando alimentos en real estado o
sospechosos de estarlo.
, _,Establoqueado el conducto de ventilacion? Eliminecualquier obstruccion para
conseguir que el aire circule libremente.
• Disponga suficiente espacio entre los alimentos almacenados para Iograr una circulacion
de aire mas eficiente.
• _,Estacerrada correctamente la puerta de la nevera?
, _,Estaconectada la toma de agua y lavalvula de corte abierta?
, _,Estasiendo aplastado o doblado el conducto de la toma de suministro de agua?
Aseg0rese de que el conducto este libre y limpio de cualquier obstrucciOn.
, _,Estacongelado el depOsito de agua debido a que la temperatura del refrigerador
es demasiado baja? Intente escoger un ajuste de temperatura mayor en el panel de
visualizacion principal.
SoluciOn de probierras 39

/
REFRIGERADORSAMSUNG(736LITROS(26PIESCOBICOS)DECAPACIDADY MAYOR)
GARANT/A LIMITADA AL COMPRADOR ORIGINAL
Este producto de marca Samsung, suministrado y distribuido por Samsung Electronics America, Inc.
(Samsung) y entregado nuevo, en su caja de cart6n original al comprador original, esta garantizado por
Samsung ante defectos de fabricaciOn en materiales y mano de obra durante un periodo de garantia limitado a:
Un (1) aSo para piezas y mano de obra del refrigerador
Cinco (5) aSos para piezas y mano de obra exclusivamente del sistema herm6tico de
refrigeraci6n.
(*Compresor, evaporador, condensador, deshumidificador, tuberias de conexi6n)
Esta garantia limitada comienza en la fecha original de compra y s61o es valido para productos adquiridos y
usados en los Estados Unidos. Para recibir servicios bajo garantia, el comprador debe ponerse en contacto
con Samsung para proceder a la resoluciOn del problema y al procedimiento de reparaci6n. El servicio de
garantia s61o puede realizarse a traves de un servicio tecnico autorizado Samsung. Debe presentarse la factura
original de venta bajo solicitud de Samsung o del servicio tecnico autorizado Samsung, como prueba de
compra.
Samsung reparara o reemplazara cualquier pieza considerada defectuosa a nuestra entera discreciOn y
sin cargo, como queda estipulado en este documento, por piezas nuevas o reparadas durante el periodo
de garantia limitada anteriormente especificado. Todas las piezas y productos reemplazados pasan a ser
propiedad de Samsung, debiendo set devueltos a Samsung. Las piezas y productos de repuesto quedaran
aun bajo el periodo restante de garantia original, o noventa (90) dias, el que sea mas extenso.
La prestaci6n de servicios en sitio sera proporcionada durante el periodo de garantia de mano de obra, sujeta
a disponibilidad dentro de los estados contiguos de los EE.UU. La prestaciOn de servicios en sitio no esta
disponible en todas las zonas. Para recibir prestaciOn de servicios en sitio, el producto debe estar despejado
y ser accesible al nivel del piso por parte del personal de servicio. Si durante la prestaci6n de servicios en sitio,
no pudiera completarse la reparaci6n, podria ser necesario el traslado, reparaci6n y devoluciOn posterior del
producto. Si la prestaci6n de servicios en sitio no esta disponible, Samsung podria escoger, a nuestra entera
discreciOn, proporcionar transporte a nuestra elecciOn hasta y desde un servicio tecnico autorizado Samsung.
De Io contrario, el transporte hasta y desde el servicio tecnico autorizado Samsung corre por cuenta del
comprador.
Esta garantia limitada cubre defectos de fabricaci6n en materiales y mano de obra bajo condiciones de uso
normal, no comercial, del producto y no se aplicara en los siguientes casos, incluidos, aunque no limitados a:
daSos ocasionados durante el transporte; entrega e instalaci6n; utilizaciones y usos para los que el producto
no fue diseSado; producto o numeros de serie alterados; daSos externos o de acabado exterior; accidentes,
mal uso, negligencia, incendio, agua, rayos u otros fen6menos naturales; uso de productos, equipamiento,
sistemas, utilidades, servicios, piezas, suministros, accesorios, aplicaciones, instalaciones, reparaciones,
tuberias externas y fugas, cableado externo, disyuntores, fusibles o conectores no suministrados y autorizados
por Samsung o que daSen este producto u ocasionen problemas de servicio; voltaje incorrecto, fluctuaciones
y sobretensi6n del suministro electrico; adaptaciones y fallas, por parte del cliente, en el cumplimiento de las
instrucciones de funcionamiento, limpieza, mantenimiento y de entorno que se incluyen y establecen en el
manual de instrucciones; perdida de alimentos por descomposici6n; consumibles incluyendo filtros y focos de
iluminaci6n.

NOEXISTENOTRASGARANTiASEXPL/CITASMASQUELASRECOGIDASYDESCRITASANTERIORMENTE,
AS/COMOTAMPOCOEXISTENOTRASGARANT/ASEXPL/CITASOIMPL/CITAS,INCLUYENDOSIN
LIMITACIONTODASLASGARANTfASIMPL/CITASDECOMERCIABILIDADO IDONEIDADPARAUNFIN
CONCRFTOQUEPUDIERANRESULTARPERTINENTESTRASLOSPER/ODOSEXPLJCITOSDEGARANTiA
INDICADOSCONANTERIORIDAD.TAMPOCOSERANLEGALMENTEVlNCULANTESPARASAMSUNG
OTRASGARANTiASEXPL/CITASUOFRECIDASPORPERSONAS,FIRMASOEMPRESASENRELACION
AESTEPRODUCTO.SAMSUNGNOSERALEGALMENTERESPONSABLEDELAPERDIDADEINGRESOS
O BENEFICIOS,LANOMATERIALIZACIONDEAHORROSUOTROSBENEFICIOS,O DECUALQUIER
DANORESULTANTEESPECIAL,ACCIDENTALO INDIRECTOOCASIONADOPORELUSO,ABUSOO
INCAPACIDADDEUSODEESTEPRODUCTO,INDEPENDIENTEMENTEDELATEOR/ALEGALSOBRELA
QUESEBASALARECLAMACION,INCLUSOSISAMSUNGHASIDOADVERTIDODELAPOSIBILIDADDE
TALESDANOS.IGUALMENTE,CUALQUIERTIPORECUPERACIONEXIGIDAASAMSUNGNOSUPERARAEL
PRECIODECOMPRADELPRODUCTOVENDIDOPORSAMSUNGYQUEHAOCASIONADOELSUPUESTO
DANO.SINLIMITARLOINDICADOANTERIORMENTE,ELCOMPRADORASUMETODOELRIESGOY
RESPONSABILIDADDECUALQUIERPERDIDA,DANOOLESIONPERSONALYA SUPROPIEDAD,ASi
COMOATERCEROSYSUSPROPIEDADES,OCASIONADASPORELUSO,ABUSOO INCAPACIDADDE
USODEESTEPRODUCTOVENDIDOPORSAMSUNGY NOPROVOCADASDIRECTAMENTEPORLA
NEGLIGENCIADESAMSUNG.ESTAGARANTiALIMITADANOSERAV,L,LIDAPARAPERSONASDISTINTAS
ALCOMPRADORORIGINALDEESTEPRODUCTO,ESINTRANSFERIBLEYESTIPULASUSOLUCION
EXCLUSIVA.
Ciertosestadosnopermitenlimitacionesenrelaci6na laduraci6nde unagarantiaimplicitao laexclusi6no
limitaci6ndedaflosaccidentalesoindirectos,detalformaquelasmencionadaslimitacionesoexcepciones
puedennoserpertinentes.Estagarantialeotorgaunosderechoslegalesespecificos,einclusopuedeconferirle
otrosderechos,distintosdependiendodelestadoenqueseencuentre.
Paraobtenerserviciodegarantia,p6ngaseencontactoconSamsungen:
CENTRODEASISTENCIAAL CLIENTEDESAMSUNG
SamsungElectronicsAmerica,Inc.400ValleyRoadSuite201Mt.Arlington,NJ07956
1-800-SAMSUNG(1-800-726-7864)y www.samsung.com

QUESTIONS OR COMMENTS?
COU.TR¥' CALE
OR VISIT US ONLINE AT WRITE
800-SAMSUNG Samsung Electronics America, Inc. 400 Valley
U.S (800-726-7864) www.samsung.com Road Suite 201 Mt. Arlington, NJ 07956
800-SAMSUNG Samsung Electronics Canada Inc. Customer
CANADA (800-726-7864) www.samsung.com/ca Service, 55 Standish Court Mississauga, Ontario
L5R 4B2 Canada
Code No. DA68-01812C REV(0.3)
-
 1
1
-
 2
2
-
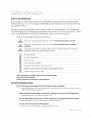 3
3
-
 4
4
-
 5
5
-
 6
6
-
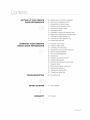 7
7
-
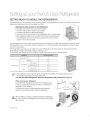 8
8
-
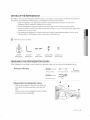 9
9
-
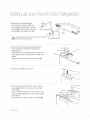 10
10
-
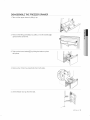 11
11
-
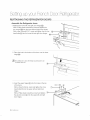 12
12
-
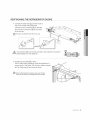 13
13
-
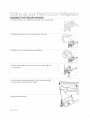 14
14
-
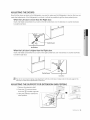 15
15
-
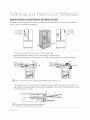 16
16
-
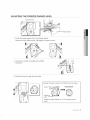 17
17
-
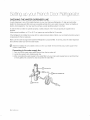 18
18
-
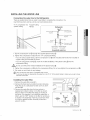 19
19
-
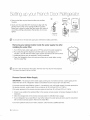 20
20
-
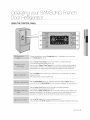 21
21
-
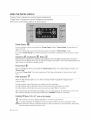 22
22
-
 23
23
-
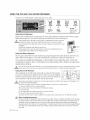 24
24
-
 25
25
-
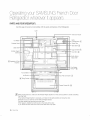 26
26
-
 27
27
-
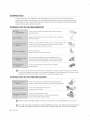 28
28
-
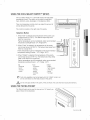 29
29
-
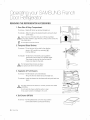 30
30
-
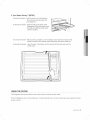 31
31
-
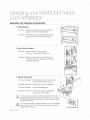 32
32
-
 33
33
-
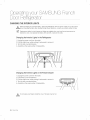 34
34
-
 35
35
-
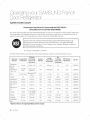 36
36
-
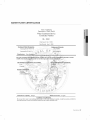 37
37
-
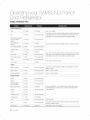 38
38
-
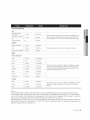 39
39
-
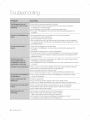 40
40
-
 41
41
-
 42
42
-
 43
43
-
 44
44
-
 45
45
-
 46
46
-
 47
47
-
 48
48
-
 49
49
-
 50
50
-
 51
51
-
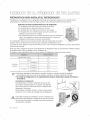 52
52
-
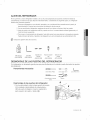 53
53
-
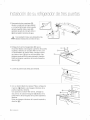 54
54
-
 55
55
-
 56
56
-
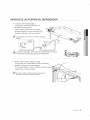 57
57
-
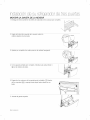 58
58
-
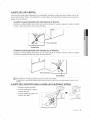 59
59
-
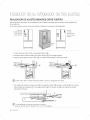 60
60
-
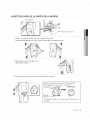 61
61
-
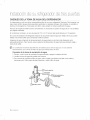 62
62
-
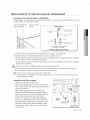 63
63
-
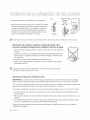 64
64
-
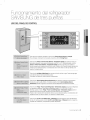 65
65
-
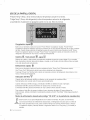 66
66
-
 67
67
-
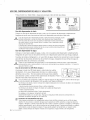 68
68
-
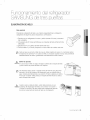 69
69
-
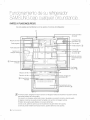 70
70
-
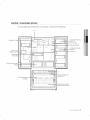 71
71
-
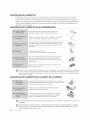 72
72
-
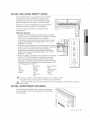 73
73
-
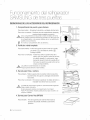 74
74
-
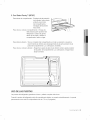 75
75
-
 76
76
-
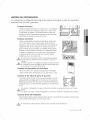 77
77
-
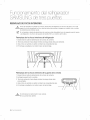 78
78
-
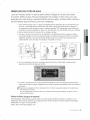 79
79
-
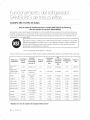 80
80
-
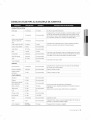 81
81
-
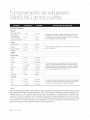 82
82
-
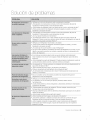 83
83
-
 84
84
-
 85
85
-
 86
86


Samsung RF267AABP/XAA-00 Manual de usuario
- Tipo
- Manual de usuario
en otros idiomas
- English: Samsung RF267AABP/XAA-00 User manual
Artículos relacionados
-
Samsung RF26XAEPN/XAA Manual de usuario
-
Samsung RF268ACRS/XAA-01 El manual del propietario
-
-
-
-
Samsung RFG297 Series Manual de usuario
-
-
-
-
Samsung RF221NCTASL Manual de usuario