Dometic 8 Serie Instrucciones de operación
- Categoría
- Neveras
- Tipo
- Instrucciones de operación
Este manual también es adecuado para

REFRIGERAT
ION
8 SERIES
RMD8501, RMD8505, RMD8551,
RMD8555
Absorber refrigerator
Operating manual
Nevera con extractor
Instrucciones de uso
EN
ES
title_16s_A4.fm Seite 1 Mittwoch, 15. Februar 2017 4:27 16

ENGLISH
Dometic Group is a customer-driven, world-leading provider of leisure products for the RV, automotive, truck and marine mar-
kets. We supply the industry and aftermarket with a complete range of air conditioners, refrigerators, awnings, cookers, sanita-
tion systems, lighting, mobile power equipment, comfort and safety solutions, windows, doors and other equipment that make
life more comfortable away from home.
Dometic Group supplies a wide range of workshop equipment for service and maintenance of built-in air conditioners. Dometic
Group also provides specially designed refrigerators for hotel rooms, offices, wine storage and transport and storage of medi-
cal products.
Our products are sold in almost 100 countries and are produced mainly in wholly-owned production facilities around the world.
ESPAÑOL
El Grupo Dometic es una empresa orientada al cliente, líder mundial en el suministro de productos innovadores para carava-
nas, autocaravanas, automóviles, camiones y la industria náutica. Proveemos a fabricantes y a distribuidores con una comple-
ta gama de aires acondicionados, frigoríficos, toldos, cocinas, sistemas sanitarios, iluminación, equipos móviles de abasteci-
miento energético, soluciones para mayor seguridad y confort, ventanas, puertas y demás equipamiento para hacerle la vida
fuera del hogar más cómoda. El Grupo Dometic suministra también equipamiento para talleres para el servicio y mantenimien-
to de aire acondicionado integrado.
El Grupo Dometic ofrece así mismo frigoríficos específicamente diseñados para habitaciones de hotel y oficinas, para el trans-
porte y conservación de productos médicos así como bodegas para vinos.
Nuestros productos se venden en cerca de 100 países y se producen principalmente en nuestras fábricas ubicadas alrededor
del mundo.
289 0317-24_ES_RMDx8xxx-Bedienung-Titel_N1-1.qxp 29.06.2012 11:45 Seite 2

Operating Instructions
Absorption Refrigerator for Recreation Vehicles
RMD 8501 RMD 8505
RMD 8551 RMD 8555
MBA 04/2012
N 1-2
Model number .............................................
Product number .............................................
Serial number .............................................
Record for future reference:
EN
English
289 0317-20_EN_RMD8xxx-Bedienung_N1-2.qxp 29.06.2012 11:58 Seite 1

2
1.0 General . . . . . . . . . . . . . . . . . . . . . . . . . . . . . . . . . . . . . . . . . . . . . . 4
1.1 Introduction . . . . . . . . . . . . . . . . . . . . . . . . . . . . . . . . . . . . . . . . . . . . . . . . . . . . . . . . . . . . . . . . 4
1.2 Guide to these operating instructions . . . . . . . . . . . . . . . . . . . . . . . . . . . . . . . . . . . . . . . . . . . .4
1.3 Copyright protection . . . . . . . . . . . . . . . . . . . . . . . . . . . . . . . . . . . . . . . . . . . . . . . . . . . . . . . . . 4
1.4 Explanation of symbols used in this manual . . . . . . . . . . . . . . . . . . . . . . . . . . . . . . . . . . . . . . . 4
1.5 Warranty . . . . . . . . . . . . . . . . . . . . . . . . . . . . . . . . . . . . . . . . . . . . . . . . . . . . . . . . . . . . . . . . . . . 5
1.6 Limitation of liability . . . . . . . . . . . . . . . . . . . . . . . . . . . . . . . . . . . . . . . . . . . . . . . . . . . . . . . . . . 5
1.7 Customer services . . . . . . . . . . . . . . . . . . . . . . . . . . . . . . . . . . . . . . . . . . . . . . . . . . . . . . . . . . . 5
1.8 Spare parts . . . . . . . . . . . . . . . . . . . . . . . . . . . . . . . . . . . . . . . . . . . . . . . . . . . . . . . . . . . . . . . . . 6
1.9 Environmental notices . . . . . . . . . . . . . . . . . . . . . . . . . . . . . . . . . . . . . . . . . . . . . . . . . . . . . . . . 6
1.9.1 Disposal . . . . . . . . . . . . . . . . . . . . . . . . . . . . . . . . . . . . . . . . . . . . . . . . . . . . . . . . . . . . . . . . . . . . . . . . . . . 6
1.9.2 Energy-saving-tips . . . . . . . . . . . . . . . . . . . . . . . . . . . . . . . . . . . . . . . . . . . . . . . . . . . . . . . . . . . . . . . . . . . 6
1.10 Declaration of conformity . . . . . . . . . . . . . . . . . . . . . . . . . . . . . . . . . . . . . . . . . . . . . . . . . . . . . . 6
2.0 Safety instructions . . . . . . . . . . . . . . . . . . . . . . . . . . . . . . . . . . . . . . 7
2.1 Application according to regulations . . . . . . . . . . . . . . . . . . . . . . . . . . . . . . . . . . . . . . . . . . . . .7
2.2 User's responsibility . . . . . . . . . . . . . . . . . . . . . . . . . . . . . . . . . . . . . . . . . . . . . . . . . . . . . . . . . . 7
2.3 Protection of children when disposing of the equipment . . . . . . . . . . . . . . . . . . . . . . . . . . . . . 7
2.4 Working upon and checking the refrigerator . . . . . . . . . . . . . . . . . . . . . . . . . . . . . . . . . . . . . . . 7
2.5 Information on coolant . . . . . . . . . . . . . . . . . . . . . . . . . . . . . . . . . . . . . . . . . . . . . . . . . . . . . . . . 8
2.6 Operating the refrigerator with gas . . . . . . . . . . . . . . . . . . . . . . . . . . . . . . . . . . . . . . . . . . . . . . 8
2.7 Safety instructions when storing foodstuffs . . . . . . . . . . . . . . . . . . . . . . . . . . . . . . . . . . . . . . . 9
3.0 Description of model . . . . . . . . . . . . . . . . . . . . . . . . . . . . . . . . . . . . 10
3.1 Model identification . . . . . . . . . . . . . . . . . . . . . . . . . . . . . . . . . . . . . . . . . . . . . . . . . . . . . . . . . . 10
3.2 Refrigerator rating plate . . . . . . . . . . . . . . . . . . . . . . . . . . . . . . . . . . . . . . . . . . . . . . . . . . . . . . . 10
3.3 Technical data . . . . . . . . . . . . . . . . . . . . . . . . . . . . . . . . . . . . . . . . . . . . . . . . . . . . . . . . . . . . . . 11
3.4 Description of refrigerator . . . . . . . . . . . . . . . . . . . . . . . . . . . . . . . . . . . . . . . . . . . . . . . . . . . . . 12
4.0 Refrigerator operation . . . . . . . . . . . . . . . . . . . . . . . . . . . . . . . . . . . 13
4.1 Cleaning . . . . . . . . . . . . . . . . . . . . . . . . . . . . . . . . . . . . . . . . . . . . . . . . . . . . . . . . . . . . . . . . . . . 13
4.2 Maintenance . . . . . . . . . . . . . . . . . . . . . . . . . . . . . . . . . . . . . . . . . . . . . . . . . . . . . . . . . . . . . . . . 13
4.3 Electrical operation . . . . . . . . . . . . . . . . . . . . . . . . . . . . . . . . . . . . . . . . . . . . . . . . . . . . . . . . . . 13
4.4 Gas operation (Liquid gas) . . . . . . . . . . . . . . . . . . . . . . . . . . . . . . . . . . . . . . . . . . . . . . . . . . . . . 14
4.5 Explanation of operating controls . . . . . . . . . . . . . . . . . . . . . . . . . . . . . . . . . . . . . . . . . . . . . . . 14
4.6 RMD 8xx1models . . . . . . . . . . . . . . . . . . . . . . . . . . . . . . . . . . . . . . . . . . . . . . . . . . . . . . . . . . . . 16
4.6.1 Electrical operation . . . . . . . . . . . . . . . . . . . . . . . . . . . . . . . . . . . . . . . . . . . . . . . . . . . . . . . . . . . . . . . . . . . 16
4.6.2 Gas operation . . . . . . . . . . . . . . . . . . . . . . . . . . . . . . . . . . . . . . . . . . . . . . . . . . . . . . . . . . . . . . . . . . . . . . . 16
4.6.3 Setting of cooling compartment temperature . . . . . . . . . . . . . . . . . . . . . . . . . . . . . . . . . . . . . . . . . . . . . . 16
4.7 RMD 8xx5 models . . . . . . . . . . . . . . . . . . . . . . . . . . . . . . . . . . . . . . . . . . . . . . . . . . . . . . . . . . . 16
4.7.1 Manual operation . . . . . . . . . . . . . . . . . . . . . . . . . . . . . . . . . . . . . . . . . . . . . . . . . . . . . . . . . . . . . . . . . . . . 16
4.7.2 Automatic operation . . . . . . . . . . . . . . . . . . . . . . . . . . . . . . . . . . . . . . . . . . . . . . . . . . . . . . . . . . . . . . . . . . 17
4.7.3 Setting of cooling compartment temperature . . . . . . . . . . . . . . . . . . . . . . . . . . . . . . . . . . . . . . . . . . . . . . 17
4.7.4 Refuelling while in automatic mode operation . . . . . . . . . . . . . . . . . . . . . . . . . . . . . . . . . . . . . . . . . . . . . . 17
4.7.5 Additional features . . . . . . . . . . . . . . . . . . . . . . . . . . . . . . . . . . . . . . . . . . . . . . . . . . . . . . . . . . . . . . . . . . . 17
4.8 Gas operation with internal batteries (optional) . . . . . . . . . . . . . . . . . . . . . . . . . . . . . . . . . . . . . 18
4.8.1 Inserting / changing the batteries . . . . . . . . . . . . . . . . . . . . . . . . . . . . . . . . . . . . . . . . . . . . . . . . . . . . . . . . 18
4.9 Frameheating . . . . . . . . . . . . . . . . . . . . . . . . . . . . . . . . . . . . . . . . . . . . . . . . . . . . . . . . . . . . . . . 19
4.10 Door locking . . . . . . . . . . . . . . . . . . . . . . . . . . . . . . . . . . . . . . . . . . . . . . . . . . . . . . . . . . . . . . . . 19
4.10.1 Fastening and releasing the door lock hook when parking the vehicle . . . . . . . . . . . . . . . . . . . . . . . . . . 20
4.11 Lighting . . . . . . . . . . . . . . . . . . . . . . . . . . . . . . . . . . . . . . . . . . . . . . . . . . . . . . . . . . . . . . . . . . . . 20
4.12 Positioning the storage racks . . . . . . . . . . . . . . . . . . . . . . . . . . . . . . . . . . . . . . . . . . . . . . . . . . 20
4.13 Storing food and making ice cubes . . . . . . . . . . . . . . . . . . . . . . . . . . . . . . . . . . . . . . . . . . . . . .21
Table of contents
289 0317-20_EN_RMD8xxx-Bedienung_N1-2.qxp 29.06.2012 11:58 Seite 2

3
4.13.1 Storing products in the cooling compartment . . . . . . . . . . . . . . . . . . . . . . . . . . . . . . . . . . . . . . . . . . . . . . 21
4.13.2 Storing products in the freezer compartment . . . . . . . . . . . . . . . . . . . . . . . . . . . . . . . . . . . . . . . . . . . . . . 21
4.13.3 Making ice cubes . . . . . . . . . . . . . . . . . . . . . . . . . . . . . . . . . . . . . . . . . . . . . . . . . . . . . . . . . . . . . . . . . . . . 21
4.13.4 Refrigerator compartments . . . . . . . . . . . . . . . . . . . . . . . . . . . . . . . . . . . . . . . . . . . . . . . . . . . . . . . . . . . . . 22
4.14 Shutting off the refrigerator . . . . . . . . . . . . . . . . . . . . . . . . . . . . . . . . . . . . . . . . . . . . . . . . . . . . 22
4.15 Defrosting . . . . . . . . . . . . . . . . . . . . . . . . . . . . . . . . . . . . . . . . . . . . . . . . . . . . . . . . . . . . . . . . . . 22
4.16 Winter operation . . . . . . . . . . . . . . . . . . . . . . . . . . . . . . . . . . . . . . . . . . . . . . . . . . . . . . . . . . . . . 23
4.17 Changing the decor panel . . . . . . . . . . . . . . . . . . . . . . . . . . . . . . . . . . . . . . . . . . . . . . . . . . . . . 24
4.18 Troubleshooting . . . . . . . . . . . . . . . . . . . . . . . . . . . . . . . . . . . . . . . . . . . . . . . . . . . . . . . . . . . . . 25
4.19 Information on failure display and trouble-shooting . . . . . . . . . . . . . . . . . . . . . . . . . . . . . . . . . 26
4.19.1 Status indicators . . . . . . . . . . . . . . . . . . . . . . . . . . . . . . . . . . . . . . . . . . . . . . . . . . . . . . . . . . . . . . . . . . . . . 26
© Dometic GmbH - 2012 - Subject to change without prior notice
Dometic GmbH
In der Steinwiese 16
D-57074 Siegen
www.dometic.com
289 0317-20_EN_RMD8xxx-Bedienung_N1-2.qxp 29.06.2012 11:58 Seite 3

4
General
1.0 General
You have made an excellent choice in selec-
ting the Dometic Absorption Refrigerator. We
are sure that you will be satisfied with your
new refrigerator in all respects. The refrigera-
tor, which works silently, meets high quality
standards and guarantees the efficient utilisa-
tion of resources and energy throughout its
entire life cycle, during manufacture, in use
and when being disposed of.
1.1 Introduction
The information, texts and illustrations in these
instructions are copyright protected and are
subject to industrial property rights.
No part of these instructions may be reprodu-
ced, copied or utilised in any other way wit-
hout written authorisation by Dometic GmbH,
Siegen.
1.3 Copyright protection
Before you start using the refrigerator,
please read the operating instructions
carefully.
These instructions provide you with the neces-
sary guidance for the proper use of your refri-
gerator. Observe in particular the safety
instructions. Observation of the instructions
and handling recommendations is important
for dealing with the refrigerator safely and for
protecting you from injury and the refrigerator
from damage. You must understand what you
have read before you carry out a task.
Keep these instructions in a safe place
close to the refrigerator so they may be
referred to at any time.
1.2 Guide to these operating
instructions
1.4 Explanation of symbols
used in this manual
Warning notices are identified by symbols. A
supplementary text gives you an explanation
of the degree of danger.
Observe these warning notices rigorously.
You will thus protect yourself and other
people from injury, and the appliance from
damage.
Warning notices
DANGER indicates an imminent hazardous
situation which, if not avoided, could result in
death or serious injury.
DANGER!
WARNING indicates a potentially hazardous
situation which, if not avoided, could result in
death or serious injury
WARNING!
WARNING indicates a potentially hazardous
situation which, if not avoided, could result in
death or serious injury
CAUTION!
CAUTION (used without the safety alert sym-
bol) indicates a potentially hazardous situation
which, if not avoided, may result in damage to
the appliance.
CAUTION!
289 0317-20_EN_RMD8xxx-Bedienung_N1-2.qxp 29.06.2012 11:58 Seite 4

5
General
All information and guidance in these opera-
ting instructions were prepared after taking
into consideration the applicable standards
and regulations as well as the current state of
the art. Dometic reserves the right to make
changes at any time which are deemed to be
in the interest of improving the product and
safety.
Dometic will assume no liability for damage in
the case of :
non-observation of the operating instructi-
ons
application not in accordance with the
regulations or provisions
use of non-original spare parts
modifications and interferences to
the appliance
effect of environmental influences, such as
- temperature fluctuations
- humidity
1.6 Limitation of liability
Dometic offers a pan-European customer ser-
vice network. Find your authorised customer
service centre by calling the phone number
indicated in the EuroService Network book,
EuroService Network - which accompanies
every refrigerator. You can also obtain the
address information of the nearest customer
service from www.dometic.com. When con-
tacting Dometic Customer Services, please
state the model, product number and serial
number together with the MLC code, if appli-
cable. You will find this information on the
rating plate inside the refrigerator. We recom-
mend that you note this data in the field provi-
ded on the front page of this operation manu-
al.
1.7 Customer services
Information
INFORMATION gives you supplementary and
useful guidance when dealing with your refrige-
rator.
Environmental Tips
ENVIRONMENTAL TIPS gives you useful gui-
dance for saving energy and disposal of the
appliance.
Warranty arrangements are in accordance
with EC Directive 44/1999/CE and the normal
conditions applicable for the country concer-
ned. For warranty or other maintenance, plea-
se contact our customer services department.
Any damage due to improper use is not cover-
ed by the warranty. The warranty does not
cover any modifications to the appliance or
the use of non-original Dometic parts. The
warranty does not apply if the installation and
operating instructions are not adhered to and
no liability shall be entertained.
1.5 Warranty
289 0317-20_EN_RMD8xxx-Bedienung_N1-2.qxp 29.06.2012 11:58 Seite 5

6
1.9.2 Energy-saving-tips
At an average ambient temperature of
25°C, it is sufficient to operate the refrige-
rator at middle thermostat setting.
Where possible, always store precooled
products.
Do not expose the refrigerator to direct
sunlight.
Ensure that air circulation of the cooling
unit is not obstructed.
Defrosting at regular intervals saves energy
(see section 4.15 "Defrosting").
Open the refrigerator door only for a short
period of time when removing products.
Run the refrigerator for about 12 hours
before filling it.
Ammonia (a natural compound of hydrogen
and nitrogen) is used in the cooling unit as a
coolant. Non-ozone-hazardous cyclopentane
is used as a propellant for manufacturing PU
foam insulation.
In order to ensure that the recyclable packa-
ging materials are re-used, they should be
sent to the customary local collection system.
The appliance should be transferred to a suit-
able waste disposal company that will ensure
re-use of the recyclable components and pro-
per disposal of the rest. For eco-friendly drai-
ning of the coolant from all absorber refrigera-
tion units, a suitable disposal plant should be
used.
1.9 Environmental notices
1.9.1 Disposal
1.8 Spare parts
Parts can be ordered throughout Europe from
our customer services.
Always give the model and product number
when you contact the customer service! You
will find this information on the rating plate
inside the refrigerator.
1.10 Declaration of conformity
General
289 0317-20_EN_RMD8xxx-Bedienung_N1-2.qxp 29.06.2012 11:58 Seite 6

7
Safety instructions
2.0 Safety instructions
The refrigerator is not suitable for the pro-
per storage of medication. Please obser-
ve in addition the instructions in the medi-
cation package inserts.
WARNING!
This refrigerator is designed for installation in
recreation vehicles such as caravans or
motorhomes. The appliance has been type-
approval tested for this application in accor-
dance with the EC Gas Directive.
The refrigerator is to be used solely for storing
foodstuffs.
2.1 Application according to
regulations
2.4 Working upon and checking
the refrigerator
2.3 Protection of children when
disposing of the equipment
When disposing of the refrigerator, detach
all refrigerator doors and leave the stora-
ge racks in the refrigerator. In this way
inadvertent entrappment and suffocation
is prevented.
WARNING!
Work on gas equipment, exhaust system
and electrical facilities must be carried
out by authorised personnel only.
Substantial damage to property and/or
injury to persons can arise through unpro-
fessional procedures.
WARNING!
Never use an unshielded flame to check
gas bearing parts and pipes for leakage!
There is a danger of fire or explosion.
DANGER!
Never open the absorber cooling unit! It is
under high pressure.
There is a danger of injury!
WARNING!
Anyone operating the refrigerator must be
familiar with the safe handling and understand
the advice in these operating instructions.
This appliance is not intended for use by per-
sons (including children) with reduced physi-
cal, sensory or mental capabilities, or lack of
experience and knowledge, unless they are
supervised or have been given instruction
concerning use of the appliance by a person
responsible for their safety. Children should be
supervised to ensure that they do not play with
the appliance. Cleaning and user maintenance
shall not be made by children.
[EN 60335-2-24, 7.12]
2.2 User's responsibility
289 0317-20_EN_RMD8xxx-Bedienung_N1-2.qxp 29.06.2012 11:58 Seite 7

8
Safety instructions
2.5 Information on coolant
Ammonia is used as a coolant.
This is a natural compound also used in hou-
sehold cleaning agents (1 litre of Salmiak
cleaner contains up to 200g of ammonia -
about twice as much as is used in the refrige-
rator). Sodium chromate is used for corrosion
protection (1.8% by weight of the solvent).
In the event of leakage (easily identifiable from
the strong odour), proceed as follows:
- Switch off the appliance.
- Air the room thoroughly.
- Inform authorised customer services.
For your safety it was ascertained in an
expert's report that no impairment of health
exists when the coolant is discharged.
It is imperative that the operating pressure
corresponds to the data specified on the
rating plate of the appliance. Compare the
operating pressure of the rating plate with the
data specified on the pressure reducing valve
of the liquid gas cylinder.
2.6 Operating the refrigerator
with gas
WARNING!
Operating the appliance with gas is
not permitted
at petrol stations
on ferry boats
while transporting the caravan/motor-
home by a transporter or breakdown
vehicle.
There is the danger of fire!
Leave the equipment switched off.
If you smell gas:
* authorised specialist personnel
Authorised specialist personnel are accredited
experts who are able, by virtue of their training and
knowledge, to vouch that the inspection and repair
work has been carried out properly.
Open all windows and leave the room.
Do not operate any electrical equipment
and prevent the use of naked flames.
Do not operate any electrical equipment
and prevent the use of naked flames.
Contact authorised specialist personnel*
for advice.
289 0317-20_EN_RMD8xxx-Bedienung_N1-2.qxp 29.06.2012 11:58 Seite 8

9
Safety instructions
The cooling unit's performance is influenced
by ambient temperatures. Please select the
medium setting for ambient temperatures bet-
ween +15°C and +25°C (refer to
Setting of
cooling compartment temperature
). The unit
operates within its optimum performance
range.
Dometic refrigerators work according to the
absorption principle. For physical reasons, an
absorption system responds slowly to
changes made by the thermostat controller, by
loss of cooling energy through opening the
door or during storing food. The devices meet
the cooling performance requirements of the
Climatic Class SN acc. to EN/ISO 7371 in the
temperature range of +10°C to +32°C ambient
temperature.
For temperatures below +10°C, winter
covers should be installed. For ambient
temperatures exceeding +32°C for a longer
period of time, it is recommended installing
Dometic additional fan (i
tem no. 241 2985 -
00
).
No refrigerator of any kind can improve the
quality of the food; refrigerators can only
maintain the food's quality for a short dura-
tion as from the time of storing it.
Please observe the following particular
conditions for storing food in a refrigerator
that is built into a vehicle:
A change in the climatic conditions such as
temperature fluctuations
High temperatures inside the vehicle when
it is closed and parked in direct sunlight
(temperatures are possible up to 50°C)
Use of the refrigerator during travel with the
power supply of 12V DC
A refrigerator built in behind a window and
exposed to direct sunlight
Storing the products too soon, i.e. shortly
after starting up the appliance for use
Under these particular conditions the refrige-
rator cannot guarantee reaching the tempera-
ture needed for perishables.
Perishables include all products with a stipula-
ted use-by date and a minimum storage tem-
perature of +4°C or less, especially for meat,
poultry, fish, sausages, pre-packed foods.
Pack raw and cooked foods separately
(e.g. in containers, aluminium foil, etc.).
Only remove the outside packaging of
single packs if all the necessary informati-
on, e.g. the use-by date, can also be read
on the single packs.
Do not leave cooled goods outside the
refrigerator for too long.
Place the foods with the next use-by date
at the front, accordingly.
Pack away any left-over food and eat at the
first opportunity.
Wash your hands before and after handling
any food.
Regularly clean the inside of the refrigera-
tor.
Please observe the instructions and informati-
on regarding the use-by date on the outside
packaging of the food.
Please observe section
"4.1 Cleaning"
of this
instruction.
2.7 Safety instructions when sto-
ring foodstuffs
289 0317-20_EN_RMD8xxx-Bedienung_N1-2.qxp 29.06.2012 11:58 Seite 9

10
Fig. 1
Description of model
RM
8 5 0 1
1
5
D
Refrigerator Mobile /
Mobile Absorption Refrigerator
Model range
5 = Width 523mm
Depth:
0 = Standard
5 = + 55mm
6 = + 65mm
Double door refirgerator
1
manual energy selection, automatic ignition
(MES)
5
automatic and manual energy selection,
automatic ignition (AES)
Dometic refrigerators are equipped for a con-
nection pressure of 30 mbar. For connection
to a 50 mbar gas system, use Truma VDR
50/30 medium pressure controller.
3.0 Description of model
3.1 Model identification
The rating plate is to be found on the inside of
the refrigerator. It contains all important details
of the refrigerator. You can read off from this
the model identification, the product number
and the serial number. You will need these
details whenever you contact the customer
service centre or when ordering spare parts.
3.2 Refrigerator rating plate
Example
Model number
Product number
Serial number
Electrical rating details
Gas pressure
2
1
3
4
5
Example :
2
1
3
4
5
289 0317-20_EN_RMD8xxx-Bedienung_N1-2.qxp 29.06.2012 11:58 Seite 10

11
3.3 Technical data
Model Dimensions Gross capacity
Rating details
Consumption * Net Ignition
H x W x D (mm) with without mains/battery electricity/gas weight Piezo Automat
Depth incl. door freezer compartment over 24hrs
Subject to technical changes.
*Average consumption measured at an average ambient
temperature of 25°C in pursuance of ISO Standard.
Fig. 2
RMD 8xxx
H
B
T
RMD 8501
RMD 8505
RMD 8551
RMD 8555
1245x523x567
1245x523x567
1245x523x622
1245x523x622
160 /30 lit.
160 /30 lit.
190 /35 lit.
190 /35 lit.
40 kg
40 kg
41.5 kg
41.5 kg
190 W / 170 W
190 W / 170 W
190 W / 170 W
190 W / 170 W
•
•
•
•
ca.3,2 KWh / 380 g
ca.3,2 KWh / 380 g
ca.3,2 KWh / 380 g
ca.3,2 KWh / 380 g
Description of model
289 0317-20_EN_RMD8xxx-Bedienung_N1-2.qxp 29.06.2012 11:58 Seite 11

12
3.4 Description of refrigerator
Freezer compartment
Operating controls
Post-evaporator for cooling compartment
Condensation water drain channel
Data plate
Vegetable bin
Upper door shelf with flap, egg shelf available as option may be inserted
Lower door shelf with bottle holders
2
1
3
4
5
6
7
8
Fig. 3
1
8
7
6
3
4
2
5
Description of model
289 0317-20_EN_RMD8xxx-Bedienung_N1-2.qxp 29.06.2012 11:58 Seite 12

13
4.0 Refrigerator operation
Refrigerator operation
4.1 Cleaning
Before starting up the refrigerator, it is recom-
mended that you clean it inside and repeat this
at regular intervals.
Use a soft cloth and lukewarm water with a
mild detergent. Then wipe out the appliance
with clean water and dry thoroughly.
To avoid material alterations, do not use soap
or hard, abrasive or soda-based cleaning
agents. Do not allow the door seal to come
into contact with oil or grease.
4.2 Maintenance
4.3 Electrical operation
12V-voltage (on-board power supply)
The refrigerator should only be used in
12VDC-operation while the vehicle’s engi-
ne is running, otherwise the on-board-bat-
tery would be discharged within a few
hours!
CAUTION!
In compliance with the applicable regulati-
ons, please note that the gas unit and the
connected ventilation ducts must be chec-
ked by authorised technical personnel
after first use and after every other year for
compliance with the European Standard
EN 1949. A test certificate has to be issu-
ed. It is the user's responsibility to
arrange this test.
The gas burner must be inspected and
cleaned as necessary at least once a
year. When using liquefied petroleum
gas (tank or refill cylinders) the mainten-
ance interval is reduced to half-yearly or
quarterly.
Keep the evidence of maintenance work
carried out on your refrigerator.
Work on gas and electrical equipment
shall be carried out by qualified person-
nel only.
It is recommended that this is carried out
by an authorised customer services
department.
We recommend maintenance following an
extended shutdown of the vehicle. Please
contact our customer services.
The cooling unit is silent in operation.
When the appliance is first put into operation,
there may be a mild odour which will disappe-
ar after a few hours.
The refrigerator will take several hours to reach
its operating temperature in the cooling com-
partment. The freezer compartment should be
cold about one hour after switching on the
refrigerator
The refrigerator is equipped to operate on
three power modes:
Mains voltage (230V AC)
Direct-current voltage (12V DC)
Gas (liquid gas propane/butane)
Select the desired power mode by the energy
selector button. Appliances with automatic
energy selection (AES) are additionally provi-
ded with "automatic mode" function. Then the
AES system automatically selects the best
energy source for each particular situation.
289 0317-20_EN_RMD8xxx-Bedienung_N1-2.qxp 29.06.2012 11:58 Seite 13

14
Refrigerator operation
The control panel buttons are not accessible
when the refrigerator door is closed. Open the
bottom door to reach the operating buttons.
Depending on the door opening direction,
there are two LEDs on the left or right edge of
the control panel. The outer LED (1) indicates
that the refrigerator is operational (blue). The
other LED (2) lights red in the event of a fault.
4.5 Explanation of operating
controls
Fig. 5
Operating controls without battery compartments
Fig. 4
Indicator LEDs
Fig. 6
Operating controls with battery compartments (L, R)
L R
Refrigerators for self-contained (gas) opera-
tion contain two battery compartments in the
control panel which are located on the left and
right next to the button bar.
12
Mains power (230V)
This option should only be selected where
the supply voltage of the connection for
power supply corresponds to the value
specified on the data plate. Any difference
in values may result in damage the
appliance.
CAUTION!
4.4 Gas operation (Liquid gas)
The refrigerator must be operated using
liquid gas (propane, butane) (no natural
gas or town gas).
When using LPG gas, please consider that
the burner needs cleaning at shorter inter-
vals due to the gas combustion method (2
- 3 times per year recommended.
In Europe, gas operation is permitted while
travelling only on the condition that the gas
system of the vehicle is equipped with a
hose rupture protection. The national regu-
lations of the respective country must be
observed.
For physical reasons, gas ignition faults
could occur starting from an altitude above
sea level of approx. 3280 ft. / 1000 m (No
malfunction!)
On the initial refrigerator start-up or after a
cylinder change, air may be trapped in the
gas line. To purge the air from the lines,
switch on the refrigerator and any other
gas appliances (e.g. stove) for a short time.
The gas ignites without delay.
Each refrigerator with manual ignition is
equipped with an automatic flame safety
valve which interrupts the gas supply auto-
matically after approx. 30 seconds when
the flame has extinguished.
Prior to starting the refrigerator in gas
mode :
Open the gas cylinder valve.
Open the shut-off valve for gas supply to
the refrigerator.
As a basic rule, gas operation is prohibi-
ted in petrol stations!
WARNING!
289 0317-20_EN_RMD8xxx-Bedienung_N1-2.qxp 29.06.2012 11:58 Seite 14

15
Refrigerator operation
Fig. 7
Fig. 8
Manual energy selection / automatic igniti-
on (RMD 8xx1) MES :
1 = Power ON/OFF switch
= Energy selector button 230V ~
= Energy selector button GAS
= Energy selector button 12V =
= Frameheating
= Temperature level selection
= Temperature level display
= Indicator LED failure /
Reset button GAS FAILURE
2
1
3
4
6
7
1 2 3 4 6 7 8 9
230V AC operation
Select “Mains voltage” by pressing button (2)
Set temperature step by pressing button (7)
Switching ON/OFF
Switch ON by pressing button (1), 2s
Switch OFF by pressing button (1), > 2s
12V DC operation (vehicle’s battery)
Select “Battery voltage” by pressing button
(4)
Set temperature step by pressing button (7)
Gas operation
Select “Gas” by pressing button (3)
Set temperature step by pressing button (7)
Manual operation
Select energy source with buttons (2,3,4)
Set temperature step by pressing button (7)
Switching ON/OFF
Switch ON by pressing button (1), 2s
Switch OFF by pressing button (1), > 2s
Automatic operation
Change over to “Automatic” with button (5)
Automatical energy selection (if available)
Sequence of priority: 1.) Solar (12V -)
2.) 230V ~
3.) 12V -
4.) Liquid gas
Set temperature step by pressing button (7)
Automatic energy selection / automatic
ignition (RMD 8xx5) AES :
1 = Power ON/OFF switch
= Energy selector button 230V ~
= Energy selector button GAS
= Energy selector button 12V =
= Selector button “AUTOMATIC”
= Frameheating
= Temperature level selection
= Temperature level display
= Indicator LED failure /
Reset button GAS FAILURE
2
1
3
4
5
6
7
8
9
1 2 3 4 5 6 8 97
8
9
289 0317-20_EN_RMD8xxx-Bedienung_N1-2.qxp 29.06.2012 11:58 Seite 15

16
Refrigerator operation
Fig. 9
To start the refrigerator, press button (1) for 2
seconds.
The refrigerator starts with the last selected
type of energy.
230V operation :
Press button (2) :
12V operation :
Press button (4) :
1
2
4
4.6.1 Electrical operation
3
Fig. 10
3
Gas operation :
Press button (3) :
The ignition process is activated automatical-
ly by means of an automatic igniter.
The flame extinguishes after reaching the pre-
set cooling compartment temperature and
ignites again if the cooling compartment tem-
perature increases again. If the flame is not lit
after the first ignition attempt, the automatic
igniter repeats the ignition twice (duration 30 s)
at time intervals of 2 minutes. If the flame is
not lit afterwards, a fault is indicated.
4.6.2 Gas operation
Fig. 11
7
4.6.3 Setting of cooling compartment
temperature
8
MES-appliances (manual energy selection)
4.6 RMD 85x1 models
To start the refrigerator, press button (1) for 2
seconds.
The refrigerator starts with the last selected
type of energy.
230V operation :
Press button (2) :
12V operation :
Press button (4) :
Gas operation :
Press button (3) :
Fig. 12
Select the desired cooling compartment tem-
perature by pressing button (7) .
The LED display (8) of the selected temperatu-
re setting is illuminated.
The scale starts with MIN position at the left
LED position (small bar = highest temperature)
and climbs up to MAX position at the right
LED position (large bar = lowest temperature).
Note: The temperature levels do not relate to
absolute temperature values.
4.7.1 Manual operation
AES appliances
(manual + automatic energy selection)
4.7 RMD 85x5 models
1
2
43
289 0317-20_EN_RMD8xxx-Bedienung_N1-2.qxp 29.06.2012 11:58 Seite 16

17
Refrigerator operation
In order to prevent unintended switching to
gas operation during refuelling, the electronic
system starts gas operation of the refrigerator
after the motor has been turned off for 15
minutes. During this period the appliance is
ready for operation ("stand-by"). The tempera-
ture level LEDs do not light then while all other
indicators remain active.
The use of unshielded flames is prohibited
in petrol station environments.
Should the refuelling stop last longer than
15 minutes, the refrigerator has to be swit-
ched off or switched over to another ener-
gy type.
WARNING!
4.7.5 Additional features (MES / AES)
To start the refrigerator, press button (1) for 2
seconds.
The refrigerator starts with the last selected
type of energy.
Automatic operation :
Press button(5) : AA
Upon switching on, the electronics automati-
cally selects one of the three possible energy
types: 230V - 12V - liquid gas. The control
electronics automatically ensures that the
refrigerator is supplied with the optimum sour-
ce of energy in each respective case.
Sequence of priority: 1.) Solar (12V -)
2.) 230V ~
3.) 12V -
4.) Liquid gas
If sufficient mains voltage is available (more
than 195 V), this power source is selected as
prime option. If a solar system capable of
powering the refrigerator is installed, the solar
12V supply takes priority.
The 12V operation is otherwise only effective
while the engine is running.
According to the sequence of priority the elec-
tronics selects GAS as energy source only, if
both of the electrical energy source are not
available.
Manual operation is possible at any time.
Fig. 13
4.7.2 Automatic operation
4.7.4 Refuelling while in AES mode
operation
1
5
4.7.3 Setting of cooling compartment
temperature
see point “4.6.3”
The brightness of the display reduces after
a few seconds if no other buttons are pres-
sed. The indicator lights again if a button is
pressed. Press the button again to activa-
te the required function.
Failures are indicated by flashing of the fai-
lure indicator LED.
Should the door be kept open for too long
(more than 2 minutes), an acoustic signal is
initiated (pulsing whistle tone).
Should the electronic control detect any
failure, an acoustic signal will sound (pul-
sing whistle tone). At the same time the
display starts flashing (for trouble-shoo-
ting, please refer to
section 4.19
).
289 0317-20_EN_RMD8xxx-Bedienung_N1-2.qxp 29.06.2012 11:58 Seite 17

18
Refrigerator operation
An optional battery compartment in the elec-
tronics case for internal (self-contained) power
supply of the electronics is available for the
model variants RMd 85x1 and RMD 85x5
(appliances with electronics).
Load the battery compartment with batteries
(8 x AA 1.5 V) before operating the refrigerator.
All operating modes can be selected while the
on-board 12 V DC power supply is active. The
internal voltage is disconnected.
If the on-board 12 V DC power supply is not
present or there is an interruption of the mains
power supply during operation, the electronics
automatically switch to the internal (battery)
power supply.
The refrigerator can now only be operated in
the gas mode.
All LED indicators except the GAS LED are not
lit during operation with internal batteries. The
GAS LED flashes every 15 seconds.
If a button is pressed, the temperature level
LEDs (7) also light.
If the battery voltage is too low, an acoustic
signal (whistle tone) sounds every 15 seconds.
Then replace the batteries in the battery com-
partment.
Fig. 14
4.8 Gas operation with internal
batteries (optional)
Left battery compartment
Fig. 16
Opening right battery compartment
Fig. 15
Opening left battery compartment
4.8.1 Inserting / changing the batteries
open
press
press
open
Observe the correct polarity !
Do not connect non-rechargeable bat-
teries to a charger.
Remove rechargeable batteries from
the battery compartment before char-
ging.
Avoid short circuits on the contacts in
the battery compartment!
Remove discharged batteries.
Remove the batteries from the battery
compartment if the refrigerator will not
be used for a long time.
Do not mix different types of batteries.
CAUTION!
Batteries (8 x AA 1.5V) are not included !
1
1
2
Switch off the refrigerator, as described in sec-
tion 4.14 Shutting of the refrigerator.
289 0317-20_EN_RMD8xxx-Bedienung_N1-2.qxp 29.06.2012 11:59 Seite 18

19
4.9 Frame heating
The operating time of the frame heater can be
set to 2 hours, 5 hours or continuous operati-
on. After selecting the operating time using the
button (6), the temperature level indicator (8) is
extinguished for a short time to show the set
operating time for a few seconds. The display
then returns to the temperature level indicator.
All models are equipped with a frame heating
(12VDC/3,5W) around the freezer compart-
ment. During summer months with high tem-
peratures and humidity the metal frame may
have water droplets forming. To evaporate
these droplets switch on the frame heating
with button (6) .
Refrigerator operation
Fig. 18
6
8
In order to prevent discharge of the on-
board battery, change the frame heater
from continuous operation to another
operating time or switch it off.
CAUTION!
4.10 Door locking
Open the door by pressing the locking button
and pull open (see Fig. 19).
Shut the door again by pushing it to close. The
snapping into the lock can be heard.
While the vehicle is parked, the locking hook
may be fixed to facilitate opening of the door
(Fig 21-22).
Fig. 20
Fig. 19
As a basic rule, shut and lock the refrige-
rator before you start your journey!
CAUTION!
Press button (6) once
Display
Operating time : 2 h
11xx
Press button (6) three times
Display
Permanent operation
33xx
Press button (6) twice
Display
Operating time : 5 h
22xx
The frame heater is active for 30 minutes after
switching on and then switches itself off and
on again at time intervals of 5 minutes.
289 0317-20_EN_RMD8xxx-Bedienung_N1-2.qxp 29.06.2012 11:59 Seite 19

20
Fig. 24
Fig. 23
Fig. 25
4.11 Lighting
The interior lighting is controlled using a door
contact. Should the door be kept open for
more than 2 minutes, an acoustic signal is
initiated (pulsing whistle tone).
4.12 Positioning the storage racks
The storage racks may be pulled out by loose-
ning the two locking devices (1) underneath.
For loosening pull the slider to the middle, for
fastening pull them sidewards.
Two of the storage racks are secured. In this
way inadvertent entrappment and suffocation
of children is prevented, if the storage racks
are removed. To protect children it must be
avoided to create space for children in the
cooling compartment.
If the vehicle is parked for a longer period of
time, the locking hook may be clamped by
means of a lockbar. The door may now be
opened by just pulling it without need of pres-
sing the locking button.
4.10.1 Fastening and releasing
the doorlock hook when parking
the vehicle
Fig. 22
Fig. 21
Fig. 26
Refrigerator operation
In the case of a fault,
contact an authori-
sed Dometic custo-
mer service agent.
If it is necessary to remove these storage
racks (i.e. for cleaning) loosen the locking pins
(2) at first as shown, by means of a suitable
screw driver.
Put in place the locking pins after removing
the storage racks.
Do not remove these storage racks.
Thus children have no space to be
entrapped in the refrigerator.
WARNING!
1
1
2
289 0317-20_EN_RMD8xxx-Bedienung_N1-2.qxp 29.06.2012 11:59 Seite 20

21
Refrigerator operation
4.13 Storing food and making ice
cubes
Switch the refrigerator on approx. 12 hours
before filling it.
Always store pre-cooled foods in the refri-
gerator. Make sure that the food is well
cooled when it is bought and also when
transporting it. Use insulated cooling bags.
Open the refrigerator door only for a short
period of time when removing products.
Products must be packed - best of all in
closed containers, wrapped in aluminium
foil or similar - and stored separately from
each other, in order to prevent drying out or
odours.
Allow foods that have been warmed up to
cool down before storing.
Avoid storing products in the refrigerator
that could emit volatile flammable gases.
Do not overfill the storage grids and com-
partments to prevent obstructing the inter-
nal air circulation.
Maintain a clearance of approx. 5 - 10 mm
between chilled products and post-evapo-
rator ("cooling fins").
Do not expose the refrigerator to direct
sunlight. Please bear in mind that the tem-
perature inside a closed vehicle increases
sharply if exposed to sunlight and that this
can reduce the efficiency of the refrigerator.
Ensure that air circulation of the cooling unit
is not obstructed. Keep the ventilation gril-
les free from obstructions.
4.13.1 Storing products in the cooling
compartment
4.13.2 Storing products in the freezer
compartment
Do not keep carbonated drinks in the free-
zer.
The freezer compartment is suitable for
making ice cubes and for short-term stora
ge of frozen food. It is not suitable as a
means of freezing foods.
When ambient temperatures are lower than
+10°C and the refrigerator is exposed to
these temperatures for extended periods of
time, an even regulation of freezer tempe-
rature cannot be guaranteed for system-
related reasons. This can cause the tempe-
rature in the freezer to rise and the stored
goods to melt.
4.13.3 Making ice cubes
Ice cubes are best frozen overnight. At night,
the refrigerator has less work to do and the
unit has more reserves.
Fig. 28
Fig. 27
Only use drinking water!!
WARNING!
1. Fill the ice cube tray
with drinking water.
2. Place the ice cube
tray in the freezer
compartment.
289 0317-20_EN_RMD8xxx-Bedienung_N1-2.qxp 29.06.2012 11:59 Seite 21

4.15 Defrosting
4.14 Shutting off the refrigerator
If the refrigerator is to be taken out of ser-
vice for an extended period of time, close
the onboard shut-off valve and the cylinder
valve .
Switch off the refrigerator by pressing but-
ton (1) (s. 4.5). Keep button (1) pressed for
3 seconds. The display disappears and the
appliance is fully switched off .
Release the locking mechanism (Fig. 30-31)
of the door lock by pushing it and shift it to
the front. If the door is shut in this position,
a small gap is nevertheless kept open to
prevent formation of mildew.
Fig. 30
Fig. 31
22
4.13.4 Refrigerator compartments
Freezer compartment :
already frozen food (deep-frozen food)
Top compartment:
convenience food
Middle compartment:
Dairy products, convenience food
Bottom compartment:
Meat, fish, food for defrosting
Vegetable compartment:
Salads, vegetables, fruit
Top door shelf:
Eggs, butter
Middle door shelf:
Cans, dressings, ketchup, jam
Bottom door shelf (drinks compart-
ment):
Drinks in bottles or bags
2
1
3
4
5
6
7
8
Fig. 29
1
2
3
4
5
6
7
8
Refrigerator operation
As time goes by, frost builds up on the fins
inside the refrigerator. A layer of frost thicker
on one side may occur and does not represent
a malfunction. When this layer of frost is about
0.118 inches (3 mm) thick, the refrigerator
should be defrosted.
Switch off the refrigerator, as described in
section
4.14 Shutting of the refrigerator
.
Remove all food and the ice cube tray.
Leave the refrigerator door open to allow air
to enter and to prevent formation of mildew.
After defrosting (freezer compartment and
fins free of frost), wipe both cooling com-
partments dry with a cloth.
289 0317-20_EN_RMD8xxx-Bedienung_N1-2.qxp 29.06.2012 11:59 Seite 22

23
The layer of ice must never be removed
forcibly, nor may defrosting be accelera-
ted using a heat source!
CAUTION!
Fig. 33
4.16 Winter operation
In winter, check that the ventilation grilles and
the exhaust duct system (1) have not been
blocked by snow, leaves, etc. .
When the outside temperature falls below
+10°C, the winter cover (2) should be fitted.
This protects the unit from excessively cold air
which could have adverse effects on the per-
formance of the unit.
You should also attach the winter cover if the
vehicle is taken out of service for a longer
period of time or while it is being cleaned from
the outside
.
Fig. 32
2
1
< +10°C
Refrigerator operation
Note: Water thawing in the main compartment
of the refrigerator runs into an appropriate
container at the back of the refrigerator. From
there, the water evaporates.
289 0317-20_EN_RMD8xxx-Bedienung_N1-2.qxp 29.06.2012 11:59 Seite 23

24
Refrigerator operation
4.17 Changing the decor panel
Fig. 35
Fig. 36
Fig. 34
Fig. 37
1
2
Decor panel dimensions (with frame) :
300 +/- 1 mm 507,5 +/- 1 mm max. 1.7 mm
Upper door
Height Width Thickness
907,4 +/- 1 mm 507,5 +/- 1 mm max. 1.7 mm
Lower door
Height Width Thickness
CAUTION!
3
4
2
1
Frameless decor panel
Decor panel with frame
Remove the lateral ledge (1) the door
(ledge is attached, not screwed).
Shift decor panel (2) away from the door
and insert the new decor panel. Re-attach
ledge (1) .
Fig. 38
1
Fig. 41
Fig.. 39 Fig. 40
3
4
2
289 0317-20_EN_RMD8xxx-Bedienung_N1-2.qxp 29.06.2012 11:59 Seite 24

25
4.18 Trouble-shooting
Refrigerator operation
Failure: The refrigerator does not cool sufficiently.
- Inadequate ventilation to the unit.
- Thermostat setting is too low.
- The condenser is heavily frosted.
- Too much warm food has been stored inside
within short period of time.
- The appliance has been running for only a short
period of time.
- Ambient temperatures too high.
- Check that ventilation grilles are not covered.
- Set thermostat to a higher level.
- Check that the refrigerator door closes properly.
- Allow warm food to cool down before storage.
- Check whether the cooling compartment works
after approx. 4 - 5 hours.
- Regularly remove ventilation grilles.
Possible cause
Action you can take
Failure: The refrigerator does not cool in gas operation mode.
- Gas cylinder empty.
- Is the upstream shut-off device open ?
- Air in the gas pipe ?
- Change gas cylinder.
- Open shut-off device.
- Switch off the appliance and start again. Repeat
this procedure 3 - 4 times, if necessary
Possible cause
Action you can take
Failure: The refrigerator does not cool in 12V operation.
- On-board fuse defective.
- On-board battery discharged.
- Engine not running.
- Heating element defective (please also refer to
failure indication).
- Fit new fuse.
- Check battery, charge it.
- Start engine.
- Please inform the Dometic Customer Service
Possible cause
Action you can take
Failure: The refrigerator does not cool in 230V operation.
- On-board fuse defective.
- Vehicle not connected to mains supply voltage.
- AES: Gas operation despite connection to the
mains supply voltage?
- Heating element defective (please also refer to
failure indication
).
- Fit new fuse.
- Make a connection to a mains power supply.
- Appliance switches to gas operation due to
insufficient mains supply voltage (automatically
switches back to 230V operation).
- Please inform the Dometic Customer Service.
Possible cause
Action you can take
289 0317-20_EN_RMD8xxx-Bedienung_N1-2.qxp 29.06.2012 11:59 Seite 25

26
Refrigerator operation
flashing +
acoustic
signal 20 s
Check burner, burner nozzles, if necessary contact
Customer Service and arrange replacement
Burner defective or coo-
ling unit defective
7
3
Operation with on-board 12 V power supply
Indicator
Fault
Remedy
flashing +
acoustic signal
20 s
Check mains power connection, mains voltage, fuse230V mode: "230V" not
available or voltage too
low
8
2
flashing +
acoustic signal
20 s
Arrange replacement of 230V heating element,
contact Customer Service
230V mode: 230V hea-
ting element defective
7
2
flashing
contact Customer ServiceTemperature sensor
without contact or
defective
7
flashing +
acoustic signal
20 s
Arrange replacement of 12V heating element,
contact Customer Service
12V mode: 12V heating
element defective
7
4
flashing +
acoustic signal
20 s
Check 12 V connection, on-board battery, fuse
AES: Check D+ signal
12V mode: „: "12 V" not
available or voltage too
low
8
4
flashing +
acoustic signal
20 s
GAS/Automatic mode:
Flame not ignited
8
3
Check gas supply (gas bottle, gas valve)
Press the button after clearing the fault.
Acoustic signal,
15 s, at 2 minute
intervals
Interior lighting is swit-
ched on
Close door, check door contact
4.19 Information on failure display
and trouble-shooting
4.19.1 Status indicators
Before notifying the authorised Service Center,
please check whether:
the instructions in section "Operating the
refrigerator" have been observed.
the refrigerator stands level.
it is possible to operate the refrigerator with
any available power source.
Refrigerators with an electronics system
(MES, AES) indicate the occurence of a
malfunction by the LED or display flashing.
If a malfunction occurs, the indicator LED
"Failure" (8) flashes simultaneously. In the
case of AES models an acoustic alarm
sounds.
Fig. 39
Fig. 40
1 2 3
4
7 8
1
2 3 4
7 8
= Button ON / OFF
= Energy selector switch 230 V AC
= Energy selector switch GAS
= Energy selector switch 12V DC
2
1
3
4
= temperature level display
= fault LED / GAS FAULT reset button
8
7
MES
AES
289 0317-20_EN_RMD8xxx-Bedienung_N1-2.qxp 29.06.2012 11:59 Seite 26

27
Refrigerator operation
Operation with batteries (internal power supply)
Indicator
Fault
Remedy
flashing
brightly l
Check burner, burner nozzles, if necessary contact
Customer Service and arrange replacement
Burner defective or coo-
ling unit defective
7
3
Automatic switching
from external to internal
power supply does not
function
(absence of the on-
board 12 V power sup-
ply for the electronics)
Switch off the refrigerator and start again.
The on-board power supply was interrupted during
the starting of the gas operation.
Note: No automatic switching is performed during
the ignition.
Refrigerator does not
function;
gas operation not possi-
ble although the batte-
ries are inserted.
flashing
brightly
Flame not ignited
8
3
Check gas supply (gas bottle, gas valve)
Press the button after clearing the fault.
Acoustic signal at 15
second intervals
Undervoltage detection
(internal batteries)
Replace batteries
289 0317-20_EN_RMD8xxx-Bedienung_N1-2.qxp 29.06.2012 11:59 Seite 27


RMD 8501 RMD 8505
RMD 8551 RMD 8555
ES
ES
MBA 04/2012
N 1-2
Instrucciones de uso
Frigorífico de absorción para vehículos de ocio
N° de modelo .............................................
N° de producto .............................................
Número de serie .............................................
Anote los siguientes datos:
Español
289 0317-24_ES_RMD8xxx-Bedienung_N1-2.qxp 29.06.2012 11:47 Seite 1

2
1.0 Aspectos generales . . . . . . . . . . . . . . . . . . . . . . . . . . . . . . . . . . . . . 4
1.1 Introducción . . . . . . . . . . . . . . . . . . . . . . . . . . . . . . . . . . . . . . . . . . . . . . . . . . . . . . . . . . . . . . . . 4
1.2 Indicaciones sobre las presentes instrucciones de uso . . . . . . . . . . . . . . . . . . . . . . . . . . . . . . 4
1.3 Derechos de autor . . . . . . . . . . . . . . . . . . . . . . . . . . . . . . . . . . . . . . . . . . . . . . . . . . . . . . . . . . . 4
1.4 Explicación de los símbolos utilizados . . . . . . . . . . . . . . . . . . . . . . . . . . . . . . . . . . . . . . . . . . . 4
1.5 Garantía . . . . . . . . . . . . . . . . . . . . . . . . . . . . . . . . . . . . . . . . . . . . . . . . . . . . . . . . . . . . . . . . . . . 5
1.6 Limitación de responsabilidad . . . . . . . . . . . . . . . . . . . . . . . . . . . . . . . . . . . . . . . . . . . . . . . . . . 5
1.7 Servicio de atención al cliente . . . . . . . . . . . . . . . . . . . . . . . . . . . . . . . . . . . . . . . . . . . . . . . . . . 5
1.8 Piezas de repuesto . . . . . . . . . . . . . . . . . . . . . . . . . . . . . . . . . . . . . . . . . . . . . . . . . . . . . . . . . . . 6
1.9 Referencias medioambientales . . . . . . . . . . . . . . . . . . . . . . . . . . . . . . . . . . . . . . . . . . . . . . . . .6
1.9.1 Eliminación de residuos . . . . . . . . . . . . . . . . . . . . . . . . . . . . . . . . . . . . . . . . . . . . . . . . . . . . . . . . . . . . . . . 6
1.9.2 Consejos para ahorrar energía . . . . . . . . . . . . . . . . . . . . . . . . . . . . . . . . . . . . . . . . . . . . . . . . . . . . . . . . . . 6
1.10 Declaración de conformidad . . . . . . . . . . . . . . . . . . . . . . . . . . . . . . . . . . . . . . . . . . . . . . . . . . . 6
2.0 Indicaciones de seguridad . . . . . . . . . . . . . . . . . . . . . . . . . . . . . . . 7
2.1 Uso conforme a lo prescrito . . . . . . . . . . . . . . . . . . . . . . . . . . . . . . . . . . . . . . . . . . . . . . . . . . . 7
2.2 Responsabilidad del usuario . . . . . . . . . . . . . . . . . . . . . . . . . . . . . . . . . . . . . . . . . . . . . . . . . . . 7
2.3 Protección de los niños a la hora de desechar el aparato . . . . . . . . . . . . . . . . . . . . . . . . . . . . 7
2.4 Trabajos y comprobaciones en el frigorífico . . . . . . . . . . . . . . . . . . . . . . . . . . . . . . . . . . . . . . . 7
2.5 Funcionamiento del frigorífico con gas . . . . . . . . . . . . . . . . . . . . . . . . . . . . . . . . . . . . . . . . . . . 8
2.6 Información sobre el líquido refrigerante . . . . . . . . . . . . . . . . . . . . . . . . . . . . . . . . . . . . . . . . . .8
2.7 Indicaciones de seguridad para almacenar alimentos . . . . . . . . . . . . . . . . . . . . . . . . . . . . . . . 9
3.0 Descripción del modelo . . . . . . . . . . . . . . . . . . . . . . . . . . . . . . . . . . 10
3.1 Denominación de modelo . . . . . . . . . . . . . . . . . . . . . . . . . . . . . . . . . . . . . . . . . . . . . . . . . . . . . 10
3.2 Placa de características del frigorífico . . . . . . . . . . . . . . . . . . . . . . . . . . . . . . . . . . . . . . . . . . . . 10
3.3 Datos técnicos . . . . . . . . . . . . . . . . . . . . . . . . . . . . . . . . . . . . . . . . . . . . . . . . . . . . . . . . . . . . . . 11
3.4 Explicación de las partes del frigorífico . . . . . . . . . . . . . . . . . . . . . . . . . . . . . . . . . . . . . . . . . . . 12
4.0 Funcionamiento del frigorífico . . . . . . . . . . . . . . . . . . . . . . . . . . . . . 13
4.1 Limpieza . . . . . . . . . . . . . . . . . . . . . . . . . . . . . . . . . . . . . . . . . . . . . . . . . . . . . . . . . . . . . . . . . . . 13
4.2 Mantenimiento . . . . . . . . . . . . . . . . . . . . . . . . . . . . . . . . . . . . . . . . . . . . . . . . . . . . . . . . . . . . . . 13
4.3 Funcionamiento con corriente . . . . . . . . . . . . . . . . . . . . . . . . . . . . . . . . . . . . . . . . . . . . . . . . . . 13
4.4 Funcionamiento a gas (gas líquido) . . . . . . . . . . . . . . . . . . . . . . . . . . . . . . . . . . . . . . . . . . . . . .14
4.5 Explicación de los elementos de mando . . . . . . . . . . . . . . . . . . . . . . . . . . . . . . . . . . . . . . . . . . 14
4.6 Modelos RMD 8xx1 . . . . . . . . . . . . . . . . . . . . . . . . . . . . . . . . . . . . . . . . . . . . . . . . . . . . . . . . . . 16
4.6.1 Funcionamiento con corriente . . . . . . . . . . . . . . . . . . . . . . . . . . . . . . . . . . . . . . . . . . . . . . . . . . . . . . . . . . 16
4.6.2 Funcionamiento a gas . . . . . . . . . . . . . . . . . . . . . . . . . . . . . . . . . . . . . . . . . . . . . . . . . . . . . . . . . . . . . . . . 16
4.6.3 Ajuste de la temperatura de la cámara frigorífica . . . . . . . . . . . . . . . . . . . . . . . . . . . . . . . . . . . . . . . . . . . 16
4.7 Modelos RMD 8xx5 . . . . . . . . . . . . . . . . . . . . . . . . . . . . . . . . . . . . . . . . . . . . . . . . . . . . . . . . . . 16
4.7.1 Funcionamiento manual . . . . . . . . . . . . . . . . . . . . . . . . . . . . . . . . . . . . . . . . . . . . . . . . . . . . . . . . . . . . . . . 16
4.7.2 Funcionamiento automático . . . . . . . . . . . . . . . . . . . . . . . . . . . . . . . . . . . . . . . . . . . . . . . . . . . . . . . . . . . . 17
4.7.3 Ajuste de la temperatura de la cámara frigorífica . . . . . . . . . . . . . . . . . . . . . . . . . . . . . . . . . . . . . . . . . . . 17
4.7.4 Parada para repostar durante el funcionamiento en el modo Automático . . . . . . . . . . . . . . . . . . . . . . . . 17
4.7.5 Funciones adicionales . . . . . . . . . . . . . . . . . . . . . . . . . . . . . . . . . . . . . . . . . . . . . . . . . . . . . . . . . . . . . . . . 17
4.8 Modo a gas con pilas internas (opcional) . . . . . . . . . . . . . . . . . . . . . . . . . . . . . . . . . . . . . . . . . 18
4.8.1 Colocación / Sustitución de pilas . . . . . . . . . . . . . . . . . . . . . . . . . . . . . . . . . . . . . . . . . . . . . . . . . . . . . . . . 18
4.9 Calefacción del marco . . . . . . . . . . . . . . . . . . . . . . . . . . . . . . . . . . . . . . . . . . . . . . . . . . . . . . . . 19
4.10 Bloqueo de la puerta . . . . . . . . . . . . . . . . . . . . . . . . . . . . . . . . . . . . . . . . . . . . . . . . . . . . . . . . . 19
4.10.1 Fijación y soltado del pasador de la cerradura de la puerta al estacionar el vehículo . . . . . . . . . . . . . . 20
4.11 Iluminación . . . . . . . . . . . . . . . . . . . . . . . . . . . . . . . . . . . . . . . . . . . . . . . . . . . . . . . . . . . . . . . . . 20
4.12 Colocación de bandejas . . . . . . . . . . . . . . . . . . . . . . . . . . . . . . . . . . . . . . . . . . . . . . . . . . . . . . 20
4.13 Almacenamiento de alimentos y fabricación de cubitos de hielo . . . . . . . . . . . . . . . . . . . . . . . 21
Índice
289 0317-24_ES_RMD8xxx-Bedienung_N1-2.qxp 29.06.2012 11:47 Seite 2

3
4.13.1 Almacenamiento de productos en la cámara frigorífica . . . . . . . . . . . . . . . . . . . . . . . . . . . . . . . . . . . . . . 21
4.13.2 Almacenamiento de productos en el congelador . . . . . . . . . . . . . . . . . . . . . . . . . . . . . . . . . . . . . . . . . . . 21
4.13.3 Fabricación de cubitos de hielo . . . . . . . . . . . . . . . . . . . . . . . . . . . . . . . . . . . . . . . . . . . . . . . . . . . . . . . . . 21
4.13.4 Compartimentos del frigorífico . . . . . . . . . . . . . . . . . . . . . . . . . . . . . . . . . . . . . . . . . . . . . . . . . . . . . . . . . . 22
4.14 Puesta fuera de servicio . . . . . . . . . . . . . . . . . . . . . . . . . . . . . . . . . . . . . . . . . . . . . . . . . . . . . . . 22
4.15 Descongelamiento . . . . . . . . . . . . . . . . . . . . . . . . . . . . . . . . . . . . . . . . . . . . . . . . . . . . . . . . . . . 22
4.16 Uso durante el invierno . . . . . . . . . . . . . . . . . . . . . . . . . . . . . . . . . . . . . . . . . . . . . . . . . . . . . . . 23
4.17 Cambio de la placa de decoración . . . . . . . . . . . . . . . . . . . . . . . . . . . . . . . . . . . . . . . . . . . . . .24
4.18 Cómo comportarse en caso de averías . . . . . . . . . . . . . . . . . . . . . . . . . . . . . . . . . . . . . . . . . . . 25
4.19 Indicaciones sobre la indicación de averías y cómo solucionarlas . . . . . . . . . . . . . . . . . . . . . . 26
4.19.1 Indicación de estatus . . . . . . . . . . . . . . . . . . . . . . . . . . . . . . . . . . . . . . . . . . . . . . . . . . . . . . . . . . . . . . . . . 26
© Dometic GmbH - 2012 - Reservado el derecho de realizar modificaciones
Dometic GmbH
In der Steinwiese 16
D-57074 Siegen
www.dometic.com
289 0317-24_ES_RMD8xxx-Bedienung_N1-2.qxp 29.06.2012 11:47 Seite 3

4
1.0 Aspectos generales
Al adquirir este frigorífico de absorción de
Dometic ha hecho una excelente elección.
Estamos convencidos de que su nuevo frigo-
rífico satisfará todas sus exigencias, en todos
los aspectos. Este frigorífico, que funciona de
manera silenciosa, cumple las más altas exi-
gencias de calidad, y garantiza el uso eficaz
de los recursos y la energía a lo largo de todo
su ciclo vital, tanto al fabricarlo y utilizarlo,
como a la hora de desecharlo.
1.1 Introducción
Los datos, textos e ilustraciones de las
instrucciones están protegidos por derechos
de autor, y están sujetos a los derechos de
protección de propiedad industrial.
Queda prohibido reproducir, fotocopiar o utili-
zar de algún modo cualquier parte de estas
instrucciones sin la autorización escrita de
Dometic GmbH, con sede en Siegen.
1.3 Derechos de autor
Antes de poner el frigorífico en marcha, lea
minuciosamente las presentes instruccio-
nes de uso.
Estas instrucciones contienen las indicaciones
necesarias para utilizar su frigorífico correcta-
mente. Tenga en cuenta especialmente las
indicaciones de seguridad. Atenerse a las
indicaciones y modos de proceder descritos
es importante para utilizar su frigorífico de
forma segura, ya que evita que sus usuarios y
el propio frigorífico sufran daños. Antes de
aplicar una medida deberá haber entendido
las instrucciones.
Guarde las instrucciones de uso cerca de
su frigorífico, de modo que pueda utilizar-
las en todo momento.
1.2 Indicaciones sobre las pre-
sentes instrucciones de uso
1.4 Explicación de los símbolos
utilizados
Aspectos generales
Las advertencias vienen señaladas mediante
iconos. Un texto complementario le detalla el
grado de peligro existente.
Tenga en cuenta este tipo de advertencias.
Al hacerlo, se protegerá, protegerá a otras
personas y evitará que el aparato sufra
daños.
Advertencias
PELIGRO indica una situación de peligro inme-
diato que puede provocar la muerte o heridas
graves en caso de no aplicar las medidas indi-
cadas.
PELIGRO!
ADVERTENCIA indica una posible situación de
peligro que puede provocar la muerte o heridas
graves en caso de no aplicar las medidas indi-
cadas.
ADVERTENCIA!
PRECAUCIÓN indica una posible situación de
peligro que puede provocar heridas leves o
medias en caso de no aplicar las medidas indi-
cadas.
PRECAUCIÓN!
PRECAUCIÓN sin el símbolo de seguridad indi-
ca una posible situación de peligro que puede
provocar daños en el aparato en caso de no
aplicar las medidas indicadas.
PRECAUCIÓN!
289 0317-24_ES_RMD8xxx-Bedienung_N1-2.qxp 29.06.2012 11:47 Seite 4

5
Aspectos generales
Información
INFORMACIÓN le proporciona datos comple-
mentarios prácticos para utilizar su frigorífico.
Indicación medioambiental
INDICACIÓN MEDIOAMBIENTAL le propor-
ciona consejos para ahorrar energía y dese-
char el aparato.
Las tramitaciones de garantía siguen la direc-
tiva CE 44/1999/CE y las condiciones prescri-
tas en el país de venta. Para cuestiones rela-
cionadas con la garantía o asistencia técnica,
diríjase a nuestro servicio de atención al clien-
te. Las averías debidas a un uso indebido del
aparato no se incluirán dentro de la garantía.
Toda modificación del aparato o toda utilizaci-
ón de piezas de repuesto que no sean piezas
Dometic originales , así como el no atenerse
a las instrucciones de montaje y uso, provoca-
rá la exoneración de la garantía y la exclusión
de los derechos de hacer efectiva una respon-
sabilidad.
1.5 Garantía
Toda la información y las indicaciones conte-
nidas en las presentes instrucciones de uso
han sido redactadas teniendo en cuenta las
normas y prescripciones vigentes, así como el
estado de la técnica. Dometic se reserva el
derecho de poder realizar en todo momento
modificaciones de producto que mejoren el
producto y su seguridad. Dometic üno asume
ninguna responsabilidad en caso de:
No seguir las instrucciones de uso
Utilizar el aparato de forma no acorde a la
prescrita
Utilizar piezas de repuesto no originales
Realizar modificaciones o intervenciones
en el aparato
Influencias de entorno, como por ejemplo
- cambios de temperatura
- humedad del aire
1.6 Limitación de responsabilidad
Dometic le ofrece una red de servicio de aten-
ción al cliente a nivel europeo. Podrá encon-
trar centros de servicio técnico autorizados
llamando a los números indicados en el folle-
to Red de Servicio EuroService que se
adjunta en todos los frigoríficos. También
podrá encontrar al socio de servicio de atenci-
ón al cliente más cercano en la página web
www.dometic.com. . Al ponerse en contacto
con el servicio de atención al cliente, indique
siempre el modelo, el número de producto, el
número de serie y, si así se requiere, el código
MLC. Encontrará esta información en la placa
de características del interior del frigorífico. Le
recomendamos que anote dichos datos en el
campo previsto para ello, en la primera página
de estas instrucciones.
1.7 Servicio de atención al
cliente
289 0317-24_ES_RMD8xxx-Bedienung_N1-2.qxp 29.06.2012 11:47 Seite 5

6
El grupo frigorífico emplea amoniaco (un com-
puesto natural de hidrógeno y nitrógeno). En
la fabricación de la espuma aislante PU se uti-
liza ciclopentano como combustible, sustan-
cia que inocua para la capa de ozono.
Para garantizar el reciclaje de los materiales
reciclables del embalaje, deberán depositarse
en los lugares de recogida habituales de su
ciudad. El aparato deberá ser recogido por
una empresa especializada en recogida de
este tipo de residuos, y deberá garantizar el
reciclaje de todas las piezas posibles y la eli-
minación adecuada del resto de los residuos.
Para vaciar de forma ecológica el líquido refri-
gerante del grupo frigorífico de absorción
deberá emplearse un equipo de eliminación
apropiado.
1.9 Referencias medioambien-
tales
1.8 Piezas de repuesto
Las piezas de repuesto pueden obtenerse en
nuestros centros de servicio técnico de toda
Europa.
Al contactar con el Servicio de atención tele-
fónica, indique siempre el modelo y el número
de producto pertinente. Encontrará esta infor-
mación en la placa de características del inte-
rior del frigorífico.
1.10 Declaración de conformidad
Aspectos generales
A una temperatura ambiental de 25 °C es
suficiente mantener el termostato en una
posición intermedia para que funcione cor-
rectamente.
Cuando sea posible, enfríe los alimentos
antes de guardarlos.
El frigorífico no deberá exponerse a los
rayos directos del sol.
Deberá garantizarse una buena circulación
de aire del grupo frigorífico.
Descongelar el frigorífico regularmente
ahorra energía (v. "4.15 Descongelamien-
to").
A la hora de tomar los productos de los
arcones refrigeradores de los estableci-
mientos, abra la puerta de los mismos sólo
durante un momento.
Ponga en marcha el frigorífico unas 12
horas antes de llenarlo.
1.9.1 Eliminación de residuos
1.9.2 Consejos para ahorrar energía
289 0317-24_ES_RMD8xxx-Bedienung_N1-2.qxp 29.06.2012 11:47 Seite 6

7
2.0 Indicaciones de seguridad
El frigorífico no ha sido concebido para
almacenar medicamentos. Si lo hace, siga
las indicaciones del prospecto del medi-
camento.
ADVERTENCIA!
Este frigorífico ha sido concebido para ser
instalado en vehículos de ocio, como por
ejemplo en caravanas o autocaravanas. El
aparato cumple la directiva comunitaria sobre
aparatos de gas de la UE según el modelo de
construcción.
Utilice el frigorífico exclusivamente para refri-
gerar y almacenar alimentos.
2.1 Uso conforme a lo prescrito
Las personas que manejan el aparato deberán
saber cómo utilizarlo de forma segura y cono-
cer las indicaciones de estas instrucciones de
uso.
Este aparato podrá ser utilizado por niños
mayores de 8 años y por personas con disca-
pacidades físicas, sensoriales o mentales, así
como por personas sin experiencia y/o cono-
cimientos pertinentes, siempre que éstos
estén siendo observados o hayan recibido
instrucciones sobre cómo manejar el aparato
de forma segura y hayan comprendido los
posibles peligros existentes. Los niños no
deberán jugar con el aparato. La limpieza y el
mantenimiento del aparato no deberá dejarse
en manos de niños.
[EN 60335-2-24, 7.12]
2.2 Responsabilidad del usuario
Indicaciones de seguridad
2.4 Trabajos y comprobaciones
en el frigorífico
2.3 Protección de los niños tras
desechar el aparato
Desmonte todas las puertas del frigorífico
a la hora de desecharlo, y guarde las ban-
dejas en el interior del mismo. Así se evi-
tarán los cierres involuntarios y los posi-
bles casos de asfixia.
ADVERTENCIA!
Los trabajos relacionados con las áreas
del gas, de la extracción de humos y los
componentes eléctricos tan sólo podrán
ser realizados por el servicio técnico
autorizado. Si se aplican medidas no
apropiadas pueden provocarse daños
materiales o personales considerables.
ADVERTENCIA!
Nunca compruebe la hermeticidad del
aparato en las piezas y los conductos de
gas teniendo una llama ardiendo.
Existe el peligro de producirse un incen-
dio o una explosión.
PELIGRO!
Nunca abra el grupo frigorífico de absor-
ción. Está sometido a una gran presión.
Existe el peligro de resultar herido.
ADVERTENCIA!
289 0317-24_ES_RMD8xxx-Bedienung_N1-2.qxp 29.06.2012 11:47 Seite 7

8
Indicaciones de seguridad
En caso de oler a gas :
* Especialista autorizado
Los especialistas autorizados son expertos reconoci-
dos, que debido a su formación o a sus conocimien-
tos pueden garantizar que el examen ha sido realiza-
do correctamente.
Abra todas las ventanas y abandone ese
espacio.
No encienda ningún dispositivo eléctrico y
evite utilizar llamas abiertas.
Cierre la válvula de la bombona de gas y
manténgala cerrada hasta haber reparado
la avería.
Consulte a un especialista autorizado* .
2.6 Información sobre el líquido
refrigerante
Se trata de una sustancia natural que también
se utiliza en los productos de limpieza domé-
stica (1 litro de limpiador de sal de amoniaco
contiene hasta 200 g de amoniaco, aprox. el
doble de lo que contiene el frigorífico). El cro-
mato sódico se utiliza como protector anticor-
rosivo (1,8% del peso del disolvente).
En caso de que se produzca alguna fuga (algo
fácilmente reconocible debido al fuerte olor):
- Desconecte el aparato.
- Airee bien la habitación.
- Informe al servicio de atención al cliente
autorizado.
Para su seguridad, se ha realizado una
inspección de que no existe ningún riesgo
para su salud en caso de que se produzca
un escape del líquido refrigerante..
La presión de funcionamiento deberá corre-
sponderse obligatoriamente con los datos
registrados en la placa de características del
frigorífico. Compare los datos de la presión de
trabajo de la placa del modelo con los del indi-
cador de presión en el cilindro de gas líquido.
2.5 Funcionamiento del frigorí-
fico a gas
ADVERTENCIA!
Queda prohibido utilizar el aparato a gas
en gasolineras
en ferrys
durante el transporte de la
caravana/autocaravana con un vehícu-
lo de transporte o remolque.
Existe el peligro de incendio.
Deje el aparato desconectado.
289 0317-24_ES_RMD8xxx-Bedienung_N1-2.qxp 29.06.2012 11:47 Seite 8

9
Los aparatos frigoríficos de todas las cla-
ses no pueden mejorar la calidad de los ali-
mentos. Tan sólo pueden mantener durante
un tiempo breve la calidad de los alimentos
del momento en el que han sido almacena-
dos.
Tenga en cuenta las siguientes condiciones
especiales a la hora de guardar alimentos
en un frigorífico integrado en un vehículo:
Entre los alimentos rápidamente perecederos
se encuentran todos los productos con fecha
de caducidad impresa y una temperatura de
almacenamiento mínima de +4 °C o inferior,
especialmente carnes, ave, pescado, embuti-
do, platos precocinados.
2.7 Indicaciones de seguridad
para almacenar alimentos
Indicaciones de seguridad
Las condiciones del entorno influyen en el ren-
dimiento del grupo frigorífico. A temperaturas
de entorno entre +15 y +25 °C, seleccione la
posición central (comp. Fig. 28, nivel de tem-
peratura 3). El grupo trabaja en el margen de
rendimiento óptimo.
Los frigoríficos de Dometic funcionan siguien-
do el principio de la absorción. Por motivos
físicos, los sistemas de absorción reaccionan
lentamente a las modificaciones del termosta-
to, a la pérdida de frío debida a la apertura de
la puerta o al almacenamiento de productos.
Los frigoríficos cumplen las exigencias de ren-
dimiento de la clase SN según EN/ISO 7371
en el margen de temperatura ambiente de +10
°C a +32 °C.
A temperaturas inferiores a +10°C, coloque
las tapas para el invierno. A temperaturas
de entorno superiores a los +32 °C durante
un período prolongado, se recomienda
instalar el ventilador adicional de Dometic
(
Número de art. 241 2985 - 00 )
.
cambio de las condiciones ambientales,
como por ejemplo cambios de temperatura
altas temperaturas interiores cuando el
vehículo se aparca cerrado y queda expue-
sto directamente a los rayos solares (tem-
peraturas posibles hasta 50 °C)
uso del frigorífico durante la conducción
con la fuente de energía 12V CC
el frigorífico instalado detrás de una venta-
na y expuesto directamente a los rayos
solares
almacenamiento demasiado rápido de pro-
ductos poco después de la puesta en mar-
cha del aparato.
Envase los productos cocinados y crudos
por separado (p. ej., envases, papel de alu-
minio o similar).
Retire los envoltorios de los envases indivi-
duales sólo cuando todos los datos nece-
sarios, como por ejemplo la fecha de cadu-
cidad, también puedan leerse en el envase
individual.
No deje los productos refrigerados fuera
del frigorífico durante mucho tiempo.
Coloque los alimentos con la fecha de
caducidad más próxima en la parte delan-
tera del frigorífico.
Vuelva a empaquetar los restos e ingiéralos
lo antes posible.
Lávese las manos antes y después de tocar
alimentos.
Limpie con regularidad el interior del frigo-
rífico.
Siga las indicaciones y descripciones sobre la
fecha de caducidad escritas en los envases de
los productos.
Tenga en cuenta el apartado "
4.1 Limpieza
" de
las presentes instrucciones
289 0317-24_ES_RMD8xxx-Bedienung_N1-2.qxp 29.06.2012 11:47 Seite 9

10
Fig. 1
RM
8 5 0 1
1
5
D
Refrigerator Mobile /
Frigorífico de absorción portátil
Serie de modelo
5 = ancho 523mm
Fondo :
0 = Standard
5 = + 55mm
6 = + 65mm
Frigorífico de dos puertas
1
selección manual de energía, encendido
automático (MES)
5
selección automática y manual de energía,
encendido automático (AES)
Todos los frigoríficos Dometic están equipa-
dos para una presión de conexión de 30
mbar. Al conectarlos a una instalación de 50
mbar utilice el regulador de presión de
admisión Truma VDR 50/30.
3.0 Descripción del modelo
3.1 Denominación de modelo
En el interior del frigorífico encontrará la placa
de características del frigorífico. En ella se
encuentran todos los datos importantes del
aparato. Podrá leer la denominación de mode-
lo, el número de producto y el número de
serie. Necesitará estos datos a la hora de con-
tactar con el Servicio de atención al cliente o
a la hora de pedir piezas de repuesto.
3.2 Placa de características del
frigorífico
Ejemplo
N° de modelo
N° de producto
Número de serie
Valores de conexión eléctrica
Presión de gas
2
1
3
4
5
Descripción del modelo
Ejemplo
2
1
3
4
5
289 0317-24_ES_RMD8xxx-Bedienung_N1-2.qxp 29.06.2012 11:47 Seite 10

11
3.3 Datos técnicos
Modelo Dimensiones Capacidad total
Valores
Consumo * Peso Encendido
Al x An x F (mm) con sin
de conexión
Eléctrico/Gas neto Piezo autom.
Fdo. incl. puerta congelador congelador Red/Batería en 24h
Reservado el derecho de realizar modificaciones técni-
cas.
*Consumo medio medido a una temperatura ambiental
media de 25°C según en estándar ISO.
Fig. 2
RMD 8xxx
H
B
T
RMD 8501
RMD 8505
RMD 8551
RMD 8555
1245x523x567
1245x523x567
1245x523x622
1245x523x622
160 /30 lit.
160 /30 lit.
190 /35 lit.
190 /35 lit.
40 kg
40 kg
41.5 kg
41.5 kg
190 W / 170 W
190 W / 170 W
190 W / 170 W
190 W / 170 W
•
•
•
•
ca.3,2 KWh / 380 g
ca.3,2 KWh / 380 g
ca.3,2 KWh / 380 g
ca.3,2 KWh / 380 g
Descripción del modelo
289 0317-24_ES_RMD8xxx-Bedienung_N1-2.qxp 29.06.2012 11:47 Seite 11

12
3.4 Explicación de las partes del frigorífico
Congelador
Elementos de manejo
Reevaporador para cámara frigorífica
Canal de salida de agua de condensación
Placa de características
Cajón para verduras
Estante superior con tapa, posibilidad de colocar huevera opcional
Estante inferior con soporte para botellas
2
1
3
4
5
6
7
8
Descripción del modelo
Fig. 3
1
8
7
6
3
4
2
5
289 0317-24_ES_RMD8xxx-Bedienung_N1-2.qxp 29.06.2012 11:47 Seite 12

13
4.0 Funcionamiento del frigorífico
Funcionamiento del frigorífico
La unidad frigorífica funciona de forma silen-
ciosa.
Al poner el aparato en funcionamiento por pri-
mera vez, es posible que éste desprenda un
olor que desaparecerá transcurridas algunas
horas. Ventile bien el vehículo.
El refrigerador alcanza su temperatura de fun-
cionamiento después de algunas horas; el
congelador debería enfriarse después de
aprox. una hora.
El frigorífico puede funcionar con tres tipos de
energía:
Tensión de alimentación (230V)
Tensión continua (12V)
Gas (gas líquido propano/butano).
El tipo de energía deseado se selecciona por
medio del conmutador de selección de
energía (modelos de ignición de pila) o la
tecla de selección de energía (MES, AES).
Los aparatos con selección de energía auto-
mática (AES) tienen la función adicional
"Automatic mode". La electrónica AES selec-
ciona automáticamente el tipo de energía,
según las prioridades.
4.1 Limpieza
Antes de utilizar el frigorífico por vez primera,
es recomendable limpiar el aparato por den-
tro, y volverlo a hacer regularmente.
Utilice un paño suave y agua templada con un
detergente suave. A continuación, lave el apa-
rato con agua limpia y séquelo completamen-
te.
Para evitar que los materiales cambien, no uti-
lice jabones ni detergentes abrasivos, granulo-
sos o con sosa cáustica. No permita que la
junta hermética de la puerta entre en contacto
con aceite o grasa.
4.2 Mantenimiento
4.3 Funcionamiento eléctrico
Alimentación de 12 V de a bordo
El funcionamiento a 12V sólo debería ser
seleccionado con el motor del vehículo en
marcha para evitar que se descargue la
bateria principal.
PRECAUCIÓN!
Siguiendo las prescripciones vigentes, le
informamos de que la instalación y los
conductos de extracción conectados
deberánser inspeccionados por un espe-
cialista autorizado tal y como se indica en
la norma europea EN 1949 antes de la pri-
mera puesta en marcha, así como en inter-
valos de dos años. Al realizar dicha
inspección se expedirá un certificado acre-
ditativo. El usuario será el responsable
de realizar dichas inspecciones.
El quemador de gas deberá ser limpiado
en caso pertinente, en todo caso al
menos una vez al año. Al utilizar auto-
gás (depósito o bombonas rellenables)
los intervalos de mantenimiento se
reducen a un periodo semestral o trime-
stral.
Guarde cuidadosamente los comproban-
tes de los trabajos de mantenimiento reali-
zados en su frigorífico.
Los trabajos en los dispositivos eléctri-
cos y de gas sólo pueden ser ejecuta-
dos por un especialista autorizado para
ello.
Recomendamos que los encargue a un
servicio técnico autorizado.
Recomendamos realizar trabajos de man-
tenimiento cuando el vehículo haya estado
detenido durante un largo período de tiem-
po. Para hacerlo, diríjase a nuestro servicio
posventa.
289 0317-24_ES_RMD8xxx-Bedienung_N1-2.qxp 29.06.2012 11:47 Seite 13

14
Funcionamiento del frigorífico
Al tener la puerta del frigorífico cerrada, el
campo de teclas del panel de mando no está
accesible. Abra la puerta inferior para poder
acceder a las teclas de mando.
En el marco izquierdo o derecho del panel de
mando (dependiendo del sentido de apertura
de la puerta) encontrará dos LEDs. El LED
externo (1) indica que el frigorífico está en ser-
vicio (azul). El otro LED (2) se ilumina en rojo
en caso de avería.
4.5 Explicación de los
elementos de mando
Fig. 5
Panel de mando sin compartimentos de pilas
Fig. 4
LED de indicación
Fig. 6
Panel de mando con compartimentos de pilas (L, R)
L R
Los frigoríficos para el funcionamiento (con
gas) autárquico incluyen dos compartimen-
tos de baterías en el panel de mando. Se
encuentran a derecha e izquierda del campo
de teclas.
12
Funcionamiento con tensión de red (230V)
Seleccione este modo de funcionamiento
sólo si el suministro de tensión de la
toma de corriente corresponde al valor
indicado en la placa de características.
¡Valores divergentes pueden dañar el apa-
rato!
PRECAUCIÓN!
4.4 Funcionamiento con gas (gas
líquido)
El frigorífico funciona con gas líquido (pro-
pano, butano) (NO con gas natural ni gas
ciudad).
En caso de utilizar autogás deberá tener en
cuenta de que debido al tipo de combusti-
ón del gas, el quemador deberá limpiarse
más a menudo (se recomienda hacerlo 2 a
3 veces al año).
En Europa está permitido conducir con el
funcionamiento a gas activado, siempre
que la instalación de gas del vehículo
venga equipada con un sistema antirrotura
de tubo. Deberán cumplirse las normativas
nacionales de su país.
A una altura de aprox. 1000 m NN pueden
producirse fallos al encender el gas por
motivos físicos (¡no se trata de un fallo
funcional!).
En la primera puesta en marcha, así como
tras sustituir la bombona de gas, los tubos
de gas pueden contener aire. Poniendo
brevemente en marcha el frigorífico y,
eventualmente otros aparatos de gas,
(como p. ej. el hornillo) los conductos de
gas se purgarán. Entonces, el gas se
encenderá sin retardo.
Todos los frigoríficos con encendido
manual están equipados con un dispositi-
vo de seguridad antiincendios que inter-
rumpe automáticamente el abastecimiento
de gas a los 30 segundos de apagarse la
llama.
Antes de poner el frigorífico en funciona-
miento en el modo de gas:
Abra la válvula de la bombona de gas.
Abra la espita de paso del suministro de
gas para el frigorífico.
Está prohibido utilizar el funcionamiento
a gas en las cercanías de las gasoline-
ras.
ADVERTENCIA!
289 0317-24_ES_RMD8xxx-Bedienung_N1-2.qxp 29.06.2012 11:47 Seite 14

15
Funcionamiento del frigorífico
Fig. 7
Fig. 8
Selección de energía manual / encendido
automático (RMD 8xx1) MES :
= Tecla ON / OFF
= Tecla de selección energética 230V ~
= Tecla de selección energética GAS
= Tecla de selección energética 12V =
= Calefacción del marco
= Tecla de nivel de temperatura
= Indicación de nivel de temperatura
= LED Avería / Tecla reset AVERÍA GAS
2
1
3
4
6
7
1 2 3 4 6 7 8 9
Selección de energía automática / encen-
dido automático (RMD 8xx5) AES :
= Tecla ON / OFF
= Tecla de selección energética 230V ~
= Tecla de selección energética GAS
= Tecla de selección energética 12V =
= Tecla de selección "AUTOMÁTICO"
= Calefacción del marco
= Tecla de nivel de temperatura
= Indicación de nivel de temperatura
= LED Avería / Tecla reset AVERÍA GAS
2
1
3
4
5
6
7
8
9
1 2 3 4 5 6 8 97
8
9
Funcionamiento con tensión de red (230V~)
Selección "Tensión de red" con la tecla (2)
Ajuste de nivel de temperatura con la tecla (7)
Encendido / Apagado
Encender pulsando la tecla (1) durante 2 seg
Apagar pulsando la tecla (1) durante > 2 seg
Funcionamiento con tensión de batería (a
bordo) (12V =)
Selección "Tensión de batería" con la tecla (4)
Ajuste de nivel de temperatura con la tecla (7)
Funcionamiento a GAS
Selección "Gas" con la tecla (3)
Ajuste de nivel de temperatura con la tecla 7)
Funcionamiento manual
Selección del tipo de energía con la tecla (2,3, 4
)
Ajuste de nivel de temperatura con la tecla (7)
Encendido / Apagado
Encender pulsando la tecla (1) durante 2 seg
Apagar pulsando la tecla (1) durante > 2 seg
Funcionamiento automático
Conmutación a "Automático" con la tecla (5)
Selección energética automática (según dis
ponibilidad):
1.) Solar (12V =)
2.) 230V ~
3.) 12V =
4.) Gas líquido
Ajuste de nivel de temperatura con la tecla (7)
289 0317-24_ES_RMD8xxx-Bedienung_N1-2.qxp 29.06.2012 11:47 Seite 15

16
Funcionamiento del frigorífico
Fig. 9
Para conectar el aparato, pulse la tecla (1)
durante 2 segundos.
El frigorífico arranca con el tipo de energía
seleccionado por última vez.
Modo 230V: :
Pulse la tecla (2) :
Modo 12V: :
Pulse la tecla (4) :
Para conectar el aparato, pulse la tecla (1)
durante 2 segundos.
El frigorífico arranca con el tipo de energía
seleccionado por última vez.
Modo 230V :
Pulse la tecla (2) :
Modo 12V: :
Pulse la tecla (4) :
Modo a gas :
Pulse la tecla (3) :
1
2
4
3
Fig. 10
Fig. 12
3
Modo a gas :
Pulse la tecla (3) :
La llama se encenderá automáticamente
mediante un sistema de encendido automáti-
co.
La llama se apaga al llegar a la temperatura de
la cámara frigorífica ajustada y volverá a
encenderse cuando la temperatura vuelva a
aumentar. En caso de que la llama no se
encienda tras el primer intento de ignición, el
sistema de encendido automático repetirá el
encendido (duración de 30 seg) 2 veces en un
intervalo de 2 minutos. En caso de que la
llama aún no se haya encendido, se indicará
una avería.
4.6.2 Funcionamiento con gas
Fig. 11
Con la tecla (7) puede seleccionar la tempera-
tura de la cámara frigorífica.
Las indicaciones LED (8) correspondientes de
la temperatura ajustada se iluminan.
La escala comienza con la posición MIN en la
indicación LED inferior (barra pequeña = tem-
peratura más alta) y llega hasta la posición
MAX en la indicación LED superior (gran barra
= temperatura más baja). Tenga en cuenta que
los niveles de temperatura no llevan asigna-
dos valores de temperatura absolutos.
7
8
4.6 Modelos RMD 85x1
4.7.1 Funcionamiento manual
Aparatos AES
(selecc. de energía manual + automática)
4.7 Modelos RMD 85x5
1
2
43
4.6.1 Funcionamiento con corriente
Aparatos MES
(selección de energía manual)
4.6.3 Ajuste de la temperatura de la
cámara frigorífica
289 0317-24_ES_RMD8xxx-Bedienung_N1-2.qxp 29.06.2012 11:47 Seite 16

17
Funcionamiento del frigorífico
Para conectar el aparato, pulse la tecla (1)
durante 2 segundos.
El frigorífico arranca con el tipo de energía
seleccionado por última vez.
Funcionamiento automático :
Pulse la tecla (5) : A
Tras la conexión, la electrónica selecciona por
sí misma uno de los tres tipos de energía posi-
bles 230V - 12V - gas líquido. El sistema de
control electrónico se asegura automática-
mente de que el frigorífico se conecte siempre
a la fuente óptima de energía.
Orden de prioridades:
1.) Solar (12V CC)
2.) 230V CA
3.) 12V -
4.) Gas líquido
Si existe la tensión de alimentación suficiente
(> 195 V), esta fuente de energía será la selec-
cionada como primera opción. Sin embargo,
si existe una instalación solar que pueda aba-
stecer al frigorífico, la alimentación 12V
mediante dicha instalación será la prioritaria.
En caso contrario, el funcionamiento de 12 V
sólo está activo cuando el motor está en mar-
cha.
El sistema de control electrónico selecciona,
según el orden de prioridad, GAS como tipo
de energía solo cuando ninguno de los dos
tipos de energía eléctrica esté disponible.
Podrá volver a activar la selección manual de
los tipos de energía en todo momento.
Fig. 13
4.7.2 Funcionamiento automático
1
5
4.7.4 Parada para repostar durante el
funcionamiento en el modo
Automático
4.7.3 Ajuste de la temperatura de la
cámara frigorífica
v. punto “4.6.3”
Para excluir una conmutación involuntaria al
modo de gas durante el repostaje, el sistema
electrónico iniciará el funcionamiento con gas
sólo una vez transcurridos 15 minutos desde
la parada del motor. Durante este tiempo, el
aparato estará en el modo stand-by.
El LED de nivel de temperatura no se encien-
de mientras todos los demás indicadores
están activos.
En las zonas de servicio y gasolineras está
prohibido utilizar llamas vivas.
En caso de que la parada de repostar dure
más de 15 min., el frigorífico deberá des-
conectarse, o bien ser conmutado a otro
tipo de energía.
ADVERTENCIA!
4.7.5 Funciones adicionales (MES/AES)
La luminosidad de la indicación LED se
reduce tras unos pocos segundos si no se
pulsan más teclas adicionales. Si se pulsa
una tecla, la indicación vuelve a iluminarse.
Pulse la tecla una vez más para activar la
función deseada.
Los errores se señalizan mediante el par-
padeo del LED de error.
Si la puerta está demasiado tiempo abier-
ta (más de 2 minutos), se emitirá una señal
de advertencia (silbido vibrante).
Si el sistema de control electrónico detec-
ta una avería, se emitirá una señal acústica
deadvertencia (silbido vibrante). Al mismo
tiempo, la indicación parpadeará
(Comprobación, v. punto 4.19).
289 0317-24_ES_RMD8xxx-Bedienung_N1-2.qxp 29.06.2012 11:47 Seite 17

18
Funcionamiento del frigorífico
Para las variantes de modelo RMD 8xx1 y
RMD 8xx5 (aparatos con sistema electrónico)
puede suministrarse un compartimento de
pilas opcional en la carcasa del sistema elec-
trónico para abastecer de tensión interna
(autárquicamente) el sistema electrónico.
Equipe el compartimento de pilas antes de la
puesta en marcha del frigorífico con pilas (8 x
AA 1,5 V).
Mientras el abastecimiento de tensión conti-
nua de 12V de a bordo esté activado, pueden
seleccionarse todos los modos de funciona-
miento. La tensión interna está desconectada.
En caso de que falte el abastecimiento de ten-
sión continua de 12V de a bordo o de que se
interrumpa el abstecimiento de tensión duran-
te el funcionamiento, el sistema electrónico
pasa automáticamente a la tensión interna (de
pilas).
Entonces, el frigorífico podrá funcionar en el
modo de gas.
En el funcionamiento con pilas internas todos
los indicadores LED estarán apagados a
excepción del LED de GAS. El LED de GAS
parpadeará en intervalos de 15 segundos.
Si se pulsa un botón, además también se ilu-
minarán los LEDs de nivel de temperatura (7).
Si la corriente de las pilas es demasiado baja,
se escuchará una señal acústica (un pitido)
cada 15 segundos.
En ese caso, sustituya las pilas del comparti-
mento.
Fig. 14
4.8 Modo a gas con pilas internas
(opcional)
Compartimento de pilas a la izquierda
Fig. 16
Abrir el compartimento de pilas a la derecha
Fig. 15
Abrir el compartimento de pilas a la izquierda
Fig. 17
4.8.1 Colocación / Sustitución de pilas
abrir
pulsar
pulsar
abrir
Las pilas (8 x AA 1.5V) no están incluidas.
¡Tenga en cuenta la polaridad!
No inserte pilas no recargables en car-
gadores.
Antes de recargarlas, extraiga las pilas
recargables (baterías) de su comparti-
mento.
¡Evite los cortacircuitos en los contac-
tos del compartimento de pilas!
Extraiga las pilas descargadas.
Extraiga las pilas del compartimento de
pilas en caso de no utilizar el frigorífico
durante mucho tiempo.
No mezcle diferentes tipos de pilas.
PRECAUCIÓN!
1
1
2
Desconecte el frigorífico tal y como se descri-
be en el punto 4.14
Puesta fuera de servicio
.
289 0317-24_ES_RMD8xxx-Bedienung_N1-2.qxp 29.06.2012 11:47 Seite 18

19
4.9 Calefacción del marco
La duración de servicio de la calefacción del
marco puede ajustarse a 2 horas, 5 horas o a
un servicio permanente. Una vez seleccionada
la duración de servicio mediante la tecla (6), la
indicación de temperatura (8) se apaga breve-
mente para indicar la duración de servicio aju-
stada durante unos pocos segundos.
Entonces, la indicación volverá a mostrar los
niveles de temperatura.
Ambos los modelos están equipados con una
calefacción del marco (12V--/3,5W) para el
congelador. Durante los meses de verano, con
altas temperaturas y elevada humedad del
aire, pueden formarse gotas de agua en el
bastidor metálico. Conecte entonces la cale-
facción del marco a través del conector (6) .
Funcionamiento del frigorífico
Fig. 18
6
8
Para evitar la descarga de la batería a
bordo, conmute la calefacción del marco
del servicio permanente a otra duración
de servicio o apague la calefacción.
PRECAUCIÓN!
4.10 Bloqueo de la puerta
Abra la puerta pulsando la tecla de bloqueo y
tire de ella (v. Fig. 19).
Vuelva a cerrar la puerta empujándola hasta
cerrarla. Podrá escuchar cómo encaja la puer-
ta.
Mientras el vehículo está detenido, podrá fijar-
se el gancho de bloqueo para abrir la puerta
con mayor facilidad (v. Fig 21-22 ).
Fig. 20
Fig. 19
Antes de iniciar el viaje, ¡cierre bien la
puerta del frigorífico y bloquéela!
PRECAUCIÓN!
Pulsar la tecla (6) una vez
Indicación
Duración de servicio: 2 h
11xx
Pulsar la tecla (6) tres veces
Indicación
Servicio permanente
33xx
Pulsar la tecla (6) dos veces
Indicación
Duración de servicio: 5 h
22xx
La calefacción del marco se activa durante 30
minutos tras su encendido, y después se
apaga y vuelve a encender cada 5 minutos.
289 0317-24_ES_RMD8xxx-Bedienung_N1-2.qxp 29.06.2012 11:47 Seite 19

20
Fig. 24
Fig. 23
Fig. 25
4.11 Iluminación
La iluminación interior es controlada mediante
un contacto en la puerta. Si la puerta está
abierta durante más de 2 minutos, se emitirá
una señal de advertencia (silbido vibrante).
4.12 Colocación de bandejas
Para extraer las bandejas, suelte dos de los
encastres (1) de la parte inferior. Para soltar-
los, desplace los encastres hacia el interior;
para fijarlos, hacia el exterior.
Dos bandejas de la cámara frigorífica están
fijadas. Así, se evita que al extraer las bande-
jas se genere un espacio intermedio demasia-
do grande. Para proteger a los niños, no debe-
rá generarse ningún espacio que permita
albergar un niño.
Si el vehículo es estacionado durante mucho
tiempo en un aparcamiento, el gancho de blo-
queo de la puerta puede fijarse con un pasa-
dor. Entonces, la puerta podrá abrirse tirando,
sin tener que pulsar la tecla de bloqueo.
4.10.1 Fijación y soltado del pasador
de la cerradura de la puerta al
estacio nar el vehículo
Fig. 22
Fig. 21
Fig. 26
Funcionamiento del frigorífico
En caso de una
avería, diríjase al ser-
vicio de atención al
cliente autorizado
por Dometic.
Si no obstante desea extraer dichas bandejas
(p. ej. para limpiarlas), primero suelte las cor-
rederas de bloqueo (2) tal y como se muestra,
con un destornillador apropiado.
Una vez extraída la bandeja central, vuelva a
insertar las correderas de bloqueo.
No retire ninguna de las bandejas.
Así, los niños no tendrán espacio para
encerrarse en el frigorífico.
ADVERTENCIA!
1
1
2
Fijación
Soltado
289 0317-24_ES_RMD8xxx-Bedienung_N1-2.qxp 29.06.2012 11:47 Seite 20

21
Funcionamiento del frigorífico
4.13.3 Fabricación de cubitos de hielo
El mejor momento para congelar cubitos de
hielo es por la noche. Por las noches, el frigo-
rífico trabaja menos y el grupo frigorífico tiene
más reservas.
Fig. 28
Fig. 27
¡Utilice sólo agua potable!
ADVERTENCIA!
4.13 Almacenamiento de alimen-
tos y fabricación de cubitos
de hielo
Ponga en marcha el frigorífico unas 12
horas antes de llenarlo.
Guarde únicamente alimentos que hayan
sido previamente enfriados en él. A la hora
de comprar y transportar los alimentos,
asegúrese de que los productos están bien
refrigerados. Utilice bolsas térmicas.
A la hora de tomar los productos de los
arcones refrigeradores de los estableci
mientos, abra la puerta de los mismos sólo
durante un momento.
Los productos deberán guardarse indivi
dualmente en envases, a ser posible en
paquetes cerrados, con papel de aluminio
o similar, para así evitar que se sequen y
generen olores.
Nunca meta alimentos calientes en el frigo-
rífico, deje que se enfríen antes de hacerlo.
Los productos que puedan emitir gases
volátiles y combustibles no deberán guar-
darse en el frigorífico.
No coloque demasiados productos en las
bandejas o los compartimentos para no
mermar la circulación de aire interna.
Mantenga una distancia (aprox. 5 - 10 mm)
entre los productos y el reevaporador ("bor
des del interior del aparato").
El frigorífico no deberá exponerse a los
rayos directos del sol. Tenga en cuenta que
la temperatura interior de un vehículo cerra
do puede ascender fuertemente debido a la
exposición solar, lo que a su vez puede
mermar considerablemente el rendimiento
del frigorífico.
Deberá garantizarse una buena circulación
de aire del grupo frigorífico. Las rejillas de
ventilación no deberán presentar suciedad
alguna.
4.13.1 Almacenamiento de productos
en la cámara frigorífica.
4.13.2 Almacenamiento de productos
en el congelador
No meta bebidas con gas en el congelador
El congelador ha sido concebido para
producir cubitos de huelo y para guardar
durante un breve período de tiempo ali-
mentos congelados. No es apto para con-
gelar alimentos
En caso de registrarse temperaturas
ambientales inferiores a +10 °C por motivos
técnicos no puede garantizarse una regula-
ción homogénea de la temperatura del
congelador si el frigorífico queda expuesto
a estas temperaturas durante largo tiempo.
Esto podría provocar un posible aumento
de temperatura en el congelador y la des-
congelación de los productos almacena-
dos en él.
1. Llene la cubitera con
agua potable.
2. Colóquela en el con-
gelador.
289 0317-24_ES_RMD8xxx-Bedienung_N1-2.qxp 29.06.2012 11:47 Seite 21

4.15 Descongelamiento
4.14 Puesta fuera de servicio
Con el tiempo en los bordes del interior del fri-
gorífico se forma escarcha. Cuando se forma
hielo considerable de forma unilateral, será
señal de un error. Cuando esta capa de hielo
sea de unos 3 mm, deberá descongelar el fri-
gorífico
22
4.13.4 Compartimentos del frigorífico
Congelador :
productos congelados previamente (con-
gelados)
Compartimento superior:
alimentos preparados
Compartimento medio:
productos lácteos, platos preparados
Compartimento inferior:
carne, pescado, productos para descon-
gelar
Compartimento para verduras:
lechuga, verdura, fruta
Bandeja superior de puerta:
huevos, mantequilla
Bandeja media de puerta:
latas, salsas, ketchup, mermelada
Bandeja baja de puerta (compartimen-
to para bebidas):
bebidas embotelladas o en paquetes
2
1
3
4
5
6
7
8
Fig. 29
1
2
3
4
5
6
7
8
Funcionamiento del frigorífico
Fig. 30
Fig. 31
El frigorífico se desconectan mediante la
tecla (1) (v. 4.5) . Mantenga pulsada la
tecla durante 3 segundos. La indicación
desapare ce y el aparato estará totalmente
desconectado.
Desbloquee el dispositivo de cierre del
bloqueo de puerta (Fig. 30-31) pulsándolo
y empujándolo hacia delante. Si ahora
cierra la puerta, el frigorífico quedará lige-
ramente abierto para evitar la formación de
moho.
Si el frigorífico se desconecta para un largo
período de tiempo, cierre la válvula de cier-
re de a bordo y la válvula de la bombona.
Desconecte el frigorífico tal y como se des-
cribe en el punto 4.14 Puesta fuera de ser-
vicio.
Saque todos los alimentos y la cubitera.
Deje abierta la puerta del frigorífico para
que pueda entrar el aire y así evitar que se
forme moho.
Tras el descongelamiento, pase un paño
parasecar las dos cámaras frigoríficas (el
congelador y los bordes no presentan
hielo).
289 0317-24_ES_RMD8xxx-Bedienung_N1-2.qxp 29.06.2012 11:47 Seite 22

23
El agua derretida de la cámara frigorífica
principal cae a un depósito recogedor
situado en el dorso del aparato. En él, el
agua se evapora.
PRECAUCIÓN!
Fig. 33
4.16 Uso durante el invierno
En invierno, compruebe regularmente si las
rejillas de ventilación y el extractor (1) están
libres de nieve, hojas u otros objetos similares.
A una temperatura exterior inferior a + 10 °C
deberá montarse la tapa de invierno (2) . Así,
se protege el grupo frigorífico contra el frío, ya
que en caso contrario el rendimiento del grupo
podría limitarse.
Coloque la tapa de invierno cuando el vehícu-
lo no vaya a ser utilizado durante mucho tiem-
po o cuando se limpie desde el exterior.
Fig. 32
2
1
< +10°C
Funcionamiento del frigorífico
Observación: El agua derretida de la cámara
frigorífica principal cae a un depósito recoge-
dor situado en el dorso del aparato. En él, el
agua se evapora.
289 0317-24_ES_RMD8xxx-Bedienung_N1-2.qxp 29.06.2012 11:47 Seite 23

24
4.17 Cambio de la placa de deco-
ración
Fig. 35
Fig. 36
Fig. 34
Fig. 37
1
2
Dimensiones de la placa de decoración
(con marco) :
300 +/- 1 mm 507,5 +/- 1 mm max. 1.7 mm
Puerta superior
Altura Ancho Grosor
907,4 +/- 1 mm 507,5 +/- 1 mm max. 1.7 mm
Puerta inferior
Altura Ancho Grosor
PRECAUCIÓN!
3
4
2
1
Funcionamiento del frigorífico
Placa de decoración sin marco
Placa de decoración con marco
Retire el listón (1) lateral de la puerta (el
listón está encajado, no atornillado).
Desplace la placa de decoración (2) sacán-
dola de la puerta, coloque la nueva placa
de decoración y vuelva a colocar el listón
(1) .
Fig. 38
1
Fig. 41
Fig. 39 Fig. 40
3
4
2
289 0317-24_ES_RMD8xxx-Bedienung_N1-2.qxp 29.06.2012 11:47 Seite 24

25
Funcionamiento del frigorífico
4.18 Cómo comportarse en caso de averías
Avería: El frigorífico no enfría lo suficiente.
- La ventilación del grupo frigorífico no es suficien-
te.
- El termostato está ajustado demasiado bajo.
- El evaporador está demasiado congelado.
- Se han almacenado demasiados alimentos
calientes en un corto período de tiempo.
- El aparato no lleva mucho tiempo en marcha.
- Las temperaturas del entorno son demasiado
elevadas.
- Compruebe si las rejillas de ventilación están
obstruidas.
- Ponga el regulador del termostato en una posici
ón más alta.
- Compruebe si la puerta se cierra correctamente.
- Deje enfriar los alimentos calentados antes de
meterlos en el frigorífico.
- Tras 4-5 h., compruebe si cámara frigorífica
enfría correctamente.
- Retire las rejillas de ventilación durante un tiem-
po.
Posible causa
Autoayuda
Avería: El frigorífico no funciona en el funcionamiento de gas.
- La bombona de gas está vacía.
- ¿El mecanismo de cierre preconectado está
abierto?
- ¿Hay aire en la conducción?
- Reemplazar la bombona..
- Abrir el mecanismo de cierre.
- Desconectar el aparato y conectarlo de nuevo.
Repetir el proceso 3 a 4 veces en caso de que
sea necesario.
Posible causa
Autoayuda
Avería: El frigorífico no funciona en el funcionamiento de 12V
- Fusible de a bordo defectuoso.
- Batería descargada.
- Encendido no conectado
- Elemento calefactor defectuoso (v. tb. Indicación
de avería).
- Colocar un nuevo fusible.
- Comprobar el estado de la batería y cargarla.
- Arrancar el motor.
- Diríjase al servicio de atención al cliente de
Dometic.
Posible causa
Autoayuda
Avería: El frigorífico no funciona en el funcionamiento de 230V
- Fusible de a bordo defectuoso.
- El vehículo no está conectado al abastecimiento
eléctrico.
- AES: ¿funcionamiento a gas a pesar de conexión
a red eléctrica?
- Elemento calefactor defectuoso (v. tb. Indicación
de avería).
- Colocar un nuevo fusible.
- Conectarlo al abastecimiento eléctrico
- El aparato pasa al modo de funcionamiento de
gas debido a una tensión de red demasiado baja
(vuelve automáticamente al modo de 230V)
- Diríjase al servicio de atención al cliente de
Dometic.
Posible causa
Autoayuda
289 0317-24_ES_RMD8xxx-Bedienung_N1-2.qxp 29.06.2012 11:47 Seite 25

26
4.19.1 Indicación de estatus
Fig. 42
Fig. 43
1 2 3
4
7 8
1
2 3 4
7 8
= Tecla ON / OFF
= Tecla de selección energética 230V ~
= Tecla de selección energética GAS
= Tecla de selección energética 12V =
2
1
3
4
= Indicación de nivel de temperatura
= LED Avería / Tecla reset AVERÍA GAS
8
7
Funcionamiento del frigorífico
MES
AES
4.19 Indicaciones sobre la indica-
ción de averías y cómo solu-
cionarlas
acústica.
Antes de informar al servicio de atención al
cliente autorizado, controle lo siguiente :
Si las indicaciones del apartado "Manejo
del frigorífico" se han seguido correcta
mente.
Si el frigorífico está en posición vertical.
Si es posible poner el frigorífico en marcha
con algún tipo de energía existente.
Los frigoríficos con un sistema electrónico
(MES, AES) muestran los errores produci-
dos mediante el parpadeo del LED o en la
pantalla.
Al producirse una avería, al mismo tiempo
parpadea el LED indicador "Avería" (8). En
los modelos AES, se escuchará una alarma
parpadeo +
señal acústica
cada 20 seg.
Comprobar el quemador y sus toberas, en caso
pertinente encargar su sustitución. Avisar al servicio
de atención al cliente
Quemador defectuoso o
grupo frigorífico defec-
tuoso
7
3
Funcionamiento con alimentación de 12 V de a bordo
Indicación
Avería
Ayuda
parpadeo +
señal acústica
cada 20 seg.
Conexión a red, tensión de red, comprobar fusibleModo 230V: „230V" no
disponible o demasiado
bajo
8
2
parpadeo +
señal acústica
cada 20 seg.
Encargar la sustitución del elemento calefactor de
230V defectuoso,
Avisar al servicio de atención al cliente
Modo 230V: elemento
calefactor de 230V
defectuoso
7
2
parpadeo
Sensor de temperatura
sin contacto o defectuo-
so
7
parpadeo +
señal acústica
cada 20 seg.
Encargar la sustitución del elemento calefactor de
12V defectuoso,
Avisar al servicio de atención al cliente
Modo 12Vs: elemento
calefactor de 12V defec-
tuoso
7
4
parpadeo +
señal acústica
cada 20 seg.
Conexión 12 V, batería de a bordo, comprobar fusi-
ble
AES: comprobar señal D+
Modo 12V: „12V" no
disponible o demasiado
bajo
8
4
parpadeo +
señal acústica
cada 20 seg.
Modo GAS/Auto: llama
no encendida
8
3
Comprobar el abastecimiento de gas (bombona de
gas, válvula de gas).Tras arreglar la avería, pulsar la
tecla
Señal acústica, durante
15 seg., en intervalos de
2 minutos
Iluminación interior
encendida
Cerrar puertas, comprobar el contacto de la puerta
289 0317-24_ES_RMD8xxx-Bedienung_N1-2.qxp 29.06.2012 11:47 Seite 26

27
Funcionamiento del frigorífico
Funcionamiento a pilas (abastecimiento de corriente interna)
Indicación
Avería
Ayuda
parpadeo
claro
Comprobar el quemador y sus toberas, en caso
pertinente encargar su sustitución. Avisar al servicio
de atención al cliente
Quemador defectuoso o
grupo frigorífico defec-
tuoso
7
3
La conmutación auto-
mática de abasteci-
miento de corriente
externa a interna no
funciona
(Fallo del abastecimien-
to de 12V de a bordo
para el sistema electró-
nico)
Desconectar el frigorífico y conectarlo de nuevo.
La tensión de a bordo se ha visto interrumpida
durante el inicio del funcionamiento a gas.
Nota: Durante la ignición no se produce una con-
mutación automática.
El frigorífico no funcio-
na;
El modo a gas no es
posible a pesar de que
las pilas están puestas.
parpadeo
claro
llama no encendida
8
3
Comprobar el abastecimiento de gas (bombona de
gas, válvula de gas).Tras arreglar la avería, pulsar la
tecla
Señal acústica, en
intervalos de 15
segundos
Sistema de reconoci-
miento de tensión míni-
ma (pilas internas)
Sustituir las pilas
289 0317-24_ES_RMD8xxx-Bedienung_N1-2.qxp 29.06.2012 11:47 Seite 27


AUSTRALIA
Dometic Australia Pty. Ltd.
1 John Duncan Court
Varsity Lakes QLD 4227
1800 212121
+61 7 55076001
Mail: sales@dometic.com.au
AUSTRIA
Dometic Austria GmbH
Neudorferstraße 108
A-2353 Guntramsdorf
+43 2236 908070
+43 2236 90807060
Mail: info@dometic.at
BENELUX
Dometic Branch Office Belgium
Zincstraat 3
B-1500 Halle
+32 2 3598040
+32 2 3598050
Mail: info@dometic.be
BRAZIL
Dometic DO Brasil LTDA
Avenida Paulista 1754, conj. 111
SP 01310-920 Sao Paulo
+55 11 3251 3352
+55 11 3251 3362
Mail: info@dometic.com.br
DENMARK
Dometic Denmark A/S
Nordensvej 15, Taulov
DK-7000 Fredericia
+45 75585966
+45 75586307
Mail: info@dometic.dk
FINLAND
Dometic Finland OY
Mestarintie 4
FIN-01730 Vantaa
+358 20 7413220
+358 9 7593700
Mail: info@dometic.fi
FRANCE
Dometic SAS
ZA du Pré de la Dame Jeanne
B.P. 5
F-60128 Plailly
+33 3 44633525
+33 3 44633518
Mail : vehiculesdeloisirs@dometic.fr
HONG KONG
Dometic Group Asia Pacific
Suites 2207-11 · 22/F · Tower 1
The Gateway · 25 Canton Road,
Tsim Sha Tsui · Kowloon
+852 2 4611386
+852 2 4665553
Mail: info@waeco.com.hk
HUNGARY
Dometic Zrt. Sales Office
Kerékgyártó u. 5.
H-1147 Budapest
+36 1 468 4400
+36 1 468 4401
Mail: [email protected]
ITALY
Dometic Italy S.r.l.
Via Virgilio, 3
I-47122 Forlì (FC)
+39 0543 754901
+39 0543 754983
Mail: vendite@dometic.it
JAPAN
Dometic KK
Maekawa-Shibaura, Bldg. 2
2-13-9 Shibaura Minato-ku
Tokyo 108-0023
+81 3 5445 3333
+81 3 5445 3339
Mail: [email protected]
MEXICO
Dometic Mx, S. de R. L. de C. V.
Circuito Médicos No. 6 Local 1
Colonia Ciudad Satélite
CP 53100 Naucalpan de Juárez
Estado de México
+52 55 5374 4108
+52 55 5393 4683
Mail: [email protected]
NETHERLANDS
Dometic Benelux B.V.
Ecustraat 3
NL-
4879 NP Etten-Leur
+31 76 5029000
+31 76 5029019
Mail: [email protected]
NEW ZEALAND
Dometic New Zealand Ltd.
PO Box 12011
Penrose
Auckland 1642
+64 9 622 1490
+64 9 622 1573
Mail: customerservices@dometic.co.nz
NORWAY
Dometic Norway AS
Østerøyveien 46
N-3232 Sandefjord
+47 33428450
+47 33428459
Mail: firmapost@dometic.no
POLAND
Dometic Poland Sp. z o.o.
Ul. Puławska 435A
PL-02-801 Warszawa
+48 22 414 3200
+48 22 414 3201
Mail: [email protected]
PORTUGAL
Dometic Spain, S.L.
Branch Office em Portugal
Rot. de São Gonçalo nº 1 – Esc. 12
2775-399 Carcavelos
+351 219 244 173
+351 219 243 206
Mail: [email protected]
RUSSIA
Dometic RUS LLC
Komsomolskaya square 6-1
RU-107140 Moscow
+7 495 780 79 39
+7 495 916 56 53
Mail: [email protected]
SINGAPORE
Dometic Pte Ltd
18 Boon Lay Way 06–140 Trade Hub 21
Singapore 609966
+65 6795 3177
+65 6862 6620
Mail: [email protected]
SLOVAKIA
Dometic Slovakia s.r.o. Sales Office Bratislava
Nádražná 34/A
900 28 Ivánka pri Dunaji
/ +421 2 45 529 680
Mail: [email protected]om
SOUTH AFRICA
Dometic (Pty) Ltd.
Regional Office
South Africa & Sub-Saharan Africa
2 Avalon Road
West Lake View Ext 11
Modderfontein 1645
Johannesburg
+27 11 4504978
+27 11 4504976
Mail: [email protected]
SPAIN
Dometic Spain S.L.
Avda. Sierra del Guadarrama, 16
E-28691 Villanueva de la Cañada
Madrid
+34 902 111 042
+34 900 100 245
Mail: [email protected]
SWEDEN
Dometic Scandinavia AB
Gustaf Melins gata 7
S-42131 Västra Frölunda
+46 31 7341100
+46 31 7341101
Mail: [email protected]
SWITZERLAND
Dometic Switzerland AG
Riedackerstrasse 7a
CH-8153 Rümlang
+41 44 8187171
+41 44 8187191
Mail: [email protected]
UNITED ARAB EMIRATES
Dometic Middle East FZCO
P. O
. Box 17860
S-D 6, Jebel Ali Freezone
Dubai
+971 4 883 3858
+971 4 883 3868
Mail: [email protected]
UNITED KINGDOM
Dometic UK Ltd.
Dometic House, The Brewery
Blandford St. Mary
Dorset DT11 9LS
+44 344 626 0133
+44 344 626 0143
Mail: [email protected]
USA
Dometic RV Division
1120 North Main Street
Elkhart, IN 46515
+1 574-264-2131
GERMANY
Dometic WAECO International GmbH
Hollefeldstraße 63 · D-48282 Emsdetten
+49 (0) 2572 879-195 · +49 (0) 2572 879-322
Mail: info@dometic-waeco.de
dometic.com
289 0662 24 01/2017
address_A4.fm Seite 22 Dienstag, 31. Januar 2017 2:40 14
-
 1
1
-
 2
2
-
 3
3
-
 4
4
-
 5
5
-
 6
6
-
 7
7
-
 8
8
-
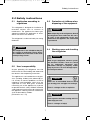 9
9
-
 10
10
-
 11
11
-
 12
12
-
 13
13
-
 14
14
-
 15
15
-
 16
16
-
 17
17
-
 18
18
-
 19
19
-
 20
20
-
 21
21
-
 22
22
-
 23
23
-
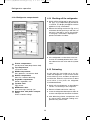 24
24
-
 25
25
-
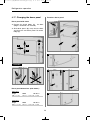 26
26
-
 27
27
-
 28
28
-
 29
29
-
 30
30
-
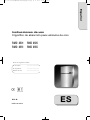 31
31
-
 32
32
-
 33
33
-
 34
34
-
 35
35
-
 36
36
-
 37
37
-
 38
38
-
 39
39
-
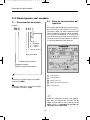 40
40
-
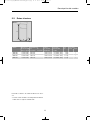 41
41
-
 42
42
-
 43
43
-
 44
44
-
 45
45
-
 46
46
-
 47
47
-
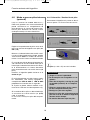 48
48
-
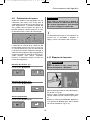 49
49
-
 50
50
-
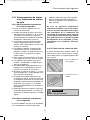 51
51
-
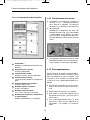 52
52
-
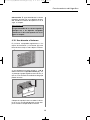 53
53
-
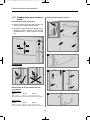 54
54
-
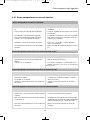 55
55
-
 56
56
-
 57
57
-
 58
58
-
 59
59
-
 60
60


Dometic 8 Serie Instrucciones de operación
- Categoría
- Neveras
- Tipo
- Instrucciones de operación
- Este manual también es adecuado para
En otros idiomas
Documentos relacionados
-
Dometic RMD 8501, RMD 8505, RMD 8551, RMD 8555 Instrucciones de operación
-
-
-
-
-
-
-
Dometic RMSL8500 Manual de usuario
-
-
Dometic RMSL8500 Manual de usuario