LG AVNW36GM1S0.ANWTLAR El manual del propietario
- Categoría
- Acondicionadores de aire móviles
- Tipo
- El manual del propietario
Este manual también es adecuado para

P/NO : MFL68525402
OWNER’S MANUAL
Please read this manual carefully before operating
your set and retain it for future reference.
Ceiling suspended air conditioner
AIR
CONDITIONER
www.lg.com
ESPAÑOL
MFL68525402
ENGLISH

2
TIPS FOR SAVING ENERGY
ENGLISH
TIPS FOR SAVING ENERGY
Here are some tips that will help you minimize the power consumption when you use the air
conditioner. You can use your air conditioner more efficiently by referring to the instructions
below:
• Do not cool excessively indoors. This may be harmful for your health and may consume more
electricity.
• Block sunlight with blinds or curtains while you are operating the air conditioner.
• Keep doors or windows closed tightly while you are operating the air conditioner.
• Adjust the direction of the air flow vertically or horizontally to circulate indoor air.
• Speed up the fan to cool or warm indoor air quickly, in a short period of time.
• Open windows regularly for ventilation as the indoor air quality may deteriorate if the air con-
ditioner is used for many hours.
• Clean the air filter once every 2 weeks. Dust and impurities collected in the air filter may block
the air flow or weaken the cooling / dehumidifying functions.
For your records
Staple your receipt to this page in case you need it to prove the date of purchase or for warranty
purposes. Write the model number and the serial number here:
Model number :
Serial number :
You can find them on a label on the side of each unit.
Dealer’s name :
Date of purchase :
ENGLISH

IMPORTANT SAFETY INSTRUCTIONS
IMPORTANT SAFETY INSTRUCTIONS
READ ALL INSTRUCTIONS BEFORE USING THE APPLIANCE.
Always comply with the following precautions to avoid dangerous situations and ensure peak
performance of your product
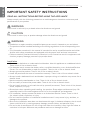
WARNING
It can result in serious injury or death when the directions are ignored
CAUTION
It can result in minor injury or product damage when the directions are ignored
WARNING
• Installation or repairs made by unqualified persons can result in hazards to you and others.
• The product shall be installed according to the Wiring regulations of the corresponding coun-
try.
• The information contained in the manual is intended for use by a qualified service technician
familiar with safety procedures and equipped with the proper tools and test instruments.
• Failure to carefully read and follow all instructions in this manual can result in equipment mal-
function, property damage, personal injury and/or death.
Installation
• Do not use a defective or underrated circuit breaker. Use this appliance on a dedicated circuit.
There is risk of fire or electric shock.
• For electrical work, contact the dealer, seller, a qualified electrician, or an Authorized Service
Center. Do not disassemble or repair the product. There is risk of fire or electric shock.
• Always ground the product. There is risk of fire or electric shock.
• Install the panel and the cover of control box securely. There is risk of fire or electric shock.
• Always install a dedicated circuit and breaker. Improper wiring or installation may cause fire or
electric shock
• Use the correctly rated breaker or fuse. There is risk of fire or electric shock.
• Do not modify or extend the power cable. There is risk of fire or electric shock.
• Do not install, remove, or re-install the unit by yourself (customer). There is risk of fire, electric
shock, explosion, or injury.
• Be cautious when unpacking and installing the product. Sharp edges could cause injury. Be
especially careful of the case edges and the fins on the condenser and evaporator.
• For installation, always contact the dealer or an Authorized Service Center. There is risk of
fire, electric shock, explosion, or injury.
• Do not install the product on a defective installation stand. It may cause injury, accident, or
damage to the product.
• Be sure the installation area does not deteriorate with age. If the base collapses, the air condi-
tioner could fall with it, causing property damage, product failure, and personal injury.
• Do not let the air conditioner run for a long time when the humidity is very high and a door or
a window is left open. Moisture may condense and wet or damage furniture.
!
!
!
3
ENGLISH

4
IMPORTANT SAFETY INSTRUCTIONS
Operation
• Take care to ensure that power cable could not be pulled out or damaged during operation.
There is risk of fire or electric shock.
• Do not place anything on the power cable. There is risk of fire or electric shock.
• Do not plug or unplug the power supply plug during operation. There is risk of fire or electric
shock.
• Do not touch(operate) the product with wet hands. There is risk of fire or electrical shock.
• Do not place a heater or other appliances near the power cable. There is risk of fire and elec-
tric shock.
• Do not allow water to run into electric parts. It may cause There is risk of fire, failure of the
product, or electric shock.
• Do not store or use flammable gas or combustibles near the product. There is risk of fire or
failure of product.
• Do not use the product in a tightly closed space for a long time. Oxygen deficiency could
occur.
• When flammable gas leaks, turn off the gas and open a window for ventilation before turn the
product on. Do not use the telephone or turn switches on or off. There is risk of explosion or
fire
• If strange sounds, or small or smoke comes from product. Turn the breaker off or disconnect
the power supply cable. There is risk of electric shock or fire.
• Stop operation and close the window in storm or hurricane. If possible, remove the product
from the window before the hurricane arrives. There is risk of property damage, failure of
product, or electric shock.
• Do not open the inlet grill of the product during operation.(Do not touch the electrostatic filter,
if the unit is so equipped.) There is risk of physical injury, electric shock, or product failure.
• When the product is soaked (flooded or submerged), contact an Authorized Service Center.
There is risk of fire or electric shock.
• Be cautious that water could not enter the product. There is risk of fire, electric shock, or
product damage.
• Ventilate the product from time to time when operating it together with a stove, etc. There is
risk of fire or electric shock.
• Turn the main power off when cleaning or maintaining the product. There is risk of electric
shock.
• When the product is not be used for a long time, disconnect the power supply plug or turn off
the breaker. There is risk of product damage or failure, or unintended operation.
• Take care to ensure that nobody could step on or fall onto the outdoor unit. This could result
in personal injury and product damage.
CAUTION
Installation
• This appliance is intended to be used by expert or trained users in shops, in light industry and on
farms, or for commercial use by lay persons.
• Always check for gas (refrigerant) leakage after installation or repair of product. Low refrigerant lev-
els may cause failure of product.
• Install the drain hose to ensure that water is drained away properly. A bad connection may cause
water leakage.
• Keep level even when installing the product. To avoid vibration or water leakage.
• Do not install the product where the noise or hot air from the outdoor unit could damage the neigh-
borhoods. It may cause a problem for your neighbors.
!
ENGLISH

IMPORTANT SAFETY INSTRUCTIONS
• Use two or more people to lift and transport the product. Avoid personal injury.
• Do not install the product where it will be exposed to sea wind (salt spray) directly. It may cause cor-
rosion on the product. Corrosion, particularly on the condenser and evaporator fins, could cause
product malfunction or inefficient operation.
Operation
• This appliance is not intended for use by persons (including children) with reduced physical, sensory
or mental capabilities, or lack of experience and knowledge, unless they have been given supervi-
sion or instruction concerning use of the appliance by a person responsible for their safety.
• Children being supervised not to play with appliance.
• Do not expose the skin directly to cool air for long periods of time. (Don't sit in the draft.) This could
harm to your health.
• Do not use the product for special purposes, such as preserving foods, works of art, etc. It is a con-
sumer air conditioner, not a precision refrigeration system. There is risk of damage or loss of prop-
erty.
• Do not block the inlet or outlet of air flow. It may cause product failure.
• Use a soft cloth to clean. Do not use harsh detergents, solvents, etc. There is risk of fire, electric
shock, or damage to the plastic parts of the product.
• Do not touch the metal parts of the product when removing the air filter. They are very sharp! There
is risk of personal injury.
• Do not step on or put anyting on the product. (outdoor units) There is risk of personal injury and fail-
ure of product.
• Always insert the filter securely. Clean the filter every two weeks or more often if necessary. A dirty
filter reduces the efficiency of the air conditioner and could cause product malfunction or damage.
• Do not insert hands or other objects through the air inlet or outlet while the product is operated.
There are sharp and moving parts that could cause personal injury.
• Do not drink the water drained from the product. It is not sanitary and could cause serious health is-
sues.
• Use a firm stool or ladder when cleaning or maintaining the product. Be careful and avoid personal
injury.
• Replace the all batteries in the remote control with new ones of the same type. Do not mix old and
new batteries or different types of batteries. There is risk of fire or explosion
• Do not recharge or disassemble the batteries. Do not dispose of batteries in a fire. They may burn or
explode.
• If the liquid from the batteries gets onto your skin or clothes, wash it well with clean water. Do not
use the remote if the batteries have leaked. The chemicals in batteries could cause burns or other
health hazards.
• If you eat the liquid from the batteries, brush your teeth and see doctor. Do not use the remote if
the batteries have leaked. The chemicals in batteries could cause burns or other health hazards.
Batteries :
Do not burn, do not try to open it, do not dispose in ordinary trash. Preserve
environment and your health.
After use, batteries must be delivered to the merchant or service authorized
network (Conama number 401 dated 11/2008).
5
ENGLISH

6
TABLE OF CONTENTS
ENGLISH
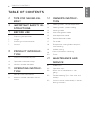
TABLE OF CONTENTS
2 TIPS FOR SAVING EN-
ERGY
3 IMPORTANT SAFETY IN-
STRUCTIONS
7 BEFORE USE
7 Preparing for operation
7 Usage
7 Cleaning and maintenance
7 Service
8 Operation indication lamps
8 PRODUCT INTRODUC-
TION
8 Name and function of parts
9 Wireless remote controller
11 OPERATING INSTRUC-
TION
11 How to insert the batteries
11 Wireless remote controller mainte-
nance
12 OWNER'S INSTRUC-
TION
12 Cooling mode -standard operation
12 Cooling mode - power cooling
13 Heating mode
15 Auto operation mode
14 Auto changeover mode
16 Dehumidification mode
17 Fan mode
18 Temperature setting/room tempera-
ture checking
19
Celsius/fahrenheit switching
19
Airflow setting
20 Timer
21 MAINTENANCE AND
SERVICE
21 Indoor unit
22 Operation tips!
22 When the air conditioner is not
going....
23 Troubleshooting Tips! Save time and
money!
23 Call the service immediately in the fol-
lowing situations
ENGLISH

BEFORE USE
7
ENGLISH
Preparing for operation
- Contact an installation specialist for installation.
- Use a dedicated circuit.
Usage
- Being exposed to direct airflow for an extended period of time could be hazardous to your
health. Do not expose occupants, pets, or plants to direct airflow for extended periods of time.
- Due to the possibility of oxygen deficiency, ventilate the room when used together with stoves
or other heating devices.
- Do not use this air conditioner for non-specified special purposes (e.g. preserving precision de-
vices, food, pets, plants, and art objects). Such usage could damage the items.
Cleaning and maintenance
- Do not touch the metal parts of the unit when removing the filter. Injuries can occur when han-
dling sharp metal edges.
- Do not use water to clean inside the air conditioner. Exposure to water can destroy the insula-
tion, leading to possible electric shock.
- When cleaning the unit, first make sure that the power and breaker are turned off. The fan ro-
tates at a very high speed during operation. There is a possibility of injury if the unit’s power is
accidentally triggered on while cleaning inner parts of the unit.
Service
For repair and maintenance, contact your authorized service dealer.
BEFORE USE
ENGLISH

8
PRODUCT INTRODUCTION
ENGLISH
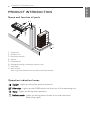
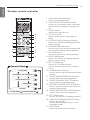
Name and function of parts
1 Indoor unit
2 Outdoor unit
3 Remote controller
4 Inlet air
5 Discharge air
6 Refrigerant piping, connection electric wire
7 Drain pipe
8 Ground wire
Wire to ground outdoor unit to prevent electrical shocks.
PRODUCT INTRODUCTION
1
3
4
6
5
4
7
2
8
Operation indication lamps
O
On/Off
: Lights up during the system operation.
Filter sign
: Lights up after 2400 hours from the time of first operating unit.
Timer
: Lights up during timer operation.
Defrost mode
: Lights up during defrost mode or hot start operation.
(heat pump type)
ENGLISH

PRODUCT INTRODUCTION
9
ENGLISH
1
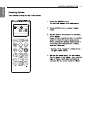
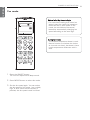
VANE ANGLE button (Useless)
Used to set each vane angle.
2
FUNCTION SETTING button (Useless)
Used to set or clear auto clean, smart clean,
electric heater or individual vane angle con-
trol.
3
ON/OFF button
Used to turn on/off the unit.
4
JET COOL button
Speed cooling operates super high fan
speed.
5
LEFT/RIGHT AIRFLOW button (Useless)
Used to set the desired left/right(horizontal)
airflow direction.
6
UP/DOWN AIRFLOW button
Used to stop or start louver movement and
set the desired up/down airflow direction.
7
ON TIMER button
Used to set the time of starting operation.
8
SLEEP TIMER button
Used to set the time of sleeping operation.
(Refer to timer setting)
9
SET / CLEAR button
Used to SET / CLEAR the timer.
Used to set the current time (if it input for
3 sec.)
10
PLASMA button (Useless)
Used to start or stop the plasma-purification
function.
11
ROOM TEMPERATURE SETTING button
Used to select the room temperature.
12
OPERATION MODE SELECTION button
Used to select the operation mode.
13
INDOOR FAN SPEED SELECTION button
Used to select fan speed in four steps low,
medium, high and auto.
14
ROOM TEMPERATURE CHECKING button
Used to check the room temperature.
15
OFF TIMER button
Used to set the time of stopping operation.
16
TIMER SETTING(Up/Down)/LIGHT button
Used to set the timer.
Used to adjust the brightness.(if it is not
time adjust mode)
17
RESET button
Used to reset the remote controller.
3
4
6
8
9
5
7
14
15
17
16
10
12
13
11
2
1
Wireless remote controller
Cooling Mode
Auto Mode or Auto Changeover
Dehumidification mode
Heating Mode
Fan Mode
Cooling Model( ), Heat Pump Model( )
Operation Mode
ENGLISH

10
PRODUCT INTRODUCTION
NOTE
!
-
The wireless remote controller do not operate the swirl mode.(4Way type)
-
For more details refer to the wireless remote control accessory manual.
-
The actual product can be different from above contents depending upon model type.
CAUTION
Caution of handling the remote controller
- Aim at the signal receiver on the wired remote controller so as to operate.
- Be sure that there are no obstructions between the remote controller and the signal receptor.
- Do not drop or throw the remote controller.
- Do not place the remote controller in a location exposed to direct sunlight, or near the heating
unit, or any other heat source.
- Block a strong light over the signal receptor with a curtain or etc. so as to prevent the abnormal
operation. (ex:electronic quick start, ELBA, inverter type fluorescent lamp)
!
ENGLISH

OPERATING INSTRUCTION
11
ENGLISH
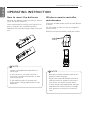
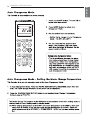
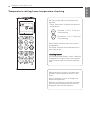
How to insert the batteries
Remove the battery cover by pulling it accord-
ing to the arrow direction.
Insert new batteries making sure that the (+)
and (-) of battery are installed correctly.
Reattach the cover by sliding it back into posi-
tion.
Wireless remote controller
maintenance
Choose a suitable place where its safe & easy
to reach.
Fix the holder to wall etc with the supplied
screws firmly.
Slide the remote controller inside the holder.
NOTE
!
- Always use/replace both batteries of
same type.
- If the system is not to be used for a
long time, remove the batteries to save
their working life.
- If the display screen of remote con-
troller starts, fading replace both of the
batteries.
NOTE
!
- Remote controller should never be ex-
posed to direct sunlight.
- Signal transmitter & receiver should al-
ways be clean for proper communica-
tion. Use a soft cloth to clean them.
- In case some other appliances also get
operated with remote control, change
their position or consult your service-
man.
OPERATING INSTRUCTION
ENGLISH

12
ENGLISH
OWNER'S INSTRUCTION
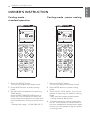
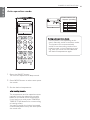
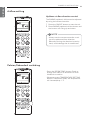
Cooling mode -
standard operation
1 Press the ON/OFF button.
The unit will respond with beep sound.
2 Press MODE button to select cooling
mode.
3 Set the desired temperature by pressing
TEMP button.
Press ROOM TEMPERATURE button to
check the room temperature. When set-
ting the desired temperature is higher than
room temperature, cooling wind isn’t blow
out.
-
Setting temp. range : 18~30 °C(64~86 °F)
Cooling mode - power cooling
1 Press the ON/OFF button.
The unit will respond with beep sound.
2 Press MODE button to select cooling
mode.
3 Press the JET COOL button. The unit will
operate in super high fan speed in cooling
mode.
- Wall mounted models operate power
cooling mode for 30 minutes.
4 To cancel the power cooling mode press
the JET COOL button or the fan button or
the room temperature setting button again
and the unit will operate in high fan speed
in cooling mode.
OWNER'S INSTRUCTION
ENGLISH

13
ENGLISH

14
OWNER'S INSTRUCTION
ENGLISH

15
ENGLISH
OWNER'S INSTRUCTION
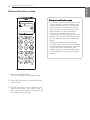
Auto operation mode
1 Press the ON/OFF button.
The unit will respond with beep sound.
2 Press MODE button to select auto opera-
tion mode.
3 Set the desired temperature.
<For cooling model>
The temperature and fan speed are auto-
matically set by the electronic controls
based on the actual room temperature.
If you feel hot or cold, press TEMPERA-
TURE SETTING buttons for more cooling
or heating effect.
You cannot switch the indoor fan speed.
It has already been set by the auto opera-
tion mode rule.
Code Feel
2 Cold
1 Slightly cool
0 Neutral
-1 Slightly warm
-2 Warm
❈ Please select the code
depend on your feeling.
During auto operation mode
- If the system is not operating as de-
sired, manually switch to another mode.
The system will not automatically
switch from the cooling mode to the
heating mode, or from heating to cool-
ing, then you must set the mode and
the desired temperature again.
ENGLISH

ENGLISH
Dehumidification mode
1 Press the ON/OFF button.
The unit will respond with beep sound.
2 Press MODE button to select dehumidifi-
cation mode.
3 Set the fan speed. You can select the fan
speed in four steps - low, middle, high, or
auto. Each time the button is pressed, the
fan speed mode is shifted.
During dehumidification mode
- If you select the dehumidification mode
on the operation selection button, the
indoor unit starts to run the dehumidifi-
cation function, automatically setting
the room temp. and air volume to the
best condition for dehumidification
based on the sensed room temp.
In this case, the setting temp. is not dis-
played in the remote controller and you
are not able to control the room temp.
either.
- During the healthy dehumidification
function, the air volume is automatically
set according to the algorithm respond-
ing to the current room temp. and
makes the room condition healthy and
comfortable even in the high humidity
season.
16
OWNER'S INSTRUCTION
ENGLISH

OWNER'S INSTRUCTION
17
ENGLISH
Fan mode
1 Press the ON/OFF button.
The unit will respond with beep sound.
2 Press MODE button to select fan mode.
3 Set the fan speed again. You can select
the fan speed in four steps - low, middle,
high, or auto. Each time the button is
pressed, the fan speed mode is shifted.
Natural wind by the auto logic
- For more fresh feeling than other fan
speed, press the indoor fan speed se-
lector and set to auto mode. In this
mode, the wind blows like natural
breeze by automatically changing fan
speed according to the auto logic.
During fan mode
- The outdoor compressor doesn't work.
Have a function to circulate the indoor
as it sends out the air that doesn't have
much temperature difference with in-
door.
ENGLISH

18
OWNER'S INSTRUCTION
ENGLISH
Temperature setting/room temperature checking
We can simply adjust the desired tem-
perature
- Press the buttons to adjust the desired
temperature
: Increase 1 °C or 1 °F per one
time pressing
: Decrease 1 °C or 1 °F per one
time pressing
Room temp: Indicate the current room
temperature
Set temp: Indicate the temperature that
user want to set
<
<Cooling mode>
The cooling mode doesn't work if desired
temperature is higher than room temper-
ature Please lower the desired tempera-
ture.
Whenever press button, the room tem-
perature will be displayed within 5 sec-
onds.
After 5 seconds, it turns to display the
desired temperature.
Because of location of remote controller,
the real room temperature and the this
displayed value can be different.
ENGLISH

OWNER'S INSTRUCTION
19
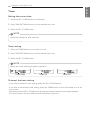
Up/down airflow direction control
The SWING (up/down) airflow can be adjusted
by using the remote controller.
1 Press the ON/OFF button to start the unit.
2 Press SWING (up/down) airflow button and
the louvers will swing up and down.
Airflow setting
NOTE
!
- Always use the remote controller to ad-
just the up/down airflow direction.
Manually moving the direction louver by
hand, could damage the air conditioner.
Celsius/fahrenheit switching
- Press the ROOM TEMP. button (5sec) to
change from celsius to fahrenheit or from
fahrenheit to celsius.
- Whenever press TEMPERATURE SETTING
button in fahrenheit mode, the temperature
will increase/drop 1 °F.
ENGLISH

20
OWNER'S INSTRUCTION
ENGLISH
Setting the current time
1 Press the SET / CLEAR button for 3 seconds.
2 Press TIME SETTING buttons until the desired time is set.
3 Press the SET / CLEAR button.
Timer setting
1 Press the TIMER button to turn timer on or off.
2 Press TIME SETTING buttons until the desired time is set.
3 Press the SET / CLEAR button.
To cancel the timer setting
- If you wish to cancel all timer setting, press the SET / CLEAR button.
- If you wish to cancel each timer setting, press the TIMER button to turn timer sleep or on or off
as you want.
And then press the SET / CLEAR button aiming the remote controller at the signal receptor.
(The timer lamp on the air conditioner and the display will go off.)
Timer
NOTE
!
Check the indicator for A.M. and P.M.
NOTE
!
Select one of the following 3 types of operation.
Timer Sleep Timer ON Timer OFF
ENGLISH

MAINTENANCE AND SERVICE
21
ENGLISH
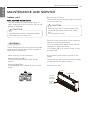
Indoor unit
Grille, case and remote control
- Turn the system off before cleanining, To
clean, wipe with a soft, dry cloth. Do not use
bleach or abrasives.
The air filters behind the front grille should be
checked and cleaned once every 2 weeks or
more often if neccessary.
- Never use any of the followings:
Water hotter than 40 °C.
Could cause deformation and/or discol-
oration.
Volatile substances.
Could damage the surfaces of the air condi-
tioner.
- Remove the air filters.
Take hold of the tab and pull slightly forward
to remove the filter.
- Clean dirt from the air filter using a vacuum
cleaner or washing with water.
If dirt is conspicuous, wash with a neutral
detergent in lukewarm water.
If hot water (40 °C or more) is used, it may
be deformed.
- After washing with water, dry well in the
shade.
Do not expose the air filter to direct sunlight
or heat from a fire when drying it.
- Install the air filter.
CAUTION
When the air filter is to be removed, do
not touch the metal parts of the indoor
unit.
It may cause an injury.
!
CAUTION
Supply power must be disconnected be-
fore cleaning the indoor unit.
!
Air filters
Air outlet vent
Air inlet
vent
(inlet grille)
Air filters
(behind
inlet grille)
Louver
B
e
n
z
e
n
e
S
C
O
U
R
I
N
C
L
B
A
R
G
E
S
I
N
N
E
R
MAINTENANCE AND SERVICE
ENGLISH

22
MAINTENANCE AND SERVICE
Do not overcool the room.
This is not good for the health
and wastes electricity.
Keep blinds or curtains closed.
Do not let direct sunshine
enter the room when the air
conditioner is in operation.
Keep the room temperature
uniform.
Adjust the vertical airflow di-
rection to ensure a uniform
temperature in the room.
Make sure that the doors
and windows are shut tight.
Avoid opening doors and win-
dows as much as possible to
keep the cool air in the room.
Clean the air filter regularly.
Blockages in the air filter re-
duce the airflow and lower
cooling and dehumidifying ef-
fects. Clean at least once
every two weeks.
Ventilate the room occasion-
ally.
Since windows are kept
closed, it is a good idea to
open them and ventilate the
room now and then.
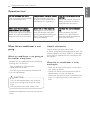
When the air conditioner is not
going....
When air conditioner is not going to
be used for a long time.
- Operate the air conditioner at the following
settings for 2 to 3 hours.
Type of operation: Fan operation
mode.(refer fan mode)
This will dry out the internal mechanisms.
- Turn off the breaker.
- Remove the batteries from the remote con-
troller.
Helpful information
The air filters and your electiric bill.
If the air filters become clogged with dust, the
cooling capacity will drop, and 6 % of the elec-
tricity used to operate the air conditioner will
be wasted.
When the air conditioner is to be
used again.
- Clean the air filter and install it in the indoor
unit. (refer air filters)
- Check that the air inlet and outlet of the in-
door/outdoor unit are not blocked.
- Check that the ground wire is connected cor-
rectly. It may be connect to the indoor unit
side.
CAUTION
Turn off the breaker when the air condi-
tioner is not going to be used for a long
time.
Dirt may collect and may cause a fire.
!
Operation tips!
ENGLISH

MAINTENANCE AND SERVICE
23
ENGLISH
Call the service immediately in the following situations
- Anything abnormal such as burning smell, loud noise etc. happen. Stop the unit and turn the
breaker off. Never try to repair by yourself or restart the system in such cases.
- Main power cord is too hot or damaged.
- Error code is generated by self diagnosis.
- Water leaks from indoor unit even if the humidity is low.
- Any switch, breaker (safety, earth) or fuse fails to work properly
User must carry routine checkup & cleaning to avoid unit’s poor performance.
In case of special situat
ion, the job must be carried out by service person only.
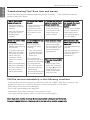
The air conditioner
does not operate.
- Have you made a
mistake in timer op-
eration?
- Has the fuse blown
or has the circuit
breaker been
tripped?
The room has a pecu-
liar odor.
- Check that this is not
a damp smell ex-
uded by the walls,
carpet, furniture or
cloth items in the
room.
It seems that conden-
sation is leaking from
the air conditioner.
- Condensation occurs
when the airflow
from the air condi-
tioner cools the
warm room air.
Air conditioner does
not operate for about
3 minutes when
restart.
- This is the protector
of the mechanism.
- Wait about three
minutes and opera-
tion will begin.
Does not cool or heat
effectively.
- Is the air filter dirty?
See air filter cleaning
instructions.
- The room may have
been very hot when
the room air condi-
tioner was first
turned on. Allow
time for it to cool
down.
- Has the temperature
been set incorrectly?
- Are the indoor unit's
air inlet or outlet
vents obstructed?
The air conditioner op-
eration is noisy.
- For a noise that
sounds like water
flowing.
* This is the sound
of freon flowing in-
side the air condi-
tioner unit.
- For a noise that
sounds like the com-
pressed air releasing
into atmosphere.
-
This is the sound of
the dehumidifying
water being
processed inside the
air conditioning unit.
Crack sound is heard.
- This sound is gener-
ated by the expan-
sion / constriction of
the front panel, etc.
due to changes of
temperature.
Remote control dis-
play is faint, or no dis-
play at all.
- Are the batteries de-
pleted?
- Are the batteries in-
serted in the oppo-
site (+) and (-)
directions?
Filter sign lamp (LED)
is ON.
- Cleaning the filter,
press the Timer but-
ton and ◀ button of
wired remote con-
troller at the same
time for 3 sec.
Troubleshooting Tips! Save time and money!
Check the following points before requesting repairs or service.... If the malfunction persist,
please contact your dealer.
ENGLISH

MANUAL DEL PROPIETARIO
Por favor lea este manual detenidamente antes de
utilizar su equipo y guárdelo para consultas futuras.
Aire acondicionado de techo
AIRE
ACONDICIONADO
www.lg.com
ESPAÑOL

2
CONSEJOS PARA AHORRAR ENERGÍA
ESPAÑOL
CONSEJOS PARA AHORRAR ENERGÍA
Aquí tiene algunos consejos que le ayudarán a minimizar el consumo de energía a la hora de uti-
lizar su aire acondicionado. Puede utilizar su aire acondicionado de un modo más eficiente sigu-
iendo las siguientes instrucciones.
Este aparato de aire acondicionado no está diseñado para ser utilizado por niños de corta edad ni
por personas disminuidas sin supervisión.
• Deberían supervisarse a los niños de corta edad para asegurarse de que no juegan con el
aparato de aire acondicionado.
• Si el cordón de alimentación es dañado, éste debe sustituirse por un cordón o ensamble espe-
cial disponible por parte del fabricante o por su agente de servicio autorizado
• Las tareas de instalación deben realizarse de acuerdo con el Código Eléctrico Nacional y sólo
puede llevarlas a cabo personal cualificado y autorizado.
ADVERTENCIA: Antes de acceder a las terminales, todos los circuitos de alimentación deben de-
sconectarse.
ADVERTENCIA: Deben incorporarse medios de desconexión a la instalación fija de acuerdo con
las reglas de instalación
ADVERTENCIA: Este aparato no es accesible al público en general
ADVERTENCIA: El aparato debe instalarse de acuerdo a las
• No mantenga la temperatura interior demasiado baja. Esto puede resultar perjudicial para su
salud y consume más energía.
• Bloquee la luz del sol con persianas o cortinas mientras cuando tenga el aire acondicionado
puesto.
• Cierre bien las puertas y ventanas cuando tenga el aire acondicionado puesto.
• Ajuste la dirección del flujo del aire vertical u horizontalmente para que circule el aire interior.
• Utilice el modo ventilador para enfriar o calentar el ambiente rápidamente durante un espacio
corto de tiempo.
• Abra las ventanas regularmente para ventilar el espacio, ya que la calidad del aire ambiente
podría deteriorarse cuando se utiliza el aire acondicionado durante muchas horas.
• Limpie el filtro de aire una vez cada dos semanas. El polvo y las impurezas acumuladas en el
filtro podrían bloquear el flujo del aire o debilitar las funciones de enfriado/deshumidificación.
PARA SUS REGISTROS
Grape su recibo a esta página en caso de que lo necesite para probar la fecha de compra o de garan-
tía efectos. Escriba aquí el número de modelo y serie:
Nº modelo :
Nº serie :
Puede encontrarlos en la etiqueta de la parte lateral de cada unidad.
Nombre del distribuidor :
Fecha de compra :
ESPAÑOL

INSTRUCCIONES DE SEGURIDAD IMPORTANTES
INSTRUCCIONES DE SEGURIDAD IMPORTANTES
LEA TODAS LAS INSTRUCCIONES DE SEGURIDAD ANTES DE UTILIZAR
EL ELECTRODOMÉSTICO.
Siga las siguientes precauciones para evitar situaciones de peligro y para garantizar el fun-
cionamiento óptimo de su producto.
ADVERTENCIA
Hacer caso omiso de estas indicaciones podría causarle graves daños e incluso la muerte.
PRECAUCIÓN
Hacer caso omiso de estas indicaciones podría causarle daños leves o averías en el producto.
ADVERTENCIA
• Las instalaciones o reparaciones llevadas a cabo por personas no cualificadas podrían suponer
un riesgo para usted y otras personas.
• El aparato debe instalarse según las normas de instalación eléctrica de cada país.
• La información contenida en el manual está dirigida a un técnico cualificado familiarizado con
medidas de seguridad y equipado con las herramientas e instrumentos de prueba adecuados.
• La lectura o el uso incorrecto de este manual puede provocar averías en el equipo, daños ma-
teriales, daños personales leves, daños personales graves y/o la muerte.
Instalación
• No utilice un interruptor automático defectuoso o de valor nominal inferior al correspondiente. Use
this appliance on a dedicated circuit. Existe riesgo de incendio o descarga eléctrica.
• Para trabajos eléctricos, póngase en contacto con el distribuidor, vendedor, técnico cualificado o
centro de asistencia técnica autorizado. No desmonte ni repare el producto usted mismo. Existe
riesgo de incendio o descarga eléctrica.
• Realice siempre la conexión del aparato a tierra. Existe riesgo de descarga eléctrica.
• Instale correctamente el panel y la cubierta de la caja de control. Existe riesgo de incendio o
descarga eléctrica.
• Instale siempre un circuito y un interruptor específico. Un cableado o instalación inadecuados
pueden causar un incendio o descargas eléctricas.
• Utilice el interruptor o fusible de valor nominal adecuado. Existe riesgo de incendio o descarga
eléctrica.
• No modifique ni utilice un prolongador en el cable de alimentación. Existe riesgo de incendio o
descarga eléctrica.
• No instale, retire ni vuelva a instalar la unidad usted mismo (cliente). Existe el riesgo de incendio,
descargas eléctricas, explosión o heridas.
• Tenga cuidado al desembalar e instalar el producto. Los bordes afilados podrían causar heridas.
Tenga un cuidado especial con los bordes de la caja y las aletas del condensador y el evaporador.
• Para la instalación, contacte con su distribuidor o con el Centro de servicio autorizado. Existe riesgo
de incendio, descarga eléctrica, explosión o lesiones.
• No instale el aparato en una superficie de instalación insegura. Pode causar lesões, acidentes ou
danificar o produto.
• Asegúrese de que el soporte de instalación no se deteriora con el tiempo. Si el soporte cae, el
aparato de aire acondicionado podría caer con él, causando daños materiales, avería del aparato, o
lesiones personales.
!
!
!
3
ESPAÑOL

4
INSTRUCCIONES DE SEGURIDAD IMPORTANTES
ESPAÑOL
• Evite que el aire acondicionado funcione durante un largo periodo de tiempo cuando la humedad
sea alta y se haya dejado abierta una ventana o puerta. La humedad puede condensarse y mojar o
dañar los muebles.
Funcionamiento
• Asegúrese de que el cable de alimentación no pueda estirarse o dañarse durante el fun-
cionamiento. Existe riesgo de incendio o descarga eléctrica.
• No coloque nada sobre el cable de alimentación. Existe riesgo de incendio o descarga eléctrica.
• No enchufe o desenchufe la clavija de alimentación para encender o apagar la unidad. Existe riesgo
de incendio o descarga eléctrica.
• No toque (utilice) el producto con las manos mojadas. Existe riesgo de incendio y descarga eléc-
trica.
• No coloque un calefactor u otros dispositivos de calor cerca del cable de alimentación. Existe
riesgo de incendio y descarga eléctrica.
• Evite que entre agua en las partes eléctricas. Podría causar fuego, averías en el producto o descar-
gas eléctricas.
• No guarde ni use, ni siquiera permita que haya gas inflamable o combustibles cerca del producto.
Existe riesgo de incendio o averías en el producto.
• No utilice el aparato en un espacio cerrado durante un periodo prolongado de tiempo. La falta de
oxígeno podría dañar su salud.
• Si hay fugas de gas, apague el gas y abra una ventana para ventilar antes de encender el aparato.
No utilice el teléfono ni encienda o apague los interruptores. Existe riesgo de explosión o incendio.
• Si el producto emite ruidos, olores o humo extraños. Apague el disyuntor o desconecte el cable de
alimentación. Existe riesgo de descargas eléctricas o incendio.
• Detenga el funcionamiento y cierre la ventana en caso de tormentas o huracanes. Si es posible, re-
tire el producto de la ventana antes de que llegue el huracán. Existe riesgo de incendio, averías en
el producto o descargas eléctricas.
• No abra la parrilla de entrada del aparato mientras esté en funcionamiento. (No toque el filtro elec-
trostático en caso de que la unidad disponga de uno.) Existe riesgo de lesiones, descargas eléctri-
cas o averías en el producto.
• Si el producto se moja (se inunda o sumerge), póngase en contacto con un Servicio técnico autor-
izado. Existe el riesgo de incendio o descargas eléctricas.
• Tenga cuidado para que no entre agua en el producto. Existe riesgo de incendio, descargas eléctri-
cas o daños en el producto.
• Ventile la sala del producto de vez en cuando mientras lo utilice con una estufa, etc... Existe el
riesgo de incendio o descargas eléctricas.
• Apague la alimentación principal al limpiar o reparar el producto. Existe riesgo de descarga eléc-
trica.
• Cuando no se vaya a usar el producto durante un largo periodo de tiempo, desenchufe el cable de
alimentación o interrumpa la alimentación con el disyuntor. Existe riesgo de daños o averías en el
producto o de un funcionamiento no deseado.
• Asegúrese de que nadie se siente o apoye sobre la unidad exterior. Podría causar lesiones o daños
en el producto.
PRECAUCIÓN
Instalación
• Este aparato ha sido diseñado para su utilización por expertos o usuarios bien preparados en tien-
das, industria de iluminación o granjas, o para uso comercial por personas no especializadas.
•
Compruebe que no haya fugas de gas (refrigerante) tras instalar o reparar el producto. Unos niveles bajos
de refrigerante podrían causar averías en el producto.
• Instale la manguera de drenaje de modo que el agua se vacíe correctamente. Una conexión defec-
tuosa podría causar fugas de agua.
!
ESPAÑOL

INSTRUCCIONES DE SEGURIDAD IMPORTANTES
•
Mantenga el equipo nivelado mientras lo instala. Para evitar las vibraciones o fugas de agua.
•
No instale el aparato donde el ruido o el aire caliente de la unidad exterior puedan molestar a los vecinos.
Podría tener problemas con los vecinos.
•
Para mover y transportar el producto son necesarias dos personas. Evitará daños personales.
•
No instale el producto en un lugar donde pueda estar expuesto al viento marino (viento salado) directa-
mente. Podría causar corrosión en el producto. La corrosión, en particular en las aletas del condensador y
el evaporador, podrían causar averías en el producto o un funcionamiento ineficaz.
Funcionamiento
• Este aparato no debe ser utilizado por personas (incluidos niños) cuyas capacidades físicas, senso-
riales o mentales estén disminuidas o que carezcan de la experiencia y conocimientos suficientes
para manejarlo, a menos que cuenten con las instrucciones o la supervisión de la persona respons-
able de su seguridad.
• No permite a los niños jugar con este aparato.
•
No exponga la piel directamente al aire frío durante largos periodos de tiempo. (No se siente en la corri-
ente de aire.) Podría dañar su salud.
•
No utilice el producto para fines especiales, como conservar comida, obras de arte, etc. Es un aire acondi-
cionado doméstico, no un sistema de refrigeración de precisión. Existe riesgo de daños o pérdidas de
propiedad.
•
No bloquee la entrada o la salida del caudal de aire. Podría causar averías en el producto.
•
Utilice un paño suave para limpiarlo. No use detergentes agresivos, disolventes, etc. Existe riesgo de
fuego, descargas eléctricas o daños en las partes de plástico del producto.
•
No toque las partes metálicas del producto al retirar el filtro de aire. Son cortantes! Existe riesgo de daños
personales.
•
No pise ni coloque nada sobre el producto. (unidades exteriores) Existe riesgo de daños personales y de
avería del producto.
•
Coloque el filtro correctamente. Limpie el filtro cada dos semanas o con mayor frecuencia si es nece-
sario. Un filtro sucio reduce la eficacia del aire acondicionado y podría causar fallos de funcionamiento o
daños.
•
No introduzca las manos ni ningún otro objeto por la entrada o la salida de aire mientras el producto esté
funcionando. Existen partes afiladas y móviles que podrían causar heridas.
•
No beba el agua de drenaje del producto. No es potable y podría causarle graves problemas de salud.
•
Use una banqueta o escalera sólida al limpiar o mantener el producto. Tenga cuidado para evitar daños
personales.
•
Cambie las pilas del controlador remoto por otras nuevas del mismo tipo. No mezcle pilas nuevas y us-
adas ni de tipos diferentes. Existe riesgo de explosión o fuego.
•
No recargue ni desmonte las pilas. No arroje las pilas al fuego. Podrían arder o explotar.
•
Si el líquido de las pilas entra en contacto con la piel o la ropa, lave la zona con abundante agua. No utilice
el controlador remoto si las pilas tienen fugas. Los productos químicos de las pilas podrían causar que-
maduras u otros riesgos para su salud.
• Si ingiere líquido de las pilas, cepíllese los dientes y acuda al médico. No utilice el controlador remoto si
las pilas tienen fugas. Los productos químicos de las pilas podrían causar quemaduras u otros riesgos
para su salud.
Baterías :
No las queme ni intente abrirlas, no las elimine con los residuos domésticos.
Proteja el medio ambiente y salud. Una vez agotadas, las se devolverán al
comercio donde se han comprado o un punto de recogida autorizado
(Conama numero 401 de 11/2008).
5
ESPAÑOL

6
ÍNDICE
ESPAÑOL
ÍNDICE
2
CONSEJOS PARA
AHORRAR ENERGÍA
3
INSTRUCCIONES DE
SEGURIDAD IMPOR-
TANTES
7
ANTES DEL USO
7 Preparación para el funcionamiento
7 Utilización
7 Limpieza y mantenimiento
7 Reparación
8
INTRODUCCIÓN AL
PRODUCTO
8 Nombre y función de las piezas
8 Lámparas indicadoras de
funcionamiento
9 Mando a distancia sin cables
11
INSTRUCCIONES DE
FUNCIONAMIENTO
11 Inserción de pilas
11 Mantenimiento del mando a distancia
inalámbrico
12
GUÍA DEL PROPIETARIO
12 Modo enfriamiento – Funcionamiento
estándar
12 Modo enfriamiento – Enfriamiento
rápido
13 Modo de calefacción
14 Modo de cambio automática
15 Operación automática
16 Operación de la deshumidificación
saludable
17 Modo Ventilador
18 Configuración de la temperatura /
Comprobación de la temperatura de la
estancia
19 Configuración del flujo de aire
19 Cambio Celsius/Fahrenheit
20 Temporizador
21
MANTENIMIENTO Y
ASISTENCIA TÉCNICA
21 Unidad interior
22 Consejos para el funcionamiento
22
Cuando el aire acondicionado no va a....
23 Consejos para la localización de
averías Ahorre tiempo y dinero
23 Llame al servicio en los siguientes
casos
ESPAÑOL

ANTES DEL USO
7
ESPAÑOL
Preparación para el funcionamiento
- Póngase en contacto con un especialista para la instalación.
- Utilice un circuito exclusivo.
Utilización
- Estar expuesto al flujo de aire directo durante un periodo largo de tiempo podría ser peligroso
para su salud. No exponga a los ocupantes, las mascotas o las plantas al flujo de aire directo du-
rante largos periodos de tiempo.
- Debido a la posibilidad de la deficiencia de oxígeno, ventile la habitación cuando use el equipo
junto a estufas u otros dispositivos de calefacción.
- No use este ventilador para fines especiales para los que no está diseñado (por ejemplo, la con-
servación de dispositivos de precisión, alimentación, mascotas, plantas u objetos de aire). Un
uso así podría dañar los artículos.
Limpieza y mantenimiento
- Nunca toque las partes metálicas de la unidad al retirar el filtro. Al manipular bordes de metal afi-
lados podrían causarle heridas.
- No use agua para limpiar el interior del ventilador. La exposición al agua puede destruir el ais-
lante y derivar en descargas eléctricas.
- Al limpiar la unidad, primero asegúrese de que la alimentación está desconectada y el interrup-
tor está apagado. El ventilador gira a gran velocidad durante el funcionamiento. Podría sufrir le-
siones si se activa accidentalmente la unidad mientras se limpian las partes internas.
Reparación
Para reparaciones y mantenimiento, póngase en contacto con un servicio técnico autorizado.
ANTES DEL USO
ESPAÑOL

8
INTRODUCCIÓN AL PRODUCTO
ESPAÑOL
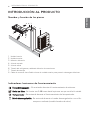
Nombre y función de las piezas
1 Unidad interior
2 Unidad exterior
3 Mando a distancia
4 Aire de entrada
5 Aire de salida
6 Tubería del refrigerante, cableado eléctrico de conexiones
7 Tubería de drenaje
8 Cable de toma de tierra Cable a tierra de unidad exterior para prevenir descargas eléctricas.
INTRODUCCIÓN AL PRODUCTO
1
3
4
6
5
4
7
2
8
Indicadores luminosos de funcionamiento
E
Encendido/apagado
: Se enciende durante el funcionamiento de sistema.
Señal del filtro
:
Se ilumina tras 2 400 horas desde la primera vez que se utilizó la unidad.
Temporizador
: Se enciende durante el funcionamiento del temporizador.
Modo descongelación
: Se enciende durante el modo descongelación o en el Ar-
ranque en caliente (modelo bomba de calor)
ESPAÑOL

INTRODUCCIÓN AL PRODUCTO
9
ESPAÑOL
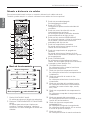
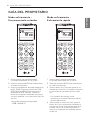
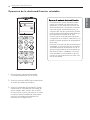
Mando a distancia sin cables
Este aire acondicionado incluye un mando a distancia sin cables de serie.
También puede adquirir un mando a distancia con cables de forma opcional.
3
Botón de encendido/apagado
Enciende/apaga la unidad.
4
Botón JET COOL
Refrigeración rápida con alta velocidad del
ventilador.
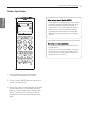
5
Botón de control de dirección de aire
izquierda/derecha (opcional)
Se utiliza para ajustar la dirección deseada
(izquierda/derecha) del flujo de aire.
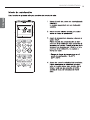
6
Botón de flujo de aire ARRIBA/ABAJO
Se utiliza para detener o iniciar el movimiento
de las aletas y seleccionar la dirección
arriba/abajo del flujo de aire.
7
Botón de temporizador encendido
Se puede seleccionar el tiempo de final-
ización del funcionamiento.
8
Botón de temporizador de apagado au-
tomático
Se puede seleccionar el tiempo de final-
ización del funcionamiento. (referirse a Ajuste
del temporizador)
9
Botón PLASMA (inútil)
Se utiliza para configurar/borrar el tempo-
rizador. Se utiliza para ajustar la hora actual (si
la entrada se hace durante 3 s).
10
PLASMA Button (inútil)
Se utiliza para iniciar o parar la función de
purificación de plasma.
11
Botón de ajuste de temperatura interior
Se utiliza para seleccionar la temperatura de
la habitación.
12
Botón de selección de modo de fun-
cionamiento
Se utiliza para seleccionar el modo de fun-
cionamiento.
13
Botón de velocidad del ventilador interior
Se utiliza para seleccionar la velocidad del
ventilador en cuatro niveles: bajo, medio,
alto y caos.
14
Botón de comprobación de temperatura in-
terior
Se utiliza para comprobar la temperatura de
la habitación.
15
Botón de apagado del temporizador
Se utiliza para seleccionar el tiempo de final-
ización del funcionamiento.
16
Botón de ajuste de temporizador
(arriba/abajo)/Luz
Se utiliza para configurar el temporizador.
Se utiliza para ajustar el brillo. (Si no está en
el modo de ajuste de tiempo)
17
Botón de reinicio
Se utiliza para reiniciar el mando a distancia.
1
Botón VANE ANGLE (inútil)
Se utiliza para ajustar el ángulo de cada aleta.
2
Botón de CONFIGURACIÓN DE FUNCIONES
(inútil)
Se utilizar para seleccionar Limpieza au-
tomática, Limpieza inteligente, calefactor
electrónico o Control de ángulo de aletas indi-
viduales.
3
4
6
8
9
5
7
14
15
17
16
10
12
13
11
2
1
Modo de refrigeración
Modo automático o cambio automático
Modo de deshumidificación
Modo de calefacción
Modo de ventilador
Modo de refrigeración ( ), modelo de bomba de calor ( )
Modo de funcionamiento
ESPAÑOL

10
INTRODUCCIÓN AL PRODUCTO
NOTA
!
* El mando a distancia sin cables no permite activar el modo remolino (4 vías)
* Para más detalles, consulte el Manual de accesorios del mando a distancia sin cables.
* El producto real puede diferir de la imagen superior según el tipo de modelo.
PRECAUCIÓN
!
Al manejar el mando a distancia
- Apunte al receptor de la señal en el mando a distancia con cables para que funcione.
- La señal del mando a distancia puede recibirse a una distancia de unos 7 metros.
- Asegúrese de que no hay obstrucciones entre el mando a distancia y el receptor de la señal.
- No deje caer ni lance el mando a distancia.
- No coloque el mando a distancia en un lugar expuesto a la luz solar directa, o cerca de la
unidad de calefacción, o cerca de otra fuente de calor.
- Si al receptor de señal le llega una luz intensa, bloquéela con una cortina, por ejemplo, para
evitar un funcionamiento anormal. (ex: inicio rápido electrónico, ELBA, lámpara fluorescente
de tipo invertido)
ESPAÑOL

ESPAÑOL
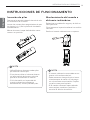
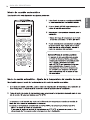
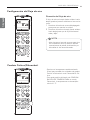
Inserción de pilas
Desmonte la tapa de la batería tirando de ella
en la dirección de la flecha.
Inserte las nuevas pilas asegurándose de que
los signos (+) y (-) de la pila están instalados
correctamente.
Monte de nuevo la tapa deslizándola nueva-
mente a su posición.
Mantenimiento del mando a
distancia inalámbrico
Seleccione una ubicación segura y de fácil ac-
ceso para éste.
Fije el soporte a la pared mediante los tornillos
incluidos.
Deslice el mando a distancia en su soporte.
INSTRUCCIONES DE FUNCIONAMIENTO
NOTA
!
- Utilice/Sustituya siempre ambas pilas
por otras del mismo tipo.
- Si no piensa utilizar el sistema durante
un largo período de tiempo, retire las
pilas a fin de extender su vida útil.
- Si la información en la pantalla del
mando a distancia comenzara a
desvanecerse, sustituya ambas pilas.
NOTA
!
- El mando a distancia nunca debe ser ex-
puesto a la luz directa del sol.
- Debe mantener siempre limpio el trans-
misor/receptor de señal a fin de asegu-
rar una correcta comunicación. Emplee
un paño suave para limpiarlo.
- Si el mando a distancia opera además
otros equipos, cambie su posición o
consulte al técnico de servicio.
INTRODUCCIÓN AL PRODUCTO
11
ESPAÑOL

ESPAÑOL
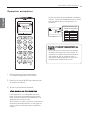
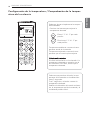
Modo enfriamiento -
Funcionamiento estándar
1 Pulse el botón de arranque/parada.
La unidad responderá con un pitido.
2 Presione el botón MODE para seleccionar
el modo enfriamiento.
3 Ajuste la temperatura deseada mediante el
botón TEMP. Presione el botón de TEM-
PERATURA AMBIENTE para verificar la
temperatura de la estancia. Cuando el
ajuste de temperatura deseada sea mayor
a la de la estancia, no se activará el flujo de
aire frío.
- Rango de temperatura disponible :
18-30 °C(64-86 °F)
Modo enfriamiento -
Enfriamiento rápido
1 Pulse el botón de arranque/parada.
La unidad responderá con un pitido.
2 Presione el botón MODE para seleccionar
el modo enfriamiento.
3 Pulse el botón Jet Cool para operar la ve-
locidad del modo frío y la unidad funcionará
en velocidad de ventilador alta en modo
frío.
- Los modelos de montaje mural
mantienen el modo enfriamiento rápido
durante 30 minutos.
4 Para cancelar el modo Jet Cool, pulse el
botón Jet Cool o el botón del ventilador o
el botón de ajuste de la temperatura de la
sala de nuevo y la unidad se pondrá en
marcha en velocidad de ventilador alta en
modo frío.
GUÍA DEL PROPIETARIO
12
GUÍA DEL PROPIETARIO
ESPAÑOL

GUÍA DEL PROPIETARIO
13
ESPAÑOL

14
GUÍA DEL PROPIETARIO
ESPAÑOL

GUÍA DEL PROPIETARIO
15
ESPAÑOL
Operación automática
1 Pulse el botón de arranque/parada.
La unidad responderá con un pitido.
2 Presione el botón MODE para seleccionar
el modo automático.
3 Ajuste la temperatura deseada.
<Para modelos con función de frío>
La temperatura y la velocidad del venti-
lador se ajustan automáticamente medi-
ante controles electrónicos basados en la
temperatura real de la sala.
Si sintiera frío o calor, presione los botones
de ajuste de temperatura a fin de lograr el-
evar o reducir la temperatura, respectiva-
mente.
Puede controlar la velocidad del ventilador
interior. Ya ha sido establecida por el proto-
colo del Modo de funcionamiento au-
tomático.
Code Feel
2 Cold
1 Slightly cool
0 Neutral
-1 Slightly warm
-2 Warm
❈ Please select the code
depend on your feeling.
Durante el modo de funcionamiento au-
tomático
- Si el sistema no funciona como desea,
cambie manualmente a otro modo. El
sistema no cambiará automáticamente
del modo de frío al modo de calor, o
viceversa. Deberá ajustar el modo y la
temperatura deseada de nuevo.
ESPAÑOL

16
ESPAÑOL
GUÍA DEL PROPIETARIO
Operación de la deshumidificación saludable
1 Pulse el botón de arranque/parada.
La unidad responderá con un pitido.
2 Presione el botón MODE para seleccionar
el modo de cambio automático.
3 Ajuste la velocidad del ventilador. Puede
seleccionar la velocidad del ventilador en
cuatro etapas: baja, medio, alta y AUTO.
En este modo, el aire sopla como si fuese
una brisa natural cambiando automática-
mente la velocidad del ventilador de
acuerdo con la lógica AUTO.
Durante el modo de deshumidificación
- Si selecciona el modo de deshumidifi-
cación en el botón de selección de la
operación, el A/C arranca la función de
deshumidificación, ajustando la temper-
atura de la sala automáticamente y el
volumen del aire de la condición óptima
para la deshumidificación basándose en
la temperatura tomada de la sala.
En este caso, la temperatura de ajuste
no aparece en el mando a distancia y no
podrá controlar tampoco la temperatura
de la sala.
- Durante la función de deshumidificación
saludable, el volumen del aire se ajusta
automáticamente de acuerdo con el al-
goritmo respondiendo a la temperatura
actual de la sala y establece una condi-
ción saludable y confortable en la sala
incluso en las estaciones con altos nive-
les de humedad.
ESPAÑOL

17
ESPAÑOL
GUÍA DEL PROPIETARIO
Modo Ventilador
1 Pulse el botón de arranque/parada.
La unidad responderá con un pitido.
2 Pulse el botón MODE para seleccionar el
modo Fan (Ventilador).
3 Ajuste de nuevo la velocidad del ventilador.
Puede seleccionar la velocidad del venti-
lador en cuatro etapas: baja, medio, alta y
AUTO. Cada vez que se pulse el botón,
cambiará el modo de velocidad del venti-
lador.
Aire natural con la lógica AUTO
- Para obtener una sensación más fresca,
pulse el selector de velocidad del venti-
lador de la unidad interior y ajuste el
modo AUTO. En este modo, el aire so-
plará como si fuese una brisa natural
cambiando naturalmente la velocidad
del ventilador de acuerdo con la lógica
AUTO.
Durante el modo ventilador
- El compresor exterior no estará en fun-
cionamiento.
Existe una función para hacer circular el
aire interior mientras se extrae el aire
que no tiene mucha diferencia de tem-
peratura con el interior.
ESPAÑOL

18
ESPAÑOL
GUÍA DEL PROPIETARIO
Configuración de la temperatura / Comprobación de la temper-
atura de la estancia
Podemos ajustar simplemente la temper-
atura deseada
- Presione los botones para ajustar la
temperatura deseada
: Eleva 1 °C ó 1 °F por cada
presión
: Disminuye 1 °C ó 1 °F por
cada presión
Temperatura ambiente: muestra la tem-
peratura actual de la estancia
Temperatura ajustada: muestra la tem-
peratura que el usuario quiere ajustar
<
<Modo enfriamiento>
El modo enfriamiento no funcionará si la
temperatura deseada es superior que la
de la estancia. Por favor, disminuya la
temperatura deseada.
Cada vez que presione el botón, la tem-
peratura de la estancia se visualizará du-
rante 5 segundos.
Tras 5 segundos, volverá a mostrar la
temperatura deseada.
Debido a la ubicación del mando a distan-
cia, la temperatura real de la estancia y la
visualizada podrían diferir.
ESPAÑOL

19
ESPAÑOL
GUÍA DEL PROPIETARIO
Dirección del flujo de aire
El flujo de aire columpio (hacia arriba o hacia
abajo) puede ajustarse mediante el control re-
moto.
1 Presione el botón de encendido/apagado
para poner en marcha la unidad.
2 Presione el botón columpio (hacia arriba o
hacia abajo) para que la rejilla horizontal
suba y baje.
Configuración del flujo de aire
NOTA
!
- Use siempre el control remoto para ajus-
tar la dirección del flujo de aire. Mover
manualmente la paleta de dirección po-
dría dañar el aire acondicionado.
Cambio Celsius/Fahrenheit
- Presione el temperatura ambiente botón
(5sec) para cambiar las unidades de grados
Celsius a Fahrenheit o de Fahrenheit a Cel-
sius.
- Con cada presión del botón de CONFIGU-
RACIÓN DE TEMPERATURA en modo
Fahrenheit, la temperatura se elevará/dis-
minuirá 1 °F.
ESPAÑOL

20
GUÍA DEL PROPIETARIO
ESPAÑOL
Configuración de la hora actual
1 Presione el botón SET / CLEAR durante 3 segundos.
2 Presione los botones de CONFIGURACIÓN HORARIA hasta establecer la hora deseada.
3 Presione el botón SET / CLEAR.
Ajuste del temporizador
1 Presione el botón TEMPORIZADOR para encenderlo o apagarlo.
2 Presione los botones de CONFIGURACIÓN HORARIA hasta establecer la hora deseada.
3 Presione el botón SET / CLEAR.
Cancelación de ajuste del temporizador
- Si desea cancelar todos los ajustes del temporizador, presione el botón SET / CLEAR.
- Si desea cancelar ajustes individuales del temporizador, presione el botón
TEMPORIZADOR para encender o apagar el temporizador de reposo,
como desee. A continuación presione el botón SET / CLEAR apuntando
al receptor de señal con el mando a distancia.
(Se apagará la luz del temporizador del aire acondicionado y la pantalla.)
Temporizador
NOTA
!
Compruebe el indicador de A.M. y P.M.
NOTA
!
Seleccione uno de los siguientes 3 tipos de funcionamiento.
Dormir Temporizador
Activar Temporizador
Desactivar Temporizador
ESPAÑOL

MANTENIMIENTO Y ASISTENCIA TÉCNICA
21
Unidad interior
Parilla, carcasa y mando a distancia
- Apague el sistema antes de limpiar. Para
limpiar, utilice un paño suave y seco. No util-
ice lejía ni productos abrasivos.
Los filtros del aire de detrás de la parrilla
frontal deberían verificarse y limpiarse una vez
cada 2 semanas o más
frecuentemente si es necesario.
- No utilice nunca nada de lo siguiente:
Agua más caliente de 40 °C
Podría deformar y/o decolorar.
Substancias volátiles.
Podrían dañarse las
superficies del aire
acondicionado.
- Saque los filtros de aire.
Tome la pestaña y jale de ella hacia adelante
para extraer el filtro.
- Limpie la suciedad del filtro del aire medi-
ante una aspiradora o lavándolo con agua.
Si queda suciedad oculta, lave con deter-
gente neutro en agua tibia
Si se usa agua caliente (40 °C o más), podría
deformarse el aparato.
- Después de lavar con agua, séquelo bien a la
sombra.
No exponga el filtro del aire a la luz solar di-
recta o al calor de un fuego para secarlo.
- Instale el filtro de aire.
MANTENIMIENTO Y ASISTENCIA TÉCNICA
PRECAUCIÓN
Cuando haya que retirar el filtro del aire,
no toque las partes metálicas de la unidad
interior.
Podría ocasionar daños.
!
PRECAUCIÓN
La alimentación debe estar desconectada
antes de limpiar la unidad interior.
!
Filtros de aire
Persiana
Salida de aire
Entrada
de aire
Filtro
de aire
B
e
n
z
e
n
e
S
C
O
U
R
I
N
C
L
B
A
R
G
E
S
I
N
N
E
R
ESPAÑOL

22
MANTENIMIENTO Y ASISTENCIA TÉCNICA
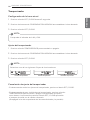
Cuando el aire acondicionado
no va a....
Si el aire acondicionado no se va a
utilizar durante un período prolon-
gado de tiempo.
- Utilice el aire acondicionado con los sigu-
ientes ajustes durante 2 ó 3 horas.
Tipo de función: Modo de funcionamiento
del ventilador. (consulte la modo ventilador )
Así se secarán los mecanismos internos.
-Apague el interruptor.
-Saque las pilas del mando a distancia.
Información útil
Filtros de aire y factura de luz
Si los filtros de aire se atascan con polvo, la
capacidad de refrigeración descenderá y se
perderá el 6 % de la luz utilizada para hacer
funcionar el aire acondicionado.
Cuando vuelva a utilizar el aire
acondicionado.
- Limpie el filtro de aire e instálelo en la unidad
interior. (Consulte la filtros de aire).
- Compruebe que la entrada y salida de aire de
la unidad interior/exterior no están blo-
queadas.
- Compruebe que el cable de toma de tierra
está correctamente conectado. Puede estar
conectado a la unidad interior.
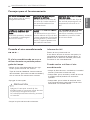
No enfríe demasiado la sala.
No es bueno para la salud y
malgasta electricidad.
Mantenga cerradas las per-
sianas y las cortinas.
No deje que la luz directa del
sol entre en la sala cuando el
aire acondicionado esté en
funcionamiento.
Mantenga uniforme la temper-
atura de la sala.
Ajuste la dirección del flujo de
aire vertical para asegurar una
temperatura uniforme en la
sala.
Asegúrese de que las puertas
y ventanas están bien cer-
radas.
Evite abrir puertas y ventanas
si es posible y mantenga el
aire frío en la sala.
Limpie el filtro de aire regular-
mente.
Las obstrucciones en el filtro
de aire reducen el flujo de aire
y hacen descender los efectos
de refrigeración y deshumidifi-
cación. Limpie el aparato una
vez cada dos semanas.
Ventile ocasionalmente la sala.
Dado que las ventanas se
mantienen cerradas, es buena
idea abrirlas y ventilar la sala
de vez en cuando.
Consejos para el funcionamiento
PRECAUCIÓN
Apague el interruptor cuando el aire
acondicionado no se vaya a utilizar durante
un período prolongado de tiempo.
La suciedad puede acumularse y provocar
un incendio.
!
ESPAÑOL

MANTENIMIENTO Y ASISTENCIA TÉCNICA
23
ESPAÑOL
Llame al servicio en los siguientes casos
- Se da un problema extraño, como un olor a quemado, un sonido muy fuerte, etc.
Apague la unidad y desactive el interruptor. No intente reparar usted mismo o reiniciar el sis-
tema en estos casos.
- El cable de la electricidad está demasiado caliente o está dañado.
- El código de error se genera por el autodiagnóstico.
- Hay escapes de agua desde la unidad interior aunque la humedad es baja.
- Los interruptores, interruptores automáticos (seguridad, tierra) o el fusible dejan de funcionar
correctamente.
El usuario debe llevar a cabo comprobaciones y limpieza de rutina para evitar un rendimiento defectuoso.
En una situación especial, sólo personal de servicio puede llevar a cabo los trabajos de reparación.
Especificaciones de alimentación : 220 V~ 60 Hz al ser un manual multimodelo, le sugerimos que
observe el consumo de su equipo en la etiqueta adherida a él.
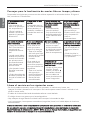
El aire acondicionado
no funciona.
- ¿Ha cometido un
fallo en la operación
del temporizador?
- ¿Se ha fundido el
fusible o se ha dis-
parado el interruptor
diferencial?
La sala tiene un olor
peculiar.
- Compruebe que no
se trata de humedad
de las paredes, al-
fombras, muebles o
prendas de vestir en
la sala.
Parece que hay una
fuga de condensación
en el aire acondi-
cionado.
- La condensación
ocurre cuando el
flujo de aire del aire
acondicionado enfría
el aire caliente de la
sala.
El aire acondicionado
no funciona unos 3
minutos después de
reiniciarlo.
- Éste es el protector
del mecanismo.
-
Espere unos 3 minu-
tos y el aparato ini-
ciará su
funcionamiento.
No enfría ni calienta
con efectividad.
- ¿Está sucio el filtro de
aire? Consulte las in-
strucciones de
limpieza del filtro de
aire.
- La sala puede haber
estado muy caliente
cuando se encendió
por primera vez el
aire acondicionado.
Deje tiempo para
que se enfríe.
- ¿Ha ajustado la tem-
peratura incorrecta-
mente?
- ¿Están obstruidas las
entradas y salidas de
aire de la unidad inte-
rior?
El aire acondicionado
hace mucho ruido.
- Si se trata de un
ruido que suena
como flujo de agua.
* Éste es el sonido
del freón que fluye
dentro de la unidad
de aire acondi-
cionado.
- Si se trata de un
ruido que suena
como aire comprim-
ido que se libera a la
atmósfera.
* Éste es el sonido
del agua de la
deshumidificación
que se procesa
dentro del aire
acondicionado.
Se oyen crujidos.
- Este sonido se gen-
era por la expan-
sión/contracción de
la parrilla de entrada,
etc. debido a cam-
bios de temperatura.
La pantalla del mando
a distancia no es clara,
o no hay visualización.
- ¿Se ha disparado el
interruptor diferen-
cial?
- ¿Están las pilas in-
sertadas en polos (+)
y (-) opuestos?
El indicador de
señales del filtro (LED)
está activado.
- Limpie el filtro, pulse
el botón Tempo-
rizador y el botón ◀
del mando a distan-
cia con cables de
forma simultánea du-
rante 3 segundos.
Consejos para la localización de averías Ahorre tiempo y dinero
Compruebe los siguientes puntos antes de solicitar reparación o asistencia técnica. Si sigue el
fallo, consulte a su distribuidor.
ESPAÑOL

-
 1
1
-
 2
2
-
 3
3
-
 4
4
-
 5
5
-
 6
6
-
 7
7
-
 8
8
-
 9
9
-
 10
10
-
 11
11
-
 12
12
-
 13
13
-
 14
14
-
 15
15
-
 16
16
-
 17
17
-
 18
18
-
 19
19
-
 20
20
-
 21
21
-
 22
22
-
 23
23
-
 24
24
-
 25
25
-
 26
26
-
 27
27
-
 28
28
-
 29
29
-
 30
30
-
 31
31
-
 32
32
-
 33
33
-
 34
34
-
 35
35
-
 36
36
-
 37
37
-
 38
38
-
 39
39
-
 40
40
-
 41
41
-
 42
42
-
 43
43
-
 44
44
-
 45
45
-
 46
46
-
 47
47


LG AVNW36GM1S0.ANWTLAR El manual del propietario
- Categoría
- Acondicionadores de aire móviles
- Tipo
- El manual del propietario
- Este manual también es adecuado para