
ENGLISH
LG
Multi
Air Conditioner
OWNER'S MANUAL
LG
Visit us at http://www.lgservice.com
IMPORTANT
• Please read this owner's manual carefully and thoroughly
before installing and operating your room air conditioner.
• Please retain this owner's manual for future reference after
reading it thoroughly.
Dear Owner
Thank you for installing LG air conditioner.
Your best choice guarantees you a great
performance and service to make your life
comfortable & pleasant.
ESPAÑOL

2
TABLE OF CONTENTS
FOR YOUR RECORDS
Write the model and serial numbers here:
Model #
Serial #
You can find them on a label on the side of each unit.
Dealer's Name
Date Purchased
Staple your receipt to this page in the event you need
it to prove date of purchase or for warranty issues.
READ THIS MANUAL
Inside you will find many helpful hints on how to use
and maintain your air conditioner properly. Just a little
preventive care on your part can save you a great deal
of time and money over the life of your air conditioner.
You'll find many answers to common problems in the
chart of troubleshooting tips. If you review our chart of
Troubleshooting Tips first, you may not need to call
for service at all.
PRECAUTION
• Contact the authorized service technician for
repair or maintenance of this unit.
• Contact the installer for installation of this unit.
• The air conditioner is not intended for use by
young children or invalids without supervision.
• Young children should be supervised to ensure
that they do not play with the air conditioner.
• When the power cord is to be replaced,
replacement work shall be performed by
authorized personnel only using only genuine
replacement parts.
A. Safety Precautions ..............................3
B. Electrical Safety...................................8
Temporary Use of an Adapter ...............8
Temporary Use of an Extension Cord ...8
Symbols used in this Manual.................8
C. Product Introduction...........................9
Indoor Units ...........................................9
Operation Indication Lamps ..................9
D. Operating Instructions......................10
How to insert the Batteries ..................10
Wireless Remote Controller Maintenance...10
Operating Method................................10
Wireless Remote Controller.................11
Operation Mode...................................12
Healthy Dehumidification Operation....13
Auto Operation ....................................13
Auto Clean...........................................13
Jet Cool/Heat Operation......................14
Display Luminosity (Optional) -
Art Cool Mirror Type ............................14
PLASMA Purification Operation (Optional) ..14
Forced operation .................................15
Sleep Mode .........................................16
Setting the Current Time .....................16
Timer Setting .......................................16
Vertical / Horizontal Airflow
Direction Control (Optional).................17
Air Circulation Mode ............................18
Auto Restart Function..........................18
E. Maintenance and Service..................19
Indoor Unit...........................................19
Outdoor Unit ........................................21
Operation Tips!....................................21
Self-Diagnosis Function ......................21
Troubleshooting Tips! Save time
and money!..........................................22
Call the service immediately in the
following situations ..............................22
Multi Type Air Conditioner
Multi Type Air Conditioner Owner’s Manual

Owner's Manual 3
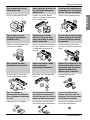
Safety Precautions
ENGLISH
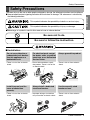
Safety Precautions
To prevent injury to the user or other people and property damage, the following instructions must be followed.
■ Incorrect operation due to ignoring instruction will cause harm or damage. The seriousness is classified by
the following indications.
■ Meanings of symbols used in this manual are as shown below.
This symbol indicates the possibility of death or serious injury.
This symbol indicates the possibility of injury or damage.
Be sure not to do.
Be sure to follow the instruction.
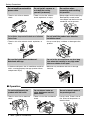
■ Installation
Do not use a defective or
underrated circuit breaker.
Use this appliance on a
dedicated circuit.
• There is risk of fire or electric
shock.
For electrical work, contact
the dealer, seller, a qualified
electrician, or an Authorized
Service Center.
• Do not disassemble or repair
the product. There is risk of fire
or electric shock.
Always ground the product.
• There is risk of fire or electric
shock.
Install the panel and the
cover of control box
securely.
• There is risk of fire or electric
shock.
Always install a dedicated
circuit and breaker.
• Improper wiring or installation
may cause fire or electric shock
Use the correctly rated
breaker or fuse.
• There is risk of fire or electric
shock.

Safety Precautions
Do not modify or extend the
power cable.
• There is risk of fire or electric
shock.
Do not install, remove, or
re-install the unit by
yourself (customer).
• There is risk of fire, electric
shock, explosion, or injury.
Be cautious when
unpacking and installing
the product.
• Sharp edges could cause injury.
Be especially careful of the
case edges and the fins on the
condenser and evaporator.
For installation, always contact the dealer or an Authorized
Service Center.
• There is risk of fire, electric shock, explosion, or
injury.
Do not install the product on a defective
installation stand.
• It may cause injury, accident, or damage to the
product.
Be sure the installation area does not
deteriorate with age.
• If the base collapses, the air conditioner could fall
with it, causing property damage, product failure,
and personal injury.
Do not let the air conditioner run for a long
time when the humidity is very high and a
door or a window is left open.
• Moisture may condense and wet or damage
furniture.
■ Operation
Do not touch(operate) the
product with wet hands.
• There is risk of fire or electrical
shock.
Do not place a heater or
other appliances near the
power cable.
• There is risk of fire and electric
shock.
Do not let electric parts of
the product get wet.
• It may cause There is risk of
fire, failure of the product, or
electric shock.
Multi Type Air Conditioner4

Owner's Manual 5
Safety Precautions
ENGLISH
Be cautious that water could not enter the
product.
• There is risk of fire, electric shock, or product
damage.
Turn the main power off when cleaning or
maintaining the product.
• There is risk of electric shock.
Gasolin
Do not store or use flammable
gas or combustibles near the
product.
• There is risk of fire or failure of
product.
If strange sounds, or small or
smoke comes from product. Turn
the breaker off or disconnect the
power supply cable.
• There is risk of electric shock or
fire.
When the product is soaked
(flooded or submerged),
contact an Authorized
Service Center.
• There is risk of fire or electric
shock.
When the product is not be used for a long
time, disconnect the power supply plug or
turn off the breaker.
• There is risk of product damage or failure, or
unintended operation.
Take care to ensure that nobody could step
on or fall onto the outdoor unit.
• This could result in personal injury and product
damage.

Safety Precautions
■ Installation
■ Operation
Always check for gas
(refrigerant) leakage after
installation or repair of product.
• Low refrigerant levels may
cause failure of product.
Install the drain hose to ensure
that water is drained away
properly.
• A bad connection may cause
water leakage.
Keep level even when
installing the product.
• To avoid vibration.
Do not install the product
where the noise or hot air from
the outdoor unit could be
offensive to the neighborhoods
or damage property.
• It may cause a problem for your
neighbors.
Use two or more people to
lift and transport the
product.
• Avoid personal injury.
Do not install the product
where it will be exposed to
sea wind (salt spray)
directly.
• It may cause corrosion on the
product. Corrosion, particularly on
the condenser and evaporator
fins, could cause product
malfunction or inefficient
operation.
90°
Do not expose the skin directly to cool air
for long periods of time.
(Don't sit in the draft.)
• This could harm to your health.
Do not use the product for special purposes,
such as preserving foods, works of art, etc.
It is a consumer air conditioner, not a
precision refrigeration system.
• There is risk of damage or loss of property.
Multi Type Air Conditioner6

Owner's Manual 7
Safety Precautions
ENGLISH
Do not block the inlet or
outlet of air flow.
• It may cause product failure.
Use a soft cloth to clean. Do
not use harsh detergents,
solvents, etc.
• There is risk of fire, electric
shock, or damage to the plastic
parts of the product.
Do not touch the metal parts of
the product when removing the
air filter. They are very sharp!
• There is risk of personal injury.
Wax
Thinner
Do not step on or put
anyting on the product.
(outdoor units)
• There is risk of personal injury
and failure of product.
Always insert the filter
securely. Clean the filter
every two weeks or more
often if necessary.
•
A dirty filter reduces the efficiency
of the air conditioner and could
cause product malfunction or
damage.
Do not insert hands or other
objects through the air inlet
or outlet while the product
is operated.
• There are sharp and moving
parts that could cause personal
injury.
Do not drink the water
drained from the product.
• It is not sanitary and could
cause serious health issues.
Use a firm stool or ladder
when cleaning or
maintaining the product.
• Be careful and avoid personal
injury.
Replace the all batteries in the
remote control with new ones
of the same type. Do not mix
old and new batteries or
different types of batteries.
• Could adversley effect
operation.
Do not recharge or
disassemble the batteries.
Do not dispose of batteries
in a fire.
• They may burn or explode.
If the liquid from the batteries gets
onto your skin or clothes, wash it
well with clean water. Do not use the
remote if the batteries have leaked.
•
The chemicals in batteries could
cause burns or other health hazards.
If you eat the liquid from the
batteries, brush your teeth and
see doctor. Do not use the remote
if the batteries have leaked.
•
The chemicals in batteries could cause
burns or other health hazards.

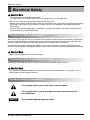
Electrical Safety
Electrical Safety
• This appliance must be properly grounded.
To minimize the risk of electric shock, you must alway plug into a grounded oulet.
• Do not cut or remove the grounding prong from the power plug.
• Attaching the adapter ground terminal to the wall receptacle cover screw does not ground the appliance
unless the cover screw is metal and not insulated, and the wall receptacle is grounded through the
house wiring.
• If you have any doubt whether the air conditioner is properly grounded, have the wall receptacle and
circuit checked by a qualified electrician.
We strongly discourage the use of an adapter due to potential safety hazards. For temporary connections,
use only a genuine adapter, available from most local hardware stores. Ensure that the large slot in the
adapter is aligned with the large slot in the receptacle for a proper polarity connection.
To disconnect the power cord from the adapter, use one hand on each to avoid damaging the ground
terminal. Avoid frequently unplugging the power cord as this can lead to eventual ground terminal damage.
• Never use the appliance with a broken adapter.
We strongly discourage the use of an extension cord due to potential safety hazards.
Temporary Use of an Adapter
Temporary Use of an Extension Cord
This symbol alerts you to the risk of electric shock.
This symbol alerts you to hazards that may cause harm to the
air conditioner.
This symbol indicates special notes.
NOTE
Symbols used in this Manual
This appliance should be installed in accordance with national wiring regulations. This guide acts as a
guide to help to explain product features.
Multi Type Air Conditioner8

ENGLISH
Owner's Manual 9
Here is a brief introduction of the indoor and outdoor units. Please see the information specific to your
indoor unit type.
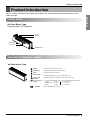
Product Introduction
Product Introduction
Art Cool Mirror Type
Display panel LCD indicators
Front panel
Air discharge
ON/OFF button
Air inlet
Air filter
Indoor Units
Defrost mode
: Lights up during defrost mode. (Heat Pump model only)
: Lights up during the system operation.
Sleep Mode : Lights up during Sleep Mode Auto operation.
Timer : Lights up during Timer operation.
Outdoor unit
operation
: Lights up during outdoor unit operation.
(Cooling model only)
On/Off
: For cooling,dehumidification, heating, modes it display Destired temperature
• Cooling : 18~30°C • AI : Auto Operation
• Dehumidification : 18~30°C • Po : Jet Cool
• Heating : 16~30°C • Lo : Test Mode
PLASMA
: Indicate PLASMA purifier operation.
Desire temperature
indicator
Art Cool mirror Type
Operation Indication Lamps

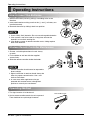
Operating Instructions
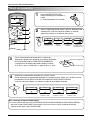
How to insert the Batteries
Wireless Remote Controller Maintenance
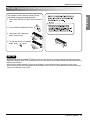
1. Remove the battery cover by pulling it according to the arrow
direction.
2. Insert new batteries making sure that the (+) and (-) of battery are
installed correctly.
3. Reattach the cover by sliding it back into position.
1. Use 2 AAA(1.5volt) batteries. Do not use rechargeable batteries.
2. If the system is not to be used for a long time, remove the
batteries to save their working life.
3. If the display screen of remote controller starts, fading replace
both of the batteries.
NOTE
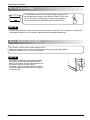
1. Choose a suitable place where its safe & easy
to reach.
2. Fix the holder to wall etc with the supplied
screws firmly.
3. Slide the remote controller inside the holder.
1. Remote controller should never be exposed to
direct sunlight.
2. Signal transmitter & receiver should always be
clean for proper communication. Use a soft
cloth to clean them.
3. In case some other appliances also get
operated with remote control, change their
position or consult your serviceman.
1. The signal receiver is inside the unit.
2.
Aim the remote controller towards the unit to operate it.
There should not be any blockage in between.
NOTE
Operating Instructions
Artcool Mirror Type
Operating Method
Multi Type Air Conditioner10

ENGLISH
Owner's Manual 11
ON
OFF
CANCEL
SET
1
3
5
4
9
10
12
14
7
2
8
13
1
11
6
Cooling Operation
Auto Operation
Healthy Dehumidification Operation
• Cooling Model( ), Heat Pump Model( )
Flip-up door
(opened)
Signal transmitter
Operation Mode
5
Operating Instructions
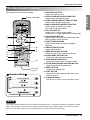
The controls will look like the following.
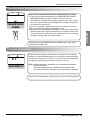
Wireless Remote Controller
1. START/STOP BUTTON
Used to turn off/on the unit.
2. OPERATION MODE SELECTION BUTTON
Used to select the operation mode.
3. ROOM TEMPERATURE SETTING BUTTONS
Used to select the room temperature.
4. INDOOR FAN SPEED SELECTOR BUTTON
Used to select fan speed in four steps
low, medium, high and CHAOS.
5. JET COOL BUTTON
Used to start or stop the speed cooling.
(It operates fan in super high speed in cooling mode)
6. CHAOS SWING BUTTON
Used to stop or start louver movement and set the
desired up/down airflow direction.
7. ON/OFF TIMER BUTTONS
Used to set the time of starting and stopping
operation.
8. TIME SETTING BUTTONS
Used to adjust the time.
9. TIMER SET/CANCEL BUTTON
Used to set and to cancel the timer operation.
10. SLEEP MODE AUTO BUTTON
Used to set sleep mode auto operation.
11. AIR CIRCULATION BUTTON
Used to circulate the room air without cooling
12. ROOM TEMPERATURE CHECKING BUTTON
Used to check the room temperature.
13. RESET BUTTON
Used prior to resetting time.
14. 2nd F BUTTON
Used prior to using modes printed in blue at the
bottom of buttons.
15. PLASMA(OPTIONAL)
Used to start or stop the plasma-purification function.
To use the functions printed in blue at the bottom of the buttons press 2
nd
F button first and then the required function
button. Pressing the 2
nd
F button activates the blue printed function of the respective button. To cancel the function
press the 2nd F button again else it will automatically cancel if remains idle after 10 seconds.
NOTE

Operating Instructions
ON
Cooling
Healthy
Dehumidification
Heating
(Heat pump model only)
To lower the temperature
To raise the temperature
1
2
3
4
Fan speed is on low. Fan speed is on medium. Fan speed is on high.CHAOS Air
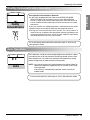
Auto
Operation
Press the START/STOP BUTTON to
turn the unit on.
The unit will respond with a beep.
Open the door of the remote controller and press the
operation mode button. Each time the button is pressed, the
operation mode is shifted in the direction of the arrow.
For cooling or heating operation set the desired indoor
temperature by pressing the ROOM TEMPERATURE
SETTING BUTTONS.
For cooling the temperature can be set within 18°C-30°C and
for heating the temperature range is 16°C-30°C
Set the fan speed with the remote controller. You can select the fan speed in four steps-low,
medium, high and CHAOS by pressing the INDOOR FAN SPEED SELECTOR BUTTON.
Each time the button is pressed, the fan speed mode is shifted.
1
2
3
4
Natural wind by the CHAOS logic
❏
For fresher feeling, press the INDOOR FAN SPEED SELECTOR BUTTON selector and set to CHAOS mode.
In this mode, the wind blows like a natural breeze by automatically changing fan speed according to the CHAOS logic.
Operation Mode
Multi Type Air Conditioner12

ENGLISH
Owner's Manual 13
Healthy
Dehumidification
Auto
Operating Instructions
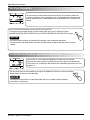
During Healthy Dehumidification Operation
❏ If you select the dehumidification mode on the OPERATION MODE
SELECTION BUTTON, the product starts to run the dehumidification
function. It automatically sets the room temperature and airflow volume to
the best condition for dehumidification, based on the sensed current room
temperature.
In this case, however, the setting temperature is not displayed on the remote
controller and you are not able to control the room temperature either.
❏ During the healthy dehumidification function, the airflow volume is
automatically set according to the optimization algorithm responding to the
current room temperature status, so that the room condition is kept healthy
and comfortable even in the very humid season.
In this operation mode the actual setting temperature and the fan speed
are automatically set by the electronic control logic based on the current
room temperature. If you feel hot or cold press the temperature setting
buttons respectively for more cooling or heating effect.
NOTE : You cannot set the actual setting temperature and the indoor fan
speed in this operation mode. But you can use the Chaos swing
in this operation.
If the system is not operating as desired, switch manually to
another mode.
To run the healthy dehumidification mode follow steps 1, and 2 and 4
(See operation mode)
To run the auto operation follow steps 1, and 2. (See operation mode)
Auto Operation
Healthy Dehumidification Operation

Operating Instructions
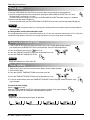
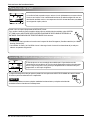
Jet Cool Operation
Jet cool function can be used to cool the room quickly in hot summer. When this
function is turned on, the air conditioner runs in cooling operation mode with super
high fan speed and 18°C setting temperature for 30 minutes for fast and effective
cooling.
You can activate this operation by pressing the JET COOL BUTTON.
To change from jet cool mode to high fan speed cooling mode, press the JET COOL BUTTON or
INIDOOR FAN SPEED SELECTOR BUTTON or the ROOM TERPERATURE SETTING BUTTON again.
• Jet cool function cannot be activated during heating or auto changeover operations.
• Art Cool and Art Cool Wide models close the side discharges during jet cool operation, for strong
cooling .
NOTE
PLASMA Purification Operation (Optional)
Plasma filter is a technology developed by LG to get rid of microscopic
contaminants in the intake air by generating a plasma of high charge electrons.
This plasma kills and destroys the contaminants completely to provide clean and
hygienic air.
Plasma purification can be started by pressing the PLASMA BUTTON on the remote controller.
Repressing it will deactivate the operation.
This feature can be used in any operation mode and any fan speed can be used while
plasma filter is functioning.
NOTE
Multi Type Air Conditioner14

ENGLISH
Owner's Manual 15
Operating Instructions
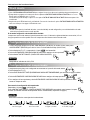
Forced operation
Operation procedures when the remote control can't be used.
The operation will be started if the ON/OFF button is pressed.
If you want to stop operation, re-press the button.
On/Off
On/Off
button
On/Off
button
Heat pump Model
Cooling Model
Room Temp. ≥ 24°C 21°C ≤ Room Temp. < 24°C Room Temp. < 21°C
Operating mode Cooling Cooling Healthy Dehumidification Heating
Indoor setting FAN Speed
High High High High
Setting Temperature
22°C 22°C 23°C 24°C
Test operation
During the TEST OPERATION, the unit operates in cooling mode at high speed fan, regardless of room
temperature and resets in 18 minutes.
During test operation, if remote controller signal is received, the unit operates as remote controller sets.
If you want to use this operation, Press and hold the ON/OFF button for 3-5 seconds, then the buzzer sound
1 "beep".
If you want to stop the operation, re-press the button.

Delay off timer Delay on timer Delay off and on timer Delay on and off timer
1. Press the SLEEP MODE AUTO BUTTON to set the time when you want the unit to stop automatically.
2. The timer is programmed in one-hour increments by pressing the SLEEP MODE AUTO BUTTON 1 to 7 times.
The sleep mode is available for 1 to 7 times.
To alter the time period in steps of 1 hour, press the SLEEP MODE AUTO BUTTON while aiming at air conditioner.
3. Make sure the sleep mode LED lights up.
To cancel the sleep mode, press the SLEEP MODE AUTO BUTTON several times until the sleep mode LED lights off.
• The sleep mode will operate indoor fan at slow speed in cooling mode and at medium speed in heating mode for
pleasant sleep.
In cooling mode or healthy dehumidification mode:
The setting temperature will rise automatically two times by 1°C over next consecutive 30 minutes (2°C in 1 hour) for a
comfortable sleep. Now this will be the final setting temperature as long as sleep mode is functioning.
NOTE
1. Time can be set only when you press the RESET BUTTON. Having replacing the batteries,
you should press the RESET BUTTON to reset the time. Press the Start/Stop button.
2. Press 2nd F button and check if icon is on.
3. Press the TIME SETTING BUTTONS until the desired time is set.
4. Press the TIME SET/CANCEL BUTTON.
Check the indicator for A.M. and P.M.
NOTE
1. Make sure to set current time correctly on the display of the remote controller.
2. Press 2nd F button.
3. Press the ON/OFF TIMER BUTTONS to turn timer on or off.
4. Press the TIME SETTING BUTTONS until the desired time is set.
5. To set the selected time, press the TIMER SETTING BUTTONS aiming the remote controller at the
signal receptor.
To cancel the timer setting
Check if icon is off.
Press the TIMER CANCEL BUTTON aiming the remote controller at the signal receptor.
(The timer lamp on the air conditioner and the display will go off.)
Select one of the following four types of operation.
NOTE
ON
OFF
CANCEL
SET
CANCEL
SET
CANCEL
SET
Sleep Mode
Setting the Current Time
Timer Setting
Operating Instructions
Multi Type Air Conditioner16

ENGLISH
Owner's Manual 17
Operating Instructions
Vertical / Horizontal Airflow Direction Control (Optional)
• By pressing the CHAOS SWING BUTTON the horizontal air flow direction is changed automatically based on the chaos
algorithm to distribute the air in the room evenly and at the same time to make the human body feel most comfortable as if
enjoying natural breeze.
• Always use the remote controller to adjust the up and down air flow direction. Manually moving the vertical air flow
direction louver by hand could damage the mechanism.When the unit is shut off, the up/down airflow direction louver will
close the air outlet vent of the system.
NOTE
The up/down airflow (Vertical airflow) can be
adjusted by using the remote controller.
1. Press the START/STOP BUTTON to start the
unit.
2. Press CHAOS SWING BUTTON.
3. The louvers will swing up &
down automatically.
4. To stop the louver at a desired
angle, press again

Operating Instructions
This operation circulates the air without cooling or heating. It can
be activated by pressing the AIR CIRCULATION BUTTON. Once
the air circulation is activated you can select the air speed by
pressing the INDOOR FAN SPEED SELECTOR BUTTON.
CHAOS Air economizes power consumption and prevents overcooling. The fan speed is automatically
changed from high to low or vice versa, depending on the ambient temperature.
NOTE
This feature is enabled by factory default setting,
but you can disable it by pressing the ON/OFF
button for 6 seconds. The unit will beep twice and
the indicator lamp(2) will blink 4 times.
To enable it, press the button again for 6 seconds.
The unit will beep twice and the indicator lamp(1)
will blink 4 times.
NOTE
Air Circulation Mode
This function is useful in the situation of power failure.
When power regains after a failure this feature restore the previous operating condition
and the air conditioner will run in the same settings.
Auto Restart Function
On/Off
Button
Multi Type Air Conditioner18

ENGLISH
Owner's Manual 19
Maintenance and Service
Indoor Unit
Before performing any maintenance, turn off the main power to the system, disconnect the circuit breaker and
unplug the power cord.
Clean the unit with a soft dry cloth. Do not use bleach or abrasives.
Never use any of these
• Water hotter than 40°C. It may cause deformation and discoloration.
• Volatile substances. They may damage the surface of the air conditioner.
Air Filters
The air filters behind the front panel / grill should be checked and
cleaned once in every 2 weeks or more often if necessary. To
remove the filters see the self explanatory diagrams for each
model type. Clean the filters with a vacuum cleaner or warm
soapy water. If dirt is not easily removed, wash with a solution of
detergent in luke warm water. Dry well in shade after washing and
reinstall the filters back in place.
G
a
s
o
l
i
n
e
P
o
w
d
e
r
Maintenance and Service
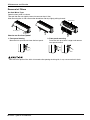
Plasma Filters
The plasma filters behind the air filter should be checked and
cleaned once in every 3 months or more often if necessary. To
remove the filters see the self explanatory diagrams for each
model type. Clean the filters with a vacuum cleaner. If it is dirty
wash it with water and dry well in shade an install back in place.
Deodorizer Filters
Remove the deodorizer filters behind the air filter and expose
them in direct sunlight for 2 hours.
And then insert these filters into original position.

Maintenance and Service
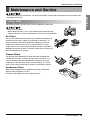
Open the front panel as shown.
Then pull the filter tab slightly forward to remove the air filter.
After removing the air filter remove the deodorizer filter by slightly pulling forward.
Front panel
Plasma filter
How to use the front panel
1. Front panel closing
Move the link upward and close the front panel.
2. Front panel removing
Raise the link up to hook hanger and remove
front panel forward.
Art Cool Mirror Type
Removal of Filters
Don't touch this plasma filter within 10 seconds after opening the inlet grille, it may cause an electric shock.
Multi Type Air Conditioner20

ENGLISH
Owner's Manual 21
Maintenance and Service
Operation Tips!
Self-Diagnosis Function
Do not overcool the room.
This is not good for the health and
wastes electricity.
Keep blinds or curtains
closed.
Do not let direct sunshine enter
the room when the air conditioner
is in operation.
Keep the room temperature
uniform.
Adjust the vertical and horizontal
airflow direction to ensure a
uniform temperature in the room.
Make sure that the
doors and windows
are shut thight.
Avoid opening doors and
windows as much as
possible to keep the cool
air in the room.
Clean the air filter
regularly.
Blockages in the air filter
reduce the airflow and
lower cooling and
dehumidifying effects.
Clean at least once every
two weeks.
Ventilate the room
occasionally.
Since windows are kept
closed, it is a good idea
to open them and
ventilate the room now
and ten.
Use high fan speed
for effective and fast
cooling.
The unit gives its rated
cooling capacity when the
fan speed is high.
Outdoor Unit
The heat exchanger coils and panel vents of the outdoor unit should be checked regularly.
If clogged with dirt or soot, the heat exchanger
and panel vents may be professionally steam cleaned.
Dirty or clogged coils will reduce the operating efficiency of the system and cause higher operating costs.
NOTE
'CH' will flash in the display when a problem occurs. Then please contact your dealer.PCB

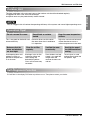
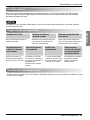
Troubleshooting Tips! Save time and money!
The air conditioner may be operating abnormally when:
Problem
■ The fuse is blown/circuit
breaker is tripped.
■ Power failure.
■ High voltage.
■ Airflow is restricted.
■ The air filter is dirty.
■
The room may have been hot.
■ Cold air is escaping.
■
Check the temperature settings.
■ There might be any heating
source in the room.
Air
conditioner
does not start
Air
conditioner
does not cool
as it should
• Check the house fuse/circuit breaker box
and replace the fuse or reset the breaker.
• If power failure occurs, turn the mode
control to OFF.
When power is restored, wait 3 minutes to
restart the air conditioner to prevent
tripping of the compressor overload.
• If the voltage is unusually very high or low
the circuit Breaker will trip.
• Make sure there are no curtains, blinds, or
furniture blocking the front of the air
conditioner.
• Clean the filter at least every 2 weeks.
See the Maintenance and Service section.
• When the air conditioner is first turned on,
you need to allow time for the room to cool
down.
• Check for open furnace floor registers and
cold air returns.
• Make sure they are correct.
• Check and remove such source or turn it
off while using the air conditioner.
What To DoPossible Causes
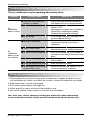
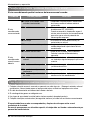
1. Anything abnormal such as burning smell, loud noise etc. happen. Stop the unit and
turn the breaker off. Never try to repair by yourself or restart the system in such cases.
2. Main power cord is too hot or damaged.
3. Error code is generated by self diagnosis.
4. Water leaks from indoor unit even if the humidity is low.
5. Any switch, breaker (safety, earth) or fuse fails to work properly
User must carry routine checkup & cleaning to avoid unit’s poor performance.
In case of special situation, the job must be carried out by service person only.
Call the service immediately in the following situations
Maintenance and Service
Multi Type Air Conditioner22

ESPAÑOL
LG
Aire acondicionado múltiple
MANUAL DE PROPIETARIO
LG
Visit us at http://www.lgservice.com
IMPORTANTE
• Lea este manual de propietario atentamente y con cuidado
antes de instalar o utilizar el aire acondicionado.
• Por favor, una vez haya leído el manual atentamente,
guárdelo para futuras consultas.
Estimado usuario
Gracias por instalar un aire acondicionado LG.
Haber tomado la mejor decisión le garantiza un
estupendo rendimiento y servicio que hará su
vida más cómoda y placentera.

2
ÍNDICE
PARA SU REGISTRO
Escriba el número de serie y de modelo aquí:
Modelo
Nº de serie
Puede encontrarlos en la etiqueta situada en el lateral de
cada unidad.
Nombre del distribuidor
Fecha de compra
■ Grape el recibo a esta página por si tiene necesidad de
probar la fecha de compra por problemas con la garantía.
LEA ESTE MANUAL
En el interior encontrará muchos útiles consejos acerca de
cómo usar y mantener el aire acondicionado correctamente.
Un poco de cuidado preventivo de su parte puede ahorrarle
una gran cantidad de dinero en toda la vida útil del aire
acondicionado.
Encontrará muchas respuestas a problemas comunes en el
diagrama de sugerencias de solución de problemas.
Si consulta nuestro gráfico de Sugerencias de solución de
problemas primero, puede que no necesite llamar al servicio
técnico.
PRECAUCIÓN
• Póngase en contacto con el servicio técnico autorizado
para reparar o mantener esta unidad.
• Póngase en contacto con el instalador para instalar la
unidad.
• El aire acondicionado no está destinado para ser usado
con niños pequeños o inválidos sin supervisión.
• Los niños pequeños deben supervisarse para
asegurarse de que no juegan con el aire acondicionado.
• Si es necesario sustituir el cable de alimentación, el
trabajo deberá ser realizado por personal autorizado
usando solamente recambios originales.
A. Precauciones de seguridad................3
B. Seguridad eléctrica .............................8
Uso temporal de un adaptador .............8
Uso temporal de un alargador ..............8
Símbolos usados en este manual .........8
C. Introducción al producto ....................9
Unidades de interior .............................9
Indicadores luminosos de operación.....9
D. Instrucciones de funcionamiento ....10
Instalación de las baterías ..................10
Mantenimiento del control remoto
inalámbrico ............................................10
Método de operación...........................10
Control remoto inalámbrico .................11
Modo de operación..............................12
Operación Healthy Dehumidification
(Deshumidificación saludable).............13
Función automática ............................13
Autolimpieza........................................13
Operación Jet Cool/Heat .....................14
Luminosidad de pantalla (Opcional) -
Tipo Art Cool Mirror .............................14
Operación PLASMA Purification
(Purificación por plasma) (Opcional) .............14
Operación forzada ..............................15
Modo Sueño .......................................16
Configuración de la hora actual ..........16
Configuración del temporizador .........16
Control de dirección de flujo de aire
vertical / horizontal (Opcional).............17
Modo de circulación de aire ...............18
Función de reinicio automático............18
E. Mantenimiento y reparación.............19
Unidad interior .....................................19
Unidad exterior ...................................21
Sugerencias de operación...................21
Función de autodiagnóstico ...............21
Consejos de resolución ! problemas
Ahorre tiempo! ....................................22
Llame al servicio técnico inmediatamente
en las siguientes situaciones ..............22
Manual de propietario del aire acondicionado multitipo
Aire Acondicionado Multitipo

Manual de propietario 3
Precauciones de seguridad
ESPAÑOL
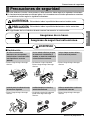
Precauciones de seguridad
Para evitar daños en el usuario u otras personas y daños materiales, deben seguirse las siguientes instrucciones.
■ Un funcionamiento incorrecto causado por ignorar las instrucciones causará daños personales o materiales.
La seriedad se clasifica según las siguientes indicaciones.
■ El significado de los símbolos de este manual se muestra a continuación.
ADVERTENCIA
PRECAUCIÓN
Este símbolo indica la posibilidad de muerte o heridas serias.
Este símbolo indica la posibilidad de heridas o daños materiales.
Asegúrese de no hacer.
Asegúrese de seguir las instrucciones.
ADVERTENCIA
■ Instalación
No utilice un cortacircuitos
defectuoso o con una capacidad
nominal inferior a la necesaria. Utilice
este dispositivo en un circuito
dedicado.
• Existe el riesgo de fuego o descargas
eléctricas.
Para los trabajos eléctricos, póngase
en contacto con el distribuidor, el
vendedor, un electricista cualificado o
un Servicio técnico autorizado.
• No desmonte ni repare el producto.
Existe el riesgo de fuego o descargas
eléctricas.
Incluya siempre una toma de tierra
con la conexión del producto.
• Existe el riesgo de fuego o descargas
eléctricas.
Instale el panel y la cubierta de la caja
de control con seguridad.
• Existe el riesgo de fuego o descargas
eléctricas.
Instálela siempre en un circuito y
cortacircuitos dedicado.
• Un cableado o instalación inadecuada
puede causar fuego o descargas
eléctricas.
Utilice un cortacircuitos o fusible con
la clasificación adecuada.
• Existe el riesgo de fuego o descargas
eléctricas.

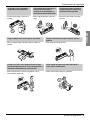
Precauciones de seguridad
No modifique ni alargue el cable de
alimentación.
• Existe el riesgo de fuego o descargas
eléctricas.
No instale, retire ni vuelva a instalar la
unidad usted mismo (cliente).
• Existe el riesgo de fuego, descargas
eléctricas, explosion o heridas.
Tenga cuidado al desembalar e
instalar el producto.
• Los bordes afilados podrían causar
heridas. Tenga un cuidado especial con
los bordes de la caja y las aletas del
condensador y el evaporador.
Para la instalación, póngase siempre en contacto con el
distribuidor o un Servicio técnico autorizado.
• Existe el riesgo de fuego, descargas eléctricas, explosion o
heridas.
No instale el producto en una base de instalación
defectuosa.
• Esto podría causar daños personales, accidentes o daños al
producto.
Asegúrese de que el área de instalación no se deteriora
con el tiempo.
• Si la base se derrumba, el aire acondicionado podría caer,
causando daños a la propiedad, fallos en el producto y daños
personales.
Evite que el aire acondicionado funcione durante un
largo periodo de tiempo cuando la humedad sea alta y se
haya dejado abierta una ventana o puerta.
• La humedad puede condensarse y mojar o dañar los muebles.
■ Funcionamiento
No toque (utilice) el producto con
las manos mojadas.
• Existe el riesgo de fuego o descargas
eléctricas.
No coloque un calefactor u otros
dispositivos cerca del cable de
alimentación.
• Existe riesgo de fuego o descargas
eléctricas.
Evite que se mojen las partes
eléctricas del producto.
• Podría causar fuego, averías en el
producto o descargas eléctricas.
Aire Acondicionado Multitipo
4

Manual de propietario 5
Precauciones de seguridad
ESPAÑOL
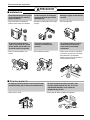
Tenga cuidado para que no entre agua en el producto.
• Existe el riesgo de fuego, descargas eléctricas o daños al
producto.
Apague la alimentación principal al limpiar o reparar el
producto.
• Existe riesgo de descarga eléctrica.
Gasolin
No guarde ni use gas inflamable o
combustibles cerca del producto.
• Existe riesgo de fuego o averías en el
producto.
Si el producto emite ruidos, olores o
humo extraños. Interrumpa la
corriente con el cortacorrientes o
desenchufe el cable de alimentación.
• Existe riesgo de descargas eléctricas o
fuego.
Si el producto se moja (se inunda o
sumerge), póngase en contacto con
un Servicio técnico autorizado.
• Existe el riesgo de fuego o descargas
eléctricas.
Cuando no se vaya a usar el producto durante un largo
periodo de tiempo, desenchufe el cable de alimentación o
interrumpa la alimentación con el cortacircuitos.
• Existe riesgo de daños o averías en el producto o de un
funcionamiento no deseado.
Tenga cuidado de asegurar que nadie, podría pisar o
caerse sobre la unidad exterior.
• Podría causar heridas o daños en el producto.

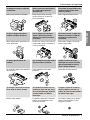
Precauciones de seguridad
■ Instalación
PRECAUCIÓN
■ Funcionamiento
Compruebe siempre que no hay fugas
de gas (refrigerante) tras instalar o
reparar el producto.
• Unos niveles bajos de refrigerante
podrían causar averías en el producto.
Instale la manguera de drenaje para
asegurarse de que el agua se drena
adecuadamente.
• Una mala conexión podría causar fugas
de agua.
Mantenga el equipo nivelado mientras
lo instala.
• Para evitar vibración.
No instale el producto donde el
ruido o el aire caliente de la unidad
exterior podrían resultar ofensivo a
los vecinos o dañar la propiedad.
• Podría causarles problemas a los
vecinos.
Para mover y transportar el
producto son necesarias dos
personas.
• Evitará daños personales.
No instale el producto en un lugar
donde pueda estar expuesto al
viento marino (viento salado)
directamente.
• Podría causar corrosión en el producto.
La corrosión, en particular en las aletas
del condensador y el evaporador,
podrían causar averías en el producto o
un funcionamiento ineficaz.
90°
No exponga la piel directamente al aire frío durante largos
periodos de tiempo. (No se siente en la corriente de aire.)
• Podría dañar su salud.
No utilice el producto para fines especiales, como
conservar comida, obras de arte, etc… Es un aire
acondicionado doméstico, no un sistema de
refrigeración de precisión.
• Existe riesgo de daños o pérdidas de propiedad.
Aire Acondicionado Multitipo
6

Manual de propietario 7
Precauciones de seguridad
ESPAÑOL
No bloquee la entrada o la salida del
caudal de aire.
• Podría causar averías en el producto.
Utilice un paño suave para limpiarlo.
No use detergentes agresivos,
disolventes, etc.
• Existe riesgo de fuego, descargas
eléctricas o daños en las partes de
plástico del producto.
Nunca toque las partes metálicas del
producto al retirar el filtro de aire.
¡Están muy afiladas!
• Existe riesgo de daños personales.
Wax
Thinner
No pise ni coloque nada sobre el
producto. (unidades de exterior)
• Existe riesgo de daños personales y de
avería del producto.
Inserte siempre el filtro de forma
segura. Limpie el filtro cada dos
semanas o con mayor frecuencia si
es necesario.
• Un filtro sucio reduce la eficacia del aire
acondicionado y podría causar daños o
averías en el producto.
No inserte las manos ni ningún otro
objeto por la entrada o la salida de
aire mientras el producto esté
funcionando.
• Existen partes afiladas y móviles que
podrían causar heridas.
No beba el agua de drenaje del
producto.
• No es potable y podría causar problemas
de salud serios.
Use una banqueta o escalera sólida al
limpiar o mantener el producto.
• Tenga cuidado para evitar daños
personales.
Cambie las baterías del control
remoto por unas nuevas del mismo
tipo. No mezcle baterías nuevas y
viejas ni de tipos diferentes.
• Could adversley effect operation.
No recargue ni desmonte las baterías.
No se arroje las baterías al fuego.
• Podrían arder o explotar.
Si el líquido de las baterías entra en
contacto con la piel o la ropa, lave la
zona con abundante agua. No utilice
el control remoto si las baterías
tienen fugas.
• Los productos químicos de las baterías
podrían causar quemaduras u otros
riesgos para su salud.
Si ingiere el líquido de las baterías,
lávese los dientes y consulte a un
médico. No utilice el control remoto si
las baterías tienen fugas.
• Los productos químicos de las baterías
podrían causar quemaduras u otros
riesgos para su salud.

Seguridad eléctrica
Seguridad eléctrica
• Este dispositivo debe incluir toma de tierra adecuada. Para minimizar el riesgo de descargas eléctricas debe
conectar el equipo en un enchufe con toma de tierra.
• No corte ni retire el polo de toma de tierra del enchufe.
• Conectar el terminal de toma de tierra del adaptador al tornillo de la cubierta de la caja de pared no proveerá una
toma de tierra adecuada a menos que el tornillo de la cubierta sea de metal no aislado y la caja de la pared
disponga de toma de tierra por el cableado.
• Si tiene alguna duda de si el aire acondicionado tiene una toma de tierra adecuada, haga que un electricista
cualificado revise la caja de pared y el circuito.
No recomendamos utilizar un adaptador debido a los potenciales riesgos para la seguridad.
Para conexiones temporales, use un adaptador original, disponible en la mayoría de las tiendas de herramientas.
Asegúrese de que la ranura grande del adaptador está alineada con la ranura grande del receptáculo para que la
polaridad sea la correcta.
Para desconectar el cable de alimentación del adaptador, use una mano en cada uno para evitar dañar el terminal de
toma de tierra.
Evite desenchufar el cable de alimentación con demasiada frecuencia ya que podría acabar dañando el terminal.
• Nunca utilice el dispositivo con un adaptador roto.
No recomendamos utilizar un cable de extensión debido a los potenciales riesgos para la seguridad.
Uso temporal de un adaptador
Uso temporal de un cable de extensión
Este símbolo le alerta del riesgo de descargas eléctricas.
Este símbolo le alerta de peligros que podrían causar daños en el
aire acondicionado.
Este símbolo indica que existen comentarios especiales.
NOTA
Símbolos usados en este manual
Este dispositivo debe instalarse según las regulaciones de cableado nacionales. Esta guía actúa como guía de
ayuda para explicarle las características del producto.
Aire Acondicionado Multitipo
8

ESPAÑOL
Manual de propietario 9
Aquí tiene una breve introducción a las unidades de interior y exterior. Consulte la información específica
a su tipo de unidad de interior.
Introducción al producto
Introducción al producto
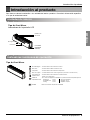
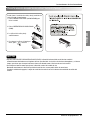
Tipo Art Cool Mirror
Indicadores de la pantalla LCD
Panel frontal
Descarga de aire
Botón ON/OFF
(ENCENDIDO/
APAGADO)
Entrada de aire
Filtro de aire
Unidades de interior
: Se ilumina durante el modo de descongelado. (Sólo para modelo con bomba de calor)
: Se ilumina durante el funcionamiento del sistema.
: Se ilumina durante el Modo automático de sueño.
: Se ilumina durante el funcionamiento del temporizador.
: Se ilumina durante el funcionamiento de la unidad de exterior.
(Modelo de sólo refrigeración)
: En los modos de refrigeración, deshumidificación y calefacción muestra la temperatura que desea
• Refrigeración : 18~30°C • AI : Función automática
• Deshumidificación : 18~30°C • Encendido: Jet Cool
• Heating : 16~30°C • Baja: Modo de prueba
: Indica el funcionamiento del purificador de PLASMA.
Modo descongelado
Modo Sueño
Temporizador
Funcionamiento de
unidad de exterior
Encendido/Apagado
PLASMA
Indicador de
temperatura deseada
Tipo Art Cool Mirror
Indicadores luminosos de operación

Instrucciones de funcionamiento
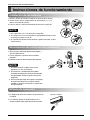
Instalación de las baterías
Mantenimiento del control remoto inalámbrico
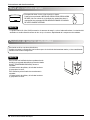
1. Retire la cubierta de la batería tirando en la dirección de las flechas.
2. Inserte las pilas nuevas asegurándose de que los polos (+) y (-) se
colocan en la posición correcta.
3. Vuelva a colocar la cubierta deslizándola de nuevo en su posición.
1. Use 2 pilas AAA (1,5v.). No utilice pilas recargables.
2. Si el sistema no va a usarse durante un largo periodo de tiempo, retire
las pilas para alargar su vida útil.
3. Si la pantalla del control remoto comienza a perder intensidad, cambie
ambas baterías.
NOTA
1. Elija un lugar adecuado donde esté seguro y
sea fácil de alcanzar.
2. Fije el soporte a la pared con los tornillos
incluidos.
3. Deslice el control remoto dentro del soporte.
1. El control remoto no debe estar nunca
expuesto a la luz solar directa.
2. El transmisor y receptor de señal debe
mantenerse limpio para que se comuniquen
correctamente. Utilice un paño suave para
limpiarlos.
3. En caso de que algún otro aparato se ponga
en funcionamiento con el control remoto,
cambie su posición o consulte a su personal
de reparaciones.
1. El receptor de señal se encuentra en el interior de
la unidad.
2.
Para utilizarlo, apunte el control remoto hacia la
unidad. No debe haber ningún obstáculo entre ellos.
NOTA
Instrucciones de funcionamiento
Tipo Artcool Mirror
Método de operación
Aire Acondicionado Multitipo
10

ESPAÑOL
Manual de propietario 11
ON
OFF
CANCEL
SET
1
3
5
4
9
10
12
14
7
2
8
13
1
11
6
Operación de refrigeración
Función automática
Deshumidificación saludable
Función de calefacción
• Modelo de refrigeración ( ), Modelo con bomba de calor ( )
Puerta abatible
(abierta)
Transmisor de señal
Modo de operación
5
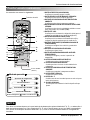
Instrucciones de funcionamiento
Los controles son como los siguientes.
Control remoto inalámbrico
1. BOTÓN START/STOP (INICIO/PARADA)
Se utiliza para encender y apagar la unidad.
2. BOTÓN DE SELECCIÓN DE MODO DE OPERACIÓN
Se utiliza para seleccionar el modo de operación.
3. BOTONES DE CONFIGURACIÓN DE TEMPERATURA
AMBIENTE
Se utiliza para seleccionar la temperatura ambiente.
4. BOTÓN DE SELECCIÓN DE VELOCIDAD DE VENTILADOR
INTERIOR
Se utiliza para seleccionar la velocidad del ventilador en cuatro
pasos, baja, media, alta y CHAOS (CAOS).
5. BOTÓN JET COOL
Se utiliza para iniciar o detener la refrigeración rápida.(opera el
ventilador en velocidad alta en el modo de refrigeración)
6. BOTÓN DE OSCILACIÓN CHAOS (CAOS)
Se utiliza para iniciar o detener el movimiento de la rejilla y
configurar la dirección que desee para el caudal de aire.
7. BOTONES TIMER ON/OFF (ENCENDIDO/APAGADO DE
TEMPORIZADOR)
Se utiliza para configurar la hora de inicio y parada de la
operación.
8. BOTONES DE CONFIGURACIÓN DE HORA
Se utilizan para ajustar la hora.
9. BOTÓN DE CONFIGURACIÓN/CANCELACIÓN DEL
TEMPORIZADOR
Se utiliza para configurar y cancelar la operación de
temporizador.
10. BOTÓN DE MODO SUEÑO AUTOMÁTICO
Se utiliza para activar el modo automático.
11. BOTÓN DE CIRCULACIÓN DE AIRE
Se utiliza para hacer circular el aire de la habitación sin
refrigeración
12. BOTÓN DE COMPROBACIÓN DE TEMPERATURA
AMBIENTE
Se utiliza para comprobar la temperatura ambiente.
13. BOTÓN RESET (REINICIO)
Se utiliza para reiniciar la hora.
14. BOTÓN de 2° F
Se utiliza antes de usar los modos impresos en azul en la parte
inferior de los botones.
15. PLASMA (OPCIONAL)
Se utiliza para iniciar o detener la función de purificación por
plasma.
Para utilizar las funciones impresas en la parte inferior de los botones pulse primero el botón 2nd F (2° F) y, a continuación, el
botón de función que desee usar. Pulsar el botón 2nd F (2° F) activa la función impresa en azul en el botón correspondiente.
Para cancelar la función pulse de nuevo el botón 2nd F (2° F) o ésta se cancelará automáticamente tras 10 segundos de
inactividad.
NOTA

Instrucciones de funcionamiento
ON
Refrigeración Deshumidificación
saludable
Calefacción
(sólo para modelos
con bomba de calor
Para bajar la temperatura
Para subir la temperatura
1
2
3
4
La velocidad del
ventilador es baja.
La velocidad del
ventilador es media.
La velocidad del
ventilador es alta.
Aire CHAOS (CAOS)
Función
automática
Pulse el BOTÓN START/STOP
(INICIO/PARADA) para encender la
unidad.
La unidad responderá con un pitido.
Abra la cubierta del control remoto y pulse el botón de modo
de operación. Cada vez que pulse el botón, el modo de
operación cambiará en la dirección de la flecha.
Para el funcionamiento de refrigeración o calefacción
seleccione la temperatura de interior pulsando los BOTONES
DE CONFIGURACIÓN DE TEMPERATURA AMBIENTE.
La temperatura de refrigeración puede configurarse entre
18°C~30°C y para la calefacción, el rango es de 16°C~30°C.
Seleccione la velocidad del ventilador con el control remoto.
Puede seleccionar la velocidad del ventilador en cuatro pasos, baja, media, alta y CHAOS (CAOS)
pulsando BOTÓN DE SELECCIÓN DE VELOCIDAD DE VENTILADOR INTERIOR.
Cada vez que pulse el botón, se cambiará el modo de velocidad de ventilador.
1
2
3
4
Aire natural por la lógica CHAOS (CAOS)
❏
Para una sensación más fresca, pulse el BOTÓN DE SELECCIÓN DE VELOCIDAD DE VENTILADOR INTERIOR y
seleccione el modo CHAOS (CAOS). En este modo, el aire parece una brisa natural cambiando de velocidad
automáticamente según la lógica CHAOS (CAOS).
Modo de operación
Aire Acondicionado Multitipo
12

ESPAÑOL
Manual de propietario 13
Deshumidificación
saludable
Automático
Instrucciones de funcionamiento
Durante la operación Healthy Dehumidification (Deshumidificación saludable)
❏
Si selecciona el modo de deshumidificación con el BOTÓN DE SELECCIÓN DE
MODO DE OPERACIÓN, el producto comenzará a ejecutar la función de
deshumidificación. Configura automáticamente la temperatura de la sala y el caudal
de aire a las mejores condiciones para deshumidicación, basándose en la detección
de la temperatura actual de la sala.
En este caso, sin embargo, la tempertura seleccionada no se mostrará en el control
remoto y no podrá controlar tampoco la temperatura de la sala.
❏
Durante la función de deshumidificación saludable, el caudal de aire se seleccionará
automáticamente según el algoritmo de optimización que responda al estado actual
de la temperatura de la sala, de forma que las condiciones de la sala se mantengan
saludables y cómodas incluso en la estación húmeda.
En este modo de funcionamiento, la temperatura seleccionada real y la velocidad del
ventilador se configurarán automáticamente con el control lógico electrónico basándose
en la temperatura real de la sala. Si tiene calor o frío, pulse los botones de configuración
de temperatura respectivamente para aumentar el efecto de calor o frío.
NOTA : No puede configurar la temperatura real y la velocidad de ventilador de
interior en este modo.
Pero en este modo puede usar el modo de oscilación Chaos (Caos).
Si el sistema no funciona como desea, cambie manualmente a otro modo
Para ejecutar un modo de deshumidificación saludable, siga los pasos 1, 2 y 4.
(Véase el modo de operación)
Para utilizar el modo automático, siga los pasos 1 y 2. (Véase el modo de operación)
Función automática
Operación Healthy Dehumidification (Deshumidificación saludable)

Instrucciones de funcionamiento
Operación Jet Cool
La función Jet Cool se puede usar para refrescar la sala rápidamente en un verano caluroso.
Al activar esta función, el aire acondicionado funciona en el modo de refrigeración con una
velocidad de ventilador maxima a una temperatura de 18ºC durante 30 minutos para obtener
una refrigeración rápida y efectiva.
Puede activar esta operación pulsando el BOTÓN JET COOL.
Para cambiar el modo Jet Cool al modo de refrigeración con velocidad alta de ventilador, pulse el BOTÓN
JET COOL o pulse el BOTÓN DE SELECCIÓN DE VELOCIDAD DE VENTILADOR DE INTERIOR o el
BOTÓN DE CONFIGURACIÓN DE TEMPERATURA DE SALA de nuevo.
• La función Jet Cool no puede activarse durante la operación Auto Changeover (Cambio automático) o el Modo
Heating (Calefacción).
• Los modelos Art Cool y Art Cool Wide cierran la descarga lateral durante el funcionamiento de jet cool para
obtener una potente refrigeración.
NOTE
Operación PLASMA Purification (Purificación por plasma) (Opcional)
El filtro de plasma es una tecnología desarrollada por LG para deshacerse de
contaminantes microscópicos del aire de entrada generando un plasma de electrones
de alta carga. Este plasma mata y destruye completamente los contaminantes para
proporcionar un aire limpio e higiénico.
La operación de purificación por plasma puede iniciarse pulsando el BOTÓN PLASMA del control remoto.
Al volver a pulsarlo se desactivará la operación.
Esta función puede usarse en cualquier modo de funcionamiento y cualquier velocidad de
ventilador mientras funciona el filtro de plasma.
NOTA
Aire Acondicionado Multitipo
14

Modelo con bomba de calor
Temp. de sala ≥ 24°C 21°C ≤ Temp. de sala < 24°C Temp. de sala < 21°C
Modo de funcionamiento Refrigeración Refrigeración Deshumidificación saludable Calefacción
Alto Alto Alto Alto
Selección de temperatura 22°C 22°C 23°C 24°C
ESPAÑOL
Manual de propietario 15
Instrucciones de funcionamiento
Operación forzada
No puede usarse el control remoto con los procedimientos de funcionamiento.
La operación comenzará cuando se pulse el botón ON/OFF (ENCENDIDO/APAGADO).
Si desea detener la operación, vuelva a pulsar el botón.
On/Off
On/Off
button
Botón
ENCENDIDO/
APAGADO
Funcionamiento de prueba
Durante el FUNCIONAMIENTO DE PRUEBA, la unidad funcionará en modo refrigeración con una velocidad de
ventilador alta, independientemente de la temperatura de la sala y se reiniciará a los 18 minutos.
Durante el funcionamiento de prueba, si se recibe señal del control remoto, la unidad funcionará con las órdenes del
control remoto.
Si desea usar esta operación, mantenga pulsado el botón ON/OFF (ENCENDIDO/APAGADO) durante 3~5 segundos
y podrá oír un pitido.
Si desea detener la operación, vuelva a pulsar el botón.
Modelo de
refrigeración

Temporizador de
demora de apagado
Temporizador de
demora de encendido
Temporizador de demora
de apagado y encendido
Temporizador de demora
de encendido y apagado
1. Pulse el BOTÓN MODO SUEÑO AUTOMÁTICO para configurar la hora a la que desea que la unidad se detenga automaticamente.
2. El temporizador se programa en incrementos de una hora pulsando el BOTÓN DE MODO SUEÑO AUTOMÁTICO de 1 a 7 veces.
El modo sueño está disponible entre 1 a 7 horas.
Para modificar el periodo de tiempo en pasos de 1 hora, pulse el BOTÓN DE MODO SUEÑO AUTOMÁTICO mientras apunta al aire
acondicionado.
3. Asegúrese de que el LED del modo sueño está iluminado. Para cancelar el modo sueño, pulse el BOTÓN DE MODO SUEÑO AUTOMÁTICO
varias veces hasta que el se apague el LED del modo sueño.
• El modo sueño operará el ventilador de interior a una velocidad baja en modo refrigeración y una velocidad media en el modo
calefacción para permitirle tener un sueño apacible.
En los modos refrigeración o deshumidificación saludable:
La temperatura seleccionada aumentará automáticamente dos veces 1ºC durante los siguientes 30 minutos consecutivos (2°C en 1
hora) para permitirle un sueño apacible. Esta será la temperatura final mientras funcione el modo sueño.
NOTA
1. La hora solo puede configurarse al pulsar el BOTÓN RESET (REINICIO). Al cambiar las pilas, debe pulsar
el BOTÓN RESET (REINICIO) para reiniciar la hora. Pulse el botón Start/Stop (Inicio/Parada).
2. Pulse el botón 2nd F (2° F) y compruebe si el icono ( ) está encendido.
3. Pulse los BOTONES DE CONFIGURACIÓN DE HORA hasta configurar la hora que desee.
4. Pulse el botón TIME SET/CANCEL (CONFIG. DE HORA/CANCELAR).
Compruebe el indicador de A.M. y P.M.
NOTA
1. Asegúrese de que la hora se ha configurado correctamente en la pantalla del control remoto.
2. Pulse el botón 2nd F (2° F).
3. Pulse el BOTÓN ON/OFF TIMER (ENCENDIDO/APAGADO DE TEMPORIZADOR) para encender o apagar la unidad.
4. Pulse los BOTONES DE CONFIGURACIÓN DE HORA hasta configurar el tiempo que desee.
5. Para configurar la hora que desee, pulse los BOTONES DE CONFIGURACIÓN DE HORA apuntando el control
remoto al receptor de señal.
Para cancelar la configuración del temporizador
Compruebe si el icono ( ) está apagado.
Pulse el BOTÓN TIMER CANCEL (CANCELACIÓN DE TEMPORIZADOR) apuntando el control remoto al receptor
de señal. (El indicador luminoso del temporizador del aire acondicionado y la pantalla se apagará)
Seleccione uno de los cuatro tipos de funcionamiento.
NOTA
ON
OFF
CANCEL
SET
CANCEL
SET
CANCEL
SET
Modo Sueño
Configuración de la hora actual
Configuración del temporizador
Instrucciones de funcionamiento
Aire Acondicionado Multitipo
16

ESPAÑOL
Manual de propietario 17
Instrucciones de funcionamiento
Control de dirección de caudal de aire vertical / horizontal (Opcional)
• Al pulsar el BOTÓN DE OSCILACIÓN CHAOS (CAOS) la dirección horizontal del caudal de aire cambiará
automáticamente basándose en el algoritmo de caos para distribuir el aire de la sala de forma homogénea y, al mismo
tiempo, para hacer que el cuerpo humano se sienta tan cómodo como si disfrutara de una brisa natural.
• Use siempre el control remoto para ajustar la dirección vertical del caudal de aire.
Moviendo manualmente la dirección vertical del caudal de aire a mano podría dañar el mecanismo.
Cuando la unidad esté apagada, la rejilla de caudal de aire vertical cerrará la abertura de ventilación de salida del
sistema.
NOTA
Puede ajustar el caudal de aire arriba y abajo (caudal de aire
vertical) usando el control remoto.
1. Pulse el BOTÓN START/STOP (INICIO/PARADA) para
iniciar la unidad.
2. Pulse el BOTÓN DE OSCILACIÓN CHAOS
(CAOS)
3. La rejilla oscilará arriba y abajo
automáticamente.
4. Para detener la rejilla en el ángulo que
desee, pulse ( ) de nuevo.

Instrucciones de funcionamiento
Esta operación hacer circular el aire sin enfriar ni calentar.
Puede activarse pulsando el BOTÓN AIR CIRCULATION (CIRCULACIÓN
DE AIRE). Una vez activada la circulación de aire, puede seleccionar la
velocidad del aire pulsando el BOTÓN DE SELECCIÓN DE VELOCIDAD
DE VENTILADOR DE INTERIOR.
La opción CHAOS Air (Aire CAOS) economiza el consume de energía y evita el sobreenfriamiento. La velocidad del
ventilador se cambia automáticamente de alta a baja o viceversa, dependiendo de la temperatura de ambiente.
NOTA
Esta función está habilitada de forma predeterminada
de fábrica pero puede deshabilitarla pulsando el botón
ON/OFF (ENCENDIDO/APAGADO) durante 6
segundos.
La unidad emitirá dos pitidos y el indicador luminoso
(2) parpadeará 4 veces.
Para habilitarlo, pulse el botón de nuevo durante 6
segundos.
La unidad emitirá dos pitidos y el indicador luminoso
(1) parpadeará 4 veces.
NOTA
Modo de circulación de aire
Esta función es útil en caso de un fallo eléctrico.
Cuando se recupere la alimentación, esta función recupera la situación de funcionamiento anterior y el aire acondicionado
funcionará con la misma configuración.
Función de reinicio automático
Botón
ENCENDIDO/
APAGADO
Aire Acondicionado Multitipo
18

ESPAÑOL
Manual de propietario 19
Mantenimiento y reparación
Unidad interior
Antes de realizar ninguna labor de mantenimiento, desconecte la alimentación principal del sistema, desconecte el
cortacircuitos y desenchufe el cable de alimentación.
Limpie la unidad con un paño suave. No utilice lejía ni limpiadores abrasivos.
Nunca use ninguno de estos
• Agua más caliente de 40°C. Podría causar deformación y descoloración.
• Substáncias volátiles. Podrían dañar la superficie del aire acondicionado.
Filtros de aire
Los filtros de aire detrás del panel frontal / rejilla deben revisarse y limpiarse cada 2
semanas o con mayor frecuencia si fuera necesario.
Para retirar los filtros, consulte los diagramas autoexplicativos de cada tipo de
modelo.
Limpie los filtros con una aspiradora o con agua jabonosa caliente.
Si la suciedad no se elimina fácilmente, lave los filtros con una solución de
detergente en agua templada.
Séquelos bien a la sombre tras lavarlos y vuelva a colocarlos en su sitio.
G
a
s
o
l
i
n
e
P
o
w
d
e
r
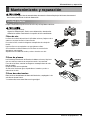
Mantenimiento y reparación
Filtros de plasma
Los filtros de plasma detrás del filtro de aire deben revisarse y limpiarse
una vez cada tres meses o con mayor frecuencia si es necesario.
Para retirar los filtros, consulte los diagramas autoexplicativos de cada
tipo de modelo.
Limpie los filtros con un aspirador.
Si está sucio, lávelo con agua, séquelo bien a la sombra y vuelva a
colocarlo en su sitio.
Filtros desodorizantes
Retire los filtros desodorizantes de detrás del filtro de aire y expóngalo a la luz
solar directa durante 2 horas.
Y a continuación, inserte estos filtros en su lugar original.

Mantenimiento y reparación
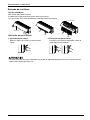
Abra el panel frontal como se muestra.
A continuación tire ligeramente de la pestaña del filtro para retirarlo.
Tras retirar el filtro, retire el filtro desodorizante tirando ligeramente hacia delante.
Panel frontal
Filtro de plasma
Utilización del panel frontal
1. Cierre del panel frontal
Mueva la tapa hacia arriba y cierre el panel
frontal.
2. Extracción del panel frontal
Levante la tapa hasta el enganche y retire el
panel frontal hacia delante.
Tipo Art Cool Mirror
Retirada de los filtros
No toque este filtro de plasma antes de transcurridos 10 segundos desde que se abra la rejilla de entrada,
podría causar descargas eléctricas.
Aire Acondicionado Multitipo
20

ESPAÑOL
Manual de propietario 21
Mantenimiento y reparación
Sugerencias de operación
Función de autodiagnóstico
No sobreenfríe la sala.
Esto no es bueno para la salud y se
malgasta electricidad.
Mantenga las cortinas y
persianas cerradas.
Impida que la luz solar directa entre en la
sala cuando el aire acondicionado se
encuentre en funcionamiento.
Mantenga la temperatura de la
sala uniforme.
Ajuste la dirección del caudal de aire
vertical y horizontal para asegurar que la
temperatura de la sala es uniforme.
Asegúrese de que las
puertas y las ventanas
están cerradas.
Evite abrir las puertas y las
ventanas todo lo posible para
mantener el aire frío en la sala.
Limpie el filtro de aire
con regularidad.
Los bloqueos en el filtro de
aire, reducen el caudal de aire
y los efectos de refrigeración y
deshumidificación.
Límpielo al menos cada dos
semanas.
Ventile la sala
ocasionalmente.
Ya que las ventanas deben
mantenerse cerradas, es una
buena idea abrirlas y ventilar
la sala de vez en cuando.
Utilice una mayor
velocidad del ventilador
para una refrigeración
más rápida y efectiva.
La unidad aporta su capacidad
de refrigeración nominal
cuando la velocidad del
ventilador es alta.
Unidad exterior
Debe revisar regularmente las bobinas del intercambiador de calor y las aberturas del panel de la unidad exterior.
Si está atascado con suciedad, deberá limpiar el intercambiador de calor y las aberturas del panel con un equipo
profesional de limpieza por vapor.
Las bobinas sucias o atascadas pueden reducir la eficacia de funcionamiento del sistema y causar unos costes de
funcionamiento más altos.
NOTA
Cuando aparece la palabra ‘CH’ en el display de la plaqueta electrónica es por que existe un problema, por favor
contacte a su instalador

Consejos de resolución ! problemas Ahorre tiempo y dinero!
El aire acondicionado podría funcionar de forma anormal cuando:
Problema
■
El fusible se ha fundido / se ha
activado el cortacircuitos.
■
Fallo eléctrico.
■
Alto voltaje.
■
El caudal de aire está bloqueado.
■
El filtro de aire está sucio.
■
La sala puede estar demasiado
caliente.
■
El aire frío se está escapando.
■
Compruebe la configuración de
temperatura.
■
Puede haber alguna fuente de calor
en la sala.
El aire
acondicionado
no se enciende
El aire
acondicionado
no enfría como
debería
• Compruebe la caja de fusibles / cortacircuitos
de la casa y cambia el fusible o reinicie el
cortacircuitos.
• Si hay un corte eléctrico, seleccione el control
de modo como OFF (APAGADO).
Cuando se reanude la alimentación, espere 3
minutos antes de reinciiar el aire acondicionado
para evitar que se active la protección de
sobrecarga del compresor.
• Si la tensión es inusalmente alta o baja, el
cortacircuitos se activará.
• Asegúrese de que no hay cortinas, persianas o
muebles bloqueando la parte frontal del aire
acondicionado.
• Limpie el filtro, al menos, cada 2 semanas.
Consulte la sección de Mantenimiento y
reparación.
• Al encender el aire acondicionado por primera
vez, debe dejar algo de tiempo para que la sala
se enfríe.
• Compruebe los registros de calefacción abiertos
y el retorno de aire frío.
• Asegúrese de que están bien.
• Compruebe y elimine esta fuente o apáguela
mientras usa el aire acondicionado.
Qué hacerCausas posibles
1. Cualquier situación anormal, como olor a quemado, un ruido algo, etc… Detenga la unidad y active el
cortacircuitos. Nunca intente reparar el equip ousted mismo o reiniciar el equipo en estos casos.
2. El cable de alimentación está demasiado caliente o dañado.
3. El autodiagnóstico genera un código de error.
4. Hay fugas de agua desde la unidad interior incluso cuando la humedad sea baja.
5. Cualquier interruptor, cortacircuitos (de seguridad, de tierra) o fusible falla no funciona correctamente
El usuario debe llevar a cabo una comprobación y limpieza de rutina para evitar un mal
rendimiento de la unidad.
En caso de que aparezca una situación especial, el trabajo debe ser llevado a cabo solamente por
personal de mantenimiento.
Llame al servicio técnico inmediatamente en las siguientes situaciones
Mantenimiento y reparación
Aire Acondicionado Multitipo
22

P/No.:MFL62490902
-
 1
1
-
 2
2
-
 3
3
-
 4
4
-
 5
5
-
 6
6
-
 7
7
-
 8
8
-
 9
9
-
 10
10
-
 11
11
-
 12
12
-
 13
13
-
 14
14
-
 15
15
-
 16
16
-
 17
17
-
 18
18
-
 19
19
-
 20
20
-
 21
21
-
 22
22
-
 23
23
-
 24
24
-
 25
25
-
 26
26
-
 27
27
-
 28
28
-
 29
29
-
 30
30
-
 31
31
-
 32
32
-
 33
33
-
 34
34
-
 35
35
-
 36
36
-
 37
37
-
 38
38
-
 39
39
-
 40
40
-
 41
41
-
 42
42
-
 43
43
-
 44
44
-
 45
45


LG TMNH186D8R0 Manual de usuario
- Tipo
- Manual de usuario
- Este manual también es adecuado para
en otros idiomas
- English: LG TMNH186D8R0 User manual
Artículos relacionados
-
LG AVNW36GM1S0.ANWTSAN El manual del propietario
-
LG AVNQ48GM2A0.ANWTLPH El manual del propietario
-
-
-
-
-
LG S092CT.UY0 Manual de usuario
-
-