RAMSET MasterShot Operator's Instruction & Training Manual
- Categoría
- Herramientas eléctricas
- Tipo
- Operator's Instruction & Training Manual
Este manual también es adecuado para

HERRAMIENTA DE PÓLVORA DE BAJA VELOCIDAD
Manual de Instrucciones y
Entrenamiento del Operador
• El MasterShot™ es una herramienta de fijación de tipo pistón que funciona a baja
velocidad. Está ideada para usarse con las cargas de pólvora Ramset CW calibre
0.22 y con los sujetadores Ramset.
• No debe hacer funcionar el MasterShot™ antes de estudiar detenidamente este
manual y de comprender en su totalidad el material contenido en el mismo.
NOTA IMPORTANTE:
La garantía de esta herramienta se activa solamente al recibir ITW
Brands el Examen del Operador contestado completamente.
ESTA HERRAMIENTA DEBE SER USADA SÓLO POR
OPERADORES AUTORIZADOS. USTED DEBE OBTENER EL
PERMISO CORRESPONDIENTE ANTES DE USARLA. SE LE
EXPEDIRÁ SU TARJETA DE OPERADOR DE HERRAMIENTA
DESPUÉS DE QUE CONTESTE CORRECTAMENTE EL EXAMEN
ADJUNTO Y LO ENVÍE, PARA RECIBIR SU TARJETA Y
ACTIVAR SU GARANTÍA. EL PERMISO DE OPERADOR
TAMBIÉN PUEDE OBTENERSE EN: www.ramset.com
THIS TOOL IS FOR USE ONLY BY LICENSED OPERATORS.
YOU MUST OBTAIN A LICENSE BEFORE USING IT. A
TOOL OPERATOR'S CARD WILL BE ISSUED TO YOU
AFTER SUCCESSFULLY COMPLETING THE ENCLOSED
EXAM AND RETURNING IT TO RECEIVE YOUR CARD
AND ACTIVATE YOUR WARRANTY. OPERATOR'S
LICENSE CAN ALSO BE OBTAINED AT: www.ramset.com
LOW VELOCITY POWDER ACTUATED TOOL
Operator's Instruction & Training Manual
• The MasterShot™ is a low velocity piston type fastening tool. It is designed for
use with Ramset .22 caliber CW powder loads and Ramset fasteners.
• Do not operate the MasterShot™ before studying this manual carefully and
thoroughly understanding the material contained herein.
IMPORTANT: The tool warranty is only activated upon receipt by ITW Brands of the
completed Operator's Exam.
Part #40088
MANUAL PRINTED IN TAIWAN Rev. 06/10
RD v01
Part #40088
MANUAL IMPRESO EN TAIWAN Rev. 06/10
RD v01

GARANTÍA
GARANTÍA
TODAS LAS GARANTÍAS DE LOS PRODUCTOS DESCRITOS AQUÍ, EXPRESAS
O IMPLÍCITAS, INCLUIDA LA GARANTÍA DE COMERCIABILIDAD E IDONEIDAD
PARA CIERTOS PROPÓSITOS EN PARTICULAR, QUEDAN EXCLUIDAS DE MANERA
ESPECÍFICA, EXCEPTO LO SIGUIENTE: ITW BRANDS REPARARÁ O REEMPLAZARÁ
A SU SOLA DISCRECIÓN CUALQUIER PIEZA DE LA HERRAMIENTA O SUJETADOR
QUE, DENTRO DE UN PLAZO DE 6 MESES DESPUÉS DE LA VENTA POR ITW BRANDS,
ESTA COMPAÑÍA ENCUENTRE QUE ESTÁ DEFECTUOSO EN LOS MATERIALES O EN
LA MANO DE OBRA; EL DESGASTE NORMAL QUEDA EXCLUIDO. ÉSTA ES LA ÚNICA
GARANTÍA DE ITW BRANDS Y EL ÚNICO RECURSO A DISPOSICIÓN DEL COMPRADOR.
Para devoluciones bajo garantía, comuníquese con: ITW Brands, Attn: QA Department,
1575 Hunter Road, Suite A, Hanover Park, IL 60133; Teléfono: (877) 489-2726.
NOTA: Es muy importante que el operador de esta herramienta lea y comprenda
completamente el manual de la herramienta completo y conteste el Examen del
Operador de la última página. La garantía no será válida hasta que no se reciba el
examen, junto con una copia del recibo de venta, y hasta que ITW Brands no revise
todo. El permiso de operador también puede obtenerse en: www.ramset.com
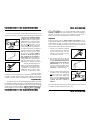
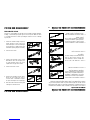
PARA EVITAR LESIONES SERIAS O LA MUERTE
Nunca cierre la herramienta con la mano sobre el extremo de
carga de esta herramienta de fijación. Esto puede ocasionar
una lesión grave en la mano causada por la penetración del
pistón o por el disparo de un elemento de fijación.
WARRANTY
WARRANTY
ALL WARRANTIES OF THE PRODUCTS DESCRIBED HEREIN, EXPRESSED OR
IMPLIED, INCLUDING THE WARRANTY OF MERCHANTABILITY AND FITNESS
FOR PARTICULAR PURPOSES ARE SPECIFICALLY EXCLUDED, EXCEPT FOR THE
FOLLOWING: ITW BRANDS WILL REPAIR OR REPLACE AT ITS SOLE OPTION
ANY TOOL PART OR FASTENER WHICH WITHIN 6 MONTHS AFTER SALE BY
ITW BRANDS IS FOUND BY ITW BRANDS TO BE DEFECTIVE IN MATERIAL OR
WORKMANSHIP, NORMAL WEAR AND TEAR EXCLUDED. THIS IS THE SOLE
WARRANTY OF ITW BRANDS AND THE SOLE REMEDY AVAILABLE TO THE BUYER.
For warranty returns contact: ITW Brands, Attn: QA Department,
1575 Hunter Road, Suite A, Hanover Park, IL 60133; Phone: (877) 489-2726.
NOTE: It is very important that the operator of this tool completely reads and
understands the entire tool manual and completes the Operator's Exam on the last
page. The warranty will not be valid until the test is received, along with a copy
of your sales receipt, and reviewed by ITW Brands. Operator's license can also
be obtained at: www.ramset.com
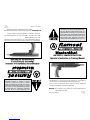
TO AVOID SERIOUS INJURY OR DEATH
Operators and bystanders
must wear eye and hearing
protection.
Never close tool with hand over fastener loading end of the tool.
A serious hand injury from penetration by the piston or a
discharged fastener could result.
Read manual before
operating tool.
El operador y terceras
personas deben
emplear protección
para los ojos y oídos.
Lea el manual antes
de operar esta
herramienta.
THIS TOOL IS FOR USE ONLY BY LICENSED OPERATORS.
YOU MUST OBTAIN A LICENSE BEFORE USING IT. A
TOOL OPERATOR'S CARD WILL BE ISSUED TO YOU
AFTER SUCCESSFULLY COMPLETING THE ENCLOSED
EXAM AND RETURNING IT TO RECEIVE YOUR CARD
AND ACTIVATE YOUR WARRANTY. OPERATOR'S
LICENSE CAN ALSO BE OBTAINED AT: www.ramset.com
LOW VELOCITY POWDER ACTUATED TOOL
Operator's Instruction & Training Manual
• The MasterShot™ is a low velocity piston type fastening tool. It is designed for
use with Ramset .22 caliber CW powder loads and Ramset fasteners.
• Do not operate the MasterShot™ before studying this manual carefully and
thoroughly understanding the material contained herein.
IMPORTANT: The tool warranty is only activated upon receipt by ITW Brands of the
completed Operator's Exam.

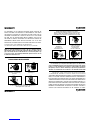
MEDIDAS DE SEGURIDAD
1 MEDIDAS DE SEGURIDAD
¡ADVERTENCIA!
Las siguientes páginas contienen avisos
de advertencia y precaución, así como
reglas para operar con seguridad la herramienta, todo lo cual debe conocer y seguir
el operador para evitar sufrir lesiones serias o la muerte. Después de estudiar
detenidamente este manual, conteste el Examen del Operador y envíelo a ITW
Brands para recibir su Tarjeta de Operador y activar la garantía.
ANTES DE CARGAR Y DISPARAR PROTÉJASE USTED MISMO Y A LOS DEMÁS
1. Nunca coloque la mano ni los dedos en
el extremo de la boca de la herramienta
cargada; el sujetador o el pistón pueden
lesionarle seriamente la mano en caso de
una descarga accidental.
2. Para lograr un funcionamiento uniforme
de la herramienta, siempre use sólo
sujetadores y cargas Ramset.
3. Los operadores y circunstantes deben
tener puesta protección para los ojos
y los oídos en todo momento. Pueden
producirse lesiones en los ojos y pérdida
de oído si no se lleva puesto el equipo
adecuado.
4. Mantenga despejada el área de trabajo
y, donde se requiera, siempre coloque
avisos de advertencia al usar la herra-
mienta. El aviso debe decir “Herramienta
de Pólvora en Uso” ("Powder Actuated
Tool in Use"), y puede obtenerse en el
Depto. de Servicios Técnicos, llamando al
1-877-ITW-BRANDS (1-877-489-2726).
NOTA IMPORTANTE: A fin de activar la garantía debe leer comple-
tamente este manual, contestar el examen y enviarlo a la dirección
señalada en la tapa posterior de este manual.
SAFETY PRECAUTIONS
1 SAFETY PRECAUTIONS
WARNING!
The following pages contain detailed warnings,
cautions, and rules of safe operation with which the
operator must be familiar and follow to avoid serious injury or death. After thorough-
ly reviewing this manual, complete the Operator's Exam and return to ITW Brands for
your Operator's Card and to activate your warranty.
BEFORE LOADING AND FIRING PROTECT YOURSELF AND OTHERS
1. Never place your hand or fingers over the
front muzzle of the tool - the fastener or
piston can seriously injure your hand in
the event of an accidental discharge.
2. Always use only Ramset fasteners and
loads at all times for consistent tool
functioning.
3. Operators and bystanders must wear
eye and hearing protection at all times.
Serious eye injury and hearing loss can
result if proper gear is not worn.
4. Keep work area clear and where required
always post warning signs when using
the tool. Sign should state, "Powder
Actuated Tool in Use" and can be obtained
by contacting Technical Services at
1-877-ITW-BRANDS (1-877-489-2726).
IMPORTANT: In order to activate your warranty, you must read this
manual thoroughly, complete the exam and return to the address on
the back page of this manual.

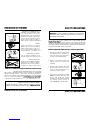
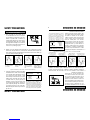
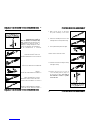
1.
Antes de usar la herramienta asegúrese de
que esté descargada y entonces realice la
revisión de funcionamiento siguiente: Revise
el funcionamiento de la herramienta sin carga
de pólvora ni sujetador; para ello, empújela
contra la superficie de trabajo, asegurándose
de que la ranura del barril se alinee con las
marcas del receptor. Repita esto varias veces
para asegurarse de que esté funcionando
correctamente la herramienta.
2. Siempre revise el material en el que vaya a fijar; para ello efectúe la Prueba
del Punzón de Marcar. Usando un sujetador como punzón de marcar, pique la
superficie de trabajo con un golpe de martillo común y verifique los resultados.
Tenga puesta protección para los ojos mientras efectúa esta prueba.
3.
Si el material base es adecuado para sujetadores
fijados con herramienta de pólvora, realice una
prueba fijando un sujetador en un material base
adecuado con una carga del número 1 (gris). Si
la carga del número 1 no clava completamente
el sujetador, pruebe con una carga del siguiente
número más alto hasta que encuentre el nivel
adecuado. Si no realiza disparos de prueba
para determinar el nivel de potencia correcto,
puede aplicar una fuerza excesiva al sujetador,
causando que éste atraviese el material de
trabajo y pueda lesionar a alguien situado al otro
lado. Si aplica una fuerza excesiva al sujetador
también puede dañar la herramienta.
MEDIDAS DE SEGURIDAD
MEDIDAS DE SEGURIDAD 2
Preparación para la carga
1. Si se embota la punta del
sujetador, significa que el
material es demasiado duro.
2. Si el material se agrieta
o rompe, significa que es
demasiado quebradizo.
3. Si el sujetador penetra
con facilidad, significa que
el material es demasiado
blando.
4. Si el sujetador hace una
pequeña muesca en el
material, significa que éste
es adecuado para fijación.
(Materiales base típicos: concreto vaciado, acero estructural y mampostería.)
NOTA: Las cargas Ramset están fabricadas para
usarse con herramientas de dicha marca. No
intente usar otras cargas. Si lo hace puede causar
una descarga accidental con los consecuentes
daños a la herramienta. Esta herramienta NO está
fabricada para usar cargas rojas (5) ni moradas
(6). Si se utilizan cargas rojas (5) o moradas (6), el
operador o los circunstantes pueden sufrir lesiones.
Niveles de potencia disponibles:
Nivel de potencia No.
Color
1. Gris Menos potente
2. Café
3. Verde
4. Amarillo Más potente
1. Prior to using the tool, make sure it
is unloaded and then do the functional
check: Check the functioning of the tool,
without a powder load or fastener, by
pushing down against the work surface,
compressing the back end of tool, pulling
the trigger and releasing the tool from the
work surface. Repeat this several times to
insure tool is operating properly.
2. Always check the material being fastened into, by performing the Center
Punch Test: Using a fastener as a center punch, strike the fastener against the
work surface using an average hammer blow and check the results. Wear eye
protection while performing this test.
3. If the base material is suitable for powder
actuated fasteners, make a test fastening
into a suitable base material with a num-
ber 1 (gray) load. If the number 1 load
does not fully set the fastener, try the next
higher power load until the proper level
is found. Failure to properly test fire to
determine correct power level may result
in overpowering the fastener, causing it to
pass completely through the work mate-
rial, injuring someone on the other side.
Overpowering the fastener may also dam-
age the tool.
SAFETY PRECAUTIONS
SAFETY PRECAUTIONS 2
1. If the fastener point
is blunted, material
is too hard.
2. If material cracks or
shatters, material is
too brittle.
3. If the fastener pen-
etrates the material
easily, material is too
soft.
4. If the fastener makes
small indentation into
material, material is
suitable for fastening.
(Typical base materials: poured concrete, structural steel and masonry.)
NOTE: Ramset loads are designed for use
with Ramset tools. Do not attempt to use
other power loads. Doing so may lead to
unintentional load discharge as well as
damage to the tool. This tool is NOT designed
to use red (5) or purple (6) power level loads.
Using red (5) or purple (6) loads can result in
serious injury to the operator or bystanders.
Available Power Levels:
Power Level No. Color
1. Gray Weakest
2. Brown
3. Green
4. Yellow Strongest
Prepare for Loading

MEDIDAS DE SEGURIDAD
3 MEDIDAS DE SEGURIDAD
1. Siempre apunte la herramienta lejos de
las personas y en una dirección segura.
2.
Nunca use la herramienta cuando haya
cerca explosivos o materiales inflamables.
3.
Nunca dispare la herramienta sin tener un
sujetador puesto. El pistón saldrá por el
extremo de la boca de la herramienta, penetrará
la superficie de trabajo y posiblemente cause
lesiones al operador o a un circunstante.
Si dispara sin tener un sujetador puesto,
también puede dañar la herramienta.
4. Siempre mantenga la herramienta per-
pendicular a la superficie de trabajo para
evitar sufrir lesiones serias o la muerte
a causa de sujetadores que reboten.
Siempre que sea posible utilice un pro-
tector contra descascaramiento*.
5. Nunca fije un sujetador demasiado cerca
de otro sujetador o de un borde libre. Esto
puede causar un rebote del sujetador.
Siempre respete los requisitos mínimos
de separación entre sujetadores y de
distancia con respecto a bordes.
6. Nunca dispare en materiales muy duros o
quebradizos como hierro fundido, azulejo,
vidrio o piedra. Estos materiales pueden
romperse y causar que salgan volando
fragmentos afilados y/o el sujetador.
* Para pedir el protector contra descascaramiento
optativo, llame al 1-877-ITW-BRANDS
(1-877-489-2726)
Manejo de la herramienta
SAFETY PRECAUTIONS
3 SAFETY PRECAUTIONS
1. Always point the tool away from people
and in a safe direction.
2. Never use tool when explosives or flam-
mable materials are nearby.
3. Never fire the tool without a fastener.
The piston will protrude from the muzzle
of the tool, enter the work surface and
possibly cause injury to the operator or a
bystander. Firing without a fastener may
also damage the tool.
4. Always hold the tool perpendicular to the
work surface to avoid serious injury or
death from ricocheting fasteners. Use a
spall guard* whenever possible.
5. Never set a fastener too close to another
fastening or a free edge. This can cause
the fastener to ricochet. Always follow
the minimum spacing and edge distance
requirements.
6. Never fire into very hard or brittle mate-
rials such as cast iron, tile, glass or
rock. These materials can shatter, causing
sharp fragments and/or the fastener to fly
freely.
* To order optional spall guard,
call 1-877-ITW-BRANDS (1-877-489-2726)
Operating the Tool
90˚
90˚

MEDIDAS DE SEGURIDAD
MEDIDAS DE SEGURIDAD 4
7. Nunca fije nada en material base de
acero estructural de un espesor inferior a
3/16". Nunca fije nada en material base de
concreto de un espesor inferior a 3 veces
la longitud de penetración del sujetador.
Siempre respete los requisitos mínimos de
penetración.
8. No se recomienda fijar en bloc o en mam-
postería. Cuando es necesario fijar en
paredes de mampostería, se recomienda
introducir los sujetadores sólo en las unio-
nes horizontales. No hay valores de fuerza
de sujeción publicados de estos materiales
debido a la falta de uniformidad de éstos.
9.
Nunca fije ningún sujetador en un agujero
o a través de éste. Siempre mantenga una
distancia mínima de 1/2" de cualquier aguero
previamente taladrado o perforado.
10.
Si decide no realizar la fijación después
de haber cargado la herramienta, siempre
retire primero la carga de pólvora, y luego
el sujetador. Nunca intente extraer de la
herramienta la carga a fuerza. Para recibir
ayuda, llame al Depto. Técnico, al 1-877-
ITW-BRANDS (1-877-489-2726).
1.
Nunca
deje desatendida una herramien-
ta cargada. Alguien puede tomarla, sin
saber que está cargada, dispararla acci-
dentalmente, y causar lesiones serias o
la muerte.
Nunca
cargue la herramienta
sino hasta que esté preparado para fijar el
sujetador. Siempre guarde la herramienta
(descargada) y las cargas bajo llave.
Manejo de la herramienta y
de las cargas de pólvora
ACERO CONCRETO
SAFETY PRECAUTIONS
SAFETY PRECAUTIONS 4
7. Never fasten into structural steel base
material thinner than 3/16". Never fasten
into concrete base material thinner than 3
times shank penetration. Always maintain
minimum penetration requirements.
8. Fastening into block and masonry is not
recommended. When it is necessary to fas-
ten into masonry walls, it is recommended
that fasteners be driven into the horizontal
joints only. Published holding values for
these materials is not available due to the
inconsistency of the materials.
9. Never fasten through or into a hole. Always
maintain at least 1/2" distance from any
pre-drilled or pre-punched hole.
10. Should you decide not to make a fastening
after the tool has been loaded, always
remove the powder load first, then the
fastener.
Never attempt to pry an unfired load
out of the tool. Call The Technical Department
at 1-877-ITW-BRANDS (1-877-489-2726) for
assistance.
1. Never leave a loaded tool unattended.
Someone may pick it up, not know it is
loaded and accidentally discharge the tool
causing serious injury or death. Never load
the tool until you are prepared to complete
the fastening. Always store loads and tool,
unloaded, under lock and key.
Handling Tool and Powder Loads
STEEL CONCRETE
STEP 1
STEP 2
PASO 1
PASO 2

MEDIDAS DE SEGURIDAD
5 MEDIDAS DE SEGURIDAD
2.
Nunca lleve sujetadores ni otros objetos duros
en el mismo bolsillo o recipiente donde tenga
cargas de pólvora. Las cargas podrían dis-
pararse y causar lesiones serias o la muerte.
3.
Las personas que padecen daltonismo deben
tener extremo cuidado al cargar la her-
ramienta. Debe tomar la carga sólo de una
caja identificada con el número de la carga
de pólvora. Nunca use cargas sueltas que
puedan identificarse de manera errónea.
4.
Nunca deben usarse las cargas de pólvora
con armas de fuego. Son más potentes que
las cargas usadas normalmente con armas
de fuego. Podrían producirse lesiones serias
o la muerte.
1.
Una vez instalado con herramienta de pól-
vora un sujetador, se considera fijado de
forma permanente. No intente extraer de
concreto o acero un sujetador instalado. Si
lo intenta puede causarse lesiones serias.
1.
Si la herramienta no dispara, manténgala
firmemente puesta contra el material por
30 segundos. Retire la herramienta de la
superficie de trabajo y abra el barril para
reajustar el pistón. Vuelva a colocar la carga
en la camara y repita la secuencia de disparo.
Si la herramienta no dispara de nuevo,
manténgala en su lugar por 30 segundos,
descárguela y luego deseche la carga en un
balde de agua. Nunca intente extraer de la
herramienta la carga a fuerza. Para recibir
ayuda, llame al Depto. Técnico, al 1-877-
ITW-BRANDS (1-877-489-2726).
Problemas en el funcionamiento
de la herramienta
Sujetadores
SAFETY PRECAUTIONS
5 SAFETY PRECAUTIONS
2. Never carry fasteners or other hard
objects in the same pocket or container
with powder loads. The loads could be set
off, causing serious injury or death.
3. A person that is color blind must be extra
careful when loading the tool. One must
only take a load from a box that is identi-
fied by powder load number. Never use
loose loads that can be misidentified.
4.
Powder loads must never be used in fire-
arms. They are more powerful than the
charges normally used in small firearms.
This could result in serious injury or death.
1. A powder actuated fastener, after it has
been installed, is considered a permanent
fastening. Do not attempt to pull a fastener
out of concrete or steel. Attempting to do
so may result in serious injury.
1.
If the tool fails to fire, hold the tool firmly against
the material for 30 seconds. Remove the tool
from the work surface, open the barrel to reset
the piston. Re-chamber the load and repeat
firing sequence. If the tool fails to fire again,
hold for 30 seconds, unload the tool, and then
discard the load into a bucket of water. Never
attempt to pry an unfired load out of the tool.
Call The Technical Department at
1-877-ITW-BRANDS (1-877-489-2726) for
assistance.
Fasteners
Operating Problems
3
245
1
30
3
245
1
30

MEDIDAS DE SEGURIDAD
MEDIDAS DE SEGURIDAD 6
2. Nunca descargue ni desarme la
herramienta si está trabada, pegada o
descompuesta y contiene una carga de
pólvora en buen estado. La herramienta
podría dispararse accidentalmente.
Siempre apunte toda herramienta trabada
lejos de usted y de las demás personas.
De inmediato guarde la herramienta
trabada o descompuesta en un recipiente
con cerradura de llave después de
ponerle una etiqueta de "Defectuosa -
No Usar" ("Defective - Do Not Use").
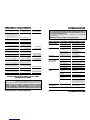
GUÍA PARA SELECCIONAR SUJETADORES RAMSET
Clavos con cabeza de 0.300”
y estrías de plástico
Longitud Diámetro
del tallo del tallo
1/2" .145
5/8" .145
3/4" .145
1" .145
1-1/4" .145
1-1/2" .145
1-3/4" .145
2" .145
2-3/8" .145
2-1/2" .145
Clavos con cabeza de 0.300”, estrías
de plástico y arandela de 7/8"
Longitud Diámetro
del tallo del tallo
1" .145
1-1/4" .145
1-1/2" .145
2" .145
2-1/2" .145
SAFETY PRECAUTIONS
SAFETY PRECAUTIONS 6
2. Never unload or disassemble a jammed,
stuck or broken tool which contains a
live powder load. This may cause the
tool to fire unintentionally. Always point
a jammed tool away from yourself
and other people. Immediately store
a jammed or broken tool in a locked
container after tagging it "Defective -
Do Not Use". Call 1-877-ITW-BRANDS
(1-877-489-2726) for technical assistance.
RAMSET FASTENER SELECTION GUIDE
.300 Head Plastic Fluted Drive Pins
Shank Shank
Length Diameter
1/2" .145
5/8" .145
3/4" .145
1" .145
1-1/4" .145
1-1/2" .145
1-3/4" .145
2" .145
2-3/8" .145
2-1/2" .145
.300 Head Plastic Fluted Drive Pin
with 7/8" Washer
Shank Shank
Length Diameter
1" .145
1-1/4" .145
1-1/2" .145
2" .145
2-1/2" .145
3" .145
DEFECTIVE
DO NOT USE
DEFECTUOSO
NO USAR

CAUTION!Be sure to read and understand all safety precautions
and complete the Operator's Exam before attempting to
operate the tool. Check to be sure the tool is unloaded and no foreign objects or
fasteners are in the barrel. Perform daily function test before operating.
OPERATION
Check the functioning of the tool, without a powder load or fastener in the tool,
by pushing down against the work surface. Depress muzzle bushing on the work
surface and pull the trigger. You should hear an audible click as the firing pin
releases. Function unloaded tool several times and insure that the breech parts and
firing mechanism operate freely before fastening with the tool.
1. Point the tool in a safe direction and slide
the barrel forward with your other hand.
This action resets the piston for the next
fastening. Loss of power may be the result
of an improperly reset piston.
2. Place a fastener, point out, into the front
end of the barrel until the plastic fluted tip
fits inside. Always load the fastener before
inserting the power load to prevent acci-
dental discharge. Do not use excessive
force when inserting the fastener. Stop if
excessive force is required and call 1-877-
ITW-BRANDS for technical assistance.
3. Insert the powder load after making sure
the chamber is clear. The powder load will
not fully set until the tool is depressed
against the work surface. Always start
with the lowest level and increase until the
proper level is found. Note: Overpowering
a fastener into steel or concrete is
dangerous.
Note: Before making the fastening, the base material should be center punch tested
for suitability of powder actuated fastenings (see pg. 2).
¡PRECAUCIÓN!
Asegúrese de leer y comprender todas las
medidas de seguridad y conteste el Examen
del Operador antes de hacer funcionar la herramienta. Revise para asegurarse de que
esté descargada la herramienta y de que no haya objetos extraños ni sujetadores en el
barril. Efectúe la prueba diaria de funcionamiento antes de utilizar la herramienta.
FUNCIONAMIENTO
Revise el funcionamiento de la herramienta sin carga de pólvora ni sujetador en
aquélla; para ello, empújela contra la superficie de trabajo. Presione el casquillo de
la boca contra la superficie de trabajo y jale del gatillo. Debe oírse un chasquido al
impulsarse el percutor.
1.
Apunte la herramienta en una dirección
segura y deslice el barril hacia adelante
con la otra mano. Con este movimiento se
reajusta el pistón para el siguiente disparo.
Una pérdida de potencia puede ser resultado
de un reajuste inadecuado del pistón.
2.
Coloque un sujetador, con la punta hacia
afuera, en el extremo delantero del barril
hasta que la punta con las estrías de plástico
se acomode en el interior. Siempre cargue
el sujetador antes de introducir la carga
de pólvora para impedir una descarga
accidental. Deténgase si se requiere una
fuerza excesiva y llame al 1-877-ITW-
BRANDS, donde recibirá asistencia técnica.
3.
Introduzca la carga de pólvora después de
asegurarse de que esté despejada la camara.
The powder load will not fully set until
the tool is depressed against the work
surface
. Siempre comience con el nivel de
potencia más bajo y vaya aumentándolo
hasta encontrar el nivel adecuado. Nota: Es
peligroso aplicar una fuerza excesiva al
introducir el sujetador en acero u concreto.
Nota: Antes de fijar el sujetador, debe someterse el material base a la prueba del punzón de marcar
para ver su idoneidad para fijarle sujetadores fijados con herramienta de pólvora (ver pág. 2)
FUNCIONAMIENTO DE LA HERRAMIENTA
7
FUNCIONAMIENTO DE LA HERRAMIENTA
TOOL OPERATION
7 TOOL OPERATION

4. Close tool by pulling the barrel back to the
closed position. Never attempt to close
the tool by exerting force on the front of
the barrel. Never place your fingers or
hands over the muzzle end of the barrel.
The proper position of the hands and
fingers are shown in the illustration.
5. With the tool in the closed position.
1. Place the tool against the materials to be
fastened. Hold the tool firmly with one hand
and completely depress the tool. Place
other hand firmly against the back of the
handle housing. 2. Pull the trigger. Always
hold the tool firmly and perpendicular to
the work surface. Excessive recoil may
be experienced if the tool is not held
firmly against the work surface. Do not
depress the tool in any manner except
against the work surface. If the tool does
not fire after pulling the trigger, hold the
tool firmly against the material for 30
seconds. Remove the tool from the work
surface, open the barrel to reset the piston.
Re-chamber the load and repeat firing
sequence. If the tool fails to fire again, hold
for 30 seconds then remove the load and
discard the load into a bucket of water.
6. To prepare for the next fastening, point the
tool in a safe direction, and slide the barrel
firmly forward. This action ejects the fired
load out of the tool and properly resets the
piston. The tool is now ready for the next
fastening.
FUNCIONAMIENTO DE LA HERRAMIENTA
FUNCIONAMIENTO DE LA HERRAMIENTA
8
4.
Cierre la herramienta; para ello, estire el barril
hacia atrás a la posición cerrada. Nunca intente
cerrar la herramienta ejerciendo fuerza en la
parte delantera del barril. Nunca coloque los
dedos ni la mano en el extremo de la boca
del barril. La posición correcta de las manos y
dedos se muestra en la ilustración.
5.
Teniendo la herramienta en la posición cerrada.
1. Coloque la herramienta contra el material
que va a fijar. Con una mano sujete firmemente
la herramienta y presione ésta completamente
contra la superficie de trabajo. Coloque
firmemente la otra mano contra la parte posterior
del alojamiento del mango. 2. Jale del gatillo.
Siempre sujete firmemente la herramienta, y en
posición perpendicular a la superficie de trabajo.
Puede experimentarse un retroceso excesivo si
no se sujeta firmemente la herramienta contra la
superficie de trabajo. No presione la herramienta
contra nada, excepto la superficie de trabajo.
Si la herramienta no dispara después de jalar el
gatillo, manténgala firmemente puesta contra el
material por 30 segundos. Retire la herramienta
de la superficie de trabajo y abra el barril para
reajustar el pistón. Vuelva a colocar la carga
en la camara y repita la secuencia de disparo.
Si la herramienta falla de nuevo y no dispara,
manténgala en su lugar por 30 segundos, después
retire la carga y deséchela en un balde de agua.
6.
Para prepararse para la siguiente operación de
fijación, apunte la herramienta en una dirección
segura, y deslice firmemente el barril hacia
adelante. Con este movimiento se expulsa de
la herramienta la carga disparada y se reajusta
el pistón. La herramienta queda lista para la
siguiente operación de fijación.
LIMPIEZA COMPLETA
Para mantener la herramienta en buen estado de funcionamiento, se recomienda
limpiarla después de un uso intensivo o de una exposición constante a suciedad y
basura. Vea las páginas 13-15.
TOOL OPERATION
TOOL OPERATION 8
THOROUGH CLEANING
To maintain your tool in good working condition, it is recommended that the tool be
cleaned after heavy use or constant exposure to dirt and debris. See pages 13-15.

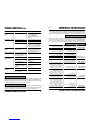
CORRECCIÓN DE PROBLEMAS
9 CORRECCIÓN DE PROBLEMAS
CORRECCIÓN DE PROBLEMAS
SIEMPRE CONSULTE EL MANUAL DE INSTRUCCIONES PARA VER LA
FORMA CORRECTA DE ENSAMBLAR LAS PIEZAS.
PROBLEMA CAUSA PROBABLE SOLUCIÓN
Sobreimpulsión del sujetador
Potencia excesiva Cambie al color de carga del siguiente
(Sobreimpulsión del pistón)
nivel inferior de potencia (ver pág. 2)
Material base blando Revise el material base (ver pág. 2)
La herramienta no dispara No se presionó la
Debe sujetarse firmemente la
herramienta y
herramienta completamente
debe presionarse completamente contra la
superficie de trabajo antes de jalar el gatillo.
Acumulación excesiva de suciedad
Para recibir asistencia técnica, llame al
en el mecanismo de disparo. Está
1-877-ITW-BRANDS (1-877-489-2726).
dañado el mecanismo de disparo.
No puede presionarse Hay piezas del mecanismo de Para recibir asistencia técnica, llame al
completamente la herramienta
disparo mal ensambladas
1-877-ITW-BRANDS (1-877-489-2726).
o dañadas
Disminución o pérdida de
El barril no regresa completamente
El barril debe tirarse completamente hacia adel-
potencia o penetración
a la posición frontal
ante para jalarse colocar correctamente el pistón
no uniforme del sujetador El pistón o el anillo de éste Reemplace el ensamble del pistón
están gastados o dañados
La uña está dañada Reemplace la uña
No puede sacarse el No está abriéndose Abra con firmeza la herramienta.
cartucho disparado completamente la herramienta Si es necesario, desármela y límpiela.
El pistón o el anillo de éste Reemplace el ensamble del pistón
están gastados o dañados
Está rota la punta eyectora del pistón
Reemplace el ensamble del pistón
Hay suciedad acumulada Limpie la camara con aceite detergente
en la camara de la carga y cepillo de alambre
La carga disparada se trabó
Retire de la herramienta el ensamble del
barril. Desarme el ensamble del barril y el
pistón Con una barra de bronce o aluminio
de 1/8” de diám. empuje la carga suave-
mente para sacarla de la camara.
Tool housing feels warm Re-firing tool too quickly Allow tool to cool for several
or hot to the touch minutes before firing.
El operador de la herramienta debe seguir cuidadosamente todas las
instrucciones de funcionamiento y medidas de seguridad para utilizarla
de forma correcta. A continuación aparece una lista de posibles
situaciones que puede encontrar el operador y las causas probables:
• Si ocurre un problema con una herramienta y se requiere asistencia técnica,
llame por favor al 1-877-ITW-BRANDS (1-877-489-2726)
ADVERTENCIA: No utilice la herramienta si no está funcionando correctamente.
TROUBLESHOOTING
9 TROUBLESHOOTING
Tool operator must carefully follow all operating instructions and precautions to
successfully operate the tool. Following is a list of potential situations an operator
may encounter and the probable causes:
•
If a tool problem occurs and technical assistance is required, please call 1-877-ITW-BRANDS
(1-877-489-2726)
WARNING: Do not operate a tool that is not functioning properly.
CORRECTING DIFFICULTIES
ALWAYS CHECK INSTRUCTION MANUAL FOR PROPER ASSEMBLY OF PARTS
DIFFICULTY PROBABLE CAUSE REMEDY
Over driving of fastener Excessive power Change to next lower power level
(Piston overdrive) load color and number (see pg. 2)
Soft base material Check base material (see pg. 2)
Tool fails to fire Failure to depress Tool must be held firmly and
tool completely completely depressed before
pulling the trigger
Excessive dirt build up Call 1-877-ITW-BRANDS
on firing mechanism. (1-877-489-2726) for
Damaged firing mechanism. technical assistance
Tool does not Misassembled or damaged Call 1-877-ITW-BRANDS
completely depress firing mechanism parts (1-877-489-2726) for
technical assistance
Reduction or loss of power Tool requires cleaning
Clean tool thoroughly (see pgs. 13-15)
and/or inconsistent Barrel not returning to Barrel must be pulled completely
fastener penetration full front position forward to properly position the piston
Worn or damaged piston Replace piston assembly
or piston ring
Damaged pawl Replace pawl
Hard base material Check base material (see pg. 2)
Fired cartridge will Tool not being opened Firmly snap the tool open from the
not extract completely closed position.
Bent piston or damaged Replace piston assembly
piston ring
Broken ejector tip on piston Replace piston assembly
Build-up of dirt in Clean chamber with a detergent
load chamber oil and wire brush
(see pgs. 13-15)
Stuck fired load Remove barrel assembly from tool.
Disassemble barrel and piston assem-
bly. Use a 1/8" dia. brass or aluminum
rod to gently push load out of chamber.
Tool housing feels warm Re-firing tool too quickly Allow tool to cool for several
or hot to the touch minutes before firing.

CORRECCIÓN DE PROBLEMAS
CORRECCIÓN DE PROBLEMAS 10
Siempre mantenga un espacio de 3 pulgadas como mínimo entre los elementos de fijación y otras
3 pulgadas alejado de los bordes o extremos cuando se efectúen fijaciones sobre en concreto. La
profundidad de penetración en concreto
siempre debe ser 1" mínimo
(ver pág. 16, “Cómo selec-
cionar un sujetador para herramienta de pólvora”. El espesor del concreto debe ser por lo menos
tres veces la profundidad de penetración.
Cuando se efectúen fijaciones sobre acero, siempre mantenga un espacio mínimo de 1-1/2 pulgada
entre los elementos de fijación y 1/2 pulgada de distancia de cualquier borde. El sujetador debe
tener suficiente longitud para penetrar el acero completamente (ver pág. 16). El espesor del acero
debe estar entre 3/16" y 5/16".
Fijación sobre Concreto
Fijación sobre Acero
PROBLEMA CAUSA PROBABLE SOLUCIÓN
No puede sacarse la La carga está trabada Never attempt to pry a load from the
carga no disparada en la camara
chamber. Instead, tap nosepiece firmly on
Nunca intente extraer de la camara a hard surface several times. Hold tool
una carga a fuerza against fastening surface for 30 seconds.
If load does not discharge, slide barrel
open. Load should eject. Put load in
bucket of water. If load does not eject,
call 1-877-ITW-BRANDS for technical
assistance.
No puede amartillarse Falta de limpieza adecuada
Limpie completamente la herramienta
la herramienta Está dañado o doblado el pistón Reemplace el ensamble del pistón
Hay piezas de la herramienta Ponga en la herramienta una etiqueta
rotas o dañadas de “Defectuosa - No Usar” ("Defective -
Do Not Use"), coloque la herramienta en
un recipiente con cerradura de llave y
llame al 1-877-ITW-BRANDS
(1-877-489-2726) para solicitar asistencia.
El pistón está trabado
El pistón fue sobreimpulsado y se
Asegúrese de que esté descargada la
en la posición inferior trabó en el casquillo de la boca
herramienta, golpee contra una superficie
dura o empuje el pistón hacia atrás con un
martillo de plomo o bronce. Reemplace el
amortiguador. Póngase gafas de seguridad
.
La punta del pistón
No se sostuvo la herramienta en posición
Reemplace el ensamble del pistón
está mellada o dañada
perpendicular en la superficie de trabajo.
Esto permite que el pistón se resbale
de la cabeza de la punta y se dañe.
El barril está apretado y El pistón está doblado Reemplace el ensamble del pistón
no se abre con facilidad Acumulación carbonosa excesiva Desarme la herramienta y límpiela
La uña del barril no funciona Reemplace la uña
o está dañada
Hay pedazos de bronce o acero Desarme la herramienta y limpie
trabados entre el barril las piezas
y el alojamiento
El barril se abre con La tapa de la uña está floja. Apriete la tapa de la uña.
demasiada facilidad El resorte de la uña del barril Reemplace el resorte de la uña
está muy débil o falta
TROUBLESHOOTING CONT.
TROUBLESHOOTING CONT. 10
When fastening into concrete always maintain a minimum 3" spacing between
fastenings and 3" from any free edge. Penetration into concrete should always be 1"
minimum (see page 16, "How to Select a Powder Actuated Fastener"). The concrete
thickness should be at least 3 times the penetration depth.
When fastening into steel always maintain a minimum 1-1/2" spacing between fasten-
ings and 1/2" from any free edge. Fastener length should be long enough to penetrate
the steel completely (see page 16) Steel thickness is limited to 3/16" to 5/16".
Fastening to Concrete
Fastening to Steel
DIFFICULTY PROBABLE CAUSE REMEDY
Unfired load will not Load stuck in chamber
Never attempt to remove an unfired,
extract
live load from the chamber.
Call
1-877-ITW-BRANDS
(1-877-489-2726) for technical
assistance.
Tool cannot be cocked Lack of proper cleaning
Clean tool thoroughly (see pgs. 13-15)
Damaged or bent piston Replace piston assembly
Broken or damaged tool parts Tag tool with warning "Defective -
Do Not Use", place tool in locked
container and call
1-877-ITW-BRANDS
(1-877-489-2726)
for assistance.
Piston stuck in down Piston overdriven and stuck Be sure tool is unloaded, tap on
position in muzzle bushing hard surface or drive piston back
with a lead or brass hammer.
Replace buffer. Wear safety goggles.
Chipped or damaged Tool not held on work surface Replace piston assembly
piston tip squarely. This allows the piston
to slip off the head of the pin and
cause damage to the piston.
Barrel tight, won't Bent piston Replace piston assembly
slide open easily Excessive carbon buildup Disassemble and clean tool
(see pgs. 13-15)
Barrel pawl inoperative Replace pawl
or damaged
Pieces of brass or steel Disassemble and clean parts
jammed between the barrel (see pgs. 13-15)
and housing
Barrel slides open Pawl cap loose. Tighten pawl cap
too easily Barrel pawl spring too Replace pawl spring
weak or 1missing

APLICACIÓNES
11 APLICACIÓNES
La arandela de 7/8" ofrece mayor superficie
de soporte al miembro de madera, con lo cual
reduce el levantamiento.
El sujetador debe penetrar completamente
el acero para poder brindar la fuerza de
sujeción máxima.
El sujetador debe penetrar completamente
el acero para poder brindar la fuerza de
sujeción máxima.
Madera a Concreto
Madera a Acero
Metal de Bajo Calibre sobre Acero
Franja de Enrasado sobre Concreto
o Paredes de mampostería
Metal de Bajo Calibre sobre
Concreto o Mampostería
APPLICATIONS
11 APPLICATIONS
7/8" washer provides a greater bearing sur-
face to the wood member, minimizing uplift.
Fastener should penetrate steel completely
for maximum holding power.
When fastening into masonry, shoot into
horizontal joints only.
Wood to Concrete
Wood to Steel
Thin Gauge Metal to Steel
Furring Strip to Concrete
or Masonry Walls
Thin Gauge Metal to Concrete
or Masonry
2-1/2" 2-1/2"
Pin Washered

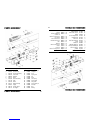
ENSAMBLE DE PIEZAS
ENSAMBLE DE PIEZAS 12
PARTS ASSEMBLY
PARTS ASSEMBLY 12
Key Part No. Description
1 235101 Handle
2 235201 Receiver stop
3 235210 Receiver Assembly
4 230103 Sear holder
5 220205 Chamber
6 235311 Barrel
7 235320 Piston Assembly
8 235110 Slide
9 235332 Buffer
10 235331 Muzzle bushing
11 235421 Trigger
12 250112 Spring, trigger
13 250113 Pin, trigger
Key Part No. Description
14 230302 Spring, firing pin
15 230301 Firing pin
16 235221 Sear
17 235222 Spring, sear
18 235202 Pin
19 235208 Pawl
20 235002 Leaf spring
21 220203 Spring, pawl
22 235204 Ring, pawl
23 230305 Spring, push pin
24 230304 Push pin
25 235001 Bolt
26 235203 O-Ring
Núm No. pza. Descripción
1 235101 Mango
2 235201 Tope del receptor
3 235210
Ensamble del receptor
4 230103 Sujetador del fiador
5 220205 Recámara
6 235311 Barril
7 235320 Ensamble del pistón
8 235110 Corredera
9 235332 Amortiguador
10 235331 Casquillo de la boca
11 235421 Gatillo
12 250112 Resorte de la, gatillo
13 250113 Pasador, gatillo
Núm No. pza. Descripción
14 230302 Resorte de la, percutor
15 230301 Percutor
16 235221 Fiador
17 235222 Resorte de la, fiador
18 235202 Pasador
19 235208 Uña
20 235002 Resorte de laminilla
21 220203 Resorte de la, uña
22 235204 Anillo, uña
23 230305 Resorte de la, pasador
de empuje
24 230304 Pasador de empuje
25 235001 Clavija
26 235203 Anillo O

LIMPIEZA Y MANTENIMIENTO
13 LIMPIEZA Y MANTENIMIENTO
INSTRUCCIONES DE MANTENIMIENTO Y LIMPIEZA
Asegúrese de que no esté cargada la herramienta antes de intentar desarmarla o limpiarla.
LIMPIEZA DE RUTINA
Todas las piezas deben limpiarse con aceite detergente y cepillo de alambre. Elimine
las peores acumulaciones de suciedad y carbonosas con el cepillo. Después de la
limpieza con aceite, todas las piezas deben limpiarse para dejarlas completamente
secas. Todo residuo excesivo de aceite tiende a captar suciedad y polvo. Tenga
puesta protección para los ojos al limpiar la herramienta.
Debe limpiarse diariamente toda suciedad presente en los ensambles del pistón,
del barril y del receptor. Las instrucciones para desarmar los componentes
aparecen en las páginas 14 y 15.
LIMPIEZA COMPLETA
Para mantener la herramienta en buen estado de funcionamiento, se recomienda
limpiarla después de un uso intensivo o de una exposición constante a suciedad
y basura. Vea las páginas 14 y 15. Si desea información acerca del servicio, llame al
1-877-ITW-BRANDS (1-877-489-2726).
PRUEBA DIARIA DE FUNCIONAMIENTO
Revise el funcionamiento de la herramienta sin carga de pólvora ni sujetador
en aquélla; para ello, presiónela contra la superficie de trabajo, jale del gatillo
y levante la herramienta de la superficie de trabajo. Accione varias veces la
herramienta sin cargar y asegúrese de que el mecanismo de disparo funcione
libremente antes de fijar el sujetador con la herramienta.
CLEANING AND MAINTENANCE
13 CLEANING AND MAINTENANCE
PROPER MAINTENANCE AND CLEANING INSTRUCTIONS
Make sure the tool is not loaded prior to attempting disassembly or cleaning.
ROUTINE CLEANING
All parts should be cleaned with detergent oil and wire brushes. Remove heavy dirt
and carbon buildup with the brush. After cleaning with oil, all parts should be wiped
thoroughly dry. Excess oil will tend to collect dirt and dust. Wear eye protection when
cleaning the tool.
The piston, barrel and receiver assemblies should all be cleaned of excess dirt on a
daily basis. Instructions for disassembly of the components are on pages 14 & 15.
THOROUGH CLEANING
To maintain your tool in good working condition, it is recommended that the tool be
cleaned after heavy use or constant exposure to dirt and debris. See pages 14-15.
Call 1-877-ITW-BRANDS (1-877-489-2726) for service information.
DAILY FUNCTION TEST
Check the functioning of the tool, without a powder load or fastener in
the tool, by depressing the tool against the work surface, pulling the
trigger and releasing from work surface. Function unloaded tool sev-
eral times and insure that the firing mechanism operates freely before
fastening with the tool.

REEMPLAZO DEL PISTÓN:
El pistón es un componente sujeto a desgaste y debe reemplazarse periódicamente.
La rotura, doblamiento y aplastamiento del pistón son señales típicas de desgaste
de éste. Antes de proceder, asegúrese de que no haya carga de pólvora en la her-
ramienta. Tenga cuidado de no perder ni dañar ninguna pieza de la herramienta.
1.
Retire el casquillo de la boca. Inspeccione el
casquillo de la boca para ver si está gastado.
Inspeccione el amortiguador y reemplácelo
si está gastado o dañado. Es un buen hábito
instalar siempre un amortiguador nuevo al
reemplazar el ensamble del pistón.
2. Retire la corredera del silenciador
3. Retire el ensamble de la uña con una
llave Allen de 6 mm. El ensamble de la
uña consta de cuatro piezas. La vista
despiezada muestra los detalles. Véase en
la página 12.
4. Retire el barril del receptor.
5.
Extraiga del barril el ensamble del pistón.
Revise el pistón y el anillo de éste para ver
si tienen desgaste o deformación excesivos.
Reemplace el ensamble del pistón si está
gastado o dañado.
6.
Limpie el interior del alojamiento del barril
con aceite detergente y cepillo de alambre.
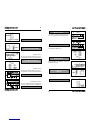
REPLACING THE PISTON:
The piston is an expendable tool part and must be replaced periodically. Breaking,
bending, or mushrooming are typical signs of a worn out piston. Make sure there
is no powder load in the tool before proceeding. Be careful not to lose or damage
any tool parts.
1. Remove the muzzle bushing. Inspect the
muzzle bushing for wear. Inspect the
buffer and replace it if worn or damaged.
It is good practice to always install a new
buffer when replacing the piston assembly.
2. Remove silencer slide.
3. Remove pawl assembly using a 6 mm
Allen Wrench. There are actually 4 parts
for pawl assembly. Please refer to the
exploded view on page 12 for details.
4. Remove barrel from receiver.
5. Pull the piston assembly out of the barrel.
Check the piston and piston ring for
excessive wear or deformation. Replace
the piston assembly if worn or damaged.
6. Clean the inside of the barrel housing with
a detergent oil and wire brush.
PISTON
RING
PISTON
DESENSAMBLE DE LA BARRA DEL PISTÓN
DESENSAMBLE DE LA BARRA DEL PISTÓN
14
PISTON ROD DISASSEMBLY
PISTON ROD DISASSEMBLY 14
BUFFER
ANILLO
DE ÉSTE
PISTÓN
Amortiguador

PISTON ROD REASSEMBLY
7. Wipe off any excess oil and insert
the piston assembly in the barrel.
8. Slide barrel assembly back into receiver
and align barrel slot with pawl housing.
9. Insert pawl assembly and screw tight.
10. Place silencer slide onto receiver.
11. Reattach the muzzle bushing assembly
and tighten firmly.
12. Function test the tool to be sure of
correct assembly. Refer to page 7 for
the function procedure. This must be
done without a fastener or powder
load in the tool.
REENSAMBLE DE LA BARRA DEL PISTÓN
15
REENSAMBLE DE LA BARRA DEL PISTÓN
15 PISTON ROD REASSEMBLY
7.
Limpie todo residuo excesivo de aceite e
introduzca el ensamble del pistón en el barril.
8. Deslice el ensamble del barril hacia el
interior del receptor y alinee la ranura del
barril con el alojamiento de la uña.
9. Introduzca el ensamble de la uña y apriete
el tornillo.
10. Introduzca el silenciador en el receptor.
11. Vuelva a colocar el ensamble del casquillo
de la boca y apriételo firmemente.
12. Pruebe el funcionamiento de la
herramienta para asegurarse de que la
armó correctamente. Diríjase a la página
7, donde encontrará el procedimiento
para la prueba de funcionamiento. Esto
debe realizarse sin sujetador ni carga
de pólvora en la herramienta.

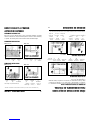
CÓMO SELECCIONAR UN SUJETADOR
PARA HERRAMIENTA DE PÓLVORA
MEDIDAS DE SEGURIDAD 16
DETERMINE EL TIPO DE SUJETADOR A USAR
Los clavos se usan para fijar directamente un objeto (instalación permanente). Los
espárragos se utilizan donde el objeto fijado va a ser quitado posteriormente o
donde se requiere acuñamiento. A continuación se muestra la forma de determinar
la longitud del tallo y de la rosca.
INSTALACIÓN PERMANENTE
1A En concreto 1B En acero
of
Longitud Espesor del Penetración
mín. del tallo = Material + requerida
(M) (P)
Longitud Espesor del Espesor
mín. del tallo = Material + de acero + 1/4" holgura
(M) (S) mín. punta
Longitud Espesor del 1/4" holgura
mín. del tallo = Acero (S) + mín. punta
Longitud Espesor del Holgura*
rosca = Material + para tuerca
(A) (M) y arandela
Longitud tallo = Penetración requerida (P)
Longitud Espesor del Holgura*
rosca = Material + para tuerca
(A) (M) y arandela
INSTALACIÓN TEMPORAL
2A En concreto 2B En acero
*
Holgura para espesor de tuerca y arandela = tamaño rosca (o sea, deje 1/4" para rosca de 1/4-20, etc.)
HOW TO SELECT A POWDER
ACTUATED FASTENER
SAFETY PRECAUTIONS 16
DETERMINE FASTENER TYPE
Drive pins are used to directly fasten an object (permanent installation). Threaded
studs are used where the object fastened may later be removed or where shimming
is required. The following shows how to determine shank and thread length:
PERMANENT INSTALLATION
1A To Concrete 1B To Steel
of
Minimum Thickness Required
Shank Length = of Material + Penetration
(M) (P)
Minimum Thickness Thickness
Shank Length = of Material + of Steel + 1/4" min. pt.
(M) (S) allowance
Minimum Thickness of 1/4" min. pt.
Shank Length = Steel (S) + allowance
Thread Thickness Allowance*
Length = of Material + for
(A) (M) Nut &Washer
Shank Length = Required Penetration (P)
Thread Thickness Allowance*
Length = of Material + for
(A) (M) Nut &Washer
REMOVABLE INSTALLATION
2A To Concrete 2B To Steel
*Allowance for thickness of nut & washer = thread size (i.e. allow 1/4" for 1/4-20 thread, etc.)

EXAMEN DEL OPERADOR
17 EXAMEN DEL OPERADOR
Después de estudiar y comprender el material del manual de esta herramienta, conteste las siguientes pregun-
tas. Suministre la información solicitada al otro lado de esta hoja. Adjunte una copia de su recibo de venta y
envíe todo a la dirección indicada en la parte posterior de este manual para activar la garantía de la herramienta
y recibir el permiso para usar ésta. El permiso de operador también puede obtenerse en: www.ramset.com
1. Al usar la herramienta, tanto el operador como
todos los circunstantes necesarios siempre
deben tener puestos gafas de seguridad y pro-
tección para los oídos.
■ Cierto ■ Falso
2.
Siempre debe probarse primero el nivel de potencia
más elevado al efectuar la primera fijación.
■ Cierto ■ Falso
3. Nunca intente disparar la herramienta hasta que
el extremo de la boca esté presionado contra
la superficie de trabajo y usted esté listo para
efectuar la fijación.
■ Cierto ■ Falso
4. La tabla roca, paneles de yeso, madera, fibra
de vidrio, azulejo de cerámica, ladrillo y lámina
metálica delgada son ejemplos de materiales en
los que no deben fijarse objetos.
■ Cierto ■ Falso
5.
Las herramientas de pólvora pueden usarse sin
peligro en una atmósfera explosiva o inflamable.
■ Cierto ■ Falso
6. Las herramientas que no funcionen bien pueden utili-
zarse y no tienen que dejar de usarse de inmediato.
■ Cierto ■ Falso
7. Al utilizar una herramienta de pólvora nunca debe
colocarse la mano enfrente de la boca de aquélla.
■ Cierto ■ Falso
8.
El concreto vaciado y el acero estructural son mate-
riales adecuados en los cuales pueden fijarse objetos.
■ Cierto ■ Falso
9.
Para determinar la idoneidad de un material base, use
un sujetador como punzón de marcar como sigue:
A) Si se embota la punta del sujetador, sig-
nifica que el material es demasiado duro.
■ Cierto ■ Falso
B) Si el sujetador penetra fácilmente, signifi-
ca que el material es demasiado blando.
■ Cierto ■ Falso
C) Si el sujetador se agrieta o rompe, significa
que el material es demasiado quebradizo.
■ Cierto ■ Falso
10. En
concreto
, no deben fijarse sujetadores a una
distancia inferior a 3" de los bordes libres.
■ Cierto ■ Falso
11. Al fijar en
concreto
, el material base debe ser
de un espesor por lo menos tres veces mayor
que la profundidad de penetración del tallo
del sujetador.
■ Cierto ■ Falso
12. No fije sujetadores en acero de un espesor
inferior a 3/16".
■ Cierto ■ Falso
13. Las herramientas, sujetadores y cargas de
pólvora deben guardarse siempre en un área
segura y bajo llave cuando no se tengan en uso
para evitar todo acceso a los mismos por parte
de personas no autorizadas.
■ Cierto ■ Falso
14. Al considerar la seguridad de una aplicación en
particular, el operador debe pensar acerca de
todo lo siguiente: a) el nivel de potencia de la
carga de pólvora, b) la seguridad del operador,
c) la seguridad de los circunstantes y compañe-
ros de trabajo, d) el material base o receptor.
■ Cierto ■ Falso
15.
No es necesario leer el Manual del Operador antes de
utilizar la herramienta de pólvora de baja velocidad.
■ Cierto ■ Falso
16. La mejor forma de revisar el material receptor
es fijar varios sujetadores utilizando la carga
más potente.
■ Cierto ■ Falso
17. La sobreimpulsión del pistón es causada por la
aplicación de una fuerza excesiva por parte de
la herramienta o por descargar el operador la
herramienta contra una superficie blanda.
■ Cierto ■ Falso
18. Uno nunca debe intentar extraer de la herra-
mienta a fuerza una carga trabada.
■ Cierto ■ Falso
19. Si se coloca la mano en el extremo de la boca
de una herramienta cargada pueden producirse
lesiones serias causadas por la sobreimpulsión
del pistón o por un sujetador disparado si la
herramienta se dispara accidentalmente.
■ Cierto ■ Falso
Firma _____________________________
Fecha_____________________________
OPERATOR'S EXAMINATION
17 OPERATOR'S EXAMINATION
After studying and understanding the material in this tool manual, answer the
following questions. Complete the information on the other side of this page. Enclose
a copy of your sales receipt and send to the address on the back of this manual to
activate your tool warranty and receive your tool license. Operator's license can also
be obtained at: www.ramset.com
1. Safety goggles and hearing protection must
always be worn by the operator and any neces-
sary bystanders when using the tool.
■ True ■ False
2. The strongest power level should be tried first
when making the first fastening.
■ True ■ False
3. Never attempt to fire the tool until the muzzle end
is compressed against the work surface and you
are ready to make a fastening.
■ True ■ False
4. Sheet rock, drywall board, wood, fiberglass,
ceramic tile, brick and thin sheet metal are
examples of materials not to be fastened into.
■ True ■ False
5. A powder actuated tool can be safely used in an
explosive or flammable atmosphere.
■ True ■ False
6. Malfunctioning tools can be used and do not have
to be removed from service immediately.
■ True ■ False
7. When operating a powder actuated tool, your hand
should never be placed in front of the tool muzzle.
■ True ■ False
8. Poured concrete and structural steel are suitable
materials for fastening into.
■ True ■ False
9. To determine the suitability of a base material,
use a fastener as a center punch as follows:
A) If the fastener is blunted, do not fasten; the
material is too hard. ■ True ■ False
B) If the fastener penetrates easily, do not fasten;
the material is too soft. ■ True ■ False
C)
If the material cracks or shatters, do not fasten;
the material is too brittle.
■
True
■
False
10. In concrete, a fastener should be driven no
closer to a free edge than 3".
■ True ■ False
11. When fastening into concrete, the base
material should be greater than the shank
penetration by at least 3 times.
■ True ■ False
12. Do not drive fasteners into steel that is thinner
than 3/16".
■ True ■ False
13. Powder actuated tools, fasteners and loads,
must always be kept in a secure, locked area
when not in use to avoid access by unauthor-
ized persons.
■ True ■ False
14. When considering the safety of a particular
application, the operator must think about all
of the following: a) the powder load power
level, b) the operator's safety, c) the safety of
bystanders and fellow workers, d) the base or
receiving material.
■ True ■ False
15. It is not necessary to read the Operator's
Manual prior to operating the MasterShot™ low
velocity powder actuated tool.
■ True ■ False
16. The best way to check the receiving material
is to set several fasteners using the most
powerful load.
■ True ■ False
17. Piston overdrive is caused by overpowering
of the tool or by discharging the tool against
a soft surface.
■ True ■ False
18. One should never attempt to pry a stuck load
out of a tool.
■ True ■ False
19. Placing a hand over the muzzle end of a loaded
tool can result in serious injury from piston
overdrive or an escaping fastener if the tool is
discharged accidentally.
■ True ■ False
Signed ____________________________
Date ______________________________

PERMISO Y ACTIVACIÓN DE LA GARANTÍA
El MasterShot™ está garantizado por 6 meses después de venta por ITW Brands.
Declaro que he leído y comprendido el Manual de Instrucciones y Entrenamiento del
Operador de la Herramienta MasterShot™ y he contestado el Examen del Operador
que aparece al reverso.
(Escriba claramente con letra de molde)
El número de serie de la herramienta es: ________________________________
Por favor envíenme el permiso a:
Nombre _________________________________________________________
Dirección ________________________________________________________
Ciudad ____________________ Estado _____________Cód. postal_________
Teléfono _________________________________________________________
Correo electr. _____________________________________________________
o Sí, me gustaría recibir noticias e información de los productos de Ramset.
ENVIAR A:
En EE.UU.
ITW Brands
ATTN: License Coordinator
955 National Parkway, Suite 95500
Schaumburg, IL 60173
En CANADÁ
ITW Construction Products
ATTN: Retail Marketing
120 Travail Road, Markham
Ontario, L3S 3J1
LICENSE AND WARRANTY ACTIVATION
The MasterShot™ Tool is warranted for 6 months after sale by ITW Brands.
I certify that I have read and understand the MasterShot™ Tool Operator's Instruction
and Training Manual and have taken the Operator's Exam on the reverse side.
(Please Print Clearly)
The serial number on my tool is: ______________________________________
Please send my tool license to:
Name ___________________________________________________________
Address _________________________________________________________
City _______________________ State ________________ Zip _____________
Phone ___________________________________________________________
Email ___________________________________________________________
o Yes. I would like to receive product updates and information from Ramset.
RETURN TO:
In USA
ITW Brands
ATTN: License Coordinator
955 National Parkway, Suite 95500
Schaumburg, IL 60173
In CANADA
ITW Construction Products
ATTN: Retail Marketing
120 Travail Road, Markham
Ontario, L3S 3J1
PERMISO Y ACTIVACIÓN DE LA GARANTÍA
18
LICENSE AND WARRANTY ACTIVATION 18
-
 1
1
-
 2
2
-
 3
3
-
 4
4
-
 5
5
-
 6
6
-
 7
7
-
 8
8
-
 9
9
-
 10
10
-
 11
11
-
 12
12
-
 13
13
-
 14
14
-
 15
15
-
 16
16
-
 17
17
-
 18
18
-
 19
19
-
 20
20


RAMSET MasterShot Operator's Instruction & Training Manual
- Categoría
- Herramientas eléctricas
- Tipo
- Operator's Instruction & Training Manual
- Este manual también es adecuado para
En otros idiomas
- English: RAMSET MasterShot
Documentos relacionados
-
RAMSET 16952 Manual de usuario
-
-
-
-
-
-
-
-