
1
EN
FR
DE
ES
IT
NL
PT
RU
CN
TW
JP
User guide
Guide de l'utilisateur
Benutzerhandbuch
Guía del usuario
Manuale di istruzioni
Gebruikershandleiding
Guia de utilizador
Руководство пользователя
用户指南
使用者指南
ユーザーガイド
Smart Outdoor Camera
Smart Outdoor Camera with Siren
More languages available at netatmo.com/outdoor-cam-setup

2
FR
DE
ES Contenido del pack:
(A) 1 cámara Cámara Exterior
Inteligente.
(B) 1 tira de montaje y tornillos
verdes.
(C) 1 soporte de montaje y su
tornillo negro.
(D) 1 llave Allen.
(E) 6 tornillos de montaje
(3 tamaños).
(F) 2 tornillos de pared
y 2 tacos.
(G) 1 envoltorio de protección.
(H) 1 Guía del usuario.
(I) 1 tarjeta código QR.
Verpackungsinhalt:
(A) 1 Smarte Außenkamera.
(B) 1 Befestigungsschelle und
grüne Schrauben.
(C) 1 Montagehalter und seine
schwarze Schraube.
(D) 1 Inbusschlüssel.
(E) 6 Montageschrauben
(3 Größen).
(F) 2 Wandschrauben und
2 Anker.
(G) 1 Schutzumschlag.
(H) 1 Benutzerhandbuch.
(I) 1 QR Code-Karte.
Contenu de la boîte :
(A) 1 Caméra Extérieure
Intelligente.
(B) 1 plaque de fixation et ses
vis vertes.
(C) 1 support de montage et sa
vis noire.
(D) 1 clé Allen.
(E) 6 vis de montage (3 tailles).
(F) 2 vis murales et 2 chevilles.
(G) 1 housse de protection.
(H) 1 Guide de l'utilisateur.
(I) 1 carte de code QR.
Pack content:
(A) 1 Smart Outdoor
Camera.
(B) 1 mounting strap
and green screws.
(C) 1 mounting holder
and its black screw.
(D) 1 Allen key.
(E) 6 mounting screws
(3 sizes).
(F) 2 wall screws
and 2 anchors.
(G) 1 protective
envelope.
(H) 1 User Guide.
(I) 1 QR code card.
E
CA
F
DB
H IG
EN
Smart Outdoor Camera
Smart Outdoor Camera

3
NL
TW
PT
RU
JP
IT
CN
パッケージ内容:
(A) Smart Outdoor Cameraカメラ×1
(B) 取り付けストラップ×1、ネ
ジ(緑)
(C) 取り付けホルダー×1、ネ
ジ(黒)
(D) 六角棒スパナ ×1
(E) 取り付けネジ ×6
(3 サイズ)
(F) 壁用ネジ ×2、アンカ
ー ×2
(G) 保護カバー ×1
(H) ユーザーガイド ×1
(I) QRコードカード ×1
內含:
(A) 1個 Smart Outdoor Camera 攝像頭。
(B) 1條安裝帶和若干綠色螺釘。
(C) 1個安裝支架及其黑色螺釘。
(D) 1把內六角扳手。
(E) 6個安裝螺釘(3種尺寸)。
(F) 2個牆面螺釘和2個錨栓。
(G) 1個防護外殼。
(H) 1份使用者指南。
(I) 1張二維碼卡片。
内含:
(A) 1个 Smart Outdoor Camera 摄像头。
(B) 1条安装带和若干绿色螺钉。
(C) 1个安装支架及其黑色螺钉。
(D) 1把内六角扳手。
(E) 6个安装螺钉(3种尺寸)。
(F) 2个墙面螺钉和2个锚栓。
(G) 1个防护外壳。
(H) 1份用户指南。
(I) 1张二维码卡片。
Комплектация:
(A) Умная Уличная Камера (1 шт.).
(B) Монтажная планка (1 шт.) и винты
заземления зеленого цвета.
(C) Монтажный держатель
(1 шт.) и винт к нему черного цвета.
(D) Шестигранный ключ (1 шт.).
(E) Крепежные винты, 3-х размеров
(6 шт.).
(F) Анкерные болты (2 шт.) и дюбели
(2 шт.).
(G) Защитный чехол (1 шт.).
(H) Руководство пользователя (1 шт.).
(I) Карточка с QR-кодом (1 шт.).
Conteúdo da embalagem:
(A) 1 Câmara Exterior Inteligente
(B 1 alça de suporte da câmara
e parafusos verdes.
(C) 1 suporte de montagem e
um parafuso preto.
(D) 1 chave Allen.*
(E) 6 parafusos de montagem
(3 tamanhos).
(F) 2 parafusos de parede e
2 buchas.
(G) 1 envelope protetor.
(H) 1 Guia de utilizador.
(I) 1 cartão com código QR.
Inhoud pakket:
(A) 1 Slimme Buitencamera.
(B) 1 montagebeugel en groene
schroeven.
(C) 1 montagehouder en
bijbehorende zwarte
schroef.
(D) 1 inbussleutel.
(E) 6 montageschroeven
(3 formaten).
(F) 2 muurschroeven en
2 -ankers.
(G) 1 beschermend omhulsel.
(H) 1 Gebruikershandleiding.
(I) 1 QR-codekaart.
Contenuto della confezione:
(A) 1 Videocamera Esterna
Intelligente.
(B) 1 staa di montaggio
e viti verdi.
(C) 1 accessorio di supporto
per il montaggio e vite nera
abbinata.
(D) 1 Brugola
(E) 6 viti di montaggio
(3 formati).
(F) 2 viti da parete e 2 tasselli.
(G) 1 involucro protettivo.
(H) 1 Manuale di istruzioni.
(I) 1 Tessera con codice QR.

4
NL
IT
ES
DE
FR
EN Required Tools (not included):
- Phillips and slotted
screwdrivers.
- Step ladder.
- Drill - Ø6mm (only required
if there is no junction box
where the product is installed).
- Caulking gun and Silicone
sealant (recommended tool).
- Level (recommended tool).
Herramientas necesarias
(no incluidas)
- Destornilladores plano y de
estrella.
- Escalera de peldaños.
- Taladro - Ø6mm (sólo se
requiere si no hay ninguna
caja de conexión donde el
producto esté instalado).
- Pistola de sellado y sellador
de silicona (herramienta reco-
mendada).
- Nivelador (herramienta reco-
mendada).
Outils requis (non inclus)
- Tournevis cruciforme et plat.
- Un escabeau.
- Une perceuse - Ø 6mm
(nécessaire uniquement s'il
n'y a aucune boîte de jonction
à l'emplacement choisi pour
installer la caméra).
- Pistolet à calfeutrer et mastic
silicone (outil recommandé).
- Niveau (outil recommandé).
Attrezzi necessari (non inclusi)
- Cacciavite a stella e cacciavite
spaccato.
- Scala.
- Trapano - Ø6mm (necessario
sono nel caso in cui non c'è
una scatola di derivazione
nel punto di installazione del
dispositivo).
- Pistola per silicone e silicone
sigillante (raccomandato).
- Livella (raccomandato).
Erforderliche Werkzeuge
(nicht inbegrien)
- Kreuzschlitz- und
Schlitzschraubendreher.
- Trittleiter.
- Bohrer - Ø6mm (nur erforderlich,
wenn es keine Anschlussdose gibt,
an der das Produkt installiert ist).
- Kartuschenpistole und Silikon-Di-
chtsto (empfohlenes Werkzeug).
- Wasserwage (empfohlenes
Werkzeug).
Benodigd gereedschap
(niet bijgeleverd)
- Kruiskop- en
sleufschroevendraaiers.
- Keukentrap/ladder.
- Boor - Ø6 mm (alleen nodig
indien er geen aansluitdoos
aanwezig is op de installa-
tieplek).
- Kitpistool en siliconenkit (aan-
bevolen gereedschap).
- Waterpas (aanbevolen ge-
reedschap).

5
Ferramentas necessárias
(não incluídas)
- Phillips e chaves de fenda.
- Escada.
- Broca - Ø6mm (necessária
apenas se não houver caixa
de junção onde o produto está
instalado).
- Pistola de calafetagem e
selante de silicone (ferramenta
recomendada).
- Nível (ferramenta recomen-
dada). ).
所需工具(未含):
- 十字和一字螺丝刀。
- 人字梯。
- Ø6毫米电钻(在无接线盒情
况下安装产品时才需要)。
- 压胶枪和硅酮密封胶(推荐
工具)。
- 水平尺(推荐工具)。
所需工具(未含):
- 十字和一字螺絲刀。
- 人字梯。
- Ø6毫米電鑽(在無接線盒情
況下安裝產品時才需要)。
- 壓膠槍和矽酮密封膠(推薦
工具)。
- 水準尺(推薦工具)。
Необходимые инструменты
(не входят в комплект)
- Крестовая и прямошлицевая отвертки.
- Стремянка.
- Дрель со сверлом Ø6 мм
(необходима только при отсутствии
распределительной коробки, куда
устанавливается изделие).
- Шпpиц-пистолет и силиконовый
герметик (рекомендуемый
инструмент).
- Уровень (рекомендуемый
инструмент).
必要な工具
(パッケージには含まれていません)
- フィリップススロットドラ
イバー
- 脚立
- ドリル 6mm (製品を取り付
ける場所にジャンクションボ
ックスがない場合のみ必要)
- コーキングガンとシリコンシ
ーラント(推奨ツール)
- 水準器 (推奨ツール)
JP
TW
CN
RU
PT

6
For optimal performance install the Smart
Outdoor Camera at a height between 2.5
and 4 meters (8 and 14 ft.) with a tilt angle
of around 30°.
Guided installation video available at:
https://www.netatmo.com/outdoor-cam-setup
Read carefully the safety information on page 48 before
proceeding to the installation.
EN
https://www.netatmo.com/outdoor-cam-setup
FR Pour un fonctionnement optimal, installez la Caméra Extérieure
Intelligente à une hauteur comprise entre 2,5 mètres et
4 mètres selon une inclinaison d'environ 30º.
Lisez attentivement les informations de sécurité de la page 48 avant de procéder à l'installation.
https://www.netatmo.com/outdoor-cam-setup
DE Für eine optimale Leistung, installieren Sie die Smarte
Außenkamera in einer Höhe zwischen 2,5 und 4 Meter,
mit einem Neigungswinkel von etwa 30°.
Lesen Sie sorgfältig die Sicherheitshinweise auf Seite 48, bevor Sie mit der Installation beginnen.
https://www.netatmo.com/outdoor-cam-setup
ES Para un rendimiento óptimo, instala a Cámara Exterior
Inteligente a una altura de entre 2,5 y 4 metros con
un ángulo inclinado de aprox. 30°.
Lee con atención la información de seguridad en la página 49 antes de proceder
con la instalación.

7
https://www.netatmo.com/outdoor-cam-setup
Voor optimale prestaties installeert u Slimme Buitencamera
op een hoogte van 2,5 tot 4 meter met een kantelhoek van
ongeveer 30°.
NL
Lees zorgvuldig de veiligheidsinformatie op pagina 49 voordat u de installatie uitvoert.
https://www.netatmo.com/outdoor-cam-setup
为优化性能,应将 Smart Outdoor Camera 安装在2.5-4米的高
度,倾斜角约30°。
CN
安装前,请仔细阅读第51页的安全信息。
https://www.netatmo.com/outdoor-cam-setup
為優化性能,應將 Smart Outdoor Camera 安裝在2.5-4米的高
度,傾斜角約30°。
TW
安裝前,請仔細閱讀第51頁的安全資訊。
https://www.netatmo.com/outdoor-cam-setup
最適なパフォーマンスのため、Smart Outdoor Cameraは2.5
から 4 メーター の高さに 約30°傾斜させて取り付けてくだ
さい。
JP
取り付け前に、51ページの安全に関する情報を注意深くお読みください。
https://www.netatmo.com/outdoor-cam-setup
Для оптимальной производительности установите Smart
Outdoor Camera на высоте от 2,5 до 4 метров и наклоните под
углом примерно 30°.
RU
Перед началом установки внимательно прочтите информацию по технике
безопасности, приведенную на странице 50.
https://www.netatmo.com/outdoor-cam-setup
Per una prestazione ottimale, installare della Videocamera
Esterna Intelligente ad un'altezza compresa tra 2,5 e 4 metri,
con un angolo di inclinazione di circa 30°.
IT
Leggere attentamente le istruzioni di sicurezza indicate a pag.49, prima di procedere all'installazione.
https://www.netatmo.com/outdoor-cam-setup
Para um bom desempenho, instale a Câmara Exterior
Inteligente a uma altura entre 2,5 e 4 metros (8 e 14 pés) com
um ângulo de inclinação de cerca de 30 °.30°.
PT
Leia atentamente as informações de segurança na página 49 antes de prosseguir para
a instalação.
Vídeo do tutorial de instalação disponível em:

8
OK
Pick a spot on the wall to install
the Smart Outdoor Camera.
Check with your smartphone that you have
Wi-Fi reception at the spot you chose.
If you do not, try to move your Wi-Fi
router closer.
Wählen Sie eine Stelle , um die Smarte Außenkamera an der
Wand zu installieren.
Überprüfen Sie mit Ihrem Smartphone, ob Sie WLAN-Empfang
an der Stelle haben, für die Sie sich entscheiden. Wenn Sie dies
nicht tun, versuchen Sie, Ihren WLAN-Router näher heran zu
positionieren.
Choisissez un endroit sur le mur pour installer la Caméra
Extérieure Intelligente.
Vérifiez avec votre smartphone que vous recevez une
connexion Wi-Fi à l'endroit choisi. Dans le cas contraire, essayez
de rapprocher votre routeur Wi-Fi.
Elige un lugar en la pared para instalar la Cámara Exterior
Inteligente.
Comprueba con tu smartphone si hay recepción de Wi-Fi en
el lugar que hayas escogido. Si no es así, prueba a acercar
el router Wi-Fi.
DE
FR
ES
EN

9
RU
IT
TW
PT
Scegliere il punto di installazione della Videocamera Esterna
Intelligente sulla parete esterna della casa.
Controllare con lo smartphone che in questo punto sia raggiunto
dal segnale WiFi. In caso negativo, avvicinare il router WiFi.
Выберите на стене место для установки Smart Outdoor Camera.
С помощью смартфона проверьте, что в выбранном месте
принимается сигнал Wi-Fi. Если сигнал не принимается,
попробуйте переместить Wi-Fi маршрутизатор ближе к камере.
Escolha um local na parede para instalar sua Câmara Exterior
Inteligente.
Verifique com o seu smartphone se você tem receção Wi-Fi
no local escolhido. Caso contrário, tente aproximar seu router
Wi-Fi.
在牆上指出安裝 Smart Outdoor Camera 的位置。
利用智慧手機檢查所選位置是否可以接收到無線網信號。如果
接收不到,請將無線路由器移動到較近的位置。
Kies een plek op de muur om Slimme Buitencamera te
installeren.
Controleer met uw smartphone of u Wi-Fi-ontvangst heeft op
de gekozen plek. Probeer indien dit niet het geval is, uw Wi-Fi-
router dichterbij te verplaatsen.
在墙上指出安装 Smart Outdoor Camera 的位置。
利用智能手机检查所选位置是否可以接收到无线网信号。如果
接收不到,请将无线路由器移动到较近的位置。
Smart Outdoor Cameraを取り付ける壁面のスポットを選んで
ください。
選んだスポットでWi-Fiが受信されるか、スマートフォンで確
認してください。 受信できない場合は、 Wi-Fiルーターを近
くに移動してください。
CN
NL
JP

10
Caution: electrical danger.
Disconnect power at fuse or circuit breaker
before proceeding to the installation.
ES
DE Vorsicht: elektrische Gefahr.
Schalten Sie den Strom der Sicherung oder Schutzschalter ab,
bevor Sie mit der Installation beginnen.
Avertissement : danger électrique.
Coupez le courant au disjoncteur général avant de procéder à
l'installation.
Atención: peligro eléctrico.
Antes de proceder con la instalación desconecta el fusible o
el disyuntor.
FR
EN

11
RU
IT
JP
TW
PT
Attenzione: rischio elettrico.
Staccare i fusibili o il contatore della corrente, prima di eettuare
l'installazione.
Внимание: опасность поражения электрическим током.
Перед началом установки отключите электропитание, вынув
плавкий предохранитель или выключив автоматический
выключатель.
Cuidado: perigo elétrico.
Desligue a energia no disjuntor antes de prosseguir para a
instalação.
注意:觸電危險!
安裝前,請斷開電源保險絲或斷路器。
Let op: gevaar door elektriciteit.
Schakel de stroom uit bij de zekering of stroomonderbreker
voordat u de installatie uitvoert.
注意:触电危险!
安装前,请断开电源保险丝或断路器。
注意: 感電
取り付け前に、ヒューズまたは回路ブレーカーの電源を切っ
てください。
CN
NL

12
If you are replacing an old light fixture,
disassemble the light fixture.
If there is a junction box behind it, go to step
(3A). If there is no junction box behind it or if
you ran a new wire to power Smart Outdoor
Camera, go to step (3B).
FR
DE
ES
Prepare the installation.
Bereiten Sie die Installation vor.
Wenn Sie eine alte Beleuchtungshalterung ersetzen, lösen Sie
diese von der Wand.
Wenn ein Kabelkasten dahinter ist, gehen Sie zu Schritt (3A).
Wenn kein Kabelkasten dahinter ist oder wenn Sie ein neues
Kabel an Ihre Kamera anschließen, gehen Sie zu Schritt (3B).
Préparez l'emplacement
Si vous remplacez un ancien appareil d'éclairage, retirez-le.
Si une boîte de jonction est présente derrière passez à l'étape
(3A).
S'il n'y a pas de boîte de jonction derrière ou que vous
installez un nouveau câble pour alimenter votre Caméra,
passez à l'étape (3B).
Preparar la instalación.
Si sustituyes un antiguo dispositivo de iluminación, desmóntalo.
Si hay una caja de conexión detrás de él, ves al paso (3A).
Si no hay ninguna caja de conexión detrás de él o si has
empleado un nuevo cable para conectar la Cámara, ves al paso
(3B).
EN
3A
3B

13
RU
IT
CN
Preparare l'installazione.
Nel caso in cui si voglia sostituire un faretto esistente,
smontarne la struttura di supporto.
Nel caso in cui il punto prescelto corrisponda al punto in cui è
collocata una scatola di derivazione, andare al passo (3A).
Se non c'è nessuna scatola di derivazione o se viene utilizzato
un nuovo cavo dell'elettricità per alimentare la Videocamera,
andare al passo (3B).
Prepare a instalação.
Se estiver substituindo uma luminária antiga, desmonte a
luminária. Se houver uma caixa de junção atrás dela, vá para a
etapa (3A). Se não houver uma caixa de junção atrás dela ou
se passou um novo fio para alimentar a sua câmara, vá para a
etapa (3B) .
Подготовьтесь к установке.
При установке камеры на место старого светильника разберите
его.
Если за светильником имеется распределительная коробка,
перейдите к шагу (3A).
Если распределительной коробки нет, или если вы провели
новый провод для питания Камеры, перейдите к шагу (3B).
準備安裝。
替換舊燈具時,請先拆掉舊燈具。
如舊燈具後面有接線盒,請前往步驟(3A)。
如舊燈具後面沒有接線盒,或者需要在攝像頭中接入新的電
線,請前往步驟(3B)。
Bereid de installatie voor.
Indien u een oude lamp moet vervangen, dan demonteert u
deze lamp eerst.
Indien zich hierachter een aansluitdoos bevindt, gaat u naar
stap (3A).
Indien zich hierachter geen aansluitdoos bevindt of indien u
een nieuwe draad naar uw Camera leidt, gaat u naar stap (3B).
准备安装。
替换旧灯具时,请先拆掉旧灯具。
如旧灯具后面有接线盒,请前往步骤(3A)。
如旧灯具后面没有接线盒,或者需要在摄像头中接入新的电
线,请前往步骤(3B)。
取り付け準備。
古い照明器具と交換する場合は、照明取付具を分解してください。
背後にジャンクションボックスがある場合は、ステップ (3A)に進んで
ください。
背後にジャンクションボックスがない場合またはカメラに電力を供給
するために、新しい電線を配線する場合は、ステップ(3B)に進んでく
ださい。
NL
TW
PT
JP

14
Fasten the mounting strap (B) to your junc-
tion box. Make sure that the UP sign is at
the top.
You can use the screws provided (E).
Skip (3B) and go directly to step (4).
DE
Sécurisez la plaque de fixation à la boîte de jonction.
Sécurisez la plaque de fixation à la boîte de jonction. Assurez-
vous que le signe UP est vers le haut.
Vous pouvez utiliser les vis fournies (E).
Sautez l'étape (3B) et allez directement à l'étape (4).
Befestigen Sie die Befestigungsschelle an der Anschlussdose.
Befestigen Sie die Befestigungsschelle (B) an Ihrer
Anschlussdose. Achten Sie darauf, dass das UP-Zeichen oben
ist.
Sie können die mitgelieferte Schraube verwenden (E).
Überspringen Sie den Schritt (3B) und gehen Sie direkt
zu Schritt (4).
Fijar la tira de montaje a la caja de conexión.
Fija la tira de montaje (B) a tu caja de conexión. Asegúrate de
que el símbolo UP se encuentra en la parte superior.
Puedes usar los tornillos incluidos en el pack (E).
Sáltate el paso (3B) y ve directamente al (4).
FR
ES
Secure the mounting strap
to the junction box.
EN

15
将安装带固定到接线盒上。
将安装带(B)紧固到接线盒上。确保“向上”(UP)标志在上
方。
可以使用提供的螺钉(E)。
跳过步骤(3B),直接前往第4步。
Prenda a alça de montagem na caixa de junção.
Prenda a alça de montagem (B) na caixa de derivação.
Verifique se o sinal UP está na parte superior.
Pode utilizar os parafusos fornecidos (E).
Passe (3B) e vá diretamente para a etapa (4).
Fissare la staa di montaggio alla scatola di derivazione.
Assicurare la staa di montaggio (B) alla scatola di derivazione.
Verificare che la scritta UP si trovi nella parte superiore.
Utilizzare le viti in dotazione (E).
Saltare il passo (3B) e andare direttamente al passo (4).
將安裝帶固定到接線盒上。
將安裝帶(B)緊固到接線盒上。確保「向上」(UP)標誌在
上方。
可以使用提供的螺釘(E)。
跳過步驟(3B),直接前往第4步。
Bevestig de montagebeugel op de aansluitdoos.
Draai de montagebeugel (B) vast op uw aansluitdoos. Zorg dat
het UP teken zich aan de bovenkant bevindt.
U kunt de bijgeleverde schroeven gebruiken (E).
Sla (3B) over en ga rechtstreeks naar stap (4).
ジャンクションボックスに取り付けストラップを固定します。
"ジャンクションボックスに取り付けストラップ(B)を固定します。 UP
の記号が上にあることを確認してください。
付属のネジ(E)を使用することができます。
ステップ(3B)をとばしてステップ(4)に直接進んでください。
Закрепите в распределительной коробке монтажную планку.
Прикрутите монтажную планку (B) к распределительной коробке.
Убедитесь, что обозначение ВЕРХ находится сверху.
Можно использовать винты (E) из комплекта.
Пропустите шаг (3B) и перейдите сразу к шагу (4).
JP
TW
CN
RU
PT
NL
IT

16
Secure the mounting strap
to the wall.
ES
DE
FR
Drill two holes above and to the left of the
power cable and secure the mounting strap as
shown in the picture.
You can use the screws and anchors provided
(F) or others that are better suited for your wall.
Make sure that the UP sign is at the top.
Fijar la tira de montaje a la pared.
Taladra dos agujeros por encima y a la izquierda del cable de
alimentación y fija la tira de montaje tal y como se muestra en el
dibujo. Puedes usar los tornillos y tacos incluidos en el pack (F) u
otros que sean más adecuados para tu pared.
Asegúrate de que el símbolo UP se encuentra en la parte
superior.
Befestigen Sie die Befestigungsschelle an der Wand.
Bohren Sie zwei Löcher links und über dem Stromkabel und
befestigen Sie die Befestigungsschelle, wie es auf dem Bild
gezeigt wird.
Sie können die mitgelieferten Schrauben und Anker
verwenden (F) oder andere, die besser zu Ihrer Wand passen.
Achten Sie darauf, dass das UP-Zeichen oben ist.
Sécurisez la plaque de fixation au mur.
Percez deux trous au-dessus et sur la gauche du câble
d'alimentation et sécurisez la plaque de fixation comme
indiqué sur l'image. Vous pouvez utiliser les vis et chevilles
fournies (F) ou d'autres mieux adaptées à votre mur.
Assurez-vous que le signe UP est vers le haut.
9 cm - 3,5 in
45˚
EN
6 cm
2.5 in

17
IT
RU
NL
PT
CN
TW
JP 壁に取り付けストラップを固定します。
電源ケーブルの上部および左側に穴を2つ開けて、図の様に取り付けス
トラップを固定します。
付属のネジとアンカー(F)を使用するか、壁に適した他のネジを使用し
てください。
UPの記号が上にあることを確認してください。
將安裝帶固定到牆上。
從上方鑽兩個孔並通到電源線左側,然後固定安裝帶,如圖
所示。
可以使用提供的螺釘和錨栓(F)或更適合牆體的其它螺釘。
確保「向上」(UP)標誌在上方。
Prenda a alça de montagem na parede.
Faça dois furos acima e à esquerda do cabo de alimentação e
prenda a alça de montagem conforme mostra a figura.
Pode utilizar os parafusos e as buchas fornecidos (F) ou outros
mais adequados para a parede.
Verifique se o sinal UP está no topo .
将安装带固定到墙上。
从上方钻两个孔并通到电源线左侧,然后固定安装带,如图
所示。
可以使用提供的螺钉和锚栓(F)或更适合墙体的其它螺钉。
确保“向上”(UP)标志在上方。
Bevestig de montagebeugel aan de muur.
Boor twee gaten bovenaan en links van de stroomkabel
en bevestig de montagebeugel zoals weergegeven op de
aeelding.
U kunt de bijgeleverde schroeven en ankers (F) gebruiken
of andere die beter geschikt zijn voor uw muur. Zorg dat het
""UP"" teken zich aan de bovenkant bevindt.
Закрепите монтажную планку на стене.
Просверлите два отверстия сверху и слева от кабеля питания и
закрепите монтажную планку, как показано на рисунке.
Можно использовать болты и дюбели (F) из комплекта, или же
другие, которые лучше подходят для вашей стены. Убедитесь, что
обозначение ВЕРХ находится сверху.
Fissare la staa di montaggio alla parete.
Eseguire due perforazioni in alto e a sinistra del cavo di
alimentazione e fissare la staa di montaggio, come mostrato
nella figura.
Utilizzare le viti e i tasselli in dotazione, o altri eventualmente
più adatti alla parete. Verificare che la scritta UP si trovi in alto

18
Hang the camera with the wire tie.
Carefully hang the camera with the wire tie from
the green screw.
Put the camera in the protective envelope (G) to
avoid any damage.
Suspendez la caméra à l'aide de la sangle.
Suspendez avec précaution la caméra à l'aide de la sangle sur
la vis verte.
Placez la caméra dans sa housse de protection (G) pour éviter
tout dommage.
FR
DE
ES
Hängen Sie die Kamera mit dem Kabelbinder auf.
Hängen Sie vorsichtig die Kamera mit dem Kabelbinder an der
grünen Schraube auf.
Legen Sie die Kamera in die Schutzhülle (G), um Schäden zu
vermeiden.
Colgar la cámara con la brida.
Cuelga con cuidado la cámara con la brida desde el tornillo
verde.
Pon la cámara en el envoltorio de protección (G) para evitar
cualquier daño.
EN

19
RU
IT
用导线匝带悬挂摄像头。
小心地用导线匝带通过绿色螺钉悬挂摄像头。将摄像头放入防
护外壳(G)中,避免损坏。
Pendure a câmara com a abraçadeira.
Pendure cuidadosamente a câmara com a abraçadeira no
parafuso verde.
Coloque a câmara no envelope de proteção (G) para evitar
danos.
Appendere la telecamera con il cavo d'aggancio.
Appendere accuratamente la telecamera alla vite verde con il
cavo d'aggancio.
Proteggere la telecamera con l'involucro protettivo (G) per
evitare danni.
CN
NL
TW
PT
JP
用導線匝帶懸掛攝像頭。
小心地用導線匝帶通過綠色螺釘懸掛攝像頭。將攝像頭放入防
護外殼(G)中,避免損壞。
Hang de camera op met behulp van de kabelbinder.
Hang de camera zorgvuldig met behulp van de kabelbinder
op aan de groene schroef.
Steek de camera in het beschermend omhulsel (G)
om beschadigingen te voorkomen.
結束ワイヤーでカメラをつり下げます。
緑色のネジの結束ワイヤーで注意しながらカメラをつり下げます。
損傷を避けるために、カメラに保護カバー(G)を掛けます。
Подвесьте камеру при помощи стяжки.
Используя стяжку, аккуратно подвесьте камеру на винт
заземления зеленого цвета.
Поместите камеру в защитный чехол (G), чтобы не допустить
повреждений.

20
Connect the wires.
Use the wire terminal behind the plate.
Blue/White (NEUTRAL) supply wire to Blue wire
Brown/Black (HOT) supply wire to Brown wire
Yellow and Green (GROUND) supply wire to Yellow and Green wire
Make sure the ground (GND) wire from the wire terminal
is also screwed to the mounting strap (B) with the
second green screw.
FR
DE
ES Conectar los cables.
Utiliza la regleta de conexión que se encuentra detrás de la
placa.
- Cable de alimentación azul/blanco (NEUTRO) a cable azul.
- Cable de alimentación marrón/negro (FASE) a cable marrón.
- Cable de alimentación amarillo y verde (TIERRA) a cable amarillo y verde.
Asegúrate de que el cable a tierra (GND) de la regleta de
conexión también está atornillado a la tira de montaje (B) con el
segundo tornillo verde.
Schließen Sie die Kabel an.
Verwenden Sie die Drahtklemme hinter der Platte.
- Blau/Weiß (NEUTRAL) führen Sie die Leitung zum blauen Draht.
- Braun/Schwarz (PHASE) führen Sie die Leitung zum braunen Draht.
- Gelb und Grün (ERDE) führen Sie die Leitung zum gelben und grünen Draht.
Achten Sie darauf dass der Erdungsdraht (GND) von der
Drahtklemme ebenfalls am Montagebügel mit der zweiten
grünen Schraube festgeschraubt ist (B).
Connectez les fils.
Utilisez la barrette de connexion derrière le boîtier mural
- Fil bleu/blanc (NEUTRE) à connecter au fil bleu.
- Fil marron/noir (PHASE) à connecter au fil marron.
- Fil jaune et vert (TERRE) à connecter au fil jaune et vert.
Assurez-vous que le fil de terre (GND) de la barrette de
connexion est également vissé sur la plaque de fixation (B)
avec la deuxième vis verte.
EN

21
PT
CN
TW
IT
RU
JP
NL
プレートの背後にワイヤー端子を使用してください。
- 青/白(ニュートラル)の供給線は青線へ。
- 茶/黒(ホット)の供給線は茶色線へ。
- 黄/緑(グラウンド)の供給線は黄/緑線へ 。
ワイヤー端子のアース線(GND)も、取り付けストラップ(B)に第2の
緑色のネジでネジ止めされていることを確認してください。
連接導線。
使用壁板後的導線接頭。
- 藍色或白色(不帶電)饋電線與藍色導線相連接。
- 棕色或黑色(帶電)饋電線與棕色導線相連接。
- 黃色和綠色(接地)饋電線與黃色和綠色導線相連接。
確保用第二個綠色螺釘將導線接頭中的地線(GND)緊固到安
裝帶(B)上。
连接导线。
使用壁板后的导线接头。
- 蓝色或白色(不带电)馈电线与蓝色导线相连接。
- 棕色或黑色(带电)馈电线与棕色导线相连接。
- 黄色和绿色(接地)馈电线与黄色和绿色导线相连接。
确保用第二个绿色螺钉将导线接头中的地线(GND)紧固到安
装带(B)上。
Подсоедините провода.
Используйте провод с клеммами, находящийся за панелью.
- Подсоедините синий/белый (НУЛЬ) провод питания к синему проводу.
- Подсоедините коричневый/черный (ФАЗА) провод питания к коричневому проводу.
- Подсоедините желто-зеленый (ЗАЗЕМЛЕНИЕ) провод питания к желто-зеленому проводу.
Убедитесь, что провод заземления (GND), идущий от провода с клеммами,
также прикручен к монтажной планке (B) вторым зеленым винтом.
Ligue os fios.
Use o terminal atrás da placa.
- Fio azul / branco (NEUTRO) para fio azul.
- Fio castanho / preto (FASE) para fio castanho.
- Fio amarelo e verde (TERRA) para fio amarelo e verde.
Verifique se o fio terra (GND) do terminal também está
parafusado na tira de montagem (B) com o segundo parafuso
verde.
Verbind de draden.
Gebruik de draadklem achter de plaat.
- Blauwe/witte (NEUTRAL) voedingsdraad met blauwe draad.
- Bruine/zwarte (HOT) voedingsdraad met bruine draad.
- Gele en groene (GROUND) voedingsdraad met gele en groene draad.
Zorg dat de aardedraad (GND) van de draadklem ook wordt
vastgeschroefd aan de montagebeugel (B) met de tweede
groene schroef.
Collegare i cavi.
Utilizzare il mamut che si trova dietro la placca.
- Cavo di alimentazione Blu/Bianco (NEUTRO) al cavo Blu.
- Cavo di alimentazione Marrone/Nero (DI FASE) al cavo Marrone.
- Cavo di alimentazione Giallo e Verde (MESSA A TERRA) al cavo Giallo e Verde.
Assicurarsi che anche il cavo della messa a terra (GND)
avvitato al mamut arrivi alla staa di montaggio (B) e fissarlo
con il secondo chiodo verde.

22
Secure the plate
on the mounting strap.
ES
DE
FR
Align the central holes of the wall plate with those
of the mounting strap and pass the green screw
through one of the holes of the “U” shaped guide.
Then turn the plate horizontal (use a level if needed)
and fasten the green screw tight.
Sécurisez le boîtier mural sur la plaque de fixation.
Alignez les trous centraux du boîtier mural avec ceux de la
plaque de fixation et passez la vis verte à travers l'un des trous
du guide en forme de "U".
Faites pivoter le boîtier mural pour le mettre à l'horizontale
(utilisez un niveau si nécessaire). Sécurisez l'ensemble en
vissant solidement la vis verte.
Fijar la placa a la tira de montaje.
Alinea los agujeros centrales de la placa con los de la tira de
montaje y pasa el tornillo verde a través de uno de los agujeros
de la guía con forma de “U”.
A continuación gira la placa en posición horizontal (utiliza un
nivelador si es necesario) y atornilla bien fuerte el tornillo verde.
Befestigen Sie die Platte an die Befestigungsschelle.
Richten Sie die mittleren Löcher der Wandplatte auf die der
Befestigungsschelle aus und führen Sie die grüne Schraube
durch eines der Löcher der “U”-förmigen Führung.
Dann drehen Sie die Platte horizontal (verwenden Sie eine
Wasserwaage, falls nötig) und ziehen Sie die grüne Schraube
ganz fest.
EN

23
CN
CN
JP
RU
PT
NL Bevestig de plaat op de montagebeugel.
Zorg dat de middelste gaten van de muurplaat gelijk liggen
met de gaten van de montagebeugel, en leid de groene
schroef door één van de gaten van de U-vormige geleider.
Draai de plaat vervolgens horizontaal (gebruik een waterpas
indien nodig) en draai de groene schroef vast.
将壁板固定到安装带上。
将壁板中心孔对准安装带中心孔,并使绿色螺钉穿过U形导板
上的任意一个孔。
然后水平转动壁板(需要时使用水准仪)并拧紧绿色螺钉。
取り付けストラップにプレートを固定します。
取り付けストラップの穴と壁プレートの中心の穴の位置を合わせ、
「U」字型のガイド穴の1つを介して緑色のネジを渡します。
次に水平板を回し(必要に応じて水準器を使用)、緑のネジをしっかり
固定します。
Assicurare la placca sulla staa di montaggio.
Allineare i fori centrali della placca da parete a quelli della staa
di montaggio e inserire la vite verde in uno dei fori della fessura
a forma di "U".
Successivamente collocare la placca in posizione orizzontale
(utilizzare una livella se necessario) e avvitare bene la vite verde.
Prenda a placa na alça de montagem.
Alinhe os orifícios centrais da placa de parede com os da alça
de montagem e passe o parafuso verde por um dos orifícios
da guia em forma de "U".
Em seguida, gire a placa na horizontal (use um nível, se
necessário) e aperte bem o parafuso verde. "
Закрепите панель на монтажной планке.
Совместите центральные отверстия настенной панели с
отверстиями в монтажной планке так, чтобы зеленый винт
попал в одно из отверстий «U»-образной направляющей.
Поверните панель по горизонтали (при необходимости,
используйте уровень) и туго затяните зеленый винт.
將壁板固定到安裝帶上。
將壁板中心孔對準安裝帶中心孔,並使綠色螺釘穿過U形導板
上的任意一個孔。
然後水準轉動壁板(需要時使用水準儀)並擰緊綠色螺釘。
IT

24
Secure the camera
to the plate.
ES
DE
Use the provided mounting holder and black
screw (C) to secure the camera to the mounting
strap and plate.
You can now cut and remove the wire tie
and the protective envelope.
Fijar la cámara a la placa.
Utiliza el soporte de montaje y el tornillo negro suministrados
(C) para fijar la cámara a la tira de montaje y a la placa.
Ahora puedes cortar y quitar la brida y el envoltorio de
protección.
Befestigen Sie die Kamera an der Platte.
Verwenden Sie die mitgelieferte Montagehalterung
und die schwarze Schraube (C), um die Kamera an der
Befestigungsschelle und der Platte zu befestigen.
Sie können nun den Kabelbinder und die Schutzhülle
schneiden und entfernen.
Fixez la caméra au boîtier mural.
Utilisez le support de montage fourni et la vis noire (C) pour
sécuriser la caméra au boîtier mural.
Vous pouvez maintenant couper la sangle et retirer la housse
de protection.
FR
EN

25
JP プレートにカメラを固定します。
付属の取り付けホルダーとブラックのネジ(C)を使用してカメラを取り
付けストラップとプレートに固定します。
そして結束ワイヤーと保護カバーをカットして外してください。
TW 將攝像頭固定到壁板上。
使用提供的安裝支架和黑色螺釘(C)將攝像頭固定到安裝帶
和壁板上。
現在可以剪斷導線匝帶並移除保護外殼。
CN 将摄像头固定到壁板上。
使用提供的安装支架和黑色螺钉(C)将摄像头固定到安装带
和壁板上。
现在可以剪断导线匝带并移除保护外壳。
RU Установите камеру на панель.
Закрепите камеру на монтажной планке и на панели с помощью
прилагаемого монтажного держателя и винта черного цвета (C).
После этого можно срезать стяжку и снять защитный чехол.
PT Prenda a câmara na base.
Use o suporte de montagem fornecido e o parafuso preto (C)
para prender a câmara na tira e na base de montagem.
Agora pode cortar e remover a abraçadeira e o envelope
protetor .
NL Bevestig de camera aan de plaat.
Gebruik de bijgeleverde montagehouder en zwarte schroef (C)
om de camera aan de montagebeugel en plaat te bevestigen.
U kunt nu de kabelbinder en het beschermend omhulsel
anippen en verwijderen.
IT Fissare la telecamera alla placca.
Utilizzare l'accessorio di supporto per il montaggio e la vite
nera (C) in dotazione per fissare la telecamera alla staa di
montaggio e alla placca.
Solo adesso il cavo d'aggancio e l'involucro protettivo possono
essere rimossi.

26
Tilt the camera to record
video from the correct angle.
DE Neigen Sie die Kamera, um das Video aus dem richtigen
Winkel aufzunehmen.
Verwenden Sie den Inbusschlüssel (D), um die Schrauben an
der Seite oder Rückseite zu lösen, um die Kamera zu kippen.
Stellen Sie sicher, dass Sie sie danach richtig befestigen.
Die Schrauben auf beiden Seiten müssen fest angezogen werden, damit
die Kamera sicher installiert ist.
ES Inclina la cámara para grabar vídeos desde el ángulo correcto.
Utiliza la llave Allen (D) para aflojar los tornillos del lateral o
la parte trasera para inclinar la cámara. Asegúrate de fijarlos
correctamente después.
Los tornillos en ambos lados deben estar apretados para poder
configurar la cámara de forma segura.
Inclinez correctement la caméra pour filmer la zone à
surveiller
Utilisez la clé Allen (D) pour desserrer les vis sur le côté ou
à l'arrière pour incliner la caméra. Assurez-vous de les fixer
correctement par la suite.
Serrez fort les vis aux deux côtés de la caméra pour qu'elle soit installée
en sécurité.
FR
Use the Allen key (D) to untighten the screws
on the side or the back to tilt the camera.
Make sure to secure them properly afterwards
The screws on both sides must be tight for the camera to be
securely installed.
EN

27
正しい角度からビデオ記録を行うためにカメラを傾けてください。
六角棒スパナ(D)を使用し、カメラを傾けるため横または背後のネジを緩
めます。 後で、正しく固定されていることを確認してください。
両側のネジを締め、カメラを安全に設置してください。
JP
傾斜攝像頭,從正確的角度錄製視頻。
使用艾倫內六角扳手(D)鬆開側面或後面的螺釘,傾斜攝像
頭。事後確保螺釘和攝像頭安全固定。
兩側的螺絲必須拴緊,以防止攝影機意外鬆脫。
TW
倾斜摄像头,从正确的角度录制视频。
使用艾伦内六角扳手(D)松开侧面或后面的螺钉,倾斜摄像
头。事后确保螺钉和摄像头安全固定。
两侧螺钉必须拧紧,以防止摄像头意外松脱。
CN
Наклоните камеру для записи видео под правильным углом.
Чтобы наклонить камеру, ослабьте винты сбоку или сзади
камеры с помощью шестигранного ключа (D). После наклона
камеры надежно затяните эти винты.
Чтобы гарантировать надежную установку камеры, винты по обе стороны
должны быть крепко затянуты.
RU
Incline a câmara para gravar vídeo do ângulo correto.
Use a chave Ellen (D) para desapertar os parafusos laterais ou
das costas para inclinar a câmara.
Certifique-se de protegê-los adequadamente depois.
PT
Kantel de camera om video vanuit de juiste hoek op te nemen.
Gebruik de inbussleutel (D) om de schroeven aan de zijkant
of de achterkant iets los te draaien en de camera te kantelen.
Vergeet niet de schroeven daarna weer vast te draaien.
De schroeven aan beide kanten goed aandraaien voor een veilige
installatie van de camera.
NL
Inclinare la telecamera per registrare i video dall'angolazione corretta.
Utilizzare la brugola(chiave di Allen) (D) per allentare le viti laterali
o posteriori e poter inclinare la telecamera. Successivamente,
fissarle di nuovo adeguatamente.
Le viti presenti su entrambi i lati devono essere serrate anché la
videocamera sia installata in modo sicuro.
IT

28
Reconnect the power.
ES
DE Schließen Sie sie wieder ans Netz an.
Die Smarte Außenkamera startet zum ersten Mal und das Licht
geht an. Dies kann eine Minute dauern.
Wenn das Licht nicht angeht, gehen Sie zu Seite 35 für
Ratschläge zur Fehlerbehebung.
Rétablissez le courant.
La Caméra Extérieure Intelligente démarre pour la première
fois et la lumière s'allume. Cela peut prendre jusqu'à une
minute. Si la lumière ne s'allume pas, rendez-vous page 34
pour obtenir des conseils de résolution de problèmes.
Vuelve a conectar la alimentación.
Cuando la Cámara Exterior Inteligente se ponga en marcha
por primera vez, la luz se encenderá. Esto puede durar hasta
un minuto.
Si la luz no se enciende, consulta en la página 35 los consejos
para la resolución de problemas.
FR
The Smart Outdoor Camera will start for the first
time and the floodlight will turn on. This can take
up to a minute.
If the floodlight does not turn on, go to page 34
for troubleshooting advice.
EN

29
JP
TW
CN
Ricollegare la corrente.
La Videocamera Esterna Intelligente si attiverà per la prima
volta e si accenderà la luce. Questo processo può durare fino
ad un minuto.
Se la luce non si accende, andare alla pagina di risoluzione di
problemi (pag.36).
Volte a ligar a energia.
A Câmara Exterior Inteligente iniciará pela primeira vez e a luz
acenderá. Isso pode levar até um minuto.
Se a luz não acender, vá para a página 34 para obter dicas
sobre solução de problemas.
Снова включите электропитание.
Smart Outdoor Camera выполнит свой первый запуск и включит
свет. Это может занять до одной минуты.
Если свет не включается, перейдите к странице 38, где
приведены инструкции по устранению неполадок.
重新接通電源。
Smart Outdoor Camera 首次啟動,燈會亮。這可能需要一分鐘
時間。如燈未亮,請查閱第39頁的故障排除建議。
Schakel de stroom opnieuw in.
Slimme Buitencamera wordt voor de eerste keer opgestart en
het licht gaat aan. Dit kan tot een minuut in beslag nemen.
Indien het licht niet aangaat, raadpleegt u pagina 36 voor
advies om dit probleem op te lossen.
重新接通电源。
Smart Outdoor Camera 首次启动,灯会亮。这可能需要一分钟
时间。如灯未亮,请查阅第38页的故障排除建议。
電源を再投入してください。
Smart Outdoor Cameraが初めてスタートし、ライトが点灯します。
これには数分かかる場合があります。
ランプが点灯しない場合、39ページのトラブルシューティングアドバイ
スを参照してください。
RU
PT
NL
IT

30
Protect the wiring.
ES
DE
FR
We recommend that you caulk the mounting
surface on the top and sides of the plate with
silicone weather sealant.
Leave bottom unsealed so moisture can drain out.
Schützen Sie die Verdrahtung.
Wir empfehlen Ihnen, dass Sie die Montagefläche auf
der Oberseite und an den Seiten der Platte mit Silikon-
Wetterdichtungsmittel abdichten.
Lassen Sie den Boden aus, so dass Feuchtigkeit austreten
kann.
Protégez le câblage.
Nous vous recommandons de calfeutrer l'espace entre le
mur et le dessus et les côtés du boîtier mural avec le mastic
silicone d'étanchéité.
Laissez le bas non calfeutré pour permettre à l'humidité d'être
évacuée.
Proteger el cableado.
Te recomendamos que selles la superficie de montaje por la
parte superior y los lados de la placa con silicona de sellado
resistente a la intemperie.
Deja la parte inferior sin sellar para que la humedad pueda
salir.
EN

31
IT Protezione dei fili.
Raccomandiamo di sigillare bene la superficie di montaggio
sulla parte superiore e ai lati della placca con silicone sigillante.
Non sigillare il lato inferiore, per permettere la fuoriuscita
dell'umidità.
NL Bescherm de bedrading.
We raden u aan het montageoppervlak aan de bovenkant
en zijkanten van de plaat te kitten met weerbestendige
siliconenkit.
De onderkant hoeft niet te worden gekit, zodat het vocht kan
weglopen.
RU Защитите электропроводку.
Рекомендуется заделать монтажную поверхность сверху и по
бокам панели, используя силиконовый герметик для наружных
швов.
Оставьте нижнюю часть без герметика, чтобы позволить стекать
влаге.
TW 保護供電線路。
建議您使用矽酮耐候密封膠對壁板上方和側面的安裝面填縫。
請勿密封底部,以便排出水分。
PT Proteja a cablagem.
Recomendamos que isole a superfície de montagem na parte
superior e nas laterais da placa com zelante de silicone.
Deixe o fundo sem lacre para que a humidade possa escorrer.
CN 保护供电线路。
建议您使用硅酮耐候密封胶对壁板上方和侧面的安装面填缝。
请勿密封底部,以便排出水分。
JP 配線を保護≈す。
プレートの上部と側面の取り付け面を気象耐性シリコンシーラントでコ
ーキングすることを推奨します。
下部は水を排出できるようするため、コーキングしないでください。

32
Téléchargez l'application.
Pour configurer votre Caméra de votre smartphone ou
tablette, rendez-vous sur netatmo.com/outdoor-cam-setup.
La Caméra Extérieure Intelligente ne peut pas être configurée
depuis un ordinateur.
FR
To set up your Camera from your smartphone or
tablet, go to netatmo.com/outdoor-cam-setup.
The Smart Outdoor Camera cannot be setup
from a computer.
Download the app.
EN
netatmo security

33
DE Laden Sie die App herunter.
Um Ihre Kamera vom Smartphone oder Tablet aus einzurichten,
gehen Sie zu netatmo.com/outdoor-cam-setup.
Die Smarte Außenkamera kann nicht über einen Computer
eingerichtet werden.
ES Descargar la aplicación.
Para configurar tu Cámara desde tu smartphone o tableta,
visita la página netatmo.com/outdoor-cam-setup.
La Cámara Exterior Inteligente no se puede configurar desde
un ordenador.
IT Scaricare l'app.
Per impostare la Videocamera da smartphone o da tablet,
andare su netatmo.com/outdoor-cam-setup.
A Videocamera Esterna Intelligente non puo essere impostata
dal computer.
PT Baixe a aplicação.
Para configurar a Câmara Externa Conectada a partir do
seu smartphone ou tablet, vá a para www.netatmo.com/
outdoor-cam-setup.
A Câmara não pode ser configurada a partir de um
computador.
RU Загрузите приложение.
Для настройки Камеры со своего смартфона или планшета
перейдите по адресу www.netatmo.com/outdoor-cam-setup.
Умная наружная камера нельзя настроить с компьютера.
TW 下載應用。
請登錄 netatmo.com/outdoor-cam-setup,利用智慧手機或平板
電腦設置攝像頭。
電腦無法設置攝像頭。
NL Download de app.
Om uw Camera in te stellen op uw smartphone of tablet, gaat u
naar netatmo.com/outdoor-cam-setup.
De Slimme Buitencamera kan niet worden ingesteld op een
computer.
CN 下载应用。
请登录 netatmo.com/outdoor-cam-setup,利用智能手机或平板
电脑设置摄像头。
计算机无法设置摄像头。
JP アプリをダウンロードしてください。
スマートフォンまたはタブレットからカメラを設定するため、netatmo.
com/outdoor-cam-setup にアクセスしてください。
屋外インテリジェントカメラはパソコンからはセットアップできませ
ん。

34
Apple homeKit
EN Your Camera is compatible with Apple HomeKit.
You will need to scan the code in the provided
card, “Homekit setup code”, during the setup of
Apple HomeKit through the App.
The code is unique and cannot be
generated again. Keep it in a safe place.
Do not throw the code card away.
FR Votre Caméra Extérieure Intelligente est compatible avec
Apple HomeKit. Vous devrez scanner le code sur la carte
fournie, "HomeKit setup code", durant la configuration de
HomeKit sur l'App.
Le code est unique et ne peut pas être généré à nouveau.
Gardez-le dans un endroit sûr. Ne pas jeter la carte.
DE Ihre Smarte Außenkamera ist mit Apple HomeKit kompatibel.
Sie müssen den Code auf der mitgelieferten Karte "HomeKit
setup code" scannen, während Apple HomeKit über die App
eingerichtet wird
Der Code ist eindeutig und kann nicht erneut generiert werden.
Bewahren Sie die Karte an einem sicheren Ort auf und werfen
Sie sie nicht weg.
ES Tu Cámara Exterior Inteligente es compatible con HomeKit
de Apple. Es necesario que escanees el código que aparece
en la tarjeta "HomeKit setup code" durante el proceso de
configuración de HomeKit de Apple a través de la aplicación.
El código es único y no puede ser generado de nuevo.
Mantenlo en un lugar seguro. No tires la tarjeta con el código.
HomeKit setup code

35
Smart Outdoor CameraはApple HomeKit に対応してい
ます。アプリからApple HomeKitをセットアップする際
には、所定のカードに記載されたコード(HomeKit setup
code)をスキャンすることになります。
コードはひとつしかなく、再発行できません。コードを確実
に保管し、コードが記載されたカードを捨てないでください。
JP
Ваша камера Smart Outdoor Camera совместима с Apple
HomeKit. Во время установки Apple HomeKit через
приложение, вам потребуется отсканировать "HomeKit setup
code", обозначенный на прилагаемой карточке.
Этот код уникальный и не может быть сгенерирован повторно.
Храните его в надежном месте и не выбрасывайте карточку с кодом.
RU
A Câmara Externa Conectada é compatível com o Apple
HomeKit. Precisará do código no final deste guia de utilizador
para a instalação.
O código é exclusivo e não pode ser gerado novamente.
Mantenha isso num local seguro. Não deite fora o guia do
utilizador.
PT
Uw Slimme Buitencamera is compatibel met Apple HomeKit.
Tijdens de installatie van Apple HomeKit via de app, scant u
de code op de bijgevoegde kaart: "HomeKit setup code".
De code is uniek en kan niet opnieuw gegenereerd worden.
Bewaar hem op een veilige plek. Gooi de codekaart niet weg.
NL
La Videocamera Esterna Intelligente è compatibile con Apple
HomeKit. Sarà necessario scansionare il codice presente
sulla scheda in dotazione, “HomeKit setup code”, durante la
configurazione di Apple HomeKit con l'App.
Il codice è unico e non può essere rigenerato. Conservarlo in
un luogo sicuro. Non gettare via la scheda contenente il codice.
IT
您的Smart Outdoor Camera攝影機支援Apple HomeKit。在
透過App安裝Apple HomeKit的過程中,您將需要掃描內附的
「HomeKit setup code」卡片上的二維碼。
該安裝代碼獨一無二而且無法再次生成。因此,請妥善保存,
不要將卡片丟掉。
TW
您的Smart Outdoor Camera摄像头支持Apple HomeKit。在通
过应用程序安装Apple HomeKit的过程中,您将需要扫描随附
的“HomeKit setup code”卡片上的二维码。
该安装代码独一无二而且无法再次生成。因此,请妥善保存,
不要将卡片扔掉。
CN

36
Setup card
30cm
1 ft.
EN This card contains unique configuration codes.
You will need them to reconfigure your Camera.
Keep the card in a safe place. Do not throw it
away.
A. SETUP QR code (black): During the product setup
or Wi-Fi configuration, show the black QR code to
the camera only when required by the App. Until the
floodlight starts to blink.
B. RESET QR code (red): To perform a factory reset,
show the red QR code to the camera. The floodlight
will make five fast blinks twice to confirm the
operation. All the data and configuration will be lost.
When showing a QR code to the Camera, keep it at
a distance of 30 cm / 1 ft. Make sure there is enough
ambient light for the camera to read the code.
It may not work at night.
QR-card-V5
Security code for product setup.
Keep card in a safe place.
Do not throw away.
To perform a factory reset, show this red QR
code to the camera.
The floodlight will make five fast blinks twice
to confirm the operation.
All the data and configuration will be lost.
During the product setup, show this black QR
code to the camera only when required by
the App. Until the floodlight starts to blink.
30cm
1 ft.
Smart Outdoor Camera

37
FR Carte de configuration
Cette carte contient des codes uniques de configuration.
Vous en aurez besoin pour reconfigurer votre Caméra.
Gardez la carte dans un endroit sûr. Ne la jetez pas.
A. Code QR de configuration (noir) : Montrez ce code à la caméra
durant l'installation ou la configuration du Wi-Fi, seulement quand
l'application vous le demande. Jusqu'à ce que le projecteur
commence à clignoter.
B. Code QR de reset (rouge) : Pour rétablir l'état de sortie d'usine de la
caméra, présentez le code rouge. Le projecteur fera 5 clignotements
rapides deux fois pour confirmer l'opération de reset. Toutes les
données et la configuration vont être eacées.
Lorsque vous présentez un code QR à la Caméra, tenez-le à
une distance de 30 cm. Assurez-vous qu'il y a susamment
de lumière pour que la caméra lise bien le code. Il se peut
que la lecture du code ne fonctionne pas pendant la nuit.
DE Setup-Karte
Diese Karte enthält eindeutige Konfigurationscodes. Sie
brauchen sie, wenn Sie Ihre Kamera neu konfigurieren
wollen. Bewahren Sie die Karte an einem sicheren Ort auf.
Werfen Sie sie nicht weg.
A. SETUP-QR-Code (schwarz): Beim Einrichten oder bei der WLAN-
Konfiguration halten Sie den schwarzen QR-Code nur in die Kamera,
wenn die App Sie dazu auordert und bis das Flutlicht zu blinken
beginnt.
B. RESET-QR-Code (rot): Um eine Rückstellung auf Werkseinstellungen
vorzunehmen, halten Sie den roten QR-Code in die Kamera. Das
Flutlicht blinkt zweimal hintereinander jeweils fünf Mal schnell, um
den Vorgang zu bestätigen. Alle Daten und die Konfiguration gehen
verloren.
Halten Sie den QR-Code in einem Abstand von etwa
30 cm vor die Kamera. Vergewissern Sie sich, dass das
Umgebungslicht ausreicht, dass die Kamera den Code lesen
kann. In der Nacht funktioniert das Ablesen möglicherweise nicht.
ES Tarjeta de configuración
Esta tarjeta contiene códigos de configuración únicos. Los
necesitarás para reconfigurar tu Cámara. Mantén la tarjeta en
un lugar seguro. No la tires.
A. Código QR de configuración (negro): Durante el proceso de
configuración del producto o del Wi-Fi, cuando la aplicación así lo
indique, deberás mostrar el código QR negro a la cámara hasta que
el foco empiece a parpadear.
B. Código QR de reseteo (rojo): Para llevar a cabo un restablecimiento
de fábrica, muestra el código QR rojo a la cámara. El foco emitirá
cinco parpadeos rápidos dos veces para confirmar la operación.
Se perderá toda la información y configuración.
Cuando muestres un código QR a la Cámara, mantenlo a
una distancia de 30 cm. Asegúrate de que hay suficiente luz
natural para que la cámara lea el código.
Puede que esta operación no funcione por la noche.

38
QR-card-V5
Security code for product setup.
Keep card in a safe place.
Do not throw away.
To perform a factory reset, show this red QR
code to the camera.
The floodlight will make five fast blinks twice
to confirm the operation.
All the data and configuration will be lost.
During the product setup, show this black QR
code to the camera only when required by
the App. Until the floodlight starts to blink.
30cm
1 ft.
IT Scheda di configurazione
Questa scheda contiene alcuni codici di configurazione
unici. Saranno necessari per riconfigurare la Videocamera.
Conservare la scheda in un luogo sicuro. Non gettarla via.
A. CONFIGURAZIONE con Codice QR (nero): durante la configurazione
del prodotto o del Wi-Fi, inquadrare il codice QR nero con la
videocamera solo quando richiesto dall'App. Fino a quando la luce
inizia a lampeggiare.
B. RIPRISTINO con codice QR (rosso): per ripristinare le impostazioni
di fabbrica, inquadrare il codice QR rosso con la videocamera. La
luce emetterà cinque lampeggi veloci per due volte per confermare
l'operazione. Tutti i dati e le impostazioni saranno cancellati.
Quando si inquadra il codice QR con la Videocamera, tenerlo
a una distanza di 30 cm. Assicurarsi che ci sia abbastanza
luce ambiente anché la videocamera legga il codice.
Potrebbe non funzionare di notte.
30cm
1 ft.
Smart Outdoor Camera

39
NL Installatiekaart
Op deze kaart staan unieke configuratiecodes. Deze heeft u
nodig voor de configuratie van uw Camera. Bewaar de kaart
op een veilige plek. Gooi hem niet weg.
A. QR INSTALLATIE-code (zwart): Tijdens de productinstallatie of
wifi-configuratie houdt u de zwarte QR-code voor de camera, alleen
wanneer de app daarom vraagt. Totdat het lampje gaat knipperen.
B. QR RESET-code (rood): Om een reset naar de fabrieksinstellingen
uit te voeren, houdt u de rode QR-code voor de camera. Het lampje
zal tweemaal vijf keer snel knipperen om de actie te bevestigen. Alle
data en configuratie gaan verloren.
Als u een QR-code aan Camera laat zien, houd deze dan op
30 cm afstand. Zorg voor voldoende omgevingslicht, zodat
de camera de code kan lezen. Het kan zijn dat het 's avonds
niet lukt.
PT Cartão de configuração
Este cartão contém códigos de configuração exclusivos.
Pode precisar deles para reconfigurar sua Câmara. Mantenha
o cartão em um local seguro. Não deite fora.
A. CONFIGURAÇÃO Código QR (preto): durante a instalação do
produto ou a configuração Wi-Fi, mostre o código para a câmara
somente quando solicitado pela aplicação. Até o projetor começar
a piscar.
B. RESET Código QR (vermelho): para executar uma redefinição de
fábrica, mostre o código QR vermelho para a câmara. A luz pisca
cinco vezes rapidamente duas vezes para confirmar a operação.
Todos os dados e configurações serão perdidos.
Ao mostrar um código QR para a Câmara, mantenha-o a
uma distância de 30 cm / 1 pé. Verifique se há luz ambiente
suficiente para a câmara ler o código. Pode não funcionar à
noite.

40
RU Карта установки
Данная карта содержит уникальные конфигурационные коды.
Они потребуются вам для изменения конфигурации вашей
камеры. Храните карту в надежном месте и не выбрасывайте
ее.
A. QR-код УСТАНОВКИ (черный): Во время установки устройства
или конфигурации соединения Wi-Fi, отсканируйте черный QR-
код камерой только, когда приложение потребует это сделать.
Дождитесь, когда прожектор начнет мигать.
Б. QR-код СБРОСА (красный): Для сброса к заводским настройкам
отсканируйте камерой красный QR-код. Прожектор подтвердит
операцию, выполнив пять коротких миганий два раза. Все данные и
параметры будут потеряны.
При сканировании QR-кодов камерой Smart Outdoor Camera,
держите их на расстоянии 30 см от камеры. Убедитесь, что
в помещении достаточно света и камера может прочитать
код. При недостаточном освещении сканирование может не
сработать.
QR-card-V5
Security code for product setup.
Keep card in a safe place.
Do not throw away.
To perform a factory reset, show this red QR
code to the camera.
The floodlight will make five fast blinks twice
to confirm the operation.
All the data and configuration will be lost.
During the product setup, show this black QR
code to the camera only when required by
the App. Until the floodlight starts to blink.
30cm
1 ft.
30cm
1 ft.
Smart Outdoor Camera

41
CN 安装代码卡
这张卡片上有独一无二的安装代码。若想重新设置Smart
Outdoor Camera摄像头,您将会需要这些代码。因此,请妥
善保存,不要将卡片扔掉。
A. 安装二维码(黑色):在安装产品或设置Wi-Fi网络的过程
中,应用程序会要求您手持卡片让摄像头扫描黑色二维
码,一直到泛光灯开始闪动。
B. 重置二维码(红色):若想恢复出厂设置,必须手持卡
片让摄像头扫描红色二维码。泛光灯将快闪五次,再度
快闪五次后,即完成操作。此举将永久删除所有的数据
和设置。
让Smart Outdoor Camera扫描二维码时,卡片与摄像头的距
离应为30厘米。必须有足够的光源,黑夜中可能无法读取
二维码。
TW 安裝代碼卡
這張卡片上有獨一無二的安裝代碼。若想重新設定Smart
Outdoor Camera攝影機,您將會需要這些代碼。因此,請
妥善保存,不要將卡片丟掉。
A. 安裝二維碼(黑色):在安裝產品或設定Wi-Fi網路的
過程中,App會要求您手持卡片讓攝影機掃描黑色二
維碼,一直到泛光燈閃動為止。
B. 重設二維碼(紅色):若想恢復出廠設定,必須手持
卡片讓攝影機掃描紅色二維碼。泛光燈將快閃五次,
再度快閃五次後,即完成操作。此舉將永久刪除所有
的資料和設定。
讓Smart Outdoor Camera掃描二維碼時,卡片與攝影機
的距離應為 30 cm。必須有足夠的光源,黑夜中可能無
法讀取二維碼。
JP セットアップ・カード
カードには、ひとつしかないセットアップ・コードが記
載されています。Smart Outdoor Cameraを再設定する際
に必要となります。カードを確実に保管し、捨てないで
ください。
A. セットアップ用QRコード(黒):製品のセットアップ
やWi-Fiの設定中、アプリから指示が出たら、黒いQRコ
ードをカメラで読み取ってください。投光照明が点滅し
始めるまで待ってください。
B. リセット用QRコード(赤):工場出荷状態に戻す場合
は、赤いQRコードをカメラで読み取ってください。リ
セットが行われたことを知らせるために、投光照明が5
回の短い点滅を2度繰り返します。リセットによって、
すべてのデータや設定が消去されます。
QRコードを読み取る際には、Smart Outdoor Cameraをコ
ードから30センチ離してください。カメラがコードを読
み取れるように、部屋を十分明るくしてください。夜間は
読み取りが正常に行われない場合があります。

42
Résolution des problèmes d'installation
Pour plus de conseils d'aide, consultez la section FAQ sur
l'application ou rendez-vous sur http://support.netatmo.com.
Vous avez besoin de remplacer la carte microSD ? Rendez-vous
sur : https://www.netatmo.com/change-sd-card.
Installation troubleshooting.
For further help please check the FAQ section on the app
or go to http://support.netatmo.com.
Need to replace the microSD card? Learn more about it at:
https://www.netatmo.com/change-sd-card.
EN
FR
!
!
Floodlight does not
turn on (the Smart
Outdoor Camera
does not start).
Fuse is blown
or circuit breaker
is turned o.
Switch that controls
old light fixture is o.
Incorrect circuit
wiring.
Possible causesProblem Solutions
Replace the fuse
or turn circuit
breaker on.
Turn old switch on and
keep it on at all times.
Your Camera needs
to be permanently
powered.
Check wire
connections. Shut
o the power first.
(Go back to step 5).
Check wire
connections. Shut
o the power first.
(Go back to step 5).
Fuse blows
or circuit breaker
trips when light
is turned on.
Crossed wires
or power wire
is grounding out.
!
!
La lumière ne
s'allume pas (la
Caméra Extérieure
Intelligente ne
démarre pas).
Le fusible a sauté
ou le disjoncteur est
coupé.
L'interrupteur qui
contrôle l'ancien
appareil d'éclairage
est en position
éteinte.
Mauvais câblage
du circuit.
Causes possiblesProblème Solutions
Remplacez le fusible
ou rétablissez le
disjoncteur.
Basculez l'interrupteur
et laissez-le en position
allumée. Votre Caméra
doit être alimentée en
permanence.
Vérifiez les
branchements.
Coupez d'abord le
courant. (Retournez
à l'étape 5)
Vérifiez les
branchements.
Coupez d'abord le
courant. (Retournez
à l'étape 5).
Le fusible a sauté
ou le disjoncteur
est coupé.
Fils croisés ou fil
d'alimentation en
contact avec la terre.

43
Para más ayuda, consulta la sección de preguntas frecuentes
(FAQ) en la aplicación o visita http://support.netatmo.com.
¿Necesitas cambiar la tarjeta microSD? Obtén más información
en: https://www.netatmo.com/change-sd-card.
Installation Fehlersuche
Weitere Hilfe finden Sie im FAQ-Bereich auf der App oder gehen
Sie zu http://support.netatmo.com.
Sie wollen die microSD-Karte ersetzen? Mehr dazu erfahren Sie
unter https://www.netatmo.com/change-sd-card.
DE
!
!
Licht geht nicht
an (Smarte
Außenkamera startet
nicht).
Sicherung ist
durchgebrannt oder
Leistungsschalter ist
ausgeschaltet.
Schalter, der die
alte Lichthalterung
steuert, ist aus.
Falsche
Stromverdrahtung.
Mögliche UrsachenProblem Lösungen
Tauschen Sie die
Sicherung aus oder
schalten Sie den
Leistungsschalter ein.
Schalten Sie den
alten Schalter ein und
lassen Sie ihn immer
eingeschaltet. Die
Kamera muss ständig mit
Strom versorgt werden.
Kabelverbindungen
prüfen. Zuerst den
Strom abschalten.
(Gehen Sie zurück
zu Schritt 5).
Kabelanschlüsse
prüfen. Schalten
Sie den Strom
zuerst aus. (Gehen
Sie zurück zu
Schritt 5).
Sicherung brennt
durch oder
Leistungsschalter
wird ausgelöst,
wenn das Licht
eingeschaltet ist.
Gekreuzte Drähte
oder Stromkabel-
Erdung ist aus.
Solución de problemas durante la instalación
ES
!
!
La luz no se
enciende (Cámara
Exterior Inteligente
no arranca).
El fusible está
fundido o el
disyuntor está
apagado.
El interruptor, que
controla el antiguo
dispositivo de
iluminación, está
apagado.
Cableado incorrecto
del circuito.
Posibles causasProblema Soluciones
Sustituye el fusible o
activa el disyuntor.
Enciende el interruptor
antiguo y mantenlo así
siempre. Tu Cámara
necesita estar siempre
encendida.
Comprueba las
conexiones de
los cables. Corta
primero la corriente.
(Vuelve al paso 5).
Comprueba
las conexiones
de los cables.
Corta primero la
corriente. (Vuelve
al paso 5)
Cuando la luz
se enciende, el
fusible se funde o
el disyuntor salta.
Cables cruzados
o cable de
alimentación
conectado a la tierra.

44
Per ulteriore assistenza, consultare la sezione FAQ sull'applicazione
o consultare il sito web http://support.netatmo.com.
Devi sostituire la scheda microSD? Per saperne di più, visita il sito:
https://www.netatmo.com/change-sd-card.
IT Risoluzione di problemi per l'installazione
!
!
La luce non
si accende
(Videocamera
Esterna Intelligente
non si attiva).
Si è bruciato un
fusibile o il contatore
è disattivato.
L'interruttore
che regolava il
faretto installato
precedentemente è
spento.
Circuito dei cavi non
corretto.
Possibili causeProblema Soluzioni
Sostituire il fusibile o
riattivare il contatore.
Accendere l'interruttore
del faretto installato
precedentemente e
mantenerlo sempre acceso.
La Videocamera deve essere
continuamente collegata alla
corrente.
Controllare i
collegamenti
dei cavi, Dopo
aver scollegare
l'elettricità. (Tornare
al passo 5).
Controllare i
collegamenti
dei cavi. Dopo
aver scollegato
l'elettricità. (Tornare
al passo 5).
Il fusibile è
bruciato o il
contatore salta
quando si accende
la luce.
I cavi incrociati
o il cavo di
alimentazione si
stanno logorando.
Installatieproblemen oplossen
Meer hulp vindt u bij de Veelgestelde Vragen op de app of u
gaat naar http://support.netatmo.com.
Wilt u een microSD-kaart vervangen? Meer informatie daarover op:
https://www.netatmo.com/change-sd-card.
NL
!
!
Licht gaat niet
aan (Slimme
Buitencamera start
niet op).
Zekering is
doorgebrand of
stroomonderbreker
is uitgeschakeld.
Schakelaar die de
oude lamp regelt
is uit.
Onjuiste
stroombedrading.
Mogelijke oorzakenProbleem Oplossingen
Vervang de zekering
of schakel de
stroomonderbreker in.
Zet oude schakelaar aan
en houd deze te allen
tijde aan. Uw Camera
moet permanent met de
stroom zijn aangesloten.
Controleer
draadverbindingen.
Schakel eerst de
stroom uit.
(Ga terug naar stap 5)
Controleer
raadverbindingen.
Schakel eerst de
stroom uit. (Ga
terug naar stap 5).
Zekering is
opgebrand of
stroomonderbreker
schakelt uit
wanneer licht wordt
ingeschakeld.
Gekruiste draden
of stroomdraad
veroorzaakt
kortsluiting.

45
Solução de problemas de instalação
Para obter mais ajuda, consulte a seção de perguntas
frequentes na aplicação ou aceda https://helpcenter.netatmo.
com.
Behöver du byta ut microSD-kortet? Läs mer om det på:
https://www.netatmo.com/change-sd-card.
PT
!
!
A luz não acende
(a Câmara Exterior
Inteligente não
inicia).
O fusível está
queimado ou o
disjuntor está
desligado.
O interruptor
que controla a
luminária antiga está
desligado.
Incorreta
eletrificação do
circuito.
Causas PossíveisProblema Soluções
Substitua o fusível ou
ligue o disjuntor.
Ligue o interruptor antigo e
mantenha-o sempre ligado. A
sua Câmara Externa Conectada
precisa estar permanentemente
alimentada.
Verifique a
eletrificação.
Desligue a energia
primeiro. (Volte ao
passo 5)
Verifique a
eletrificação.
Desligue a energia
primeiro. (Volte ao
passo 5)
Quando a luz está
acesa o fusível
queima ou o
disjuntor dispara.
Os fios trocados
ou não está ligado
à terra.

46
Устранение неполадок при установке
Для получения дополнительной помощи обратитесь к разделу FAQ в
приложении или перейдите по адресу http://support.netatmo.com.
Вам требуется заменить карту памяти microSD? Информацию о том, как это
сделать, вы найдете по ссылке: hps://www.netatmo.com/change-sd-card.
RU
!
!
Свет не включается
(Smart Outdoor
Camera не
запускается).
Перегорел
предохранитель
или выключен
автоматический
выключатель.
Неправильное
подключение
электропроводки.
Возможные причиныНеполадка Способы устранения
Замените
предохранитель
или включите
автоматический
выключатель.
Включите старый
выключатель и
оставьте его в таком
положении. Камера
требует постоянного
электропитания.
Проверьте
соединения
проводов. Перед
проверкой
выключите
электропитание.
(Вернитесь к шагу 5).
Проверьте
соединения
проводов. Перед
проверкой
выключите
электропитание.
(Вернитесь к шагу 5).
При включении
света перегорает
предохранитель
или срабатывает
автоматический
выключатель.
Перекручены
провода или
провод питания не
заземлен.
安装故障排除
如需更多帮助,请查看应用程序中的FAQ部分或登录
http://support.netatmo.com。
若需要替换microSD存储卡,请查阅https://www.netatmo.com/change-sd-
card页面。
CN
!
!
灯不亮(Smart
Outdoor Camera 未
启动)。
保险丝熔断或断
路器处于关闭状
态。
控制旧灯具的开
关处于关闭状
态。
电路线路不正
确。
可能原因问题 解決方案
更换保险丝或打
开断路器。
打开旧开关,使其一
直处于打开状态。摄
像头需要持续供电。
检查导线接头。
首先切断电源。
(返回第5步)
检查导线接头。
首先切断电源。
(返回第5步)
灯被打开时,保
险丝熔断或断路
器跳闸。
导线交叉或电源
线接地。
Выключатель от
старого светильника
выключен.

47
安裝故障排除
如需更多説明,請查看應用程式中的FAQ部分或登錄
http://support.netatmo.com。
若需要更換microSD記憶卡,請查閱https://www.netatmo.com/change-sd-
card頁面。
TW
!
!
燈不亮(Smart
Outdoor Camera
未啟動)。
保險絲熔斷或斷
路器處於關閉狀
態。
控制舊燈具的開
關處於關閉狀
態。
電路線路不正
確。
可能原因問題 解決方案
更換保險絲或打
開斷路器。
打開舊開關,使其一
直處於打開狀態。攝
像頭需要持續供電。
檢查導線接頭。
首先切斷電源。
(返回第5步)
檢查導線接頭。
首先切斷電源。
(返回第5步)
燈被打開時,保
險絲熔斷或斷路
器跳閘。
導線交叉或電源
線接地。
取り付けトラブルシューティング
さらにヘルプが必要な場合は、アプリのFAQセクションをご確認いただ
くか、http://support.netatmo.comをご覧ください。
microSDカードの交換については、こちらにアクセスしてください:
https://www.netatmo.com/change-sd-card.
JP
!
!
ライトが点灯しませ
ん(Smart Outdoor
Cameraがスタート
しません)。
ヒューズが溶断され
るか、または回路遮
断器がオフになって
います。
古い照明取付具を
制御するスイッチ
がオフになってい
ます。
誤った回路配線。
考えられる原因問題 解決法
ヒューズを交換する
か、回路ブレーカー
をオンにします。
古いスイッチの電源を入
れ、常にオンにしておき
ます。 カメラは恒久的
に電力を供給する必要が
あります。
配線接続を確認し
てください。 ま
ず電源を遮断して
ください。 (ス
テップ5に戻って
ください)
配線接続を確認し
てください。 ま
ず電源を遮断して
ください。 (ス
テップ5に戻って
ください)
ヒューズが溶断さ
れるか、または回
路遮断器がオフに
なっています。
電線が交差している
か電源線が接地され
ています。

48
EN
FR
DE
IMPORTANT: Safety information
Class I electrical appliance: use only on 100-240 V AC 50-60Hz.
Risk of electric shock or fire. A good knowledge of electrical
systems is required. If not qualified, do not attempt to install. Contact
a qualified electrician.
Disconnect power at fuse or circuit breaker before installing
or servicing.
No user serviceable parts inside. To avoid electrical shock,
do not disassemble the product.
To prevent wiring damage or abrasion, do not expose wiring
to sharp objects such as edges of metal sheet.
Assistance may be required to support the product during
installation.
Handle the product with care during the installation. Sharp edges
could hurt you or damage the walls. The front glass could break
if hit. Broken glass should be replaced.
Keep a minimum distance of 1 meter (3.3 feet) between the light and
your eyes or any surface in front.
IMPORTANT : Informations de sécurité
Appareil électrique de classe 1 : Supporte uniquement 100-240 V
AC 50-60Hz.
Risque de choc électrique ou d'incendie. Une bonne connaissance
des systèmes électriques est nécessaire. Si vous n'êtes pas qualifié,
n'essayez pas d'installer l'appareil. Contactez un électricien qualifié.
Coupez le courant électrique au fusible ou au disjoncteur général
avant l'installation ou l'entretien.
Aucune pièce réparable par l'utilisateur. Pour éviter un choc
électrique, ne démontez pas le produit.
Pour éviter l'endommagement du câblage ou l'abrasion, n'exposez
pas le câblage à des objets tranchants tels que les bords d'une tôle.
De l'aide peut être nécessaire lors de l'installation.
Manipulez le produit avec précaution lors de l'installation. Les arêtes
vives pourraient vous blesser ou endommager les murs. La vitre
avant pourrait se briser en cas de choc. Le verre brisé doit être
remplacé.
Gardez une distance minimale de 1 mètre entre la lumière et vos
yeux ou toute autre surface.
ACHTUNG: Sicherheitsinformation
Klasse I Elektrogerät: nur verwenden bei 100-240 V AC 50-60Hz.
Risiko eines elektrischen Schlags oder Feuer. Es ist eine gute
Kenntnis der elektrischen Anlagen erforderlich. Wenn Sie nicht
qualifiziert sind, versuchen Sie nicht es zu installieren. Kontaktieren
Sie einen qualifizierten Elektriker.
Schalten Sie den Strom der Sicherung oder Schutzschalter vor der
Installation oder Wartung aus.
Keine zu wartenden Teile im Inneren. Zur Vermeidung eines
Stromschlags, zerlegen Sie das Produkt nicht.
Um Kabelschäden oder Abrieb zu verhindern, die Verdrahtung nicht
scharfen Gegenständen wie Blechkanten aussetzen.
Es kann sein, dass Hilfe während der Installation erforderlich ist.
Behandeln Sie das Produkt während der Installation sorgfältig.
Scharfe Kanten können Ihnen Schaden zufügen oder die Wände
beschädigen. Das Frontglas könnte brechen, wenn es getroen
wird. Gebrochenes Glas sollte ausgetauscht werden.
Halten Sie mindestens 1 Meter Abstand (3,3 Fuß) zwischen dem
Licht und Ihren Augen oder zu jeder Fläche auf der Vorderseite.

49
ES
IT
NL
IMPORTANTE: Información de seguridad
Dispositivo eléctrico de clase I: utilizar sólo a 100-240 V CA 50-
60Hz.
Riesgo de descarga eléctrica o incendio. Se requiere un buen
conocimiento de los sistemas eléctricos. Si no estás cualificado, no
intentes realizar la instalación. Ponte en contacto con un electricista
cualificado.
Antes de la instalación o puesta en funcionamiento, desconecta la
alimentación del fusible o el disyuntor.
En el interior del aparato no hay ninguna pieza que sea útil para el
usuario. Para evitar descargas eléctricas, está prohibido desmontar
el aparato.
Para evitar que los cables se dañen o abrasen, no expongas el
cableado a objetos afilados como los bordes de las hojas de metal.
Puede ser que se requiera asistencia durante la instalación.
Trata el producto con cuidado durante la instalación. Los cantos
afilados pueden causarte heridas o dañar las paredes. El cristal de
la parte delantera se puede romper si recibe un golpe. El cristal roto
se debe sustituir.
Mantén una distancia de como mínimo un metro entre la luz y tus
ojos o cualquier superficie que haya delante.
IMPORTANTE: Informazioni di sicurezza
Apparecchio elettrico di Classe I: utilizzare solo con 100-240 V AC
50-60Hz.
Rischio elettrico o pericolo di incendio. Per eseguire l'installazione
è richiesta una buona conoscenza dei sistemi di elettricità. In caso
contrario, non eettuare nessun tentativo di installazione. Rivolgersi
ad un elettricista professionista.
Staccare i fusibili o disattivare il contatore, prima dell'installazione o
di una eventuale riparazione.
All'interno del dispositivo non ci sono elementi utilizzabili da parte
dell'utente. Non smontare il prodotto per evitare folgorazione.
Per evitare danni o abrasioni ai cavi, tenerli lontano da oggetti
alati, come estremità di fogli metallici.
Durante l'installazione potrebbe essere necessaria assistenza.
Maneggiare il dispositivo con cura durante l'installazione. Le
estremità alate possono provocare danni alle persone e alle
pareti. Il vetro anteriore del dispositivo può frantumarsi, se viene
urtato. In questo caso, è necessario sostituirlo.
Mantenere una distanza di minimo 1 metro tra la luce e gli occhi o
qualunque tipo di superficie che si trovi davanti al dispositivo.
BELANGRIJK: Veiligheidsinformatie
Klasse I elektrisch apparaat: gebruik alleen met 100-240 V AC
50-60Hz.
Risico op elektrische schok of brand. Een goede kennis van
elektrische systemen is vereist. Indien u niet gekwalificeerd bent,
installeer dit product dan niet zelf. Neem contact op met een
gekwalificeerd elektricien.
Schakel de stroom uit bij de zekering of stroomonderbreker
voordat u aan de installatie of het onderhoud begint.
Bevat geen door de gebruiker te repareren onderdelen. Om een
elektrische schok te vermijden, mag u het product niet demonteren.
Stel de bedrading niet bloot aan scherpe objecten, zoals randen
van metaalplaat, om schade en slijtage aan de bedrading te
voorkomen.
Tijdens de installatie heeft u mogelijk hulp nodig.
Ga zorgvuldig met het product om tijdens de installatie. Scherpe
randen kunnen u pijn doen of de muren beschadigen. Het glas aan
de voorkant kan breken wanneer u er tegenaan stoot. Gebroken
glas moet worden vervangen.
Houd een minimum afstand van 1 meter (3,3 feet) tussen het licht en
uw ogen of eventuele voorwerpen aan de voorkant.

50
PT
RU
Informações Importantes sobre Segurança
Aparelho elétrico classe I: use somente em 100-240 V CA 50-60Hz.
Risco elétrico ou incêndio. É necessário um bom conhecimento
de sistemas elétricos. Se não estiver qualificado, não tente instalar.
Entre em contato com um eletricista qualificado.
Desligue a energia do fusível ou do disjuntor antes de instalar ou
fazer a manutenção.
Não há peças reparáveis pelo utilizador. Para evitar choque elétrico,
não desmonte o produto.
Para evitar danos não exponha a cablagem a objetos pontiagudos,
como bordas de metal cortantes.
Pode ser necessária assistência durante a instalação.
Manuseie o produto com cuidado durante a instalação. Bordas
metálicas afiadas podem danificar. O vidro da frente pode partir se
bater. Vidro partido deve ser substituído.
Mantenha uma distância mínima de 1 metro (3,3 pés) entre a luz e os
olhos ou qualquer superfície à frente.
ВАЖНАЯ ИНФОРМАЦИЯ: Информация по технике безопасности
Электробытовой прибор 1-го класса защиты от поражения электрическим током:
использовать только в сети переменного тока с напряжением 100-240 В и
частотой 50-60 Гц.
Опасность поражения электрическим током или пожара. Необходимо хорошее
знание электрических систем. Не пытайтесь выполнить установку, если не
имеете необходимой квалификации. Обратитесь к квалифицированному
электрику.
Перед установкой или обслуживанием отключите электропитание, вынув
плавкий предохранитель или выключив автоматический выключатель.
Изделие не содержит внутри себя деталей, обслуживаемых пользователем.
Чтобы не допустить поражения электрическим током, не разбирайте изделие.
Чтобы избежать повреждения или истирания электропроводки, не допускайте
контакта электропроводки с острыми предметами, такими, как края
металлического листа.
В процессе установки может потребоваться посторонняя помощь.
Во время установки необходимо осторожно обращаться с изделием. Острые
края могут причинить травмы или повредить стены. Переднее стекло может
разбиться при ударе. Разбитое стекло следует заменить.
Минимальное расстояние от прожектора до ваших глаз или до любой
поверхности впереди должно составлять не менее 1 метра (3,3 фута).
CN 重要提示:安全信息
I 类电气:只能在100-240伏交流电及50-60赫兹的情况下使
用。触电或火灾危险!需要具备良好的电气系统知识。如无资
质,请勿尝试安装。联系具备资质的电工。
安装或维修前,请断开电源保险丝或断路器。
不含用户可维修零件。为了避免触电,请勿拆卸本产品。
为防止线路损坏或磨损,请勿使线路与尖锐物体接触,如金属
薄板边缘。
安装过程中可能需要帮助。
安装过程中,对本产品应轻拿轻放。锋利边缘对用户或墙壁会
造成伤害。正面的玻璃遭受碰撞后可能会破碎。玻璃破碎后应
进行更换。
灯光与眼睛或正前方的表面之间最低应保持相距1米(3.3英
尺)。

51
TW
JP
重要提示:安全資訊
I 類電氣:只能在100-240伏交流電及50-60赫茲的情況下使
用。觸電或火災危險!需要具備良好的電氣系統知識。如無資
質,請勿嘗試安裝。聯繫具備資質的電工。
安裝或維修前,請斷開電源保險絲或斷路器。
不含使用者可維修零件。為了避免觸電,請勿拆卸本產品。
為防止線路損壞或磨損,請勿使線路與尖銳物體接觸,如金屬
薄板邊緣。
安裝過程中可能需要幫助。
安裝過程中,對本產品應輕拿輕放。鋒利邊緣對用戶或牆壁會
造成傷害。正面的玻璃遭受碰撞後可能會破碎。玻璃破碎後應
進行更換。
燈光與眼睛或正前方的表面之間最低應保持相距1米(3.3英
尺)。
重要: 安全に関する情報
クラスI機器 : 100-240 V AC 50-60Hzでのみ使用すること。
感電や火災の危険があります。 電気システムの十分な知識が必要とされ
ます。 十分な知識がない場合、取り付けを行わないでください。 有資
格の電気技術者にお問い合わせください。
取り付けまたはメンテナンスを行う際には事前に、ヒューズまたは回路
ブレーカーの電源を切ってください。
製品内部には手を触れないでください。 感電を避けるため、製品を分解
しないでください。
配線の損傷や摩耗を防ぐために、金属シートのエッジなど尖ったもので
傷をつけないでください。
取り付け時にアシスタントが必要になる場合があります。
取り付け時には注意して取り扱ってください。 尖ったエッジにより怪我
の恐れまたは壁に傷がつくことがあります。 衝撃が与えられるとフロ
ントガラスが破損する可能性があります。 割れたガラスは交換する必要
があります。
ライトまたは全面の正面から目の距離は最低1メートル(3.3フィート)
離してください。

52
FCC Statement
This equipment has been tested and found to comply with the limits
for a Class B digital device, pursuant to part 15 of the FCC rules.
These limits are designed to provide reasonable protection against
harmful interference in a residential installation.
This equipment generates, uses and can radiate radio
frequency energy and, if not installed and used in accordance
with the instructions, may cause harmful interference to radio
communications. However, there is no guarantee that interference
will not occur in a particular installation.
lf this equipment does cause harmful interference to radio or
television reception, which can be determined by turning the
equipment o and on, the user is encouraged to try to correct the
interference by one or more of the following measures:
- Reorient or relocate the receiving antenna.
- Increase the separation between the equipment and receiver.
- Connect the equipment into an outlet on a circuit dierent from
that to which the receiver is connected.
- Consult the dealer or an experienced radio/TV technician for help.
Should you need further certification information (FCC ID, IC) please open the
cover at the bottom of the product by pulling back the strip with your nails.
Si vous avez besoin de plus d'informations sur la certification (FCC ID, IC),
ouvrez le couvercle en-dessous du produit en tirant la languette avec vos
ongles.
FCC Radiation Exposure Statement
This equipment complies with FCC RF radiation exposure limits set
forth for an uncontrolled environment. This transmitter should be
installed and operated with a minimum distance of 20 centimeters
between the radiator and your body and must not be co-located or
operating in conjunction with any other antenna or transmitter. This
equipment complies with Part 15 of the FCC Rules.
Operation is subject to the following two conditions:
(1) This device may not cause harmful interference, and
(2) This device must accept any interference received, including
interference that may cause undesired operation.
Caution!
Any changes or modifications to this unit not expressly approved by
the party responsible for compliance could void the user’s authority
to operate the equipment.
Legal notice
“Made for iPod”, “Made for iPhone”, “Made for iPad” mean that an
electronic accessory has been designed to connect specifically to
iPod, iPhone and iPad and has been certified by the developer to
meet Apple performance standards. Apple is not responsible for the
operation of this device or its compliance with safety and regulatory
standards. Please note that the use of this accessory with iPhone
may aect wireless performance.
Safety warnings
This device is not intended for use by persons (including children)
with reduced physical, sensory or mental capabilities, or lack
of experience and knowledge, unless they have been given
supervision or instruction concerning use of the appliance by a
person responsible for their safety. Children should be supervised to
ensure that they do not play with the appliance.
Consignes de sécurité
Cet appareil n’est pas destiné à être utilisé par des personnes
(notamment des enfants) dont les capacités physiques, sensorielles
ou mentales sont réduites, ou qui n’ont pas d’expérience et de
connaissances, à moins qu’elles ne soient surveillées ou instruites
concernant l’utilisation de l’appareil par une personne responsable
de leur sécurité. Les enfants doivent être surveillés pour s’assurer
qu’ils ne jouent pas avec l’appareil.

53
Sicherheitshinweise
Dieses Gerät darf nicht von Personen (einschließlich Kindern)
verwendet werden, deren körperliche, sensorische oder geistige
Fähigkeiten beeinträchtigt sind oder die keine Erfahrung und kein
Wissen haben, es sei denn, sie werden beaufsichtigt oder von einer
für ihre Sicherheit verantwortlichen Person in die Benutzung des
Geräts eingewiesen wurde. Kinder sollten beaufsichtigt werden,
um sicherzustellen, dass sie nicht mit dem Gerät spielen. Eine leicht
zugängliche Trennvorrichtung ist außerhalb des Geräts anzubringen
Advertencias de seguridad
Este dispositivo no está diseñado para que lo utilicen personas
(incluidos niños) con facultades físicas, sensoriales o mentales
reducidas ni con falta de experiencia y conocimiento, salvo que una
persona responsable de su seguridad los supervise o instruya sobre
el uso del aparato. Hay que asegurarse de que los niños no jueguen
con el aparato. Un dispositivo de desconexión facilmente accesible
debe ser incorporado al exterior del producto.
Avvertenze di sicurezza
Questo dispositivo non è destinato all’uso da parte di persone
(compresi i bambini) con ridotte capacità fisiche, sensoriali o mentali,
o sprovviste della necessaria esperienza e conoscenza, a meno che
siano sorvegliate o abbiano ricevuto istruzioni sull’uso del dispositivo
da parte di una persona responsabile della loro sicurezza. I bambini
devono essere sorvegliati per assicurarsi che non giochino con
l’apparecchio. Deve essere predisposto nelle immediate vicinanze e
facilmente accessibile un dispositivo di disconnessione.
Veiligheidsinstructies
Dit apparaat is niet bedoeld voor gebruik door personen (inclusief
kinderen) van wie de fysieke, sensorische of mentale vermogens
zijn verminderd of die geen ervaring en kennis hebben, tenzij ze
onder toezicht staan of geïnstrueerd in het gebruik van het apparaat
door een persoon die verantwoordelijk is voor hun veiligheid.
Houd toezicht op kinderen om ervoor te zorgen dat ze niet met het
apparaat spelen.
Внимание
Данное устройство не предназначено для использования
лицами (в том числе детьми) со сниженными физическими,
сенсорными или умственными возможностями, либо с
недостаточным опытом или знаниями, кроме случаев, когда
это делается под присмотром или по инструкции, данной им в
отношении использования устройства лицом, ответственным
за их безопасность. Не оставляйте детей без присмотра, чтобы
они не играли с устройством.
Необходимо предусмотреть внешнее легко доступное
приспособление для отключения устройства.
安全警告
本设备不适用于身体、感官或精神官能有缺陷的人士或缺乏经验
和知识的人士(包括儿童)使用,除非由负责其安全的人员对其
使用本设备进行监督或指导。儿童必须在监护下使用。
设备外部应装有易于使用的断开装置。
安全警告
本產品不適用於身體、感官或精神官能有缺陷之人士或缺乏經驗
和知識之人士(包括兒童)使用,除非由負責其安全的人員對其
使用本產品進行監督或指導。兒童必須在監護下使用。
本產品外部應裝有易於使用的斷開裝置。
安全上の警告
この機器は身体的、知覚的または精神的能力が減少した方(お子様を含
む)や、経験・知識の不十分な方によるご利用には向いていません。ただ
し、利用者の安全に責任のある第三者から、使用に関して監督または指示
を受けている場合を除きます。お子様が機器を玩具として扱うことのない
よう、監督してください。すぐにアクセスできる接続解除デバイスが、装
備の外部に組み込まれます。

54
Canadian Compliance Statement
This device complies with Industry Canada license-exempt RSS
standard(s). Operation is subject to the following two conditions:
(1) this device may not cause interference, and (2) this device must
accept any interference, including interference that may cause
undesired operation of the device. Cet appareil est conforme
aux normes CNR exemptes de licence d’Industrie Canada. Le
fonctionnement est soumis aux deux conditions suivantes: (1) cet
appareil ne doit pas provoquer d’interférences et (2) cet appareil
doit accepter toute interférence, y compris celles susceptibles
de provoquer un fonctionnement non souhaité de l’appareil.
This Class B digital apparatus complies with Canadian ICES-003.
Cet appareil numérique de la classe B est conforme à la norme
NMB-003 du Canada. This device and its antenna(s) must not be
co-located or operating in conjunction with any other antenna or
transmitter. Cet appareil et son antenne (s) ne doit pas être co-
localisés ou fonctionnant en conjonction avec une autre antenne
ou transmetteur.
Taiwan Wireless Statements
無線設備的警告聲明
本產品符合低功率電波輻射性電機管理辦法 第十二條、十四條等
條文規定:
1.經型式認證合格之低功率射頻電機,非經許可,公司、商號 或
使用者均不得擅自變更頻率、加大功率或變更原設計之特性及功
能。
2.低功率射頻電機之使用不得影響飛航安全及干擾合法通信;經發
現有干 擾現象時,應立即停用,並改善至無干擾時方
得繼續使用。
前項合法通信,指依電信法規定作業之無線電通信。
低功率射頻電機須忍受合法通信或工業、科學及醫療用電波輻射
性電機設 備之干擾。
Use of the Works with Apple HomeKit logo means that an
electronic accessory has been designed to connect specifically
to iPod touch, iPhone, or iPad, respectively, and has been certified
by the developer to meet Apple performance standards. Apple is
not responsible for the operation of this device or its compliance
with safety and regulatory standards.
Controlling this HomeKit-enabled accessory automatically and
away from home requires an Apple TV with tvOS 10.x or later or
an iPad with iOS 10.x or later set up as a home hub.
Apple and the Apple logo are trademarks of Apple Inc., registered
in the U.S. and other countries. App Store is a service mark of
Apple Inc.
Google Play and the Google Play logo are trademarks of Google Inc.
Wireless connectivity / Connexion sans-fil / Drahtlose
Konnektivität / Conexión inalámbrica / Connessione senza fili /
Draadloze connectiviteit / Trådlös anslutning / Trådløs tilkobling /
Беспроводная связь / 无线连接 / 無線連接 / ワイヤレス接続
Wi-Fi and Bluetooth: 2400-2496 MHz @ 100 mW
America, Australia, New Zealand: 916.3 - 916.5 MHz @ 16 mW
Japan, Singapore, Taiwan, Malaysia: 922.32 - 922.52 MHz @ 16 mW
China: 868.3 - 868.5 MHz @ 16 mW
Europe (and rest of the World default): 869.3 - 869.5 MHz @ 16 mW

55
EU Declaration of Conformity
Česky [Czech] - Netatmo tímto prohlašuje, že tento NOC01 je ve shodě
se základními požadavky a dalšími příslušnými ustanoveními směrnice
2014/53/EU a ROHS 2011/65/ES.
Originál EU prohlášení o shodě lze nalézt na http://www.netatmo.com/
declaration/noc.
Dansk [Danish] - Undertegnede Netatmo erklærer herved, at følgende
udstyr NOC01 overholder de væsentlige krav og øvrige relevante krav i
direktiv 2014/53/EU og ROHS 2011/65/EF.
Den oprindelige EU-overensstemmelseserklæringen kan findes på http://
www.netatmo.com/declaration/noc.
Deutsch [German] - Hiermit erklärt Netatmo, dass sich das Gerät NOC01 in
Übereinstimmung mit den grundlegenden Anforderungen und den übrigen
einschlägigen Bestimmungen der Richtlinie 2014/53/EU und ROHS 2011/65/
EG befindet.
Die Original-EU-Konformitätserklärung finden Sie unter http://www.netatmo.
com/declaration/noc.
Eesti [Estonian] - Käesolevaga kinnitab Netatmo seadme NOC01 vastavust
direktiivi 2014/53/EU ja ROHS 2011/65/EÜ põhinõuetele ja nimetatud
direktiivist tulenevatele teistele asjakohastele sätetele.
Vastavusdeklaratsiooni tervikteksti saab veebilehelt http://www.netatmo.
com/declaration/noc.
English - Hereby, Netatmo declares that this NOC01 is in compliance
with the essential requirements and other relevant provisions of Directive
2014/53/EU and ROHS 2011/65/EC.
The original EU declaration of conformity may be found at http://www.
netatmo.com/declaration/noc.
Español [Spanish] - Por medio de la presente Netatmo declara que el NOC01
cumple con los requisitos esenciales y cualesquiera otras disposiciones
aplicables o exigibles de la Directiva 2014/53/EU y ROHS 2011/65/CE.
El original de la declaración de conformidad UE se puede encontrar en
http://www.netatmo.com/declaration/noc.
Ελληνική [Greek] - Με tην παροyσα Netatmo δηλωνει οtι NOC01 σyμμορφωνεtαι
προσ tισ οyσιωδεισ απαιtησεισ και tισ λοιπεσ σxεtικεσ διαtαξεισ tησ οδηγιασ
2014/53/EU και ROHS 2011/65/EK.
Μπορείτε να βρείτε ένα αντίγραφο της πλήρους δήλωσης συμμόρφωσης στη
διεύθυνση hp://www.netatmo.com/declaraon/noc.
Français [French] - Par la présente Netatmo déclare que l'appareil NOC01 est
conforme aux exigences essentielles et aux autres dispositions pertinentes
de la directive 2014/53/EU et ROHS 2011/65/CE.
La déclaration de conformité UE originelle est disponible sur http://www.
netatmo.com/declaration/noc.
Hrvatski [Croaan] - Ovime, Netatmo izjavljuje da je ovaj NOC01 u skladu s
osnovnim zahtjevima i drugim relevantnim odredbama Direktive 2014/53/
EU i ROHS 2011/65/EC.
Kopija pune Izjave o sukladnosti može se preuzeti na http://www.netatmo.
com/declaration/noc.
Italiano [Italian] - Con la presente Netatmo dichiara che questo NOC01 è
conforme ai requisiti essenziali ed alle altre disposizioni pertinenti stabilite
dalla direttiva 2014/53/EU e ROHS 2011/65/CE.
La dichiarazione di conformità UE originale si trova a http://www.netatmo.
com/declaration/noc.
Latviski [Latvian] - Ar šo Netatmo deklarē, ka NOC01 atbilst Direktīvas
2014/53/EU un ROHS 2011/65/EK būtiskajām prasībām un citiem ar to
saistītajiem noteikumiem.
Pilnas atbilstības deklarācijas kopiju var iegūt vietnē http://www.netatmo.
com/declaration/noc.
Lietuvių [Lithuanian] - Šiuo Netatmo deklaruoja, kad šis NOC01 atitinka
esminius reikalavimus ir kitas 2014/53/EU ir ROHS 2011/65/EB Direktyvos
nuostatas. Originali EU atitikties deklaracija yra http://www.netatmo.com/
declaration/noc.
Nederlands [Dutch] - Hierbij verklaart Netatmo dat het toestel NOC01 in
overeenstemming is met de essentiële eisen en de andere relevante
bepalingen van richtlijn 2014/53/EU en ROHS 2011/65/EG.
De oorspronkelijke EU-verklaring van overeenstemming is te vinden op
http://www.netatmo.com/declaration/noc.
Mal [Maltese] - Hawnhekk, Netatmo, jiddikjara li dan NOC01 jikkonforma
mal-ħtiġijiet essenzjali u ma provvedimenti oħrajn relevanti li hemm fid-
Dirrettiva 2014/53/EU u ROHS 2011/65/EC.
Kopja tad-Dikjarazzjoni sħiħa ta 'konformità tista' tinkiseb fuq http://www.
netatmo.com/declaration/noc.

56
Magyar [Hungarian] - Alulírott, Netatmo nyilatkozom, hogy a NOC01
megfelel a vonatkozó alapvetõ követelményeknek és az 2014/53/EU i
ROHS 2011/65/EC irányelv egyéb elõírásainak.
Az eredeti EU megfelelőségi nyilatkozat megtalálható a http://www.
netatmo.com/declaration/noc oldalon.
Norsk [Norwegian] - Erklærer herved Netatmo at dette NOC01 er i
samsvar med de grunnleggende krav og øvrige relevante krav i direktiv
2014/53/EU og ROHS 2011/65/EC.
En kopi av den fullstendige samsvarserklæringen kan fås ved http://www.
netatmo.com/declaration/noc.
Polski [Polish] - Niniejszym Netatmo oświadcza, że NOC01 jest zgodny z
zasadniczymi wymogami oraz pozostałymi stosownymi postanowieniami
Dyrektywy 2014/53/EU i ROHS 2011/65/EC.
Kopię pełnej deklaracji zgodności można pobrać pod adresem http://
www.netatmo.com/declaration/noc.
Svenska [Swedish] - Härmed intygar Netatmo att denna NOC01 står
I överensstämmelse med de väsentliga egenskapskrav och övriga
relevanta bestämmelser som framgår av direktiv 2014/53/EU och ROHS
2011/65/EG.
En kopia av hela Konformitetsdeklarationen finns på http://www.netatmo.
com/declaration/noc.
Português [Portuguese] - Netatmo declara que este NOC01 está conforme
com os requisitos essenciais e outras disposições da Directiva 2014/53/
EU e ROHS 2011/65/CE.
Uma cópia completa da declaração de conformidade pode ser obtida
em http://www.netatmo.com/declaration/noc.
Română [Romanian] - Astfel, Netatmo declară că acest NOC01 este
în conformitate cu cerințele esențiale și alte prevederi relevante ale
Directivei 2014/53/EU și ROHS anului 2011/65/CE.
O copie a declarației de conformitate completă poate fi obținută la http://
www.netatmo.com/declaration/noc.
Slovensko [Slovenian] - Netatmo izjavlja, da je ta NOC01 v skladu z
bistvenimi zahtevami in ostalimi relevantnimi določili direktive 2014/53/
EU in ROHS 2011/65/ES.
Kopijo celotne izjave o skladnosti najdete na spletni povezavi http://
www.netatmo.com/declaration/noc.
Slovensky [Slovak] - Netatmo týmto vyhlasuje, že NOC01 spĺňa základné
požiadavky a všetky príslušné ustanovenia Smernice 2014/53/EU a
ROHS 2011/65/ES.
Úplné znenie Vyhlásenia o zhode nájdete na webovej stránke http://
www.netatmo.com/declaration/noc.
Suomi [Finnish] - Netatmo vakuuttaa täten että NOC01 tyyppinen laite on
direktiivin 2014/53/EU ja ROHS 2011/65/EY oleellisten vaatimusten ja sitä
koskevien direktiivin muiden ehtojen mukainen.
Alkuperäinen EU-vaatimustenmukaisuusvakuutus on osoitteesta http://
www.netatmo.com/declaration/noc.
Türkçe [Turkish] - Netatmo, bu NOC01'in 2014/53/EU ve ROHS 2011/65/
EC Yönetmeliğinin temel şartlarına ve diğer ilgili hükümlerine uygun
olduğunu beyan eder.
Tam uygunluk beyanının bir kopyası http://www.netatmo.com/declaration/
noc adresinden edinilebilir.
български [Bulgarian] - С настоящото Netatmo декларира, че това NOC01
е в съответствие със съществените изисквания и другите приложими
разпоредби на Директива 2014/53/EU и ROHS 2011/65/ЕC.
Копие от пълния декларацията за съответствие може да бъде получена на
hp://www.netatmo.com/declaraon/noc.
Netatmo, 73/77 rue de Sèvres, 92100 Boulogne-Billancourt, France
Boulogne-Billancourt, 01/12/2016
CEO
Frédéric POTTER

57
WARNING
Privacy
The Netatmo Smart Outdoor Camera was designed for an outdoor personal
use. Countries’ laws and regulations may restrict the use of your Smart
Outdoor Camera. Please check the laws of your country.
To respect privacy, please avoid installing your Smart Outdoor Camera
monitoring the street or your neighbors’ property. We also advise you to
inform your family, relatives and home employees, if any, that you have
installed a camera.
Security
By using Smart Outdoor Camera, you agree that you will not rely on its
services for any life safety or critical purposes. Mobile notifications are
provided for informational purposes only.
DISCLAIMER
Vie privée
La Caméra Extérieure Intelligente est destinée à un usage en extérieur
et personnel. Les lois en vigueur dans votre pays peuvent restreindre
l’utilisation de votre Caméra Extérieure Intelligente. Veuillez vous renseigner
sur les lois de votre pays.
Afin de respecter la vie privée, veuillez ne pas positionner la Caméra
Extérieure Intelligente de manière à ce qu’elle puisse filmer des lieux publics
ou les propriétés voisines. Nous vous conseillons de même de tenir au
courant votre famille, proches et employés de maison de l’installation d’une
caméra.
Sécurité
Les services de la Caméra Extérieure Intelligente ne sont pas homologués
pour répondre à des situations d’urgence. Les notifications mobiles sont
envoyées à titre d’information seulement.

58

59
CE marking is the manufacturer's declaration that the
product meets the requirements of the applicable EC
directives.
The product complies with the requirements of the relevant
ACMA Standards.
The product complies with the Technical Regulations
Conformity Certification of Specified Radio Equipment.
Triman logo
WEEE symbol designates safe and responsible collection,
recycling and recovery procedures for all types of electronic
waste
Universal recycling symbol
The product requires an AC power supply to operate properly.
It accepts voltage from 100V to 240V with a frequency from
50Hz to 60Hz.
FCC The product complies with the limits for a Class B digital device,
pursuant to part 15 of the FCC rules (USA).
The product complies with Industry Canada license-exempt
RSS standard(s).
IDIC
Serial number
gXXXXXX
Model Number
M/N

60
Copyright Netatmo © 2020 All rights reserved. Reproduction and
distribution prohibited without written authorization from Netatmo
V9
Product model: NOC01
FCC ID: N3A-NOC01
IC : 10860A-NOC01
QSG-PR
-
 1
1
-
 2
2
-
 3
3
-
 4
4
-
 5
5
-
 6
6
-
 7
7
-
 8
8
-
 9
9
-
 10
10
-
 11
11
-
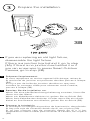 12
12
-
 13
13
-
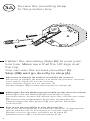 14
14
-
 15
15
-
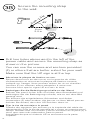 16
16
-
 17
17
-
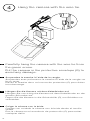 18
18
-
 19
19
-
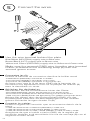 20
20
-
 21
21
-
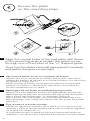 22
22
-
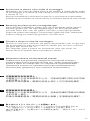 23
23
-
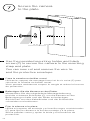 24
24
-
 25
25
-
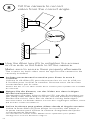 26
26
-
 27
27
-
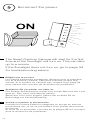 28
28
-
 29
29
-
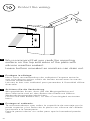 30
30
-
 31
31
-
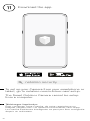 32
32
-
 33
33
-
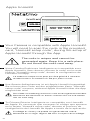 34
34
-
 35
35
-
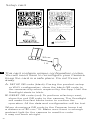 36
36
-
 37
37
-
 38
38
-
 39
39
-
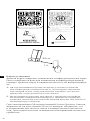 40
40
-
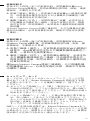 41
41
-
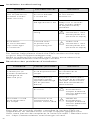 42
42
-
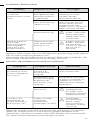 43
43
-
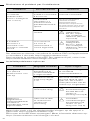 44
44
-
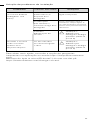 45
45
-
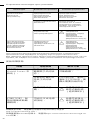 46
46
-
 47
47
-
 48
48
-
 49
49
-
 50
50
-
 51
51
-
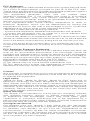 52
52
-
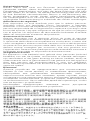 53
53
-
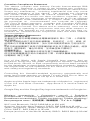 54
54
-
 55
55
-
 56
56
-
 57
57
-
 58
58
-
 59
59
-
 60
60


en otros idiomas
- français: Netatmo NOC01-UK Mode d'emploi
- italiano: Netatmo NOC01-UK Guida utente
- Deutsch: Netatmo NOC01-UK Benutzerhandbuch
- português: Netatmo NOC01-UK Guia de usuario
- 日本語: Netatmo NOC01-UK ユーザーガイド
Artículos relacionados
-
Netatmo Exterieure intelligente avec sirène El manual del propietario
-
Netatmo NOC01-US Manual de usuario
-
Netatmo 4260708 Manual de usuario
-
Netatmo Netatmo Smart Video Doorbell Guía de instalación
-
Netatmo Smart Smoke Alarm NSD01 El manual del propietario
-
Netatmo In-Wall Transformer for Smart Video Doorbell Guía del usuario
-