
HR-146V
HR-146R
HR-146NR
HR-146K
HR-146G
HR-146S
HR-146S/A
HR-146H
HR-146AA
HR-146HAA
HR-146HAAME
HR-156R/A
HR-156S
HR-156S/A
HR-156V/A
HR-156VT/A
HR-156NR/A
HR-156H
HR-156AE
HR-166V
HR-166R
HR-166AE
HR-166NR
HR-166K
HR-166G
HR-166S
HR-166H
HR-166HAA
HR-166HAAME


HAI HR-LINE
1

2

3

4

5

6

7

8

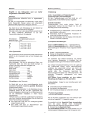
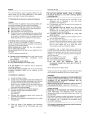
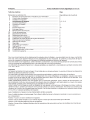
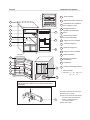
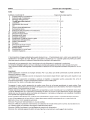
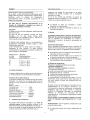
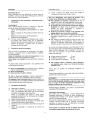
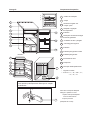
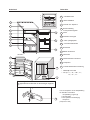
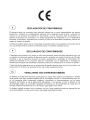
Die Zeichnungen dienen nur zu Illustrationszwecken.
Ihr Gerät kann in der Ausstattung von den Zeichnungen
abweichen.
*Arbeits- / Abdeckplatte
Abstellfläche
Tauwasser Ablaufrinne
* Glas-/ Plexiglasplatte
* Gemüseschale(n)
Ablage Fach
Dosen- Fläschenregal
Flaschenregal
Wärmetauscher / Kondensator
Kompressor
Kontaktschalter Innenbeleuchtung
* je nach Modell
Innenbeleuchtung
und Temperaturregler
* Lüftungsgitter
1
2
3
4
5
6
7
8
9
10
11
12
13
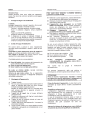
Zum Entfernen der Lampenabdeckung
Gerät vom Szromnetz trennen
Lampenabdeckung gem
äss Pfeile
1 zusammendrücken
2 durch seitliche Handbewegung
aushängen
(Lamp 230 V 15W)
Deutsch
Gerätkomponenten
14
Gefrierfach mit * Klappe / Tür
12
13
2
4
5
6
7
8
** Kann sein"V","R","NR","K",
"G","S","H"
HR-166**
¢
¢
¢
1
2
3
4
5
6
7
8
9
10
11
4
5
2
1
1
14
4
5

1

2

3

4

5

6

7

8

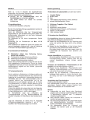
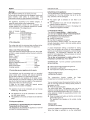
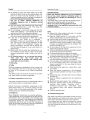
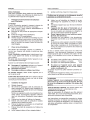
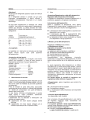
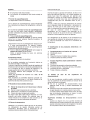
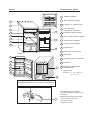
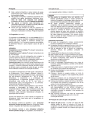
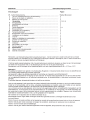
The drawings are for illustration purposes only.
The equipment of your appliance can differ from the
drawings.
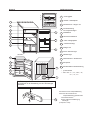
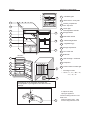
*Work surface / cover plate
Storage element
Water drain channel
* Glass/ Plexiglas shelf
* Vegetable tray(s)
Storage compartment
Can - bottle rack
Bottle rack
Heat exchanger / condenser
Compressor
Contact switch for interior light
* according to model
Interior light
and temperature controller
* Ventilation grille
1
2
3
4
5
6
7
8
9
10
11
12
13
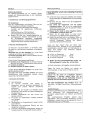
To replace the lamp:
Unplug the appliance
1 Press the lamp protection cover
2 take it out
replace the lamp (230 V 15W)
re-fix the lamp protection cover
English
Appliance components
14
Freezing compartment
with * flap / door
12
13
2
4
5
6
7
8
** canbe"V","R","NR","K",
"G","S","H"
HR-166**
1
2
3
4
5
6
7
8
9
10
11
¢
¢
¢
4
5
2
1
1
14
4
5

1

2

3

4

5

6

7

8

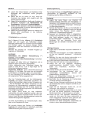
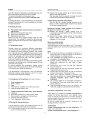
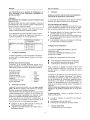
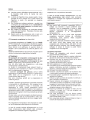
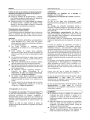
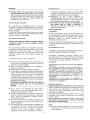
Eclairage intérieur et
régulateur de température
* Surface de travail / rangement
Rayon
Gouttière d'écoulement
de l'eau de dégrivrage
* Plaque de verre / plexiglas
* Casier(s) à légumes
Casiers de rangement
Casiers à boîtes / bouteilles
Casier à bouteilles
Echangeur de chaleur /
condensateur
Compresseur
Contacteur d'éclairage intérieur
* selon le modèle
* Grille d'aération
1
2
3
4
5
6
7
8
9
10
11
12
13
Pour retirer la protection de la lampe
Retirer la prise du réseau
Appuyer sur les bords de la protection
1 comme indiqué par les flèches
2 retirer la protection par un
mouvement latéral
(Lampe 240 V 15W)
Français
Composants de l'appareil
14
Compartiment de congélation
avec * abattant / porte
** Peut être"V","R","NR","K",
"G","S","H"
¢
¢
¢
Les dessins ne servent qu'à des fins d'illustration.
Votre appareil peut différer de ces dessins quant à son
équipement.
12
13
2
4
5
6
7
8
HR-166**
1
2
3
4
5
6
7
8
9
10
11
4
5
2
1
1
14
4
5

1

2

3

4

5

6

7

8

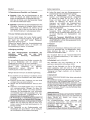
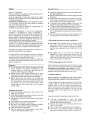
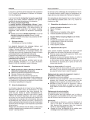
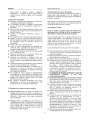
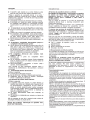
Illuminazione interna
con regolatore di sbrinatura
*Piano di lavoro / di copertura
Ripiano
Scanalatura di scolo dell'acqua di
sbrinatura
* Piano in vetro / in plexiglas
* Portafrutta
Contenitore a mensola
Portabottiglie / portalattine
Portabottiglie
Scambiatore di calore / condensatore
Compressore
Illuminazione interrna con interruttore
a contatto
* a seconda del modello
*Griglia di aerazione
1
2
3
4
5
6
7
8
9
10
11
12
13
Per rimuovere il coperchio della lampadina
Estrarre la spina, svitare o disattivare il fusibile.
Premere il coperchio della lampadina nel
senso mostrato dalla freccia
1 e rimuoverlo con un
2 movimento laterale della mano
(Lampadina 240 V 15 W)
Italiano
Componenti dell'apparecchio
14
Vano congelatore con anta
a *ribaltina / *porta
** Può essere"V","R","NR","K",
"G","S","H"
¢
¢
¢
I disegni servono per mostrare fisicamente la
configurazione standard dell'apparecchio.
Il vostro apparecchio può quindi essere diverso da quello
illustrato qui.
12
13
2
4
5
6
7
8
HR-166**
1
2
3
4
5
6
7
8
9
10
11
4
5
2
1
1
14
4
5

1

2

3

4

5

6

7

8

9

Para retirar la tapa de la bombilla
Tirar básicamente de la clavija de la red
1 Comprimir y
2 dessenganchar la tapa de la bombilla
con un movimiento de la mano
como indica la flecha
(Lampa 230 V 15W)
Alumbrado interior
y regulador de temperatura
*Placa de trabajo / cubierta
Superficie de almacenamiento
Canal de salida del agua de congelado
* Placa de vidrio / plexiglás
* Cajón (es) para hortalizas
Compartimento
Estante para envases/frascos
Portabotellas
Intercambiador de calor / condensador
Compresor
Interruptor de contacto para
alumbrado interior
* según modelo
* Rejilla de ventilación
1
2
3
4
5
6
7
8
9
10
11
12
13
Español
Componentes del aparato
14
Congelador con * trampilla / puerta
** Puede ser"V","R","NR","K",
"G","S","H"
¢
¢
¢
Los dibujos sirven sólo con propósito ilustrativo. Su aparato
puede diferir de los dibujos en lo referente a su equipamiento.
12
13
2
4
5
6
7
8
HR-166**
1
2
3
4
5
6
7
8
9
10
11
4
5
2
1
1
14
4
5

1

2

3

4

5

6

7

8

Para retirar a tampa da lâmpada
desligue o aparelho na ficha
1 Apertar a tampa da lâmpada
como as setas indicam
2 e puxar para fora
(Lâmpada 230 V 15W)
Lâmpada e regulação
da temperatura
*Tampo
Prateleira
Calha para escoamento da água
de descongelamento
* Prateleira de vidro / plexiglas
* Gaveta(s) para legumes
Prateleira
Prateleira para garrafas e latas
Prateleira para garrafas
Permutador de calor
Compressor
Interruptor da lâmpada interior
* segundo o modelo
* Grelha de ventilação
1
2
3
4
5
6
7
8
9
10
11
12
13
Português
Componentes do aparelho
14
Gaveta de congelar com
* tampa / porta
** Pode ser"V","R","NR","K",
"G","S","H"
¢
¢
¢
Os desenhos servem para esclarecer.
O seu aparelho pode apresentar diferenças em relação
aos desenhos.
12
13
2
4
5
6
7
8
HR-166**
1
2
3
4
5
6
7
8
9
10
11
4
5
2
1
1
14
4
5

1

2

3

4

5

6

7

8

voor het verwijderen van de lampafdekking
de netstekker eruit trekken
lampafdekking volgens pijl
1 samendrukken
2 door zijwaartse handbeweging
verwijderen
(Lamp 240 V 15W)
Binnenverlichting
en temperatuurregelaar
*Werk-/afdekblad
Plank
Dooiwater afvoergeul
* Glas-/ plexiglasplaat
* Groenteschaal/schalen
Bewaarvak
Blikken-/flessenrek
Flessenrek
Warmtewisselaar /condensor
Compressor
Contactschakelaar binnenverlichting
* afhankelijk van model
* Ventilatierooster
1
2
3
4
5
6
7
8
9
10
11
12
13
Nederlands
Onderdelen
14
Vriesvak mit * klep/deur
** kanzijn"V","R","NR","K",
"G","S","H"
¢
¢
¢
De tekeningen dienen alleen illustratiedoeleinden.
Uw apparaat kann anders dan in de tekeningen uitgerust
zijn.
12
13
2
4
5
6
7
8
HR-166**
1
2
3
4
5
6
7
8
9
10
11
4
5
2
1
1
14
4
5


Transcripción de documentos
HR-146V HR-146R HR-146NR HR-146K HR-146G HR-146S HR-146S/A HR-146H HR-146AA HR-146HAA HR-146HAAME HR-156R/A HR-156S HR-156S/A HR-156V/A HR-156VT/A HR-156NR/A HR-156H HR-156AE HR-166V HR-166R HR-166AE HR-166NR HR-166K HR-166G HR-166S HR-166H HR-166HAA HR-166HAAME HAI HR-LINE 1 2 3 4 5 6 7 8 Deutsch Gerätkomponenten ¢ ¢ ¢ 1 * Lüftungsgitter 2 *Arbeits- / Abdeckplatte 3 Gefrierfach mit * Klappe / Tür 4 Innenbeleuchtung und Temperaturregler 5 Abstellfläche 6 Tauwasser Ablaufrinne 7 * Glas-/ Plexiglasplatte 8 * Gemüseschale(n) 9 Ablage Fach 1 2 3 9 4 5 4 5 6 10 7 8 11 HR-166** 10 Dosen- Fläschenregal 11 Flaschenregal 12 Wärmetauscher / Kondensator 13 Kompressor 14 Kontaktschalter Innenbeleuchtung 2 4 5 12 6 7 * je nach Modell 8 ** Kann sein " V ", " R ", " NR ", " K ", " G ", " S ", " H " 13 Die Zeichnungen dienen nur zu Illustrationszwecken. Ihr Gerät kann in der Ausstattung von den Zeichnungen abweichen. 1 5 4 2 14 1 Zum Entfernen der Lampenabdeckung Gerät vom Szromnetz trennen Lampenabdeckung gemäss Pfeile 1 zusammendrücken 2 durch seitliche Handbewegung aushängen (Lamp 230 V 15W) 1 2 3 4 5 6 7 8 English Appliance components ¢ ¢ ¢ 1 * Ventilation grille 2 *Work surface / cover plate 3 Freezing compartment with * flap / door 4 Interior light and temperature controller 5 Storage element 6 Water drain channel 7 * Glass/ Plexiglas shelf 8 * Vegetable tray(s) 9 Storage compartment 1 2 3 9 4 5 4 5 6 10 7 8 11 HR-166** 2 4 5 10 Can - bottle rack 11 Bottle rack 12 Heat exchanger / condenser 13 Compressor 14 Contact switch for interior light 12 6 * 7 according to model ** can be " V ", " R ", " NR ", " K ", " G ", " S ", " H " 8 13 The drawings are for illustration purposes only. The equipment of your appliance can differ from the drawings. 1 5 4 2 14 1 To replace the lamp: Unplug the appliance 1 Press the lamp protection cover 2 take it out replace the lamp (230 V 15W) re-fix the lamp protection cover 1 2 3 4 5 6 7 8 Français Composants de l'appareil ¢ ¢ ¢ 1 2 3 9 4 1 * Grille d'aération 2 * Surface de travail / rangement 3 Compartiment de congélation avec * abattant / porte 4 Eclairage intérieur et régulateur de température 5 Rayon 6 Gouttière d'écoulement de l'eau de dégrivrage 7 * Plaque de verre / plexiglas 8 * Casier(s) à légumes 9 Casiers de rangement 5 4 5 6 10 7 8 11 HR-166** 10 Casiers à boîtes / bouteilles 11 Casier à bouteilles 12 Echangeur de chaleur / condensateur 13 Compresseur 14 Contacteur d'éclairage intérieur 2 4 5 12 6 7 * 8 ** Peut être " V ", " R ", " NR ", " K ", " G ", " S ", " H " selon le modèle 13 Les dessins ne servent qu'à des fins d'illustration. Votre appareil peut différer de ces dessins quant à son équipement. 1 5 4 2 14 1 Pour retirer la protection de la lampe Retirer la prise du réseau Appuyer sur les bords de la protection 1 comme indiqué par les flèches 2 retirer la protection par un mouvement latéral (Lampe 240 V 15W) 1 2 3 4 5 6 7 8 Italiano Componenti dell'apparecchio ¢ ¢ ¢ 1 2 3 9 4 1 *Griglia di aerazione 2 *Piano di lavoro / di copertura 3 Vano congelatore con anta a *ribaltina / *porta 4 Illuminazione interna con regolatore di sbrinatura 5 Ripiano 6 Scanalatura di scolo dell'acqua di sbrinatura 7 * Piano in vetro / in plexiglas 8 * Portafrutta 9 Contenitore a mensola 5 4 5 6 10 7 8 11 HR-166** 10 Portabottiglie / portalattine 11 Portabottiglie 12 Scambiatore di calore / condensatore 13 Compressore 14 Illuminazione interrna con interruttore a contatto 2 4 5 12 6 7 * a seconda del modello 8 ** Può essere " V ", " R ", " NR ", " K ", " G ", " S ", " H " 13 I disegni servono per mostrare fisicamente la configurazione standard dell'apparecchio. Il vostro apparecchio può quindi essere diverso da quello illustrato qui. 1 5 4 2 14 1 Per rimuovere il coperchio della lampadina Estrarre la spina, svitare o disattivare il fusibile. Premere il coperchio della lampadina nel senso mostrato dalla freccia 1 e rimuoverlo con un 2 movimento laterale della mano (Lampadina 240 V 15 W) 1 2 3 4 5 6 7 8 9 Español Componentes del aparato ¢ ¢ ¢ 1 2 3 1 * Rejilla de ventilación 2 *Placa de trabajo / cubierta 3 Congelador con * trampilla / puerta 4 Alumbrado interior y regulador de temperatura 5 Superficie de almacenamiento 6 Canal de salida del agua de congelado 7 * Placa de vidrio / plexiglás 8 * Cajón (es) para hortalizas 9 Compartimento 9 4 5 4 5 6 10 7 8 11 HR-166** 10 Estante para envases/frascos 11 Portabotellas 12 Intercambiador de calor / condensador 13 Compresor 14 Interruptor de contacto para alumbrado interior 2 4 5 12 6 7 * 8 ** Puede ser " V ", " R ", " NR ", " K ", " G ", " S ", " H " según modelo 13 Los dibujos sirven sólo con propósito ilustrativo. Su aparato puede diferir de los dibujos en lo referente a su equipamiento. 1 5 4 2 14 1 Para retirar la tapa de la bombilla Tirar básicamente de la clavija de la red 1 Comprimir y 2 dessenganchar la tapa de la bombilla con un movimiento de la mano como indica la flecha (Lampa 230 V 15W) 1 2 3 4 5 6 7 8 Português Componentes do aparelho ¢ ¢ ¢ 1 * Grelha de ventilação 2 *Tampo 3 Gaveta de congelar com * tampa / porta 4 Lâmpada e regulação da temperatura 5 Prateleira 6 Calha para escoamento da água de descongelamento 7 * Prateleira de vidro / plexiglas 8 * Gaveta(s) para legumes 9 Prateleira 1 2 3 9 4 5 4 5 6 10 7 8 11 HR-166** 10 Prateleira para garrafas e latas 11 Prateleira para garrafas 12 Permutador de calor 13 Compressor 14 Interruptor da lâmpada interior 2 4 5 12 6 7 * segundo o modelo 8 ** Pode ser " V ", " R ", " NR ", " K ", " G ", " S ", " H " 13 Os desenhos servem para esclarecer. O seu aparelho pode apresentar diferenças em relação aos desenhos. 1 Para retirar a tampa da lâmpada desligue o aparelho na ficha 1 Apertar a tampa da lâmpada como as setas indicam 2 e puxar para fora 5 4 2 14 1 (Lâmpada 230 V 15W) 1 2 3 4 5 6 7 8 Nederlands Onderdelen ¢ ¢ ¢ 1 * Ventilatierooster 2 *Werk-/afdekblad 3 Vriesvak mit * klep/deur 4 Binnenverlichting en temperatuurregelaar 5 Plank 6 Dooiwater afvoergeul 7 * Glas-/ plexiglasplaat 8 * Groenteschaal/schalen 9 Bewaarvak 1 2 3 9 4 5 4 5 6 10 7 8 11 HR-166** 10 Blikken-/flessenrek 11 Flessenrek 12 Warmtewisselaar /condensor 13 Compressor 14 Contactschakelaar binnenverlichting 2 4 5 12 6 7 * afhankelijk van model 8 ** kan zijn " V ", " R ", " NR ", " K ", " G ", " S ", " H " 13 De tekeningen dienen alleen illustratiedoeleinden. Uw apparaat kann anders dan in de tekeningen uitgerust zijn. 1 5 4 2 14 1 voor het verwijderen van de lampafdekking de netstekker eruit trekken lampafdekking volgens pijl 1 samendrukken 2 door zijwaartse handbeweging verwijderen (Lamp 240 V 15W)-
 1
1
-
 2
2
-
 3
3
-
 4
4
-
 5
5
-
 6
6
-
 7
7
-
 8
8
-
 9
9
-
 10
10
-
 11
11
-
 12
12
-
 13
13
-
 14
14
-
 15
15
-
 16
16
-
 17
17
-
 18
18
-
 19
19
-
 20
20
-
 21
21
-
 22
22
-
 23
23
-
 24
24
-
 25
25
-
 26
26
-
 27
27
-
 28
28
-
 29
29
-
 30
30
-
 31
31
-
 32
32
-
 33
33
-
 34
34
-
 35
35
-
 36
36
-
 37
37
-
 38
38
-
 39
39
-
 40
40
-
 41
41
-
 42
42
-
 43
43
-
 44
44
-
 45
45
-
 46
46
-
 47
47
-
 48
48
-
 49
49
-
 50
50
-
 51
51
-
 52
52
-
 53
53
-
 54
54
-
 55
55
-
 56
56
-
 57
57
-
 58
58
-
 59
59
-
 60
60
-
 61
61
-
 62
62
-
 63
63
-
 64
64
-
 65
65
-
 66
66
-
 67
67
-
 68
68


en otros idiomas
- français: Haier HR-146S Manuel utilisateur
- italiano: Haier HR-146S Manuale utente
- English: Haier HR-146S User manual
- Deutsch: Haier HR-146S Benutzerhandbuch
- Nederlands: Haier HR-146S Handleiding
- português: Haier HR-146S Manual do usuário