Graco Size4Me 70 El manual del propietario
- Categoría
- Asiento de coche
- Tipo
- El manual del propietario

www.gracobaby.com
Size4Me™ 70
Child Restraint
Owner’s Manual
FAILURE TO PROPERLY USE THIS
CHILD RESTRAINT INCREASES THE
RISK OF SERIOUS INJURY OR DEATH IN
A SUDDEN STOP OR CRASH.
READ THIS MANUAL.
Do not install or use this child restraint
until you read and understand the
instructions in this manual.
PD205009A
© 2012 Graco
3/12 US

2
TABLE OF CONTENTS
Important Information.......................4
Warnings...................................5-8
Basic Information...............................9
What is LATCH?..........................10-11
LATCH System.................................12
Before You Begin
Use
Height & Weight Limits.............13-15
Features...................................16-17
Rear-Facing Installation
With LATCH.............................18-19
Forward-Facing Installation
With LATCH.............................20-21
Rear-Facing Installation With
Vehicle Seat Belts.....................22-23
Forward-Facing Installation With
Vehicle Seat Belts.....................24-25
Placing Child in Child Restraint..26-29
Operations and Adjustments.........30-35
s(ARNESS3TRAPS30
s#HEST#LIP31
s"UCKLE31
s#ROTCH3TRAP!DJUSTMENT32-33
s2ECLINE5PRIGHT0OSITIONS34-35
s2EMOVINGLATCH from Vehicle
Anchor Points...............................36
sLATCH Storage.............................37
Vehicle Seat Belts.......................38-46
s,OCKING#LIP45-46
Additional Information...............47-53
s 4ETHER3TORAGE47
s"ODY3UPPORT48
s(EAD0ILLOW49
s(ARNESS#OVERS49
s#AREAND#LEANING50-54

3
s!IRCRAFT5SE54
s3ECOND(AND#HILD2ESTRAINT54
Replacement Parts...........................56
s,OCKING#LIP3TORAGE56
s)NSTRUCTION-ANUAL3TORAGE56
Read and understand instruction
manual and child restraint labels.
)NFANTSLESSTHANLBSKGmust
use child restraint rear-facing.
Infants or toddlers 20 to 40 lbs.
KGTOKGmay be rear-facing.
Do not use child restraint rear-facing
INVEHICLESEATWITHAIRBAG
Secure children in rear seat of
VEHICLEWHENEVERPOSSIBLE
TABLE OF CONTENTS
.EVERLEAVECHILDUNATTENDED
Install child restraint securely with
VEHICLESEATBELTORLATCH belt.
Do not use after the useful life date
SHOWNONBACKOFCHILDRESTRAINT
Do not allow anyone (babysitter,
RELATIVESETCTOUSECHILDRESTRAINT
without first understanding all
instructions.

4
No child restraint can guarantee protection from injury in every situation,
but proper use helps reduce the risk of serious injury or death.
READ THIS MANUAL CAREFULLY.
IMPORTANT INFORMATION
Child restraints could be recalled for safety
reasons. You must register this restraint to be
reached in a recall. Send your name, address,
and the restraint’s model number and
date of manufacture to:
Graco Children’s Products, Inc.
/AKLANDS"LVD
Exton, PA 19341
ORCALL
or register online at
HTTPWWWGRACOBABYCOMCARSEATREGISTRATION
For recall information:
#ALLTHE53'OVERNMENTS
Vehicle Safety Hotline
AT
449nnn
or go to http://www.NHTSA.gov

5
NEVER PLACE THIS CHILD RESTRAINT IN A
VEHICLE SEATING LOCATION THAT HAS A
FRONT AIR BAG. If an air bag inflates, it can
hit the child and child restraint with great
force and cause serious injury or death to
your child. Refer to your vehicle owner’s
manual for information about side air bags
and child restraint installation.
WARNINGS
- Prevent serious injury or death:

6
Failure to follow these
instructions and child restraint
labels can result in child
striking the vehicle’s interior
during a sudden stop or crash.
Secure child restraint with a
vehicle seat belt or
LATCH that is
properly routed as shown in this
manual.
Select a suitable location for the
child restraint in your vehicle.
Choose the correct mode of use
for the child restraint depending
on your child’s size. Infants less
than 20 lbs. (9.1kg) must use this
child restraint rear-facing.
Serious crippling injury or death
can result if infant faces front of
vehicle.
The American Academy of
Pediatrics (AAP) recommends that
children be rear-facing until age 2
or until they reach the maximum
rear-facing height and weight
rating for their seat.
Vehicle seat belt system MUST
hold child restraint securely. Not
all vehicle seat belts can be used
with a child restraint.
If vehicle seat belt does not hold
child restraint securely, read
“Vehicle Seat Belts” section.
WARNINGS
- Prevent serious injury or death:
(continued)

7
Never put a child restraint in a
front vehicle seat unless
recommended by vehicle owner’s
manual. National Highway Traffic
Safety Administration (NHTSA)
alerts vehicle owners that
according to accident statistics,
children are safer in the rear seat.
For vehicles with air bags, refer to
vehicle owner’s manual for child
restraint installation information.
If child restraint is in a crash, it
must be replaced. DO NOT use it
again! A crash can cause unseen
damage and using it again could
result in serious injury or death.
DO NOT use child restraint if it is
damaged or missing parts.
DO NOT use accessories or parts
other than those provided by
Graco. Their use could alter the
performance of the child restraint.
Rear-facing child restraint must be
properly leveled:
s4OORECLINEDCANRESULTIN
injury or ejection.
s4OOUPRIGHTCANRESULTIN
breathing difficulties.
WARNINGS
- Prevent serious injury or death:
(continued)

8
Never leave child unattended,
even when sleeping. Child may
become tangled in harness straps
and suffocate or strangle.
DO NOT remove
LATCH system
from child restraint. If using
vehicle seat belt to secure child
restraint, LATCH connectors must
be stored. (see section “LATCH
storage”)
Never attach two
LATCH connectors
to one vehicle
lower anchor
point unless
specifically
allowed by the
vehicle manufacturer.
NEVER use the
rear-facing LATCH
belt and the forward-facing
LATCH belt at the same time. You
can only use one LATCH belt at a
time depending on which mode
you install the child restraint.
WARNINGS
- Prevent serious injury or death:
(continued)

9
BASIC INFORMATION
Certification
4HISCHILDRESTRAINTMEETSOREXCEEDSALL
applicable requirements of Federal
-OTOR6EHICLE3AFETY3TANDARDFOR
USEINMOTORVEHICLESANDAIRCRAFT
Unoccupied Child Restraint
Dangerous Vehicle Seats
Child Restraint Useful Life
Always secure child restraint to LATCH
ORAVEHICLESEATBELTEVENWHEN
unoccupied. In a crash, an unsecured
child restraint can injure passengers.
Do not use child restraint on rear-facing
ORSIDEFACINGVEHICLESEATS
STOP using this child restraint and
THROWITAWAYYEARSAFTERTHEDATEOF
manufacture. ,OOKFORTHISSTICKERON
rear of child restraint:
Warm Weather
#HILDRESTRAINTPARTSCANGETVERYHOTIN
the sun or warm weather.
To avoid burns, always check
before putting child in child
restraint.
Vehicle Seat Protection
0ROTECTVEHICLESEAT5SEACHILDRESTRAINT
MATTOWELORTHINBLANKETUNDERAND
behind child restraint.

10
WHAT IS LATCH?
5NITED3TATES&EDERAL-OTOR6EHICLE
3AFETY3TANDARDSHAVEDElNEDA
system for installing child restraints in
VEHICLES4HESYSTEMISCALLED LATCH.
LATCH stands for:
Lower Anchors and Tethers for CHildren.
LATCHINTHEVEHICLECONSISTSOFATOP
tether anchor point and two lower
anchor points.
3OMEVEHICLEOWNERMANUALSUSETHE
term ISOFIX to identify the new child
RESTRAINTANCHORSYSTEM4HISCHILD
restraint with LATCH can also be used
INVEHICLESEATINGPOSITIONSEQUIPPED
with ISOFIX.
.EWERVEHICLESMAYHAVEONEOR
more seating positions equipped with
LATCH anchor points.
)FVEHICLEISEQUIPPEDWITH
LATCH, the
VEHICLELOWERANCHORPOINTSMAYBE
VISIBLEATTHEVEHICLESEATCREASE)FNOT
VISIBLETHEYMAYBEMARKEDWITHA
symbol or a colored dot.
#HECKVEHICLEOWNERSMANUALFORVEHICLE
TOPTETHERANCHORLOCATIONS4HEYMAY
be identified using one of the anchor
symbols .
5SEVEHICLEBELTNOT
LATCHCONNECTORS
for installations with children weighing
MORETHANPOUNDSKG
NOTE:3OMEVEHICLEMANUFACTURERS
HAVELOWERMAXIMUMWEIGHTRATINGS
for LATCH anchors, so you must consult
YOURVEHICLEOWNERSMANUALORCALLTHE
VEHICLEMANUFACTURERTOCONlRMTHE
LIMITSONYOURVEHICLESLATCH anchors.

11
Vehicle Top Tether
Anchor Points
Vehicle
Lower Anchor
Points
Vehicle
Seat Crease
4YPICALSEATINA
PASSENGERVEHICLE
/THERVEHICLETYPES
MAYHAVEDIFFERENT
LATCH locations.
See your vehicle
owner’s manual for
exact locations,
anchor identification,
and requirements
for use with a child
restraint.
WHAT IS LATCH?
CONTINUED

12
LATCH SYSTEM
Child Restraint
Top Tether -
BLACK
LATCH consists of a permanently
attached lower anchor belt and a top
tether strap.
ONLY use LATCH in a seating position
RECOMMENDEDBYVEHICLE
manufacturer. NEVER use forward
facing and
rear-facing LATCH belts at
the same time.
LATCHLOWERVEHICLEANCHORPOINTSARE
DEFINEDASINCHESCMFROMTHE
center of one LATCH anchor to the
center of another LATCH anchor.
LATCH can ONLY be used if LATCH
ANCHORSPACINGISINCHESCM
DO NOT use
LATCH if anchor spacing
ISOVERINCHESCM
FORWARD-FACING LATCH BELT
- BLACK
Vehicle Top
Tether
Anchor
Point
Vehicle Lower
Anchor Points
Vehicle
Lower
Anchor
Points
Forward-facing
Lower Anchor
Belt - BLACK
Rear-facing Lower
Anchor Belt - GRAY
REAR-FACING LATCH BELT - GRAY

13
HEIGHT & WEIGHT LIMITS
IMPORTANT:4HISCHILDRESTRAINTISCERTIlEDFORUSErear-facing with children up
TOLBSKG(OWEVERSOMECHILDRENAPPROACHINGLBSKGMAYBE
too tall to fit rear-facing. Child should use child restraint forward-facing only if
CHILDISOVERLBSKGANDCANSITUPRIGHTUNASSISTED
(
*
SEE!MERICAN!CADEMYOF0EDIATRICS!!0RECOMMENDATIONSON
PANDP
Rear-facing: 4 to 40 lbs. (1.8kg-18.1kg)
s)NFANTSWHOWEIGHLESSTHANLBSKGMUST be
rear-facing.
s)NFANTSORTODDLERSTOLBSKGTOKG
may be rear-facing.
s(ARNESSHEIGHTMUSTBEat or just below child’s
shoulders.
4 lbs.
(1.8kg)
40 lbs.
(18.1kg)
20 lbs.
(9.1kg)
LBS
(31.8kg)
REAR-FACING
FORWARD-FACING

14
Forward-facing: 20 to 70 lbs. (9.1kg to 31.8kg)
s#HILDMUSTNOTEXCEEDINCHESCM
s4ODDLERSTOLBSKGTOKGWHOARECAPABLEOF
sitting upright unassisted may be forward-facing. If unable to
sit unassisted, use rear-facing.
s4ODDLERSTOLBSKGTOKGANDUPTOINCHES
CMTALLMUST be
forward-facing.
s(ARNESSHEIGHTMUSTBEat or just above child’s shoulders.
s#HILDSEARSAREBELOWTOPOFHEADSUPPORT)FTOPSOFEARSAREABOVETOPOF
head support, child is too large for seat.
3EEPFOR!MERICAN!CADEMYOF0EDIATRICS!!0RECOMMENDATIONS
HEIGHT & WEIGHT LIMITS
CONTINUED

15
A preterm infant or low birth
weight infant may be at special
RISKINAVEHICLEORAIRCRAFT
According to the American
!CADEMYOF0EDIATRICS!!0THESE
infants may suffer breathing
difficulties if improperly reclined in
a child restraint.
'RACOADVISESTHATYOUHAVEYOUR
PHYSICIANORHOSPITALSTAFFEVALUATE
your infant and recommend the
proper child restraint or car bed
BEFOREYOUANDYOURINFANTLEAVE
the hospital.
Preterm or
Low Birthweight Infants
*

16
FEATURES
Harness
BUCKLE
Crotch
strap
Harness
release
LEVER
Harness
adjustment strap
Harness
strap
Chest
clip
Recline
Handle
Forward-facing LATCH
beltSTORED
Rear-facing
LATCH belt
STORED
Rear-facing LATCH
storage bar
Head support
adjustment handle
5NITED3TATES&EDERAL-OTOR6EHICLE3AFETY
3TANDARDSHAVEDElNEDASYSTEMFORINSTALLINGCHILD
RESTRAINTSINVEHICLES4HESYSTEMISCALLED LATCH.
LATCH may ONLY be used IN PLACE of vehicle
belt if vehicle is equipped with LATCH anchor
points. Please refer to vehicle owner’s manual
for LATCH locations in vehicles.

17
4ETHERSTRAP
4ETHERHOOK
Forward-facing LATCH
RELEASELEVER
4ETHERSTORAGE
bar
Rear-facing
LATCH release
LEVER
Forward-facing
LATCH storage
bars
FEATURES
Splitter plate
Harness
straps
6EHICLESARENOWORCANBEEQUIPPED
with tether anchor points behind some
seats. A tether anchors the top of the child
RESTRAINTTOTHEBODYOFTHEVEHICLE7HEN
USEDPROPERLYWITHTHEVEHICLESEATBELTOR
LATCH, a tether helps reduce injury in a
sudden stop or crash.
Harness
COVERPLATE
Instruction
manual storage

18
REAR-FACING INSTALLATION WITH LATCH
1. Pull out on handle on front of child
restraint (a) and adjust to rear-facing
position 1 (b)-AKESURE
forward-facing LATCH belt is stored.
(see fig. c, pg. 37)
2. Place rear-facing ONVEHICLESEAT
equipped with LATCH anchors.
3. For ease of installation, extend
LATCH belt to its maximum length.
4. Attach rear-facing connectors to
VEHICLELOWERANCHORS(c). Belt must lie
flat and not be twisted. Pull connectors
to be sure they are securely attached to
the anchor points. (d).
5. Press down firmly in center of child
restraint while pulling LATCH
adjustment belt through slot in
seat pad (e). -AKESUREFREEENDOF
adjustment belt is outside the seating
area (f).
a
b
d
e
c
f
CLICK!
Slot

19
Hold seat and pULLFRONTTOBACKANDLEFTTORIGHTATBELTPATH
TOCHECKFORSECUREINSTALLATION(g)4HECHILDRESTRAINTSHOULD
NOTMOVESIDETOSIDEORFORWARDMORETHANINCHCM
#HECKTHATTHELOWERANCHORBELTSTAYSTIGHTANDDOESNOT
slip from the tightened position. If it does not stay tight, try
ANOTHERSEATINGPOSITIONORCONTACT#USTOMER3ERVICE
#HECKLEVELINDICATORONCHILDRESTRAINT(h).
Vehicle mustBEONLEVELGROUND and child in
CHILDRESTRAINTWHENCHECKINGLEVELINDICATOR
Ball MUST be entirely in green zone (h). If
necessary, place rolled towels under child
RESTRAINTATVEHICLESEATCREASEUNTILENTIREBALLIS
INGREENZONE4HENRECHECKLEVELINDICATOR
sDO NOT use tether
rear-facing4ETHERmust be
STOREDSEEh4ETHER3TORAGEvPAGE
s0ERIODICALLYCHECKTHATCHILDRESTRAINTISSECURELY
INSTALLEDANDPROPERLYLEVELEDADJUSTIFNECESSARY
s4OREMOVE LATCHSEEh2EMOVINGLATCH from
6EHICLE!NCHOR0OINTSvP
g
LAPC0110
A
h
,!4#(

20
FORWARD-FACING INSTALLATION WITH LATCH
1. Pull out on handle on front of child restraint (a) and adjust to forward-facing
position 2 or 3 (b)-AKESURErear-facing LATCH belt is stored.
(see fig. b, pg. 37)
5NHOOKTETHERFROMTETHERSTORAGESEE
PAGE
3. Place forward-facing ONVEHICLESEAT
equipped with
LATCH anchors.
For ease of installation, extend LATCH
belt to its maximum length.
4. Attach forward-facing connectors to
VEHICLELOWERANCHORS(c). Belt must lie
flat and not be twisted. Pull connectors
to be sure they are securely attached (d).
3LIDECHILDRESTRAINTBACKUNTILTHE
RESTRAINTISINCONTACTWITHTHEVEHICLE
SEATBACK
0RESSDOWNFIRMLYINCENTEROFCHILD
RESTRAINTTOCOMPRESSVEHICLESEAT
cushion while tightening LATCH belt by
pulling adjustment belt (e).
a
d
c
b
e
CLICK!

21
f
(OLDSEATANDPULLFRONTTOBACKAND
LEFTTORIGHTATBELTPATHTOCHECKFOR
secure installation (f)4HECHILD
RESTRAINTSHOULDNOTMOVESIDETOSIDE
ORFORWARDMORETHANINCHCM
#HECKTHATTHELOWERANCHORBELT
stays tight and does not slip from the
tightened position. If it does not stay
tight, try another seating position or
CONTACT#USTOMER3ERVICE
!TTACHTETHERSTRAPHOOK(A) to anchor
hardware (B) and tighten adjustment
BELTTOREMOVEANYSLACK(g).
Belt must lie flat and not be twisted.
0ERIODICALLYCHECKTHATCHILDRESTRAINT
ISSECURELYINSTALLEDADJUSTIF
necessary.
s4OREMOVE LATCHSEEh2EMOVING
LATCHFROM6EHICLE!NCHOR0OINTSv
P
g
Pull to
4IGHTEN
A
B
4ETHER
,!4#(

22
0LEASEREFERTOPh6EHICLE3EAT"ELTSv
TODETERMINEWHATTYPEOFVEHICLESEAT
BELTISINYOURVEHICLE
1. Store rear-facing and forward-facing
LATCH belt as shown (a). Pull out on
handle on front of child restraint(b)
and adjust to rear-facing position 1 (c).
2. Place rear-facing ONVEHICLESEAT
3. 4HREADVEHICLESEATBELTTHROUGH
rear-facing openings under the seat
PADANDBUCKLEBELT(d). Press down
firmly in center of child restraint to
COMPRESSVEHICLESEATCUSHIONWHILE
TIGHTENINGVEHICLESEATBELT(e).
LATCH belts MUST be stored when
USINGVEHICLESEATBELTTOINSTALLCHILD
restraint.
REAR-FACING INSTALLATION WITH VEHICLE SEAT BELTS
a
b
d
e
WARNING
c

23
(OLDSEATANDPULLFRONTTOBACKANDLEFTTORIGHTATTHEBELT
PATHTOCHECKFORSECUREINSTALLATION(f)4HECHILDRESTRAINT
SHOULDNOTMOVESIDETOSIDEORFORWARDMORETHANINCH
CM6EHICLELAPBELTMUST stay tight. If not secure, see
h6EHICLE3EAT"ELTSvPAGE
#HECKLEVELINDICATORONCHILDRESTRAINTVehicle must be on
LEVELGROUND and child in child restraint when
CHECKINGLEVELINDICATOR
"ALLMUST be entirely in green zone (g). If
necessary, place rolled towels under child
RESTRAINTATVEHICLESEATCREASEUNTILENTIREBALLIS
INGREENZONE4HENRECHECKLEVELINDICATOR
DO NOT use tether rear-facing4ETHERmust be
STOREDSEEh4ETHER3TORAGEvPAGE
0ERIODICALLYCHECKTHATCHILDRESTRAINTISSECURELY
INSTALLEDANDPROPERLYLEVELEDADJUSTIFNECESSARY
LAPC01
10
A
g
f

24
LATCH belts MUST be stored when
USINGVEHICLESEATBELTTOINSTALLCHILD
restraint.
0LEASEREFERTOPh6EHICLE3EAT"ELTSv
TODETERMINEWHATTYPEOFVEHICLESEAT
BELTISINYOURVEHICLE
1. Store
rear-facing and forward-facing
LATCH belt as shown (a). Pull out on
handle on front of child restraint (b)
and adjust to forward-facing position 2 or 3 (c).
5NHOOKTETHERFROMTETHERSTORAGESEEPAGE
3. Place forward-facing ONVEHICLESEAT
3LIDECHILDRESTRAINTBACKUNTILTHERESTRAINTISINCONTACTWITH
THEVEHICLESEATBACK
4HREADVEHICLESEATBELTTHROUGHforward-facingOPENINGSANDBUCKLEBELT(d).
FORWARD-FACING INSTALLATION
WITH VEHICLE SEAT BELTS
a
b
d
WARNING
c

25
5. Press down firmly in center of child
RESTRAINTTOCOMPRESSVEHICLESEAT
CUSHIONWHILETIGHTENINGVEHICLESEAT
belt (e).
(OLDSEATANDPULLFRONTTOBACKAND
LEFTTORIGHTATBELTPATHTOCHECKFOR
secure installation (f)4HECHILD
RESTRAINTSHOULDNOTMOVESIDETOSIDE
ORFORWARDMORETHANINCHCM
Vehicle lap belt MUST stay tight. If not
SECURESEEh6EHICLE3EAT"ELTSvPG
!TTACHTETHERSTRAPHOOK(A) to anchor
hardware (B) and tighten adjustment
BELTTOREMOVEANYSLACK(g))FVEHICLE
DOESNOTHAVEANCHORPOINTSTOATTACH
TETHERHOOKTETHERHOOKSHOULDBE
STOREDSEEh4ETHER3TORAGEvPAGE
Belt must lay flat and not be twisted.
0ERIODICALLYCHECKTHATCHILDRESTRAINTIS
SECURELYINSTALLEDADJUSTIFNECESSARY
f
Installation with
,AP3HOULDER
belt
,!4#(
STORED
4ETHER
g
Pull to
4IGHTEN
A
B
e

26
PLACING CHILD IN CHILD RESTRAINT
To prevent serious injury
or death:
sKeep harness straps snug and
positioned on shoulders with
CHESTCLIPATARMPITLEVEL
s$ONOTUSESTRAPCOVERS
BLANKETSCUSHIONSORPADDING
under harness straps or child
UNLESSPROVIDEDBY'RACO
sChild should be dressed in
clothing that does not
INTERFEREWITHBUCKLINGTHE
harness.
FORWARD-FACING
sLBSKGKG
Harness height must be
ATORJUSTABOVECHILDS
shoulders.
s#HILDSEARSAREBELOW top
of head support. If tops of
EARSAREABOVETOPOFHEAD
support, child is too large
for seat.
REAR-FACING
sLBSKGKG
s(ARNESSHEIGHTMUSTBEAT
or just below child’s
shoulders. Body support
*
MUST be used if shoulders
are below lowest harness
setting (
*
SEEPAGE
Check Harness System
WARNING

27
sBEFOREADJUSTINGTHEHEADSUPPORTHEIGHTHAVE
your child lean forward slightly.
s3QUEEZEANDPULLUPTHEREDHEADSUPPORTADJUSTMENT
handle (a) ONTOPOFSEATUNTILITLOCKSINTOONEOFTHE
HEIGHTPOSITIONS(b).
s4OLOWERSQUEEZEREDHEADSUPPORTADJUSTMENTHANDLE
and push head support down.
Rear-facing
s(EADSUPPORTSHOULDBEPOSITIONEDSOTHEHARNESSSTRAPSAREATORJUSTBELOW
THESHOULDERSANDCHILDISLESSTHANINCHESCMANDLESSTHANLBS
KG
s-AKESURETHEHEADSUPPORTDOESNOTTOUCHTHEFRONTVEHICLESEAT
Forward-facing
s(EADSUPPORTSHOULDBEPOSITIONEDSOTHATTHEHARNESSSTRAPSAREATORJUST
ABOVETHECHILDSSHOULDERSLBSKGKG
Refer to page 26 for harness strap placement.
Adjusting Head Support
Failure to properly adjust the harness straps for your
CHILDINCREASESTHERISKOFSERIOUSINJURYORDEATHIN
THEEVENTOFASHARPTURNSUDDENSTOPORCRASH
WARNING
a
b

28
1. Place child in child restraint
WITHCHILDSBACKmATAGAINST
BACKOFCHILDRESTRAINT
0LACEHARNESSSTRAPSOVERCHILDS
SHOULDERSANDINSERTTONGUES
INTOBUCKLESEEPAGE
0ULLUPONTONGUESTOBESURE
THEYARELOCKED
3. Close chest clip:
Position chest clip at armpit
LEVELSEEPAGE
PLACING CHILD IN CHILD RESTRAINT
CONTINUED
Chest
Clip
"UCKLE
Harness
Adjustment
Strap
Crotch
Strap

29
4. Adjust harness straps to be snug.
CHECK that the harness is snug. You
should not be able to pinch the
harness if it is snug. A snug strap
SHOULDNOTALLOWANYSLACK)TLIESINA
RELATIVELYSTRAIGHTLINEWITHOUT
sagging. It does not press on the
child’s flesh or push the child’s body
into an unnatural position (a)
#HECKTHATHARNESSSTRAPSONchest
and thighs are snug.
5. A rolled towel can be used on each
side to support small children (b).
Be sure towels do not interfere with
HARNESSSYSTEM4OWELSSHOULDNOT
be placed under child. Do not use
towel with body support.
a
b

30
s4OTIGHTEN0ULLHARNESSADJUSTMENTSTRAP(a)
s4OLOOSEN,IFTLEVER(b) while pulling shoulder
harness straps (c).
OPERATIONS & ADJUSTMENTS
a
b
c
Harness Strap
Chest Clip
"UCKLE
Harness
Adjustment
Strap

31
s4OOPEN0RESSTABSANDPULLAPART(d)
s4OCLOSE3NAPHALVESTOGETHER
-AKESURETHECHESTCLIPISLOCKED
by pulling out on each half. (e)
s4OBUCKLE)NSERTBOTHTONGUESINTO
BUCKLE0ULLUPONTONGUESTOBE
SURETHEYARELOCKED(f).
4OTIGHTEN0ULLHARNESSADJUSTMENT
strap (g)
s4OUNBUCKLE,OOSENBYLIFTINGLEVERAND
pulling shoulder harness straps (h)4ILT
TOPOFBUCKLETOWARDSEAT(i) and press
in at the top of the red button (j) and
PULLTONGUESOUTOFBUCKLE(k)
Chest Clip:
Buckle:
d
e
f
h i
g
j
k

32
s2ECLINECHILDRESTRAINTTOPOSITION1 (l).
s&ROMBOTTOMOFCHILDRESTRAINTROTATE
retainer to side in order to push it
through slot easier (m).
s0ULLCROTCHSTRAPFROMCHILDRESTRAINT
as shown (n).
s)NSERTCROTCHSTRAPINTODESIREDSLOT(o).
Pull up on crotch strap to be sure it is
secure.
s#ROTCHSTRAPMUSTBEUSEDINTHEREAR
crotch strap position when used
rear-facing (p).
Crotch Strap Adjustment:
OPERATIONS & ADJUSTMENTS
CONTINUED

33
Rear Crotch
Strap Position
Front Crotch
Strap Position
p
o
l
m
n

34
OPERATIONS & ADJUSTMENTS
CONTINUED
FAILURE TO PROPERLYRECLINETHEINFANTRESTRAINTONTHEVEHICLESEAT
INCREASESTHERISKOFSERIOUSINJURYORDEATH
WARNING
1. Pull out on recline handle on front of child restraint
(a).
"ALLINLEVELINDICATORMUSTBEENTIRELYINGREEN(b)
and child restraint must be in recline position 1 (c) as
indicated on label on side of base (e).
6EHICLEMUSTBEONLEVELGROUNDANDCHILDINCHILD
RESTRAINTWHENCHECKINGLEVELINDICATOR
NOTE: Level indicator is for rear-facing use only.
Rear-Facing
1. Pull out on recline
handle on front of child
restraint (d).
2. Adjust recline to
position 2 or 3 as
indicated on label (e) on
side of base.
If you change recline
positions you will need
TORECHECKINSTALLATIONTO
MAKESUREBELTISTIGHT
Forward-Facing

35
a
d
SAP0800E
LAPC0110A
b
3
2
1
REAR-F
A
CIN
G
ORIENT
ADO
HA
CIA ATRÁS
4-40 LBS
(1.8k
g - 18.1
kg
)
FORWARD-FA
CIN
G
ORIENTADO
HACIA /DELANTE
20-40 LBS
(9.1
kg - 18.1 kg)
FORW
ARD
-FA
CIN
G
ORIENT
ADO
HA
CIA
DELANTE
20-70 LBS
(9.1kg - 31.8 kg
)
e
c

36
Removing LATCH from Vehicle
Anchor Points:
1. Release the tension on the LATCH connector by
LIFTINGLEVERASSHOWN(a).
4OREMOVELATCH, pull on release strap as shown
(b).
3. Repeat steps for other connector.
a
OPERATIONS & ADJUSTMENTS
CONTINUED
Removing Tether from Vehicle
1. Release the tension on the tether connector by
LIFTINGLEVERASSHOWN(c).
2. Press and hold tether release hinge. (d).
3. Push connector in, lift connector up and
PULLOUTAWAYFROMANCHORPOINT(d).
b
c
d

37
1. Locate LATCH storage bars for
forward-facing and
rear-facing LATCH belts (a).
2. Fasten LATCH onto storage
bar as shown (b or c).
Repeat for other side of seat.
REAR-FACING STORAGE
FORWARD-FACING STORAGE
a
b c

38
Not all vehicle seat belts
can be used with a child
restaint. The child
restraint must be held
securely at all times by a
lap belt (or lap belt
portion of a lap/shoulder
belt) that will not change
length while driving.
4OPROVIDETHEMOSTSECUREINSTALLATIONOFTHE
child restraint:
s2EADTHEVEHICLEOWNERSMANUAL
regarding child restraint installation
and seat belt use with child restraint.
s&OLLOWALLINSTRUCTIONLABELSONVEHICLE
seat belt and child restraint.
If child restraint is not held securely after
FOLLOWINGINSTRUCTIONSINTHISMANUALVEHICLE
SEATBELTLABELSANDVEHICLEOWNERSMANUAL
s-OVECHILDRESTRAINTTOANOTHER
seating location and try again, or
s#ONTACTVEHICLEDEALERFORPOSSIBLE
seat belt modification parts.
VEHICLE SEAT BELTS
WARNING

39
Belts Forward of Seat Crease
Vehicle seat belts located
forward of seat crease may not
securely hold child restraint.
#HECKVEHICLEOWNERSMANUAL
ORSEEVEHICLEDEALERFORCAR
seat installation requirements.
sIf approved for use with
child restraint, install child
restraint and check for
secure installation by
pulling child restraint front
to back. If child restraint
slides forward, DO NOT
use these seat belts.
Seat
Crease
Seat
Crease
VEHICLE SEAT BELTS
CONTINUED

40
a
Lap Belts - Manually Adjustable
4HELOCKINGLATCHPLATEONSOMESEATBELTSMAY
SLIPANDLOOSENAFTERBEINGBUCKLEDONCHILD
restraint if positioned at certain angle. If this
HAPPENSmIPLATCHPLATEOVER(a) and
REBUCKLE4ESTINSTALLATIONAGAINTOSEEIFTHIS
WORKS)FNOTMOVECHILDRESTRAINTTOANOTHER
seating position.
Flip
VEHICLE SEAT BELTS
CONTINUED

41
Lap Belts - With Retractor
Lap belts with retractors may or may not hold
a child restraint securely.
&OLLOWTHESESTEPSTODETERMINEIFYOUHAVEA
retractor system that will hold child restraint
securely:
a. Pull belt all the way out
B!LLOWBELTTORETRACTABOUTINCHESCM
c. Pull out on belt again.
)FBELTISLOCKEDANDYOUcannot pull the belt
OUTANYFURTHERYOUHAVEAN!UTOMATIC
,OCKING2ETRACTORWHICHMAYBEUSEDASA
child restraint. Remember, when installing a
CHILDRESTRAINTPULLBELTALLTHEWAYOUTBUCKLE
belt, and then tighten.
If you can pull the belt out again (step c
ABOVEYOUMUSTHAVEAN%MERGENCY,OCKING
Retractor which MUST NOT be used with a
child restraint.
Retractor
VEHICLE SEAT BELTS
CONTINUED

42
DO NOT use with any child restraint.
DO NOT use with any child restraint.
"ELTSWILLNOTSTAYTIGHTWHILEDRIVING
Passive Restraint - Lap Belt
with Motorized Shoulder Belt
Passive Restraint - Lap or
Shoulder Belt Mounted on Door
VEHICLE SEAT BELTS
CONTINUED

43
Pull on latch plate (a). If belt slides
FREELYTHROUGHLATCHPLATEALOCKING
clip MUST be used (see Pg. 45
h,OCKING#LIPvSECTION
3OMECOMBINATIONLAPSHOULDERBELTS
with sliding latch plates may be
CONVERTEDINTOANhautomatic
locking modevTHATWILLALLOWUSE
WITHOUTALOCKINGCLIP3EEVEHICLE
OWNERSMANUALANDLABELONVEHICLE
belts for instructions.
3OME%MERGENCY,OCKING2ETRACTOR
BELTSWILLCONVERTTO!UTOMATIC,OCKING
2ETRACTOR!,2BELTSIFYOUPULLTHEBELT
ALLTHEWAYOUT2EFERTOYOURVEHICLE
owner’s manual.
VEHICLE SEAT BELTS
CONTINUED
Combination Lap/Shoulder
Belt with Slidin Latch Plate
a
Pull

44
4HELOCKINGLATCHPLATEONSOMESEAT
belts may slip and loosen after being
BUCKLEDONCHILDRESTRAINTIFPOSITIONED
at a certain angle. If this happens, flip
THELATCHPLATEOVER(a) and
REBUCKLE4ESTINSTALLATIONAGAINTOSEE
IFTHISWORKS)FNOTMOVECHILDRESTRAINT
to another seating position.
a
Flip
VEHICLE SEAT BELTS
CONTINUED

45
Avoid serious injury or death:
s&AILURETOUSELOCKINGCLIP
where required will result in
child restraint not being
securely held in place.
s2EMOVELOCKINGCLIPFROM
seat belts when not being
used with child restraint.
s$/./4USELOCKINGCLIPASA
vehicle seat belt shortener.
You MUSTUSELOCKINGCLIPPROVIDEDWITH
CHILDRESTRAINTWITHAVEHICLESEATBELTTHAT
slides freely through the latch plate or the
lap belt cannot be tightly secured.
Locking Clip
VEHICLE SEAT BELTS
CONTINUED
WARNING

46
)NSTALLCHILDRESTRAINTANDTIGHTENVEHICLESEATBELT
2. Hold seat belts together at latch plate (a)THENUNBUCKLE
3LIDELOCKINGCLIPONSEATBELTSAPPOXIMATELYINCH
CMANDUPTOINCHCMAWAYFROMLATCHPLATE
2EBUCKLESEATBELT
4ESTINSTALLATIONTOSEEIFCHILDRESTRAINTISSECURE
If not secure, additional belt tightening may be required:
s5NBUCKLEVEHICLESEATBELT
s(OLDBELTSTOGETHERANDREMOVELOCKINGCLIP
s3HORTENLENGTHOFLAPBELTPORTION
slightly by pulling belt through latch plate
s2EATTACHLOCKINGCLIP
s"UCKLEVEHICLESEATBELT
0RESSCHILDRESTRAINTFURTHERDOWNINTOVEHICLESEAT
CUSHIONTOHELPBUCKLEVEHICLESEATBELT
4ESTINSTALLATIONTOSEEIFCHILDRESTRAINTISSECURE)FNOTSECURE
REPEATABOVESTEPUNTILSECURE
WITHINv
CM
a
VEHICLE SEAT BELTS
CONTINUED

47
DO NOT anchor tether strap to
VEHICLEWHENUSINGCHILDRESTRAINT
rear-facing.
Tether hook must be attached to
child restraint for rear-facing use or
IFVEHICLEISNOTEQUIPPEDWITHTETHER
anchors.
s!TTACHTETHERHOOKTOBACKOFCHILD
restraint as shown.
s0ULLLOOSEENDOFADJUSTMENTSTRAPTO
REMOVEANYSLACK
s2OLLLOOSEENDOFADJUSTMENTSTRAP
up and secure with a rubber band.
ADDITIONAL INFORMATION

48
Body Support
(on certain models)
To prevent ejection in sudden stop or
crash:
s.EVERALLOWBODYSUPPORTTOBUNCHOR
fold behind child.
s Only use body support in
rear-facing
mode.
s"ODYSUPPORT-534BEUSEDIFSHOULDERS
are below lowest harness setting.
WARNING
ADDITIONAL INFORMATION
CONTINUED

49
a
Slide head pillow into opening in head
support as shown (a) #URVEDBOTTOMOF
head pillow allows for head pillow to be
pulled down to fit smaller infants.
Head Pillow and Harness Covers
(on certain models)
Harness
covers
Head
pillow
To prevent serious head injury in
sudden stop or crash:
s-AKESURETHEHARNESSSYSTEMIS
properly secured.
s#HECKTHATTHEHARNESSSTRAPSARENOT
twisted.
s-AKESURETHATHARNESSCOVERSDONOT
interfere with placement of the chest
CLIPATARMPITLEVEL
WARNING

50
Head Support Cover: clean with a damp
sponge using mild soap and cool water. If
NECESSARYCOVERMAYBEREMOVEDFOR
cleaning.
2EMOVEELASTICLOOPSFROMHEADSUPPORTAS
indicated in (a).
2EMOVEHEADSUPPORTCOVERASSHOWN(b).
-ACHINEWASHCOVERINCOLDWATERON
DELICATECYCLEANDDRIPDRY$/./453%
BLEACH.
4OPUTTHEHEADSUPPORTCOVERBACKON
REVERSEPRECEDINGINSTRUCTIONS
Head Support Cover
a
b
ADDITIONAL INFORMATION
CONTINUED
Refer to seat pad care tag for washing
instructions.
Care and Cleanin

51
Seat Pad: clean with a damp sponge
using mild soap and cool water. If necessary,
SEATPADMAYBEREMOVEDFORCLEANING
,OOSENHARNESSSTRAPSBYLIFTINGLEVERUP(a)
while pulling shoulder harness straps (b).
2EMOVEBOTHHARNESSSTRAPLOOPSFROM
SPLITTERPLATEONBACKOFCHILDRESTRAINT(c) and
pull through front of pad. Open chest clip,
RELEASETONGUESFROMBUCKLE
Seat Pad
ADDITIONAL INFORMATION
CONTINUED
a
b
c
Care and Cleanin

52
ADDITIONAL INFORMATION
CONTINUED
2EMOVEELASTICSTRAPSFROMHOOKSONBACK
of seat as shown (d).
2EMOVEHOOKSATFRONTOFSEATASSHOWN(e).
2EMOVESEATPADFROMSHELLBYPUSHINGHARNESS
straps and crotch strap through seat pad.
-ACHINEWASHPADINCOLDWATERON
DELICATECYCLEANDDRIPDRY$/./453%
BLEACH.
4OPUTTHESEATPADBACKONREVERSE
preceding instructions.
d
e

53
WARNING
Prevent serious injury or death:
s"UCKLEMUSTBEPROPERLYLATCHED
s0ERIODICALLYINSPECTANDCLEANBUCKLETOREMOVE
OBJECTSORDEBRISTHATCOULDPREVENTLATCHING
4URNRESTRAINTOVERPUSHRETAINERTHROUGHCROTCHSTRAPSLOT(a).
4OCLEANBUCKLEPLACEINACUPOFWARMWATERANDGENTLYAGITATE
THEBUCKLEPRESSTHEREDBUTTONSEVERALTIMESWHILEINTHEWATER(b).
DO NOT SUBMERGE THE HARNESS WEBBING.$/./453%
3/!03OR,5"2)#!.43$/./4USEHOUSEHOLDDETERGENTS.EVER
LUBRICATEBUCKLE
3HAKEOUTEXCESSWATERANDALLOWTOAIRDRYHARNESSWEBBING
should be dry before use (c).
2EPEAT3TEPANDASNEEDED"UCKLESHOULDFASTENWITHA
hCLICKv
2EATTACHBUCKLEINTOTHESAMESLOTFROM3TEP
2ECHECKHARNESSFORCORRECTINSTALLATIONBEFOREUSE
ADDITIONAL INFORMATION
CONTINUED
Buckle Cleaning Process:
b
a
c

54
Surface wash only with mild soap
and damp cloth. NO BLEACH.
If harness straps or belt are frayed
ORHEAVILYSOILEDTHEYMUST be
replaced.
Harness Straps &
LATCH Belt:
Aircraft Use
Second Hand Child Restraint
4HISCHILDRESTRAINTISCERTIlEDFORUSEON
AIRCRAFTSEELABELONCHILDRESTRAINT#ONTACT
airline about their policy.
5SETHISCHILDRESTRAINTONLYONFORWARDFACING
aircraft seats.
Install child restraint on an aircraft the same
WAYITISINSTALLEDINAVEHICLEWHENUSINGA
VEHICLESEATBELT
'RACO#HILDRENS0RODUCTS)NCADVISESAGAINST
loaning or passing along a child restraint.
ADDITIONAL INFORMATION
CONTINUED

55
NOTES

56
Child Restraint
Owne
r
’s Manual
Store instruction
manual in the
slot with the
INSTRUCTIONBOOK
icon as shown.
,OCKING
Clip
Storage
4OPURCHASEPARTSORACCESSORIESINTHE5NITED3TATES
please contact us at the following:
www.gracobaby.com
or
1-800-345-4109
REPLACEMENT PARTS

www.gracobaby.com
Size4Me™ 70
Asiento de seguridad infantil
Manual del propietario
NO USAR DEBIDAMENTE ESTE SISTEMA
DE SEGURIDAD PARA NIÑOS AUMENTA
EL RIESGO DE LESIONES SERIAS O
FATALES EN UN ACCIDENTE O AL
DETENERSE DE REPENTE.
LEA ESTE MANUAL.
No instale ni use este sistema de
seguridad para niños hasta que haya
leído y entendido las instrucciones en
este manual.
PD205009A
© 2012 Graco
3/12 US

2
TABLA DE CONTENIDO
Información importante....................4
Advertencia...................................5-8
Información básica............................9
¿Qué es el LATCH?....................10-11
El sistema LATCH............................12
Antes de Empezar
Utilización
Límites de altura y peso.............13-15
Características.......................16-17
Instalación orientada hacia atrás con
LATCH.......................................18-19
Instalación orientada hacia delante
con LATCH................................20-21
Instalación de orientacion trasera con
los cinturones de seguridad del
vehículo.....................................22-23
Instalación orientada hacia delante
con el cinturón de seguridad del
vehículo.....................................24-25
Colocar al niño en el asiento de
seguridad...................................26-29
Operaciones y ajustes..................30-35
s#ORREASDELARNÏS30
s0RESILLAPARAELPECHO31
s(EBILLA31
s!JUSTEDELACORREADE
la entrepierna..........................32-33
s0OSICIONESRECLINADAVERTICAL34-35
s2ETIRARELLATCH de los puntos
de anclaje del vehículo.................36
s!LMACENAJEDELLATCH..................37
Cinturones de seguridad
del vehículo...........................38-46
s#LIPDECIERRE45-46
Información adicional................47-53
s !LMACENAJE DEL ANCLAJE47
s3OPORTEDELCUERPO48
s!LMOHADAPARALACABEZA49
s&UNDASDEARNÏS49
Información adicional

3
s#UIDADOYLIMPIEZA50-54
s5SOENAERONAVES54
s!SIENTODESEGURIDADPARAAUTOS
de segunda mano........................54
TABLA DE CONTENIDO
Lea detenidamente este manual de
instrucciones y las etiquetas del asiento
de seguridad.
Los niños de peso inferior a 20 libras
(9kg) deben usar el asiento orientados
hacia atrás. Niños de 20 a 40 libras de
peso (9.1kg a 18,1kg) pueden sentarse
orientados hacia atrás.
No coloque el asiento orientados
hacia atrás en el asiento del vehículo
equipado con la bolsa de aire.
3IENTEALOSNI×OSCONSISTEMADE
seguridad en el asiento trasero del
vehículo siempre que sea posible.
No deje a los niños solos.
Coloque firmemente el asiento con
el cinturón de seguridad del
vehículo o el cinturón LATCH.
No use el asiento de seguridad
después de la fecha indicada en la
parte trasera del mismo.
No permita que nadie (niñera,
familiares, etc.) use el asiento de
seguridad para autos sin haber
leído y comprendido primero todas
las instrucciones.
Lista de control de seguridad
2EPUESTOS56
s!LMACENAMIENTODELATRABADE
seguridad....................................56
s!LMACENAJEDEMANUAL
de instrucciones...........................56
Información adicional

4
Ningún asiento de seguridad garantiza la protección contra
lesiones en cualquier situación, pero su utilización correcta ayuda
a reducir el riesgo de lesiones graves o la muerte.
LEA ATENTAMENTE ESTE MANUAL.
INFORMACIÓN IMPORTANTE
Los asientos de seguridad para niños
(asientos para autos) se pueden retirar por
RAZONESDESEGURIDAD$EBEREGISTRARESTEASIENTO
en caso de que deba ser retirado, para que le
PUEDANLOCALIZAR%NVÓELAPORCORREOHOYOENVÓE
su nombre, dirección y el número de modelo
y fecha de fabricación del asiento de seguridad
para niños a:
'RACO#HILDRENS0RODUCTS)NC
/AKLANDS"LVD%XTON0!
OLLAMEAL
o regístrelo en línea en
HTTPWWWGRACOBABYCOMCARSEATREGISTRATION
Para obtener información
sobre las retiradas:
Llame a la línea gratuita de
información de seguridad
AUTOMOTRIZDEL'OBIERNO
DE%%55AL
449nnnO
http://www.NHTSA.gov
Información de registro

5
NUNCA PONGA ESTE SISTEMA DE SEGURIDAD
PARA NIÑOS EN UN ASIENTO DEL VEHÍCULO
EQUIPADO CON UNA BOLSA DE AIRE
DELANTERA. Si la bolsa de aire se infla, puede
golpear al niño y al sistema de seguridad para
niños con mucha fuerza y causar lesiones serias
o la muerte de su niño. Consulte el manual del
dueño del vehículo para obtener información
sobre la instalación de las bolsas de aire
laterales y del sistema de seguridad para niños.
ADVERTENCIA
- Prevenga lesiones graves o
la muerte:

6
El incumplimiento de estas
instrucciones y de las indicaciones
de las etiquetas del asiento podría
causar el choque del niño contra el
interior del vehículo durante una
parada repentina o un accidente.
Sujete el asiento con un cinturón de
seguridad del vehículo o un sistema
LATCH que esté bien colocado
según las indicaciones de este
manual. Elija el lugar adecuado
para el asiento de seguridad en su
vehículo. Elija el modo de empleo
correcto para el asiento de
seguridad de acuerdo al tamaño de
su niño. Los niños de peso inferior
a 20 libras (9kg) deben usar este
asiento de seguridad orientado
hacia atrás.
La orientación de los niños hacia
la parte delantera del vehículo les
podría causar lesiones graves o la
muerte.
La Academia Norteamericana de
Pediatría (AAP por sus siglas en
inglés) recomienda que los bebés
estén sentados orientado hacia
atrás hasta los 2 años o hasta que
alcancen la altura y el peso máximo
para sentarse orientado hacia
atrás que se indica en el asiento. El
sistema de cinturones de seguridad
del vehículo DEBE sujetar
firmemente el asiento de
seguridad. No todos los cinturones
de seguridad de todos los vehículos
pueden utilizarse con los asientos
de seguridad.
ADVERTENCIA
- Prevenga lesiones graves o
la muerte:
(cont.)

7
Si el cinturón de seguridad del
vehículo no sujeta firmemente el
asiento de seguridad, lea la
sección “Cinturones de seguridad
del vehículo”. No coloque nunca el
asiento de seguridad en el asiento
delantero del vehículo a menos
que lo recomiende el manual de
propietario del vehículo.
La Administración Nacional de
Seguridad de Tráfico en Carreteras
(National Highway Traffic Safety
Administration, NHTSA) advierte
a los propietarios de vehículos que
según las estadísticas de
accidentes, los niños viajan más
seguros en el asiento trasero.
Remítase al manual del propietario
del vehículo para obtener
información sobre la instalación
de los asientos de seguridad en los
vehículos con la bolsa de aire.
Se debe reemplazar el asiento de
seguridad si ha sufrido un
accidente. ¡NO lo use de nuevo! Un
accidente podría causar daños
ocultos y usarlo de nuevo podría
causar lesiones graves o la muerte.
NO use el asiento de seguridad
si ha resultado dañado o si faltan
piezas.
NO use accesorios o piezas que no
sean los proporcionados por Graco,
ya que ello podría alterar el
rendimiento del asiento de
seguridad.
ADVERTENCIA
- Prevenga lesiones graves o
la muerte:
(cont.)

8
El asiento de seguridad de
orientación trasera debe nivelarse
correctamente:
s5NAPOSICIØNDEMASIADORECLINADA
podría causar lesiones o la
expulsión del asiento.
s5NAPOSICIØNDEMASIADOVERTICAL
podría causar dificultad
respiratoria.
No deje nunca al niño solo, ni
siquiera mientras duerme, ya que
se podría quedar atrapado entre las
correas y asfixiarse o estrangularse.
NO retire el sistema
LATCH del
asiento de seguridad. Si usa el
cinturón de seguridad del
vehículo para sujetar el asiento
de seguridad, debe almacenar los
conectores
LATCH (consulte la
sección“Almacenaje del LATCH”).
No conecte nunca dos
conectores LATCH
a un punto de
anclaje inferior
del vehículo a
menos que el
fabricante del
vehículolo especifique.
NUNCA use los cinturones
LATCH
orientado hacia atrás y adelante al
mismo tiempo. Solamente puede
usar un cinturón LATCH por vez
según el modo de instalación del
sistema de seguridad para niños.
ADVERTENCIA
- Prevenga lesiones graves o
la muerte:
(cont.)

9
INFORMACIÓN BÁSICA
Certificación
Este asiento de seguridad cumple o
excede todos los requisitos requeridos
PORLA.ORMA&EDERALDE3EGURIDAD
de Automóviles para uso en automóviles
y aeronaves.
Asiento de seguridad desocupado
Asientos peligrosos del vehículo
Vida útil del asiento de seguridad
3UJETESIEMPREELASIENTODESEGURIDAD
con el sistema
LATCH o el cinturón de
seguridad del vehículo, incluso cuando
esté desocupado. Al detenerse de
REPENTE3IELASIENTODESEGURIDADNO
está sujeto puede causar lesiones a los
pasajeros.
No use el asiento de seguridad en los
asientos del vehículo orientados hacia
atrás o hacia un lado.
Cuando hace calor
,ASPIEZASDELASIENTODESEGURIDADSE
pueden calentar mucho bajo el sol o
cuando hace calor.
Para evitar quemaduras, compruebe
siempre la temperatura del asiento
antes de sentar a los niños.
Protección del asiento del vehículo
0ROTEJAELASIENTODELVEHÓCULO5SEUNA
alfombrilla, una toalla o una manta fina
debajo y detrás del asiento de seguridad.
DEJE de usar este sistema de seguridad
PARANI×OSYTÓRELOALABASURAA×OS
después de la fecha de fabricación.
Busque este etiqueta en el trasero del
asiento de
seguridad:

10
,AS.ORMAS&EDERALESDE3EGURIDAD
para Vehículos Automotor de Estados
5NIDOSHANDElNIDOUNSISTEMAPARA
la instalación de los sistemas de
seguridad para niños en los vehículos.
Este sistema se denomina LATCH, que
son las siglas en inglés de:
Anclaje inferior y superior para niños.
El
LATCH del vehículo consta de un
punto de anclaje superior y dos
puntos de anclaje inferiores.
Los manuales del propietario de
algunos vehículos emplean el término
ISOFIX para definir al nuevo sistema
de anclaje para asientos de seguridad
para autos. El asiento de seguridad
con LATCH también puede usarse en
asientos del vehículo equipados con
ISOFIX. Los vehículos nuevos suelen
tener uno o varios asientos equipados
con puntos de anclaje LATCH.
3IELVEHÓCULOVIENEEQUIPADOCON
LATCH,
se pueden ver los puntos de anclaje
inferiores en el pliegue del asiento del
VEHÓCULO3INOSEVENPUEDEQUEESTÏN
marcados con un símbolo o un punto
de color.
Compruebe las ubicaciones del anclaje
superior del vehículo en el manual del
PROPIETARIODELVEHÓCULO3EPUEDEN
LOCALIZARPORMEDIODELOSSÓMBOLOSDE
anclaje .
5SEELCINTURØNDELVEHÓCULONOLOS
conectores
LATCH) en instalaciones para
NI×OSQUEPESENMÉSDELIBRASKG
NOTA: Algunos fabricantes de vehículos
usan calificaciones más bajas del peso para
los conectores LATCH, de manera que
debe consultar el manual del dueño del
vehículo o llamar al fabricante del vehículo
para confirmar los límites de los conectores
LATCH de su vehículo.
¿QUÉ ES EL LATCH?
Sistema LATCH para vehículos:

11
Puntos de anclaje
superior del vehículo
Pliegue del asiento
del vehículo
Asiento típico en un vehículo
de pasajeros. Otros tipos de
vehículos pueden tener otras
ubicaciones para el sistema
LATCH.
Vea el manual del
propietario de su vehículo
para informarse sobre las
ubicaciones exactas, la
identificación de los anclajes
y los requisitos para su uso
con el asiento de seguridad.
¿QUÉ ES EL LATCH?
(cont.)
Puntos de anclaje
inferior del
vehículo

12
SISTEMA LATCH
Anclaje superior
del asiento de
seguridad -
NEGRO
El LATCH consta de un cinturón de
anclaje inferior permanente y una
CORREADEANCLAJESUPERIOR5TILICECON
LATCH ÚNICAMENTE en el asiento
recomendado por el fabricante del
vehículo. NUNCA use los cinturones
LATCH orientado hacia atrás y
adelante al mismo tiempo.
Los puntos de anclaje LATCH inferiores
delvehículo se definen como a 11
pulgadas (28 cm) desde el centro de
un anclaje El LATCH se puede usar
SOLAMENTE si el espacio del sujetador
LATCH tiene 11 pulgadas (28 cm) NO
use el
LATCH si el espacio del sujetador
tiene más de 11 pulgadas (28 cm).
ORIENTADA HACIA DELANTE EL
CINTURÓN LATCH - NEGRO
Punto de anclaje
superior del
vehículo
Puntos de
anclaje inferior
del vehículo
Puntos de
anclaje
inferior del
vehículo
Cinturón de anclaje
inferior orientado
hacia adelante -
NEGRO
Cinturón de anclaje
inferior orientado
hacia atrás - GRIS
ORIENTADA HACIA ATRÁ EL
CINTURÓN LATCH - GRIS

13
IMPORTANTE: Este asiento de seguridad para autos cuenta con la certificación
PARAUTILIZARLOorientados hacia atrás con niños de hasta 40 libras de peso
KG3INEMBARGOESPROBABLEQUEALGUNOSNI×OSQUESEACERCANALAS
40 libras (18,1 kg) resulten ser demasiado altos para viajar orientados hacia
atrás3EDEBEAJUSTARSUASIENTODESEGURIDADorientado hacia delante
SOLAMENTESIPESAMÉSDELIBRASKGYESCAPAZDESENTARSEPORSÓMISMO
(
*
VEARECOMENDACIONESDELA!CADEMIA.ORTEAMERICANADE0EDIATRÓA!!0
PÉGINASY
Orientado hacia atrás: 4 a 40 libras (1,8kg-18,1kg)
s.I×OSQUEPESANMENOSQUELIBRASKGDEBEN
sentarse orientados hacia atrás.
s.I×OSDEYLIBRASDEPESOKGAKG
pueden sentarse orientados hacia atrás.
s,AALTURADELARNÏSDEBEESTARa o apenas por
debajo de los hombros del niño.
4 libras
(1.8kg)
40 libras
(18.1kg)
20 libras
(9.1kg)
LIBRAS
(31.8kg)
ORIENTADO HACIA ATRÁS
ORIENTADO HACIA DELANTE
LÍMITES DE ALTURA Y PESO

14
Orientados hacia delante: de 20 a 70 libras (9,1kg a 31,8kg)
s%LNI×ONODEBEEXCEDERLASPULGADASCM
s,OSNI×OSDEALIBRASDEKGAKGQUESONCAPACES
de sentarse por sí mismos pueden sentarse orientados hacia
delante3INOSEPUEDENSENTARPORSÓSOLOSAJUSTEELASIENTODE
seguridad
orientado hacia atrás.
s,OSNI×OSDEALIBRASDEKGAKGYHASTAPULGADASCM
de altura DEBEN sentarse orientados hacia delante.
s,AALTURADELARNÏSDEBEESTARa o apenas por encima de los hombros del
niño.
s,OSOÓDOSDELNI×OESTÉNDEBAJODELAPARTESUPERIORDELAAPOYACABEZA3ILA
parte de arriba de los oídos se encuentran arriba de la parte superior de la
APOYACABEZAELNI×OESDEMASIADOGRANDEPARAELASIENTO
6EALAPÉGPARAOBTENERLASRECOMENDACIONESDELAAcademia Norteamericana
DE0EDIATRÓA!!0.
LÍMITES DE ALTURA Y PESO
(cont.)

15
5NNI×OPREMATUROODEBAJOPESODENACIMIENTOCORRE
peligro en un vehículo o aeronave.
3EGÞNLA!MERICAN!CADEMYOF0EDIATRICS!CADEMIA
DE0EDIATRÓADELOS%STADOS5NIDOSESTOSNI×OSPODRÓAN
sufrir dificultades de respiración si son recostados de
forma incorrecta en un asiento de seguridad.
Graco aconseja que pida a su médico o al personal del
hospital que examinen a su niño y que le recomienden
un asiento o cama para auto adecuado antes de que
usted y su niño salgan del hospital.
Niños prematuros o de bajo peso de
nacimiento
*

16
CARACTERÍSTICAS
(EBILLADELARNÏS
Correa del
entrepiernas
0ALANCAPARA
liberar el
arnés
Correa de
ajuste del arnés
Correa del
arnés
0RESILLA
para el
pecho
0ALANCADE
reclinación
Orientado hacia delante cinturón
del LATCH (guardado) **
Orientado
hacia atrás
cinturón
del LATCH
(guardado) **
Orientado
hacia atrás barra de
almacenamiento del LATCH
Manija del ajuste
del soporte de la
CABEZA
,AS.ORMAS&EDERALESDE3EGURIDADPARA6EHÓCULOS
!UTOMOTORDE%STADOS5NIDOSHANDETERMINADOUN
sistema de instalación de sistemas de seguridad para
niños en los vehículos. El sistema se denomina LATCH.
El LATCH debe usarse SOLAMENTE EN LUGAR del
cinturón del vehículo si el vehículo està equipado
con puntos de anclaje LATCH. Por favor, consulte
el manual del propietaro del vehículo para identi-
ficar las ubicaciones del LATCH en su vehículo.

17
Correa del
anclaje***
Traba del
anclaje
Orientado hacia delante
cinturón del LATCH
Barra de
almacenamiento
del anclaje
Orientado hacia
atrás cinturón
del LATCH
Orientado hacia
delante barra de
almacenamientos
del LATCH
CARACTERÍSTICAS
La placa de
unión
Correa
del arnés
***Los vehículos ahora vienen equipados
(o pueden estar equipados) con puntos
de sujeción del anclaje detràs de algunos
ASIENTOS5NANCLAJESUJETALAPARTE
superior del sistem a de seguridad
para niños a la carrocería del vehículo.
Cuando se usa debidamente con el
cinturón de seguridad del vehículo o
el
LATCH, el anclaje ayuda a reducir
las lesiones en una parada repentina
o accidente.
0LACAQUE
cubre al arnés
Almacenaje de
manual de
instrucciones

18
INSTALACIÓN ORIENTADA HACIA ATRÁS CON LATCH
1. Tire de la manija del frente del sistema
de seguridad para niños (a) y ajústela en
la posición orientada hacia atrás 1 (b).
Asegúrese de que el cinturón LATCH
orientado hacia adelante esté
GUARDADOVEALAlGCPÉG
2. Colóquelo orientado hacia atrás en el
asiento del vehículo equipado con
anclajes
LATCH.
0ARAFACILITARLAINSTALACIØNEXTIENDAEL
cinturón LATCH hasta el máximo.
4. Enganche los conectores orientados
hacia atrás a los anclajes inferiores del
vehículo (c). El cinturón debe mantenerse
en posición plana sin doblarse. Jale los
conectores para asegurarse que están
bien sujetos a los puntos de anclaje (d).
/PRIMACONlRMEZAHACIAABAJOENELCENTRODELSISTEMADESEGURIDADPARA
niños mientras pasa el cinturón de ajuste LATCH por la ranura en la almohadilla
del asiento (e). Asegúrese que el extremo libre del cinturón de ajuste esté afuera
del lugar para sentarse (f).
a
b
d
e
c
f
2ANURA
CLICK!

19
!GARREELASIENTOYTIREDEADELANTEHACIAATRÉSYDEIZQUIERDA
a derecha a nivel del pasaje del cinturón para asegurarse de
que esté perfectamente instalado (g). El sistema de seguridad
para niños no deberá moverse de un lado a otro ni hacia
adelante más de 1 pulgada (2,5 cm). Asegúrese de que el
cinturón de anclaje inferior se mantiene apretado y no se
SUELTADELAPOSICIØNDEAPRETADO$ENOMANTENERSEAPRETADO
COLØQUELOENOTROASIENTOOPØNGASEENCONTACTOCON3ERVICIOAL#LIENTE
#OMPRUEBEELINDICADORDENIVELDELASIENTODESEGURIDAD(h).
El vehículo DEBE
estar en una superficie plana con el niño dentro del asiento de seguridad al
comprobar el indicador de nivel. El indicador DEBE quedar completamente
DENTRODELAZONAVERDE(h)3IESNECESARIOCOLOQUETOALLAS
enrolladas debajo del asiento, exactamente en el pliegue del
asiento del vehículo, hasta que quede completamente dentro de
LAZONAVERDE6UELVAACOMPROBARELINDICADORDENIVEL
sNO use el anclaje superior con el asiento de seguridad
orientado hacia atrás3Edebe almacenar el anclaje
SUPERIORVEAh!LMACENAJEDELANCLAJEvENLAPÉGINA
sCompruebe periódicamente si el asiento de seguridad
está perfectamente instalado y correctamente nivelado
y ajústelo si es necesario.
s0ARAREMOVARVEAh2ETIRARELLATCH de los puntos
DEANCLAJEDELVEHÓCULOvPÉGINA
g
LAPC01
10
A
h
,!4#(

20
INSTALACIÓN ORIENTADA HACIA DELANTE CON LATCH
1. Tire de la manija del frente del sistema de seguridad para niños (a) y ajústela en
la posición orientada hacia adelante 2 o 3 (b). Asegúrese de que el cinturón
LATCH orientado hacia atrás esté guardado. (Vea la Fig. b, pág. 37)
$ESTRABELACORREADELALMACENAMIENTOVEA
LAPÉGINA
#OLØQUELOorientado hacia delante en el
asiento del vehículo equipado con anclajes
LATCH0ARAFACILITARLAINSTALACIØNEXTIENDA
el cinturón LATCH hasta el máximo.
4. Enganche los conectores orientado hacia
delante a los anclajes inferiores del vehículo
(c). El cinturón debe quedar plano y no estar
retorcido. Jale los conectores para asegurarse
de que están bien conectados a los puntos de
anclaje (d).
$ESLICEELSISTEMADESEGURIDADPARANI×OS
hasta que esté en contacto con el respaldo
del asiento del vehículo.
0RESIONEFUERTEMENTEENELCENTRODELASIENTODESEGURIDADPARACOMPRIMIREL
cojín del asiento del vehículo al el cinturón LATCH jalando la correa (e).
a
d
e
b
c
CLICK!

21
!GARREELASIENTOYTIREDEADELANTE
HACIAATRÉSYDEIZQUIERDAADERECHAA
nivel del pasaje del cinturón para
asegurarse de que esté perfectamente
instalado (f). El sistema de seguridad
para niños no deberá moverse de un
lado a otro ni hacia adelante más de
1 pulgada (2,5 cm).
8. Asegúrese de que el cinturón de anclaje
inferior se mantiene apretado y no se
SUELTADELAPOSICIØNDEAPRETADO$ENO
mantenerse apretado, colóquelo en otro
ASIENTOOPØNGASEENCONTACTOCON3ERVICIO
al Cliente.
9. Conecte el gancho de la correa de anclaje
(A) al anclaje (B) y apriételo del todo (g).
El cinturón debe quedar plano y no estar
retorcido.
Compruebe periódicamente si el asiento de
seguridad está perfectamente instalado y
ajústelo si es necesario.
s0ARAREMOVARVEAh2ETIRAREL
LATCH de los
PUNTOSDEANCLAJEDELVEHÓCULOvPÉGINA
f
g
A
B
,!4#(
Anclaje
Jale para
apretar

22
0ORFAVORCONSULTELASECCIØNh#INTURONESDE
SEGURIDADDELVEHÓCULOvENLAPÉGPARA
determinar qué tipo de cinturón de seguridad tiene
su vehículo.
1. Guarde el cinturón LATCH orientado hacia
adelante y atrás como se indica (a). Tire de la
manija del frente del sistema de seguridad para
niños (b) y ajústela en la posición orientada
hacia atrás 1 (c).
2. Colóquelo orientado hacia atrás en el asiento del vehículo.
0ASEELCINTURØNDESEGURIDADDELVEHÓCULOPORLASABERTURASorientada hacia
atrás debajo de la almohadilla del asiento y abróchelo (d)0RESIONEFUERTEMENTE
en el centro del asiento de seguridad para comprimir el cojín del asiento del
vehículo al tiempo que aprieta el cinturón de seguridad del vehículo(e).
El cinturón LATCH DEBE almacenarse cuando se
utilice el cinturón de seguridad del vehículo para
instalar el asiento de seguridad.
INSTALACIÓN DE ORIENTACION TRASERA CON LOS
CINTURONES DE SEGURIDAD DEL VEHÍCULO
a
b
d
e
ADVERTENCIA
c

23
!GARREELASIENTOYTIREDEADELANTEHACIAATRÉSYDEIZQUIERDA
a derecha a nivel del pasaje del cinturón para asegurarse de
que esté perfectamente instalado (f). El sistema de
seguridad para niños no deberá moverse de un lado a otro
ni hacia adelante más de 1 pulgada (2,5 cm).El cinturón de
REGAZODELVEHÓCULODEBEMANTENERSEAPRETADO3INO
queda bien sujeto, vea “Cinturones de seguridad del
AVEHÓCULOvENLAPÉGINA
5. Compruebe el indicador de nivel del asiento de seguridad. El
vehículo debe estar en una superficie plana con el niño
dentro del asiento de seguridad al comprobar el indicador
de nivel.
%LINDICADORDEBEQUEDARCOMPLETAMENTEDENTRODELAZONA
verde (g)3IESNECESARIOCOLOQUETOALLASENROLLADASDEBAJO
del asiento, en el pliegue del asiento del vehículo, hasta que
QUEDECOMPLETAMENTEDENTRODELAZONAVERDE6UELVAA
comprobar el indicador de nivel.
NO use el anclaje superior con el asiento de seguridad
orientado hacia atrás3Edebe almacenar el anclaje superior (vea
h!LMACENAJEDELANCLAJEvENLAPÉGINA#OMPRUEBEPERIØDICAMENTESIEL
asiento de seguridad está perfectamente instalado y correctamente nivelado y
ajústelo si es necesario.
LAPC01
10
A
g
f

24
El cinturón LATCH DEBE almacenarse
cuando se use el cinturón de seguridad del
vehículo para instalar el asiento de seguridad.
0ORFAVORCONSULTELASECCIØNh#INTURONESDE
SEGURIDADDELVEHÓCULOvENLAPÉGPARA
determinar qué tipo de cinturón de seguridad
tiene su vehículo.
1. Guarde el cinturón
LATCH orientado hacia
adelante y atrás como se indica (a). Tire de la manija del frente del sistema de
seguridad para niños (b) y ajústela en la posición orientada hacia adelante 2
o 3 (c).
$ESTRABELACORREADELALMACENAMIENTOVEALAPÉGINA
#OLØQUELOorientado hacia delanteENELASIENTODELVEHÓCULO$ESLICEEL
sistema de seguridad para niños hasta que esté en contacto con el respaldo del
asiento del vehículo.
0ASEELCINTURØNDESEGURIDADDELVEHÓCULOPORLASAPERTURAS!BROCHEEL
cinturón (d).
INSTALACIÓN ORIENTADA HACIA DELANTE CON
LOS CINTURONES DE SEGURIDAD DEL VEHÍCULO
a
b
d
ADVERTENCIA
c

25
0RESIONEFUERTEMENTEENELCENTRODELASIENTO
de seguridad para comprimir el cojín del
asiento del vehículo al tiempo que aprieta el
cinturón de seguridad del vehículo (e).
!GARREELASIENTOYTIREDEADELANTEHACIA
ATRÉSYDEIZQUIERDAADERECHAANIVELDEL
pasaje del cinturón para asegurarse de que
esté perfectamente instalado (f). El sistema
de seguridad para niños no deberá moverse
de un lado a otro ni hacia adelante más de 1
PULGADACM%LCINTURØNDEREGAZODEL
vehículo DEBEMANTENERSEAPRETADO3INO
queda bien sujeto, vea “Cinturones de
SEGURIDADDELVEHÓCULOvENLAPÉGINA
#ONECTEELGANCHODELACORREADEANCLAJE
(A) al anclaje (B) y apriételo del todo (g)3I
el vehículo no cuenta con puntos de anclaje
para conectar el gancho, debe almacenarlo;
vea “Almacenaje del anclaje” en la página
%LCINTURØNDEBEQUEDARPLANOYNOESTAR
retorcido. Compruebe periódicamente si
el asiento de seguridad está perfectamente
instalado y ajústelo si es necesario.
f
Instalación con
cinturón de
seguridad para la
CINTURAHOMBRO
,!4#(
(almacenar)
Anclaje
g
Jale para
apretar
A
B
e

26
COLOCAR AL NIÑO EN EL ASIENTO DE SEGURIDAD
Para prevenir lesiones
graves o la muerte:
sMantenga las correas del arnés
bien apretadas y colocadas en
los hombros con el cierre del
arnés abrochado al nivel de las
axilas.
s.OPONGAALMOHADILLAS
mantas ni cojines debajo de
las correas o del niño, a menos
que sean proporcionados por
Graco.
s%LNI×ODEBELLEVARROPAQUENO
estorbe al abrochar el arnés.
ORIENTADO HACIA DELANTE
sLBSKGKG
La altura del arnés debe estar
a o apenas por encima de los
hombros del niño.
s,OSOÓDOSDELNI×OESTÉN
DEBAJO de la parte superior
DELAAPOYACABEZA3ILAPARTEDEARRIBADE
los oídos se encuentran arriba de la parte
SUPERIORDELAAPOYACABEZAELNI×OES
demasiado grande para el asiento.
ORIENTADO HACIA ATRÁS
sLBSKGKG
s,AALTURADELARNÏSDEBEESTAR
a o apenas por debajo de los
hombros del niño. El soporte
del cuerpo
*
DEBE usarse si
los hombros están debajo de la posición
másbaja del arnés (
*
vea página 48).
Compruebe el sistema
del arnés:
ADVERTENCIA

27
sANTESDEAJUSTARLAALTURADELAPOYACABEZAPIDAASUNI×O
que se mueva un poco hacia adelante.
s!PRIETELAMANIJAROJADEAJUSTEDELSOPORTEDELACABEZA(a) de
arriba del asiento hasta que se trabe en una de las 8 posiciones de la altura (b).
s0ARABAJARLOAPRIETEYTIREHACIAARRIBADELAMANIJAROJADEAJUSTEYEMPUJEEL
SOPORTEDELACABEZAHACIAABAJO
Orientado hacia atrás
s%LSOPORTEDELACABEZADEBECOLOCARSEDEMANERATALQUELASCORREASDELARNÏSESTÏN
AOAPENASPORDEBAJODELOSHOMBROSYELNI×OTENGAMENOSDECM
(40 pulg.) de largo y pese menos de 18,1 kg (40 libras).
s!SEGÞRESEDEQUEELSOPORTEDELACABEZANOTOCAELASIENTODELANTERODEL
vehículo.
Orientado hacia delante
s%LSOPORTEDELACABEZADEBECOLOCARSEDEMANERATALQUELASCORREASDELARNÏSESTÏN
AOAPENASPORENCIMADELOSHOMBROSDELNI×OKGAKGALIBRAS
Consulte la página 26 para determinar la colocación de la correa del
arnés.
Ajuste del soporte de la cabeza
No ajustar debidamente las correas del arnés de su niño
aumenta el riesgo de lesiones serias o la muerte en una curva
cerrada, parada repentina o accidente.
ADVERTENCIA
a
b

28
1. Coloque al niño en el asiento
de seguridad con la espalda
apoyada contra el respaldo del
asiento.
2. Coloque las correas del arnés
por encima de los hombros del
niño e inserte la(s) lengüeta(s)
ENLAHEBILLAVEAPÉGINA
Jale la(s) lengüeta(s) para
asegurarse de que están bien
sujeta(s).
#IERRELAPRESILLAPARAELPECHO
0ONGALAPRESILLAPARAEL
pecho al nivel de las axilas
VEAPG
COLOCAR AL NIÑO EN EL ASIENTO DE SEGURIDAD
(cont.)
0RESILLA
para el
pecho
(EBILLA
Correa de
ajuste del
arnés
Correa de la
entrepierna

29
4. Ajuste las correas del arnés para que
estén apretadas. VERIFIQUE que el arnés
esté tensionado. NO debería poder
APRETARELARNÏSSIESTÉTENSO5NACORREA
TENSANODEBERÉESTARmOJA3EMANTIENE
en una línea casi recta sin doblarse. No
aprieta la carne del niño ni empuja el
cuerpo del niño en una posición que no
sea natural. (a)
Compruebe si las correas del arnés en el
pecho y los muslos están bien
ajustadas.
3EPUEDEUSARUNATOALLAENROLLADAEN
cada lado como soporte para los niños
pequeños (b). Asegúrese de que las
toallas no interfieren en el sistema del
arnés. NO se deben colocar toallas
debajo del niño. No use una toalla con el
soporte del cuerpo.
a
b

30
Correas del
arnés
0RESILLAPARA
el pecho
(EBILLA
Correa de
ajuste
del arnés
s0ARAAPRETAR4IRELACORREADEAJUSTEDELARNÏS(a).
s0ARASOLTAR,EVANTELAPALANCA(b) mientras tira las
correas del arnés del hombro (c).
a
b
c
OPERACIONES Y AJUSTES
Correas del arnés

31
s0ARAABRIRLA/PRIMALASLENGàETASY
sepárelas (d)
s0ARACERRARLA!BROCHELASDOSMITADES
Asegúrese de que la presilla para el
pecho esté trabada, tirando de cada
mitad. (e)
s0ARAABROCHAR)NSERTEAMBASLENGàETAS
en la hebilla. Jale las lengüetas para
asegurarse de que están cerradas (f).
0ARAAPRETAR4IRELACORREADEAJUSTE
del arnés (g).
s0ARADESABROCHAR!mØJELOLEVANTANDO
la palanca mientras tira las correas del
arnés para los hombros (h). Incline la
parte de arriba de la hebilla hacia el
asiento (i) y oprima arriba del
botón rojo (j) y tire las lenguas de la
hebilla. (k)
Presilla para el pecho:
Hebilla:
d
e
f
h i
g
j
k

32
s2ECLINEELSISTEMADESEGURIDADDELNI×OALAPOSICIØN1 (l).
s$ESDEABAJODELSISTEMADESEGURIDADPARAELNI×OGIREELRETÏN
hacia el costado para pasarlo con mayor facilidad por la ranura (m).
s4IRELACORREADELAENTREPIERNADELSISTEMADESEGURIDADPARAEL
niño como se indica (n).
s0ONGALACORREADELAENTREPIERNAENLARANURADESEADA(o). Tire
de la correa de la entrepierna para asegurarse de que esté bien
instalada.
s,ACORREADELAENTREPIERNADEBEUSARSEENLAPOSICIØNDELACORREA
de la entrepierna trasera cuando se usa
orientado hacia atrás (p).
Ajuste de la correa de la entrepierna:
OPERACIONES Y AJUSTES
(cont.)

33
0OSICIØN
trasera de la
correa de la
entrepierna
0OSICIØN
delantera de
la correa de
la entrepierna
p
o
l
m
n

34
NO INCLINAR DEBIDAMENTE el sistema de seguridad para bebés en el
asiento del vehículo aumenta el riesgo de lesiones serias o la muerte.
ADVERTENCIA
1. Tire hacia afuera la manija de reclinación que
está al frente del sistema de seguridad para niños
(a).
2. La bola en el indicador del nivel debe estar
completamente verde (b) y el sistema de seguridad
para niños debe estar en la posición de reclinación 1
(c) como se indica en la etiqueta en el costado de la
base (e).
%LVEHÓCULODEBEESTARENUNASUPERlCIEPLANACON
el niño dentro del sistema de seguridad al
comprobar el indicador de nivel.
NOTA: El indicador del nivel debe usarse
solamente cuando está orientado hacia atrás.
Orientado hacia atrás
1. Tire hacia afuera la manija
de reclinación que está al
frente del sistema de
seguridad para niños (d).
2. Ajuste la reclinación en la
posición 2 ó 3 que se indica
en la etiqueta (e) en el
costado de la base.
3ICAMBIALASPOSICIONESDE
reclinación, necesitará evaluar
la instalación para asegurarse
de que el cinturón esté tenso.
Orientado hacia
delante
OPERACIONES Y AJUSTES
(cont.)
Posiciones reclinada / vertical:

35
a
d
SAP0800E
LAPC0110A
b
3
2
1
REAR-F
A
CIN
G
ORIENT
ADO
HA
CIA ATRÁS
4-40 LBS
(1.8k
g - 18.1
kg
)
FORWARD-FA
CIN
G
ORIENTADO
HACIA /DELANTE
20-40 LBS
(9.1
kg - 18.1 kg)
FORW
ARD
-FA
CIN
G
ORIENT
ADO
HA
CIA
DELANTE
20-70 LBS
(9.1kg - 31.8 kg
)
e
c

36
Retirar el LATCH de los puntos
de anclaje del vehículo:
OPERACIONES Y AJUSTES
(cont.)
1. Libere la tensión del conector LATCH levantando
la palanca como se indica (a).
0ARAELIMINAREL
LATCH, tire de la correa de
liberación como se indica (b).
2EPITALOSPASOSENELOTROCONECTOR
a
Sacar la correa del vehículo
1. Libere la tensión del conector de la correa
levantando la palanca como se indica (c).
2. Oprima y sujete la bisagra de liberación de
la correa (d).
%MPUJEELCONECTORHACIADENTROLEVANTEEL
conector y tire hacia afuera (en el sentido opuesto
al punto de anclaje) (d).
b
c
d

37
5BIQUELASBARRASDEALMACENAJEDEL
sistema LATCH de los cinturones
LATCH orientados hacia adelante o
hacia atrás (a).
2. Abroche el sistema LATCH en la barra
de almacenaje como se indica (b or c).
2EPITAPARAELOTROLADODELASIENTO
ALMACENAMIENTO ORIENTADO
HACIA ATRÁS
ALMACENAMIENTO
ORIENTADO HACIA ADELANTE
a
b c
Almacenaje LATCH:

38
No se pueden usar todos los
cinturones de seguridad de
vehículos con los asientos de
seguridad. Durante el manejo,
sujete siempre el asiento con
el cinturón de seguridad de
regazo o con una parte del
cinturón de regazo/hombro
que no cambie de longitud.
0ARALOGRARLAINSTALACIØNDELASIENTODE
seguridad más segura:
s,EALASECCIØNDELMANUALDELPROPIETARIO
del vehículo referente a la instalación de
los asientos de seguridad y el uso de los
cinturones de seguridad con los asientos.
s3IGALASINSTRUCCIONESDETODASLAS
etiquetas del cinturón de seguridad del
vehículo y del asiento de seguridad.
3IELASIENTONOQUEDABIENSUJETODESPUÏS
de seguir las instrucciones de este manual,
de las etiquetas de los cinturones de
seguridad del vehículo y del manual del
propietario del vehículo:
s#OLOQUEELASIENTODESEGURIDADENOTRO
asiento diferente e inténtelo de nuevo, o
s0ØNGASEENCONTACTOCONEL
concesionario del vehículo para que le
PROPORCIONENPIEZASDEMODIlCACIØNDE
los cinturones de seguridad que
posiblemente necesite.
ADVERTENCIA
CINTURONES DE SEGURIDAD DEL VEHÍCULO

39
Cinturones ubicados delante del
pliegue del asiento
Los cinturones de seguridad del vehículo
UBICADOSDELANTEDELPLIEGUEENELASIENTOQUIZÉ
no sujeten bien el asiento. Consulte el manual
del propietario del vehículo o visite el
concesionario del vehículo para informarse
sobre los requisitos de instalación de los
asientos.
sSi queda aprobado para utilizarlo con el
asiento, instálelo y compruebe si está
perfectamente instalado jalando el asiento
de atrás hacia delante. Si el asiento se
desplaza hacia delante, NO use estos
cinturones de seguridad.
0LIEGUEDEL
asiento
CINTURONES DE SEGURIDAD DEL VEHÍCULO
(cont.)
0LIEGUEDEL
asiento

40
a
Cinturones de regazo - ajustables manualmente
La placa de cierre en algunos cinturones de
SEGURIDADSEPUEDEDESLIZARYSOLTARTRAS
abrocharla al asiento en ciertos ángulos. En este
caso, dé la vuelta a la placa de cierre (a) y vuelva
a abrocharla. Compruebe la instalación
DENUEVOPARAVERSIFUNCIONA3INOFUNCIONA
coloque el asiento de seguridad en otra
posición diferente.
Déle
la
vuelta
CINTURONES DE SEGURIDAD DEL VEHÍCULO
(cont.)

41
Cinturones de regazo - con retractor
,OSCINTURONESDEREGAZOCONRETRACTORPUEDENO
no sujetar el asiento firmemente.
3IGAESTOSPASOSPARADETERMINARSISUSISTEMADE
retractor que sujeta el asiento firmemente :
A3AQUEELCINTURØNDESEGURIDADDELTODO
B$EJEQUEELCINTURØNSERETRAIGA
APROXIMADAMENTEPULGADASCM
C3AQUEELCINTURØNDENUEVO
3IELCINTURØNSECIERRAATOPEYno puede jalarlo
más, usted dispone de un retractor de cierre
automático que se puede usar con el asiento.
2ECUERDECUANDOINSTALEELASIENTOSAQUEEL
cinturón del todo, abróchelo y luego, apriételo.
Si puede sacar el cinturón de nuevo (paso c
arriba), tiene un retractor de cierre para
emergencias que NO SE DEBE usar con el
asiento.
2ETRACTOR
CINTURONES DE SEGURIDAD DEL VEHÍCULO
(cont.)

42
NO SE DEBE usar con ningún asiento.
NO SE DEBE usar con ningún asiento.
Los cinturones no se mantendrán
apretados durante el manejo del auto.
Cinturón pasivo - cinturón de regazo
con cinturón de hombro motorizado
Cinturón pasivo - cinturón de regazo
y hombro montado en la puerta
CINTURONES DE SEGURIDAD DEL VEHÍCULO
(cont.)

43
Jale la placa de cierre (a)3IELCINTURØNSEDESLIZA
fácilmente por la placa de cierre,SE DEBEUTILIZAR
un clip de cierre (vea la sección “Clip de cierre” en
la página 45).
!LGUNOSCINTURONESCOMBINADOSDEREGAZO
HOMBROCONPLACASDECIERREDESLIZANTESSEPUEDEN
convertir al “modo de cierre automático” que
PERMITIRÉUTILIZARLOSSINCLIPDECIERRE#ONSULTEEL
manual del propietario del vehí culo y lea la
etiqueta ubicada en los cinturones para ver las
instrucciones.
Algunos cinturones replegables con traba de
EMERGENCIA%MERGENCY,OCKING2ETRACTOR%,2
se convertirán en cinturones replegables con traba
AUTOMÉTICA!UTOMATIC,OCKING2ETRACTOR!,2SI
uno tira todo el cinturón hacia afuera. Consulte el
manual del dueño del vehículo.
Cinturón combinado de regazo / hombro
con placa de cierre deslizante
a
Jale
CINTURONES DE SEGURIDAD DEL VEHÍCULO
(cont.)

44
La placa de cierre fija de algunos
cinturones de seguridad se puede
DESLIZARYSOLTARTRASABROCHARLAAL
asiento en ciertos ángulos. En este
caso, dé la vuelta a la placa de cierre
(a) y vuelva a abrocharla. Compruebe
la instalación de nuevo para ver si
FUNCIONA3INOFUNCIONACOLOQUEEL
asiento en otra posición diferente.
a
CINTURONES DE SEGURIDAD DEL VEHÍCULO
(cont.)
Cinturón combinado de regazo / hombro
con una placa de cierre fija
Déle
la
vuelta

45
Evite lesiones graves o la muerte:
s.OUSARELCLIPDECIERRECUANDO
se requiere impide que el asiento
quede bien sujeto.
s1UITEELCLIPDECIERREDELOS
cinturones de seguridad cuando
no lo utilice con el asiento.
s./USEELCLIPDECIERREPARA
acortar la longitud del cinturón
de seguridad.
3%DEBE usar el clip de cierre que se
incluye con el asiento con el cinturón
DESEGURIDADDELVEHÓCULOQUESEDESLIZA
fácilmente por la placa de cierre o
CUANDOELCINTURØNDEREGAZONOSE
pueda mantener bien sujeto.
Clip de cierre
CINTURONES DE SEGURIDAD DEL VEHÍCULO
(cont.)
ADVERTENCIA

46
1. Instale el asiento y apriete el cinturón de seguridad del vehículo.
3UJETELOSCINTURONESDESEGURIDADENLAPLACADECIERRE(a) y
desabróchelos.
$ESLICELATRABADESEGURIDADENLOSCINTURONESDESEGURIDAD
APROXIMADAMENTECMPULGYHASTACMPULGEN
sentido opuesto a la placa de unión.
4. Vuelva a abrochar el cinturón de seguridad.
5. Compruebe la instalación para ver si el asiento ha quedado bien sujeto.
3INOHAQUEDADOBIENSUJETOQUIZÉSEANECESARIOAPRETARMÉSELCINTURØN
s$ESABROCHEELCINTURØNDESEGURIDADDELVEHÓCULO
s3UJETELOSCINTURONESYQUITEELCLIPDECIERRE
s!CORTELALONGITUDDELAPARTEDELCINTURØNDEL
REGAZOJALÉNDOLOPORLAPLACADECIERRE
s6UELVAACOLOCARELCLIPDECIERRE
s!BROCHEELCINTURØNDESEGURIDADDELVEHÓCULO
Oprima el asiento en el cojín del asiento del vehículo para
poder abrochar el cinturón de seguridad del vehículo.
Compruebe la instalación para ver si el asiento ha quedado bien
SUJETO3INOREPITALOSPASOSANTERIORESHASTAQUEQUEDEBIENSUJETO
dentro de 2,5 cm
(1 pulgada)
a
CINTURONES DE SEGURIDAD DEL VEHÍCULO
(cont.)

47
NO conecte la correa de anclaje
SUPERIORALVEHÓCULOALUTILIZARELASIENTO
orientado hacia atrás.
El gancho del anclaje debe
conectarse cuando el asiento se usa en
orientación trasera o si el vehículo no
viene equipado con los anclajes
correspondientes.
s#ONECTEELGANCHODELANCLAJEALA
parte trasera del asiento como se
indica.
s*ALEELEXTREMOSUELTODELACORREAPARA
apretarla.
s%NROLLEELEXTREMOSUELTODELACORREAY
sujétela con una goma.
INFORMACIÓN ADICIONAL
Almacenaje del anclaje
Para almacenar el gancho del anclaje:

48
Soporte del cuerpo
(ciertos modelos)
Para prevenir la eyección en un
accidente o parada repentina:
s Nunca deje que el soporte del cuerpo
se apile o se doble detrás del niño.
s5SEELSOPORTEDELCUERPOSOLAMENTEEN
el modo
orientado hacia atrás.
s%LSOPORTEDELCUERPO$%"%USARSESILOS
hombros están debajo de la posición más
baja del arnés.
ADVERTENCIA
INFORMACIÓN ADICIONAL
(cont.)

49
a
$ESLICELAALMOHADAPARALACABEZAHACIALA
ABERTURAENELSOPORTEDELACABEZACOMO
se indica (a) El fondo curvo de la almohada
PARALACABEZAPERMITEQUESEPUEDATIRAR
hacia abajo en el caso de niño.
Almohada para la cabeza y fundas del arnés
Fundas
del arnés
Almohada
para la
cabeza
Para prevenir la eyección en un
accidente o parada repentina:
s!SEGÞRESEDEQUEELSISTEMADELARNÏS
esté debidamente sujetado.
s2EVISEQUELASCORREASDELARNÏSNO
estén torcidas.
s!SEGÞRESEDEQUELASFUNDASDELARNÏS
no interfieran con la colocación de
la presilla del pecho a la altura de las
axilas.
ADVERTENCIA

50
Funda del Apoyacabezas: limpiar con una
esponja húmeda usando un jabón suave y agua
FRESCA$ESERNECESARIOSEPUEDESACARLAFUNDA
para limpiarla.
3AQUELOSNUDOSELÉSTICOSDELAPOYACABEZAS
como se indica en (a).
3AQUELASFUNDASDELAPOYACABEZASCOMOSE
indica. (b).
,AVELAFUNDAAMÉQUINAENAGUAFRÓAENELCICLO
DELICADOYSÏQUELAALAIRE./53%
",!.15%!$/2
0ARAVOLVERAPONERLAFUNDADELASIENTOINVIERTA
las instrucciones anteriores.
Funda del Apoyacabezas
a
b
Consulte la etiqueta de cuidado de la almohadilla
del asiento para obtener las instrucciones de lavado.
Cuidado y limpieza
INFORMACIÓN ADICIONAL
(cont.)

51
Almohadilla del asiento: limpie con una
esponja húmeda usando un jabón suave y agua
FRESCA$ESERNECESARIOSEPUEDESACARLA
almohadilla del asiento para limpiarla.
1. Afloje las correas del arnés levantando la
palanca hacia arriba (a) mientras tira las
correas del arnés para los hombros (b).
2ETIRELOSDOSBUCLESDELASCORREASDELARNÏS
de la placa de unión de la parte trasera del
asiento (c) y páselos por la parte delantera
de la almohadilla. Abra la presilla del pecho,
libere las lenguas de la hebilla.
Almohadilla del asiento
INFORMACIÓN ADICIONAL
(cont.)
a
b
c
Cuidado y limpieza

52
INFORMACIÓN ADICIONAL
(conti.)
3AQUELASCORREASELÉSTICASDELOSGANCHOSDEATRÉS
del asiento como se indica (d).
3AQUELOSGANCHOSDELFRENTEDELASIENTOCOMOSE
indica (e).
3AQUELAALMOHADILLADELASIENTODELARMAZØN
empujando las correas del arnés y la correa de la
entrepierna por la almohadilla del asiento.
,AVELAFUNDAAMÉQUINAENAGUAFRÓAENELCICLO
DELICADOYSÏQUELAALAIRE./53%",!.15%!$/2
0ARAVOLVERAPONERLAFUNDADELASIENTOINVIERTALAS
instrucciones anteriores.
d
e

53
Prevenga lesiones graves o la muerte:
s,AHEBILLADEBEABROCHARSECORRECTAMENTE
s)NSPECCIONEYLIMPIELAHEBILLAPERIØDICAMENTEPARA
quitar objetos o desechos que podrían impedir la sujeción.
$EVUELTAELSISTEMADESEGURIDADPASEELRETÏNPORLARANURADE
la correa de la entrepierna (a).
0ARALIMPIARLAHEBILLAPØNGALEENUNATAZADEAGUATIBIAYAGITE
suavemente la hebilla, oprima el botón rojo varias veces mientras esté
sumergida en el agua (b). NO SUMERJA LAS CORREAS DEL ARNÉS.
NO USE JABONES ni LUBRICANTES. NO use detergentes para uso
doméstico. Nunca lubrique la hebilla.
%LIMINEELEXCESODEAGUAYPERMITAQUESESEQUEALAIRELACORREA
del arnés debe estar seca antes del uso (c).
2EPITALOSPASOSYSEGÞNSEANECESARIO,AHEBILLADEBETRABARSE
haciendo un “clic”.
6UELVAASUJETARLAHEBILLAENLAMISMARANURAQUEENEL0ASO
Vuelva a inspeccionar el arnés para determinar si la instalación es correcta antes de
usarlo.
INFORMACIÓN ADICIONAL
(cont.)
Proceso de limpieza de la hebilla:
b
a
c
ADVERTENCIA

54
3ELAVALASUPERlCIESOLAMENTE
con un jabón suave y un paño
mojado.
3ILASCORREASDELARNÏSESTÉN
deshilachadas o muy sucias,
DEBENREEMPLAZARSE
Correas del arnés y del
sistema LATCH:
Uso en aeronaves
Asiento de seguridad para autos
de segunda mano
Este asiento ha sido certificado para uso en
aeronaves (vea la etiqueta del asiento).
0ØNGASEENCONTACTOCONLASAEROLÓNEASPARA
obtener información sobre su política.
5TILICEESTEASIENTOSOLAMENTEENASIENTOSDE
aeronaves orientados hacia delante.
Instale el asiento en la aeronave de la misma
manera que se instala en un vehículo, cuando
se usa el cinturón de seguridad del vehículo.
'RACO#HILDRENS0RODUCTS)NCDESACONSEJA
prestar o regalar el asiento.
INFORMACIÓN ADICIONAL
(cont.)

55
NOTAS

56
Child Restraint
Owne
r
’s Manual
Guarde el manual de
instrucciones en la
ranura con
símbolo del libro
de instrucciones
como se indica.
Almacenamiento
del clip de cierre
0ARACOMPRARREPUESTOSOACCESORIOSENLOS%STADOS5NIDOSPORFAVOR
comuníquese con nosotros en:
www.gracobaby.com
o
1-800-345-4109
REPUESTOS
-
 1
1
-
 2
2
-
 3
3
-
 4
4
-
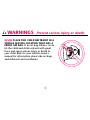 5
5
-
 6
6
-
 7
7
-
 8
8
-
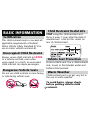 9
9
-
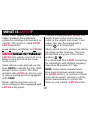 10
10
-
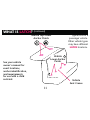 11
11
-
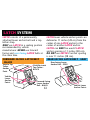 12
12
-
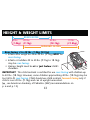 13
13
-
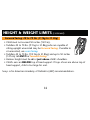 14
14
-
 15
15
-
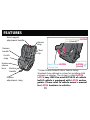 16
16
-
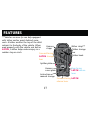 17
17
-
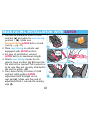 18
18
-
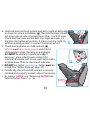 19
19
-
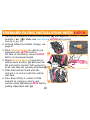 20
20
-
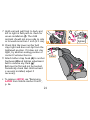 21
21
-
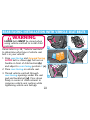 22
22
-
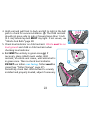 23
23
-
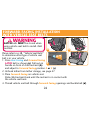 24
24
-
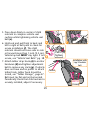 25
25
-
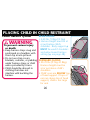 26
26
-
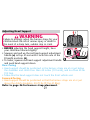 27
27
-
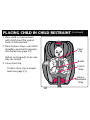 28
28
-
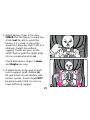 29
29
-
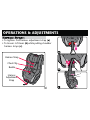 30
30
-
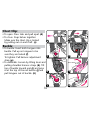 31
31
-
 32
32
-
 33
33
-
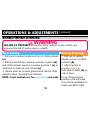 34
34
-
 35
35
-
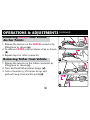 36
36
-
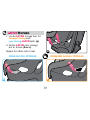 37
37
-
 38
38
-
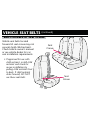 39
39
-
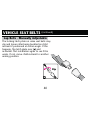 40
40
-
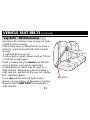 41
41
-
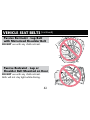 42
42
-
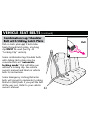 43
43
-
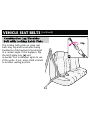 44
44
-
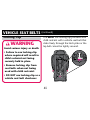 45
45
-
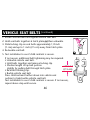 46
46
-
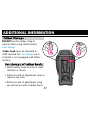 47
47
-
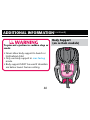 48
48
-
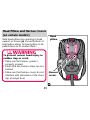 49
49
-
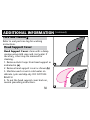 50
50
-
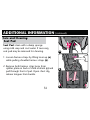 51
51
-
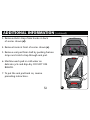 52
52
-
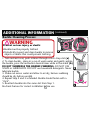 53
53
-
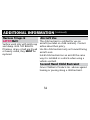 54
54
-
 55
55
-
 56
56
-
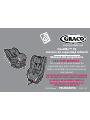 57
57
-
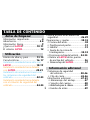 58
58
-
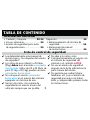 59
59
-
 60
60
-
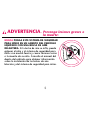 61
61
-
 62
62
-
 63
63
-
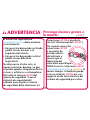 64
64
-
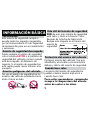 65
65
-
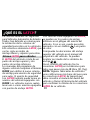 66
66
-
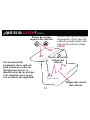 67
67
-
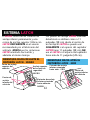 68
68
-
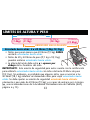 69
69
-
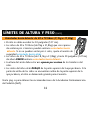 70
70
-
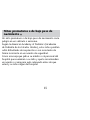 71
71
-
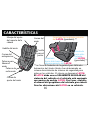 72
72
-
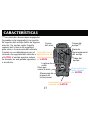 73
73
-
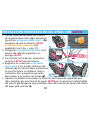 74
74
-
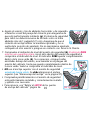 75
75
-
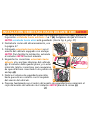 76
76
-
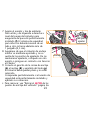 77
77
-
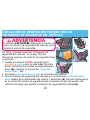 78
78
-
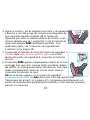 79
79
-
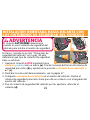 80
80
-
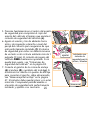 81
81
-
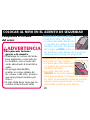 82
82
-
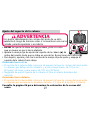 83
83
-
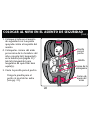 84
84
-
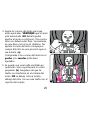 85
85
-
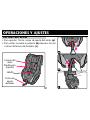 86
86
-
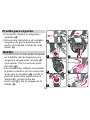 87
87
-
 88
88
-
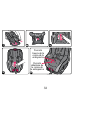 89
89
-
 90
90
-
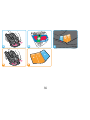 91
91
-
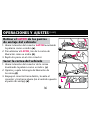 92
92
-
 93
93
-
 94
94
-
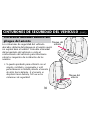 95
95
-
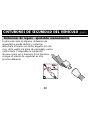 96
96
-
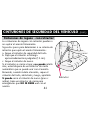 97
97
-
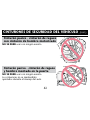 98
98
-
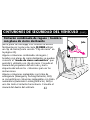 99
99
-
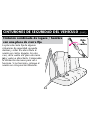 100
100
-
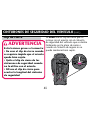 101
101
-
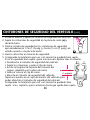 102
102
-
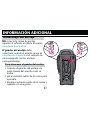 103
103
-
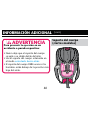 104
104
-
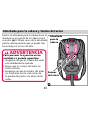 105
105
-
 106
106
-
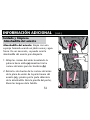 107
107
-
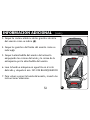 108
108
-
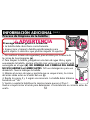 109
109
-
 110
110
-
 111
111
-
 112
112


Graco Size4Me 70 El manual del propietario
- Categoría
- Asiento de coche
- Tipo
- El manual del propietario
en otros idiomas
- English: Graco Size4Me 70 Owner's manual
Artículos relacionados
-
Graco PD214124A Manual de usuario
-
-
-
-
-
-
Graco 1765438 Manual de usuario
-
Graco Child Restraint Manual de usuario
-
-