SW-Motech KFT.22.995.30100/B Mounting instructions
- Tipo
- Mounting instructions

ANBAUANLEITUNG
mounting instructions • instructions de montage • instrucciones de montaje • istruzioni di montaggio
beinhaltet • contains • contient • contiene • contiene
KFT.22.995.30100/B
KFT.22.995.30001/B
KFT.22.995.80000/B

Art.-Nr.: KFT.22.995.30001/B Revision: 00 · Datum: 11 - 2022
PRO Seitenträger
~ 1 h. LEICHT SCHWER
DEUTSCH · Vielen Dank, dass Sie sich für dieses Premium-Produkt von SW-
MOTECH entschieden haben. Besuchen Sie unseren Webshop für weitere
Informationen (z. B. Modellzuweisungen). Erforderliche Dokumente (z. B.
ABE) stehen Ihnen dort als Download zur Verfügung.
Bitte lesen und verstehen Sie alle Anweisungen, Sicherheitshinweise und
Warnungen in dieser Anbauanleitung vor Montage und Nutzung des
Produkts, um Verletzungen und Schäden zu vermeiden. Bewahren Sie diese
Anbauanleitung als Referenz auf.
Dieses Produkt wurde für Fahrzeuge im Werkszustand entwickelt. Die
Kompatibilität mit Original-Zubehörteilen bzw. den Zubehörteilen anderer
Hersteller kann nicht gewährleistet werden.
Diese Anbauanleitung ist nach unserem derzeitigen Kenntnisstand verfasst
worden. Rechtliche Ansprüche auf Richtigkeit bestehen nicht. Fehler und
Irrtümer vorbehalten. Technische und gestalterische Änderungen sind
vorbehalten. Das Urheberrecht liegt bei SW-MOTECH.
SICHERHEITSWARNUNGSSYMBOL
Dieses Warnsymbol wird in dieser Anbauanleitung verwendet, um vor
tödlichen Gefahren, Verletzungen oder anderen Gefahren zu warnen. Die
Wörter GEFAHR, WARNUNG oder VORSICHT werden mit diesem
Warnsymbol verwendet, um wichtige Sicherheitshinweise und
Informationen in Bezug auf die Montage und Nutzung dieses Produkts zu
übermitteln. Diese Wörter zusammen mit dem Sicherheitswarnsymbol
bedeuten:
GEFAHR: Weist auf eine gefährliche Situation hin, die zum Tod oder zu
schweren Verletzungen führt, wenn sie nicht vermieden wird!
WARNUNG: Weist auf eine gefährliche Situation hin, die zum Tod oder zu
schweren Verletzungen führen kann, wenn sie nicht vermieden wird!
VORSICHT: Weist auf eine gefährliche Situation hin, die zu leichten oder
mittelschweren Verletzungen führen kann, wenn sie nicht vermieden wird!
HINWEIS: Wichtige Informationen, jedoch nicht in Bezug auf Todes- oder
Verletzungsgefahr (nur Sachschäden)!
ALLGEMEINE HINWEISE
WARNUNG: Die Montage und/oder Wartung dieses Produkts erfordert
fortgeschrittene technische Fähigkeiten, geeignetes Werkzeug und ein
gutes Verständnis der Werkzeugnutzung und Drehmomentangaben. Zu
Ihrer eigenen Sicherheit empfiehlt SW-MOTECH, die Montage und/oder
Wartung von einer qualifizierten und zertifizierten Zweiradwerkstatt
durchführen zu lassen.
WARNUNG: Wenn Sie sich für die Eigenmontage dieses Produkts
entscheiden, lesen Sie vor Montage und Nutzung die Anbauanleitung
sorgfältig und vollständig durch und befolgen Sie alle Anweisungen, um
schwere oder tödliche Verletzungen zu vermeiden. Beachten Sie bei der
Montage und Verwendung auch alle relevanten Informationen im
Fahrzeughandbuch. WENN SIE EINEN TEIL DIESER ANBAUANLEITUNG
NICHT VERSTEHEN ODER EINE ERKLÄRUNG EINER ANWEISUNG
BENÖTIGEN, VERSUCHEN SIE NICHT DIESES PRODUKT ZU MONTIERN,
OHNE SW-MOTECH UM HILFE ZU FRAGEN!
VORBEREITUNG: Lesen Sie die Anbauanleitung aufmerksam und stellen Sie
sicher, dass alle Teile der Stückliste vorhanden sind.
VORSICHT: Achten Sie auf den sicheren Stand Ihres Fahrzeugs.
Schalten Sie den Motor ab und ziehen Sie den Zündschlüssel. Lassen Sie
den Motor/Auspuff bei Bedarf abkühlen. Klemmen Sie die Batterie bei
Arbeiten an der Elektrik ab. Verwenden Sie nur geeignetes Werkzeug und
tragen Sie während der Montage und Wartung immer eine Schutzbrille
und Handschuhe. Lassen Sie sich bei der Montage und Wartung von einer
zweiten Person helfen.
MONTAGE: Alle vom Fahrzeug entfernten Teile und Verbindungen müssen
gemäß den Angaben des Fahrzeugherstellers wieder eingebaut oder durch
von SW-MOTECH gelieferte Teile und Hardware ersetzt werden.
WARNUNG: Sichern Sie alle Gewinde, sofern nicht anders angegeben,
mit mittelstarker, flüssiger Schraubensicherung.
GEFAHR: Von SW-MOTECH nicht definierte Anzugsdrehmomente
müssen Sie vom Fahrzeughersteller oder von einer zertifizierten
Motorradwerkstatt beziehen.
FUNKTIONSKONTROLLE: Stellen Sie nach der Montage sicher, dass keine
beweglichen Teile blockiert sind und die Funktion des Fahrzeugs nicht
gestört wird. Kabel und Schläuche dürfen nicht scheuern und/oder
geklemmt werden.
WARNUNG: Führen Sie vor Fahrtbeginn eine umfassende
Funktionskontrolle durch. Prüfen Sie nach den ersten 50 km und dann
regelmäßig das Anzugsmoment aller Verbindungen und den festen Sitz
des Produkts. Montiertes Zubehör kann das Fahrverhalten und die
Stabilität des Fahrzeugs verändern.
ANBAUANLEITUNG · ANBAUANLEITUNG LESEN UND AUFBEWAHREN!
SW-MOTECH GmbH & Co. KG
Ernteweg 7-10
35282 Rauschenberg
Deutschland
www.sw-motech.com
Die inhaltliche Übersetzung erfolgt automatisiert.
© SW-MOTECH GmbH & Co. KG
Irrtümer und Änderungen vorbehalten.
Technische und Design-Änderungen vorbehalten.
1

Beachten Sie in dem Abschnitt MONTAGE
vorkommenden Symbole und deren Bedeutung.
Wenn im Abschnitt MONTAGE die Bezeichnung OEM
vorkommt, müssten die Vorgaben des
Fahrzeugherstellers beachtet und angewandt
werden.
Bei Fragen steht Ihnen unser Kundendienst sowie unsere
Distributoren gerne zur Verfügung. Unsere
Telefonnummer sowie eine Liste unserer Distributoren
finden Sie in unserem Webshop:
www.sw-motech.com
Schraubensicherung verwenden: Weist darauf hin,
dass ein Gewinde mit flüssiger Schraubensicherung
bestrichen werden muss. H (HIGH): hohe Festigkeit;
M (MEDIUM): mittlere Festigkeit; L (LOW): niedrige
Festigkeit.
Anziehen / Anzugsmomentangabe beachten: Weist auf
das von SW-MOTECH bzw. vom Fahrzeughersteller (OEM)
vorgegeben Anzugsmoment eines Teils hin.
Keine Schraubensicherung verwenden: Weist
darauf hin, dass an der Stelle keine flüssige
Schraubensicherung notwendig ist.
LEGENDENüBERSICHT · ANBAUANLEITUNG LESEN UND AUFBEWAHREN!
Die inhaltliche Übersetzung erfolgt automatisiert.
© SW-MOTECH GmbH & Co. KG
Irrtümer und Änderungen vorbehalten.
Technische und Design-Änderungen vorbehalten.
2

STüCKLISTE · ANBAUANLEITUNG LESEN UND AUFBEWAHREN!
Die inhaltliche Übersetzung erfolgt automatisiert.
© SW-MOTECH GmbH & Co. KG
Irrtümer und Änderungen vorbehalten.
Technische und Design-Änderungen vorbehalten.
3
21
KFT.22.822.001.11
2/2
2
M8 x 40; DIN 912
SC.ST.08.040.48.912.109
4/4
3
KFT.05.440.007.11
4/4
4
M8 x 35; DIN 6912
SC.ST.08.035.02.6912.088
4/4
5
ø 8,4; DIN 125
US.ST.084.02.125
4/4
6
Ø 20 / ø 8,4 / h 14,5
DB.ST.0200.0084.0145.02
4/4
37
KFT.06.525.005.11
1/1
8
M6 x 25; ISO 7380
SC.ST.06.025.02.7380.109
3/3
9
Ø 20 / ø 6,4 / h 5
DB.ST.0200.0064.0050.02
1/1
10
M6; DIN 6927
MU.ST.06.02.6927.08
3/3
411
KFT.22.995.971.01.11
1/1
12
KFT.22.995.972.01.11
1/1
13
KFT.00.152.SV.8
1/1

1
WARNUNG: Tragen Sie immer Augen- und Handschutz!
WARNUNG: Verwenden Sie immer geeignetes Werkzeug!
Entfernen Sie auf beiden Fahrzeugseiten die gezeigten Schrauben und
demontieren Sie die Soziusfußrasten.
ANBAUSCHRITT · ANBAUANLEITUNG LESEN UND AUFBEWAHREN!
Die inhaltliche Übersetzung erfolgt automatisiert.
© SW-MOTECH GmbH & Co. KG
Irrtümer und Änderungen vorbehalten.
Technische und Design-Änderungen vorbehalten.
4

2
1×2
2×4
M 23 Nm
3×4
4×4
M 23 Nm
5×4
6×4
Verschrauben Sie die Anbaubleche (1) auf beiden Seiten mit den Sozius-
Fußrasten am Fahrzeug.
WARNUNG: Verwenden Sie flüssige Schraubensicherung!
Ziehen Sie die Schrauben (2) noch nicht an.
Verschrauben Sie die Anbaubleche (3) beidseitig am Fahrzeugheck.
WARNUNG: Verwenden Sie flüssige Schraubensicherung!
Ziehen Sie die Schrauben (4) noch nicht an.
Hinweis: Um den Seitenträger zusammen mit dem SW-MOTECH Gepäckträger
zu montieren, verwenden Sie die Distanzbuchsen des Gepäckträgers (*), wie in
der Detailzeichnung gezeigt.
ANBAUSCHRITT · ANBAUANLEITUNG LESEN UND AUFBEWAHREN!
Die inhaltliche Übersetzung erfolgt automatisiert.
© SW-MOTECH GmbH & Co. KG
Irrtümer und Änderungen vorbehalten.
Technische und Design-Änderungen vorbehalten.
5

3
7×1
8×3
9,6 Nm
9×1
10 ×3
Verschrauben Sie den Querverbinder (7) mit Ihrem Nummernschild am
Kennzeichenträger.
Ziehen Sie die Schrauben noch nicht an.
ANBAUSCHRITT · ANBAUANLEITUNG LESEN UND AUFBEWAHREN!
Die inhaltliche Übersetzung erfolgt automatisiert.
© SW-MOTECH GmbH & Co. KG
Irrtümer und Änderungen vorbehalten.
Technische und Design-Änderungen vorbehalten.
6

4
11 ×1
12 ×1
13 ×1
Verbinden Sie die Seitenträger (11) und (12) mit den Schnellverschlüssen (13)
an den Anbaublechen (1) und (3) und dem Querverbinder (7).
Sichern Sie die Schnellverschlüsse mit den Sicherungsscheiben.
Wenn alle Komponenten spannungsfrei sitzen, ziehen Sie die Schrauben wie
vorgegeben an.
HINWEIS: Die Diebstahlsicherung ist separat erhältlich.
ANBAUSCHRITT · ANBAUANLEITUNG LESEN UND AUFBEWAHREN!
Die inhaltliche Übersetzung erfolgt automatisiert.
© SW-MOTECH GmbH & Co. KG
Irrtümer und Änderungen vorbehalten.
Technische und Design-Änderungen vorbehalten.
7

PRODUKTSPEZIFISCHE HINWEISE
GEFAHR: Die angegebene maximale Zuladung beinhaltet das Gewicht von
Koffer/Gepäck und Adapterkit! Es gilt die vom Fahrzeughersteller genannte,
maximale Zuladung des Fahrzeugs!
12,5 KG ( 27,5 lbs) 130 km/h ( 80mph)
HINWEIS: Die Seitenträger wurden ausschließlich für die Verwendung von SW-
MOTECH Adapterkits konzipiert.
HINWEIS: Demontieren Sie die Seitenträger bei Fahrten ohne Gepäck.
Benutzen Sie die Seitenträger immer paarweise.
WARNUNG: Achten Sie darauf, dass sich die Koffer nach Montage am
Fahrzeug NICHT im Abgassstrom befinden! Verbrennungsgefahr!
HINWEIS: Beachten Sie alle landesspezifischen Vorschriften für Zulassung und
Betrieb Ihres Fahrzeugs sowie anwendbare TüV-Vorschriften. Lassen Sie
eintragungspflichtige Teile nach Montage durch Ihre Prüfstelle in die
Fahrzeugpapiere eintragen.
PRODUKTHINWEISE · ANBAUANLEITUNG LESEN UND AUFBEWAHREN!
Die inhaltliche Übersetzung erfolgt automatisiert.
© SW-MOTECH GmbH & Co. KG
Irrtümer und Änderungen vorbehalten.
Technische und Design-Änderungen vorbehalten.
8

Item number: KFT.22.995.30001/B Revision: 00 · Date: 11 - 2022
PRO side carrier
~ 1 h. EASY DIFFICULT
ENGLISH ·Thank you for choosing this premium product from SW-MOTECH.
Visit our online shop for more information (e.g. model assignments). Required
documents (e.g. national type approval) are available there for you to
download.
Please read and understand all the instructions, safety information and
warnings in these mounting instructions before mounting and using the
product in order to avoid injury and damage. Keep these mounting
instructions for reference.
This product was developed for vehicles in factory condition. Compatibility
with original accessories or accessories from other manufacturers cannot
be guaranteed.
These mounting instructions have been prepared to the best of our current
knowledge. No legal claims relating to accuracy can be made. Errors and
omissions excepted. We reserve the right to make technical and design
changes. The copyright is held by SW-MOTECH.
SAFETY WARNING SYMBOL
This warning symbol is used in these mounting instructions to warn of
deadly dangers, injuries or other hazards. The words DANGER, WARNING or
CAUTION are used as part of this warning symbol to convey important safety
messages and information relating to the installation and use of this
product. These words, together with the safety warning symbol, mean:
DANGER: Indicates a hazardous situation which, if not avoided, will result
in death or serious injury!
WARNING: Indicates a hazardous situation which, if not avoided, may
result in death or serious injury!
CAUTION: Indicates a hazardous situation which, if not avoided, may result
in minor or moderate injury!
NOTE: Important information, but not relating to a risk of death or injury
(property damage only)!
GENERAL INFORMATION
WARNING: Assembly and/or maintenance of this product requires
advanced technical skill, appropriate tools, and a good understanding of tool
usage and torque specifications. For your own safety, SW-MOTECH
recommends having the assembly and/or maintenance carried out by a
qualified and certified motorcycle workshop.
WARNING: If you do choose to assemble this product yourself, carefully
and fully read the mounting instructions before assembly and use, and
follow all instructions to avoid serious injury or death. Also observe all
relevant information in the vehicle manual when mounting or using the
product. IF YOU DO NOT UNDERSTAND ANY PART OF THESE MOUNTING
INSTRUCTIONS OR NEED AN EXPLANATION AS TO A SPECIFIC
INSTRUCTION, DO NOT ATTEMPT TO INSTALL THIS PRODUCT WITHOUT
CONSULTING SW-MOTECH FOR ASSISTANCE!
PREPARATION: Read the mounting instructions carefully and make sure
that all parts on the parts list are available.
CAUTION: Ensure that your vehicle is standing securely. Switch off the
engine and remove the ignition key. Allow the engine/exhaust to cool
down if necessary. Disconnect the battery when working on the electrical
system. Only use proper tools and always wear safety goggles and gloves
during assembly and maintenance. Have a second person help you with
assembly and maintenance.
ASSEMBLY: All parts and connections removed from the vehicle must be
reinstalled according to the vehicle manufacturer's specifications or
replaced with parts and hardware supplied by SW-MOTECH.
WARNING: Secure all threads with a medium-strength liquid
threadlocker, unless otherwise specified.
DANGER: Tightening torques not defined by SW-MOTECH must be
obtained from the vehicle manufacturer or a certified motorbike
workshop.
FUNCTIONAL CHECK:After mounting the product, ensure that no moving
parts are obstructed and that the function of the vehicle is not impeded.
Cables and hoses must not rub against each other and/or be hindered in any
way.
WARNING: Carry out a comprehensive functionality check before you
start to drive. Check the tightening torque of all connections and the tight
fit of the product after the first 50 km and then at regular intervals.
Mounted accessories can change the handling and stability of the vehicle.
MOUNTING INSTRUCTIONS · READ AND KEEP MOUNTING INSTRUCTIONS!
SW-MOTECH GmbH & Co. KG
Ernteweg 7-10
35282 Rauschenberg
Germany
www.sw-motech.com
The content translation is automated.
© SW-MOTECH GmbH & Co. KG
Errors and omissions excepted
Subject to technical and design changes.
1

Take note of the symbols and what they mean in the
ASSEMBLY section. If the term OEM appears in the
ASSEMBLY section, the vehicle manufacturer's
specifications must be observed and applied.
If you have any questions, please don't hesitate to contact
our Customer Service team or our distributors. You can
find our telephone number and a list of our distributors in
our online shop:
www.sw-motech.com
Use thread locker: Indicates that a thread must be
coated with liquid thread locker. H (HIGH): high
strength; M (MEDIUM): medium strength; L (LOW):
low strength.
Tighten/note the tightening torque information:
Indicates the tightening torque of a part specified by SW-
MOTECH or the vehicle manufacturer (OEM).
Do not use thread lock: Indicates that no liquid
thread lock should be used at this point.
LEGEND OVERVIEW · READ AND KEEP MOUNTING INSTRUCTIONS!
The content translation is automated.
© SW-MOTECH GmbH & Co. KG
Errors and omissions excepted
Subject to technical and design changes.
2

PARTS LIST · READ AND KEEP MOUNTING INSTRUCTIONS!
The content translation is automated.
© SW-MOTECH GmbH & Co. KG
Errors and omissions excepted
Subject to technical and design changes.
3
21
KFT.22.822.001.11
2/2
2
M8 x 40; DIN 912
SC.ST.08.040.48.912.109
4/4
3
KFT.05.440.007.11
4/4
4
M8 x 35; DIN 6912
SC.ST.08.035.02.6912.088
4/4
5
ø 8,4; DIN 125
US.ST.084.02.125
4/4
6
Ø 20 / Ø 8.4 / h 14.5
DB.ST.0200.0084.0145.02
4/4
37
KFT.06.525.005.11
1/1
8
M6 x 25; ISO 7380
SC.ST.06.025.02.7380.109
3/3
9
Ø 20 / Ø 6.4 / h 5
DB.ST.0200.0064.0050.02
1/1
10
M6; DIN 6927
MU.ST.06.02.6927.08
3/3
411
KFT.22.995.971.01.11
1/1
12
KFT.22.995.972.01.11
1/1
13
KFT.00.152.SV.8
1/1

1
WARNING: Always wear eye and hand protection!
WARNING: Always use appropriate tools!
Remove the screws indicated as well as the passenger footrests on both sides
of the vehicle.
MOUNTING STEP · READ AND KEEP MOUNTING INSTRUCTIONS!
The content translation is automated.
© SW-MOTECH GmbH & Co. KG
Errors and omissions excepted
Subject to technical and design changes.
4

2
1×2
2×4
M 23 Nm
3×4
4×4
M 23 Nm
5×4
6×4
Screw the mounting brackets (1) to the passenger footrests on both sides of
the vehicle.
WARNING: Use a liquid threadlocker!
Do not tighten the screws (2) yet.
Screw the mounting brackets (3) to the rear of the vehicle on both sides.
WARNING: Use a liquid threadlocker!
Do not tighten the screws (4) yet.
Note: In order to mount the side carrier together with the SW-MOTECH
rack,use the rack spacers (*) as indicated in the detailed drawing.
MOUNTING STEP · READ AND KEEP MOUNTING INSTRUCTIONS!
The content translation is automated.
© SW-MOTECH GmbH & Co. KG
Errors and omissions excepted
Subject to technical and design changes.
5

3
7×1
8×3
9.6 Nm
9×1
10 ×3
Screw the crossbar (7) to your license plate on the license plate holder.
Do not tighten the screws yet.
MOUNTING STEP · READ AND KEEP MOUNTING INSTRUCTIONS!
The content translation is automated.
© SW-MOTECH GmbH & Co. KG
Errors and omissions excepted
Subject to technical and design changes.
6

4
11 ×1
12 ×1
13 ×1
Using the quick-release fasteners, (13) connect the side carriers (11) and (12)
to the mounting brackets (1) and (3) as well as to the crossbar (7).
Secure the quick-release fasteners using the lock washers.
When all components are loosely in proper position, tighten the screws as
specified.
NOTE: Anti-theft protection is sold separately.
MOUNTING STEP · READ AND KEEP MOUNTING INSTRUCTIONS!
The content translation is automated.
© SW-MOTECH GmbH & Co. KG
Errors and omissions excepted
Subject to technical and design changes.
7

PRODUCT-SPECIFIC NOTES
DANGER: The specified maximum load includes the weight of the carrier
adapter kit/luggage and adapter kit! The maximum vehicle load capacity
specified by the vehicle manufacturer is applicable!
12.5KG( 27.5 lbs) 130 km/h ( 80 mph)
NOTE: The side carriers have been designed exclusively for use with SW-
MOTECH adapter kits.
NOTE: Dismantle the side carriers when riding without luggage. Always use the
side carriers in pairs.
WARNING: Ensure that the cases are NOT in the exhaust gas flow after
mounting them on the vehicle! Risk of burns!
NOTE: Ensure you adhere to country-specific regulations regarding the
registration and operation of your vehicle or any applicable TÜV regulations. After
assembly, parts that are subject to registration should be entered in the vehicle
documents by your test center.
PRODUCT INFORMATION · READ AND KEEP MOUNTING INSTRUCTIONS!
The content translation is automated.
© SW-MOTECH GmbH & Co. KG
Errors and omissions excepted
Subject to technical and design changes.
8

Número de artículo: KFT.22.995.30001/B Revisión: 00 · Fecha: 11 - 2022
Soporte lateral PRO
~ 1 h. FÁCIL COMPLICADO
ESPAÑOL · Gracias por elegir este producto de primera calidad de SW-
MOTECH. Visite nuestra tienda online para obtener más información (p. ej.,
sobre el uso de los modelos). Desde esa página podrá descargar los
documentos que necesite (por ejemplo, la homologación nacional de tipo).
Para evitar lesiones y daños, asegúrese de leer y comprender todas las
instrucciones, advertencias de seguridad y precauciones de este manual
antes de montar y utilizar el producto. Guarde estas instrucciones de
montaje como referencia.
Este producto ha sido desarrollado para vehículos en condiciones de
fábrica. No se garantiza la compatibilidad con los accesorios originales o de
otros fabricantes.
Estas instrucciones de montaje se han redactado de acuerdo con nuestros
conocimientos actuales. No hay reclamaciones legales de corrección. Salvo
errores y omisiones. Nos reservamos el derecho a realizar cambios
técnicos y de diseño. Los derechos de autor pertenecen a SW-MOTECH.
SÍMBOLO DE ADVERTENCIA DE SEGURIDAD
Este símbolo de advertencia se utiliza en estas instrucciones de montaje
para advertir de peligros mortales, lesiones u otros riesgos. Las palabras
PELIGRO, ATENCIÓN o PRECAUCIÓN se utilizan con este símbolo de
advertencia para transmitir importantes avisos de seguridad e información
relacionada con el montaje y uso de este producto. Estas palabras, junto con
el símbolo de advertencia de seguridad, significan:
PELIGRO: Indica una situación de peligro que, si no se evita, provoca
lesiones graves o incluso la muerte.
ATENCIÓN: Indica una situación de peligro que, si no se evita, puede
provocar lesiones graves o incluso la muerte.
PRECAUCIÓN: Indica una situación de peligro que, si no se evita, puede
provocar lesiones leves o de gravedad media.
NOTA: Información importante, pero que no está relacionada con un
riesgo de lesiones o muerte (solo daños materiales).
INDICACIONES GENERALES
ATENCIÓN: El montaje y/o mantenimiento de este producto requiere
conocimientos técnicos avanzados, las herramientas apropiadas, un buen
manejo de dichas herramientas y conocer las especificaciones de los pares
de apriete. Por su propia seguridad, SW-MOTECH recomienda que el
montaje y/o el mantenimiento los realice un taller de motocicletas
cualificado y certificado.
ATENCIÓN: Si elige ensamblar este producto usted mismo, antes de
montarlo y usarlo, lea las instrucciones de montaje detenidamente y en su
totalidad, y siga todas las indicaciones para evitar lesiones graves o
mortales. Cuando monte y utilice el producto, tenga también en cuenta toda
la información relevante que figure en el manual del vehículo. SI NO
ENTIENDE ALGUNA PARTE DE ESTAS INSTRUCCIONES DE MONTAJE O
NECESITA ALGUNA ACLARACIÓN, NO INTENTE INSTALAR ESTE PRODUCTO
SIN CONSULTAR A SW-MOTECH PARA OBTENER AYUDA.
PREPARACIÓN: Lea atentamente las instrucciones de montaje y asegúrese
de que todas las piezas de la lista de piezas están presentes.
PRECAUCIÓN:Asegúrese de que su vehículo esté estacionado de
manera segura. Apague el motor y retire la llave de encendido. Deje que el
motor o el escape se enfríen si es necesario. Desconecte la batería cuando
trabaje en el sistema eléctrico. Utilice únicamente las herramientas
adecuadas y use siempre gafas de seguridad y guantes al realizar el
montaje y las tareas de mantenimiento. Pida a otra persona que le ayude
con el montaje y el mantenimiento.
MONTAJE: Todas las piezas y conexiones retiradas del vehículo deben ser
reinstaladas de acuerdo con las especificaciones del fabricante del vehículo
o sustituidas por piezas y herrajes suministrados por SW-MOTECH.
ATENCIÓN: Asegure todas las roscas con fijador de roscas líquido de
resistencia media, a menos que se especifique lo contrario.
PELIGRO: Los pares de apriete no definidos por SW-MOTECH deben
obtenerse del fabricante del vehículo o de un taller de motocicletas
certificado.
COMPROBACIÓN FUNCIONAL:Después del montaje, asegúrese de que no
haya piezas móviles bloqueadas y de que no se altere el funcionamiento del
vehículo. Los cables y tubos no deben rozarse ni quedar pinzados.
ATENCIÓN: Realice una comprobación exhaustiva del funcionamiento
antes de iniciar la marcha. Tras los primeros 50 km y, después, con
regularidad, compruebe el par de apriete de todas las conexiones y que el
producto está firmemente sujeto. Los accesorios instalados pueden
cambiar el comportamiento de conducción y la estabilidad del vehículo.
INSTRUCCIONES DE MONTAJE · LEE Y CONSERVA LAS INSTRUCCIONES DE MONTAJE!
SW-MOTECH GmbH & Co. KG
Ernteweg 7-10
35282 Rauschenberg
Alemania
www.sw-motech.com
La traducción del contenido es automática
© SW-MOTECH GmbH & Co. KG
Salvo errores y omisiones
Sujeto a cambios técnicos y de diseño.
1

Preste atención a los símbolos que figuran en la
sección de MONTAJE y su significado. Cuando, en la
sección de MONTAJE, aparecen las siglas OEM, se
deberán seguir y aplicar las especificaciones del
fabricante del vehículo.
Si tiene alguna pregunta, nuestro servicio de atención al
cliente y nuestros distribuidores estarán encantados de
prestarle ayuda. Encontrará nuestro número de teléfono
y una lista de nuestros distribuidores en nuestra tienda
online:
www.sw-motech.com
Usar fijador de roscas: Indica que una rosca debe
recubrirse con fijador de roscas líquido. H (HIGH):
resistencia alta; M (MEDIUM): resistencia media; L
(LOW): resistencia baja.
Respete la información del par de apriete: Indica el par
de apriete de una pieza especificada por SW-MOTECH o el
fabricante del vehículo (OEM).
No usar fijador de roscas: Indica que no es necesario
usar fijador de roscas líquido en este punto.
RESUMEN DE LA LEYENDA · LEE Y CONSERVA LAS INSTRUCCIONES DE MONTAJE!
La traducción del contenido es automática
© SW-MOTECH GmbH & Co. KG
Salvo errores y omisiones
Sujeto a cambios técnicos y de diseño.
2

LISTA DE PIEZAS · LEE Y CONSERVA LAS INSTRUCCIONES DE MONTAJE!
La traducción del contenido es automática
© SW-MOTECH GmbH & Co. KG
Salvo errores y omisiones
Sujeto a cambios técnicos y de diseño.
3
21
KFT.22.822.001.11
2/2
2
M8 x 40; DIN 912
SC.ST.08.040.48.912.109
4/4
3
KFT.05.440.007.11
4/4
4
M8 x 35; DIN 6912
SC.ST.08.035.02.6912.088
4/4
5
ø 8,4; DIN 125
US.ST.084.02.125
4/4
6
Ø 20 / ø 8,4 / h 14,5
DB.ST.0200.0084.0145.02
4/4
37
KFT.06.525.005.11
1/1
8
M6 x 25; ISO 7380
SC.ST.06.025.02.7380.109
3/3
9
Ø 20 / ø 6,4 / h 5
DB.ST.0200.0064.0050.02
1/1
10
M6; DIN 6927
MU.ST.06.02.6927.08
3/3
411
KFT.22.995.971.01.11
1/1
12
KFT.22.995.972.01.11
1/1
13
KFT.00.152.SV.8
1/1

1
ADVERTENCIA: ¡Use siempre protección de ojos y manos!
ADVERTENCIA: ¡Utilice siempre herramientas adecuadas!
Retire los tornillos indicados de ambos lados del vehículo y quite los
reposapiés para pasajero.
PASO DE FIJACIóN · LEE Y CONSERVA LAS INSTRUCCIONES DE MONTAJE!
La traducción del contenido es automática
© SW-MOTECH GmbH & Co. KG
Salvo errores y omisiones
Sujeto a cambios técnicos y de diseño.
4

2
1×2
2×4
M 23 Nm
3×4
4×4
M 23 Nm
5×4
6×4
Atornille las placas de fijación (1) con los reposapiés para pasajero a ambos
lados del vehículo.
ADVERTENCIA: ¡Utilice fijador de roscas líquido!
No atornilles todavía los tornillos (2).
Atornille las placas de fijación (3)a ambos lados de la parte trasera del
vehículo.
ADVERTENCIA: ¡Utilice fijador de roscas líquido!
No apriete los tornillos (4) todavía.
Nota: Para montar el soporte lateral junto con el portaequipaje de SW-
MOTECH, utilice los espaciadores del portaequipaje (*) como se muestra en el
dibujo de detalle.
PASO DE FIJACIóN · LEE Y CONSERVA LAS INSTRUCCIONES DE MONTAJE!
La traducción del contenido es automática
© SW-MOTECH GmbH & Co. KG
Salvo errores y omisiones
Sujeto a cambios técnicos y de diseño.
5

3
7×1
8×3
9,6 Nm
9×1
10 ×3
Atornille el conector transversal (7) con su matrícula al soporte de matrícula.
No apriete todavía los tornillos.
PASO DE FIJACIóN · LEE Y CONSERVA LAS INSTRUCCIONES DE MONTAJE!
La traducción del contenido es automática
© SW-MOTECH GmbH & Co. KG
Salvo errores y omisiones
Sujeto a cambios técnicos y de diseño.
6

4
11 ×1
12 ×1
13 ×1
Conecte los soportes laterales (11) y (12) con los cierres rápidos (13) a las
placas de fijación (1) y (3) y el conector transversal (7).
Asegure los cierres rápidos con las arandelas de seguridad.
Cuando todos los componentes estén colocados sin tensión, apriete los
tornillos según lo indicado.
NOTA: El sistema antirrobo está disponible por separado.
PASO DE FIJACIóN · LEE Y CONSERVA LAS INSTRUCCIONES DE MONTAJE!
La traducción del contenido es automática
© SW-MOTECH GmbH & Co. KG
Salvo errores y omisiones
Sujeto a cambios técnicos y de diseño.
7

INDICACIONES ESPECÍFICAS DEL PRODUCTO
PELIGRO: ¡La carga máxima indicada incluye el peso de la
maleta/equipaje y del kit de adaptador! ¡Se aplica la carga máxima del
vehículo especificada por el fabricante del mismo!
12,5 kg ( 27,5 libras) 130 km/h ( 80 mph)
NOTA: Los soportes laterales se han concebido exclusivamente para el uso de
kits de adaptador de SW-MOTECH.
NOTA: Desmonte los soportes laterales en los trayectos sin equipaje. Utilice los
soportes laterales siempre por parejas.
ATENCIÓN: ¡Asegúrese de que las maletas NO estén en el flujo de gases
de escape después de instalarlas en el vehículo! ¡Peligro de quemaduras!
NOTA: Deben respetarse todas las normas nacionales para la matriculación y
uso del vehículo, así como las normas de inspección técnica vigentes. En caso de
piezas con registro obligatorio, tu organismo de inspección debe registrarlas en
los documentos del vehículo tras el montaje.
INFORMACIóN SOBRE LOS PRODUCTOS · LEE Y CONSERVA LAS INSTRUCCIONES DE MONTAJE!
La traducción del contenido es automática
© SW-MOTECH GmbH & Co. KG
Salvo errores y omisiones
Sujeto a cambios técnicos y de diseño.
8

Numéro d‘article: KFT.22.995.30001/B Révision: 00 · Date: 11 - 2022
Support latéral PRO
~ 1 h. FACILE DIFFICILE
FRANÇAIS ·Nous vous remercions d'avoir choisi ce produit haut de gamme de
SW-MOTECH. Visitez notre boutique en ligne pour plus d'informations (par
exemple affectation des modèles). Les documents nécessaires (par exemple
ABE) y sont disponibles en téléchargement.
Veuillez lire et prendre en compte toutes les instructions, les consignes de
sécurité et les avertissements contenus dans ce manuel de montage avant
de monter et d'utiliser le produit afin d'éviter toute blessure ou tout
dommage. Veuillez conserver la notice d'utilisation pour référence.
Ce produit a été développé pour des véhicules en configuration d'usine.
Nous ne sommes pas en mesure d'assurer la compatibilité avec les pièces
de rechange originales ou les pièces de rechange d'autres fabricants.
La présente notice d'installation a été élaborée conformément à nos
connaissances actuelles. Il n'existe aucun droit juridique à l'exactitude des
informations qu'elle contient. Sous réserve d'erreurs et de fautes. Sous
réserve de modifications techniques et conceptuelles. SW-MOTECH détient
les droits d'auteur.
SYMBOLE D'AVERTISSEMENT DE SÉCURITÉ
Ce symbole d'avertissement est utilisé dans ces instructions de montage
pour mettre en garde contre des dangers mortels, de blessures ou d'autres
risques. Les mots DANGER, ATTENTION ou PRUDENCE sont utilisés avec ce
symbole d'avertissement pour transmettre des consignes de sécurité et des
informations importantes concernant le montage et l'utilisation de ce
produit. Ces mots, associés au symbole d'avertissement de sécurité,
signifient :
DANGER :signale une situation dangereuse pouvant entraîner la mort ou
des blessures graves si elle n'est pas évitée !
ATTENTION :signale une situation dangereuse pouvant entraîner la mort ou
des blessures graves si elle n'est pas évitée !
PRUDENCE: Indique une situation dangereuse susceptible d'entraîner des
blessures de gravité réduite ou moyenne si elle se présente !
REMARQUE : Informations importantes, mais qui n'entraînent pas de
risque de décès ou de blessure (dommages matériels uniquement).
REMARQUES GÉNÉRALES
ATTENTION : le montage et/ou l'entretien de ce produit nécessite des
compétences techniques avancées, des outils appropriés et une bonne
compréhension de l'utilisation des outils et des indications de réglage. Pour
votre propre sécurité, SW-MOTECH recommande de confier le montage
et/ou l'entretien à un atelier de réparation de deux-roues qualifié et
certifié.
ATTENTION : si vous décidez de monter vous-même ce produit, lisez
attentivement et intégralement les instructions de montage avant le
montage et l'utilisation et suivez toutes les instructions afin d'éviter des
blessures graves ou mortelles. Lors du montage et de l'utilisation, tenez
également compte de toutes les informations pertinentes du manuel du
véhicule. SI VOUS NE COMPRENEZ PAS UNE PARTIE DE CE MANUEL
D'INSTALLATION OU SI VOUS AVEZ BESOIN D'EXPLICATIONS CONCERNANT
UNE INSTRUCTION, N'ESSAYEZ PAS D'INSTALLER CE PRODUIT SANS
DEMANDER DE L'AIDE À SW-MOTECH !
PRÉPARATION : Veuillez lire attentivement les instructions de montage et
assurez-vous que tous les éléments de la liste de pièces sont présents.
PRUDENCE :veillez à ce que votre véhicule soit bien stable. Éteignez le
moteur et retirez la clé de contact. Laissez refroidir le
moteur/l'échappement si nécessaire. Débranchez la batterie lorsque vous
travaillez sur le système électrique. Utilisez uniquement des outils
appropriés et portez toujours des lunettes de protection et des gants
pendant le montage et l'entretien. Faites-vous aider par une deuxième
personne lors du montage et de l'entretien.
MONTAGE : Toutes les pièces et connexions retirées du véhicule doivent
être réinstallées conformément aux instructions du fabricant du véhicule ou
remplacées par des pièces et du matériel fournis par SW-MOTECH.
ATTENTION Sauf indication contraire, sécurisez tous les filetages avec
du frein filet liquide de force moyenne.
DANGER : Les couples de serrage non définis par SW-MOTECH doivent
être obtenus auprès du constructeur du véhicule ou d'un atelier de
réparation de motos certifié.
CONTRÔLE DU FONCTIONNEMENT :Après le montage, assurez-vous
qu'aucune pièce mobile n'est bloquée et que le fonctionnement du véhicule
n'est pas perturbé. Les câbles et les tuyaux ne doivent pas frotter et/ou être
coincés.
ATTENTION : Effectuez un contrôle de fonctionnement complet avant
de commencer à rouler. Après les 50 premiers kilomètres, puis
régulièrement, vérifiez le couple de serrage de tous les raccords et la
bonne fixation du produit. Les accessoires montés peuvent modifier le
comportement sur la route et la stabilité du véhicule.
INSTRUCTIONS DE MONTAGE · LIRE ET CONSERVER LES INSTRUCTIONS DE MONTAGE!
SW-MOTECH GmbH & Co. KG
Ernteweg 7-10
35282 Rauschenberg
Allemagne
www.sw-motech.com
La traduction du contenu est automatisée.
© SW-MOTECH GmbH & Co. KG
Sous réserve d'erreurs et de modifications
Sous réserve de modifications techniques et de design.
1

Vous trouverez les symboles et leur signification
dans la section MONTAGE. Si le terme OEM apparaît
dans la section MONTAGE, il faut respecter et
appliquer les consignes du fabricant du véhicule.
Si vous avez des questions, notre service clientèle ainsi
que nos distributeurs se tiennent à votre disposition. Vous
trouverez notre numéro de téléphone ainsi que la liste de
nos distributeurs sur notre boutique en ligne :
www.sw-motech.com
Utilisez du frein filet : Indique qu'un filetage doit être
enduit de frein filet liquide. H (HIGH) : haute
résistance ; M (MEDIUM) : force moyenne ; L (LOW) :
faible résistance.
Serrer en respectant les instructions de couple de
serrage : indique le couple de serrage d'une pièce
prescrit par SW-MOTECH ou par le fabricant du véhicule
(OEM).
Ne pas utiliser de frein filet : signifie que l'utilisation
d'un frein filet liquide n'est pas nécessaire à ce
stade.
APERçU DES LéGENDES · LIRE ET CONSERVER LES INSTRUCTIONS DE MONTAGE!
La traduction du contenu est automatisée.
© SW-MOTECH GmbH & Co. KG
Sous réserve d'erreurs et de modifications
Sous réserve de modifications techniques et de design.
2

LISTE DES PIèCES · LIRE ET CONSERVER LES INSTRUCTIONS DE MONTAGE!
La traduction du contenu est automatisée.
© SW-MOTECH GmbH & Co. KG
Sous réserve d'erreurs et de modifications
Sous réserve de modifications techniques et de design.
3
21
KFT.22.822.001.11
2/2
2
M8 x 40; DIN 912
SC.ST.08.040.48.912.109
4/4
3
KFT.05.440.007.11
4/4
4
M8 x 35; DIN 6912
SC.ST.08.035.02.6912.088
4/4
5
ø 8,4; DIN 125
US.ST.084.02.125
4/4
6
Ø 20 / Ø 8,4 / h 14,5
DB.ST.0200.0084.0145.02
4/4
37
KFT.06.525.005.11
1/1
8
M6 x 25; ISO 7380
SC.ST.06.025.02.7380.109
3/3
9
Ø 20 / Ø 6,4 / h 5
DB.ST.0200.0064.0050.02
1/1
10
M6; DIN 6927
MU.ST.06.02.6927.08
3/3
411
KFT.22.995.971.01.11
1/1
12
KFT.22.995.972.01.11
1/1
13
KFT.00.152.SV.8
1/1

1
AVERTISSEMENT : portez toujours des lunettes et des gants de protection
!
AVERTISSEMENT : utilisez toujours des outils adaptés !
Retirez les vis indiquées des deux côtés du véhicule, et démontez les repose-
pieds passager.
PHASE DE MONTAGE · LIRE ET CONSERVER LES INSTRUCTIONS DE MONTAGE!
La traduction du contenu est automatisée.
© SW-MOTECH GmbH & Co. KG
Sous réserve d'erreurs et de modifications
Sous réserve de modifications techniques et de design.
4

2
1×2
2×4
M 23 Nm
3×4
4×4
M 23 Nm
5×4
6×4
Vissez les plaques de montage (1) aux repose-pieds passager des deux côtés
du véhicule.
AVERTISSEMENT : Utilisez du frein filet liquide !
Ne serrez pas encore les vis (2).
Vissez les plaques de montage (3) des deux côtés de l'arrière du véhicule.
AVERTISSEMENT : Utilisez du frein filet liquide !
Ne serrez pas encore les vis (4).
Remarque : Pour monter le support latéral au le porte-bagages SW-
MOTECH,utiliser les entretoises de porte-bagages (*) comme indiqué sur le
schéma détaillé.
PHASE DE MONTAGE · LIRE ET CONSERVER LES INSTRUCTIONS DE MONTAGE!
La traduction du contenu est automatisée.
© SW-MOTECH GmbH & Co. KG
Sous réserve d'erreurs et de modifications
Sous réserve de modifications techniques et de design.
5

3
7×1
8×3
9,6 Nm
9×1
10 ×3
Vissez le connecteur transversal (7) à votre plaque d'immatriculation sur le
support de plaque d'immatriculation.
Ne serrez pas encore les vis.
PHASE DE MONTAGE · LIRE ET CONSERVER LES INSTRUCTIONS DE MONTAGE!
La traduction du contenu est automatisée.
© SW-MOTECH GmbH & Co. KG
Sous réserve d'erreurs et de modifications
Sous réserve de modifications techniques et de design.
6

4
11 ×1
12 ×1
13 ×1
Raccordez les supports latéraux (11) et (12) aux plaques de montage (1) et (3)
et au connecteur transversal (7) à l'aide des verrouillages rapides (13).
Fixez les verrouillages rapides avec les rondelles de sécurité.
Lorsque tous les composants sont hors tension, serrez les vis comme
indiqué.
ATTENTION : le kit antivol est vendu séparément.
PHASE DE MONTAGE · LIRE ET CONSERVER LES INSTRUCTIONS DE MONTAGE!
La traduction du contenu est automatisée.
© SW-MOTECH GmbH & Co. KG
Sous réserve d'erreurs et de modifications
Sous réserve de modifications techniques et de design.
7

REMARQUES SPÉCIFIQUES AU PRODUIT
DANGER : la charge maximale indiquée comprend le poids de la valise /
du bagage et du kit d'adaptation. La charge maximale du véhicule indiquée
par le constructeur du véhicule s'applique !
12,5 kg ( 27,5 livres) 130 km/h ( 80mph)
REMARQUE : les supports latéraux sont conçus exclusivement pour l'utilisation
du kit d'adaptation SW-MOTECH.
REMARQUE :démontez les supports latéraux lorsque vous conduisez sans
bagagerie. Utilisez toujours les supports latéraux par paires.
ATTENTION : assurez-vous que les sacoches ne se trouvent PAS dans le
flux de gaz d'échappement après les avoir montées sur le véhicule ! Risque
de brûlures !
REMARQUE : Respectez toutes les réglementations spécifiques à chaque pays
pour l’immatriculation et l'utilisation de votre véhicule ainsi que les
réglementations TÜV applicables. Après le montage, faites ajouter les pièces
soumises à enregistrement dans les documents du véhicule par votre centre de
contrôle.
INFORMATIONS SUR LES PRODUITS · LIRE ET CONSERVER LES INSTRUCTIONS DE MONTAGE!
La traduction du contenu est automatisée.
© SW-MOTECH GmbH & Co. KG
Sous réserve d'erreurs et de modifications
Sous réserve de modifications techniques et de design.
8

Numero di articolo: KFT.22.995.30001/B Revisione: 00 · Data: 11 - 2022
Telaio laterale PRO
~ 1 h. FACILE DIFFICILE
ITALIANO ·Grazie per aver scelto questo prodotto premium di SW-MOTECH.
Visita il nostro negozio online per ulteriori informazioni (ad es. per la
compatibilità con i vari modelli). I documenti richiesti (ad es. certificato di
omologazione nazionale) possono essere scaricati qui.
Si prega di leggere attentamente le avvertenze di sicurezza e le istruzioni
per il montaggio prima di montare e utilizzare il prodotto, al fine di evitare
eventuali lesioni e danni. Conserva queste istruzioni per il montaggio come
riferimento futuro.
Questo prodotto è stato sviluppato per veicoli in condizioni di fabbrica. La
compatibilità con gli accessori originali o di altri produttori non può essere
garantita.
Queste istruzioni per il montaggio sono state redatte in base alle nostre
conoscenze attuali. Non sussistono pretese di correttezza giuridiche. Salvo
errori ed omissioni. Ci riserviamo il diritto di apportare modifiche tecniche e
di design. Copyright SW-MOTECH.
SIMBOLO DI SICUREZZA
Questo simbolo di avvertenza è usato nelle presenti istruzioni di
montaggio per segnalare pericoli mortali, rischio di lesioni o altri pericoli.
Le parole "PERICOLO", "AVVERTENZA" O "ATTENZIONE" sono utilizzate con
questo simbolo di avvertenza per trasmettere importanti istruzioni di
sicurezza e informazioni relative al montaggio e all'uso di questo prodotto.
Queste parole, utilizzate insieme al simbolo di avvertenza, significano:
PERICOLO: indica una situazione di pericolo che, se non evitata, può
causare morte o lesioni gravi!
AVVERTENZA: indica una situazione di pericolo che, se non evitata, può
causare morte o lesioni gravi!
ATTENZIONE: indica una situazione di pericolo che, se non evitata, può
provocare lesioni lievi o di entità moderata!
AVVISO: indica informazioni importanti che non riguardano il rischio di
morte o di lesioni (riguardano unicamente il rischio di danni materiali)!
INFORMAZIONI GENERALI
AVVERTENZA: il montaggio e/o la manutenzione di questo prodotto
richiedono competenze tecniche avanzate, strumenti adeguati e una buona
conoscenza dell'uso della strumentazione e delle indicazioni relative alle
coppie di serraggio. Per ragioni di sicurezza, SW-MOTECH raccomanda di
far eseguire il montaggio e/o la manutenzione presso un'officina per
motociclette qualificata e certificata.
AVVERTENZA: se si decide di installare questo prodotto in autonomia,
leggere attentamente le istruzioni per il montaggio prima del montaggio e
dell'uso e seguire tutte le avvertenze per evitare lesioni gravi o mortali.
Durante il montaggio e l'uso, seguire anche tutte le istruzioni pertinenti
contenute nel manuale del veicolo. SE NON SI COMPRENDONO TALI
ISTRUZIONI, ANCHE SOLO IN PARTE, O SE SONO NECESSARI CHIARIMENTI,
NON CERCARE DI MONTARE IL PRODOTTO IN AUTONOMIA SENZA CHIEDERE
IL SUPPORTO DI SW-MOTECH!
PREPARAZIONE: leggere attentamente le istruzioni per il montaggio e
assicurarsi che siano disponibili tutti i componenti contenuti nella lista.
ATTENZIONE: assicurarsi che il veicolo sia perfettamente fermo.
Spegnere il motore e togliere la chiave. Se necessario, lasciar raffreddare
il motore/lo scarico. Scollegare la batteria quando si interviene
sull'impianto elettrico. Usare esclusivamente strumenti idonei e indossare
sempre occhiali e guanti protettivi durante le operazioni di montaggio e
manutenzione. Chiedere aiuto a una seconda persona durante le fasi di
montaggio e manutenzione.
MONTAGGIO: tutti i componenti e i collegamenti rimossi dal veicolo devono
essere reinstallati secondo le specifiche del produttore del veicolo o
sostituiti con componenti e attrezzatura forniti da SW-MOTECH.
AVVERTENZA: fissare tutte le filettature con frenafiletti liquido a
media resistenza, se non diversamente specificato.
PERICOLO: le coppie di serraggio non definite da SW-MOTECH devono
essere richieste al costruttore del veicolo o a un'officina certificata.
CONTROLLO DI FUNZIONALITÀ: dopo il montaggio accertarsi che non vi
siano parti mobili bloccate e che il funzionamento del veicolo non sia
compromesso. I cavi e i tubi flessibili non devono sfregare e/o essere
schiacciati.
AVVERTENZA: eseguire un controllo completo delle funzioni prima di
mettersi alla guida. Controllare la coppia di serraggio di tutti i
collegamenti e la tenuta del prodotto dopo i primi 50 km e in seguito
regolarmente. Gli accessori montati possono modificare la
maneggevolezza e la stabilità del veicolo.
ISTRUZIONI PER IL MONTAGGIO · LEGGI E CONSERVA LE ISTRUZIONI DI MONTAGGIO!
SW-MOTECH GmbH & Co. KG
Ernteweg 7-10
35282 Rauschenberg
Germania
www.sw-motech.com
La traduzione dei contenuti è automatizzata.
© SW-MOTECH GmbH & Co. KG
Salvo errori e omissioni.
Soggetto a modifiche tecniche e di design.
1

Consultare i simboli e il loro significato nella sezione
MONTAGGIO. Se nella sezione montaggio compare la
sigla OEM, è necessario rispettare e applicare le
specifiche del produttore del veicolo.
Per qualsiasi domanda, non esitare a contattare il nostro
servizio clienti o i nostri distributori. Il nostro numero di
telefono e l'elenco dei nostri distributori sono disponibili
nel nostro negozio online:
www.sw-motech.com
Usare un frenafiletti: indica che la filettatura deve
essere rivestita con un frenafiletti liquido. H (ALTA):
alta resistenza; M (MEDIA): media resistenza; L
(BASSO): bassa resistenza.
Serraggio / rispetto delle specifiche sulla coppia di
serraggio: indica la coppia di serraggio di un componente
specificata da SW-MOTECH o dal produttore del veicolo
(OEM).
Non utilizzare il frenafiletti: segnala di non dover
utilizzare il frenafiletti liquido in quel determinato
punto.
LEGENDA · LEGGI E CONSERVA LE ISTRUZIONI DI MONTAGGIO!
La traduzione dei contenuti è automatizzata.
© SW-MOTECH GmbH & Co. KG
Salvo errori e omissioni.
Soggetto a modifiche tecniche e di design.
2

ELENCO DELLE PARTI · LEGGI E CONSERVA LE ISTRUZIONI DI MONTAGGIO!
La traduzione dei contenuti è automatizzata.
© SW-MOTECH GmbH & Co. KG
Salvo errori e omissioni.
Soggetto a modifiche tecniche e di design.
3
21
KFT.22.822.001.11
2/2
2
M8 x 40; DIN 912
SC.ST.08.040.48.912.109
4/4
3
KFT.05.440.007.11
4/4
4
M8 x 35; DIN 6912
SC.ST.08.035.02.6912.088
4/4
5
ø 8,4; DIN 125
US.ST.084.02.125
4/4
6
Ø 20 / Ø 8,4 / h 14,5
DB.ST.0200.0084.0145.02
4/4
37
KFT.06.525.005.11
1/1
8
M6 x 25; ISO 7380
SC.ST.06.025.02.7380.109
3/3
9
Ø 20 / Ø 6,4 / h 5
DB.ST.0200.0064.0050.02
1/1
10
M6; DIN 6927
MU.ST.06.02.6927.08
3/3
411
KFT.22.995.971.01.11
1/1
12
KFT.22.995.972.01.11
1/1
13
KFT.00.152.SV.8
1/1

1
AVVERTENZA: indossare sempre le protezioni per gli occhi e per le mani!
AVVERTENZA: utilizzare sempre strumenti adeguati!
Rimuovere le viti indicate da entrambi i lati del veicolo e smontare le pedane
passeggero.
FASE DI MONTAGGIO · LEGGI E CONSERVA LE ISTRUZIONI DI MONTAGGIO!
La traduzione dei contenuti è automatizzata.
© SW-MOTECH GmbH & Co. KG
Salvo errori e omissioni.
Soggetto a modifiche tecniche e di design.
4

2
1×2
2×4
M 23 Nm
3×4
4×4
M 23 Nm
5×4
6×4
Avvitare le staffe di montaggio (1) alle pedane passeggero su entrambi i lati
del veicolo.
AVVERTENZA: usare un frenafiletti liquido!
Non serrare ancora le viti (2).
Avvitare le staffe di montaggio (3) alla parte posteriore del veicolo su
entrambi i lati.
AVVERTENZA: usare un frenafiletti liquido!
Non serrare ancora le viti (4).
Avviso: per montare il telaio laterale insieme al portabagagli SW-
MOTECH,utilizzare i distanziali del portapacchi (*) come indicato nel disegno
dettagliato.
FASE DI MONTAGGIO · LEGGI E CONSERVA LE ISTRUZIONI DI MONTAGGIO!
La traduzione dei contenuti è automatizzata.
© SW-MOTECH GmbH & Co. KG
Salvo errori e omissioni.
Soggetto a modifiche tecniche e di design.
5

3
7×1
8×3
9,6 Nm
9×1
10 ×3
Avvitare il connettore a croce (7) alla targa sul portatarga.
Non serrare ancora le viti.
FASE DI MONTAGGIO · LEGGI E CONSERVA LE ISTRUZIONI DI MONTAGGIO!
La traduzione dei contenuti è automatizzata.
© SW-MOTECH GmbH & Co. KG
Salvo errori e omissioni.
Soggetto a modifiche tecniche e di design.
6

4
11 ×1
12 ×1
13 ×1
Collegare i telai laterali (11) e (12) con le chiusure rapide (13) sulle staffe di
montaggio (1) e (3) e sul connettore a croce (7).
Fissare le chiusure rapide con le rondelle di sicurezza.
Quando tutti i componenti sono posizionati senza tensione, serrare le viti
come indicato.
AVVERTENZA: antifurto disponibile separatamente.
FASE DI MONTAGGIO · LEGGI E CONSERVA LE ISTRUZIONI DI MONTAGGIO!
La traduzione dei contenuti è automatizzata.
© SW-MOTECH GmbH & Co. KG
Salvo errori e omissioni.
Soggetto a modifiche tecniche e di design.
7

AVVERTENZE SPECIFICHE DEL PRODOTTO
PERICOLO: il carico massimo specificato comprende il peso del bagaglio e
del kit adattatore! Si applica il carico massimo del veicolo specificato dal
costruttore del veicolo!
12,5 kg( 27,5 lbs) 130 km/h ( 80 mph)
AVVISO: i telai laterali sono stati progettati esclusivamente per l'uso con i kit
adattatori SW-MOTECH.
AVVISO: smontare i telai laterali quando si viaggia senza bagagli. Utilizzare
sempre i telai laterali in coppia.
AVVERTENZA: assicurarsi che le borse laterali NON siano investite dal
flusso dei gas di scarico una volta montate sul veicolo! Rischio di ustioni!
AVVISO: osservare le normative specifiche del paese per l'immatricolazione e
l'utilizzo del veicolo, nonché le norme TÜV applicabili. Dopo l'assemblaggio, far
inserire le parti soggette a omologazione nei documenti del veicolo dal proprio
centro di test.
INFORMAZIONI SUI PRODOTTI · LEGGI E CONSERVA LE ISTRUZIONI DI MONTAGGIO!
La traduzione dei contenuti è automatizzata.
© SW-MOTECH GmbH & Co. KG
Salvo errori e omissioni.
Soggetto a modifiche tecniche e di design.
8

Art.-Nr.: KFT.22.995.80000/B Revision: 00 · Datum: 09 - 2023
Zusatz-Kit US-Modell
~ 0.5 h. LEICHT SCHWER
DEUTSCH · Vielen Dank, dass Sie sich für dieses Premium-Produkt von SW-
MOTECH entschieden haben. Besuchen Sie unseren Webshop für weitere
Informationen (z. B. Modellzuweisungen). Erforderliche Dokumente (z. B.
ABE) stehen Ihnen dort als Download zur Verfügung.
Bitte lesen und verstehen Sie alle Anweisungen, Sicherheitshinweise und
Warnungen in dieser Anbauanleitung vor Montage und Nutzung des
Produkts, um Verletzungen und Schäden zu vermeiden. Bewahren Sie diese
Anbauanleitung als Referenz auf.
Dieses Produkt wurde für Fahrzeuge im Werkszustand entwickelt. Die
Kompatibilität mit Original-Zubehörteilen bzw. den Zubehörteilen anderer
Hersteller kann nicht gewährleistet werden.
Diese Anbauanleitung ist nach unserem derzeitigen Kenntnisstand verfasst
worden. Rechtliche Ansprüche auf Richtigkeit bestehen nicht. Fehler und
Irrtümer vorbehalten. Technische und gestalterische Änderungen sind
vorbehalten. Das Urheberrecht liegt bei SW-MOTECH.
SICHERHEITSWARNUNGSSYMBOL
Dieses Warnsymbol wird in dieser Anbauanleitung verwendet, um vor
tödlichen Gefahren, Verletzungen oder anderen Gefahren zu warnen. Die
Wörter GEFAHR, WARNUNG oder VORSICHT werden mit diesem
Warnsymbol verwendet, um wichtige Sicherheitshinweise und
Informationen in Bezug auf die Montage und Nutzung dieses Produkts zu
übermitteln. Diese Wörter zusammen mit dem Sicherheitswarnsymbol
bedeuten:
GEFAHR: Weist auf eine gefährliche Situation hin, die zum Tod oder zu
schweren Verletzungen führt, wenn sie nicht vermieden wird!
WARNUNG: Weist auf eine gefährliche Situation hin, die zum Tod oder zu
schweren Verletzungen führen kann, wenn sie nicht vermieden wird!
VORSICHT: Weist auf eine gefährliche Situation hin, die zu leichten oder
mittelschweren Verletzungen führen kann, wenn sie nicht vermieden wird!
HINWEIS: Wichtige Informationen, jedoch nicht in Bezug auf Todes- oder
Verletzungsgefahr (nur Sachschäden)!
ALLGEMEINE HINWEISE
WARNUNG: Die Montage und/oder Wartung dieses Produkts erfordert
fortgeschrittene technische Fähigkeiten, geeignetes Werkzeug und ein
gutes Verständnis der Werkzeugnutzung und Drehmomentangaben. Zu
Ihrer eigenen Sicherheit empfiehlt SW-MOTECH, die Montage und/oder
Wartung von einer qualifizierten und zertifizierten Zweiradwerkstatt
durchführen zu lassen.
WARNUNG: Wenn Sie sich für die Eigenmontage dieses Produkts
entscheiden, lesen Sie vor Montage und Nutzung die Anbauanleitung
sorgfältig und vollständig durch und befolgen Sie alle Anweisungen, um
schwere oder tödliche Verletzungen zu vermeiden. Beachten Sie bei der
Montage und Verwendung auch alle relevanten Informationen im
Fahrzeughandbuch. WENN SIE EINEN TEIL DIESER ANBAUANLEITUNG
NICHT VERSTEHEN ODER EINE ERKLÄRUNG EINER ANWEISUNG
BENÖTIGEN, VERSUCHEN SIE NICHT DIESES PRODUKT ZU MONTIERN,
OHNE SW-MOTECH UM HILFE ZU FRAGEN!
VORBEREITUNG: Lesen Sie die Anbauanleitung aufmerksam und stellen Sie
sicher, dass alle Teile der Stückliste vorhanden sind.
VORSICHT: Achten Sie auf den sicheren Stand Ihres Fahrzeugs.
Schalten Sie den Motor ab und ziehen Sie den Zündschlüssel. Lassen Sie
den Motor/Auspuff bei Bedarf abkühlen. Klemmen Sie die Batterie bei
Arbeiten an der Elektrik ab. Verwenden Sie nur geeignetes Werkzeug und
tragen Sie während der Montage und Wartung immer eine Schutzbrille
und Handschuhe. Lassen Sie sich bei der Montage und Wartung von einer
zweiten Person helfen.
MONTAGE: Alle vom Fahrzeug entfernten Teile und Verbindungen müssen
gemäß den Angaben des Fahrzeugherstellers wieder eingebaut oder durch
von SW-MOTECH gelieferte Teile und Hardware ersetzt werden.
WARNUNG: Sichern Sie alle Gewinde, sofern nicht anders angegeben,
mit mittelstarker, flüssiger Schraubensicherung.
GEFAHR: Von SW-MOTECH nicht definierte Anzugsdrehmomente
müssen Sie vom Fahrzeughersteller oder von einer zertifizierten
Motorradwerkstatt beziehen.
FUNKTIONSKONTROLLE: Stellen Sie nach der Montage sicher, dass keine
beweglichen Teile blockiert sind und die Funktion des Fahrzeugs nicht
gestört wird. Kabel und Schläuche dürfen nicht scheuern und/oder
geklemmt werden.
WARNUNG: Führen Sie vor Fahrtbeginn eine umfassende
Funktionskontrolle durch. Prüfen Sie nach den ersten 50 km und dann
regelmäßig das Anzugsmoment aller Verbindungen und den festen Sitz
des Produkts. Montiertes Zubehör kann das Fahrverhalten und die
Stabilität des Fahrzeugs verändern.
ANBAUANLEITUNG · ANBAUANLEITUNG LESEN UND AUFBEWAHREN!
SW-MOTECH GmbH & Co. KG
Ernteweg 7-10
35282 Rauschenberg
Deutschland
www.sw-motech.com
Die inhaltliche Übersetzung erfolgt automatisiert.
© SW-MOTECH GmbH & Co. KG
Irrtümer und Änderungen vorbehalten.
Technische und Design-Änderungen vorbehalten.
1

Beachten Sie in dem Abschnitt MONTAGE
vorkommenden Symbole und deren Bedeutung.
Wenn im Abschnitt MONTAGE die Bezeichnung OEM
vorkommt, müssten die Vorgaben des
Fahrzeugherstellers beachtet und angewandt
werden.
Bei Fragen steht Ihnen unser Kundendienst sowie unsere
Distributoren gerne zur Verfügung. Unsere
Telefonnummer sowie eine Liste unserer Distributoren
finden Sie in unserem Webshop:
www.sw-motech.com
Schraubensicherung verwenden: Weist darauf hin,
dass ein Gewinde mit flüssiger Schraubensicherung
bestrichen werden muss. H (HIGH): hohe Festigkeit;
M (MEDIUM): mittlere Festigkeit; L (LOW): niedrige
Festigkeit.
Anziehen / Anzugsmomentangabe beachten: Weist auf
das von SW-MOTECH bzw. vom Fahrzeughersteller (OEM)
vorgegeben Anzugsmoment eines Teils hin.
Keine Schraubensicherung verwenden: Weist
darauf hin, dass an der Stelle keine flüssige
Schraubensicherung notwendig ist.
LEGENDENüBERSICHT · ANBAUANLEITUNG LESEN UND AUFBEWAHREN!
Die inhaltliche Übersetzung erfolgt automatisiert.
© SW-MOTECH GmbH & Co. KG
Irrtümer und Änderungen vorbehalten.
Technische und Design-Änderungen vorbehalten.
2

STüCKLISTE · ANBAUANLEITUNG LESEN UND AUFBEWAHREN!
Die inhaltliche Übersetzung erfolgt automatisiert.
© SW-MOTECH GmbH & Co. KG
Irrtümer und Änderungen vorbehalten.
Technische und Design-Änderungen vorbehalten.
3
21
KFT.22.995.001.11
1/1
2
M6 x 20; DIN 7991
SC.ST.06.020.02.7991.088
2/2
3
Ø 16 / ø 6,4 / h 6
DB.00.160.064.006.01
3/4
34
M6 x 30; ISO 7380
SC.ST.06.030.02.7380.109
1/1
55
M6 x 30; DIN 912
SC.ST.06.030.01.912.088
2/2
6
M6 x 16; DIN 912
SC.ST.06.016.01.912.088
2/2
7
ø 6,4; DIN 125
US.ST.064.01.125
8/8
8
Ø 16 / ø 6,4 / h 6
DB.00.160.064.006.01
1/4
9
M6; DIN 985
MU.ST.06.01.985.08
4/4

1
WARNUNG: Tragen Sie immer Augen- und Handschutz!
WARNUNG: Verwenden Sie immer geeignetes Werkzeug!
Lösen Sie die drei Schrauben und entfernen Sie den Nummernschildhalter
vom Fahrzeug.
ANBAUSCHRITT · ANBAUANLEITUNG LESEN UND AUFBEWAHREN!
Die inhaltliche Übersetzung erfolgt automatisiert.
© SW-MOTECH GmbH & Co. KG
Irrtümer und Änderungen vorbehalten.
Technische und Design-Änderungen vorbehalten.
4

2
1×1
2×2
M OEM
3×3
Verschrauben Sie das Adapterblech (1) am Fahrzeug.
WARNUNG: Verwenden Sie flüssige Schraubensicherung!
Ziehen Sie die Schrauben (2) nach Herstellerangaben an.
ANBAUSCHRITT · ANBAUANLEITUNG LESEN UND AUFBEWAHREN!
Die inhaltliche Übersetzung erfolgt automatisiert.
© SW-MOTECH GmbH & Co. KG
Irrtümer und Änderungen vorbehalten.
Technische und Design-Änderungen vorbehalten.
5

3
4×1
OEM
Verschrauben Sie den original Kennzeichenhalter (Orig.) mit der Schraube (4)
locker am Fahrzeug.
Ziehen Sie die Schraube (4) noch nicht an.
ANBAUSCHRITT · ANBAUANLEITUNG LESEN UND AUFBEWAHREN!
Die inhaltliche Übersetzung erfolgt automatisiert.
© SW-MOTECH GmbH & Co. KG
Irrtümer und Änderungen vorbehalten.
Technische und Design-Änderungen vorbehalten.
6

4
Markieren Sie mit einem geeigneten Werkzeug die beiden Bohrpunkte auf der
Rückseite des Kennzeichenhalters (Orig.).
Lösen Sie anschließend die Schraube (4) und entfernen Sie den
Kennzeichenhalter vom Fahrzeug.
WARNUNG: Verletzungsgefahr!
Bohren Sie an den beiden Markierungen zwei 6,5-mm-Bohrungen durch den
Nummernschildhalter. Entgraten Sie anschließend die Bohrränder.
ANBAUSCHRITT · ANBAUANLEITUNG LESEN UND AUFBEWAHREN!
Die inhaltliche Übersetzung erfolgt automatisiert.
© SW-MOTECH GmbH & Co. KG
Irrtümer und Änderungen vorbehalten.
Technische und Design-Änderungen vorbehalten.
7

5
5×2
9 Nm
6×2
7 Nm
7×8
8×1
9×4
Verschrauben Sie das Nummernschild, den Kennzeichenhalter und den dem
SW-MOTECH Seitenträger beiliegenden Querverbinder (*) mit den gezeigten
Teilen am Adapterblech (1).
WARNUNG: Verwenden Sie flüssige Schraubensicherung (nur Schraube
(4))!
Ziehen Sie die Schraube (4) nach Herstellerangaben an.
Ziehen Sie die Schrauben (5) und (6) wie in der Anbauanleitung vorgegeben
an.
ANBAUSCHRITT · ANBAUANLEITUNG LESEN UND AUFBEWAHREN!
Die inhaltliche Übersetzung erfolgt automatisiert.
© SW-MOTECH GmbH & Co. KG
Irrtümer und Änderungen vorbehalten.
Technische und Design-Änderungen vorbehalten.
8

PRODUKTSPEZIFISCHE HINWEISE
HINWEIS: Beachten Sie die landesspezifischen Vorschriften für
Zulassung/Betrieb Ihres Fahrzeugs bzw. anwendbare TÜV-Vorschriften. Lassen
Sie eintragungspflichtige Teile nach Montage durch Ihre Prüfstelle in die
Fahrzeugpapiere eintragen.
PRODUKTHINWEISE · ANBAUANLEITUNG LESEN UND AUFBEWAHREN!
Die inhaltliche Übersetzung erfolgt automatisiert.
© SW-MOTECH GmbH & Co. KG
Irrtümer und Änderungen vorbehalten.
Technische und Design-Änderungen vorbehalten.
9

Item number: KFT.22.995.80000/B Revision: 00 · Date: 09 - 2023
Additional kit US model
~ 0.5 h. EASY DIFFICULT
ENGLISH ·Thank you for choosing this premium product from SW-MOTECH.
Visit our online shop for more information (e.g. model assignments). Required
documents (e.g. national type approval) are available there for you to
download.
Please read and understand all the instructions, safety information and
warnings in these mounting instructions before mounting and using the
product in order to avoid injury and damage. Keep these mounting
instructions for reference.
This product was developed for vehicles in factory condition. Compatibility
with original accessories or accessories from other manufacturers cannot
be guaranteed.
These mounting instructions have been prepared to the best of our current
knowledge. No legal claims relating to accuracy can be made. Errors and
omissions excepted. We reserve the right to make technical and design
changes. The copyright is held by SW-MOTECH.
SAFETY WARNING SYMBOL
This warning symbol is used in these mounting instructions to warn of
deadly dangers, injuries or other hazards. The words DANGER, WARNING or
CAUTION are used as part of this warning symbol to convey important safety
messages and information relating to the installation and use of this
product. These words, together with the safety warning symbol, mean:
DANGER: Indicates a hazardous situation which, if not avoided, will result
in death or serious injury!
WARNING: Indicates a hazardous situation which, if not avoided, may
result in death or serious injury!
CAUTION: Indicates a hazardous situation which, if not avoided, may result
in minor or moderate injury!
NOTE: Important information, but not relating to a risk of death or injury
(property damage only)!
GENERAL INFORMATION
WARNING: Assembly and/or maintenance of this product requires
advanced technical skill, appropriate tools, and a good understanding of tool
usage and torque specifications. For your own safety, SW-MOTECH
recommends having the assembly and/or maintenance carried out by a
qualified and certified motorcycle workshop.
WARNING: If you do choose to assemble this product yourself, carefully
and fully read the mounting instructions before assembly and use, and
follow all instructions to avoid serious injury or death. Also observe all
relevant information in the vehicle manual when mounting or using the
product. IF YOU DO NOT UNDERSTAND ANY PART OF THESE MOUNTING
INSTRUCTIONS OR NEED AN EXPLANATION AS TO A SPECIFIC
INSTRUCTION, DO NOT ATTEMPT TO INSTALL THIS PRODUCT WITHOUT
CONSULTING SW-MOTECH FOR ASSISTANCE!
PREPARATION: Read the mounting instructions carefully and make sure
that all parts on the parts list are available.
CAUTION: Ensure that your vehicle is standing securely. Switch off the
engine and remove the ignition key. Allow the engine/exhaust to cool
down if necessary. Disconnect the battery when working on the electrical
system. Only use proper tools and always wear safety goggles and gloves
during assembly and maintenance. Have a second person help you with
assembly and maintenance.
ASSEMBLY: All parts and connections removed from the vehicle must be
reinstalled according to the vehicle manufacturer's specifications or
replaced with parts and hardware supplied by SW-MOTECH.
WARNING: Secure all threads with a medium-strength liquid
threadlocker, unless otherwise specified.
DANGER: Tightening torques not defined by SW-MOTECH must be
obtained from the vehicle manufacturer or a certified motorbike
workshop.
FUNCTIONAL CHECK:After mounting the product, ensure that no moving
parts are obstructed and that the function of the vehicle is not impeded.
Cables and hoses must not rub against each other and/or be hindered in any
way.
WARNING: Carry out a comprehensive functionality check before you
start to drive. Check the tightening torque of all connections and the tight
fit of the product after the first 50 km and then at regular intervals.
Mounted accessories can change the handling and stability of the vehicle.
MOUNTING INSTRUCTIONS · READ AND KEEP MOUNTING INSTRUCTIONS!
SW-MOTECH GmbH & Co. KG
Ernteweg 7-10
35282 Rauschenberg
Germany
www.sw-motech.com
The content translation is automated.
© SW-MOTECH GmbH & Co. KG
Errors and omissions excepted
Subject to technical and design changes.
1

Take note of the symbols and what they mean in the
ASSEMBLY section. If the term OEM appears in the
ASSEMBLY section, the vehicle manufacturer's
specifications must be observed and applied.
If you have any questions, please don't hesitate to contact
our Customer Service team or our distributors. You can
find our telephone number and a list of our distributors in
our online shop:
www.sw-motech.com
Use thread locker: Indicates that a thread must be
coated with liquid thread locker. H (HIGH): high
strength; M (MEDIUM): medium strength; L (LOW):
low strength.
Tighten/note the tightening torque information:
Indicates the tightening torque of a part specified by SW-
MOTECH or the vehicle manufacturer (OEM).
Do not use thread lock: Indicates that no liquid
thread lock should be used at this point.
LEGEND OVERVIEW · READ AND KEEP MOUNTING INSTRUCTIONS!
The content translation is automated.
© SW-MOTECH GmbH & Co. KG
Errors and omissions excepted
Subject to technical and design changes.
2

PARTS LIST · READ AND KEEP MOUNTING INSTRUCTIONS!
The content translation is automated.
© SW-MOTECH GmbH & Co. KG
Errors and omissions excepted
Subject to technical and design changes.
3
21
KFT.22.995.001.11
1/1
2
M6 x 20; DIN 7991
SC.ST.06.020.02.7991.088
2/2
3
Ø 16 / ø 6,4 / h 6
DB.00.160.064.006.01
3/4
34
M6 x 30; ISO 7380
SC.ST.06.030.02.7380.109
1/1
55
M6 x 30; DIN 912
SC.ST.06.030.01.912.088
2/2
6
M6 x 16; DIN 912
SC.ST.06.016.01.912.088
2/2
7
ø 6.4; DIN 125
US.ST.064.01.125
8/8
8
Ø 16 / ø 6,4 / h 6
DB.00.160.064.006.01
1/4
9
M6; DIN 985
MU.ST.06.01.985.08
4/4

1
WARNING: Always wear eye and hand protection!
WARNING: Always use the proper tools!
Unscrew the three screws and remove the license plate holder from the
vehicle.
MOUNTING STEP · READ AND KEEP MOUNTING INSTRUCTIONS!
The content translation is automated.
© SW-MOTECH GmbH & Co. KG
Errors and omissions excepted
Subject to technical and design changes.
4

2
1×1
2×2
M OEM
3×3
Screw the adapter plate (1) to the vehicle.
WARNING: Use a liquid threadlocker!
Tighten the screws (2) according to the manufacturer's instructions.
MOUNTING STEP · READ AND KEEP MOUNTING INSTRUCTIONS!
The content translation is automated.
© SW-MOTECH GmbH & Co. KG
Errors and omissions excepted
Subject to technical and design changes.
5

3
4×1
OEM
Screw the original license plate holder (Orig.) loosely onto the vehicle with the
screw (4).
Do not tighten the screw (4) yet.
MOUNTING STEP · READ AND KEEP MOUNTING INSTRUCTIONS!
The content translation is automated.
© SW-MOTECH GmbH & Co. KG
Errors and omissions excepted
Subject to technical and design changes.
6

4
Use a suitable tool to mark the two drilling points on the back of the license
plate holder (Orig.).
Then loosen the screw (4) and remove the license plate holder from the
vehicle.
WARNING: Risk of injury!
Drill two 1/4" holes through the license plate holder at the two marks. Then
deburr the bore edges.
MOUNTING STEP · READ AND KEEP MOUNTING INSTRUCTIONS!
The content translation is automated.
© SW-MOTECH GmbH & Co. KG
Errors and omissions excepted
Subject to technical and design changes.
7

5
5×2
9 Nm
6×2
7 Nm
7×8
8×1
9×4
Screw the license plate, the license plate holder and the crossbar (*) included
with the SW-MOTECH side carrier to the parts shown on the adapter plate (1).
WARNING: Use liquid thread locker (only screw (4))!
Tighten the screw (4) according to the manufacturer's instructions.
Tighten the screws (5) and (6) as specified in the mounting instructions.
MOUNTING STEP · READ AND KEEP MOUNTING INSTRUCTIONS!
The content translation is automated.
© SW-MOTECH GmbH & Co. KG
Errors and omissions excepted
Subject to technical and design changes.
8

PRODUCT-SPECIFIC NOTES
NOTE: Observe the country-specific regulations for the registration/operation of
your vehicle or applicable TÜV regulations. After assembly, have parts that are
subject to registration entered in the vehicle documents by your test centre.
PRODUCT INFORMATION · READ AND KEEP MOUNTING INSTRUCTIONS!
The content translation is automated.
© SW-MOTECH GmbH & Co. KG
Errors and omissions excepted
Subject to technical and design changes.
9

Número de artículo: KFT.22.995.80000/B Revisión: 00 · Fecha: 09 - 2023
Kit adicional, modelo de EE. UU.
~ 0.5 h. FÁCIL COMPLICADO
ESPAÑOL · Gracias por elegir este producto de primera calidad de SW-
MOTECH. Visite nuestra tienda online para obtener más información (p. ej.,
sobre el uso de los modelos). Desde esa página podrá descargar los
documentos que necesite (por ejemplo, la homologación nacional de tipo).
Para evitar lesiones y daños, asegúrese de leer y comprender todas las
instrucciones, advertencias de seguridad y precauciones de este manual
antes de montar y utilizar el producto. Guarde estas instrucciones de
montaje como referencia.
Este producto ha sido desarrollado para vehículos en condiciones de
fábrica. No se garantiza la compatibilidad con los accesorios originales o de
otros fabricantes.
Estas instrucciones de montaje se han redactado de acuerdo con nuestros
conocimientos actuales. No hay reclamaciones legales de corrección. Salvo
errores y omisiones. Nos reservamos el derecho a realizar cambios
técnicos y de diseño. Los derechos de autor pertenecen a SW-MOTECH.
SÍMBOLO DE ADVERTENCIA DE SEGURIDAD
Este símbolo de advertencia se utiliza en estas instrucciones de montaje
para advertir de peligros mortales, lesiones u otros riesgos. Las palabras
PELIGRO, ATENCIÓN o PRECAUCIÓN se utilizan con este símbolo de
advertencia para transmitir importantes avisos de seguridad e información
relacionada con el montaje y uso de este producto. Estas palabras, junto con
el símbolo de advertencia de seguridad, significan:
PELIGRO: Indica una situación de peligro que, si no se evita, provoca
lesiones graves o incluso la muerte.
ATENCIÓN: Indica una situación de peligro que, si no se evita, puede
provocar lesiones graves o incluso la muerte.
PRECAUCIÓN: Indica una situación de peligro que, si no se evita, puede
provocar lesiones leves o de gravedad media.
NOTA: Información importante, pero que no está relacionada con un
riesgo de lesiones o muerte (solo daños materiales).
INDICACIONES GENERALES
ATENCIÓN: El montaje y/o mantenimiento de este producto requiere
conocimientos técnicos avanzados, las herramientas apropiadas, un buen
manejo de dichas herramientas y conocer las especificaciones de los pares
de apriete. Por su propia seguridad, SW-MOTECH recomienda que el
montaje y/o el mantenimiento los realice un taller de motocicletas
cualificado y certificado.
ATENCIÓN: Si elige ensamblar este producto usted mismo, antes de
montarlo y usarlo, lea las instrucciones de montaje detenidamente y en su
totalidad, y siga todas las indicaciones para evitar lesiones graves o
mortales. Cuando monte y utilice el producto, tenga también en cuenta toda
la información relevante que figure en el manual del vehículo. SI NO
ENTIENDE ALGUNA PARTE DE ESTAS INSTRUCCIONES DE MONTAJE O
NECESITA ALGUNA ACLARACIÓN, NO INTENTE INSTALAR ESTE PRODUCTO
SIN CONSULTAR A SW-MOTECH PARA OBTENER AYUDA.
PREPARACIÓN: Lea atentamente las instrucciones de montaje y asegúrese
de que todas las piezas de la lista de piezas están presentes.
PRECAUCIÓN:Asegúrese de que su vehículo esté estacionado de
manera segura. Apague el motor y retire la llave de encendido. Deje que el
motor o el escape se enfríen si es necesario. Desconecte la batería cuando
trabaje en el sistema eléctrico. Utilice únicamente las herramientas
adecuadas y use siempre gafas de seguridad y guantes al realizar el
montaje y las tareas de mantenimiento. Pida a otra persona que le ayude
con el montaje y el mantenimiento.
MONTAJE: Todas las piezas y conexiones retiradas del vehículo deben ser
reinstaladas de acuerdo con las especificaciones del fabricante del vehículo
o sustituidas por piezas y herrajes suministrados por SW-MOTECH.
ATENCIÓN: Asegure todas las roscas con fijador de roscas líquido de
resistencia media, a menos que se especifique lo contrario.
PELIGRO: Los pares de apriete no definidos por SW-MOTECH deben
obtenerse del fabricante del vehículo o de un taller de motocicletas
certificado.
COMPROBACIÓN FUNCIONAL:Después del montaje, asegúrese de que no
haya piezas móviles bloqueadas y de que no se altere el funcionamiento del
vehículo. Los cables y tubos no deben rozarse ni quedar pinzados.
ATENCIÓN: Realice una comprobación exhaustiva del funcionamiento
antes de iniciar la marcha. Tras los primeros 50 km y, después, con
regularidad, compruebe el par de apriete de todas las conexiones y que el
producto está firmemente sujeto. Los accesorios instalados pueden
cambiar el comportamiento de conducción y la estabilidad del vehículo.
INSTRUCCIONES DE MONTAJE · LEE Y CONSERVA LAS INSTRUCCIONES DE MONTAJE!
SW-MOTECH GmbH & Co. KG
Ernteweg 7-10
35282 Rauschenberg
Alemania
www.sw-motech.com
La traducción del contenido es automática
© SW-MOTECH GmbH & Co. KG
Salvo errores y omisiones
Sujeto a cambios técnicos y de diseño.
1

Preste atención a los símbolos que figuran en la
sección de MONTAJE y su significado. Cuando, en la
sección de MONTAJE, aparecen las siglas OEM, se
deberán seguir y aplicar las especificaciones del
fabricante del vehículo.
Si tiene alguna pregunta, nuestro servicio de atención al
cliente y nuestros distribuidores estarán encantados de
prestarle ayuda. Encontrará nuestro número de teléfono
y una lista de nuestros distribuidores en nuestra tienda
online:
www.sw-motech.com
Usar fijador de roscas: Indica que una rosca debe
recubrirse con fijador de roscas líquido. H (HIGH):
resistencia alta; M (MEDIUM): resistencia media; L
(LOW): resistencia baja.
Respete la información del par de apriete: Indica el par
de apriete de una pieza especificada por SW-MOTECH o el
fabricante del vehículo (OEM).
No usar fijador de roscas: Indica que no es necesario
usar fijador de roscas líquido en este punto.
RESUMEN DE LA LEYENDA · LEE Y CONSERVA LAS INSTRUCCIONES DE MONTAJE!
La traducción del contenido es automática
© SW-MOTECH GmbH & Co. KG
Salvo errores y omisiones
Sujeto a cambios técnicos y de diseño.
2

LISTA DE PIEZAS · LEE Y CONSERVA LAS INSTRUCCIONES DE MONTAJE!
La traducción del contenido es automática
© SW-MOTECH GmbH & Co. KG
Salvo errores y omisiones
Sujeto a cambios técnicos y de diseño.
3
21
KFT.22.995.001.11
1/1
2
M6 x 20; DIN 7991
SC.ST.06.020.02.7991.088
2/2
3
Ø 16 / ø 6,4 / h 6
DB.00.160.064.006.01
3/4
34
M6 x 30; ISO 7380
SC.ST.06.030.02.7380.109
1/1
55
M6 x 30; DIN 912
SC.ST.06.030.01.912.088
2/2
6
M6 x 16; DIN 912
SC.ST.06.016.01.912.088
2/2
7
ø 6,4; DIN 125
US.ST.064.01.125
8/8
8
Ø 16 / ø 6,4 / h 6
DB.00.160.064.006.01
1/4
9
M6; DIN 985
MU.ST.06.01.985.08
4/4

1
ATENCIÓN: ¡Use siempre protección de ojos y manos!
ATENCIÓN: ¡Utilice siempre herramientas adecuadas!
Afloje los tres tornillos y retire el soporte de matrícula del vehículo.
PASO DE FIJACIóN · LEE Y CONSERVA LAS INSTRUCCIONES DE MONTAJE!
La traducción del contenido es automática
© SW-MOTECH GmbH & Co. KG
Salvo errores y omisiones
Sujeto a cambios técnicos y de diseño.
4

2
1×1
2×2
M OEM
3×3
Atornille la placa adaptadora (1) al vehículo.
ATENCIÓN: ¡Utilice fijador de roscas líquido!
Apriete los tornillos (2) según las instrucciones del fabricante.
PASO DE FIJACIóN · LEE Y CONSERVA LAS INSTRUCCIONES DE MONTAJE!
La traducción del contenido es automática
© SW-MOTECH GmbH & Co. KG
Salvo errores y omisiones
Sujeto a cambios técnicos y de diseño.
5

3
4×1
OEM
Atornille ligeramente el soporte de matrícula original (Orig.) al vehículo con
el tornillo (4).
No apriete el tornillo (4) del todo todavía.
PASO DE FIJACIóN · LEE Y CONSERVA LAS INSTRUCCIONES DE MONTAJE!
La traducción del contenido es automática
© SW-MOTECH GmbH & Co. KG
Salvo errores y omisiones
Sujeto a cambios técnicos y de diseño.
6

4
Utilice una herramienta adecuada para marcar los dos puntos de perforación
en la parte posterior del soporte de matrícula (Orig.).
Luego afloje el tornillo (4) y retire el soporte de matrícula del vehículo.
ATENCIÓN: ¡Peligro de lesiones!
Haga dos agujeros en las marcas del soporte de matrícula con un taladro de
6,5 mm. Luego desbarbe los bordes de los orificios.
PASO DE FIJACIóN · LEE Y CONSERVA LAS INSTRUCCIONES DE MONTAJE!
La traducción del contenido es automática
© SW-MOTECH GmbH & Co. KG
Salvo errores y omisiones
Sujeto a cambios técnicos y de diseño.
7

5
5×2
9 Nm
6×2
7 Nm
7×8
8×1
9×4
Atornille la matrícula, el soporte de matrícula y la barra de unión (*) incluida
con el soporte lateral de SW-MOTECH a las piezas que se muestran en la
placa adaptadora (1).
ATENCIÓN: ¡Utilice afija tornillos líquido (solo en el tornillo (4))!
Apriete el tornillo (4) según las instrucciones del fabricante.
Apriete los tornillos (5) y (6) como se especifica en las instrucciones de
montaje.
PASO DE FIJACIóN · LEE Y CONSERVA LAS INSTRUCCIONES DE MONTAJE!
La traducción del contenido es automática
© SW-MOTECH GmbH & Co. KG
Salvo errores y omisiones
Sujeto a cambios técnicos y de diseño.
8

INDICACIONES ESPECÍFICAS DEL PRODUCTO
NOTA: Tenga en cuenta las normas específicas del país para la
matriculación/uso de su vehículo o las normas aplicables de la ITV. En caso de
piezas con registro obligatorio, su organismo de inspección debe registrarlas tras
el montaje en los documentos del vehículo.
INFORMACIóN SOBRE LOS PRODUCTOS · LEE Y CONSERVA LAS INSTRUCCIONES DE MONTAJE!
La traducción del contenido es automática
© SW-MOTECH GmbH & Co. KG
Salvo errores y omisiones
Sujeto a cambios técnicos y de diseño.
9

Numéro d‘article: KFT.22.995.80000/B Révision: 00 · Date: 09 - 2023
Kit complémentaire modèle US
~ 0.5 h. FACILE DIFFICILE
FRANÇAIS · Nous vous remercions d'avoir choisi ce produit haut de gamme
de SW-MOTECH. Visitez notre boutique en ligne pour plus d'informations (par
exemple affectation des modèles). Les documents nécessaires (par exemple
ABE) y sont disponibles en téléchargement.
Veuillez lire et prendre en compte toutes les instructions, les consignes de
sécurité et les avertissements contenus dans ce manuel de montage avant
de monter et d'utiliser le produit afin d'éviter toute blessure ou tout
dommage. Veuillez conserver la notice d'utilisation pour référence.
Ce produit a été développé pour des véhicules en configuration d'usine.
Nous ne sommes pas en mesure d'assurer la compatibilité avec les pièces
de rechange originales ou les pièces de rechange d'autres fabricants.
La présente notice d'installation a été élaborée conformément à nos
connaissances actuelles. Il n'existe aucun droit juridique à l'exactitude des
informations qu'elle contient. Sous réserve d'erreurs et de fautes. Sous
réserve de modifications techniques et conceptuelles. SW-MOTECH détient
les droits d'auteur.
SYMBOLE D'AVERTISSEMENT DE SÉCURITÉ
Ce symbole d'avertissement est utilisé dans ces instructions de montage
pour mettre en garde contre des dangers mortels, de blessures ou d'autres
risques. Les mots DANGER, ATTENTION ou RECOMMANDATION sont utilisés
avec ce symbole d'avertissement pour transmettre des consignes de
sécurité et des informations importantes concernant le montage et
l'utilisation de ce produit. Ces mots, associés au symbole d'avertissement
de sécurité, signifient :
DANGER : signale une situation dangereuse pouvant entraîner la mort ou
des blessures graves si elle n'est pas évitée !
ATTENTION : signale une situation dangereuse pouvant entraîner la mort
ou des blessures graves si elle n'est pas évitée !
PRUDENCE : Indique une situation dangereuse susceptible d'entraîner des
blessures de gravité réduite ou moyenne si elle se présente !
REMARQUE : Informations importantes, mais qui n'entraînent pas de
risque de décès ou de blessure (dommages matériels uniquement).
REMARQUES GÉNÉRALES
ATTENTION : le montage et/ou l'entretien de ce produit nécessite des
compétences techniques avancées, des outils appropriés et une bonne
compréhension de l'utilisation des outils et des indications de réglage. Pour
votre propre sécurité, SW-MOTECH recommande de confier le montage
et/ou l'entretien à un atelier de réparation de deux-roues qualifié et
certifié.
ATTENTION : si vous décidez de monter vous-même ce produit, lisez
attentivement et intégralement les instructions de montage avant le
montage et l'utilisation et suivez toutes les instructions afin d'éviter des
blessures graves ou mortelles. Lors du montage et de l'utilisation, tenez
également compte de toutes les informations pertinentes du manuel du
véhicule. SI VOUS NE COMPRENEZ PAS UNE PARTIE DE CE MANUEL
D'INSTALLATION OU SI VOUS AVEZ BESOIN D'EXPLICATIONS CONCERNANT
UNE INSTRUCTION, N'ESSAYEZ PAS D'INSTALLER CE PRODUIT SANS
DEMANDER DE L'AIDE À SW-MOTECH !
PRÉPARATION : Veuillez lire attentivement les instructions de montage et
assurez-vous que tous les éléments de la liste de pièces sont présents.
PRUDENCE : veillez à ce que votre véhicule soit bien stable. Éteignez le
moteur et retirez la clé de contact. Laissez refroidir le
moteur/l'échappement si nécessaire. Débranchez la batterie lorsque vous
travaillez sur le système électrique. Utilisez uniquement des outils
appropriés et portez toujours des lunettes de protection et des gants
pendant le montage et l'entretien. Faites-vous aider par une deuxième
personne lors du montage et de l'entretien.
MONTAGE : Toutes les pièces et connexions retirées du véhicule doivent
être réinstallées conformément aux instructions du fabricant du véhicule ou
remplacées par des pièces et du matériel fournis par SW-MOTECH.
ATTENTION Sauf indication contraire, sécurisez tous les filetages avec
du frein filet liquide de force moyenne.
DANGER : Les couples de serrage non définis par SW-MOTECH doivent
être obtenus auprès du constructeur du véhicule ou d'un atelier de
réparation de motos certifié.
CONTRÔLE DU FONCTIONNEMENT : Après le montage, assurez-vous
qu'aucune pièce mobile n'est bloquée et que le fonctionnement du véhicule
n'est pas perturbé. Les câbles et les tuyaux ne doivent pas frotter et/ou être
coincés.
ATTENTION : Effectuez un contrôle de fonctionnement complet avant
de commencer à rouler. Après les 50 premiers kilomètres, puis
régulièrement, vérifiez le couple de serrage de tous les raccords et la
bonne fixation du produit. Les accessoires montés peuvent modifier le
comportement sur la route et la stabilité du véhicule.
INSTRUCTIONS DE MONTAGE · LIRE ET CONSERVER LES INSTRUCTIONS DE MONTAGE!
SW-MOTECH GmbH & Co. KG
Ernteweg 7-10
35282 Rauschenberg
Allemagne
www.sw-motech.com
La traduction du contenu est automatisée.
© SW-MOTECH GmbH & Co. KG
Sous réserve d'erreurs et de modifications
Sous réserve de modifications techniques et de design.
1

Vous trouverez les symboles et leur signification
dans la section MONTAGE. Si le terme OEM apparaît
dans la section MONTAGE, il faut respecter et
appliquer les consignes du fabricant du véhicule.
Si vous avez des questions, notre service clientèle ainsi
que nos distributeurs se tiennent à votre disposition. Vous
trouverez notre numéro de téléphone ainsi que la liste de
nos distributeurs sur notre boutique en ligne :
www.sw-motech.com
Utilisez du frein filet : Indique qu'un filetage doit être
enduit de frein filet liquide. H (HIGH) : haute
résistance ; M (MEDIUM) : force moyenne ; L (LOW) :
faible résistance.
Serrer en respectant les instructions de couple de
serrage : indique le couple de serrage d'une pièce
prescrit par SW-MOTECH ou par le fabricant du véhicule
(OEM).
Ne pas utiliser de frein filet : signifie que l'utilisation
d'un frein filet liquide n'est pas nécessaire à ce
stade.
APERçU DES LéGENDES · LIRE ET CONSERVER LES INSTRUCTIONS DE MONTAGE!
La traduction du contenu est automatisée.
© SW-MOTECH GmbH & Co. KG
Sous réserve d'erreurs et de modifications
Sous réserve de modifications techniques et de design.
2

LISTE DES PIèCES · LIRE ET CONSERVER LES INSTRUCTIONS DE MONTAGE!
La traduction du contenu est automatisée.
© SW-MOTECH GmbH & Co. KG
Sous réserve d'erreurs et de modifications
Sous réserve de modifications techniques et de design.
3
21
KFT.22.995.001.11
1/1
2
M6 x 20; DIN 7991
SC.ST.06.020.02.7991.088
2/2
3
Ø 16 / ø 6,4 / h 6
DB.00.160.064.006.01
3/4
34
M6 x 30; ISO 7380
SC.ST.06.030.02.7380.109
1/1
55
M6 x 30; DIN 912
SC.ST.06.030.01.912.088
2/2
6
M6 x 16; DIN 912
SC.ST.06.016.01.912.088
2/2
7
ø 6,4; DIN 125
US.ST.064.01.125
8/8
8
Ø 16 / ø 6,4 / h 6
DB.00.160.064.006.01
1/4
9
M6; DIN 985
MU.ST.06.01.985.08
4/4

1
ATTENTION : portez toujours des lunettes et des gants de protection !
ATTENTION : Utilisez toujours des outils appropriés !
Dévissez les trois vis et retirez le support de plaque d'immatriculation du
véhicule.
PHASE DE MONTAGE · LIRE ET CONSERVER LES INSTRUCTIONS DE MONTAGE!
La traduction du contenu est automatisée.
© SW-MOTECH GmbH & Co. KG
Sous réserve d'erreurs et de modifications
Sous réserve de modifications techniques et de design.
4

2
1×1
2×2
M OEM
3×3
Vissez la plaque d'adaptation (1) sur le véhicule.
ATTENTION : utilisez du frein filet liquide !
Serrez les vis (2) selon les instructions du fabricant.
PHASE DE MONTAGE · LIRE ET CONSERVER LES INSTRUCTIONS DE MONTAGE!
La traduction du contenu est automatisée.
© SW-MOTECH GmbH & Co. KG
Sous réserve d'erreurs et de modifications
Sous réserve de modifications techniques et de design.
5

3
4×1
OEM
Visser le support de plaque d'origine (Orig.) sur le véhicule avec la vis (4) sans
serrer.
Ne serrez pas encore la vis (4).
PHASE DE MONTAGE · LIRE ET CONSERVER LES INSTRUCTIONS DE MONTAGE!
La traduction du contenu est automatisée.
© SW-MOTECH GmbH & Co. KG
Sous réserve d'erreurs et de modifications
Sous réserve de modifications techniques et de design.
6

4
Utilisez un outil approprié pour marquer les deux points de perçage au dos du
support de plaque (Orig.).
Desserrez ensuite la vis (4) et retirez le support de plaque du véhicule.
ATTENTION : risque de blessure !
Percez deux trous de 6,5 mm à travers le support de plaque au niveau des
deux marques. Ébarbez ensuite les bords des trous.
PHASE DE MONTAGE · LIRE ET CONSERVER LES INSTRUCTIONS DE MONTAGE!
La traduction du contenu est automatisée.
© SW-MOTECH GmbH & Co. KG
Sous réserve d'erreurs et de modifications
Sous réserve de modifications techniques et de design.
7

5
5×2
9 Nm
6×2
7 Nm
7×8
8×1
9×4
Vissez la plaque d'immatriculation, le support de plaque et la barre de
jonction (*) fournie avec le support latéral SW-MOTECH aux pièces indiquées
sur la plaque d'adaptation (1).
ATTENTION : utilisez du frein filet liquide (uniquement sur la vis (4)) !
Serrer la vis (4) selon les instructions du fabricant.
Serrez les vis (5) et (6) comme indiqué dans les instructions de montage.
PHASE DE MONTAGE · LIRE ET CONSERVER LES INSTRUCTIONS DE MONTAGE!
La traduction du contenu est automatisée.
© SW-MOTECH GmbH & Co. KG
Sous réserve d'erreurs et de modifications
Sous réserve de modifications techniques et de design.
8

REMARQUES SPÉCIFIQUES AU PRODUIT
REMARQUE :Respectez les réglementations spécifiques au pays pour
l'immatriculation/l'exploitation de votre véhicule ou les réglementations TÜV
applicables. Après le montage, faites inscrire les pièces soumises à
immatriculation dans les papiers du véhicule par votre centre de contrôle.
INFORMATIONS SUR LES PRODUITS · LIRE ET CONSERVER LES INSTRUCTIONS DE MONTAGE!
La traduction du contenu est automatisée.
© SW-MOTECH GmbH & Co. KG
Sous réserve d'erreurs et de modifications
Sous réserve de modifications techniques et de design.
9

Numero di articolo: KFT.22.995.80000/B Revisione: 00 · Data: 09 - 2023
Kit aggiuntivo modello USA
~ 0.5 h. FACILE DIFFICILE
ITALIANO ·Grazie per aver scelto questo prodotto premium di SW-MOTECH.
Visita il nostro negozio online per ulteriori informazioni (ad es. per la
compatibilità con i vari modelli). I documenti richiesti (ad es. certificato di
omologazione nazionale) possono essere scaricati qui.
Si prega di leggere attentamente le avvertenze di sicurezza e le istruzioni
per il montaggio prima di montare e utilizzare il prodotto, al fine di evitare
eventuali lesioni e danni. Conserva queste istruzioni per il montaggio come
riferimento futuro.
Questo prodotto è stato sviluppato per veicoli in condizioni di fabbrica. La
compatibilità con gli accessori originali o di altri produttori non può essere
garantita.
Queste istruzioni per il montaggio sono state redatte in base alle nostre
conoscenze attuali. Non sussistono pretese di correttezza giuridiche. Salvo
errori ed omissioni. Ci riserviamo il diritto di apportare modifiche tecniche e
di design. Copyright SW-MOTECH.
SIMBOLO DI SICUREZZA
Questo simbolo di avvertenza è usato nelle presenti istruzioni di
montaggio per segnalare pericoli mortali, rischio di lesioni o altri pericoli.
Le parole "PERICOLO", "AVVERTENZA" O "ATTENZIONE" sono utilizzate con
questo simbolo di avvertenza per trasmettere importanti istruzioni di
sicurezza e informazioni relative al montaggio e all'uso di questo prodotto.
Queste parole, utilizzate insieme al simbolo di avvertenza, significano:
PERICOLO: indica una situazione di pericolo che, se non evitata, può
causare morte o lesioni gravi!
AVVERTENZA: indica una situazione di pericolo che, se non evitata, può
causare morte o lesioni gravi!
ATTENZIONE: indica una situazione di pericolo che, se non evitata, può
provocare lesioni lievi o di entità moderata!
AVVISO: indica informazioni importanti che non riguardano il rischio di
morte o di lesioni (riguardano unicamente il rischio di danni materiali)!
INFORMAZIONI GENERALI
AVVERTENZA: il montaggio e/o la manutenzione di questo prodotto
richiedono competenze tecniche avanzate, strumenti adeguati e una buona
conoscenza dell'uso della strumentazione e delle indicazioni relative alle
coppie di serraggio. Per ragioni di sicurezza, SW-MOTECH raccomanda di
far eseguire il montaggio e/o la manutenzione presso un'officina per
motociclette qualificata e certificata.
AVVERTENZA: se si decide di installare questo prodotto in autonomia,
leggere attentamente le istruzioni per il montaggio prima del montaggio e
dell'uso e seguire tutte le avvertenze per evitare lesioni gravi o mortali.
Durante il montaggio e l'uso, seguire anche tutte le istruzioni pertinenti
contenute nel manuale del veicolo. SE NON SI COMPRENDONO TALI
ISTRUZIONI, ANCHE SOLO IN PARTE, O SE SONO NECESSARI CHIARIMENTI,
NON CERCARE DI MONTARE IL PRODOTTO IN AUTONOMIA SENZA CHIEDERE
IL SUPPORTO DI SW-MOTECH!
PREPARAZIONE: leggere attentamente le istruzioni per il montaggio e
assicurarsi che siano disponibili tutti i componenti contenuti nella lista.
ATTENZIONE: assicurarsi che il veicolo sia perfettamente fermo.
Spegnere il motore e togliere la chiave. Se necessario, lasciar raffreddare
il motore/lo scarico. Scollegare la batteria quando si interviene
sull'impianto elettrico. Usare esclusivamente strumenti idonei e indossare
sempre occhiali e guanti protettivi durante le operazioni di montaggio e
manutenzione. Chiedere aiuto a una seconda persona durante le fasi di
montaggio e manutenzione.
MONTAGGIO: tutti i componenti e i collegamenti rimossi dal veicolo devono
essere reinstallati secondo le specifiche del produttore del veicolo o
sostituiti con componenti e attrezzatura forniti da SW-MOTECH.
AVVERTENZA: fissare tutte le filettature con frenafiletti liquido a
media resistenza, se non diversamente specificato.
PERICOLO: le coppie di serraggio non definite da SW-MOTECH devono
essere richieste al costruttore del veicolo o a un'officina certificata.
CONTROLLO DI FUNZIONALITÀ: dopo il montaggio accertarsi che non vi
siano parti mobili bloccate e che il funzionamento del veicolo non sia
compromesso. I cavi e i tubi flessibili non devono sfregare e/o essere
schiacciati.
AVVERTENZA: eseguire un controllo completo delle funzioni prima di
mettersi alla guida. Controllare la coppia di serraggio di tutti i
collegamenti e la tenuta del prodotto dopo i primi 50 km e in seguito
regolarmente. Gli accessori montati possono modificare la
maneggevolezza e la stabilità del veicolo.
ISTRUZIONI PER IL MONTAGGIO · LEGGI E CONSERVA LE ISTRUZIONI DI MONTAGGIO!
SW-MOTECH GmbH & Co. KG
Ernteweg 7-10
35282 Rauschenberg
Germania
www.sw-motech.com
La traduzione dei contenuti è automatizzata.
© SW-MOTECH GmbH & Co. KG
Salvo errori e omissioni.
Soggetto a modifiche tecniche e di design.
1

Consultare i simboli e il loro significato nella sezione
MONTAGGIO. Se nella sezione montaggio compare la
sigla OEM, è necessario rispettare e applicare le
specifiche del produttore del veicolo.
Per qualsiasi domanda, non esitare a contattare il nostro
servizio clienti o i nostri distributori. Il nostro numero di
telefono e l'elenco dei nostri distributori sono disponibili
nel nostro negozio online:
www.sw-motech.com
Usare un frenafiletti: indica che la filettatura deve
essere rivestita con un frenafiletti liquido. H (ALTA):
alta resistenza; M (MEDIA): media resistenza; L
(BASSO): bassa resistenza.
Serraggio / rispetto delle specifiche sulla coppia di
serraggio: indica la coppia di serraggio di un componente
specificata da SW-MOTECH o dal produttore del veicolo
(OEM).
Non utilizzare il frenafiletti: segnala di non dover
utilizzare il frenafiletti liquido in quel determinato
punto.
LEGENDA · LEGGI E CONSERVA LE ISTRUZIONI DI MONTAGGIO!
La traduzione dei contenuti è automatizzata.
© SW-MOTECH GmbH & Co. KG
Salvo errori e omissioni.
Soggetto a modifiche tecniche e di design.
2

ELENCO DELLE PARTI · LEGGI E CONSERVA LE ISTRUZIONI DI MONTAGGIO!
La traduzione dei contenuti è automatizzata.
© SW-MOTECH GmbH & Co. KG
Salvo errori e omissioni.
Soggetto a modifiche tecniche e di design.
3
21
KFT.22.995.001.11
1/1
2
M6 x 20; DIN 7991
SC.ST.06.020.02.7991.088
2/2
3
Ø 16 / ø 6,4 / h 6
DB.00.160.064.006.01
3/4
34
M6 x 30; ISO 7380
SC.ST.06.030.02.7380.109
1/1
55
M6 x 30; DIN 912
SC.ST.06.030.01.912.088
2/2
6
M6 x 16; DIN 912
SC.ST.06.016.01.912.088
2/2
7
ø 6,4; DIN 125
US.ST.064.01.125
8/8
8
Ø 16 / ø 6,4 / h 6
DB.00.160.064.006.01
1/4
9
M6; DIN 985
MU.ST.06.01.985.08
4/4

1
AVVERTENZA: indossare sempre le protezioni per gli occhi e per le mani!
AVVERTENZA: Utilizzare sempre strumenti adeguati!
Allentare le tre viti e rimuovere il porta targa dal veicolo.
FASE DI MONTAGGIO · LEGGI E CONSERVA LE ISTRUZIONI DI MONTAGGIO!
La traduzione dei contenuti è automatizzata.
© SW-MOTECH GmbH & Co. KG
Salvo errori e omissioni.
Soggetto a modifiche tecniche e di design.
4

2
1×1
2×2
M OEM
3×3
Avvitare la piastra di adattamento (1) al veicolo.
AVVERTENZA: Usare un frenafiletti liquido!
Serrare le viti (2) come specificato nelle istruzioni del produttore.
FASE DI MONTAGGIO · LEGGI E CONSERVA LE ISTRUZIONI DI MONTAGGIO!
La traduzione dei contenuti è automatizzata.
© SW-MOTECH GmbH & Co. KG
Salvo errori e omissioni.
Soggetto a modifiche tecniche e di design.
5

3
4×1
OEM
Avvitare il porta targa originale (Orig.) con la vite (4) allentata sul veicolo.
Non serrare ancora la vite (4).
FASE DI MONTAGGIO · LEGGI E CONSERVA LE ISTRUZIONI DI MONTAGGIO!
La traduzione dei contenuti è automatizzata.
© SW-MOTECH GmbH & Co. KG
Salvo errori e omissioni.
Soggetto a modifiche tecniche e di design.
6

4
Utilizzando un attrezzo idoneo, segnare i due punti di foratura sul retro del
porta targa (Orig.).
Quindi allentare la vite (4) e rimuovere il porta targa dal veicolo.
AVVERTENZA: rischio di lesioni!
Praticare due fori da 6,5 mm attraverso il portatarga in corrispondenza delle
due marcature. Successivamente sbavare i bordi della foratura.
FASE DI MONTAGGIO · LEGGI E CONSERVA LE ISTRUZIONI DI MONTAGGIO!
La traduzione dei contenuti è automatizzata.
© SW-MOTECH GmbH & Co. KG
Salvo errori e omissioni.
Soggetto a modifiche tecniche e di design.
7

5
5×2
9 Nm
6×2
7 Nm
7×8
8×1
9×4
Avvitare la targa, il porta targa e la barra di congiunzione (*) forniti in
dotazione con il telaio laterale SW-MOTECH alle parti indicate sulla piastra
adattatrice (1).
AVVERTENZA: utilizzare un frenafiletti liquido (solo vite (4))!
Serrare la vite (4) secondo le istruzioni del produttore.
Serrare le viti (5) e (6) come specificato nelle istruzioni per il montaggio.
FASE DI MONTAGGIO · LEGGI E CONSERVA LE ISTRUZIONI DI MONTAGGIO!
La traduzione dei contenuti è automatizzata.
© SW-MOTECH GmbH & Co. KG
Salvo errori e omissioni.
Soggetto a modifiche tecniche e di design.
8

AVVERTENZE SPECIFICHE DEL PRODOTTO
AVVISO :Rispettare le normative specifiche del paese per
l'immatricolazione/l'uso del veicolo o le normative TÜV applicabili. Dopo il
montaggio, far inserire le parti soggette a omologazione nei documenti del veicolo
dal proprio centro di test.
INFORMAZIONI SUI PRODOTTI · LEGGI E CONSERVA LE ISTRUZIONI DI MONTAGGIO!
La traduzione dei contenuti è automatizzata.
© SW-MOTECH GmbH & Co. KG
Salvo errori e omissioni.
Soggetto a modifiche tecniche e di design.
9
-
 1
1
-
 2
2
-
 3
3
-
 4
4
-
 5
5
-
 6
6
-
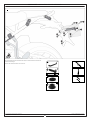 7
7
-
 8
8
-
 9
9
-
 10
10
-
 11
11
-
 12
12
-
 13
13
-
 14
14
-
 15
15
-
 16
16
-
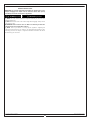 17
17
-
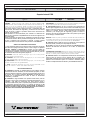 18
18
-
 19
19
-
 20
20
-
 21
21
-
 22
22
-
 23
23
-
 24
24
-
 25
25
-
 26
26
-
 27
27
-
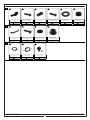 28
28
-
 29
29
-
 30
30
-
 31
31
-
 32
32
-
 33
33
-
 34
34
-
 35
35
-
 36
36
-
 37
37
-
 38
38
-
 39
39
-
 40
40
-
 41
41
-
 42
42
-
 43
43
-
 44
44
-
 45
45
-
 46
46
-
 47
47
-
 48
48
-
 49
49
-
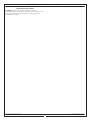 50
50
-
 51
51
-
 52
52
-
 53
53
-
 54
54
-
 55
55
-
 56
56
-
 57
57
-
 58
58
-
 59
59
-
 60
60
-
 61
61
-
 62
62
-
 63
63
-
 64
64
-
 65
65
-
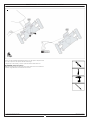 66
66
-
 67
67
-
 68
68
-
 69
69
-
 70
70
-
 71
71
-
 72
72
-
 73
73
-
 74
74
-
 75
75
-
 76
76
-
 77
77
-
 78
78
-
 79
79
-
 80
80
-
 81
81
-
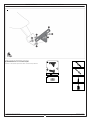 82
82
-
 83
83
-
 84
84
-
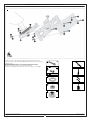 85
85
-
 86
86


SW-Motech KFT.22.995.30100/B Mounting instructions
- Tipo
- Mounting instructions
en otros idiomas
- français: SW-Motech KFT.22.995.30100/B
- italiano: SW-Motech KFT.22.995.30100/B
- English: SW-Motech KFT.22.995.30100/B
- Deutsch: SW-Motech KFT.22.995.30100/B
Artículos relacionados
-
 SW-Motech MSS.07.975.10200/S Mounting instructions
-
 SW-Motech KFT.01.052.65000/B Mounting instructions
-
 SW-Motech KFT.01.070.65100/B Mounting instructions
-
 SW-Motech SBL.41.092.10000/B Mounting instructions
-
 SW-Motech HTA.06.932.10000 Mounting instructions
-
 SW-Motech HTA.06.932.11000 Mounting instructions
-
 SW-Motech HTA.22.995.11000 Mounting instructions
-
 SW-Motech MSS.22.995.10000/B Mounting instructions
-
 SW-Motech GPS.02.049.10000/B Mounting instructions
-
 SW-Motech SBL.05.846.10000/B Mounting instructions


