
Guide d'utilisation
User guide
Gebruikershandleiding
Benutzerhandbuch
Guía del usuario
Guia de usuario
Guida utente
SAR/DAS :
Head/Tête (XXX) X.XXXW/kg,
Body/Corp (XXX) X.XXXW/kg,
Membre/Member (XXX) X.XXXW/kg
Comes with the Google™ app and Google Chrome™
Google, Android, Google Play, YouTube and other
marks are trademarks of Google LLC.


3
Summary
Français ............................................................................9
English ............................................................................. 13
Deutch ............................................................................. 16
Italiano ...........................................................................20
Nederlands ................................................................... 24
Español .......................................................................... 28
Português ...................................................................... 32
MENTIONS LEGALES / LEGAL MENTIONS.............. 36
Français ..........................................................................37
English ............................................................................. 41
Déclaration de conformité simplifiée ..................... 46
Simplified declaration of conformity ......................47
SUMMARY

4
1
2
5
6
3
4

5
FR
1. Bouton Marche/Arrêt
2. Volume
3. Appareil photo avant
4. Prise USB & prise Jack
5. Appareils photo arrière & Flash
6. Haut-parleurs
EN
1.
2. Volume
3. Front camera
4. USB port and Jack plug
5.
6. Speakers
DE
1. in / Aus-Taste
2. Lautstärkeregelung
3. Frontkamera
4. USB-Anschluss und Klinkenstecker
5. Kameras & Blitz auf Rückseite
6. Lautsprecher
IT
1. Tasto di accensione
2. Volume
3. Fotocamera frontale
4.
5.
6.
NL
1. Knop aan/uit
2. Volume
3. Camera aan de voorkant
4. USB-poort en jackstekker
5.
6. Luidsprekers
ES
1. Botón encendido
2. Volumen
3. Cámara frontal
4. Puerto USB y conector Jack
5.
6. Altavoz
PT
1.
2. Volume
3. Cámara frontal
4. Porta USB e tomada Jack
5. Camera & Flash back
6. Caixas de som

6
Konrow vous remercie
AVERTISSEMENT :
CONTENU DE LA BOITE :
•
•
Konrow thanks you
cellphone in this guide.
CAUTION:
not part of this product.
GIFTBOX CONTENT:
• 1 Smartphone • 1 User guide
• 1 Mains adaptor / USBable • 1 Headset
Konrow bedankt sich bei Ihnen für die
ACHTUNG:
PACKUNGSINHALT :
• 1 Smartphone • 1 Bedienungsanleitung
• 1 Netzteil / USB Kabel • 1 Freisprecheinrichtung
Konrow ti ringrazia
ATTENZIONE:
CONTENUTO DELLA SCATOLA:
• 1 Smartphone • 1 Guida per l’utente
•

7
Konrow bedankt
het gebruik van de smartphone.
Waarschuwing:
INHOUD VAN DE DOOS:
• 1 smartphone • 1 gebruikershandleiding
• 1 AC-adapter / USB kabel • 1 handsfree pakket
Konrow le agradece
ADVERTENCIA:
CONTENIDO DE LA CAJA:
• 1 Smartphone • 1 Manual de usuario
• 1 Enchufe / USB câble • 1 Kit peatón
Konrow obrigado
por ter escolhido o SKY55 smartphone. Você vai encontrar neste guia todas as informações
relacionadas ao uso do telefone smartphone.
AVISO:
CONTEÚDO DO PACOTE:
• 1 smartphone • 1 Guia do usuário
• 1 Ficha do setor / Cabo USB • 1 fone de ouvido

8

9
1. Insertion d'une carte SIM
•
•
ATTENTION :
2. Insertion d'une carte MicroSD
•
•
•
ATTENTION :
complète du smartphone.
3. Charge de la batterie
Charge de la batterie :
•
prise de courant.
•
puis de la prise de courant.
IMPORTANT :
•
•
Note :
Français
1
2

10
Précautions d’emploi à respecter pour la charge de la batterie :
•
•
doit toujours être facilement accessible.
•
•
•
•
•
4. Allumer/éteindre votre smartphone
5. Verrouillage/déverrouillage des cartes
SIM
Votre SKY55 est un smartphone double SIM, il vous permet de téléphoner avec deux
abonnements à partir du même appareil.
•
•
le code PIN.

11
6. Verrouillage/déverrouillage du téléphone
Pour déverrouiller l’écran :
•
•
•
ATTENTION :
smartphone.
MOT DE PASSE : _________________
Pour verrouiller votre appareil :
• Appuyez simplement sur le bouton marche/arrêt.
7. Émettre et recevoir un appel
ATTENTION :
temps.
Émere un appel :
• Touchez l’icône
votre choix.
•
•
• .
Recevoir un appel :
• .
• .
8. Activation Bluetooth / Wi-Fi
Note : an de limiter votre exposition aux champs électromagnétiques, nous vous
recommandons de désactiver le Bluetooth et la Wi-Fi lorsqu’ils ne sont plus utilisés.
Bluetooth
ou dans les paramètres du smartphone.
•
•
.

12
Wi-Fi
paramètres du smartphone.
•
•
.
9. Télécharger une application
magazines et des jeux.
d'accueil et appuyez sur l'icône Play Store.
Note :
Google.
en ligne.
10. Rétablir les paramètres d'usine
PRÉCAUTION :
Pour eectuer une remise à zéro des données :
•
•
NOTE :

13
1. Inserting a SIM card
•
• Then replace the back cover.
CAUTION: The mobile data can only be used on one SIM card.
2. Inserting a MicroSD
•
• Insert the memory card into the relevant slot.
• Then replace the back cover.
CAUTION:
3. Installing and charging the battery
Charging the battery:
•
•
•
the power outlet.
IMPORTANT:
• The smartphone is only recharged via its USB port.
•
Note:
to charge fully.
4. Switching the smartphone on and off
3 seconds.
standby mode. Press it again to leave standby mode.
English
1
2

14
5. Locking/unlocking SIM cards
Your SKY55 is a dual SIM smartphone. It enables you to phone
using two lines from the same device. There are two SIM card slots.
•
number without entering the PIN code.
6. Locking/unlocking the phone
To unlock the screen:
• Press the power key on your phone.
• Hold and drag the unlock icon to the top to unlock the device.
You can set the screen lock by adding a password or a drawing to reproduce
when unlocking your smartphone.
CAUTION:
warranty will not cover such an oversight. Even a “reset” cannot solve the
PASSWORD: _________________
To lock your device :
•
7. Making and receiving calls
NOTE:
Making a call :
• Tap the icon on the main menu or the home screen to dial the number of your choice.
• Tap the operators icon to call with SIM 1 or SIM 2.
•
•
.
Receiving a call :
• .
• .

15
8. Bluetooth/Wi-Fi activation
Note: To limit your exposure to EMF we recommend you to deactivate Bluetooth and Wi-Fi
when it is not any more used.
Bluetooth
•
•
.
Wi Fi
•
•
.
9. Download an application
Note: The availability of access to Google Play depends on your phone operator and the country in which you
Note: Konrow will shall under no condions be responsible for the content on the on-line store. The product
warranty will not cover any malfuncon due to an applicaon from on-line stores.
10. Reset
CAUTION:
To do a reset of the data:
•
•
NOTE :
it back.

16
Deutch
1. Einsetzen einer SIM-Karte
•
•
ACHTUNG: Die mobilen Daten können nur auf einer SIM-Karte verwendet werden.
2. Einsetzen einer MicroSD-Karte
•
• Setzen Sie die Speicherkarte in den dafür vorgesehenen Steckplatz ein.
•
ACHTUNG: Das Einsetzen oder Entfernen einer SIM- Karte oder eine MicroSD-Karte
erfordert das vollständige Abschalten des Smartphones.
3. Akku einlegen und aufladen
Das Auaden des Akkus:
•
Netzadapter an eine Steckdose an.
•
an.
•
der Steckdose trennen.
WICHTIG :
•
•
werden.
Notiz:
Sie können das Gerät verwenden, während es aufgeladen wird. In diesem Fall ist es möglich,
dass sich die Ladezeit verlängert.
1
2

17
4. Schalten Sie Ihr Telefon ein / aus
erneut um den Standby-Modus wieder zu verlassen.
5. SIM-Karte Sperren / Entriegeln
demselben Gerät zu rufen. Es gibt zwei Steckplätze für zwei SIM-Karten.
• Wenn Sie Ihr Telefon starten werden Sie nacheinander aufgefordert die PIN Ihrer zwei SIM-
•
eingeben.
6. Verriegelung / Entriegelung der smarphone
Zum Entsperren des Bildschirms:
•
• Tippen und halten Sie das Entsperren-Symbol und ziehen Sie es nach
Ihres Smartphones ein Kennwort oder eine Zeichnung zum Reproduzieren
hinzufügen
ACHTUNG:
des Musters welches für die Bildschirmsperre verwendet wird lässt Ihr
wirksam da es scih um Fahrlässigkeit handelt. Auch ein Reset kann dieses
oder Ihre Zeichnung unten auf.
PASSWORT: _________________
So sperren Sie das Gerät :
• Drücken Sie einfach die Ein- / Aus-Taste.
7. Senden und Empfangen eines Anrufs
ACHTUNG:

18
Einen Anruf tägenn :
• Berühren Sie das Hauptmenü-Symbol oder den Home-Bildschirm die Nummer Ihrer Wahl
zu wählen.
• Berühren Sie das Symbol für Ihren Service-Aufruf mit der SIM-Karte 1 oder SIM 2.
•
• .
Empfangen eines Anrufs :
• .
• .
8. Aktivierung Bluetooth/Wi-Fi
Hinweis: Um die Belastung durch elektromagnetische Felder zu begrenzen, empfehlen wir,
dass Sie Bluetooth und Wi-Fi deaktivieren, wenn sie nicht in Gebrauch sind.
Bluetooth in den Verknüpfungen zur
in den Einstellungen des Smartphones einschalten.
•
•
.
Wi-Fi in den Verknüpfungen zur Grundeinstellung in
des Smartphone einschalten
•
•
.
9. Programm-Downloads
Symbol.
Note:
Note: Konrow ist unter keinen Umständen für den Inhalt des Online-Shops verantwortlich. Die
Produktgarane deckt keine Fehlfunkonen ab, die auf eine Anwendung von Online-Shops zurückzuführen
sind.
10. Zurücksetzen

19
VORSICHT:
Zum Zurücksetzen Daten:
•
•
HINWEIS: Wenn Sie irgendwelche Probleme mit dem Produkt auftreten, führen Sie zunächst
ein System-Reset, bevor sie es zurück schicken.

20
1. Inserisci una SIM card
•
la direzione di inserimento delle carte.
•
ATTENZIONE:
2. Inserisci una MicroSD
• Spegnere il telefono e rimuovere la cover posteriore.
•
•
ATTENZIONE:
completamente spento.
3. Installa e carica la batteria
Caricare la batteria:
•
•
•
IMPORTANTE:
• Lo smartphone è caricato solo dalla sua porta USB.
•
Nota: Puoi usare il dispositivo quando sta caricando. In questo caso, la batteria potrebbe
richiedere più tempo per caricarsi completamente.
Italiano
1
2

21
4. Accendi e spegni lo smartphone
posizionato sul lato dello smartphone per 3 secondi.
5. Blocca/Sblocca le SIM card
Il tuo SKY55 è uno smartphone dual SIM. Ti abilita a telefonare usando due line dallo stesso
•
•
inserire il codice PIN.
6. Blocca/Sblocca il telefono
Per sbloccare lo schermo:
• Premi il pulsante di accensione sul tuo telefono.
•
È possibile impostare il blocco dello schermo aggiungendo una password o un
ATTENZIONE:
coprirà tale svista. Anche un “reset” non può risolvere il problema. Come
PASSWORD: _________________
Per bloccare il tuo dispositivo
•
7. Effettua e ricevi le chiamate
NOTA: E’ impossibile eettuare o ricevere una chiamata nello stesso momento sulle due SIM
card. Per esempio, se sei in chiamata sulla linea della SIM 1, coloro che stanno cercando di
contattarti sulla SIM 2, saranno automaticamente deviate alla segreteria telefonica.
Eeuare una chiamata
• Tocca l’icona sul menu principale o sulla schermata home per comporre il numero di tua

22
scelta.
• Tocca l’icona degli operatori per chiamare con la SIM 1 o la SIM 2.
•
• .
Ricevere una chiamata
• .
• .
8. Attiva Bluetooth/Wi-Fi
Nota: Per limitare la tua esposizione all’EMF ti raccomandiamo ti disattivare il Bluetooth e il
Wi-Fi quando non è più usato.
Bluetooth dalle scorciatoie della regolazione base
•
• .
Wi Fi
dello smartphone.
•
• .
9. Scarica un’applicazione
Nota: La disponibilità di accesso a Google Play dipende dal vostro operatore telefonico e dal paese in cui vi
trovate. L'accesso a Google Play richiede la creazione di un account Google.
Nota: Konrow non sarà in alcun modo responsabile del contenuto del negozio on-line. La garanzia del
prodoo non coprirà eventuali malfunzionamen dovu ad un'applicazione proveniente da negozi on-line.
10. Resetta
ATTENZIONE:
non saranno eliminate.
Per fare un reset dei da:
•

23
•
NOTA:
rimandarlo indietro.

24
1. Het plaatsen van de SIM-kaart
• Schakel de telefoon uit en verwijder de achterklep. Plaats de SIM-kaart correct in de daarvoor
van het inbrengen van de kaarten respecteert.
• Plaats vervolgens de achterklep terug.
LET OP
2. Het plaatsen van een micro SD-kaart
• Schakel de telefoon uit en verwijder de achterklep.
• Plaats de geheugenkaart in de daarvoor bestemde sleuf.
• Plaats vervolgens de achterklep terug.
LET OP: Voor het plaatsen of verwijderen van een SIM-kaart en een MicroSD-kaart moet de
smartphone volledig afsluiten.
3. Het installeren en het opladen van de batterij
De batterij opladenj :
•
netspanningsadapter aan op een stopcontact.
•
laadstatus aan.
•
en vervolgens van het stopcontact.
LET OP:
•
•
LET OP: u kunt het apparaat gebruiken terwijl het wordt opgeladen. Het is mogelijk dat de
Nederlands
1
2

25
4. Het in- en uitschakelen van de
smartphone
de aan-/uitknop aan de zijkant van de smartphone.
modus te verlaten.
5. Het vergrendelen/ontgrendelen van de SIM-kaartenn
Je SKY55 is een dual SIM-smartphone. Je kunt zo via twee lijnen vanaf hetzelfde apparaat bellen. Er
• Wanneer je je telefoon opstart zal je worden gevraagd om de PIN-codes van je twee SIM-
•
6. Het vergrendelen/ontgrendelen van de telefoon
Het ontgrendelen van het scherm:
•
• Houd dit vast en sleep het ontgrendelingspictogram naar boven om het
apparaat te ontgrendelen.
U kunt de schermvergrendeling instellen door een wachtwoord of tekening
toe te voegen die moet worden weergegeven bij het ontgrendelen van uw
smartphone.
LET OP: als je je wachtwoord voor de schermvergrendeling, de
PIN-code of het patroon vergeet, wordt je smartphone permanent
geblokkeerd. Als dit vergeten wordt of verloren gaat, zal de garantie
van het product geen betrekking hebben op dit onderdeel. Zelfs een
"reset" kan het probleem niet oplossen. Onthoud je wachtwoord of het
patroon daarom goed en schrijf het op.
WACHTWOORD: _______________
Het vergrendelen van het apparaat:
• druk gewoon op de aan-/uitknop.

26
7. Het maken en het ontvangen van oproepen
LET OP: het is onmogelijk om op beide SIM-kaarten tegelijkertijd een oproep te maken
of te ontvangen.
Als je bijvoorbeeld op de SIM 1-lijn belt, zullen degenen, die contact met je proberen op te
nemen op de SIM 2-lijn, automatisch worden doorgeschakeld naar de voicemail.
Het maken van een oproep :
• Tik om het nummer van je keuze te kunnen selecteren op het pictogram in het hoofdmenu of
op het startscherm.
• Tik dan op het pictogram van de operator om met SIM 1 of met SIM 2 te kunnen bellen.
•
• .
Een oproep ontvangen :
•
.
• .
8. Bluetooth/WiFi-activering
LET OP: om je blootstelling aan EMF te beperken, raden wij je aan om de Bluetooth- en de
WiFi-functie uit te schakelen wanneer het niet wordt gebruikt.
Je kunt de Bluetooth
•
•
.
Je kunt de WiFi
•
•
.
9. Het downloaden van een applicatie
pictogram.
Opmerking:
het land waarin u zich bevindt. Voor toegang tot Google Play moet een Google-account worden aangemaakt.
Opmerking: Konrow is onder geen enkele voorwaarde verantwoordelijk voor de inhoud van de on-line
winkel. De productgarane dekt geen enkele storing als gevolg van een toepassing van de onlinewinkels.

27
10. Reset
LET OP : het resetten zal al je persoonlijke gegevens, alle contacten in je telefoon en de apps
die je hebt geïnstalleerd verwijderen. Daarom bevelen wij je aan om, voordat je met deze
procedure begint, een back-up van je gegevens te maken. De informatie, die op de externe
geheugenkaart is opgeslagen, wordt niet gewist.
Om de gegevens opnieuw te reseen:
•
•
De smartphone wordt dan uitgeschakeld en bij het herstarten wordt het systeem dan
opnieuw ingesteld.
LET OP: als je een probleem hebt met je apparaat probeer dan, vóórdat je het terugstuurt,
het systeem eerst opnieuw te resetten
Google, Android, Google Play en andere merken zijn handelsmerken van Google LLC.

28
1. Insertar la tarjeta SIM
•
de respetar la dirección de inserción de las tarjetas.
• Luego vuelva a colocar la tapa posterior.
PRECAUCIÓN : Los datos móviles solo se pueden utilizar en una tarjeta SIM.
2. Insertar tarjeta Micro SD
•
• Inserta la tarjeta de memoria en la ranura provista.
• Luego vuelva a colocar la tapa posterior.
PRECAUCIÓN: la inserción o extracción de una tarjeta SIM y una tarjeta MicroSD requiere
que el teléfono inteligente se apague por completo.
3. Instalar y cargar la bateria
Cargado de la batería :
•
de CA a una toma de corriente.
•
luego de la toma de corriente.
IMPORTANTE:
•
•
Nota :
en cargarse completamente.
Español
1
2

29
4. Encender / apagar su teléfono
5. Bloqueo/Desbloque de tarjeta SIM
•
el código PIN.
6. Bloquear/Desbloquear el teléfono
Para desbloquear la pantalla:
• Presione la tecla de encendido.
•
ATENCIÓN: El olvido o pérdida de la contraseña, código PIN o
dibujo sirviendo de bloqueo de pantalla bloquea denitívamente su
smartphone.
CONTRASEÑA: _______________
Para bloquear su dispositivo :
• Presione el botón de encendido/apagado.
7. Haciendo y recibiendo llamadas
NOTA:
Haciendo una llamada :

30
•
preferencia
•
• Presione los botones +/- para ajustar el volumen de la llamada
• .
Recibiendo una llamada :
• Cuando reciba una llamada deslice su dedo sobre el icono
.
• .
8. Bluetooth/Activacion del Wi-Fi
Nota: Para limitar la exposición a CEM recomendamos desactivar el Bluetooth y el Wi-Fi
cuando no este en uso.
Bluetooth
•
•
.
Wi-Fi
•
•
.
9. Descargar una aplicacion
Note:
encuentre. Para acceder a Google Play es necesario crear una cuenta de Google.
Nota: Konrow no se hará responsable bajo ninguna condición del contenido de la enda online. La garana
del producto no cubrirá ningún mal funcionamiento debido a una aplicación de las endas en línea.
10. Restablecer
PRECAUCIÓN: Los datos de reinicio borran todos sus datos personales, todos los contactos
en su teléfono y las aplicaciones que ha instalado. Es por eso que le recomendamos hacer
una copia de seguridad de sus datos antes de comenzar el procedimiento. Sin embargo, la
información almacenada en la tarjeta de memoria externa no se borrará.

31
Para hacer un reinicio de los datos:
•
•
apagará y se reiniciará. El sistema se reiniciará.
NOTA: Si tiene algún problema con su dispositivo, intente reiniciar el sistema antes de devolverlo.
Google, Android, Google Play y otras marcas son marcas comerciales de Google LLC.

32
1. Inserir um cartão SIM
•
•
CUIDADO: Os dados móveis só podem ser usados em um cartão SIM.
2. Inserir um cartão de memória MicroSD
•
• Inserire la scheda di memoria nello slot fornito.
•
CUIDADO: Inserir ou remover um cartão SIM ou MicroSD requer que o telemóvel esteja
completamente desligado.
3. Instalar e carregar a bateria
Carregar a bateria:
•
•
•
IMPORTANTE:
• Lo smartphone viene caricato solo tramite la porta USB.
•
Aviso:
pode demorar mais tempo a carregar.
Português
1
2

33
4. Ligar e desligar o telemóvel
localizado no lado do telemóvel durante 3 segundos.
segundo para entrar em modo standby. Prima o outra vez
para sair do modo standby.
5. Bloquear/desbloquear cartões SIM
telemóvel. Há duas entradas para cartões SIM.
•
inserir o código PIN.
6. Bloquear/desbloquear o telemóvel
Para bloquear o ecrã:
•
•
CUIDADO:
PALAVRA PASSE: _________________
Para bloquear o seu disposivo:
•
7. Fazer e receber chamadas
CUIDADO: : É impossível fazer e receber chamadas nos dois cartões SIM ao mesmo tempo.
Por exemplo, se estiver uma chamada no SIM 1, aqueles que o tentam contactar no SIM 2
irá automaticamente para voicemail.

34
Fazendo uma ligação:
•
•
• Prima os botões +/- para ajustar o volume das chamadas.
• .
Receber uma chamada :
• .
• .
8. Ativação de Bluetooth/Wi-Fi
Repare: Para limitar a sua exposição a EMF nós recomendamos que desative o Bluetooth e
Wi-Fi quando já não os está a utilizar.
Pode ativar o Bluetooth através dos atalhos de regulação básica da barra de noticações
ou nos parâmetros do telemóvel.
• Clique no botão de ativação e mova para a direita.
• Quando o Bluetooth está ativado irá ver o ícone na barra de
noticações .
Pode ativar o Wi-Fi através de atalhos de regulação básica da barra de noticações ou nos
parâmetros do telemóvel.
• Clique no botão de ativação e mova para a direita.
• Quando o Wi-FI está ativado irá ver o ícone na barra de
noticações .
9. Baixar uma aplicação
O smartphone SKY55 vem com o Google Play, permitindo o download de milhares de
aplicações incluindo música, lmes, TV, livros, revistas e jogos. Para acessar o Google Play,
vá para a página da aplicação com o botão na página inicial e toque no ícone Play Store.
Nota: A disponibilidade de acesso ao Google Play depende do seu operador telefónico e do
país em que se encontra. Para acessar o Google Play, você precisa criar uma conta Google.
Nota: Em nenhuma circunstância a Konrow pode ser considerada responsável pelo conteúdo da loja online.
A garana do produto não cobrirá qualquer defeito de funcionamento devido a uma aplicação de loja online.
10. Reposição de sistema
CUIDADO:

35
Para apagar os dados:
•
•
fábrica.
REPARA:
fábrica antes de o enviar de volta.

36
MENTIONS LEGALES / LEGAL MENTIONS

37
Consignes de sécurité
Batterie et chargement
Audion
Au volant
En France, conformément à l’article R412-5-1 du Code de la route l’usage d’un
téléphone tenu en main par le conducteur ou d'un appareil ou le port de tout
système de type
d’un véhicule en circulation
est interdit. Les sanctions relatives au non-respect de cet article sont une
amende ainsi qu’un retrait de points du permis de conduire.
ATTENTION : cette réglementation s’applique uniquement en France. Lors de vos
voyages à l’étranger, veuillez consulter au préalable la réglementation en vigueur
dans votre pays de destination.
Français

38
Selon l'environnement
Ne pas exposer l’appareil à la lumière directe du soleil ni à toute autre source extrême de chaleur ou
Appareil à manipuler avec précauon
Risque d'incendie ou de choc électrique
Conseil d'utilisation
Entretien de l'appareil
Eviter les pertes de données

39
Recyclage
en plus nombreuses.
Consignes de mise au rebut de l’appareil pour les utilisateurs privés :
ou le revendeur de l’appareil.
Consignes de mise au rebut de l’appareil pour les utilisateurs professionnels : les
lors de sa mise au rebut.
Débit d'absorption spécifique "DAS" - Exposition aux
radiofréquences
ATTENTION :
Conseil pour réduire le niveau d’exposition aux rayonnements électromagnétiques :

40
En cas de problème :
Contactez notre service après-vente depuis la page contact de notre site Internet : www.konrow.com
La garantie s’étend uniquement à la France métropolitaine.
•
•
•
•
•
ou un logiciel non fourni par Konrow.
•
•
•
•
•
•

41
Safety and care information
Charging the battery
then back on again immediately may damage the electrical circuits.
with wet hands and do not pull on the charger to disconnect it.
This charger is for indoor use only.
Only use adapter as per below:
Manufacturer name : Konrow
Rated Output: 5V
Hearing
Prolonged use of this music player at full power may damage the user’s hearing. In order to prevent
these risks it is recommended not to listen at high volume levels for long periods.
While driving
NOTE: this legislation applies only in France. During trips abroad, please refer to the
legislation in place in the country you are/go.
According to each environment
English

42
distance of 15cm between the device and your electronic implant.
Risk of fire or electric shock
Device to handle with care
Operating guidelines
Maintaining the device
a safety check.
Prevent data loss
Recycling
The symbol shown here and on the product means that the product is classed as
or commercial waste at the end of its working life.
been put in place to recycle products using best available recovery and recycling
Product disposal instructions for residential users:

43
authority or the retailer where the product was purchased.
Product disposal instructions for business users:
contract and ensure that this product is not mixed with other commercial waste for disposal.
Specific Absorption Rate "SAR" - Exposure to radio frequency
during laboratory tests.
The actual value of the SAR during use of the device is lower than this level.
The value of the SAR of the device can vary according to the following factors: how far/close the
NOTE:
the network band.
Advice to reduce the level of exposure to radiation:
Use of a hands-free kit also allows the level of exposure to be reduced.
and teenagers should keep the device away from their lower abdomen.
If you have any problem:
www.konrow.com
Made in China
This warranty excludes damage caused by external circumstances.
The warranty is applicable only in metropolitan France.

44
The warranty does not cover:
•
•
•
pressure drop.
•
•
•
•
•
•
•
•
French Civil Code.

45

46
Déclaration de conformité simplifiée
Informations sur la batterie et le fabriquant
Derrière la batterie, sur l'appareil
Numéro de série de l'appareil
Derrière la batterie, sur l'appareil
IMEI
Derrière la batterie, sur l'appareil

47
Maurice Haddad / CEO
and at a distance of 5mm from the body.
UG_04062020
Simplified declaration of conformity
Battery and manufacturer informations
Behind the battery, on the device
Device serial number
Behind the battery, on the device
IMEI
Behind the battery, on the device

www.konrow.com
Transcripción de documentos
Guide d'utilisation User guide Gebruikershandleiding Benutzerhandbuch Guía del usuario Guia de usuario Guida utente SAR/DAS : Head/Tête (XXX) X.XXXW/kg, Body/Corp (XXX) X.XXXW/kg, Membre/Member (XXX) X.XXXW/kg Comes with the Google™ app and Google Chrome™ Google, Android, Google Play, YouTube and other marks are trademarks of Google LLC. SUMMARY Summary Français.............................................................................9 English. . ............................................................................ 13 Deutch. . ............................................................................ 16 Italiano............................................................................ 20 Nederlands.................................................................... 24 Español........................................................................... 28 Português. . ..................................................................... 32 MENTIONS LEGALES / LEGAL MENTIONS.............. 36 Français...........................................................................37 English. . ............................................................................ 41 Déclaration de conformité simplifiée. . .................... 46 Simplified declaration of conformity.......................47 3 4 3 5 2 1 6 4 FR 1. Bouton Marche/Arrêt 2. Volume 3. Appareil photo avant 4. Prise USB & prise Jack 5. Appareils photo arrière & Flash 6. Haut-parleurs EN 1. ON/OFF button 2. Volume 3. Front camera 4. USB port and Jack plug 5. Rear cameras & flash 6. Speakers DE 1. in / Aus-Taste 2. Lautstärkeregelung 3. Frontkamera 4. USB-Anschluss und Klinkenstecker 5. Kameras & Blitz auf Rückseite 6. Lautsprecher IT 1. Tasto di accensione 2. Volume 3. Fotocamera frontale 4. Connettore USB 5. Fotocamera posteriore & flash 6. Altoparlanti NL 1. Knop aan/uit 2. Volume 3. Camera aan de voorkant 4. USB-poort en jackstekker 5. Achteruitrijcamera & flash 6. Luidsprekers ES 1. Botón encendido 2. Volumen 3. Cámara frontal 4. Puerto USB y conector Jack 5. Cámara trasera & flash 6. Altavoz PT 1. On / Off Button 2. Volume 3. Cámara frontal 4. Porta USB e tomada Jack 5. Camera & Flash back 6. Caixas de som 5 Konrow vous remercie d’avoir choisi le smartphone SKY55. Vous trouverez dans ce guide toutes les informations relatives à l’utilisation de ce téléphone portable. AVERTISSEMENT : Tous les matériaux d’emballage, comme le scotch, les feuilles en plastique, les ficelles et les étiquettes ne font pas partie de ce produit. CONTENU DE LA BOITE : • 1 Smartphone • 1 Prise secteur / Câble USB • 1 Manuel d’utilisation • 1 Kit piéton Konrow thanks you for purchasing SKY55 smartphone. You will find all the information regarding the use of this cellphone in this guide. CAUTION: The packaging materials, such as the adhesive tape, plastic film, string and labels are not part of this product. GIFTBOX CONTENT: • 1 Smartphone • 1 Mains adaptor / USBable • 1 User guide • 1 Headset Konrow bedankt sich bei Ihnen für die Wahl des SKY55 Smartphone. Sie werden in dieser Bedienungsanleitung alle Informationen zur Verwendung des Mobiltelefons finden. ACHTUNG: Alle Verpackungsmaterialien wie Klebeband, Kunststoffplatten, Kabelbinder und Tags sind nicht dieser Produktteil. PACKUNGSINHALT : • 1 Smartphone • 1 Netzteil / USB Kabel • 1 Bedienungsanleitung • 1 Freisprecheinrichtung Konrow ti ringrazia per aver acquistato il smartphone SKY55. Troverai in questa guida informazioni sull’utilizzo di questo cellulare. ATTENZIONE: Tutti i materiali d’imballaggio come il nastro adesivo, le foglie di plastica, gli spagi e le etichette non fanno parte del prodotto. CONTENUTO DELLA SCATOLA: • 1 Smartphone • 1 Adattatore CA / Cavo USB 6 • 1 Guida per l’utente • 1 Kit pedone Konrow bedankt om ervoor gekozen het SKY55 smartphone. U vindt in deze gids alle informatie met betrekking tot het gebruik van de smartphone. Waarschuwing: alle verpakkingsmaterialen, zoals tape, de kunststof platen(bladeren), moeten de schroefdraad en de etiketten zijn geen onderdeel van dit product. INHOUD VAN DE DOOS: • 1 smartphone • 1 AC-adapter / USB kabel • 1 gebruikershandleiding • 1 handsfree pakket Konrow le agradece de haber escogido el teléfono inteligente SKY55. Usted encontrará en este guía todas las informaciones relativas a la utilización de este teléfono inteligente. ADVERTENCIA: todos los materiales de embalaje, como el celo, las hojas plásticas, las cuerdas finas y las etiquetas no forman parte de este producto. CONTENIDO DE LA CAJA: • 1 Smartphone • 1 Enchufe / USB câble • 1 Manual de usuario • 1 Kit peatón Konrow obrigado por ter escolhido o SKY55 smartphone. Você vai encontrar neste guia todas as informações relacionadas ao uso do telefone smartphone. AVISO: Todos os materiais de embalagem, tais como fita adesiva, folhas de plástico, arames e etiquetas não fazem parte deste produto. CONTEÚDO DO PACOTE: • 1 smartphone • 1 Ficha do setor / Cabo USB • 1 Guia do usuário • 1 fone de ouvido 7 8 2 Français 1 1. Insertion d'une carte SIM • Éteindre le téléphone et retirer le capot arrière. Insérez la carte SIM correctement dans l’emplacement prévu à cet effet (voir le schéma ci-contre). Vous avez 2 ports de cartes SIM (SIM1 et SIM2). Veillez à respecter le sens d’insertion des cartes. • Remettez ensuite le capot arrière en place. ATTENTION : Les données mobiles ne sont utilisables que sur une seule carte SIM. 2. Insertion d'une carte MicroSD • Éteindre le téléphone et retirer le capot arrière. • Insérez la carte mémoire dans l’emplacement prévu à cet effet. • Remettez ensuite le capot arrière en place. ATTENTION : L’insertion ou le retrait d’une carte SIM et d’une carte MicroSD requiert l’extinction complète du smartphone. 3. Charge de la batterie Charge de la batterie : • Pour charger la batterie, brancher le câble USB (fourni) dans le port USB de votre smartphone et l’autre extrémité sur l’adaptateur secteur (fourni). Reliez ensuite l’adaptateur secteur à une prise de courant. • L’icône de charge de la batterie s’allume pendant la charge et indique l’état de charge. Lorsque la batterie est entièrement chargée, vous pouvez débrancher le câble USB de l’appareil puis de la prise de courant. IMPORTANT : • La recharge du smartphone s’effectue uniquement via son port USB. • La batterie doit être chargée pendant au moins 5 à 7 heures lors de la première charge. Note : vous pouvez utiliser l’appareil lorsqu’il est en cours de chargement. Il est alors possible que la durée de charge complète de la batterie soit plus longue. 9 Précautions d’emploi à respecter pour la charge de la batterie : • Pour recharger la batterie, utilisez uniquement l’adaptateur secteur fourni avec votre appareil. N’utilisez aucune autres alimentations ou dispositifs électriques. • La prise électrique à laquelle l’appareil est branché doit être installée près de l’équipement et doit toujours être facilement accessible. • Patientez toujours au moins 5 secondes après avoir éteint l’appareil avant de le redémarrer. Éteindre et rallumer immédiatement l’appareil peut endommager les circuits électriques. • Ne pas démonter la batterie. Ne pas jeter la batterie dans le feu ou dans l’eau. Ne pas charger la batterie si la température ambiante dépasse 45°C. • Pour toute réparation ou pour le remplacement de la batterie, adressez-vous à un technicien qualifié. • La durée de vie de la batterie dépend en grande partie de l’utilisation que vous en faites. N’exposez pas la batterie à des températures inférieures à 0° ou supérieures à 50°. Son fonctionnement pourrait en être altéré. • D’importantes interférences électromagnétiques ou des décharges électrostatiques peuvent provoquer un dysfonctionnement ou une perte de données. Si l’appareil ne fonctionne pas correctement, réinitialisez le smartphone ou débranchez l’adaptateur secteur de la prise de courant, puis rebranchez-le. 4. Allumer/éteindre votre smartphone Pour allumer le smartphone, appuyez 3 secondes sur le bouton Marche/Arrêt situé sur la tranche du smartphone. Si le smartphone est allumé, appuyez brièvement sur le bouton pour le mettre en mode veille. Appuyez encore une fois, pour quitter le mode veille. Pour éteindre le smartphone, appuyez 3 secondes sur le bouton Marche/Arrêt le temps qu’un menu apparaisse, cliquez ensuite sur le bouton Éteindre puis confirmer. 5. Verrouillage/déverrouillage des cartes SIM Votre SKY55 est un smartphone double SIM, il vous permet de téléphoner avec deux abonnements à partir du même appareil. Il y a deux emplacements prévus pour deux cartes SIM. • Au démarrage de votre téléphone ce dernier vous invitera à entrer successivement le code PIN de vos deux cartes SIM. (SIM1 puis SIM 2) • La fonction d’appel d’urgence vous permet d’appeler un numéro d’urgence sans avoir à saisir le code PIN. 10 6. Verrouillage/déverrouillage du téléphone Pour déverrouiller l’écran : • Appuyez sur la touche d’allumage de votre téléphone. • Touchez l’icône de déverrouillage et faites-le glisser vers le haut pour déverrouiller l’appareil. • Vous pouvez paramétrer le verrouillage de l’écran en ajoutant un mot de passe ou un dessin à reproduire lors du déverrouillage de votre smartphone ATTENTION : L’oubli ou la perte du mot de passe, Code PIN ou dessin servant au verrouillage de l’écran bloque définitivement votre smartphone. En cas d’oubli ou de perte, la garantie du produit ne prendra pas effet pour une telle négligence. En effet, même un reset ne peut pas solutionner ce problème. Par précaution, notez votre mot de passe ou votre dessin. MOT DE PASSE : _________________ Pour verrouiller votre appareil : • Appuyez simplement sur le bouton marche/arrêt. 7. Émettre et recevoir un appel ATTENTION : Il est impossible d’émettre ou de recevoir un appel sur les deux cartes SIM en même temps. Par exemple si vous êtes en communication sur la ligne de la carte SIM1, les correspondants essayant de vous joindre sur la carte SIM2 seront automatiquement envoyés sur le répondeur. Émettre un appel : • Touchez l’icône du menu principal ou de l’écran d’accueil pour composer le numéro de votre choix. • Touchez l’icône de votre opérateur pour appeler avec la carte SIM 1 ou SIM 2. • Appuyez sur les boutons +/- pour régler le volume de l’appel. • Lorsque vous voulez mettre fin à l’appel, appuyez sur l’icône . Recevoir un appel : • Lors de la réception d’un appel, faites glisser votre doigt vers l’icône • Lorsque vous voulez mettre fin à l’appel, appuyez sur l’icône . . 8. Activation Bluetooth / Wi-Fi Note : afin de limiter votre exposition aux champs électromagnétiques, nous vous recommandons de désactiver le Bluetooth et la Wi-Fi lorsqu’ils ne sont plus utilisés. Vous pouvez activer le Bluetooth par les raccourcis de réglages de base de la barre de notifications ou dans les paramètres du smartphone. • Appuyez sur le bouton d’activation et faites-le glisser sur la droite. • Une fois le Bluetooth activé l’icône apparaît dans votre barre de notification . 11 Vous pouvez activer le Wi-Fi par les raccourcis de réglages de base de la barre de notifications ou dans les paramètres du smartphone. • Appuyez sur le bouton d’activation et faite le glisser sur la droite. • Une fois le Wi-Fi activé, l’icône apparait dans votre barre de . notification 9. Télécharger une application Votre smartphone SKY55 est fourni avec le logiciel Google Play qui vous permet de télécharger des milliers d'applications, telles que de la musique, des films, de la télévision, des livres, des magazines et des jeux. Pour accéder à Google Play, allez à la page de l'application en utilisant le bouton situé sur la page d'accueil et appuyez sur l'icône Play Store. Note : La disponibilité de l'accès à Google Play dépend de votre opérateur téléphonique et du pays dans lequel vous vous trouvez. L'accès à Google Play nécessite la création d'un compte Google. ATTENTION : Konrow ne sera en aucun cas responsable du contenu de la boutique en ligne. La garantie du produit ne couvrira aucun dysfonctionnement dû à une application des magasins en ligne. 10. Rétablir les paramètres d'usine Si vous souhaitez réinitialiser votre smartphone, vous pouvez effectuer une remise à zéro des données à partir du système d’exploitation Android™. PRÉCAUTION : Une remise à zéro des données effacera toutes vos données personnelles, tous les contacts stockés dans votre téléphone ainsi que les applications que vous avez installés. C’est pourquoi nous vous conseillons d’effectuer une sauvegarde de vos données, avant de lancer la procédure. En revanche, les informations stockées sur la carte mémoire externe ne seront pas effacées. Pour effectuer une remise à zéro des données : • Dans Paramètres, cliquez sur « Option de réinitialisation », puis sur « Effacer toutes les données » • Cliquez sur « Réinitialiser le téléphone » puis sur « Tout Effacer » pour confirmer. Le smartphone s’éteindra. Au redémarrage, le système sera réinitialisé. NOTE : Si vous rencontrez un quelconque souci avec votre appareil, veuillez d’abord effectuer une réinitialisation du système avant de le ramener au S.A.V. Google, Android, Google Play et autres marques sont des marques de Google LLC. 12 2 English 1 1. Inserting a SIM card • Switch off the phone and remove the back cover. Insert the SIM card correctly in the space provided for this purpose. You have 2 SIM card ports (SIM1 and SIM2). Be sure to respect the direction of insertion of the cards. • Then replace the back cover. CAUTION: The mobile data can only be used on one SIM card. 2. Inserting a MicroSD • Switch off the phone and remove the back cover. • Insert the memory card into the relevant slot. • Then replace the back cover. CAUTION: Inserting or removing a SIM card or a MicroSD card requires the smartphone to be completely switched off. 3. Installing and charging the battery Charging the battery: • To charge the battery, connect the USB câble (supplied) to the USB port of your smartphone and the other end to the AC adaptor (supplied). Then connect the AC adaptor to a power outlet. • The battery charge icon illuminates during charging and indicates the charge status. • When the battery is fully charged, you can disconnect the USB câble from the device then from the power outlet. IMPORTANT: • The smartphone is only recharged via its USB port. • The battery SKY55 be charged for at least 5 to 7 hours when first charged. Note: You can use the device when it is being charged. In this case, the battery may take longer to charge fully. 4. Switching the smartphone on and off To switch the smartphone on, press the On/Off button located on the side of the smartphone for 3 seconds. If the smartphone is switched on, press for less than a second on the button to put the device into standby mode. Press it again to leave standby mode. 13 To switch off the smartphone, press the On/Off button for 3 seconds until a menu appears, then touch the Off button and confirm. 5. Locking/unlocking SIM cards Your SKY55 is a dual SIM smartphone. It enables you to phone using two lines from the same device. There are two SIM card slots. • When you start up your phone, the latter invites you to enter the PIN codes of your two SIM cards in succession. (SIM1 then SIM 2) The «emergency call» function enables you to call an emergency number without entering the PIN code. 6. Locking/unlocking the phone To unlock the screen: • Press the power key on your phone. • Hold and drag the unlock icon to the top to unlock the device. You can set the screen lock by adding a password or a drawing to reproduce when unlocking your smartphone. CAUTION: Forgetting your screen lock password, PIN code or pattern permanently blocks your smartphone. If this is forgotten or lost, the product warranty will not cover such an oversight. Even a “reset” cannot solve the problem. As a precaution, take a note of your password or pattern. PASSWORD: _________________ To lock your device : • Simply press the on/off button. 7. Making and receiving calls NOTE: It is impossible to make or receive a call on the two SIM cards at the same time. For example, if you are on a call on the SIM 1 line, those trying to contact you on SIM 2 will automatically be diverted to voicemail. Making a call : on the main menu or the home screen to dial the number of your choice. • Tap the icon • Tap the operators icon to call with SIM 1 or SIM 2. • Press the +/- buttons to adjust the call volume. . • When you want to end a call, press the icon Receiving a call : • When a call is received, slide your finger over the icon • When you want to end a call, press the icon . 14 . 8. Bluetooth/Wi-Fi activation Note: To limit your exposure to EMF we recommend you to deactivate Bluetooth and Wi-Fi when it is not any more used. You can activate Bluetooth by the shortcuts of basic regulation of the notification bar or in the parameters of the smartphone. • Click on the activation button and scroll to the right. • When the Bluetooth is activated you will see the icon on the notification bar . You can activate Wi Fi by the shortcuts of basic regulation of the notification bar or in the parameters of the smartphone. • Click on the activation button and scroll to the right. • When the Wi-Fi is activated you will see the icon on the . notification bar 9. Download an application Your SKY55 smartphone is supplied with the Google Play enabling you to download thousands of applications, such as music, movies, TV, books, magazines, and games. To access Google Play, go to the application page using the button located on the home page and tap the Play Store icon. Note: The availability of access to Google Play depends on your phone operator and the country in which you are located. Access to Google Play requires a Google Account to be created. Note: Konrow will shall under no conditions be responsible for the content on the on-line store. The product warranty will not cover any malfunction due to an application from on-line stores. 10. Reset If you want to reset your smartphone, you can do a reset of data from the operating system Android™. CAUTION: A reset data erase all your personal data, all contacts in your phone and the applications you have installed. That is why we recommend that you make a backup of your data before starting the procedure. However the information stored on the external memory card will not be erased. To do a reset of the data: • In Settings, click "Reset Option" and then "Erase All Data" • Click “Reset phone” and confirm “Erase everything”. The smartphone will turn off and on rebooting the system will reset. NOTE : If you have any problem with your device, please try to reset the system before sending it back. Google, Android, Google Play and other marks are trademarks of Google LLC. 15 2 Deutch 1 1. Einsetzen einer SIM-Karte • Schalten Sie das Telefon aus und entfernen Sie die hintere Abdeckung. Legen Sie die SIMKarte richtig in den dafür vorgesehenen Platz ein. Sie haben 2 SIM-Karten-Ports (SIM1 und SIM2). Achten Sie darauf, die Einsetzrichtung der Karten zu beachten. • Dann ersetzen Sie die hintere Abdeckung. ACHTUNG: Die mobilen Daten können nur auf einer SIM-Karte verwendet werden. 2. Einsetzen einer MicroSD-Karte • Schalten Sie das Telefon aus und entfernen Sie die hintere Abdeckung. • Setzen Sie die Speicherkarte in den dafür vorgesehenen Steckplatz ein. • Dann ersetzen Sie die hintere Abdeckung. ACHTUNG: Das Einsetzen oder Entfernen einer SIM- Karte oder eine MicroSD-Karte erfordert das vollständige Abschalten des Smartphones. 3. Akku einlegen und aufladen Das Aufladen des Akkus: • Um den Akku zu laden, verbinden Sie das USB-Kabel (mitgeliefert) mit dem USB-Anschluss Ihres Smartphones und das andere Ende mit dem Netzteil (mitgeliefert). Schließen Sie dann den Netzadapter an eine Steckdose an. • Das Batterielade-Symbol leuchtet während des Ladevorgangs auf und zeigt den Ladestatus an. • Wenn der Akku vollständig geladen ist, können Sie das USB-Kabel vom Gerät und dann von der Steckdose trennen. WICHTIG : • Das Smartphone wird nur über seinen USB-Anschluss aufgeladen. • Der Akku muss während des ersten Ladevorgangs mindestens 5 bis 7 Stunden geladen werden. Notiz: Sie können das Gerät verwenden, während es aufgeladen wird. In diesem Fall ist es möglich, dass sich die Ladezeit verlängert. 16 4. Schalten Sie Ihr Telefon ein / aus Um Ihr Smartphone ein zu schalten, drücken Sie 3 Sekunden auf die Ein / Aus-Taste, die sich am Rand des Smartphone befindet. Wenn das Smartphone eingeschaltet ist, drücken Sie kurz die Taste, um es in den Standby-Modus zu schalten. Drücken Sie erneut um den Standby-Modus wieder zu verlassen. Um das Smartphone aus zu schalten, drücken Sie 3 Sekunden auf die Ein / Aus-Taste, bis ein Menü angezeigt wird. Klicken Sie auf die Schaltfläche AUS und bestätigen Sie. 5. SIM-Karte Sperren / Entriegeln Ihr SKY55 ist ein Dual-SIM-Smartphone Es ermöglicht Ihnen mit zwei Verbindungen von demselben Gerät zu rufen. Es gibt zwei Steckplätze für zwei SIM-Karten. • Wenn Sie Ihr Telefon starten werden Sie nacheinander aufgefordert die PIN Ihrer zwei SIMKarten zu ein zu geben. (erst SIM1 und dann SIM 2) • Die Notruf-Funktion ermöglicht es Ihnen, eine Notrufnummer anrufen, ohne die PIN eingeben. 6. Verriegelung / Entriegelung der smarphone Zum Entsperren des Bildschirms: • Drücken Sie die Power-Taste auf Ihrem Handy. • Tippen und halten Sie das Entsperren-Symbol und ziehen Sie es nach oben, um das Gerät zu entsperren. Sie können die Bildschirmsperre festlegen, indem Sie beim Entsperren Ihres Smartphones ein Kennwort oder eine Zeichnung zum Reproduzieren hinzufügen ACHTUNG: Das Vergessen oder der Verlust des Passworts, Ihres PIN oder des Musters welches für die Bildschirmsperre verwendet wird lässt Ihr Smartphone dauerhaft blockieren. Wenn Sie vergessen oder verloren haben, greift die Produktgarantie nicht wirksam da es scih um Fahrlässigkeit handelt. Auch ein Reset kann dieses Problem nicht lösen. Als Vorsichtsmaßnahme, schreiben Sie Ihr Passwort oder Ihre Zeichnung unten auf. PASSWORT: _________________ So sperren Sie das Gerät : • Drücken Sie einfach die Ein- / Aus-Taste. 7. Senden und Empfangen eines Anrufs ACHTUNG: Sie können keine Anrufe auf beiden SIM-Karten gleichzeitig tätigen oder empfangen. Wenn Sie zum Beispiel einen Anruf auf der Linie von SIM1 tätigen, können Anrufer auf SIM2 sie nicht erreichen und werden automatisch an Ihre Mobilbox weitergeleitet. 17 Einen Anruf tätigenn : • Berühren Sie das Hauptmenü-Symbol oder den Home-Bildschirm die Nummer Ihrer Wahl zu wählen. • Berühren Sie das Symbol für Ihren Service-Aufruf mit der SIM-Karte 1 oder SIM 2. • Drücken Sie die +/- Tasten um die Lautstärke des Anrufs einzustellen. • Wenn Sie das Gespräch beenden möchten, drücken Sie auf das Symbol . Empfangen eines Anrufs : • Wenn ein Anruf eingeht, schieben Sie Ihren Finger auf das Symbol . • Wenn Sie das Gespräch beenden möchten, drücken Sie auf das Symbol . 8. Aktivierung Bluetooth/Wi-Fi Hinweis: Um die Belastung durch elektromagnetische Felder zu begrenzen, empfehlen wir, dass Sie Bluetooth und Wi-Fi deaktivieren, wenn sie nicht in Gebrauch sind. Sie können Bluetooth in den Verknüpfungen zur Grundeinstellung in der Benachrichtigungsleiste aktivieren oder in den Einstellungen des Smartphones einschalten. • Drücken Sie die Aktivierungstaste und schieben Sie sie nach rechts. • Nach der Aktivierung wird das Bluetooth-Symbol in der Benachrichtigungsleiste angezeigt. . Sie können Wi-Fi in den Verknüpfungen zur Grundeinstellung in der Benachrichtigungsleiste aktivieren oder in den Einstellungen des Smartphone einschalten • Drücken Sie die Aktivierungstaste und schieben Sie sie nach rechts. • Wenn Wi-Fi aktiviert ist erscheintdas Wi-Fi-Symbol in der Benachrichtigungsleiste . 9. Programm-Downloads Ihr SKY55-Smartphone wird mit Google Play geliefert, mit dem Sie Tausende von Anwendungen wie Musik, Filme, Fernsehen, Bücher, Zeitschriften und Spiele herunterladen können. Um auf Google Play zuzugreifen, gehen Sie mit der Schaltfläche auf der Startseite auf die Anwendungsseite und tippen Sie auf das Play StoreSymbol. Note: Die Verfügbarkeit des Zugriffs auf Google Play hängt von Ihrem Telefonanbieter und dem Land ab, in dem Sie sich befinden. Für den Zugriff auf Google Play muss ein Google-Konto erstellt werden. Note: Konrow ist unter keinen Umständen für den Inhalt des Online-Shops verantwortlich. Die Produktgarantie deckt keine Fehlfunktionen ab, die auf eine Anwendung von Online-Shops zurückzuführen sind. 10. Zurücksetzen 18 Wenn Sie zurücksetzen Ihr Smartphone möchten, können Sie einen Reset der Daten aus dem Android™ Betriebssystem auszuführen. VORSICHT: Ein Reset löschen alle persönlichen Daten, alle Kontakte in Ihrem Telefon und Anwendungen die Sie installiert haben. Daher empfehlen wir Ihnen, vor dem Start des Verfahrens eine Sicherungskopie Ihrer Daten zu machen. Die gespeicherten Informationen auf einer externen Speicherkarte werden nicht gelöscht. Zum Zurücksetzen Daten: • Klicken Sie unter Einstellungen auf "Option zurücksetzen" und dann auf "Alle Daten löschen". • Klicken Sie auf „Telefon zurücksetzen“ und dann bestätigen Sie auf „Alle löschen“. Das Smartphone wird ausgeschaltet. Nach dem Neustart wird das System zurückgesetzt. HINWEIS: Wenn Sie irgendwelche Probleme mit dem Produkt auftreten, führen Sie zunächst ein System-Reset, bevor sie es zurück schicken. Google, Android, Google Play und andere Marken sind Marken der Google LLC. 19 2 Italiano 1 1. Inserisci una SIM card • Spegnere il telefono e rimuovere la cover posteriore. Inserire la carta SIM correttamente nello spazio previsto a tale scopo. Hai 2 porte per schede SIM (SIM1 e SIM2). Assicurati di rispettare la direzione di inserimento delle carte. • Quindi sostituire il coperchio posteriore. ATTENZIONE: I dati mobili possono essere utilizzati solo su una scheda SIM. 2. Inserisci una MicroSD • Spegnere il telefono e rimuovere la cover posteriore. • Inserire la scheda di memoria nello slot pertinente. • Quindi sostituire il coperchio posteriore. ATTENZIONE: Inserire o rimuovere una SIM card o una MicroSD card richiede che il telefono sia completamente spento. 3. Installa e carica la batteria Caricare la batteria: • Per caricare la batteria, connetti il cavo USB (fornito) alla porta USB del tuo smartphone e l’altra parte all’adattatore CA (fornito), Quindi connetti l’adattatore CA alla presa elettrica. • L’icona di ricarica della batteria si illumine durante il caricamento e indica lo stato di carica. • Quando la batteria è completamente carica, puoi disconnettere il cavo USB dal dispositivo quindi dalla presa elettrica. IMPORTANTE: • Lo smartphone è caricato solo dalla sua porta USB. • La batteria deve essere caricata per almeno 5-7 ore la prima volta. Nota: Puoi usare il dispositivo quando sta caricando. In questo caso, la batteria potrebbe richiedere più tempo per caricarsi completamente. 20 4. Accendi e spegni lo smartphone Per accendere lo smartphone, premi il pulsante On/Off posizionato sul lato dello smartphone per 3 secondi. Se lo smartphone è acceso, premi per meno di un secondo sul pulsante per mettere il dispositivo in modalità standby. Premilo di nuovo per disattivare la modalità standby. Per spegnere lo smartphone, premi il pulsante On/Off per 3 secondi fin a quando appare il menu, quindi tocca il pulsante Off e conferma. 5. Blocca/Sblocca le SIM card Il tuo SKY55 è uno smartphone dual SIM. Ti abilita a telefonare usando due line dallo stesso dispositivo. Ci sono due slot per SIM card. • Quando avvii il tuo telefono, quest’ultimo ti invita a inserire i codici PIN delle due SIM card in successione. (SIM1 qundi SIM 2) • La funzione della «chiamata d’e,ergenza» ti abilita a chiamare un numero di emergenza senza inserire il codice PIN. 6. Blocca/Sblocca il telefono Per sbloccare lo schermo: • Premi il pulsante di accensione sul tuo telefono. • Blocca e trascina l’icona di sblocco sulla parte alta per sbloccare il dispositivo. È possibile impostare il blocco dello schermo aggiungendo una password o un disegno da riprodurre quando si sblocca lo smartphone. ATTENZIONE: Dimenticando la tua password, il tuo codice PIN o la sequenza per lo sblocco dello schermo blocca permanentemente il tuo smartphone. Se questo è dimenticato o perso, la garanzia del prodotto, non coprirà tale svista. Anche un “reset” non può risolvere il problema. Come preavvertimento, prendi nota della tua password o della tua sequenza. PASSWORD: _________________ Per bloccare il tuo dispositivo • Premi semplicemente il pulsante on/off 7. Effettua e ricevi le chiamate NOTA: E’ impossibile effettuare o ricevere una chiamata nello stesso momento sulle due SIM card. Per esempio, se sei in chiamata sulla linea della SIM 1, coloro che stanno cercando di contattarti sulla SIM 2, saranno automaticamente deviate alla segreteria telefonica. Effettuare una chiamata • Tocca l’icona sul menu principale o sulla schermata home per comporre il numero di tua 21 scelta. • Tocca l’icona degli operatori per chiamare con la SIM 1 o la SIM 2. • Premi I pulsanti +/- per regolare il volume della chiamata. • Quando vuoi terminare una chiamata, premi l’icona . Ricevere una chiamata • Quando ricevi una chiamata, scorri le tue dita sull’icona • Quando vuoi terminare una chiamata, premi l’icona . . 8. Attiva Bluetooth/Wi-Fi Nota: Per limitare la tua esposizione all’EMF ti raccomandiamo ti disattivare il Bluetooth e il Wi-Fi quando non è più usato. Puoi attivare il Bluetooth dalle scorciatoie della regolazione base della barra di notifica o nei parametri dello smartphone. • Clicca sul pulsante di attivazione e scrolla verso destra. • Quando il Bluetooth è attivato vedrai l’icona della barra di notifica . Puoi atitvare il Wi Fi dalle scorciatoie della regolazione base della barra di notifica o nei parametri dello smartphone. • Clicca sul pulsante di attivazione e scrolla verso destra.. • Quando il Wi-Fi è attivato vedrai l’icona sulla barra di notifica . 9. Scarica un’applicazione Il vostro smartphone SKY55 viene fornito con il Google Play che vi permette di scaricare migliaia di applicazioni, come musica, film, TV, libri, riviste e giochi. Per accedere a Google Play, andare alla pagina dell'applicazione utilizzando il pulsante situato sulla home page e toccare l'icona Play Store. Nota: La disponibilità di accesso a Google Play dipende dal vostro operatore telefonico e dal paese in cui vi trovate. L'accesso a Google Play richiede la creazione di un account Google. Nota: Konrow non sarà in alcun modo responsabile del contenuto del negozio on-line. La garanzia del prodotto non coprirà eventuali malfunzionamenti dovuti ad un'applicazione proveniente da negozi on-line. 10. Resetta Se vuoi resettare il tuo smartphone, puoi fare un reset dei dati dal sistema operativo Android™. ATTENZIONE: Un reset dei dati elimina tutti i tuoi dati personali, tutti i contatti nel tuo telefono e le applicazioni che hai installato. Per questo motive, ti raccomandiamo di fare un backup dei tuoi dati prima di iniziare la procedura. Comunque le informazioni archiviate sulla memory card esterna non saranno eliminate. 22 Per fare un reset dei dati: • In Impostazioni, fai clic su "Ripristina opzioni" e quindi su "Cancella tutti i dati" • Clicca su “Resetta telefono” e confirma, “Elimina tutto”. Lo smartphone si spegnerà e riavviandosi, il sistema si resetterà. NOTA: Per qualsiasi problema con il tuo smartphone, prova a resettare il sistema, prima di rimandarlo indietro. Google, Android, Google Play e altre marche sono marchi commerciali di Google LLC. 23 2 Nederlands 1 1. Het plaatsen van de SIM-kaart • Schakel de telefoon uit en verwijder de achterklep. Plaats de SIM-kaart correct in de daarvoor bestemde ruimte. U hebt twee SIM-kaartpoorten (SIM1 en SIM2). Zorg ervoor dat u de richting van het inbrengen van de kaarten respecteert. • Plaats vervolgens de achterklep terug. LET OP: De mobiele gegevens kunnen alleen op één SIM-kaart worden gebruikt. 2. Het plaatsen van een micro SD-kaart • Schakel de telefoon uit en verwijder de achterklep. • Plaats de geheugenkaart in de daarvoor bestemde sleuf. • Plaats vervolgens de achterklep terug. LET OP: Voor het plaatsen of verwijderen van een SIM-kaart en een MicroSD-kaart moet de smartphone volledig afsluiten. 3. Het installeren en het opladen van de batterij De batterij opladenj : • Om de batterij op te laden, sluit u de USB-kabel (bijgeleverd) aan op de USB-poort van uw smartphone en het andere uiteinde op de netadapter (bijgeleverd). Sluit vervolgens de netspanningsadapter aan op een stopcontact. • Het pictogram voor het opladen van de batterij gaat branden tijdens het opladen en geeft de laadstatus aan. • Wanneer de batterij volledig is opgeladen, kunt u de USB-kabel loskoppelen van het apparaat en vervolgens van het stopcontact. LET OP: • De smartphone wordt alleen opgeladen via de USB-poort. • De batterij moet tijdens de eerste keer opladen minstens 5 tot 7 uur worden opgeladen. LET OP: u kunt het apparaat gebruiken terwijl het wordt opgeladen. Het is mogelijk dat de volledige oplaadtijd van de batterij langer is. 24 4. Het in- en uitschakelen van de smartphone Als je de smartphone wilt inschakelen, druk je 3 seconden op de aan-/uitknop aan de zijkant van de smartphone. Als de smartphone dan is ingeschakeld, druk je minder dan één seconde op de knop om het apparaat in de standbymodus te zetten. Druk nogmaals op de knop om de standbymodus te verlaten. Om de smartphone uit te schakelen, druk je 3 seconden op de aan-/uitknop totdat er een menu verschijnt, druk dan op de uitknop en bevestig dat je het apparaat wilt uitschakelen. 5. Het vergrendelen/ontgrendelen van de SIM-kaartenn Je SKY55 is een dual SIM-smartphone. Je kunt zo via twee lijnen vanaf hetzelfde apparaat bellen. Er zijn twee sleufjes voor het plaatsen van een SIM-kaart. • Wanneer je je telefoon opstart zal je worden gevraagd om de PIN-codes van je twee SIMkaarten achtereenvolgens in te voeren. (eerst SIM 1 en dan SIM 2) • Met de functie "noodoproep" kun je altijd een noodnummer bellen zonder dat je eerst de pincode hoeft in te voeren 6. Het vergrendelen/ontgrendelen van de telefoon Het ontgrendelen van het scherm: • Druk op de aan-/uitknop op je telefoon. • Houd dit vast en sleep het ontgrendelingspictogram naar boven om het apparaat te ontgrendelen. U kunt de schermvergrendeling instellen door een wachtwoord of tekening toe te voegen die moet worden weergegeven bij het ontgrendelen van uw smartphone. LET OP: als je je wachtwoord voor de schermvergrendeling, de PIN-code of het patroon vergeet, wordt je smartphone permanent geblokkeerd. Als dit vergeten wordt of verloren gaat, zal de garantie van het product geen betrekking hebben op dit onderdeel. Zelfs een "reset" kan het probleem niet oplossen. Onthoud je wachtwoord of het patroon daarom goed en schrijf het op. WACHTWOORD: _______________ Het vergrendelen van het apparaat: • druk gewoon op de aan-/uitknop. 25 7. Het maken en het ontvangen van oproepen LET OP: het is onmogelijk om op beide SIM-kaarten tegelijkertijd een oproep te maken of te ontvangen. Als je bijvoorbeeld op de SIM 1-lijn belt, zullen degenen, die contact met je proberen op te nemen op de SIM 2-lijn, automatisch worden doorgeschakeld naar de voicemail. Het maken van een oproep : • Tik om het nummer van je keuze te kunnen selecteren op het pictogram in het hoofdmenu of op het startscherm. • Tik dan op het pictogram van de operator om met SIM 1 of met SIM 2 te kunnen bellen. • Druk op de +/- knoppen om het belvolume aan te passen. • Als je een gesprek wilt beëindigen, druk je op het pictogram . Een oproep ontvangen : • Wanneer je een oproep ontvangt, schuif je met je vinger over het pictogram om aan te nemen . . • Als je een gesprek wilt beëindigen, druk je weer op het pictogram. 8. Bluetooth/WiFi-activering LET OP: om je blootstelling aan EMF te beperken, raden wij je aan om de Bluetooth- en de WiFi-functie uit te schakelen wanneer het niet wordt gebruikt. Je kunt de Bluetooth-funcie door de snelkoppelingen van de basisregulatie van de notificatiebalk of in de parameters van de smartphone activeren. • Klik op de activeringsknop en scroll dan naar rechts. • Als de Bluetooth-functie is geactiveerd, zul je hiervan een pictogram op de notificatiebalk zien . Je kunt de WiFi functie met de snelkoppelingen van de basisregulatie van de notificatiebalk of in de parameters van de smartphone activeren. • Klik op de activeringsknop en scroll dan naar rechts. • Als de WiFi-functie is geactiveerd, zul je hiervan een pictogram op de notificatiebalk zien . 9. Het downloaden van een applicatie Uw SKY55-smartphone wordt geleverd met de Google Play waarmee u duizenden applicaties kunt downloaden, zoals muziek, films, TV, boeken, tijdschriften en games. Om toegang te krijgen tot Google Play, gaat u naar de applicatiepagina met behulp van de knop op de startpagina en tikt u op het Play Storepictogram. Opmerking: De beschikbaarheid van toegang tot Google Play is afhankelijk van uw telefoonmaatschappij en het land waarin u zich bevindt. Voor toegang tot Google Play moet een Google-account worden aangemaakt. Opmerking: Konrow is onder geen enkele voorwaarde verantwoordelijk voor de inhoud van de on-line winkel. De productgarantie dekt geen enkele storing als gevolg van een toepassing van de onlinewinkels. 26 10. Reset Als je je smartphone wilt resetten, kun je de data via het besturingssysteem Android™ resetten. LET OP : het resetten zal al je persoonlijke gegevens, alle contacten in je telefoon en de apps die je hebt geïnstalleerd verwijderen. Daarom bevelen wij je aan om, voordat je met deze procedure begint, een back-up van je gegevens te maken. De informatie, die op de externe geheugenkaart is opgeslagen, wordt niet gewist. Om de gegevens opnieuw te resetten: • Klik in Instellingen op "Resetoptie" en vervolgens "Wis alle gegevens" • Klik dan op "Reset telefoon" en bevestig "Alles verwijderen". De smartphone wordt dan uitgeschakeld en bij het herstarten wordt het systeem dan opnieuw ingesteld. LET OP: als je een probleem hebt met je apparaat probeer dan, vóórdat je het terugstuurt, het systeem eerst opnieuw te resetten Google, Android, Google Play en andere merken zijn handelsmerken van Google LLC. 27 2 Español 1 1. Insertar la tarjeta SIM • Apague el teléfono y retire la cubierta posterior. Inserte la tarjeta SIM correctamente en el espacio provisto para este propósito. Tienes 2 puertos de tarjeta SIM (SIM1 y SIM2). Asegúrese de respetar la dirección de inserción de las tarjetas. • Luego vuelva a colocar la tapa posterior. PRECAUCIÓN : Los datos móviles solo se pueden utilizar en una tarjeta SIM. 2. Insertar tarjeta Micro SD • Apague el teléfono y retire la cubierta posterior. • Inserta la tarjeta de memoria en la ranura provista. • Luego vuelva a colocar la tapa posterior. PRECAUCIÓN: la inserción o extracción de una tarjeta SIM y una tarjeta MicroSD requiere que el teléfono inteligente se apague por completo. 3. Instalar y cargar la bateria Cargado de la batería : • Para cargar la batería, conecte el câble USB (suministrado) al puerto USB de su teléfono inteligente y el otro extremo al adaptador de CA (suministrado). Luego, conecte el adaptador de CA a una toma de corriente. • El icono de carga de la batería se ilumina durante la carga e indica el estado de carga. Cuando la batería está completamente cargada, puede desconectar el câble USB del dispositivo y luego de la toma de corriente. IMPORTANTE: • El teléfono inteligente solo se carga a través de su puerto USB. • La batería debe cargarse durante al menos 5 a 7 horas durante la primera carga. Nota : Puede utilizar el equipo mientras se esta cargando. En este caso la batería puede tardar mas en cargarse completamente. 28 4. Encender / apagar su teléfono Para encender el teléfono presione el botón encendido/ apagado localizado al costado del teléfono por 3 segundos. Si el dispositivo esta encendido, presione por menos de un segundo en el botón para poner al equipo en modo de espera. Para apagar el teléfono, presione el botón encendido/apagado por 3 segundos hasta que aparezca un menú, presione el botón de apagado y confirme. 5. Bloqueo/Desbloque de tarjeta SIM Su SKY55 es un teléfono inteligente de doble SIM. Permite tener dos líneas telefónicas en al mismo dispositivo. Tiene dos ranuras para tarjeta SIM. • Al inicializar su teléfono, lo invitara a introducir el código PIN de sus dos tarjetas SIM sucesivamente. (SIM 1 luego SIM 2). La función de «llamada de emergencia» le permite llamar a un numero de emergencia sin introducir el código PIN. 6. Bloquear/Desbloquear el teléfono Para desbloquear la pantalla: • Presione la tecla de encendido. • Mantenga y arrastre el icono de desbloqueo hacia arriba para desbloquear el dispositivo. Puede configurar el bloqueo de pantalla agregando una contraseña o un dibujo para reproducir al desbloquear su teléfono inteligente. ATENCIÓN: El olvido o pérdida de la contraseña, código PIN o dibujo sirviendo de bloqueo de pantalla bloquea definitívamente su smartphone. En caso de olvido o pérdida, la garantía del teléfono sería anulada. La garantía no cubre ningún daño provocado por el mal uso o la degligencia. Incluso un reinício no puede solucionar éste problema. Como medida de precaución, guarde su contraseña o su dibujo. CONTRASEÑA: _______________ Para bloquear su dispositivo : • Presione el botón de encendido/apagado. 7. Haciendo y recibiendo llamadas NOTA: Es imposible hacer o recibir una llamada con las dos tarjetas SIM al mismo tiempo. Por ejemplo, si usted esta en una llamada con la línea del SIM 1, aquellos tratando de contactarlo por el SIM 2 serán enviados al buzón de voz automáticamente Haciendo una llamada : 29 • Toque el icono en el menú principal o pantalla de inicio para marcar el numero de su preferencia • Toque el icono de operadora para llamar con el SIM 1 o el SIM 2. • Presione los botones +/- para ajustar el volumen de la llamada • Cuando quiera terminar una llamada presione el icono . Recibiendo una llamada : • Cuando reciba una llamada deslice su dedo sobre el icono • Cuando quiera finalizar una llamada presione el icono . . 8. Bluetooth/Activacion del Wi-Fi Nota: Para limitar la exposición a CEM recomendamos desactivar el Bluetooth y el Wi-Fi cuando no este en uso. Puede activar el Bluetooth por el acceso directo para arreglos básicos de la barra de notificaciones en los parámetros del teléfono inteligente. • Haga click en el botón de activación y deslícelo hacia a la derecha. • Cuando el Bluetooth esta activado vera el icono en la barra de notificaciones . Puede activar el Wi-Fi por el acceso directo para arreglos básicos de la barra de notificaciones en los parámetros del teléfono inteligente. • Haga clic en el botón de activación y deslícelo hacia la derecha. • Cuando el Wi-Fi esta activado vera el icono en la barra de notificaciones . 9. Descargar una aplicacion El smartphone SKY55 se suministra con Google Play, lo que le permite descargar miles de aplicaciones, como música, películas, televisión, libros, revistas y juegos. Para acceder a Google Play, vaya a la página de la aplicación con el botón que se encuentra en la página de inicio y toque el icono de Play Store. Note: La disponibilidad de acceso a Google Play depende de su operador de telefonía y del país en el que se encuentre. Para acceder a Google Play es necesario crear una cuenta de Google. Nota: Konrow no se hará responsable bajo ninguna condición del contenido de la tienda online. La garantía del producto no cubrirá ningún mal funcionamiento debido a una aplicación de las tiendas en línea. 10. Restablecer Si desea restablecer su teléfono inteligente, puede hacer un restablecimiento de datos del sistema operativo Android™. PRECAUCIÓN: Los datos de reinicio borran todos sus datos personales, todos los contactos en su teléfono y las aplicaciones que ha instalado. Es por eso que le recomendamos hacer una copia de seguridad de sus datos antes de comenzar el procedimiento. Sin embargo, la información almacenada en la tarjeta de memoria externa no se borrará. 30 Para hacer un reinicio de los datos: • En Configuración, haga clic en "Restablecer opción" y luego "Borrar todos los datos" • Haga clic en "Restablecer teléfono" y confirme, "Borrar todo". El teléfono inteligente se apagará y se reiniciará. El sistema se reiniciará. El dispositivo se reiniciará automáticamente. No desconecte el cargador o la bacteria mientras este proceso no finalice e inície de nuevo el dispositivo uede que el restablecimiento de fábrica no borre de forma permanente todos los datos de tu teléfono, incluyendo tu información personal. NOTA: Si tiene algún problema con su dispositivo, intente reiniciar el sistema antes de devolverlo. Google, Android, Google Play y otras marcas son marcas comerciales de Google LLC. 31 2 Português 1 1. Inserir um cartão SIM • Desligue o telefone e remova a tampa traseira. Insira o cartão SIM corretamente no espaço fornecido para essa finalidade. Você tem 2 portas de cartão SIM (SIM1 e SIM2). Certifique-se de respeitar a direção de inserção dos cartões. • Em seguida, substitua a tampa traseira. CUIDADO: Os dados móveis só podem ser usados em um cartão SIM. 2. Inserir um cartão de memória MicroSD • Desligue o telefone e remova a tampa traseira. • Inserire la scheda di memoria nello slot fornito. • Em seguida, substitua a tampa traseira. CUIDADO: Inserir ou remover um cartão SIM ou MicroSD requer que o telemóvel esteja completamente desligado. 3. Instalar e carregar a bateria Carregar a bateria: • Per caricare la batteria, collegare il cavo USB (in dotazione) alla porta USB del dispositivo smartphone e l'altra estremità sull'adattatore CA (in dotazione). Quindi collegare l'adattatore settore ad una presa di corrente. • L'icona di carica della batteria si illumina durante la carica e indica lo stato di carica. • Quando la batteria è completamente carica, è possibile scollegare il cavo USB dal dispositivo quindi dalla presa di corrente. IMPORTANTE: • Lo smartphone viene caricato solo tramite la porta USB. • La batteria deve essere caricata per almeno 5 o 7 ore alla prima carica. Aviso: Pode utilizar o seu dispositivo enquanto ele está a ser carregado. Neste caso, a sua bateria pode demorar mais tempo a carregar. 32 4. Ligar e desligar o telemóvel Para ligar o telemóvel, prima o botão de Ligar/Desligar localizado no lado do telemóvel durante 3 segundos. Se o telemóvel estiver ligado, prima o botão menos de um segundo para entrar em modo standby. Prima o outra vez para sair do modo standby. ara desligar o telemóvel, prima o botão Ligar/Desligar por 3 segundos até um menu aparecer, e depois toque no botão Off e confirme. 5. Bloquear/desbloquear cartões SIM O seu SKY55 é um telemóvel com dual SIM. Isto permite que use dois números no mesmo telemóvel. Há duas entradas para cartões SIM. • Quando liga o seu telemóvel, um menu convida-o a colocar o seu código PIN dos seus dois cartões SIM em sucessão. (SIM1 e depois SIM2) A função de “chamada de emergência” permite que ligue um número de emergência sem ter de inserir o código PIN. 6. Bloquear/desbloquear o telemóvel Para bloquear o ecrã: • Prima o botão de energia do telemóvel. • Mantenha e arraste o ícone de desbloqueio para desbloquear o seu dispositivo. Você pode definir o bloqueio de tela adicionando uma senha ou desenho para reproduzir ao desbloquear seu smartphone. CUIDADO: Esquecer-se da password de bloqueio de ecrã, código PIN ou padrão de desbloqueio bloqueia permanentemente o seu telemóvel. Se se esquecido ou perdido a garantia não cobre tais acontecimentos. Até uma “reposição do sistema” não resolve o problema. Como precaução, anote a sua palavra passe ou padrão. PALAVRA PASSE: _________________ Para bloquear o seu dispositivo: • Simplesmente prima o botão de LIgar/Desligar. 7. Fazer e receber chamadas CUIDADO: : É impossível fazer e receber chamadas nos dois cartões SIM ao mesmo tempo. Por exemplo, se estiver uma chamada no SIM 1, aqueles que o tentam contactar no SIM 2 irá automaticamente para voicemail. 33 Fazendo uma ligação: • Carregue no ícone no menu principal no seu ecrã principal para digitar um número. • Carregue no ícone de operadoras para telefonar com o SIM 1 ou com o SIM 2. • Prima os botões +/- para ajustar o volume das chamadas. • Quando quiser desligar uma chamada, prima o ícone . Receber uma chamada : • Quando uma chamada é recebida, deslize o dedo pelo ícone . • Quando quiser desligar uma chamada, prima o ícone . 8. Ativação de Bluetooth/Wi-Fi Repare: Para limitar a sua exposição a EMF nós recomendamos que desative o Bluetooth e Wi-Fi quando já não os está a utilizar. Pode ativar o Bluetooth através dos atalhos de regulação básica da barra de notificações ou nos parâmetros do telemóvel. • Clique no botão de ativação e mova para a direita. • Quando o Bluetooth está ativado irá ver o ícone na barra de notificações . Pode ativar o Wi-Fi através de atalhos de regulação básica da barra de notificações ou nos parâmetros do telemóvel. • Clique no botão de ativação e mova para a direita. • Quando o Wi-FI está ativado irá ver o ícone na barra de notificações . 9. Baixar uma aplicação O smartphone SKY55 vem com o Google Play, permitindo o download de milhares de aplicações incluindo música, filmes, TV, livros, revistas e jogos. Para acessar o Google Play, vá para a página da aplicação com o botão na página inicial e toque no ícone Play Store. Nota: A disponibilidade de acesso ao Google Play depende do seu operador telefónico e do país em que se encontra. Para acessar o Google Play, você precisa criar uma conta Google. Nota: Em nenhuma circunstância a Konrow pode ser considerada responsável pelo conteúdo da loja online. A garantia do produto não cobrirá qualquer defeito de funcionamento devido a uma aplicação de loja online. 10. Reposição de sistema Se quiser repor o sistema do seu telemóvel, pode fazer uma reposição de fábrica do sistema operativo Android™. CUIDADO: Fazer uma reposição de sistema apagará todos os seus dados pessoais, todos os contactos e todas as aplicações que instalou. Isto é o porquê de recomendarmos que faça um backup dos seus dados antes de começar com o procedimento. No entanto a informação guardada no cartão de memória exterior não é apagada. 34 Para apagar os dados: • Em Configurações, clique em "Redefinir opção" e, em seguida, "Limpar todos os dados" • Clique em "Redefinir telefone" e confirme "Apagar tudo". O telemóvel irá desligar e ligar outra vez, ao ligar o sistema irá ser reposto com as definições de fábrica. REPARA: Se tiver qualquer problema com o seu dispositivo, por favor tente repor as definições de fábrica antes de o enviar de volta. Google, Android, Google Play e outras marcas são marcas comerciais da Google LLC. 35 MENTIONS LEGALES / LEGAL MENTIONS 36 Français Consignes de sécurité Veuillez lire attentivement les consignes de sécurité. Batterie et chargement Patientez toujours au moins 5 secondes après avoir éteint l’appareil avant de le redémarrer. Éteindre et rallumer immédiatement l’appareil peut endommager les circuits électriques. Ne pas démonter la batterie. Ne pas jeter la batterie dans le feu ou dans l’eau. Ne pas charger la batterie si la température ambiante est inférieure à 0°C ou supérieur à 45°C. Pour toute réparation ou pour le remplacement de la batterie, adressez-vous à un technicien qualifié. La durée de vie de la batterie dépend en grande partie de l’utilisation que vous en faites. Pour recharger la batterie, utilisez uniquement l’adaptateur secteur fourni avec votre appareil Konrow. N’utilisez aucune autres alimentations ou dispositifs électriques. La prise électrique à laquelle l’appareil est branché doit être installée près de l’équipement et doit toujours être facilement accessible. Le câble d’alimentation doit être mis en place de sorte que l’on ne marche pas dessus ou qu’il soit écrasé particulièrement à l’endroit de la prise, à l’endroit où il est branché et à l’endroit d’où il sort de l’appareil. Ne surchargez pas la prise électrique. Utilisez uniquement la source d’alimentation comme indiqué. Débranchez cet appareil durant les orages ou lorsqu’il n’est pas utilisé durant une longue période. Ne touchez pas le cordon d’alimentation lorsque vos mains sont mouillées et ne tirez pas sur le chargeur pour le débrancher. Le chargeur est conçu pour un usage en intérieur uniquement et dans une zone bien aérée. Utiliser uniquement le chargeur suivant : Nom du fabriquant : Konrow Adresse du fabriquant : 150 Avenue des Chartreux, 13004 Marseille FRANCE Modèle : UT-256E-5100ZY Tension d'entrée : AC 100-240V~50/60Hz - 0.2A max. Tension de sortie : 5V 1.0A Audition À pleine puissance l’écoute prolongée de l’appareil peut endommager l’oreille de l’utilisateur. Afin d'éviter des dommages auditifs éventuels, il est recommandé de ne pas utiliser l'appareil à un niveau sonore élevé pendant une longue durée. Au volant En France, conformément à l’article R412-5-1 du Code de la route l’usage d’un téléphone tenu en main par le conducteur ou d'un appareil ou le port de tout système de type écouteurs, kit piéton, oreillette, casque susceptibles de limiter tant l’attention que l’audition des conducteurs à bord d’un véhicule en circulation est interdit. Les sanctions relatives au non-respect de cet article sont une amende ainsi qu’un retrait de points du permis de conduire. ATTENTION : cette réglementation s’applique uniquement en France. Lors de vos voyages à l’étranger, veuillez consulter au préalable la réglementation en vigueur dans votre pays de destination. 37 Selon l'environnement Ne pas utiliser votre appareil dans certains lieux tels que les avions, les hôpitaux, les stations-services et les garages professionnels ainsi qu’en conduisant un véhicule. Les ondes électromagnétiques de l'appareil peuvent perturber le bon fonctionnement des appareils électroniques utilisés dans ces différents lieux. Nous vous conseillons d’arrêter ou de mettre votre appareil en mode avion dans ces différents lieux pour éviter toutes perturbations. Ne pas exposer l’appareil à la lumière directe du soleil ni à toute autre source extrême de chaleur ou de froid. Température d’utilisation : -10°C et 40°C. Si vous utilisez un implant électronique (stimulateurs cardiaques, pompes à insuline, neurostimulateur…) veuillez respecter une distance de 15 cm entre l'appareil et votre implant électronique. Appareil à manipuler avec précaution Ne pas exercer de fortes pressions sur l’écran et ne pas poser d’objets dessus. Cela pourrait endommager l’écran. Tenez l’appareil éloigné de tout objet métallique (pièces, clés…). Ne pas laisser tomber l’appareil. Ne pas l’exposer aux chocs, frictions et impacts. Risque d'incendie ou de choc électrique Ne pas exposer cet appareil à la pluie ou à l’humidité. Ne pas exposer le produit à des gouttes d’eau ou à des éclaboussures et ne placer aucun objet rempli de liquide, tel un vase, sur l’appareil. Ne pas utiliser le produit à proximité de sources inflammables ou explosives. N’installez pas cet appareil près de sources de chaleur telles que des plaques électriques, cuisinières ou autres (même les amplificateurs). Conseil d'utilisation Entretien de l'appareil Ne pas mettre d’objets pointus directement en contact avec la surface et ne pas vaporiser de produit nettoyant directement sur l’écran. Nettoyez votre appareil uniquement avec un chiffon doux (sec ou légèrement humidifié). Ne pas tenter de démonter l’appareil, il ne serait plus couvert par la garantie. Utilisez uniquement les pièces détachées/accessoires et les pièces de rechange spécifiées par le fabricant. Référez-vous à un personnel agréé pour toute réparation. Après toute révision ou réparation effectuée sur ce produit, demandez au technicien de procéder à une vérification de sécurité. Eviter les pertes de données D’importantes interférences électromagnétiques ou des décharges électrostatiques peuvent provoquer un dysfonctionnement ou une perte de données. Si l’appareil ne fonctionne pas correctement, réinitialisez l'appareil ou débranchez l’adaptateur secteur de la prise de courant, puis rebranchez-le. Afin d’éviter les pertes de données, pensez à faire une sauvegarde (informatique ou papier) des informations enregistrées dans l’appareil. 38 Recyclage Le symbole indiqué ici et sur l’appareil signifie que l’appareil est classé comme un équipement électrique ou électronique et qu’il ne doit pas être mis au rebut avec d’autres déchets ménagers ou commerciaux en fin de vie. La directive DEEE 2012/19/EU (directive relative aux déchets d’équipements électriques et électroniques) a été instaurée pour recycler les appareils à l’aide des techniques de récupération et de recyclage les plus performantes, afin de minimiser les effets sur l’environnement, traiter les substances dangereuses et éviter les décharges de plus en plus nombreuses. Consignes de mise au rebut de l’appareil pour les utilisateurs privés : lorsque vous n’utilisez plus l’appareil, enlevez la batterie et mettez-la au rebut ainsi que l’appareil en respectant les processus de recyclage locaux. Pour de plus amples informations, contactez les autorités locales ou le revendeur de l’appareil. Consignes de mise au rebut de l’appareil pour les utilisateurs professionnels : les utilisateurs professionnels doivent contacter leurs fournisseurs, vérifier les conditions générales du contrat d’achat et s’assurer que cet appareil n’est pas mélangé à d’autres déchets commerciaux lors de sa mise au rebut. Débit d'absorption spécifique "DAS" - Exposition aux radiofréquences Votre appareil est conçu et construit de manière à respecter les normes européennes en matière d'exposition aux fréquences radioélectriques. Le DAS (Débit d’Absorption Spécifique) des appareils quantifie le niveau d’exposition maximal de l’utilisateur aux ondes électromagnétiques, pour une utilisation près de l’oreille et près du corps. La réglementation européenne impose que le DAS ne dépasse pas la moyenne de 2W/kg sur 10g de tissu. La valeur du DAS est déterminée en se basant sur le niveau le plus élevé de radiofréquences émis lors des essais en laboratoire. La valeur réelle du DAS lors de l’utilisation de l'appareil est inférieure à ce niveau. La valeur du DAS de l'appareil peut varier en fonction des facteurs suivants : proximité/éloignement par rapport à une antenne-relais, utilisation d’accessoires et autres. ATTENTION : L’indice DAS peut varier en fonction des exigences nationales en matière de divulgation et de tests et en fonction de la bande de fréquence du réseau. Conseil pour réduire le niveau d’exposition aux rayonnements électromagnétiques : Veillez à utiliser votre appareil dans de bonnes conditions de réception, pour diminuer la quantité de rayonnement reçus (notamment dans un parking souterrain ou lors de déplacement en transport (train, voiture)). Un icône de réception vous indique la qualité de réception de votre appareil. La réception est bonne lorsque la jauge du signal réseau est pleine. Afin de limiter l’exposition aux rayonnements, nous vous recommandons l’usage du kit piéton. Afin de limiter les mauvaises conséquences de l’exposition à un rayonnement prolongé, nous conseillons aux adolescents de tenir le appareil éloigné de leur bas ventre et aux femmes enceintes de tenir l'appareil éloigné du ventre. 39 En cas de problème : Contactez notre service après-vente depuis la page contact de notre site Internet : www.konrow.com Fabriqué en Chine 2020 Konrow En cas de problème irrésolu, veuillez contacter votre revendeur. Pour des raisons de sécurité seule notre station technique est habilitée à intervenir sur nos produits, dans cette optique nous ne fournissons aucune pièce détachée. La garantie fournisseur Konrow est valable pour un usage normal du produit tel qu’il est défini dans le cadre de la notice d’utilisation. Sont exclues de cette garantie, les détériorations dues à une cause étrangère à l’appareil. En particulier, la garantie ne s’applique pas si l’appareil a été endommagé à la suite d’un choc ou d’une chute, d’une fausse manœuvre, d’un branchement non conforme aux instructions mentionnées dans la notice, de l’effet de foudre, de surtension secteur, d’une protection insuffisante contre la chaleur, l’humidité ou le gel. La garantie s’étend uniquement à la France métropolitaine. La garantie ne couvre pas : • Les manuels d’utilisation, ni les applications, réglages, contenus ou données quel qu’il soit. • L’usure normale du produit (écrans, batteries et appareil photo). • Toute détérioration du produit due à une mauvaise utilisation, notamment celles causées par des objets, une pression, une chute. • Toute utilisation du produit non conforme aux précautions d’emploi stipulées dans le manuel d’utilisation. • Les dégâts occasionnés au produit par un autre produit connecté ou utilisé avec, un accessoire ou un logiciel non fourni par Konrow. • Tous dommages occasionnés sur la batterie. • Le produit ou ses accessoires s’il a été démonté ou modifié d’une quelconque façon. • Tout produit non identifiable par son numéro de série ou le(s) numéro(s) IMEI. Si ses éléments ont été retirés, effacés, modifiés ou rendus illisibles, la garantie ne s’applique pas. • Les dommages effectués sur le produit dus à une exposition à l’humidité, à des conditions de chaleur ou froid extrêmes, à la corrosion, à l’oxydation, avec tout liquide quel qu’il soit. • Toute détérioration de(s) lecteur(s) SIM ou lecteur MicroSD. • En tout état de cause, la garantie légale pour vices cachés s’appliquera conformément aux articles 1541 et suivants du Code Civil. 40 English Safety and care information Read these instructions carefully. Charging the battery Always wait at least 5 seconds after switching off the device before restarting it. Switching the device off and then back on again immediately may damage the electrical circuits. Do not disassemble the battery. Do not dispose of batteries in fire or water. Do not charge the battery if the room temperature is below 0°C or exceeds 45°C. For all repairs or to replace the battery, consult a qualified technician. The lifetime of the battery depends largely on how you use it. To recharge the battery, only use the mains adaptor supplied with your device. Do not use any other power supply or electrical device. The power outlet to which the device is connected must be near the equipment and must always be easily accessible. The power cord must be placed so that it will not be stepped on or crushed particularly at the outlet, where it is plugged in or where it is connected to the device. Do not overload the power outlet. Use the power supply only as indicated. Disconnect this device during electrical storms or when not in use for an extended period. Do not touch the power cord with wet hands and do not pull on the charger to disconnect it. This charger is for indoor use only. Only use adapter as per below: Manufacturer name : Konrow Manufacturer address : 150 Avenue des Chartreux, 13004 Marseille FRANCE Model Name : UT-256E-5100ZY Rated Input : AC 100-240V~50/60Hz - 0.2A max. Rated Output: 5V 1.0A Hearing Prolonged use of this music player at full power may damage the user’s hearing. In order to prevent these risks it is recommended not to listen at high volume levels for long periods. While driving In France, in accordance with Article R412-5-1 of the French Highway Code, drivers are not permitted to use hand-held phones nor the use of a device or a hands-free kit capable of distracting the attention whilst the vehicle is moving. The penalty for non-compliance with this article is a fine and point penalty on your driving licence. NOTE: this legislation applies only in France. During trips abroad, please refer to the legislation in place in the country you are/go. According to each environment Do not use your device in certain locations such as aircraft, hospitals, service stations and professional garages or while driving a vehicle. The electromagnetic waves from the device can disrupt the performance of electronic devices used in these locations. We recommend that you switch off your 41 device or switch it to flight mode in these locations to avoid interference. If you use an electronic implant (pacemakers, insulin pumps, neurostimulators, etc), please keep a distance of 15cm between the device and your electronic implant. Do not expose the device to direct sunlight or other source of extreme heat or cold. Operating temperature: -10°C and 40°C. Risk of fire or electric shock Do not expose this device to rain or moisture. Do not expose the product to water droplets or to splashes and do not place any object filled with liquid, such as a vase, on the device. Do not use the product near flammable or explosive materials. Device to handle with care Do not exert excessive pressure on the screen and do not put objects on it. This could damage the screen. Do not drop the device. Do not expose the device to shocks, friction or impact. Operating guidelines Maintaining the device Keep the device away from all metal objects (coins, keys, etc). Clean only with a soft cloth (dry or slightly damp). Do not attempt to disassemble the device; it would no longer be covered by the warranty. Use only the spare parts/accessories specified by the manufacturer. Refer to a qualified person for any repairs. After any service or repair carried out on this product, ask the technician to perform a safety check. Prevent data loss Significant electromagnetic interference or electrostatic discharge may cause malfunction or loss of data. If the device is not working properly, restart the device or unplug the mains adaptor from the power outlet then plug it in again. In order to prevent data loss, remember to make a (computer or paper) back-up of information saved on the device. Recycling The symbol shown here and on the product means that the product is classed as Electrical or Electronic Equipment and should not be disposed with other household or commercial waste at the end of its working life. The Waste Electrical and Electronic Equipment (WEEE) Directive (2012/19/EU) has been put in place to recycle products using best available recovery and recycling techniques to minimise the impact on the environment, treat any hazardous substances and avoid the increasing landfill. Product disposal instructions for residential users: If you no longer use the device, remove and dispose of the battery, as well as the device, in 42 compliance with the local recycling procedures. For more information please contact your local authority or the retailer where the product was purchased. Product disposal instructions for business users: Business users should contact their suppliers and check the terms and conditions of the purchase contract and ensure that this product is not mixed with other commercial waste for disposal. Specific Absorption Rate "SAR" - Exposure to radio frequency Your device is designed and produced to comply with European authorities for exposure to radiofrequencies. The SAR (Specific Absorption Rate) of devices quantifies the maximum level of exposure of the user to electromagnetic waves for normal use at the ear and use close to the body. European legislation stipulates that the SAR must not exceed 2W/kg averaged over 10g of tissue. The value of the SAR is determined on the basis of the highest level of radio frequencies emitted during laboratory tests. The actual value of the SAR during use of the device is lower than this level. The value of the SAR of the device can vary according to the following factors: how far/close the device is to a relay antenna, use of accessories and others. NOTE: The SAR value may vary, depending on national reporting and testing requirements and the network band. Advice to reduce the level of exposure to radiation: Please use your device where reception is good to reduce the quantity of radiation received (avoid using in an underground car park or when travelling (train or car)). A reception icon indicates the quality of reception on your device. A full bar display means that reception is good. Use of a hands-free kit also allows the level of exposure to be reduced. When using a hands-free kit, pregnant women should keep the device away from their abdomen and teenagers should keep the device away from their lower abdomen. If you have any problem: Please contact the after-sales service on the contact page of our website: www.konrow.com Made in China 2020 Konrow. If unresolved problem, contact your retailer. The Konrow supplier warranty is valid for normal use of the device as defined in the instructions. This warranty excludes damage caused by external circumstances. Specifically, the warranty does not apply if the device is damaged as a result of a bump or drop, an operating error, a connection that does not comply with these instructions, lightning, a surge, or inadequate protection against heat, humidity or freezing temperatures. The warranty is applicable only in metropolitan France. 43 The warranty does not cover: • User manuals or applications, settings, content or data of any kind. • Normal usury of the product (screens, batteries and camera). • Damage to the product due to misuse, including in particular those caused by objects, a pressure drop. • Any use of the label with the precautions outlined in the manual. • Defects caused to the product with another product connected or used with an accessory or software not provided by Konrow. • Any damage to the battery. • The product or its accessories if it has been disassembled or modified in any way. • Any unidentifiable product by serial number or IMEI number(s). If its elements have been removed, altered or defaced, the warranty does not apply. • Damage done to the product caused by exposure to moisture, conditions that extreme heat or cold, corrosion, oxidation, with any liquid whatsoever • Any damage to SIM player(s) or SIM MicroSD reader. • The legal warranty for hidden defects applies in compliance with Articles 1541 et seq. of the French Civil Code. 44 45 Déclaration de conformité simplifiée Nous, Konrow - 150 Avenue des Chartreux - 13004 Marseille - FRANCE, déclarons formellement que le Smartphone SKY55 est en accordance avec les exigences essentielles la directive RED 2014/53/UE : La déclaration de conformité complète est disponible à l’adresse suivante : http://www.konrow.com/download/Declaration_de_conformite/SKY55/Declaration_of_ conformity_full.pdf Les informations complètes concernant l'appareil se trouvent dans les différentes sections ci dessous : Informations sur la batterie et le fabriquant Derrière la batterie, sur l'appareil Numéro de série de l'appareil Derrière la batterie, sur l'appareil IMEI Derrière la batterie, sur l'appareil La procédure de déclaration de conformité RED a été conduite sous la supervision de l'organisation suivante: PHOENIX TESTLAB Königswinkel 10, D-32825 Blomberg, Germany. Téléphone: +49(0)5235-9500-24 Fax: +49(0)5235-9500-28 03/06/2020 Date Maurice Haddad / CEO (Nom et signature de la personne en droit) La réglementation française impose que le DAS ne dépasse pas la valeur maximale de 2W/kg sur 10g de tissu. L’appareil est bien conforme aux réglementations de radiofréquences lorsque l’appareil est utilisé à l’oreille et à une distance de 5mm du corps. 46 Simplified declaration of conformity We, Konrow - 150 Avenue des Chartreux - 13004 Marseille - FRANCE, hereby declare that the Smartphone SKY55 complies with the essential requirements of the RED Directive 2014/53/UE : The Full declaration of conformity is available in the following link : http://www.konrow.com/download/Declaration_de_conformite/SKY55/Declaration_of_ conformity_full.pdf The complete informations about the device can be found in the different sections below: Battery and manufacturer informations Behind the battery, on the device Device serial number Behind the battery, on the device IMEI Behind the battery, on the device The procedure of Declaration of conformity RED was conducted under the supervision of the following organisation: PHOENIX TESTLAB Königswinkel 10, D-32825 Blomberg, Germany. Téléphone: +49(0)5235-9500-24 Fax: +49(0)5235-9500-28 03/06/2020 Date Maurice Haddad / CEO (Name and signature of the duly authorised person) French regulation require that the SAR does not exceed the maximum value of 2W/kg on 10g of tissue. The device complies with radio frequency regulations when the device is used at the ear and at a distance of 5mm from the body. UG_04062020 47 www.konrow.com-
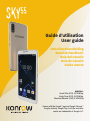 1
1
-
 2
2
-
 3
3
-
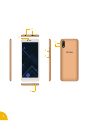 4
4
-
 5
5
-
 6
6
-
 7
7
-
 8
8
-
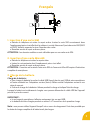 9
9
-
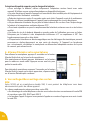 10
10
-
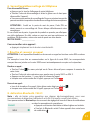 11
11
-
 12
12
-
 13
13
-
 14
14
-
 15
15
-
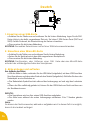 16
16
-
 17
17
-
 18
18
-
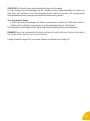 19
19
-
 20
20
-
 21
21
-
 22
22
-
 23
23
-
 24
24
-
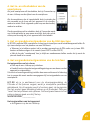 25
25
-
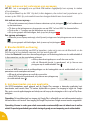 26
26
-
 27
27
-
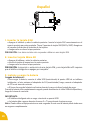 28
28
-
 29
29
-
 30
30
-
 31
31
-
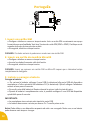 32
32
-
 33
33
-
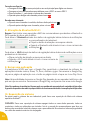 34
34
-
 35
35
-
 36
36
-
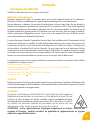 37
37
-
 38
38
-
 39
39
-
 40
40
-
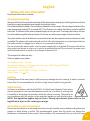 41
41
-
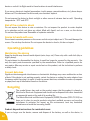 42
42
-
 43
43
-
 44
44
-
 45
45
-
 46
46
-
 47
47
-
 48
48


en otros idiomas
- français: Konrow Sky 55 Le manuel du propriétaire
- English: Konrow Sky 55 Owner's manual
- Deutsch: Konrow Sky 55 Bedienungsanleitung
- Nederlands: Konrow Sky 55 de handleiding
- português: Konrow Sky 55 Manual do proprietário
Artículos relacionados
-
Konrow Easy Touch Manual de usuario
-
-
-
-
-
-
-
-
-