Anker Wireless Vertical Ergonomic Mouse Manual de usuario
- Categoría
- Ratones
- Tipo
- Manual de usuario

01 02 03 04 05 06 07 08
Welcome Guide
Anleitung zum Einstieg | Guía de bienvenida | Guide de bienvenue
Installazione guidata | Guia de boas-vindas |
取扱説明書
| |
Wireless Vertical Ergonomic Mouse
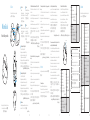
At a Glance
Auf einen Blick | De un vistazo | En un coup d’oeil | In sintesi
Legenda
外観
|
ON OFF
Scroll Wheel
Mausrad
Rueda de desplazamiento
Molette de défilement | Rotellina
Roda |
スクロールホイール
| |
Left Button
Linke Maustaste | Botón izquierdo
Bouton gauche | Pulsante sinistro
Botão esquerdo |
左ボタン
| |
Right Button
Rechte Maustaste | Botón derecho
Bouton droit | Pulsante destro
Botão direito |
右ボタン
| |
DPI Switch
DPI-Taste | Selector de PPP
Commutateur de DPI
Interruttore DPI | Botão DPI
DPI 切り替えスイッチ
|
)DPI
Next Page Button (Not for Apple Mac OS)
„Weiter“-Taste (Nicht für Apple Mac OS)
Botón de página siguiente (no para Mac OS de Apple)
Bouton Page suivante (ne fonctionne pas avec l’OS Apple)
Pulsante Pagina successiva (non per Apple Mac OS)
Botão de página seguinte (Não disponível para o sistema Mac OS da Apple)
ボタン - 次ページへ進む ( ※ MacOS では動作しません )
|
)
Previous Page Button (Not for Apple Mac OS)
„Zurück“-Taste (Nicht für Apple Mac OS)
Botón de página anterior (no para Mac OS de Apple)
Bouton Page précédente (ne fonctionne pas avec l’OS Apple)
Pulsante Pagina precedente (non per Apple Mac OS)
Botão de página anterior (Não disponível para o sistema Mac OS da Apple)
ボタン - 前ページへ戻る ( ※ MacOS では動作しません )
|
)
Nano Receiver
Nano-Empfänger | Nanorreceptor | Nano-récepteur | Nano ricevitore
Recetor Nano
ナノレシーバー
|
1. DPI Switch: Press this button to switch between 800, 1200, and 1600 DPI.
DPI-Taste: Drücken Sie diese Taste, um zwischen 800, 1.200 und 1.600 DPI
umzuschalten.
Selector de PPP: Pulse este botón para seleccionar entre 800, 1200 y 1600 PPP.
Commutateur de DPI: Appuyez sur ce bouton pour basculer entre 800, 1200 et
1600 DPI (points par pouce).
Interruttore DPI: Premere questo pulsante per selezionare 800, 1200 o 1600 DPI.
Botão DPI: Prima este botão para alternar entre 800, 1200 e 1600 DPI.
DPI 切り替えスイッチ:このボタンを押して、800、1200、1600 DPI を切り
替えます。
16001200800DPI
.)DPI
2. Next Page Button: Press this button to go forward one page while web
browsing.
„Weiter“-Taste: Drücken Sie diese Taste, um beim Browsen auf die nächste Seite
zu gelangen.
Botón de página siguiente: Pulse este botón para avanzar una página al navegar
por la web.
Bouton Page suivante: Appuyez sur ce bouton pour avancer d'une page pendant
la navigation.
Pulsante Pagina successiva: Premere questo pulsante per andare avanti di una
pagina durante la navigazione sul Web.
Botão de página seguinte: Prima este botão para avançar uma página quando
navegar na web.
ボタン - 次ページへ進む:WEB ブラウザーを使用中にこのボタンを押すと、
次のページへ進みます。
3. Previous Page Button: Press this button to go back one page while web
browsing.
„Zurück“-Taste: Drücken Sie diese Taste, um beim Browsen zurück auf die
vorherige Seite zu gelangen.
Botón de página anterior: Pulse este botón para retroceder una página al navegar
por la web.
Bouton Page précédente: Appuyez sur ce bouton pour reculer d'une page
pendant la navigation.
Pulsante Pagina precedente: Premere questo pulsante per tornare indietro di una
pagina durante la navigazione sul Web.
Botão de página anterior: Prima este botão para retroceder uma página quando
navegar na web.
ボタン - 前ページへ戻る:WEB ブラウザーを使用中にこのボタンを押すと、
前のページへ戻ります。
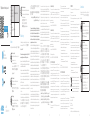
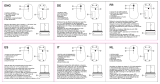
Instructions
Anleitung | Instrucciones | Instructions | Istruzioni
Instruções
操作方法
|
|
1.
Remove the battery cover.
Entfernen Sie die Batterieabdeckung. | Retire la tapa de la pila.
Retirez le capot de pile. | Rimuovere il coperchio del vano batteria.
Retire a tampa do compartimento da pilha. |
バッテリーカバーを外してください。
|
|
2. Insert 1 AA battery (not included) into the battery slot.
Legen Sie eine AA-Batterie (nicht im Lieferumfang enthalten) in das Batteriefach ein.
Inserte 1 pila AA (no incluida) en la ranura de la pila.
Insérez une pile AA (non fournie) dans l'emplacement pour pile.
Inserire una batteria AA (non inclusa) nell'apposito vano.
Coloque uma pilha AA (não incluída) no compartimento da pilha.
単 3 形電池ひとつ ( 別売り ) を電池挿入部へ入れてください。
AA
3. Remove the nano receiver from the battery slot and insert it into the
computer’s USB port. The driver will automatically install.
Nehmen Sie den Nano-Empfänger aus dem Batteriefach heraus und stecken
Sie ihn in den USB-Anschluss des Computers. Der Treiber wird automatisch
installiert.
Extraiga el nanorreceptor de la ranura de la pila e insértelo en el puerto USB del
ordenador. El controlador se instalará automáticamente.
Retirez le nano-récepteur de l'emplacement pour pile et insérez-le dans le port
USB de l'ordinateur. Le pilote s'installe automatiquement.
Rimuovere il nano ricevitore dal vano batteria e inserirlo nella porta USB del
computer. Il driver viene installato automaticamente.
Retire o recetor nano do compartimento da pilha e insira-o na porta USB do
computador. O controlador vai instalar automaticamente.
電池挿入部からナノレシーバーを取り出し、お使いのパソコンの USB ポー
トへ差し込んでください。差し込むと、ドライバーが自動的にインストール
されます。
4. Press the DPI switch to shift to the desired DPI level.
Drücken Sie die DPI-Taste, um die gewünschte DPI-Stufe auszuwählen.
Pulse el selector de PPP para cambiar al nivel de PPP deseado.
Appuyez sur le commutateur de DPI pour passer au niveau de DPI souhaité.
Premere l'interruttore DPI per selezionare il livello DPI desiderato.
Prima o botão DPI para selecionar o nível de DPI desejado.
DPI 切り替えスイッチを押して、お好みの DPI レベルを選択します。
DPIDPI
LED Indicator
Red Indicator Status
Status der roten Anzeige
Estado del indicador rojo
Indicateur d'état rouge
Indicatore di stato rosso
Estado do Indicador Vermelho
赤色インジケーターのステータス
|
DPI Level
DPI-Stufe | Nivel de PPP
Niveau de DPI | Livello DPI
Nível de DPI
|
DPI レベル
|
)DPI
Flashing once
Blinkt einmal | Un parpadeo
Clignotant une fois | Lampeggiamento singolo
Pisca uma vez
1 回の点滅
|
800 DPI
Flashing twice
Blinkt zweimal | Dos parpadeos
Clignotant deux fois | Lampeggiamento doppio
Pisca duas vezes
2 回の点滅
|
1200 DPI
Flashing three times
Blinkt dreimal | Tres parpadeos
Clignotant trois fois | Lampeggiamento triplo
Pisca três vezes
3 回の点滅
|
|
1600 DPI
The red indicator flashes continuously if the battery is low.
Das rote Anzeigelicht blinkt dauerhaft, wenn die Batterie schwach ist.
El indicador rojo parpadea de forma continua si la pila se está
agotando.
l'indicateur rouge clignote en continu si la pile est faible.
l'indicatore rosso lampeggia continuamente se il livello di carica della
batteria è basso.
O indicador vermelho pisca continuamente se a pilha estiver fraca.
バッテリー残量が少ない場合、赤色インジケーターは連続して点
滅します。
Specifications
Technische Daten | Especificaciones | Spécifications techniques | Specifiche
Especificações |
製品の仕様
DPI
800 / 1200 (default) / 1600 DPI
800 / 1.200 (Standard) / 1.600 DPI
800 / 1200 (predeterminado) / 1600PPP
800 / 1200 (défaut) / 1600 DPI
800/1200 (impostazione predefinita)/1600 DPI
800/1200 (predefinição)/1600 DPI
800 / 1200( デフォルト設定 ) / 1600 DPI
)DPI16001200800
Battery Type
Batterietyp
Tipo de batería
Type de pile
Tipo di batteria
Tipo de pilha
バッテリータイプ
|
1 AA battery (not included)
1 AA Batterie (nicht im Lieferumfang enthalten)
1 pila AA (no incluida) | 1 pile AA (non fournie)
Una batteria AA (non inclusa)
Uma pilha AA (não incluída)
単3形電池(別売り)
|
AA
Supported Systems
Unterstützte Systeme
Sistemas compatibles
Systèmes pris en charge
Sistemi supportati
Sistemas Compatíveis
対応 OS
|
|
Windows 10 / 8 / 7 / Vista / XP, Linux, Mac OS X

09 10 11 12 13 14 15 16
Size
Abmessungen | Tamaño
Taille | Dimensioni
Dimensões
サイズ
|
105 × 67 × 58 mm / 4.1 × 2.6 × 2.3 in
Weight
Gewicht | Peso | Poids
Peso
Peso
重さ
|
81 g / 2.9 oz
Attention
Achtung | Atención | Attention | Attenzione Atenção
注意
| |
Don’t expose to liquids
Keinen Flüssigkeiten aussetzen | No lo exponga a líquidos
Ne pas exposer à des liquides
Non esporre il prodotto a sostanze liquide
Não expor a líquidos |
水分に触れないようにしてください
|
Don’t disassemble
Nicht zerlegen | No lo desmonte | Ne pas démonter
Non smontare
Não desmontar
危険ですので分解しないでください
|
Avoid dropping
Nicht fallenlassen | Evite las caídas | Ne pas faire tomber
Non far cadere il prodotto
Evitar deixar cair
過度な衝撃を与えないでください
|
Avoid extreme temperatures
Extreme Temperaturen meiden | Evite temperaturas extremas
Éviter les températures extrêmes | Evitare temperature estreme
Evitar temperaturas extremas
極端な温度下では使用しないでください
|
Troubleshooting
Fehlerbehebung | Resolución de problemas | Dépannage | Risoluzione dei problemi
Resolução de problemas
トラブルシューティング
|
1. Make sure the nano receiver is plugged into your device’s USB port. If it is still
unresponsive, plug the receiver into another USB port on your device.
Vergewissern Sie sich, dass der Nano-Empfänger im USB-Anschluss des Geräts
steckt. Falls die Maus immer noch nicht reagiert, stecken Sie den Empfänger in
einen anderen USB-Anschluss an Ihrem Gerät.
Asegúrese de que el nanorreceptor esté conectado al puerto USB del dispositivo.
Si sigue sin responder, conecte el receptor a otro puerto USB del dispositivo.
Assurez-vous que le nano-récepteur est branché dans le port USB de votre
périphérique. Si elle ne répond toujours pas, branchez le récepteur dans un autre
port USB de votre périphérique.
Assicurarsi che il nano ricevitore sia inserito nella porta USB del dispositivo. Se
il mouse continua a non funzionare, inserire il ricevitore in un'altra porta USB
del dispositivo.
Certifique-se de que o recetor nano está ligado à porta USB do seu dispositivo.
Se continuar a não funcionar, ligue o recetor a outra porta USB no seu dispositivo.
ナノレシーバーがお使いの機器 ( パソコンなど ) の USB ポートに正しく差し
込まれているか確認してください。それでもマウスが動かない場合は、ナノ
レシーバーを別の USB ポートに差し込んでください。
2. Your mouse is not paired with the nano receiver. To pair: Turn on the mouse,
plug the nano receiver into your device’s USB port, and then hold the scroll
wheel and the right button of the mouse simultaneously. Release the two
buttons after 3 seconds to finish paring. If unsuccessful, unplug the receiver,
turn off the mouse, and then repeat the above steps to restart pairing. During
pairing, make sure the mouse is close to the receiver.
Ihre Maus ist nicht mit dem Nano-Empfänger gekoppelt. Zum Koppeln: Schalten
Sie die Maus ein, stecken Sie den Nano-Empfänger in den USB-Anschluss Ihres
Geräts und halten Sie dann das Mausrad und die rechte Maustaste gleichzeitig
gedrückt. Lassen Sie die beiden Tasten nach 3 Sekunden wieder los, um die
Kopplung abzuschließen. Falls das nicht funktioniert hat, entfernen Sie den
Empfänger, schalten Sie die Maus aus und wiederholen Sie dann die oben
beschriebenen Schritte zum erneuten Koppeln. Achten Sie darauf, dass die Maus
sich während des Koppelns in unmittelbarer Nähe des Empfängers befindet.
El ratón no está emparejado con el nanorreceptor. Para emparejarlo: Encienda el
ratón, conecte el nanorreceptor al puerto USB del dispositivo y, a continuación,
mantenga pulsada la rueda de desplazamiento y el botón derecho del ratón
simultáneamente. Suelte los dos botones tras 3 segundos para finalizar el
emparejamiento. Si no se completa correctamente, desconecte el receptor,
apague el ratón y, a continuación, repita los pasos anteriores para reiniciar el
emparejamiento. Durante el emparejamiento, asegúrese de que ratón esté
cerca del receptor.
Votre souris n'est pas couplée au nano-récepteur. Pour la coupler: allumez la
souris, branchez le nano-récepteur dans le port USB de votre périphérique, puis
maintenez en même temps la molette de défilement et le bouton droit de la
souris. Relâchez les deux boutons après 3 secondes pour terminer le couplage.
En cas d'échec, débranchez le récepteur, éteignez la souris, puis répétez les
étapes ci-dessus pour recommencer le couplage. Lors du couplage, la souris doit
être à proximité du récepteur.
Il mouse non è associato al nano ricevitore. Per eseguire l'associazione:
Accendere il mouse, inserire il nano ricevitore nella porta USB del dispositivo,
quindi tenere premuti contemporaneamente il pulsante destro e la rotellina del
mouse. Rilasciare i due pulsanti dopo tre secondi per completare l'associazione.
Se il problema persiste, scollegare il ricevitore, spegnere il mouse e ripetere
i passaggi descritti in precedenza per riavviare l'associazione. Durante
l'associazione, verificare che il mouse sia vicino al ricevitore.
O rato não está emparelhado com o recetor nano. Para emparelhar: Ative o rato
e ligue o recetor nano à porta USB do seu dispositivo. Em seguida, mantenha
premido em simultâneo a roda e o botão direito do rato. Solte os dois botões
após 3 segundos para concluir o emparelhamento. Se a operação não for bem-
sucedida, desligue o recetor e o rato e repita os passos acima para reiniciar o
emparelhamento. Durante o emparelhamento, certifique-se de que o rato está
próximo do recetor.
マウスとナノレシーバーがうまくペアリングされていない可能性がありま
す。正しくペアリングするためには、マウスの電源を入れ、ナノレシーバー
をお使いの機器 ( パソコンなど ) の USB ポートに差し込み、マウスのスクロ
ールホイールと右ボタンを同時に 3 秒間長押しします。3 秒間の長押し後、
両方のボタンから手を離してください。もし上手くペアリングできない場合
は、ナノレシーバーを USB ポートから取り外し、マウスの電源を切り、再
度同じペアリング作業を繰り返してください。ペアリング作業は、マウスと
ナノレシーバーを近づけた状態で実施してください。
3
Declaration of Conformity
This product complies with the radio interference requirements of the European
Community. Hereby, Anker Innovations Limited declares that the radio equipment
type A7850M is in compliance with Directive 2014/53/EU. The full text of the
EU declaration of conformity is available at the following internet address: https://
www.anker.com/products
Maximum output power: 0dBm.
Frequency band: 2.4G band (2.4000GHz-2.4835GHz)
Declaration of Conformity
This product complies with the radio interference requirements of the European
Community. Hereby, Anker Innovations Limited declares that the radio equipment
type A7850R is in compliance with Directive 2014/53/EU. The full text of the EU
declaration of conformity is available at the following internet address: https://
www.anker.com/products
Maximum output power: 0dBm.
Frequency band: 2.4G band (2.4000GHz-2.4835GHz)
Wireless Vertical Ergonomic Mouse
Model No. : A7850M FCC ID: 2AOKB-A7850M IC: 23451-A7850M
IC NOTICE TO CANADIAN USERS
This device complies with Industry Canada license-exempt RSS standard(s).
Operation is subject to the following two conditions: (1) This device may not
cause interference, and (2) This device must accept any interference, including
interference that may cause undesired operation of the device. This device
complies with RSS-210 of Industry Canada. Operation is subject to the condition
that this device does not cause harmful interference. This Class B digital apparatus
complies with Canadian ICES-003 (Cet appareil numérique de la Classe B
conforme à la norme NMB-003 du Canada).
Le présent appareil est conforme aux CNR d'Industrie Canada applicables
aux appareils radio exempts de licence. L'exploitation est autorisée aux deux
conditions suivantes : (1) l'appareil ne doit pas produire de brouillage, et (2)
l'utilisateur de l'appareil doit accepter tout brouillage radioélectrique subi, même si
le brouillage est susceptible d'en compromettre le fonctionnement.
FCC STATEMENT
1. This device complies with Part 15 of the FCC Rules. Operation is subject to the
following two conditions:
(1) This device may not cause harmful interference.
(2) This device must accept any interference received, including interference that
may cause undesired operation.
2. Changes or modifications not expressly approved by the party responsible for
compliance could void the user's authority to operate the equipment.
NOTE: This equipment has been tested and found to comply with the limits
for a Class B digital device, pursuant to Part 15 of the FCC Rules. These limits
are designed to provide reasonable protection against harmful interference in a
residential installation.
This equipment generates uses and can radiate radio frequency energy and, if
not installed and used in accordance with the instructions, may cause harmful
interference to radio communications. However, there is no guarantee that
interference will not occur in a particular installation. If this equipment does cause
harmful interference to radio or television reception, which can be determined
by turning the equipment off and on, the user is encouraged to try to correct the
interference by one or more of the following measures:
Reorient or relocate the receiving antenna.
Increase the separation between the equipment and receiver.
Connect the equipment into an outlet on a circuit different from that to which
the receiver is connected.
Consult the dealer or an experienced radio/TV technician for help.
Nano Receiver
Model No.: A7850R FCC ID: 2AOKB-A7850R IC: 23451-A7850R
IC NOTICE TO CANADIAN USERS
This device complies with Industry Canada license-exempt RSS standard(s).
Operation is subject to the following two conditions: (1) This device may not
cause interference, and (2) This device must accept any interference, including
interference that may cause undesired operation of the device. This device
complies with RSS-210 of Industry Canada. Operation is subject to the condition
that this device does not cause harmful interference. This Class B digital apparatus
complies with Canadian ICES-003 (Cet appareil numérique de la Classe B
conforme à la norme NMB-003 du Canada).
Le présent appareil est conforme aux CNR d'Industrie Canada applicables
aux appareils radio exempts de licence. L'exploitation est autorisée aux deux
conditions suivantes : (1) l'appareil ne doit pas produire de brouillage, et (2)
l'utilisateur de l'appareil doit accepter tout brouillage radioélectrique subi, même si
le brouillage est susceptible d'en compromettre le fonctionnement.
FCC STATEMENT
1. This device complies with Part 15 of the FCC Rules. Operation is subject to the
following two conditions:
(1) This device may not cause harmful interference.
(2) This device must accept any interference received, including interference that
may cause undesired operation.
2. Changes or modifications not expressly approved by the party responsible for
compliance could void the user's authority to operate the equipment.
NOTE: This equipment has been tested and found to comply with the limits
for a Class B digital device, pursuant to Part 15 of the FCC Rules. These limits
are designed to provide reasonable protection against harmful interference in a
residential installation.
This equipment generates uses and can radiate radio frequency energy and, if
not installed and used in accordance with the instructions, may cause harmful
interference to radio communications. However, there is no guarantee that
interference will not occur in a particular installation. If this equipment does cause
harmful interference to radio or television reception, which can be determined
by turning the equipment off and on, the user is encouraged to try to correct the
interference by one or more of the following measures:
Reorient or relocate the receiving antenna.
Increase the separation between the equipment and receiver.
Connect the equipment into an outlet on a circuit different from that to which
the receiver is connected.
Consult the dealer or an experienced radio/TV technician for help.
This symbol means the product must not be discarded as household
waste, and should be delivered to an appropriate collection facility
for recycling. Follow local rules and never dispose of the product
and rechargeable batteries with normal household waste. Correct
disposal of old products and rechargeable batteries helps prevent
negative consequences for the environment and human health.
Wireless Vertical Ergonomic Mouse
Model No. : A7850M
Nano Receiver
Model No.: A7850R
Anker Innovations Limited
Room 1318-19, Hollywood Plaza, 610 Nathan Road, Mongkok, Kowloon, Hong Kong
51005000969 V01
A7850
@Anker
@Anker Japan
@Anker Deutschland
anker.com/support
For FAQs and more information, please visit:
Customer Service
Kundenservice | Servicio de atención al cliente | Service client | Servizio clienti
Serviço de Apoio ao Cliente
カスタマーサポート
|
|
18-month limited warranty
18Monate eingeschränkte Garantie | Garantía limitada de 18 meses
Garantie limitée de 18mois | Garanzia limitata di 18 mesi
18 meses de garantia limitada
18 ヶ月保証
18
Lifetime technical support
Technischer Support für die Produktlebensdauer
Asistencia técnica de por vida | Assistance technique à vie
Supporto tecnico per l'intero ciclo di vita
Suporte técnico ao longo da vida útil do produto.
テクニカルサポート
|
support@anker.com
(US) +1 (800) 988 7973 Mon-Fri 9:00 - 17:00 (PT)
(UK) +44 (0) 1604 936200 Mon-Fri 6:00 - 11:00 (GMT)
(DE) +49 (0) 69 9579 7960 Mon-Fri 6:00 - 11:00
(
日本
) +81 03 4455 7823
月-金
9:00 - 17:00
(
) +86 400 0550 036
9:00 - 17:30
Transcripción de documentos
At a Glance Scroll Wheel Mausrad Rueda de desplazamiento Molette de défilement | Rotellina Roda | スクロールホイール 스크롤 휠 | 滚轮 | عجلة التمرير Auf einen Blick | De un vistazo | En un coup d’oeil | In sintesi Legenda | 外観 | 개요 | 概览 | نظرة سريعة Welcome Guide Right Button Rechte Maustaste | Botón derecho Bouton droit | Pulsante destro Botão direito | 右ボタン 오른쪽 버튼 | 右按键 | الزر األيمن Wireless Vertical Ergonomic Mouse Left Button Linke Maustaste | Botón izquierdo Bouton gauche | Pulsante sinistro Botão esquerdo | 左ボタン 왼쪽 버튼 | 左按键 | الزر األيسر DPI Switch DPI-Taste | Selector de PPP Commutateur de DPI Interruttore DPI | Botão DPI DPI 切り替えスイッチ | DPI 스위치 DPI 切换键 )DPI( مفتاح النقاط في كل بوصة Next Page Button (Not for Apple Mac OS) „Weiter“-Taste (Nicht für Apple Mac OS) Botón de página siguiente (no para Mac OS de Apple) Bouton Page suivante (ne fonctionne pas avec l’OS Apple) Pulsante Pagina successiva (non per Apple Mac OS) Botão de página seguinte (Não disponível para o sistema Mac OS da Apple) ボタン - 次ページへ進む ( ※ MacOS では動作しません ) 다음 페이지 버튼 (Apple Mac OS 사용 불가 ) | 前进键 ( 不适用于 Apple Mac OS) ON OFF )Apple Mac OS زر الصفحة التالية (غير متوفر لنظام التشغيل Previous Page Button (Not for Apple Mac OS) „Zurück“-Taste (Nicht für Apple Mac OS) Botón de página anterior (no para Mac OS de Apple) Bouton Page précédente (ne fonctionne pas avec l’OS Apple) Pulsante Pagina precedente (non per Apple Mac OS) Botão de página anterior (Não disponível para o sistema Mac OS da Apple) ボタン - 前ページへ戻る ( ※ MacOS では動作しません ) 이전 페이지 버튼 (Apple Mac OS 사용 불가 ) | 后退键 ( 不适用于 Apple Mac OS) )Apple Mac OS زر الصفحة السابقة (غير متوفر لنظام التشغيل Anleitung zum Einstieg | Guía de bienvenida | Guide de bienvenue Installazione guidata | Guia de boas-vindas | 取扱説明書 제품 안내서 | 使用指南 | دليل الترحيب Nano Receiver Nano-Empfänger | Nanorreceptor | Nano-récepteur | Nano ricevitore Recetor Nano | ナノレシーバー | 나노 수신기 | Nano 接收器 وحدة االستقبال الصغيرة 01 02 1. DPI Switch: Press this button to switch between 800, 1200, and 1600 DPI. DPI-Taste: Drücken Sie diese Taste, um zwischen 800, 1.200 und 1.600 DPI umzuschalten. Selector de PPP: Pulse este botón para seleccionar entre 800, 1200 y 1600 PPP. Commutateur de DPI : Appuyez sur ce bouton pour basculer entre 800, 1 200 et 1 600 DPI (points par pouce). Interruttore DPI: Premere questo pulsante per selezionare 800, 1200 o 1600 DPI. Botão DPI: Prima este botão para alternar entre 800, 1200 e 1600 DPI. DPI 切り替えスイッチ:このボタンを押して、800、1200、1600 DPI を切り 替えます。 DPI 스위치 : 이 버튼을 누르면 800, 1200 및 1600 DPI 사이를 전환할 수 있습니다 . DPI 切换 键:按键可在 800、1200 和 1600 间切换 DPI。 نقطة1600 و1200 و800 اضغط على هذا الزر للتبديل بين:)DPI( مفتاح النقاط في كل بوصة .)DPI( في كل بوصة 2. Next Page Button: Press this button to go forward one page while web browsing. „Weiter“-Taste: Drücken Sie diese Taste, um beim Browsen auf die nächste Seite zu gelangen. Botón de página siguiente: Pulse este botón para avanzar una página al navegar por la web. Bouton Page suivante : Appuyez sur ce bouton pour avancer d'une page pendant la navigation. Pulsante Pagina successiva: Premere questo pulsante per andare avanti di una pagina durante la navigazione sul Web. Botão de página seguinte: Prima este botão para avançar uma página quando navegar na web. ボタン - 次ページへ進む:WEB ブラウザーを使用中にこのボタンを押すと、 次のページへ進みます。 다음 페이지 버튼 : 이 버튼을 누르면 웹 검색 중 한 페이지 다음으로 넘어갈 수 있습니다 . 前进键:浏览网页时,按键可跳转到下一页。 3. Previous Page Button: Press this button to go back one page while web browsing. „Zurück“-Taste: Drücken Sie diese Taste, um beim Browsen zurück auf die vorherige Seite zu gelangen. Botón de página anterior: Pulse este botón para retroceder una página al navegar por la web. Bouton Page précédente : Appuyez sur ce bouton pour reculer d'une page pendant la navigation. Pulsante Pagina precedente: Premere questo pulsante per tornare indietro di una pagina durante la navigazione sul Web. Botão de página anterior: Prima este botão para retroceder uma página quando navegar na web. ボタン - 前ページへ戻る:WEB ブラウザーを使用中にこのボタンを押すと、 前のページへ戻ります。 이전 페이지 버튼 : 이 버튼을 누르면 웹 검색 중 한 페이지 이전으로 넘어갈 수 있습 니다 . 后退键:浏览网页时,按键可返回到上一页。 . اضغط على هذا الزر للرجوع صفحة واحدة أثناء تصفح الويب:زر الصفحة السابقة Instructions Anleitung | Instrucciones | Instructions | Istruzioni | Instruções | 操作方法 | 지침 说明 | اإلرشادات 1. Remove the battery cover. Entfernen Sie die Batterieabdeckung. | Retire la tapa de la pila. Retirez le capot de pile. | Rimuovere il coperchio del vano batteria. Retire a tampa do compartimento da pilha. | バッテリーカバーを外してください。 배터리 커버를 분리합니다. | 取下电池盖 | .أزل غطاء البطارية . اضغط على هذا الزر للتقدم صفحة واحدة أثناء تصفح الويب:زر الصفحة التالية 03 04 2. Insert 1 AA battery (not included) into the battery slot. Legen Sie eine AA-Batterie (nicht im Lieferumfang enthalten) in das Batteriefach ein. Inserte 1 pila AA (no incluida) en la ranura de la pila. Insérez une pile AA (non fournie) dans l'emplacement pour pile. Inserire una batteria AA (non inclusa) nell'apposito vano. Coloque uma pilha AA (não incluída) no compartimento da pilha. 単 3 形電池ひとつ ( 別売り ) を電池挿入部へ入れてください。 AA 배터리 ( 미포함 ) 1 개를 배터리 슬롯에 삽입합니다 . 在电池槽中插入 1 节 AA 电池 ( 不含 )。 . (غير مضمّنة) في فتحة البطاريةAA أدخل بطارية واحدة بحجم 4. Press the DPI switch to shift to the desired DPI level. Drücken Sie die DPI-Taste, um die gewünschte DPI-Stufe auszuwählen. Pulse el selector de PPP para cambiar al nivel de PPP deseado. Appuyez sur le commutateur de DPI pour passer au niveau de DPI souhaité. Premere l'interruttore DPI per selezionare il livello DPI desiderato. Prima o botão DPI para selecionar o nível de DPI desejado. DPI 切り替えスイッチを押して、お好みの DPI レベルを選択します。 DPI 스위치를 누르면 원하는 DPI 레벨로 전환됩니다 . 按 DPI 切换键切换至合适的 DPI 档位。 .) المطلوبDPI( ) للتبديل إلى مستوى النقاط في كل بوصةDPI( اضغط على مفتاح النقاط في كل بوصة LED Indicator 3. Remove the nano receiver from the battery slot and insert it into the computer’s USB port. The driver will automatically install. Nehmen Sie den Nano-Empfänger aus dem Batteriefach heraus und stecken Sie ihn in den USB-Anschluss des Computers. Der Treiber wird automatisch installiert. Extraiga el nanorreceptor de la ranura de la pila e insértelo en el puerto USB del ordenador. El controlador se instalará automáticamente. Retirez le nano-récepteur de l'emplacement pour pile et insérez-le dans le port USB de l'ordinateur. Le pilote s'installe automatiquement. Rimuovere il nano ricevitore dal vano batteria e inserirlo nella porta USB del computer. Il driver viene installato automaticamente. Retire o recetor nano do compartimento da pilha e insira-o na porta USB do computador. O controlador vai instalar automaticamente. 電池挿入部からナノレシーバーを取り出し、お使いのパソコンの USB ポー トへ差し込んでください。差し込むと、ドライバーが自動的にインストール されます。 배터리 슬롯에서 나노 수신기를 분리하여 컴퓨터의 USB 포트에 삽입합니다 . 드라이 버가 자동으로 설치됩니다 . 从电池槽中取出 Nano 接收器, 插入计算机的 USB 端口。驱动程序将自动安装。 سيتم تثبيت. في الكمبيوترUSB وأدخلها في منفذ،أزل وحدة االستقبال الصغيرة من فتحة البطارية .برنامج التشغيل تلقائيًا 05 Red Indicator Status Status der roten Anzeige Estado del indicador rojo Indicateur d'état rouge Indicatore di stato rosso Estado do Indicador Vermelho 赤色インジケーターのステータス 빨간색 표시등 상태 | 红色指示灯状态 Specifications Flashing twice Blinkt zweimal | Dos parpadeos Clignotant deux fois | Lampeggiamento doppio 1200 DPI Pisca duas vezes | 2 回の点滅 | 두 번 깜박임 闪烁两次 | وميض لمرتَين DPI Level DPI-Stufe | Nivel de PPP Niveau de DPI | Livello DPI Nível de DPI | DPI レベル DPI 레벨 | DPI 档位 )DPI( مستوى النقاط في كل بوصة Technische Daten | Especificaciones | Spécifications techniques | Specifiche Especificações | 사양 | 製品の仕様 | 规格 | المواصفات Flashing three times Blinkt dreimal | Tres parpadeos Clignotant trois fois | Lampeggiamento triplo 1600 DPI Pisca três vezes | 3 回の点滅 | 세 번 깜빡임 | 闪烁三次 | وميض لثالث مرات DPI 800 / 1200( デフォルト設定 ) / 1600 DPI 800 / 1200( 기본값 ) / 1600 DPI 800/1200( 默认 )/1600 DPI The red indicator flashes continuously if the battery is low. Das rote Anzeigelicht blinkt dauerhaft, wenn die Batterie schwach ist. El indicador rojo parpadea de forma continua si la pila se está agotando. l'indicateur rouge clignote en continu si la pile est faible. l'indicatore rosso lampeggia continuamente se il livello di carica della batteria è basso. O indicador vermelho pisca continuamente se a pilha estiver fraca. )DPI( نقطة في كل بوصة1600 / ) (العدد االفتراضي1200 / 800 Battery Type Batterietyp Tipo de batería Type de pile Tipo di batteria Tipo de pilha バッテリー残量が少ない場合、赤色インジケーターは連続して点 滅します。 배터리 잔량이 부족하면 빨간색 표시등이 계속해서 깜박입니다 . 电池电量不足时,红色指示灯将持续闪烁。 1 AA battery (not included) 1 AA Batterie (nicht im Lieferumfang enthalten) 1 pila AA (no incluida) | 1 pile AA (non fournie) Una batteria AA (non inclusa) Uma pilha AA (não incluída) バッテリータイプ 배터리 유형 | 电池型号 نوع البطارية 単 3 形電池 ( 別売り ) AA 배터리 1 개 ( 미포함 ) | 1 节 AA 电池 ( 不含 ) ) (غير مضمّنةAA بطارية واحدة بحجم Supported Systems Unterstützte Systeme Sistemas compatibles Systèmes pris en charge Windows 10 / 8 / 7 / Vista / XP, Linux, Mac OS X Sistemi supportati Sistemas Compatíveis 対応 OS | 지원 시스템 支持的系统 | األنظمة المدعومة . يومض المؤشر األحمر باستمرار إذا كان مستوى شحن البطارية منخفضًا:مالحظة حالة المؤشر األحمر Flashing once Blinkt einmal | Un parpadeo Clignotant une fois | Lampeggiamento singolo 800 DPI Pisca uma vez | 1 回の点滅 | 한 번 깜박임 闪烁一次 | وميض لمرة واحدة 06 800 / 1200 (default) / 1600 DPI 800 / 1.200 (Standard) / 1.600 DPI 800 / 1200 (predeterminado) / 1600 PPP 800 / 1 200 (défaut) / 1 600 DPI 800/1200 (impostazione predefinita)/1600 DPI 800/1200 (predefinição)/1600 DPI 07 08 For FAQs and more information, please visit: anker.com/support Size Abmessungen | Tamaño Taille | Dimensioni Dimensões | サイズ | 크기 尺寸 | الحجم Weight Gewicht | Peso | Poids Peso | Peso | 重さ | 무게 重量 | الوزن Avoid extreme temperatures Extreme Temperaturen meiden | Evite temperaturas extremas Éviter les températures extrêmes | Evitare temperature estreme Evitar temperaturas extremas 105 × 67 × 58 mm / 4.1 × 2.6 × 2.3 in 極端な温度下では使用しないでください 너무 높거나 낮은 기온에 노출시키지 마십시오 避免极端高温或低温 | تجنب درجات الحرارة القصوى 81 g / 2.9 oz Troubleshooting Attention @Anker @Anker Japan @Anker Deutschland Achtung | Atención | Attention | Attenzione | Atenção | 注意 | 주의 | 注意 | مالحظة Don’t expose to liquids Keinen Flüssigkeiten aussetzen | No lo exponga a líquidos Ne pas exposer à des liquides Non esporre il prodotto a sostanze liquide Não expor a líquidos | 水分に触れないようにしてください 액체에 닿지 않도록 주의하십시오 | 请勿暴露在液体中 ال تعرّ ض المنتج للسوائل 1. Make sure the nano receiver is plugged into your device’s USB port. If it is still unresponsive, plug the receiver into another USB port on your device. Vergewissern Sie sich, dass der Nano-Empfänger im USB-Anschluss des Geräts steckt. Falls die Maus immer noch nicht reagiert, stecken Sie den Empfänger in einen anderen USB-Anschluss an Ihrem Gerät. Asegúrese de que el nanorreceptor esté conectado al puerto USB del dispositivo. Si sigue sin responder, conecte el receptor a otro puerto USB del dispositivo. Assurez-vous que le nano-récepteur est branché dans le port USB de votre périphérique. Si elle ne répond toujours pas, branchez le récepteur dans un autre port USB de votre périphérique. Assicurarsi che il nano ricevitore sia inserito nella porta USB del dispositivo. Se il mouse continua a non funzionare, inserire il ricevitore in un'altra porta USB del dispositivo. Certifique-se de que o recetor nano está ligado à porta USB do seu dispositivo. Se continuar a não funcionar, ligue o recetor a outra porta USB no seu dispositivo. Don’t disassemble Nicht zerlegen | No lo desmonte | Ne pas démonter Non smontare | Não desmontar 危険ですので分解しないでください | 분해하지 마십시오 请勿拆卸 | ال تفككه A7850 51005000969 V01 Fehlerbehebung | Resolución de problemas | Dépannage | Risoluzione dei problemi Resolução de problemas | トラブルシューティング | 문제 해결 | 故障诊断 استكشاف األخطاء وإصالحها Avoid dropping Nicht fallenlassen | Evite las caídas | Ne pas faire tomber Non far cadere il prodotto | Evitar deixar cair ナノレシーバーがお使いの機器 ( パソコンなど ) の USB ポートに正しく差し 込まれているか確認してください。それでもマウスが動かない場合は、ナノ レシーバーを別の USB ポートに差し込んでください。 過度な衝撃を与えないでください | 떨어뜨리지 마십시오 避免掉落 | تجنب إسقاط المنتج 09 10 나노 수신기 장치의 USB 포트에 연결되었는지 확인하십시오 . 응답이 없을 경우 수신 기를 장치의 다른 USB 포트에 삽입하십시오 . 确保 Nano 接收器已插入设备的 USB 端口。如果 没有反应,请将接收器插入设 备的另一个 USB 端口。 في حال عدم استجابة. الخاص بالجهازUSB تأكد من توصيل وحدة االستقبال الصغيرة في منفذ . آخر متوفر في جهازكUSB صِ ل وحدة االستقبال بمنفذ،الماوس 2. Your mouse is not paired with the nano receiver. To pair: Turn on the mouse, plug the nano receiver into your device’s USB port, and then hold the scroll wheel and the right button of the mouse simultaneously. Release the two buttons after 3 seconds to finish paring. If unsuccessful, unplug the receiver, turn off the mouse, and then repeat the above steps to restart pairing. During pairing, make sure the mouse is close to the receiver. Ihre Maus ist nicht mit dem Nano-Empfänger gekoppelt. Zum Koppeln: Schalten Sie die Maus ein, stecken Sie den Nano-Empfänger in den USB-Anschluss Ihres Geräts und halten Sie dann das Mausrad und die rechte Maustaste gleichzeitig gedrückt. Lassen Sie die beiden Tasten nach 3 Sekunden wieder los, um die Kopplung abzuschließen. Falls das nicht funktioniert hat, entfernen Sie den Empfänger, schalten Sie die Maus aus und wiederholen Sie dann die oben beschriebenen Schritte zum erneuten Koppeln. Achten Sie darauf, dass die Maus sich während des Koppelns in unmittelbarer Nähe des Empfängers befindet. El ratón no está emparejado con el nanorreceptor. Para emparejarlo: Encienda el ratón, conecte el nanorreceptor al puerto USB del dispositivo y, a continuación, mantenga pulsada la rueda de desplazamiento y el botón derecho del ratón simultáneamente. Suelte los dos botones tras 3 segundos para finalizar el emparejamiento. Si no se completa correctamente, desconecte el receptor, apague el ratón y, a continuación, repita los pasos anteriores para reiniciar el emparejamiento. Durante el emparejamiento, asegúrese de que ratón esté cerca del receptor. Votre souris n'est pas couplée au nano-récepteur. Pour la coupler : allumez la souris, branchez le nano-récepteur dans le port USB de votre périphérique, puis maintenez en même temps la molette de défilement et le bouton droit de la souris. Relâchez les deux boutons après 3 secondes pour terminer le couplage. En cas d'échec, débranchez le récepteur, éteignez la souris, puis répétez les étapes ci-dessus pour recommencer le couplage. Lors du couplage, la souris doit être à proximité du récepteur. 11 Il mouse non è associato al nano ricevitore. Per eseguire l'associazione: Accendere il mouse, inserire il nano ricevitore nella porta USB del dispositivo, quindi tenere premuti contemporaneamente il pulsante destro e la rotellina del mouse. Rilasciare i due pulsanti dopo tre secondi per completare l'associazione. Se il problema persiste, scollegare il ricevitore, spegnere il mouse e ripetere i passaggi descritti in precedenza per riavviare l'associazione. Durante l'associazione, verificare che il mouse sia vicino al ricevitore. O rato não está emparelhado com o recetor nano. Para emparelhar: Ative o rato e ligue o recetor nano à porta USB do seu dispositivo. Em seguida, mantenha premido em simultâneo a roda e o botão direito do rato. Solte os dois botões após 3 segundos para concluir o emparelhamento. Se a operação não for bemsucedida, desligue o recetor e o rato e repita os passos acima para reiniciar o emparelhamento. Durante o emparelhamento, certifique-se de que o rato está próximo do recetor. マウスとナノレシーバーがうまくペアリングされていない可能性がありま す。正しくペアリングするためには、マウスの電源を入れ、ナノレシーバー をお使いの機器 ( パソコンなど ) の USB ポートに差し込み、マウスのスクロ ールホイールと右ボタンを同時に 3 秒間長押しします。3 秒間の長押し後、 両方のボタンから手を離してください。もし上手くペアリングできない場合 は、ナノレシーバーを USB ポートから取り外し、マウスの電源を切り、再 度同じペアリング作業を繰り返してください。ペアリング作業は、マウスと ナノレシーバーを近づけた状態で実施してください。 마우스가 나노 수신기와 페어링되지 않습니다 . 페어링하려면 마우스를 켜고 나노 수 신기를 장치의 USB 포트에 삽입한 후 스크롤 휠과 마우스 오른쪽 버튼을 동시에 누릅 니다 . 3 초 후 동시에 손을 떼면 페어링이 완료됩니다 . 실패할 경우 리시버를 분리하 고 마우스 전원을 종료한 후 위 단계를 반복하여 페어링을 다시 시작합니다 . 페어링 중에는 마우스와 수신기를 가까이 두십시오 . 鼠标未与 Nano 接收器配对。配对方法:打开鼠标开关,将 Nano 接收器插入 设备的 USB 端口,然后同时按住鼠标的滚轮和右键。3 秒钟后,松开两个按键, 即可完成配对。如果不成功,请拔下接收器,关闭鼠标开关,重复上述步骤, 重新配对。在配对过程中,确保鼠标靠近接收器。 شغّل الماوس وصِ ل وحدة االستقبال الصغيرة: لالقتران.الماوس غير مقترن بوحدة االستقبال الصغيرة أفلت الزرَ ين. ثم انقر فوق عجلة التمرير والزر األيمن في الوقت نفسه، الخاص بالجهازUSB بمنفذ افصل وحدة االستقبال وأوقف تشغيل الماوس، في حال فشل االقتران. ثوان إلنهاء عملية االقتران3 بعد تأكد من أن الماوس قريب، أثناء االقتران.ثم كرر الخطوات أعاله مرة أخرى إلعادة بدء االقتران .من وحدة االستقبال 12 Declaration of Conformity This product complies with the radio interference requirements of the European Community. Hereby, Anker Innovations Limited declares that the radio equipment type A7850M is in compliance with Directive 2014/53/EU. The full text of the EU declaration of conformity is available at the following internet address: https:// www.anker.com/products Maximum output power: 0dBm. Frequency band: 2.4G band (2.4000GHz-2.4835GHz) Declaration of Conformity This product complies with the radio interference requirements of the European Community. Hereby, Anker Innovations Limited declares that the radio equipment type A7850R is in compliance with Directive 2014/53/EU. The full text of the EU declaration of conformity is available at the following internet address: https:// www.anker.com/products Maximum output power: 0dBm. Frequency band: 2.4G band (2.4000GHz-2.4835GHz) Wireless Vertical Ergonomic Mouse Model No. : A7850M FCC ID: 2AOKB-A7850M IC: 23451-A7850M IC NOTICE TO CANADIAN USERS This device complies with Industry Canada license-exempt RSS standard(s). Operation is subject to the following two conditions: (1) This device may not cause interference, and (2) This device must accept any interference, including interference that may cause undesired operation of the device. This device complies with RSS-210 of Industry Canada. Operation is subject to the condition that this device does not cause harmful interference. This Class B digital apparatus complies with Canadian ICES-003 (Cet appareil numérique de la Classe B conforme à la norme NMB-003 du Canada). Le présent appareil est conforme aux CNR d'Industrie Canada applicables aux appareils radio exempts de licence. L'exploitation est autorisée aux deux conditions suivantes : (1) l'appareil ne doit pas produire de brouillage, et (2) l'utilisateur de l'appareil doit accepter tout brouillage radioélectrique subi, même si le brouillage est susceptible d'en compromettre le fonctionnement. (1) This device may not cause harmful interference. (2) This device must accept any interference received, including interference that may cause undesired operation. 2. Changes or modifications not expressly approved by the party responsible for compliance could void the user's authority to operate the equipment. NOTE: This equipment has been tested and found to comply with the limits for a Class B digital device, pursuant to Part 15 of the FCC Rules. These limits are designed to provide reasonable protection against harmful interference in a residential installation. This equipment generates uses and can radiate radio frequency energy and, if not installed and used in accordance with the instructions, may cause harmful interference to radio communications. However, there is no guarantee that interference will not occur in a particular installation. If this equipment does cause harmful interference to radio or television reception, which can be determined by turning the equipment off and on, the user is encouraged to try to correct the interference by one or more of the following measures: Reorient or relocate the receiving antenna. Increase the separation between the equipment and receiver. Connect the equipment into an outlet on a circuit different from that to which the receiver is connected. Consult the dealer or an experienced radio/TV technician for help. Nano Receiver Model No.: A7850R FCC ID: 2AOKB-A7850R IC: 23451-A7850R IC NOTICE TO CANADIAN USERS 1. This device complies with Part 15 of the FCC Rules. Operation is subject to the following two conditions: This device complies with Industry Canada license-exempt RSS standard(s). Operation is subject to the following two conditions: (1) This device may not cause interference, and (2) This device must accept any interference, including interference that may cause undesired operation of the device. This device complies with RSS-210 of Industry Canada. Operation is subject to the condition that this device does not cause harmful interference. This Class B digital apparatus complies with Canadian ICES-003 (Cet appareil numérique de la Classe B conforme à la norme NMB-003 du Canada). Le présent appareil est conforme aux CNR d'Industrie Canada applicables aux appareils radio exempts de licence. L'exploitation est autorisée aux deux conditions suivantes : (1) l'appareil ne doit pas produire de brouillage, et (2) l'utilisateur de l'appareil doit accepter tout brouillage radioélectrique subi, même si le brouillage est susceptible d'en compromettre le fonctionnement. 13 14 FCC STATEMENT FCC STATEMENT 1. This device complies with Part 15 of the FCC Rules. Operation is subject to the following two conditions: (1) This device may not cause harmful interference. (2) This device must accept any interference received, including interference that may cause undesired operation. 2. Changes or modifications not expressly approved by the party responsible for compliance could void the user's authority to operate the equipment. NOTE: This equipment has been tested and found to comply with the limits for a Class B digital device, pursuant to Part 15 of the FCC Rules. These limits are designed to provide reasonable protection against harmful interference in a residential installation. This equipment generates uses and can radiate radio frequency energy and, if not installed and used in accordance with the instructions, may cause harmful interference to radio communications. However, there is no guarantee that interference will not occur in a particular installation. If this equipment does cause harmful interference to radio or television reception, which can be determined by turning the equipment off and on, the user is encouraged to try to correct the interference by one or more of the following measures: Reorient or relocate the receiving antenna. Increase the separation between the equipment and receiver. Connect the equipment into an outlet on a circuit different from that to which the receiver is connected. Consult the dealer or an experienced radio/TV technician for help. This symbol means the product must not be discarded as household waste, and should be delivered to an appropriate collection facility for recycling. Follow local rules and never dispose of the product and rechargeable batteries with normal household waste. Correct disposal of old products and rechargeable batteries helps prevent negative consequences for the environment and human health. Customer Service Kundenservice | Servicio de atención al cliente | Service client | Servizio clienti | Serviço de Apoio ao Cliente | カスタマーサポート | 고객 서비스 | 客户服务 خدمة العمالء 18-month limited warranty 18 Monate eingeschränkte Garantie | Garantía limitada de 18 meses Garantie limitée de 18 mois | Garanzia limitata di 18 mesi 18 meses de garantia limitada | 18 ヶ月保証 | 18 개월 제한 보증 有限保修 18 个月 | شهرً ا18 ضمان محدود لمدة Lifetime technical support Technischer Support für die Produktlebensdauer Asistencia técnica de por vida | Assistance technique à vie Supporto tecnico per l'intero ciclo di vita Suporte técnico ao longo da vida útil do produto. テクニカルサポート | 평생 기술 지원 | 终身技术支持 دعم تقني دائم [email protected] (US) +1 (800) 988 7973 Mon-Fri 9:00 - 17:00 (PT) (UK) +44 (0) 1604 936200 Mon-Fri 6:00 - 11:00 (GMT) (DE) +49 (0) 69 9579 7960 Mon-Fri 6:00 - 11:00 ( 日本 ) +81 03 4455 7823 月 - 金 9:00 - 17:00 ( 中国 ) +86 400 0550 036 周一至周五 9:00 - 17:30 Wireless Vertical Ergonomic Mouse Model No. : A7850M Nano Receiver Model No.: A7850R Anker Innovations Limited Room 1318-19, Hollywood Plaza, 610 Nathan Road, Mongkok, Kowloon, Hong Kong 15 16-
 1
1
-
 2
2


Anker Wireless Vertical Ergonomic Mouse Manual de usuario
- Categoría
- Ratones
- Tipo
- Manual de usuario
en otros idiomas
Artículos relacionados
Otros documentos
-
 Compucessory CCS51302 Manual de usuario
-
 Terry Trading PCA2 Manual de usuario
-
Tecknet M002 Manual de usuario
-
 AmazonBasics B07G28NF3L Manual de usuario
-
Asus WT425 Guía de inicio rápido
-
Asus L701 ROG SPATHA (90MP00A1-B0UA00) Manual de usuario
-
Penclic R2 Especificación
-
SPEEDLINK Saphyr Guía de instalación
-
Tecknet M006 Manual de usuario
-
Silvercrest SFM 4 A1 Operating Instructions Manual


