La página se está cargando...

INSTALLATION AND MAINTENANCE
THANK YOU

Table of Contents .......................................................................
2
Safety Information .....................................................................
2
Limited Warranty And Liability
.................................................
3
Pre-installation Planning & Information ...................................
3
Roof, Gutter & Downspout Material Requirements ..................
4
Electrical Requirements ................................................................
4
Materials Needed For Installation ............................................
6
Installing The Cable ...................................................................
7
Maintenance And Operation Of The Cable ................................
16
Removing The Cable For Roof Repair
.......................................
16
Appendix A: Estimating The Cable Length You Need ...............
16
NOTICES:
NEVER:
.
℉
℃
ALWAYS:
WARNING:
Safety Information
Table of Contents

A.
The Purpose of the Heating Cable
B.
Who Should Install This Heating
C.
When to Install the Cable
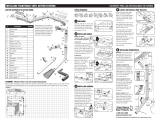
PRE-INSTALLATION PLANNING & INFORMATION
LIMITED WARRANTY AND LIABILITY

D. Determining Where the Cable Should Be Installed
E. The Heating Cable Length Checking Should be Installed
This kit is only designed for use on:
N
:
ELECTRICAL REQUIREMENTS
WARNI
G:
ROOF, GUTTER & DOWNSPOUT MATERIAL REQUIREMENTS
PRE-INSTALLATION PLANNING & INFORMATION

Table1 Required Amps Based on Product Model
CatalogNumber
Required Amps
ELECTRICAL REQUIREMENTS (continued)

A. CWR KIT MATERIALS
B. Additional Tools and Materials Required
MATERIALS NEEDED FOR INSTALLATION

A. PLANNING YOUR CABLE INSTALLATION
Pattern for the roofline:
Planning the layout or pattern on the roof.
WHERE TO START:
WARNING:
WARNING:
INSTALLING THE CABLE

Pattern for skylights:
Pattern for valleys:
Overhang
Triangle Height
Pattern for dormers:
INSTALLING THE CABLE (continued)

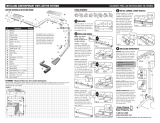
Installation techniques for other special roof areas:
About the number of the cables.
The cable shortage or excess.
Installation technique in the gutters and downspouts:
INSTALLING THE CABLE (continued)

B. PROPER HANDLING & CARE OF THE CABLE
C. TESTING THE CABLE
D. PREPARE YOUR ROOF, GUTTERS &
DOWNSPOUTS
Attaching the cable with clips and cable spacers.
E. ATTACHING THE CABLE
Attaching the cable at the starting point.
At bottoms of triangles along edge of roof
INSTALLING THE CABLE (continued)

Along the rise of large triangles
Around dormers
INSTALLING THE CABLE (continued)

Near skylights
Up and down valleys
Installing the cable in the gutter using cable spacers.
INSTALLING THE CABLE (continued)

Installing the cable in downspouts using cable spacers
INSTALLING THE CABLE (continued)

F. FINAL INSTALLATION STEPS
WARNING:
INSTALLING THE CABLE (continued)

A. PRE-SEASON VERIFICATION
C. CHECKING OPERATION AND CONDITION
OF CABLE
Figure 24. Forming a drip loop near the starting point.
B. TURNING THE CABLE ON AND OFF
D. RESETTING CIRCUIT
BREAKER/REPLACEING BLOWN FUSE
MAINTENANCE AND OPERATION OF THE CABLE

E. OFF-SEASON USE
.
A. FOR TYPICAL APPLICATION
APPENDIX A: ESTIMATING THE CABLE LENGTH YOU NEED
REMOVING THE CABLE FOR ROOF REPAIR
MAINTENANCE AND OPERATION OF THE CABLE (continued)

Table B-1 Cable Length Estimation Formula for Typical Roof
Applications
Area
What to measure
How to calculate
Table B-2 Overhang Multiplier
ROOF
Less than
12 in.
OVERHANG
Less than
30 cm
Multiplier
For roof with gutter
4.0
Multiplier
For roof without gutter
3.0
Table B-3
De-Icing
Kits
Catalog Number
Length
Ft.
M
B. FOR ICING SUTUATION IN THE GUTTER ONLY
APPENDIX A:
ESTIMATING THE CABLE LENGTH YOU NEED (continued)

Table B-4 Cable Needed for Gutter Only Ice Situations
Area
How to Calculate
C. FOR ROOFS WITH SPECIAL ROOF AREA APPLICATIONS
Table B-5 Cable Length Estimation Formula for a Roof with Special Roof Areas
Area
Whattomeasure
How to calculate
D
C
G
F
B
B
E
Figure B-3. Roof Measurements
APPENDIX A:
ESTIMATING THE CABLE LENGTH YOU NEED (continued)

Table B-6 Special Roof Area Multiplier
Multiplier
Multiplier
D. EXAMPLE #1 – EXAMPLE OF TYPICAL ESTIMATION
.
E. EXAMPLE #2 – EXAMPLE OF SPECIAL ROOF AREA ESTIMATION
APPENDIX A:
ESTIMATING THE CABLE LENGTH YOU NEED (continued)


¡GRACIAS!

Materiales Y Accesorios
Necesarios Para La Instalación
................................... 26
Cómo Instalar El Cable ................................................. 27
Mantenimiento Y Funcionamiento
Del Cable ........................................................................ 36
Retirar El Cable Para Reparar El Tejado ............................ 38
Apéndice A: Estimación De La Longitud Del Cable ........... 38
Tabla de contenidos ....................................................... 22
Información De Seguridad Importante .......................... 22
Limitación De Garantía Y Responsabilidad ....................... 23
Planificación E Información Previas A La Instalación ....... 23
Requisitos Del Tejado, Las Canaletas
Y Los Tubos De Bajada De Aguas
...................................... 24
Requisitos Eléctricos ..................................................... 24
NOTAS:
NUNCA:
SIEMPRE:
ADVERTENCIA:
INFORMACIÓN DE SEGURIDAD IMPORTANTE
Tabla de contenidos

A. Función del cable de calefacción
B. Quién debe instalar el cable de calefacción
C. Cuándo instalar el cable
PLANIFICACIÓN E INFORMACIÓN PREVIAS A LA
INSTALACIÓN (continued)
LIMITACIÓN DE GARANTÍA Y RESPONSABILIDAD

D. Ubicación de la instalación del cable
E. Longitud del cable de calefacción
Este equipo está diseñado para su uso en:
REQUISITOS ELÉCTRICOS
ADVE
R
TENCIA:
REQUISITOS DEL TEJADO, LAS CANALETAS Y LOS TUBOS
DE BAJADA DE AGUAS
PLANIFICACIÓN E INFORMACIÓN PREVIAS A LA
INSTALACIÓN (continued)

Tabla1 Amperaje necesario en función del modelo del producto
Número de producto
Amperaje necesario
REQUISITOS ELÉCTRICOS (continued)

A. JUEGO DE MATERIALES PARA EL CABLE CWR
B. HERRAMIENTAS Y MATERIALES ADICIONALES
MATERIALES Y ACCESORIOS NECESARIOS PARA LA
INSTALACIÓN
REQUISITOS ELÉCTRICOS (continued)

A. PLANIFICAR LA INSTALACIÓN DEL CABLE
Patrón de la línea del tejado:
Planificación del diseño o patrón del cable sobre el tejado.
DÓNDE EMPEZAR:
ADVERTENCIA:
ADVERTENCIA:
CÓMO INSTALAR EL CABLE

Voladizo
Altura del triángulo
Patrón para la zona de un tragaluz:
Patrón para la zona de una limahoya:
CÓMO INSTALAR EL CABLE (continued)

Patrón para la zona de una ventana de buhardilla:
Técnicas de instalación para otras zonas especiales del
tejado:
Técnica de instalación en canaletas y tubos de bajada
de aguas:
CÓMO INSTALAR EL CABLE (continued)

Sobre el número de cables.
Escasez o exceso de cable.
CÓMO INSTALAR EL CABLE (continued)

E. SUJECIÓN DEL CABLE
B. CÓMO MANIPULAR Y CONSERVAR EL
CABLE CORRECTAMENTE
Fijación del cable en el punto de inicio.
C. COMPROBAR EL FUNCIONAMIENTO DEL
CABLE
D. PREPARACIÓN DEL TEJADO, LAS
CANALETAS Y LOS TUBOS DE BAJADA DE
AGUAS
CÓMO INSTALAR EL CABLE (continued)

Sujeción del cable con grapas y separadores de cables.
En la parte inferior de los triángulos a lo largo de los bordes
del tejado
A lo largo de la subida de los triángulos grandes
CÓMO INSTALAR EL CABLE (continued)

Alrededor de una ventana de buhardilla
A lo largo de una limahoya
Cerca de un tragaluz
CÓMO INSTALAR EL CABLE (continued)

Instalación del cable en la canaleta utilizando separa-
dores de cables.
CÓMO INSTALAR EL CABLE (continued)

Installing the cable in downspouts using cable spacers
ADVERTENCIA:
CÓMO INSTALAR EL CABLE (continued)

F. PASOS FINALES DE LA INSTALACIÓN
A. COMPROBACIONES PREVIAS A LA TEM-
PORADA DE DESHIELO
Figura 24. Formación de un lazo de goteo cerca del punto de inicio.
MANTENIMIENTO Y FUNCIONAMIENTO
DEL CABLE
CÓMO INSTALAR EL CABLE (continued)

B. ACTIVACIÓN Y DESACTIVACIÓN DEL CABLE
C. COMPROBACIÓN DEL FUNCIONAMIENTO Y ESTADO DEL CABLE
D. RESTABLECER EL DISYUNTOR / SUSTITUIR UN FUSIBLE FUNDIDO
MANTENIMIENTO Y FUNCIONAMIENTO
DEL CABLE (continued)

E. USO DEL CABLE FUERA DE LA TEMPORADA DE DESHIELO
A. PARA TEJADOS ESTÁNDAR
APÉNDICE A: ESTIMACIÓN DE LA LONGITUD DEL CABLE
RETIRAR EL CABLE PARA REPARAR EL TEJADO
MANTENIMIENTO Y FUNCIONAMIENTO
DEL CABLE (continued)

Tabla B-1 Fórmula de estimación de la longitud de cable necesaria para
tejados estándar
Zona
Elemento a medir
Cómo realizar el cálculo
Tabla B-2 Coeficiente multiplicador de voladizos
Coeficiente
multiplicador
Para tejado
con canaleta
Coeficiente
multiplicador
Para tejado
sin canaleta
VOLADIZO DEL TEJADO
Menos de 12 pulgadas
Menos de 30 cm
Tabla B-3 Equipos de deshielo
Número de producto Longitud
Pies
M
APÉNDICE A: ESTIMACIÓN DE LA LONGITUD
DEL CABLE (continued)

B. PARA PROBLEMAS DE HIELO SÓLO EN LAS CANALETAS
Tabla B-4 Longitud de cable necesaria para problemas de hielo sólo en las canaletas
Zona
Cómo realizar el cálculo
C. PARA TEJADOS CON ZONAS ESPECIALES
Tabla B-5 Fórmula de estimación de la longitud de cable necesaria para tejados
con zonas especiales
Zona
Elemento a medir
Cómo realizar el cálculo
APÉNDICE A: ESTIMACIÓN DE LA LONGITUD
DEL CABLE (continued)

Figura B-3. Mediciones del tejado
Tabla B-6 Coeficiente multiplicador de zonas especiales del tejado
Coeficiente multiplicador
Coeficiente multiplicador
D. EJEMPLO 1 – EJEMPLO DE ESTIMACIÓN PARA TEJADO ESTÁNDAR
E EJEMPLO 2 – EJEMPLO DE ESTIMACIÓN PARA ZONAS ESPECIALES DEL TEJADO
APÉNDICE A: ESTIMACIÓN DE LA LONGITUD
DEL CABLE (continued)

1/42