Electrolux ERA39395W8 Manual de usuario
- Categoría
- Neveras
- Tipo
- Manual de usuario

MMaannuuaall ddee iinnssttrruucccciioonneess
UUsseerr MMaannuuaall
ERA 39355 W
Frigorifico
Fridge


electrolux
3
Bienvenido al mundo Electrolux
Gracias por elegir un producto Electrolux de primera clase, el cual esperamos le
proporcione una gran satisfacción en el futuro. Electrolux ambiciona ofrecerle una
amplia variedad de productos de calidad que haga su vida más cómoda. Usted
encontrará algunos ejemplos en la portada de este manual. Por favor, tómese
unos minutos para estudiar este manual de modo que pueda aprovecharse de los
beneficios de su nueva máquina. Nosotros prometemos proporcionarle una
experiencia superior como usuario y mucha tranquilidad. ¡Buena suerte!

4
electrolux
En este manual se utilizan los símbolos siguientes
Información importante para su seguridad personal y para evitar daños al
electrodoméstico
Información general y consejos
Información medioambiental
El símbolo en el producto o en su embalaje indica que este producto no se
puede tratar como desperdicios normales del hogar. Este producto se debe
entregar al punto de recolección de equipos eléctricos y electrónicos para
reciclaje. Al asegurarse de que este producto se deseche correctamente, usted
ayudará a evitar posibles consecuencias negativas para el ambiente y la salud
pública, lo cual podría ocurrir si este producto no se manipula de forma adecuada.
Para obtener información más detallada sobre el reciclaje de este producto,
póngase en contacto con la administración de su ciudad, con su servicio de
desechos del hogar o con la tienda donde compró el producto.

electrolux
5
INDICE
Advertencias yy cconsejos iimportants 66
Uso 9
Limpieza de las partes internas 9
El panel de control 9
Display 10
Funcionamiento 10
Desconexión 10
Regulación de la temperatura 11
Menú de Funciones 11
Uso del compartimento frigorífico 12
Refrigeración de alimentos y bebidas 13
Como utilizar el dispensador de agua con
cartucho de filtro BRITA MAXTRA 14
Circulatión de aire 19
Rejillas movibles 20
Compartimiento para botellas 20
Ubicación estantes de la
contrapuerta 20
Consejos 21
Consejos para refrigeración 21
Manutención 21
Limpieza periódica 21
Temporadas largas de inactividad 22
Lámpara de iluminación 22
Desescarche 22
Datos ttécnicos 23
Como aactuar ssi eel aaparato nno
funciona 23
Instalación 24
Colocación 24
Conexión eléctrica 24
Retenes-Repisas 25
Distanciadores posteriores 25
Reversibilidad de la puerta 26
Garantía/Servicio ppostventa 28
Garantía EEuropea 30
www.electrolux.com 31

6
electrolux
ADVERTENCIAS Y
CONSEJOS
IMPORTANTS
Es mmuy iimportante cconservar eeste
libro dde iinstrucciones jjunto aal aaparato
por ssi ffuera nnecesario cconsultarlo. SSi eel
aparato sse vvendiese oo ttransfiriese aa
otra ppersona, aacuérdese dde eentregarlo
junto ccon éél ppara qque eel nnuevo
propietario cconozca eel ffuncionamiento
de lla mmáquina yy ssus aadvertencias.
En ccaso dde qque eeste aaparato, ddotado
de ccierre mmagnético, ssustituya uuno
con ccierre aautomático, aaconsejamos
que lla ccerradura dde eeste úúltimo qquede
inservible, aantes dde ddeshacerse dde éél.
Así sse eevitará qque llos nniños, jjugando,
puedan qquedarse eencerrados ddentro,
con ggrave ppeligro dde ssus vvidas.
Estas aadvertencias hhan ssido
redactadas ppara ssu sseguridad yy ppara
la sseguridad dde llos ddemás. LLe
rogamos, ppor llo ttanto, lleerlas
atentamente aantes dde iinstalar yy uutilizar
el aaparato.
Seguridad
• Este aparato no está pensado para
ser utilizado por personas
(incluidos los niños) con
capacidades físicas, sensoriales o
mentales reducidas, o que no
tengan experiencia y conocimiento,
a menos que una persona
responsable de su seguridad les
supervise o les ofrezca instrucción
en el uso del aparato.
Los niños deben ser supervisados
para asegurarse de que no
jueguen con el aparato.
• Es peligroso modificar o intentar
modificar las características de
este aparato.
• Quitar siempre el enchufe de la toma
de corriente antes de efectuar
cualquier operación de limpieza o
manutención (como la substitución
de la bombilla en aquellos aparatos
que la tienen).
• No consumir nunca los cubitos de
hielo recién sacados del
congelador ya que podrían
provocar quemaduras.
• Estos aparatos son pesados. Tener
cuidado en los desplazamientos.
• EEste aaparato nno ccontiene een eel
circuito rrefrigerante yy een eel
aislamiento, ggases rrefrigerantes
nocivos ppare eel oozono. EEl aaparato
no ddebe sser eeliminado jjunto ccon
los ddeshechos uurbanos yy
chatarras. SSe ddebe eevitar eel ddaño
del ccircinto rrefrigerante, ssobre ttodo
en lla pparse pposterior ccerca ddel
intercambiador. LLas iinformaciones
sobre llos ccentros dde rrecepción sson
suministradas ppor llas aautoridades
municipales
• PPrestar lla mmáxima aatención ddurante
las ooperaciones dde ddesplazamiento
pare nno ddañar llas pparses ddel
circuito rrefrigerante aa ffin dde eevitar
las pposibles ssalidas dde lliquido.
• EEl aaparato nno ddebe sser ccolocado
cerca dde ttermosifones oo ccocinas aa
gas.
• EEvitar lla eexposición pprolongada ddel
aparato aa llos rrayos ssolares
• LLa pparse pposterior ddel aaparato ddebe

electrolux
7
recibir uuna ccirculación dde aaire
suficiente yy sse ddebe eevitar ccualquier
daño aal ccircuito rrefrigerante.
• SSolamente ppare llos ccongeladores
(excluidos llos eempotrados): ssu
mejor uubicación ees eel ssótano.
• NNo iintroducir aaparatos eeléctricos
en eel iinterior ddel eequipo ((por
ejemplo: ffabricadora dde hhelados).
Asistencia
• Cualquier modificación que
eventualmente fuese necesaria a la
instalación eléctrica doméstica
para poder instalar el aparato tiene
que ser realizada sólo por personal
competente.
• Para eventuales intervenciones
dirigirse a un Centro de Asistencia
Técnica autorizado y exigir las
piezas de repuesto originales.
• En caso de necesitar reparaciones
no intentar hacerlas personalmente.
Las reparaciones efectuadas por
personas no competentes pueden
provocar daños. Ponerse en
contacto con el Centro de
Asistencia más cercano y emplear
sólo repuestos originales.
Uso
• Los frigoríficos y/o congeladores
domésticos están destinados sólo
a la conservación y/o congelación
de alimentos.
• Las mejores prestaciones se
obtienen con temperaturas
ambiente comprendidas entre
+18°C y +43°C (Clase T); +18°C y
+38°C (Clase ST); +16°C y +32°C
(Clase N); +10°C y +32°C (Clase
SN); la clase de pertenencia está
indicada en la placa matrícula
situada en la cámara al lado del
cajón verduras.
Atención:
en caso de temperaturas
ambiente diferentes de las
indicadas para la clase climática a
la cual pertenece este producto, es
preciso observar las indicaciones
siguientes: cuando la temperatura
ambiente desciende por debajo del
valor mínimo puede suceder que la
temperatura de conservación en el
vano congelador no esté
garantizada; por lo tanto, se
aconseja que se consuman a lo
más pronto los alimentos
presentes en su interior.
• Los productos que hayan sido
descongelados no se tienen que
volver a congelar.
• Seguir atentamente las
indicaciones del fabricante para la
conservación y/o congelación de
los alimentos.
• En todos los aparatos de
refrigeración y congelación existen
superficies que se cubren con
escarcha. Según el modelo, la
escarcha puede ser eliminada
automáticamente (desescarche
automático) o manualmente. No
intentar nunca quitar la escarcha con
un objeto puntiagudo ya que se
podría dañar irremediablemente el
evaporador. Utilizar para ello sólo el
rascador de plástico que se
suministra con el aparato. Por el

8
electrolux
mismo motivo no despegar nunca las
cubetas del hielo con un cuchillo o
cualquier otro objeto puntiagudo.
• No colocar en el compartimiento
de la baja temperatura (congelador
o conservador) bebidas gaseosas
que podrían explotar.
Instalación
• El aparato se calienta
considerablemente en la proximidad
del condensador y del compresor,
por lo tanto hay que verificar que el
aire pueda circular libremente
alrededor del mismo. Una ventilación
insuficiente puede causar un mal
funcionamiento y daños al aparato.
Seguir cuidadosamente las
instrucciones que se dan para la
instalación.
• Una vez instalado el aparato
verificar que no esté apoyado
sobre el cable de alimentación.
Importante:
en caso de que el
cable de alimentación se dañe,
deberá ser sustituido con un cable
especial. Ambos cables pueden
ser solicitados al fabricante o al
Servicio de asistencia.
• Si el aparato es transportado en
forma horizontal es posible que el
aceite contenido en el compresor
pase al circuito refrigerante.
Esperar por lo menos dos horas
antes de poner en marcha el
aparato para dar tiempo a que el
aceite regrese al compresor.
Protección del
ambiente
Este aaparato nno ccontiene een eel ccircuito
refrige-rrante yy een eel aaislamiento, ggases
refrigerantes nnocivos ppara eel oozono. EEl
aparato nno ddebe sser eeliminado jjunto
con llos ddeshechos uurbanos yy
chatarras. SSe ddebe eevitar eel ddano ddel
circinto rrefrigerante, ssobre ttodo een lla
parte pposterior ccerca ddel
intercambiador. LLas iinformaciones
sobre llos ccentros dde rrecepciõn sson
suministradas ppor llas aautoridades
municipales; LLos mmateriales uusados een
este aaparato mmarcados ccon eel ssimbolo
son rreciclables.

electrolux
9
USO
Limpieza de las partes
internas
Antes del empleo limpiar todas las
partes internas con agua tibia y jabón
neutro, a fin de eliminar el
característico olor de nuevo y secarlas
luego cuidadosamente.
No eemplear ddetergentes oo
polvos aabrasivos qque ppodrían ddañar llas
superficies.
El panel de control
A
B
C
D
E
A - Tecla de encendido / apagado del
aparato
B - Tecla de regulación de la
temperatura
C - Display de visualización de las
temperaturas y funciones
D - Tecla de activación de las
funciones
E - Tecla de confirmación

10
electrolux
Display
Indicador de temperatura positiva
Indicador de la temperatura
Si está encendido, indica que
está activa la función Child Lock
Si está encendido, indica que está
activa la función Shopping
Si está encendido, indica que está
activa la función Eco Mode
Importante
Si la puerta permanece abierta durante
mas de 7 minutos la luz interior será
desconectada automáticamente la luz
se reactivará al volver a cerrar y abrir la
puerta.
Desconexión
La desconexión se realiza pulsando la
tecla (A) durante más de 1 segundo.
Después de esto, se indicará una cuenta
atrás de la temperatura de -3 -2 -1.
Funcionamiento
Después de pulse la toma de
corriente, si el display no se ilumina de
conexión la tecla (A), encendido del
aparato.
Para la correcta conservación de los
alimentos, es recomendable definir la
función Eco Mode y las siguientes
temperaturas:
+5°C en el frigorífico
• Para modificar la temperatura,
consulte la sección "Regulación de
la temperatura".

electrolux
11
Regulación de la
Temperatura
Apretando el botón (B), en el indicador
parpadea la temperatura programada.
Confirme la temperatura elegida
pulsando el botón E (se oye un sonido)
o esperando unos segundos (no se
oye el sonido).
El indicador indica de nuevo la
temperatura actual dentro del
compartimiento.
La temperatura programada es
alcanzada dentro de 24 h.
Después de periodos largos sin usar el
aparato no será necesario regular de
nuevo la temperatura, ya que esta
permanece almacenada en memoria.
¡Atención!
Durante el periodo de estabilización,
después de la primera puesta en
marcha, la temperatura mostrada
puede no corresponderse con la
temperatura programada.
Durante este periodo es posible que
la temperatura mostrada sea differente
a la temperatura programada.
Menú de Funciones
Pulsando la tecla D se activa el menú
de funciones. La activación de cada
función puede confirmarse pulsando la
tecla. Si después de unos segundo no
se confirma ninguna función el display
saldrá del menú de funciones y
regresará su estado normal.
En el display se indican las siguientes
funciones:
Función Child Lock
Función Shopping
Función Eco Mode
Función Child Lock
La función Child Lock se activa
pulsando la tecla D (si es necesario,
varias veces) hasta que aparezca el
icono correspondiente .
Debe confirmar la selección pulsando
en pocos segundos el botón E . Se
oirá una señal acústica y el icono
permanecerá activado.
En este estado, ninguna acción sobre
los botones implicará variación alguna
mientras la función esté activa.
Se puede desactivar la función en
cualquier momento pulsando la tecla D
hasta que el icono correspondiente
comience a parpadear y seguidamente
pulsar el botón E.
Función Shopping
Si hay que introducir una gran
cantidad de alimentos calientes, por
ejemplo después de haber hecho la
compra, se aconseja activar la función
Shopping para enfriarlos más
rápidamente y para evitar que suba la
temperatura de los alimentos que ya
están en el frigorífico.
La función Shopping se activa
pulsando la tecla D (si es necesario
varias veces) hasta que aparezca el
icono correspondiente .
Debe confirmar la selección pulsando
en pocos segundos el botón E . Se
oirá una señal acústica y el icono
permanecerá activado.
La función Shopping se apaga
automáticamente después de unas 6
horas.

12
electrolux
Se puede desactivar la función en
cualquier momento pulsando la tecla D
hasta que el icono correspondiente
comience a parpadear y seguidamente
pulsar el botón E.
Función Eco Mode
La función Eco Mode se activa
pulsando la tecla D (si es necesario,
varias veces) hasta que aparezca el
icono correspondiente (o fijando la
temperatura en + 5°C).
Debe confirmar la selección pulsando
en pocos segundos el botón E . Se
oirá una señal acústica y el icono
permanecerá activado.
En este estado, las temperaturas se
fijan de modo automático (+ 5°C), para
obtener las mejores condiciones de
conservación de los alimentos.
Se puede desactivar la función en
cualquier momento modificando la
temperatura seleccionada en el
compartimiento.
Uso del compartimento
frigorífico
Es posible programar la temperatura
de este compartimento entre +2°C y
+8°C.
Durante el funcionamiento normal se
indica la temperatura dentro del
compartimiento frigorífico.
¡Atención!
Es normal que exista una diferencia
entre la temperatura mostrada y la
programada. En particular cuando:
• recientemente se ha modificado la
temperatura programada.
• la puerta ha quedado abierta por
mucho tiempo.
• se han introducido en el frigorífico
alimentos calientes.
Función Holiday “H”
Al activar la función Holiday se regula
la temperatura del frigorífico a +15 ºC.
Esta función le permite mantener
frigorífico vacío y con la puerta cerrada
durante periodos largos como las
vacaciones, evitándose la formación
de malos olores.
La función Holiday H puede regularse
pulsando la tecla B. Al pulsar la tecla
B, en el indicador parpadea el ajuste
de temperatura actual. Vuelva a pulsar
la tecla B. Cuando aparezca en
pantalla la letra H, confirme la
temperatura elegida apretando el
botón E (oirá un sonido) o esperando
unos segundos (no oirá el sonido).
Ahora el refrigerador se encuentra en
función Holiday del modo de ahorro de
energía y el indicador muestra la letra
H.
Se puede desactivar la función en
cualquier momento modificando la
temperatura seleccionada en el
compartimiento.
¡Atención!
El frigorífico de estar totalmente vacío
de alimentos cuando se active la
función Holiday.

electrolux
13
Refrigeracíon de alimentos
y bebidas
Para utilizar de la mejor manera el
compartimiento refrigerante, es
necesario:
• no introducir comidas calientes o
líquidos en en evaporacíon;
• tapar o envolver los alimentos,
especialmente si son aromáticos;
• no colocar sobre las rejillas
papeles, cartones o plásticos que
obstaculicen la circulacíon del aire.

14
electrolux
Cómo utilizar el dispensador
de agua con cartucho de
filtro BRITA MAXTRA
Unidad de filtro de agua BRITA
Componentes internos:
1. depósito de agua
2. embudo
3. tapa del depósito
4. válvula + junta
5. incluido el cartucho de filtro BRITA
MAXTRA
6. Memo BRITA: indicador electrónico de
cambio de cartucho
Componentes externos
7.Dispensador
8.Nivel de agua
9.Bandeja de retención de goteo
OPERACIONES INICIALES PARA
EL USO DEL DISPENSADOR DE
AGUA
1.Retire cintas y otros sistemas de
protección del conjunto del depósito.
2.Limpie los componentes como se
indica en el capítuloPROCEDIMIENTO DE
LIMPIEZA DEL DISPENSADOR DE
AGUA,con el fin de eliminar posibles
residuos.
PROCEDIMIENTO DE LIMPIEZA DEL
DISPENSADOR DE AGUA
1.Abra los dos elementos de retención
situados a los lados del depósito,como se
indica en las ilustraciones.
-Retire el cartucho BRITA MAXTRA de la
unidad de filtro de agua.
-Presione los elementos de retención de
la mitad y elévelo.
-Desplace el elemento de retención hacia
el depósito central.

electrolux
15
2.Empuje el depósito hacia arriba en el
sentido de la válvula.
3.Retire la tapa y el embudo.
4.Desenrosque la válvula girando de
derecha a izquierda (procure
especialmente no aflojar la junta de la
válvula,ya que es necesaria para el
funcionamiento correcto de la unidad).
5.Limpie la tapa del depósito,la válvula y la
junta con una solución de agua tibia y
jabón neutro. Aclare y colóquelo dentro
del orificio de la puerta durante la limpieza
de los demás componentes (para evitar
fugas de aire frío desde el frigorífico).
6.Limpie el depósito y el embudo en el
lavavajillas o con una solución de agua
tibia y jabón neutro y aclárelos.
7.Después de limpiar los componentes
del depósito retire la válvula de la puerta
del frigorífico y monte el depósito en
orden inverso (4-3-2-1)al del desmontaje
(preste atención a la colocación de la
junta de la válvula).
8.Coloque el depósito montado en la
puerta,en el sentido de la válvula.
9.Cierre los elementos de retención
en orden inverso a la apertura.
10.Vuelva a introducir el cartucho
BRITA MAXTRA en el embudo como se
indica en el capítulo "Cómo cambiar el
cartucho BRITA MAXTRA".
Cómo utilizar el cartucho de filtro
BRITA MAXTRA
PASO 1: PREPARACIÓN DEL
CARTUCHO
Para preparar el cartucho de filtro BRITA,
retire la envoltura protectora (nota:el
cartucho y la envoltura interior pueden
aparecer húmedos; esto se debe
sencillamente a la condensación).
Sumerja el cartuchoen agua fría y
sacúdalo con suavidad para eliminar las
posibles burbujas de aire.Ya puede utilizar
el filtro. A diferencia de lo que sucede con
otros cartuchos de filtro de agua,no es es
necesario remojar previamente el nuevo
cartucho Maxtra.

16
electrolux
PASO 2:INTRODUCCIÓN EN
EL DEPÓSITO DE AGUA
Retire la tapa del depósito. Antes de
introducir el cartucho,retire el embudo y
límpielo bien,aclarándolo y secándolo con
un paño. A continuación limpie bien el
interior del depósito de agua con un paño
húmedo y séquelo también. Coloque el
cartucho en el depósito de agua y
empújelo hacia abajo,hasta que encaje en
su sitio con un chasquido.
El cartucho debe permanecer en su sitio
si se invierte la posición del embudo.
PASO 3:ACLARADO DEL CARTUCHO
Retire el embudo de la unidad de filtro
BRITA,llénelo de agua del grifo y déjela
filtrar.Deseche en el fregadero los dos
primeros llenados. Estos se utilizan para
enjuagar el cartucho de filtro.
A continuación vuelva a colocar el
embudo en la unidad de filtro de agua
BRITA.
Vuelva a colocar la tapa en el recipiente y
presiónela con cuidado hacia abajo para
cerciorarse de que encaja correctamente
en su sitio.
PASO 4:RECARGA DEL DEPÓSITO
DE AGUA
Para llenar el depósito con agua fría,
simplemente abra la tapa superior
abatible,vierta una jarra de agua en el
depósito a través de la cubierta como se
muestra en la ilustración (utilice la tapa
cada vez que desee filtrar el agua).
Importante!
Para evitar el riesgo de derrames de agua
al abrir o cerrar la puerta del frigorífico,
recomendamos no llenar el tanque al
máximo, dejando suficiente espacio de
aire.
NOTA: SI NO HA UTILIZADO TODA EL
AGUA FILTRADA DEL DEPÓSITO EN 1
O 2 DÍAS,ELIMINE EL AGUA QUE
PUEDA HABER EN EL INTERIOR DE LA
UNIDAD DE FILTRO DE AGUA BRITA
ANTES DE VOLVER A LLENARLO
Espere a que el agua se filtre y repita el
PASO 4 tantas veces como lo desee
hasta que la unidad de filtro de agua
BRITA se llene.

electrolux
17
RETIRE EL CARTUCHO TIRANDO
DEL ANILLO DEL ASA
Para cambiar el cartucho al cabo de
cuatro semanas,utilice el asa con anillo de
la parte superior del cartucho para
extraerlo del embudo y repita los pasos
del 1 al 3 anteriores.
EL INDICADOR MEMO BRITA
Para obtener el máximo rendimiento del
filtro y un sabor óptimo, es importante
cambiar el cartucho BRITA
periódicamente. BRITA recomienda que
sustituya el cartucho de la unidad BRITA
del frigorífico cada cuatro semanas.
El indicador Memo BRITA le recuerda
automáticamente cuándo tiene que
cambiar el filtro.
.
El exclusivo indicador Memo BRITA mide
el tiempo de uso recomendado del
cartucho.Memo es fácil de usar y le
recuerda automáticamente cuándo debe
cambiar el cartucho. El indicador Memo
BRITA se encuentra en la tapa del depósito
de agua. El funcionamiento es muy
sencillo.
Encienda la pantalla de Memo:
Para activar Memo,presione sin soltar el
botón de inicio situado en la tapa hasta
que aparezcan cuatro barras en la pantalla
y parpadeen dos veces. El indicador
Memo ya está activado.
Control de funcionamiento:
El punto parpadeante en la esquina inferior
derecha de Memo indica que éste se
encuentra funcionando.

18
electrolux
Cambio de la pantalla:
Cada semana desaparece una barra,
para indicar el tiempo restante del
cartucho.Al cabo de cuatro semanas
desaparecen las cuatro barras.Esto, unido
a la flecha parpadeante,indica que es
necesario cambiar el cartucho.
Introduzca un cartucho nuevo siguiendo
las instrucciones y reactive Memo como
se ha indicado antes.
NOTA: Cuando sólo se muestra una
barra,debe comprobar si tiene un
cartucho de filtro BRITA MAXTRA
disponible.
Importante:el indicador Memo está
diseñado para usarse exclusivamente con
cartuchos de filtro BRITA.
"MEMO"BRITA:el indicador electrónico de
cambio de cartucho tiene una duración
aproximada de 5 años.Al final de la
duración de "MEMO",recuerde que es un
dispositivo electrónico y deséchelo de
acuerdo con la normativa vigente para
dichos aparatos.
Para retirar un "MEMO"agotado, coloque
un destornillador en la ranura situada junto
a él y empújelo hacia fuera.
Tenga en cuenta que el indicador
"MEMO"no se debe extraer para ningún
otro fin que no sea desecharlo.
INFORMACIÓN IMPORTANTE
• El orificio de la válvula en la puerta del
frigorífico DEBE ESTAR CERRADA
con la VÁLVULA DE AGUA durante el
funcionamiento normal del aparato
• Utilice sólo agua potable.Si utiliza
cualquier otro tipo de bebida, podría
dejar residuos,sabor y olor en el
depósito y en el grifo.
• Es posible que se oiga algún ruido
provocado por el aire que penetra al
salir el agua del depósito.
• Si el agua no fluye bien,vuelva a
presionar la palanca de
accionamiento. Mantenga el vaso
debajo del grifo durante algunos
instantes,para asegurarse de que
toda el agua cae en él.

electrolux
19
• No utilice bebidas carbonatadas,
como las gaseosas.El líquido puede
gotear debido a la presión del gas
• Recuerde que el agua es un
alimento.Consuma el agua filtrada en
un plazo de uno a dos días.
• Si el la unidad de filtro de agua BRITA
no se utiliza durante un tiempo
prolongado (como en vacaciones),es
conveniente que deseche el agua que
ha quedado en el sistema y deje el
cartucho dentro del depósito del
filtro.Antes de volver a utilizar el
sistema,retire el cartucho y repita los
pasos del 1 al 4 indicados en Cómo
utilizar el cartucho de filtro de agua
BRITA MAXTRA.
• La unidad de filtro de agua BRITA está
diseñada para utilizarse sólo con agua
potable de la red de suministro
(nota:es un agua que se controla
constantemente y cuyo consumo es
seguro de acuerdo con la normativa)o
con agua suministrada por empresas
que hayan comprobado que es
segura para beber.Si las autoridades
indican que es necesario hervir el
agua,también puede hervirse el agua
filtrada por BRITA.Una vez levantada la
recomendación de hervir el agua,será
necesario limpiar todo el sistema de
filtro e introducir un cartucho nuevo.
En la guía de información sobre BRITA
puede consultar más detalles sobre el uso
de los cartuchos de filtro BRITA y del
indicador 'Memo'.
Puede comprar recambios del filtro
BRITA y del indicador de duración a
través del servicio post-venta de
Electrolux o BRITA.
Circulación de aire
El compartimiento frigorífico está
provisto de un ventilador especial que
se activa actuando sobre el interruptor
(A) ; el piloto verde encendido indica
que el ventilador está en marcha.
Se aconseja el uso del ventilador
cuando la temperatura ambiente
exceda de los 25°C.
Este dispositivo consiente la
refrigeración rápida de los alimentos y
la máxima uniformidad de temperatura
en el compartimiento.
A

20
electrolux
Rejillas movibles
En las paredes del compartimento
existen unas guías que consienten
poner las rejillas a distintas alturas.
Compartimiento para
botellas
Almacene las botellas con el cuello
hacia adelante.
Atención: Coloque echadas sólo las
botellas sin abrir.
Para guardar botellas ya abiertas
puede usted alzar el compartimiento
hasta dejarlo inclinado.
Para ello tire del compartimiento hacia
adelante hasta que sea posible virarlo
hacia arriba e introduzca entonces la
superficie delantera en el nivel
inmediato superior.
D338
Ubicación estantes de la
contrapuerta
Para poder colocar confecciones de
varios tamaños es posible colocar los
estantes de la contrapuerta a varias
alturas.
La operación se efectúa de la siguiente
manera: Empujar gradualmente el
estante en el sentido indicado por las
flechas hasta llegar a desengancharlo,
luego volverlo a montar en la posición
deseada.

electrolux
21
CONSEJOS
Consejos para refrigeración
Para un correcto uso aconsejamos:
Carne:
debe ser envuelta en saquitos
de plástico y colocada en el espacio
situado sobre los cajones verdura.
En eesta pposicíon lla ccarne ppuede sser
conservada aal mmáximo ppor 11 aa 22 ddias.
Alimentos ccocinados ,, pplatos ffríos, eetc.
tienen que conservarse bien cubiertos
y se pueden colocar en cualquier
bandeja del frigorífico.
Fruta yy vverdura:
una vez lavada, ha de
colocarse en el cajón (cajones) inferior.
Mantequilla yy qqueso:
deben colocarse
en los reci-pientes adecuados o
envueltos en hojas de aluminio o
politileno, a fin de evitar el contacto
con el aire.
Leche eembotellada:
bien tapada, en la
contropuerta.
Bananas, ppapas, ccebollas yy aajo, ssi nno
están cconfeccionados, nno sse ddeben
colocar een ffrigorífico.
MANUTENCIÓN
Desenchufar ssiempre eel
aparato aantes dde pproceder aa
cualquier ooperación dde llimpieza.
Atención
Este aaparato ccontiene
hidrocarburos een eel ccircuito
refrigerante; ppor llo ttanto eel
mantenimiento yy lla rrecarga
deben sser eefectuados
exclusivamente ppor ppersonal
autorizado ppor lla eempresa.
Limpieza periódica
Muchos ddetergentes eespecíficos ppara
las ssuperficies dde ccocina ccontienen
agentes qquímicos qque ppuede
atacar/perjudicar llas ppartes een pplástico
presentes een eeste aaparato. SSe
aconseja ppues llimpiar eel rrevestimiento
de eeste aaparato ssólo ccon aagua
caliente qque ccontenga uuna ppequeña
cantidad dde ddetergente llíquido ppara
vajillas.
Limpiar el interior con agua templada
y bicarbonato y las partes exteriores
esmaltadas con cera a la silicona;
limpiar el condensador y el
motocompresor con un cepillo o un
aspirador.
Esta operación mejorará el
funcionamiento con el consiguiente
ahorro de energia.

22
electrolux
Temporadas largas de
inactividad
Durante los períodos en los cuales el
aparato no esté funcionando observar
las siguientes precauciones:
• desenchufarlo;
• sacar todos los alimentos;
• limpiar cuidadosamente el interior y
todos los accesorios.
• Dejar las puertas entornadas para
facilitar la circulación del aire, a fin
de evitar la formación de olores
desagradables.
Lámpara de iluminación
Para la sustitución eventual de la
lámpara oprimir el enganche posterior
y al mismo tiempo sacar la tapa en
dirección de las flechas.
Atención
Sustituir la lámpara por otra de igual
potencia (la potencia máxima está
indicada en el difusor de luz).
D037
Desescarche
La escarcha del evaporador del
compartimento refrigerante se elimina
automáticamente a cada interrupcion
del motocompresor. El agua de la
escarcha derretida, mediante un canal
adecuado, se recoge en un pequeño
depósito colocado en la parte
posterior sobre el motocompresor del
aparato, de donde evapora.
Se rrecomienda llimpiar pperiódicamente
el aagujero dde ddesagüe ddel aagua dde
desescarche, ssituado een lla pparte
central ddel ccanal een eel ccompartimiento
refrigerante, uutilizando eel ««limpiador»
adecuado qque sse eencuentra een eel
agujero, ppara eevitar qque eel aagua dde
desescarche ccaiga ssobre llos
alimentos.
Atención
Se rrecomienda nno uutilizar uutensilios
metálicos ppara qquitar lla eescarcha aa ffin
de eevitar ggraves ddaños aal aaparato.
No uusar ddispositivo mmecánico aalguno uu
otro mmedio aartificial ppara aacelerar eel
processo dde ddesescarche eexcepto llos
recomendados.
D037

electrolux
23
COMO ACTUAR SI EL
APARATO NO FUNCIONA
Si el aparato presentase anomalías
será oportuno controlar:
• Que esté bien enchufado y que el
interruptor de la instalación eléctrica
esté conectado.
• Que no haya un corte de energía
eléctrica.
• Además si el aparato hace
demasiado ruido verificar que los
costados no estén en contacto con
muebles que pueden causar ruidos
o vibraciones y que la unidad
refrigerante no vibre.
• Si se ven restos de agua en el
fondo del refrigerador comprobar
que el orificio de desagüe de la
escarcha derretida no esté
obturado (ver cápitulo
Desescarche).
Después de hacer las verificaciones
anteriores, si la anomalía persiste,
llame al Centro de Asistencia Técnica
más cercano.
Es iimportante een eel mmomento dde
llamar pproporcionar lla rreferencia ddel
modelo yy eel nnúmero dde mmatrícula ddel
aparato iindicados een eel ccertificado dde
garantía oo een lla ttarjeta mmatrícula.
DATOS TÉCNICOS
378
0,403
147
1800
600
650
Capacidad neta del frigorífico en litros
Consumo energético en kWh/año
Consumo energético en kWh/día
Dimensiones en mm
Altura
Ancho
Profundidad
Los datos técnicos se indican en la placa-matrícula situada sobre el lado
izquierdo interno del aparato.

24
electrolux
Conexión eléctrica
Antes de enchufar el aparato,
asegurarse de que la tensión y la
frecuencia indicadas en la tarjeta
matrícula, correspondan a las de la
instalación doméstica. Se admite una
oscilación de 6% sobre la tensión
nominal.
Para el funcionamiento a tensiones
distintas, habrá que utilizar un
autotransformador de potencia
adecuada. Asegurarse de que la toma
de corriente y el enchufe sean
compatibles entre sí sin tener que
interponer reducciones ladrones o
adaptadores varios. Si fuera necesario,
cambiar la toma de la instalación de la
casa con una adapta.
Es iindispensable cconectar eel aaparato aa
una ttoma dde ttierra eeficaz.
Para ello el enchufe del cable de
alimentación está dotado de un
adecuado contacto. Si la toma de
corriente de la instalación doméstica
no estuviera conectada a tierra,
conectar el aparato a una instalación
de tierra, conforme a las leyes en vigor,
consultando para ello con un técnico
especializado.
El ffabricante ddeclina ttoda
responsabilidad een eel ccaso qque eesta
norma nno ssea rrespetada.
Este aparato es conforme a las
siguientes Directivas
Comunitarias:
•
87/308 CCEE
del 2/6/87 relativa a la
supresión de interferencias radio.
•
73/23 CCEE
19/02/73 (Baja tensión)
y modificaciones sucesivas;
•
89/336 CCEE
03/05/89
(Compatibilidad electromagnética) y
modificaciones sucesivas.
INSTALACIÓN
Colocación
Situar el aparato lejos de fuentes de calor,
como: radiadores, estufas, exposición
directa a los rayos del sol, etc.
Asegurarse de que en les partes
posterior, superior e inferior no haya
ningún obstáculo que impida la
circulacidn del aire.
Para que el aparato rinda mejor, la
distancia mínima entre la parte superior
y el eventual mueble pénsil de encima,
debería ser por lo menos de 100 mm .
La solución preferible, de todos
modos, seria la ilustrada en la (sin
mueble). Dos patas graduables,
situadas en la base del mueble,
consienten rivelarlo a la perfección.
Asegurarse de que la toma de corriente
y el enchute sean compatibles entre sí
sin tener que interponer reducciones
ladrones o adaptadores varios. Si fuera
necesario, cambiar la toma de la
instalación de la casa con una adepta.
Importante
Se debe
poder desenchufar el aparato;
por lo tanto una vez efectuada la
instalación es necesario que el enchufe
no quede escondido.
100 mm10 mm
10 mm
NP007

electrolux
25
Retenes-Repisas
Su aparato dispone de retenes-repisas
que permiten bloquear las repisas
durante el transporte.
Para quitarlos actuar como sigue:
mover los retenes-repisas en la
dirección de la flecha, subir el vidrio
por la parte trasera y empujarlo hacia
adelante hasta que queda libre,
seguidamente quitar los retenes.
A
C
B
Distanciadores
posteriores
En el aparato hay dos distanciadores
que deberàn ser montados como se
muestra en la figura.
Aflojar los tornillos, introducir el
distanciador debajo de la cabeza del
tronillo y volver a atornillar.

26
electrolux
• Quitar la puerta
• Retirar usando una herramienta la
cubierta (e) y desatornilla el eje de
la bisagra inferior (f) y atornillalo en
el lado contrario.
• Reinsertar la cubierta (e) en el lado
contrario.
• Reinsertar la puerta.
• Poner atención para que el canto
frontal de la puerta tiene que estar
en paralelo con el panel superior.
• Fijar el tope puerta en el lado
opuesto.
• Posicionar y ajustar la bisagra
superior (que se encuentra en el
interior de la bolsa del libro de
instrucciones) en el lado contrario.
Reversibilidad de la
puerta
Antes de llevar a cabo alguna
operación, quitar el enchufe de
alimentación. Para cambiar el sentido
de apertura de la puerta, proceder de
la siguiente forma.
Para llevar a cabo las siguientes
operaciones, sugerimos que estas se
realicen acompañado de otra persona
con el fin de ayudar a sujetar la puerta
del aparato durante los procesos.
• Abrir la puerta con el frigorífico en
posición vertical. Desatornillar los
tornillos de la cornisa puerta
superior de plástico.
• Extraer el tapón y montarlo en el
lado opuesto (d).
• Tumbar el aparato sobre la parte
posterior.
• Retirar el tornillo de la bisagra (a)
• Retire los tornillos de la bisagra
superior y extráigala (b).
• Retire el tope puerta extrayendo su
tornillo (c).
a
b
c

electrolux
27
• Fije la nueva tapa bisagra ( que se
encuentra en el interior de la bolsa
del libro de instrucciones).
• Levantar el aparato situándolo en
su posición vertical.
• Abrir la puerta y colocar la cornisa
puerta superior con tornillos.
• Fijar la manilla de la puerta en el
lado opuesto.
Colocar de nuevo, nivelar el
aparato, esperar por lo menos dos
horas antes de y conectar la
alimentación.
De todas formas si no pudiera realizar
las operaciones mencionadas,
contacte con tu Servicio Técnico mas
cercano. El Servicio postventa
especializado llevará acabo la
reversibilidad de la puerta por su
cuenta.
Advertencia
Después dde hhaber ccambiado eel ssentido
de aapertura dde llas ppuertas ccompruebe
que ttodos llos ttornillos eestén
debidamente aapretados yy qque lla
guarnición mmagnética sse aajusta
correctamente aal mmueble. SSi lla
temperatura aambiente ees bbaja ((p.ej.
invierno), lla gguarnición mmagnética
quizás nno aajuste pperfectamente. EEn eel
caso mmencionado, eespere aa qque lla
guarnición sse aajuste ssola oo aacelere eeste
proceso ccalentando lla zzona aafectada
con uun ssecador nnormal dde ppelo.

28
electrolux
Welcome to the world of Electrolux
You’ve chosen a first class product from Electrolux, which hopefully will provide
you with lots of pleasure in the future. Electrolux ambition is to offer a wide variety
of quality products that would make your life even more comfortable. You can look
at some examples on the cover in this manual. But now it’s time to study this
manual and start using and enjoying the benefits from your new machine. We
promise that it’ll make your life a little easier. Good luck!

electrolux
29
The following symbols are used in this manual:
Important information concerning your personal safety and information on
how to avoid damaging the appliance.
General information and tips
Environmental information
The symbol on the product or on its packaging indicates that this product
may not be treated as household waste. Instead it shall be handed over to the
applicable collection point for the recycling of electrical and electronic equipment.
By ensuring this product is disposed of correctly, you will help prevent potential
negative consequences for the environment and human health, which could
otherwise be caused by inappropriate waste handling of this product. For more
detailed information about recycling of this product, please contact your local city
office, your household waste disposal service or the shop where you purchased
the product.

30
electrolux
CONTENTS
Safety IInformation 31
Use 334
Cleaning the interior 34
Control panel 34
Display 35
First switch on 35
Switching off 35
Temperature regulation 35
Functions Menu 36
Use of the fridge compartment 37
Fresh food refrigeration 37
How to use the water dispenser with
BRITA MAXTRA filter cartridge BRITA
water filter unit 38
Movable shelves 44
Bottle rack 44
Positioning the door shelves 44
Air recycling 45
Hints 45
Hints for refrigeration 45
Maintenance 445
Periodic cleaning 46
Periods of non-operation 46
Interior light 46
Defrosting 46
Technical iinformation 47
Customer sservice aand sspare pparts 447
Installation 48
Location 48
Electrical connection 48
Shelf holders 49
Rear spacers 49
Door reversibility 50

electrolux
31
SAFETY INFORMATION
It iis mmost iimportant tthat tthis
instruction bbook sshould bbe rretained
with tthe aappliance ffor ffuture rreference.
Should tthe aappliance bbe ssold oor
transferred tto aanother oowner, oor
should yyou mmove hhouse aand lleave tthe
appliance, aalways eensure tthat tthe
book iis ssupplied wwith tthe aappliance iin
order tthat tthe nnew oowner ccan bbe
acquainted wwith tthe ffunctioning oof tthe
appliance aand tthe rrelevant wwarnings.
If tthis aappliance ffeaturing mmagnetic
door sseals iis tto rreplace aan oolder
appliance hhaving aa sspring llock ((latch)
on tthe ddoor oor llid, bbe ssure tto mmake
that sspring llock uunusable bbefore yyou
discard tthe oold aappliance. TThis wwill
prevent iit ffrom bbecoming aa ddeath-ttrap
for aa cchild.
These wwarnings aare pprovided iin tthe
interest oof ssafety. YYou mmust rread tthem
carefully bbefore iinstalling oor uusing tthe
appliance.
General Safety
• This appliance is not intended for
use by persons (including children)
with reduced physical, sensory or
mental capabilities, or lack of
experience and knowledge, unless
they have been given supervision
or instruction concerning use of the
appliance by a person responsible
for their safety.
Children should be supervised to
ensure that they do not play with
the appliance.
• It is dangerous to alter the
specifications or modify this
product in any way.
• Before any cleaning or
maintenance work is carried out,
be sure to switch off and unplug
the appliance.
• This appliance is heavy. Care
should be taken when moving it
• Ice lollies can cause frost burns if
consumed straight from the
appliance.
•• Take uutmost ccare wwhen hhandling
your aappliance sso aas nnot tto ccause
any ddamages tto tthe ccooling uunit
with cconsequent ppossible ffluid
leakages.
• The aappliance mmust nnot bbe llocated
close tto rradiators oor ggas ccookers.
• Avoid pprolonged eexposure oof tthe
appliance tto ddirect ssunlight.
• There mmust bbe aadequate vventilation
round tthe bback oof tthe aappliance
and aany ddamage tto tthe rrefrigerant
circuit mmust bbe aavoided.
• For ffreezers oonly ((except bbuilt-iin
models): aan iideal llocation iis tthe
cellar oor bbasement.
• Do nnot uuse oother eelectrical
appliances ((such aas iice ccream
makers) iinside oof rrefrigerating
appliances.
Service/Repair
• Any electrical work required to
install this appliance should be
carried out by a qualified electrician
or competent person
• This product should be serviced by
an authorized Service Centre, and
only genuine spare parts should be
used.

32
electrolux
• Under no circumstances should
you attempt to repair the appliance
yourself. Repairs carried out by
inexperienced persons may cause
injury or more serious
malfunctioning. Refer to your local
Service Centre, and always insist
on genuine spare parts.
• This appliance contains
hydrocarbons in its cooling unit;
maintenance and recharging must
therefore only be carried out by
authorized technicians.
Use
• The domestic refrigerators and
freezers are designed to be used
specifically for the storage of edible
foodstuffs only.
• Best performance is obtained with
ambient temperature between
+18°C and +43°C (class T); +18°C
and +38°C (class ST); +16°C and
+32°C (class N); +10°C and +32°C
(class SN). The class of your
appliance is shown on its rating
plate.
Warning:
when the ambient
temperature is not included within
the range indicated for the class of
this appliance, the following
instructions must be observed:
when the ambient temperature
drops below the minimum level, the
storage temperature in the freezer
compartment cannot be
guaranteed; therefore it is advisable
to use the food stored as soon as
possible.
• Frozen food must not be re-frozen
once it has been thawed out.
• Manufacturers’ storage
recommendations should be strictly
adhered to. Refer to relevant
instructions.
• The inner lining of the appliance
consists of channels through which
the refrigerant passes. If these
should be punctured this would
damage the appliance beyond
repair and cause food loss. DO
NOT USE SHARP INSTRUMENTS
to scrape off frost or ice. Frost may
be removed by using the scraper
provided. Under no circumstances
should solid ice be forced off the
liner. Solid ice should be allowed to
thaw when defrosting the
appliance.
• Do not place carbonated or fizzy
drinks in the freezer as it creates
pressure on the container, which
may cause it to explode, resulting
in damage to the appliance.Do not
use a mechanical device or any
artificial means to speed up the
thawing process other than those
recommended by the
manufacturer. Never use metal
objects for cleaning your appliance
as it may get damaged.
Installation
• During normal operation, the
condenser and compressor at the
back of the appliance heat up
considerably. For safety reasons,
minimum ventilation must be as
shown in the instructions.

electrolux
33
Attention: kkeep vventilation oopenings
clear oof oobstruction.
• Care must be taken to ensure that
the appliance does not stand on
the electrical supply cable.
Important:
if the supply cord is
damaged, it must be replaced by a
special cord or assembly availa-ble
from the manufacturer or its service
agent.
• If the appliance is transported
horizontally, it is possible that the
oil contained in the compressor
flows in the refrigerant circuit. It is
advisable to wait at least two hours
before connecting the appliance to
allow the oil to flow back in the
compressor.
• There are working parts in this
product which heat up. Always
ensure that there is adequate
ventilation as a failure to do this will
result in component failure and
possible food loss. See installation
instructions.
• Parts which heat up should not be
exposed. Wherever possible the
back of the product should be
against a wall.
Environment
Protection
This aappliance ddoes nnot ccontain
gasses wwhich ccould ddamage tthe oozone
layer, iin eeither iits rrefrigerant ccircuit oor
insulation mmaterials. TThe aappliance
shall nnot bbe ddiscarded ttogether wwith
the uurban rrefuse aand rrubbish. AAvoid
damaging tthe ccooling uunit, eespecially
at tthe rrear nnear tthe hheat eexchanger.
Information oon yyour llocal ddisposal ssites
may bbe oobtained ffrom mmunicipal
authorities. TThe mmaterials uused oon tthis
appliance mmarked bby tthe ssymbol
are rrecyclable.

34
electrolux
USE
Cleaning the interior
Before using the appliance for the first
time, wash the interior and all internal
accessories with luke-warm water and
some neutral soap so as to remove
the typical smell of a brand-new
product, then dry thoroughly.
Do nnot uuse ddetergents oor
abrasive ppowders, aas tthese wwill
damage tthe ffinish.
Control panel
A
B
C
D
E
A - Appliance button ON/OFF
B - Temperature regulation button
C - Temperature and function indicator
D - Function button
E - Confirmation button

electrolux
35
Display
Positive Temperature indicator
Temperature indicator
If on the Child Lock function is on
If on the Shopping function is on
If on the Eco Mode function is on
First switch on
After plugging the plug into the power
outlet, if the display is not illuminated,
press key (A), appliance on.
For a correct storage of the food select
the Eco Mode function that guarantee
the following temperature is set:
+5°C in the fridge
• To select a different temperature
see "Temperature regulation".
Important
If the door remains ajar for some
minutes, the internal
lighting will turn off electronically; after
this, the lighting function will be reset
by closing and opening the door itself.
Switching off
The appliance is shut off by pressing
key (A) for more than 1 second. During
this, a countdown of the temperature
from -3 -2 -1 will be shown.
Temperature regulation
The temperature may be regulated by
pressing the key B.
By pressing the key B the current
temperature setting flashes on the
indicator and by pressing the key B
again it is possible to change it.
You confirm the choice of the
temperature either by pressing the key
E, (you will hear the buzzer) or by
waiting for some seconds (you will not
hear the buzzer).
Then the indicator shows again the
inside compartment temperature.
The newly selected-temperature must
be reached after 24 hours.
After a long period out of use it is not
necessary to set again the temperature
because it remains stored.

36
electrolux
Attention!
During the stability period by the first
starting the temperature displayed can
not correspond to the setting
temperature. During this time it is
possible that the temperature
displayed is different than the setting
temperature.
Functions Menu
By activating the key D the functions
menu is operating.
Each function could be confirmed by
pressing button E. If there is no
confirmation after some seconds the
display will go out from the menu and
return in normal condition.
The following functions are indicated:
Child Lock function
Shopping function
Eco Mode function
Child Lock Function
The Child Lock function is activated by
pressing key D (several times if
necessary) until the corresponding icon
appears .
You must confirm the choice by
pressing key E within few seconds.
You will hear the buzzer and the icon
remains lighted.
In this condition any possible operation
through the keys does not cause any
change as long as this function is
activated.
It is possible to de-activate the
function at any time by pressing key D
until the corresponding icon will flash
and then key E.
Shopping Function
If you need to insert a large amount of
warm food, for example after doing the
grocery shopping, we suggest
activating the Shopping function to
chill the products more rapidly and to
avoid warming the other food which is
already in the refrigerator.
The Shopping function is activated by
pressing key D (several times if
necessary) until the corresponding icon
appears .
You must confirm the choise by
pressing key E within few seconds.
You will hear the buzzer and the icon
remains lighted.
The Shopping function shuts off
automatically after approximately 6
hours.
It is possible to de-activate the
function at any time by pressing key D
until the corresponding icon will flash
and then key E.
Eco Mode Function
The Eco Mode function is activated by
pressing key D (several times if
necessary) until the corresponding icon
appears (or setting the temperature
at +5°C).
You must confirm the choice by
pressing key E within few seconds.
You will hear the buzzer and the icon
remains lighted.
In this condition the chosen
temperatures are automatically set (+
5°C), in the best conditions for storing
food.
It is possible to de-activate the
function at any time by changing the
selected temperature in the
compartment.

electrolux
37
Now the refrigerator is in the Holiday
function in the energy- saving mode
and the indicator shows the letter H.
It is possible to de-activate the function
at any time by changing the selected
temperature in the compartment.
Attention!
The fridge compartment must be
empty with Holiday function on.
Fresh food refrigeration
To obtain the best performance:
• do not store warm food or
evaporating liquids in the
refrigerator;
• do cover or wrap the food,
particularly if it has a strong flavour.
• Position food so that air can
circulate freely round it.
Use of the fridge
compartment
The temperature of this compartment
may be regulated between +2°C and
+8°C.
During normal functioning the indicator
shows the temperature inside the
fridge.
Attention!
Difference between the temperature
displayed and temperature setting is
normal. Especially when:
• a new setting has recently been
selected
• the door has been left open for a
long time
• warm food has been placed in the
compartment.
Holiday Function “H”
The Holiday function sets the
temperature at + 15°C.
This function allows you to keep the
refrigerator shut and empty during a
long holiday period ( e. g. the summer
holidays) without the formation of a
bad smell.
The Holiday Function H may be
regulated by pressing the key B. By
pressing the key B the current
temperature setting flashes on the
indicator. Press the key B again. When
on the display appears the letter H
confirm the choice of the temperature
or by pressing the key E, (you will hear
the buzzer) or by waiting for some
seconds (you will not hear the buzzer).

38
electrolux
How to use the water dispenser with
BRITA MAXTRA filter cartridge BRITA
water filter unit
Internal components:
1.water tank
2.funnel
3.tank lid
4.valve +gasket
5.including BRITA MAXTRA filter cartridge
6.BRITA Memo -the electronic cartridge
exchange indicator
External components:
7.Dispenser
8.Water Lever
9.Water drop tray
INITIAL OPERATIONS TO USE YOUR
WATER DISPENSER
1.Remove every tape and other protection
system from the tank assembly;
2.Clean the components as described
into the WATER DISPENSER CLEANING
PROCEDURE chapter in order to remove
eventual residues;
WATER DISPENSER CLEANING
PROCEDURE
1.Unblock the two stopping elements on
the sides of the tank as shown in the
pictures;
-Take out the BRITA MAXTRA cartridge
from the water filter unit
-Press the stopping elements in the
middle and move it up.
-Move the stopper into direction of the
central tank

electrolux
39
2.2.Push up the tank along the direction
of the Valve
3.Remove the lid and the funnel
4.Unscrew the valve in counter clockwise
(pay particular attention to lose the Valve
Gasket because is necessary toa correct
functioning of the features);
5.Clean the tank lid,the valve and the
gasket with a solution of warm water and
neutral soap.Rinse it and put it inside the
door hole during the cleaning of the other
components (in order to avoid cold air
leakage from the fridge);
6.Clean the tank and funnel into the
dishwasher or with a solution of warm
water and neutral soap and rinse them;
7.After the tank components cleaning
take back the valve from the fridge door
and assembly the tank in the inverse
order (4;3;2;1)of disassembly (pay
attention at the valve gasket positioning);
8.Put the tank assembled on the door
along the valve direction;
9.Block the stopping elements in inverse
order of unblock;
10.Insert again the BRITA MAXTRA
cartridge in the funnel as described in
chapter "How to change the BRITA
MAXTRA cartridge".
How to use the BRITA MAXTRA
filter cartridge
STEP 1:PREPARING THE
CARTRIDGE
To prepare your BRITA filter
cartridge,please remove protective
wrapper (note:cartridge and inside
wrapper may appear moist, this is simply
condensation). Immerse cartridge in cold
water and shake it gently to remove any
air bubbles.The filter now is ready to use.
As required for some other water filter
cartridges, there is no need to pre-soak
the new Maxtra Cartridge.

40
electrolux
STEP 2:INSERT IN THE WATER
TANK
Remove the tank lid.Before inserting the
cartridge,remove the funnel and clean it
thoroughly by rising it and wiping it
dry.Then thoroughly clean the inside of the
water tank with a dump cloth and wipe it
dry as well. Place the cartridge into the
filter tank and push downwards until it
'clicks' firmly into place.The cartridge
should stay in place if the funnel is turned
upside down.
STEP 3:RINSE CARTRIDGE
Take the funnel out of the BRITA water filter
unit,fill it under the tap with cold tap water
and allow it to filter through.Discard the first
two fillings into the sink.These first two
fillings are used to flush the filter cartridge.
Then place the funnel back into BRITA
water filter unit.
Place the cover back onto the jag and
press it carefully downwards to ensure it
fits correctly into place.
STEP 4:REFILL WATER TANK
To fill the tank with cold water, simply
open the flip top lid, take a jug of tap
water and pour it inside the tank through
the cover as shown into the picture (use
the lid every time that you want to filter
your water).
Important!
In order to avoid risk of spillage of water
during closing and opening of the
refrigerator door,we recommend to not fill
completely the water tank but leave a
head space of air.
NOTE:IF YOU HAVE NOT USED ALL
FILTERED WATER IN THE WATER TANK
WITHIN 1-2 DAYS PLEASE DISCARD
ANY WATER LEFT INSIDE THE BRITA
WATER FILTER UNIT BEFORE
REFILLING IT.
Allow the water to filter through and
repeat STEP 4 on page 15 as many times
as you want until the BRITA water filter
unit is filled up.

electrolux
41
REMOVE CARTRIDGE WITH RING
PULL HANDLE
To exchange the cartridge after four
weeks, simply use the ring pull handle on
the top of the cartridge to remove it from
the funnel,and repeat steps 1 -3 above;
THE BRITA MEMO
For maximum filter performance
andoptimum taste,it is important to change
your BRITA cartridge regularly. BRITA
recommends that you replace the cartridge
in the BRITA unit of your fridge every four
weeks.
BRITA Memo automatically reminds
you when to change the cartridge.
The unique BRITA Memo measures the
recommended time of use of your
cartridge. Memo is easy to use and
automatically reminds your when to
change your cartridge.The BRITA Memo is
located on the lid of the water tank.
Operation is really simple.
Start the Memo display:
To start Memo please press and hold
down the start button on the lid until all four
bars appear in the display and flash
twice.The Memo is now set.
Functional control:
The flashing dot in the bottom right corner
of the Memo indicates that the Memo is
working.

42
electrolux
Change display:
Every week one bar will disappear to
show the remaining cartridge life. After
four weeks all four bars will disappear.
This,and a flashing arrow indicate that the
cartridge should now be changed. Insert
a new cartridge according to the
instructions and reactivate the Memo as
described above.
NOTE:When only one bar is showing, you
should just check whether you have a
new BRITA MAXTRA filter cartridge to
hand.
Important:
The Memo is only designed to
be used with BRITA filter cartridges.
BRITA "MEMO"-the electronic cartridge
exchange indicator has a life of
approximately 5 years. At the end of the
"MEMO's"life please remember that it is
an electronic device and to dispose on
the "MEMO"according to all applicable
provisions and regulations.To remove the
exhausted "MEMO"place a screwdriver in
the notch next to the "MEMO"and push it
out.
Please note that "MEMO"should not be
removed for any other reason than to
dispose of it.

electrolux
43
IMPORTANT INFORMATION
• The fridge door valve hole MUST
BE CLOSED with the WATER
VALVE during the regular
functioning of the appliance.
• Use only drinking water.The use of
any other drink type can leave
residues,taste or odor in the
reservoir and in the tap.
• It is possible to hear some noises
caused by air entering when the
water left the reservoir.
• In case the water does not flow
well, press the driving lever once
again. Keep the glass below the tap
for some instants,in order to assure
that all the water is collected by the
glass.
• Do not use gasified drinks,such as
soft drinks.The drink can leak due
to the gas pressure.
• Remember that water is a foodstuff.
Please consume filtered water
within one to two days.
• Should your BRITA water filter unit
not be in use for a prolonged
period (e.g. vacation),we
recommend that you discard any
water left inside the system and
leave the cartridge inside the filter
tank.Before using the system again
take out the cartridge and repeat
steps 1 to 4 of “How to use the
BRITA MAXTRA water filter
cartridge ” on page 15.
• The BRITA water filter unit is
designed for use only with
municipally treated tap water
(note:this water is constantly
controlled and according to legal
regulations safe to drink)or with
water from private supplies which
has been tested safe to drink.If an
instruction is received from the
authorities that mains water must
be boiled,the BRITA filtered water
also be boiled. When the instruction
to boil water is no longer in force,
the entire filter system must be
cleaned and a new cartridge
inserted.
More information on the use of
BRITA filter cartridges and the
‘Memo ’ can be found in the BRITA
information guide.

44
electrolux
Movable shelves
The walls of the refrigerator are
equipped with a series of runners so
that the shelves can be positioned as
desired.
Bottle rack
Place bottles in the rack with the
bottleneck to the front.
Important: Only store unopened
bottles horizontally.
The bottle rack can be tilted for storing
opened bottles.
To do this pull the bottle rack forward
until it can be tilted upwards, then
slide the front support into the next
level up.
Positioning the door
shelves
To permit storage of food packages of
various sizes, the door shelves can be
placed at different heights.
To make these adjustments proceed
as follows: Gradually pull the shelf in
the direction of the arrows until it
comes free, then reposition as
required.
D338

electrolux
45
Air recycling
The refrigerator compartment is
equipped with a device which can be
turned on with the switch ( A- see fig.).
The green light, when on, means that
the fan is working.
It is suggested that the device be
used when the ambient temperature
exceeds 25°C .
This device allows for rapid cooling of
foods and a more uniform temperature
in the compartment.
A
HINTS
Hints for refrigeration
Useful hints:
Meat ((all ttypes):
wrap in polythene
bags and place on the glass shelf
above the vegetable drawer.
For ssafety, sstore iin tthis wway oonly oone
or ttwo ddays aat tthe mmost.
Cooked ffoods, ccold ddishes, eetc..:
these should be covered and may be
placed on any shelf.
Fruit aand vvegetables:
these should be
thoroughly cleaned and placed in the
special drawer(s) provided.
Butter aand ccheese:
these should be
placed in special airtight containers or
wrapped in aluminium foil or polythene
bags to exclude as much air as
possible.
Milk bbottles:
these should have a cap
and should be stored in the bottle rack
on the door.
Bananas, ppotatoes, oonions aand ggarlic,
if nnot ppacked, mmust nnot bbe kkept iin tthe
refrigerator.
MAINTENANCE
Unplug tthe aappliance bbefore
carrying oout aany mmaintenance
operation.
Warning
This aappliance ccontains
hydrocarbons iin iits ccooling uunit;
maintenance aand rrecharging mmust
therefore oonly bbe ccarried oout bby
authorized ttechnicians.

46
electrolux
Periodic cleaning
Many pproprietary kkitchen ssurface
cleaners ccontain cchemicals tthat ccan
attack/damage tthe pplastics uused iin
this aappliance. FFor tthis rreason iit iis
recommended tthat tthe oouter ccasing oof
this aappliance iis oonly ccleaned wwith
warm wwater wwith aa llittle wwashing-uup
liquid aadded.
Clean the inside with warm water and
bicarbonate of soda.
Rinse and dry thoroughly.
Clean the condenser (black grill) and
the compressor at the back of the
appliance with a brush or a vacuum
cleaner. This operation will improve the
performance of the appliance and
save electricity consumption.
Periods of non-operation
When the appliance is not in use for
long periods, take the following
precautions:
• remove the plug from the wall socket;
• remove all food;
• defrost and clean the interior and
all accessories;
• leave the door ajar to allow air to
circulate to prevent unpleasant smells.
Interior light
If it becomes necessary to replace the
lamp, press on the rear hook and at the
same time slide the cover in the
direction indicated by the arrow.
Attention
Replace the lamp with one of the
same power (the maximum power is
shown on the light diffuser).
Defrosting
Frost is automatically eliminated from
the evaporator of the refrigerator
compartment every time the motor
compressor stops, during normal use.
The defrost water drains out through a
trough into a special container at the
back of the appliance, over the motor
compressor, where it evaporates.
It iis iimportant tto pperiodically cclean tthe
defrost wwater ddrain hhole iin tthe mmiddle
of tthe rrefrigerator ccompartment
channel tto pprevent tthe wwater
overflowing aand ddripping oonto tthe ffood
inside. UUse tthe sspecial ccleaner
provided, wwhich yyou wwill ffind aalready
inserted iinto tthe ddrain hhole.
D037

electrolux
47
CUSTOMER SERVICE
AND SPARE PARTS
If the appliance is not functioning
properly, check that:
• the plug is firmly in the wall socket
and the mains power switch is on;
• there is an electricity supply (find
out by plugging in another
appliance);
• If there are water drops on the
bottom of the cabinet, check that
the defrost water drain opening is
not obstructed (see “Defrosting”
section).
• If your appliance is still not working
properly after making the above
checks, contact the nearest service
centre.
To oobtain ffast sservice, iit iis eessential
that wwhen yyou aapply ffor iit yyou sspecify
the mmodel aand sserial nnumber oof yyour
appliance wwhich ccan bbe ffound oon tthe
guarantee ccertificate oor oon tthe rrating
plate llocated iinside tthe aappliance, oon
the bbottom lleft-hhand sside.
TECHNICAL INFORMATION
378
0,403
147
1800
600
650
Net Fridge Capacity lt.
Energy Consumption kWh/year
Dimensions mm
High
Energy Consumption kWh/24h
Width
Depth
The technical infomation are situated in the rating plate on the internal left side of
the appliance.

48
electrolux
INSTALLATION
Location
The appliance should be installed well
away from sources of heat such as
radiators, boilers, direct sunlight etc.
Ensure that air can circulate freely
around the back of the cabinet. To
ensure best performance, if the
appliance is positioned below an
overhanging wall unit, the minimum
distance between the top of the
cabinet and the wall unit must be at
least 100 mm . Ideally, however, the
appliance should not be positioned
below overhanging wall units. Accurate
levelling is ensured by one or more
adjustable feet at the base of the
cabinet.
Attention
It must be possible to disconnect the
appliance from the mains power
supply; the plug must therefore be
easily accessible after installation.
Electrical connection
Before plugging in, ensure that the
voltage and frequency shown on the
serial number plate correspond to your
domestic power supply. Voltage can
vary by ±6% of the rated voltage.
For operation with different voltages, a
suitably sized auto-transformer must
be used.
The aappliance mmust bbe eearthed.
The power supply cable plug is provided
with a contact for this purpose.
If the domestic power supply socket is
not earthed, connect the appliance to
a separate earth in compliance with
current regulations, consulting a
specialist technician.
The MManufacturer ddeclines aall
responsibility iif tthe aabove ssafety
precautions aare nnot oobserved.
This appliance complies with
the following E.E.C. Directives:
•
87/308 EEEC
of 2/6/87 relative to
radio interference suppression.
•
73/23 EEEC
of 19.2.73 (Low Voltage
Directive) and subsequent
modifications;
•
89/336 EEEC
of 3.5.89
(Electromagnetic Compatibility
Directive) and subsequent
modifications.
100 mm10 mm
10 mm
NP00

electrolux
49
Rear spacers
In the appliance, there are two spacers
which must be fitted as shown in the
figure .
Slacken the screws and insert the
spacer under the screw head, then re-
tighten the screws.
Shelf holders
Your appliance is equipped with shelf
retainers that make it possible to
secure the shelves during
transportation.
To remove them proceed as follows:
Move the shelf holders in the direction
of the arrow, raise the shelf from the
rear and push it forward until it is freed
and remove the retainers.
A
C
B

50
electrolux
Door reversibility
Before carrying out any operations,
remove the plug from the power socket.
To change the opening direction of the
door, proceed as follows:
• To carry out the following operations,
we suggest that this be made with
another person that will keep a firm
hold on the doors of the appliance
during the operations.
• Open the door with the appliance in
the upright position. Unscrew the
screws and remove the upper door
plastic trim.
• Remove the little plastic cover from
the door plastic trim and refit on the
opposite side (d).
• Lay down the appliance back side
down.
• Remove the screw of the hinge cover
plug (a).
• Unscrew the upper hinge and remove
it (b).
• Unscrew the screw and remove the
door stopper (c).
• Remove the door.
• Remove using a tool the cover (e)
unscrew the lower hinge pivot (f)
and place it on the opposite side.
• Reinsert the cover (e) on the
opposite side.
• Reinsert the door .
• Pay attention that the front board of
the doors are parallel to the front
board of the top.
• Fix the door stopper on the
opposite side.
• Position and fix the upper hinge (that
can be found in the instruction for use
bag) on the opposite side .
• Fix the screw of the new cover hinge
(that can be found in the instruction for
use bag).
a
b
c

electrolux
51
• Lift up the appliance to vertical
position.
• Open the door and reposition the
upper door plastic trim with screws.
• Fix the handle on the opposite side.
Reposition, level the appliance,
wait for at least two hours and then
connect it to the power socket.
In case you do not want to carry out the
above mentioned operations, contact the
nearest After Sales Service Force.. The
After Sales Service specialist will carry
out the reversibility of the doors at
your cost.
Warning
After hhaving rreversed tthe oopening
direction oof tthe ddoors ccheck tthat aall tthe
screws aare pproperly ttightened aand tthat
the mmagnetic sseal aadheres tto tthe
cabinet.
If tthe aambient ttemperature iis ccold ((i.e.
in WWinter), tthe ggasket mmay nnot ffit
perfectly tto tthe ccabinet. IIn tthat ccase,
wait ffor tthe nnatural ffitting oof tthe ggasket
or aaccelerate tthis pprocess bby hheating
up tthe ppart iinvolved wwith aa nnormal
hairdrier. LLay ddown tthe aappliance bback
side ddown
.


2223 437-93-00 08102008
wwwwww..eelleeccttrroolluuxx..ccoomm
www.electrolux.es
-
 1
1
-
 2
2
-
 3
3
-
 4
4
-
 5
5
-
 6
6
-
 7
7
-
 8
8
-
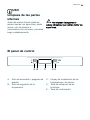 9
9
-
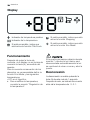 10
10
-
 11
11
-
 12
12
-
 13
13
-
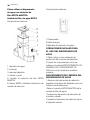 14
14
-
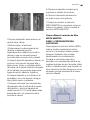 15
15
-
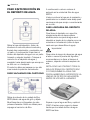 16
16
-
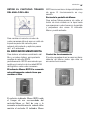 17
17
-
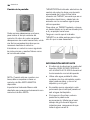 18
18
-
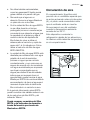 19
19
-
 20
20
-
 21
21
-
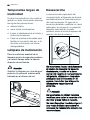 22
22
-
 23
23
-
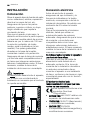 24
24
-
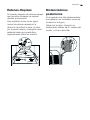 25
25
-
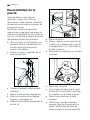 26
26
-
 27
27
-
 28
28
-
 29
29
-
 30
30
-
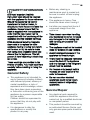 31
31
-
 32
32
-
 33
33
-
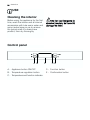 34
34
-
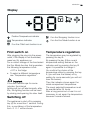 35
35
-
 36
36
-
 37
37
-
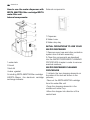 38
38
-
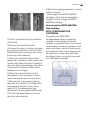 39
39
-
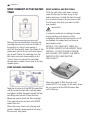 40
40
-
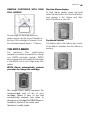 41
41
-
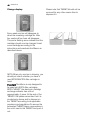 42
42
-
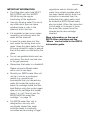 43
43
-
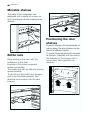 44
44
-
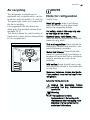 45
45
-
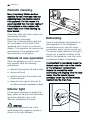 46
46
-
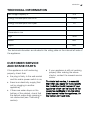 47
47
-
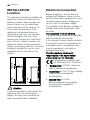 48
48
-
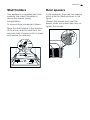 49
49
-
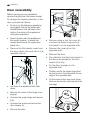 50
50
-
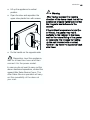 51
51
-
 52
52
-
 53
53
-
 54
54
-
 55
55
-
 56
56


Electrolux ERA39395W8 Manual de usuario
- Categoría
- Neveras
- Tipo
- Manual de usuario
en otros idiomas
- English: Electrolux ERA39395W8 User manual
Artículos relacionados
-
Electrolux ERA39395X8 Manual de usuario
-
-
-
Electrolux ERC39291W8 Manual de usuario
-
-
-
Electrolux ENB35405S Manual de usuario
-
-
-
Electrolux ENB35405S8 Manual de usuario