Jonsered 967957301-00 El manual del propietario
- Categoría
- Cortadoras de césped
- Tipo
- El manual del propietario
Este manual también es adecuado para

English
Spanish
French
L4721
Operator’s manual
Manual del usuario
Manuel d'utilisation
Please read the operator’s manual carefully and make sure you understand the instructions before using the machine.
Lea atentamente el manual de instrucciones y asegúrese de que entiende las instrucciones antes de utilizar la máquina.
Lire attentivement le manuel d’utilisation et veiller à bien comprendre les instructions avant d’utiliser la scie.

2 – English
SAFETY RULES
IMPORTANT! THIS CUTTING MACHINE IS CAPABLE
OF AMPUTATING HANDS AND FEET AND
THROWING OBJECTS. FAILURE TO OBSERVE THE
FOLLOWING SAFETY INSTRUCTIONS COULD
RESULT IN SERIOUS INJURY OR DEATH.
!
WARNING! Look for this symbol to point
out important safety precautions. It
means CAUTION!!! BECOME ALERT!!!
YOUR SAFE TY IS INVOLVED.
!
WARNING! In order to prevent accidental
starting when setting up, transporting,
adjusting or making repairs, always
disconnect spark plug wire and place
wire where it can not come in contact
with plug.
CAUTION! Muffler and other engine parts become
extremely hot during operation and remain hot after
engine has stopped. To avoid severe burns on contact,
stay away from these areas.
!
WARNING! Engine exhaust, some of its
constituents, and certain vehicle
components contain or emit chemicals
known to the State of California to cause
cancer and birth defects or other
reproductive harm.
!
WARNING! Battery posts, terminals and
related accessories contain lead and
lead compounds, chemicals known to
the State of California to cause cancer
and birth defects or other reproductive
harm. Wash hands after handling.
!
WARNING! This lawn mower is equipped
with an internal combustion engine and
should not be used on or near any
unimproved forest-covered, brush-
covered or grass-covered land unless
the engine’s exhaust system is equipped
with a spark arrester meeting applicable
local or state laws (if any). If a spark
arrester is used, it should be maintained
in effective working order by the
operator.
In the state of California the above is required by law
(Section 4442 of the California Public Resources Code).
Other states may have similar laws. Federal laws apply on
federal lands. A spark arrester for the muffler is available
through your nearest authorized service center.
Children
!
WARNING! Children can be seriously
injured or killed by this equipment.
Carefully read and follow all of the safety
instructions below.
CHILDREN CAN BE INJURED BY THIS EQUIPMENT.
The American Academy of Pediatrics recommends that
children be a minimum of 12 year of age before operating
a pedestrian controlled lawn mower and a minimum of 16
years of age before operating a riding lawn mower.
Tragic accidents can occur if the operator is not alert to
the presence of children. Children are often attracted to
the machine and the mowing activity. Never assume that
children will remain where you last saw them.
• Keep children out of the mowing area and under the
watchful care of a responsible adult other than the
operator.
• Be alert and turn machine off if children enter the
area.
• Before and while walking backwards, look behind and
down for small children.
• Never allow children to operate the machine.
• Be particularly careful near corners, bushes, trees or
other objects that block your view.
General operation
• Read, understand, and follow all instructions on the
machine and in the manual(s) before starting. Be
thoroughly familiar with the controls and the proper
use of the machine before starting.
• Do not put hands or feet near or under rotating parts.
Keep clear of the discharge opening at all times.
• Only allow responsible individuals, who are familiar
with the instructions, to operate the machine.
• Clear the area of objects such as rocks, toys, wire,
bones, sticks, etc., which could be picked up and
thrown by blade. Stay behind the handle when the
engine (motor) is running.
• Be sure the area is clear of other people before
mowing. Stop machine if anyone enters the area.
• Do not operate machine bare footed or while wearing
sandals. Always wear substantial footwear with good
ankle support while mowing.
• Do not pull mower backwards unless absolutely
necessary. Always look down and behind before and
while moving backwards.
• Never direct discharged material toward anyone.
Avoid discharging material against a wall or
obstruction. Material may richochet back toward the
operator. Stop blade when crossing gravel surfaces

English – 3
• Do not operate the mower without proper guards,
plates, grass catcher or other safety protective
devices in place.
• See manufacturer’s instructions for proper operation
and installation of accessories. Only use accessories
approved by the manufacturer.
• Stop blade when crossing gravel surfaces.
• Never leave a running machine unattended.
• Stop the engine (motor) and wait until the blade
comes to a complete stop before cleaning the
machine, removing the grass catcher, or unclogging
the discharge chute.
• Mow only in daylight or good artificial light.
• Do not operate the machine while under the influence
of alcohol or drugs.
• Never operate machine in wet grass. Always be sure
of your footing: keep a firm hold on the handle, walk,
never run.
• Disengage drive system, if so equipped, before
starting the engine (motor).
• If the equipment should start to vibrate abnormally,
stop the engine (motor) and check immediately for the
cause. Vibration is generally a warning of trouble.
• Always wear eye protection when operating machine.
• Use extra care when approaching blind corners,
shrubs, trees, or other objects that may obscure
vision.
• When loading or unloading this machine, do not
exceed the maximum recommended operation angle
of 15°.
• Wear proper Personal Protective Equipment (PPE)
while operating this machine, including (at a
minimum) sturdy footwear, eye protection, and
hearing protection. Do not mow in shorts or open toed
footwear.
Always let someone know you are outside mowing.
Slope operation
Slopes are a major factor related to slip & fall accidents,
which can result in severe injury. All slopes require extra
caution. If you feel uneasy on a slope, do not mow it.
Do:
• Mow across the face of slopes, never up and down.
• Remove obstacles such as rocks, tree limbs, etc.
• Watch for holes, ruts, bumps or hidden objects.
Uneven terrain could cause a slip and fall accident.
Tall grass can hide obstacles.
Do not:
• Do not mow near drop-offs, ditches or embankments.
You could lose your footing or balance.
• Do not mow on wet grass or excessively steep slopes.
Poor footing could cause a slip and fall accident.
Safe handling of gasoline
To avoid personal injury or property damage, use extreme
care in handling gasoline. Gasoline is extremely
flammable and the vapors are explosive.
• Extinguish all cigarettes, cigars, pipes and other
sources of ignition.
• Use only an approved container.
• Never remove gas cap or add fuel with the engine
running.
• Allow the engine to cool before refueling.
• Never refuel the machine indoors.
• Never store the machine or fuel container where there
is an open flame, spark or pilot light such as a water
heater or on other appliances.
• Never fill containers inside a vehicle, on a truck or
trailer bed with a plastic liner. Always place containers
on the ground away from your vehicle before filling.
• Remove gas-powered equipment from the truck or
trailer and refuel it on the ground. If this is not
possible, then refuel such equipment with a portable
container, rather than from a gasoline dispenser
nozzle.
• Keep the nozzle in contact with the rim of the fuel tank
or container opening at all times until fuelling is
complete. Do not use a nozzle lock-open device.
• If fuel is spilled on clothing, change clothing
immediately.
• Never overfill the fuel tank.
• Replace gas cap and tighten securely.
General service
• Never run a machine inside a closed area.
• Never make adjustments or repairs with the engine
(motor) running. Disconnect the spark plug wire, and
keep the wire away from the plug to prevent
accidental starting.
• Keep all nuts and bolts tight to be sure the equipment
is in safe working condition.
• Never tamper with safety devices. Check their proper
operation regularly. Never do anything to interfere with
the intended function of a safety device or reduce the
protection provided by a safety device.
• Keep machine free of grass, leaves, or other debris
build-up. Clean oil or fuel spillage. Allow machine to
cool before storing.
• Stop and inspect the equipment if you strike an object.
Repair, if necessary, before restarting.
• Never attempt to make wheel height adjustments
while the engine is running.
• Grass catcher components are subject to wear,
damage, and deterioration, which could expose
moving parts or allow objects to be thrown. Frequently
check components and replace with manufacturer’s
recommended parts, when necessary.
• Mower blades are sharp and can cut. Wrap the
blade(s) or wear gloves, and use extra caution when
servicing them.
• Do not change the engine governor setting or
overspeed the engine.
• Maintain or replace safety and instruction labels, as
necessary.
SAFETY RULES

4 – English
Key to symbols
WARNING! The machine can be a
dangerous tool if used incorrectly or
carelessly, which can cause serious or fatal
injury to the operator or others.
Please read the operator’s manual
carefully and make sure you understand
the instructions before using the machine.
Stop the engine
STOP
Start the engine
Fast
Slow
Fuel
Oil
Choke
DANGER, Keep hands
and feet away.
Watch out for thrown objects and ricochets.
Warning: rotating cutter. Keep hands and
feet clear.
Warning: rotating parts. Keep hands and feet
clear.
Keep people and animals well away from the
working area.
Before and while walking rearward, look
behind and down for small children, animals
or other risks that can cause you to fall.
Slope hazard.
Use approved hearing protection.
Explanation of warning levels
The warnings are graded in three levels.
WARNING!
!
WARNING! Used if there is a risk of
serious injury or death for the operator
or damage to the surroundings if the
instructions in the manual are not
followed.
IMPORTANT!
!
IMPORTANT! Used if there is a risk of
injury to the operator or damage to the
surroundings if the instructions in the
manual are not followed.
CAUTION
CAUTION! Used if there is a risk of damage to
materials or the machine if the instructions in the
manual are not followed.
KEY TO SYMBOLS

English – 5
CONTENTS
Contents
SAFETY RULES
Children . . . . . . . . . . . . . . . . . . . . . . . . . . . . . . . . . . . . .2
General operation. . . . . . . . . . . . . . . . . . . . . . . . . . . . . .2
Slope operation . . . . . . . . . . . . . . . . . . . . . . . . . . . . . . .3
Safe handling of gasoline . . . . . . . . . . . . . . . . . . . . . . . .3
General service . . . . . . . . . . . . . . . . . . . . . . . . . . . . . . .3
KEY TO SYMBOLS
Key to symbols . . . . . . . . . . . . . . . . . . . . . . . . . . . . . . . .4
Explanation of warning levels. . . . . . . . . . . . . . . . . . . . .4
CONTENTS
Contents . . . . . . . . . . . . . . . . . . . . . . . . . . . . . . . . . . . . .5
PRESENTATION
Customer responsibilities . . . . . . . . . . . . . . . . . . . . . . . .6
The Lawn mower . . . . . . . . . . . . . . . . . . . . . . . . . . . . . .6
Steps before using a new lawn mower. . . . . . . . . . . . . .7
WHAT IS WHAT?
What is what on the lawn mower? . . . . . . . . . . . . . . . . .8
MACHINE´S SAFETY EQUIPMENT
General. . . . . . . . . . . . . . . . . . . . . . . . . . . . . . . . . . . . . .9
ASSEMBLING AND ADJUSTMENTS
General. . . . . . . . . . . . . . . . . . . . . . . . . . . . . . . . . . . . .10
Remove the lawn mower from the carton. . . . . . . . . . .10
Handle . . . . . . . . . . . . . . . . . . . . . . . . . . . . . . . . . . . . .10
Grass catcher . . . . . . . . . . . . . . . . . . . . . . . . . . . . . . . .11
Starter handle. . . . . . . . . . . . . . . . . . . . . . . . . . . . . . . .11
Convert the lawn mower. . . . . . . . . . . . . . . . . . . . . . . .11
Cutting height . . . . . . . . . . . . . . . . . . . . . . . . . . . . . . . .12
Filling with oil . . . . . . . . . . . . . . . . . . . . . . . . . . . . . . . .12
FUEL HANDLING
General. . . . . . . . . . . . . . . . . . . . . . . . . . . . . . . . . . . . .13
Fueling . . . . . . . . . . . . . . . . . . . . . . . . . . . . . . . . . . . . .13
Transport and storage. . . . . . . . . . . . . . . . . . . . . . . . . .13
OPERATING
Personal protective equipment. . . . . . . . . . . . . . . . . . .14
General safety precautions. . . . . . . . . . . . . . . . . . . . . .14
Basic working techniques. . . . . . . . . . . . . . . . . . . . . . .16
Transport and storage. . . . . . . . . . . . . . . . . . . . . . . . . .16
Starting and stopping . . . . . . . . . . . . . . . . . . . . . . . . . .17
MAINTENANCE
General. . . . . . . . . . . . . . . . . . . . . . . . . . . . . . . . . . . . .18
Maintenance schedule . . . . . . . . . . . . . . . . . . . . . . . . .18
General recommendations . . . . . . . . . . . . . . . . . . . . . .19
General inspection . . . . . . . . . . . . . . . . . . . . . . . . . . . .19
General lubrication . . . . . . . . . . . . . . . . . . . . . . . . . . . .19
Cleaning . . . . . . . . . . . . . . . . . . . . . . . . . . . . . . . . . . . .19
Engine . . . . . . . . . . . . . . . . . . . . . . . . . . . . . . . . . . . . .20
Muffler. . . . . . . . . . . . . . . . . . . . . . . . . . . . . . . . . . . . . .21
Spark plug . . . . . . . . . . . . . . . . . . . . . . . . . . . . . . . . . .21
Air filter . . . . . . . . . . . . . . . . . . . . . . . . . . . . . . . . . . . . .21
Blade . . . . . . . . . . . . . . . . . . . . . . . . . . . . . . . . . . . . . .22
Drive belt . . . . . . . . . . . . . . . . . . . . . . . . . . . . . . . . . . .24
TROUBLESHOOTING
Troubleshooting schedule. . . . . . . . . . . . . . . . . . . . . . .26

6 – English
Customer responsibilities
• Read and observe the safety rules.
• Follow the maintenance schedule in this manual. Any
maintenance other than that described in this manual
must be carried out by your servicing dealer (retailer).
PRESENTATION
The Lawn mower
Serial number:
Date of purchase:
The model and serial numbers will be found on a decal
attached to the rear of the lawn mower housing. You
should record both serial number and date of purchase
and keep in a safe place for future reference.
Product specifications
Gasoline Capacity and
Type
1.0 Quarts / 0.98 Liters
(Unleaded Regular Only)
Oil Type (API SG-SL)
SAE 30 (above 0°C / 32°F)
SAE 5W-30 (below 0° /
32°F)
Oil Capacity 16 Ounces
Spark Plug (Gap: 0.0295" /
0.75mm)
BPR5ES
Blade Bolt Torque 35-40 ft. Ibs. (47-54 Nm)

English – 7
Steps before using a new lawn
mower
• Please read the operator’s manual carefully.
• Check that the cutting equipment is correctly fitted
and adjusted. See instructions under the heading
Assembly.
• Fill with fuel and oil in the engine. See the instructions
under the heading fuel handling.
!
WARNING! Under no circumstances may
the design of the machine be modified
without the permission of the
manufacturer. Always use genuine
accessories. Non-authorized
modifications and/or accessories can
result in serious personal injury or the
death of the operator or others.
!
WARNING! A lawn mower is a dangerous
tool if used carelessly or incorrectly and
can cause serious, even fatal injuries. It
is extremely important that you read and
understand the contents of this
operator’s manual.
!
WARNING! Long-term inhalation of the
engine’s exhaust fumes can represent a
health hazard.
!
WARNING! In order to prevent accidental
starting when setting up, transporting,
adjusting or making repairs, always
disconnect spark plug wire and place
wire where it can not come in contact
with plug.
!
WARNING! The muffler gets very hot in
use and remains so for a short time
afterwards. Do not touch the muffler if it
is hot!
!
WARNING! Engine exhaust, some of its
constituents, and certain vehicle
components contain or emit chemicals
known to the State of California to cause
cancer and birth defects or other
reproductive harm.
!
WARNING! Battery posts, terminals and
related accessories contain lead and
lead compounds, chemicals known to
the State of California to cause cancer
and birth defects or other reproductive
harm. Wash hands after handling.
!
WARNING! This lawn mower is equipped
with an internal combustion engine and
should not be used on or near any
unimproved forest-covered, brush-
covered or grass-covered land unless
the engine’s exhaust system is equipped
with a spark arrester meeting applicable
local or state laws (if any). If a spark
arrester is used, it should be maintained
in effective working order by the
operator.
In the state of California the above is required by law
(Section 4442 of the California Public Resources Code).
Other states may have similar laws. Federal laws apply on
federal lands. A spark arrester for the muffler is available
through your nearest authorized service center.
PRESENTATION

8 – English
What is what on the lawn mower?
1 Operator presence control bar
2 Drive bail
3 Starter handle
4 Grass catcher
5 Fuel cap
6 Air filter
7 Spark plug
8 Drive cover
9 Muffler
10 Wash-out port
11 Rear deflector
12 Engine oil cap with dipstick
13 Cutting height control
14 Mulch plug
15 Operator’s manual
16 Discharge chute
WHAT IS WHAT?
1
2
3
4
5
7
8
10
11
13
14
6
12
9
11
15
16

English – 9
General
This section describes the machine's safety equipment,
its purpose, and how checks and maintenance should be
carried out to ensure that it operates correctly.
!
WARNING! Never use a machine that
has faulty safety equipment! If your
machine fails any checks contact your
service agent to get it repaired.
Prevent unintentional starting by
removing the ignition cable from the
spark plug.
Operator presence control bar
IMPORTANT! Federal regulations require an engine
control to be installed on this lawn mower in order to
minimize the risk of blade contact injury. Do not under
any circumstances attempt to defeat the function of the
operator control. The blade turns when the engine is
running.
The engine brake is designed to stop the engine. When
the grip on the operator presence control bar is released
the engine should stop.
Checking the operator presence control bar
• Start the engine and then release the operator
presence control bar. The engine should stop.
Rear deflector
The rear deflector, attached between the rear wheels of
your mower, is provided to minimize the possibility that
objects will be thrown out of the rear of the mower into the
operator’s mowing position.
Inspecting the rear deflector
• Make sure the rear deflector is not damaged and that
there are no visible defects such as cracks, or broken
springs that force the door closed. Replace the
deflector or springs if damaged.
Muffler
!
WARNING! Never use a machine without
a muffler, or with a faulty muffler. A
damaged muffler may substantially
increase the noise level and the fire
hazard. Keep fire fighting equipment
handy.
The muffler gets very hot during and
after use. This also applies during idling.
Be aware of the fire hazard, especially
when working near flammable
substances and/or vapours.
The muffler is designed to keep noise levels to a minimum
and to direct exhaust fumes away from the user.
Inspecting the muffler
• Check regularly that the muffler is complete and
secured correctly.
MACHINE´S SAFETY EQUIPMENT

10 – English
General
!
WARNING! Prevent unintentional
starting by removing the ignition cable
from the spark plug.
CAUTION! This lawn mower is shipped without oil or
gasoline in the engine.
Remove the lawn mower from the
carton
• Remove loose parts included with mower.
• Cut down two end corners of carton and lay end panel
down flat.
• Remove all packing materials, except padding
between upper and lower handle and padding holding
the operator presence control bar to upper handle.
• Roll the lawn mower out of the carton and make sure
that no loose parts are left within the carton.
Handle
CAUTION! Take care not to damage the cables and
wires when you unfold the handlebar.
Operating position
1 Raise the lower handle section to operating position.
Align the handle bar pins with a slot in the handle
bracket to set a comfortable height position for the
handle.
2 Tighten the lower handlebar knobs.
3 Remove protective padding, raise the upper handle
section into place on the lower handle and tighten
both upper knobs.
4 Remove any packing material from around operator
presence control bar.
Vertical handle storage
The handle can be set in a vertical storage position.
1 Loosen the lower handle knobs.
2 Rotate the handle and align the handle bar pins with
the vertical slots on the handle bracket.
3 Retighten the knobs.
Storage/Transport position
The handle assembly can be folded to minimize space
needed for transport and storage.
CAUTION! Take care not to damage the cables and
wires when you fold the handlebar.
1 Loosen the 2 handle knobs on the upper handle and
allow handle to fold down to the rear.
2 Loosen the 2 handle knobs on the lower handle and
pivot entire handle assembly forward and allow it to
rest on mower.
ASSEMBLING AND ADJUSTMENTS

English – 11
Grass catcher
Assembly of the catcher
1 Put the grass catcher frame into the grass bag with
the rigid part of the bag on the bottom. Make sure the
handle of the frame is outside of the top of the bag.
2 Secure the grass bag to the frame by using the
quick-action clips.
Starter handle
Install starter handle
1 Loosen the T-knob.
2 Hold the operator presence control bar against the
upper handle.
3 Grip the starter handle, slowly pull the engine starter
handle until the starter rope can slip into the loop of
the rope guide.
4 Tighten the T-knob.
Convert the lawn mower
Your lawn mower was shipped ready to be used in
mulching mode.
The mulching mode will recut the grass clippings many
times, which will reduce the clippings in size so that as
they fall onto the lawn they will disperse into the grass and
not be noticed. In addition, the mulched grass will
biodegrade quickly to provide nutrients for the lawn.
Use rear bagging to collect the grass clippings within the
grass catcher.
!
WARNING! Do not run your lawn mower
without rear door closed or approved
grass catcher in place. Never attempt to
operate the lawn mower with the rear
door removed or propped open.
Rear bagging
1 Lift the back shield and remove the mulch plug.
2 Lift the back shield and place the grass catcher frame
hooks onto the grass bag brackets.
3 Release the back shield and allow it to rest on top of
the grass bag frame.
ASSEMBLING AND ADJUSTMENTS

12 – English
Mulching
1 Lift the back shield and remove the grass bag (if
equipped).
2 Insert the mulch plug (accessory) into the collector
channel.
3 Allow the back shield to close and ensure the back
shield is firmly shut against the mulch plug.
Rear-side discharging
1 Lift the back shield and remove the mulch plug or
grass bag (if equipped).
2 Install the discharge chute.
3 Close the back shield to allow the machine to
discharge material to the left of the machine while
cutting.
Cutting height
The cutting height can be adjusted to 9 (1-9) different
positions.
Raise wheels for low cut and lower wheels for high cut.
Adjust cutting height to suit your requirements. Medium
position is best for most lawns.
• To change cutting height, squeeze height adjuster
lever toward the wheel. Move the wheel up or down to
suit your requirements. Set the same height at all four
corners.
• The adjuster lever is spring loaded.
Filling with oil
• The oil tank is empty at delivery.
Fill oil to the FULL mark on the dipstick. Refer to the
manual of the engine manufacturer for details.
ASSEMBLING AND ADJUSTMENTS

English – 13
General
!
WARNING! Running an engine in a
confined or badly ventilated area can
result in death due to asphyxiation or
carbon monoxide poisoning.
Fuel and fuel fumes are highly
inflammable and can cause serious
injury when inhaled or allowed to come
in contact with the skin. For this reason
observe caution when handling fuel and
make sure there is adequate ventilation.
The exhaust fumes from the engine are
hot and may contain sparks which can
start a fire. Never start the machine
indoors or near combustible material!
Do not smoke and do not place any hot
objects in the vicinity of fuel.
Fueling
• Use fresh, clean, regular unleaded gasoline with a
minimum of 87 octane. Do not mix oil with gasoline.
Purchase fuel in quantities that can be used within 30
days to assure fuel freshness
!
WARNING! Always stop the engine and
let it cool for a few minutes before
refueling. The engine should be
switched off.
Use a fuel can at all times to avoid
spillage.
Fill fuel tank to bottom of tank filler neck.
Do not overfill. Use fresh, clean, regular
unleaded gasoline with a minimum of 87
octane. Do not mix oil with gasoline.
Purchase fuel in quantities that can be
used within 30 days to assure fuel
freshness.
When refuelling, open the fuel cap
slowly so that any excess pressure is
released gently.
Clean the area around the fuel cap.
Tighten the fuel cap carefully after
refueling. Negligence may lead to the
start of a fire.
Never start the machine:
• If you have spilled fuel or engine oil on the machine,
wipe off the spillage and allow remaining fuel to
evaporate.
• If you have spilled fuel on yourself or your clothes,
change your clothes. Wash any part of your body that
has come in contact with fuel. Use soap and water.
• If the machine is leaking fuel. Check regularly for
leaks from the fuel cap and fuel lines.
Engine oil
CAUTION! Check the oil level before starting the lawn
mower. A too low oil level can cause serious damage to
the engine.
• See instructions in the section “Maintenance”.
Transport and storage
• Store and transport the machine and fuel so that there
is no risk of any leakage or fumes coming into contact
with sparks or open flames, for example, from
electrical machinery, electric motors, electrical relays/
switches or boilers.
• When storing and transporting fuel always use
approved containers intended for this purpose.
Long-term storage
• When storing the machine for long periods the fuel
tank must be emptied. Contact your local gas station
to find out where to dispose of excess fuel.
• Fuel stabilizer is an acceptable alternative to avoid
tacky deposits during storage. Add stabilizer to the
fuel in the tank or the storage container. Always follow
the mix ratio found on stabilizer container. Run the
engine for at least 10 minutes after adding the
stabilizer so that it will reach the carburetor. Do not
empty the gas tank and carburetor if using fuel
stabilizer.
CAUTION! Alcohol blended fuels (called gasohol or
using ethanol or methanol) can attract moisture which
leads to separation and formation of acids during
storage.
Acidic gas can damage the fuel system of an engine
while in storage. To avoid engine problems, the fuel
system should be emptied before storage of 30 days or
longer. Empty the gas tank, start the engine and let it
run until the fuel lines and carburetor are empty. Use
fresh fuel next season. Never use engine or carburetor
cleaner products in the fuel tank or permanent damage
may occur.
FUEL HANDLING

14 – English
Personal protective equipment
You must use approved personal protective equipment
whenever you use the machine. Personal protective
equipment cannot eliminate the risk of injury but it will
reduce the degree of injury if an accident does happen.
Ask your dealer for help in choosing the right equipment.
Always wear:
• Sturdy, non-slip boots or shoes.
• Heavy, long pants. Do not wear shorts sandals or go
barefoot.
• Gloves must be worn when required, for example
when fitting, inspecting or cleaning the blade.
• Wear ear protectors to avoid damage to hearing.
Exposure to noise can cause hearing loss.
• Always wear safety glasses or eye shields while
operating your lawn mower or performing any
adjustments or repairs. We recommend standard
safety glasses or a wide vision safety mask over
spectacles.
General safety precautions
This section describes basic safety directions for using
the machine. This information is never a substitute for
professional skills and experience.
• Please read the operator’s manual carefully and make
sure you understand the instructions before using the
machine.
• Keep in mind that the operator is responsible for
accidents or hazards occuring to other people or their
property.
• See manufacturer’s instructions for proper operation
and installation of accessories. Only use accessories
approved by the manufacturer.
• The machine must be kept clean. Signs and stickers
must be fully legible.
• Maintain or replace safety and instruction labels, as
necessary.
• Always disconnect the spark plug before performing
maintenance or service.
Children
!
WARNING! Children can be seriously
injured or killed by this equipment.
Carefully read and follow all of the safety
instructions below.
CHILDREN CAN BE INJURED BY THIS EQUIPMENT.
The American Academy of Pediatrics recommends that
children be a minimum of 12 year of age before operating
a pedestrian controlled lawn mower and a minimum of 16
years of age before operating a riding lawn mower.
Serious accidents may occur if you fail to be on your
guard for children in the vicinity of the machine. Children
are often attracted to the machine and mowing. Never
assume that children will remain where you last saw
them.
• Keep an eye out and shut off the machine if children
enter the work area.
• Never use the machine if persons, especially children
or pets, are in the immediate vicinity.
• Before and during reversing procedures, look behind
you and down for small children.
OPERATING

English – 15
Always use common sense
It is not possible to cover every conceivable situation you
can face. Always exercise care and use your common
sense. If you get into a situation where you feel unsafe,
stop and seek expert advice. Contact your dealer, service
agent or an experienced user. Do not attempt any task
that you feel unsure of!
!
WARNING! This machine produces an
electromagnetic field during operation.
This field may under some
circumstances interfere with active or
passive medical implants. To reduce the
risk of serious or fatal injury, we
recommend persons with medical
implants consult their physician and the
medical implant manufacturer before
operating this machine.
!
WARNING! The machine can be a
dangerous tool if used incorrectly or
carelessly, which can cause serious or
fatal injury to the operator or others.
Never allow children or other persons
not trained in the use of the machine to
use or service it.
The machine should not be used by
people with reduced physical or mental
capacities or people who are unsuitable
for health reasons to operate the
machine, without supervision of a
person responsible for their safety.
Never allow anyone else to use the
machine without first ensuring that they
have read and understood the contents
of the operator’s manual.
Never use the machine if you are
fatigued, while under the influence of
alcohol or drugs, medication or anything
that could affect your vision, alertness,
coordination or judgement.
!
WARNING! Unauthorized modifications
and/or accessories may lead to serious
injury or death to the user or others.
Under no circumstances may the design
of the machine be modified without the
permission of the manufacturer.
Do not modify this product or use it if it
appears to have been modified by
others.
Never use a machine that is faulty. Carry
out the safety checks, maintenance and
service instructions described in this
manual. Some maintenance and service
measures must be carried out by trained
and qualified specialists. See
instructions under the heading
Maintenance.
Always use genuine accessories.
Work area safety
• Branches, twigs, stones, etc. should be removed from
the lawn before you start to mow.
• Objects hitting against the cutting attachment could
be thrown and cause damage to people and objects.
Keep people and animals well away.
• Never use the machine in bad weather, for instance in
fog, in rain, damp or in wet locations, strong winds,
intense cold, risk of lightning, etc. Working in bad
weather is tiring and can lead to dangerous
conditions, e.g. slippery surfaces.
• Do not mow wet grass. It is slippery, and tires can lose
their grip so that the machine skids.
• Observe your surroundings to ensure that nothing can
affect your control of the machine.
• Beware of roots, stones, twigs, pits, ditches etc. Tall
grass can hide obstacles.
• Mowing slopes can be dangerous. Do not use the
lawn mower on very steep slopes. The lawn mower
should not be used on inclines greater than 15
degrees.
• On sloping ground you should work along the slope. It
is much easier to work along a slope than it is to work
up and down it.
• Be careful when you are approaching hidden corners
and objects that could block your view.
Work safety
• A lawn mower is only designed to mow lawns. All
other use is forbidden.
• Always let someone know you are outside mowing.
• Do not operate the mower without proper guards,
plates, grass catcher or other safety protective
devices in place.
• Wear personal protective equipment. See instructions
under the heading ”Personal protective equipment”.
• Do not start a lawn mower unless the cutter and all
covers are fitted correctly. Otherwise the cutter could
come loose and cause personal injuries.
• Make sure the cutter does not hit foreign objects such
as stones, roots or the like. This can make the cutter
dull and bend the engine shaft. A bent blade or engine
shaft can result in an imbalance and heavy vibration,
which results in a great risk of the blade becoming
loose.
• The brake handle must never be permanently
anchored to the handle when the machine is running.
• Place the lawn mower on firm, flat surface and start it.
Make sure that the cutter cannot come into contact
with the ground or other objects.
• Always place yourself behind the machine. Allow all
the wheels to remain on the ground and keep both
hands on the handle when mowing. Keep your hands
and feet away from the rotating blades.
• Do not tilt the machine when the engine is running.
OPERATING

16 – English
• Pay particular attention when pulling the machine
towards you during work.
• Never lift up the lawn mower or carry it around when
the engine is running. If you must lift the lawn mower,
first switch off the engine and disconnect the ignition
lead from the spark plug.
• Do not mow the lawn while walking backwards.
• The engine should be switched off when moving over
ground that is not to be mowed. For example, gravel
paths, stone, shingle, asphalt, etc.
• Never run with the machine when it is running. You
should always walk with the lawn mower.
• Shut down the engine before changing the cutting
height. Never make adjustments with the engine
running.
• Never leave the machine unsupervised with the motor
running. Turn off the motor. Ensure the cutting
attachment has stopped rotating.
• If any foreign object is hit or if vibrations occur stop the
machine immediately. Disconnect the spark plug wire
from the spark plug. Check that the machine is not
damaged. Repair any damage.
• Never direct discharged material toward anyone.
Avoid discharging material against a wall or
obstruction. Material may richochet back toward the
operator.
Basic working techniques
• Always cut with a sharp blade for optimal results. A
dull blade gives an uneven cut and the grass becomes
yellow on the surface of the cut.
• Never mow more than 1/3 of the length of the grass.
This especially applies during dry periods. Mow first
with the cutting height set high. Then check the result
and lower to an appropriate height. If the grass is
really long, drive slowly and mow twice if necessary.
• For extremely heavy cutting, reduce the width of cut
by overlapping previously cut path and mow slowly.
• Cut in different directions each time in order to avoid
stripes in the lawn.
• Before pulling the machine towards you, disengage
the drive and push the machine forward approx. 3’’ (10
cm).
• Make sure to disengage the drive when approaching
an obstacle.
Pores in cloth grass catchers can become filled with dirt
and dust with use and the catcher will collect less grass.
To prevent this, regularly hose the grass catcher off with
water and let dry before using.
Slope operation
Mowing slopes can be dangerous. Do not use the lawn
mower on slopes steeper than 15°. All slopes demand
extra care. If you feel unsure, do not mow it.
Do:
• Mow across the face of slopes, never up and down.
• Exercise extreme caution when changing direction on
slopes.
• Remove obstacles such as stones, branches, etc.
• Watch for holes, ruts, bumps or hidden objects.
Uneven terrain could cause a slip and fall accident.
Tall grass can hide obstacles.
Do not:
• Do not mow too close to edges, ditches or banks.
• Avoid sudden changes in direction.
• Do not mow wet grass. It is slippery, and tires can lose
their grip so that the machine skids.
Transport and storage
• Secure the equipment during transportation in order
to avoid transport damage and accidents.
• Store the equipment in a lockable area so that it is out
of reach of children and unauthorized persons.
• Store the machine and its equipment in a dry and frost
proof place.
• When loading or unloading this machine, do not
exceed the maximum recommended operation angle
of 15°.
• Empty the fuel tank by running the machine until the
tank is empty.
• Drain the engine oil as described under Changing the
engine oil.
• Clean the machine. For more information, see the
”Cleaning” section.
• Lubricate as shown in the Maintenance section of this
manual.
• Tighten bolts and nuts.
• Replace or repair damaged components.
• Touch up all rusted or chipped paint surfaces, sand
lightly before painting.
• Place the lawn mower in Transport position. See
”Storage/Transport position” in the Assembly and
adjustments section of this manual.
• Cover your unit with a suitable protective cover that
does not retain moisture. Do not use plastic. Plastic
cannot breathe, which allows condensation to form
and will cause your unit to rust. Never cover mower
while engine and exhaust areas are still warm!
• For transport and storage of fuel, see the section
“Fuel handling”.
MAX 1/3
OPERATING

English – 17
Starting and stopping
Before starting
!
WARNING! Please read the operator’s
manual carefully and make sure you
understand the instructions before
using the machine.
Wear personal protective equipment.
See instructions under the heading
”Personal protective equipment”.
• Keep people and animals well away from the working
area.
• Perform daily maintenance. See instructions in the
section “Maintenance”.
• Ensure the ignition lead sits correctly on the spark
plug.
• Add oil if necessary. See instructions in the section
"Maintenance".
• Add gasoline. See instructions in the section "Fuel
handling".
• Disengage drive system, if equipped, before starting
the engine (motor).
Manual Start
The operator presence control bar must be held against
the handlebar when the engine is started.
• Position yourself behind the machine.
• Grip the starter handle and pull quickly. Do not allow
the starter rope to snap back. Never wrap the starter
cord around your hand
Drive
• Self-propelling is controlled by holding the operator
presence control bar down to the handle and pulling
one or both of the drive levers upwards toward the
handle. The further toward the handle the drive levers
are pulled, the faster the unit will travel.
• Forward motion will stop when the drive levers are
released.
• To stop forward motion without stopping the engine,
release the drive lever only. Hold the the operator
presence control bar down against handle to continue
mowing without self-propelling.
When the drive starts feeling slow you need to adjust the
drive control cable. Finely adjust the cable using the
adjuster screw.
• Turn off the engine. Always disconnect the spark plug
before performing maintenance or accessing movable
parts.
• To tension the wire and increase speed, turn the
adjustment screw counterclockwise.
Make sure the drive control cable is not tensioned too
tight. If the lawn mower starts to drive without the clutch
lever is being operated, extend the wire.
• To extend the wire and reduce speed, screw the
adjustment screw clockwise.
Stopping
• Stop the engine by releasing the operator presence
control bar.
Emptying the grass catcher
• Lift up on grass catcher using the frame handle.
• Remove grass catcher with clippings from under lawn
mower handle.
• Empty clippings from bag using both frame handle
and bag handle.
CAUTION! Do not drag the bag when emptying, it will
cause unnecessary wear.
OPERATING

18 – English
General
!
WARNING! The user must only carry out the maintenance and service work described in this
manual. More extensive work must be carried out by an authorized service workshop.
Switch off the engine before carrying out any checks or maintenance. Stop the engine (motor) and wait
until the blade comes to a complete stop before cleaning the machine, removing the grass catcher, or
unclogging the discharge chute. Prevent unintentional starting by removing the ignition cable from the
spark plug. The starter key or battery must also be removed on machines with electric start.
The life span of the machine can be reduced and the risk of accidents can increase if machine
maintenance is not carried out correctly and if service and/or repairs are not carried out
professionally. If you need further information please contact your nearest servicing dealer.
• Let an approved dealer or an approved service center regularly examine the product to do adjustments or repairs.
• Replace any damaged, worn or broken parts.
• Always use genuine accessories.
Maintenance schedule
In the maintenance schedule you can see which parts of your machine that require maintenance, and with which
intervals it should take place. The intervals are calculated based on average use of the machine, and may differ
depending on the rate of your personal use.
Daily Maintenance Before use
After each
use
Every 10
hours
Every 25
hours
Every 100
hours
Before
storage
Lawn mower
Tighten bolts and nuts. X X
Clean / Inspect Grass Catcher * X X X
Check tires X
Check drivewheels*** X
Clean the machine**** X X
Clean under the drive cover*** X
Check the drive belt / Pulleys*** X
Check that the cutter is undamaged and not
cracked. Replace the cutter if necessary.
X
1
General lubrication X
Clean and Recharge Battery ** X X
2
Engine
Check the engine’s oil level X
3
Change engine oil *****
Clean the air filter. Replace if
necessary. *****
Check that the muffler is securely attached
and not damaged.
X
Replace the spark plug. X
Empty fuel tank or add Stabilizer X
* If so equipped **** Use a scraper to clean under deck
** Machines equipped with electric start ***** See engine manual
***Power-Propelled machines
Note 1: Replace blades more often when mowing in sandy soil. Note 2: Charge the battery for max. 48 hours. Note 3:
And after 5 hours of use.
MAINTENANCE

English – 19
General recommendations
The warranty on this lawn mower does not cover items
that have been subjected to operator abuse or
negligence. To receive full value from the warranty,
operator must maintain mower as instructed in this
manual. Some adjustments will need to be made
periodically to properly maintain your unit. At least once
a season, check to see if you should make any of the
adjustments described in the Maintenance section of
this manual.
• At least once a year, replace the spark plug, clean
or replace air filter element and check blade for
wear. A new spark plug and clean/new air filter
element assure proper air-fuel mixture and help
your engine run better and last longer.
• Follow the maintenance schedule in this manual.
General inspection
• Check that nuts and screws are tight.
General lubrication
CAUTION! Do not oil or grease plastic wheel
bearings. Viscous lubricants will attract dust and dirt
that will shorten the life of the self lubricating bearings.
If you feel they must be lubricated, use only a dry
powdered graphite type lubricant sparingly.
Keep unit well lubricated.
1 Engine oil
See ”Engine” in
section Maintenance
2 Rear door hinge
Spray lubricant
3
Handle bar mounting
bolts
Cleaning
!
WARNING! Always disconnect the
spark plug before performing
maintenance or service.
• Brush leaves, grass and the like off of the lawn
mower.
• Keep finished surfaces / wheels free of gasoline, oil,
etc.
• Keep top of engine around starter clear and clean
of grass clippings and chaff. This will help engine air
flow and extend engine life.
• Clean the underside of your lawn mower by
scraping to remove build-up of grass and trash.
• Do not use a high pressure washer to clean the
machine.
• Never flush water directly on the engine.
• Clean the air intake on the starter. Check the starter
and starter cord.
• When cleaning under the cutting cover, empty the fuel
tank and put the machine on its side with the muffler
down.
CAUTION! With the exception of the water washout
port (if equipped), we do not recommend using a
garden hose to clean the outside of your lawn
mower unless the electrical system, muffler, air filter
and carburetor are covered to keep water out.
Water in engine can result in shortened engine life.
Drive wheels
Check wheels each time before you mow to be sure
they move freely. Clean the wheels if not rotating freely.
1 Remove the bolt.
2 Remove wheels from wheel adjusters.
3 Remove any trash or grass cuttings from inside the
dust cover, pinion and/or drive wheel gear teeth.
4 Replace the wheels.
If after cleaning, the drive wheels do not turn freely,
contact a authorized service workshop.
Grass catcher
• Pores in cloth grass catchers can become filled with
dirt and dust with use and the catcher will collect
less grass. To prevent this, regularly hose the grass
catcher off with water and let dry before using.
• Check the grass catcher frequently for wear or
deterioration. Replace if necessary.
2
3
1
MAINTENANCE

20 – English
Gear cases
• To keep your drive system working properly, the gear
cases and area around the drive should be kept clean
and free of trash build-up. Clean under the drive cover
twice a season.
• The gear cases are filled with lubricant to the proper
level at the factory. The only time the lubricant needs
attention is if service has been performed on the gear
case.
• Under normal usage the grass catcher is subject to
deterioration and wear. Check the grass catcher
frequently for wear or deterioration. Replace the bag
only with grass bags that meet the manufacturer’s
recommendations and specifications.
Water washout feature
Your lawn mower is equipped with a fitting that allows
quick and easy cleaning of the underside of the housing.
Note that water, grass and other debris will drain from
beneath the mower housing during the washout process.
1 Move the machine to an area of cut grass or another
hard surface.
2 Remove grass catcher or mulch plug from the lawn
mower.
3 Close the back shield.
4 Connect a garden hose to the washout port fitting.
5 Turn on water supply and check for leaks at the fitting.
6 If no leaks are present, start engine and let engine run
until the underside of the lawn mower is clean.
CAUTION! Do not engage the drive system during the
washout process.
7 Turn off the engine.
8 Shut off water supply and remove hose from fitting.
IMPORTANT! Do not remove hose from fitting while
engine is running. Water in engine can result in
shortened engine life.
9 Start engine and let engine run for a full minute to
remove excess water from mower.
Engine
Lubrication
Use only high quality detergent oil rated with API service
classification SG-SL. Select the oil’s SAE viscosity grade
according to your expected operating temperature.
CAUTION! Although multi-viscosity oils (5W30, 10W30
etc.) improve starting in cold weather, these
multi-viscosity oils will result in increased oil
consumption when used above 32°F. Check your
engine oil level more frequently to avoid possible
engine damage from running low on oil.
• Check the engine oil level before starting the engine
and after each 5 hours of continuous use. Tighten oil
plug securely each time you check the oil level.
Oil level
Before starting for the first time
• The oil tank is empty at delivery.
Fill oil to the FULL mark on the dipstick. Refer to the
manual of the engine manufacturer for details.
IMPORTANT! Do not overfill!
Check the engine’s oil level
The lawn mower should stand on flat ground when you
check the oil level. Ensure the ignition lead is disconnected
from the spark plug before you open the oil filler cap.
1 Check the oil level with the dipstick on the oil filler cap.
2 Remove the oil cap and wipe the dipstick clean.
3 Put the dipstick back in. The oil filler cap must be
completely screwed on to show the oil level correctly.
4 If the oil level is low, fill engine oil to the FULL mark on
the dipstick.
TEMPERATURE RANGE ANTICIPATED BEFORE NEXT OIL CHANGE
SAE VISCOSITY GRADES
-20 0 30 40
80
100
-30
-20 0
20 30 40
F
C
32
-10
10
60
5W-30
SAE 30
MAINTENANCE

English – 21
CAUTION! Initial oil fill requires less oil due to residual
oil in engine from the manufacturers 100% quality
testing. When changing oil you will need a larger oil
quantity then the initial fill.
Add oil
1 The lawn mower must stand on flat ground when you
check the oil level. Ensure the ignition lead is
disconnected
from the spark plug before you open the
oil filler cap.
2 Remove the oil cap and wipe the dipstick clean.
3 Slowly pour oil down the oil fill spout, stopping evey
few ounces to check the oil level with the dipstick.
4 Stop adding oil when you reach the FULL mark on the
dipstick. Wait a minute to allow oil to settle.
5 Always be sure to retighten oil dipstick before starting
engine.
6 Connect the ignition lead to the spark plug.
Oil change
CAUTION! The oil level must always be checked before
starting the engine.
Change the oil after first 5 hours of operation. Follow
the maintenance schedule in this manual. Clean more
often if conditions are exeptionally dusty.
1 Disconnect the ignition lead from the spark plug.
2 Always empty the fuel tank before you place the lawn
mower on its side. Empty the fuel tank by running the
machine until the tank is empty.
3 Unscrew the oil filler cap.
4 Place a suitable vessel in position to collect the oil as
it drains.
5 Drain the oil by tipping the engine so that the oil runs
out through the filler pipe. When the machine is tilted,
make sure the air filter always is placed in the highest
position. Ask where you can dispose of surplus
engine oil at your local gas station.
6 If you have spilled fuel or engine oil on the machine,
wipe off the spillage and allow remaining fuel to
evaporate.
7 Slowly pour oil down the oil fill spout, stopping evey
few ounces to check the oil level with the dipstick. Do
not overfill!
8 Always be sure to retighten oil dipstick before starting
engine.
9 Connect the ignition lead to the spark plug.
Muffler
If the muffler is corroded or is damaged in any other way,
it must be replaced because it may become a fire hazard
and/or cause injury.
Spark plug
CAUTION! Always use the recommended spark plug
type! Use of the wrong spark plug can damage the
piston/cylinder.
• Replace spark plug at the beginning of each mowing
season or after every 100 hours of operation,
whichever occurs first. Spark plug type and gap
setting are shown in the ”Product specification”
section of this manual.
Air filter
Your engine will not run properly and may be damaged by
using a dirty air filter. Replace the air filter cartridge every
100 hours of operation or every season, which ever
occurs first. Service air cleaner more often under dusty
conditions.
• Remove the air filter cover and take out the filter.
• Clean the filter by knocking the filter against a flat
surface. Never use solvent with petroleum, for
example, kerosene, or compressed air to clean the
filter.
• An air filter that has been in use for a long time cannot
be cleaned completely. The filter must therefore be
replaced with a new one at regular intervals. A
damaged air filter must always be replaced.
• When reassembling, make sure that the filter
completely seals against the filter holder.
MAINTENANCE

22 – English
Blade
!
WARNING! Always wear heavy-duty
gloves when servicing and maintaining
the blade. The blade is very sharp and
cuts can occur very easily.
Always stop the engine before doing any
work on the blade. This continues to
rotate even after the throttle has been
released. Ensure that the blade has
stopped completely and disconnect the
spark plug cap before you start to work
on it.
• Check the blade for cracks or any other damage. A
damaged blade must always be replaced.
• Always ensure the blade is well ground and balanced
correctly. To check blade balance, you will need a 5/8"
diameter steel bolt, pin, or a cone balancer. When
using a cone balancer, follow the instructions supplied
with balancer.
• Do not use a nail for balancing blade. The lobes of the
center hole may appear to be centered, but are not.
• Slide blade on to an unthreaded portion of the steel
bolt or pin and hold the bolt or pin parallel with the
ground. If blade is balanced, it should remain in a
horizontal position. If either end of the blade moves
downward, sharpen the heavy end until the blade is
balanced.
IMPORTANT! The blades should be balanced after
sharpening. We do not recommend sharpening blade.
Sharpening and balancing the blade should be
conducted by an authorized service workshop.
Damaged blades should be replaced immediately.
NEVER use a mower with a damaged blade.
Replacing the blades
1 Always disconnect the spark plug before performing
maintenance or service.
2 Always empty the fuel tank before you place the lawn
mower on its side. Empty the fuel tank by running the
machine until the tank is empty.
3 Turn lawn mower on its side. When the machine is
tilted, make sure the air filter always is placed in the
highest position.
4 Use a wood block between blade and mower housing
to prevent blade from turning when removing blade
bolt.
5 Remove the blade bolt by turning the bolt counter-
clockwise.
6 Remove the old blade. Make sure the blade adapter is
free of damage. Also check that the blade bolt is
undamaged and that the engine shaft is not bent.
IMPORTANT! Use only a replacement blade approved
by the manufacturer of your mower. Using a blade not
approved by the manufacturer of your mower is
hazardous, could damage your mower and void your
warranty.
MAINTENANCE

English – 23
Assembly:
1 Position the blade adapter on the engine crank shaft.
Be sure key in adapter and crankshaft keyway are
aligned and that the drive belt is inside the tab of the
belt retainer.
2 The blade must be mounted with the angled ends
pointing up towards the engine.
3 Install the blade bolt with the lock washer and
hardened washer into blade adapter and crankshaft.
4 Use block of wood between blade and lawn mower
housing and tighten the blade bolt, turning clockwise.
5 The bolt should be tightened with a torque of 35-40 ft.
Ibs. / 47-54 Nm.
6 Verify the spark plug wire is disconnected from the
engine.
!
WARNING! Always disconnect spark
plug wire and place wire where it cannot
contact spark plug to prevent accidental
starting.
7 Pull the blade around by hand and make sure it
rotates freely.
IMPORTANT!
Always exercise care and use your common sense.
Avoid all situations which you consider to be beyond
your capability. If you still feel uncertain about operating
procedures after reading these instructions, you should
consult an expert before continuing. Contact an
authorized service workshop.
Always use genuine parts.
MAINTENANCE

24 – English
Drive belt
1 Rear insert
2 Belt cover
3 Idler bracket
4 Stripper ring
5 Blade adapter
6 Transmission drive pulley
7 Transmission
8 Blade
9 Hardened washer
10 Lock washer
11 Blade bolt
12 Drive cover
Remove the drive belt
• Empty the fuel tank by running the machine until the
tank is empty.
• Always disconnect the spark plug before performing
maintenance or accessing mocable parts.
• Turn lawn mower on its side. Make sure air filter and
carburetor is facing upward.
• Remove drive cover.
1
6
7
8
9
10
11
2
4
3
5
12
MAINTENANCE

English – 25
• Remove the blade bolt by turning the bolt counter-
clockwise. Remove blade and attaching hardware:
bolt, lock washer and hardened washer.
• Remove the screw and the pulley.
• Pull out the belt and thread it over the adapter.
Replace the drive belt
IMPORTANT! Always use genuine parts.
• Thread the new belt over the adapter and place the
belt on engine pulley.
• Route the belt over the stripper ring into the hole of
the chassis.
• Reinstall the transmission pulley and place the belt on
the pulley.
• Reinstall drive cover.
• Reinstall the blade. See instructions in the section
”Replacing the blades”.
• Tighten spark plug.
MAINTENANCE

26 – English
TROUBLESHOOTING
Troubleshooting schedule
!
WARNING! If service operations or troubleshooting does not require the machine to be on, the
engine should be switched off, and the spark plug wire disconnected from the spark plug.
Problem Probable cause Potential Solution
The machine
does not start
Incorrect starting procedure. See instructions under the heading Starting and stopping.
Air filter clogged Clean the air filter. Replace if necessary.
There is no fuel in the fuel tank Refill with fuel
Spark plug defective Replace the spark plug.
Spark plug cable disconnected.
Check that the spark plug wire is connected to the spark
plug.
Loose blade or broken blade adapter Tighten blade bolt or replace blade adapter.
Defect operator presence control bar Contact an authorized service workshop.
Fuel valve lever (if equipped) in OFF postion Turn fuel valve lever to the ON position.
The battery voltage is too low (if equipped) Charge the battery.
Battery connected incorrectly (if equipped) Connect battery to engine
Blown fuse (if equipped) Replace fuse
Less power
Height of cut too low.
Raise height of cut.
Cutting extremely tall grass
Air filter clogged Clean the air filter. Replace if necessary.
Buildup of grass, leaves and trash under
mower
Clean underside of mower housing.
Too much oil in the engine Check the engine’s oil level
Walking speed too fast Cut at slower walking speed.
Uneven mowing
Worn, bent or loose blade Replace the blade if it is bent or damaged.
Wheel heights uneven Set all wheels at same height
Buildup of grass, leaves and trash under
mower
Clean underside of mower housing.
Excessive
vibrations
Worn, bent or loose blade Replace the blade if it is bent or damaged.
Bent engine crankshaft Contact an authorized service workshop.
Starter rope hard
to pull
Engine flywheel brake is on when the operator
presence control bar is released
Depress the operator presence control bar to upper
handle before pulling starter rope.
Bent engine crankshaft Contact an authorized service workshop.
Blade adapter broken Contact your service agent.
Incorrect starting procedure. See instructions under the heading Starting and stopping.
Grass catcher
not filling (if
equippped)
Cutting height too low Raise height of cut.
Worn blade Replace the blade
Catcher not venting air Clean / Inspect Grass Catcher
Difficult to push
the machine
forward
Cutting extremely tall grass
Raise height of cut.
Cutting height too low
Grass catcher too full Empty the grass catcher
Handle height not right for you Adjust handle height (if equippped)
Drive starts
feeling slow
Belt wear
See instructions under the heading Replacing the drive
belt.
Belt off of pulley
Worn, damaged or untensioned clutch wire
For more information, see the ”Starting and Stopping”
section.

English – 27

28 – Spanish
REGLAS DE SEGURIDAD
IMPORTANTE: ESTA MÁQUINA CORTADORA ES
CAPAZ DE AMPUTAR MANOS Y PIES Y DE
ARROJAR OBJETOS. SI NO CUMPLE CON LAS
SIGUIENTES INSTRUCCIONES DE SEGURIDAD
PUEDE CAUSAR DAÑOS GRAVES O LA MUERTE.
!
ADVERTENCIA: Busque este símbolo
para señalar precauciones de seguridad
importantes. Esto significa
¡PRECAUCIÓN! ¡ESTÉ ALERTA! SU
SEGURIDAD ESTÁ EN JUEGO.
!
ADVERTENCIA: Para evitar el arranque
accidental cuando realice la
configuración, el transporte, el ajuste o
las reparaciones, desconecte siempre el
cable de la bujía y colóquelo donde no
puede entrar en contacto con ella.
AVISO: El silenciador y otras piezas del motor están
muy calientes durante el funcionamiento y
permanecen calientes después de que el motor se ha
detenido. Para evitar quemaduras graves al contacto,
manténgase alejado de estas zonas.
!
ADVERTENCIA: Los gases de escape
del motor, algunos de sus componentes
y algunos componentes del vehículo
contienen o emiten químicos que según
el Estado de California provocan cáncer
y malformaciones congénitas u otros
daños reproductivos.
!
ADVERTENCIA: Los postes de batería,
terminales y accesorios relacionados
contienen plomo y compuestos de
plomo, químicos que según el Estado de
California provocan cáncer y
malformaciones congénitas u otros
daños reproductivos. Lávese las manos
luego de su uso.
!
ADVERTENCIA: Este cortacésped está
equipado con un motor de combustión
interna y no debe utilizarse sobre
ningún terreno subdesarrollado
cubierto de bosque, maleza o césped, o
cerca de este, a menos que el sistema
de escape del motor esté equipado con
un parachispas que cumpla las leyes
locales o estatales (si existen). Si se usa
un detenedor de chispas, el operador
debe mantenerlo en orden de trabajo
eficaz.
En el estado de California, lo anterior es requisito de la
ley (Sección 4442 del Código de Recursos Públicos de
California). Otros estados pueden tener leyes similares.
Las leyes federales se aplican a las tierras federales. Se
puede obtener un parachispas para el silenciador a
través del centro de servicio autorizado más cercano.
Niños
!
ADVERTENCIA: Los niños pueden
resultar gravemente heridos o morir a
causa de este equipo. Lea atentamente
las siguientes instrucciones de
seguridad y cumpla lo que indica.
LOS NIÑOS PUEDEN RESULTAR LESIONADOS POR
ESTE EQUIPO. La Academia Americana de Pediatría
recomienda que los niños tengan un mínimo de 12 años
antes de operar un cortacésped de manejo a pie y un
mínimo de 16 años antes de operar un cortacésped
montado.
Pueden ocurrir trágicos accidentes si el operador no está
atento a la presencia de niños. A los niños suelen
atraerles las máquinas y el corte del césped. Nunca
suponga que los niños permanecerán en el mismo lugar
en que los vio por última vez.
• Mantenga a los niños fuera de la zona de corte y bajo
la observación atenta de un adulto responsable que
no sea el operador.
• Manténgase alerta y apague la máquina si los niños
entran al área.
• Antes y mientras camina hacia atrás, mire hacia atrás
y hacia abajo en busca de niños pequeños.
• Nunca permita que los niños operen la máquina.
• Sea particularmente cuidadoso cerca de las
esquinas, arbustos, árboles u otros objetos que
bloqueen su vista.
Funcionamiento general
• Lea, comprenda y siga todas las instrucciones que
aparecen en la máquina y en los manuales antes de
comenzar. Familiarícese con los controles y el uso
correcto de la máquina antes de arrancar.
• No ponga las manos ni los pies cerca o debajo de las
piezas giratorias. Manténgase alejado de la abertura
de descarga en todo momento.
• Solo permita a individuos responsables que operen la
máquina y que estén familiarizados con las
instrucciones.
• Despeje el área de objetos tales como rocas,
juguetes, cables, huesos, palos, etc., que podrían ser
recogidos y arrojados por la cuchilla. Manténgase
detrás del manillar cuando el motor esté en marcha.
• Asegúrese de que el área esté despejada de otras
personas antes de cortar el césped. Detenga la
máquina si alguien entra en el área.
• No opere la máquina con los pies descalzos o
mientras usa sandalias. Siempre utilice calzado
resistente con buen soporte para tobillos durante las
tareas de corte.
• No tire del cortacésped hacia atrás, a menos que sea
absolutamente necesario. Mire siempre hacia abajo y
atrás antes y mientras retroceda.
• Nunca dirija el material que se descarga hacia nadie.
Evite descargar el material contra una pared u otra
obstrucción. El material puede rebotar de vuelta al
operador. Detenga la cuchilla cuando cruce
superficies de grava

Spanish – 29
• No haga funcionar un cortacésped sin protecciones
adecuadas, placas, recogedor de césped u otros
dispositivos protectores de seguridad instalados.
• Consulte las instrucciones del fabricante para conocer el
correcto funcionamiento y la instalación de accesorios.
Utilice solo accesorios aprobados por el fabricante.
• Detenga la cuchilla cuando cruce superficies de grava.
• Nunca deje la máquina en funcionamiento sin vigilar.
• Detenga el motor y espere hasta que la cuchilla se detenga
por completo antes de limpiar la máquina, quitar el
recogedor de césped o desatascar el conducto de
expulsión.
• Corte el césped solo durante el día o con buena luz artificial.
• No opere la máquina mientras esté bajo la influencia de
alcohol o drogas.
• Nunca opere la máquina sobre césped húmedo. Preste
atención mientras camina: mantenga firmemente el manillar
y camine, nunca corra.
• Desacople el sistema de transmisión, si lo tiene, antes de
arrancar el motor.
• Si el equipo comenzara a vibrar de forma anormal, detenga
el motor y revise de inmediato para buscar la causa. La
vibración es generalmente una advertencia de problemas.
• Use siempre protección ocular cuando opere la máquina.
• Tenga especial cuidado al aproximarse a esquinas ciegas,
arbustos, árboles u otros objetos que pueden interrumpir la
visión.
• Cuando carga o descarga esta máquina, no exceda el
ángulo de funcionamiento máximo recomendado de 15°.
• Use equipo de protección personal (PPE, Personal
Protective Equipment) mientras usa esta máquina, incluido
(como mínimo) un calzado resistente, protección ocular y
protectores auriculares. No realice el corte en pantalones
cortos o con calzado de punta abierta.
Siempre informe a alguien más que está afuera de cortando
césped.
Operación en pendientes
Las pendientes son un importante factor relacionado con
accidentes de caídas y resbalones, lo cual puede dar como
resultado lesiones graves. Todas las pendientes requieren tener
mucha precaución. Si se siente incómodo en una pendiente, no
corte el césped en ella.
Lo que debe hacer:
• Corte el césped a través de la cara de las pendientes, nunca
de arriba abajo.
• Retire los obstáculos como rocas, ramas, etc.
• Permanezca atento a agujeros, surcos, baches u objetos
ocultos. El terreno irregular podría causar un accidente de
caída o resbalones. El césped alto puede ocultar
obstáculos.
Lo qué no debe hacer:
• No corte cerca de declives, zanjas o terraplenes. Podría
perder la estabilidad o el equilibrio.
• No corte sobre césped húmedo o en pendientes
excesivamente empinadas. Un terreno deficiente podría
causar un accidente de caídas o resbalones.
Manipulación segura de gasolina
Para evitar una lesión personal o un daño en la propiedad, tenga
cuidado extremo al manejar la gasolina. La gasolina es
extremadamente inflamable y los vapores son explosivos.
• Apague todos los cigarrillos, puros, pipas y otras fuentes de
ignición.
• Utilice solo un recipiente aprobado.
• Nunca retire el tapón de la gasolina ni agregue combustible
con el motor en funcionamiento.
• Permita que el motor se enfríe antes de reabastecer de
combustible.
• Nunca reabastezca de combustible la máquina en
interiores.
• Nunca almacene la máquina o el recipiente de combustible
donde haya una llama abierta, chispas o luz piloto, como un
calentador de agua o en otros dispositivos.
• Nunca llenar los recipientes dentro de un vehículo, en un
camión o plataforma de remolque con una cubierta de
plástico. Siempre coloque los recipientes en el suelo
alejados del vehículo antes de rellenar.
• Retire el equipo que funciona con gasolina del camión o
trailer y rellénelo en el suelo. Si esto no es posible, entonces
rellene este equipo con un recipiente portátil, en lugar de
hacerlo directamente con la boquilla del dispensador de
gasolina.
• Mantenga la boquilla en contacto con el borde de la apertura
del depósito o recipiente de combustible en todo momento
hasta completar el llenado. No use un dispositivo que
mantenga abierto el seguro de la boquilla.
• Si el combustible se derrama sobre la ropa, cámbiesela de
inmediato.
• Nunca llene en exceso el depósito de combustible.
• Vuelva a colocar la tapa de la gasolina y asegúrela
apretándola.
Servicios generales
• Nunca haga funcionar una máquina dentro de una zona
cerrada.
• Nunca haga ajustes o reparaciones con el motor en marcha.
Desconecte el cable de la bujía y manténgalo lejos de la
bujía para evitar el arranque accidental.
• Mantenga todas las tuercas y pernos apretados para
asegurarse de que el equipo se encuentra en condiciones
de trabajo seguras.
• Nunca manipule los dispositivos de seguridad. Revise con
regularidad que operen bien. Nunca haga nada que
interfiera con la función prevista de un dispositivo de
seguridad ni reduzca la protección proporcionada por un
dispositivo de seguridad.
• Mantenga la máquina libre de cualquier acumulación de
césped, hojas u otra basura. Limpie los derrames de aceite
o combustible. Permita que la máquina se enfríe antes de
almacenarla.
• Detenga e inspeccione el equipo si se golpea un objeto.
Repárela, de ser necesario, antes de volver a empezar.
• Nunca intente realizar ajustes de altura de la rueda mientras
el motor está en marcha.
• Los componentes del recogedor de césped están sujetos a
desgaste, daño y deterioro, lo que podría exponer las piezas
móviles o permitir que los objetos sean lanzados. Revise
con frecuencia los componentes y sustitúyalos con piezas
recomendadas por el fabricante, cuando sea necesario.
• Las cuchillas de corte están afiladas y pueden cortar.
Envuelva las cuchillas o use guantes y tenga mucha
precaución cuando les dé servicio.
• No cambie la configuración del regulador del motor ni
aumente en exceso la velocidad del motor.
• Conserve o cambie las etiquetas de seguridad e
instrucciones según sea necesario.
REGLAS DE SEGURIDAD

30 – Spanish
Clave de los símbolos
ADVERTENCIA: La máquina puede ser
una herramienta peligrosa si se usa
incorrectamente o se manipula
bruscamente, ya que puede causar
lesiones graves o mortales para el
operador u otras personas.
Lea atentamente el manual de
instrucciones y asegúrese de que entiende
las instrucciones antes de utilizar la
máquina.
Detenga el motor
STOP
Arranque el motor
Rápido
Lento
Combustible
Aceite
Estrangulador
PELIGRO, mantenga lejos
las manos y los pies.
Tenga cuidado con los objetos que puedan
salir despedidos o producir algún impacto por
efectos de rebote.
Advertencia: cortadora giratoria. Mantenga
las manos y los pies alejados.
Advertencia: piezas giratorias. Mantenga las
manos y los pies alejados.
Mantenga a las personas y los animales
bien lejos de la zona de trabajo.
Antes y mientras camina hacia atrás, mire
hacia atrás y hacia abajo en busca de niños
pequeños, animales u otros riesgos que
pueden hacer que la caída.
Pendiente peligrosa.
Use protección auricular aprobada.
Explicación de los niveles de
advertencia
Las advertencias se clasifican en tres niveles.
ADVERTENCIA:
!
ADVERTENCIA: Se usa si existe el
riesgo de lesiones graves o la muerte
del operador, o daños al entorno si no se
siguen las instrucciones del manual.
IMPORTANTE:
!
IMPORTANTE: Se usa si existe el riesgo
de lesiones para el operador o daños al
entorno si no se siguen las
instrucciones del manual.
AVISO:
AVISO: Se usa si existe el riesgo de generar daños a
los materiales o a la máquina si no se siguen las
instrucciones del manual.
CLAVE DE LOS SÍMBOLOS
PARADA

Spanish – 31
CONTENIDO
Contenido
REGLAS DE SEGURIDAD
Niños . . . . . . . . . . . . . . . . . . . . . . . . . . . . . . . . . . . . . .28
Funcionamiento general . . . . . . . . . . . . . . . . . . . . . . . .28
Operación en pendientes . . . . . . . . . . . . . . . . . . . . . . .29
Manipulación segura de gasolina. . . . . . . . . . . . . . . . .29
Servicios generales . . . . . . . . . . . . . . . . . . . . . . . . . . .29
CLAVE DE LOS SÍMBOLOS
Clave de los símbolos . . . . . . . . . . . . . . . . . . . . . . . . .30
Explicación de los niveles de advertencia . . . . . . . . . .30
CONTENIDO
Contenido . . . . . . . . . . . . . . . . . . . . . . . . . . . . . . . . . . .31
PRESENTACIÓN
Responsabilidades del cliente . . . . . . . . . . . . . . . . . . .32
El cortacésped . . . . . . . . . . . . . . . . . . . . . . . . . . . . . . .32
Pasos antes de utilizar un nuevo cortacésped. . . . . . .33
DESCRIPCIÓN DE LOS ELEMENTOS
Descripción de los elementos del cortacésped . . . . . .34
EQUIPO DE SEGURIDAD DE LA MÁQUINA
Información general . . . . . . . . . . . . . . . . . . . . . . . . . . .35
MONTAJE Y AJUSTES
Información general . . . . . . . . . . . . . . . . . . . . . . . . . . .36
Retire el cortacésped de la caja . . . . . . . . . . . . . . . . . .36
Manilla . . . . . . . . . . . . . . . . . . . . . . . . . . . . . . . . . . . . .36
Recogedor de césped . . . . . . . . . . . . . . . . . . . . . . . . .37
Empuñadura de arranque. . . . . . . . . . . . . . . . . . . . . . .37
Conversión del cortacésped. . . . . . . . . . . . . . . . . . . . .37
Altura de corte . . . . . . . . . . . . . . . . . . . . . . . . . . . . . . .38
Llenado de aceite . . . . . . . . . . . . . . . . . . . . . . . . . . . . .38
MANEJO DEL COMBUSTIBLE
Información general . . . . . . . . . . . . . . . . . . . . . . . . . . .39
Llenado de combustible . . . . . . . . . . . . . . . . . . . . . . . .39
Transporte y almacenamiento . . . . . . . . . . . . . . . . . . .39
FUNCIONAMIENTO
Equipo de protección personal. . . . . . . . . . . . . . . . . . .40
Instrucciones generales de seguridad . . . . . . . . . . . . .40
Técnicas básicas de trabajo. . . . . . . . . . . . . . . . . . . . .42
Transporte y almacenamiento . . . . . . . . . . . . . . . . . . .42
Arranque y detención . . . . . . . . . . . . . . . . . . . . . . . . . .43
MANTENIMIENTO
Información general . . . . . . . . . . . . . . . . . . . . . . . . . . .44
Programa de mantenimiento . . . . . . . . . . . . . . . . . . . .44
Recomendaciones generales. . . . . . . . . . . . . . . . . . . .45
Inspección general . . . . . . . . . . . . . . . . . . . . . . . . . . . .45
Lubricación general . . . . . . . . . . . . . . . . . . . . . . . . . . .45
Limpieza . . . . . . . . . . . . . . . . . . . . . . . . . . . . . . . . . . . .45
Motor . . . . . . . . . . . . . . . . . . . . . . . . . . . . . . . . . . . . . .46
Silenciador . . . . . . . . . . . . . . . . . . . . . . . . . . . . . . . . . .47
Bujía . . . . . . . . . . . . . . . . . . . . . . . . . . . . . . . . . . . . . . .47
Filtro de aire . . . . . . . . . . . . . . . . . . . . . . . . . . . . . . . . .47
Cuchilla. . . . . . . . . . . . . . . . . . . . . . . . . . . . . . . . . . . . .48
Correa de transmisión . . . . . . . . . . . . . . . . . . . . . . . . .50
SOLUCIÓN DE PROBLEMAS
Programa de solución de problemas . . . . . . . . . . . . . .52

32 – Spanish
Responsabilidades del cliente
• Lea y observe las reglas de seguridad.
• Siga el programa de mantenimiento en este manual.
Cualquier tipo de mantenimiento distinto al que se
describe en este manual debe realizarlo el proveedor
de servicios (vendedor minorista).
PRESENTACIÓN
El cortacésped
Número de serie:
Fecha de compra:
Los números de serie y de modelo se ubican en una
etiqueta adherida a la parte trasera de la carcasa del
cortacésped. Debe registrar tanto el número de serie
como la fecha de compra y mantenerlos en un lugar
seguro para futuras referencias.
Especificaciones del producto
Capacidad y tipo de
gasolina
0,98 litros
(1 cuarto de galón)
(Solo regular sin plomo)
Tipo de aceite
(API SG-SL)
SAE 30 (superior a
0 °C/32 °F) SAE 5W-30
(inferior a 0 °/32 °F)
Capacidad de aceite 532 ml (16 onzas)
Bujía (separación:
0,75 mm (0,0295 pulg.)
BPR5ES
Par del tornillo de la hoja 47 a 54 Nm (35 a 40 lb-pie)

Spanish – 33
Pasos antes de utilizar un nuevo
cortacésped
• Lea atentamente el manual de instrucciones.
• Verifique que el equipo de corte está correctamente
montado y ajustado. Consulte las instrucciones en el
capítulo Montaje.
• Llene con combustible y aceite en el motor. Consulte
las instrucciones en el capítulo Manipulación de
combustible.
!
ADVERTENCIA: Bajo ninguna
circunstancia podrá modificar el diseño
de la máquina sin el permiso del
fabricante. Utilice siempre accesorios
originales. Las modificaciones o
accesorios no autorizados pueden
provocar daños personales o la muerte
del operador u otras personas.
!
ADVERTENCIA: Un cortacésped es una
herramienta peligrosa si se utiliza
incorrectamente o si se manipula
bruscamente y puede provocar lesiones
graves e incluso fatales. Es muy
importante que lea y comprenda el
contenido de este manual de usuario.
!
ADVERTENCIA: La inhalación a largo
plazo de los gases de escape del motor
puede representar un peligro para la
salud.
!
ADVERTENCIA: Para evitar el arranque
accidental cuando realice la
configuración, el transporte, el ajuste o
las reparaciones, desconecte siempre el
cable de la bujía y colóquelo donde no
puede entrar en contacto con ella.
!
ADVERTENCIA: El silenciador se
calienta mucho durante el uso y
permanece así durante un corto período
posteriormente. No toque el silenciador
si está caliente.
!
ADVERTENCIA: Los gases de escape
del motor, algunos de sus componentes
y algunos componentes del vehículo
contienen o emiten químicos que según
el Estado de California provocan cáncer
y malformaciones congénitas u otros
daños reproductivos.
!
ADVERTENCIA: Los postes de batería,
terminales y accesorios relacionados
contienen plomo y compuestos de
plomo, químicos que según el Estado de
California provocan cáncer y
malformaciones congénitas u otros
daños reproductivos. Lávese las manos
luego de su uso.
!
ADVERTENCIA: Este cortacésped está
equipado con un motor de combustión
interna y no debe utilizarse sobre
ningún terreno subdesarrollado
cubierto de bosque, maleza o césped, o
cerca de este, a menos que el sistema
de escape del motor esté equipado con
un parachispas que cumpla las leyes
locales o estatales (si existen). Si se usa
un detenedor de chispas, el operador
debe mantenerlo en orden de trabajo
eficaz.
En el estado de California, lo anterior es requisito de la
ley (Sección 4442 del Código de Recursos Públicos de
California). Otros estados pueden tener leyes similares.
Las leyes federales se aplican a las tierras federales. Se
puede obtener un parachispas para el silenciador a
través del centro de servicio autorizado más cercano.
PRESENTACIÓN

34 – Spanish
Descripción de los elementos del cortacésped
1 Espada de control de presencia del operador
2 Agarradera de control
3 Empuñadura de arranque
4 Recogedor de césped
5 Tapón de combustible
6 Filtro de aire
7 Bujía
8 Cubierta de la unidad
9 Silenciador
10 Puerto de lavado
11 Deflector trasero
12 Tapón de aceite del motor con varilla de nivel
13 Control de altura de corte
14 Conector del mantillo
15 Manual del usuario
16 Conducto de expulsión
DESCRIPCIÓN DE LOS ELEMENTOS
1
2
3
4
5
7
8
10
11
13
14
6
12
9
11
15
16

Spanish – 35
Información general
En esta sección se describe el equipo de seguridad de la
máquina y su propósito, y cómo los controles y
mantenimiento deben llevarse a cabo para asegurarse
de que funciona correctamente.
!
ADVERTENCIA: Nunca utilice una
máquina que tenga el equipo de
seguridad defectuoso. Si la máquina no
realiza correctamente ninguna
comprobación, póngase en contacto
con su agente de servicio para repararla.
Evite un arranque accidental quitando el
cable de encendido de la bujía.
Espada de control de presencia del
operador
IMPORTANTE: Las regulaciones federales requieren
la instalación de un control del motor en este
cortacésped a fin de minimizar el riesgo de lesiones
por contacto con la cuchilla. Bajo ninguna
circunstancia trate de anular la función del control del
operador. La cuchilla gira cuando el motor está en
marcha.
El freno motor está diseñado para detener el motor. El
motor se debería detener cuando se suelta la
empuñadura de la espada de control de presencia del
operador.
Comprobación de la espada de control de presencia
del operador
• Arranque el motor y luego suelte la espada de control
de presencia del operador. El motor debería
detenerse.
Deflector trasero
El deflector trasero, conectado entre las ruedas traseras
del cortacésped, sirve para minimizar la posibilidad de
que los objetos sean expulsados desde la parte trasera
del cortacésped hacia la posición de corte del operador.
Inspección del deflector trasero
• Asegúrese de que el deflector trasero no está dañado
y que no se aprecian defectos como grietas o
resortes rotos que fuerzan el cierre de la puerta.
Sustituya el deflector o los resortes si están dañados.
Silenciador
!
ADVERTENCIA: Nunca utilice una
máquina sin un silenciador o con un
silenciador defectuoso. Un silenciador
dañado puede aumentar
considerablemente el nivel de ruido y el
peligro de incendio. Mantenga los
equipos de extinción de incendios a
mano.
El silenciador se calienta mucho durante
y después de su uso. Esto también se
aplica durante el ralentí. Tenga presente
el riesgo de incendio, especialmente
cuando se trabaja cerca de sustancias
inflamables o vapores.
El silenciador está diseñado para mantener los niveles
de ruido al mínimo y para dirigir los gases de escape
lejos del usuario.
Revisión del silenciador
• Compruebe con regularidad que el silenciador está
completo y fijado correctamente.
EQUIPO DE SEGURIDAD DE LA MÁQUINA

36 – Spanish
Información general
!
ADVERTENCIA: Evite un arranque
accidental quitando el cable de
encendido de la bujía.
AVISO: Este cortacésped se entrega sin aceite ni
gasolina en el motor.
Retire el cortacésped de la caja
• Retire las piezas sueltas incluidas con el
cortacésped.
• Recorte dos esquinas de cartón y asiente el panel
final en el suelo.
• Retire todo el material de embalaje, excepto el relleno
existente entre la manilla superior e inferior y el
relleno que retiene la espada de control de presencia
del operador en la manilla superior.
• Saque el cortacésped fuera de la caja y asegúrese de
que no queden piezas sueltas dentro de la caja.
Manilla
AVISO: Tenga cuidado de no dañar los cables y
alambres cuando se desenvuelva el manillar.
Posición de funcionamiento
1 Levante la empuñadura inferior a la posición de
funcionamiento. Alinee los pasadores del manillar
con una ranura en el soporte de la empuñadura para
fijar una altura cómoda para la empuñadura.
2 Apriete las perillas del manillar inferior.
3 Quite el relleno de protección, levante el manillar
superior hasta la posición correcta sobre el manillar
inferior y apriete ambas perillas superiores.
4 Retire el material de embalaje existente alrededor de
la espada de control de presencia del operador.
Almacenamiento vertical del manillar
El manillar puede ajustarse en una posición de
almacenamiento vertical.
1 Suelte las perillas del manillar inferior.
2 Gire la empuñadura y alinee los pasadores del
manillar con las ranuras verticales en el soporte de la
empuñadura.
3 Vuelva a apretar las perillas.
Posición de almacenamiento/transporte
El conjunto del manillar puede plegarse para minimizar el
espacio necesario para el almacenamiento y el
transporte.
AVISO: Tenga cuidado de no dañar los cables y
alambres al plegar el manillar.
1 Suelte las dos perillas del manillar superior y permita
que este se pliegue hacia abajo, hacia la parte
trasera.
2 Suelte las dos perillas del manillar inferior y gire todo
el conjunto del manillar hacia delante y deje que
descanse sobre el cortacésped.
MONTAJE Y AJUSTES

Spanish – 37
Recogedor de césped
Montaje del recogedor
1 Coloque el bastidor del recogedor de césped en la
bolsa para césped con la parte rígida de la bolsa en la
parte inferior. Asegúrese de que el mango del
bastidor esté fuera de la parte superior de la bolsa.
2 Asegure la bolsa para césped en el bastidor con los
clips de acción rápida.
Empuñadura de arranque
Instalación de la empuñadura de arranque
1 Suelte la perilla T.
2 Sostenga la espada de control de presencia del
operador contra el manillar superior.
3 Agarre la empuñadura de arranque del motor y,
cuidadosamente, tire de ella hasta que la cuerda de
arranque pueda deslizarse en el lazo de la guía de
cuerda.
4 Apriete la perilla T.
Conversión del cortacésped
El cortacésped se suministra listo para usarse en el modo
de trituración.
El modo de trituración vuelve a cortar el césped muchas
veces, lo que permite reducir en tamaño los recortes, de
modo que, al caer sobre el césped, se dispersen en él y
no se noten. Además, el césped triturado se biodegrada
rápidamente para proporcionar nutrientes al césped.
Use la bolsa trasera para recoger el césped cortado
dentro del recogedor de césped.
!
ADVERTENCIA: No ponga en marcha el
cortacésped con la puerta trasera
abierta o sin el recogedor de césped
aprobado en su lugar. Nunca intente
manejar el cortacésped con la puerta
trasera retirada o abierta por completo.
Bolsa trasera
1 Levante el protector trasero y saque el conector del
mantillo.
2 Levante el protector trasero y coloque los ganchos
del bastidor del recogedor de césped en los soportes
de la bolsa para césped.
3 Libere el protector trasero y permita que descanse
sobre la parte superior del bastidor de la bolsa para
césped.
MONTAJE Y AJUSTES

38 – Spanish
Trituración
1 Levante el protector trasero y saque la bolsa para
césped (si está equipada).
2 Inserte el conector de mantillo (accesorio) en el canal
del colector.
3 Deje que el protector trasero se cierre y asegúrese de
que el protector trasero está cerrado firmemente
contra el conector de mantillo.
Descarga lateral trasera
1 Levante el protector trasero y saque el conector de
mantillo o la bolsa para césped (si está equipada).
2 Instale el conducto de expulsión.
3 Cierre el protector trasero para permitir que la
máquina descargue material hacia la izquierda de la
máquina durante el corte.
Altura de corte
La altura de corte se puede ajustar en nueve posiciones
diferentes (de 1 a 9).
Levante las ruedas para un corte bajo y baje las ruedas
para un corte alto. Ajuste la altura de corte para que se
adapte a sus necesidades. La posición media es la mejor
para la mayoría de los terrenos.
• Para cambiar la altura de corte, presione la palanca
de ajuste de altura hacia la rueda. Mueva la rueda
hacia arriba o hacia abajo para que se adapte a sus
necesidades. Establezca la misma altura en las
cuatro esquinas.
• La palanca de ajuste se carga por resorte.
Llenado de aceite
• El depósito de aceite se vacía antes del envío.
Llene con aceite hasta la marca FULL (Lleno) de la
varilla de nivel. Para conocer más detalles, consulte
el manual del fabricante del motor.
MONTAJE Y AJUSTES

Spanish – 39
Información general
!
ADVERTENCIA: Hacer funcionar un motor
en un área confinada o mal ventilada
puede producir la muerte por asfixia o
intoxicación por monóxido de carbono.
El combustible y sus vapores son
altamente inflamables y pueden causar
lesiones graves cuando se inhalan o si
entran en contacto con la piel. Por esta
razón, tenga precaución al manipular el
combustible y asegúrese de que haya
suficiente ventilación.
Los gases de escape del motor están
calientes y pueden contener chispas que
podrían iniciar un incendio. Nunca
arranque la máquina en interiores o cerca
de material combustible.
No fume ni coloque objetos calientes
cerca del combustible.
Llenado de combustible
• Use gasolina sin plomo nueva, limpia, estándar con
un mínimo de 87 octanos. No mezcle aceite con
gasolina. Adquiera combustible en cantidades que
sea posible usar dentro de un plazo de 30 días, a fin
de garantizar su frescura.
!
ADVERTENCIA: Siempre detenga el motor
y deje que se enfríe durante unos minutos
antes de reabastecer de combustible. El
motor debe apagarse.
Utilice un recipiente para combustible en
todo momento para evitar que se derrame.
Llene el depósito de combustible hasta la
parte inferior del tubo de llenado del
depósito. No lo llene de más. Use gasolina
sin plomo nueva, limpia, estándar con un
mínimo de 87 octanos. No mezcle aceite
con gasolina. Compre combustible en
cantidades que se puedan usar en 30 días
para garantizar que no esté viejo al usarlo.
Cuando reabastezca de combustible, abra
lentamente el tapón de combustible, de
modo que cualquier exceso de presión se
libere suavemente.
Limpie el área alrededor del tapón de
combustible.
Apriete el tapón de combustible
cuidadosamente después del
reabastecimiento de combustible. La
negligencia puede provocar el inicio de un
incendio.
Nunca arranque la máquina:
• Si derramó combustible o aceite de motor sobre la
máquina, limpie el derrame y deje que el combustible
restante se evapore.
• Si derramó combustible sobre usted o su ropa,
cámbiese de ropa. Lave cualquier parte de su cuerpo
que haya entrado en contacto con el combustible.
Utilice jabón y agua.
• Si la máquina tiene fugas de combustible, compruebe
regularmente si hay fugas en el tapón y las tuberías
de combustible.
Aceite del motor
AVISO: Compruebe el nivel de aceite antes de arrancar
el cortacésped. Un nivel de aceite demasiado bajo puede
causar graves daños al motor.
• Consulte las instrucciones en la sección
“Mantenimiento”.
Transporte y almacenamiento
• Almacene y transporte la máquina y el combustible
de manera que no exista riesgo de fugas o que los
humos entren en contacto con chispas o llamas
abiertas, por ejemplo, de máquinas eléctricas,
motores eléctricos, relés/conmutadores eléctricos o
calderas.
• Cuando almacene y transporte combustible, siempre
use los contenedores aprobados para este fin.
Almacenamiento prolongado
• Al almacenar la máquina durante largos períodos, el
depósito de combustible debe vaciarse. Póngase en
contacto con su estación local de gas para averiguar
dónde puede deshacerse del exceso de combustible.
• El estabilizador de combustible es una alternativa
aceptable para evitar depósitos pegajosos durante el
almacenamiento. Añada estabilizador al combustible
en el depósito o en el recipiente de almacenamiento.
Siga siempre la proporción de mezcla que se
encuentra en el recipiente del estabilizador. Haga
funcionar el motor durante al menos 10 minutos
después de agregar el estabilizador, para que
alcance el carburador. No vacíe el tanque de gasolina
y el carburador si utiliza estabilizador de combustible.
AVISO: Los combustibles mezclados con alcohol
(llamados gasohol o con etanol o metanol) pueden atraer
la humedad, que lleva a la separación y la formación de
ácidos durante el almacenamiento.
El gas ácido puede dañar el sistema de combustible de
un motor mientras está almacenado. Para evitar
problemas en el motor, el sistema de combustible se
debe vaciar antes de ser almacenado por 30 días o más.
Vacíe el depósito de gasolina, arranque el motor y déjelo
funcionar hasta que las tuberías de combustible y el
carburador estén vacíos. Use combustible nuevo la
temporada siguiente. Nunca use productos limpiadores
para motor o carburador en el tanque de combustible
porque puede ocurrir un daño permanente.
MANEJO DEL COMBUSTIBLE

40 – Spanish
Equipo de protección personal
Debe utilizar el equipo de protección personal autorizado
siempre que utilice la máquina. El equipo de protección
personal no puede eliminar el riesgo de lesiones, pero
reducirá el grado de lesiones en caso de que se produzca
un accidente. Pida ayuda a su distribuidor para elegir el
equipo correspondiente.
Siempre use:
• Botas o zapatos antideslizante y resistentes.
• Pantalones largos y gruesos. No use pantalones
cortos, sandalias ni permanezca descalzo.
• Debe utilizar guantes cuando sea necesario; por
ejemplo cuando ajusta, inspecciona o limpia la hoja.
• Utilice protectores auriculares para evitar daños en el
sistema auditivo. La exposición al ruido puede causar
pérdida de audición.
• Utilice siempre gafas de seguridad o protectores
oculares mientras use el cortacésped o realice
cualquier ajuste o reparación. Recomendamos usar
gafas de seguridad estándar o una máscara de
seguridad de amplia visión sobre lentes.
Instrucciones generales de
seguridad
En esta sección se describen las instrucciones de
seguridad básicas para usar la máquina. Esta
información nunca es un sustituto de la competencia y
experiencia profesionales.
• Lea atentamente el manual de instrucciones y
asegúrese de que entiende las instrucciones antes
de utilizar la máquina.
• Tenga en cuenta que el operador es responsable de
los accidentes o los peligros que ocurren a otras
personas o sus propiedades.
• Consulte las instrucciones del fabricante para
conocer el correcto funcionamiento y la instalación de
accesorios. Utilice solo accesorios aprobados por el
fabricante.
• La máquina debe mantenerse limpia. Los avisos y los
autoadhesivos deben ser perfectamente legibles.
• Conserve o cambie las etiquetas de seguridad e
instrucciones según sea necesario.
• Siempre desconecte la bujía antes de realizar tareas
de mantenimiento o de servicio.
Los niños
!
ADVERTENCIA: Los niños pueden
resultar gravemente heridos o morir a
causa de este equipo. Lea atentamente
las siguientes instrucciones de
seguridad y cumpla lo que indica.
LOS NIÑOS PUEDEN RESULTAR LESIONADOS POR
ESTE EQUIPO. La Academia Americana de Pediatría
recomienda que los niños tengan un mínimo de 12 años
antes de operar un cortacésped de manejo a pie y un
mínimo de 16 años antes de operar un cortacésped
montado. Accidentes graves pueden ocurrir si no está
pendiente de la presencia de niños cerca de la máquina.
A menudo, a los niños les atrae la máquina y el corte de
césped. Nunca dé por un hecho que los niños
permanecerán donde usted los vio por última vez.
• Manténgase atento y apague la máquina si entran
niños al área de trabajo.
• No utilice nunca la máquina si hay personas,
especialmente niños o mascotas, cerca de esta.
• Antes y durante el retroceso, mire detrás de usted y
hacia abajo en busca de niños pequeños.
FUNCIONAMIENTO

Spanish – 41
Utilice siempre el sentido común
No es posible abordar todas las situaciones posibles que
puede afrontar. Siempre tenga cuidado y use su sentido
común. Si entra en una situación en la que se sienta
inseguro, deténgase y busque el asesoramiento de
expertos. Póngase en contacto con el distribuidor, el agente
de servicio o un usuario experimentado. No intente realizar
ninguna tarea en la cual se sienta inseguro.
!
ADVERTENCIA: Esta máquina produce un
campo electromagnético durante el
funcionamiento. Este campo puede, en
determinadas circunstancias, interferir con
implantes médicos activos o pasivos. Para
reducir el riesgo de lesiones graves o
mortales, recomendamos a las personas
con implantes médicos que consulten a su
médico y al fabricante del implante médico
antes de operar esta máquina.
!
ADVERTENCIA: La máquina puede ser una
herramienta peligrosa si se usa
incorrectamente o se manipula
bruscamente, ya que puede causar lesiones
graves o mortales para el operador u otras
personas.
Nunca permita que los niños u otras
personas no capacitadas usen o le den
servicio a la máquina.
Personas con capacidades físicas o
mentales reducidas no deben utilizar la
máquina, así como personas no aptas por
razones de salud, sin la supervisión de una
persona responsable de su seguridad.
Nunca permita que otra persona utilice la
máquina sin asegurarse primero de que han
leído y comprendido el contenido del
manual de usuario.
No utilice nunca la máquina si está
cansado, bajo la influencia del alcohol o las
drogas, medicamentos o cualquier cosa
que pudiera afectar su visión, vigilancia,
coordinación o criterio.
!
ADVERTENCIA: Las modificaciones o los
accesorios no autorizados pueden provocar
graves lesiones o incluso la muerte al
usuario u otras personas. Bajo ninguna
circunstancia podrá modificar el diseño de
la máquina sin el permiso del fabricante.
No modifique este producto ni lo utilice si
parece haber sido modificado por otros.
Nunca utilice una máquina que esté
defectuosa. Realice las comprobaciones de
seguridad, el mantenimiento y las
instrucciones de servicio descritas en este
manual. Especialistas capacitados y
calificados deben llevar acabo algunas
medidas de mantenimiento y servicio.
Consulte las instrucciones en el capítulo
Mantenimiento.
Utilice siempre accesorios originales.
Seguridad en el área de trabajo
• Las ramas, palos, piedras, etc., deben ser retirados del
césped antes de empezar a cortarlo.
• Los objetos que golpean contra el equipo de corte
podrían ser arrojados y causar daños a personas y
objetos. Mantenga lejos a las personas y a los
animales.
• No utilice nunca la máquina en caso de mal tiempo, por
ejemplo, en caso de niebla, lluvia, humedad o en
lugares con humedad, fuertes vientos, frío intenso,
riesgo de rayos, etc. Realizar trabajos en condiciones
de mal tiempo es agotador y puede llevar a condiciones
peligrosas, por ejemplo, superficies resbalosas.
• No corte el césped húmedo. Es resbaladizo y los
neumáticos pueden perder adherencia, de modo que la
máquina podría patinar.
• Observe sus alrededores para asegurarse de que nada
pueda afectar el control de la máquina.
• Tenga cuidado con raíces, piedras, ramas, fosos,
zanjas, etc. El césped alto puede ocultar obstáculos.
• Cortar el césped en pendientes puede resultar
peligroso. No utilice el cortacésped en pendientes muy
pronunciadas. El cortacésped no se debe usar en
inclinaciones mayores a 15 grados.
• Sobre un terreno inclinado debe trabajar a lo largo de la
pendiente. Es mucho más fácil trabajar a lo largo de una
pendiente que trabajar de arriba abajo.
• Tenga cuidado cuando se acerca a rincones escondidos
y objetos que puedan bloquear la vista.
Seguridad en el trabajo
• Un cortacésped está diseñado únicamente para cortar
el césped. Todo otro uso está prohibido.
• Siempre informe a alguien más que está afuera de
cortando césped.
• No haga funcionar un cortacésped sin protecciones
adecuadas, placas, recogedor de césped u otros
dispositivos protectores de seguridad instalados.
• Use equipo de protección personal. Consulte las
instrucciones bajo el título “Equipo de protección
personal”.
• No arranque un cortacésped salvo que el cortador y
todas las tapas estén correctamente montadas. De lo
contrario, el cortador podría soltarse y causar daños
personales.
• Asegúrese de que el cortador no golpee objetos
extraños como piedras, raíces o elementos similares.
Esto puede hacer que el cortador se desafile y doblar el
eje del motor. Si se dobla una hoja o un eje del motor,
pueden provocar inestabilidad y vibraciones excesivas,
lo que se traduce en un gran riesgo de que se afloje la
hoja.
• La palanca de freno nunca debe estar
permanentemente anclada al manillar cuando la
máquina está funcionando.
• Coloque el cortacésped sobre una superficie firme y
plana y arránquelo. Asegúrese de que el cortador no
entre en contacto con el suelo u otros objetos.
• Siempre colóquese detrás de la máquina. Permita que
todas las ruedas permanezcan en el suelo y mantenga
ambas manos en el manillar cuando corte césped.
Mantenga las manos y los pies alejados de las cuchillas
giratorias.
• No incline la máquina cuando el motor está en marcha.
FUNCIONAMIENTO

42 – Spanish
• Preste especial atención cuando acerque la máquina
hacia usted durante el trabajo.
• Nunca levante el cortacésped ni lo transporte cuando el
motor esté en marcha. Si debe levantar el cortacésped,
en primer lugar, apague el motor y desconecte el cable
de encendido de la bujía.
• No corte el césped mientras camina hacia atrás.
• El motor debe estar apagado cuando se mueva sobre
terreno que no esté cortado. Por ejemplo, caminos de
grava, piedra, guijarros, asfalto, etc.
• No corra con la máquina cuando esté en marcha.
Siempre debe caminar con el cortacésped.
• Apague el motor antes de cambiar la altura de corte.
Nunca haga ajustes con el motor en marcha.
• Nunca deje la máquina con el motor en marcha sin
supervisión. Apague el motor. Asegúrese de que el
equipo de corte haya dejado de girar.
• Si se golpea algún objeto extraño o si se producen
vibraciones, detenga la máquina de inmediato.
Desconecte el cable de bujía de la bujía. Compruebe
que la máquina no esté dañada. Repare cualquier
daño.
• Nunca dirija el material que se descarga hacia nadie.
Evite descargar el material contra una pared u otra
obstrucción. El material puede rebotar de vuelta al
operador.
Técnicas básicas de trabajo
• Siempre corte con una cuchilla afilada para obtener los
resultados óptimos. Una cuchilla desafilada da un corte
irregular y el césped queda amarillo en la superficie
cortada.
• No realice nunca el corte en más de un tercio de la
longitud del césped. Esto se aplica especialmente
durante los períodos secos. Primero, realice el corte
con el ajuste de altura alto. A continuación, compruebe
el resultado y baje hasta una altura adecuada. Si el
césped es muy largo, conduzca lentamente y córtelo
dos veces si es necesario.
• Para cortes extremadamente difíciles, reduzca el ancho
de corte superponiéndose previamente a la ruta cortada
y realizando el corte lentamente.
• Corte en diferentes direcciones cada vez para evitar
rayas en el césped.
• Antes de tirar de la máquina hacia usted, desconecte la
unidad y empuje la máquina hacia delante
aproximadamente 10 cm (3").
• Asegúrese de desconectar la unidad al aproximarse a
un obstáculo.
Los poros en los recogedores de césped de tela pueden
llenarse de suciedad y polvo con el uso, y el recogedor de
césped atrapará menos césped. Para evitar esto, lave
regularmente con una manguera el recogedor de césped y
deje secar antes de usarlo.
Operación en pendiente
Cortar el césped en pendientes puede resultar peligroso.
No utilice el cortacésped en pendientes pronunciadas de
más de 15°. Todas las pendientes exigen un cuidado
adicional. Si se siente inseguro, no corte el césped.
Lo que debe hacer:
• Corte el césped a través de la cara de las pendientes,
nunca de arriba abajo.
• Ponga extrema atención al cambiar la dirección en las
pendientes.
• Saque obstáculos como piedras, ramas, etc.
• Permanezca atento a agujeros, surcos, baches u
objetos ocultos. El terreno irregular podría causar un
accidente de caída o resbalones. El césped alto puede
ocultar obstáculos.
Lo qué no debe hacer:
• No corte demasiado cerca de bordes, zanjas o bancos.
• Evite cambios bruscos en la dirección.
• No corte el césped húmedo. Es resbaladizo y los
neumáticos pueden perder adherencia, de modo que la
máquina podría patinar.
Transporte y almacenamiento
• Fije el equipo durante el transporte para evitar daños y
accidentes de transporte.
• Almacene el equipo en un área bloqueable para que
esté fuera del alcance de los niños y personas no
autorizadas.
• Almacene la máquina y su equipo en un lugar seco y a
prueba de heladas.
• Cuando carga o descarga esta máquina, no exceda el
ángulo de funcionamiento máximo recomendado de
15°.
• Vacíe el depósito de combustible haciendo funcionar la
máquina hasta vaciarlo.
• Drene el aceite del motor como se describe en Cambio
del aceite del motor.
• Limpie la máquina. Para obtener más información,
consulte la sección “Limpieza”.
• Realice la lubricación como se muestra en la sección
Mantenimiento del manual.
• Apriete los pernos y las tuercas.
• Reemplace o repare los componentes dañados.
• Retoque todas las superficies pintadas que estén
oxidadas o descascaradas y lije levemente las
superficies antes de pintarlas.
• Coloque el cortacésped en posición de transporte.
Consulte “Posición de transporte/almacenamiento” en
la sección de Montaje y ajustes de este manual.
• Cubra la unidad con una cubierta protectora adecuada
que no retenga la humedad. No use plástico. El plástico
no es permeable, lo que permite la formación de
condensación y provocará que la unidad se oxide.
Nunca cubra el cortacésped mientras las áreas del
motor y el escape sigan calientes.
• Para el transporte y almacenamiento del combustible,
consulte la sección “Manejo del combustible”.
MAX 1/3
FUNCIONAMIENTO

Spanish – 43
Arranque y detención
Antes de empezar
!
ADVERTENCIA: Lea atentamente el
manual de instrucciones y asegúrese
de que entiende las instrucciones antes
de utilizar la máquina.
Use equipo de protección personal.
Consulte las instrucciones bajo el título
“Equipo de protección personal”.
• Mantenga a las personas y los animales bien lejos de
la zona de trabajo.
• Realice el mantenimiento diario. Consulte las
instrucciones en la sección “Mantenimiento”.
• Asegúrese de que el cable de encendido esté
correctamente asentado en la bujía.
• Agregue aceite si fuera necesario. Consulte las
instrucciones en la sección “Mantenimiento”.
• Agregue gasolina. Consulte las instrucciones en la
sección “Manipulación del combustible”.
• Antes de arrancar el motor, desactive el sistema de
transmisión, si se incluye.
Arranque manual
Durante el arranque del motor, la espada de control de
presencia del operador se debe sostener contra el
manillar.
• Colóquese detrás de la máquina.
• Agarre la empuñadura de arranque y tírela
rápidamente. No permita que la cuerda de arranque
se contraiga. No enrolle el cordón de arranque
alrededor de su mano
Impulsor
• La autopropulsión se controla sosteniendo la espada
de control de presencia del operador hacia abajo
contra la manilla y tirando una o ambas palancas de
la transmisión en dirección a la manilla. Mientras más
tire de las palancas de la unidad hacia el manillar,
más rápido se desplazará la unidad.
• Si se sueltan las palancas de la transmisión, se
detendrá el movimiento de avance.
• Para detener el movimiento de avance sin parar el
motor, basta con soltar la palanca de la unidad.
Sujete la espada de control de presencia del
operador hacia abajo contra el manillar para
continuar cortando el césped sin autopropulsión.
Cuando la unidad funciona de forma lenta, debe ajustar
el cable de control de mando. Ajuste el cable con
precisión mediante el tornillo de ajuste.
• Apague el motor. Siempre desconecte la bujía antes
de realizar tareas de mantenimiento o de acceder a
las piezas móviles.
• Para tensar el cable y aumentar la velocidad, gire el
tornillo de ajuste en el sentido contrario de las agujas
del reloj.
Asegúrese de que la tensión del cable de control de
mando no esté demasiado ajustada. Si el cortacésped
arranca sin operar la palanca de embrague, extienda el
cable.
• Para extender el cable y reducir la velocidad, gire el
tornillo de ajuste en el sentido de las agujas del reloj.
Detención
• Para detener el motor, suelte la espada de control de
presencia del operador.
Vaciado del recogedor de césped
• Levante el recogedor de césped usando el mango del
bastidor.
• Saque el recogedor de césped con los recortes desde
debajo del manillar del cortacésped.
• Vacíe los recortes desde la bolsa utilizando tanto el
mango del bastidor como el manillar de la bolsa.
AVISO: No arrastre la bolsa cuando la vacíe, ya que
causará un desgaste innecesario.
FUNCIONAMIENTO

44 – Spanish
Información general
!
ADVERTENCIA: El usuario solo debe llevar a cabo el trabajo de mantenimiento y servicio descrito en este
manual. Un taller de servicio autorizado se debe encargar de realizar una labor más amplia.
Apague el motor antes de realizar cualquier comprobación o mantenimiento. Detenga el motor y espere
hasta que la cuchilla se detenga por completo antes de limpiar la máquina, quitar el recogedor de césped
o desatascar el conducto de expulsión. Evite un arranque accidental quitando el cable de encendido de la
bujía. También debe sacar la llave del motor de arranque o la batería en máquinas con arranque eléctrico.
La vida útil de la máquina se puede reducir y el riesgo de accidentes puede aumentar si el mantenimiento
de la máquina no se realiza correctamente y si el servicio o las reparaciones no se llevan a cabo de forma
profesional. Si necesita más información, comuníquese con su taller de servicio más cercano.
• Permita que un concesionario autorizado o un centro de servicio autorizado examinen frecuentemente el producto
para realizar ajustes o reparaciones.
• Cambie todas las piezas dañadas, desgastadas o rotas.
• Utilice siempre accesorios originales.
Programa de mantenimiento
En el programa de mantenimiento puede ver las partes de la máquina que requieren mantenimiento y con qué
frecuencia se debe realizar. Los intervalos se calculan sobre la base de un uso promedio de la máquina y pueden variar
dependiendo de la frecuencia del uso personal.
Mantenimiento diario
Antes del
uso
Después
de cada
uso
Cada
10 horas
Cada
25 horas
Cada
100 horas
Antes del
almacena-
miento
Cortacésped
Apriete los pernos y las tuercas. X X
Limpiar/revisar el recogedor de césped* X X X
Revisar los neumáticos X
Revisar las ruedas de tracción*** X
Limpiar la máquina**** X X
Revisar bajo la cubierta de la unidad*** X
Revisar la correa de transmisión/poleas*** X
Verificar que la cortadora no esté dañada ni
agrietada. Reemplazar la cortadora si es
necesario.
X
1
Lubricación general X
Limpiar y recargar la batería** X X
2
Motor
Revise el nivel de aceite del motor X
3
Cambie el aceite del motor*****
Limpie el filtro de aire. Cámbielo si
fuera necesario.*****
Revise que el silenciador está conectado
correctamente y no está dañado.
X
Reemplace la bujía. X
Vacíe el depósito de combustible o agregue
estabilizador
X
*Si está equipado ****Use un raspador para limpiar debajo del equipo
**Máquinas equipadas con arranque eléctrico *****Consulte el manual del motor
***Máquinas impulsadas eléctricamente
Nota 1: Reemplace las cuchillas más a menudo cuando corte césped en suelos arenosos. Nota 2: Cargue la batería por
un máximo de 48 horas. Nota 3: Y después de cinco horas de uso.
MANTENIMIENTO

Spanish – 45
Recomendaciones generales
La garantía de este cortacésped no cubre artículos que
hayan sido objeto de abuso o negligencia por parte del
operador. Para recibir todo el valor de la garantía, el
operador debe realizar mantenimiento en el
cortacésped según las instrucciones de este manual.
Se deberán realizar algunos ajustes de forma regular
para realizar un mantenimiento adecuado de la unidad.
Al menos una vez por temporada, inspeccione y va si
debería hacer alguno de los ajustes descritos en la
sección Mantenimiento de este manual.
• Al menos una vez al año, reemplace la bujía, limpie
o reemplace el elemento del filtro de aire y revise el
desgaste de la cuchilla. Una bujía nueva y un
elemento limpio/nuevo del filtro de aire garantizan
una mezcla adecuada de aire-combustible y ayudan
a que el motor funcione mejor y dure más.
• Siga el programa de mantenimiento en este manual.
Inspección general
• Revise que las tuercas y tornillos estén apretados.
Lubricación general
AVISO: No aceite ni engrase los cojinetes de las
ruedas de plástico. Los lubricantes viscosos atraen el
polvo y la suciedad, los que acortan la vida útil de los
cojinetes autolubricantes. Si siente que deben
lubricarse, utilice solamente un tipo de lubricante de
grafito en polvo seco con moderación.
Mantenga la unidad bien lubricada.
1 Aceite del motor
Consulte
“
Motor
”
en
la sección
Mantenimiento
2
Bisagra de la puerta
trasera
Lubricante en
aerosol
3
Pernos de montaje
del manillar
Limpieza
!
ADVERTENCIA: Siempre desconecte
la bujía antes de realizar tareas de
mantenimiento o de servicio.
• Elimine hojas, césped y elementos similares fuera
del cortacésped.
• Mantenga las superficies acabadas y las ruedas
libres de gasolina, aceite, etc.
• Mantenga la parte superior del motor alrededor del
motor de arranque despejada y limpia sin recortes
de césped y paja. Esto ayudará al flujo de aire en el
motor y extenderá la vida útil del mismo.
• Limpie la parte inferior del cortacésped raspándolo
para eliminar acumulaciones de césped y basura.
• No use un limpiador de alta presión para limpiar la
máquina.
• No use nunca agua directamente sobre el motor.
• Limpie la entrada de aire del motor de arranque.
Revise el motor de arranque y el cordón de
arranque.
• Cuando limpie debajo de la cubierta de corte, vacíe
el depósito de combustible y ponga la máquina en
su costado con el silenciador hacia abajo.
AVISO: Con la excepción del puerto de lavado de
agua (si está equipado), no recomendamos usar
una manguera de jardín para limpiar el exterior del
cortacésped, a menos que el sistema eléctrico, el
silenciador, el filtro de aire y el carburador estén
cubiertos para impedir el ingreso de agua. El agua
en el motor puede provocar una reducción de la
vida útil del mismo.
Ruedas motrices
Revise siempre las ruedas antes de cortar el césped
para asegurarse de que se mueven libremente. Limpie
las ruedas si no giran libremente.
1 Quite el perno.
2 Quite las ruedas de los ajustadores de rueda.
3 Quite toda la basura o los cortes de césped desde el
interior de la tapa de polvo, el piñón o los dientes del
engranaje de la rueda motriz.
4 Sustituya las ruedas.
Si después de la limpieza, las ruedas motrices no giran
libremente, póngase en contacto con un taller de
servicio autorizado.
Recogedor de césped
• Los poros en los recogedores de césped de tela
pueden llenarse de suciedad y polvo con el uso, y el
recogedor de césped atrapará menos césped. Para
evitar esto, lave regularmente con una manguera el
recogedor de césped y deje secar antes de usarlo.
• Revise el recogedor de césped frecuentemente en
busca de desgaste o deterioro. Cámbiela si fuera
necesario.
2
3
1
MANTENIMIENTO

46 – Spanish
Cajas de engranajes
• Para mantener funcionando correctamente el sistema
de transmisión, las cajas de engranajes y el área
alrededor de la unidad deben mantenerse limpias y
libres de acumulación de basura. Limpie debajo de la
cubierta de la unidad dos veces por temporada.
• Las cajas de engranajes se llenan de lubricante al
nivel adecuado en la fábrica. La única vez que el
lubricante necesita atención es cuando se realiza
servicio en la caja de engranajes.
• Con un uso normal, el recogedor de césped está
sujeto al deterioro y desgaste. Revise el recogedor de
césped frecuentemente en busca de desgaste o
deterioro. Reemplace la bolsa solo con bolsas para
césped que cumplan con las recomendaciones y
especificaciones del fabricante.
Función de lavado de agua
El cortacésped está equipado con un adaptador que
permite una limpieza rápida y fácil de la parte inferior de
la caja. Tenga en cuenta que el agua, el césped y otros
restos se drenan desde debajo de la carcasa del
cortacésped durante el proceso de lavado.
1 Mueva la máquina a una zona de césped cortado u
otra superficie dura.
2 Retire el recogedor de césped o el conector del
mantillo del cortacésped.
3 Cierre la protección trasera.
4 Conecte una manguera de jardín al racor del puerto
de lavado.
5 Suministre agua y compruebe que no haya fugas en
la conexión.
6 Si no hay fugas, arranque el motor y deje que funcione
hasta que la parte inferior del cortacésped esté limpia.
AVISO: No active el sistema de transmisión durante el
proceso de lavado.
7 Apague el motor.
8 Corte el suministro de agua y retire la manguera
desde la conexión.
IMPORTANTE: No retire la manguera desde la
conexión mientras el motor está funcionando. El agua
en el motor puede provocar una reducción de la vida
útil del mismo.
9 Arranque el motor y deje que funcione durante un
minuto para eliminar el exceso de agua del
cortacésped.
Motor
Lubricación
Utilice solamente aceite detergente de alta calidad
categorizado con la clasificación de servicio API SG-SL.
Seleccione el grado de viscosidad SAE del aceite de
acuerdo con la temperatura de operación esperada.
AVISO: Aunque los aceites de viscosidad múltiple
(5W30, 10W30, etc.) mejoran el arranque en frío, dan
como resultado un aumento en el consumo de aceite
cuando se utilizan por encima de 0 °C (32 °F).
Compruebe el nivel de aceite del motor más a menudo
para evitar posibles daños al motor por un
funcionamiento con bajo nivel de aceite.
• Compruebe el nivel de aceite del motor antes de
arrancar el motor y después de cada 5 horas de uso
continuo. Cada vez que revise el nivel de aceite,
apriete firmemente el tapón del depósito.
Nivel de aceite
Antes de arrancar por primera vez
• El depósito de aceite se vacía antes del envío.
Llene con aceite hasta la marca FULL (Lleno) de la varilla
de nivel. Para conocer más detalles, consulte el manual
del fabricante del motor.
IMPORTANTE: No lo llene demasiado.
Revise el nivel de aceite del motor
El cortacésped debe estar sobre una superficie plana
cuando compruebe el nivel de aceite. Asegúrese de
desconectar el cable de encendido de la bujía antes de abrir
el tapón de llenado de aceite.
1 Compruebe el nivel de aceite con la varilla de nivel en
el tapón de llenado de aceite.
2 Retire el tapón de aceite y limpie la varilla de nivel.
3 Vuelva a colocar la varilla de nivel. Se debe atornillar
por completo la tapa de llenado de aceite para indicar
correctamente el nivel de aceite.
4 Si el nivel de aceite es bajo, llene con aceite de motor
hasta la marca FULL (Lleno) de la varilla de nivel.
TEMPERATURE RANGE ANTICIPATED BEFORE NEXT OIL CHANGE
SAE VISCOSITY GRADES
-20 0 30 40
80
100
-30
-20 0
20 30 40
F
C
32
-10
10
60
5W-30
SAE 30
MANTENIMIENTO
GRADOS DE VISCOSIDAD SAE
RANGO DE TEMPERATURA PREVISTA ANTES DEL PRÓXIMO CAMBIO DE ACEITE

Spanish – 47
AVISO: El llenado de aceite inicial requiere una menor
cantidad de aceite debido a los residuos de aceite en
el motor de las pruebas de calidad del 100 % de los
fabricantes. Durante el cambio de aceite necesitará
una cantidad de aceite superior a la del llenado inicial.
Agregar aceite
1 El cortacésped debe estar sobre una superficie plana
cuando compruebe el nivel de aceite. Asegúrese de
desconectar el cable de encendido
de la bujía antes de
abrir el tapón de llenado de aceite.
2 Retire el tapón de aceite y limpie la varilla de nivel.
3 Vierta lentamente el aceite por el tubo de llenado de
aceite y deténgase al verter algunos mililitros para
comprobar el nivel de aceite con la varilla.
4 Deje de agregar aceite cuando llegue a la marca
FULL (Lleno) en la varilla. Espere un minuto para
dejar asentar el aceite.
5 Asegúrese siempre de volver a apretar la varilla de
aceite antes de hacer arrancar el motor.
6 Desconecte el cable de encendido de la bujía.
Cambiar aceite
AVISO: El nivel de aceite debe comprobarse siempre
antes de arrancar el motor.
Cambie el aceite después de las primeras 5 horas de
funcionamiento. Después cada 50 horas de
funcionamiento o 12 meses. Siga el programa de
mantenimiento en este manual. Limpie con más
frecuencia si las condiciones son excepcionalmente
polvorientas.
1 Desconecte el cable de encendido de la bujía.
2 Siempre vacíe el depósito de combustible antes de
colocar el cortacésped de su costado. Vacíe el
depósito de combustible haciendo funcionar la
máquina hasta vaciarlo.
3 Destornille el tapón de llenado de aceite.
4 Coloque un recipiente adecuado para recolectar el
aceite drenado.
5 Drene el aceite inclinando el motor para que el aceite
fluya a través del tubo de llenado. Cuando incline la
máquina, asegúrese de que el filtro de aire quede
siempre en la posición más alta. Pregunte dónde
puede deshacerse de los excedentes de aceite del
motor en su estación de gasolina local.
6 Si derramó combustible o aceite de motor sobre la
máquina, limpie el derrame y deje que el combustible
restante se evapore.
7 Vierta lentamente el aceite por el tubo de llenado de
aceite y deténgase al verter algunos mililitros para
comprobar el nivel de aceite con la varilla. No lo llene
demasiado.
8 Asegúrese siempre de volver a apretar la varilla de
aceite antes de hacer arrancar el motor.
9 Desconecte el cable de encendido de la bujía.
Silenciador
Si el silenciador está corroído o está dañado de alguna
otra manera, debe reemplazarse, porque puede
convertirse en un peligro de incendio o causar lesiones.
Bujía
AVISO: Utilice siempre el tipo de bujía recomendado.
Usar la bujía incorrecta puede dañar el pistón/cilindro.
• Reemplace la bujía al comienzo de cada temporada
de corte de césped o después de cada 100 horas de
funcionamiento, lo que ocurra primero. El tipo de
bujía de encendido y el ajuste de la brecha aparecen
en la sección
“
Especificación del producto
”
de este
manual.
Filtro de aire
El motor no funcionará correctamente y podría dañarse si
se usa un filtro de aire sucio. Reemplace el cartucho del
filtro de aire cada 100 horas de funcionamiento o cada
temporada, lo que ocurra primero. Dé servicio al
limpiador de aire con más frecuencia bajo condiciones de
polvo.
• Quite la tapa del filtro de aire y saque el filtro.
• Limpie el filtro golpeándolo contra una superficie
plana. Nunca utilice disolventes con petróleo, por
ejemplo, queroseno o aire comprimido para limpiar el
filtro.
• Un filtro de aire que se ha utilizado durante un largo
período no se puede limpiar completamente. Por lo
tanto, el filtro debe reemplazarse por uno nuevo en
intervalos regulares. Siempre debe reemplazar un
filtro de aire dañado.
• Durante el montaje, asegúrese de que el filtro se sella
completamente contra el portafiltro.
MANTENIMIENTO

48 – Spanish
Cuchilla
!
ADVERTENCIA: Siempre utilice guantes
resistentes para realizar el servicio y el
mantenimiento de la cuchilla. La hoja
está muy afilada, por lo que se pueden
producir cortes con mucha facilidad.
Siempre detenga el motor antes de
realizar cualquier trabajo en la hoja.
Sigue girando incluso después de soltar
el acelerador. Asegúrese de que la hoja
esté completamente detenida y
desconecte el sombrerete de bujía antes
de empezar a trabajar en ella.
• Verifique si la cuchilla tiene grietas o presenta algún
otro tipo de daño. Siempre debe reemplazar las hojas
dañadas.
• Asegúrese siempre de que la cuchilla está bien
nivelada y equilibrada correctamente. Para verificar el
balance de la cuchilla, necesitará un perno de acero,
un pasador o un cono de equilibrado de 5/8 " de
diámetro. Cuando se utiliza un cono de equilibrado,
siga las instrucciones proporcionadas con el cono.
• No use un clavo para equilibrar la cuchilla. Los
lóbulos del agujero central pueden aparecer
centrados, pero no lo están.
• Deslice la cuchilla hacia una parte desenroscada del
perno o pasador de acero y sujete el perno o el
pasador paralelo al suelo. Si la cuchilla está
equilibrada, debe permanecer en posición horizontal.
Si uno de los extremos de la cuchilla se mueve hacia
abajo, afile el extremo más pesado hasta que la
cuchilla esté equilibrada.
IMPORTANTE: Debe equilibrar las cuchillas después
de afilarlas. No recomendamos que afile la cuchilla, ya
que esto más el afilado debe realizarlo un taller de
servicio autorizado.
Las hojas dañadas deben reemplazarse de inmediato.
NUNCA use un cortacésped con una hoja dañada.
Reemplazo de las cuchillas
1 Siempre desconecte la bujía antes de realizar tareas
de mantenimiento o de servicio.
2 Siempre vacíe el depósito de combustible antes de
colocar el cortacésped de su costado. Vacíe el
depósito de combustible haciendo funcionar la
máquina hasta vaciarlo.
3 Ubique el cortacésped de costado. Cuando incline la
máquina, asegúrese de que el filtro de aire quede
siempre en la posición más alta.
4 Use un bloque de madera entre la cuchilla y la
carcasa del cortacésped para evitar el giro de la
cuchilla cuando saque el perno de esta.
5 Extraiga el perno de la cuchilla girándolo en el sentido
contrario de las agujas del reloj.
6 Quite la cuchilla antigua. Asegúrese de que el
adaptador de la cuchilla no tiene daños. También
compruebe que el perno de la cuchilla no esté
dañado y que el eje del motor no está doblado.
IMPORTANTE: Utilice solo una cuchilla de reemplazo
aprobada por el fabricante del cortacésped. Usar una
cuchilla no aprobada por el fabricante del cortacésped
es peligroso, podría dañar el cortacésped y anular la
garantía.
MANTENIMIENTO

Spanish – 49
Montaje:
1 Coloque el adaptador de la cuchilla en el cigüeñal del
motor. Asegúrese de que la llave en el adaptador y la
chaveta del cigüeñal estén alineados y de que la
nueva correa de transmisión esté dentro de la
lengüeta del retenedor de la correa.
2 La hoja debe estar montada con los extremos
acodados en dirección hacia el motor.
3 Instale el perno de la cuchilla con la arandela de
bloqueo y la arandela endurecida en el adaptador de
la cuchilla y el cigüeñal.
4 Use un bloque de madera entre la cuchilla y la
carcasa del cortacésped, y apriete el perno de la
cuchilla en el sentido de las agujas del reloj.
5 El perno debe apretarse a un par de 47 a 54 Nm / 35 a
40 lb-pie.
6 Compruebe que el cable de la bujía está
desconectado del motor.
!
ADVERTENCIA: Desconecte siempre el
cable de la bujía y colóquelo donde no
pueda entrar en contacto con la bujía
para evitar el arranque accidental.
7 Gire la hoja de manera manual y asegúrese de que
gira sin problemas.
IMPORTANTE:
Siempre tenga cuidado y use su sentido común. Evite
todas las situaciones que considere que están más
allá de su capacidad. Si todavía se siente inseguro
acerca de los procedimientos operativos después de
leer estas instrucciones, debería consultar a un
experto antes de continuar. Póngase en contacto con
un taller de servicio autorizado.
Utilice siempre piezas originales.
MANTENIMIENTO

50 – Spanish
Correa de transmisión
1 Pieza trasera
2 Cubierta de la correa
3 Soporte de la rueda guía
4 Anillo separador
5 Adaptador de la cuchilla
6 Polea del disco de transmisión
7 Transmisión
8 Hoja
9 Arandela endurecida
10 Arandela de bloqueo
11 Tornillo de la cuchilla
12 Cubierta de la unidad
Retiro de la correa de transmisión
• Vacíe el depósito de combustible haciendo funcionar
la máquina hasta vaciarlo.
• Siempre desconecte la bujía antes de realizar tareas
de mantenimiento o de acceder a las piezas móviles.
• Ubique el cortacésped de costado. Asegúrese de que
el filtro de aire y carburador estén orientados hacia
arriba.
• Quite la cubierta de la unidad.
1
6
7
8
9
10
11
2
4
3
5
12
MANTENIMIENTO

Spanish – 51
• Extraiga el perno de la cuchilla girándolo en el sentido
contrario de las agujas del reloj. Retire la cuchilla y la
tornillería de fijación: perno, arandela de bloqueo y
arandela endurecida.
• Retire el tornillo y la polea.
• Extraiga la correa y enróllela en el adaptador.
Reemplace la correa de transmisión
IMPORTANTE: Utilice siempre piezas originales.
• Enrosque la nueva correa en el adaptador y
colóquela en la polea del motor.
• Pase la correa por el anillo separador hacia el orificio
del chasis.
• Vuelva a instalar la polea de transmisión y coloque la
correa en la polea.
• Vuelva a instalar la cubierta de la transmisión.
• Vuelva a instalar la cuchilla. Consulte las
instrucciones en la sección “Reemplazo de las
cuchillas”.
• Apriete la bujía.
MANTENIMIENTO

52 – Spanish
SOLUCIÓN DE PROBLEMAS
Programa de solución de problemas
!
ADVERTENCIA: Si las operaciones de servicio o la solución de problemas no requieren que la
máquina esté encendida, el motor debe estar apagado y el cable de la bujía desconectado de la
bujía.
Problema Causa probable Solución potencial
La máquina no
arranca
Procedimiento de arranque incorrecto. Consulte las instrucciones bajo el título Arranque y detención.
Filtro de aire obstruido Limpie el filtro de aire. Cámbiela si fuera necesario.
No hay combustible en el depósito de combustible Recargar con combustible
Bujía defectuosa Reemplace la bujía.
El cable de la bujía está desconectado. Compruebe que el cable esté conectado en la bujía.
La hoja está floja o el adaptador de la hoja está roto
Apriete el perno de la cuchilla o reemplace el adaptador de la
cuchilla.
Espada de control de presencia del operador
defectuosa
Póngase en contacto con un taller de servicio autorizado.
La palanca de la válvula de combustible (si está
instalada) está en la posición de apagado
Gire la palanca del paso de combustible a la posición de
encendido.
La tensión de la batería es demasiado baja (si está
equipada)
Cargue la batería.
La batería está conectada incorrectamente (si está
equipada)
Conecte la batería al motor
Fusible fundido (si se incluye) Sustituya el fusible
Menos energía
La altura de corte es demasiado baja.
Eleve la altura de corte.
Corte de césped extremadamente largo
Filtro de aire obstruido Limpie el filtro de aire. Cámbiela si fuera necesario.
Acumulación de césped, hojas y basura bajo el
cortacésped
Limpie la parte inferior de la carcasa de la cortadora de césped.
Hay demasiado aceite en el motor Revise el nivel de aceite del motor
La velocidad de avance es demasiado rápida Reduzca la velocidad de avance.
Corte de césped
irregular
La hoja está desgastada doblada o floja Si la hoja está doblada o dañada, reemplácela.
La altura de las ruedas es desigual Ajuste todas las ruedas a la misma altura
Acumulación de césped, hojas y basura bajo el
cortacésped
Limpie la parte inferior de la carcasa de la cortadora de césped.
Vibraciones
excesivas
La hoja está desgastada doblada o floja Si la hoja está doblada o dañada, reemplácela.
El cigüeñal del motor está doblado Póngase en contacto con un taller de servicio autorizado.
Dificultad para tirar
de la cuerda de
arranque
El freno del volante del motor se activa cuando se
suelta la espada de control de presencia del operador
Presione la espada de control de presencia del operador hacia la
manilla superior antes de tirar de la cuerda de arranque.
El cigüeñal del motor está doblado Póngase en contacto con un taller de servicio autorizado.
El adaptador de la hoja está roto Póngase en contacto con su taller de servicio.
Procedimiento de arranque incorrecto. Consulte las instrucciones bajo el título Arranque y detención.
El recogedor de
césped no se llena
(si está equipado)
La altura de corte es demasiado baja Eleve la altura de corte.
Cuchilla gastada Reemplace la hoja
El recogedor no ventila el aire Limpie/revise el recogedor de césped
Es difícil empujar
la máquina hacia
delante
Corte de césped extremadamente largo
Eleve la altura de corte.
La altura de corte es demasiado baja
El recogedor de césped está demasiado lleno Vacíe el recogedor de césped
La altura de la empuñadura no se ajusta a sus
parámetros
Ajuste la altura del manillar (si está equipado)

Spanish – 53
Problema Causa probable Solución potencial
La unidad funciona
de forma lenta
La correa está desgastada
Consulte las instrucciones bajo el título Cómo cambiar la correa de
transmisión.
Correa fuera de la polea
El cable del embrague está desgastado, dañado o
poco tenso
Para obtener más información, consulte la sección
“
Arranque y
detención
”
.
SOLUCIÓN DE PROBLEMAS

2018-10-26
Original instructions
Instrucciones originales
Instructions originales
114096627
-
 1
1
-
 2
2
-
 3
3
-
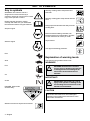 4
4
-
 5
5
-
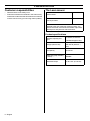 6
6
-
 7
7
-
 8
8
-
 9
9
-
 10
10
-
 11
11
-
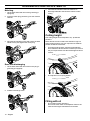 12
12
-
 13
13
-
 14
14
-
 15
15
-
 16
16
-
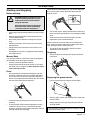 17
17
-
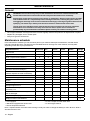 18
18
-
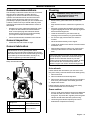 19
19
-
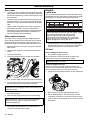 20
20
-
 21
21
-
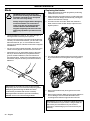 22
22
-
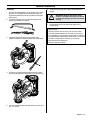 23
23
-
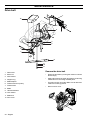 24
24
-
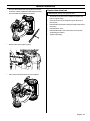 25
25
-
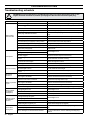 26
26
-
 27
27
-
 28
28
-
 29
29
-
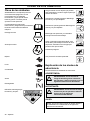 30
30
-
 31
31
-
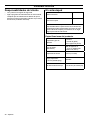 32
32
-
 33
33
-
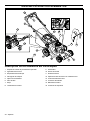 34
34
-
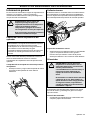 35
35
-
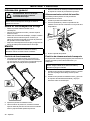 36
36
-
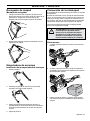 37
37
-
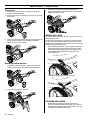 38
38
-
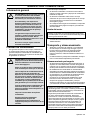 39
39
-
 40
40
-
 41
41
-
 42
42
-
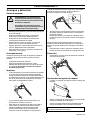 43
43
-
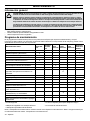 44
44
-
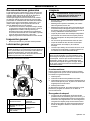 45
45
-
 46
46
-
 47
47
-
 48
48
-
 49
49
-
 50
50
-
 51
51
-
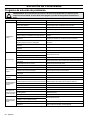 52
52
-
 53
53
-
 54
54


Jonsered 967957301-00 El manual del propietario
- Categoría
- Cortadoras de césped
- Tipo
- El manual del propietario
- Este manual también es adecuado para
en otros idiomas
- English: Jonsered 967957301-00 Owner's manual
Otros documentos
-
Husqvarna 917.38451 Manual de usuario
-
-
-
-
Craftsman 917.370721 Manual de usuario
-
-
-
-
-