Kichler Lighting 11310BKTLED Manual de usuario
- Tipo
- Manual de usuario

This device complies with part 15 of the FCC Rules. Operation is
subject to the following two conditions: (1) This device may not cause
harmful interference, and (2) this device must accept any interference
received, including interference that may cause undesired operation.
INSTALLATION INSTRUCTIONS
Model 11310
CAUTION – RISK OF SHOCK –
Disconnect Power at the main circuit breaker panel or main fusebox
before starting and during the installation.
WARNING:
• This xture is intended for installation in accordance with the
National Electric Code (NEC) and all local code specications.
If you are not familiar with code requirements, installation by a
certied electrician is recommended.
• This lighting xture is suitable for indoor or outdoor use, dry,
damp or wet locations.
• Use ONLY the supplied LED driver to power xture.
• The LED light output is strong enough to injure human eyes.
Precautions must be taken to prevent looking directly at the
LED’s with unaided eyes for more than a few seconds.
DIMMING: For recommended dimmers, visit kichler.com/dimming.
CLEANING: Always be certain that electric current is turned o before
cleaning.
• Plastic Lens: Only a soft damp cloth should be used. Other
cleaning products may damage the lens.
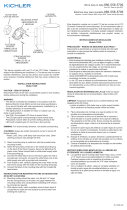
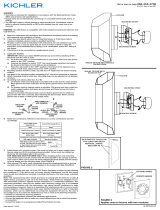
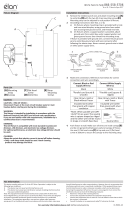
1) Attach mounting strap to outlet box with the provided strap
mounting screws.
2) Attach the grounding conductor to the raised grounding lug
on the back of the xture housing. Secure by tightening the
green screw. Never connect black or white power supply wires
to the grounding lug.
3) Connect the black xture wires to the black supply wire with a
provided wire connector. Connect the white xture wires to the
white supply wire with a provided wire connector.
4) Push xture to wall, carefully aligning the screw holes on the
side of the canopy with the holes on the mounting strap tabs.
5) Connect the xture to the mounting strap with the included at
head screws.
INSTRUCTIONS FOR MOUNTING FIXTURE OUTDOORS AND/OR
IN WET LOCATIONS.
6) Mounting surface should be clean, dry, at and 1/4” larger
that the canopy/xture on all sides. Any gaps between the
mounting surface and canopy/xture exceeding 3/16” should
be corrected as required.
7) With silicone caulk, caulk completely around where back of
canopy/xture meets the wall surface to prevent water from
entering the outlet box.
8) The uplight lens must be in place for all wet or outdoor locations.
Este dispositivo cumple con la parte 115 de las normas de la FCC
(Comisión Federal de Comunicaciones). Su funcionamiento está su-
jeto a las dos condiciones siguientes: Este dispositivo no debe cau-
sar interferencia perjudicial, y (2) debe aceptar cualquier interferen-
cia recibida, incluyendo interferencias que puedan causar un
funcionamiento indeseable.
INSTRUCCIONES DE INSTALACIÓN
Modelo 11310
PRECAUCIÓN – RIESGO DE DESCARGA ELÉCTRICA –
Desconecte la electricidad en el panel principal del interruptor
automático o caja principal de fusibles antes de comenzar y
durante la instalación.
ADVERTENCIA:
• Esta lámpara está diseñada para instalarse conforme al Código
Nacional de Electricidad (NEC, por sus siglas en inglés) y a todas
las especicaciones de códigos locales. Si no está familiarizado
con los requerimientos del código, se recomienda que la
instalación la realice un electricista certicado.
• Esta lámpara es adecuada para usarse en interiores o exteriores,
en lugares secos, mojados o húmedos.
• Utilice ÚNICAMENTE el alimentador para LED incluido para
suministrar corriente a la unidad.
• La luz LED que se obtiene es sucientemente fuerte como
para dañar los ojos. Deben tomarse precauciones para prevenir
ver directamente a la luz LED sin protección por más de unos
cuantos segundos.
REGULACIÓN DE INTENSIDAD DE LA LUZ: Para los regula-
dores de intensidad de luz recomendados, visite kichler.com/
dimming.
LIMPIEZA: Asegúrese siempre que la corriente eléctrica esté
apagada antes de limpiar.
• Lentes de plástico: Sólo debe usar un paño suave húmedo.
Otros productos de limpieza pueden dañar las lentes.
1) Fije la abrazadera de montaje a la caja de salida con los
tornillos de la abrazadera suministrados.
2) Fije el conductor a tierra con la terminal de la conexión a
tierra elevada en la parte posterior de la caja del artefacto.
Fije apretando el tornillo verde. Nunca conecte los alambres
de alimentación negro o blanco a la terminal de la conexión
a tierra.
3) Conecte los cables negros del artefacto al cable de aliment
ación negro con un conector suministrado. Conecte los cables
blancos del artefacto al cable de suministro blanco con un
conector suministrado.
4) Empuje el artefacto a la pared, alineando cuidadosamente los
oricios de los tornillos en el lado del escudete con los oricios
en las lengüetas de la abrazadera de montaje.
5) Conecte el artefacto a la abrazadera de montaje con los tornillos
de cabeza plana incluidos.
INSTRUCCIONES PARA MONTAJE DE LA LÁMPARA EN
EXTERIORES Y/O LUGARES HÚMEDOS.
6) La supercie para el montaje debe estar limpia, seca, a nivel
y 1/4” mayor que el escudete/artefacto en todos sus lados.
Cualquier espacio entre la supercie de montaje y el
escudete/artefacto que exceda de 3/16” debe corregirse
como se necesite.
7) Con un sellador de silicón, selle por completo alrededor en
donde la parte negra del escudete/artefacto se une a la
supercie de la pared para prevenir la entrada de agua a la
caja de salida.
8) Las lentes de iluminación dirigidas hacia arriba deben
colocarse para lugares húmedos o al exterior.
IS-11310-US
OUTLET BOX
CAJA DE
SALIDA
MOUNTING STRAP
ABRAZADERA DE
MONTAJE
FLAT HEAD SCREWS
TORNILLOS DE
CABEZA PLANA
CANOPY
ESCUDETE
FIXTURE
ARTEFACTO
STRAP MOUNTING SCREWS
TORNILLOS DE LA
ABRAZADERA
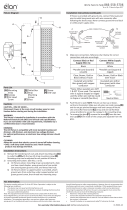
We’re here to help 866-558-5706
Hrs: M-F 9am to 5pm EST
Estamos aquí para ayudarle 866-558-5706
Horario: Lunes-Viernes 9am a 5pm EST (hora ocial del este)
La página se está cargando...
Transcripción de documentos
We’re here to help OUTLET BOX CAJA DE SALIDA Estamos aquí para ayudarle FIXTURE ARTEFACTO MOUNTING STRAP ABRAZADERA DE MONTAJE 866-558-5706 Hrs: M-F 9am to 5pm EST 866-558-5706 Horario: Lunes-Viernes 9am a 5pm EST (hora oficial del este) Este dispositivo cumple con la parte 115 de las normas de la FCC (Comisión Federal de Comunicaciones). Su funcionamiento está sujeto a las dos condiciones siguientes: Este dispositivo no debe causar interferencia perjudicial, y (2) debe aceptar cualquier interferencia recibida, incluyendo interferencias que puedan causar un funcionamiento indeseable. INSTRUCCIONES DE INSTALACIÓN Modelo 11310 FLAT HEAD SCREWS TORNILLOS DE CABEZA PLANA CANOPY ESCUDETE STRAP MOUNTING SCREWS TORNILLOS DE LA ABRAZADERA This device complies with part 15 of the FCC Rules. Operation is subject to the following two conditions: (1) This device may not cause harmful interference, and (2) this device must accept any interference received, including interference that may cause undesired operation. INSTALLATION INSTRUCTIONS Model 11310 CAUTION – RISK OF SHOCK – Disconnect Power at the main circuit breaker panel or main fusebox before starting and during the installation. WARNING: • This fixture is intended for installation in accordance with the National Electric Code (NEC) and all local code specifications. If you are not familiar with code requirements, installation by a certified electrician is recommended. • This lighting fixture is suitable for indoor or outdoor use, dry, damp or wet locations. • Use ONLY the supplied LED driver to power fixture. • The LED light output is strong enough to injure human eyes. Precautions must be taken to prevent looking directly at the LED’s with unaided eyes for more than a few seconds. DIMMING: For recommended dimmers, visit kichler.com/dimming. CLEANING: Always be certain that electric current is turned off before cleaning. • Plastic Lens: Only a soft damp cloth should be used. Other cleaning products may damage the lens. 1) 2) 3) 4) 5) Attach mounting strap to outlet box with the provided strap mounting screws. Attach the grounding conductor to the raised grounding lug on the back of the fixture housing. Secure by tightening the green screw. Never connect black or white power supply wires to the grounding lug. Connect the black fixture wires to the black supply wire with a provided wire connector. Connect the white fixture wires to the white supply wire with a provided wire connector. Push fixture to wall, carefully aligning the screw holes on the side of the canopy with the holes on the mounting strap tabs. Connect the fixture to the mounting strap with the included flat head screws. INSTRUCTIONS FOR MOUNTING FIXTURE OUTDOORS AND/OR IN WET LOCATIONS. 6) Mounting surface should be clean, dry, flat and 1/4” larger that the canopy/fixture on all sides. Any gaps between the mounting surface and canopy/fixture exceeding 3/16” should be corrected as required. 7) With silicone caulk, caulk completely around where back of canopy/fixture meets the wall surface to prevent water from entering the outlet box. 8) The uplight lens must be in place for all wet or outdoor locations. PRECAUCIÓN – RIESGO DE DESCARGA ELÉCTRICA – Desconecte la electricidad en el panel principal del interruptor automático o caja principal de fusibles antes de comenzar y durante la instalación. ADVERTENCIA: • Esta lámpara está diseñada para instalarse conforme al Código Nacional de Electricidad (NEC, por sus siglas en inglés) y a todas las especificaciones de códigos locales. Si no está familiarizado con los requerimientos del código, se recomienda que la instalación la realice un electricista certificado. • Esta lámpara es adecuada para usarse en interiores o exteriores, en lugares secos, mojados o húmedos. • Utilice ÚNICAMENTE el alimentador para LED incluido para suministrar corriente a la unidad. • La luz LED que se obtiene es suficientemente fuerte como para dañar los ojos. Deben tomarse precauciones para prevenir ver directamente a la luz LED sin protección por más de unos cuantos segundos. REGULACIÓN DE INTENSIDAD DE LA LUZ: Para los reguladores de intensidad de luz recomendados, visite kichler.com/ dimming. LIMPIEZA: Asegúrese siempre que la corriente eléctrica esté apagada antes de limpiar. • Lentes de plástico: Sólo debe usar un paño suave húmedo. Otros productos de limpieza pueden dañar las lentes. 1) 2) 3) 4) 5) Fije la abrazadera de montaje a la caja de salida con los tornillos de la abrazadera suministrados. Fije el conductor a tierra con la terminal de la conexión a tierra elevada en la parte posterior de la caja del artefacto. Fije apretando el tornillo verde. Nunca conecte los alambres de alimentación negro o blanco a la terminal de la conexión a tierra. Conecte los cables negros del artefacto al cable de aliment ación negro con un conector suministrado. Conecte los cables blancos del artefacto al cable de suministro blanco con un conector suministrado. Empuje el artefacto a la pared, alineando cuidadosamente los orificios de los tornillos en el lado del escudete con los orificios en las lengüetas de la abrazadera de montaje. Conecte el artefacto a la abrazadera de montaje con los tornillos de cabeza plana incluidos. INSTRUCCIONES PARA MONTAJE DE LA LÁMPARA EN EXTERIORES Y/O LUGARES HÚMEDOS. 6) La superficie para el montaje debe estar limpia, seca, a nivel y 1/4” mayor que el escudete/artefacto en todos sus lados. Cualquier espacio entre la superficie de montaje y el escudete/artefacto que exceda de 3/16” debe corregirse como se necesite. 7) Con un sellador de silicón, selle por completo alrededor en donde la parte negra del escudete/artefacto se une a la superficie de la pared para prevenir la entrada de agua a la caja de salida. 8) Las lentes de iluminación dirigidas hacia arriba deben colocarse para lugares húmedos o al exterior. IS-11310-US-
 1
1
-
 2
2


Kichler Lighting 11310BKTLED Manual de usuario
- Tipo
- Manual de usuario
en otros idiomas
Artículos relacionados
-
 Kichler Lighting 11309BKTLED Manual de usuario
-
 Kichler Lighting 11251AZT30 Manual de usuario
-
 Kichler Lighting 11250AZT30 Manual de usuario
-
 Kichler Lighting 85090CG Manual de usuario
-
 Kichler Lighting 49278AZTLED Manual de usuario
-
 Kichler Lighting 85081CH Manual de usuario
-
 Kichler Lighting 85056CH Manual de usuario
-
 Kichler Lighting 85068PN Manual de usuario
-
 Kichler Lighting 85063CH Manual de usuario
-
 Kichler Lighting 85078CH Manual de usuario


