
• Store Idle Appliances Indoors – When not in use,
appliances should be stored indoors in dry, and high or
locked-up place – out of reach of children.
• Maintain Appliance With Care – Keep cutting edge sharp
and clean for best performance and to reduce the risk of
injury. Follow instructions for lubricating and changing
accessories. Keep handles dry, clean, and free from oil
and grease.
• Check Damaged Parts – Before further use of the
appliance, a guard or other part that is damaged should be
carefully checked to determine that it will operate
properly and perform its intended function. Check for
alignment of moving parts, binding of moving parts,
breakage of parts, mounting, and any other condition that
may affect its operation. A guard or other part that is
damaged should be properly repaired or replaced by an
authorized service center unless indicated elsewhere in
this manual.
• Keep all parts of the body away from the saw chain. Do
not remove cut material or hold material to be cut when
blades are moving. Make sure the switch is off when
clearing jammed material. Saw chain continues to move
after the switch is turned off. A moment of inattention
while operating the pole saw may result in serious
personal injury.
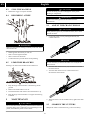
• Carry the pole saw by the handle with the saw chain
stopped. When transporting or storing the pole saw,
always fit the saw chain device cover. Proper handling of
the pole saw will reduce possible personal injury from the
saw chain.
• Hold the pole saw by insulated gripping surfaces only,
because the saw chain may contact hidden wiring or its
own cord. A saw chain contacting a "live" wire may make
exposed metal parts of the pole saw "live" and could give
the operator an electric shock.
• Keep cable away from cutting area. During operation the
cable may be hidden in shrubs and can be accidentally cut
by the saw chain.
• Do not use the pole saw in bad weather conditions,
especially when there is a risk of lightning. This
decreases the risk of being struck by lightning.
• To reduce the risk of electrocution, never use near any
electrical power lines. Contact with or use near power
lines may cause serious injury or electric shock resulting
in death.
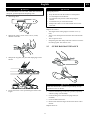
• Always use two hands when operating the pole saw. Hold
the pole saw with both hands to avoid loss of control.
• Always use head protection when operating the pole saw
overhead. Falling debris can result in serious personal
injury.
• Prevent unintentional starting. Ensure the power switch is
in the off-position before connecting to battery pack,
picking up or carrying the appliance. Carrying the
appliance with your finger on the power switch or
energizing appliance that have the power switch on
invites accidents.
• Make sure the power switch is off and the battery pack is
removed before clearing jammed material, making
adjustments, changing accessories, storing or servicing
the appliance. Unexpected actuation of the appliance
while clearing jammed material or servicing may result in
serious personal injury.
• Recharge only with the charger specified by the
manufacturer. A charger that is suitable for one type of
battery pack may create a risk of fire when used with
another battery pack.
• Use appliances only with specifically designated battery
packs. Use of any other battery packs may create a risk of
injury and fire.
• When battery pack is not in use, keep it away from other
metal objects, like paper clips, coins, keys, nails, screws
or other small metal objects, that can make a connection
from one terminal to another. Shorting the battery
terminals together may cause burns or a fire.
• Under abusive conditions, liquid may be ejected from the
battery; avoid contact. If contact accidentally occurs,
flush with water. If liquid contacts eyes, additionally seek
medical help. Liquid ejected from the battery may cause
irritation or burns.
• Do not use a battery pack or appliance that is damaged or
modified. Damaged or modified batteries may exhibit
unpredictable behavior resulting in fire, explosion or risk
of injury.
• Do not expose a battery pack or appliance to fire or
excessive temperature. Exposure to fire or temperature
above 130°C may cause explosion. The temperature of
130°C can be replaced by the temperature of 265°F.
• Follow all charging instructions and do not charge the
battery pack or appliance outside of the temperature range
specified in the instructions. Charging improperly or at
temperatures outside of the specified range may damage
the battery and increase the risk of fire.
• Have servicing performed by a qualified repair person
using only identical replacement parts. This will ensure
that the safety of the product is maintained.
• Do not modify or attempt to repair the appliance or the
battery pack (as applicable) except as indicated in the
instructions for use and care.
2.2 CHILD SAFETY
Tragic accidents can occur if the operator is not aware of the
presence of children.
• Keep children out of the working area and under the
watchful care of a responsible adult.
• Do not allow children under the age of 14 to operate this
machine. Children who are 14 years of age and older
must read and understand the operating instructions and
safety rules in this manual and must be trained and
supervised by a parent.
• Stay alert, and turn the machine off if a child or any other
person enters the working area.
• Use extreme care when approaching blind corners,
doorways, shrubs, trees, or other objects that may obscure
your view of a child who may run into the path of the
machine.
5
English EN


 1
1
 2
2
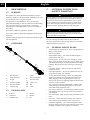 3
3
 4
4
 5
5
 6
6
 7
7
 8
8
 9
9
 10
10
 11
11
 12
12
 13
13
 14
14
 15
15


Greenworks PS80L01 Brushless Cordless Manual de usuario
Greenworks CSB403 Guía del usuario
Makita GAU02 Manual de usuario
Worx WG320 Guía del usuario
 Ego Power+ PSA1000 Manual de usuario
