Electrolux ERS3DF18S Manual de usuario
- Categoría
- Neveras
- Tipo
- Manual de usuario


CONTENTS
1. SAFETY INFORMATION....................................................................................2
2. SAFETY INSTRUCTIONS..................................................................................4
3. INSTALLATION.................................................................................................. 6
4. CONTROL PANEL............................................................................................. 9
5. DAILY USE......................................................................................................... 9
6. HINTS AND TIPS............................................................................................. 12
7. CARE AND CLEANING....................................................................................13
8. TROUBLESHOOTING......................................................................................13
9. NOISES............................................................................................................ 17
10. TECHNICAL DATA.........................................................................................17
11. INFORMATION FOR TEST INSTITUTES......................................................17
WE’RE THINKING OF YOU
Thank you for purchasing an Electrolux appliance. You’ve chosen a product that
brings with it decades of professional experience and innovation. Ingenious and
stylish, it has been designed with you in mind. So whenever you use it, you can
be safe in the knowledge that you’ll get great results every time.
Welcome to Electrolux.
Visit our website to:
Get usage advice, brochures, trouble shooter, service and repair information:
www.electrolux.com/support
Register your product for better service:
www.registerelectrolux.com
Buy Accessories, Consumables and Original spare parts for your appliance:
www.electrolux.com/shop
CUSTOMER CARE AND SERVICE
Always use original spare parts.
When contacting our Authorised Service Centre, ensure that you have the
following data available: Model, PNC, Serial Number.
The information can be found on the rating plate.
Warning / Caution-Safety information
General information and tips
Environmental information
Subject to change without notice.
1. SAFETY INFORMATION
Before the installation and use of the appliance, carefully
read the supplied instructions. The manufacturer is not
responsible for any injuries or damage that are the result
www.electrolux.com2

of incorrect installation or usage. Always keep the
instructions in a safe and accessible location for future
reference.
1.1 Children and vulnerable people safety
• This appliance can be used by children aged from 8
years and above and persons with reduced physical,
sensory or mental capabilities or lack of experience
and knowledge if they have been given supervision or
instruction concerning the use of the appliance in a
safe way and understand the hazards involved.
• Children aged from 3 to 8 years are allowed to load
and unload the appliance provided that they have
been properly instructed.
• This appliance may be used by persons with very
extensive and complex disabilities provided that they
have been properly instructed.
• Children of less than 3 years of age should be kept
away from the appliance unless continuously
supervised.
• Do not let children play with the appliance.
• Children shall not carry out cleaning and user
maintenance of the appliance without supervision.
• Keep all packaging away from children and dispose of
it appropriately.
1.2 General Safety
• This appliance is intended to be used in household
and similar applications such as:
– Farm houses; staff kitchen areas in shops, offices
and other working environments;
– By clients in hotels, motels, bed and breakfast and
other residential type environments.
• To avoid contamination of food respect the following
instructions:
– do not open the door for long periods;
– clean regularly surfaces that can come in contact
with food and accessible drainage systems;
ENGLISH 3

– store raw meat and fish in suitable containers in the
refrigerator, so that it is not in contact with or drip
onto other food.
• WARNING: Keep ventilation openings, in the
appliance enclosure or in the built-in structure, clear of
obstruction.
• WARNING: Do not use mechanical devices or other
means to accelerate the defrosting process, other than
those recommended by the manufacturer.
• WARNING: Do not damage the refrigerant circuit.
• WARNING: Do not use electrical appliances inside the
food storage compartments of the appliance, unless
they are of the type recommended by the
manufacturer.
• Do not use water spray and steam to clean the
appliance.
• Clean the appliance with a moist soft cloth. Only use
neutral detergents. Do not use abrasive products,
abrasive cleaning pads, solvents or metal objects.
• When the appliance is empty for long period, switch it
off, defrost, clean, dry and leave the door open to
prevent mould from developing within the appliance.
• Do not store explosive substances such as aerosol
cans with a flammable propellant in this appliance.
• If the supply cord is damaged, it must be replaced by
the manufacturer, its Authorised Service Centre or
similarly qualified persons in order to avoid a hazard.
2. SAFETY INSTRUCTIONS
2.1 Installation
WARNING!
Only a qualified person must
install this appliance.
• Remove all the packaging.
• Do not install or use a damaged
appliance.
• Do not use the appliance before
installing it in the built-in structure due
to safety manner.
• Follow the installation instructions
supplied with the appliance.
• Always take care when moving the
appliance as it is heavy. Always use
safety gloves and enclosed footwear.
• Make sure the air can circulate
around the appliance.
• At first installation or after reversing
the door wait at least 4 hours before
connecting the appliance to the power
supply. This is to allow the oil to flow
back in the compressor.
www.electrolux.com4

• Before carrying out any operations on
the appliance (e.g. reversing the
door), remove the plug from the
power socket.
• Do not install the appliance close to
radiators or cookers, ovens or hobs.
• Do not expose the appliance to the
rain.
• Do not install the appliance where
there is direct sunlight.
• Do not install this appliance in areas
that are too humid or too cold.
• When you move the appliance, lift it
by the front edge to avoid scratching
the floor.
• The appliance contains a bag of
desiccant. This is not a toy. This is not
food. Please dispose of it
immediately.
2.2 Electrical connection
WARNING!
Risk of fire and electric
shock.
WARNING!
When positioning the
appliance, ensure the supply
cord is not trapped or
damaged.
WARNING!
Do not use multi-plug
adapters and extension
cables.
• The appliance must be earthed.
• Make sure that the parameters on the
rating plate are compatible with the
electrical ratings of the mains power
supply.
• Always use a correctly installed
shockproof socket.
• Make sure not to cause damage to
the electrical components (e.g. mains
plug, mains cable, compressor).
Contact the Authorised Service
Centre or an electrician to change the
electrical components.
• The mains cable must stay below the
level of the mains plug.
• Connect the mains plug to the mains
socket only at the end of the
installation. Make sure that there is
access to the mains plug after the
installation.
• Do not pull the mains cable to
disconnect the appliance. Always pull
the mains plug.
2.3 Use
WARNING!
Risk of injury, burns, electric
shock or fire.
The appliance contains flammable
gas, isobutane (R600a), a natural gas
with a high level of environmental
compatibility. Be careful not to cause
damage to the refrigerant circuit
containing isobutane.
• Do not change the specification of this
appliance.
• Do not put electrical appliances (e.g.
ice cream makers) in the appliance
unless they are stated applicable by
the manufacturer.
• If damage occurs to the refrigerant
circuit, make sure that there are no
flames and sources of ignition in the
room. Ventilate the room.
• Do not let hot items to touch the
plastic parts of the appliance.
• Do not store flammable gas and liquid
in the appliance.
• Do not put flammable products or
items that are wet with flammable
products in, near or on the appliance.
• Do not touch the compressor or the
condenser. They are hot.
2.4 Internal lighting
WARNING!
Risk of electric shock.
• Concerning the lamp(s) inside this
product and spare part lamps sold
separately: These lamps are intended
to withstand extreme physical
conditions in household appliances,
such as temperature, vibration,
humidity, or are intended to signal
information about the operational
status of the appliance. They are not
intended to be used in other
applications and are not suitable for
household room illumination.
ENGLISH 5

2.5 Care and cleaning
WARNING!
Risk of injury or damage to
the appliance.
• Before maintenance, deactivate the
appliance and disconnect the mains
plug from the mains socket.
• This appliance contains hydrocarbons
in the cooling unit. Only a qualified
person must do the maintenance and
the recharging of the unit.
• Regularly examine the drain of the
appliance and if necessary, clean it. If
the drain is blocked, defrosted water
collects in the bottom of the
appliance.
2.6 Service
• To repair the appliance contact the
Authorised Service Centre. Use
original spare parts only.
• Please note that self-repair or non-
professional repair can have safety
consequences and might void the
guarantee.
• The following spare parts will be
available for 7 years after the model
has been discontinued: thermostats,
temperature sensors, printed circuit
boards, light sources, door handles,
door hinges, trays and baskets.
Please note that some of these spare
parts are only available to
professional repairers, and that not all
spare parts are relevant for all
models.
• Door gaskets will be available for 10
years after the model has been
discontinued.
2.7 Disposal
WARNING!
Risk of injury or suffocation.
• Disconnect the appliance from the
mains supply.
• Cut off the mains cable and discard it.
• Remove the door to prevent children
and pets to be closed inside of the
appliance.
• The refrigerant circuit and the
insulation materials of this appliance
are ozone-friendly.
• The insulation foam contains
flammable gas. Contact your
municipal authority for information on
how to discard the appliance
correctly.
• Do not cause damage to the part of
the cooling unit that is near the heat
exchanger.
3. INSTALLATION
WARNING!
Refer to Safety chapters.
WARNING!
Refer to installation
instruction document to
install your appliance.
WARNING!
Fix the appliance in
accordance with installation
instruction document to
avoid a risk of instability of
the appliance.
www.electrolux.com6

3.1 Dimensions
B
A
H1
W1
D1
W2
D2
W3
D3
90°
Overall dimensions ¹
H1 mm 1772
W1 mm 548
D1 mm 549
¹ the height, width and depth of the
appliance without the handle and feet
Space required in use ²
H2 (A+B) mm 1816
W2 mm 548
D2 mm 551
A mm 1780
B mm 36
² the height, width and depth of the
appliance including the handle, plus the
space necessary for free circulation of
the cooling air
Overall space required in use ³
H3 (A+B) mm 1816
W3 mm 548
D3 mm 1071
³ the height, width and depth of the
appliance including the handle, plus the
space necessary for free circulation of
the cooling air, plus the space necessary
to allow door opening to the minimum
angle permitting removal of all internal
equipment
ENGLISH 7

3.2 Location
To ensure appliance's best functionality,
you should not install the appliance in the
nearby of the heat source (oven, stoves,
radiators, cookers or hobs) or in a place
with direct sunlight. Make sure that air
can circulate freely around the back of
the cabinet.
This appliance should be installed in a
dry, well ventilated indoor position.
This appliance is intended to be used at
ambient temperature ranging from 10°C
to 38°C.
The correct operation of the
appliance can only be
guaranteed within the
specified temperature range.
If you have any doubts
regarding where to install the
appliance, please turn to the
vendor, to our customer
service or to the nearest
Authorised Service Centre.
It must be possible to
disconnect the appliance
from the mains power
supply. The plug must
therefore be easily
accessible after installation.
3.3 Electrical connection
• Before plugging in, ensure that the
voltage and frequency shown on the
rating plate correspond to your
domestic power supply.
• The appliance must be earthed. The
power supply cable plug is provided
with a contact for this purpose. If the
domestic power supply socket is not
earthed, connect the appliance to a
separate earth in compliance with
current regulations, consulting a
qualified electrician.
• The manufacturer declines all
responsibility if the above safety
precautions are not observed.
• This appliance complies with the
E.E.C. Directives.
3.4 Ventilation requirements
The airflow behind the appliance must be
sufficient.
5 cm
min.
200 cm
2
min.
200 cm
2
CAUTION!
Refer to the installation
instructions for the
installation.
3.5 Door reversibility
Please refer to the separate document
with instructions on installation and door
reversal.
CAUTION!
At every stage of reversing
the door protect the floor
from scratching with a
durable material.
www.electrolux.com8

4. CONTROL PANEL
1 2
4 3
1 2
4 3
1. Temperature indicator LED
2. FastCool indicator
3. FastCool button
4. Temperature regulator
ON/OFF button
4.1 Switching on
1. Insert the plug into the wall socket.
2. Touch the temperature regulator
button if all LED indicators are off.
4.2 Switching off
Keep touching the temperature regulator
button for 3 seconds.
All indicators light off.
4.3 Temperature regulation
To operate the appliance, touch the
temperature regulator until the LED
corresponding to the required
temperature lights up. Selection is
progressive, varying from 2°C to 8°C.
Recommended setting is 4°C.
1. Touch temperature regulator.
Current temperature indicator blinks. Any
time you touch the temperature
regulator, the setting moves by one
position. The corresponding LED blinks
for a while.
2. Touch the temperature regulator until
the required temperature is selected.
The set temperature will be
reached within 24 hours.
After a power failure the set
temperature remains stored.
4.4 FastCool function
If you need to insert in the fridge
compartment a large amount of food at
ambient temperature, for example after
doing the grocery shopping, we suggest
activating theFastCool function to chill
the products more rapidly and to avoid
warming the other food which is already
in the refrigerator.
To activate FastCool function press the
FastCool button. The FastCool indicator
switches on.
This function stops
automatically after 6 hours.
It is possible to deactivate the function at
any time by pressing FastCool button
again. The FastCool indicator switches
off.
5. DAILY USE
CAUTION!
This refrigerating appliance
is not suitable for freezing
foodstuffs.
5.1 Positioning the door
shelves
To permit storage of food packages of
various sizes, the door shelves can be
placed at different heights.
1. Gradually pull the shelf up until it
comes free.
2. Reposition as required.
ENGLISH 9

1
2
5.2 Movable shelves
The walls of the refrigerator are equipped
with a series of runners so that the
shelves can be positioned as desired.
Do not move the glass shelf
above the vegetable drawer
to ensure correct air
circulation.
5.3 Vegetable drawer
The drawer is suitable for storing fruit
and vegetables.
To remove the drawer (e.g. for cleaning):
1. Pull out the drawer and lift it up.
2. Push the rails inside the cabinet to
avoid damage to the appliance when
closing the door.
To reassemble:
1. Pull out the rails.
www.electrolux.com10

2. Place the rear part of the drawer (1)
on the rails.
2
1
3. Keep the front of the drawer (2) lifted
up while pushing the drawer in.
4. Press the front part of the drawer
downwards.
Pull out the drawer again
and check if it is placed
correctly on both rear and
front hooks.
5.4 Humidity control
The glass shelf incorporates a device
with slits (adjustable by means of a
sliding lever), which makes it possible to
regulate the humidity in the vegetable
drawer(s).
The position of the humidity control
depends on the type and on the amount
of fruits and vegetables:
• Slots closed: recommended when
there is a small amount of fruits and
vegetables. In this way, the natural
moisture content in fruits and
vegetables is preserved longer.
• Slots opened: recommended when
there is a big amount of fruits and
vegetables. In this way, more air
circulation results in a lower air
moisture.
5.5 Temperature indicator
For proper storage of food the
refrigerator is equipped with the
temperature indicator. The symbol on the
side wall of the appliance indicates the
coldest area in the refrigerator.
If OK is displayed (A), put fresh food into
area indicated by symbol, if not (B), wait
at least 12 hours and check if it is OK
(A).
If it is still not OK (B), adjust the setting
control to a colder setting.
OK
OK
A
B
5.6 DYNAMICAIR
The refrigerator compartment is
equipped with a device that allows rapid
cooling of foods and keeps more uniform
temperature in the compartment.
Switch on the device when
you have to cool down a big
amount of food or when the
room temperature is higher
than 35°C to guarantee a
greater homogenization of
internal temperature.
Press the button (A) to switch ON the
fan. The green light (B) appears.
A
B
ENGLISH 11

Before switching off the
appliance, remember to turn
off the fan by pressing the
button (A). The green light
(B) disappears.
6. HINTS AND TIPS
6.1 Hints for energy saving
• Most efficient use of energy is
ensured in the configuration with the
drawers in the bottom part of the
appliance and shelves evenly
distributed. Position of the door bins
does not affect energy consumption.
• Do not open the door frequently or
leave it open longer than necessary.
• Do not set too high temperature to
save energy unless it is required by
the characteristics of the food.
• If the ambient temperature is high and
the temperature control is set to low
temperature and the appliance is fully
loaded, the compressor may run
continuously, causing frost or ice
formation on the evaporator. In this
case, set the temperature control
toward higher temperature to allow
automatic defrosting and to save
energy this way.
• Ensure a good ventilation. Do not
cover the ventilation grilles or holes.
6.2 Hints for fresh food
refrigeration
• Good temperature setting that
ensures preservation of fresh food is
a temperature less than or equal to
+4°C.
Higher temperature setting inside the
appliance may lead to shorter shelf
life of food.
• Cover the food with packaging to
preserve its freshness and aroma.
• Always use closed containers for
liquids and for food, to avoid flavours
or odours in the compartment.
• To avoid the cross-contamination
between cooked and raw food, cover
the cooked food and separate it from
the raw one.
• It is recommended to defrost the food
inside the fridge.
• Do not insert hot food inside the
appliance. Make sure it has cooled
down at room temperature before
inserting it.
• To prevent food waste the new stock
of food should always be placed
behind the old one.
6.3 Hints for food refrigeration
• Meat (all types): wrap in a suitable
packaging and place it on the glass
shelf above the vegetable drawer.
Store meat for at most 1-2 days.
• Fruit and vegetables: clean thoroughly
(eliminate the soil) and place in a
special drawer (vegetable drawer).
• It is advisable not to keep the exotic
fruits like bananas, mangos, papayas
etc. in the refrigerator.
• Vegetables like tomatoes, potatoes,
onions, and garlic should not be kept
in the refrigerator.
• Butter and cheese: place in an airtight
container or wrap in an aluminium foil
or a polythene bag to exclude as
much air as possible.
• Bottles: close them with a cap and
place them on the door bottle shelf, or
(if available) on the bottle rack.
• In order to accelerate cooling down of
the goods, it is advisable to turn on
the fan. The activation of dynamic air
allows greater homogenization of
internal temperatures.
• Always refer to the expiry date of the
products to know how long to keep
them.
www.electrolux.com12

7. CARE AND CLEANING
WARNING!
Refer to Safety chapters.
7.1 Cleaning the interior
Before using the appliance for the first
time, the interior and all internal
accessories should be washed with
lukewarm water and some neutral soap
to remove the typical smell of a brand-
new product, then dried thoroughly.
CAUTION!
Do not use detergents,
abrasive powders, chlorine
or oil-based cleaners as they
will damage the finish.
CAUTION!
The accessories and parts of
the appliance are not
suitable for washing in a
dishwasher.
7.2 Periodic cleaning
The equipment has to be cleaned
regularly:
1. Clean the inside and accessories
with lukewarm water and some
neutral soap.
2. Regularly check the door seals and
wipe them clean to ensure they are
clean and free from debris.
3. Rinse and dry thoroughly.
7.3 Defrosting of the
refrigerator
Frost is automatically eliminated from the
evaporator of the refrigerator
compartment during normal use. The
defrost water drains out through a trough
into a special container at the back of the
appliance, over the motor compressor,
where it evaporates.
It is important to periodically clean the
defrost water drain hole in the middle of
the refrigerator compartment channel to
prevent the water overflowing and
dripping onto the food inside.
For this purpose use the tube cleaner
provided with the appliance.
7.4 Period of non-operation
When the appliance is not in use for long
period, take the following precautions:
1. Disconnect the appliance from
electricity supply.
2. Remove all food.
3. Clean the appliance and all
accessories.
4. Leave the door open to prevent
unpleasant smells.
8. TROUBLESHOOTING
WARNING!
Refer to Safety chapters.
ENGLISH 13

8.1 What to do if...
Problem Possible cause Solution
The appliance does not
operate.
The appliance is switched
off.
Switch on the appliance.
The mains plug is not con‐
nected to the mains socket
correctly.
Connect the mains plug to
the mains socket correctly.
There is no voltage in the
mains socket.
Connect a different electri‐
cal appliance to the mains
socket. Contact a qualified
electrician.
The appliance is noisy. The appliance is not sup‐
ported properly.
Check if the appliance
stands stable.
The compressor operates
continually.
Temperature is set incor‐
rectly.
Refer to "Control Panel"
chapter.
Many food products were
put in at the same time.
Wait a few hours and then
check the temperature
again.
The room temperature is
too high.
Refer to "Installation" chap‐
ter.
Food products placed in
the appliance were too
warm.
Allow food products to cool
to room temperature be‐
fore storing.
The door is not closed cor‐
rectly.
Refer to "Closing the door"
section.
The FastCool function is
switched on.
Refer to "FastCool func‐
tion" section.
The compressor does not
start immediately after
pressing the "FastCool", or
after changing the temper‐
ature.
The compressor starts af‐
ter a period of time.
This is normal, no error
has occurred.
Door is misaligned or inter‐
feres with ventilation grill.
The appliance is not level‐
led.
Refer to installation instruc‐
tions.
Door does not open easily. You attempted to re-open
the door immediately after
closing.
Wait a few seconds be‐
tween closing and re-open‐
ing of the door.
The lamp does not work. The lamp is in stand-by
mode.
Close and open the door.
The lamp is defective. Contact the nearest Au‐
thorized Service Centre.
www.electrolux.com14

Problem Possible cause Solution
There is too much frost
and ice.
The door is not closed cor‐
rectly.
Refer to "Closing the door"
section.
The gasket is deformed or
dirty.
Refer to "Closing the door"
section.
Food products are not
wrapped properly.
Wrap the food products
better.
Temperature is set incor‐
rectly.
Refer to "Control Panel"
chapter.
Appliance is fully loaded
and is set to the lowest
temperature.
Set a higher temperature.
Refer to "Control Panel"
chapter.
Temperature set in the ap‐
pliance is too low and the
ambient temperature is too
high.
Set a higher temperature.
Refer to "Control Panel"
chapter.
Water flows on the rear
plate of the refrigerator.
During the automatic de‐
frosting process, frost
melts on the rear plate.
This is correct.
There is too much con‐
densed water on the rear
wall of the refrigerator.
Door was opened too fre‐
quently.
Open the door only when
necessary.
Door was not closed com‐
pletely.
Make sure the door is
closed completely.
Stored food was not wrap‐
ped.
Wrap food in suitable
packaging before storing it
in the appliance.
Water flows inside the re‐
frigerator.
Food products prevent the
water from flowing into the
water collector.
Make sure that food prod‐
ucts do not touch the rear
plate.
The water outlet is clog‐
ged.
Clean the water outlet.
Water flows on the floor. The melting water outlet is
not connected to the evap‐
orative tray above the com‐
pressor.
Attach the melting water
outlet to the evaporative
tray.
Temperature cannot be
set.
The "FastCool function" is
switched on.
Switch off "FastCool func‐
tion" manually, or wait until
the function deactivates
automatically to set the
temperature. Refer to
"FastCool function" sec‐
tion.
ENGLISH 15

Problem Possible cause Solution
The temperature in the ap‐
pliance is too low/too high.
The temperature is not set
correctly.
Set a higher/lower temper‐
ature.
The door is not closed cor‐
rectly.
Refer to "Closing the door"
section.
The food products' temper‐
ature is too high.
Let the food products tem‐
perature decrease to room
temperature before stor‐
age.
Many food products are
stored at the same time.
Store less food products at
the same time.
The door has been opened
often.
Open the door only if nec‐
essary.
The FastCool function is
switched on.
Refer to "FastCool func‐
tion" section.
There is no cold air circula‐
tion in the appliance.
Make sure that there is
cold air circulation in the
appliance. Refer to "Hints
and Tips" chapter.
Temperature setting LEDs
flash at the same time.
An error has occurred in
measuring the tempera‐
ture.
Contact the nearest Au‐
thorised Service Centre.
The cooling system will
continue to keep food
products cold, but temper‐
ature adjustment will not
be possible.
If the advice does not lead to
the desired result, call the
nearest Authorized Service
Centre.
8.2 Replacing the lamp
The appliance is equipped with a longlife
LED interior light.
Only service is allowed to replace the
lighting device. Contact your Authorised
Service Centre.
8.3 Closing the door
1. Clean the door gaskets.
2. If necessary, adjust the door. Refer
to installation instructions.
3. If necessary, replace the defective
door gaskets. Contact the Authorised
Service Centre.
www.electrolux.com16

9. NOISES
SSSRRR!
CLICK!
HISSS!
BRRR!
BLUBB!
10. TECHNICAL DATA
The technical information is situated in
the rating plate on the internal side of the
appliance and on the energy label.
The QR code on the energy label
supplied with the appliance
provides a web link to the information
related to the performance of the
appliance in the EU EPREL database.
Keep the energy label for reference
together with the user manual and all
other documents provided with this
appliance.
It is also possible to find the same
information in EPREL using the link
https://eprel.ec.europa.eu
and the model
name and product number that you find
on the rating plate of the appliance.
See the link
www.theenergylabel.eu
for
detailed information about the energy
label.
11. INFORMATION FOR TEST INSTITUTES
Installation and preparation of the
appliance for any EcoDesign verification
shall be compliant with EN 62552.
Ventilation requirements, recess
dimensions and minimum rear
clearances shall be as stated in this User
Manual at Chapter 3. Please contact the
manufacturer for any other further
information, including loading plans.
ENGLISH 17

12. ENVIRONMENTAL CONCERNS
Recycle materials with the symbol .
Put the packaging in relevant containers
to recycle it. Help protect the
environment and human health by
recycling waste of electrical and
electronic appliances. Do not dispose of
appliances marked with the symbol
with the household waste. Return the
product to your local recycling facility or
contact your municipal office.
www.electrolux.com18

INHALTSVERZEICHNIS
1. SICHERHEITSHINWEISE................................................................................19
2. SICHERHEITSANWEISUNGEN...................................................................... 22
3. MONTAGE........................................................................................................24
4. BEDIENFELD................................................................................................... 27
5. TÄGLICHER GEBRAUCH................................................................................27
6. TIPPS UND HINWEISE....................................................................................30
7. REINIGUNG UND PFLEGE............................................................................. 31
8. FEHLERSUCHE............................................................................................... 32
9. GERÄUSCHE................................................................................................... 36
10. TECHNISCHE DATEN................................................................................... 36
11. INFORMATIONEN FÜR PRÜFINSTITUTE....................................................36
WIR DENKEN AN SIE
Vielen Dank, dass Sie sich für ein Gerät von Electrolux entschieden haben. Sie
haben ein Produkt gewählt, hinter dem jahrzehntelange professionelle Erfahrung
und Innovation stehen. Bei der Entwicklung dieses großartigen und eleganten
Geräts haben wir an Sie gedacht. So haben Sie bei jedem Gebrauch die
Gewissheit, dass Sie stets großartige Ergebnisse erzielen werden.
Willkommen bei Electrolux.
Besuchen Sie uns auf unserer Website, um:
Anwendungshinweise, Prospekte, Fehlerbehebungs-, Service- und Reparatur-
Informationen zu erhalten:
www.electrolux.com/support
Ihr erworbenes Produkt zu registrieren, um den besten Service für es zu
gewährleisten:
www.registerelectrolux.com
Zubehör, Verbrauchsmaterial und Original-Ersatzteile für Ihr Gerät zu
erwerben:
www.electrolux.com/shop
REPARATUR- UND KUNDENDIENST
Verwenden Sie ausschließlich Original-Ersatzteile.
Halten Sie folgende Angaben bereit, wenn Sie sich an den Kundendienst
wenden: Modell, Produktnummer (PNC), Seriennummer.
Diese Informationen finden Sie auf dem Typenschild.
Warnungs-/Sicherheitshinweise
Allgemeine Informationen und Empfehlungen
Informationen zum Umweltschutz
Änderungen vorbehalten.
1. SICHERHEITSHINWEISE
Lesen Sie vor der Montage und dem Gebrauch des
Geräts zuerst die Bedienungsanleitung. Bei
DEUTSCH 19

Verletzungen oder Schäden infolge nicht
ordnungsgemäßer Montage oder Verwendung
übernimmt der Hersteller keine Haftung. Bewahren Sie
die Anleitung zum Nachschlagen an einem sicheren und
zugänglichen Ort auf.
1.1 Sicherheit von Kindern und schutzbedürftigen
Personen
• Das Gerät kann von Kindern ab 8 Jahren und
Personen mit eingeschränkten physischen,
sensorischen oder geistigen Fähigkeiten oder mit
mangelnder Erfahrung und/oder mangelndem Wissen
nur dann verwendet werden, wenn sie durch eine für
ihre Sicherheit zuständige Person beaufsichtigt
werden oder in die sichere Verwendung des Geräts
eingewiesen wurden und die mit dem Gerät
verbundenen Gefahren verstanden haben.
• Kinder zwischen 3 und 8 Jahren dürfen das Gerät be-
und entladen, vorausgesetzt, sie wurden
ordnungsgemäß eingewiesen.
• Dieses Gerät kann von Personen mit schweren und
komplexen Behinderungen benutzt werden,
vorausgesetzt, sie wurden ordnungsgemäß
eingewiesen.
• Halten Sie Kinder unter 3 Jahren vom Gerät fern,
wenn sie nicht ständig beaufsichtigt werden.
• Kinder dürfen nicht mit dem Gerät spielen.
• Kinder dürfen keine Reinigung und Wartung ohne
Beaufsichtigung durchführen.
• Halten Sie sämtliches Verpackungsmaterial von
Kindern fern und entsorgen Sie es ordnungsgemäß.
1.2 Allgemeine Sicherheit
• Dieses Gerät ist für die Verwendung im Haushalt und
ähnliche Zwecke vorgesehen, wie z. B.:
– Bauernhöfe, Personalküchenbereiche in
Geschäften, Büros und anderen Arbeitsumfeldern;
www.electrolux.com20

– Für Gäste in Hotels, Motels, Pensionen und
anderen wohnungsähnlichen Räumlichkeiten.
• Um eine Kontaminierung von Lebensmitteln zu
vermeiden, beachten Sie die folgenden Hinweise:
– Öffnen Sie die Tür nicht über längere Zeit hinweg;
– Reinigen Sie regelmäßig Oberflächen, die mit
Lebensmitteln in Kontakt kommen können, und
zugängliche Ablaufsysteme;
– Lagern Sie rohes Fleisch und Fisch in geeigneten
Behältern im Kühlschrank, so dass sie nicht mit
anderen Lebensmitteln in Berührung kommen oder
auf diese tropfen.
• WARNUNG: Achten Sie darauf, dass die
Belüftungsöffnungen im Schrank, um das Gerät und in
der Einbaunische nicht blockiert sind.
• WARNUNG: Versuchen Sie nicht, den Abtauvorgang
durch andere als vom Hersteller empfohlene
mechanische oder sonstige Hilfsmittel zu
beschleunigen.
• WARNUNG: Beschädigen Sie nicht den
Kältekreislauf.
• WARNUNG: Betreiben Sie in den Lebensmittelfächern
des Geräts keine anderen als die vom Hersteller
empfohlenen Elektrogeräte.
• Reinigen Sie das Gerät nicht mit Wasserspray oder
Dampf.
• Reinigen Sie das Geräts mit einem weichen, feuchten
Tuch. Nur neutrale Reinigungsmittel verwenden.
Benutzen Sie keine Scheuermittel, scheuernde
Reinigungsschwämmchen, Lösungsmittel oder
Metallgegenstände.
• Wenn das Gerät längere Zeit leer steht, schalten Sie
es aus, tauen Sie es ab, reinigen und trocknen Sie es
und lassen Sie die Tür offen, um Schimmelbildung im
Gerät zu vermeiden.
• Bewahren Sie in dem Gerät keine explosiven
Substanzen, wie Spraydosen mit entzündlichen
Treibgasen auf.
DEUTSCH 21

• Wenn das Netzkabel beschädigt ist, muss es vom
Hersteller, seinem autorisierten Kundenservice oder
einer gleichermaßen qualifizierten Person
ausgetauscht werden, um Gefahrenquellen zu
vermeiden.
2. SICHERHEITSANWEISUNGEN
2.1 Montage
WARNUNG!
Die Montage des Geräts darf
nur von einer qualifizierten
Fachkraft durchgeführt
werden.
• Entfernen Sie das gesamte
Verpackungsmaterial.
• Montieren Sie ein beschädigtes Gerät
nicht und benutzen Sie es nicht.
• Verwenden Sie das Gerät aus
Sicherheitsgründen nicht, bevor es in
den Einbauschrank gesetzt wird.
• Halten Sie sich an die mitgelieferte
Montageanleitung.
• Seien Sie beim Umsetzen des
Gerätes vorsichtig, da es sehr schwer
ist. Tragen Sie stets
Sicherheitshandschuhe und festes
Schuhwerk.
• Stellen Sie sicher, dass die Luft um
das Gerät zirkulieren kann.
• Warten Sie nach der Montage oder
dem Wechsel des Türanschlags
mindestens 4 Stunden, bevor Sie das
Gerät an die Stromversorgung
anschließen. Dies ist erforderlich,
damit das Öl in den Kompressor
zurückfließen kann.
• Ziehen Sie den Stecker aus der
Steckdose, bevor Sie am Gerät
arbeiten (z.B. Wechsel des
Türanschlags).
• Stellen Sie das Gerät nicht in der
Nähe von Heizkörpern, Herden,
Backöfen oder Kochfeldern auf.
• Setzen Sie das Gerät nicht dem
Regen aus.
• Stellen Sie das Gerät nicht dort auf,
wo es direktem Sonnenlicht
ausgesetzt sein könnte.
• Stellen Sie dieses Gerät nicht in
Bereichen auf, die zu feucht oder kalt
sind.
• Wenn Sie das Gerät verschieben
möchten, heben Sie es bitte an der
Vorderkante an, um den Fußboden
nicht zu verkratzen.
• Das Gerät enthält einen Beutel mit
Trockenmittel. Dieser Beutel ist kein
Spielzeug. Dieser Beutel ist kein
Lebensmittel. Bitte entsorgen Sie ihn
umgehend.
2.2 Elektrischer Anschluss
WARNUNG!
Brand- und
Stromschlaggefahr.
WARNUNG!
Achten Sie bei der Montage
des Geräts darauf, dass das
Netzkabel nicht eingeklemmt
oder beschädigt wird.
WARNUNG!
Verwenden Sie keine
Mehrfachsteckdosen oder
Verlängerungskabel.
• Das Gerät muss geerdet sein.
• Stellen Sie sicher, dass die Daten auf
dem Typenschild mit den elektrischen
Nennwerten der Netzspannung
übereinstimmen.
• Schließen Sie das Gerät nur an eine
ordnungsgemäß installierte
Schutzkontaktsteckdose an.
• Achten Sie darauf, elektrische
Bauteile (wie Netzstecker, Netzkabel
und Kompressor) nicht zu
beschädigen. Wenden Sie sich an
den autorisierten Kundendienst oder
einen Elektriker, um die elektrischen
Bauteile auszutauschen.
• Das Netzkabel muss unterhalb des
Netzsteckers verlegt werden.
• Stecken Sie den Netzstecker erst
nach Abschluss der Montage in die
www.electrolux.com22

Steckdose. Stellen Sie sicher, dass
der Netzstecker nach der Montage
noch zugänglich ist.
• Ziehen Sie nicht am Netzkabel, wenn
Sie das Gerät von der
Stromversorgung trennen möchten.
Ziehen Sie stets am Netzstecker.
2.3 Gebrauch
WARNUNG!
Es besteht Verletzungs-,
Verbrennungs-,
Stromschlag- oder
Brandgefahr.
Das Gerät enthält Isobutan
(R600a), ein brennbares Erdgas mit
einem hohen Grad an
Umweltverträglichkeit. Achten Sie darauf,
den Kältekreislauf, der Isobutan enthält,
nicht zu beschädigen.
• Nehmen Sie keine technischen
Änderungen am Gerät vor.
• Stellen Sie keine elektrischen Geräte
(z. B. Eisbereiter) in das Gerät, wenn
solche Geräte nicht ausdrücklich vom
Hersteller für diesen Zweck
zugelassen sind.
• Wird der Kältekreislauf beschädigt,
stellen Sie bitte sicher, dass es keine
Flammen und Zündquellen im Raum
gibt. Belüften Sie den Raum.
• Stellen Sie keine heißen
Gegenstände auf die Kunststoffteile
des Geräts.
• Bewahren Sie keine entzündbaren
Gase und Flüssigkeiten im Gerät auf.
• Laden Sie keine entflammbaren
Produkte oder Gegenstände, die mit
entflammbaren Produkten benetzt
sind, in das Gerät und stellen Sie
solche nicht in die Nähe oder auf das
Gerät.
• Berühren Sie nicht den Kompressor
oder den Kondensator. Sie sind heiß.
2.4 Innenbeleuchtung
WARNUNG!
Stromschlaggefahr.
• Bezüglich der Lampe(n) in diesem
Gerät und separat verkaufter
Ersatzlampen: Diese Lampen müssen
extremen physikalischen
Bedingungen in Haushaltsgeräten
standhalten, wie z.B. Temperatur,
Vibration, Feuchtigkeit, oder sollen
Informationen über den
Betriebszustand des Gerätes
anzeigen. Sie sind nicht für den
Einsatz in anderen Geräten
vorgesehen und nicht für die
Raumbeleuchtung geeignet.
2.5 Reinigung und Pflege
WARNUNG!
Verletzungsgefahr sowie
Risiko von Schäden am
Gerät.
• Schalten Sie das Gerät immer aus
und ziehen Sie den Netzstecker aus
der Steckdose, bevor
Reinigungsarbeiten durchgeführt
werden.
• Der Kältekreis des Gerätes enthält
Kohlenwasserstoffe. Das Gerät muss
von einer qualifizierten Fachkraft
gewartet und nachgefüllt werden.
• Prüfen Sie regelmäßig den
Wasserabfluss des Geräts und
reinigen Sie ihn gegebenenfalls. Bei
verstopftem Wasserabfluss sammelt
sich das Abtauwasser am Boden des
Geräts an.
2.6 Wartung
• Zur Reparatur des Geräts wenden Sie
sich an den autorisierten
Kundendienst. Dabei dürfen
ausschließlich Originalersatzteile
verwendet werden.
• Bitte beachten Sie, dass eigene
Reparaturen oder Reparaturen, die
nicht von Fachkräften durchgeführt
werden, die Sicherheit des Geräts
beeinträchtigen und die Garantie
ungültig machen können.
• Folgende Ersatzteile sind innerhalb
von 7 Jahren nach Produkteinstellung
des Modells erhältlich: Thermostate,
Temperatursensoren, Leiterplatten,
Lichtquellen, Türgriffe, Türscharniere,
Ablagen und Körbe. Bitte beachten
Sie, dass einige dieser Ersatzteile nur
an Reparaturbetriebe geliefert werden
können und nicht alle Ersatzteile für
alle Modelle relevant sind.
DEUTSCH 23

• Türdichtungen sind innerhalb von 10
Jahren nach Produkteinstellung des
Modells erhältlich.
2.7 Entsorgung
WARNUNG!
Verletzungs- und
Erstickungsgefahr.
• Trennen Sie das Gerät von der
Stromversorgung.
• Schneiden Sie das Netzkabel ab, und
entsorgen Sie es.
• Entfernen Sie die Tür, um zu
verhindern, dass sich Kinder oder
Haustiere in dem Gerät einschließen.
• Der Kältekreislauf und die
Isolierungsmaterialien dieses Gerätes
sind ozonfreundlich.
• Die Isolierung enthält entzündliches
Gas. Für Informationen zur korrekten
Entsorgung des Gerätes wenden Sie
sich an Ihre kommunale Behörde.
• Achten Sie darauf, dass die
Kühleinheit in der Nähe des
Wärmetauschers nicht beschädigt
wird.
3. MONTAGE
WARNUNG!
Siehe Kapitel
Sicherheitshinweise.
WARNUNG!
Lesen Sie zur Installation
des Geräts die
Montageanleitung.
WARNUNG!
Befestigen Sie das Gerät
gemäß der
Montageanleitung, um das
Risiko eines instabilen
Geräts zu vermeiden.
www.electrolux.com24

3.1 Abmessungen
B
A
H1
W1
D1
W2
D2
W3
D3
90°
Gesamtabmessungen ¹
H1 mm 1772
W1 mm 548
D1 mm 549
¹ Höhe, Breite und Tiefe des Geräts ohne
Griff und Füße
Platzbedarf während des Betriebs ²
H2 (A+B) mm 1816
W2 mm 548
D2 mm 551
A mm 1780
B mm 36
² Höhe, Breite und Tiefe des Geräts
einschließlich Griff und zuzüglich des
notwendigen Freiraums für die
Zirkulation der Kühlluft
Platzbedarf insgesamt während des
Betriebs ³
H3 (A+B) mm 1816
W3 mm 548
D3 mm 1071
³ Höhe, Breite und Tiefe des Geräts
einschließlich Griff plus des notwendigen
Freiraums für die Zirkulation der Kühlluft,
zuzüglich des Platzes, der notwendig ist,
um eine Türöffnung bis zu dem
minimalen Winkel zu ermöglichen, der
die Entfernung der gesamten
Innenausstattung erlaubt
DEUTSCH 25

3.2 Standort
Um die beste Funktionalität des Gerätes
zu gewährleisten, sollten Sie das Gerät
nicht in der Nähe von Wärmequellen
(Backöfen, Heizöfen, Heizkörpern,
Herden oder Kochfeldern) oder an einem
Ort mit direkter Sonneneinstrahlung
installieren. Stellen Sie sicher, dass die
Luft frei um die Geräterückseite
zirkulieren kann.
Dieses Gerät sollte in einem trockenen,
gut belüfteten Innenbereich aufgestellt
werden.
Dieses Gerät ist für den Einsatz bei einer
Umgebungstemperatur von 10°C bis
38°C vorgesehen.
Der ordnungsgemäße
Betrieb des Geräts wird nur
innerhalb des angegebenen
Temperaturbereichs
gewährleistet.
Bei Fragen zum
Aufstellungsort des Geräts
wenden Sie sich an den
Verkäufer, unseren
Kundendienst oder
nächstgelegenen
autorisierten Kundendienst.
Es muss möglich sein, das
Gerät vom Netz zu trennen.
Daher muss der Stecker
nach der Installation
zugänglich bleiben.
3.3 Elektroanschluss
• Kontrollieren Sie vor dem Einschalten
des Geräts, ob die Netzspannung und
-frequenz Ihres Hausanschlusses mit
den auf dem Typenschild
angegebenen Anschlusswerten
übereinstimmen.
• Das Gerät muss geerdet sein. Zu
diesem Zweck ist der Netzstecker mit
einem Schutzkontakt ausgestattet.
Falls die Steckdose Ihres
Hausanschlusses nicht geerdet sein
sollte, lassen Sie das Gerät gemäß
den geltenden Vorschriften von einem
qualifizierten Elektriker erden.
• Der Hersteller übernimmt keinerlei
Haftung bei Missachtung der
vorstehenden Sicherheitshinweise.
• Das Gerät entspricht den EC-
Richtlinien.
3.4 Anforderungen an die
Belüftung
Der Luftstrom hinter dem Gerät muss
ausreichend sein.
5 cm
min.
200 cm
2
min.
200 cm
2
VORSICHT!
Lesen Sie die
Montageanleitungen für die
Installation.
3.5 Wechseln des
Türanschlags
Informationen zu Montage und zum
Wechseln des Türanschlags finden Sie
in einer separaten Anleitung.
VORSICHT!
Wenn Sie den Türanschlag
wechseln, schützen Sie den
Boden mit einem
strapazierfähigem Material
vor Verkratzungen.
www.electrolux.com26

4. BEDIENFELD
1 2
4 3
1 2
4 3
1. Temperaturanzeige-LED
2. Anzeige FastCool
3. Taste FastCool
4. Temperaturregler
Taste EIN/AUS
4.1 Einschalten des Geräts
1. Stecken Sie den Stecker in die
Netzsteckdose.
2. Berühren Sie den Temperaturregler,
wenn alle LEDs ausgeschaltet sind.
4.2 Ausschalten des Geräts
Halten Sie die Taste des
Temperaturreglers länger als 3 Sek.
gedrückt.
Alle Anzeigen erlöschen.
4.3 Temperaturregelung
Zur Inbetriebnahme des Geräts,
berühren Sie den Temperaturregler, bis
die LED der gewünschten Temperatur
aufleuchtet. Die Wahl erfolgt schrittweise
von 2 °C bis 8 °C. Empfohlene
Einstellung: 4 °C.
1. Berühren Sie den Temperaturregler.
Die Kontrolllampe der aktuellen
Temperatur blinkt. Mit jeder Berührung
des Temperaturreglers ändert sich die
Einstellung um eine Position. Die
entsprechende LED blinkt eine Zeit lang.
2. Berühren Sie den Temperaturregler
wiederholt, bis die gewünschte
Temperatur ausgewählt ist.
Die eingestellte Temperatur
wird innerhalb von 24
Stunden erreicht. Nach
einem Stromausfall bleibt die
eingestellte Temperatur
gespeichert.
4.4 Funktion FastCool
Wenn Sie zum Beispiel nach einem
Einkauf größere Mengen Lebensmittel
mit Raumtemperatur in den Kühlschrank
einlegen möchten, empfehlen wir die
Aktivierung der Funktion FastCool, um
die Lebensmittel schneller zu kühlen und
um zu vermeiden, dass die bereits im
Kühlschrank befindlichen Lebensmittel
erwärmt werden.
Drücken Sie zum Einschalten der
Funktion FastCool die Taste FastCool.
Die Kontrolllampe FastCool leuchtet.
Diese Funktion endet
automatisch nach 6
Stunden.
Diese Funktion kann jederzeit durch
erneutes Drücken der Taste FastCool
ausgeschaltet werden. Die Kontrolllampe
FastCool erlischt.
5. TÄGLICHER GEBRAUCH
VORSICHT!
Dieses Kühlgerät eignet sich
nicht zum Einfrieren von
Lebensmitteln.
5.1 Positionieren der
Türablagen
Die Türablagen können in verschiedener
Höhe positioniert werden; damit
ermöglichen sie das Lagern verschieden
großer Lebensmittelpackungen.
1. Ziehen Sie die Ablage langsam nach
oben, bis sie sich löst.
DEUTSCH 27

2. Setzen Sie die Ablage in
gewünschter Höhe ein.
1
2
5.2 Verstellbare Ablagen
Die Wände des Kühlschranks sind mit
einer Reihe von Führungsschienen
ausgestattet, die verschiedene
Möglichkeiten für das Einsetzen der
Ablagen bieten.
Die Glasablage über der
Gemüseschublade sollte
jedoch nicht verstellt
werden, um eine korrekte
Luftzirkulation zu
gewährleisten.
5.3 Obst-/Gemüseschublade
Die Schublade eignet sich zum
Aufbewahren von Obst und Gemüse.
Herausnehmen der Schublade (z.B. zur
Reinigung):
1. Ziehen Sie die Schublade heraus
und heben Sie sie an.
2. Schieben Sie die Schienen in das
Gerät, um eine Beschädigung des
Geräts beim Schließen der Tür zu
verhindern.
Wiedereinbau:
1. Ziehen Sie die Schienen heraus.
www.electrolux.com28

2. Setzen Sie den hinteren Teil der
Schublade (1) auf die Schienen.
2
1
3. Heben Sie den vorderen Teil der
Schublade (2) an, während Sie sie
hineinschieben.
4. Drücken Sie den vorderen Teil der
Schublade nach unten.
Ziehen Sie die Schublade
wieder heraus, um zu
prüfen, ob sie richtig auf den
hinteren und vorderen
Haken sitzt.
5.4 Feuchtigkeitsregulierung
In die Glasablage ist eine Vorrichtung mit
(über einen Schieber verstellbaren)
Schlitzen integriert, die die
Feuchtigkeitsregelung in den
Gemüseschubladen ermöglicht.
Die Position des Feuchtigkeitsreglers
hängt von der Art und der Menge des
Obstes und Gemüses ab:
• Schlitze geschlossen: Für eine kleine
Menge an Obst und Gemüse
empfohlen. So bleibt der
Feuchtigkeitsgehalt im Obst und
Gemüse länger erhalten.
• Schlitze geöffnet: Für eine große
Menge an Obst und Gemüse
empfohlen. Auf diese Weise führt eine
höhere Luftzirkulation zu einer
geringeren Luftfeuchtigkeit.
5.5 Temperaturanzeige
Um eine korrekte Lagerung der
Lebensmittel zu gewährleisten, verfügt
dieser Kühlschrank über eine
Temperaturanzeige. Das Symbol an der
Seitenwand des Geräts zeigt den
kältesten Bereich im Kühlraum an.
Wenn OK angezeigt wird (A), lagern Sie
die frischen Lebensmittel im Bereich, der
durch das Symbol angezeigt wird. Bei (B)
warten Sie mindestens 12 Stunden und
prüfen Sie, ob OK (A) angezeigt wird.
Wird nicht OK (B) angezeigt, wählen Sie
eine kältere Einstellung.
OK
OK
A
B
5.6 DYNAMICAIR
Das Kühlfach ist mit einer Vorrichtung
ausgestattet, die das schnelle Abkühlen
von Lebensmitteln ermöglicht und eine
gleichmäßigere Temperatur im Fach
aufrechterhält.
Schalten Sie die Vorrichtung
ein, wenn Sie eine große
Menge an Lebensmittel
kühlen müssen oder wenn
die Raumtemperatur höher
als 35 °C ist, um eine
gleichmäßigere
Innentemperatur zu
gewährleisten.
Drücken Sie zum Einschalten des
Ventilators die Taste (A). Die grüne
Kontrolllampe (B) leuchtet auf.
DEUTSCH 29

A
B
Bevor Sie das Gerät
ausschalten, schalten Sie
den Ventilator durch
Drücken der Taste (A) aus.
Die grüne Kontrolllampe (B)
erlischt.
6. TIPPS UND HINWEISE
6.1 Tipps zum Energiesparen
• Die effizienteste Energienutzung wird
erreicht, wenn die Schubladen im
unteren Teil des Geräts eingesetzt
und die Ablagen gleichmäßig
angeordnet sind. Die Position der
Türablagen wirkt sich nicht auf den
Energieverbrauch aus.
• Öffnen Sie die Tür nicht zu häufig,
und lassen Sie diese nicht länger
offen als notwendig.
• Stellen Sie die Temperatur nicht zu
hoch ein, um Energie zu sparen, es
sei denn, dies ist wegen der
Beschaffenheit des Lebensmittels
erforderlich.
• Wenn die Umgebungstemperatur
hoch ist, der Temperaturregler auf
eine niedrige Temperatur eingestellt
und das Gerät voll beladen ist, kann
es zu andauerndem Betrieb des
Kompressors und damit zu Reif- oder
Eisbildung am Verdampfer kommen.
Stellen Sie in diesem Fall den
Temperaturregler auf eine höhere
Temperatur, um das automatische
Abtauen zu ermöglichen und Energie
zu sparen.
• Sorgen Sie für eine gute Belüftung.
Bedecken Sie die Lüftungsgitter oder
-öffnungen nicht.
6.2 Hinweise für die Kühlung
frischer Lebensmittel
• Eine gute Temperatureinstellung, die
die Konservierung von frischen
Lebensmitteln sicherstellt, ist eine
Temperatur von weniger oder gleich
+4 °C.
Eine höhere Temperatureinstellung im
Gerät kann die Haltbarkeit der
Lebensmittel verkürzen.
• Decken Sie die Lebensmittel mit
Verpackungsmaterial ab, um ihre
Frische und ihr Aroma zu bewahren.
• Verwenden Sie immer geschlossene
Behälter für Flüssigkeiten und
Lebensmittel, um Düfte oder Gerüche
im Fach zu vermeiden.
• Um eine Kreuzkontamination
zwischen gekochten und rohen
Lebensmitteln zu vermeiden, decken
Sie die gekochten Lebensmittel ab
und trennen Sie sie von den rohen.
• Es wird empfohlen Lebensmittel im
Kühlschrank aufzutauen.
• Stellen Sie keine warmen
Lebensmittel in das Gerät.
Vergewissern Sie sich, dass sie auf
Raumtemperatur abgekühlt sind,
bevor Sie sie einlegen.
• Um eine Verschwendung von
Lebensmitteln zu vermeiden, sollten
die neuen Lebensmittel immer hinter
die alten gelegt werden.
6.3 Hinweise für die Kühlung
von Lebensmitteln
• Fleisch (alle Sorten): Wickeln Sie
Fleisch in geeignetes Material und
legen Sie es auf die Glasablage über
der Gemüseschublade. Lagern Sie
Fleisch höchstens 1 - 2 Tage.
• Obst und Gemüse: Gründlich reinigen
(Erde entfernen) und in die spezielle
Schublade (Obst- und
Gemüseschublade) legen.
• Es wird empfohlen, exotische Früchte
wie Bananen, Mangos, Papayas usw.
nicht im Kühlschrank aufzubewahren.
• Gemüse wie Tomaten, Kartoffeln,
Zwiebeln und Knoblauch sollten nicht
im Kühlschrank aufbewahrt werden.
www.electrolux.com30

• Butter und Käse: Diese sollten stets in
luftdichten Behältern verpackt sein
oder in Aluminiumfolie bzw. in
Polyäthylenbeutel eingepackt werden,
um so wenig Luft wie möglich in der
Verpackung zu haben.
• Flaschen: Sie sollten mit Deckel in der
Flaschenablage in der Tür oder im
Flaschenhalter (falls vorhanden)
aufbewahrt werden.
• Es wird empfohlen für eine schnellere
Kühlung der Produkte den Ventilator
einzuschalten. Durch das Einschalten
von Dynamicair wird eine
gleichmäßigere Innentemperatur
erzielt.
• Achten Sie auf das Haltbarkeitsdatum
der Lebensmittel, damit Sie wissen,
wie lange sie gelagert werden
können.
7. REINIGUNG UND PFLEGE
WARNUNG!
Siehe Kapitel
Sicherheitshinweise.
7.1 Reinigen des Innenraums
Bevor Sie das Gerät in Betrieb nehmen,
beseitigen Sie den typischen Neugeruch
am besten durch Reinigen der Innenteile
mit lauwarmem Wasser und einer
neutralen Seife. Sorgfältig nachtrocknen.
VORSICHT!
Verwenden Sie keine
chemischen
Reinigungsmittel,
Scheuerpulver, chlor- oder
ölhaltige Reinigungsmittel,
da diese die Oberfläche
beschädigen.
VORSICHT!
Das Zubehör des Geräts
und die Innenteile eignen
sich nicht für die Reinigung
im Geschirrspüler.
7.2 Regelmäßige Reinigung
Das gesamte Gerät muss regelmäßig
gereinigt werden:
1. Reinigen Sie das Innere und die
Zubehörteile mit lauwarmem Wasser
und etwas Neutralseife.
2. Prüfen und säubern Sie die
Türdichtungen in regelmäßigen
Abständen, um zu gewährleisten,
dass diese sauber und frei von
Fremdkörpern sind.
3. Spülen und trocknen Sie diese
sorgfältig ab.
7.3 Abtauen des Kühlschranks
Bei normalem Betrieb wird Reif
automatisch aus dem Verdampfer des
Kühlschranks entfernt. Das Tauwasser
sammelt sich in einer Auffangrinne und
läuft durch eine Abflussöffnung in einen
speziellen Behälter an der Rückseite des
Geräts über dem Kompressor, wo es
verdampft.
Eine regelmäßige Reinigung des
Abtauwasser-Ablauflochs in der Mitte
des Kühlfachkanals ist wichtig, um zu
verhindern, dass das Wasser überläuft
und auf die eingelagerten Lebensmittel
tropft.
Benutzen Sie hierfür den Rohrreiniger,
der mit dem Gerät geliefert wird.
7.4 Stillstandszeiten
Bei längerem Stillstand des Geräts
müssen Sie folgende Vorkehrungen
treffen:
DEUTSCH 31

1. Trennen Sie das Gerät von der
Spannungsversorgung.
2. Entnehmen Sie alle Lebensmittel.
3. Reinigen Sie das Gerät und alle
Zubehörteile.
4. Lassen Sie die Tür offen, um das
Entstehen unangenehmer Gerüche
zu vermeiden.
8. FEHLERSUCHE
WARNUNG!
Siehe Kapitel
Sicherheitshinweise.
8.1 Was tun, wenn...
Störung Mögliche Ursache Abhilfe
Das Gerät funktioniert
nicht.
Das Gerät ist ausgeschal‐
tet.
Schalten Sie das Gerät
ein.
Der Netzstecker wurde
nicht richtig in die Steckdo‐
se gesteckt.
Stecken Sie den Netzste‐
cker korrekt in die Steckdo‐
se.
Es liegt keine Spannung
an der Steckdose an.
Testen Sie, ob ein anderes
Gerät an dieser Steckdose
funktioniert. Wenden Sie
sich an eine Elektrofach‐
kraft.
Das Gerät erzeugt Geräu‐
sche.
Unebenheiten im Boden
wurden nicht ausgegli‐
chen.
Prüfen Sie, ob das Gerät
stabil steht.
Der Kompressor ist durch‐
gehend in Betrieb.
Die Temperatur wurde
falsch eingestellt.
Siehe Kapitel „Bedienfeld“.
Es wurden zu viele Le‐
bensmittel gleichzeitig ein‐
gelegt.
Warten Sie einige Stunden
und prüfen Sie erneut die
Temperatur.
Die Raumtemperatur ist zu
hoch.
Siehe Kapitel „Montage“.
In das Gerät eingelegte
Lebensmittel waren noch
zu warm.
Lassen Sie die Lebensmit‐
tel auf Raumtemperatur
abkühlen, bevor Sie sie
einlagern.
Die Tür ist nicht richtig ge‐
schlossen.
Siehe Abschnitt „Schließen
der Tür“.
Die Funktion FastCool ist
eingeschaltet.
Siehe Abschnitt „Funktion
FastCool“.
www.electrolux.com32

Störung Mögliche Ursache Abhilfe
Der Kompressor schaltet
sich nicht sofort ein, nach‐
dem Sie „FastCool“ ge‐
drückt oder die Temperatur
auf einen anderen Wert
eingestellt haben.
Der Kompressor schaltet
sich erst nach einer Weile
ein.
Das ist normal, es ist kein
Fehler aufgetreten.
Die Tür ist nicht richtig aus‐
gerichtet oder berührt das
Belüftungsgitter.
Das Gerät ist nicht ausge‐
richtet.
Siehe Montageanleitung.
Die Tür lässt sich nicht
leicht öffnen.
Sie haben versucht, die
Tür unmittelbar nach dem
Schließen wieder zu öff‐
nen.
Warten Sie einige Sekun‐
den zwischen dem Schlie‐
ßen und erneuten Öffnen
der Tür.
Die Lampe funktioniert
nicht.
Die Lampe ist im Standby-
Modus.
Schließen und öffnen Sie
die Tür.
Die Lampe ist defekt. Wenden Sie sich an die
nächste autorisierte Kun‐
dendienststelle.
Zu starke Reif- und Eisbil‐
dung.
Die Tür ist nicht richtig ge‐
schlossen.
Siehe Abschnitt „Schließen
der Tür“.
Die Dichtung ist verzogen
oder verschmutzt.
Siehe Abschnitt „Schließen
der Tür“.
Die Lebensmittel sind nicht
richtig verpackt.
Verpacken Sie die Lebens‐
mittel richtig.
Die Temperatur wurde
falsch eingestellt.
Siehe Kapitel „Bedienfeld“.
Das Gerät ist voll beladen
und auf die niedrigste
Temperatur eingestellt.
Stellen Sie eine höhere
Temperatur ein. Siehe Ka‐
pitel „Bedienfeld“.
Die Temperatur im Gerät
ist zu niedrig und die Um‐
gebungstemperatur ist zu
hoch.
Stellen Sie eine höhere
Temperatur ein. Siehe Ka‐
pitel „Bedienfeld“.
Wasser fließt an der Rück‐
wand des Kühlschranks hi‐
nunter.
Während des automati‐
schen Abtauprozesses
schmilzt Reif auf der Rück‐
wand.
Dies ist normal.
Es gibt zu viel Kondens‐
wasser an der Rückwand
des Kühlschranks.
Die Tür wurde zu häufig
geöffnet.
Öffnen Sie die Tür nur bei
Bedarf.
Die Tür wurde nicht voll‐
ständig geschlossen.
Achten Sie darauf, die Tür
vollständig zu schließen.
DEUTSCH 33

Störung Mögliche Ursache Abhilfe
Das eingelagerte Lebens‐
mittel wurde nicht verpackt.
Packen Sie das Lebens‐
mittel in eine geeignete
Verpackung, bevor Sie es
in das Gerät legen.
Wasser fließt in den Kühl‐
schrank.
Lebensmittel verhindern
das Abfließen des Was‐
sers in den Wassersamm‐
ler.
Stellen Sie sicher, dass die
Lebensmittel nicht die
Rückwand berühren.
Der Wasserablauf ist ver‐
stopft.
Reinigen Sie den Wasser‐
ablauf.
Wasser läuft auf den Bo‐
den.
Der Tauwasserablauf ist
nicht mit der Verdampfer‐
schale über dem Kompres‐
sor verbunden.
Verbinden Sie den Tau‐
wasserablauf mit der Ver‐
dampferschale.
Die Temperatur kann nicht
eingestellt werden.
Die Funktion „FastCool“ ist
eingeschaltet.
Schalten Sie die Funktion
„FastCool“ manuell aus,
oder warten Sie mit dem
Einstellen der Temperatur,
bis die Funktion automa‐
tisch ausgeschaltet wird.
Siehe Abschnitt Funktion
„FastCool“.
Die Temperatur im Gerät
ist zu niedrig/zu hoch.
Die Temperatur ist nicht
richtig eingestellt.
Stellen Sie eine höhere/
niedrigere Temperatur ein.
Die Tür ist nicht richtig ge‐
schlossen.
Siehe Abschnitt „Schließen
der Tür“.
Die Temperatur der zu
kühlenden Lebensmittel ist
zu hoch.
Lassen Sie die Lebensmit‐
tel auf Raumtemperatur
abkühlen, bevor Sie sie in
das Gerät geben.
Es wurden zu viele Le‐
bensmittel gleichzeitig ein‐
gelegt.
Lagern Sie weniger Le‐
bensmittel zur selben Zeit
ein.
Die Tür wurde zu häufig
geöffnet.
Öffnen Sie die Tür nur,
wenn es notwendig ist.
Die Funktion FastCool ist
eingeschaltet.
Siehe Abschnitt „Funktion
FastCool“.
Die Kaltluft kann im Gerät
nicht zirkulieren.
Kaltluftzirkulation im Gerät
sicherstellen. Siehe Kapitel
„Tipps und Hinweise“.
www.electrolux.com34

Störung Mögliche Ursache Abhilfe
Die LEDs der einstellbaren
Temperaturen blinken
gleichzeitig.
Fehler beim Messen der
Temperatur.
Kontaktieren Sie den
nächsten autorisierten
Kundendienst. Das Kühl‐
system hält zwar die einge‐
lagerten Lebensmittel wei‐
terhin kühl, doch eine
Temperatureinstellung ist
nicht mehr möglich.
Bitte wenden Sie sich an
den nächsten autorisierten
Kundendienst, wenn alle
genannten
Abhilfemaßnahmen nicht
zum gewünschten Erfolg
führen.
8.2 Austauschen der Lampe
Das Gerät ist mit einer langlebigen LED-
Innenbeleuchtung ausgestattet.
Die Beleuchtung darf nur von einer
Fachkraft ausgetauscht werden. Wenden
Sie sich an Ihren autorisierten
Kundendienst.
8.3 Schließen der Tür
1. Reinigen Sie die Türdichtungen.
2. Stellen Sie die Tür nach Bedarf ein.
Siehe Montageanleitung.
3. Ersetzen Sie die defekten
Türdichtungen, falls erforderlich.
Wenden Sie sich an einen
autorisierten Kundendienst.
DEUTSCH 35

9. GERÄUSCHE
SSSRRR!
CLICK!
HISSS!
BRRR!
BLUBB!
10. TECHNISCHE DATEN
Die technischen Daten befinden sich auf
dem Typenschild innen im Gerät sowie
auf der Energieplakette.
Der QR-Code auf der Energieplakette
des Geräts bietet einen Web-Link zu
Informationen über die Geräteleistung in
der EU EPREL-Datenbank. Bewahren
Sie daher die Energieplakette als
Referenz zusammen mit dieser
Bedienungsanleitung und allen anderen
Unterlagen, die mit dem Gerät geliefert
wurden, auf.
Es ist auch möglich, die gleichen
Informationen in EPREL zu finden,
indem Sie den Link
https://
eprel.ec.europa.eu
sowie den
Modellnamen und die Produktnummer,
die Sie auf dem Typenschild des Geräts
finden, verwenden.
Beachten Sie den Link
www.theenergylabel.eu
bezüglich
detaillierter Informationen zur
Energieplakette.
11. INFORMATIONEN FÜR PRÜFINSTITUTE
Die Installation und die Vorbereitung des
Geräts für eine eventuelle EcoDesign-
Prüfung müssen mit EN 62552
übereinstimmen. Die Anforderungen an
die Belüftung, die Abmessungen der
Aussparungen und die Mindestabstände
auf der Rückseite müssen den Angaben
in diesem Benutzerhandbuch in Kapitel 3
entsprechen. Für weitere Informationen,
einschließlich der Beladungspläne,
wenden Sie sich bitte an den Hersteller.
www.electrolux.com36

12. UMWELTTIPPS
Recyceln Sie Materialien mit dem
Symbol . Entsorgen Sie die
Verpackung in den entsprechenden
Recyclingbehältern. Recyceln Sie zum
Umwelt- und Gesundheitsschutz
elektrische und elektronische Geräte.
Entsorgen Sie Geräte mit diesem Symbol
nicht mit dem Hausmüll. Bringen Sie
das Gerät zu Ihrer örtlichen
Sammelstelle oder wenden Sie sich an
Ihr Gemeindeamt.
DEUTSCH 37

CONTENIDO
1. INFORMACIÓN SOBRE SEGURIDAD............................................................ 38
2. INSTRUCCIONES DE SEGURIDAD................................................................41
3. INSTALACIÓN..................................................................................................43
4. PANEL DE CONTROL..................................................................................... 45
5. USO DIARIO.....................................................................................................46
6. CONSEJOS...................................................................................................... 48
7. MANTENIMIENTO Y LIMPIEZA.......................................................................49
8. SOLUCIÓN DE PROBLEMAS..........................................................................50
9. RUIDOS............................................................................................................54
10. DATOS TÉCNICOS........................................................................................54
11. INFORMACIÓN PARA LOS INSTITUTOS DE PRUEBAS.............................54
PENSAMOS EN USTED
Gracias por adquirir un aparato Electrolux. Ha escogido un producto que contiene
décadas de experiencia e innovación profesionales. Ingenioso y elegante, se ha
diseñado pensando en usted. Así pues, siempre que lo utilice, puede tener la
seguridad de que conseguirá excelentes resultados.
Bienvenido a Electrolux.
Visite nuestro sitio web para:
Obtener consejos, folletos, soluciones a problemas e información de servicio y
reparación:
www.electrolux.com/support
Registrar su producto para recibir un mejor servicio:
www.registerelectrolux.com
Adquirir accesorios, artículos de consumo y recambios originales para su
aparato:
www.electrolux.com/shop
ATENCIÓN Y SERVICIO AL CLIENTE
Le recomendamos que utilice recambios originales.
Al contactar con nuestro centro autorizado de servicio técnico, cerciórese de
tener la siguiente información a mano: Modelo, PNC, Número de serie.
La información se puede encontrar en la placa de características.
Advertencia / Precaución-Información sobre seguridad
Información general y consejos
Información sobre el medio ambiente
Salvo modificaciones.
1. INFORMACIÓN SOBRE SEGURIDAD
Antes de instalar y utilizar el aparato, lea atentamente
las instrucciones facilitadas. El fabricante no se hace
responsable de lesiones o daños producidos como
www.electrolux.com38

resultado de una instalación o un uso incorrectos.
Conserve siempre estas instrucciones en lugar seguro y
accesible para futuras consultas.
1.1 Seguridad de niños y personas vulnerables
• Este aparato puede ser utilizado por niños de 8 años
en adelante y personas cuyas capacidades físicas,
sensoriales o mentales estén disminuidas o que
carezcan de la experiencia y conocimientos
suficientes para manejarlo, siempre que cuenten con
las instrucciones o la supervisión sobre el uso del
electrodoméstico de forma segura y comprendan los
riesgos.
• Los niños de 3 a 8 años pueden cargar y descargar el
aparato siempre que hayan sido debidamente
instruidos.
• Este aparato puede ser utilizado por personas con
discapacidades muy extensas y complejas, siempre
que hayan sido instruidas adecuadamente.
• Es necesario mantener alejados del aparato a los
niños de menos de 3 años salvo que estén bajo
supervisión continua.
• No deje que los niños jueguen con el aparato.
• La limpieza y mantenimiento de usuario del aparato
no podrán ser realizados por niños sin supervisión.
• Mantenga todo el material de embalaje fuera del
alcance de los niños y deséchelo de forma adecuada.
1.2 Seguridad general
• Este aparato está concebido para utilizarse en
aplicaciones domésticas y similares, tales como:
– Granjas; áreas de cocina para el personal en
tiendas, oficinas y otros entornos de trabajo;
– Por clientes en hoteles, moteles, pensiones y otros
entornos de tipo residencial.
• Para evitar la contaminación alimentaria, respete las
siguientes instrucciones:
ESPAÑOL 39

– no abra la puerta durante largos periodos de
tiempo;
– limpie regularmente las superficies que pueden
entrar en contacto con los alimentos y los sistemas
de drenaje accesibles;
– guarde la carne y el pescado crudos en recipientes
adecuados en el frigorífico, de manera que no
estén en contacto con otros alimentos ni goteen
sobre ellos.
• ADVERTENCIA: Mantenga libres de obstrucciones las
aberturas de ventilación del alojamiento del aparato o
de la estructura empotrada.
• ADVERTENCIA: No utilice dispositivos mecánicos ni
medios artificiales para acelerar el proceso de
descongelación, excepto los recomendados por el
fabricante.
• ADVERTENCIA: No dañe el circuito del refrigerante.
• ADVERTENCIA: No utilice dispositivos eléctricos
dentro de los compartimientos para alimentos del
aparato, salvo si son del tipo recomendado por el
fabricante.
• No utilice pulverizadores ni vapor de agua para limpiar
el aparato.
• Limpie el aparato con un paño suave humedecido.
Utilice solo detergentes neutros. No utilice productos
abrasivos, estropajos duros, disolventes ni objetos
metálicos.
• Cuando el aparato esté vacío durante un largo
período, apáguelo, descongélelo, límpielo, séquelo y
deje la puerta abierta para evitar que se desarrolle
moho en el interior del aparato.
• No almacene sustancias explosivas tales como latas
de aerosol con un propulsor inflamable en este
aparato.
• Si el cable eléctrico sufre algún daño, el fabricante, su
servicio técnico autorizado o un profesional cualificado
tendrán que cambiarlo para evitar riesgos.
www.electrolux.com40

2. INSTRUCCIONES DE SEGURIDAD
2.1 Instalación
ADVERTENCIA!
Sólo un técnico cualificado
puede instalar el aparato.
• Retire todo el embalaje.
• No instale ni utilice un aparato
dañado.
• No utilice el aparato antes de
instalarlo en la estructura empotrada
por motivos de seguridad.
• Siga las instrucciones de instalación
suministradas con el aparato.
• Tenga cuidado al mover el aparato,
porque es pesado. Utilice siempre
guantes de protección y calzado
cerrado.
• Asegúrese de que el aire pueda
circular alrededor del aparato.
• En la primera instalación otras invertir
el sentido de apertura de la puerta,
espere al menos 4 horas antes de
conectar el aparato a la alimentación
eléctrica. Esto es para permitir que el
aceite regrese al compresor.
• Desenchufe siempre el aparato antes
de llevar a cabo cualquier operación,
por ejemplo cambiar el sentido de
apertura de la puerta.
• No instale el aparato cerca de
radiadores, cocinas, hornos o placas
de cocción.
• No exponga el aparato a la lluvia.
• No instale el aparato donde reciba luz
solar directa.
• No instale este aparato en áreas
excesivamente húmedas o frías.
• Al mover el aparato, levántelo por el
borde frontal para no arañar el suelo.
• El aparato contiene una bolsa de
desecante. No se trata de un juguete.
No es un alimento. No olvide
desecharlo inmediatamente.
2.2 Conexión eléctrica
ADVERTENCIA!
Riesgo de incendios y
descargas eléctricas.
ADVERTENCIA!
Al colocar el producto,
asegúrese de que el cable
de alimentación no queda
atrapado o doblado.
ADVERTENCIA!
No utilice adaptadores de
enchufes múltiples ni cables
prolongadores.
• El aparato debe conectarse a tierra.
• Asegúrese de que los parámetros de
la placa de características son
compatibles con los valores eléctricos
del suministro eléctrico.
• Utilice siempre una toma con
aislamiento de conexión a tierra
correctamente instalada.
• Asegúrese de no provocar daños en
los componentes eléctricos (como
enchufe, cable de alimentación,
compresor). Póngase en contacto con
un electricista o con el servicio
técnico autorizado para cambiar los
componentes eléctricos.
• El cable de alimentación debe estar
por debajo del nivel del enchufe de
alimentación.
• Conecte el enchufe a la toma de
corriente únicamente cuando haya
terminado la instalación. Asegúrese
de tener acceso al enchufe del
suministro de red una vez finalizada
la instalación.
• No desconecte el aparato tirando del
cable de conexión a la red. Tire
siempre del enchufe.
2.3 Uso del aparato
ADVERTENCIA!
Existe riesgo de lesiones,
quemaduras, descargas
eléctricas o incendios.
El aparato contiene un gas
inflamable, isobutano (R600a), un gas
natural con alto grado de compatibilidad
medioambiental. Tenga cuidado para no
dañar el circuito de refrigerante que
contiene isobutano.
ESPAÑOL 41

• No cambie las especificaciones de
este aparato.
• No utilice otros aparatos eléctricos
(como máquinas de hacer helados)
dentro de aparatos de refrigeración,
salvo que el fabricante haya
autorizado su utilización.
• Si se daña el circuito del refrigerante,
evite las llamas y fuentes de ignición
en la habitación. Ventile la habitación.
• No toque con elementos calientes las
piezas de plástico del aparato.
• No almacene gas ni líquido inflamable
en el aparato.
• No coloque productos inflamables ni
objetos mojados con productos
inflamables dentro, cerca o encima
del aparato.
• No toque el compresor ni el
condensador. Están calientes.
2.4 Luces interiores
ADVERTENCIA!
Riesgo de descarga
eléctrica.
• En cuanto a la(s) bombilla(s) de este
producto y las de repuesto vendidas
por separado: Estas bombillas están
destinadas a soportar condiciones
físicas extremas en los aparatos
domésticos, como la temperatura, la
vibración, la humedad, o están
destinadas a señalar información
sobre el estado de funcionamiento del
aparato. No están destinadas a
utilizarse en otras aplicaciones y no
son adecuadas para la iluminación de
estancias domésticas.
2.5 Mantenimiento y limpieza
ADVERTENCIA!
Podría sufrir lesiones o
dañar el aparato.
• Antes de proceder con el
mantenimiento, apague el aparato y
desconecte el enchufe de la red.
• Este equipo contiene hidrocarburos
en la unidad de refrigeración. Solo
una persona cualificada debe realizar
el mantenimiento y la recarga de la
unidad.
• Examine periódicamente el desagüe
del aparato y límpielo si fuera
necesario. Si el desagüe se bloquea,
el agua descongelada se acumulará
en la base del aparato.
2.6 Asistencia
• Para reparar el aparato, póngase en
contacto con el centro de servicio
autorizado. Utilice solamente piezas
de recambio originales.
• Tenga en cuenta que la
autorreparación o la reparación no
profesional puede tener
consecuencias de seguridad y podría
anular la garantía.
• Las siguientes piezas de repuesto
estarán disponibles durante 7 años
después de que el modelo se haya
retirado: termostatos, sensores de
temperatura, placas de circuitos
impresos, fuentes de luz, manijas de
puertas, bisagras de puertas,
bandejas y cestas. Tenga en cuenta
que algunas de estas piezas de
recambio solo están disponibles para
los reparadores profesionales, y que
no todas las piezas de recambio son
relevantes para todos los modelos.
• Las juntas de las puertas estarán
disponibles durante 10 años después
de que el modelo se haya retirado.
2.7 Desecho
ADVERTENCIA!
Existe riesgo de lesiones o
asfixia.
• Desconecte el aparato de la red.
• Corte el cable de conexión a la red y
deséchelo.
• Retire la puerta para evitar que los
niños y las mascotas queden
encerrados en el aparato.
• El circuito del refrigerante y los
materiales aislantes de este aparato
no dañan la capa de ozono.
• La espuma aislante contiene gas
inflamable. Póngase en contacto con
las autoridades locales para saber
cómo desechar correctamente el
aparato.
• No dañe la parte de la unidad de
refrigeración que está cerca del
intercambiador de calor.
www.electrolux.com42

3. INSTALACIÓN
ADVERTENCIA!
Consulte los capítulos sobre
seguridad.
ADVERTENCIA!
Consulte el documento de
instrucciones de instalación
para instalar su aparato.
ADVERTENCIA!
Fije el aparato de acuerdo
con las instrucciones de
instalación para evitar el
riesgo de inestabilidad.
3.1 Dimensiones
B
A
H1
W1
D1
W2
D2
W3
D3
90°
Dimensiones generales ¹
H1 mm 1772
W1 mm 548
D1 mm 549
¹ la altura, anchura y profundidad del
aparato sin el mango y las patas
Espacio necesario en uso ²
H2 (A+B) mm 1816
W2 mm 548
D2 mm 551
A mm 1780
ESPAÑOL 43

Espacio necesario en uso ²
B mm 36
² la altura, anchura y profundidad del
aparato, incluyendo la manija, más el
espacio necesario para la libre
circulación del aire de refrigeración
Espacio total necesario en uso ³
H3 (A+B) mm 1816
W3 mm 548
D3 mm 1071
³ la altura, anchura y profundidad del
aparato, incluido el mango, más el
espacio necesario para la libre
circulación del aire de refrigeración, más
el espacio necesario para permitir la
apertura de la puerta hasta el ángulo
mínimo que permita la extracción de
todo el equipo interno
3.2 Ubicación
Para garantizar el mejor funcionamiento
del aparato, no debe instalarlo en las
proximidades de la fuente de calor
(horno, estufas, radiadores, cocinas o
fogones) ni en un lugar con luz solar
directa. Asegúrese de que el aire pueda
circular libremente alrededor de la parte
posterior del gabinete.
Este aparato debe instalarse en una
ubicación interior seca y bien ventilada.
Este aparato está destinado a ser
utilizado a una temperatura ambiente
que oscila entre 10°C y 38°C.
Solo se puede garantizar el
correcto funcionamiento del
aparato dentro del rango de
temperatura especificado.
Si tiene cualquier duda
respecto al lugar de
instalación del aparato,
consulte al vendedor, a
nuestro servicio de atención
al cliente o al servicio
técnico autorizado más
cercano.
Puede que en algún
momento sea necesario
desenchufar el aparato de la
toma de corriente. por lo que
el enchufe debe quedar
accesible tras la instalación
del aparato.
3.3 Conexión eléctrica
• Antes de conectar el aparato,
compruebe que el voltaje y la
frecuencia indicados en la placa de
datos técnicos se corresponden con
el suministro de la vivienda.
• El aparato debe conectarse a tierra.
El enchufe del cable de alimentación
se suministra con un contacto para tal
fin. Si la toma de red de la vivienda
carece de conexión a tierra, conecte
el aparato a una toma de tierra
conforme con la normativa, después
de consultar a un electricista
profesional
• El fabricante declina toda
responsabilidad si no se toman las
precauciones antes indicadas.
• Este aparato cumple las directivas
CEE.
3.4 Requisitos de ventilación
El flujo de aire detrás del aparato debe
ser suficiente.
5 cm
min.
200 cm
2
min.
200 cm
2
PRECAUCIÓN!
Consulte las instrucciones
para realizar la instalación.
www.electrolux.com44

3.5 Cambio del sentido de
apertura de la puerta
Consulte el documento separado con
instrucciones de instalación y de
inversión de la puerta.
PRECAUCIÓN!
En todas las fases del
cambio de sentido de la
puerta, proteja la puerta de
arañazos con un material
resistente.
4. PANEL DE CONTROL
1 2
4 3
1 2
4 3
1. Indicador LED de temperatura
2. Indicador FastCool
3. Botón FastCool
4. Regulador de temperatura
Botón de encendido/apagado
4.1 Encendido
1. Introduzca el enchufe en la toma de
pared.
2. Toque el botón del regulador de
temperatura si todos los LED están
apagados.
4.2 Apagado
Siga tocando el botón del regulador de
temperatura durante 3 segundos.
Todos los indicadores se apagan.
4.3 Regulación de la
temperatura
Para utilizar el aparato, toque el
regulador de temperatura hasta que se
encienda el LED correspondiente a la
temperatura que desea. La selección es
progresiva y oscila de 2°C a 8°C. El
ajuste recomendado es de 4°C.
1. Toque el regulador de temperatura.
El indicador de temperatura actual
parpadea. Cada vez que se toca el
regulador de temperatura, el ajuste se
mueve una posición. El LED parpadea
un momento.
2. Toque el regulador de temperatura
hasta que se seleccione la
temperatura deseada.
La temperatura programada
se alcanza en un plazo de
24 horas. Después de un
corte del suministro
eléctrico, la temperatura
ajustada se guarda.
4.4 Función FastCool
Si necesita introducir una gran cantidad
de alimentos a temperatura ambiente,
por ejemplo después de hacer la
compra, se aconseja activar la función
FastCool para enfriarlos más
rápidamente y evitar que suba la
temperatura de los que ya están
almacenados en el frigorífico.
Para activar la función FastCool, pulse el
botón FastCool. Se enciende el indicador
FastCool.
La función se detiene
automáticamente después
de 6 horas.
La función se puede desactivar en
cualquier momento pulsando de nuevo el
botón FastCool. Se apaga el indicador
FastCool.
ESPAÑOL 45

5. USO DIARIO
PRECAUCIÓN!
Este aparato de enfriamiento
no es adecuado para
congelar alimentos.
5.1 Colocación de los estantes
de la puerta
Para poder guardar alimentos de
distintos tamaños, los estantes de la
puerta se pueden colocar a diferentes
alturas.
1. Tire gradualmente del estante hacia
arriba hasta que se suelte.
2. Vuelva a colocarlo según sea
necesario.
1
2
5.2 Estantes móviles
Las paredes del frigorífico cuentan con
una serie de guías para colocar los
estantes del modo que se prefiera.
No coloque el estante de
vidrio por encima del cajón
de verduras para no impedir
la correcta circulación del
aire.
5.3 Cajón para verduras
Este cajón es adecuado para guardar
frutas y verduras.
Para retirar el cajón (p. ej., con fines de
limpieza):
1. Tire del cajón y levántelo.
2. Empuje los rieles dentro del armario
para evitar que se dañe el aparato al
cerrar la puerta.
Para volver a montar:
www.electrolux.com46

1. Tire de los rieles.
2. Coloque la parte trasera del cajón (1)
sobre los rieles.
2
1
3. Mantenga la parte delantera del
cajón (2) levantada mientras empuja
el cajón hacia dentro.
4. Presione la parte delantera del cajón
hacia abajo.
Saque el cajón de nuevo y
compruebe si está colocado
correctamente en los
ganchos traseros y
delanteros.
5.4 Control de humedad
El estante de cristal incorpora un
dispositivo con ranuras (ajustables
mediante un palanca deslizante), que
permite regular la humedad de los
cajones para verduras.
La posición del control de la humedad
depende del tipo y de la cantidad de
frutas y verduras:
• Ranuras cerradas: se recomienda
cuando hay una pequeña cantidad de
frutas y verduras. De esta manera, el
contenido de humedad natural de las
frutas y verduras se conserva durante
más tiempo.
• Ranuras abiertas: se recomienda
cuando hay una gran cantidad de
frutas y verduras. De esta manera,
una mayor circulación de aire da
como resultado menor humedad del
aire.
5.5 Indicador de temperatura
Para almacenar correctamente los
alimentos, el frigorífico dispone de
indicador de temperatura. El símbolo de
la pared lateral indica el área más fría
del frigorífico.
Si aparece OK (A), coloque los alimentos
frescos en el área indicada por el
símbolo, si no (B), espere al menos 12
horas y compruebe si aparece OK (A).
Si todavía no aparece OK (B), ajuste el
control de configuración a un ajuste más
frío.
OK
OK
A
B
ESPAÑOL 47

5.6 DYNAMICAIR
El compartimento frigorífico cuenta con
un dispositivo que permite enfriar los
alimentos con rapidez y mantiene una
temperatura más uniforme dentro del
compartimento.
Encienda el aparato cuando
tenga que enfriar una gran
cantidad de alimentos o
cuando la temperatura
ambiente sea superior a
35°C para garantizar una
mayor homogeneización de
la temperatura interna.
Pulse el interruptor (A) para encender el
ventilador. Se enciende la luz verde (B).
A
B
Antes de apagar el aparato,
recuerde apagar el
ventilador pulsando el botón
(A). Se apaga la luz verde
(B).
6. CONSEJOS
6.1 Consejos para ahorrar
energía
• Se garantiza el consumo más
eficiente de energía en la
configuración con los cajones en la
parte inferior del aparato y los
estantes distribuidos uniformemente.
La posición de los contenedores de la
puerta no afecta al consumo de
energía.
• No abra la puerta con frecuencia ni la
deje abierta más tiempo del
necesario.
• No fije una temperatura demasiado
alta para ahorrar energía, a menos
que lo requieran las características
del alimento.
• Si la temperatura ambiente es alta, se
ha ajustado un valor de temperatura
bajo y el aparato está totalmente
lleno, el compresor podría funcionar
sin detenerse y generar escarcha o
hielo en el evaporador. En este caso,
ajuste el control a una temperatura
más alta para permitir la
descongelación automática y ahorrar
energía de esta manera.
• Asegure una buena ventilación. No
cubra las rejillas de ventilación ni los
agujeros.
6.2 Consejos para la
refrigeración de alimentos
frescos
• Un buen ajuste de temperatura que
asegure la conservación de los
alimentos frescos es una temperatura
menor o igual a +4°C.
Una temperatura más alta en el
interior del aparato puede reducir la
vida útil de los alimentos.
• Cubra el alimento con el envase para
preservar su frescura y aroma.
• Utilice siempre recipientes cerrados
para líquidos y para alimentos, para
evitar sabores u olores en el
compartimento.
• Para evitar la contaminación cruzada
entre alimentos cocidos y crudos,
cubra la comida cocinada y sepárela
de la cruda.
• Se recomienda descongelar los
alimentos dentro de la nevera.
• No coloque alimentos calientes dentro
del aparato. Asegúrese de que se
haya enfriado a temperatura ambiente
antes de introducirla.
• Para evitar el desperdicio de
alimentos, los alimentos más
recientes deben colocarse siempre
detrás de los viejos.
www.electrolux.com48

6.3 Consejos para la
refrigeración de alimentos
• Carne (de todo tipo): guárdela en un
envoltorio adecuado y colóquela en el
estante de vidrio, sobre el cajón de
las verduras. Almacene la carne
durante un máximo de 1-2 días.
• Frutas y verduras: limpie a fondo
(elimine la suciedad) y coloque en un
cajón especial (cajón de verduras).
• Es aconsejable no guardar en el
frigorífico las frutas exóticas como
plátanos, mangos, papayas, etc.
• Las verduras como tomates, patatas,
cebollas y ajos no deben guardarse
en el frigorífico.
• Mantequilla y queso: coloque en un
recipiente hermético, envuelva en
papel de aluminio o en bolsas de
polietileno para eliminar todo el aire
posible.
• Botellas: cierre con un tapón y
colóquelas en el estante para botellas
de la puerta de la puerta o en el
botellero (si dispone de él).
• Para acelerar el enfriamiento de los
productos, se recomienda encender
el ventilador. La activación del aire
dinámico permite una mayor
homogeneización de las temperaturas
internas.
• Consulte siempre la fecha de
caducidad de los productos para
saber cuánto tiempo debe
conservarlos.
7. MANTENIMIENTO Y LIMPIEZA
ADVERTENCIA!
Consulte los capítulos sobre
seguridad.
7.1 Limpieza del interior
Antes de utilizar el aparato por primera
vez, lave su interior y todos los
accesorios internos con agua templada y
jabón neutro para eliminar el típico olor
de los productos nuevos. A continuación,
seque todo bien.
PRECAUCIÓN!
No utilice detergentes,
polvos abrasivos ni
limpiadores a base de cloro
o aceite, ya que podrían
dañar el acabado.
PRECAUCIÓN!
Los accesorios y las piezas
del aparato no deben
lavarse en el lavavajillas.
7.2 Limpieza periódica
El equipo debe limpiarse de forma
regular:
1. Limpie el interior y los accesorios con
agua templada y un jabón neutro.
2. Revise y limpie periódicamente las
juntas de la puerta para mantenerlas
limpias y sin restos.
3. Aclare y seque a fondo.
7.3 Descongelación del
frigorífico
La escarcha se elimina automáticamente
del evaporador del compartimento
frigorífico durante el uso normal. El agua
de la descongelación se descarga por un
canal hacia un recipiente especial
situado en la parte posterior del aparato,
sobre el motor compresor, desde donde
se evapora.
Es importante limpiar periódicamente el
orificio de salida del agua de
descongelación situado en la mitad del
canal del compartimento frigorífico para
evitar que el agua se desborde y caiga
sobre los alimentos del interior.
Utilice para ello la varilla limpiadora
incluida con el aparato.
ESPAÑOL 49

7.4 Periodos sin
funcionamiento
Si el aparato no se utiliza durante un
tiempo prolongado, tome las siguientes
precauciones
1. Desconecte el aparato de la red
eléctrica.
2. Extraiga todos los alimentos.
3. Limpie el aparato y todos los
accesorios.
4. Deje la puerta abierta para evitar
olores desagradables.
8. SOLUCIÓN DE PROBLEMAS
ADVERTENCIA!
Consulte los capítulos sobre
seguridad.
8.1 Qué hacer si...
Problema Posible causa Solución
El aparato no funciona. El aparato se apaga. Encienda el electrodomés‐
tico.
El aparato no está correc‐
tamente enchufado a la to‐
ma de corriente.
Enchufe el aparato correc‐
tamente a la toma de co‐
rriente.
No hay tensión en la toma
de corriente.
Enchufe un aparato eléctri‐
co diferente a la toma de
corriente. Llame a un elec‐
tricista cualificado.
El aparato hace ruido. El aparato no está bien
apoyado en el suelo.
Compruebe que los sopor‐
tes del aparato descansan
sobre una superficie esta‐
ble.
El compresor funciona
continuamente.
La temperatura está ajus‐
tada incorrectamente.
Consulte el capítulo "Panel
de control".
Se han guardado muchos
alimentos al mismo tiempo.
Espere unas horas y vuel‐
va a comprobar la tempe‐
ratura.
La temperatura ambiente
es demasiado alta.
Consulte el capítulo "Insta‐
lación".
www.electrolux.com50

Problema Posible causa Solución
Los alimentos introducidos
en el aparato estaban de‐
masiado calientes.
Deje que los alimentos se
enfríen a temperatura am‐
biente antes de almace‐
narlos.
La puerta no está bien ce‐
rrada.
Consulte la sección "Cierre
de la puerta".
La función FastCool está
activada.
Consulte la sección “Fun‐
ción FastCool”.
El compresor no se pone
en marcha inmediatamen‐
te después de pulsar
"FastCool", o tras cambiar
la temperatura.
El compresor se pone en
marcha después de un
cierto tiempo.
Esto es normal y no signifi‐
ca que exista un error.
La puerta está mal alinea‐
da o interfiere con la rejilla
de ventilación.
El aparato no está nivela‐
do.
Consulte las instrucciones
de instalación.
La puerta no se abre fácil‐
mente.
Ha intentado volver a abrir
la puerta inmediatamente
después de cerrarla.
Espere unos segundos en‐
tre el cierre y la reapertura
de la puerta.
La bombilla no funciona. La bombilla está en modo
de espera.
Cierre y abra la puerta.
La bombilla es defectuosa. Póngase en contacto con
el servicio técnico autoriza‐
do más cercano.
Hay demasiada escarcha
o hielo.
La puerta no está bien ce‐
rrada.
Consulte la sección "Cierre
de la puerta".
La junta de la puerta está
sucia o deformada.
Consulte la sección "Cierre
de la puerta".
Los alimentos no están
bien envueltos.
Envuelva mejor los produc‐
tos.
La temperatura está ajus‐
tada incorrectamente.
Consulte el capítulo "Panel
de control".
El aparato está completa‐
mente cargado y ajustado
a la temperatura más baja.
Seleccione una temperatu‐
ra más alta. Consulte el
capítulo "Panel de control".
La temperatura ajustada
en el aparato es demasia‐
do baja y la temperatura
ambiente demasiado alta.
Seleccione una temperatu‐
ra más alta. Consulte el
capítulo "Panel de control".
ESPAÑOL 51

Problema Posible causa Solución
El agua fluye por la placa
posterior del frigorífico.
Durante el proceso de des‐
congelación automática, la
escarcha se derrite en la
placa posterior.
Es correcto.
Hay demasiada agua de
condensación en la pared
posterior del frigorífico.
La puerta se abre con de‐
masiada frecuencia.
Abra la puerta solo cuando
sea necesario.
La puerta no se cierra
completamente.
Asegúrese de que la puer‐
ta está cerrada completa‐
mente.
Los alimentos guardados
no están envueltos correc‐
tamente.
Envuelva los alimentos co‐
rrectamente antes de guar‐
darlos en el aparato.
El agua fluye por el interior
del frigorífico.
Los productos impiden que
el agua fluya al colector de
agua.
Asegúrese de que los ali‐
mentos no entran en con‐
tacto con la placa poste‐
rior.
La salida de agua está
obstruida.
Limpie la salida de agua.
Hay agua en el suelo. La salida de agua de la
descongelación no está
conectada a la bandeja de
evaporación situada sobre
el compresor.
Fije la salida de agua de
descongelación a la ban‐
deja de evaporación.
No es posible ajustar la
temperatura.
La "Función FastCool" está
activada.
Apague manualmente la
"Función FastCool", o es‐
pere hasta que la función
se desactive automática‐
mente antes de ajustar la
temperatura. Consulte
"Función FastCool".
La temperatura del aparato
es demasiado baja/alta.
La temperatura no se ha
ajustado correctamente.
Seleccione una temperatu‐
ra más alta o baja.
La puerta no está bien ce‐
rrada.
Consulte la sección "Cierre
de la puerta".
La temperatura de los pro‐
ductos es demasiado alta.
Deje que la temperatura
de los productos descien‐
da a la temperatura am‐
biente antes de guardar‐
los.
Se han guardado muchos
alimentos al mismo tiempo.
Guarde menos productos
al mismo tiempo.
La puerta se ha abierto
con frecuencia.
Si es necesario, cierre la
puerta.
www.electrolux.com52

Problema Posible causa Solución
La función FastCool está
activada.
Consulte la sección “Fun‐
ción FastCool”.
No hay circulación de aire
frío en el aparato.
Compruebe que el aire frío
circula libremente en el
aparato. Consulte el capí‐
tulo "Consejos".
Los LED de ajuste de tem‐
peratura parpadean al mis‐
mo tiempo.
Se ha producido un error
en la medición de la tem‐
peratura.
Póngase en contacto con
el servicio técnico autoriza‐
do más cercano. El siste‐
ma de refrigeración segui‐
rá manteniendo fríos los
alimentos, pero no podrá
ajustar la temperatura.
Si el consejo anterior no
ofrece resultados, llame al
servicio técnico autorizado
más cercano.
8.2 Cambio de la bombilla
El aparato está equipado con una luz
LED interior de larga duración.
El dispositivo de iluminación solo debe
ser sustituido por el servicio técnico.
Póngase en contacto con el servicio
técnico.
8.3 Cierre de la puerta
1. Limpie las juntas de la puerta.
2. Si es necesario, ajuste la puerta.
Consulte las instrucciones de
instalación.
3. Si es necesario, cambie las juntas
defectuosas. Póngase en contacto
con el servicio técnico autorizado.
ESPAÑOL 53

9. RUIDOS
SSSRRR!
CLICK!
HISSS!
BRRR!
BLUBB!
10. DATOS TÉCNICOS
La información técnica se encuentra en
la placa de datos técnicos en el lado
interior izquierdo del aparato y en la
etiqueta de energía.
El código QR de la etiqueta energética
suministrada con el aparato proporciona
un enlace web a la información
relacionada con el rendimiento del
aparato en la base de datos de EU
EPREL. Guarde la etiqueta de energía
como referencia junto con el manual de
usuario y todos los demás documentos
que se proporcionan con este aparato.
También puede encontrar la misma
información en EPREL utilizando el
enlace
https://eprel.ec.europa.eu
y el
nombre del modelo y el número de
producto que se encuentra en la placa
de características del aparato.
Consulte el enlace
www.theenergylabel.eu
para información
detallada sobre la etiqueta energética.
11. INFORMACIÓN PARA LOS INSTITUTOS DE
PRUEBAS
La instalación y la preparación del
aparato para cualquier verificación de
EcoDiseño deberá cumplir con EN
62552. Los requisitos de ventilación, las
dimensiones de los huecos y las
distancias mínimas traseras serán los
indicados en el Capítulo 3 de este
Manual de Usuario. Por favor, póngase
en contacto con el fabricante para
www.electrolux.com54

cualquier otra información adicional,
incluyendo los planos de carga.
12. ASPECTOS MEDIOAMBIENTALES
Recicle los materiales con el símbolo .
Coloque el material de embalaje en los
contenedores adecuados para su
reciclaje. Ayude a proteger el medio
ambiente y la salud pública, así como a
reciclar residuos de aparatos eléctricos y
electrónicos. No deseche los aparatos
marcados con el símbolo junto con los
residuos domésticos. Lleve el producto a
su centro de reciclaje local o póngase en
contacto con su oficina municipal.
*
ESPAÑOL 55

www.electrolux.com/shop
222377925-A-402020
Transcripción de documentos
ERS3DF18S EN DE ES Refrigerator Kühlschrank Frigorífico User Manual Benutzerinformation Manual de instrucciones 2 19 38 2 www.electrolux.com CONTENTS 1. SAFETY INFORMATION....................................................................................2 2. SAFETY INSTRUCTIONS..................................................................................4 3. INSTALLATION.................................................................................................. 6 4. CONTROL PANEL............................................................................................. 9 5. DAILY USE......................................................................................................... 9 6. HINTS AND TIPS............................................................................................. 12 7. CARE AND CLEANING....................................................................................13 8. TROUBLESHOOTING......................................................................................13 9. NOISES............................................................................................................ 17 10. TECHNICAL DATA.........................................................................................17 11. INFORMATION FOR TEST INSTITUTES......................................................17 WE’RE THINKING OF YOU Thank you for purchasing an Electrolux appliance. You’ve chosen a product that brings with it decades of professional experience and innovation. Ingenious and stylish, it has been designed with you in mind. So whenever you use it, you can be safe in the knowledge that you’ll get great results every time. Welcome to Electrolux. Visit our website to: Get usage advice, brochures, trouble shooter, service and repair information: www.electrolux.com/support Register your product for better service: www.registerelectrolux.com Buy Accessories, Consumables and Original spare parts for your appliance: www.electrolux.com/shop CUSTOMER CARE AND SERVICE Always use original spare parts. When contacting our Authorised Service Centre, ensure that you have the following data available: Model, PNC, Serial Number. The information can be found on the rating plate. Warning / Caution-Safety information General information and tips Environmental information Subject to change without notice. 1. SAFETY INFORMATION Before the installation and use of the appliance, carefully read the supplied instructions. The manufacturer is not responsible for any injuries or damage that are the result ENGLISH 3 of incorrect installation or usage. Always keep the instructions in a safe and accessible location for future reference. 1.1 Children and vulnerable people safety • • • • • • • This appliance can be used by children aged from 8 years and above and persons with reduced physical, sensory or mental capabilities or lack of experience and knowledge if they have been given supervision or instruction concerning the use of the appliance in a safe way and understand the hazards involved. Children aged from 3 to 8 years are allowed to load and unload the appliance provided that they have been properly instructed. This appliance may be used by persons with very extensive and complex disabilities provided that they have been properly instructed. Children of less than 3 years of age should be kept away from the appliance unless continuously supervised. Do not let children play with the appliance. Children shall not carry out cleaning and user maintenance of the appliance without supervision. Keep all packaging away from children and dispose of it appropriately. 1.2 General Safety • • This appliance is intended to be used in household and similar applications such as: – Farm houses; staff kitchen areas in shops, offices and other working environments; – By clients in hotels, motels, bed and breakfast and other residential type environments. To avoid contamination of food respect the following instructions: – do not open the door for long periods; – clean regularly surfaces that can come in contact with food and accessible drainage systems; 4 www.electrolux.com store raw meat and fish in suitable containers in the refrigerator, so that it is not in contact with or drip onto other food. WARNING: Keep ventilation openings, in the appliance enclosure or in the built-in structure, clear of obstruction. WARNING: Do not use mechanical devices or other means to accelerate the defrosting process, other than those recommended by the manufacturer. WARNING: Do not damage the refrigerant circuit. WARNING: Do not use electrical appliances inside the food storage compartments of the appliance, unless they are of the type recommended by the manufacturer. Do not use water spray and steam to clean the appliance. Clean the appliance with a moist soft cloth. Only use neutral detergents. Do not use abrasive products, abrasive cleaning pads, solvents or metal objects. When the appliance is empty for long period, switch it off, defrost, clean, dry and leave the door open to prevent mould from developing within the appliance. Do not store explosive substances such as aerosol cans with a flammable propellant in this appliance. If the supply cord is damaged, it must be replaced by the manufacturer, its Authorised Service Centre or similarly qualified persons in order to avoid a hazard. – • • • • • • • • • 2. SAFETY INSTRUCTIONS 2.1 Installation WARNING! Only a qualified person must install this appliance. • • • Remove all the packaging. Do not install or use a damaged appliance. Do not use the appliance before installing it in the built-in structure due to safety manner. • • • • Follow the installation instructions supplied with the appliance. Always take care when moving the appliance as it is heavy. Always use safety gloves and enclosed footwear. Make sure the air can circulate around the appliance. At first installation or after reversing the door wait at least 4 hours before connecting the appliance to the power supply. This is to allow the oil to flow back in the compressor. ENGLISH • • • • • • • Before carrying out any operations on the appliance (e.g. reversing the door), remove the plug from the power socket. Do not install the appliance close to radiators or cookers, ovens or hobs. Do not expose the appliance to the rain. Do not install the appliance where there is direct sunlight. Do not install this appliance in areas that are too humid or too cold. When you move the appliance, lift it by the front edge to avoid scratching the floor. The appliance contains a bag of desiccant. This is not a toy. This is not food. Please dispose of it immediately. 2.2 Electrical connection • • • • • • • access to the mains plug after the installation. Do not pull the mains cable to disconnect the appliance. Always pull the mains plug. 2.3 Use WARNING! Risk of injury, burns, electric shock or fire. The appliance contains flammable gas, isobutane (R600a), a natural gas with a high level of environmental compatibility. Be careful not to cause damage to the refrigerant circuit containing isobutane. • WARNING! Risk of fire and electric shock. • WARNING! When positioning the appliance, ensure the supply cord is not trapped or damaged. • WARNING! Do not use multi-plug adapters and extension cables. • The appliance must be earthed. Make sure that the parameters on the rating plate are compatible with the electrical ratings of the mains power supply. Always use a correctly installed shockproof socket. Make sure not to cause damage to the electrical components (e.g. mains plug, mains cable, compressor). Contact the Authorised Service Centre or an electrician to change the electrical components. The mains cable must stay below the level of the mains plug. Connect the mains plug to the mains socket only at the end of the installation. Make sure that there is 5 • • • Do not change the specification of this appliance. Do not put electrical appliances (e.g. ice cream makers) in the appliance unless they are stated applicable by the manufacturer. If damage occurs to the refrigerant circuit, make sure that there are no flames and sources of ignition in the room. Ventilate the room. Do not let hot items to touch the plastic parts of the appliance. Do not store flammable gas and liquid in the appliance. Do not put flammable products or items that are wet with flammable products in, near or on the appliance. Do not touch the compressor or the condenser. They are hot. 2.4 Internal lighting WARNING! Risk of electric shock. • Concerning the lamp(s) inside this product and spare part lamps sold separately: These lamps are intended to withstand extreme physical conditions in household appliances, such as temperature, vibration, humidity, or are intended to signal information about the operational status of the appliance. They are not intended to be used in other applications and are not suitable for household room illumination. 6 www.electrolux.com 2.5 Care and cleaning WARNING! Risk of injury or damage to the appliance. • • • Before maintenance, deactivate the appliance and disconnect the mains plug from the mains socket. This appliance contains hydrocarbons in the cooling unit. Only a qualified person must do the maintenance and the recharging of the unit. Regularly examine the drain of the appliance and if necessary, clean it. If the drain is blocked, defrosted water collects in the bottom of the appliance. 2.6 Service • • • To repair the appliance contact the Authorised Service Centre. Use original spare parts only. Please note that self-repair or nonprofessional repair can have safety consequences and might void the guarantee. The following spare parts will be available for 7 years after the model has been discontinued: thermostats, temperature sensors, printed circuit boards, light sources, door handles, • door hinges, trays and baskets. Please note that some of these spare parts are only available to professional repairers, and that not all spare parts are relevant for all models. Door gaskets will be available for 10 years after the model has been discontinued. 2.7 Disposal WARNING! Risk of injury or suffocation. • • • • • • Disconnect the appliance from the mains supply. Cut off the mains cable and discard it. Remove the door to prevent children and pets to be closed inside of the appliance. The refrigerant circuit and the insulation materials of this appliance are ozone-friendly. The insulation foam contains flammable gas. Contact your municipal authority for information on how to discard the appliance correctly. Do not cause damage to the part of the cooling unit that is near the heat exchanger. 3. INSTALLATION WARNING! Refer to Safety chapters. WARNING! Refer to installation instruction document to install your appliance. WARNING! Fix the appliance in accordance with installation instruction document to avoid a risk of instability of the appliance. ENGLISH 7 D3 D1 3.1 Dimensions W1 90 D2 ° W3 B A H1 W2 Overall dimensions ¹ H1 mm 1772 W1 mm 548 D1 mm 549 ¹ the height, width and depth of the appliance without the handle and feet Space required in use ² H2 (A+B) mm 1816 W2 mm 548 D2 mm 551 A mm 1780 B mm 36 ² the height, width and depth of the appliance including the handle, plus the space necessary for free circulation of the cooling air Overall space required in use ³ H3 (A+B) mm 1816 W3 mm 548 D3 mm 1071 ³ the height, width and depth of the appliance including the handle, plus the space necessary for free circulation of the cooling air, plus the space necessary to allow door opening to the minimum angle permitting removal of all internal equipment 8 www.electrolux.com 3.2 Location To ensure appliance's best functionality, you should not install the appliance in the nearby of the heat source (oven, stoves, radiators, cookers or hobs) or in a place with direct sunlight. Make sure that air can circulate freely around the back of the cabinet. This appliance should be installed in a dry, well ventilated indoor position. This appliance is intended to be used at ambient temperature ranging from 10°C to 38°C. The correct operation of the appliance can only be guaranteed within the specified temperature range. • • separate earth in compliance with current regulations, consulting a qualified electrician. The manufacturer declines all responsibility if the above safety precautions are not observed. This appliance complies with the E.E.C. Directives. 3.4 Ventilation requirements The airflow behind the appliance must be sufficient. 5 cm min. 200 cm2 If you have any doubts regarding where to install the appliance, please turn to the vendor, to our customer service or to the nearest Authorised Service Centre. It must be possible to disconnect the appliance from the mains power supply. The plug must therefore be easily accessible after installation. 3.3 Electrical connection • • Before plugging in, ensure that the voltage and frequency shown on the rating plate correspond to your domestic power supply. The appliance must be earthed. The power supply cable plug is provided with a contact for this purpose. If the domestic power supply socket is not earthed, connect the appliance to a min. 200 cm2 CAUTION! Refer to the installation instructions for the installation. 3.5 Door reversibility Please refer to the separate document with instructions on installation and door reversal. CAUTION! At every stage of reversing the door protect the floor from scratching with a durable material. ENGLISH 9 4. CONTROL PANEL 1 2 progressive, varying from 2°C to 8°C. Recommended setting is 4°C. 1. Touch temperature regulator. Current temperature indicator blinks. Any time you touch the temperature regulator, the setting moves by one position. The corresponding LED blinks for a while. 2. Touch the temperature regulator until the required temperature is selected. 4 1. 2. 3. 4. 3 Temperature indicator LED FastCool indicator FastCool button Temperature regulator ON/OFF button 4.1 Switching on 1. Insert the plug into the wall socket. 2. Touch the temperature regulator button if all LED indicators are off. 4.2 Switching off Keep touching the temperature regulator button for 3 seconds. All indicators light off. 4.3 Temperature regulation To operate the appliance, touch the temperature regulator until the LED corresponding to the required temperature lights up. Selection is The set temperature will be reached within 24 hours. After a power failure the set temperature remains stored. 4.4 FastCool function If you need to insert in the fridge compartment a large amount of food at ambient temperature, for example after doing the grocery shopping, we suggest activating theFastCool function to chill the products more rapidly and to avoid warming the other food which is already in the refrigerator. To activate FastCool function press the FastCool button. The FastCool indicator switches on. This function stops automatically after 6 hours. It is possible to deactivate the function at any time by pressing FastCool button again. The FastCool indicator switches off. 5. DAILY USE CAUTION! This refrigerating appliance is not suitable for freezing foodstuffs. 5.1 Positioning the door shelves To permit storage of food packages of various sizes, the door shelves can be placed at different heights. 1. Gradually pull the shelf up until it comes free. 2. Reposition as required. 10 www.electrolux.com 1 2 5.2 Movable shelves The walls of the refrigerator are equipped with a series of runners so that the shelves can be positioned as desired. Do not move the glass shelf above the vegetable drawer to ensure correct air circulation. 5.3 Vegetable drawer The drawer is suitable for storing fruit and vegetables. To remove the drawer (e.g. for cleaning): 1. Pull out the drawer and lift it up. 2. Push the rails inside the cabinet to avoid damage to the appliance when closing the door. To reassemble: 1. Pull out the rails. ENGLISH 2. Place the rear part of the drawer (1) on the rails. 11 vegetables. In this way, more air circulation results in a lower air moisture. 5.5 Temperature indicator 2 1 For proper storage of food the refrigerator is equipped with the temperature indicator. The symbol on the side wall of the appliance indicates the coldest area in the refrigerator. If OK is displayed (A), put fresh food into area indicated by symbol, if not (B), wait at least 12 hours and check if it is OK (A). 3. Keep the front of the drawer (2) lifted up while pushing the drawer in. 4. Press the front part of the drawer downwards. Pull out the drawer again and check if it is placed correctly on both rear and front hooks. 5.4 Humidity control The glass shelf incorporates a device with slits (adjustable by means of a sliding lever), which makes it possible to regulate the humidity in the vegetable drawer(s). If it is still not OK (B), adjust the setting control to a colder setting. A OK B OK 5.6 DYNAMICAIR The refrigerator compartment is equipped with a device that allows rapid cooling of foods and keeps more uniform temperature in the compartment. Switch on the device when you have to cool down a big amount of food or when the room temperature is higher than 35°C to guarantee a greater homogenization of internal temperature. Press the button (A) to switch ON the fan. The green light (B) appears. The position of the humidity control depends on the type and on the amount of fruits and vegetables: • • Slots closed: recommended when there is a small amount of fruits and vegetables. In this way, the natural moisture content in fruits and vegetables is preserved longer. Slots opened: recommended when there is a big amount of fruits and A B 12 www.electrolux.com Before switching off the appliance, remember to turn off the fan by pressing the button (A). The green light (B) disappears. 6. HINTS AND TIPS 6.1 Hints for energy saving • • • • • Most efficient use of energy is ensured in the configuration with the drawers in the bottom part of the appliance and shelves evenly distributed. Position of the door bins does not affect energy consumption. Do not open the door frequently or leave it open longer than necessary. Do not set too high temperature to save energy unless it is required by the characteristics of the food. If the ambient temperature is high and the temperature control is set to low temperature and the appliance is fully loaded, the compressor may run continuously, causing frost or ice formation on the evaporator. In this case, set the temperature control toward higher temperature to allow automatic defrosting and to save energy this way. Ensure a good ventilation. Do not cover the ventilation grilles or holes. 6.2 Hints for fresh food refrigeration • • • • Good temperature setting that ensures preservation of fresh food is a temperature less than or equal to +4°C. Higher temperature setting inside the appliance may lead to shorter shelf life of food. Cover the food with packaging to preserve its freshness and aroma. Always use closed containers for liquids and for food, to avoid flavours or odours in the compartment. To avoid the cross-contamination between cooked and raw food, cover • • • the cooked food and separate it from the raw one. It is recommended to defrost the food inside the fridge. Do not insert hot food inside the appliance. Make sure it has cooled down at room temperature before inserting it. To prevent food waste the new stock of food should always be placed behind the old one. 6.3 Hints for food refrigeration • • • • • • • • Meat (all types): wrap in a suitable packaging and place it on the glass shelf above the vegetable drawer. Store meat for at most 1-2 days. Fruit and vegetables: clean thoroughly (eliminate the soil) and place in a special drawer (vegetable drawer). It is advisable not to keep the exotic fruits like bananas, mangos, papayas etc. in the refrigerator. Vegetables like tomatoes, potatoes, onions, and garlic should not be kept in the refrigerator. Butter and cheese: place in an airtight container or wrap in an aluminium foil or a polythene bag to exclude as much air as possible. Bottles: close them with a cap and place them on the door bottle shelf, or (if available) on the bottle rack. In order to accelerate cooling down of the goods, it is advisable to turn on the fan. The activation of dynamic air allows greater homogenization of internal temperatures. Always refer to the expiry date of the products to know how long to keep them. ENGLISH 13 7. CARE AND CLEANING WARNING! Refer to Safety chapters. 7.1 Cleaning the interior Before using the appliance for the first time, the interior and all internal accessories should be washed with lukewarm water and some neutral soap to remove the typical smell of a brandnew product, then dried thoroughly. CAUTION! Do not use detergents, abrasive powders, chlorine or oil-based cleaners as they will damage the finish. compartment during normal use. The defrost water drains out through a trough into a special container at the back of the appliance, over the motor compressor, where it evaporates. It is important to periodically clean the defrost water drain hole in the middle of the refrigerator compartment channel to prevent the water overflowing and dripping onto the food inside. For this purpose use the tube cleaner provided with the appliance. CAUTION! The accessories and parts of the appliance are not suitable for washing in a dishwasher. 7.2 Periodic cleaning The equipment has to be cleaned regularly: 1. Clean the inside and accessories with lukewarm water and some neutral soap. 2. Regularly check the door seals and wipe them clean to ensure they are clean and free from debris. 3. Rinse and dry thoroughly. 7.3 Defrosting of the refrigerator Frost is automatically eliminated from the evaporator of the refrigerator 8. TROUBLESHOOTING WARNING! Refer to Safety chapters. 7.4 Period of non-operation When the appliance is not in use for long period, take the following precautions: 1. Disconnect the appliance from electricity supply. 2. Remove all food. 3. Clean the appliance and all accessories. 4. Leave the door open to prevent unpleasant smells. 14 www.electrolux.com 8.1 What to do if... Problem Possible cause Solution The appliance does not operate. The appliance is switched off. Switch on the appliance. The mains plug is not con‐ Connect the mains plug to nected to the mains socket the mains socket correctly. correctly. There is no voltage in the mains socket. Connect a different electri‐ cal appliance to the mains socket. Contact a qualified electrician. The appliance is noisy. The appliance is not sup‐ ported properly. Check if the appliance stands stable. The compressor operates continually. Temperature is set incor‐ rectly. Refer to "Control Panel" chapter. Many food products were put in at the same time. Wait a few hours and then check the temperature again. The room temperature is too high. Refer to "Installation" chap‐ ter. Food products placed in the appliance were too warm. Allow food products to cool to room temperature be‐ fore storing. The door is not closed cor‐ Refer to "Closing the door" rectly. section. The FastCool function is switched on. Refer to "FastCool func‐ tion" section. The compressor does not The compressor starts af‐ start immediately after ter a period of time. pressing the "FastCool", or after changing the temper‐ ature. This is normal, no error has occurred. Door is misaligned or inter‐ The appliance is not level‐ feres with ventilation grill. led. Refer to installation instruc‐ tions. Door does not open easily. You attempted to re-open the door immediately after closing. Wait a few seconds be‐ tween closing and re-open‐ ing of the door. The lamp does not work. The lamp is in stand-by mode. Close and open the door. The lamp is defective. Contact the nearest Au‐ thorized Service Centre. ENGLISH 15 Problem Possible cause Solution There is too much frost and ice. The door is not closed cor‐ Refer to "Closing the door" rectly. section. The gasket is deformed or dirty. Refer to "Closing the door" section. Food products are not wrapped properly. Wrap the food products better. Temperature is set incor‐ rectly. Refer to "Control Panel" chapter. Appliance is fully loaded and is set to the lowest temperature. Set a higher temperature. Refer to "Control Panel" chapter. Temperature set in the ap‐ Set a higher temperature. pliance is too low and the Refer to "Control Panel" ambient temperature is too chapter. high. Water flows on the rear plate of the refrigerator. During the automatic de‐ frosting process, frost melts on the rear plate. This is correct. There is too much con‐ densed water on the rear wall of the refrigerator. Door was opened too fre‐ quently. Open the door only when necessary. Door was not closed com‐ pletely. Make sure the door is closed completely. Stored food was not wrap‐ ped. Wrap food in suitable packaging before storing it in the appliance. Food products prevent the water from flowing into the water collector. Make sure that food prod‐ ucts do not touch the rear plate. The water outlet is clog‐ ged. Clean the water outlet. Water flows inside the re‐ frigerator. Water flows on the floor. The melting water outlet is Attach the melting water not connected to the evap‐ outlet to the evaporative orative tray above the com‐ tray. pressor. Temperature cannot be set. The "FastCool function" is switched on. Switch off "FastCool func‐ tion" manually, or wait until the function deactivates automatically to set the temperature. Refer to "FastCool function" sec‐ tion. 16 www.electrolux.com Problem Possible cause The temperature in the ap‐ The temperature is not set pliance is too low/too high. correctly. Solution Set a higher/lower temper‐ ature. The door is not closed cor‐ Refer to "Closing the door" rectly. section. The food products' temper‐ Let the food products tem‐ ature is too high. perature decrease to room temperature before stor‐ age. Many food products are stored at the same time. Store less food products at the same time. The door has been opened Open the door only if nec‐ often. essary. The FastCool function is switched on. Refer to "FastCool func‐ tion" section. There is no cold air circula‐ Make sure that there is tion in the appliance. cold air circulation in the appliance. Refer to "Hints and Tips" chapter. Temperature setting LEDs flash at the same time. An error has occurred in measuring the tempera‐ ture. If the advice does not lead to the desired result, call the nearest Authorized Service Centre. 8.2 Replacing the lamp The appliance is equipped with a longlife LED interior light. Only service is allowed to replace the lighting device. Contact your Authorised Service Centre. Contact the nearest Au‐ thorised Service Centre. The cooling system will continue to keep food products cold, but temper‐ ature adjustment will not be possible. 8.3 Closing the door 1. Clean the door gaskets. 2. If necessary, adjust the door. Refer to installation instructions. 3. If necessary, replace the defective door gaskets. Contact the Authorised Service Centre. ENGLISH 17 9. NOISES SSSRRR! BRRR! CLICK! HISSS! BLUBB! 10. TECHNICAL DATA The technical information is situated in the rating plate on the internal side of the appliance and on the energy label. The QR code on the energy label supplied with the appliance provides a web link to the information related to the performance of the appliance in the EU EPREL database. Keep the energy label for reference together with the user manual and all other documents provided with this appliance. It is also possible to find the same information in EPREL using the link https://eprel.ec.europa.eu and the model name and product number that you find on the rating plate of the appliance. See the link www.theenergylabel.eu for detailed information about the energy label. 11. INFORMATION FOR TEST INSTITUTES Installation and preparation of the appliance for any EcoDesign verification shall be compliant with EN 62552. Ventilation requirements, recess dimensions and minimum rear clearances shall be as stated in this User Manual at Chapter 3. Please contact the manufacturer for any other further information, including loading plans. 18 www.electrolux.com 12. ENVIRONMENTAL CONCERNS Recycle materials with the symbol . Put the packaging in relevant containers to recycle it. Help protect the environment and human health by recycling waste of electrical and electronic appliances. Do not dispose of appliances marked with the symbol with the household waste. Return the product to your local recycling facility or contact your municipal office. DEUTSCH 19 INHALTSVERZEICHNIS 1. SICHERHEITSHINWEISE................................................................................19 2. SICHERHEITSANWEISUNGEN...................................................................... 22 3. MONTAGE........................................................................................................24 4. BEDIENFELD................................................................................................... 27 5. TÄGLICHER GEBRAUCH................................................................................27 6. TIPPS UND HINWEISE....................................................................................30 7. REINIGUNG UND PFLEGE............................................................................. 31 8. FEHLERSUCHE............................................................................................... 32 9. GERÄUSCHE................................................................................................... 36 10. TECHNISCHE DATEN................................................................................... 36 11. INFORMATIONEN FÜR PRÜFINSTITUTE....................................................36 WIR DENKEN AN SIE Vielen Dank, dass Sie sich für ein Gerät von Electrolux entschieden haben. Sie haben ein Produkt gewählt, hinter dem jahrzehntelange professionelle Erfahrung und Innovation stehen. Bei der Entwicklung dieses großartigen und eleganten Geräts haben wir an Sie gedacht. So haben Sie bei jedem Gebrauch die Gewissheit, dass Sie stets großartige Ergebnisse erzielen werden. Willkommen bei Electrolux. Besuchen Sie uns auf unserer Website, um: Anwendungshinweise, Prospekte, Fehlerbehebungs-, Service- und ReparaturInformationen zu erhalten: www.electrolux.com/support Ihr erworbenes Produkt zu registrieren, um den besten Service für es zu gewährleisten: www.registerelectrolux.com Zubehör, Verbrauchsmaterial und Original-Ersatzteile für Ihr Gerät zu erwerben: www.electrolux.com/shop REPARATUR- UND KUNDENDIENST Verwenden Sie ausschließlich Original-Ersatzteile. Halten Sie folgende Angaben bereit, wenn Sie sich an den Kundendienst wenden: Modell, Produktnummer (PNC), Seriennummer. Diese Informationen finden Sie auf dem Typenschild. Warnungs-/Sicherheitshinweise Allgemeine Informationen und Empfehlungen Informationen zum Umweltschutz Änderungen vorbehalten. 1. SICHERHEITSHINWEISE Lesen Sie vor der Montage und dem Gebrauch des Geräts zuerst die Bedienungsanleitung. Bei 20 www.electrolux.com Verletzungen oder Schäden infolge nicht ordnungsgemäßer Montage oder Verwendung übernimmt der Hersteller keine Haftung. Bewahren Sie die Anleitung zum Nachschlagen an einem sicheren und zugänglichen Ort auf. 1.1 Sicherheit von Kindern und schutzbedürftigen Personen • • • • • • • Das Gerät kann von Kindern ab 8 Jahren und Personen mit eingeschränkten physischen, sensorischen oder geistigen Fähigkeiten oder mit mangelnder Erfahrung und/oder mangelndem Wissen nur dann verwendet werden, wenn sie durch eine für ihre Sicherheit zuständige Person beaufsichtigt werden oder in die sichere Verwendung des Geräts eingewiesen wurden und die mit dem Gerät verbundenen Gefahren verstanden haben. Kinder zwischen 3 und 8 Jahren dürfen das Gerät beund entladen, vorausgesetzt, sie wurden ordnungsgemäß eingewiesen. Dieses Gerät kann von Personen mit schweren und komplexen Behinderungen benutzt werden, vorausgesetzt, sie wurden ordnungsgemäß eingewiesen. Halten Sie Kinder unter 3 Jahren vom Gerät fern, wenn sie nicht ständig beaufsichtigt werden. Kinder dürfen nicht mit dem Gerät spielen. Kinder dürfen keine Reinigung und Wartung ohne Beaufsichtigung durchführen. Halten Sie sämtliches Verpackungsmaterial von Kindern fern und entsorgen Sie es ordnungsgemäß. 1.2 Allgemeine Sicherheit • Dieses Gerät ist für die Verwendung im Haushalt und ähnliche Zwecke vorgesehen, wie z. B.: – Bauernhöfe, Personalküchenbereiche in Geschäften, Büros und anderen Arbeitsumfeldern; DEUTSCH Für Gäste in Hotels, Motels, Pensionen und anderen wohnungsähnlichen Räumlichkeiten. Um eine Kontaminierung von Lebensmitteln zu vermeiden, beachten Sie die folgenden Hinweise: – Öffnen Sie die Tür nicht über längere Zeit hinweg; – Reinigen Sie regelmäßig Oberflächen, die mit Lebensmitteln in Kontakt kommen können, und zugängliche Ablaufsysteme; – Lagern Sie rohes Fleisch und Fisch in geeigneten Behältern im Kühlschrank, so dass sie nicht mit anderen Lebensmitteln in Berührung kommen oder auf diese tropfen. WARNUNG: Achten Sie darauf, dass die Belüftungsöffnungen im Schrank, um das Gerät und in der Einbaunische nicht blockiert sind. WARNUNG: Versuchen Sie nicht, den Abtauvorgang durch andere als vom Hersteller empfohlene mechanische oder sonstige Hilfsmittel zu beschleunigen. WARNUNG: Beschädigen Sie nicht den Kältekreislauf. WARNUNG: Betreiben Sie in den Lebensmittelfächern des Geräts keine anderen als die vom Hersteller empfohlenen Elektrogeräte. Reinigen Sie das Gerät nicht mit Wasserspray oder Dampf. Reinigen Sie das Geräts mit einem weichen, feuchten Tuch. Nur neutrale Reinigungsmittel verwenden. Benutzen Sie keine Scheuermittel, scheuernde Reinigungsschwämmchen, Lösungsmittel oder Metallgegenstände. Wenn das Gerät längere Zeit leer steht, schalten Sie es aus, tauen Sie es ab, reinigen und trocknen Sie es und lassen Sie die Tür offen, um Schimmelbildung im Gerät zu vermeiden. Bewahren Sie in dem Gerät keine explosiven Substanzen, wie Spraydosen mit entzündlichen Treibgasen auf. – • • • • • • • • • 21 22 www.electrolux.com • Wenn das Netzkabel beschädigt ist, muss es vom Hersteller, seinem autorisierten Kundenservice oder einer gleichermaßen qualifizierten Person ausgetauscht werden, um Gefahrenquellen zu vermeiden. 2. SICHERHEITSANWEISUNGEN 2.1 Montage WARNUNG! Die Montage des Geräts darf nur von einer qualifizierten Fachkraft durchgeführt werden. • • • • • • • • • • • • Entfernen Sie das gesamte Verpackungsmaterial. Montieren Sie ein beschädigtes Gerät nicht und benutzen Sie es nicht. Verwenden Sie das Gerät aus Sicherheitsgründen nicht, bevor es in den Einbauschrank gesetzt wird. Halten Sie sich an die mitgelieferte Montageanleitung. Seien Sie beim Umsetzen des Gerätes vorsichtig, da es sehr schwer ist. Tragen Sie stets Sicherheitshandschuhe und festes Schuhwerk. Stellen Sie sicher, dass die Luft um das Gerät zirkulieren kann. Warten Sie nach der Montage oder dem Wechsel des Türanschlags mindestens 4 Stunden, bevor Sie das Gerät an die Stromversorgung anschließen. Dies ist erforderlich, damit das Öl in den Kompressor zurückfließen kann. Ziehen Sie den Stecker aus der Steckdose, bevor Sie am Gerät arbeiten (z.B. Wechsel des Türanschlags). Stellen Sie das Gerät nicht in der Nähe von Heizkörpern, Herden, Backöfen oder Kochfeldern auf. Setzen Sie das Gerät nicht dem Regen aus. Stellen Sie das Gerät nicht dort auf, wo es direktem Sonnenlicht ausgesetzt sein könnte. Stellen Sie dieses Gerät nicht in Bereichen auf, die zu feucht oder kalt sind. • • Wenn Sie das Gerät verschieben möchten, heben Sie es bitte an der Vorderkante an, um den Fußboden nicht zu verkratzen. Das Gerät enthält einen Beutel mit Trockenmittel. Dieser Beutel ist kein Spielzeug. Dieser Beutel ist kein Lebensmittel. Bitte entsorgen Sie ihn umgehend. 2.2 Elektrischer Anschluss WARNUNG! Brand- und Stromschlaggefahr. WARNUNG! Achten Sie bei der Montage des Geräts darauf, dass das Netzkabel nicht eingeklemmt oder beschädigt wird. WARNUNG! Verwenden Sie keine Mehrfachsteckdosen oder Verlängerungskabel. • • • • • • Das Gerät muss geerdet sein. Stellen Sie sicher, dass die Daten auf dem Typenschild mit den elektrischen Nennwerten der Netzspannung übereinstimmen. Schließen Sie das Gerät nur an eine ordnungsgemäß installierte Schutzkontaktsteckdose an. Achten Sie darauf, elektrische Bauteile (wie Netzstecker, Netzkabel und Kompressor) nicht zu beschädigen. Wenden Sie sich an den autorisierten Kundendienst oder einen Elektriker, um die elektrischen Bauteile auszutauschen. Das Netzkabel muss unterhalb des Netzsteckers verlegt werden. Stecken Sie den Netzstecker erst nach Abschluss der Montage in die DEUTSCH • extremen physikalischen Bedingungen in Haushaltsgeräten standhalten, wie z.B. Temperatur, Vibration, Feuchtigkeit, oder sollen Informationen über den Betriebszustand des Gerätes anzeigen. Sie sind nicht für den Einsatz in anderen Geräten vorgesehen und nicht für die Raumbeleuchtung geeignet. Steckdose. Stellen Sie sicher, dass der Netzstecker nach der Montage noch zugänglich ist. Ziehen Sie nicht am Netzkabel, wenn Sie das Gerät von der Stromversorgung trennen möchten. Ziehen Sie stets am Netzstecker. 2.3 Gebrauch WARNUNG! Es besteht Verletzungs-, Verbrennungs-, Stromschlag- oder Brandgefahr. Das Gerät enthält Isobutan (R600a), ein brennbares Erdgas mit einem hohen Grad an Umweltverträglichkeit. Achten Sie darauf, den Kältekreislauf, der Isobutan enthält, nicht zu beschädigen. • • • • • • • Nehmen Sie keine technischen Änderungen am Gerät vor. Stellen Sie keine elektrischen Geräte (z. B. Eisbereiter) in das Gerät, wenn solche Geräte nicht ausdrücklich vom Hersteller für diesen Zweck zugelassen sind. Wird der Kältekreislauf beschädigt, stellen Sie bitte sicher, dass es keine Flammen und Zündquellen im Raum gibt. Belüften Sie den Raum. Stellen Sie keine heißen Gegenstände auf die Kunststoffteile des Geräts. Bewahren Sie keine entzündbaren Gase und Flüssigkeiten im Gerät auf. Laden Sie keine entflammbaren Produkte oder Gegenstände, die mit entflammbaren Produkten benetzt sind, in das Gerät und stellen Sie solche nicht in die Nähe oder auf das Gerät. Berühren Sie nicht den Kompressor oder den Kondensator. Sie sind heiß. 2.4 Innenbeleuchtung WARNUNG! Stromschlaggefahr. • Bezüglich der Lampe(n) in diesem Gerät und separat verkaufter Ersatzlampen: Diese Lampen müssen 23 2.5 Reinigung und Pflege WARNUNG! Verletzungsgefahr sowie Risiko von Schäden am Gerät. • • • Schalten Sie das Gerät immer aus und ziehen Sie den Netzstecker aus der Steckdose, bevor Reinigungsarbeiten durchgeführt werden. Der Kältekreis des Gerätes enthält Kohlenwasserstoffe. Das Gerät muss von einer qualifizierten Fachkraft gewartet und nachgefüllt werden. Prüfen Sie regelmäßig den Wasserabfluss des Geräts und reinigen Sie ihn gegebenenfalls. Bei verstopftem Wasserabfluss sammelt sich das Abtauwasser am Boden des Geräts an. 2.6 Wartung • • • Zur Reparatur des Geräts wenden Sie sich an den autorisierten Kundendienst. Dabei dürfen ausschließlich Originalersatzteile verwendet werden. Bitte beachten Sie, dass eigene Reparaturen oder Reparaturen, die nicht von Fachkräften durchgeführt werden, die Sicherheit des Geräts beeinträchtigen und die Garantie ungültig machen können. Folgende Ersatzteile sind innerhalb von 7 Jahren nach Produkteinstellung des Modells erhältlich: Thermostate, Temperatursensoren, Leiterplatten, Lichtquellen, Türgriffe, Türscharniere, Ablagen und Körbe. Bitte beachten Sie, dass einige dieser Ersatzteile nur an Reparaturbetriebe geliefert werden können und nicht alle Ersatzteile für alle Modelle relevant sind. 24 www.electrolux.com • Türdichtungen sind innerhalb von 10 Jahren nach Produkteinstellung des Modells erhältlich. 2.7 Entsorgung WARNUNG! Verletzungs- und Erstickungsgefahr. • • • Trennen Sie das Gerät von der Stromversorgung. Schneiden Sie das Netzkabel ab, und entsorgen Sie es. Entfernen Sie die Tür, um zu verhindern, dass sich Kinder oder Haustiere in dem Gerät einschließen. • • • Der Kältekreislauf und die Isolierungsmaterialien dieses Gerätes sind ozonfreundlich. Die Isolierung enthält entzündliches Gas. Für Informationen zur korrekten Entsorgung des Gerätes wenden Sie sich an Ihre kommunale Behörde. Achten Sie darauf, dass die Kühleinheit in der Nähe des Wärmetauschers nicht beschädigt wird. 3. MONTAGE WARNUNG! Siehe Kapitel Sicherheitshinweise. WARNUNG! Lesen Sie zur Installation des Geräts die Montageanleitung. WARNUNG! Befestigen Sie das Gerät gemäß der Montageanleitung, um das Risiko eines instabilen Geräts zu vermeiden. DEUTSCH 25 D3 D1 3.1 Abmessungen W1 90 D2 ° W3 B A H1 W2 Gesamtabmessungen ¹ H1 mm 1772 W1 mm 548 D1 mm 549 ¹ Höhe, Breite und Tiefe des Geräts ohne Griff und Füße Platzbedarf während des Betriebs ² H2 (A+B) mm 1816 W2 mm 548 D2 mm 551 A mm 1780 B mm 36 ² Höhe, Breite und Tiefe des Geräts einschließlich Griff und zuzüglich des notwendigen Freiraums für die Zirkulation der Kühlluft Platzbedarf insgesamt während des Betriebs ³ H3 (A+B) mm 1816 W3 mm 548 D3 mm 1071 ³ Höhe, Breite und Tiefe des Geräts einschließlich Griff plus des notwendigen Freiraums für die Zirkulation der Kühlluft, zuzüglich des Platzes, der notwendig ist, um eine Türöffnung bis zu dem minimalen Winkel zu ermöglichen, der die Entfernung der gesamten Innenausstattung erlaubt 26 www.electrolux.com 3.2 Standort Um die beste Funktionalität des Gerätes zu gewährleisten, sollten Sie das Gerät nicht in der Nähe von Wärmequellen (Backöfen, Heizöfen, Heizkörpern, Herden oder Kochfeldern) oder an einem Ort mit direkter Sonneneinstrahlung installieren. Stellen Sie sicher, dass die Luft frei um die Geräterückseite zirkulieren kann. Dieses Gerät sollte in einem trockenen, gut belüfteten Innenbereich aufgestellt werden. Dieses Gerät ist für den Einsatz bei einer Umgebungstemperatur von 10°C bis 38°C vorgesehen. Der ordnungsgemäße Betrieb des Geräts wird nur innerhalb des angegebenen Temperaturbereichs gewährleistet. Bei Fragen zum Aufstellungsort des Geräts wenden Sie sich an den Verkäufer, unseren Kundendienst oder nächstgelegenen autorisierten Kundendienst. Es muss möglich sein, das Gerät vom Netz zu trennen. Daher muss der Stecker nach der Installation zugänglich bleiben. 3.3 Elektroanschluss • • Kontrollieren Sie vor dem Einschalten des Geräts, ob die Netzspannung und -frequenz Ihres Hausanschlusses mit den auf dem Typenschild angegebenen Anschlusswerten übereinstimmen. Das Gerät muss geerdet sein. Zu diesem Zweck ist der Netzstecker mit einem Schutzkontakt ausgestattet. • • Falls die Steckdose Ihres Hausanschlusses nicht geerdet sein sollte, lassen Sie das Gerät gemäß den geltenden Vorschriften von einem qualifizierten Elektriker erden. Der Hersteller übernimmt keinerlei Haftung bei Missachtung der vorstehenden Sicherheitshinweise. Das Gerät entspricht den ECRichtlinien. 3.4 Anforderungen an die Belüftung Der Luftstrom hinter dem Gerät muss ausreichend sein. 5 cm min. 200 cm2 min. 200 cm2 VORSICHT! Lesen Sie die Montageanleitungen für die Installation. 3.5 Wechseln des Türanschlags Informationen zu Montage und zum Wechseln des Türanschlags finden Sie in einer separaten Anleitung. VORSICHT! Wenn Sie den Türanschlag wechseln, schützen Sie den Boden mit einem strapazierfähigem Material vor Verkratzungen. DEUTSCH 27 4. BEDIENFELD 1 2 4 1. 2. 3. 4. 3 Temperaturanzeige-LED Anzeige FastCool Taste FastCool Temperaturregler Taste EIN/AUS 4.1 Einschalten des Geräts 1. Stecken Sie den Stecker in die Netzsteckdose. 2. Berühren Sie den Temperaturregler, wenn alle LEDs ausgeschaltet sind. 4.2 Ausschalten des Geräts Halten Sie die Taste des Temperaturreglers länger als 3 Sek. gedrückt. Alle Anzeigen erlöschen. 4.3 Temperaturregelung Zur Inbetriebnahme des Geräts, berühren Sie den Temperaturregler, bis die LED der gewünschten Temperatur aufleuchtet. Die Wahl erfolgt schrittweise von 2 °C bis 8 °C. Empfohlene Einstellung: 4 °C. 1. Berühren Sie den Temperaturregler. Die Kontrolllampe der aktuellen Temperatur blinkt. Mit jeder Berührung des Temperaturreglers ändert sich die Einstellung um eine Position. Die entsprechende LED blinkt eine Zeit lang. 2. Berühren Sie den Temperaturregler wiederholt, bis die gewünschte Temperatur ausgewählt ist. Die eingestellte Temperatur wird innerhalb von 24 Stunden erreicht. Nach einem Stromausfall bleibt die eingestellte Temperatur gespeichert. 4.4 Funktion FastCool Wenn Sie zum Beispiel nach einem Einkauf größere Mengen Lebensmittel mit Raumtemperatur in den Kühlschrank einlegen möchten, empfehlen wir die Aktivierung der Funktion FastCool, um die Lebensmittel schneller zu kühlen und um zu vermeiden, dass die bereits im Kühlschrank befindlichen Lebensmittel erwärmt werden. Drücken Sie zum Einschalten der Funktion FastCool die Taste FastCool. Die Kontrolllampe FastCool leuchtet. Diese Funktion endet automatisch nach 6 Stunden. Diese Funktion kann jederzeit durch erneutes Drücken der Taste FastCool ausgeschaltet werden. Die Kontrolllampe FastCool erlischt. 5. TÄGLICHER GEBRAUCH VORSICHT! Dieses Kühlgerät eignet sich nicht zum Einfrieren von Lebensmitteln. 5.1 Positionieren der Türablagen Die Türablagen können in verschiedener Höhe positioniert werden; damit ermöglichen sie das Lagern verschieden großer Lebensmittelpackungen. 1. Ziehen Sie die Ablage langsam nach oben, bis sie sich löst. 28 www.electrolux.com 2. Setzen Sie die Ablage in gewünschter Höhe ein. 1 2 5.2 Verstellbare Ablagen 2. Schieben Sie die Schienen in das Gerät, um eine Beschädigung des Geräts beim Schließen der Tür zu verhindern. Die Wände des Kühlschranks sind mit einer Reihe von Führungsschienen ausgestattet, die verschiedene Möglichkeiten für das Einsetzen der Ablagen bieten. Wiedereinbau: Die Glasablage über der Gemüseschublade sollte jedoch nicht verstellt werden, um eine korrekte Luftzirkulation zu gewährleisten. 5.3 Obst-/Gemüseschublade Die Schublade eignet sich zum Aufbewahren von Obst und Gemüse. Herausnehmen der Schublade (z.B. zur Reinigung): 1. Ziehen Sie die Schublade heraus und heben Sie sie an. 1. Ziehen Sie die Schienen heraus. DEUTSCH 2. Setzen Sie den hinteren Teil der Schublade (1) auf die Schienen. 2 1 3. Heben Sie den vorderen Teil der Schublade (2) an, während Sie sie hineinschieben. 4. Drücken Sie den vorderen Teil der Schublade nach unten. Ziehen Sie die Schublade wieder heraus, um zu prüfen, ob sie richtig auf den hinteren und vorderen Haken sitzt. 5.4 Feuchtigkeitsregulierung In die Glasablage ist eine Vorrichtung mit (über einen Schieber verstellbaren) Schlitzen integriert, die die Feuchtigkeitsregelung in den Gemüseschubladen ermöglicht. Die Position des Feuchtigkeitsreglers hängt von der Art und der Menge des Obstes und Gemüses ab: • Schlitze geschlossen: Für eine kleine Menge an Obst und Gemüse empfohlen. So bleibt der Feuchtigkeitsgehalt im Obst und Gemüse länger erhalten. • 29 Schlitze geöffnet: Für eine große Menge an Obst und Gemüse empfohlen. Auf diese Weise führt eine höhere Luftzirkulation zu einer geringeren Luftfeuchtigkeit. 5.5 Temperaturanzeige Um eine korrekte Lagerung der Lebensmittel zu gewährleisten, verfügt dieser Kühlschrank über eine Temperaturanzeige. Das Symbol an der Seitenwand des Geräts zeigt den kältesten Bereich im Kühlraum an. Wenn OK angezeigt wird (A), lagern Sie die frischen Lebensmittel im Bereich, der durch das Symbol angezeigt wird. Bei (B) warten Sie mindestens 12 Stunden und prüfen Sie, ob OK (A) angezeigt wird. Wird nicht OK (B) angezeigt, wählen Sie eine kältere Einstellung. A OK B OK 5.6 DYNAMICAIR Das Kühlfach ist mit einer Vorrichtung ausgestattet, die das schnelle Abkühlen von Lebensmitteln ermöglicht und eine gleichmäßigere Temperatur im Fach aufrechterhält. Schalten Sie die Vorrichtung ein, wenn Sie eine große Menge an Lebensmittel kühlen müssen oder wenn die Raumtemperatur höher als 35 °C ist, um eine gleichmäßigere Innentemperatur zu gewährleisten. Drücken Sie zum Einschalten des Ventilators die Taste (A). Die grüne Kontrolllampe (B) leuchtet auf. 30 www.electrolux.com Bevor Sie das Gerät ausschalten, schalten Sie den Ventilator durch Drücken der Taste (A) aus. Die grüne Kontrolllampe (B) erlischt. A B 6. TIPPS UND HINWEISE 6.1 Tipps zum Energiesparen • • • • • Die effizienteste Energienutzung wird erreicht, wenn die Schubladen im unteren Teil des Geräts eingesetzt und die Ablagen gleichmäßig angeordnet sind. Die Position der Türablagen wirkt sich nicht auf den Energieverbrauch aus. Öffnen Sie die Tür nicht zu häufig, und lassen Sie diese nicht länger offen als notwendig. Stellen Sie die Temperatur nicht zu hoch ein, um Energie zu sparen, es sei denn, dies ist wegen der Beschaffenheit des Lebensmittels erforderlich. Wenn die Umgebungstemperatur hoch ist, der Temperaturregler auf eine niedrige Temperatur eingestellt und das Gerät voll beladen ist, kann es zu andauerndem Betrieb des Kompressors und damit zu Reif- oder Eisbildung am Verdampfer kommen. Stellen Sie in diesem Fall den Temperaturregler auf eine höhere Temperatur, um das automatische Abtauen zu ermöglichen und Energie zu sparen. Sorgen Sie für eine gute Belüftung. Bedecken Sie die Lüftungsgitter oder -öffnungen nicht. 6.2 Hinweise für die Kühlung frischer Lebensmittel • Eine gute Temperatureinstellung, die die Konservierung von frischen Lebensmitteln sicherstellt, ist eine Temperatur von weniger oder gleich +4 °C. Eine höhere Temperatureinstellung im Gerät kann die Haltbarkeit der Lebensmittel verkürzen. • • • • • • Decken Sie die Lebensmittel mit Verpackungsmaterial ab, um ihre Frische und ihr Aroma zu bewahren. Verwenden Sie immer geschlossene Behälter für Flüssigkeiten und Lebensmittel, um Düfte oder Gerüche im Fach zu vermeiden. Um eine Kreuzkontamination zwischen gekochten und rohen Lebensmitteln zu vermeiden, decken Sie die gekochten Lebensmittel ab und trennen Sie sie von den rohen. Es wird empfohlen Lebensmittel im Kühlschrank aufzutauen. Stellen Sie keine warmen Lebensmittel in das Gerät. Vergewissern Sie sich, dass sie auf Raumtemperatur abgekühlt sind, bevor Sie sie einlegen. Um eine Verschwendung von Lebensmitteln zu vermeiden, sollten die neuen Lebensmittel immer hinter die alten gelegt werden. 6.3 Hinweise für die Kühlung von Lebensmitteln • • • • Fleisch (alle Sorten): Wickeln Sie Fleisch in geeignetes Material und legen Sie es auf die Glasablage über der Gemüseschublade. Lagern Sie Fleisch höchstens 1 - 2 Tage. Obst und Gemüse: Gründlich reinigen (Erde entfernen) und in die spezielle Schublade (Obst- und Gemüseschublade) legen. Es wird empfohlen, exotische Früchte wie Bananen, Mangos, Papayas usw. nicht im Kühlschrank aufzubewahren. Gemüse wie Tomaten, Kartoffeln, Zwiebeln und Knoblauch sollten nicht im Kühlschrank aufbewahrt werden. DEUTSCH • • • Butter und Käse: Diese sollten stets in luftdichten Behältern verpackt sein oder in Aluminiumfolie bzw. in Polyäthylenbeutel eingepackt werden, um so wenig Luft wie möglich in der Verpackung zu haben. Flaschen: Sie sollten mit Deckel in der Flaschenablage in der Tür oder im Flaschenhalter (falls vorhanden) aufbewahrt werden. Es wird empfohlen für eine schnellere Kühlung der Produkte den Ventilator • 31 einzuschalten. Durch das Einschalten von Dynamicair wird eine gleichmäßigere Innentemperatur erzielt. Achten Sie auf das Haltbarkeitsdatum der Lebensmittel, damit Sie wissen, wie lange sie gelagert werden können. 7. REINIGUNG UND PFLEGE WARNUNG! Siehe Kapitel Sicherheitshinweise. 7.1 Reinigen des Innenraums Bevor Sie das Gerät in Betrieb nehmen, beseitigen Sie den typischen Neugeruch am besten durch Reinigen der Innenteile mit lauwarmem Wasser und einer neutralen Seife. Sorgfältig nachtrocknen. VORSICHT! Verwenden Sie keine chemischen Reinigungsmittel, Scheuerpulver, chlor- oder ölhaltige Reinigungsmittel, da diese die Oberfläche beschädigen. VORSICHT! Das Zubehör des Geräts und die Innenteile eignen sich nicht für die Reinigung im Geschirrspüler. 3. Spülen und trocknen Sie diese sorgfältig ab. 7.3 Abtauen des Kühlschranks Bei normalem Betrieb wird Reif automatisch aus dem Verdampfer des Kühlschranks entfernt. Das Tauwasser sammelt sich in einer Auffangrinne und läuft durch eine Abflussöffnung in einen speziellen Behälter an der Rückseite des Geräts über dem Kompressor, wo es verdampft. Eine regelmäßige Reinigung des Abtauwasser-Ablauflochs in der Mitte des Kühlfachkanals ist wichtig, um zu verhindern, dass das Wasser überläuft und auf die eingelagerten Lebensmittel tropft. Benutzen Sie hierfür den Rohrreiniger, der mit dem Gerät geliefert wird. 7.2 Regelmäßige Reinigung Das gesamte Gerät muss regelmäßig gereinigt werden: 1. Reinigen Sie das Innere und die Zubehörteile mit lauwarmem Wasser und etwas Neutralseife. 2. Prüfen und säubern Sie die Türdichtungen in regelmäßigen Abständen, um zu gewährleisten, dass diese sauber und frei von Fremdkörpern sind. 7.4 Stillstandszeiten Bei längerem Stillstand des Geräts müssen Sie folgende Vorkehrungen treffen: 32 www.electrolux.com 1. Trennen Sie das Gerät von der Spannungsversorgung. 2. Entnehmen Sie alle Lebensmittel. 3. Reinigen Sie das Gerät und alle Zubehörteile. 4. Lassen Sie die Tür offen, um das Entstehen unangenehmer Gerüche zu vermeiden. 8. FEHLERSUCHE WARNUNG! Siehe Kapitel Sicherheitshinweise. 8.1 Was tun, wenn... Störung Mögliche Ursache Abhilfe Das Gerät funktioniert nicht. Das Gerät ist ausgeschal‐ tet. Schalten Sie das Gerät ein. Der Netzstecker wurde Stecken Sie den Netzste‐ nicht richtig in die Steckdo‐ cker korrekt in die Steckdo‐ se gesteckt. se. Es liegt keine Spannung an der Steckdose an. Testen Sie, ob ein anderes Gerät an dieser Steckdose funktioniert. Wenden Sie sich an eine Elektrofach‐ kraft. Das Gerät erzeugt Geräu‐ sche. Unebenheiten im Boden wurden nicht ausgegli‐ chen. Prüfen Sie, ob das Gerät stabil steht. Der Kompressor ist durch‐ gehend in Betrieb. Die Temperatur wurde falsch eingestellt. Siehe Kapitel „Bedienfeld“. Es wurden zu viele Le‐ bensmittel gleichzeitig ein‐ gelegt. Warten Sie einige Stunden und prüfen Sie erneut die Temperatur. Die Raumtemperatur ist zu Siehe Kapitel „Montage“. hoch. In das Gerät eingelegte Lebensmittel waren noch zu warm. Lassen Sie die Lebensmit‐ tel auf Raumtemperatur abkühlen, bevor Sie sie einlagern. Die Tür ist nicht richtig ge‐ schlossen. Siehe Abschnitt „Schließen der Tür“. Die Funktion FastCool ist eingeschaltet. Siehe Abschnitt „Funktion FastCool“. DEUTSCH Störung Mögliche Ursache 33 Abhilfe Der Kompressor schaltet Der Kompressor schaltet sich nicht sofort ein, nach‐ sich erst nach einer Weile dem Sie „FastCool“ ge‐ ein. drückt oder die Temperatur auf einen anderen Wert eingestellt haben. Das ist normal, es ist kein Fehler aufgetreten. Die Tür ist nicht richtig aus‐ Das Gerät ist nicht ausge‐ gerichtet oder berührt das richtet. Belüftungsgitter. Siehe Montageanleitung. Die Tür lässt sich nicht leicht öffnen. Sie haben versucht, die Tür unmittelbar nach dem Schließen wieder zu öff‐ nen. Warten Sie einige Sekun‐ den zwischen dem Schlie‐ ßen und erneuten Öffnen der Tür. Die Lampe funktioniert nicht. Die Lampe ist im StandbyModus. Schließen und öffnen Sie die Tür. Die Lampe ist defekt. Wenden Sie sich an die nächste autorisierte Kun‐ dendienststelle. Die Tür ist nicht richtig ge‐ schlossen. Siehe Abschnitt „Schließen der Tür“. Die Dichtung ist verzogen oder verschmutzt. Siehe Abschnitt „Schließen der Tür“. Zu starke Reif- und Eisbil‐ dung. Die Lebensmittel sind nicht Verpacken Sie die Lebens‐ richtig verpackt. mittel richtig. Die Temperatur wurde falsch eingestellt. Siehe Kapitel „Bedienfeld“. Das Gerät ist voll beladen und auf die niedrigste Temperatur eingestellt. Stellen Sie eine höhere Temperatur ein. Siehe Ka‐ pitel „Bedienfeld“. Die Temperatur im Gerät ist zu niedrig und die Um‐ gebungstemperatur ist zu hoch. Stellen Sie eine höhere Temperatur ein. Siehe Ka‐ pitel „Bedienfeld“. Wasser fließt an der Rück‐ Während des automati‐ Dies ist normal. wand des Kühlschranks hi‐ schen Abtauprozesses nunter. schmilzt Reif auf der Rück‐ wand. Es gibt zu viel Kondens‐ wasser an der Rückwand des Kühlschranks. Die Tür wurde zu häufig geöffnet. Öffnen Sie die Tür nur bei Bedarf. Die Tür wurde nicht voll‐ ständig geschlossen. Achten Sie darauf, die Tür vollständig zu schließen. 34 www.electrolux.com Störung Mögliche Ursache Abhilfe Das eingelagerte Lebens‐ Packen Sie das Lebens‐ mittel wurde nicht verpackt. mittel in eine geeignete Verpackung, bevor Sie es in das Gerät legen. Wasser fließt in den Kühl‐ schrank. Lebensmittel verhindern das Abfließen des Was‐ sers in den Wassersamm‐ ler. Stellen Sie sicher, dass die Lebensmittel nicht die Rückwand berühren. Der Wasserablauf ist ver‐ stopft. Reinigen Sie den Wasser‐ ablauf. Wasser läuft auf den Bo‐ den. Der Tauwasserablauf ist Verbinden Sie den Tau‐ nicht mit der Verdampfer‐ wasserablauf mit der Ver‐ schale über dem Kompres‐ dampferschale. sor verbunden. Die Temperatur kann nicht eingestellt werden. Die Funktion „FastCool“ ist Schalten Sie die Funktion eingeschaltet. „FastCool“ manuell aus, oder warten Sie mit dem Einstellen der Temperatur, bis die Funktion automa‐ tisch ausgeschaltet wird. Siehe Abschnitt Funktion „FastCool“. Die Temperatur im Gerät ist zu niedrig/zu hoch. Die Temperatur ist nicht richtig eingestellt. Stellen Sie eine höhere/ niedrigere Temperatur ein. Die Tür ist nicht richtig ge‐ schlossen. Siehe Abschnitt „Schließen der Tür“. Die Temperatur der zu Lassen Sie die Lebensmit‐ kühlenden Lebensmittel ist tel auf Raumtemperatur zu hoch. abkühlen, bevor Sie sie in das Gerät geben. Es wurden zu viele Le‐ bensmittel gleichzeitig ein‐ gelegt. Lagern Sie weniger Le‐ bensmittel zur selben Zeit ein. Die Tür wurde zu häufig geöffnet. Öffnen Sie die Tür nur, wenn es notwendig ist. Die Funktion FastCool ist eingeschaltet. Siehe Abschnitt „Funktion FastCool“. Die Kaltluft kann im Gerät nicht zirkulieren. Kaltluftzirkulation im Gerät sicherstellen. Siehe Kapitel „Tipps und Hinweise“. DEUTSCH Störung Mögliche Ursache Die LEDs der einstellbaren Fehler beim Messen der Temperaturen blinken Temperatur. gleichzeitig. Bitte wenden Sie sich an den nächsten autorisierten Kundendienst, wenn alle genannten Abhilfemaßnahmen nicht zum gewünschten Erfolg führen. 8.2 Austauschen der Lampe Das Gerät ist mit einer langlebigen LEDInnenbeleuchtung ausgestattet. Die Beleuchtung darf nur von einer Fachkraft ausgetauscht werden. Wenden 35 Abhilfe Kontaktieren Sie den nächsten autorisierten Kundendienst. Das Kühl‐ system hält zwar die einge‐ lagerten Lebensmittel wei‐ terhin kühl, doch eine Temperatureinstellung ist nicht mehr möglich. Sie sich an Ihren autorisierten Kundendienst. 8.3 Schließen der Tür 1. Reinigen Sie die Türdichtungen. 2. Stellen Sie die Tür nach Bedarf ein. Siehe Montageanleitung. 3. Ersetzen Sie die defekten Türdichtungen, falls erforderlich. Wenden Sie sich an einen autorisierten Kundendienst. 36 www.electrolux.com 9. GERÄUSCHE SSSRRR! BRRR! CLICK! HISSS! BLUBB! 10. TECHNISCHE DATEN Die technischen Daten befinden sich auf dem Typenschild innen im Gerät sowie auf der Energieplakette. Der QR-Code auf der Energieplakette des Geräts bietet einen Web-Link zu Informationen über die Geräteleistung in der EU EPREL-Datenbank. Bewahren Sie daher die Energieplakette als Referenz zusammen mit dieser Bedienungsanleitung und allen anderen Unterlagen, die mit dem Gerät geliefert wurden, auf. Es ist auch möglich, die gleichen Informationen in EPREL zu finden, indem Sie den Link https:// eprel.ec.europa.eu sowie den Modellnamen und die Produktnummer, die Sie auf dem Typenschild des Geräts finden, verwenden. Beachten Sie den Link www.theenergylabel.eu bezüglich detaillierter Informationen zur Energieplakette. 11. INFORMATIONEN FÜR PRÜFINSTITUTE Die Installation und die Vorbereitung des Geräts für eine eventuelle EcoDesignPrüfung müssen mit EN 62552 übereinstimmen. Die Anforderungen an die Belüftung, die Abmessungen der Aussparungen und die Mindestabstände auf der Rückseite müssen den Angaben in diesem Benutzerhandbuch in Kapitel 3 entsprechen. Für weitere Informationen, einschließlich der Beladungspläne, wenden Sie sich bitte an den Hersteller. DEUTSCH 37 12. UMWELTTIPPS Recyceln Sie Materialien mit dem Entsorgen Sie Geräte mit diesem Symbol Symbol . Entsorgen Sie die Verpackung in den entsprechenden Recyclingbehältern. Recyceln Sie zum Umwelt- und Gesundheitsschutz elektrische und elektronische Geräte. nicht mit dem Hausmüll. Bringen Sie das Gerät zu Ihrer örtlichen Sammelstelle oder wenden Sie sich an Ihr Gemeindeamt. 38 www.electrolux.com CONTENIDO 1. INFORMACIÓN SOBRE SEGURIDAD............................................................ 38 2. INSTRUCCIONES DE SEGURIDAD................................................................41 3. INSTALACIÓN..................................................................................................43 4. PANEL DE CONTROL..................................................................................... 45 5. USO DIARIO.....................................................................................................46 6. CONSEJOS...................................................................................................... 48 7. MANTENIMIENTO Y LIMPIEZA.......................................................................49 8. SOLUCIÓN DE PROBLEMAS..........................................................................50 9. RUIDOS............................................................................................................54 10. DATOS TÉCNICOS........................................................................................54 11. INFORMACIÓN PARA LOS INSTITUTOS DE PRUEBAS.............................54 PENSAMOS EN USTED Gracias por adquirir un aparato Electrolux. Ha escogido un producto que contiene décadas de experiencia e innovación profesionales. Ingenioso y elegante, se ha diseñado pensando en usted. Así pues, siempre que lo utilice, puede tener la seguridad de que conseguirá excelentes resultados. Bienvenido a Electrolux. Visite nuestro sitio web para: Obtener consejos, folletos, soluciones a problemas e información de servicio y reparación: www.electrolux.com/support Registrar su producto para recibir un mejor servicio: www.registerelectrolux.com Adquirir accesorios, artículos de consumo y recambios originales para su aparato: www.electrolux.com/shop ATENCIÓN Y SERVICIO AL CLIENTE Le recomendamos que utilice recambios originales. Al contactar con nuestro centro autorizado de servicio técnico, cerciórese de tener la siguiente información a mano: Modelo, PNC, Número de serie. La información se puede encontrar en la placa de características. Advertencia / Precaución-Información sobre seguridad Información general y consejos Información sobre el medio ambiente Salvo modificaciones. 1. INFORMACIÓN SOBRE SEGURIDAD Antes de instalar y utilizar el aparato, lea atentamente las instrucciones facilitadas. El fabricante no se hace responsable de lesiones o daños producidos como ESPAÑOL 39 resultado de una instalación o un uso incorrectos. Conserve siempre estas instrucciones en lugar seguro y accesible para futuras consultas. 1.1 Seguridad de niños y personas vulnerables • • • • • • • Este aparato puede ser utilizado por niños de 8 años en adelante y personas cuyas capacidades físicas, sensoriales o mentales estén disminuidas o que carezcan de la experiencia y conocimientos suficientes para manejarlo, siempre que cuenten con las instrucciones o la supervisión sobre el uso del electrodoméstico de forma segura y comprendan los riesgos. Los niños de 3 a 8 años pueden cargar y descargar el aparato siempre que hayan sido debidamente instruidos. Este aparato puede ser utilizado por personas con discapacidades muy extensas y complejas, siempre que hayan sido instruidas adecuadamente. Es necesario mantener alejados del aparato a los niños de menos de 3 años salvo que estén bajo supervisión continua. No deje que los niños jueguen con el aparato. La limpieza y mantenimiento de usuario del aparato no podrán ser realizados por niños sin supervisión. Mantenga todo el material de embalaje fuera del alcance de los niños y deséchelo de forma adecuada. 1.2 Seguridad general • • Este aparato está concebido para utilizarse en aplicaciones domésticas y similares, tales como: – Granjas; áreas de cocina para el personal en tiendas, oficinas y otros entornos de trabajo; – Por clientes en hoteles, moteles, pensiones y otros entornos de tipo residencial. Para evitar la contaminación alimentaria, respete las siguientes instrucciones: 40 www.electrolux.com no abra la puerta durante largos periodos de tiempo; – limpie regularmente las superficies que pueden entrar en contacto con los alimentos y los sistemas de drenaje accesibles; – guarde la carne y el pescado crudos en recipientes adecuados en el frigorífico, de manera que no estén en contacto con otros alimentos ni goteen sobre ellos. ADVERTENCIA: Mantenga libres de obstrucciones las aberturas de ventilación del alojamiento del aparato o de la estructura empotrada. ADVERTENCIA: No utilice dispositivos mecánicos ni medios artificiales para acelerar el proceso de descongelación, excepto los recomendados por el fabricante. ADVERTENCIA: No dañe el circuito del refrigerante. ADVERTENCIA: No utilice dispositivos eléctricos dentro de los compartimientos para alimentos del aparato, salvo si son del tipo recomendado por el fabricante. No utilice pulverizadores ni vapor de agua para limpiar el aparato. Limpie el aparato con un paño suave humedecido. Utilice solo detergentes neutros. No utilice productos abrasivos, estropajos duros, disolventes ni objetos metálicos. Cuando el aparato esté vacío durante un largo período, apáguelo, descongélelo, límpielo, séquelo y deje la puerta abierta para evitar que se desarrolle moho en el interior del aparato. No almacene sustancias explosivas tales como latas de aerosol con un propulsor inflamable en este aparato. Si el cable eléctrico sufre algún daño, el fabricante, su servicio técnico autorizado o un profesional cualificado tendrán que cambiarlo para evitar riesgos. – • • • • • • • • • ESPAÑOL 41 2. INSTRUCCIONES DE SEGURIDAD 2.1 Instalación ADVERTENCIA! Al colocar el producto, asegúrese de que el cable de alimentación no queda atrapado o doblado. ADVERTENCIA! Sólo un técnico cualificado puede instalar el aparato. • • • • • • • • • • • • • • Retire todo el embalaje. No instale ni utilice un aparato dañado. No utilice el aparato antes de instalarlo en la estructura empotrada por motivos de seguridad. Siga las instrucciones de instalación suministradas con el aparato. Tenga cuidado al mover el aparato, porque es pesado. Utilice siempre guantes de protección y calzado cerrado. Asegúrese de que el aire pueda circular alrededor del aparato. En la primera instalación otras invertir el sentido de apertura de la puerta, espere al menos 4 horas antes de conectar el aparato a la alimentación eléctrica. Esto es para permitir que el aceite regrese al compresor. Desenchufe siempre el aparato antes de llevar a cabo cualquier operación, por ejemplo cambiar el sentido de apertura de la puerta. No instale el aparato cerca de radiadores, cocinas, hornos o placas de cocción. No exponga el aparato a la lluvia. No instale el aparato donde reciba luz solar directa. No instale este aparato en áreas excesivamente húmedas o frías. Al mover el aparato, levántelo por el borde frontal para no arañar el suelo. El aparato contiene una bolsa de desecante. No se trata de un juguete. No es un alimento. No olvide desecharlo inmediatamente. 2.2 Conexión eléctrica ADVERTENCIA! Riesgo de incendios y descargas eléctricas. ADVERTENCIA! No utilice adaptadores de enchufes múltiples ni cables prolongadores. • • • • • • • El aparato debe conectarse a tierra. Asegúrese de que los parámetros de la placa de características son compatibles con los valores eléctricos del suministro eléctrico. Utilice siempre una toma con aislamiento de conexión a tierra correctamente instalada. Asegúrese de no provocar daños en los componentes eléctricos (como enchufe, cable de alimentación, compresor). Póngase en contacto con un electricista o con el servicio técnico autorizado para cambiar los componentes eléctricos. El cable de alimentación debe estar por debajo del nivel del enchufe de alimentación. Conecte el enchufe a la toma de corriente únicamente cuando haya terminado la instalación. Asegúrese de tener acceso al enchufe del suministro de red una vez finalizada la instalación. No desconecte el aparato tirando del cable de conexión a la red. Tire siempre del enchufe. 2.3 Uso del aparato ADVERTENCIA! Existe riesgo de lesiones, quemaduras, descargas eléctricas o incendios. El aparato contiene un gas inflamable, isobutano (R600a), un gas natural con alto grado de compatibilidad medioambiental. Tenga cuidado para no dañar el circuito de refrigerante que contiene isobutano. 42 www.electrolux.com • • • • • • • No cambie las especificaciones de este aparato. No utilice otros aparatos eléctricos (como máquinas de hacer helados) dentro de aparatos de refrigeración, salvo que el fabricante haya autorizado su utilización. Si se daña el circuito del refrigerante, evite las llamas y fuentes de ignición en la habitación. Ventile la habitación. No toque con elementos calientes las piezas de plástico del aparato. No almacene gas ni líquido inflamable en el aparato. No coloque productos inflamables ni objetos mojados con productos inflamables dentro, cerca o encima del aparato. No toque el compresor ni el condensador. Están calientes. • 2.6 Asistencia • • • 2.4 Luces interiores ADVERTENCIA! Riesgo de descarga eléctrica. • En cuanto a la(s) bombilla(s) de este producto y las de repuesto vendidas por separado: Estas bombillas están destinadas a soportar condiciones físicas extremas en los aparatos domésticos, como la temperatura, la vibración, la humedad, o están destinadas a señalar información sobre el estado de funcionamiento del aparato. No están destinadas a utilizarse en otras aplicaciones y no son adecuadas para la iluminación de estancias domésticas. 2.5 Mantenimiento y limpieza ADVERTENCIA! Podría sufrir lesiones o dañar el aparato. • • Antes de proceder con el mantenimiento, apague el aparato y desconecte el enchufe de la red. Este equipo contiene hidrocarburos en la unidad de refrigeración. Solo una persona cualificada debe realizar el mantenimiento y la recarga de la unidad. Examine periódicamente el desagüe del aparato y límpielo si fuera necesario. Si el desagüe se bloquea, el agua descongelada se acumulará en la base del aparato. • Para reparar el aparato, póngase en contacto con el centro de servicio autorizado. Utilice solamente piezas de recambio originales. Tenga en cuenta que la autorreparación o la reparación no profesional puede tener consecuencias de seguridad y podría anular la garantía. Las siguientes piezas de repuesto estarán disponibles durante 7 años después de que el modelo se haya retirado: termostatos, sensores de temperatura, placas de circuitos impresos, fuentes de luz, manijas de puertas, bisagras de puertas, bandejas y cestas. Tenga en cuenta que algunas de estas piezas de recambio solo están disponibles para los reparadores profesionales, y que no todas las piezas de recambio son relevantes para todos los modelos. Las juntas de las puertas estarán disponibles durante 10 años después de que el modelo se haya retirado. 2.7 Desecho ADVERTENCIA! Existe riesgo de lesiones o asfixia. • • • • • • Desconecte el aparato de la red. Corte el cable de conexión a la red y deséchelo. Retire la puerta para evitar que los niños y las mascotas queden encerrados en el aparato. El circuito del refrigerante y los materiales aislantes de este aparato no dañan la capa de ozono. La espuma aislante contiene gas inflamable. Póngase en contacto con las autoridades locales para saber cómo desechar correctamente el aparato. No dañe la parte de la unidad de refrigeración que está cerca del intercambiador de calor. ESPAÑOL 3. INSTALACIÓN ADVERTENCIA! Consulte los capítulos sobre seguridad. ADVERTENCIA! Fije el aparato de acuerdo con las instrucciones de instalación para evitar el riesgo de inestabilidad. ADVERTENCIA! Consulte el documento de instrucciones de instalación para instalar su aparato. D3 D1 3.1 Dimensiones W1 90 D2 ° W3 B A H1 W2 Dimensiones generales ¹ Espacio necesario en uso ² H1 mm 1772 H2 (A+B) mm 1816 W1 mm 548 W2 mm 548 D1 mm 549 D2 mm 551 A mm 1780 ¹ la altura, anchura y profundidad del aparato sin el mango y las patas 43 44 www.electrolux.com Puede que en algún momento sea necesario desenchufar el aparato de la toma de corriente. por lo que el enchufe debe quedar accesible tras la instalación del aparato. Espacio necesario en uso ² B mm 36 ² la altura, anchura y profundidad del aparato, incluyendo la manija, más el espacio necesario para la libre circulación del aire de refrigeración Espacio total necesario en uso ³ H3 (A+B) mm 1816 W3 mm 548 D3 mm 1071 ³ la altura, anchura y profundidad del aparato, incluido el mango, más el espacio necesario para la libre circulación del aire de refrigeración, más el espacio necesario para permitir la apertura de la puerta hasta el ángulo mínimo que permita la extracción de todo el equipo interno 3.3 Conexión eléctrica • • • 3.2 Ubicación Para garantizar el mejor funcionamiento del aparato, no debe instalarlo en las proximidades de la fuente de calor (horno, estufas, radiadores, cocinas o fogones) ni en un lugar con luz solar directa. Asegúrese de que el aire pueda circular libremente alrededor de la parte posterior del gabinete. Este aparato debe instalarse en una ubicación interior seca y bien ventilada. • Antes de conectar el aparato, compruebe que el voltaje y la frecuencia indicados en la placa de datos técnicos se corresponden con el suministro de la vivienda. El aparato debe conectarse a tierra. El enchufe del cable de alimentación se suministra con un contacto para tal fin. Si la toma de red de la vivienda carece de conexión a tierra, conecte el aparato a una toma de tierra conforme con la normativa, después de consultar a un electricista profesional El fabricante declina toda responsabilidad si no se toman las precauciones antes indicadas. Este aparato cumple las directivas CEE. 3.4 Requisitos de ventilación El flujo de aire detrás del aparato debe ser suficiente. 5 cm min. 200 cm2 Este aparato está destinado a ser utilizado a una temperatura ambiente que oscila entre 10°C y 38°C. Solo se puede garantizar el correcto funcionamiento del aparato dentro del rango de temperatura especificado. Si tiene cualquier duda respecto al lugar de instalación del aparato, consulte al vendedor, a nuestro servicio de atención al cliente o al servicio técnico autorizado más cercano. min. 200 cm2 PRECAUCIÓN! Consulte las instrucciones para realizar la instalación. ESPAÑOL 3.5 Cambio del sentido de apertura de la puerta Consulte el documento separado con instrucciones de instalación y de inversión de la puerta. 45 PRECAUCIÓN! En todas las fases del cambio de sentido de la puerta, proteja la puerta de arañazos con un material resistente. 4. PANEL DE CONTROL 1 2 progresiva y oscila de 2°C a 8°C. El ajuste recomendado es de 4°C. 1. Toque el regulador de temperatura. El indicador de temperatura actual parpadea. Cada vez que se toca el regulador de temperatura, el ajuste se mueve una posición. El LED parpadea un momento. 2. Toque el regulador de temperatura hasta que se seleccione la temperatura deseada. 4 1. 2. 3. 4. 3 Indicador LED de temperatura Indicador FastCool Botón FastCool Regulador de temperatura Botón de encendido/apagado 4.1 Encendido 1. Introduzca el enchufe en la toma de pared. 2. Toque el botón del regulador de temperatura si todos los LED están apagados. 4.2 Apagado Siga tocando el botón del regulador de temperatura durante 3 segundos. Todos los indicadores se apagan. 4.3 Regulación de la temperatura Para utilizar el aparato, toque el regulador de temperatura hasta que se encienda el LED correspondiente a la temperatura que desea. La selección es La temperatura programada se alcanza en un plazo de 24 horas. Después de un corte del suministro eléctrico, la temperatura ajustada se guarda. 4.4 Función FastCool Si necesita introducir una gran cantidad de alimentos a temperatura ambiente, por ejemplo después de hacer la compra, se aconseja activar la función FastCool para enfriarlos más rápidamente y evitar que suba la temperatura de los que ya están almacenados en el frigorífico. Para activar la función FastCool, pulse el botón FastCool. Se enciende el indicador FastCool. La función se detiene automáticamente después de 6 horas. La función se puede desactivar en cualquier momento pulsando de nuevo el botón FastCool. Se apaga el indicador FastCool. 46 www.electrolux.com 5. USO DIARIO PRECAUCIÓN! Este aparato de enfriamiento no es adecuado para congelar alimentos. 5.1 Colocación de los estantes de la puerta 5.3 Cajón para verduras Este cajón es adecuado para guardar frutas y verduras. Para retirar el cajón (p. ej., con fines de limpieza): 1. Tire del cajón y levántelo. Para poder guardar alimentos de distintos tamaños, los estantes de la puerta se pueden colocar a diferentes alturas. 1. Tire gradualmente del estante hacia arriba hasta que se suelte. 2. Vuelva a colocarlo según sea necesario. 2. Empuje los rieles dentro del armario para evitar que se dañe el aparato al cerrar la puerta. 1 2 5.2 Estantes móviles Las paredes del frigorífico cuentan con una serie de guías para colocar los estantes del modo que se prefiera. Para volver a montar: No coloque el estante de vidrio por encima del cajón de verduras para no impedir la correcta circulación del aire. ESPAÑOL 47 1. Tire de los rieles. La posición del control de la humedad depende del tipo y de la cantidad de frutas y verduras: 2. Coloque la parte trasera del cajón (1) sobre los rieles. 2 1 • • Ranuras cerradas: se recomienda cuando hay una pequeña cantidad de frutas y verduras. De esta manera, el contenido de humedad natural de las frutas y verduras se conserva durante más tiempo. Ranuras abiertas: se recomienda cuando hay una gran cantidad de frutas y verduras. De esta manera, una mayor circulación de aire da como resultado menor humedad del aire. 5.5 Indicador de temperatura 3. Mantenga la parte delantera del cajón (2) levantada mientras empuja el cajón hacia dentro. 4. Presione la parte delantera del cajón hacia abajo. Saque el cajón de nuevo y compruebe si está colocado correctamente en los ganchos traseros y delanteros. 5.4 Control de humedad El estante de cristal incorpora un dispositivo con ranuras (ajustables mediante un palanca deslizante), que permite regular la humedad de los cajones para verduras. Para almacenar correctamente los alimentos, el frigorífico dispone de indicador de temperatura. El símbolo de la pared lateral indica el área más fría del frigorífico. Si aparece OK (A), coloque los alimentos frescos en el área indicada por el símbolo, si no (B), espere al menos 12 horas y compruebe si aparece OK (A). Si todavía no aparece OK (B), ajuste el control de configuración a un ajuste más frío. A OK B OK 48 www.electrolux.com 5.6 DYNAMICAIR A El compartimento frigorífico cuenta con un dispositivo que permite enfriar los alimentos con rapidez y mantiene una temperatura más uniforme dentro del compartimento. B Encienda el aparato cuando tenga que enfriar una gran cantidad de alimentos o cuando la temperatura ambiente sea superior a 35°C para garantizar una mayor homogeneización de la temperatura interna. Antes de apagar el aparato, recuerde apagar el ventilador pulsando el botón (A). Se apaga la luz verde (B). Pulse el interruptor (A) para encender el ventilador. Se enciende la luz verde (B). 6. CONSEJOS 6.1 Consejos para ahorrar energía • • • • • Se garantiza el consumo más eficiente de energía en la configuración con los cajones en la parte inferior del aparato y los estantes distribuidos uniformemente. La posición de los contenedores de la puerta no afecta al consumo de energía. No abra la puerta con frecuencia ni la deje abierta más tiempo del necesario. No fije una temperatura demasiado alta para ahorrar energía, a menos que lo requieran las características del alimento. Si la temperatura ambiente es alta, se ha ajustado un valor de temperatura bajo y el aparato está totalmente lleno, el compresor podría funcionar sin detenerse y generar escarcha o hielo en el evaporador. En este caso, ajuste el control a una temperatura más alta para permitir la descongelación automática y ahorrar energía de esta manera. Asegure una buena ventilación. No cubra las rejillas de ventilación ni los agujeros. 6.2 Consejos para la refrigeración de alimentos frescos • • • • • • • Un buen ajuste de temperatura que asegure la conservación de los alimentos frescos es una temperatura menor o igual a +4°C. Una temperatura más alta en el interior del aparato puede reducir la vida útil de los alimentos. Cubra el alimento con el envase para preservar su frescura y aroma. Utilice siempre recipientes cerrados para líquidos y para alimentos, para evitar sabores u olores en el compartimento. Para evitar la contaminación cruzada entre alimentos cocidos y crudos, cubra la comida cocinada y sepárela de la cruda. Se recomienda descongelar los alimentos dentro de la nevera. No coloque alimentos calientes dentro del aparato. Asegúrese de que se haya enfriado a temperatura ambiente antes de introducirla. Para evitar el desperdicio de alimentos, los alimentos más recientes deben colocarse siempre detrás de los viejos. ESPAÑOL 6.3 Consejos para la refrigeración de alimentos • • • • • Carne (de todo tipo): guárdela en un envoltorio adecuado y colóquela en el estante de vidrio, sobre el cajón de las verduras. Almacene la carne durante un máximo de 1-2 días. Frutas y verduras: limpie a fondo (elimine la suciedad) y coloque en un cajón especial (cajón de verduras). Es aconsejable no guardar en el frigorífico las frutas exóticas como plátanos, mangos, papayas, etc. Las verduras como tomates, patatas, cebollas y ajos no deben guardarse en el frigorífico. Mantequilla y queso: coloque en un recipiente hermético, envuelva en • • • 49 papel de aluminio o en bolsas de polietileno para eliminar todo el aire posible. Botellas: cierre con un tapón y colóquelas en el estante para botellas de la puerta de la puerta o en el botellero (si dispone de él). Para acelerar el enfriamiento de los productos, se recomienda encender el ventilador. La activación del aire dinámico permite una mayor homogeneización de las temperaturas internas. Consulte siempre la fecha de caducidad de los productos para saber cuánto tiempo debe conservarlos. 7. MANTENIMIENTO Y LIMPIEZA ADVERTENCIA! Consulte los capítulos sobre seguridad. 7.1 Limpieza del interior Antes de utilizar el aparato por primera vez, lave su interior y todos los accesorios internos con agua templada y jabón neutro para eliminar el típico olor de los productos nuevos. A continuación, seque todo bien. PRECAUCIÓN! No utilice detergentes, polvos abrasivos ni limpiadores a base de cloro o aceite, ya que podrían dañar el acabado. PRECAUCIÓN! Los accesorios y las piezas del aparato no deben lavarse en el lavavajillas. 7.2 Limpieza periódica El equipo debe limpiarse de forma regular: 1. Limpie el interior y los accesorios con agua templada y un jabón neutro. 2. Revise y limpie periódicamente las juntas de la puerta para mantenerlas limpias y sin restos. 3. Aclare y seque a fondo. 7.3 Descongelación del frigorífico La escarcha se elimina automáticamente del evaporador del compartimento frigorífico durante el uso normal. El agua de la descongelación se descarga por un canal hacia un recipiente especial situado en la parte posterior del aparato, sobre el motor compresor, desde donde se evapora. Es importante limpiar periódicamente el orificio de salida del agua de descongelación situado en la mitad del canal del compartimento frigorífico para evitar que el agua se desborde y caiga sobre los alimentos del interior. Utilice para ello la varilla limpiadora incluida con el aparato. 50 www.electrolux.com Si el aparato no se utiliza durante un tiempo prolongado, tome las siguientes precauciones 1. Desconecte el aparato de la red eléctrica. 2. Extraiga todos los alimentos. 3. Limpie el aparato y todos los accesorios. 4. Deje la puerta abierta para evitar olores desagradables. 7.4 Periodos sin funcionamiento 8. SOLUCIÓN DE PROBLEMAS ADVERTENCIA! Consulte los capítulos sobre seguridad. 8.1 Qué hacer si... Problema Posible causa Solución El aparato no funciona. El aparato se apaga. Encienda el electrodomés‐ tico. El aparato no está correc‐ Enchufe el aparato correc‐ tamente enchufado a la to‐ tamente a la toma de co‐ ma de corriente. rriente. No hay tensión en la toma de corriente. Enchufe un aparato eléctri‐ co diferente a la toma de corriente. Llame a un elec‐ tricista cualificado. El aparato hace ruido. El aparato no está bien apoyado en el suelo. Compruebe que los sopor‐ tes del aparato descansan sobre una superficie esta‐ ble. El compresor funciona continuamente. La temperatura está ajus‐ tada incorrectamente. Consulte el capítulo "Panel de control". Se han guardado muchos Espere unas horas y vuel‐ alimentos al mismo tiempo. va a comprobar la tempe‐ ratura. La temperatura ambiente es demasiado alta. Consulte el capítulo "Insta‐ lación". ESPAÑOL Problema Posible causa 51 Solución Los alimentos introducidos Deje que los alimentos se en el aparato estaban de‐ enfríen a temperatura am‐ masiado calientes. biente antes de almace‐ narlos. La puerta no está bien ce‐ rrada. Consulte la sección "Cierre de la puerta". La función FastCool está activada. Consulte la sección “Fun‐ ción FastCool”. El compresor no se pone en marcha inmediatamen‐ te después de pulsar "FastCool", o tras cambiar la temperatura. El compresor se pone en marcha después de un cierto tiempo. Esto es normal y no signifi‐ ca que exista un error. La puerta está mal alinea‐ da o interfiere con la rejilla de ventilación. El aparato no está nivela‐ do. Consulte las instrucciones de instalación. La puerta no se abre fácil‐ mente. Ha intentado volver a abrir la puerta inmediatamente después de cerrarla. Espere unos segundos en‐ tre el cierre y la reapertura de la puerta. La bombilla no funciona. La bombilla está en modo de espera. Cierre y abra la puerta. La bombilla es defectuosa. Póngase en contacto con el servicio técnico autoriza‐ do más cercano. Hay demasiada escarcha o hielo. La puerta no está bien ce‐ rrada. Consulte la sección "Cierre de la puerta". La junta de la puerta está sucia o deformada. Consulte la sección "Cierre de la puerta". Los alimentos no están bien envueltos. Envuelva mejor los produc‐ tos. La temperatura está ajus‐ tada incorrectamente. Consulte el capítulo "Panel de control". El aparato está completa‐ Seleccione una temperatu‐ mente cargado y ajustado ra más alta. Consulte el a la temperatura más baja. capítulo "Panel de control". La temperatura ajustada en el aparato es demasia‐ do baja y la temperatura ambiente demasiado alta. Seleccione una temperatu‐ ra más alta. Consulte el capítulo "Panel de control". 52 www.electrolux.com Problema Posible causa Solución El agua fluye por la placa posterior del frigorífico. Durante el proceso de des‐ Es correcto. congelación automática, la escarcha se derrite en la placa posterior. Hay demasiada agua de condensación en la pared posterior del frigorífico. La puerta se abre con de‐ masiada frecuencia. Abra la puerta solo cuando sea necesario. La puerta no se cierra completamente. Asegúrese de que la puer‐ ta está cerrada completa‐ mente. Los alimentos guardados no están envueltos correc‐ tamente. Envuelva los alimentos co‐ rrectamente antes de guar‐ darlos en el aparato. El agua fluye por el interior Los productos impiden que Asegúrese de que los ali‐ del frigorífico. el agua fluya al colector de mentos no entran en con‐ agua. tacto con la placa poste‐ rior. La salida de agua está obstruida. Limpie la salida de agua. Hay agua en el suelo. La salida de agua de la descongelación no está conectada a la bandeja de evaporación situada sobre el compresor. Fije la salida de agua de descongelación a la ban‐ deja de evaporación. No es posible ajustar la temperatura. La "Función FastCool" está Apague manualmente la activada. "Función FastCool", o es‐ pere hasta que la función se desactive automática‐ mente antes de ajustar la temperatura. Consulte "Función FastCool". La temperatura del aparato La temperatura no se ha es demasiado baja/alta. ajustado correctamente. Seleccione una temperatu‐ ra más alta o baja. La puerta no está bien ce‐ rrada. Consulte la sección "Cierre de la puerta". La temperatura de los pro‐ ductos es demasiado alta. Deje que la temperatura de los productos descien‐ da a la temperatura am‐ biente antes de guardar‐ los. Se han guardado muchos Guarde menos productos alimentos al mismo tiempo. al mismo tiempo. La puerta se ha abierto con frecuencia. Si es necesario, cierre la puerta. ESPAÑOL Problema 53 Posible causa Solución La función FastCool está activada. Consulte la sección “Fun‐ ción FastCool”. No hay circulación de aire frío en el aparato. Compruebe que el aire frío circula libremente en el aparato. Consulte el capí‐ tulo "Consejos". Los LED de ajuste de tem‐ Se ha producido un error peratura parpadean al mis‐ en la medición de la tem‐ mo tiempo. peratura. Si el consejo anterior no ofrece resultados, llame al servicio técnico autorizado más cercano. 8.2 Cambio de la bombilla El aparato está equipado con una luz LED interior de larga duración. El dispositivo de iluminación solo debe ser sustituido por el servicio técnico. Póngase en contacto con el servicio técnico autoriza‐ do más cercano. El siste‐ ma de refrigeración segui‐ rá manteniendo fríos los alimentos, pero no podrá ajustar la temperatura. Póngase en contacto con el servicio técnico. 8.3 Cierre de la puerta 1. Limpie las juntas de la puerta. 2. Si es necesario, ajuste la puerta. Consulte las instrucciones de instalación. 3. Si es necesario, cambie las juntas defectuosas. Póngase en contacto con el servicio técnico autorizado. 54 www.electrolux.com 9. RUIDOS SSSRRR! BRRR! CLICK! HISSS! BLUBB! 10. DATOS TÉCNICOS La información técnica se encuentra en la placa de datos técnicos en el lado interior izquierdo del aparato y en la etiqueta de energía. El código QR de la etiqueta energética suministrada con el aparato proporciona un enlace web a la información relacionada con el rendimiento del aparato en la base de datos de EU EPREL. Guarde la etiqueta de energía como referencia junto con el manual de usuario y todos los demás documentos que se proporcionan con este aparato. También puede encontrar la misma información en EPREL utilizando el enlace https://eprel.ec.europa.eu y el nombre del modelo y el número de producto que se encuentra en la placa de características del aparato. Consulte el enlace www.theenergylabel.eu para información detallada sobre la etiqueta energética. 11. INFORMACIÓN PARA LOS INSTITUTOS DE PRUEBAS La instalación y la preparación del aparato para cualquier verificación de EcoDiseño deberá cumplir con EN 62552. Los requisitos de ventilación, las dimensiones de los huecos y las distancias mínimas traseras serán los indicados en el Capítulo 3 de este Manual de Usuario. Por favor, póngase en contacto con el fabricante para ESPAÑOL 55 cualquier otra información adicional, incluyendo los planos de carga. 12. ASPECTOS MEDIOAMBIENTALES Recicle los materiales con el símbolo . Coloque el material de embalaje en los contenedores adecuados para su reciclaje. Ayude a proteger el medio ambiente y la salud pública, así como a reciclar residuos de aparatos eléctricos y * electrónicos. No deseche los aparatos marcados con el símbolo junto con los residuos domésticos. Lleve el producto a su centro de reciclaje local o póngase en contacto con su oficina municipal. 222377925-A-402020 www.electrolux.com/shop-
 1
1
-
 2
2
-
 3
3
-
 4
4
-
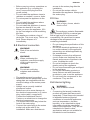 5
5
-
 6
6
-
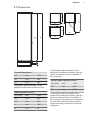 7
7
-
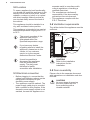 8
8
-
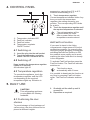 9
9
-
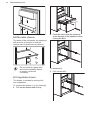 10
10
-
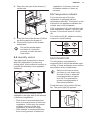 11
11
-
 12
12
-
 13
13
-
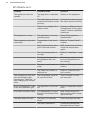 14
14
-
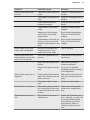 15
15
-
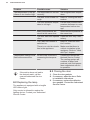 16
16
-
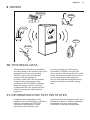 17
17
-
 18
18
-
 19
19
-
 20
20
-
 21
21
-
 22
22
-
 23
23
-
 24
24
-
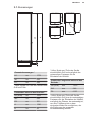 25
25
-
 26
26
-
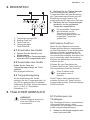 27
27
-
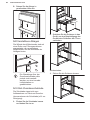 28
28
-
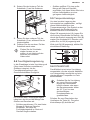 29
29
-
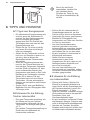 30
30
-
 31
31
-
 32
32
-
 33
33
-
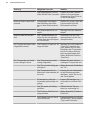 34
34
-
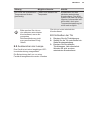 35
35
-
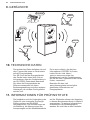 36
36
-
 37
37
-
 38
38
-
 39
39
-
 40
40
-
 41
41
-
 42
42
-
 43
43
-
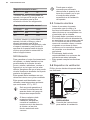 44
44
-
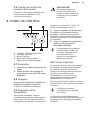 45
45
-
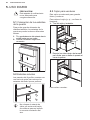 46
46
-
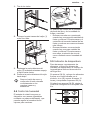 47
47
-
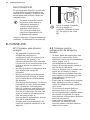 48
48
-
 49
49
-
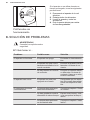 50
50
-
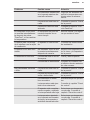 51
51
-
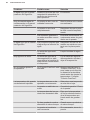 52
52
-
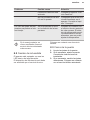 53
53
-
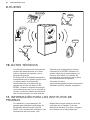 54
54
-
 55
55
-
 56
56


Electrolux ERS3DF18S Manual de usuario
- Categoría
- Neveras
- Tipo
- Manual de usuario
en otros idiomas
- English: Electrolux ERS3DF18S User manual
- Deutsch: Electrolux ERS3DF18S Benutzerhandbuch
Artículos relacionados
-
Electrolux ENT8TE18S Manual de usuario
-
Electrolux LNS8FF19S Manual de usuario
-
Electrolux LNT7TE18S Manual de usuario
-
Electrolux KNT4FD18S Manual de usuario
-
-
Electrolux KFS4DF18S Manual de usuario
-
Electrolux LNS6TE19S Manual de usuario
-
Electrolux LNS9TE19S Manual de usuario
-
Electrolux LNT4FE18S Manual de usuario
-
Electrolux KRB1AF12S Manual de usuario
