
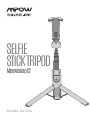
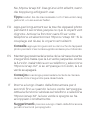
MODEL: PA197A
Mpow isnap X2
SELFIE
STICK TRIPOD

x1
x1
x1
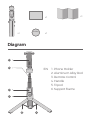
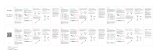
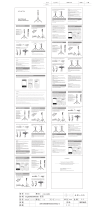
EN 1. Phone Holder
2. Aluminum Alloy Rod
3. Remote Control
4. Handle
5. Tripod
6. Support Frame
x1
Diagram
Battery

DE
1. Handy Halte
2. Aluminiumlegierun Stang
3. Fernbedienung
4. Griff
5. Stativ
6. Stützrahmen
FR
1. Pince de téléphone
2. Tige d'alliage d'aluminium
3. Télécommand
4. Manette
5. Trépied
6. Cadre de soutien
ES
1. Clip de teléfono
2. Palo de aleación de aluminio
3. Control remoto
4. Manivela
5. Trípode
6. Marco de soporte estable
IT
1. Porta telefono
2. Asta in lega
3. Telecomando di conreollo lontano
4. Maniglia
5. Tripode
6. Telaio di supporto

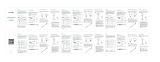
EN
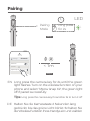
Long press the camera key for 2s until the green
light flashes. Turn on the wireless function on your
phone and select “Mpow isnap X2”, the green light
off if paired successfully.
Tips: Long press the camera key for another 2s to turn it off.
Pairing
LED
Long press
for 2s
Step1
Pairing
Mode
Step2
< 1m
Mpow isnap X2
DEVICES
Settings
Connected
Bluetooth
Bluetooth
DE Halten Sie die Kamerataste 2 Sekunden lang
gedrückt, bis das grüne Licht blinkt. Schalten Sie
die Wireless-Funktion Ihres Handys ein und wählen

FR
Appuyez longuement sur la touche Appareil photo
pendant 2 secondes jusqu'à ce que le voyant vert
clignote. Activez la fonction sans fil sur votre
téléphone et sélectionnez "Mpow notap X2". Si le
couplage est réussi, le voyant vert s'éteint.
Conseils: appuyez longuement sur la touche de l'appareil
photo pendant 2 secondes supplémentaires pour l'éteindre.
ES Mantenga presionada la tecla de la cámara durante
2 segundos hasta que la luz verde parpadee. Active
la función inalámbrica en su teléfono y seleccione
"Mpow isnap X2", si se empareja con éxito, la luz
verde se apagará.
Consejos: mantenga presionada la tecla de la cámara
durante otros 2 segundos para desactivarla.
IT Preme a lungo il tasto della fotocamera per 2
secondi fino a quando la luce verde lampeggia.
Attiva la funzione wireless sul telefono e seleziona
"Mpow isnap X2", la luce verde si spegne se ha
accoppiato correttamente.
Suggerimenti: premere a lungo il tasto della fotocamera
per altri 2 secondi per spegnerlo
Sie „Mpow isnap X2“. Das grüne Licht erlischt, wenn
die Kopplung erfolgreich war.
Tipps: Halten Sie die Kamerataste noch 2 Sekunden lang
gedrückt, um sie auszuschalten.

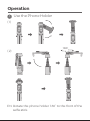
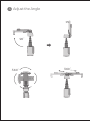
Rotate the phone holder 180° to the front of the
selfie stick
EN
1
Operation
( 1)
( 2)
Use the Phone Holder
180°

Faites pivoter la pince de téléphone de 180 ° vers
l'avant de la perche selfie
FR
Gire el clip del teléfono 180 ° hacia la parte frontal
del palo selfie.
ES
Ruotare il supporto del telefono a 180 ° verso la
parte anteriore del selfie stick.
IT
Drehen Sie den Handyhalter um 180 ° nach vorne
auf den Selfie-Stick.
DE
Despliegue el lado doblado del soporte del teléfono
ES
Spiegare il lato piegato del supporto del telefono.
IT
Unfold the folded side of the phone holder.
EN
Klappen Sie die gefaltete Seite des Handyhalters auf.DE
Déplier le côté plié de la pince de téléphone.FR

(1) Tightly push the clip to the right to mount your phone
and make sure it is securely clamped.
(2) Extend the Rod.
Tips: Please avoid blocking the side button of your phone.
2
Install Your Phone
(1) Drücken Sie den Clip fest nach rechts, um das Handy
zu befestigen, und vergewissern Sie sich, dass es fest
eingeklemmt ist.
DE
(2) Ziehen Sie die Stange herau.
Tipps: Bitte blockieren Sie nicht die Seitentaste Ihres Handys.
EN

(1) Poussez fermement le clip vers la droite pour monter
votre téléphone et assurez-vous qu'il est bien serré.
(2) Étendre la canne.
FR
Conseils: évitez de bloquer le bouton latéral de votre téléphone.
(1) Presione firmemente el clip hacia la derecha para
colocar el teléfono, y asegúrese de que esté
firmemente sujeto.
(2) Varilla de extensión.
ES
Consejos: evite bloquear el botón lateral de su teléfono.
(1) Spingere saldamente la clip verso destra per montare
il telefono e assicurarsi che sia saldamente bloccato.
(2) Estendere l'asta.
IT
Suggerimenti: evitare di bloccare il pulsante laterale del telefono.

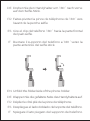
3
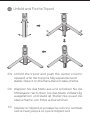
Adjust the Angle
90°
360°
360°

EN
Unfold the tripod and push the center column
upward until the tripod is fully expanded and
stable. Place it on the flat surface to take photos.
DE
Klappen Sie das Stativ aus und schieben Sie die
Mittelsäule nach oben, bis das Stativ vollständig
ausgefahren und stabil ist. Stellen Sie es auf die
ebene Fläche, um Fotos aufzunehmen.
FR
Dépliez le trépied et poussez la colonne centrale
vers le haut jusqu'à ce que le trépied soit
4
Unfold and Fix the Tripod

EN
Push the remote control up to take it out
complètement déployé et stable. Placez-le sur la
surface plane pour prendre des photos.
Remove the Remote Control
ES
Despliegue el trípode y empuje la columna central
hacia arriba hasta que el trípode esté completamente
extendido y estable. Colóquelo en la superficie
plana para tomar fotos.
IT
Aprire il treppiede e spingere la colonna centrale
verso l'alto fino a quando il treppiede non è
completamente espanso e stabile. Posizionarlo sulla
superficie piana per scattare foto.
5
Tips: Remove the insulating strip before use

DE
Schieben Sie die Fernbedienung nach oben, um
sie herauszunehmen
Tipps: Entfernen Sie den Isolierstreifen vor dem Gebrauch
FR
Poussez la télécommande pour l'extraire
10m / 33ft
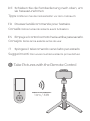
Take Pictures with the Remote Control
6
Conseils: Retirer la bande isolante avant l'utilisation.
ES
IT
Empuje el control remoto hacia arriba para sacarlo.
Consejos: Retire la tira aislante antes de usar.
Spingere il telecomando verso l'alto per estrarlo.
Suggerimenti: Rimuovere la striscia isolante prima dell'uso.

EN
Tips: Please make sure you've set your phone's volume button
as the shutter.
DE
FR
ES
IT
Tipps: Bitte stellen Sie sicher, dass Sie die Lautstärketaste
Ihres Handys als Auslöser eingestellt haben.
Conseils: Assurez-vous que vous avez défini le bouton
de volume de votre téléphone comme déclencheur.
Consejos: asegúrese de haber configurado el botón de
volumen de su teléfono como el obturador.
Suggerimenti: assicurati di aver installato il pulsante
del volume del telefono come otturatore.
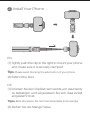
Fold the Selfie Stick Tripod
7

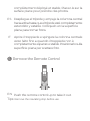
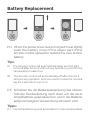
Battery Replacement
EN
When the power is low due to long-term use, tightly
push the battery cover of the upper part of the
remote control upward to replace the new button
battery.
(1) The remote control will automatically sleep and the light
turns off after 2mins if without any operation, just click the
camera key to wake it up.
(2) The remote control will automatically off after 30mins if
without any operation, and you need to press the camera
key for 2 seconds to turn it on.
Tips:
DE
Schieben Sie die Batterieabdeckung des oberen
Teils der Fernbedienung nach oben, um die neue
Knopfbatterie auszutauschen, wenn die Batterie
aufgrund längerer Verwendung schwach wird.
(1) Die Fernbedienung wird automatisch in den Ruhezustand
Tipps:

versetzt und das Licht erlischt nach 2 Minuten, wenn keine
Bedienung erfolgt. Klicken Sie dann einfach auf die
Kamerataste, um die Fernbedienung aufzuwecken.
(2) Die Fernbedienung schaltet sich automatisch nach 30
Minuten aus, wenn keine Bedienung erfolgt. Sie müssen
die Kamerataste 2 Sekunden lang drücken, um die
Fernbedienung einzuschalten.
FR
Lorsque la puissance est faible en raison d'une
utilisation à long terme, poussez fermement le
couvercle de la pile de la partie supérieure de la
télécommande vers le haut pour remplacer la
nouvelle pile bouton.
(1) La télécommande se met automatiquement en veille et la
lumière s'éteint au bout de 2 minutes si sans aucune opération,
il sut de cliquer sur la touche de l'appareil photo pour la
réactiver.
(2) La télécommande s'éteindra automatiquement après 30
minutes si aucune opération n'est effectuée et vous devez
appuyer sur la touche de l'appareil photo pendant 2
secondes pour l'allumer.
Conseils:
ES
Cuando la energía es baja debido al uso a largo
plazo, empuje firmemente la tapa de la batería
hacia arriba para reemplazar la batería del nuevo.
(1) Sin ninguna operación el control remoto se apagará
automáticamente y la luz se apagará después de 2 minutos.
Simplemente haga clic en la tecla de la cámara par
Consejos:

IT
Quando la batteria è scarica a causa dell'uso a lungo
termine, spingere verso l'alto il coperchio della
batteria della parte superiore del telecomando verso
l'alto per sostituire la nuova batteria a bottone.
(1) Il telecomando si spegnerà automaticamente e la luce si
spegnerà dopo 2 minuti se senza alcuna operazione, basta
fare clic sul tasto della fotocamera per riattivarlo.
(2) Il telecomando si spegne automaticamente dopo 30 minuti
se non viene eseguita alcuna operazione ed è necessario
premere il tasto della fotocamera per 2 secondi per accenderlo
Suggerimenti:
(2) El control remoto se apagará automáticamente después
de 30 minutos si no se realiza ninguna operación, y debe
presionar la tecla de la cámara durante 2 segundos para
encenderlo.

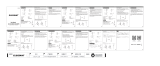
MPOW TECHNOLOGY CO., LTD
www.xmpow.com | support@xmpow.com
Copyright © MPOW Inc. All rights reserved.
Transcripción de documentos
SELFIE STICK TRIPOD MpowisnapX2 MODEL: PA197A x1 Battery x1 x1 x1 Diagram 1 2 EN 1. Phone Holder 2. Aluminum Alloy Rod 3. Remote Control 4. Handle 5. Tripod 6. Support Frame 3 4 5 6 DE 1. Handy Halte 2. Aluminiumlegierun Stang 3. Fernbedienung 4. Griff 5. Stativ 6. Stützrahmen FR 1. Pince de téléphone 2. Tige d'alliage d'aluminium 3. Télécommand 4. Manette 5. Trépied 6. Cadre de soutien ES 1. Clip de teléfono 2. Palo de aleación de aluminio 3. Control remoto 4. Manivela 5. Trípode 6. Marco de soporte estable IT 1. Porta telefono 2. Asta in lega 3. Telecomando di conreollo lontano 4. Maniglia 5. Tripode 6. Telaio di supporto Pairing LED Pairing Mode Long press for 2s Step1 Settings Bluetooth < 1m Bluetooth DEVICES Mpow isnap X2 Connected Step2 EN Long press the camera key for 2s until the green light flashes. Turn on the wireless function on your phone and select “Mpow isnap X2”, the green light off if paired successfully. Tips: Long press the camera key for another 2s to turn it off. DE Halten Sie die Kamerataste 2 Sekunden lang gedrückt, bis das grüne Licht blinkt. Schalten Sie die Wireless-Funktion Ihres Handys ein und wählen Sie „Mpow isnap X2“. Das grüne Licht erlischt, wenn die Kopplung erfolgreich war. Tipps: Halten Sie die Kamerataste noch 2 Sekunden lang gedrückt, um sie auszuschalten. FR Appuyez longuement sur la touche Appareil photo pendant 2 secondes jusqu'à ce que le voyant vert clignote. Activez la fonction sans fil sur votre téléphone et sélectionnez "Mpow notap X2". Si le couplage est réussi, le voyant vert s'éteint. Conseils: appuyez longuement sur la touche de l'appareil photo pendant 2 secondes supplémentaires pour l'éteindre. ES Mantenga presionada la tecla de la cámara durante 2 segundos hasta que la luz verde parpadee. Active la función inalámbrica en su teléfono y seleccione "Mpow isnap X2", si se empareja con éxito, la luz verde se apagará. Consejos: mantenga presionada la tecla de la cámara durante otros 2 segundos para desactivarla. IT Preme a lungo il tasto della fotocamera per 2 secondi fino a quando la luce verde lampeggia. Attiva la funzione wireless sul telefono e seleziona "Mpow isnap X2", la luce verde si spegne se ha accoppiato correttamente. Suggerimenti: premere a lungo il tasto della fotocamera per altri 2 secondi per spegnerlo. Operation 1 Use the Phone Holder ( 1) ( 2) 180° EN Rotate the phone holder 180° to the front of the selfie stick. DE Drehen Sie den Handyhalter um 180 ° nach vorne auf den Selfie-Stick. FR Faites pivoter la pince de téléphone de 180 ° vers l'avant de la perche selfie. ES Gire el clip del teléfono 180 ° hacia la parte frontal del palo selfie. IT Ruotare il supporto del telefono a 180 ° verso la parte anteriore del selfie stick. EN Unfold the folded side of the phone holder. DE Klappen Sie die gefaltete Seite des Handyhalters auf. FR Déplier le côté plié de la pince de téléphone. ES Despliegue el lado doblado del soporte del teléfono. IT Spiegare il lato piegato del supporto del telefono. 2 Install Your Phone EN (1) Tightly push the clip to the right to mount your phone and make sure it is securely clamped. Tips: Please avoid blocking the side button of your phone. (2) Extend the Rod. DE (1) Drücken Sie den Clip fest nach rechts, um das Handy zu befestigen, und vergewissern Sie sich, dass es fest eingeklemmt ist. Tipps: Bitte blockieren Sie nicht die Seitentaste Ihres Handys. (2) Ziehen Sie die Stange herau. FR (1) Poussez fermement le clip vers la droite pour monter votre téléphone et assurez-vous qu'il est bien serré. Conseils: évitez de bloquer le bouton latéral de votre téléphone. (2) Étendre la canne. ES (1) Presione firmemente el clip hacia la derecha para colocar el teléfono, y asegúrese de que esté firmemente sujeto. Consejos: evite bloquear el botón lateral de su teléfono. (2) Varilla de extensión. IT (1) Spingere saldamente la clip verso destra per montare il telefono e assicurarsi che sia saldamente bloccato. Suggerimenti: evitare di bloccare il pulsante laterale del telefono. (2) Estendere l'asta. 3 Adjust the Angle 90° 360° 360° 4 Unfold and Fix the Tripod EN Unfold the tripod and push the center column upward until the tripod is fully expanded and stable. Place it on the flat surface to take photos. DE Klappen Sie das Stativ aus und schieben Sie die Mittelsäule nach oben, bis das Stativ vollständig ausgefahren und stabil ist. Stellen Sie es auf die ebene Fläche, um Fotos aufzunehmen. FR Dépliez le trépied et poussez la colonne centrale vers le haut jusqu'à ce que le trépied soit complètement déployé et stable. Placez-le sur la surface plane pour prendre des photos. ES Despliegue el trípode y empuje la columna central hacia arriba hasta que el trípode esté completamente extendido y estable. Colóquelo en la superficie plana para tomar fotos. IT Aprire il treppiede e spingere la colonna centrale verso l'alto fino a quando il treppiede non è completamente espanso e stabile. Posizionarlo sulla superficie piana per scattare foto. 5 Remove the Remote Control EN Push the remote control up to take it out. Tips: Remove the insulating strip before use. DE Schieben Sie die Fernbedienung nach oben, um sie herauszunehmen. Tipps: Entfernen Sie den Isolierstreifen vor dem Gebrauch. FR Poussez la télécommande pour l'extraire. Conseils: Retirer la bande isolante avant l'utilisation. ES Empuje el control remoto hacia arriba para sacarlo. Consejos: Retire la tira aislante antes de usar. IT Spingere il telecomando verso l'alto per estrarlo. Suggerimenti: Rimuovere la striscia isolante prima dell'uso. 6 Take Pictures with the Remote Control 10m / 33ft EN Tips: Please make sure you've set your phone's volume button as the shutter. DE Tipps: Bitte stellen Sie sicher, dass Sie die Lautstärketaste Ihres Handys als Auslöser eingestellt haben. FR Conseils: Assurez-vous que vous avez défini le bouton de volume de votre téléphone comme déclencheur. ES Consejos: asegúrese de haber configurado el botón de volumen de su teléfono como el obturador. IT Suggerimenti: assicurati di aver installato il pulsante del volume del telefono come otturatore. 7 Fold the Selfie Stick Tripod Battery Replacement EN When the power is low due to long-term use, tightly push the battery cover of the upper part of the remote control upward to replace the new button battery. Tips: (1) The remote control will automatically sleep and the light turns off after 2mins if without any operation, just click the camera key to wake it up. (2) The remote control will automatically off after 30mins if without any operation, and you need to press the camera key for 2 seconds to turn it on. DE Schieben Sie die Batterieabdeckung des oberen Teils der Fernbedienung nach oben, um die neue Knopfbatterie auszutauschen, wenn die Batterie aufgrund längerer Verwendung schwach wird. Tipps: (1) Die Fernbedienung wird automatisch in den Ruhezustand versetzt und das Licht erlischt nach 2 Minuten, wenn keine Bedienung erfolgt. Klicken Sie dann einfach auf die Kamerataste, um die Fernbedienung aufzuwecken. (2) Die Fernbedienung schaltet sich automatisch nach 30 Minuten aus, wenn keine Bedienung erfolgt. Sie müssen die Kamerataste 2 Sekunden lang drücken, um die Fernbedienung einzuschalten. FR Lorsque la puissance est faible en raison d'une utilisation à long terme, poussez fermement le couvercle de la pile de la partie supérieure de la télécommande vers le haut pour remplacer la nouvelle pile bouton. Conseils: (1) La télécommande se met automatiquement en veille et la lumière s'éteint au bout de 2 minutes si sans aucune opération, il suffit de cliquer sur la touche de l'appareil photo pour la réactiver. (2) La télécommande s'éteindra automatiquement après 30 minutes si aucune opération n'est effectuée et vous devez appuyer sur la touche de l'appareil photo pendant 2 secondes pour l'allumer. ES Cuando la energía es baja debido al uso a largo plazo, empuje firmemente la tapa de la batería hacia arriba para reemplazar la batería del nuevo. Consejos: (1) Sin ninguna operación el control remoto se apagará automáticamente y la luz se apagará después de 2 minutos. Simplemente haga clic en la tecla de la cámara par. (2) El control remoto se apagará automáticamente después de 30 minutos si no se realiza ninguna operación, y debe presionar la tecla de la cámara durante 2 segundos para encenderlo. IT Quando la batteria è scarica a causa dell'uso a lungo termine, spingere verso l'alto il coperchio della batteria della parte superiore del telecomando verso l'alto per sostituire la nuova batteria a bottone. Suggerimenti: (1) Il telecomando si spegnerà automaticamente e la luce si spegnerà dopo 2 minuti se senza alcuna operazione, basta fare clic sul tasto della fotocamera per riattivarlo. (2) Il telecomando si spegne automaticamente dopo 30 minuti se non viene eseguita alcuna operazione ed è necessario premere il tasto della fotocamera per 2 secondi per accenderlo. www.xmpow.com | [email protected] MPOW TECHNOLOGY CO., LTD Copyright © MPOW Inc. All rights reserved.-
 1
1
-
 2
2
-
 3
3
-
 4
4
-
 5
5
-
 6
6
-
 7
7
-
 8
8
-
 9
9
-
 10
10
-
 11
11
-
 12
12
-
 13
13
-
 14
14
-
 15
15
-
 16
16
-
 17
17
-
 18
18


Mpow Selfie Sticktripod Manual de usuario
- Tipo
- Manual de usuario
- Este manual también es adecuado para
en otros idiomas
- français: Mpow Selfie Sticktripod Manuel utilisateur
- italiano: Mpow Selfie Sticktripod Manuale utente
- English: Mpow Selfie Sticktripod User manual
- Deutsch: Mpow Selfie Sticktripod Benutzerhandbuch
Artículos relacionados
Otros documentos
-
 BlitzWolf US-BW-BS3 Sports Manual de usuario
-
 BlitzWolf BW-BS3-US Manual de usuario
-
 BlitzWolf BW-BS10-G Manual de usuario
-
 ELEGIANT ELEGIANTFurmores4983 Manual de usuario
-
Sony VCT-D680RM Manual de usuario
-
-
 ATUMTEK ATSS002 Manual de usuario
-
Rollei Actioncam 9s Plus Manual de usuario


