Ingersoll-Rand 1/4” AND 3/8” CHUCK GUARD KITS Guía de instalación
- Tipo
- Guía de instalación
Los Ingersoll-Rand 1/4” AND 3/8” CHUCK GUARD KITS son diseñados para operaciones de taladrado en las industrias aeroespacial, de automoción, de electrodomésticos, electrónica, de mecanizado y del mueble. Proporcionan seguridad y rendimiento optimizados, y están hechos para una máxima durabilidad de las piezas. Estos kits ayudan a cumplir con las regulaciones locales, estatales, federales y nacionales aplicables a las herramientas neumáticas manuales.
Los Ingersoll-Rand 1/4” AND 3/8” CHUCK GUARD KITS son diseñados para operaciones de taladrado en las industrias aeroespacial, de automoción, de electrodomésticos, electrónica, de mecanizado y del mueble. Proporcionan seguridad y rendimiento optimizados, y están hechos para una máxima durabilidad de las piezas. Estos kits ayudan a cumplir con las regulaciones locales, estatales, federales y nacionales aplicables a las herramientas neumáticas manuales.


Transcripción de documentos
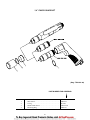
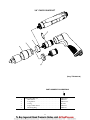
04577920 INSTALLATION MANUAL FOR 1/4” AND 3/8” CHUCK GUARD KITS FOR Q2 SERIES QP AND QS DRILLS Form P7512 Edition 2 November, 2001 F E P Series QP and QS Drills and Chuck Guard Kits are designed for drilling operations in the aerospace, automotive, appliance, electronic, machining and furniture industries. Ingersoll--Rand is not responsible for customer modification of tools or accessory kits for applications on which Ingersoll--Rand was not consulted. IMPORTANT SAFETY INFORMATION ENCLOSED. READ THIS MANUAL BEFORE OPERATING THE TOOL AND INSTALLING THE CHUCK GUARD KIT. IT IS THE RESPONSIBILITY OF THE EMPLOYER TO PLACE THE INFORMATION IN THIS MANUAL INTO THE HANDS OF THE OPERATOR. FAILURE TO OBSERVE THE FOLLOWING WARNINGS COULD RESULT IN INJURY. PLACING TOOL IN SERVICE • • • Always operate, inspect and maintain this tool in accordance with all regulations (local, state, federal and country), that may apply to hand held/hand operated pneumatic tools. For safety, top performance, and maximum durability of parts, operate this tool at 90 psig (6.2 bar/620 kPa) maximum air pressure at the inlet. Always turn off the air supply and disconnect the air supply hose before installing, removing or adjusting any accessory on this tool, or before performing any maintenance on this tool. • Always wear eye protection when operating or performing maintenance on this tool. Always wear hearing protection when operating this tool. Keep hands, loose clothing, long hair and jewelry away from working end of tool. Keep body stance balanced and firm. Do not overreach when operating this tool. Anticipate and be alert for sudden changes in motion, reaction torques, or forces during start--up and operation. Tool accessories may continue to rotate briefly after throttle is released. Air powered tools can vibrate in use. Vibration, repetitive motions or uncomfortable positions may be harmful to your hands and arms. Stop using any tool if discomfort, tingling feeling or pain occurs. Seek medical advice before resuming use. Use accessories recommended by Ingersoll--Rand. This tool is not designed for working in explosive atmospheres. This tool is not insulated against electric shock. Do not carry or drag the tool by the cord or cable. • • • • Do not use damaged, frayed or deteriorated hoses and fittings. Always use clean, dry air at 90 psig (6.2 bar/620 kPa) maximum air pressure. Dust, corrosive fumes and/or excessive moisture can ruin the motor of an air tool. Do not lubricate tools with flammable or volatile liquids such as kerosene, diesel or jet fuel. Do not remove any labels. Replace any damaged label. USING THE TOOL • • • • • • • • • • • Note the position of the reversing mechanism before operating the tool so as to be aware of the direction of rotation when operating the throttle. Prevent exposure and breathing of harmful dust and particles created by power tool use: Some dust created by power sanding, sawing, grinding, drilling and other construction activities contains chemicals known to cause cancer, birth defects or other reproductive harm. Some examples of these chemicals are: -- lead from lead based paints, -- crystalline silica from bricks and cement and other masonry products, and -- arsenic and chromium from chemically treated lumber. Your risk from these exposures varies, depending on how often you do this type of work. To reduce your exposure to these chemicals: work in a well ventilated area, and work with approved safety equipment, such as those dust masks that are specially designed to filter out microscopic particles. The use of other than genuine Ingersoll--Rand replacement parts may result in safety hazards, decreased tool performance, and increased maintenance, and may invalidate all warranties. Repairs should be made only by authorized trained personnel. Consult your nearest Ingersoll--Rand Authorized Servicenter. Refer All Communications to the Nearest Ingersoll--Rand Office or Distributor. Ingersoll--Rand Company, 2001 Printed in U.S.A. WARNING SYMBOL IDENTIFICATION WARNING WARNING Always wear eye protection when operating or performing maintenance on this tool. Read this manual before operating tool. 2 WARNING Always wear hearing protection when operating this tool. 04577920 Manuel P7512 Révision 2 November, 2001 MANUEL D’INSTALLATION DES KITS DE PROTECTION DE MANDRINS DE 1/4” ET 3/8” POUR LES PERCEUSES QP & QS DE LA SERIE Q2 NOTE F Les perceuses Séries QP et QS et les kits de protection de mandrin sont destinés aux opérations de perçage dans les industries de l’aérospatiale, de l’automobile, des appareils ménagers, de l’électronique, de l’ameublement. Ingersoll--Rand ne peut être tenu responsable de la modification des outils ou des accessoires par le client pour les adapter à des applications qui n’ont pas été approuvées par Ingersoll--Rand. ATTENTION D’IMPORTANTES INFORMATIONS DE SÉCURITÉ SONT JOINTES. VEUILLEZ LIRE CE MANUEL AVANT D’UTILISER L’OUTIL ET D’INSTALLER LE KIT DE PROTECTION DE MANDRIN. L’EMPLOYEUR EST TENU DE COMMUNIQUER LES INFORMATIONS DE CE MANUEL AUX EMPLOYES UTILISANT CET OUTIL. LE NON RESPECT DES AVERTISSEMENTS SUIVANTS PEUT CAUSER DES BLESSURES. MISE EN SERVICE DE L’OUTIL • • • Cet outil doit toujours être exploité, inspecté et entretenu conformément à toutes les réglementations (locales, départementales, fédérales et nationales), applicables aux outils pneumatiques tenus/commandés à la main. Pour la sécurité, les performances optimales et la durabilité maximale des pièces, cet outil doit être connecté à une alimentation d’air comprimé de 6,2 bar (620 kPa) maximum à l’entrée. Couper toujours l’alimentation d’air comprimé et débrancher le flexible d’alimentation avant d’installer, déposer ou ajuster tout accessoire sur cet outil, ou d’entreprendre une opération d’entretien quelconque sur l’outil. • Porter toujours des lunettes de protection pendant l’utilisation et l’entretien de cet outil. Porter toujours une protection acoustique pendant l’utilisation de cet outil. Gardez les mains, vêtements amples, cheveux longs et bijoux éloignés de l’extrémité rotative de l’outil. Garder une position équilibrée et ferme. Ne pas se pencher trop en avant pendant l’utilisation de cet outil. Anticiper et prendre garde aux changements soudains de mouvement, couples de réaction ou forces lors du démarrage et de l’exploitation. La percussion des accessoires de l’outil peut continuer pendant un certain temps après le relâchement de la gâchette. Les outils pneumatiques peuvent vibrer pendant l’exploitation. Les vibrations, les mouvements répétitifs et les positions inconfortables peuvent causer des douleurs dans les mains et les bras. N’utiliser plus d’outils en cas d’inconfort, de picotements ou de douleurs. Consulter un médecin avant de recommencer à utiliser l’outil. Utiliser les accessoires recommandés par Ingersoll-Rand. Cet outil n’est pas conçu pour fonctionner dans des atmosphères explosives. Cet outil n’est pas isolé contre les chocs électriques. Ne transportez pas et ne tirez pas l’outil par le cordon ou le flexible. • • • • Ne pas utiliser des flexibles ou des raccords endommagés, effilochés ou détériorés. Utiliser toujours de l’air sec et propre à une pression maximum de 6,2 bar (620 kPa). La poussière, les fumées corrosives et/ou une humidité excessive peuvent endommager le moteur d’un outil pneumatique. Ne jamais lubrifier les outils avec des liquides inflammables ou volatiles tels que le kérosène, le gasol ou le carburant d’aviation. Ne retirer aucune étiquette. Remplacer toute étiquette endommagée. UTILISATION DE L’OUTIL • • • • • • • • • • • Noter la position du levier d’inversion avant de mettre l’outil en marche de manière à savoir dans quel sens il va tourner lorsque la commande est actionnée. Evitez toute exposition et respiration des poussières et particules nocives créées par l’emploi de l’outil pneumatique: Certaines poussières produites par les opérations de ponçage, sciage, meulage, perçage et autres activités de construction contiennent des produits chimiques qui sont reconnus comme pouvant causer le cancer, des infirmités de naissance ou d’autres risques à effets nocifs. Parmi ces produits chimiques on trouve : -- le plomb des peintures à base de plomb, -- les cristaux de silice contenus dans les briques, le ciment et d’autres produits de maçonnerie, et -- l’arsenic et le chrome des bois traités chimiquement. Le risque présenté par l’exposition à ces poussières est fonction de la fréquence et du type de travail effectué. Pour réduire l’exposition à ces produits chimiques : travaillez dans une zone bien aérée, et utilisez les équipements de sécurité approuvés, tels que les masques à poussière qui sont spécialement conçus pour filtrer et arrêter les particules microscopiques. NOTE L’utilisation de rechanges autres que les pièces d’origine Ingersoll--Rand peut causer des risques d’insécurité, réduire les performances de l’outil et augmenter l’entretien, et peut annuler toutes les garanties. Les réparations ne doivent être effectuées que par des réparateurs qualifiés autorisés. Consultez votre Centre de Service Ingersoll--Rand le plus proche. Adressez toutes vos communications au Bureau Ingersoll--Rand ou distributeur le plus proche. Ingersoll--Rand Company 2001 Imprimé aux É.U. SIGNIFICATION DES SYMBOLES D’AVERTISSEMENT ATTENTION Porter toujours des lunettes de protection pendant l’utilisation et l’entretien de cet outil. ATTENTION Lire ce manuel avant d’utiliser l’outil. 4 ATTENTION Porter toujours une protection acoustique pendant l’utilisation de cet outil. 04576815 Impreso P7512 Edición 2 Noviembre, 2001 MANUAL DE INSTALACIÓN DE KITS PROTECTORES DE PORTABROCAS DE 1/4” Y 3/8” PARA TALADROS QP y QS DE LA SERIE Q2 E Los taladros y kits protectores de portabrocas de las series QP y QS están diseñados para las operaciones de taladrado en la industria aeroespacial, de automoción, de electrodomésticos, electrónica, de mecanizado y del mueble. Ingersoll--Rand no aceptará responsabilidad alguna por la modificación de las herramientas o kits de accesorios efectuada por el cliente para las aplicaciones que no hayan sido consultadas con Ingersoll--Rand. AVISO SE ADJUNTA INFORMACIÓN IMPORTANTE DE SEGURIDAD. LEA ESTE MANUAL ANTES DE UTILIZAR LA HERRAMIENTA E INSTALAR EL KIT PROTECTOR DE PORTABROCAS. ES RESPONSABILIDAD DE LA EMPRESA ASEGURARSE DE QUE EL OPERARIO ESTÉ AL TANTO DE LA INFORMACIÓN QUE CONTIENE ESTE MANUAL. EL HACER CASO OMISO DE LOS AVISOS SIGUIENTES PODRÍA OCASIONAR LESIONES. PARA PONER LA HERRAMIENTA EN SERVICIO • • • Use, inspeccione y mantenga esta herramienta siempre de acuerdo a todas las normativas (locales, estatales, federales, nacionales), que apliquen a las herramientas neumáticas de operación y agarre manual. Para seguridad, máximo rendimiento y durabilidad de piezas, use esta herramienta a una máxima presión de aire de 90 psig (6,2 bar/620kPa) en la admisión de manguera de suministro. Corte siempre el suministro de aire y desconecte la manguera de suministro de aire antes de instalar, desmontar o ajustar cualquier accesorio de esta herramienta, o antes de realizar cualquier operación de • • • • mantenimiento de la misma. No utilice mangueras de aire y accesorios dañados, desgastados ni deteriorados. Use siempre aire limpio y seco a una máxima presión de 90 psig (6,2 bar/620kPa). El polvo, los gases corrosivos y/o el exceso de humedad podrían estropear el motor de una herramienta neumática. No lubrique las herramientas con líquidos inflamables o volátiles tales como queroseno, gasoil o combustible para motores a reacción. No saque ninguna etiqueta. Sustituya toda etiqueta dañada. USO DE HERRAMIENTA • • • • • • • • Use siempre protección ocular cuando utilice esta herramienta o realice operaciones de mantenimiento en la misma. Use siempre protección para los oídos cuando utilice esta herramienta. Mantenga las manos, la ropa suelta, el cabello largo y las alhajas apartados del extremo de trabajo de la herramienta. Mantenga una postura del cuerpo equilibrada y firme. No estire demasiado los brazos al manejar la herramienta. Anticipe y esté atento a los cambios repentinos en el movimiento, pares de reacción u otras fuerzas durante la puesta en marcha y utilización. El accesorio de herramienta podría seguir girando brevemente después de haber soltado la palanca de estrangulación. Las herramientas neumáticas pueden vibrar durante el uso. La vibración, repetición o posiciones incomodas pueden dañarle los brazos y manos. En caso de incomodidad, sensación de hormigueo o dolor, deje de usar la herramienta. Consulte a un médico antes de volver a usarla otra vez. Utilice únicamente los accesorios Ingersoll--Rand recomendados. Esta herramienta no ha sido diseñada para trabajar en ambientes explosivos. • • • • • Esta herramienta no está aislada contra descargas eléctricas. No lleve ni arrastre la herramienta sujetándola por la manguera. No lleve ni arrastre la herramienta sujetándola por el cable. Note la posición de la palanca de inversión antes de funcionar la herramienta para estar consciente de su dirección giratoria cuando funcione el estrangulador. Evite respirar el polvo y partículas nocivos que se producen al utilizar la herramienta, así como exponerse a ellos: -- el plomo de las pinturas con base de plomo, -- la sílice cristalina de ladrillos y hormigón y otros productos asociados con la albañilería, y -- el arsénico y el cromo que produce la madera sometida a tratamientos químicos. El riesgo a la persona que presenta una exposición de este tipo varia en función de la frecuencia con que se realiza esta clase de trabajo. Para reducir la exposición a estas sustancias químicas: trabaje en una zona bien ventilada y utilice equipo de protección homologado, por ejemplo una mascarilla especialmente diseñada para filtrar partículas microscópicas. NOTA El uso de piezas de recambio que no sean las auténticas piezas Ingersoll--Rand podría poner en peligro la seguridad, reducir el rendimiento de la herramienta y aumentar los cuidados de mantenimiento necesarios, así como invalidar toda garantía. Las reparaciones sólo serán realizadas por personal cualificado y autorizado. Consulte con el centro de servicio Ingersoll--Rand autorizado más próximo. Toda comunicación se deberá dirigir a la oficina o al distribuidor Ingersoll--Rand más próximo. Ingersoll--Rand Company 2001 Impreso en EE. UU. IDENTIFICACIÓN DE SÍMBOLOS DE AVISO ADVERTENCIA Use siempre protección ocular cuando utilice esta herramienta o realice operaciones de mantenimiento en la misma. ADVERTENCIA Lea este manual antes de usar la herramienta. 6 ADVERTENCIA Use siempre protección para los oídos cuando utilice esta herramienta. 04577920 Formulário P7512 Edição 2 Novembro, 2001 P MANUAL DE INSTALAÇÃO PARA KITS DE PROTECÇÃO DE MANDRIL DE 1/4” E 3/8” PARA OS BERBEQUINS Q2 SÉRIES QP E QS AVISO Os Berbequins Séries QP e QS e os Kits de Protecção de Mandril são concebidos para operações de perfuração nas indústrias aeroespacial, automóvel, de aparelhos, electrónica, de maquinagem e de mobiliário. A Ingersoll--Rand não pode ser responsabilizada pela modificação de ferramentas ou kits de acessórios para aplicações para as quais não tenha sido consultada. ADVERTÊNCIA IMPORTANTES INFORMAÇÕES DE SEGURANÇA EM ANEXO. LEIA ESTE MANUAL ANTES DE OPERAR A FERRAMENTA E INSTALAR O KIT DE PROTECÇÃO DE MANDRIL. É DA RESPONSABILIDADE DA ENTIDADE PATRONAL PÔR AS INFORMAÇÕES CONTIDAS NESTE MANUAL À DISPOSIÇÃO DOS UTILIZADORES. A NÃO OBEDIÊNCIA ÀS ADVERTÊNCIAS SEGUINTES PODERÁ RESULTAR EM LESÕES PESSOAIS. COLOCANDO A FERRAMENTA EM FUNCIONAMENTO • • • Opere, inspeccione e mantenha sempre esta ferramenta de acordo com todas regulamentações (local, estadual, federal e do país), que possam ser aplicadas às ferramentas pneumáticas operadas manualmente ou seguras com as mãos. Para segurança, máximo desempenho e máxima durabilidade das peças, opere esta ferramenta com uma pressão de ar máxima de 6,2 bar/620 kPa (90 psig) na entrada. Desligue sempre a alimentação de ar e desconecte a mangueira de alimentação de ar antes de instalar, remover ou ajustar qualquer acessório nesta ferramenta, ou antes de executar qualquer serviço de manutenção nesta ferramenta. • Use sempre óculos de protecção quando estiver operando ou executando serviço de manutenção nesta ferramenta. Use sempre protecção contra ruído ao operar esta ferramenta. Mantenha as mãos, roupas soltas, cabelos longos e jóias afastados da extremidade de trabalho da ferramenta. Mantenha o corpo numa posição equilibrada e firme. Não estique o corpo ao operar esta ferramenta. Esteja preparado e alerta para mudanças súbitas no movimento, binários ou forças de reacção durante o arranque e o funcionamento. Os acessórios da ferramenta podem continuar a girar brevemente após a pressão ter sido aliviada. Ferramentas accionadas pneumáticamente podem vibrar em uso. Vibração, movimentos repetitivos ou posições desconfortáveis podem ser prejudiciais às mãos e aos braços. Pare de usar a ferramenta caso ocorra algum desconforto, sensação de formigueiro ou dor. Procure assistência médica antes de retornar ao trabalho. Use acessórios recomendados pela Ingersoll--Rand. Esta Ferramenta não foi concebida para trabalhos em atmosferas explosivas. Esta Ferramenta não está isolada contra choques eléctricos. Não transporte a ferramenta pelo cabo ou fio. Não transporte ou arraste a ferramenta pela mangueira. • • • • Não use mangueiras de ar ou adaptadores danificados, gastos ou deteriorados. Use sempre ar seco e limpo com pressão máxima de 6,2 bar/620 kPa (90 psig). Pó, fumos corrosivos e/ou humidade excessiva podem arruinar o motor de uma ferramenta pneumática. Não lubrifique as ferramentas com líquidos inflamáveis ou voláteis tais como querosene, diesel ou combustível de jactos. Não remova nenhum rótulo. Reponha qualquer rótulo danificado. USANDO A FERRAMENTA • • • • • • • • • • • • Observe qual é a posição da alavanca que reverte o sentido de rotação antes de operar esta ferramenta de modo a estar atento ao sentido de rotação quando operar o regulador de pressão. Evite expor--se e respirar as poeiras e partículas nocivas criadas pela utilização de ferramentas motorizadas: Algumas poeiras criadas por operações motorizadas de lixar, serrar, rectificar, perfurar e outras actividades de construção contêm produtos químicos conhecidos por causarem cancro, malformações congénitas e terem efeitos nocivos na reprodução. Alguns exemplos desses produtos químicos são: -- chumbo de tintas à base de chumbo, -- sílica cristalina de tijolos e cimento e outros produtos de alvenaria e -- arsénico e crómio de madeira tratada quimicamente Os riscos dessas exposições varia, dependendo de com que frequência faz esse tipo de trabalho. Para reduzir a sua exposição a esses produtos químicos: trabalhe numa área bem ventilada e com equipamento de segurança aprovado, como as máscaras contra a poeira que são especialmente projectadas para filtrar partículas microscópicas. AVISO O uso de peças de substituição que não sejam genuinamente da Ingersoll--Rand podem resultar em riscos de segurança, diminuição do desempenho da ferramenta, aumento da necessidade de manutenção e pode invalidar todas as garantias. As reparações devem ser feitas somente por pessoal treinado autorizado. Consulte o Centro de Serviços da Ingersoll--Rand mais próximo. Envie Todos os Comunicados Para o Distribuidor ou Escritório da Ingersoll--Rand Mais Próximo. Ingersoll--Rand Company 2001 Impresso nos E.U.A. IDENTIFICAÇÃO DO SÍMBOLO DE AVISO ADVERTÊNCIA Use sempre protecção para os olhos ao operar ou fazer manutenção nesta ferramenta. ADVERTÊNCIA Leia este manual antes de operar a ferramenta. 8 ADVERTÊNCIA Use sempre protecção auricular ao operar esta ferramenta. For Series QP: 1. 2. 3. 4. For Series QS: Installing the Retaining Ring (4): a.) For tool with short Gear Case, protruding 1” from Pistol Housing, no Retaining Ring (4) is used. b.) For tool with long Gear Case, protruding 1.5” from Pistol Housing, install the Retaining Ring (4) in the groove on the Gear Case. Slide Short Sleeve (1), flanged--end first, over Drill Chuck and Gear Case until flange is against Pistol Housing for a short Gear Case tool or Retaining Ring for a long Gear Case tool. Slide O--ring (2) over Drill Chuck into groove on the Gear Case. Slide Small Chuck Guard (3) over Drill Chuck onto O--ring (2), and up against Short Sleeve (1) flange. The friction fit between the Guard and the O--ring will hold the Guard in place. For Series QP: 1. INSTALLATION OF THE 1/4” CHUCK GUARD 1. 2. 3. Slide Short Sleeve (1), flanged--end first, over Drill Chuck and Gear Case until flange is against Retaining Ring (4) and Pistol Housing. Slide O--ring (2) over Drill Chuck into groove on the Gear Case. Slide Small Chuck Guard (3) over Drill Chuck onto O--ring (2), and up against Short Sleeve (1) flange. The friction fit between the Guard and the O--ring will hold the Guard in place. INSTALLATION OF THE 3/8” CHUCK GUARD For Series QS: Remove the Chuck using the following technique: 1. The thread in the following step is a left--hand Thread. Rotate the screwdriver clockwise to remove the screw. a.) For reversible models, open the Chuck and using a Pozi--Drive Screwdriver, unscrew and remove the Chuck Retaining Screw. b.) Insert the short leg of a 1/4” hex wrench into the Jaws of the Chuck and tighten the Chuck. c.) Using a brass hammer, sharply rap the long leg of the wrench in a counterclockwise direction to loosen the Chuck. d.) Unscrew and remove the Chuck from the spindle. 2. Installing the Retaining Ring (5): a.) For tool with short Gear Case, protruding 1” from Pistol Housing, no Retaining Ring (5) is used. b.) For tool with long Gear Case, protruding 1.5” from Pistol Housing, install the Retaining Ring (5) in the groove on the Gear Case. 3. Installing the Short Sleeve (1) or Long Sleeve (2): a.) For tool with short Gear Case, protruding 1” from Pistol Housing, slide Long Sleeve (2) over Drill Chuck and Gear Case until Sleeve is against Pistol Housing. b.) For tool with long Gear Case, protruding 1.5” form Pistol Housing, slide Short Sleeve (1), flanged--end first, over Drill Chuck and Gear Case, until Sleeve is against Retaining Ring (5). 4. Slide O--ring (3) over Drill Chuck into groove on the Gear Case. 5. Slide Large Chuck Guard (4) over Drill Chuck onto O--ring (3), and up against flange of Short Sleeve (1) for the long Gear Case, and Long Sleeve (2) for the short Gear Case. The friction fit between the Guard and the O--ring will hold the Guard in place. 6. Thread the Chuck back onto the spindle. Remove the Chuck using the following technique: The thread in the following step is a left--hand Thread. Rotate the screwdriver clockwise to remove the screw. a.) For reversible models, open the Chuck and using a Pozi--Drive Screwdriver, unscrew and remove the Chuck Retaining Screw. b.) Insert the short leg of a 1/4” hex wrench into the Jaws of the Chuck and tighten the Chuck. c.) Using a brass hammer, sharply rap the long leg of the wrench in a counterclockwise direction to loosen the Chuck. d.) Unscrew and remove the Chuck from the spindle. 2. Remove the Chuck using the following technique: a.) Insert the short leg of a 1/4” hex wrench into the Jaws of the Chuck and tighten the Chuck. b.) Using a brass hammer, sharply rap the long leg of the wrench in a counterclockwise direction to loosen the Chuck. c.) Unscrew and remove the Chuck from the spindle. 3. Slide Short Sleeve (1), flanged--end first, over Drill Chuck and Gear Case until flange is against Retaining Ring (5) and Pistol Housing. 4. Slide O--ring (3) over Drill Chuck into groove on the Gear Case. 5. Slide Large Chuck Guard (4) over Drill Chuck onto O--ring (3), and up against Short Sleeve (1) flange. The friction fit between the Guard and the O--ring will hold the Guard in place. 6. Thread the Chuck back onto the spindle. For additional assembly instructions, refer to the Operation and Maintenance Manual for the specific tool you are repairing. 9 1/4” CHUCK GUARD KIT (Dwg. TPA1837--00) PART NUMBER FOR ORDERING 1 2 3 4 Chuck Guard Kit, 1/4” . . . . . . . . . . . . . . . . . . . . . . . . . . . . Short Sleeve . . . . . . . . . . . . . . . . . . . . . . . . . . . . . . . . O-- ring . . . . . . . . . . . . . . . . . . . . . . . . . . . . . . . . . . . . Small Chuck Guard . . . . . . . . . . . . . . . . . . . . . . . . . . Retaining Ring . . . . . . . . . . . . . . . . . . . . . . . . . . . . . . 10 TRD-- A961-- S TRD-- 931 BU-- 948 TRD-- 961-- S TRH-- 197 3/8” CHUCK GUARD KIT (Dwg. TPA1838--00) PART NUMBER FOR ORDERING 1 2 3 4 5 Chuck Guard Kit, 3/8” . . . . . . . . . . . . . . . . . . . . . . . . . . . . Short Sleeve . . . . . . . . . . . . . . . . . . . . . . . . . . . . . . . . Long Sleeve . . . . . . . . . . . . . . . . . . . . . . . . . . . . . . . . O-- ring . . . . . . . . . . . . . . . . . . . . . . . . . . . . . . . . . . . . Large Chuck Guard . . . . . . . . . . . . . . . . . . . . . . . . . . Retaining Ring . . . . . . . . . . . . . . . . . . . . . . . . . . . . . . 11 TRD-- A961 TRD-- 931 TRD-- 931-- L BU-- 948 TRD-- 961 TRH-- 197 12 13-
 1
1
-
 2
2
-
 3
3
-
 4
4
-
 5
5
-
 6
6
-
 7
7
-
 8
8
-
 9
9
-
 10
10
-
 11
11
-
 12
12
-
 13
13
-
 14
14


Ingersoll-Rand 1/4” AND 3/8” CHUCK GUARD KITS Guía de instalación
- Tipo
- Guía de instalación
Los Ingersoll-Rand 1/4” AND 3/8” CHUCK GUARD KITS son diseñados para operaciones de taladrado en las industrias aeroespacial, de automoción, de electrodomésticos, electrónica, de mecanizado y del mueble. Proporcionan seguridad y rendimiento optimizados, y están hechos para una máxima durabilidad de las piezas. Estos kits ayudan a cumplir con las regulaciones locales, estatales, federales y nacionales aplicables a las herramientas neumáticas manuales.
en otros idiomas
Artículos relacionados
-
Ingersoll-Rand 7AHST4 Operation and Maintenance Manual
-
-
Ingersoll-Rand 7802 Instructions Manual
-
-
-
Ingersoll-Rand 180PQ1-EU Instructions Manual
-
-
Ingersoll Rand D 232 ONE Instructions Manual
-
-
Ingersoll-Rand TXA Series Operation and Maintenance Manual