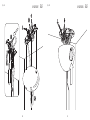
Design Marcel Wanders, 2007
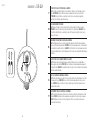
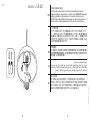
Skygarden 1/2

2 3
IT
ISTRUZIONI DI INSTALLAZIONE ED IMPIEGO
ATTENZIONE!
La sicurezza dell’apparecchio é garantita solo
rispettando queste istruzioni sia in fase di installazione
che di impiego; é pertanto necessario conservarle.
AVVERTENZE:
• All’atto dell’installazione ed ogni volta che si
interviene sull’apparecchio, assicurarsi che sia stata
tolta la tensione di alimentazione.
• L’apparecchio non può essere in alcun modo
modificato o manomesso, ogni modifica ne può
compromettere la sicurezza rendendo lo stesso
pericoloso. FLOS declina ogni responsabilità per i
prodotti modificati.
• Se il cavo flessibile si danneggia, deve essere
sostituito da FLOS o da personale qualificato al fine
di evitare pericoli.
• Il simbolo riportato sull’apparecchio indica la
necessità di utilizzare lampade di tipo autoprotetto.
• Per un funzionamento sicuro e corretto è necessario
che questo apparecchio sia collegato ad un
efficiente impianto di messa a terra.
• Il simbolo riportato sull’apparecchio indica che il
prodotto deve essere smaltito in modo differenziato
dai rifiuti urbani.
DATI TECNICI
• 1 EUR: Lampada incandescente ad alogeni MAX
105W, attacco E27, tipo HSGS.
• 2 EUR: Lampada incandescente ad alogeni MAX
205W, attacco E27, tipo HSGS.
ISTRUZIONI PER LA PULIZIA DELL’APPARECCHIO
• Per la pulizia dell’apparecchio utilizzare
esclusivamente un panno morbido eventualmente
inumidito con acqua e sapone.
• Attenzione: non utilizzare alcool o solventi.
EN
INSTRUCTION FOR CORRECT INSTALLATION AND USE
WARNING!
The safety of this fitting can only be guaranteed if these
instructions are observed, during both installation and
use. Please retain these instructions safety.
REMARKS:
• When installing and whenever acting on the appliance,
ensure that the power supply has been switched off.
• The appliance may in no way be modified or tampered
with, any modification may compromise safety causing
the appliance to become dangerous. FLOS declines all
responsibility for products that are modified.
• Should the external trailing cable get damaged, it must
be replaced by FLOS or by qualified personnel in order
to avoid any danger.
• The symbol marked on the appliance indicates the
need to use self-protected bulbs.
• This appliance must be connected to an efficient
grounding system in order to work safely and correctly.
• The symbol shown on the device indicates that the
product must be thrown out in a different manner than
with the urban trashes.
TECHNICAL DATA
• 1 EUR: Incandescent halogen bulb MAX 105W, E27
fitting, HSGS type.
• 2 EUR: Incandescent halogen bulb MAX 205W, E27
fitting, HSGS type.
• 1 USA: Incandescent halogen light bulb MAX 100W,
E26 coupling, type T Shielded.
• 2 USA: Incandescent light bulb MAX 150W,
attachment E26, type T.
CLEANING INSTRUCTIONS
• Use only a soft cloth to clean the appliance,
dampened with water and soap or mild cleanser if
needed for resistant dirt.
• Warning: do not use alcohol or other solvents.
DE
INSTALLATION - UND GEBRAUCHSANWEISUNGEN
ACHTUNG!
Wir garantieren nur dann für die Sicherheit der
Leuchte, wenn diese Anweisungen sowohl bei der
Installation als auch beim Gebrauch genau beachtet
werden. Es ist daher ratsam, sie aufzubewahren.
BEMERKUNGEN:
• Bei der Installation und bei Eingriffen an der Leuchte ist
sicherzustellen, daß die Anlage vom Netz abgeschaltet ist;
• Der Apparat darf auf keinen Fall veraendert oder unerlaubt
geoeffnet werden, jede Veraenderung desselben kann die
Sicherheit in Frage stellen und somit gefaehrlich werden.
FLOS lehnt jede Verantwortung fuer unsachgemaess
behandelte Produkte ab.
• Falls das flexible äußere Kabel beschädigt wird, muß es von
FLOS oder von qualifiziertem Personal ersetzt werden, um
Gefahren zu vermeiden.
• Das auf der Leuchte wiedergegebene Symbol zeigt an,
dass Glühbirnen des selbstschützenden Typs zu benutzen
sind.
• Für eine sichere und ordnungsgemäße Funktionsweise
ist diese Leuchte an eine effiziente Erdungsanlage
anzuschließen.
• Das auf dem Gerät wiedergegebene Symbol zeigt an, dass
das Produkt getrennt vom Stadtmüll entsorgt werden muss.
TECHNISCHE DATEN
• 1 EUR: Halogenglühbirne MAX 105W, Anschluß E27,
Typ HSGS.
• 2 EUR: Halogenglühbirne MAX 205W, Anschluß E27,
Typ HSGS.
REINIGUNGSVORSCHRIFTEN
• Bei der Reinigung der Leuchte darf man ausschließlich
weiche Tücher verwenden. Eventuell kann man diese
mit Wasser und Seife oder mit einem neutralen
Reinigungsmittel anfeuchten.
• Achtung: Weder Alkohol noch Lösungsmittel verwenden.
FR
INSTRUCTIONS D’INSTALLATION ET D’EMPLOI
ATTENTION!
La sûreté de cet appareil est garantie uniquement si l’on
respecte ces instructions soit en phase d’installation
soit pendant l’utilisation; il faut donc les conserver.
NOTICES:
• Au moment de l’installation et chaque fois que l’on intervient sur
l’appareil, s’assurer que la tension d’alimentation ait été coupée.
• L’appareil ne peut être modifié ou altéré de quelque manière
que ce soit, toute modification peut compromettre la sécurité
de celui-ci en le rendant dangereux. FLOS décline toute
responsabilité pour les produits modifiés.
• Si le cordon flexible externe est endommagé, il doit être
remplacé par FLOS ou par le personnel qualifié afin d’éviter
des dangers.
• Le symbole reporté sur l’appareil indique la nécessité
d’utiliser des ampoules de type “auto-protégé”.
• Pour un fonctionnement sûr et correct, il est nécessaire que
l’appareil soit relié à une installation efficace de mise à la terre.
• Le symbole montré sur l’appareil indique que le produit
doit être éliminé d’une autre façon que celle avec les déchets
urbains.
DONNEES TECHNIQUES
• 1 EUR: Ampoule incand. à halo. MAX 105W branch.
E27, type HSGS.
• 2 EUR: Ampoule incand. à halo. MAX 205W branch.
E27, type HSGS.
• 1 USA: Ampoule incandescente à halogènes MAX 100W
fixation E26 type T Shielded (avec écran).
• 2 USA: Ampoule incandescente MAX 150W,
branchement E26 type T.
INSTRUCTIONS POUR LE NETTOYAGE
•
Pour le nettoyage de l’appareil utiliser exclusivement un chiffon
doux, humecté si nécessaire, avec de l’eau et du savon ou
avec un détergent neutre pour les salissures les plus tenaces.
•
Attention: ne pas utiliser d’alcool ou solvents
.

4 5
ES
INSTRUCCIONES DE INSTALACIÓN Y DE USO
¡ATENCIÓN!
La seguridad del aparato sólo puede garantizarse
con la condición de que se respeten las siguientes
instrucciones, tanto en la fase de instalación como de
uso, por lo cual se recomienda conservarlas.
ADVERTENCIA:
•
Para efectuar la instalación, y toda vez que se efectúe alguna
operación en el aparato, asegurarse de haber cortado la corriente
eléctrica.
•
El aparato no puede ser en ningùn caso modificado o forzado,
cualquier modificaciòn puede comprometer la seguridad
haciéndolo peligroso. FLOS declina cualquier responsabilidad por
los productos modificados.
•
Si el cable externo se estropea, debe ser sustituido por FLOS
o por personal cualificado con el fin de evitar situaciones
peligrosas.
•
El símbolo marcado en el aparato indica la necesidad de
utilizar bombillas de tipo autoprotegido.
•
Para obtener un funcionamiento seguro y correcto es necesario
que esto aparato sea conectado a un eficiente sistema de tierra.
•
El símbolo que aparece en el aparato indica que el producto
debe ser eliminado en modo diferenciado del resto de los
desechos urbanos.
DATOS TECNICOS
•
1 EUR: Bombillas de incandescencia alógena MÁX 105W
conexión E27 tipo HSGS.
•
2 EUR: Bombillas de incandescencia alógena MÁX 205W
conexión E27 tipo HSGS.
•
1 USA: Bombillas de incandescencia alógena MÁX 100W
conexión E26 tipo T Shielded.
•
2 USA: Bombilla de incand. MÁX 150W, conexión E26 tipo T.
INSTRUCCIONES PARA LIMPIAR EL APARATO
•
Para la limpieza del aparato, utilizar exclusivamente un paño
suave. En caso de suciedad más resistente, humedecer el paño
con agua y jabón o un detergente neutro.
•
Advertencia: no emplear alcohol ni disolventes.
PT
INSTRUÇÕES INSTALAÇÃO E USO
ATENÇÃO!
A segurança do aparelho é garantida somente se
respeitarmos as instruções tanto na fase de instalação
como na de uso; portanto é necessário conservar tais
instruções.
ADVERTÊNCIA:
• Para efectuar la instalación, y toda vez que se efectúe
alguna operación en el aparato, asegurarse de haber
cortado la corriente eléctrica.
• De forma alguma o aparelho deve ser modificado ou
alterado, toda e qualquer modificação pode comprometer
a segurança tornando o aparelho perigoso. FLOS
declina toda e qualquer responsabilidade pelos produtos
modificados.
• Se o cabo flexível está danificado, deve ser substituído
pela FLOS ou por pessoal qualificado para evitar
qualquer perigo.
• O símbolo indicado no aparelho indica a necessidade
de utilizar lâmpadas com blindagem externa.
• Para um funcionamento seguro e correcto é necessário
que este aparelho esteja ligado a uma eficiente
instalação de ligação a terra.
• O símbolo indicado no aparelho indica que o produto
deve ser eliminado de forma diferenciada em relação ao
lixo urbano.
DADOS TÉCNICOS
• 1: Lâmpada incandescente alógena MAX 105W
ligação E27 tipo HSGS.
• 2: Lâmpada incandescente alógena MAX 205W
ligação E27 tipo HSGS.
INSTRUÇÕES PARA A LIMPEZA DO APARELHO
• Para limpeza do aparelho utilizar exclusivamente um
tecido macio eventualmente úmido com água e sabão ou
detergente neutro para a sujeira mais difícil.
• Atenção: não utilizar álcool ou solventes.
RUS
•
•
•
•
•
•
•
•
•
•
J

6 77
CN
SA
•
•
•
•
•
•
•
•
KC
•
•
•
•
•
•
•
•

8 98 9
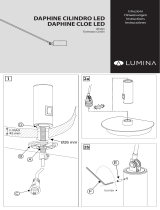
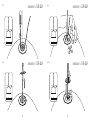
IT Fig.1A/1B EUR NOTA BENE: Scegliere i tasselli ad espansione idonei per la superficie destinata al montaggio.
EN Pic. 1A/1B EUR NOTE: Select and employ screw anchors which are suited to the surface where the
appliance is to be installed.
DE Abb.1A/1B EUR BEACHTEN SIE! Die dehnbaren Einsatzstücke sind angemessen für die vorgesehene
Oberfläche zur Montage auszuwählen.
FR Fig.1A/1B EUR NOTE: Choisir les chevilles à expansion correctes pour la superficie destinée au montage.
ES Fig.1A/1B EUR Nota importante: Elegir los tacos de expansión idoneos para la superficie destinada al montaje.
PT Fig.1A/1B EUR Observar bem: escolher as buchas de expansão idóneas para a superfície destinada a
montagem.
RUS
J
1A/1B
CN 1A/1B
SA
KC 1A/1B

10 1110 11
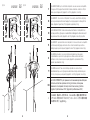
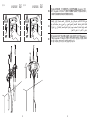
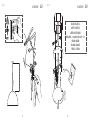
SKYGARDEN 1 EUR SKYGARDEN 2 EUR
Fig. 1A Fig. 1B
IT
Fig.1A-B EUR NOTA BENE: per il corretto utilizzo del prodotto è necessario assicurare la compatibilità
del fissaggio a soffitto (tipologia di tasselli utilizzati in funzione del materiale costituente il soffitto) in
relazione al peso dellìapparecchio (Skygarden 1 circa 15 Kg, Skygarden 2 circa 29 Kg).
EN
Fig.1A-B EUR NOTE: for a correct use of the product it is necessary to ensure that the ceiling fixing
(type of nogs used depend on the material making up the ceiling) is appropriate for the weight of the
appliance (Skygarden 1 approximately 15 Kg, Skygarden 2 approximately 29 Kg).
DE
Abb.1A-B EUR BEACHTEN SIE! Für den korrekten Gebrauch des Produkts ist die Kompatibilität der
Befestigung an der Decke (Typologie der verwendeten Dübel in Abhängigkeit des Deckenmaterials) mit
Bezug auf das Gewicht des Geräts (Skygarden 1 etwa 15 Kg, Skygarden 2 etwa 29 Kg ) zu prüfen.
FR
Fig.1A-B EUR NOTE: pour une utilisation correcte du produit, il est nécessaire d’assurer la compatibilité
de la fixation au plafond (typologie des chevilles utilisées en fonction du matériel qui constitue le
plafond) par rapport au poids de l’appareil (Skygarden 1 environ 15 Kg, Skygarden 2 environ 29Kg).
ES
Fig.1A-B EUR Nota importante: por la correcta utilización del producto hace falta asegurar
la compatibilidad de la sujeción al techo (tipología de tacos utilizados en función del material
constituyente el techo) en relación al peso del aparato (Skygarden 1 aproximadamente 15 Kg,
Skygarden 2 aproximadamente 29 Kg).
PT
Fig.1A-B EUR bservar bem: Para a correcta utilização do produto é necessário verificar a
compatibilidade da fixação ao tecto (tipologia de buchas utilizadas em função do material do qual é
feito o tecto) em relação ao peso do aparelho (Skygarden 1 cerca 15 Kg, Skygarden 2 cerca 29 Kg).
RUS
J

12 13
CN
SA
KC
SKYGARDEN 1 EUR SKYGARDEN 2 EUR
Fig. 1A Fig. 1B

14 15
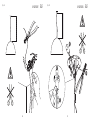
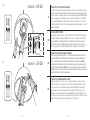
SKYGARDEN 1 EUR
Fig. 2A SKYGARDEN 2 EUR
Fig. 2B
2
1
4
3

16 17
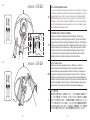
SKYGARDEN 1 EUR
Fig. 3A SKYGARDEN 2 EUR
Fig. 3B

18 19
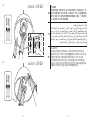
SKYGARDEN 1 EUR
Fig. 4A
3
1
2
4
SKYGARDEN 2 EUR
Fig. 4B

20 21
SKYGARDEN 1 USA
Fig. 1C
BLACK to BLACK (L)
WHITE to WHITE (N)
GREEN to EARTH (GND)
NEGRO a NEGRO
BLANCO a BLANCO
VERDE a la TIERRA
SKYGARDEN 1 USA
Fig. 2C

BLACK to BLACK (L)
WHITE to WHITE (N)
GREEN to EARTH (GND)
NEGRO a NEGRO
BLANCO a BLANCO
VERDE a la TIERRA
22 23
SKYGARDEN 2 USA
Fig. 1D SKYGARDEN 2 USA
Fig. 2D
EN
Fig.2D WARNING! This apparatus must be mounted/supported independently from the Outlet Box; NOTE: for a
correct use of the product it is necessary to ensure that the fixing is suitable for the type of ceiling (type of nogs used
depend on the material making up the ceiling) in relation to the weight of the apparatus (approximately 29 kg).
FR
Fig.2D ATTENTION! Cet appareil doit être monté/supporté indépendamment de la Boite de connexion
- Outlet Box; NOTE: Pour une utilisation correcte du produit, il est nécessaire de s’assurer de la
compatibilité de la fixation au plafond (typologie des chevilles utilisées en fonction du matériel qui
constitue le plafond) par rapport au poids de l’appareil (environ 29 kg).
ES
Fig.2D ¡ATENCIÓN! Este aparato tiene que ser montado/soportado independientemente de la caja
de conexión -Outlet box-; NOTA BIEN: por la correcta utilización del producto hace falta asegurar la
compatibilidad de la sujeción al techo (tipología de tacos utilizados en función del material constituyente
el techo) en relación al peso del aparato (aproximadamente 29 Kg).
J

24 25
SKYGARDEN 2 USA
Fig. 3D
2
1
4
3
SKYGARDEN 2 USA
Fig. 4D

26 27
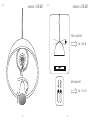
SKYGARDEN 1-2 EUR-USA
Fig. 5 SKYGARDEN 1-2 EUR-USA
Fig. 6
Fig. 7-8-9-10
Fig. 11-12-13
flatness adjustment
bulb replacement

28 29
SKYGARDEN 1-2 EUR-USA
SKYGARDEN 1-2 EUR-USA
Fig. 7
Fig. 8
SKYGARDEN 1-2 EUR-USA
SKYGARDEN 1-2 EUR-USA
Fig. 9
Fig. 10

30 31
SKYGARDEN 1-2 EUR-USA
SKYGARDEN 1-2 EUR-USA
Fig. 11
Fig. 12
IT
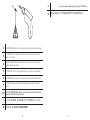
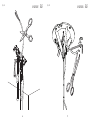
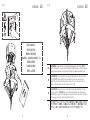
ISTRUZIONI PER LA SOSTITUZIONE DELLA LAMPADA
Assicurarsi che sia stata tolta la tensione di alimentazione. - Assicurarsi che la lampada non sia calda.
Attendere 30 minuti a lampada spenta prima di procedere alla sostituzione della lampada (la lampada
deve essere fredda). - Si consiglia di effettuare l’operazione utilizzando dei guanti puliti. Fig.11 Tenendo
ben fermo con una mano il corpo lampada rimuovere con l’altra mano il diffusore in vetro ruotandolo
in senso antiorario. Fig.12 In caso riscontriate difficoltà a rimuovere il diffusore in vetro chiedete ad
un’altra persona di aiutarvi a tenere fermo il corpo lampada in modo da utilizzare entrambe le mani per
la rimozione del diffusore.
EN
BULB REPLACEMENT PROCEDURE
Ensure that power has been turned off. - Check that the bulb is not too hot! Wait 30 minutes with the
bulb off before trying the procedure (the light bulb must be cold). - It is advisable to do this wearing
clean gloves. Fig.11 Keep the light body firm with one hand with the other hand remove the glass
diffuser turning it anti-clockwise. Fig.12 Should you encounter any problems with the removal of the
diffuser ask another person to keep the light body firm and use both hands to remove the diffuser.
DE
VERFAHREN FÜR DIE AUSWECHSELUNG DER GLÜHBIRNE
Prüfen, dass der Versorgungsstrom abgeschaltet ist. - Prüfen, dass die Glühbirne nicht zu heiß ist! Bevor der
Vorgang durchgeführt wird, ist etwa 30 Minuten bei ausgeschalteter Lampe zu warten (die Glühbirne muss
kalt sein). - Es wird empfohlen, bei der Ausführung der Handlung saubere Handschuhe zu tragen. Abb.11
Lampenkörper mit einer Hand festhalten, mit der anderen Hand den gläsernen Lichtschirm entfernen, indem
er gegen den Uhrzeigersinn gedreht wird. Abb.12 Falls Sie bei der Entfernung des gläsernen Lichtschirms auf
Schwierigkeiten stoßen, sollten Sie eine weitere Person bitten, den Lampenkörper festzuhalten, sodass Sie beide
Hände für die Entfernung des Lichtschirms benutzen können.
FR
INSTRUCTIONS POUR LE REMPLACEMENT DE LA LAMPE
S’assurer que l’appareil n’est plus sous tension. - S’assurer que la lampe ne soit pas trop chaude!
Attendre 30 minutes une fois la lampe éteinte avant d’effectuer l’opération (la lampe doit être froide).
- Il est conseillé d’effectuer ces manipulations avec des gants propres.
Fig.11
Tout en maintenant
fermement d’une main le corps de la suspension retirer de l’autre main le diffuseur en verre en le
tournant dans le sens inverse des aiguilles d’une montre.
Fig.12
Si vous rencontrez des difficultés à
retirer le diffuseur en verre, faites appel à une deuxième persone qui pourra tenir fermement le corps de
la suspension: vous pourrez ainsi utiliser vos deux mains pour retirer le diffuseur.

32 33
SKYGARDEN 1-2 EUR-USA
SKYGARDEN 1-2 EUR-USA
Fig. 11
Fig. 12
ES
PASOS A SEGUIR PARA CAMBIAR LA BOMBILLA
Desconecte la electricidad antes de empezar, asegúrese quitando la corriente del cuadro de luces. - ¡Asegúrese
que la lámpara no esta demasiado caliente! Espere 30 minutos desde que apagó la lámpara antes de efectuar
el cambio (la bombilla tiene que estar fría). ¡Se aconseja efectuar esta operación utilizando guantes limpios!
Fig.11
Manteniendo firmemente con una mano el cuerpo de la lámpara quite con la otra mano el difusor de
vidrio girándolo en el sentido contrario a las agujas del reloj.
Fig.12
En el caso de que encontrara dificultad al
quitar el difusor de vidrio pida ayuda a otra persona para que tenga sujeto el cuerpo de la lámpara de manera
que pueda utilizar ambas manos para quitar el difusor.
PT
PROCEDIMENTO PARA A SUBSTITUIÇÃO DA LÂMPADA
RUS
J

34 35
SKYGARDEN 1-2 EUR-USA
SKYGARDEN 1-2 EUR-USA
Fig. 11
Fig. 12
CN
SA
KC

36 37
SKYGARDEN 1-2 EUR-USA
Fig. 13
IT
ISTRUZIONI PER LA SOSTITUZIONE DELLA LAMPADA
Fig.13 Sostituire la lampada (vedi dati tecnici). Rimontare il diffusore in vetro ruotandolo in senso
orario. ATTENZIONE! Avvitare il diffusore tenendolo perpendicolare rispetto alla sede filettata.
ATTENZIONE! Avvitare il diffusore senza forzarlo; arrivati a fine corsa allentarne leggermente
l’avvitamento per facilitarne una futura rimozione.
EN
BULB REPLACEMENT PROCEDURE
Fig.13 Replace the bulb (see technical data). Replace the glass diffuser by turning it clockwise.
WARNING! Screw on the diffuser keeping it perpendicular to the threaded area. DANGER!!! Screw
on the diffuser without forcing; on reaching the end of the thread loosen slightly to make it easy to
remove in the future.
DE
VERFAHREN FÜR DIE AUSWECHSELUNG DER GLÜHBIRNE
Abb.13 Glühbirne auswechseln (s. Technische Angaben). Gläsernen Lichtschirm wieder anbringen,
indem er im Uhrzeigersinn gedreht wird. ACHTUNG! Lichtschirm anschrauben, wobei er mit Bezug auf
den Gewindesitz senkrecht zu halten ist. GEFAHR!!! Lichtschirm nicht zu fest anschrauben; nach dem
Erreichen des Endanschlags ist die Verschraubung leicht zu lockern, um eine zukünftige Entfernung zu
erleichtern.
FR
INSTRUCTIONS POUR LE REMPLACEMENT DE LA LAMPE
Fig.13 Remplacer la lampe (voir détails techniques). Refixer le diffuseur en verre en le tournant dans le
sens des aiguilles d’une montre. ATTENTION! Visser le diffuseur en le tenant perpendiculaire par rapport à
l’emplacement fileté. DANGER!!! Visser le diffuseur sans forcer; une fois vissé à fond, dévisser très légèrement
pour faciliter un futur démontage.
ES
PASOS A SEGUIR PARA CAMBIAR LA BOMBILLA
Fig.13 Cambie la bombilla (vea los datos técnicos). Montar el difusor de vidrio girándolo en el sentido
de las agujas del reloj. ¡ATENCION! Enroscar el difusor teniéndolo perpendicular con respecto a la
rosca. CUIDADO!!! Enroscar el difusor sin forzarlo; cuando llegue al final aflojar ligeramente para
facilitar un futuro cambio.
PT
PROCEDIMENTO PARA A SUBSTITUIÇÃO DA LÂMPADA
Fig.13 Substituir a lâmpada (ver os dados técnicos). Remontar o difusor de vidro girando no sentido
horário. ATENÇÃO! Aparafusar o difusor segurando-o perpendicular em relação a parte rosqueada.
PERIGO!!! Aparafusar o difusor sem forçar, chegando no fim de curso afrouxar levemente para
facilitar uma futura remoção.

38 39
SKYGARDEN 1-2 EUR-USA
Fig. 13
34301 LB - 20/04/2023
RUS
J
CN
SA
KC

flos.com
-
 1
1
-
 2
2
-
 3
3
-
 4
4
-
 5
5
-
 6
6
-
 7
7
-
 8
8
-
 9
9
-
 10
10
-
 11
11
-
 12
12
-
 13
13
-
 14
14
-
 15
15
-
 16
16
-
 17
17
-
 18
18
-
 19
19
-
 20
20
-
 21
21


en otros idiomas
- français: FLOS Skygarden 2 Guide d'installation
- English: FLOS Skygarden 2 Installation guide
- Deutsch: FLOS Skygarden 2 Installationsanleitung
- русский: FLOS Skygarden 2 Инструкция по установке
- português: FLOS Skygarden 2 Guia de instalação
- 日本語: FLOS Skygarden 2 インストールガイド
Artículos relacionados
-
 FLOS Zeppelin 1 Guía de instalación
-
 FLOS Romeo Outdoor C3 Pvc (71 cm) Green wall Guía de instalación
-
 FLOS Overlap Suspension 2 Guía de instalación
-
 FLOS Luminator Guía de instalación
-
 FLOS IC Lights Ceiling/Wall 1 Guía de instalación
-
 FLOS IC Lights Floor 1 Guía de instalación
-
 FLOS Tatou Floor Guía de instalación
-
 FLOS Glo-Ball Wall Guía de instalación
-
 FLOS IC Lights C/W1 Double Guía de instalación
-
 FLOS Glo-Ball Suspension 1 Guía de instalación