
STRETTA COUNTERTOP
IMPORTANT INFORMATION ABOUT YOUR STRETTA COUNTERTOP
STRETTA
COUNTERTOP INSTALLATION
• CAUTION: The product is heavy and should be lifted by two people to avoid injury or
damage during installation.
• For Indoor Installation Only
• To clean your Stretta countertop, use a mild dish soap and warm water applied with a soft
cloth. Do not utilize abrasive cleaners or cleaning tools. Always test cleaning products in an
inconspicuous area first.
• Your Stretta countertop is manufactured with 100% pre-consumer recycled cores and
low-emitting, water-based adhesives.
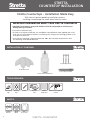
INSTALLATION KIT CONTAINS:
TOOLS REQUIRED:
from VT Industries
™
from VT Industries
™
from VT Industries
™
SAFETY:
from VT Industries
™
4 Wood Biscuits
Multi-bit Screwdriver
or Drill
Pencil
Measuring
Tape
1
Masking
Tape
Circular
Saw
Stretta Countertops – Installation Made Easy
With Stretta’s patent-pending installation process,
installing a countertop has never been faster or easier!
Safety
Glasses
Dusk
Mask
Ear
Protection
180 Grit
Sandpaper
1 Bottle
Color-matched Adhesive
1 Specialty Screw Bit
3 Specialty Screws

STRETTA COUNTERTOP
2
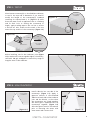
STEP 1 - TEST FIT
STEP 2 - JOIN COUNTERTOP
from VT Industries
™
from VT Industries
™
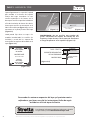
Place Stretta countertop(s) on installed base cabinetry
to test fit the tops and to determine if you need to
modify the length of the countertop(s). Standard
overhang for exposed ends is ½
”
(Figure 1-1) while
those that meet a wall or appliance have no overhang
and fit flush. Prior to cutting the countertop to
length, apply masking tape to the cut line to ensure
a smooth cut. Also, make sure the teeth of the saw
enter the top surface of the countertop. (Figure 1-2)
½
”
TOP OF STRETTA
COUNTERTOP
< >
(Figure 1-1)
TOP OF STRETTA
COUNTERTOP
MASKING TAPE
(Figure 1-2)
Before installing, test fit the Londoner
®
joint (Figure
1-3) to make sure it comes together tightly. If necessary,
sand with 180 grit sandpaper to remove any rough or
irregular areas of the substrate.
Install 4 biscuits into one side of the
countertop. (Figure 2-1) Apply a
generous amount of color-matched
adhesive to both sides of the Londoner
joint and the biscuits, so that when
the countertops are joined together,
the excess glue is squeezed out. Pull
countertops together. (Figure 2-2)
Allow the glue to cure for five minutes
prior to removing the excess with
warm water and a cotton cloth.
TOP OF STRETTA
COUNTERTOP
SAW
TOP OF STRETTA
COUNTERTOP
(Figure 2-1) (Figure 2-2)
(Figure 1-3)

©2020 VT Industries, Inc. All rights reserved.
All trademarks and registered trademarks are the property of their respective owners.
STEP 3 - SECURE COUNTERTOP
from VT Industries
™
from VT Industries
™
For additional information on installing your Stretta
countertop, please visit strettacountertops.com
Para obtener información adicional sobre cómo instalar
su tope Stretta, visite strettacountertops.com
To finish the exposed ends of the countertop and backsplash, please see the
easy-to-follow instructions included in the Stretta Endcap Kit.
CAUTION: Do not use screws that exceed the
combined thickness of the corner mounting
bracket and the thickness of the Stretta
countertop, otherwise you risk surface
penetration. (Figure 3-4)
cabinet corner
mounting brackets
cabinet corner
mounting brackets
Overhead View
BASE CABINET
(Figure 3-3)
(Figure 3-4)
STRETTA COUNTERTOP
CORNER
MOUNTING BRACKETS
BASE CABINET
WOOD SCREW
DO NOT DRILL PAST
3
Slide the countertops away from the
wall slightly to access the pockets on the
underside of the countertop. Drive the
three specialty screws into the pockets
using the specialty screw bit included in
the Stretta Installation Kit. Two screw
pockets are located on the bottom side
of the countertop (Figure 3-1) and
one is located on the back side of the
countertop. (Figure 3-2)
You can now attach your countertop
to the cabinets by driving screws (not
included) through the cabinet corner
mounting brackets into the countertop.
(Figure 3-3)
UNDERSIDE OF STRETTA
COUNTERTOP
BACKSIDE OF STRETTA
COUNTERTOP
UNDERSIDE OF STRETTA
COUNTERTOP
(Figure 3-2)(Figure 3-1)

TOPE STRETTA
INFORMACIÓN IMPORTANTE SOBRE SU TOPE STRETTA
INSTALACIÓN DEL TOPE
STRETTA
• ADVERTENCIA: El producto es pesado y debe ser levantado por dos personas para evitar
lesiones o daños durante la instalación.
• Solo para la instalación en interiores.
• Para limpiar su tope Stretta, use un jabón lavaplatos suave y agua tibia aplicados con un
paño suave. No utilice limpiadores abrasivos ni herramientas de limpieza. Pruebe siempre
primero los productos de limpieza en un área poco visible.
• Su tope Stretta está fabricado 100% con núcleos reciclados preconsumo y adhesivos a base
de agua de baja emisión.
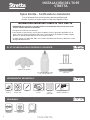
EL KIT DE INSTALACIÓN CONTIENE LO SIGUIENTE:
HERRAMIENTAS REQUERIDAS:
from VT Industries
™
from VT Industries
™
from VT Industries
™
SEGURIDAD:
from VT Industries
™
4 galletas de madera
Destornillador
o taladro multibroca
Lápiz
Cinta
métrica
1
Cinta de
enmascarar
Sierra
circular
Topes Stretta - Facilitando la instalación
Con el proceso de instalación con patente pendiente de
Stretta, instalar un tope nunca ha sido más rápido ni fácil.
Gafas de
seguridad
Mascarilla contra
el polvo
Protección
para los oídos
Papel de
lija de
grano 180
1 botella de adhesivo del
color correspondiente
1 broca para tornillos
especiales
3 tornillos especiales

TOPE STRETTA
2
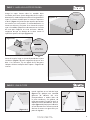
PASO 1 - HAGA UN AJUSTE DE PRUEBA
SASO 2 - UNA EL TOPE
from VT Industries
™
from VT Industries
™
Ponga los topes Stretta sobre los muebles bajos
instalados para hacer ajustes de prueba de los topes y
determinar si usted tiene que modificar la longitud de los
topes. El saliente estándar para los extremos expuestos
es de ½” (Figura 1-1), mientras que aquellos que entren
en contacto con una pared o un electrodoméstico no
tienen un saliente y se ajustan al ras. Antes de cortar el
tope a la medida, aplique cinta de enmascarar a la línea
de corte para asegurar un corte uniforme. Además,
asegúrese de que los dientes de la sierra corten la
superficie superior del tope (Figura 1-2).
½
”
PARTE SUPERIOR DEL
TOPE STRETTA
< >
(Figura 1-1)
PARTE SUPERIOR
DEL TOPE
STRETTA
CINTA DE
ENMASCARAR
(Figura 1-2)
Antes de instalar, haga un ajuste de prueba de la junta
Londoner
®
(Figura 1-3) para asegurarse de que se una
bien. Si es necesario, lije con papel de lija de grano
180 para eliminar cualquier área áspera o irregular del
sustrato
Instale 4 galletas en un lado del tope
(Figura 2-1). Aplique una cantidad
generosa de adhesivo del color
correspondiente a ambos lados de
la junta Londoner y las galletas, de
modo que cuando los topes se unan, se
exprima el exceso de adhesivo. Una los
topes (Figura 2-2). Deje que el adhesivo
se cure durante cinco minutos antes de
eliminar el exceso con agua tibia y un
paño de algodón.
PARTE SUPERIOR DEL
TOPE STRETTA
SIERRA
PARTE SUPERIOR
DEL TOPE STRETTA
(Figura 2-1) (Figura 2-2)
(Figura 1-3)

©2020 VT Industries, Inc. Todos los derechos reservados.
Todas las marcas comerciales y marcas comerciales registradas son propiedad de sus respectivos dueños.
PASO 3 - ASEGURE EL TOPE
from VT Industries
™
from VT Industries
™
Para obtener información adicional sobre cómo instalar
su tope Stretta, visite strettacountertops.com
Para acabar los extremos expuestos del tope y el protector contra
salpicaduras, por favor, consulte las instrucciones fáciles de seguir
incluidas en el kit de tapas de Stretta.
ADVERTENCIA: No use tornillos que excedan del
grosor combinado del soporte de montaje de una
esquina y el tope Stretta, o de lo contrario usted corre
el riesgo de penetrar en la superficie (Figura 3-4).
soportes
de montaje
de las esquinas
del mueble
soportes
de montaje
de las esquinas
del mueble
Vista desde arriba
MUEBLE BASE
(Figura 3-3)
(Figura 3-4)
TOPE STRETTA
SOPORTES DE MONTAJE
DE LAS ESQUINAS
MUEBLE BASE
TORNILLO PARA
MADERA
NO PERFORE
MÁS ALLÁ
DE ESTE PUNTO
3
Separe ligeramente los topes de la pared
para acceder a los huecos de la parte
inferior del tope. Introduzca los tres
tornillos especiales en los huecos con la
broca para tornillos especiales incluida en
el kit de instalación de Stretta. Dos de los
huecos para tornillos se encuentran en el
lado inferior del tope (Figura 3-1) y uno se
encuentra en la parte posterior del tope
(Figura 3-2).
Usted puede fijar ahora su tope a los
muebles introduciendo los tornillos (no
incluidos) a través de los soportes de
montaje de las esquinas del mueble en el
tope (Figura 3-3).
PARTE INFERIOR DEL
TOPE STRETTA
PARTE POSTERIOR DEL
TOPE STRETTA
PARTE INFERIOR DEL
TOPE STRETTA
(Figura 3-2)(Figura 3-1)
-
 1
1
-
 2
2
-
 3
3
-
 4
4
-
 5
5
-
 6
6


