Air King 6C507B/9145B Manual de usuario
- Categoría
- Ventiladores domésticos
- Tipo
- Manual de usuario

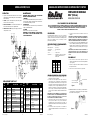
Figure 1
5. Unplug power cord before installing or servicing the fan.
WARNING: DO NOT DEPEND UPON THE ON-OFF SWITCH
AS THE SOLE MEANS OF DISCONNECTING POWER WHEN
INSTALLING OR SERVICING THE FAN. ALWAYS UNPLUG
THE POWER CORD.
6. This fan is intended for general use ONLY. It must NOT be
used in potentially dangerous locations such as flammable,
explosive, chemical-laden or wet atmospheres. DO NOT use
fan in a window. Rain may create an electrical hazard.
WARNING: TO REDUCE THE RISK OF FIRE OR ELECTRIC
SHOCK, DO NOT USE THIS FAN WITH ANY SOLID STATE
SPEED CONTROL DEVICE.
ASSEMBLY
1. Remove T-Knob from Fan Head Assembly while being careful
to retain the Hex Nut on the opposite side.
( Figure 1)
2. Insert the Fan Head Assembly into the Slot on the Clip Assem-
bly.
3. Reinstall the T-Knob. Tighten securely.
SPECIFICATIONS
Motor ..............................120V, 50/60 Hz
Blade diameter...............6" ( 15.2 cm)
Cord ............................... 6 ft. (1.8 m), 18/3
Speeds ...........................2
Control ...........................Rotary Switch
Approvals ....................... UL listed. Close mesh fan guard meets
OSHA requirements.
READ AND SAVE THESE INSTRUCTIONS
READ CAREFULLY BEFORE ATTEMPTING TO ASSEMBLE, INSTALL, OPERATE OR MAINTAIN THE PRODUCT DESCRIBED.
PROTECT YOURSELF AND OTHERS BY OBSERVING ALL SAFETY INFORMATION. FAILURE TO COMPLY WITH
INSTRUCTIONS COULD RESULT IN PERSONAL INJURY AND/OR PROPERTY DAMAGE!
RETAIN INSTRUCTIONS FOR FUTURE REFERENCE.
DESCRIPTION
The AirKing 6" (15.2 cm) Clip-On Air Circulator features whisper
quiet operation, rotary switch control with adjustable vertical tilt
and 360° head pivot. The six inch (15.2 cm), 3-paddle fan blade
is powered by a permanently pre-lubricated motor.
1
2085299ARev. C (Color) 2/97
6" CLIP-ON AIR CIRCULATOR
MODEL 6C507B/9145B
OPERATING INSTRUCTIONS & PARTS MANUAL
GENERAL SAFETY INFORMATION
1. Make certain that the power source conforms to the electrical
requirements of the fan.
2. The power cord is equipped with a three-prong grounded plug
that must be inserted into a matching receptacle. Under no
circumstances must the grounding prong be cut off the plug.
Where a two-prong wall receptacle is encountered, it must be
replaced with a properly grounded three-prong receptacle
installed in accordance with the National Electrical Code (NEC)
and all applicable local codes and ordinances. This work must
be done only by a qualified electrician, using copper wire only.
WARNING: USE OF A THREE-PRONG TO TWO-PRONG
ADAPTER IS NOT RECOMMENDED. IMPROPER CONNEC-
TION MAY CREATE THE RISK OF ELECTROCUTION. USE OF
SUCH ADAPTERS IS NOT PERMITTED IN CANADA.
3. Where possible, avoid the use of extension cords. If they must
be used, minimize the risk of overheating by ensuring that they
are UL listed and of the proper gage and length. Never use a
single extension cord to operate more than one fan.
4. Do not insert fingers or foreign objects into the fan. Do not block
or tamper with the fan in any manner while it is in operation.
MODEL
6C507B/9145B
SPEED
HIGH LOW
CFM 566 488
M
3
/s .27 .23
RPM 2460 2295
Amps 0.19 0.15
Watts 13 11
dB A 37 34
Figure 2
4. WALLMOUNT USE: Install a Screw (#8 x 3/4" Wood Screw or
equivalent...not supplied) in the wall and hang the Clip Assem-
bly on the Screw.
(Figure 2)
2085299ARev. C (Color) 2/97
MODELO 6C507B/9145B
4
OPERACIÓN
1. Enganche el ventilador a una estructura que tenga un espesor de entre
3/4" y 1 1/8". Si engancha el ventilador a estructuras de mayor o menor
espesor podría desestabilizarlo.
2. VELOCIDAD: La velocidad se controla mediante un conjuntor rotatorio
de tres posiciones localizado en la parte trasera del alojamiento del
motor.
3. AJUSTE DEL ÁNGULO: Afloje la perilla de debajo de la cabeza del
ventilador. Incline la cabeza a la posición de flujo de aire deseada.
Vuelva a apretar la perilla.
4. CORDÓN DE ALIMENTACIÓN ELÉCTRICA: Enchufe el cordón de
alimentación eléctrica en un receptáculo de pared (120 volts CA, 60
Hz).
MANTENIMIENTO
ADVERTENCIA: DESCONECTE SIEMPRE EL CORDÓN ANTES DE
MOVER O DAR SERVICIO AL VENTILADOR.
LIMPIEZA
Utilice un trapo suave, humedecido con una solución de jabón suave. Evite
el uso de gasolina, bencina, diluyentes, solventes clorados, limpiadores
ásperos, etc., ya que causarán daños al ventilador.
LUBRICACIÓN
Los cojinetes de precisión vienen sellados de fábrica de por vida y no
requieren de lubricación adicional.
ALMACENAMIENTO
Cuando no esté en uso, guarde la unidad en un lugar limpio y seco.
ADVERTENCIA: PARA REDUCIR EL RIESGO DE INCENDIOS O
DESCARGAS ELÉCTRICAS, NO USE ESTE VENTILADOR CON
NINGÚN DISPOSITIVO DE CONTROL DE VELOCIDAD DE ESTADO
SÓLIDO.
NO.
REF
PARTE
NO.
DESCRIPCIÓN
CANT.
19
20
LISTA DE REPUESTOS
NO.
REF
PARTE
NO.
DESCRIPCIÓN
CANT.
14 2091138 Tornillo de la cubierta trasera
del motor 2
15 2011724 Interruptor de mando 1
16 2050099W Cordón eléctrico 1
17 2011704A Perilla de ajuste 1
18 2011397 Cuello 1
19 2009102 Pata 2
20 2091116 Tornillo HWH #8 x 5/8 Tipo 25 1
21 2091149B Resorte de las mordazas 1
22 2011377 Mordaza superior 1
23 2011387 Mordaza inferior 1
1 2011739 Ornamento 1
2 2096065 Rejilla frontal 1
3 2011754 Paletas 1
4 2090588 Abrazadera de las paletas 1
5 2090123 Tuerca hexagonal M4 2
6 2091156 Tuerca hexagonal 8-32 1
7 2011684 Alojamiento del motor y rejilla trasera 1
8 2030078H Conjunto del motor 1
9 2090117 Arandela de bloqueo con dientes ext #8 1
10 2091119 Tornillo de tierra #6 x 3/8" 1
11 2057062 Interruptor 1
12 2011764 Interruptor 1

MODEL 6C507B/9145B
2085299ARev. C (Color) 2/97
2
OPERATION
1. Clip fan to a structure that is between 3/4" and 1 1/8" thick.
Clipping the fan to structures with greater or lesser widths may
lead to instability.
2. SPEED: Speed is controlled by three position rotary switch
located on rear of motor housing.
3. ANGLE ADJUSTMENT: Loosen knob under fan head. Tilt
head to desired air flow position. Retighten knob.
4. POWER SUPPLY CORD: Plug power supply cord into wall
outlet (120V AC, 60 Hz).
REF
NO.
PART
NO.
DESCRIPTION
QTY.
19
20
MAINTENANCE
WARNING: ALWAYS UNPLUG THE CORD BEFORE
MOVING OR SERVICING THE FAN.
CLEANING
Use a soft cloth moistened with a mild soap solution. Avoid use of
gasoline, benzine, thinner, chlorinated solvents, harsh cleaners,
etc. This will result in damge to the fan.
LUBRICATION
Precision bearings are sealed at the factory for life and will not
require any further lubrication.
STORAGE
When not in use, keep unit in a clean, dry place.
WARNING: TO AVOID THE RISK OF FIRE OR ELEC-
TRIC SHOCK, DO NOT USE FAN WITH ANY SOLID
STATE SPEED DEVICE.
REPLACEMENT PARTS LIST
REF
NO.
PART
NO.
DESCRIPTION
QTY.
3
MANUAL DE INSTRUCCIONES DE OPERACIÓN Y PARTES
2085299ARev. C (Color) 2/97
DESCRIPCIÓN
El ventilador AirKing de mordazas de 6" (15.2 cm) es de operación
silenciosa, tiene un control de conjuntor rotatorio, inclinación vertical
ajustable y un movimiento de la cabeza de 360°. Su unidad giratoria de 3
paletas, de seis pulgadas (15.2 cm), es accionada por un motor
permanentemente prelubricado.
LEA Y GUARDE ESTAS INSTRUCCIONES
LÉALAS CUIDADOSAMENTE ANTES DE INTENTAR ARMAR, INSTALAR, OPERAR O DAR MANTENIMIENTO AL PRODUCTO
DESCRITO. PROTÉJASE A SÍ MISMO Y A LOS DEMÁS OBSERVANDO TODA LA INFORMACIÓN SOBRE SEGURIDAD. ¡NO
SEGUIR LAS INSTRUCCIONES PODRÍA RESULTAR EN LESIONES PERSONALES Y/O DAÑOS A LA PROPIEDAD!
GUARDE LAS INSTRUCCIONES PARA REFERENCIAS FUTURAS.
5. Desenchufe el cordón eléctrico antes de instalar o dar servicio al
ventilador.
ADVERTENCIA: NO DEPENDA DEL INTERRUPTOR DE ENCENDIDO
Y APAGADO COMO EL ÚNICO MEDIO PARA INTERRUMPIR LA
ALIMENTACIÓN ELÉCTRICA CUANDO INSTALE O DÉ SERVICIO AL
VENTILADOR. SIEMPRE DESENCHUFE EL CORDÓN ELÉCTRICO.
6. Este ventilador es para uso general EXCLUSIVAMENTE. NO deberá
usarse en localidades potencialmente peligrosas tales como atmósferas
inflamables, explosivas, cargadas de gases o húmedas. NO utilice el
ventilador en una ventana, ya que la lluvia podría crear un peligro
eléctrico.
ADVERTENCIA: PARA REDUCIR EL RIESGO DE INCENDIOS O
DESCARGAS ELÉCTRICAS, NO USE ESTE VENTILADOR CON
NINGÚN DISPOSITIVO DE CONTROL DE VELOCIDAD DE ESTADO
SÓLIDO.
ENSAMBLAJE
1. Quite el tornillo con cabeza en T del conjunto de la cabeza del
ventilador, teniendo cuidado de conservar la tuerca hexagonal del lado
opuesto.
(Figura 1)
2. Introduzca el conjunto de la cabeza del ventilador en la ranura del
montaje de las mordazas.
3. Vuelva a colocar el tornillo con cabeza en T y apriételo bien.
ESPECIFICATIONES Y FUNCIONAMIENTO
Motor ...................................120V, 50/60 Hz
Tamano de paletas ............. 6" ( 15.2 cm)
Cordón eléctrico .................6 pies (1.8 m), 18/3
Velocidades ........................2
Control ................................Conjuntor rotario
Aprobaciones. .....................Catalogación UL. El protector de malla
cerrada del ventilador satisface las
normas OSHA.
INFORMACIÓN GENERAL SOBRE SEGURIDAD
1. Cerciórese de que la fuente de electricidad se adapte a los
requerimientos eléctricos del ventilador.
2. El cordón eléctrico está equipado con una clavija a tierra de tres
espigas que tiene que ser enchufada a un receptáculo del mismo
diseño. Bajo ninguna circunstancia deberá cortarse la espiga a tierra
de la clavija. De existir un receptáculo de pared de dos espigas, deberá
reemplazarse por uno de tres espigas debidamente puesto a tierra e
instalado de conformidad con el Código Nacional de Electricidad y
todos los códigos y ordenanzas locales aplicables. El trabajo deberá
hacerlo un electricista calificado, utilizando exclusivamente alambre
de cobre.
ADVERTENCIA: NO SE RECOMIENDA EL USO DE UN ADAPTADOR
DE TRES A DOS ESPIGAS. LA CONEXIÓN INDEBIDA PODRÍA CREAR
EL RIESGO DE SER ELECTROCUTADO. EL USO DE TALES
ADAPTADORES NO ESTÁ PERMITIDO EN CANADÁ.
3. Siempre que sea posible, evite el uso de extensiones eléctricas. Si
tienen que usarse, minimice el riesgo de sobrecalentamiento
asegurándose de que sean de catalogación UL y del calibre y la
longitud adecuadas. Nunca use una sola extensión para operar más de
un ventilador.
4. No introduzca los dedos ni objetos extraños en el ventilador. No
obstruya ni manipule indebidamente el ventilador mientras esté en
operación.
MODELO
6C507B/9145B
VELOC.
ALTA BAJA
CFM 566 488
M
3
/s .27 .23
RPM 2460 2295
Amps 0.19 0.15
Watts 13 11
dB A 37 34
4. MONTAJE EN PARED: Instale un tornillo (uno para madera #8 x 3/4"
o uno equivalente. No está incluido) en la pared y cuelgue el montaje
de las mordazas del tornillo.
(Figura 2)
Figura 1
Figura 2
TUERCA HEXAGONAL
TORNILLO CON CABEZA EN T
MONTAJE DE LAS MORDAZAS
VENTILADOR DE MORDAZAS
DE 6" (15.2 cm)
MODELO 6C507B/9145B
1 2011739 Ornament 1
2 2096065 Front Grill 1
3 2011754 Fan Blade 1
4 2090588 Blade Clamp 1
5 2090123 M4 Hex Nut 2
6 2091156 8-32 Hex Nut 1
7 2011684 Motor Housing & Rear Grill 1
8 2030078H Motor Assembly 1
9 2090117 Lockwasher #8 Ext. Tooth 1
10 2091119 #6 x 3/8" Ground Screw 1
11 2057062 Switch 1
12 2011764 Rear Motor Cover 1
14 2091138 Rear Motor Cover Screw 2
15 2011724 Switch Knob 1
16 2050099W Cordset 1
17 2011704A Adjustment Knob 1
18 2011397 Neck 1
19 2009102 Foot 2
20 2091116 Screw #8 x 5/8 HWH 1
Type 25
21 2091149B Clip Spring 1
22 2011377 Top Clip 1
23 2011387 Bottom Clip 1
Transcripción de documentos
OPERATING INSTRUCTIONS & PARTS MANUAL MODELO 6C507B/9145B OPERACIÓN MANTENIMIENTO 1. Enganche el ventilador a una estructura que tenga un espesor de entre 3/4" y 1 1/8". Si engancha el ventilador a estructuras de mayor o menor espesor podría desestabilizarlo. ADVERTENCIA: DESCONECTE SIEMPRE EL CORDÓN ANTES DE MOVER O DAR SERVICIO AL VENTILADOR. LIMPIEZA Utilice un trapo suave, humedecido con una solución de jabón suave. Evite el uso de gasolina, bencina, diluyentes, solventes clorados, limpiadores ásperos, etc., ya que causarán daños al ventilador. LUBRICACIÓN Los cojinetes de precisión vienen sellados de fábrica de por vida y no requieren de lubricación adicional. ALMACENAMIENTO Cuando no esté en uso, guarde la unidad en un lugar limpio y seco. ADVERTENCIA: PARA REDUCIR EL RIESGO DE INCENDIOS O DESCARGAS ELÉCTRICAS, NO USE ESTE VENTILADOR CON NINGÚN DISPOSITIVO DE CONTROL DE VELOCIDAD DE ESTADO SÓLIDO. 2. VELOCIDAD: La velocidad se controla mediante un conjuntor rotatorio de tres posiciones localizado en la parte trasera del alojamiento del motor. 3. AJUSTE DEL ÁNGULO: Afloje la perilla de debajo de la cabeza del ventilador. Incline la cabeza a la posición de flujo de aire deseada. Vuelva a apretar la perilla. 4. CORDÓN DE ALIMENTACIÓN ELÉCTRICA: Enchufe el cordón de alimentación eléctrica en un receptáculo de pared (120 volts CA, 60 Hz). 6" CLIP-ON AIR CIRCULATOR MODEL 6C507B/9145B READ AND SAVE THESE INSTRUCTIONS READ CAREFULLY BEFORE ATTEMPTING TO ASSEMBLE, INSTALL, OPERATE OR MAINTAIN THE PRODUCT DESCRIBED. PROTECT YOURSELF AND OTHERS BY OBSERVING ALL SAFETY INFORMATION. FAILURE TO COMPLY WITH INSTRUCTIONS COULD RESULT IN PERSONAL INJURY AND/OR PROPERTY DAMAGE! RETAIN INSTRUCTIONS FOR FUTURE REFERENCE. DESCRIPTION The AirKing 6" (15.2 cm) Clip-On Air Circulator features whisper quiet operation, rotary switch control with adjustable vertical tilt and 360° head pivot. The six inch (15.2 cm), 3-paddle fan blade is powered by a permanently pre-lubricated motor. 5. Unplug power cord before installing or servicing the fan. SPECIFICATIONS 6. This fan is intended for general use ONLY. It must NOT be used in potentially dangerous locations such as flammable, explosive, chemical-laden or wet atmospheres. DO NOT use fan in a window. Rain may create an electrical hazard. WARNING: DO NOT DEPEND UPON THE ON-OFF SWITCH AS THE SOLE MEANS OF DISCONNECTING POWER WHEN INSTALLING OR SERVICING THE FAN. ALWAYS UNPLUG THE POWER CORD. Motor .............................. 120V, 50/60 Hz Blade diameter ............... 6" ( 15.2 cm) Cord ............................... 6 ft. (1.8 m), 18/3 Speeds ........................... 2 Control ........................... Rotary Switch Approvals ....................... UL listed. Close mesh fan guard meets OSHA requirements. MODEL SPEED CFM M3/s RPM Amps Watts dB A 20 19 WARNING: TO REDUCE THE RISK OF FIRE OR ELECTRIC SHOCK, DO NOT USE THIS FAN WITH ANY SOLID STATE SPEED CONTROL DEVICE. ASSEMBLY 6C507B/9145B HIGH LOW 566 .27 2460 0.19 13 37 1. Remove T-Knob from Fan Head Assembly while being careful to retain the Hex Nut on the opposite side. ( Figure 1) 2. Insert the Fan Head Assembly into the Slot on the Clip Assembly. 3. Reinstall the T-Knob. Tighten securely. 488 .23 2295 0.15 11 34 GENERAL SAFETY INFORMATION 1. Make certain that the power source conforms to the electrical requirements of the fan. LISTA DE REPUESTOS NO. PARTE NO. REF 1 2011739 2 3 4 DESCRIPCIÓN NO. CANT. REF PARTE NO. DESCRIPCIÓN Ornamento 1 2096065 Rejilla frontal 1 2011754 Paletas 1 15 2011724 2090588 Abrazadera de las paletas 1 16 2050099W Cordón eléctrico 14 2091138 Tornillo de la cubierta trasera del motor Interruptor de mando CANT. 2 1 1 5 2090123 Tuerca hexagonal M4 2 17 2011704A Perilla de ajuste 1 6 2091156 Tuerca hexagonal 8-32 1 18 2011397 Cuello 1 7 2011684 Alojamiento del motor y rejilla trasera 1 19 2009102 Pata 2 8 2030078H Conjunto del motor 1 20 2091116 Tornillo HWH #8 x 5/8 Tipo 25 1 9 2090117 Arandela de bloqueo con dientes ext #8 1 21 2091149B Resorte de las mordazas 1 10 2091119 Tornillo de tierra #6 x 3/8" 1 22 2011377 Mordaza superior 1 11 2057062 Interruptor 1 23 2011387 Mordaza inferior 1 12 2011764 Interruptor 1 Rev. C (Color) 2/97 4 2085299A 2. The power cord is equipped with a three-prong grounded plug that must be inserted into a matching receptacle. Under no circumstances must the grounding prong be cut off the plug. Where a two-prong wall receptacle is encountered, it must be replaced with a properly grounded three-prong receptacle installed in accordance with the National Electrical Code (NEC) and all applicable local codes and ordinances. This work must be done only by a qualified electrician, using copper wire only. Figure 1 4. WALLMOUNT USE: Install a Screw (#8 x 3/4" Wood Screw or equivalent...not supplied) in the wall and hang the Clip Assembly on the Screw. (Figure 2) WARNING: USE OF A THREE-PRONG TO TWO-PRONG ADAPTER IS NOT RECOMMENDED. IMPROPER CONNECTION MAY CREATE THE RISK OF ELECTROCUTION. USE OF SUCH ADAPTERS IS NOT PERMITTED IN CANADA. 3. Where possible, avoid the use of extension cords. If they must be used, minimize the risk of overheating by ensuring that they are UL listed and of the proper gage and length. Never use a single extension cord to operate more than one fan. Figure 2 4. Do not insert fingers or foreign objects into the fan. Do not block or tamper with the fan in any manner while it is in operation. Rev. C (Color) 2/97 1 2085299A MANUAL DE INSTRUCCIONES DE OPERACIÓN Y PARTES MODEL 6C507B/9145B OPERATION MAINTENANCE 1. Clip fan to a structure that is between 3/4" and 1 1/8" thick. Clipping the fan to structures with greater or lesser widths may lead to instability. WARNING: ALWAYS UNPLUG THE CORD BEFORE MOVING OR SERVICING THE FAN. CLEANING Use a soft cloth moistened with a mild soap solution. Avoid use of gasoline, benzine, thinner, chlorinated solvents, harsh cleaners, etc. This will result in damge to the fan. LUBRICATION Precision bearings are sealed at the factory for life and will not require any further lubrication. STORAGE When not in use, keep unit in a clean, dry place. WARNING: TO AVOID THE RISK OF FIRE OR ELECTRIC SHOCK, DO NOT USE FAN WITH ANY SOLID STATE SPEED DEVICE. 2. SPEED: Speed is controlled by three position rotary switch located on rear of motor housing. 3. ANGLE ADJUSTMENT: Loosen knob under fan head. Tilt head to desired air flow position. Retighten knob. 4. POWER SUPPLY CORD: Plug power supply cord into wall outlet (120V AC, 60 Hz). VENTILADOR DE MORDAZAS DE 6" (15.2 cm) MODELO 6C507B/9145B LEA Y GUARDE ESTAS INSTRUCCIONES LÉALAS CUIDADOSAMENTE ANTES DE INTENTAR ARMAR, INSTALAR, OPERAR O DAR MANTENIMIENTO AL PRODUCTO DESCRITO. PROTÉJASE A SÍ MISMO Y A LOS DEMÁS OBSERVANDO TODA LA INFORMACIÓN SOBRE SEGURIDAD. ¡NO SEGUIR LAS INSTRUCCIONES PODRÍA RESULTAR EN LESIONES PERSONALES Y/O DAÑOS A LA PROPIEDAD! GUARDE LAS INSTRUCCIONES PARA REFERENCIAS FUTURAS. DESCRIPCIÓN 5. Desenchufe el cordón eléctrico antes de instalar o dar servicio al ventilador. ADVERTENCIA: NO DEPENDA DEL INTERRUPTOR DE ENCENDIDO Y APAGADO COMO EL ÚNICO MEDIO PARA INTERRUMPIR LA ALIMENTACIÓN ELÉCTRICA CUANDO INSTALE O DÉ SERVICIO AL VENTILADOR. SIEMPRE DESENCHUFE EL CORDÓN ELÉCTRICO. 6. Este ventilador es para uso general EXCLUSIVAMENTE. NO deberá usarse en localidades potencialmente peligrosas tales como atmósferas inflamables, explosivas, cargadas de gases o húmedas. NO utilice el ventilador en una ventana, ya que la lluvia podría crear un peligro eléctrico. ADVERTENCIA: PARA REDUCIR EL RIESGO DE INCENDIOS O DESCARGAS ELÉCTRICAS, NO USE ESTE VENTILADOR CON NINGÚN DISPOSITIVO DE CONTROL DE VELOCIDAD DE ESTADO SÓLIDO. El ventilador AirKing de mordazas de 6" (15.2 cm) es de operación silenciosa, tiene un control de conjuntor rotatorio, inclinación vertical ajustable y un movimiento de la cabeza de 360°. Su unidad giratoria de 3 paletas, de seis pulgadas (15.2 cm), es accionada por un motor permanentemente prelubricado. ESPECIFICATIONES Y FUNCIONAMIENTO Motor ................................... 120V, 50/60 Hz Tamano de paletas ............. 6" ( 15.2 cm) Cordón eléctrico ................. 6 pies (1.8 m), 18/3 Velocidades ........................ 2 Control ................................ Conjuntor rotario Aprobaciones. ..................... Catalogación UL. El protector de malla cerrada del ventilador satisface las normas OSHA. ENSAMBLAJE 1. Quite el tornillo con cabeza en T del conjunto de la cabeza del ventilador, teniendo cuidado de conservar la tuerca hexagonal del lado opuesto. (Figura 1) MODELO 6C507B/9145B VELOC. ALTA BAJA CFM M3/s RPM Amps Watts dB A 20 566 .27 2460 0.19 13 37 488 .23 2295 0.15 11 34 2. Introduzca el conjunto de la cabeza del ventilador en la ranura del montaje de las mordazas. 3. Vuelva a colocar el tornillo con cabeza en T y apriételo bien. 19 INFORMACIÓN GENERAL SOBRE SEGURIDAD REPLACEMENT PARTS LIST REF NO. PART NO. DESCRIPTION QTY. 1 2011739 Ornament 1 2 2096065 Front Grill 1 3 2011754 Fan Blade 1 4 2090588 Blade Clamp 1 5 2090123 M4 Hex Nut 2 6 2091156 8-32 Hex Nut 1 7 2011684 Motor Housing & Rear Grill 1 8 2030078H Motor Assembly 1 9 2090117 Lockwasher #8 Ext. Tooth 10 2091119 #6 x 3/8" Ground Screw 11 2057062 12 2011764 Rev. C (Color) 2/97 REF NO. PART NO. DESCRIPTION QTY. 14 2091138 Rear Motor Cover Screw 2 15 2011724 Switch Knob 1 16 2050099W Cordset 1 17 2011704A Adjustment Knob 1 18 2011397 Neck 1 19 2009102 Foot 2 20 2091116 Screw #8 x 5/8 HWH Type 25 1 1 21 2091149B Clip Spring 1 1 22 2011377 Top Clip 1 Switch 1 23 2011387 Bottom Clip 1 Rear Motor Cover 1 2 2085299A 1. Cerciórese de que la fuente de electricidad se adapte a los requerimientos eléctricos del ventilador. 2. El cordón eléctrico está equipado con una clavija a tierra de tres espigas que tiene que ser enchufada a un receptáculo del mismo diseño. Bajo ninguna circunstancia deberá cortarse la espiga a tierra de la clavija. De existir un receptáculo de pared de dos espigas, deberá reemplazarse por uno de tres espigas debidamente puesto a tierra e instalado de conformidad con el Código Nacional de Electricidad y todos los códigos y ordenanzas locales aplicables. El trabajo deberá hacerlo un electricista calificado, utilizando exclusivamente alambre de cobre. ADVERTENCIA: NO SE RECOMIENDA EL USO DE UN ADAPTADOR DE TRES A DOS ESPIGAS. LA CONEXIÓN INDEBIDA PODRÍA CREAR EL RIESGO DE SER ELECTROCUTADO. EL USO DE TALES ADAPTADORES NO ESTÁ PERMITIDO EN CANADÁ. 3. Siempre que sea posible, evite el uso de extensiones eléctricas. Si tienen que usarse, minimice el riesgo de sobrecalentamiento asegurándose de que sean de catalogación UL y del calibre y la longitud adecuadas. Nunca use una sola extensión para operar más de un ventilador. 4. No introduzca los dedos ni objetos extraños en el ventilador. No obstruya ni manipule indebidamente el ventilador mientras esté en operación. Rev. C (Color) 2/97 TORNILLO CON CABEZA EN T TUERCA HEXAGONAL MONTAJE DE LAS MORDAZAS Figura 1 4. MONTAJE EN PARED: Instale un tornillo (uno para madera #8 x 3/4" o uno equivalente. No está incluido) en la pared y cuelgue el montaje de las mordazas del tornillo. (Figura 2) Figura 2 3 2085299A-
 1
1
-
 2
2


Air King 6C507B/9145B Manual de usuario
- Categoría
- Ventiladores domésticos
- Tipo
- Manual de usuario
En otros idiomas
- English: Air King 6C507B/9145B User manual