
A
Hardware Review
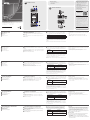
1
DisplayPort In Port
2
Power Jack
3
Power LED
4
DisplayPort Out Port
B
Hardware Installation
Refer to the installation diagram above and do the following.
1
Use a DisplayPort cable to connect the unit’s DisplayPort In Port to a
computer.
2
Use a DisplayPort cable to connect the unit’s DisplayPort Out Port to a
display device.
3
The unit is powered by the connected computer. Depending on the
output quality, you may need to connect the unit to the supplied
power adapter. The power source is indicated by the color of the
Power LED:
Power LED Description
Orange The unit is powered by a connected computer.
Green The unit is powered by a power adapter.
Note:
• This setup can transmit 4K signals up to 10 m. To extend the
transmission up to 15 m or 20 m, cascade another one or two VB905
units to this setup and connect each VB905 to the supplied power
adapter.
• Make sure each DisplayPort cable used in this setup is not longer than 5 m.
B
Hardware Installation
© Copyright 2018 ATEN
®
International Co., Ltd.
ATEN and the ATEN logo are trademarks of ATEN International Co., Ltd. All rights reserved. All
other trademarks are the property of their respective owners.
Part No. PAPE-1223-L40G Printing Date: 03/2018
4K DisplayPort Booster
Quick Start Guide
VB905
VB905 4K DisplayPort Booster
www.aten.com
Booster DisplayPort 4K VB905
www.aten.com
VB905 4K-DisplayPort-Verstärker
www.aten.com
Refuerzo DisplayPort 4K VB905
www.aten.com
VB905 Усилитель сигнала 4K DisplayPort
www.aten.com
Amplifi catore DisplayPort 4K VB905
www.aten.com
ATEN VanCryst
™
Rack Mounting
Optionally purchase a Rack Mount Kit (ATEN KC06-0039-100G) for this
setup.
1. Place the brackets into position onto the back of the VB905.
2. Use the supplied screws to secure the brackets to the back of the
VB905.
Package Contents
1 VB905 4K DisplayPort Booster
1 Power Adapter
1 User Instructions
Support and Documentation Notice
All information, documentation, fi rmware,
software utilities, and specifi cations
contained in this package are subject to
change without prior notifi cation by
the manufacturer.
To reduce the environmental impact of our
products, ATEN documentation and software
can be found online at
http://www.aten.com/download/
Technical Support
www.aten.com/support
이 기기는 업무용(A급) 전자파적합기기로서 판매자 또는
사용자는 이 점을 주의하시기 바라며, 가정외의 지역에
서 사용하는 것을 목적으로 합니다.
Scan for
more information
EMC Information
FEDERAL COMMUNICATIONS COMMISSION INTERFERENCE
STATEMENT:
This equipment has been tested and found to comply with the limits
for a Class A digital device, pursuant to Part 15 of the FCC Rules.
These limits are designed to provide reasonable protection against
harmful interference when the equipment is operated in a commercial
environment. This equipment generates, uses, and can radiate radio
frequency energy and, if not installed and used in accordance with
the instruction manual, may cause harmful interference to radio
communications. Operation of this equipment in a residential area
is likely to cause harmful interference in which case the user will be
required to correct the interference at his own expense.
FCC Caution: Any changes or modifi cations not expressly approved by
the party responsible for compliance could void the user's authority to
operate this equipment.
Warning: Operation of this equipment in a residential environment
could cause radio interference.
This device complies with Part 15 of the FCC Rules. Operation is subject
to the following two conditions: (1) this device may not cause harmful
interference, and (2) this device must accept any interference received,
including interference that may cause undesired operation.
A
Hardware Review
1
3
2
1 2
3
4
A
Aperçu du matériel
1
Port d’entrée DisplayPort
2
Fiche d'alimentation
3
LED d'alimentation
4
Port de sortie DisplayPort
B
Installation du matériel
Reportez-vous au schéma d’installation ci-dessus et effectuez les étapes
suivantes.
1
Utilisez un câble DisplayPort pour raccorder le port d’entrée DisplayPort
de l'unité à un ordinateur.
2
Utilisez un câble DisplayPort pour raccorder le port de sortie DisplayPort
de l'unité à un dispositif d’affi chage.
3
L’unité est alimentée par l'ordinateur connecté. Selon la qualité de
la sortie, vous pouvez avoir à raccorder l’unité à l’adaptateur secteur
fourni. La source d'alimentation est indiquée parla couleur de la LED
d’alimentation :
LED
d'alimentation
Description
Orange L’unité est alimentée par un ordinateur connecté.
Vert L’unité est alimentée par un adaptateur secteur.
Remarque :
• Cette confi guration peut transmettre les signaux 4K jusqu’à 10 m. Pour
étendre la transmission jusqu’à 15 m ou 20 m, mettez en cascade une
ou deux autres unités VB905 dans cette confi guration et raccordez
chaque VB905 à l’adaptateur secteur fourni.
• Assurez-vous que chaque câble DisplayPort utilisé ne dépasse pas 5 m
de long.
Montage en rack
Achetez en option un kit de montage en rack (ATEN KC06-0039-100G)
pour cette confi guration.
1. Placez les supports en position au dos du VB905.
2. Utilisez les vis fournies pour visser les supports au dos du VB905.
A
Hardwareübersicht
1
DisplayPort-Eingang
2
Netzanschluss
3
Betriebsanzeige-LED
4
DisplayPort-Ausgang
B
Hardwareinstallation
Beachten Sie die obige Installationsabbildung und gehen Sie wie folgt vor.
1
Verbinden Sie den DisplayPort-Eingang des Gerätes über ein
DisplayPort-Kabel mit einem Computer.
2
Verbinden Sie den DisplayPort-Ausgang des Gerätes über ein
DisplayPort-Kabel mit einem Anzeigegerät.
3
Das Gerät wird über den verbundenen Computer mit Strom versorgt.
Je nach Ausgangsqualität müssen Sie das Gerät möglicherweise mit
dem mitgelieferten Netzteil verbinden. Die Stromquelle wird durch die
Farbe der Betriebsanzeige-LED angezeigt.
Betriebsanzeige-LED Beschreibung
Orange
Das Gerät wird über einen verbundenen
Computer mit Strom versorgt.
Grün
Das Gerät wird über ein Netzteil mit
Strom versorgt.
Hinweis:
• Diese Konfi guration kann 4K-Signale bis zu 10 m übertragen.
Zur Erweiterung der Übertragung auf bis zu 15 oder 20 m kaskadieren
Sie ein oder zwei weitere VB905-Geräte mit dieser Konfi guration und
verbinden jedes VB905 mit dem mitgelieferten Netzteil.
• Stellen Sie sicher, dass jedes in dieser Konfi guration verwendete
DisplayPort-Kabel nicht länger als 5 m ist.
Rackmontage
Kaufen Sie optional ein Rackmontage-Set (ATEN KC06-0039-100G) für
diese Konfi guration.
1. Bringen Sie die Halterungen an der Rückseite des VB905 an.
2. Befestigen Sie die Halterungen mit den mitgelieferten Schrauben an der
Rückseite des VB905.
A
Revisión de hardware
1
Puerto de entrada DisplayPort
2
Conector de alimentación
3
LED de alimentación
4
Puerto de salida DisplayPort
B
Instalación de hardware
Consulte el diagrama de instalación anterior y realice lo siguiente:
1
Utilice un cable DisplayPort para conectar el puerto de entrada
DisplayPort de la unidad al ordenador.
2
Utilice un cable DisplayPort para conectar el puerto de salida
DisplayPort de la unidad al dispositivo de visualización.
3
La unidad se alimenta por el PC conectado. Dependiendo de la calidad
de la salida, es posible que necesitará conectar la unidad al adaptador
de alimentación suministrado. La fuente de alimentación está indicada
por el color de la luz LED de alimentación:
LED de
alimentación
Descripción
Naranja La unidad se alimenta por el PC conectado.
Verde
La unidad se alimenta por un adaptador de
alimentación.
Nota:
• Esta confi guración puede transmitir señales de 4K hasta 10 m. Para
prolongar la transmisión hasta 15 m o 20 m, conectar en cascada uno
o dos unidades VB905 adicionales a esta confi guración y conecte cada
VB905 al adaptador de alimentación suministrado.
• Asegúrese de que cada cable DisplayPort utilizado en esta confi guración
no tiene una longitud superior a 5 m.
Montaje en bastidor
Como alternativa, compre un Kit de Montaje en Bastidor
(ATEN KC06-0039-100G) para esta confi guración.
1. Coloque los soportes en su posición de la parte posterior del VB905.
2. Utilice los tornillos suministrados para asegurar los soportes a la parte
posterior del VB905.
A
Descrizione hardware
1
Porta DisplayPort In
2
Connettore di alimentazione
3
LED alimentazione
4
Porta DisplayPort Out
B
Installazione dell'hardware
Fare riferimento allo schema di installazione precedente e agire come
segue.
1
Utilizzare un cavo DisplayPort per collegare la porta DisplayPort In
dell'unità ad un computer.
2
Utilizzare un cavo DisplayPort per collegare la porta DisplayPort Out
dell'unità ad un display.
3
L'unità è alimentata dal computer collegato. A seconda della qualità
di uscita, potrebbe essere necessario collegare l'unità all'adattatore di
alimentazione fornito in dotazione. La fonte di alimentazione è indicata
dal colore del LED alimentazione:
LED alimentazione Descrizione
Arancione
L'unità è alimentata da un computer
collegato.
Verde
L'unità è alimentata da un adattatore di
alimentazione.
Nota:
• Questa confi gurazione può trasmettere segnali 4K fi no a 10 m. Per
estendere la trasmissione fi no a 15 m o 20 m, collegare a cascata una
o due unità VB905 a questa confi gurazione e collegare ciascun VB905
all'adattatore di alimentazione fornito in dotazione.
• Assicurarsi che ogni cavo DisplayPort utilizzato in questa confi gurazione
non sia più lungo di 5 m.
Montaggio su rack
Opzionalmente, acquistare un kit per il montaggio su rack
(ATEN KC06-0039-100G) per questa confi gurazione.
1. Collocare le staffe in posizione sul retro di VB905.
2. Utilizzare le viti fornite in dotazione per fi ssare le staffe sul retro di
VB905.
A
Обзор аппаратного обеспечения
1
Входной порт DisplayPort
2
Разъём питания
3
Индикатор питания
4
Выходной порт DisplayPort
B
Установка аппаратного обеспечения
Руководствуясь приведенной выше установочной схемой,
выполните следующие действия.
1
Подключите входной порт DisplayPort устройства к компьютеру
кабелем DisplayPort.
2
Подключите выходной порт DisplayPort устройства к монитору
кабелем DisplayPort.
3
Устройство получает питание от подключенного компьютера.
В зависимости от качества вывода может потребоваться
подключить устройство к поставляемому адаптеру питания.
Источник питания обозначается цветом индикатора питания:
Индикатор
питания
Описание
Оранжевый
Устройство получает питание от
подключенного компьютера.
Зеленый
Устройство получает питание от адаптера
питания.
Примечание.
• При таком способе подключения сигналы 4K могут передаваться
на расстояние до 10 м. Для увеличения расстояния передачи
до 15 или 20 м следует установить каскадное подключение еще
одного или двух устройств VB905 и подключить каждое из этих
устройств к поставляемому адаптеру питания.
• Убедитесь, что длина каждого из используемых для подключения
кабелей DisplayPort не превышает 5 м.
Монтаж в стойке
Для установки этим способом необходимо отдельно приобрести
комплект для монтажа в стойке (ATEN KC06-0039-100G).
1. Установите кронштейны в предусмотренном месте в задней
части VB905.
2. Прикрепите кронштейны к задней панели VB905 поставляемыми
в комплекте винтами.
La página se está cargando...
Transcripción de documentos
A Support and Documentation Notice Package Contents Hardware Review 1 All information, documentation, firmware, software utilities, and specifications contained in this package are subject to change without prior notification by the manufacturer. To reduce the environmental impact of our products, ATEN documentation and software can be found online at http://www.aten.com/download/ 1 VB905 4K DisplayPort Booster 1 Power Adapter 1 User Instructions 2 B Hardware Installation Technical Support www.aten.com/support 1 Scan for more information ATEN VanCryst™ VB905 EMC Information FEDERAL COMMUNICATIONS COMMISSION INTERFERENCE STATEMENT: This equipment has been tested and found to comply with the limits for a Class A digital device, pursuant to Part 15 of the FCC Rules. These limits are designed to provide reasonable protection against harmful interference when the equipment is operated in a commercial environment. This equipment generates, uses, and can radiate radio frequency energy and, if not installed and used in accordance with the instruction manual, may cause harmful interference to radio communications. Operation of this equipment in a residential area is likely to cause harmful interference in which case the user will be required to correct the interference at his own expense. FCC Caution: Any changes or modifications not expressly approved by the party responsible for compliance could void the user's authority to operate this equipment. Warning: Operation of this equipment in a residential environment could cause radio interference. 3 4K DisplayPort Booster Quick Start Guide 3 © Copyright 2018 ATEN® International Co., Ltd. ATEN and the ATEN logo are trademarks of ATEN International Co., Ltd. All rights reserved. All other trademarks are the property of their respective owners. Part No. PAPE-1223-L40G 4 Printing Date: 03/2018 This device complies with Part 15 of the FCC Rules. Operation is subject to the following two conditions: (1) this device may not cause harmful interference, and (2) this device must accept any interference received, including interference that may cause undesired operation. 2 이 기기는 업무용(A급) 전자파적합기기로서 판매자 또는 사용자는 이 점을 주의하시기 바라며, 가정외의 지역에 서 사용하는 것을 목적으로 합니다. VB905 4K DisplayPort Booster A Hardware Review DisplayPort In Port 2 Power Jack 3 Power LED 4 DisplayPort Out Port 1 www.aten.com B Hardware Installation 3 Refer to the installation diagram above and do the following. 1 Use a DisplayPort cable to connect the unit’s DisplayPort In Port to a computer. 2 Use a DisplayPort cable to connect the unit’s DisplayPort Out Port to a display device. The unit is powered by the connected computer. Depending on the output quality, you may need to connect the unit to the supplied power adapter. The power source is indicated by the color of the Power LED: Power LED Orange Green Description The unit is powered by a connected computer. The unit is powered by a power adapter. Rack Mounting Optionally purchase a Rack Mount Kit (ATEN KC06-0039-100G) for this setup. 1. Place the brackets into position onto the back of the VB905. 2. Use the supplied screws to secure the brackets to the back of the VB905. Note: • This setup can transmit 4K signals up to 10 m. To extend the transmission up to 15 m or 20 m, cascade another one or two VB905 units to this setup and connect each VB905 to the supplied power adapter. • Make sure each DisplayPort cable used in this setup is not longer than 5 m. Booster DisplayPort 4K VB905 A Aperçu du matériel Port d’entrée DisplayPort Fiche d'alimentation 3 LED d'alimentation 4 Port de sortie DisplayPort 1 2 www.aten.com B Installation du matériel 3 Reportez-vous au schéma d’installation ci-dessus et effectuez les étapes suivantes. 1 Utilisez un câble DisplayPort pour raccorder le port d’entrée DisplayPort de l'unité à un ordinateur. 2 Utilisez un câble DisplayPort pour raccorder le port de sortie DisplayPort de l'unité à un dispositif d’affichage. L’unité est alimentée par l'ordinateur connecté. Selon la qualité de la sortie, vous pouvez avoir à raccorder l’unité à l’adaptateur secteur fourni. La source d'alimentation est indiquée parla couleur de la LED d’alimentation : LED d'alimentation Orange Vert Description Montage en rack Achetez en option un kit de montage en rack (ATEN KC06-0039-100G) pour cette configuration. 1. Placez les supports en position au dos du VB905. 2. Utilisez les vis fournies pour visser les supports au dos du VB905. L’unité est alimentée par un ordinateur connecté. L’unité est alimentée par un adaptateur secteur. Remarque : • Cette configuration peut transmettre les signaux 4K jusqu’à 10 m. Pour étendre la transmission jusqu’à 15 m ou 20 m, mettez en cascade une ou deux autres unités VB905 dans cette configuration et raccordez chaque VB905 à l’adaptateur secteur fourni. • Assurez-vous que chaque câble DisplayPort utilisé ne dépasse pas 5 m de long. www.aten.com VB905 4K-DisplayPort-Verstärker A Hardwareübersicht DisplayPort-Eingang 2 Netzanschluss 3 Betriebsanzeige-LED 4 DisplayPort-Ausgang 1 B Hardwareinstallation 3 Beachten Sie die obige Installationsabbildung und gehen Sie wie folgt vor. 1 Verbinden Sie den DisplayPort-Eingang des Gerätes über ein DisplayPort-Kabel mit einem Computer. 2 Verbinden Sie den DisplayPort-Ausgang des Gerätes über ein DisplayPort-Kabel mit einem Anzeigegerät. Das Gerät wird über den verbundenen Computer mit Strom versorgt. Je nach Ausgangsqualität müssen Sie das Gerät möglicherweise mit dem mitgelieferten Netzteil verbinden. Die Stromquelle wird durch die Farbe der Betriebsanzeige-LED angezeigt. Betriebsanzeige-LED Orange Grün Beschreibung Das Gerät wird über einen verbundenen Computer mit Strom versorgt. Das Gerät wird über ein Netzteil mit Strom versorgt. Rackmontage Kaufen Sie optional ein Rackmontage-Set (ATEN KC06-0039-100G) für diese Konfiguration. 1. Bringen Sie die Halterungen an der Rückseite des VB905 an. 2. Befestigen Sie die Halterungen mit den mitgelieferten Schrauben an der Rückseite des VB905. Hinweis: • Diese Konfiguration kann 4K-Signale bis zu 10 m übertragen. Zur Erweiterung der Übertragung auf bis zu 15 oder 20 m kaskadieren Sie ein oder zwei weitere VB905-Geräte mit dieser Konfiguration und verbinden jedes VB905 mit dem mitgelieferten Netzteil. • Stellen Sie sicher, dass jedes in dieser Konfiguration verwendete DisplayPort-Kabel nicht länger als 5 m ist. Refuerzo DisplayPort 4K VB905 A Revisión de hardware Puerto de entrada DisplayPort 2 Conector de alimentación 3 LED de alimentación 4 Puerto de salida DisplayPort 1 www.aten.com B Instalación de hardware 3 Consulte el diagrama de instalación anterior y realice lo siguiente: 1 Utilice un cable DisplayPort para conectar el puerto de entrada DisplayPort de la unidad al ordenador. 2 Utilice un cable DisplayPort para conectar el puerto de salida DisplayPort de la unidad al dispositivo de visualización. La unidad se alimenta por el PC conectado. Dependiendo de la calidad de la salida, es posible que necesitará conectar la unidad al adaptador de alimentación suministrado. La fuente de alimentación está indicada por el color de la luz LED de alimentación: LED de alimentación Naranja Verde Descripción Montaje en bastidor Como alternativa, compre un Kit de Montaje en Bastidor (ATEN KC06-0039-100G) para esta configuración. 1. Coloque los soportes en su posición de la parte posterior del VB905. 2. Utilice los tornillos suministrados para asegurar los soportes a la parte posterior del VB905. La unidad se alimenta por el PC conectado. La unidad se alimenta por un adaptador de alimentación. Nota: • Esta configuración puede transmitir señales de 4K hasta 10 m. Para prolongar la transmisión hasta 15 m o 20 m, conectar en cascada uno o dos unidades VB905 adicionales a esta configuración y conecte cada VB905 al adaptador de alimentación suministrado. • Asegúrese de que cada cable DisplayPort utilizado en esta configuración no tiene una longitud superior a 5 m. Amplificatore DisplayPort 4K VB905 A Descrizione hardware Porta DisplayPort In Connettore di alimentazione 3 LED alimentazione 4 Porta DisplayPort Out 1 2 www.aten.com B Installazione dell'hardware 3 Fare riferimento allo schema di installazione precedente e agire come segue. 1 Utilizzare un cavo DisplayPort per collegare la porta DisplayPort In dell'unità ad un computer. 2 Utilizzare un cavo DisplayPort per collegare la porta DisplayPort Out dell'unità ad un display. L'unità è alimentata dal computer collegato. A seconda della qualità di uscita, potrebbe essere necessario collegare l'unità all'adattatore di alimentazione fornito in dotazione. La fonte di alimentazione è indicata dal colore del LED alimentazione: LED alimentazione Arancione Verde Descrizione L'unità è alimentata da un computer collegato. L'unità è alimentata da un adattatore di alimentazione. Montaggio su rack Opzionalmente, acquistare un kit per il montaggio su rack (ATEN KC06-0039-100G) per questa configurazione. 1. Collocare le staffe in posizione sul retro di VB905. 2. Utilizzare le viti fornite in dotazione per fissare le staffe sul retro di VB905. Nota: • Questa configurazione può trasmettere segnali 4K fino a 10 m. Per estendere la trasmissione fino a 15 m o 20 m, collegare a cascata una o due unità VB905 a questa configurazione e collegare ciascun VB905 all'adattatore di alimentazione fornito in dotazione. • Assicurarsi che ogni cavo DisplayPort utilizzato in questa configurazione non sia più lungo di 5 m. VB905 Усилитель сигнала 4K DisplayPort A Обзор аппаратного обеспечения Входной порт DisplayPort Разъём питания 3 Индикатор питания 4 Выходной порт DisplayPort 1 2 www.aten.com B Установка аппаратного обеспечения Руководствуясь приведенной выше установочной схемой, выполните следующие действия. 1 Подключите входной порт DisplayPort устройства к компьютеру кабелем DisplayPort. 2 Подключите выходной порт DisplayPort устройства к монитору кабелем DisplayPort. 3 Устройство получает питание от подключенного компьютера. В зависимости от качества вывода может потребоваться подключить устройство к поставляемому адаптеру питания. Источник питания обозначается цветом индикатора питания: Индикатор питания Оранжевый Зеленый Описание Устройство получает питание от подключенного компьютера. Устройство получает питание от адаптера питания. Примечание. • При таком способе подключения сигналы 4K могут передаваться на расстояние до 10 м. Для увеличения расстояния передачи до 15 или 20 м следует установить каскадное подключение еще одного или двух устройств VB905 и подключить каждое из этих устройств к поставляемому адаптеру питания. • Убедитесь, что длина каждого из используемых для подключения кабелей DisplayPort не превышает 5 м. Монтаж в стойке Для установки этим способом необходимо отдельно приобрести комплект для монтажа в стойке (ATEN KC06-0039-100G). 1. Установите кронштейны в предусмотренном месте в задней части VB905. 2. Прикрепите кронштейны к задней панели VB905 поставляемыми в комплекте винтами.-
 1
1
-
 2
2


en otros idiomas
- français: ATEN VB905 Guide de démarrage rapide
- italiano: ATEN VB905 Guida Rapida
- English: ATEN VB905 Quick start guide
- Deutsch: ATEN VB905 Schnellstartanleitung
- русский: ATEN VB905 Инструкция по началу работы
- português: ATEN VB905 Guia rápido
- polski: ATEN VB905 Skrócona instrukcja obsługi
- 日本語: ATEN VB905 クイックスタートガイド
- Türkçe: ATEN VB905 Hızlı başlangıç Kılavuzu
Artículos relacionados
-
ATEN CS1953 Guía de inicio rápido
-
ATEN KE9900ST Guía de inicio rápido
-
ATEN KE9952R Guía de inicio rápido
-
ATEN CE924 Guía de inicio rápido
-
ATEN CN9950 Guía de inicio rápido
-
ATEN VE1901AEUT Guía de inicio rápido
-
ATEN CE920 Guía de inicio rápido
-
ATEN VE3912T Guía de inicio rápido
-
ATEN VB800 Guía de inicio rápido
-