
User Guide
Lieferumfang
1 VE600L
1 VE600R
1 DVI-D-/Audio-Kombikabel (1,8 m)
2 Netzteile
1 Benutzerhandbuch
Systemvoraussetzungen
Graksignal-/Audioquelle
• Eine DVI-Grakkarte mit DVI-D-Ausgang. Sie sollte die maximale
Auösung unterstützen, die der anzuschließende Bildschirm
unterstützt.
• Ein Stereo-Mini-Klinkenausgang (optional)
Anzeige-/Audiowiedergabegerät
• Ein DVI-D-Anschluss
• Ein Stereo-Mini-Klinkeneingang (optional)
Kabel
• Verbinden Sie die Graksignalquelle und das Anzeigegerät mit
der Graksignal-Verlängerung. Verwenden Sie dazu zwei DVI-D-
Kabel.
• Verbinden Sie den VE600L mit dem VE600R. Verwenden Sie
DVI Video Extender
VE600
© Copyright 2007 ATEN
®
International Co., Ltd.
ATEN and the ATEN logo are trademarks of ATEN International Co., Ltd. All rights reserved. All other
trademarks are the property of their respective owners.
This product is RoHS compliant.
Manual Part No. PAPE-1285-300G Printing Date:06/2007
VE600 DVI Video Extender User Guide
Package Contents
1 VE600L (Local Unit)
1 VE600R (Remote Unit)
1 DVI-D/Audio Cable (1.8m)
2 Power Adapters
1 User Guide
System Requirements
Video/Audio Source
• A DVI graphic controller or card having a DVI-D port. It should
support the maximum display resolution of the display to be
connected.
• A mini stereo audio output jack (optional)
Video Display/Audio Receiver
• A DVI-D port
• A mini stereo audio input jack (optional)
Cables
• Use DVI-D cables to connect the video source and display device
to the DVI Video Extender.
• Use Cat 5e or Cat 6 cabling to connect the VE600L to the
VE600R. (Cat 5e and Cat 6 cabling must be purchased
separately.) The maximum cabling distances are as follows:
• Cat 5e – 25m
• Cat 6 – 30m
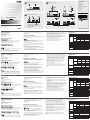
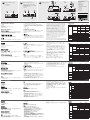
Hardware Installation
C
Installing the DVI Video Extender involves the following steps (see
also the installation diagram):
Important:
• Before beginning the installation procedure ensure that all
equipment to be connected is powered off.
• To prevent damage to your installation, make sure that all devices
are properly grounded.
1. Connect one end of the supplied DVI/Audio combo cable to the
DVI port and speaker jack on the source device (e.g. computer or
DVD player).
2. Connect the other end of the DVI/Audio combo cable to the
DVI-D port and SPEAKER port on the VE600L.
3. Connect the two ends of a Cat 5e or Cat 6 cable to the REMOTE
I/O ports on the VE600L and VE600R.
4. Plug the monitor’s DVI cable into the DVI-D port on the VE600R.
5. Plug the speakers into the SPEAKER port on the VE600R.
6. Slide the DISPLAY RESOLUTION switch to SXGA if the monitor
supports resolutions only up to 1280 x 1024 (SXGA) or 1080i
(HDTV). Slide the switch to UXGA if the monitor supports
resolutions higher than 1280 x 1024 (SXGA).
7. Plug one of the supplied power adapters into an AC power outlet,
and then connect its power cable to the VE600R.
8. Plug the other supplied power adapter into an AC power outlet,
and then connect its power cable to the VE600L.
9. Turn on the source and display devices.
To improve video quality over long distances, try sliding the
PICTURE COMPENSATION switch to EQ ON.
Specications
Technische Daten
dazu Ethernet-Kabel der Kat. 5e oder Kat. 6. (Die Ethernet-
Kabel sind nicht im Lieferumfang enthalten.) Die maximalen
Kabellängen sind Folgende:
• Kat 5e – 25 m
• Kat 6 – 30 m
Hardware installieren
C
Zur Installation der DVI-Grakerweiterung müssen Sie die
folgenden Schritte durchführen (siehe das Installationsdiagramm):
Wichtig:
• Schalten Sie vor der Installation alle anzuschließenden Geräte
aus.
• Um eine Beschädigung Ihrer Geräte zu vermeiden, müssen alle
Geräte ordnungsgemäß geerdet sein.
1. Verbinden Sie das eine Ende des mitgelieferten DVI-Audio-
Kombikabels mit dem DVI- und dem Lautsprecheranschluss der
Signalquelle (z.B. Computer oder DVD-Player).
2. Verbinden Sie das andere Ende des DVI-Audio-Kombikabels
mit dem DVI-D-Anschluss und dem Anschluss SPEAKER des
VE600L.
3. Verbinden Sie beide Enden eines Ethernet-Kabels der Kat. 5e
oder Kat. 6 mit den Anschlüssen REMOTE I/O am VE600L und
am VE600R.
4. Verbinden Sie das DVI-Kabel des Bildschirms mit dem DVI-D-
Port des VE600R.
5. Verbinden Sie die Lautsprecher mit dem Anschluss SPEAKER
des VE600R.
6. Stellen Sie den Auösungswahlschalter auf SXGA, wenn der
Monitor Auösungen bis 1280 x 1024 (SXGA) oder 1080i (HDTV)
unterstützt. Stellen Sie den Schalter auf UXGA, wenn der Monitor
Auösungen höher als 1280 x 1024 (SXGA) unterstützt.
7. Verbinden Sie das mitgelieferte Netzteil mit einer Steckdose und
sein Stromkabel mit dem VE600R.
8. Verbinden Sie das andere mitgelieferte Netzteil mit einer
Steckdose und sein Stromkabel mit dem VE600L.
9. Schalten Sie die Signalquelle und das Anzeigegerät ein.
Um die Bildqualität über längere Kabelwege zu optimieren,
schieben Sie den Bildkompensationsschalter nach EQ ON.
Système d'extension vidéo DVI VE600 Guide de l'utilisateur
VE600 DVI Graksignal-Verlängerung Benutzerhandbuch
3. Conecte los dos extremos de un cable de Cat 5e ó 6 a los
puertos REMOTE I/O del VE600L y del VE600R.
4. Conecte el cable DVI del monitor al puerto DVI-D del VE600R.
5. Conecte los altavoces al puerto SPEAKER del VE600R.
6. Deslice el conmutador DISPLAY RESOLUTION hasta la
posición SXGA si el monitor sólo admite resoluciones hasta1280
x 1024 (SXGA) o 1080i (HDTV). Deslice el conmutador hasta la
posición UXGA si el monitor admite resoluciones superiores a
1280 x 1024 (SXGA).
7. Conecte uno de los adaptadores de alimentación incluidos a una
toma eléctrica. A continuación, conecte el cable de alimentación
correspondiente al VE600R.
8. Conecte el otro adaptador de alimentación incluido a una toma
eléctrica. A continuación, conecte el cable de alimentación
correspondiente al VE600L.
9. Encienda los dispositivos de visualización y fuente.
Para mejorar la calidad gráca para largas distancias, intente
deslizar el conmutador PICTURE COMPENSATION hacia la
EQ ON.
Contenido del paquete
1 VE600L
1 VE600R
1 cable combinado DVI-D/audio (1,8 m)
2 adaptadores de alimentación
1 manual del usuario
Requisitos del sistema
Fuente de señal de audio/gráca
• Una controladora o tarjeta gráca DVI con un puerto DVI-D.
Debe admitir la resolución máxima empleada en el dispositivo de
visualización que vaya a conectar.
• Un miniconector de salida de audio estéreo (opcional).
Dispositivo de visualización / Receptor de audio
• Un puerto DVI-D
• Un miniconector de entrada de audio estéreo (opcional).
Cables
• Use cables DVI-D para conectar la fuente de señal gráca y el
dispositivo de visualización al prolongador de señal gráca DVI.
• Use un cable de Cat. 5e ó 6 para conectar el VE600L al VE600R
(dichos cables se deben comprar aparte). Las longitudes
máximas de los cables son las siguientes:
• Cat. 5e : 25 m
• Cat. 6 : 30 m
Instalación del hardware
C
La instalación del prolongador de señal gráca DVI requiere los
siguientes pasos (véase también el diagrama de instalación):
Importante:
• Antes de iniciar el proceso de instalación, asegúrese de que
todos los equipos que vaya a conectar estén apagados.
• Para evitar daños en los dispositivos, verique que todos ellos
estén conectados a tierra correctamente.
1. Conecte un extremo del cable combinado DVI/audio incluido al
puerto DVI y al conector para altavoces del dispositivo fuente (p.
ej. ordenador o reproductor de DVD).
2. Conecte el otro extremo del cable combinado DVI/audio al
puerto DVI-D y al puerto SPEAKER del VE600L.
Prolongador de señal gráca DVI VE600 Manual de usuario
Contenu de l’emballage
1 VE600L
1 VE600R
1 câble combiné DVI-D/audio (1,8 m)
2 adaptateurs secteur
1 guide de l’utilisateur
Conguration système
Source audio/vidéo
• Une carte ou un contrôleur graphique DVI doté d’un port DVI-D.
Requiert la prise en charge de la résolution maximale du
périphérique d’afchage à connecter.
• Un mini-connecteur de sortie audio stéréo (en option)
Afchage vidéo / Récepteur audio
• Un port DVI-D
• Un mini-connecteur d’entrée audio stéréo (en option)
Câbles
• Utilisez des câbles DVI-D pour connecter la source vidéo et le
périphérique d’afchage au système d’extension vidéo DVI.
• Utilisez un câble de catégorie 5e ou 6 pour relier le VE600L
au VE600R (ces câbles doivent être achetés séparément). La
Spécications
longueur maximale des câbles est la suivante :
• Cat. 5e : 25 m
• Cat. 6 : 30 m
Installation du matériel
C
L’installation du système d’extension vidéo DVI requiert les étapes
suivantes (reportez-vous également au schéma d’installation) :
Important :
• Avant de démarrer la procédure d’installation, assurez-vous que
tous les périphériques à connecter sont éteints.
• An d’éviter d’endommager votre installation, vériez que tous les
périphériques sont correctement reliés à la terre.
1. Reliez l’une des extrémités du câble combiné DVI/audio au
port DVI et au connecteur des haut-parleurs du périphérique
source (ordinateur ou lecteur DVD, par exemple).
2. Reliez l’autre extrémité du câble combiné DVI/audio au
port DVI-D et au port SPEAKER du VE600L.
3. Reliez les deux extrémités d’un câble de catégorie 5e ou 6 aux
ports REMOTE I/O du VE600L et du VE600R.
4. Branchez le câble DVI du moniteur sur le port DVI-D du VE600R.
5. Branchez les haut-parleurs sur le port SPEAKER du VE600R.
6. Faites glisser le bouton DISPLAY RESOLUTION en position
SXGA si le moniteur prend uniquement en charge des résolutions
maximales de 1280 x 1024 (SXGA) ou 1080i (HDTV). Faites
glisser le bouton en position UXGA si le moniteur prend en
charge des résolutions supérieures à 1280 x 1024 (SXGA).
7. Branchez l’un des adaptateurs secteur fournis sur une sortie
d’alimentation secteur, puis reliez le câble d’alimentation
correspondant au VE600R.
8. Branchez l’autre adaptateur secteur fourni sur une sortie d’
alimentation secteur, puis reliez le câble d’alimentation
correspondant au VE600L.
9. Allumez les périphériques d’afchage et source.
Pour améliorer la qualité vidéo sur de longues distances, essayez
de faire glisser le bouton PICTURE COMPENSATION vers la
EQ ON.
Especicaciones
Función VE600L
VE600R
Conexión al ordenador
1 --
Conexión a la consola
-- 1
Conectores
Puerto de
ordenador
Monitor
1 DVI-D hembra
(blanco)
--
Altavoz
1 clavija mini
estéreo hembra
(verde)
--
Puerto de
consola
Monitor --
1 DVI-D hembra
(blanco)
Altavoz
--
1 clavija mini
estéreo hembra
(verde)
Enlace 1 conector RJ-45 hembra
Alimentación 1 toma de c.c.
Conmutador
Resolución 1 deslizante --
Compensación de
imagen
-- 1 deslizante
Indicadores
LED
Alimentación 1 (naranja)
Monitor 1280 x 1024 a 60 Hz; 1080i; DDC2B
Consumo 5,3 V c.c., 6.5W
Entorno
Temperatura de
funcionamiento
-5 °C a 50 °C
Temperatura de
almacenamiento
-25 °C a 65 °C
Humedad 0 a 85% HR, sin condensar
Propiedades
físicas
Carcasa Metálica
Peso 0.20 kg
Dimensiones
(L x An x Al)
11,90 x 8,60 x 2,30 cm
Online Registration
International:
http://support.aten.com
North America:
http://www.aten-usa.com/
product_registration
Technical Phone Support
International:
886-2-86926959
North America:
1-888-999-ATEN
The following contains information that relates to China:
www.aten.com
A C
Installation Diagram
DVI/Audio combo cable
VE600L Front
VE600L / VE600R Front View
4
1
2
8
1. SPEAKER Port
2. DVI-D Port
VE600R Front
5
VE600L Rear VE600R Rear
7
6
3
Cat 5e or Cat 6 Cable
B
1 2
1 2 3
4
Function
VE600L
VE600R
Computer Connection
1
N/A
Console Connection
N/A
1
Connectors
Computer
Port
Video
1 x DVI-D
Female (White)
N/A
Speaker
1 x Mini Stereo
Jack Female
(Green)
N/A
Console
Port
Video
N/A
1 x DVI-D
Female (White)
Speaker
N/A
1 x Mini Stereo
Jack Female
(Green)
Link
1 x RJ-45 Female
Power
1 x DC Jack
Switch
Display Resolution
1 x Slide
N/A
Picture Compensation
N/A
1 x Slide
LEDs
Power
1 (Orange)
Video
1280 x 1024 @ 60Hz; 1080i;
DDC2B
Power Consumption
DC 5.3V, 6.5W
Environment
Operating Temp.
-5–50° C
Storage Temp.
-25–65° C
Humidity
0–85% RH, Non-condensing
Physical
Properties
Housing
Metal
Weight
0.20 kg
Dimensions (L x W x H)
11.90 x 8.60 x 2.30 cm
VE600L / VE600R Rear View
Fonction
VE600L
VE600R
Connexion à l'ordinateur
1
--
Connexion à la console
--
1
Connecteurs
Port de
l'ordinateur
Moniteur
1 DVI-D
femelle
(blanc)
--
Haut-parleur
1 mini-
connecteur
stéréo femelle
(vert)
--
Port de
console
Moniteur
--
1 DVI-D
femelle
(blanc)
Haut-parleur
--
1 mini-
connecteur
stéréo femelle
(vert)
Liaison
1 prise RJ-45 femelle
Alimentation
1 connecteur de c.c.
Bouton
Résolution
1
commutateur
coulissant
--
Compensation de l'image
--
1 commutateur
coulissant
Voyants
Alimentation
1 (orange)
Moniteur
1280 x 1024 à 60 Hz ; 1080i ;
DDC2B
Consommation électrique 5,3 V c.c., 6.5W
Environnement
Température de
fonctionnement
-5 °C à 50 °C
Température de stockage -25 °C à 65 °C
Humidité
HR de 0 à 85 %, sans
condensation
Propriétés
physiques
Carcasse Métallique
Poids
0.20 kg
Dimensions (L x P x H)
11,90 x 8,60 x 2,30 cm
Funktion
VE600L
VE600R
Verbindung zum Computer
1
--
Konsolanschluss
--
1
Anschlüsse
Computer-
Port
Bildschirm
1 x DVI-D
Weiblein (weiß)
--
Lautsprecher
1 x Mini-
Stereo-Buchse,
Weiblein (grün)
--
Konsolport
Bildschirm
--
1 x DVI-D
Weiblein
(weiß)
Lautsprecher
--
1 x Mini-
Stereo-
Buchse,
Weiblein
(grün)
Link
1 x RJ-45 Weiblein
Stromversorgung
1 x Stromeingangsbuchse
Switch
Bildschirmauösung
1 x
Schiebeschalter
--
Bildkompensation
--
1 x
Schiebeschalter
LED-
Anzeigen
Stromversorgung 1 (orange)
Bildschirm
1280 x 1024 bei 60 Hz; 1080i;
DDC2B
Stromverbrauch
5,3 V =, 6.5W
Umgebung
Betriebstemperatur
-5 bis 50 °C
Lagertemperatur
-25 bis 65 °C
Feuchtigkeit
0 -85% rel. Luftfeuchte, nicht
kondensierend
Physische
Eigenschaften
Gehäuse Metall
Gewicht
0.20 kg
Abmessungen (L x B x H)
11,90 x 8,60 x 2,30 cm
1. DISPLAY RESOLUTION Switch (VE600L) /
PICTURE COMPENSATION Switch (VE600R)
2. REMOTE I/O Port
3. POWER LED (top cover)
4. Power Jack
www.aten.com
www.aten.com
www.aten.com
La página se está cargando...
Transcripción de documentos
A C VE600L / VE600R Front View 1 Online Registration Installation Diagram International: http://support.aten.com 2 5 1 North America: http://www.aten-usa.com/ product_registration 4 Technical Phone Support International: 886-2-86926959 1. SPEAKER Port 2. DVI-D Port North America: 1-888-999-ATEN DVI/Audio combo cable 2 B The following contains information that relates to China: VE600L / VE600R Rear View 1 2 VE600L Front 3 DVI Video Extender VE600R Front 8 7 VE600 VE600L Rear VE600R Rear User Guide 4 1. DISPLAY RESOLUTION Switch (VE600L) / PICTURE COMPENSATION Switch (VE600R) 2. REMOTE I/O Port 3. POWER LED (top cover) 4. Power Jack © Copyright 2007 ATEN® International Co., Ltd. ATEN and the ATEN logo are trademarks of ATEN International Co., Ltd. All rights reserved. All other trademarks are the property of their respective owners. This product is RoHS compliant. Manual Part No. PAPE-1285-300G Printing Date:06/2007 6 3 Cat 5e or Cat 6 Cable VE600 DVI Video Extender User Guide Package Contents 1 VE600L (Local Unit) 1 VE600R (Remote Unit) 1 DVI-D/Audio Cable (1.8m) 2 Power Adapters 1 User Guide System Requirements www.aten.com separately.) The maximum cabling distances are as follows: • Cat 5e – 25m • Cat 6 – 30m Hardware Installation C Installing the DVI Video Extender involves the following steps (see also the installation diagram): Video/Audio Source Important: • A DVI graphic controller or card having a DVI-D port. It should support the maximum display resolution of the display to be connected. • A mini stereo audio output jack (optional) • Before beginning the installation procedure ensure that all equipment to be connected is powered off. • To prevent damage to your installation, make sure that all devices are properly grounded. Video Display/Audio Receiver 1. Connect one end of the supplied DVI/Audio combo cable to the DVI port and speaker jack on the source device (e.g. computer or DVD player). 2. Connect the other end of the DVI/Audio combo cable to the DVI-D port and SPEAKER port on the VE600L. 3. Connect the two ends of a Cat 5e or Cat 6 cable to the REMOTE I/O ports on the VE600L and VE600R. 4. Plug the monitor’s DVI cable into the DVI-D port on the VE600R. 5. Plug the speakers into the SPEAKER port on the VE600R. • A DVI-D port • A mini stereo audio input jack (optional) Cables • Use DVI-D cables to connect the video source and display device to the DVI Video Extender. • Use Cat 5e or Cat 6 cabling to connect the VE600L to the VE600R. (Cat 5e and Cat 6 cabling must be purchased 6. Slide the DISPLAY RESOLUTION switch to SXGA if the monitor supports resolutions only up to 1280 x 1024 (SXGA) or 1080i (HDTV). Slide the switch to UXGA if the monitor supports resolutions higher than 1280 x 1024 (SXGA). 7. Plug one of the supplied power adapters into an AC power outlet, and then connect its power cable to the VE600R. 8. Plug the other supplied power adapter into an AC power outlet, and then connect its power cable to the VE600L. 9. Turn on the source and display devices. Specifications Function Computer Connection Console Connection Video Computer Port Speaker Connectors Switch LEDs VE600R N/A 1 N/A N/A 1 x DVI-D Female (White) 1 x Mini Stereo N/A Jack Female (Green) 1 x RJ-45 Female 1 x DC Jack 1 x Slide N/A N/A 1 x Slide 1 (Orange) 1280 x 1024 @ 60Hz; 1080i; DDC2B DC 5.3V, 6.5W -5–50° C -25–65° C 0–85% RH, Non-condensing Metal 0.20 kg 11.90 x 8.60 x 2.30 cm Video Console Port To improve video quality over long distances, try sliding the PICTURE COMPENSATION switch to EQ ON. VE600L 1 N/A 1 x DVI-D Female (White) 1 x Mini Stereo Jack Female (Green) N/A Speaker Link Power Display Resolution Picture Compensation Power Video Power Consumption Operating Temp. Environment Storage Temp. Humidity Housing Physical Weight Properties Dimensions (L x W x H) Système d'extension vidéo DVI VE600 Guide de l'utilisateur Contenu de l’emballage 1 VE600L 1 VE600R 1 câble combiné DVI-D/audio (1,8 m) 2 adaptateurs secteur 1 guide de l’utilisateur Configuration système www.aten.com longueur maximale des câbles est la suivante : • Cat. 5e : 25 m • Cat. 6 : 30 m Installation du matériel C L’installation du système d’extension vidéo DVI requiert les étapes suivantes (reportez-vous également au schéma d’installation) : Source audio/vidéo Important : • Une carte ou un contrôleur graphique DVI doté d’un port DVI-D. Requiert la prise en charge de la résolution maximale du périphérique d’affichage à connecter. • Un mini-connecteur de sortie audio stéréo (en option) • Avant de démarrer la procédure d’installation, assurez-vous que tous les périphériques à connecter sont éteints. • Afin d’éviter d’endommager votre installation, vérifiez que tous les périphériques sont correctement reliés à la terre. Affichage vidéo / Récepteur audio • Un port DVI-D • Un mini-connecteur d’entrée audio stéréo (en option) Câbles • Utilisez des câbles DVI-D pour connecter la source vidéo et le périphérique d’affichage au système d’extension vidéo DVI. • Utilisez un câble de catégorie 5e ou 6 pour relier le VE600L au VE600R (ces câbles doivent être achetés séparément). La 1. Reliez l’une des extrémités du câble combiné DVI/audio au port DVI et au connecteur des haut-parleurs du périphérique source (ordinateur ou lecteur DVD, par exemple). 2. Reliez l’autre extrémité du câble combiné DVI/audio au port DVI-D et au port SPEAKER du VE600L. 3. Reliez les deux extrémités d’un câble de catégorie 5e ou 6 aux ports REMOTE I/O du VE600L et du VE600R. 4. Branchez le câble DVI du moniteur sur le port DVI-D du VE600R. 5. Branchez les haut-parleurs sur le port SPEAKER du VE600R. 6. Faites glisser le bouton DISPLAY RESOLUTION en position SXGA si le moniteur prend uniquement en charge des résolutions maximales de 1280 x 1024 (SXGA) ou 1080i (HDTV). Faites glisser le bouton en position UXGA si le moniteur prend en charge des résolutions supérieures à 1280 x 1024 (SXGA). 7. Branchez l’un des adaptateurs secteur fournis sur une sortie d’alimentation secteur, puis reliez le câble d’alimentation correspondant au VE600R. 8. Branchez l’autre adaptateur secteur fourni sur une sortie d’ alimentation secteur, puis reliez le câble d’alimentation correspondant au VE600L. 9. Allumez les périphériques d’affichage et source. Pour améliorer la qualité vidéo sur de longues distances, essayez de faire glisser le bouton PICTURE COMPENSATION vers la EQ ON. Spécifications Fonction Connexion à l'ordinateur Connexion à la console Moniteur Port de l'ordinateur Haut-parleur Connecteurs Moniteur Port de console VE600L 1 -1 DVI-D femelle (blanc) 1 miniconnecteur stéréo femelle (vert) VE600R -1 --- 1 DVI-D femelle (blanc) 1 miniconnecteur -stéréo femelle (vert) 1 prise RJ-45 femelle 1 connecteur de c.c. 1 commutateur -coulissant 1 commutateur -coulissant 1 (orange) 1280 x 1024 à 60 Hz ; 1080i ; DDC2B 5,3 V c.c., 6.5W -5 °C à 50 °C -25 °C à 65 °C HR de 0 à 85 %, sans condensation Métallique 0.20 kg 11,90 x 8,60 x 2,30 cm -- Haut-parleur Liaison Alimentation Résolution Bouton Compensation de l'image Voyants Alimentation Moniteur Consommation électrique Température de fonctionnement Environnement Température de stockage Humidité Carcasse Propriétés Poids physiques Dimensions (L x P x H) VE600 DVI Grafiksignal-Verlängerung Benutzerhandbuch Lieferumfang 1 VE600L 1 VE600R 1 DVI-D-/Audio-Kombikabel (1,8 m) 2 Netzteile 1 Benutzerhandbuch Systemvoraussetzungen Grafiksignal-/Audioquelle • Eine DVI-Grafikkarte mit DVI-D-Ausgang. Sie sollte die maximale Auflösung unterstützen, die der anzuschließende Bildschirm unterstützt. • Ein Stereo-Mini-Klinkenausgang (optional) Anzeige-/Audiowiedergabegerät • Ein DVI-D-Anschluss • Ein Stereo-Mini-Klinkeneingang (optional) Kabel • Verbinden Sie die Grafiksignalquelle und das Anzeigegerät mit der Grafiksignal-Verlängerung. Verwenden Sie dazu zwei DVI-DKabel. • Verbinden Sie den VE600L mit dem VE600R. Verwenden Sie www.aten.com dazu Ethernet-Kabel der Kat. 5e oder Kat. 6. (Die EthernetKabel sind nicht im Lieferumfang enthalten.) Die maximalen Kabellängen sind Folgende: • Kat 5e – 25 m • Kat 6 – 30 m Hardware installieren C Zur Installation der DVI-Grafikerweiterung müssen Sie die folgenden Schritte durchführen (siehe das Installationsdiagramm): Wichtig: • Schalten Sie vor der Installation alle anzuschließenden Geräte aus. • Um eine Beschädigung Ihrer Geräte zu vermeiden, müssen alle Geräte ordnungsgemäß geerdet sein. 1. Verbinden Sie das eine Ende des mitgelieferten DVI-AudioKombikabels mit dem DVI- und dem Lautsprecheranschluss der Signalquelle (z.B. Computer oder DVD-Player). 2. Verbinden Sie das andere Ende des DVI-Audio-Kombikabels mit dem DVI-D-Anschluss und dem Anschluss SPEAKER des VE600L. 3. Verbinden Sie beide Enden eines Ethernet-Kabels der Kat. 5e oder Kat. 6 mit den Anschlüssen REMOTE I/O am VE600L und am VE600R. 4. Verbinden Sie das DVI-Kabel des Bildschirms mit dem DVI-DPort des VE600R. 5. Verbinden Sie die Lautsprecher mit dem Anschluss SPEAKER des VE600R. 6. Stellen Sie den Auflösungswahlschalter auf SXGA, wenn der Monitor Auflösungen bis 1280 x 1024 (SXGA) oder 1080i (HDTV) unterstützt. Stellen Sie den Schalter auf UXGA, wenn der Monitor Auflösungen höher als 1280 x 1024 (SXGA) unterstützt. 7. Verbinden Sie das mitgelieferte Netzteil mit einer Steckdose und sein Stromkabel mit dem VE600R. 8. Verbinden Sie das andere mitgelieferte Netzteil mit einer Steckdose und sein Stromkabel mit dem VE600L. 9. Schalten Sie die Signalquelle und das Anzeigegerät ein. Um die Bildqualität über längere Kabelwege zu optimieren, schieben Sie den Bildkompensationsschalter nach EQ ON. Technische Daten Funktion Verbindung zum Computer Konsolanschluss ComputerPort Bildschirm Lautsprecher Bildschirm Anschlüsse Konsolport Lautsprecher Link Stromversorgung Bildschirmauflösung Switch LEDAnzeigen Bildkompensation Umgebung Physische Eigenschaften Betriebstemperatur Lagertemperatur Feuchtigkeit Gehäuse Gewicht Abmessungen (L x B x H) VE600R -1 --- 1 x DVI-D -Weiblein (weiß) 1 x MiniStereo-Buchse, Weiblein (grün) 1 x RJ-45 Weiblein 1 x Stromeingangsbuchse 1x -Schiebeschalter 1 x -Schiebeschalter Stromversorgung Bildschirm Stromverbrauch VE600L 1 -1 x DVI-D Weiblein (weiß) 1 x MiniStereo-Buchse, Weiblein (grün) 1 (orange) 1280 x 1024 bei 60 Hz; 1080i; DDC2B 5,3 V =, 6.5W -5 bis 50 °C -25 bis 65 °C 0 -85% rel. Luftfeuchte, nicht kondensierend Metall 0.20 kg 11,90 x 8,60 x 2,30 cm Prolongador de señal gráfica DVI VE600 Manual de usuario Contenido del paquete 1 VE600L 1 VE600R 1 cable combinado DVI-D/audio (1,8 m) 2 adaptadores de alimentación 1 manual del usuario Requisitos del sistema Fuente de señal de audio/gráfica • Una controladora o tarjeta gráfica DVI con un puerto DVI-D. Debe admitir la resolución máxima empleada en el dispositivo de visualización que vaya a conectar. • Un miniconector de salida de audio estéreo (opcional). Dispositivo de visualización / Receptor de audio • Un puerto DVI-D • Un miniconector de entrada de audio estéreo (opcional). Cables • Use cables DVI-D para conectar la fuente de señal gráfica y el dispositivo de visualización al prolongador de señal gráfica DVI. www.aten.com • Use un cable de Cat. 5e ó 6 para conectar el VE600L al VE600R (dichos cables se deben comprar aparte). Las longitudes máximas de los cables son las siguientes: • Cat. 5e : 25 m • Cat. 6 : 30 m Instalación del hardware C La instalación del prolongador de señal gráfica DVI requiere los siguientes pasos (véase también el diagrama de instalación): Importante: • Antes de iniciar el proceso de instalación, asegúrese de que todos los equipos que vaya a conectar estén apagados. • Para evitar daños en los dispositivos, verifique que todos ellos estén conectados a tierra correctamente. 1. Conecte un extremo del cable combinado DVI/audio incluido al puerto DVI y al conector para altavoces del dispositivo fuente (p. ej. ordenador o reproductor de DVD). 2. Conecte el otro extremo del cable combinado DVI/audio al puerto DVI-D y al puerto SPEAKER del VE600L. 3. Conecte los dos extremos de un cable de Cat 5e ó 6 a los puertos REMOTE I/O del VE600L y del VE600R. 4. Conecte el cable DVI del monitor al puerto DVI-D del VE600R. 5. Conecte los altavoces al puerto SPEAKER del VE600R. 6. Deslice el conmutador DISPLAY RESOLUTION hasta la posición SXGA si el monitor sólo admite resoluciones hasta1280 x 1024 (SXGA) o 1080i (HDTV). Deslice el conmutador hasta la posición UXGA si el monitor admite resoluciones superiores a 1280 x 1024 (SXGA). 7. Conecte uno de los adaptadores de alimentación incluidos a una toma eléctrica. A continuación, conecte el cable de alimentación correspondiente al VE600R. 8. Conecte el otro adaptador de alimentación incluido a una toma eléctrica. A continuación, conecte el cable de alimentación correspondiente al VE600L. 9. Encienda los dispositivos de visualización y fuente. Para mejorar la calidad gráfica para largas distancias, intente deslizar el conmutador PICTURE COMPENSATION hacia la EQ ON. Especificaciones Función Conexión al ordenador Conexión a la consola Monitor Puerto de ordenador Conectores Monitor Puerto de consola Conmutador Indicadores LED Monitor Consumo Entorno Propiedades físicas Altavoz Altavoz Enlace Alimentación Resolución Compensación de imagen Alimentación Temperatura de funcionamiento Temperatura de almacenamiento Humedad Carcasa Peso Dimensiones (L x An x Al) VE600L 1 -1 DVI-D hembra (blanco) 1 clavija mini estéreo hembra (verde) VE600R -1 --- 1 DVI-D hembra (blanco) 1 clavija mini -estéreo hembra (verde) 1 conector RJ-45 hembra 1 toma de c.c. 1 deslizante --- -- 1 deslizante 1 (naranja) 1280 x 1024 a 60 Hz; 1080i; DDC2B 5,3 V c.c., 6.5W -5 °C a 50 °C -25 °C a 65 °C 0 a 85% HR, sin condensar Metálica 0.20 kg 11,90 x 8,60 x 2,30 cm-
 1
1
-
 2
2


en otros idiomas
- français: ATEN VE600 Guide de démarrage rapide
- italiano: ATEN VE600 Guida Rapida
- English: ATEN VE600 Quick start guide
- Deutsch: ATEN VE600 Schnellstartanleitung
- 日本語: ATEN VE600 クイックスタートガイド
Artículos relacionados
-
ATEN VE600A-AT-U Manual de usuario
-
ATEN VC160 Guía de inicio rápido
-
ATEN VE066 Manual de usuario
-
ATEN VE560 Guía de inicio rápido
-
ATEN CS62D Guía de inicio rápido
-
-
ATEN VE500RQ Guía de inicio rápido
-
-
-