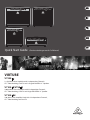
Behringer VIRTUBE VT100FX Guía de inicio rápido
- Categoría
- Altavoces de la barra de sonido
- Tipo
- Guía de inicio rápido
Este manual también es adecuado para
La página se está cargando...

2 VIRTUBE VT250FX/VT100FX/VT50FX/VT100FXH Quick Start Guide 3
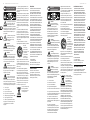
Important Safety
Instructions
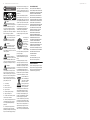
LEGAL DISCLAIMER
LIMITED WARRANTY
Instrucciones de
seguridad
NEGACIÓN LEGAL
GARANTÍA LIMITADA
Terminals marked with this symbol carry
electrical current of su cient magnitude
to constitute risk of electric shock.
Use only high-quality professional speaker cables with
¼" TS or twist-locking plugs pre-installed. Allother
installation or modi cation should be performed only
by quali edpersonnel.
This symbol, wherever it appears,
alertsyou to the presence of uninsulated
dangerous voltage inside the
enclosure-voltage that may be su cient to constitute a
risk ofshock.
This symbol, wherever it appears,
alertsyou to important operating and
maintenance instructions in the
accompanying literature. Please read the manual.
Caution
To reduce the risk of electric shock, donot
remove the top cover (or the rear section).
No user serviceable parts inside. Refer servicing to
quali ed personnel.
Caution
To reduce the risk of re or electric shock,
do not expose this appliance to rain and
moisture. The apparatus shall not be exposed to dripping
or splashing liquids and no objects lled with liquids,
suchas vases, shall be placed on the apparatus.
Caution
These service instructions are for use
by quali ed service personnel only.
Toreduce the risk of electric shock do not perform any
servicing other than that contained in the operation
instructions. Repairs have to be performed by quali ed
servicepersonnel.
1. Read these instructions.
2. Keep these instructions.
3. Heed all warnings.
4. Follow all instructions.
5. Do not use this apparatus near water.
6. Clean only with dry cloth.
7. Do not block any ventilation openings. Install in
accordance with the manufacturer’s instructions.
8. Do not install near any heat sources such as
radiators, heat registers, stoves, or other apparatus
(including ampli ers) that produce heat.
9. Do not defeat the safety purpose of the polarized
or grounding-type plug. A polarized plug has two blades
with one wider than the other. A grounding-type plug
has two blades and a third grounding prong. The wide
blade or the third prong are provided for your safety. Ifthe
provided plug does not t into your outlet, consult an
electrician for replacement of the obsolete outlet.
10. Protect the power cord from being walked on or
pinched particularly at plugs, convenience receptacles,
and the point where they exit from the apparatus.
11. Use only attachments/accessories speci ed by
themanufacturer.
12. Use only with the
cart, stand, tripod, bracket,
or table speci ed by the
manufacturer, orsold with
the apparatus. When a cart
is used, use caution when
moving the cart/apparatus
combination to avoid
injury from tip-over.
13. Unplug this apparatus during lightning storms or
when unused for long periods of time.
14. Refer all servicing to quali ed service personnel.
Servicing is required when the apparatus has been
damaged in any way, such as power supply cord or plug
is damaged, liquid has been spilled or objects have fallen
into the apparatus, the apparatus has been exposed
to rain or moisture, does not operate normally, or has
beendropped.
15. The apparatus shall be connected to a MAINS socket
outlet with a protective earthing connection.
16. Where the MAINS plug or an appliance coupler is
used as the disconnect device, the disconnect device shall
remain readily operable.
TECHNICAL SPECIFICATIONS AND APPEARANCES
ARE SUBJECT TO CHANGE WITHOUT NOTICE AND
ACCURACY IS NOT GUARANTEED. BEHRINGER,
KLARKTEKNIK, MIDAS, BUGERA, AND TURBOSOUND
ARE PART OF THE MUSIC GROUP MUSICGROUP.COM.
ALL TRADEMARKS ARE THE PROPERTY OF THEIR
RESPECTIVE OWNERS. MUSICGROUP ACCEPTS NO
LIABILITY FOR ANY LOSS WHICH MAY BE SUFFERED
BY ANY PERSON WHO RELIES EITHER WHOLLY OR
IN PART UPON ANY DESCRIPTION, PHOTOGRAPH
OR STATEMENT CONTAINED HEREIN. COLORS AND
SPECIFICATIONS MAY VARY FROM ACTUAL PRODUCT.
MUSIC GROUP PRODUCTS ARE SOLD THROUGH
AUTHORIZED FULLFILLERS AND RESELLERS ONLY.
FULLFILLERSAND RESELLERS ARE NOT AGENTS OF
MUSICGROUP AND HAVE ABSOLUTELY NO AUTHORITY
TO BIND MUSICGROUP BY ANY EXPRESS OR IMPLIED
UNDERTAKING OR REPRESENTATION. THIS MANUAL
IS COPYRIGHTED. NO PART OF THIS MANUAL MAY
BE REPRODUCED OR TRANSMITTED IN ANY FORM
OR BY ANY MEANS, ELECTRONIC OR MECHANICAL,
INCLUDING PHOTOCOPYING AND RECORDING OF ANY
KIND, FOR ANY PURPOSE, WITHOUT THE EXPRESS
WRITTEN PERMISSION OF MUSICGROUPIPLTD.
ALL RIGHTS RESERVED.
© 2013 MUSICGroupIPLtd.
Trident Chambers, Wickhams Cay, P.O. Box 146,
Road Town, Tortola, British Virgin Islands
For the applicable warranty terms and conditions
and additional information regarding MUSIC Group’s
Limited Warranty, please see complete details online at
www.music-group.com/warranty.
Las terminales marcadas con este símbolo
transportan corriente eléctrica de
magnitud su ciente como para constituir
un riesgo de descarga eléctrica. Utilice solo cables de
altavoz profesionales y de alta calidad con conectores
TS de 6,3 mm o de bayoneta pre jados. Cualquier otra
instalación o modi cación debe ser realizada únicamente
por un técnico cuali cado.
Este símbolo, siempre que aparece,
leadvierte de la presencia de voltaje
peligroso sin aislar dentro de la caja;
estevoltaje puede ser su ciente para constituir un riesgo
dedescarga.
Este símbolo, siempre que aparece,
leadvierte sobre instrucciones operativas
y de mantenimiento que aparecen en la
documentación adjunta. Por favor, lea el manual.
Atención
Para reducir el riesgo de descarga
eléctrica, no quite la tapa (o la parte
posterior). No hay piezas en el interior del equipo que
puedan ser reparadas por el usuario. Si es necesario,
póngase en contacto con personal cuali cado.
Atención
Para reducir el riesgo de incendio o
descarga eléctrica, no exponga este
aparato a la lluvia, humedad o alguna otra fuente que
pueda salpicar o derramar algún líquido sobre el aparato.
Nocoloque ningún tipo de recipiente para líquidos sobre
el aparato.
Atención
Las instrucciones de servicio deben
llevarlas a cabo exclusivamente personal
cuali cado. Para evitar el riesgo de una descarga eléctrica,
no realice reparaciones que no se encuentren descritas
en el manual de operaciones. Lasreparaciones deben ser
realizadas exclusivamente por personalcuali cado.
1. Lea las instrucciones.
2. Conserve estas instrucciones.
3. Preste atención a todas las advertencias.
4. Siga todas las instrucciones.
5. No use este aparato cerca del agua.
6. Limpie este aparato con un paño seco.
7. No bloquee las aberturas de ventilación. Instale el
equipo de acuerdo con las instrucciones del fabricante.
8. No instale este equipo cerca de fuentes de calor
tales como radiadores, acumuladores de calor, estufas u
otros aparatos (incluyendo ampli cadores) que puedan
producir calor.
9. No elimine o deshabilite nunca la conexión a tierra
del aparato o del cable de alimentación de corriente.
Unenchufe polarizado tiene dos polos, uno de los cuales
tiene un contacto más ancho que el otro. Una clavija con
puesta a tierra dispone de tres contactos: dos polos y la
puesta a tierra. El contacto ancho y el tercer contacto,
respectivamente, son los que garantizan una mayor
seguridad. Si el enchufe suministrado con el equipo no
concuerda con la toma de corriente, consulte con un
electricista para cambiar la toma de corriente obsoleta.
10. Coloque el cable de suministro de energía de manera
que no pueda ser pisado y que esté protegido de objetos
a lados. Asegúrese de que el cable de suministro de
energía esté protegido, especialmente en la zona de la
clavija y en el punto donde sale del aparato.
11. Use únicamente los dispositivos o accesorios
especi cados por el fabricante.
12. Use únicamente la
carretilla, plataforma,
trípode, soporte o mesa
especi cados por el
fabricante o suministrados
junto con el equipo.
Altransportar el equipo,
tenga cuidado para evitar
daños y caídas al tropezar con algún obstáculo.
13. Desenchufe el equipo durante tormentas o si no va a
utilizarlo durante un periodo largo.
14. Confíe las reparaciones únicamente a servicios
técnicos cuali cados. La unidad requiere mantenimiento
siempre que haya sufrido algún daño, si el cable de
suministro de energía o el enchufe presentaran daños,
sehubiera derramado un líquido o hubieran caído objetos
dentro del equipo, si el aparato hubiera estado expuesto
a la humedad o la lluvia, si ha dejado de funcionar de
manera normal o si ha sufrido algún golpe o caída.
15. Al conectar la unidad a la toma de corriente eléctrica
asegúrese de que la conexión disponga de una unión
atierra.
16. Si el enchufe o conector de red sirve como único
medio de desconexión, éste debe ser accesiblefácilmente.
LAS ESPECIFICACIONES TÉCNICAS Y LA APARIENCIA
EXTERIOR ESTÁN SUJETAS A CAMBIOS SIN
PREVIO AVISO Y NO PODEMOS GARANTIZAR LA
TOTAL EXACTITUD DE TODO LO QUE APARECE
AQUÍ. BEHRINGER, KLARK TEKNIK, MIDAS,
BUGERA, Y TURBOSOUND SON PARTE DEL GRUPO
MUSICGROUP MUSICGROUP.COM. TODAS LAS
MARCAS REGISTRADAS SON PROPIEDAD DE SUS
RESPECTIVOS DUEÑOS. MUSICGROUP NO ACEPTA
NINGÚN TIPO DE RESPONSABILIDAD POR POSIBLES
DAÑOS Y PERJUICIOS SUFRIDOS POR CUALQUIER
PERSONA QUE SE HAYA BASADO COMPLETAMENTE
O EN PARTE EN LAS DESCRIPCIONES, FOTOGRAFÍAS
O EXPLICACIONES QUE APARECEN EN ESTE
DOCUMENTO. LOS COLORES Y ESPECIFICACIONES
TÉCNICAS PUEDEN VARIAR LIGERAMENTE DE UN
PRODUCTO A OTRO. LOSPRODUCTOS MUSICGROUP
SON COMERCIALIZADOS ÚNICAMENTE A TRAVÉS DE
DISTRIBUIDORES OFICIALES. LOS DISTRIBUIDORES
Y MAYORISTAS NO SON AGENTES DE MUSICGROUP,
POR LO QUE NO ESTÁN AUTORIZADOS A CONCEDER
NINGÚN TIPO DE CONTRATO O GARANTÍA QUE
OBLIGUE A MUSICGROUP DE FORMA EXPRESA O
IMPLÍCITA. ESTE MANUAL ESTÁ PROTEGIDO POR LAS
LEYES DEL COPYRIGHT. ESTE MANUAL NO PUEDE
SER REPRODUCIDO O TRANSMITIDO, NI COMPLETO
NI EN PARTE, PORNINGÚN TIPO DE MEDIO, TANTO SI
ES ELECTRÓNICO COMO MECÁNICO, INCLUYENDOEL
FOTOCOPIADO O REGISTRO DE CUALQUIER TIPO Y PARA
CUALQUIER FIN, SIN LA AUTORIZACIÓN EXPRESA Y POR
ESCRITO DE MUSICGROUPIPLTD.
RESERVADOS TODOS LOS DERECHOS.
© 2013 MUSICGroupIPLtd.
Trident Chambers, Wickhams Cay, P.O. Box 146,
Road Town, Tortola, British Virgin Islands
Si quiere conocer los detalles y condiciones aplicables
de la garantía así como información adicional sobre la
Garantía limitada de MUSIC group, consulte online toda la
información en la web www.music-group.com/warranty.
La página se está cargando...
La página se está cargando...

8 9VIRTUBE VT250FX/VT100FX/VT50FX/VT100FXH Quick Start Guide
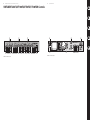
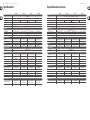
VIRTUBE VT250FX/VT100FX/VT50FX/VT100FXH Controls
(2) (17)
(1) (3)
(4) (5) (6) (7) (8) (10) (11) (12) (13) (14) (15) (16) (20) (21) (22) (23 ) (24) (25) (26)
(18) (19)
(9)
VIRTUBE control elements (front panel)
(28)
(27) (29)
(30) (35)
(33) (31) (32) (34)
VIRTUBE control elements (rear panel)

10 11VIRTUBE VT250FX/VT100FX/VT50FX/VT100FXH Quick Start Guide
VIRTUBE VT250FX/VT100FX/VT50FX/VT100FXH Controls
(EN) Controls
(15) Use the CONTOUR control for additional,
highlycharacteristic adjustment of the
midrange, allowing you to easily create
traditional as well as ultra-modern
guitar sounds.
(16) The VOLUME control adjusts the volume level
of the OVERDRIVE channel.
(17) The DIGITAL FX LED lights up when the
eects processor is active.
(18) Use the FX PRESET control to select one of
16 eects.
(19) The FX LEVEL control adjusts the mix ratio
between the original and the eect signal.
(20) The REVERB LEVEL control determines the
eect intensity of the additional reverb eect.
(21) The FX LOOP MIX control (VT100FXH and
VT100FX only) determines the eect intensity
of the externaleect.
(22) The MASTER VOLUME control adjusts
both the overall volume and the line out/
headphones volume.
(23) The VTC push button activates and
deactivates the VTC Virtual Tube Circuitry.
(24) The CD IN connector allows you to connect
the output signal of a CD player, tape deck,
or CD/MD walkman.
(25) The LINE OUT/PHONES jack is for
headphonesconnection.
(26) The POWER switch turns your VIRTUBE on
and o.
(27) The VIRTUBE is connected to the mains using a
standard IEC receptacle.
(28) FUSE HOLDER/VOLTAGE SELECTOR.
(29) This is where the fan of the unit is located.
(30) The SPEAKER OUT connectors (only one on
the VT100FX and VT50FX) can be used to
connect external speakers with a miminum
impedance of 4Ω. Theoutputs of the VT250FX
deliver 50 Watts ofpower per channel
(L/R). Always use speakers with a minimum
impedance of 8 Ω to ensure maximum
power output.
(31) The FX LEVEL button allows you to adapt the
FX LOOP to the operating level of an external
eects device (+4dBu/-10 dBV).
(32) The VIRTUBE provides a serial insert
path for insertingexternal eects
(e.g. reverb processor). Todo so, connect
the FX SEND jack to the input of the
eectsdevice.
(33) Connect the FX RETURN jack to the output of
the external eects device. The VT250FX has
two jacks (L/R) because it is a stereo amplier.
(34) Use the FOOTSWITCH jack to connect the
¼" TRS plug of the footswitch supplied with
the unit.
(35) SERIAL NUMBER.
Check Out behringer.com for Full Manual
(ES) Controles
(14) El control TREBLE te permite regular las
frecuencias altas del canal OVERDRIVE.
(15) El control CONTOUR te permite alterar el
rango mediode frecuencias de manera que
puedas producir fácil y rápidamente desde
sonidos tradicionales hastasupermodernos.
(16) Con el control VOLUME regulas el volumen
del canalOVERDRIVE.
(17) El LED DIGITAL FX se ilumina cuando el
procesador deefectos está activo.
(18) Con el control FX PRESET puedes seleccionar
uno delos 16 efectos.
(19) Con el control FX LEVEL regulas la relación
entre la señal original sin efecto y la señal
con efecto.
(20) Con el control REVERB LEVEL
determinas la cantidad de efecto de la
reverb independiente.
(21) Con el control FX LOOP MIX (solo VT100FXH
yVT100FX) determinas la cantidad de efecto
de los procesadoresexternos.
(22) Con el control MASTER VOLUME regulas el
volumen general, de los auriculares y de la
salida de línea.
(23) Accionando el pulsador VTC se activa y
desactiva la conmutación Virtual Tube, VTC.
(24) En la entrada CD IN puedes conectar las
salidas de un reproductor de CD, cintas o MD.
(25) Conecta tus auriculares en la salida
LINEOUT/PHONES.
(26) Con el interruptor POWER se enciende el
VIRTUBE.
(27) La conexión a la red eléctrica se realiza
mediante un conector IEC estándar.
(28) PORTAFUSIBLES/SELECCIÓN DE VOLTAJE.
(29) Aquí se encuentra el ventilador del
amplicador.
(30) En las salidas SPEAKER OUT (los VT100FX
y VT50FX solo tienen una salida) puedes
conectar altavoces externos con impedancia
mínima de 4 Ω. Las salidas del VT250FX
proporcionan, por canal, 50 vatios (L/R).
Utiliza solo altavoces con impedancia de 8 Ω
para un funcionamientoóptimo.
(31) El botón FX LEVEL te permite ajustar los
conectores del bucle de efectos (FX LOOP)
al nivel operativo del procesador de efectos
externo (+4 dBu/-10 dBV).
(32) El VIRTUBE cuenta con una ruta de inserción
serial para efectos externos (por ejemplo,
una reverb). Parahacer uso de esta ruta,
conecta la salida FX SEND con la entrada del
procesador de efectos externo.
(33) Conecta la salida del procesador de efectos
en la entrada FX RETURN. El VT250FX
dispone de 2 entradas (L/R) dado que se
trata de un amplicador estéreo.
(34) Enchufa el pedal suministrado en el conector
FOOTSWITCH.
(35) NÚMERO DE SERIE.
Si quiere acceder al manual de instrucciones completo,
vaya a la página web behringer.com
(1) The INPUT socket is the ¼" connector for your
guitar. Please use a standard ¼" TS connector.
(2) The CLEAN CHANNEL LED lights up when the
CLEAN channel is active.
(3) The GAIN control determines the volume of
the CLEANchannel.
(4) The CRUNCH button (VT100FXH and
VT100FX only) allows you to add some slight
distortion to your clean sound, giving it a bit
of “dirt” or “crunch”.
(5) The BASS control in the EQ section allows you
to raise orlower the bass frequencies on the
CLEAN channel.
(6) With the MIDDLE control you can raise or
lower the midrange frequencies onthe
CLEAN channel.
(7) The TREBLE control adjusts the treble
frequencies on the CLEAN channel.
(8) Press the CHANNEL button to switch
between the CLEAN and OVERDRIVE channels.
The channel LED lights up when the channel
is activated.
(9) The OVERDRIVE CHANNEL LED lights up
when the channel is active.
(10) The GAIN control determines the amount
of gain appliedand hence the degree
ofdistortion in the OVERDRIVE channel.
(11) The OD1/OD2 button (VT100FXH and
VT100FX only) switches between
twodierent overdrive sounds.
(12) The BASS control in the EQ section allows you
to raise or lower the bass frequencies on the
OVERDRIVEchannel.
(13) With the MIDDLE control (VT100FXH and
VT100FX only) you can raise or lower
the midrange frequencies on the
OVERDRIVE channel.
(14) The TREBLE control adjusts the treble
frequencies on the OVERDRIVE channel.
(1) El conector jack de 6,3 mm rotulado INPUT
es la entradadel VIRTUBE a la que debes
conectar tu guitarra. Utilizacables estándar
con conectores jack mono de6,3mm.
(2) El LED CLEAN CHANNEL se ilumina cuando el
canal “limpio” está activo.
(3) Con este control GAIN regulas el volumen del
canalCLEAN.
(4) El botón CRUNCH (solo VT100FXH y VT100FX)
tepermite distorsionar levemente el sonido
“limpio“de tu guitarra, dándole un carácter
más sucioy “crujiente”.
(5) El control BASS de la sección EQ te permite
aumentar oatenuar las frecuencias bajas del
canal CLEAN.
(6) El control MIDDLE te permite aumentar o
atenuar las frecuencias medias del canal CLEAN.
(7) El control TREBLE te permite regular las
frecuencias altas del canal CLEAN.
(8) Con el botón CHANNEL puedes conmutar
entre los canales CLEAN y OVERDRIVE. El LED
del canal activo seilumina.
(9) El LED OVERDRIVE CHANNEL se ilumina
cuando el canal está activo.
(10) Con el control GAIN regulas la
preamplicación y, porende, la cantidad de
distorsión del canalOVERDRIVE.
(11) Con el botón OD1/OD2 (solo VT100FXH
y VT100FX) conmutas entre 2 tipos de
overdrive distintos.
(12) El control BASS de la sección EQ te permite
aumentar oatenuar las frecuencias bajas del
canal OVERDRIVE.
(13) El control MIDDLE (solo VT100FXH y VT100FX)
tepermite aumentar o atenuar las frecuencias
medias del canal OVERDRIVE.
La página se está cargando...
La página se está cargando...

16 VIRTUBE VT250FX/VT100FX/VT50FX/VT100FXH Quick Start Guide 17
Specications Especicaciones técnicas
VT250FX VT100FX VT50FX VT100FXH
Audio Inputs
Input ¼" TS, RF ltered
Input impedance approx. 1 MΩ, unbalanced
FX Return 2 x ¼" TS ¼" TS ¼" TS ¼" TS
Input impedance approx. 33 kΩ, unbalanced
CD In ¼" TRS
Input impedance approx. 5.6 kΩ, unbalanced
Audio Outputs
FX Send ¼" TS
Output impedance approx. 5.6, kΩ unbalanced approx. 8.2, kΩ unbalanced approx. 5.6, kΩ unbalanced approx. 8.2, kΩ unbalanced
Line Out / Phones ¼" TRS, unbalanced
Output level max. +16 dBV / 100 Ω
Loudspeaker Outputs
Type 2 x ¼" ¼" ¼" 2 x ¼"
Min. load impedance 2 x 8 Ω 4 Ω 8 Ω 4 Ω
Amplier
Peak power 2 x 50 Watts / 8 Ω 100 Watts / 4 Ω 60 Watts / 8 Ω 100 Watts / 4 Ω
Digital Signal Processing
Converter 24-bit, sigma-delta
Sample rate 40 kHz
Loudspeaker
Size 2 x 12" 12" 12" —
Model
BUGERA Vintage Guitar
Series 2 x 12G50J8
BUGERA Vintage Guitar
Series 12G70J4
BUGERA Vintage Guitar
Series 12G50J8
—
Impedance 2 x 8 Ω 4 Ω 8 Ω —
Continuous power (IEC268-5) 2 x 50 Watts 70 Watts 50 Watts —
Peak power 2 x 200 Watts 280 Watts 200 Watts —
Power Supply
Power consumption max. 180 Watts max. 180 Watts max. 90 Watts max. 180 Watts
Fuse
100 V~, 50/60 Hz T 3.15 A H 250 V T 2.5 A H 250 V T 1.6 A H 250 V T 2.5 A H 250 V
120 V~, 50/60 Hz T 2.5 A H 250 V T 2.5 A H 250 V T 1.25 A H 250 V T 2.5 A H 250 V
220 - 230 V~, 50/60 Hz T 1.25 A H 250 V T 1.0 A H 250 V T 630 mA H 250 V T 1.0 A H 250 V
Mains connection Standard IEC receptacle
Dimensions / Weight
Dimensions (H x W x D)
520 x 670 x 275 mm
(20.5 x 26.3 x 10.8")
550 x 580 x 275 mm
(21.6 x 22.8 x 10.9")
520 x 515 x 275 mm
(20.5 x 20.3 x 10.8")
250 x 580 x 270 mm
(9.8 x 22.8 x 10.6")
Weight 22.2 kg (48.8 lbs) 20.4 kg (44.9 lbs) 16.5 kg (36.3 lbs) 12.7 kg (27.9 lbs)
VT250FX VT100FX VT50FX VT100FXH
Entradas de Audio
Input jack mono hembra de 6,3 mm, entrada con ltro de radiofrecuencias
Impedancia de entrada aprox. 1 MΩ no balanceada
FX Return 2 jack mono hembra de 6,3 mm jack mono hembra de 6,3 mm jack mono hembra de 6,3 mm jack mono hembra de 6,3 mm
Impedancia de entrada aprox. 33 kΩ no balanceada
CD In jack estéreo hembra de 6,3 mm
Impedancia de entrada aprox. 5,6 kΩ no balanceada
Salidas de Audio
FX Send jack mono hembra de 6,3 mm
Impedancia de salida aprox. 5,6 kΩ no balanceada aprox. 8,2 kΩ no balanceada aprox. 5,6 kΩ no balanceada aprox. 8,2 kΩ no balanceada
Line Out / Phones jack estéreo hembra de 6,3 mm, no balanceado
Nivel de salida máx. +16 dBV / 100 Ω
Salidas de Altavoz
Tipo 2 jack hembra de 6,3 mm jack hembra de 6,3 mm jack hembra de 6,3 mm 2 jack hembra de 6,3 mm
Impedancia de carga mín. 2 x 8 Ω 4 Ω 8 Ω 4 Ω
Amplicador
Valor de pico 2 x 50 Watt / 8 Ω 100 Watt / 8 Ω 60 Watt / 8 Ω 100 Watt / 4 Ω
Procesamiento Digital
Convertidor Sigma-Delta de 24 bits
Frecuencia de muestreo 40 kHz
Altavoz
Diámetro 2 x 12" 12" 12" —
Modelo
serie BUGERA vintage para
guitarra 2 x 12G50J8
serie BUGERA vintage para
guitarra 12G70J4
serie BUGERA vintage para
guitarra 12G50J8
—
Impedancia 4 Ω 4 Ω 8 Ω —
Potencia continua (IEC268-5) 2 x 50 Watt 70 Watt 50 Watt —
Valor de pico 2 x 200 Watt 280 Watt 200 Watt —
Suministro de Corriente
Consumo de potencia máx. 180 Watt máx. 180 Watt máx. 90 Watt máx. 180 Watt
Fusible
100 V~, 50/60 Hz T 3,15 A H 250 V T 2,5 A H 250 V T 1,6 A H 250 V T 2,5 A H 250 V
120 V~, 50/60 Hz T 2,5 A H 250 V T 2,5 A H 250 V T 1,25 A H 250 V T 2,5 A H 250 V
220 - 230 V~, 50/60 Hz T 1,25 A H 250 V T 1,0 A H 250 V T 630 mA H 250 V T 1,0 A H 250 V
Conector de corriente Conector IEC estándar
Dimensiones / Peso
Dimensiones (alt. x anch. x prof.) 520 x 670 x 275 mm 550 x 580 x 275 mm 520 x 515 x 275 mm 250 x 580 x 270 mm
Peso 22,2 kg 20,4 kg 16,5 kg 12,7 kg
La página se está cargando...

20 VIRTUBE VT250FX/VT100FX/VT50FX/VT100FXH Quick Start Guide 21
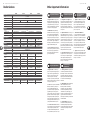
Other important information
1. Register online. Please register your new
MUSIC Group equipment right after you purchase it by
visiting behringer. com. Registering your purchase using
our simple online form helps us to process your repair
claims more quickly and eciently. Also, read the terms
and conditions of our warranty, ifapplicable.
2. Malfunction. Should your MUSICGroup
Authorized Reseller not be located in your vicinity, you
may contact the MUSIC Group Authorized Fulller for
your country listed under “Support” at behringer. com.
Shouldyour country not be listed, please check if your
problem can be dealt with by our “OnlineSupport” which
may also be found under “Support” at behringer. com.
Alternatively, please submit an online warranty claim at
behringer. com BEFORE returning theproduct.
3. Power Connections. Before plugging the
unit into a power socket, please make sure you are using
the correct mains voltage for your particular model.
Faultyfuses must be replaced with fuses of the same
typeand rating without exception.
1. Registro online. Le recomendamos que
registre su nuevo aparato MUSIC Group justo después de
su compra accediendo a la página web behringer. com.
Elregistro de su compra a través de nuestro sencillo
sistema online nos ayudará a resolver cualquier
incidencia que se presente a la mayor brevedad posible.
Además,aproveche para leer los términos y condiciones de
nuestra garantía, si es aplicable en sucaso.
2. Averías. En el caso de que no exista un distribuidor
MUSIC Group en las inmediaciones, puede ponerse en
contacto con el distribuidor MUSIC Group de su país,
queencontrará dentro del apartado “Support” de nuestra
página web behringer. com. En caso de que su país no
aparezca en ese listado, acceda a la sección “Online Support”
(quetambiénencontrará dentro del apartado “Support” de
nuestra páginaweb) y compruebe si su problema aparece
descrito y solucionado allí. De forma alternativa, envíenos a
través de la página web una solicitud online de soporte en
periodo de garantía ANTES de devolvernos el aparato.
3. Conexiones de corriente. Antes de enchufar
este aparato a una salida de corriente, asegúrese de que dicha
salida sea del voltaje adecuado para su modelo concreto.
En caso de que deba sustituir un fusible quemado, deberá
hacerlo por otro de idénticas especicaciones, sinexcepción.
1. Enregistrez-vous en ligne. Prenez le
temps d’enregistrer votre produit MUSIC Group aussi vite
que possible sur le site Internet behringer. com. Le fait
d’enregistrer le produit en ligne nous permet de gérer
les réparations plus rapidement et plus ecacement.
Prenezégalement le temps de lire les termes et conditions
de notre garantie.
2. Dysfonctionnement. Si vous n’avez pas de
revendeur MUSIC Group près de chez vous, contactez le
distributeur MUSIC Group de votre pays: consultez la liste
des distributeurs de votre pays dans la page “Support” de
notre site Internet behringer. com. Si votre pays n’est pas
dans la liste, essayez de résoudre votre problème avec
notre “aideen ligne” que vous trouverez également dans
la section “Support” du site behringer. com. Vous pouvez
également nous faire parvenir directement votre demande
de réparation sous garantie par Internet sur le site
behringer. com AVANT de nous renvoyer le produit.
3. Raccordement au secteur. Avant de relier
cet équipement au secteur, assurez-vous que la tension
secteur de votre région soit compatible avec l’appareil.
Veillez à remplacer les fusibles uniquement par des
modèles exactement de même taille et de même valeur
électrique — sans aucune exception.
1. Online registrieren. Bitte registrieren Sie Ihr
neues MUSIC Group-Gerät direkt nach dem Kauf auf der
Website behringer. com. Wenn Sie Ihren Kauf mit unserem
einfachen online Formular registrieren, können wir Ihre
Reparaturansprüche schneller und ezienter bearbeiten.
Lesen Sie bitte auch unsere Garantiebedingungen,
fallszutreend.
2. Funktionsfehler. Sollte sich kein MUSICGroup
Händler in Ihrer Nähe benden, können Sie den
MUSICGroup Vertrieb Ihres Landes kontaktieren,
derauf behringer. com unter „Support“ aufgeführt ist.
Sollte Ihr Land nicht aufgelistet sein, prüfen Sie bitte,
ob Ihr Problem von unserem „Online Support“ gelöst
werden kann, den Sie ebenfalls auf behringer. com unter
„Support“ nden. Alternativ reichen Sie bitte Ihren
Garantieanspruch online auf behringer. com ein, BEVOR Sie
das Produktzurücksenden.
3. Stromanschluss. Bevor Sie das Gerät an
eine Netzsteckdose anschließen, prüfen Sie bitte, obSie
die korrekte Netzspannung für Ihr spezielles Modell
verwenden. Fehlerhafte Sicherungen müssen ausnahmslos
durch Sicherungen des gleichen Typs und Nennwerts
ersetztwerden.
1. Registre-se online. Por favor, registre seu
novo equipamento MUSIC Group logo após a compra
visitando o site behringer. com Registrar sua compra
usando nosso simples formulário online nos ajuda a
processar seus pedidos de reparos com maior rapidez e
eciência. Além disso, leia nossos termos e condições de
garantia, caso seja necessário.
2. Funcionamento Defeituoso.
Casoseufornecedor MUSIC Group não esteja localizado
nas proximidades, você pode contatar um distribuidor
MUSIC Group para o seu país listado abaixo de “Suporte”
embehringer. com. Se seu país não estiver na lista,
favorchecar se seu problema pode ser resolvido com o
nosso “Suporte Online” que também pode ser achado
abaixo de “Suporte”em behringer. com. Alternativamente,
favor enviar uma solicitação de garantia online em
behringer. com ANTES da devolução do produto.
3. Ligações. Antes de ligar a unidade à tomada,
assegure-se de que está a utilizar a voltagem correcta para
o modelo em questão. Os fusíveis com defeito terão de
ser substituídos, sem qualquer excepção, por fusíveis do
mesmo tipo e corrente nominal.
Important information
Aspectos importantes
Informations importantes
Weitere wichtige
Informationen
Outras Informações
Importantes
Dados técnicos
VT250FX VT100FX VT50FX VT100FXH
Entradas Áudio
Input ¼" TS, RF ltrado
Impedância de entrada 1 MΩ não balanceada
FX Return 2 x ¼" TS ¼" TS ¼" TS ¼" TS
Impedância de entrada 33 kΩ não balanceada
CD In ¼" TRS
Impedância de entrada 5,6 kΩ não balanceada
Saídas Áudio
FX Send ¼" TS
Impedância de saída 5,6 kΩ não balanceada 8,2 kΩ não balanceada 5,6 kΩ não balanceada 8,2 kΩ não balanceada
Line Out / Phones ¼" TRS, não balanceada
Nível de saída max. +16 dBV / 100 Ω
Saídas de Altifalante
Tipo 2 x ¼" ¼" ¼" 2 x ¼"
Mín. impedância de carga 2 x 8 Ω 4 Ω 8 Ω 4 Ω
Amplicador
Potência de pico 2 x 50 Watt / 8 Ω 100 Watt / 4 Ω 60 Watt / 8 Ω 100 Watt / 4 Ω
Processamento Digital de Sinal
Conversor Sigma-delta de 24 bit
Taxa de amostragem 40 kHz
Altifalante
Dimensões 2 x 12" 12" 12" —
Modelo
BUGERA Vintage Guitar
Series 2 x 12G50J8
BUGERA Vintage Guitar
Series 12G70J4
BUGERA Vintage Guitar
Series 12G50J8
—
Impedância 2 x 8 Ω 4 Ω 8 Ω —
Corrente contínua (IEC268-5) 2 x 50 Watt 70 Watt 50 Watt —
Potência de pico 2 x 200 Watt 280 Watt 200 Watt —
Alimentação
Consumo de energia máx. 180 Watt máx. 180 Watt máx. 90 Watt máx. 180 Watt
Fusível
100 V~, 50/60 Hz T 3,15 A H 250 V T 2,5 A H 250 V T 1,6 A H 250 V T 2,5 A H 250 V
120 V~, 50/60 Hz T 2,5 A H 250 V T 2,5 A H 250 V T 1,25 A H 250 V T 2,5 A H 250 V
220 - 230 V~, 50/60 Hz T 1,25 A H 250 V T 1,0 A H 250 V T 630 mA H 250 V T 1,0 A H 250 V
Ligação à corrente Ficha IEC standard
Dimensões / Peso
Dimensões (A x L x P) 520 x 670 x 275 mm 550 x 580 x 275 mm 520 x 515 x 275 mm 250 x 580 x 270 mm
Peso 22,2 kg 20,4 kg 16,5 kg 12,7 kg
La página se está cargando...
La página se está cargando...
Transcripción de documentos
2 VIRTUBE VT250FX/VT100FX/VT50FX/VT100FXH Important Safety Instructions Terminals marked with this symbol carry electrical current of sufficient magnitude to constitute risk of electric shock. Use only high-quality professional speaker cables with ¼" TS or twist-locking plugs pre-installed. All other installation or modification should be performed only by qualified personnel. This symbol, wherever it appears, alerts you to the presence of uninsulated dangerous voltage inside the enclosure - voltage that may be sufficient to constitute a risk of shock. This symbol, wherever it appears, alerts you to important operating and maintenance instructions in the accompanying literature. Please read the manual. Caution To reduce the risk of electric shock, do not remove the top cover (or the rear section). No user serviceable parts inside. Refer servicing to qualified personnel. Caution To reduce the risk of fire or electric shock, do not expose this appliance to rain and moisture. The apparatus shall not be exposed to dripping or splashing liquids and no objects filled with liquids, such as vases, shall be placed on the apparatus. Quick Start Guide 9. Do not defeat the safety purpose of the polarized or grounding-type plug. A polarized plug has two blades with one wider than the other. A grounding-type plug has two blades and a third grounding prong. The wide blade or the third prong are provided for your safety. If the provided plug does not fit into your outlet, consult an electrician for replacement of the obsolete outlet. 10. Protect the power cord from being walked on or pinched particularly at plugs, convenience receptacles, and the point where they exit from the apparatus. 11. Use only attachments/accessories specified by the manufacturer. 12. Use only with the cart, stand, tripod, bracket, or table specified by the manufacturer, or sold with the apparatus. When a cart is used, use caution when moving the cart/apparatus combination to avoid injury from tip-over. 13. Unplug this apparatus during lightning storms or when unused for long periods of time. 14. Refer all servicing to qualified service personnel. Servicing is required when the apparatus has been damaged in any way, such as power supply cord or plug is damaged, liquid has been spilled or objects have fallen into the apparatus, the apparatus has been exposed to rain or moisture, does not operate normally, or has been dropped. 15. The apparatus shall be connected to a MAINS socket outlet with a protective earthing connection. 16. Where the MAINS plug or an appliance coupler is used as the disconnect device, the disconnect device shall remain readily operable. Caution These service instructions are for use by qualified service personnel only. To reduce the risk of electric shock do not perform any servicing other than that contained in the operation instructions. Repairs have to be performed by qualified service personnel. 1. Read these instructions. 2. Keep these instructions. 3. Heed all warnings. 4. Follow all instructions. 5. Do not use this apparatus near water. 6. Clean only with dry cloth. 7. Do not block any ventilation openings. Install in accordance with the manufacturer’s instructions. 8. Do not install near any heat sources such as radiators, heat registers, stoves, or other apparatus (including amplifiers) that produce heat. LEGAL DISCLAIMER TECHNICAL SPECIFICATIONS AND APPEARANCES ARE SUBJECT TO CHANGE WITHOUT NOTICE AND ACCURACY IS NOT GUARANTEED. BEHRINGER, KLARK TEKNIK, MIDAS, BUGERA, AND TURBOSOUND ARE PART OF THE MUSIC GROUP (MUSIC-GROUP.COM). ALL TRADEMARKS ARE THE PROPERTY OF THEIR RESPECTIVE OWNERS. MUSIC GROUP ACCEPTS NO LIABILITY FOR ANY LOSS WHICH MAY BE SUFFERED BY ANY PERSON WHO RELIES EITHER WHOLLY OR IN PART UPON ANY DESCRIPTION, PHOTOGRAPH OR STATEMENT CONTAINED HEREIN. COLORS AND SPECIFICATIONS MAY VARY FROM ACTUAL PRODUCT. MUSIC GROUP PRODUCTS ARE SOLD THROUGH AUTHORIZED FULLFILLERS AND RESELLERS ONLY. FULLFILLERS AND RESELLERS ARE NOT AGENTS OF MUSIC GROUP AND HAVE ABSOLUTELY NO AUTHORITY TO BIND MUSIC GROUP BY ANY EXPRESS OR IMPLIED UNDERTAKING OR REPRESENTATION. THIS MANUAL IS COPYRIGHTED. NO PART OF THIS MANUAL MAY BE REPRODUCED OR TRANSMITTED IN ANY FORM OR BY ANY MEANS, ELECTRONIC OR MECHANICAL, INCLUDING PHOTOCOPYING AND RECORDING OF ANY KIND, FOR ANY PURPOSE, WITHOUT THE EXPRESS WRITTEN PERMISSION OF MUSIC GROUP IP LTD. ALL RIGHTS RESERVED. © 2013 MUSIC Group IP Ltd. Trident Chambers, Wickhams Cay, P.O. Box 146, Road Town, Tortola, British Virgin Islands LIMITED WARRANTY For the applicable warranty terms and conditions and additional information regarding MUSIC Group’s Limited Warranty, please see complete details online at www.music-group.com/warranty. Instrucciones de seguridad Las terminales marcadas con este símbolo transportan corriente eléctrica de magnitud suficiente como para constituir un riesgo de descarga eléctrica. Utilice solo cables de altavoz profesionales y de alta calidad con conectores TS de 6,3 mm o de bayoneta prefijados. Cualquier otra instalación o modificación debe ser realizada únicamente por un técnico cualificado. Este símbolo, siempre que aparece, le advierte de la presencia de voltaje peligroso sin aislar dentro de la caja; este voltaje puede ser suficiente para constituir un riesgo de descarga. Este símbolo, siempre que aparece, le advierte sobre instrucciones operativas y de mantenimiento que aparecen en la documentación adjunta. Por favor, lea el manual. Atención Para reducir el riesgo de descarga eléctrica, no quite la tapa (o la parte posterior). No hay piezas en el interior del equipo que puedan ser reparadas por el usuario. Si es necesario, póngase en contacto con personal cualificado. Atención Para reducir el riesgo de incendio o descarga eléctrica, no exponga este aparato a la lluvia, humedad o alguna otra fuente que pueda salpicar o derramar algún líquido sobre el aparato. No coloque ningún tipo de recipiente para líquidos sobre el aparato. Atención Las instrucciones de servicio deben llevarlas a cabo exclusivamente personal cualificado. Para evitar el riesgo de una descarga eléctrica, no realice reparaciones que no se encuentren descritas en el manual de operaciones. Las reparaciones deben ser realizadas exclusivamente por personal cualificado. 1. Lea las instrucciones. 2. Conserve estas instrucciones. 3. Preste atención a todas las advertencias. 4. Siga todas las instrucciones. 5. No use este aparato cerca del agua. 6. Limpie este aparato con un paño seco. 7. No bloquee las aberturas de ventilación. Instale el equipo de acuerdo con las instrucciones del fabricante. 8. No instale este equipo cerca de fuentes de calor tales como radiadores, acumuladores de calor, estufas u otros aparatos (incluyendo amplificadores) que puedan producir calor. 9. No elimine o deshabilite nunca la conexión a tierra del aparato o del cable de alimentación de corriente. Un enchufe polarizado tiene dos polos, uno de los cuales tiene un contacto más ancho que el otro. Una clavija con puesta a tierra dispone de tres contactos: dos polos y la puesta a tierra. El contacto ancho y el tercer contacto, respectivamente, son los que garantizan una mayor seguridad. Si el enchufe suministrado con el equipo no concuerda con la toma de corriente, consulte con un electricista para cambiar la toma de corriente obsoleta. 10. Coloque el cable de suministro de energía de manera que no pueda ser pisado y que esté protegido de objetos afilados. Asegúrese de que el cable de suministro de energía esté protegido, especialmente en la zona de la clavija y en el punto donde sale del aparato. 11. Use únicamente los dispositivos o accesorios especificados por el fabricante. 12. Use únicamente la carretilla, plataforma, trípode, soporte o mesa especificados por el fabricante o suministrados junto con el equipo. Al transportar el equipo, tenga cuidado para evitar daños y caídas al tropezar con algún obstáculo. 13. Desenchufe el equipo durante tormentas o si no va a utilizarlo durante un periodo largo. 14. Confíe las reparaciones únicamente a servicios técnicos cualificados. La unidad requiere mantenimiento siempre que haya sufrido algún daño, si el cable de suministro de energía o el enchufe presentaran daños, se hubiera derramado un líquido o hubieran caído objetos dentro del equipo, si el aparato hubiera estado expuesto a la humedad o la lluvia, si ha dejado de funcionar de manera normal o si ha sufrido algún golpe o caída. 15. Al conectar la unidad a la toma de corriente eléctrica asegúrese de que la conexión disponga de una unión a tierra. 16. Si el enchufe o conector de red sirve como único medio de desconexión, éste debe ser accesible fácilmente. 3 NEGACIÓN LEGAL LAS ESPECIFICACIONES TÉCNICAS Y LA APARIENCIA EXTERIOR ESTÁN SUJETAS A CAMBIOS SIN PREVIO AVISO Y NO PODEMOS GARANTIZAR LA TOTAL EXACTITUD DE TODO LO QUE APARECE AQUÍ. BEHRINGER, KLARK TEKNIK, MIDAS, BUGERA, Y TURBOSOUND SON PARTE DEL GRUPO MUSIC GROUP (MUSIC-GROUP.COM). TODAS LAS MARCAS REGISTRADAS SON PROPIEDAD DE SUS RESPECTIVOS DUEÑOS. MUSIC GROUP NO ACEPTA NINGÚN TIPO DE RESPONSABILIDAD POR POSIBLES DAÑOS Y PERJUICIOS SUFRIDOS POR CUALQUIER PERSONA QUE SE HAYA BASADO COMPLETAMENTE O EN PARTE EN LAS DESCRIPCIONES, FOTOGRAFÍAS O EXPLICACIONES QUE APARECEN EN ESTE DOCUMENTO. LOS COLORES Y ESPECIFICACIONES TÉCNICAS PUEDEN VARIAR LIGERAMENTE DE UN PRODUCTO A OTRO. LOS PRODUCTOS MUSIC GROUP SON COMERCIALIZADOS ÚNICAMENTE A TRAVÉS DE DISTRIBUIDORES OFICIALES. LOS DISTRIBUIDORES Y MAYORISTAS NO SON AGENTES DE MUSIC GROUP, POR LO QUE NO ESTÁN AUTORIZADOS A CONCEDER NINGÚN TIPO DE CONTRATO O GARANTÍA QUE OBLIGUE A MUSIC GROUP DE FORMA EXPRESA O IMPLÍCITA. ESTE MANUAL ESTÁ PROTEGIDO POR LAS LEYES DEL COPYRIGHT. ESTE MANUAL NO PUEDE SER REPRODUCIDO O TRANSMITIDO, NI COMPLETO NI EN PARTE, POR NINGÚN TIPO DE MEDIO, TANTO SI ES ELECTRÓNICO COMO MECÁNICO, INCLUYENDO EL FOTOCOPIADO O REGISTRO DE CUALQUIER TIPO Y PARA CUALQUIER FIN, SIN LA AUTORIZACIÓN EXPRESA Y POR ESCRITO DE MUSIC GROUP IP LTD. RESERVADOS TODOS LOS DERECHOS. © 2013 MUSIC Group IP Ltd. Trident Chambers, Wickhams Cay, P.O. Box 146, Road Town, Tortola, British Virgin Islands GARANTÍA LIMITADA Si quiere conocer los detalles y condiciones aplicables de la garantía así como información adicional sobre la Garantía limitada de MUSIC group, consulte online toda la información en la web www.music-group.com/warranty. 8 9 VIRTUBE VT250FX/VT100FX/VT50FX/VT100FXH Quick Start Guide VIRTUBE VT250FX/VT100FX/VT50FX/VT100FXH Controls (2) (9) (1) (3) (4) (5) (6) (7) (8) (10) (11) (12) (13) (14) (15) (16) VIRTUBE control elements (front panel) (17) (18) (19) (20) (21) (22) (23) (24) (25) (26) (28) (27) VIRTUBE control elements (rear panel) (30) (29) (35) (33) (31) (32) (34) 10 11 VIRTUBE VT250FX/VT100FX/VT50FX/VT100FXH Quick Start Guide VIRTUBE VT250FX/VT100FX/VT50FX/VT100FXH Controls (EN) Controls (1) (2) (3) (4) (5) (6) (7) (8) The INPUT socket is the 1/4" connector for your guitar. Please use a standard 1/4" TS connector. The CLEAN CHANNEL LED lights up when the CLEAN channel is active. The VOLUME control adjusts the volume level of the OVERDRIVE channel. The GAIN control determines the volume of the CLEAN channel. (17) The DIGITAL FX LED lights up when the effects processor is active. The CRUNCH button (VT100FXH and VT100FX only) allows you to add some slight distortion to your clean sound, giving it a bit of “dirt” or “crunch”. (18) Use the FX PRESET control to select one of 16 effects. (19) The FX LEVEL control adjusts the mix ratio between the original and the effect signal. The BASS control in the EQ section allows you to raise or lower the bass frequencies on the CLEAN channel. (20) The REVERB LEVEL control determines the effect intensity of the additional reverb effect. (21) The FX LOOP MIX control (VT100FXH and VT100FX only) determines the effect intensity of the external effect. With the MIDDLE control you can raise or lower the midrange frequencies on the CLEAN channel. (22) The TREBLE control adjusts the treble frequencies on the CLEAN channel. Press the CHANNEL button to switch between the CLEAN and OVERDRIVE channels. The channel LED lights up when the channel is activated. The OVERDRIVE CHANNEL LED lights up when the channel is active. (10) The GAIN control determines the amount of gain applied and hence the degree of distortion in the OVERDRIVE channel. (11) The OD1/OD2 button (VT100FXH and VT100FX only) switches between two different overdrive sounds. (12) The BASS control in the EQ section allows you to raise or lower the bass frequencies on the OVERDRIVE channel. (14) Use the CONTOUR control for additional, highly characteristic adjustment of the midrange, allowing you to easily create traditional as well as ultra-modern guitar sounds. (16) (9) (13) (15) With the MIDDLE control (VT100FXH and VT100FX only) you can raise or lower the midrange frequencies on the OVERDRIVE channel. The TREBLE control adjusts the treble frequencies on the OVERDRIVE channel. (23) (24) (25) (31) The FX LEVEL button allows you to adapt the FX LOOP to the operating level of an external effects device (+4 dBu/-10 dBV). (ES) Controles (32) The VIRTUBE provides a serial insert path for inserting external effects (e.g. reverb processor). To do so, connect the FX SEND jack to the input of the effects device. (1) (33) (34) (35) Connect the FX RETURN jack to the output of the external effects device. The VT250FX has two jacks (L/R) because it is a stereo amplifier. Use the FOOTSWITCH jack to connect the 1/4" TRS plug of the footswitch supplied with the unit. El control TREBLE te permite regular las frecuencias altas del canal OVERDRIVE. (15) El control CONTOUR te permite alterar el rango medio de frecuencias de manera que puedas producir fácil y rápidamente desde sonidos tradicionales hasta supermodernos. El conector jack de 6,3 mm rotulado INPUT es la entrada del VIRTUBE a la que debes conectar tu guitarra. Utiliza cables estándar con conectores jack mono de 6,3 mm. (16) (2) El LED CLEAN CHANNEL se ilumina cuando el canal “limpio” está activo. Con el control VOLUME regulas el volumen del canal OVERDRIVE. (17) (3) Con este control GAIN regulas el volumen del canal CLEAN. El LED DIGITAL FX se ilumina cuando el procesador de efectos está activo. (18) (4) El botón CRUNCH (solo VT100FXH y VT100FX) te permite distorsionar levemente el sonido “limpio“ de tu guitarra, dándole un carácter más sucio y “crujiente”. Con el control FX PRESET puedes seleccionar uno de los 16 efectos. (19) Con el control FX LEVEL regulas la relación entre la señal original sin efecto y la señal con efecto. (20) Con el control REVERB LEVEL determinas la cantidad de efecto de la reverb independiente. SERIAL NUMBER. (5) El control BASS de la sección EQ te permite aumentar o atenuar las frecuencias bajas del canal CLEAN. (6) El control MIDDLE te permite aumentar o atenuar las frecuencias medias del canal CLEAN. (7) The VTC push button activates and deactivates the VTC Virtual Tube Circuitry. The MASTER VOLUME control adjusts both the overall volume and the line out/ headphones volume. (14) Check Out behringer.com for Full Manual (21) El control TREBLE te permite regular las frecuencias altas del canal CLEAN. Con el control FX LOOP MIX (solo VT100FXH y VT100FX) determinas la cantidad de efecto de los procesadores externos. (22) (8) The CD IN connector allows you to connect the output signal of a CD player, tape deck, or CD/MD walkman. Con el botón CHANNEL puedes conmutar entre los canales CLEAN y OVERDRIVE. El LED del canal activo se ilumina. Con el control MASTER VOLUME regulas el volumen general, de los auriculares y de la salida de línea. (23) (9) Accionando el pulsador VTC se activa y desactiva la conmutación Virtual Tube, VTC. The LINE OUT/PHONES jack is for headphones connection. El LED OVERDRIVE CHANNEL se ilumina cuando el canal está activo. (24) (10) Con el control GAIN regulas la preamplificación y, por ende, la cantidad de distorsión del canal OVERDRIVE. En la entrada CD IN puedes conectar las salidas de un reproductor de CD, cintas o MD. (25) Conecta tus auriculares en la salida LINE OUT/PHONES. (26) Con el interruptor POWER se enciende el VIRTUBE. (26) The POWER switch turns your VIRTUBE on and off. (27) The VIRTUBE is connected to the mains using a standard IEC receptacle. (28) FUSE HOLDER/VOLTAGE SELECTOR. (29) This is where the fan of the unit is located. (30) The SPEAKER OUT connectors (only one on the VT100FX and VT50FX) can be used to connect external speakers with a miminum impedance of 4 Ω. The outputs of the VT250FX deliver 50 Watts of power per channel (L/R). Always use speakers with a minimum impedance of 8 Ω to ensure maximum power output. (11) Con el botón OD1/OD2 (solo VT100FXH y VT100FX) conmutas entre 2 tipos de overdrive distintos. (12) El control BASS de la sección EQ te permite aumentar o atenuar las frecuencias bajas del canal OVERDRIVE. (27) La conexión a la red eléctrica se realiza mediante un conector IEC estándar. (28) PORTAFUSIBLES/SELECCIÓN DE VOLTAJE. El control MIDDLE (solo VT100FXH y VT100FX) te permite aumentar o atenuar las frecuencias medias del canal OVERDRIVE. (29) Aquí se encuentra el ventilador del amplificador. (30) En las salidas SPEAKER OUT (los VT100FX y VT50FX solo tienen una salida) puedes conectar altavoces externos con impedancia mínima de 4 Ω. Las salidas del VT250FX proporcionan, por canal, 50 vatios (L/R). Utiliza solo altavoces con impedancia de 8 Ω para un funcionamiento óptimo. (13) (31) El botón FX LEVEL te permite ajustar los conectores del bucle de efectos (FX LOOP) al nivel operativo del procesador de efectos externo (+4 dBu/-10 dBV). (32) El VIRTUBE cuenta con una ruta de inserción serial para efectos externos (por ejemplo, una reverb). Para hacer uso de esta ruta, conecta la salida FX SEND con la entrada del procesador de efectos externo. (33) Conecta la salida del procesador de efectos en la entrada FX RETURN. El VT250FX dispone de 2 entradas (L/R) dado que se trata de un amplificador estéreo. (34) Enchufa el pedal suministrado en el conector FOOTSWITCH. (35) NÚMERO DE SERIE. Si quiere acceder al manual de instrucciones completo, vaya a la página web behringer.com 16 VIRTUBE VT250FX/VT100FX/VT50FX/VT100FXH Quick Start Guide Specifications Especificaciones técnicas VT250FX VT100FX VT50FX VT100FXH Audio Inputs Input Input impedance FX Return Input impedance CD In Input impedance 1/4" TS, RF filtered approx. 1 MΩ, unbalanced 2 x 1/4" TS 1/4" TS 1/4" TS 1/4" TS approx. 33 kΩ, unbalanced 1/4" TRS approx. 5.6 kΩ, unbalanced approx. 5.6, kΩ unbalanced approx. 8.2, kΩ unbalanced approx. 5.6, kΩ unbalanced 1/4" TRS, unbalanced max. +16 dBV / 100 Ω approx. 8.2, kΩ unbalanced 1/4" 4Ω 1/4" 8Ω 2 x 1/4" 4Ω 2 x 50 Watts / 8 Ω 100 Watts / 4 Ω 60 Watts / 8 Ω 100 Watts / 4 Ω 24-bit, sigma-delta 40 kHz 12" BUGERA Vintage Guitar Series 12G70J4 4Ω 70 Watts 280 Watts 12" BUGERA Vintage Guitar Series 12G50J8 8Ω 50 Watts 200 Watts Weight FX Send Impedancia de salida Line Out / Phones Nivel de salida Tipo Impedancia de carga mín. Valor de pico max. 180 Watts max. 180 Watts max. 90 Watts T 3.15 A H 250 V T 2.5 A H 250 V T 1.25 A H 250 V T 2.5 A H 250 V T 1.6 A H 250 V T 2.5 A H 250 V T 1.25 A H 250 V T 1.0 A H 250 V T 630 mA H 250 V Standard IEC receptacle — Diámetro — Modelo — — — Impedancia Potencia continua (IEC268-5) Valor de pico jack mono hembra de 6,3 mm aprox. 5,6 kΩ no balanceada jack mono hembra de 6,3 mm aprox. 8,2 kΩ no balanceada aprox. 5,6 kΩ no balanceada jack estéreo hembra de 6,3 mm, no balanceado máx. +16 dBV / 100 Ω aprox. 8,2 kΩ no balanceada 2 jack hembra de 6,3 mm 2x8Ω jack hembra de 6,3 mm 4Ω jack hembra de 6,3 mm 8Ω 2 jack hembra de 6,3 mm 4Ω 2 x 50 Watt / 8 Ω 100 Watt / 8 Ω 60 Watt / 8 Ω 100 Watt / 4 Ω Sigma-Delta de 24 bits 40 kHz 2 x 12" serie BUGERA vintage para guitarra 2 x 12G50J8 4Ω 2 x 50 Watt 2 x 200 Watt 12" serie BUGERA vintage para guitarra 12G70J4 4Ω 70 Watt 280 Watt 12" serie BUGERA vintage para guitarra 12G50J8 8Ω 50 Watt 200 Watt — máx. 180 Watt máx. 180 Watt máx. 90 Watt máx. 180 Watt T 3,15 A H 250 V T 2,5 A H 250 V T 1,25 A H 250 V T 2,5 A H 250 V T 1,6 A H 250 V T 2,5 A H 250 V T 1,25 A H 250 V T 1,0 A H 250 V T 630 mA H 250 V Conector IEC estándar — — — — Suministro de Corriente max. 180 Watts T 2.5 A H 250 V T 2.5 A H 250 V T 1.0 A H 250 V Dimensions / Weight Dimensions (H x W x D) jack mono hembra de 6,3 mm, entrada con filtro de radiofrecuencias aprox. 1 MΩ no balanceada jack mono hembra de 6,3 mm jack mono hembra de 6,3 mm aprox. 33 kΩ no balanceada jack estéreo hembra de 6,3 mm aprox. 5,6 kΩ no balanceada Altavoz 2 x 12" BUGERA Vintage Guitar Series 2 x 12G50J8 2x8Ω 2 x 50 Watts 2 x 200 Watts Power Supply Power consumption Fuse 100 V~, 50/60 Hz 120 V~, 50/60 Hz 220 - 230 V~, 50/60 Hz Mains connection 2 jack mono hembra de 6,3 mm Convertidor Frecuencia de muestreo Loudspeaker Impedance Continuous power (IEC268-5) Peak power Input Impedancia de entrada FX Return Impedancia de entrada CD In Impedancia de entrada Procesamiento Digital Converter Sample rate Model VT100FXH Amplificador Digital Signal Processing Size VT50FX Salidas de Altavoz 2 x 1/4" 2x8Ω Amplifier Peak power VT100FX Salidas de Audio 1/4" TS Loudspeaker Outputs Type Min. load impedance VT250FX Entradas de Audio Audio Outputs FX Send Output impedance Line Out / Phones Output level 17 Consumo de potencia Fusible 100 V~, 50/60 Hz 120 V~, 50/60 Hz 220 - 230 V~, 50/60 Hz Conector de corriente T 2,5 A H 250 V T 2,5 A H 250 V T 1,0 A H 250 V Dimensiones / Peso 520 x 670 x 275 mm (20.5 x 26.3 x 10.8") 22.2 kg (48.8 lbs) 550 x 580 x 275 mm (21.6 x 22.8 x 10.9") 20.4 kg (44.9 lbs) 520 x 515 x 275 mm (20.5 x 20.3 x 10.8") 16.5 kg (36.3 lbs) 250 x 580 x 270 mm (9.8 x 22.8 x 10.6") 12.7 kg (27.9 lbs) Dimensiones (alt. x anch. x prof.) Peso 520 x 670 x 275 mm 22,2 kg 550 x 580 x 275 mm 20,4 kg 520 x 515 x 275 mm 16,5 kg 250 x 580 x 270 mm 12,7 kg 20 VIRTUBE VT250FX/VT100FX/VT50FX/VT100FXH Quick Start Guide Other important information Dados técnicos VT250FX VT100FX VT50FX VT100FXH 1/4" TS 1/4" TS Entradas Áudio Input Impedância de entrada FX Return Impedância de entrada CD In Impedância de entrada 1/4" TS, RF filtrado 1 MΩ não balanceada 2 x 1/4" TS 1/4" TS 33 kΩ não balanceada 1/4" TRS 5,6 kΩ não balanceada Saídas Áudio FX Send Impedância de saída Line Out / Phones Nível de saída 5,6 kΩ não balanceada 1/4" TS 8,2 kΩ não balanceada 5,6 kΩ não balanceada 1/4" TRS, não balanceada max. +16 dBV / 100 Ω 8,2 kΩ não balanceada Saídas de Altifalante Tipo Mín. impedância de carga 2 x 1/4" 2x8Ω 1/4" 4Ω 1/4" 8Ω 2 x 1/4" 4Ω 2 x 50 Watt / 8 Ω 100 Watt / 4 Ω 60 Watt / 8 Ω 100 Watt / 4 Ω Amplificador Potência de pico Processamento Digital de Sinal Conversor Taxa de amostragem Sigma-delta de 24 bit 40 kHz Altifalante Dimensões Modelo Impedância Corrente contínua (IEC268-5) Potência de pico 2 x 12" BUGERA Vintage Guitar Series 2 x 12G50J8 2x8Ω 2 x 50 Watt 2 x 200 Watt 12" BUGERA Vintage Guitar Series 12G70J4 4Ω 70 Watt 280 Watt 12" BUGERA Vintage Guitar Series 12G50J8 8Ω 50 Watt 200 Watt máx. 180 Watt máx. 180 Watt máx. 90 Watt T 3,15 A H 250 V T 2,5 A H 250 V T 1,25 A H 250 V T 2,5 A H 250 V T 2,5 A H 250 V T 1,0 A H 250 V 520 x 670 x 275 mm 22,2 kg 550 x 580 x 275 mm 20,4 kg — T 1,6 A H 250 V T 1,25 A H 250 V T 630 mA H 250 V Ficha IEC standard — — — 520 x 515 x 275 mm 16,5 kg 1. Register online. Please register your new MUSIC Group equipment right after you purchase it by visiting behringer. com. Registering your purchase using our simple online form helps us to process your repair claims more quickly and efficiently. Also, read the terms and conditions of our warranty, if applicable. 2. Malfunction. Should your MUSIC Group Authorized Reseller not be located in your vicinity, you may contact the MUSIC Group Authorized Fulfiller for your country listed under “Support” at behringer. com. Should your country not be listed, please check if your problem can be dealt with by our “Online Support” which may also be found under “Support” at behringer. com. Alternatively, please submit an online warranty claim at behringer. com BEFORE returning the product. 3. Power Connections. Before plugging the unit into a power socket, please make sure you are using the correct mains voltage for your particular model. Faulty fuses must be replaced with fuses of the same type and rating without exception. Aspectos importantes máx. 180 Watt T 2,5 A H 250 V T 2,5 A H 250 V T 1,0 A H 250 V Dimensões / Peso Dimensões (A x L x P) Peso Important information — Alimentação Consumo de energia Fusível 100 V~, 50/60 Hz 120 V~, 50/60 Hz 220 - 230 V~, 50/60 Hz Ligação à corrente 21 250 x 580 x 270 mm 12,7 kg 1. Registro online. Le recomendamos que registre su nuevo aparato MUSIC Group justo después de su compra accediendo a la página web behringer. com. El registro de su compra a través de nuestro sencillo sistema online nos ayudará a resolver cualquier incidencia que se presente a la mayor brevedad posible. Además, aproveche para leer los términos y condiciones de nuestra garantía, si es aplicable en su caso. 2. Averías. En el caso de que no exista un distribuidor MUSIC Group en las inmediaciones, puede ponerse en contacto con el distribuidor MUSIC Group de su país, que encontrará dentro del apartado “Support” de nuestra página web behringer. com. En caso de que su país no aparezca en ese listado, acceda a la sección “Online Support” (que también encontrará dentro del apartado “Support” de nuestra página web) y compruebe si su problema aparece descrito y solucionado allí. De forma alternativa, envíenos a través de la página web una solicitud online de soporte en periodo de garantía ANTES de devolvernos el aparato. 3. Conexiones de corriente. Antes de enchufar este aparato a una salida de corriente, asegúrese de que dicha salida sea del voltaje adecuado para su modelo concreto. En caso de que deba sustituir un fusible quemado, deberá hacerlo por otro de idénticas especificaciones, sin excepción. Informations importantes Outras Informações Importantes 1. Enregistrez-vous en ligne. Prenez le temps d’enregistrer votre produit MUSIC Group aussi vite que possible sur le site Internet behringer. com. Le fait d’enregistrer le produit en ligne nous permet de gérer les réparations plus rapidement et plus efficacement. Prenez également le temps de lire les termes et conditions de notre garantie. 1. Registre-se online. Por favor, registre seu novo equipamento MUSIC Group logo após a compra visitando o site behringer. com Registrar sua compra usando nosso simples formulário online nos ajuda a processar seus pedidos de reparos com maior rapidez e eficiência. Além disso, leia nossos termos e condições de garantia, caso seja necessário. 2. Dysfonctionnement. Si vous n’avez pas de revendeur MUSIC Group près de chez vous, contactez le distributeur MUSIC Group de votre pays : consultez la liste des distributeurs de votre pays dans la page “Support” de notre site Internet behringer. com. Si votre pays n’est pas dans la liste, essayez de résoudre votre problème avec notre “aide en ligne” que vous trouverez également dans la section “Support” du site behringer. com. Vous pouvez également nous faire parvenir directement votre demande de réparation sous garantie par Internet sur le site behringer. com AVANT de nous renvoyer le produit. 2. Funcionamento Defeituoso. Caso seu fornecedor MUSIC Group não esteja localizado nas proximidades, você pode contatar um distribuidor MUSIC Group para o seu país listado abaixo de “Suporte” em behringer. com. Se seu país não estiver na lista, favor checar se seu problema pode ser resolvido com o nosso “Suporte Online” que também pode ser achado abaixo de “Suporte”em behringer. com. Alternativamente, favor enviar uma solicitação de garantia online em behringer. com ANTES da devolução do produto. 3. Raccordement au secteur. Avant de relier cet équipement au secteur, assurez-vous que la tension secteur de votre région soit compatible avec l’appareil. Veillez à remplacer les fusibles uniquement par des modèles exactement de même taille et de même valeur électrique — sans aucune exception. Weitere wichtige Informationen 1. Online registrieren. Bitte registrieren Sie Ihr neues MUSIC Group-Gerät direkt nach dem Kauf auf der Website behringer. com. Wenn Sie Ihren Kauf mit unserem einfachen online Formular registrieren, können wir Ihre Reparaturansprüche schneller und effizienter bearbeiten. Lesen Sie bitte auch unsere Garantiebedingungen, falls zutreffend. 2. Funktionsfehler. Sollte sich kein MUSIC Group Händler in Ihrer Nähe befinden, können Sie den MUSIC Group Vertrieb Ihres Landes kontaktieren, der auf behringer. com unter „Support“ aufgeführt ist. Sollte Ihr Land nicht aufgelistet sein, prüfen Sie bitte, ob Ihr Problem von unserem „Online Support“ gelöst werden kann, den Sie ebenfalls auf behringer. com unter „Support“ finden. Alternativ reichen Sie bitte Ihren Garantieanspruch online auf behringer. com ein, BEVOR Sie das Produkt zurücksenden. 3. Stromanschluss. Bevor Sie das Gerät an eine Netzsteckdose anschließen, prüfen Sie bitte, ob Sie die korrekte Netzspannung für Ihr spezielles Modell verwenden. Fehlerhafte Sicherungen müssen ausnahmslos durch Sicherungen des gleichen Typs und Nennwerts ersetzt werden. 3. Ligações. Antes de ligar a unidade à tomada, assegure-se de que está a utilizar a voltagem correcta para o modelo em questão. Os fusíveis com defeito terão de ser substituídos, sem qualquer excepção, por fusíveis do mesmo tipo e corrente nominal.-
 1
1
-
 2
2
-
 3
3
-
 4
4
-
 5
5
-
 6
6
-
 7
7
-
 8
8
-
 9
9
-
 10
10
-
 11
11
-
 12
12
-
 13
13


Behringer VIRTUBE VT100FX Guía de inicio rápido
- Categoría
- Altavoces de la barra de sonido
- Tipo
- Guía de inicio rápido
- Este manual también es adecuado para
en otros idiomas
Artículos relacionados
-
Behringer ULTRATONE KT108 Guía de inicio rápido
-
-
Behringer BX1800 Guía de inicio rápido
-
-
Behringer Powerlight PL2000 Guía de inicio rápido
-
Behringer VS1520 Guía de inicio rápido
-
Behringer EUROPORT EPA40 Guía de inicio rápido
-
-
-
Behringer HD300 El manual del propietario