9959 9960
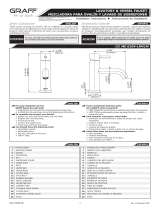
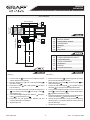
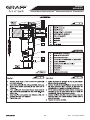
Grid Lavatory & Bar Sink Drain
(with Overflow)
Grid Lavatory & Bar Sink Drain
(without Overflow)
Ø2-1/4" (Ø57mm)
Ø
Ø32mm)
1-1/4"
~8-25/64" (~ 213mm)
FITS
Ø1-1/2" (Ø38mm)
DRAIN OPENIG
FITS
Ø1-1/2" (Ø38mm)
DRAIN OPENIG
Ø Ø2-1/4" ( 57mm)
Ø
(Ø32mm)
1-1/4"
~8-25/64" (~ 213mm)
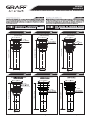
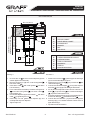
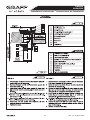
9962 9963
~8-1/2" (~216mm)
2-1/2" ( 63mm)
( 2mm)
1-1/4"
FITS
1-3/4" ( 44mm)
DRAIN OPENING
9964
IOG 2292.00
9961
Grid Lavatory & Bar Sink Drain
(with Overflow)
~8-1/2" (~216mm)
2-1/2" ( 63mm)
FITS
1-3/4" ( 44mm)
DRAIN OPENING
( 32mm)
1-1/4"
~7-3/16" (~182mm)
2-1/2" ( 63mm)
(Ø32mm)
Ø1-1/4"
FITS
Ø1-3/4" (Ø44mm)
DRAIN OPENING
~8-3/4" (~222mm)
2-1/2" ( 63mm)
(Ø32mm)
Ø1-1/4"
FITS
Ø1-3/4" (Ø44mm)
DRAIN OPENING
Installation Instructions •
Instrucciones de Instalación
DRAINS
DESAGÜES
Rev. 13 August 2023

IOG 2292.00 2
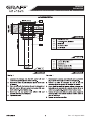
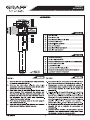
9957
Model
Modelo 9958
Model
Modelo
Pop-up Umbrella Drain
Assy (without Overflow)
No Collect Pop-up Umbrella Drain
Assy (without Overflow)
9955
Model
Modelo 9956
Model
Modelo
Pop-up Umbrella Drain Assy (with Overflow) Pop-up Umbrella Drain Assy (with Overflow)
Ø2-43/64" (Ø68mm)
10-1/32" (255mm)
3-21/32" (93mm)
Ø
(Ø32mm)
1-1/4"
Ø1-3/4"
(Ø44mm)
19/32"
(15mm)
Ø2-27/32" (Ø72mm)
FITS
Ø1-3/4" (Ø44mm)
DRAIN OPENING
MAX. 10-11/32" (MAX. 263mm)
3-21/32" (93mm)
Ø
(Ø32mm)
1-1/4"
Ø1-3/4"
(Ø44mm)
FITS
Ø1-3/4" (Ø44mm)
DRAIN OPENING
Ø Ø2-3/8" ( 60mm)
Ø
(Ø32mm)
1-1/4"
Ø1-31/32"
(Ø50mm)
11-19/64" (287mm)
FITS
Ø1-3/4" (Ø44mm)
DRAIN OPENING
MAX. 7-29/32" (MAX. 201mm)
Ø Ø2-23/32" ( 69mm)
Ø
(Ø32mm)
1-1/4"
FITS
Ø1- / " (Ø mm)
DRAIN OPENING
1 2 38
Installation Instructions •
Instrucciones de Instalación
DRAINS
DESAGÜES
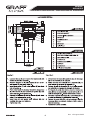
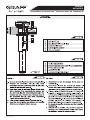
9310
Model
Modelo
Ø 1 1/2" (38mm)
Ø 2 1/4" ( 57mm)
1/2" (13mm)
Vessel Ring
9965
Model
Modelo
Flip plug Drain (with Overflow)
9966
Model
Modelo
~7-3/16" (~182mm)
2-1/2" ( 63mm)
(Ø32mm)
Ø1-1/4"
FITS
Ø1-3/4" (Ø44mm)
DRAIN OPENING
9985
Model
Modelo
Pop-up Drain (with Overflow)
FITS
Ø1- / " (Ø mm)
DRAIN OPENING
7 8 48
Ø Ø2-9/16" ( 65mm)
MAX. 3-1/2" (MAX. 89mm)
Ø2-7/16" (Ø62mm)
FITS
Ø1-3/4”(Ø44mm)
DRAIN OPENING
Ø1-1/4”
(Ø32mm)
MAX. 8-3/4" (MAX. 222mm)
Rev. 13 August 2023

Installation Instructions •
Instrucciones de Instalación
DRAINS
DESAGÜES
Rev. 13 August 2023

Installation Instructions •
Instrucciones de Instalación
DRAINS
DESAGÜES
Rev. 13 August 2023

3
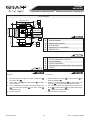
For 9963 model
Para el modelo 9963
~
1
2
3
4
5
6
7
1
2
3
4
5
6
7
DRAIN COLLAR
COLLAR GASKET
UNDER-BOWL GASKET
FLANGED NUT
NUT
WASHER
TAILPIECE
ANILLO DE DESAGÜE
JUNTA SUPERIOR DEL ANILLO
JUNTA INFERIOR
TUERCA
CON BRIDA
TUERCA
ARANDELA
PIPA DE DESCARGA
~
See fig. 3 Ver el dis. 3
1. Unscrew the nut and remove the tailpiece with 1. Desenroscar la tuerca y quitar el pipa de descarga
washer from the assembly con la arandela de conjunto.
2. Remove flanged nut and under- 2. Quitar la tuerca con brida y la bowl gasket
from drain collar .
junta inferior del
anillo de desagüe .
3. Insert drain collar with collar gasket into drain 3. Colocar el anillo de desagüe con la junta superior
hole of lavatory.del anillo en el agujero de desagüe del lavabo.
4. From underneath the lavatory thread the flanged nut 4. Por la parte de abajo del lavabo colocar el tuerca con
and under-bowl gasket onto brida y la junta inferior en el drain collar .
Hand tighten only.
anillo de desagüe
. Apretar únicamente a mano.
5. Connect the tailpiece and the washer with drain 5. Conectar el pipa de descarga y la arandela con
collar by tightening the nut .el anillo de desagüe ajustando la tuerca
6. Insert trap nut and gasket onto tailpiece and 6. Colocar la tuerca del sifón y la junta sobre el pipa de
carefully slide trap over tailpiece. descarga y con cuidado deslizar el sifón sobre el
7. Tighten trap nuts. pipa de descarga.
7. Apretar las tuercas del sifón.
Ø
( 32mm)
1-1/4"
Ø
Ø2-1/2" ( 63mm)Ø
MAX. 1-3/8"
(MAX. 35mm)
FITS
Ø1-5/8" Ø
DRAIN OPENING
( 42mm)
2
3
4
5
6
7
1
~7-3/16" (~182mm)
(7)
(5) (7) (5)
(4)
(7) (5) (7) (5)
(7)
(7)
Installation Instructions •
Instrucciones de Instalación
DRAINS
DESAGÜES
IOG 2292.00 5Rev. 13 August 2023

3
For 9965, 9966 model
Para el modelo 9965, 9966
~
1
2
3
4
5
6
7
1
2
3
4
5
6
7
DRAIN COLLAR
COLLAR GASKET
UNDER-BOWL GASKET
FLANGED NUT
NUT
WASHER
TAILPIECE
ANILLO DE DESAGÜE
JUNTA SUPERIOR DEL ANILLO
JUNTA INFERIOR
TUERCA
CON BRIDA
TUERCA
ARANDELA
PIPA DE DESCARGA
~
See fig. 3 Ver el dis. 3
1. Unscrew the nut and remove the tailpiece with 1. Desenroscar la tuerca y quitar el pipa de descarga
washer from the assembly con la arandela de conjunto.
2. Remove flanged nut and under- 2. Quitar la tuerca con brida y la bowl gasket
from drain collar .
junta inferior del
anillo de desagüe .
3. Insert drain collar with collar gasket into drain 3. Colocar el anillo de desagüe con la junta superior
hole of lavatory.del anillo en el agujero de desagüe del lavabo.
4. From underneath the lavatory thread the flanged nut 4. Por la parte de abajo del lavabo colocar el tuerca con
and under-bowl gasket onto brida y la junta inferior en el drain collar .
Hand tighten only.
anillo de desagüe
. Apretar únicamente a mano.
5. Connect the tailpiece and the washer with drain 5. Conectar el pipa de descarga y la arandela con
collar by tightening the nut .el anillo de desagüe ajustando la tuerca
6. Insert trap nut and gasket onto tailpiece and 6. Colocar la tuerca del sifón y la junta sobre el pipa de
carefully slide trap over tailpiece. descarga y con cuidado deslizar el sifón sobre el
7. Tighten trap nuts. pipa de descarga.
7. Apretar las tuercas del sifón.
G-9965 MAX. 3-1/8"
(MAX. 80mm)
FITS
Ø1-5/8" Ø
DRAIN OPENING
( 42mm)
(7)
(5) (7) (5)
(4)
(7) (5) (7) (5)
(7)
(7)
Installation Instructions •
Instrucciones de Instalación
DRAINS
DESAGÜES
IOG 2292.00 6
Ø
( 32mm)
1-1/4"
Ø
6
7
Ø2-17/16" ( 62mm)Ø
G-9966 8-3/4" (222mm)
3
4
1
2
5
G-9965 7-3/16" (182mm)
G-9966 MAX. 1-9/16"
(MAX. 40mm)
Rev. 13 August 2023

Installation Instructions •
Instrucciones de Instalación
DRAINS
DESAGÜES
Rev. 13 August 2023

Installation Instructions •
Instrucciones de Instalación
DRAINS
DESAGÜES
Rev. 13 August 2023

Installation Instructions •
Instrucciones de Instalación
DRAINS
DESAGÜES
Rev. 13 August 2023

Installation Instructions •
Instrucciones de Instalación
DRAINS
DESAGÜES
10 Rev. 13 August 2023

7
For 9985 model
Para el modelo 9985
~
1
2
3
4
5
6
1
2
3
4
5
6
DRAIN COLLAR
COLLAR GASKET
UNDER-BOWL GASKET
FLANGED NUT
DRAIN PLUG
DRAIN SWITCH ASSEMBLY
TAPA DE DESAGÜE
JUNTA SUPERIOR DE ANILLO
JUNTA INFERIOR
TUERCA
CON BRIDA
TUERCA
CONJUNTO DE CONMUTADOR DE DESAGÜE
~
See fig. 7 Ver el dis. 7
1. 1.
2.
Remove flanged nut and under-
2.
Quitar la tuerca con brida y la
bowl gasket
from drain collar .
junta inferior del
anillo de desagüe .
3.
Insert drain collar with collar gasket into drain
3.
Colocar el anillo de desagüe con la junta superior
hole of lavatory.del anillo en el agujero de desagüe del lavabo.
4.
From underneath the lavatory thread the flanged nut
4.
Por la parte de abajo del lavabo colocar el tuerca con
and under-bowl gasket onto brida y la junta inferior en el
drain collar .
Hand tighten only.
anillo de desagüe
. Apretar únicamente a mano.
Tighten trap nuts. Apretar las tuercas del sifón.
(4)
Installation Instructions •
Instrucciones de Instalación
DRAINS
DESAGÜES
11
Ø2-9/16" ( 65mm)Ø
MAX.2-3/8"
(MAX. 60mm)
FITS
Ø1-7/8" Ø
DRAIN OPENING
( 48mm)
~3-1/2" ( ~89mm)
1
2
3
4
6
5
IOG 2292.00 Rev. 13 August 2023

•
•
Installation Instructions •
Instrucciones de Instalación
DRAINS
DESAGÜES
Rev. 13 August 2023
www.graff-designs.com
MORE INFORMATION
MÁS INFORMACIÓN
-
 1
1
-
 2
2
-
 3
3
-
 4
4
-
 5
5
-
 6
6
-
 7
7
-
 8
8
-
 9
9
-
 10
10
-
 11
11
-
 12
12