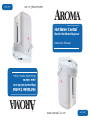
Aroma AAP-340F Manual de usuario
- Categoría
- Hervidores eléctricos
- Tipo
- Manual de usuario
Este manual también es adecuado para

Hot Water Central
™
Electric Hot Water Dispenser
Instruction Manual
www.AromaCo.com
AAP-340F
www.AromaCo.com
AAP-340F
Hot Water Central
™
Dispensador eléctrico de
agua caliente
Manual de Instrucciones

Published By:
Aroma Housewares Co.
6469 Flanders Drive
San Diego, CA 92121
U.S.A.
1-800-276-6286
www.AromaCo.com
© 2010 Aroma Housewares Company All rights reserved.
Aroma Housewares Co.
6469 Flanders Drive
San Diego, CA 92121
U.S.A.
1-800-276-6286
www.AromaCo.com
© 2010 Aroma Housewares Company.
With the Aroma
®
Hot Water Central
™
, hot water is just a button press
away. Boil up to 4 quarts of water in just 30 minutes, then have it hot
throughout the day.
With hot water available around the clock, the Hot Water Central
™
is
ideal for the quick preparation of all kinds of hot meals and beverages.
Including:
• Hot Tea
• Hot Chocolate
• Quick Noodles
• Baby Formula
• Instant Coffee
• Oatmeal
The Aroma
®
Hot Water Central
™
includes adjustable temperature levels
which are great for setting t
he temperature just right. And the Delay Start
function allows for the Hot Water Central
™
to be shut down when no
one’s home, but have hot water ready again right when it’s needed.
For more information on your Hot Water Central
™
or for additional kitchen
solutions, visit us online at www.Aromaco.com.
Please read the following instructions carefully before your first use.
Con la Hot Water Central
™
de Aroma
®
, el agua caliente está a solo un
botón de distancia. Hierva hasta un galón de agua en solo 30 minutos y
manténgala caliente durante todo el día.
Con agua caliente disponible a toda hora, la Hot Water Central
™
es
ideal para preparar rápidamente todo tipo de comidas y bebidas
calientes; incluyendo:
• Té caliente
• Chocolate caliente
• Tallarines rápidos
• Fórmula para bebés
• Café instantáneo
• Harina de avena
La Hot Water Central
™
de Aroma
®
incluye niveles ajustables de
temperatura, ideales para programar la temperatura a la perfección; y
la función de arranque demorado permite que la Hot Water Central
™
se
apague cuando no haya nadie en casa, pero también que esté lista y
caliente cuando se requiera.
Para mayor información sobre su Hot Water Central
™
o para soluciones
adicionales para su cocina, visítenos en línea al: www.Aromaco.com.
Por favor lea cuidadosamente las siguientes instrucciones antes de
usarla por p
rimera vez.

GUARDE ESTAS INSTRUCCIONES
1. Lea todas las instrucciones antes de usarlo.
2. No toque las superficies calientes. Use las asas o mangos.
3. Para evitar los choques eléctricos, no sumerja en agua ni en ningún
otro líquido el cable, el enchufe ni el calentador de agua.
4. Cuando sea usado cerca de niños es necesario supervisarlos
cuidadosamente. Este equipo no es para ser usado por niños.
5. Desenchúfelo del tomacorriente cuando no esté en uso y antes de
limpiarlo. Espere a que se e
nfríe por completo antes de retirar o
colocar piezas, y antes de limpiarlo.
6. No lo use si el cable o el enchufe están dañados, si no ha
funcionado bien o ha tenido alguna avería. Contacte a nuestro
servicio a clientes para que lo examinen, lo repararen o lo ajusten.
7. El uso de accesorios no recomendados por Aroma
®
Housewares
puede provocar lesiones.
8. No lo use al aire libre.
9. No permita que el cable cuelgue de la mesa o mostrador, ni que
toque superficies calientes.
10. No lo c
oloque cerca de una hornilla de gas o eléctrica caliente, ni
en un horno caliente.
11. Se debe tener sumo cuidado al trasladarlo con aceite u otros
líquidos calientes.
12. Siempre conecte el enchufe al equipo primero, luego al
tomacorriente. Para desconectarlo, desenchúfelo del
tomacorriente.
13. No lo use para otra cosa que no sea el uso previsto.
14. No permita que el agua sobrepase la marca de lleno ("FULL") ni
que quede por debajo de la marca de volver a llenar ("REFILL"), d
e
lo contrario se rebasará o se secará al hervir.
15. No abra la tapa superior cuando el agua esté hirviendo para evitar
que pueda quemarse con el vapor caliente.
16. No llene el jarro con ninguna sustancia que no sea agua.
17. Agua en la Hot Water Central
™
estará muy caliente. Tenga cuidado
al servir como agua caliente puede causar quemaduras. Siempre
temperatura de ensayo antes de servir.
18. Si la fórmula toma de bebé con agua caliente, añadir agua fría
siempre así. Agua de la Hot W
ater Central
™
será demasiado
caliente para el bebé. La cantidad de agua fría necesaria para
alcanzar una temperatura adecuada puede variar. Siempre
pruebe la temperatura antes de servir.
1
Basic safety precautions should always be followed when using
electrical appliances, including the following:
1
IMPORTANT SAFEGUARDS
IMPORTANTES INSTRUCCIONES DE SEGURIDAD
1. Read all instructions before use.
2. Do not touch hot surfaces. Use handles or knobs.
3. To protect against electrical shock, do not immerse the cord, plug or
the appliance in water or any other liquid.
4. Close supervision is necessary when this appliance is used near
children. This appliance is not intended to be used by children.
5. Unplug from outlet when not in use and before cleaning. Allow to
cool completely before putting on or taking o
ff any parts, and
before cleaning.
6. Do not operate this appliance with a damaged cord or plug or after
the appliance malfunctions or has been damaged in any manner.
Contact Aroma
®
customer service for examination, repair or
adjustment.
7. The use of accessory attachments not recommended by Aroma
®
Housewares may cause injuries or damage to the product.
8. Do not use outdoors.
9. Do not allow the cord to hang over the edge of a table or counter,
or to touch hot surfaces.
10.D
o not place on or near a hot gas or electric burner, or in a heated
oven.
11.Extreme caution must be used when moving the appliance
containing hot water.
12.Always attach the plug to the appliance first, then plug the cord into
the wall outlet. To disconnect, remove the plug from the wall outlet.
13.Do not use this appliance for other than intended use.
14.Never fill water beyond the “FULL” mark in the inner pot or below the
“REFILL” mark on the water level indicator, otherwise it w
ill spill over or
dry-up during boiling.
15.Do not open the lid when water is boiling to avoid scalding by hot
steam.
16.Do not fill the Hot Water Central
™
with any substance other than
water.
17.Water in the Hot Water Central
™
will be extremely hot. Use caution
when serving as hot water may cause scalding. Always test
temperature before serving.
18.If making baby formula with hot water, always add cold water as
well. Water from the Hot Water Central
™
will be too hot for the baby.
The amount of cold water needed to reach an adequate
temperature will vary. Always test the temperature before serving.
SAVE THESE INSTRUCTIONS
Siempre se deben seguir las precauciones de seguridad básicas al usar
electrodomésticos, incluidas las siguientes:

INSTRUCCIONES PARA PONER A TIERRA
GROUNDING INSTRUCTIONS
(A)
CIRCUIT GROUNDING
CONDUCTOR
CONNECTED
PROPERLY
GROUND
PRONG
(C)
ADAPTER
GROUNDING MEANS
AA22D
(B)
METAL
MOUNTING
SCREW
COVER OF GROUNDED
OUTLET BOX
Este aparato fue diseñado solamente para
uso doméstico.
2
This appliance is for household use only.
SHORT CORD INSTRUCTIONS
INSTRUCCIONES DE CABLE CORTO
1. A short power-supply cord is provided
to reduce the risks resulting from
becoming entangled in or tripping
over a longer cord.
2. Longer extension cords are available
and may be used if care is exercised
in their use.
3. If a longer extension cord is used:
a. The marked electrical rating of the
extension cord should be at least
as great as the electrical rating of
the appliance.
b
. The longer cord should be
arranged so that it will not drape
over the countertop or tabletop
where it can be pulled by children
or tripped over unintentionally.
c. If the appliance is of the grounded
type, the extension cord should be a grounding 3-wire cord.
This appliance must be grounded while in use to protect the operator from
electrical shock. The appliance is equipped with a 3-conductor cord and a
3-prong grounding-type plug to fit the proper grounding-type receptacle. The
appliance has a plug that looks like sketch A. An adapter, sketch B, should be
used for connecting sketch-A plug plugs to two-plugs to two-prong receptacles.
The grounding tab, which e
xtends from the adapter, must be connected to a
permanent ground such as a properly grounded outlet box as shown in sketch C
using a metal screw.
(A)
CIRCUIT GROUNDING
CONDUCTOR
CONNECTED
PROPERLY
GROUND
PRONG
(C)
ADAPTER
GROUNDING MEANS
AA22D
(B)
METAL
MOUNTING
SCREW
COVER OF GROUNDED
OUTLET BOX
1. Se proporciona un cable eléctrico
corto con el propósito de reducir el
riesgo de tropezarse o enredarse con
un cable más largo.
2. Hay cables de extensión más largos
disponibles y deben ser usados con
sumo cuidado.
3. Si se usa un cable de extensión más
largo:
a. La clasificación eléctrica marcada
en el cable de extensión debe ser
por lo menos igual que la
clasificación eléctrica del aparato.
b. El cable m
ás largo debe ser
colocado de manera que no
cuelguepor el borde del mostrador
o mesa en donde pudiera ser
jalado por un niño o alguien
pudiera tropezarse con el cable sin querer.
c. Si el aparato es del tipo de tierra, el cable de extensión debe ser un cable
a tierra de 3 cables.
¡MANTÉNGALO
LEJOS DE LOS
NIÑOS!
¡NO DEJE QUE EL CABLE CUELGUE!
Este aparato electrodoméstico debe estar puesto a tierra mientras se usa para
proteger al usuario contra un choque eléctrico. El aparato viene equipado con
un cable de 3 conductores y una clavija de puesto a tierra de 3 espigas de
contacto para entrar al receptáculo correcto de puesto a tierra. El aparato
tiene una clavija como se muestra en el dibujo A. Se debe usar un adaptador,
dibujo B, para conectar l
a clavija al receptáculo de dos espigas. La espiga de
puesto a tierra, que se extiende del adaptador, debe conectarse a un puesto a
tierra permanente tal y como una caja de salida debidamente puesta a tierra
como se muestra en el dibujo C usando un tornillo metálico.
(A)
Conductor de circuito
terrestre
correctamente
conectado
Diente de
tierra
(B)
Tornillo de
montaje
metálico
Cubierta de la caja
de toma de tierra
(C)
Adaptador
Conexión a tierra
significa AA22D
2

3
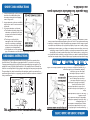
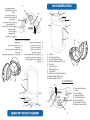
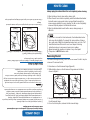
1. Handle
2. Lid Removal Hinge
3. Manual Dispense Pump
4. Manual Dispense Safety Lock
5. Lid Latch
6. Control Panel
7. Dispensing Spout
8. Cup Switch
9. Water Level Indicator Window
10. Stainless Steel Water Tank
11. Stainless Steel Inner Lid
PARTS IDENTIFICATION
IDENTIFICACION DE LAS PARTES
12. Automatic Dispense
Button
13. Unlock Button
14. Temp Set Button
15. Delay Start Button
16. Reboiling Button
17. Heat Indicator Light
18. Warm Indicator Light
4
1
12
7
8
9
13
15
16
14
5
2
11
10
3
6
17
18
3
Control Panel
3
1. Manija
2. Bisagra para quitar la tapa
3. Bomba de servicio manual
4. Candado de seguridad para
servicio manual
5. Cerrojo de la tapa
6. Tablero de control
7. Chorro de servicio
8. Alternador de tazas
12. Botón de servicio
automático
13. Botón para
desasegurar
14. Botón para programar
la temperatura
15. Botón para retrasar el
arranque
16. Botón para re-hervir
17. Luz indicadora de
calor
18. Luz indicadora de
temperatura tibia
4
1
12
7
8
9
13
15
16
14
5
2
11
10
6
17
18
Tablero de control
9. Ventana con indicador del nivel
del agua
10. Tanque de agua de acero
inoxidable
11. Tapa interior de acero
inoxidable

4
4
USING YOUR HOT WATER CENTRAL
™
CÓMO USAR
1. Read all the instructions and important safeguards.
2. Remove all packaging materials; check that all items are received in
good condition.
3. Wash the stainless steel water tank with warm, soapy water using a
sponge or dishcloth.
4. Rinse thoroughly to remove any soapy residue.
5. Wipe body and stainless steel inner lid clean with a damp cloth.
Before First Use:
NOTE:
•Do not use abrasive cleaners or scouring pads.
•Do not immerse the appliance, cord or plug in water at any time.
1. Lift the lid latch to open the lid. If needed, for filling purposes, the
entire lid can be removed from the lid removal hinge on the back of
the lid. See “Removing the Lid” on page 7 for details.
2. Fill the stainless steel water tank with water anywhere between the
“Full” mark in the stainless steel inner pot and the 2 cup mark on the
water level indicator. Properly replace the lid before heating water.
3. Attach the power cord by plugging the connector to the Hot Water
Central
™
and then connect the plug to an available wall outlet.
4. The water will automatically begin heating and the heat indicator
light will illuminate.
5. The warming temperature selection will default to 185°. To select
another
temperature, press the TEMP SET button to toggle between
150°, 185° and 210°.
6. Once the water has come to a boil, the unit will automatically switch
to the Warm function. The heat indicator light will go off and the
warm indicator light will illuminate.
7. The Hot Water Central
™
will keep the water warm at the selected
warm temperature as long as it is plugged in, unless the Delay Start
function is used.
To Heat Water:
NOTE:
• If filled to the full, 16-cup capacity, water will take approximately
30 minutes to reach a boil. Smaller amounts of water will have a
proportionally shorter boiling time.
•Never fill water past the “FULL” mark in the stainless steel inner pot
or below the 2 cup mark on the water level indicator, otherwise it
may spill over or cause damage to the unit.
•Do not open the lid while water is boiling to avoid scalding by hot
steam.
1. Lea todas las instrucciones y medidas de seguridad.
2. Deshágase de los materiales de empaque y verifique que todos los artículos
estén en buenas condiciones.
3. Lave el tanque de agua de acero inoxidable con agua tibia y jabonosa con
una esponja o con un paño de cocina.
4. Enjuague meticulosamente para quitarle cualquier residuo de jabón.
5. Limpie la base y la tapadera de a
cero inoxidable con un paño húmedo.
Antes de usarlo por primera vez:
NOTA:
• No utilice trapos o cojinetes raspantes.
• Por ninguna razón meta el aparato, el cordón o el enchufe al agua.
1. Levante la aldaba del disparador de la tapa. Si es necesario la tapadera
entera puede ser removida de la bisagra para cargar y descargar en el
respaldo de la tapa. Vea en la página 7 “Para quitar la tapa.”
2. Llene con agua el tanque de agua de acero inoxidable dondequiera, entre
la marca de Full (
“Lleno”) y la marca de las dos tazas, en el indicador del
nivel de agua. Reemplace la tapa antes de calentar el agua.
3. Adhiera el cable de corriente enchufando el adaptador con la Hot Water
Central
™
para después conectar el enchufe en la pared.
4. El agua empezará a calentarse automáticamente y la luz del indicador de
calor se iluminará.
5. La selección de la temperatura quedará en la predeterminada d
e 185°.
Para elegir otra temperatura, haga presión en el botón que dice: ‘TEMP SET’
(Programador de temperatura) para alternar entre 150°, 185° y 210°.
6. Una vez que el agua ha empezado a hervir, la unidad automáticamente
cambiará a la función de Tibia (‘Warm’). La luz indicadora de caliente
(‘Heat’) se apagará y la luz indicadora de Tibia (‘Warm’) se prenderá.
7. La Hot Water Central
™
mantendrá el agua tibia a la temperatura elegida
mientras esté conectada, a menos que se haya optado por la función de
Retraso del encendido o (‘Delay Start’).
Para calentar agua:
NOTA:
•Si se llena a su capacidad de 16 tazas, el agua tardará aproximadamente
unos 30 minutos para hervir. Cantidades menores de agua tardarán
proporcionalmente menos en hervir.
•Nunca llene el tanque de agua por arriba de la marca que dice “Full’
(Llena), o con menos de la marca de las dos tazas, ya que, o se puede
derramar, o bien puede causarle daño a la unidad.
•Nunca abra la tapa mientras el agua esté h
irviendo para así evitar
quemarse con el vapor caliente.

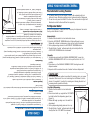
Cup Switch Dispensing:
1. Disable the automatic lock as instructed
above.
2. Press a heat-safe cup against the CUP SWITCH
located behind the dispensing spout (see
Figure A).
3. Water will begin pouring once the switch is
depressed.
4. To stop dispensing, simply remove the cup.
5. The Hot Water Central
™
will automatically lock
shortly after the CUP SWITCH is released.
5
CÓMO USAR
Figure A
1. For safety reasons, the Hot Water Central
™
will automatically lock
after each use. All buttons will be locked and water will not dispense.
2. To use the unit, press the UNLOCK button. The warm indicator light will
illuminate and all buttons will function properly.
The Automatic Locking Feature:
For your convenience, there are three easy ways to dispense hot water
from your Hot Water Central
™
.
Automatically:
1. Disable the automatic lock as instructed above.
2. Press the AUTOMATIC DISPENSE button. Water will begin to pour.
Water will continue to dispense as long as the button is pressed.
3. To stop dispensing, release the AUTOMATIC DISPENSE button.
4. The Hot Water Central
™
will automatically lock shortly after the
AUTOMATIC DISPENSE button is released.
Manually:
1. To dispense water with the MANUAL DISPENSE PUMP, move the
MANUAL DISPENSE SAFETY LOCK on the top of the lid to the “On”
position.
2. Press down on the MANUAL DISPENSE PUMP. Pressing down will
dispense water.
3. Repeat until the needed amount of water has been dispensed.
To Dispense Water:
HELPFUL HINT:
•The manual dispense option is excellent for serving, since no power
is needed. Disconnect the cord and bring the Hot Water Central
™
where it’s needed. It’s perfect for making and sharing favorite hot
beverages with guests and family.
USING YOUR HOT WATER CENTRAL
™
Servicio mediante la taza de prendido:
1. Como se indica arriba, desarme el cerrojo
automático.
2. Presione una taza resistente al calor contra el
alternador de tazas, localizado atrás del borbotón
de servicio (vea la Figura A).
3. Una vez que se haya soltado el alternador de
tazas el agua empezará a servirse.
4. Para dejar de servir agua, solo quite la taza
5. Una vez se haya soltado l
a taza de Prendido, la
Hot Water Central
™
se cerrará automáticamente.
Figura A
1. Por razones de seguridad, la Hot Water Central
™
se apagará
automáticamente después de cada uso. Todos los botones quedarán
asegurados y no se podrá servir agua.
2. Para usar la unidad presione el botón de UNLOCK (Quitar el cerrojo). La luz
indicadora de Warm se prenderá y todos los botones funcionarán
debidamente.
La función del cerrado automático:
Para su comodidad tenemos tres maneras fáciles de servir agua desde su Hot
Water Central
™
.
Automáticamente:
1. Desarme el cerrojo automático tal como se indica arriba.
2. Presione el botón de Servido automático (Automatic Dispense) y el
agua empezará a caer. El agua continuará cayendo mientras el
botón de Automatic dispense se mantenga apretado.
3. Para dejar de servir suelte el mencionado botón.
4. La Hot W
ater Central
™
se cerrará automáticamente segundos
después de haber soltado el botón de Servicio Automático
(Automatic dispense).
Manualmente:
1. Para servir agua con la bomba de servicio manual (Manual dispense pump),
mueva el cerrojo manual de seguridad situado en la parte superior de la
tapa a la posición de Prendido (On).
2. Presione el botón de bomba de servicio manual (Manual dispense pump)
para s
ervir agua.
3. Repítase hasta que se haya servido la cantidad de agua deseada.
Para servir agua:
CONSEJO ÚTIL:
•La opción de servicio manual es ideal para servir, ya que no se requiere
de electricidad. Desenchufe el cordón y lleve la Hot Water Central
™
a
donde sea necesario. Es perfecta para preparar y compartir bebidas
calientes con invitados y la familia.
5

6
CÓMO USAR
Water may be reboiled at any time after the Hot Water Central
™
has
entered the Warm function.
1. Press the REBOILING button. The Hot Water Central
™
will begin to
reboil the water and the heat indicator light will illuminate.
2. The warm temperature selection will remain at the previous level. To
change the warm temperature, press the TEMP SET button.
3. Once the water reaches a boil, the Hot Water C
entral
™
will
automatically switch back to Warm mode. The heat indicator light
will turn off and the warm indicator light will illuminate.
4. The Hot Water Central
™
will keep the water at the chosen warm
temperature until it is unplugged or the Delay Start function is
selected.
To Reboil:
NOTE:
•Reboil time will vary based on the amount of water being reboiled.
•Never operate the Hot Water Central
™
if the amount of water is
below the 2 cups line.
The Delay Start function is a great way to cut down on power use by
having the Hot Water Central
™
power off when no one is home, then
reboil the water just in time.
1. Press the DELAY START button. The Delay Start function will default to 6
hours, meaning that in 6 hours the Hot Water Central
™
will be back on
and have water at a boil.
2. To adjust the Delay Start time, press the DELAY START button to toggle
between the Delay Start time options. The Hot Water Central
™
will
Delay Start for 3, 6 or 9 hours.
3. Once the DELAY START button is pressed, the Hot Water Central
™
will
power off for the chosen time.
4. The Hot Water Central
™
will have water reach a boil once the
selected time has passed.
To Use the Delay Start:
6
HELPFUL HINTS:
•Pressing the REBOILING button at any time will cancel the Delay
Start function and the Hot Water Central
™
will begin to reboil the
water.
•Water may still be dispensed from any of the 3 pouring options
during the Delay Start. Simply follow the steps in “To Dispense
Water” on page 5.
USING YOUR HOT WATER CENTRAL
™
El agua puede rehervirse en cualquier momento después de que la Hot
Water Central
™
haya cambiado a la función de tibia (Warm).
1. Presione el botón de rehervido (Reboiling). Su maquina empezara a rehervir
y la luz indicadora de calor (Heat) se iluminará.
2. La selección de temperatura tibia se mantendrá al mismo nivel. Para
cambiar la temperatura presione el botón de TEMP SET (
Programador de
temperatura).
3. Una vez se haya llegado a la ebullición del agua, la Hot Water Central
™
cambiara automáticamente a la modalidad de tibia (Warm). La luz
indicadora del calor se apagará y la indicadora de tibia se prenderá.
4. La Hot Water Central
™
mantendrá el agua a la temperatura seleccionada
hasta que se desconecte, o bien se elija la función de retrasar el arranque
(Delay start).
Para volver a hervir:
NOTA:
•El tiempo de rehervido variará dependiendo de la cantidad de agua que
se quiera hervir.
•Nunca prenda la Hot Water Central
™
si el nivel del agua está por debajo
de la línea de las dos tazas.
La función de arranque retrasado es ideal para bajar el consumo de
corriente eléctrica cuando nuestra maquina esté apagada y no haya
nadie en casa, para después rehervir el agua justo a tiempo para
preparar esas d
eliciosas bebidas calientes.
1. Presione el botón de arranque retrasado (Delay start). Esta función
programará el sistema para que en 6 horas se prenda nuestra maquina y
volver a tener agua hirviendo.
2. Para ajustar la función de rarranque retrasado (Delay start), presione el
botón para alternar entre las opciones de tiempo ofrecidas. La Hot Water
Central
™
retrasará el arranque por 3, 6 o 9 horas.
3. Una vez se haya apretado el botón de arranque retrasado (Delay start) la
Hot Water Central
™
caliente se apagará durante el lapso de tiempo
seleccionado.
4. La Hot Water Central
™
tendrá agua hirviendo una vez que el tiempo
escogido haya transcurrido.
Para utilizar el arranque retrasado:
CONSEJOS ÚTILES:
•Al presionar el botón de rehervir (Reboiling) se cancelará la función de
retraso de arranque y la Hot Water Central
™
empezará a hervir agua.
•El agua podrá ser servida desde cualquiera de las tres opciones, solo siga
los pasos en la página 5 en “Para servir agua.”

HOW TO CLEAN
Always unplug the unit and allow it to cool completely before cleaning.
1. Wipe the lid and body clean with a damp cloth.
2. When the unit has cooled completely, wash the stainless steel water
tank with warm, soapy water and a sponge. Rinse thoroughly to
remove soapy residue. For easy cleaning, the lid can be completely
removed. Properly replace the lid before next use.
3. Wipe the stainless steel inner li
d with a warm, damp sponge or
dishcloth.
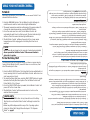
Figure B
Figure C
7
CÓMO LIMPIEZA
7
For easier cleaning and filling, the lid of the Hot Water Central
™
may be
removed. To remove the lid:
1. Press down on the lid removal hinge (Figure B).
2. While holding down on the lid removal hinge remove the lid as
shown in Figure C.
Removing the Lid:
3. To replace the lid, position it back into place while holding down on
the lid removal hinge.
4. Once the lid is in place, release the lid removal hinge.
NOTE:
•If you live in an area that has hard water, the stainless steel water
tank may discolor slightly. To remedy this, mix a solution of lemon
juice and water, filling the stainless steel water tank up to the “Full”
mark. Boil water and let soak for one hour. Repeat cleaning
instructions above to remove any lemon juice residue.
•Never immerse the appliance in water or any other liquid.
•This product is NOT d
ishwasher safe.
Siempre desconecte la unidad y permita que se enfríe completamente
antes de iniciar el proceso de limpieza.
1. Limpie y enjuague la tapa con un trapo húmedo.
2. Una vez que la unidad se ha enfriado totalmente, lave el tanque de agua de
acero inoxidable con una esponja jabonosa y agua tibia. Séquela
concienzudamente para quitarle residuos de jabón. La tapa puede ser
desmontada para facilitarle la limpieza. V
ea abajo “Quitando la Tapa.”
Coloque la tapa adecuadamente antes de volver a usarse la unidad.
3. Limpie el tanque de agua de acero inoxidable con una esponja húmeda.
Figura B
Figura C
Para facilitar la limpieza y el llenado, la tapa de la Hot Water Central
™
se puede quitar. Para quitar la tapa:
1. Haga presión en la bisagra (Figura B).
2. Mientras hace ésto, quite la tapa como se demuestra en la Figura C.
Para quitar la tapa:
3. Para volver a colocar la tapa póngala en su lugar mientras aprieta la
bisagra.
4. Una vez esté de vuelta en su lugar, suelte la bisagra para quitar la tapa.
NOTA:
•Si Ud. vive en una zona con agua pesada (agua que contiene una alta
concentración de sales y calcio) el tanque de agua de acero inoxidable
se puede decolorar un poco. Como remedio mezcle una solución de jugo
de limón y agua, llenando el tanque de agua hasta la marca de Lleno
(Full). Hierva agua y déjela remojar durante una hora.
•Nunca meta el aparato en agua u otro liquido.
•Este artefacto no debe d
e lavarse en un lavaplatos.

LIMITED WARRANTY
Aroma Housewares Company warrants this product free from defects in
material and workmanship for one year from provable date of purchase
in continental United States.
Within this warranty period, Aroma Housewares Company will repair or
replace, at its option, defective parts at no charge, provided the
product is returned, freight prepaid with proof of purchase and U.S.
$15.00 for shipping a
nd handling charges payable to Aroma Housewares
Company. Before returning an item, please call the toll free number
below for return authorization number. Allow 2-4 weeks for return
shipping.
This warranty does not cover improper installation, misuse, abuse or
neglect on the part of the owner. Warranty is also invalid in any case
that the product is taken apart or serviced by an unauthorized service
station.
T
his warranty gives you specific legal rights, which may vary from state to
state, and does not cover areas outside the United States.
AROMA HOUSEWARES COMPANY
6469 Flanders Drive
San Diego, California 92121
1-800-276-6286
M-F, 8:30 AM - 4:30 PM, Pacific Time
Website: www.AromaCo.com
8
GARANTÍA LIMITADA
Aroma Housewares Company garantiza que este producto esté libre de
defectos de fabricación y en los materiales durante un período de un
año de la fecha comprobable de compra dendro de Los Estados
Unidos.
Dentro de este período de garantía, Aroma Housewares Company, a su
opción, reparará o reemplazará gratuitamente cualquier parte que
resulte defectuosa, siempre y cuando el producto sea devuelto a
A
roma Housewares Company, con porte pagado y comprobante de
compra y U.S. $15.00 para gastos de envío y manejo. Sírvase llamar al
número telefónico gratuito que se menciona abajo para obtener un
número de autorización de devolución. Espere entre 2-4 semanas para
recibir el aparato nuevamente.
Esta garantía no cubre la instalación incorrecta, uso indebido, maltrato
o negligencia por parte del usuario.
La garantía también es inválida en
caso de que el aparato sea desarmado o se le dé mantenimiento por
un centro de servicio no autorizado.
Esta garantía le ofrece derechos legales específicos, los cuales podrán
variar de un estado a otro y no cubre fuera de Los Estados Unidos.
AROMA HOUSEWARES COMPANY
6469 Flanders Drive
San Diego, California 92121
1-800-276-6286
L-V, 8:30 AM - 4:30 PM, Tiempo del Pacífico
S
itio Web: www.AromaCo.com
8
Transcripción de documentos
www.AromaCo.com AAP-340F Hot Water Central™ Dispensador eléctrico de agua caliente Manual de Instrucciones Instruction Manual Electric Hot Water Dispenser Hot Water Central™ www.AromaCo.com AAP-340F Con la Hot Water Central™ de Aroma®, el agua caliente está a solo un botón de distancia. Hierva hasta un galón de agua en solo 30 minutos y manténgala caliente durante todo el día. Con agua caliente disponible a toda hora, la Hot Water Central™ es ideal para preparar rápidamente todo tipo de comidas y bebidas calientes; incluyendo: • • • • • • Té caliente Chocolate caliente Tallarines rápidos Fórmula para bebés Café instantáneo Harina de avena © 2010 Aroma Housewares Company All rights reserved. Aroma Housewares Co. 6469 Flanders Drive San Diego, CA 92121 U.S.A. 1-800-276-6286 www.AromaCo.com Published By: La Hot Water Central™ de Aroma® incluye niveles ajustables de temperatura, ideales para programar la temperatura a la perfección; y la función de arranque demorado permite que la Hot Water Central™ se apague cuando no haya nadie en casa, pero también que esté lista y caliente cuando se requiera. Para mayor información sobre su Hot Water Central™ o para soluciones adicionales para su cocina, visítenos en línea al: www.Aromaco.com. ™ Por favor lea cuidadosamente las siguientes instrucciones antes de usarla por primera vez. Please read the following instructions carefully before your first use. For more information on your Hot Water Central or for additional kitchen solutions, visit us online at www.Aromaco.com. The Aroma Hot Water Central includes adjustable temperature levels which are great for setting the temperature just right. And the Delay Start ™ function allows for the Hot Water Central to be shut down when no one’s home, but have hot water ready again right when it’s needed. ™ Aroma Housewares Co. 6469 Flanders Drive San Diego, CA 92121 U.S.A. 1-800-276-6286 www.AromaCo.com Hot Tea Hot Chocolate Quick Noodles Baby Formula Instant Coffee Oatmeal © 2010 Aroma Housewares Company. ® • • • • • • With hot water available around the clock, the Hot Water Central™ is ideal for the quick preparation of all kinds of hot meals and beverages. Including: With the Aroma® Hot Water Central™, hot water is just a button press away. Boil up to 4 quarts of water in just 30 minutes, then have it hot throughout the day. 1 SAVE THESE INSTRUCTIONS Basic safety precautions should always be followed when using electrical appliances, including the following: 1. Read all instructions before use. 2. Do not touch hot surfaces. Use handles or knobs. 3. To protect against electrical shock, do not immerse the cord, plug or the appliance in water or any other liquid. 4. Close supervision is necessary when this appliance is used near children. This appliance is not intended to be used by children. 5. Unplug from outlet when not in use and before cleaning. Allow to cool completely before putting on or taking off any parts, and before cleaning. 6. Do not operate this appliance with a damaged cord or plug or after the appliance malfunctions or has been damaged in any manner. Contact Aroma® customer service for examination, repair or adjustment. 7. The use of accessory attachments not recommended by Aroma® Housewares may cause injuries or damage to the product. 8. Do not use outdoors. 9. Do not allow the cord to hang over the edge of a table or counter, or to touch hot surfaces. 10. Do not place on or near a hot gas or electric burner, or in a heated oven. 11. Extreme caution must be used when moving the appliance containing hot water. 12. Always attach the plug to the appliance first, then plug the cord into the wall outlet. To disconnect, remove the plug from the wall outlet. 13. Do not use this appliance for other than intended use. 14. Never fill water beyond the “FULL” mark in the inner pot or below the “REFILL” mark on the water level indicator, otherwise it will spill over or dry-up during boiling. 15. Do not open the lid when water is boiling to avoid scalding by hot steam. ™ 16. Do not fill the Hot Water Central with any substance other than water. ™ 17.Water in the Hot Water Central will be extremely hot. Use caution when serving as hot water may cause scalding. Always test temperature before serving. 18.If making baby formula with hot water, always add cold water as ™ well. Water from the Hot Water Central will be too hot for the baby. The amount of cold water needed to reach an adequate temperature will vary. Always test the temperature before serving. IMPORTANTES INSTRUCCIONES DE SEGURIDAD Siempre se deben seguir las precauciones de seguridad básicas al usar electrodomésticos, incluidas las siguientes: 1. 2. 3. 4. 5. 6. 7. 8. 9. 10. 11. 12. 13. 14. 15. 16. 17. 18. Lea todas las instrucciones antes de usarlo. No toque las superficies calientes. Use las asas o mangos. Para evitar los choques eléctricos, no sumerja en agua ni en ningún otro líquido el cable, el enchufe ni el calentador de agua. Cuando sea usado cerca de niños es necesario supervisarlos cuidadosamente. Este equipo no es para ser usado por niños. Desenchúfelo del tomacorriente cuando no esté en uso y antes de limpiarlo. Espere a que se enfríe por completo antes de retirar o colocar piezas, y antes de limpiarlo. No lo use si el cable o el enchufe están dañados, si no ha funcionado bien o ha tenido alguna avería. Contacte a nuestro servicio a clientes para que lo examinen, lo repararen o lo ajusten. El uso de accesorios no recomendados por Aroma® Housewares puede provocar lesiones. No lo use al aire libre. No permita que el cable cuelgue de la mesa o mostrador, ni que toque superficies calientes. No lo coloque cerca de una hornilla de gas o eléctrica caliente, ni en un horno caliente. Se debe tener sumo cuidado al trasladarlo con aceite u otros líquidos calientes. Siempre conecte el enchufe al equipo primero, luego al tomacorriente. Para desconectarlo, desenchúfelo del tomacorriente. No lo use para otra cosa que no sea el uso previsto. No permita que el agua sobrepase la marca de lleno ("FULL") ni que quede por debajo de la marca de volver a llenar ("REFILL"), de lo contrario se rebasará o se secará al hervir. No abra la tapa superior cuando el agua esté hirviendo para evitar que pueda quemarse con el vapor caliente. No llene el jarro con ninguna sustancia que no sea agua. ™ Agua en la Hot Water Central estará muy caliente. Tenga cuidado al servir como agua caliente puede causar quemaduras. Siempre temperatura de ensayo antes de servir. Si la fórmula toma de bebé con agua caliente, añadir agua fría ™ siempre así. Agua de la Hot Water Central será demasiado caliente para el bebé. La cantidad de agua fría necesaria para alcanzar una temperatura adecuada puede variar. Siempre pruebe la temperatura antes de servir. GUARDE ESTAS INSTRUCCIONES IMPORTANT SAFEGUARDS 1 INSTRUCCIONES DE CABLE CORTO 1. Se proporciona un cable eléctrico ¡NO DEJE QUE EL CABLE CUELGUE! corto con el propósito de reducir el riesgo de tropezarse o enredarse con un cable más largo. 2. Hay cables de extensión más largos disponibles y deben ser usados con sumo cuidado. 3. Si se usa un cable de extensión más largo: a. La clasificación eléctrica marcada en el cable de extensión debe ser por lo menos igual que la clasificación eléctrica del aparato. b. El cable más largo debe ser ¡MANTÉNGALO colocado de manera que no LEJOS DE LOS cuelguepor el borde del mostrador NIÑOS! o mesa en donde pudiera ser jalado por un niño o alguien pudiera tropezarse con el cable sin querer. c. Si el aparato es del tipo de tierra, el cable de extensión debe ser un cable a tierra de 3 cables. INSTRUCCIONES PARA PONER A TIERRA Este aparato electrodoméstico debe estar puesto a tierra mientras se usa para proteger al usuario contra un choque eléctrico. El aparato viene equipado con un cable de 3 conductores y una clavija de puesto a tierra de 3 espigas de contacto para entrar al receptáculo correcto de puesto a tierra. El aparato tiene una clavija como se muestra en el dibujo A. Se debe usar un adaptador, dibujo B, para conectar la clavija al receptáculo de dos espigas. La espiga de puesto a tierra, que se extiende del adaptador, debe conectarse a un puesto a tierra permanente tal y como una caja de salida debidamente puesta a tierra como se muestra en el dibujo C usando un tornillo metálico. (A) (A) Conductor circuito CIRCUITde GROUNDING CONDUCTOR terrestre CONNECTED correctamente PROPERLY conectado (B) (B) Tornillo de METAL montaje MOUNTING metálico SCREW Diente de GROUND tierraPRONG Cubierta de la caja COVER OF GROUNDED OUTLET BOXde tierra de toma (C) (C) Adaptador ADAPTER Conexión a MEANS tierra GROUNDING significa AA22D AA22D 2 (B) Este aparato fue diseñado solamente para uso doméstico. 2 This appliance is for household use only. GROUNDING MEANS AA22D (C) ADAPTER COVER OF GROUNDED OUTLET BOX GROUND PRONG METAL MOUNTING SCREW (A) CIRCUIT GROUNDING CONDUCTOR CONNECTED PROPERLY This appliance must be grounded while in use to protect the operator from electrical shock. The appliance is equipped with a 3-conductor cord and a 3-prong grounding-type plug to fit the proper grounding-type receptacle. The appliance has a plug that looks like sketch A. An adapter, sketch B, should be used for connecting sketch-A plug plugs to two-plugs to two-prong receptacles. The grounding tab, which extends from the adapter, must be connected to a permanent ground such as a properly grounded outlet box as shown in sketch C using a metal screw. GROUNDING INSTRUCTIONS 1. A short power-supply cord is provided to reduce the risks resulting from becoming entangled in or tripping over a longer cord. 2. Longer extension cords are available and may be used if care is exercised in their use. 3. If a longer extension cord is used: a. The marked electrical rating of the extension cord should be at least as great as the electrical rating of the appliance. b. The longer cord should be arranged so that it will not drape over the countertop or tabletop where it can be pulled by children or tripped over unintentionally. c. If the appliance is of the grounded type, the extension cord should be a grounding 3-wire cord. SHORT CORD INSTRUCTIONS 16 15 14 3 12. Automatic Dispense Button 12 13. Unlock Button 14. Temp Set Button 15. Delay Start Button 13 16. Reboiling Button 17. Heat Indicator Light 18. Warm Indicator Light 2 IDENTIFICACION DE LAS PARTES 3 4 5 6 7 1 8 17 1. 2. 3. 4. 5. 6. 7. 8. 9. 10. 11. 18 Control Panel Handle Lid Removal Hinge Manual Dispense Pump Manual Dispense Safety Lock Lid Latch Control Panel Dispensing Spout Cup Switch Water Level Indicator Window Stainless Steel Water Tank Stainless Steel Inner Lid 10 10 9 1. 2. 3. 4. 5. 6. 7. 8. Manija Bisagra para quitar la tapa Bomba de servicio manual Candado de seguridad para servicio manual Cerrojo de la tapa Tablero de control Chorro de servicio Alternador de tazas 9 11 17 8 1 7 16 11 9. Ventana con indicador del nivel del agua 10. Tanque de agua de acero inoxidable 11. Tapa interior de acero inoxidable Tablero de control 12. Botón de servicio automático 13. Botón para desasegurar 12 14. Botón para programar la temperatura 15. Botón para retrasar el arranque 13 16. Botón para re-hervir 17. Luz indicadora de calor 18. Luz indicadora de temperatura tibia 18 15 2 3 4 6 5 14 PARTS IDENTIFICATION 3 CÓMO USAR Antes de usarlo por primera vez: 1. Lea todas las instrucciones y medidas de seguridad. 2. Deshágase de los materiales de empaque y verifique que todos los artículos estén en buenas condiciones. 3. Lave el tanque de agua de acero inoxidable con agua tibia y jabonosa con una esponja o con un paño de cocina. 4. Enjuague meticulosamente para quitarle cualquier residuo de jabón. 5. Limpie la base y la tapadera de acero inoxidable con un paño húmedo. NOTA: • No utilice trapos o cojinetes raspantes. • Por ninguna razón meta el aparato, el cordón o el enchufe al agua. Para calentar agua: 1. 2. 3. 4. 5. 6. 7. Levante la aldaba del disparador de la tapa. Si es necesario la tapadera entera puede ser removida de la bisagra para cargar y descargar en el respaldo de la tapa. Vea en la página 7 “Para quitar la tapa.” Llene con agua el tanque de agua de acero inoxidable dondequiera, entre la marca de Full (“Lleno”) y la marca de las dos tazas, en el indicador del nivel de agua. Reemplace la tapa antes de calentar el agua. Adhiera el cable de corriente enchufando el adaptador con la Hot Water Central™ para después conectar el enchufe en la pared. El agua empezará a calentarse automáticamente y la luz del indicador de calor se iluminará. La selección de la temperatura quedará en la predeterminada de 185°. Para elegir otra temperatura, haga presión en el botón que dice: ‘TEMP SET’ (Programador de temperatura) para alternar entre 150°, 185° y 210°. Una vez que el agua ha empezado a hervir, la unidad automáticamente cambiará a la función de Tibia (‘Warm’). La luz indicadora de caliente (‘Heat’) se apagará y la luz indicadora de Tibia (‘Warm’) se prenderá. La Hot Water Central™ mantendrá el agua tibia a la temperatura elegida mientras esté conectada, a menos que se haya optado por la función de Retraso del encendido o (‘Delay Start’). NOTA: • Si se llena a su capacidad de 16 tazas, el agua tardará aproximadamente unos 30 minutos para hervir. Cantidades menores de agua tardarán proporcionalmente menos en hervir. • Nunca llene el tanque de agua por arriba de la marca que dice “Full’ (Llena), o con menos de la marca de las dos tazas, ya que, o se puede derramar, o bien puede causarle daño a la unidad. • Nunca abra la tapa mientras el agua esté hirviendo para así evitar quemarse con el vapor caliente. 4 4 • If filled to the full, 16-cup capacity, water will take approximately 30 minutes to reach a boil. Smaller amounts of water will have a proportionally shorter boiling time. • Never fill water past the “FULL” mark in the stainless steel inner pot or below the 2 cup mark on the water level indicator, otherwise it may spill over or cause damage to the unit. • Do not open the lid while water is boiling to avoid scalding by hot steam. NOTE: 1. Lift the lid latch to open the lid. If needed, for filling purposes, the entire lid can be removed from the lid removal hinge on the back of the lid. See “Removing the Lid” on page 7 for details. 2. Fill the stainless steel water tank with water anywhere between the “Full” mark in the stainless steel inner pot and the 2 cup mark on the water level indicator. Properly replace the lid before heating water. 3. Attach the power cord by plugging the connector to the Hot Water Central™ and then connect the plug to an available wall outlet. 4. The water will automatically begin heating and the heat indicator light will illuminate. 5. The warming temperature selection will default to 185°. To select another temperature, press the TEMP SET button to toggle between 150°, 185° and 210°. 6. Once the water has come to a boil, the unit will automatically switch to the Warm function. The heat indicator light will go off and the warm indicator light will illuminate. 7. The Hot Water Central™ will keep the water warm at the selected warm temperature as long as it is plugged in, unless the Delay Start function is used. To Heat Water: • Do not use abrasive cleaners or scouring pads. • Do not immerse the appliance, cord or plug in water at any time. NOTE: 1. Read all the instructions and important safeguards. 2. Remove all packaging materials; check that all items are received in good condition. 3. Wash the stainless steel water tank with warm, soapy water using a sponge or dishcloth. 4. Rinse thoroughly to remove any soapy residue. 5. Wipe body and stainless steel inner lid clean with a damp cloth. Before First Use: USING YOUR HOT WATER CENTRAL™ 5 Cup Switch Dispensing: 1. Disable the automatic lock as instructed above. 2. Press a heat-safe cup against the CUP SWITCH located behind the dispensing spout (see Figure A). 3. Water will begin pouring once the switch is depressed. 4. To stop dispensing, simply remove the cup. 5. The Hot Water Central™ will automatically lock shortly after the CUP SWITCH is released. Figure A • The manual dispense option is excellent for serving, since no power is needed. Disconnect the cord and bring the Hot Water Central™ where it’s needed. It’s perfect for making and sharing favorite hot beverages with guests and family. HELPFUL HINT: Manually: 1. To dispense water with the MANUAL DISPENSE PUMP, move the MANUAL DISPENSE SAFETY LOCK on the top of the lid to the “On” position. 2. Press down on the MANUAL DISPENSE PUMP. Pressing down will dispense water. 3. Repeat until the needed amount of water has been dispensed. Automatically: 1. Disable the automatic lock as instructed above. 2. Press the AUTOMATIC DISPENSE button. Water will begin to pour. Water will continue to dispense as long as the button is pressed. 3. To stop dispensing, release the AUTOMATIC DISPENSE button. 4. The Hot Water Central™ will automatically lock shortly after the AUTOMATIC DISPENSE button is released. For your convenience, there are three easy ways to dispense hot water from your Hot Water Central™. To Dispense Water: 1. For safety reasons, the Hot Water Central™ will automatically lock after each use. All buttons will be locked and water will not dispense. 2. To use the unit, press the UNLOCK button. The warm indicator light will illuminate and all buttons will function properly. The Automatic Locking Feature: USING YOUR HOT WATER CENTRAL™ CÓMO USAR La función del cerrado automático: 1. Por razones de seguridad, la Hot Water Central™ se apagará automáticamente después de cada uso. Todos los botones quedarán asegurados y no se podrá servir agua. 2. Para usar la unidad presione el botón de UNLOCK (Quitar el cerrojo). La luz indicadora de Warm se prenderá y todos los botones funcionarán debidamente. Para servir agua: Para su comodidad tenemos tres maneras fáciles de servir agua desde su Hot Water Central™. Automáticamente: 1. Desarme el cerrojo automático tal como se indica arriba. 2. Presione el botón de Servido automático (Automatic Dispense) y el agua empezará a caer. El agua continuará cayendo mientras el botón de Automatic dispense se mantenga apretado. 3. Para dejar de servir suelte el mencionado botón. 4. La Hot Water Central™ se cerrará automáticamente segundos después de haber soltado el botón de Servicio Automático (Automatic dispense). Manualmente: 1. Para servir agua con la bomba de servicio manual (Manual dispense pump), mueva el cerrojo manual de seguridad situado en la parte superior de la tapa a la posición de Prendido (On). 2. Presione el botón de bomba de servicio manual (Manual dispense pump) para servir agua. 3. Repítase hasta que se haya servido la cantidad de agua deseada. CONSEJO ÚTIL: • La opción de servicio manual es ideal para servir, ya que no se requiere de electricidad. Desenchufe el cordón y lleve la Hot Water Central™ a donde sea necesario. Es perfecta para preparar y compartir bebidas calientes con invitados y la familia. Servicio mediante la taza de prendido: 1. Como se indica arriba, desarme el cerrojo automático. 2. Presione una taza resistente al calor contra el alternador de tazas, localizado atrás del borbotón de servicio (vea la Figura A). 3. Una vez que se haya soltado el alternador de tazas el agua empezará a servirse. 4. Para dejar de servir agua, solo quite la taza 5. Una vez se haya soltado la taza de Prendido, la Hot Water Central™ se cerrará automáticamente. Figura A 5 CÓMO USAR Para volver a hervir: El agua puede rehervirse en cualquier momento después de que la Hot Water Central™ haya cambiado a la función de tibia (Warm). 1. 2. 3. 4. Presione el botón de rehervido (Reboiling). Su maquina empezara a rehervir y la luz indicadora de calor (Heat) se iluminará. La selección de temperatura tibia se mantendrá al mismo nivel. Para cambiar la temperatura presione el botón de TEMP SET (Programador de temperatura). Una vez se haya llegado a la ebullición del agua, la Hot Water Central™ cambiara automáticamente a la modalidad de tibia (Warm). La luz indicadora del calor se apagará y la indicadora de tibia se prenderá. La Hot Water Central™ mantendrá el agua a la temperatura seleccionada hasta que se desconecte, o bien se elija la función de retrasar el arranque (Delay start). NOTA: •El tiempo de rehervido variará dependiendo de la cantidad de agua que se quiera hervir. •Nunca prenda la Hot Water Central™ si el nivel del agua está por debajo de la línea de las dos tazas. Para utilizar el arranque retrasado: La función de arranque retrasado es ideal para bajar el consumo de corriente eléctrica cuando nuestra maquina esté apagada y no haya nadie en casa, para después rehervir el agua justo a tiempo para preparar esas deliciosas bebidas calientes. 1. Presione el botón de arranque retrasado (Delay start). Esta función programará el sistema para que en 6 horas se prenda nuestra maquina y volver a tener agua hirviendo. 2. Para ajustar la función de rarranque retrasado (Delay start), presione el botón para alternar entre las opciones de tiempo ofrecidas. La Hot Water Central™ retrasará el arranque por 3, 6 o 9 horas. 3. Una vez se haya apretado el botón de arranque retrasado (Delay start) la Hot Water Central™ caliente se apagará durante el lapso de tiempo seleccionado. 4. La Hot Water Central™ tendrá agua hirviendo una vez que el tiempo escogido haya transcurrido. CONSEJOS ÚTILES: • Al presionar el botón de rehervir (Reboiling) se cancelará la función de retraso de arranque y la Hot Water Central™ empezará a hervir agua. • El agua podrá ser servida desde cualquiera de las tres opciones, solo siga los pasos en la página 5 en “Para servir agua.” HELPFUL HINTS: NOTE: 6 6 • Pressing the REBOILING button at any time will cancel the Delay Start function and the Hot Water Central™ will begin to reboil the water. • Water may still be dispensed from any of the 3 pouring options during the Delay Start. Simply follow the steps in “To Dispense Water” on page 5. 1. Press the DELAY START button. The Delay Start function will default to 6 hours, meaning that in 6 hours the Hot Water Central™ will be back on and have water at a boil. 2. To adjust the Delay Start time, press the DELAY START button to toggle between the Delay Start time options. The Hot Water Central™ will Delay Start for 3, 6 or 9 hours. 3. Once the DELAY START button is pressed, the Hot Water Central™ will power off for the chosen time. 4. The Hot Water Central™ will have water reach a boil once the selected time has passed. The Delay Start function is a great way to cut down on power use by having the Hot Water Central™ power off when no one is home, then reboil the water just in time. To Use the Delay Start: •Reboil time will vary based on the amount of water being reboiled. •Never operate the Hot Water Central™ if the amount of water is below the 2 cups line. 1. Press the REBOILING button. The Hot Water Central™ will begin to reboil the water and the heat indicator light will illuminate. 2. The warm temperature selection will remain at the previous level. To change the warm temperature, press the TEMP SET button. 3. Once the water reaches a boil, the Hot Water Central™ will automatically switch back to Warm mode. The heat indicator light will turn off and the warm indicator light will illuminate. 4. The Hot Water Central™ will keep the water at the chosen warm temperature until it is unplugged or the Delay Start function is selected. Water may be reboiled at any time after the Hot Water Central™ has entered the Warm function. To Reboil: USING YOUR HOT WATER CENTRAL™ 7 3. To replace the lid, position it back into place while holding down on the lid removal hinge. 4. Once the lid is in place, release the lid removal hinge. Figure B Figure C CÓMO LIMPIEZA Siempre desconecte la unidad y permita que se enfríe completamente antes de iniciar el proceso de limpieza. 1. Limpie y enjuague la tapa con un trapo húmedo. 2. Una vez que la unidad se ha enfriado totalmente, lave el tanque de agua de acero inoxidable con una esponja jabonosa y agua tibia. Séquela concienzudamente para quitarle residuos de jabón. La tapa puede ser desmontada para facilitarle la limpieza. Vea abajo “Quitando la Tapa.” Coloque la tapa adecuadamente antes de volver a usarse la unidad. 3. Limpie el tanque de agua de acero inoxidable con una esponja húmeda. NOTA: 1. Press down on the lid removal hinge (Figure B). 2. While holding down on the lid removal hinge remove the lid as shown in Figure C. For easier cleaning and filling, the lid of the Hot Water Central™ may be removed. To remove the lid: Removing the Lid: •If you live in an area that has hard water, the stainless steel water tank may discolor slightly. To remedy this, mix a solution of lemon juice and water, filling the stainless steel water tank up to the “Full” mark. Boil water and let soak for one hour. Repeat cleaning instructions above to remove any lemon juice residue. • Never immerse the appliance in water or any other liquid. • This product is NOT dishwasher safe. •Si Ud. vive en una zona con agua pesada (agua que contiene una alta concentración de sales y calcio) el tanque de agua de acero inoxidable se puede decolorar un poco. Como remedio mezcle una solución de jugo de limón y agua, llenando el tanque de agua hasta la marca de Lleno (Full). Hierva agua y déjela remojar durante una hora. •Nunca meta el aparato en agua u otro liquido. •Este artefacto no debe de lavarse en un lavaplatos. Para quitar la tapa: Para facilitar la limpieza y el llenado, la tapa de la Hot Water Central™ se puede quitar. Para quitar la tapa: 1. Haga presión en la bisagra (Figura B). 2. Mientras hace ésto, quite la tapa como se demuestra en la Figura C. NOTE: 1. Wipe the lid and body clean with a damp cloth. 2. When the unit has cooled completely, wash the stainless steel water tank with warm, soapy water and a sponge. Rinse thoroughly to remove soapy residue. For easy cleaning, the lid can be completely removed. Properly replace the lid before next use. 3. Wipe the stainless steel inner lid with a warm, damp sponge or dishcloth. Figura B Figura C 3. Para volver a colocar la tapa póngala en su lugar mientras aprieta la bisagra. 4. Una vez esté de vuelta en su lugar, suelte la bisagra para quitar la tapa. Always unplug the unit and allow it to cool completely before cleaning. 7 HOW TO CLEAN GARANTÍA LIMITADA 8 Aroma Housewares Company garantiza que este producto esté libre de defectos de fabricación y en los materiales durante un período de un año de la fecha comprobable de compra dendro de Los Estados Unidos. Dentro de este período de garantía, Aroma Housewares Company, a su opción, reparará o reemplazará gratuitamente cualquier parte que resulte defectuosa, siempre y cuando el producto sea devuelto a Aroma Housewares Company, con porte pagado y comprobante de compra y U.S. $15.00 para gastos de envío y manejo. Sírvase llamar al número telefónico gratuito que se menciona abajo para obtener un número de autorización de devolución. Espere entre 2-4 semanas para recibir el aparato nuevamente. Esta garantía no cubre la instalación incorrecta, uso indebido, maltrato o negligencia por parte del usuario. La garantía también es inválida en caso de que el aparato sea desarmado o se le dé mantenimiento por un centro de servicio no autorizado. Esta garantía le ofrece derechos legales específicos, los cuales podrán variar de un estado a otro y no cubre fuera de Los Estados Unidos. AROMA HOUSEWARES COMPANY 6469 Flanders Drive San Diego, California 92121 1-800-276-6286 L-V, 8:30 AM - 4:30 PM, Tiempo del Pacífico Sitio Web: www.AromaCo.com 8 AROMA HOUSEWARES COMPANY 6469 Flanders Drive San Diego, California 92121 1-800-276-6286 M-F, 8:30 AM - 4:30 PM, Pacific Time Website: www.AromaCo.com This warranty gives you specific legal rights, which may vary from state to state, and does not cover areas outside the United States. This warranty does not cover improper installation, misuse, abuse or neglect on the part of the owner. Warranty is also invalid in any case that the product is taken apart or serviced by an unauthorized service station. Within this warranty period, Aroma Housewares Company will repair or replace, at its option, defective parts at no charge, provided the product is returned, freight prepaid with proof of purchase and U.S. $15.00 for shipping and handling charges payable to Aroma Housewares Company. Before returning an item, please call the toll free number below for return authorization number. Allow 2-4 weeks for return shipping. Aroma Housewares Company warrants this product free from defects in material and workmanship for one year from provable date of purchase in continental United States. LIMITED WARRANTY-
 1
1
-
 2
2
-
 3
3
-
 4
4
-
 5
5
-
 6
6
-
 7
7
-
 8
8
-
 9
9
-
 10
10


Aroma AAP-340F Manual de usuario
- Categoría
- Hervidores eléctricos
- Tipo
- Manual de usuario
- Este manual también es adecuado para
en otros idiomas
- English: Aroma AAP-340F User manual