GROHE GLOUCESTER El manual del propietario
- Categoría
- Artículos sanitarios
- Tipo
- El manual del propietario

English Français Español
Application
Operation is possible in conjunction with:
• Pressurized storage heaters
• Thermally controlled instantaneous
heaters
• Hydraulically controlled instantaneous
heaters
Operation with low-pressure storage
heaters (displacement water heaters) is not
possible.
Specifications
• Max. flow:
6.6 L/min or 1.75 gpm/60 psi
• Flow pressure
- min.: 7.25 psi
- recommended: 14.5 - 72.5 psi
- greater than 72.5 psi, fit pressure
reducing valve
• Max.
operating pressure: 145 psi
• Test pressure: 232 psi
• Temperature
max. (hot water inlet): 158 °F
Thermal disinfection possible
• Water connection: cold - RH
hot - LH
• Deck thickness max. 2 3/8"
• Non reversible cartridge
Notes:
- Major pressure differences between cold
and hot water supply should be avoided.
- To be installed according to local codes
and regulations.
- This faucet is not intended for the use
with po
rtable appliances.
Replacement parts, see page 6
( * = special accessories).
Care
Instructions for care of this faucet will be
found in the Limited Warranty supplement.
Domaine d'application
Le service est possible en combinaison
avec:
• Des chauffe-eau à accumulateur sous
pression
• Des chauffe-eau instantanés à
commande thermique
• Des chauffe-eau instantanés à
commande hydraulique
Un service avec des systèmes d'eau
chaude à écoulement libre n'est pas
possible.
Caractéristiques techniques
• Débit maxi.:
6,6 l/min o
u 1,75 g/min/4,1 bar
• Pression dynamique
- mini.: 0,5 bar
- recommandée: 1 - 5 bar
- supérieure à 5 bar, mise en place d'un
réducteur de pression
• Pression de service maxi.: 10 bar
• Pressiond d'épreuve: 16 bar
• Température
maxi. (admission d'eau chaude): 70 °C
Désinfection thermique possible
• Raccord d'eau: froide - à droite
chaude - à gauche
• Longueur de serrage maxi. 60mm
• Cartouche non réversible
Rem
arques:
- Il convient d'éviter toute différence de
pression importante entre l'alimentation
en eau chaude froide et chaude.
- A installer conformément aux
prescriptions et réglementations locales.
- Ce robinet n'est pas destiné a être utilisé
dans des apareils portatif.
Pièces de rechange, voir page 6
(* = accessoires spéciaux).
Entretien
Vouz trouverez les instructions d'entretien
de ce mitigeur dans le supplément Garantie
Limitée.
Campo de aplicación
Es posible el funcionamiento en conjunción
con:
• Acumuladores de presión
• Calentadores instantáneos con control
térmico
• Calentadores instantáneos con control
hidráulico
No instalar con acumuladores de baja
presión (calentadores de agua sin presión).
Características técnicas
• Caudal máx.:
6.6 L/min o 1.75 gpm/60 psi
• Presión
- mín.: 7,25 psi
- recomendada: 14,5 - 72,5 psi
- si la presión es superior a 72,5 psi, se
deberá instalar una válvula reductora
de
presión
• Presión de utilización máx.: 145 psi
• Presión de verificación: 232 psi
• Temperatura
máx. (entrada del agua caliente): 158 °F
Desinfección térmica posible
• Acometida del agua: fria - a la derecha
caliente - a la izquierda
• Longitud de aprieta para fijación máx.
“8/3 2
• Cartucho irreversible
Notas:
- Deberán evitarse las diferencias de
presión entre las acometidas del agua
fría y del agua caliente.
- A ser instalado conforme a có
digos y
reglamentos locales.
- Este mezclador no esta previsto para
utilizar en enseres móuiles.
Componentes de sustitución, véase la
página 6 (* = accesorios especiales).
Cuidados periódicos
En el suplemento Garantía a Limitada
encontrará las instrucciones relativas al
cuidado de esta batería.
+1 888 6447643
CDN
+1 800 4447643
USA
www.grohe.com
Parts/Assembly
Unidad/de Partes
M965770_SP_EZ (9/16)
M965770_SP_EZ (9/16)
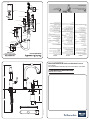
HANDLE KIT
CARTRIDGE CAP
CARTRIDGE NUT
SPRAY HOSE
SPRAY ASSEMBLY
AERATOR KIT
SHANK
SHANK MOUNTING KIT
FAUCET MOUNTING KIT
FLOW RESTRICTOR KIT
SOAP DISPENSER
WEIGHT
KEY
CARTRIDGE KIT
SET SCREW & PLUG
BUTTON
DECKPLATE KIT
OWNERS MANUAL
MANUAL DEL USUARIO
GLOUCESTER Pull Out Kitchen Faucet
30318000
GLOUCESTER Grifo de Cocina Extensible I 30318000
GLOUCESTER
Pull Out Kitchen Faucet
Grifo de Cocina Extensible
30318000
434 mm
(17-1/16")
530 mm
(20-7/8")
282 mm
(11-1/8")
269 mm
(10-5/8")
68 mm
(2-11/16")
34 mm
(1-5/16")
60 mm
(2-3/8")
30 mm
(1-3/16")
Max 68 mm
(2-11/16")
45 mm
(1-3/4")
76 mm
(3")
74 mm
(2-15/16")
253 mm
(9-15/16")
66 mm
(2-5/8")

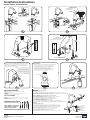
Installation Instructions
Instrucciones de Instalación
Care and Cleaning:
Do
:
Simply rinse the product clean with clear water, dry with
a soft cotton flannel cloth.
Do Not:
Clean the product with soaps, acid, polish, abrasives,
harsh cleaners, or a cloth with a coarse surface.
Recommended Tools
Note: Supplies and P-Trap
not included and must be
purchased separately
Debe: Lavar el producto sólo con agua limpia. Secar con un trapo suave de algodón.
No Debe: Limpiar el producto con jabones, ácido, productos para pulir, abrasivos,
limpiadores duros, ni con un trapo grueso.
Para el Cuidado:
Herramientas Recomendadas
Nota: No están incluidos los suministros flexibles o elevadores
de cabeza redonda y se deben comprar por separado.
Gloucester Pull out Kitchen Faucet
30318000
Gloucester Grifo de Cocina Extensible
30318000
7
Hand Spray
2
• To test the installed faucet, move the HANDLE (1) left into the OFF
position and pull out the HAND SPRAY (2). Noting that the SPRAY
HOSE (3) should pull out approximately 2 ft., point the spray into
the sink. Move the HANDLE (1), in the cold and hot positions,
flushing the water lines thoroughly.
• Para probar el grifo instalado, coloque la
manija (1) a la izquierda en la posición
OFF y jale el rociador manual (2).
Considerando que la manguera de
rociado (3) debe jalarse aproximadamente
0,60 m, apunte el rociador dentro del
fregadero. Mueva la manija (3) en las
posiciones fría y caliente y deje que
las líneas de agua se descarguen
completamente.
1
PUTTY
MASILLA
SEAL
SELLO
SEAL
SELLO
2
RUBBER WASHER
ARANDELA DE CAUCHO
METAL WASHER
ARANDELA DE METÁL
RETAINER
IGUALA
UNDER SIDE OF
MOUNTING SURFACE
BAJO LADO SUPERFICIE DE MONAJE
4
ASSEMBLE COUNTERWEIGHT
REUNA CONTRAPESO
24"
SPRAY OPERATION
6
• Lift faucet handle to start water flow. Faucet will default to an
aerated stream. To select the other spray functions, press
the TOGGLE BUTTON (2) as you turn to SPRAY MODE.
• El grifo de levantamiento se maneja para comenzar el
flujo de echar agua. Grifo mantendrá un chorro aireado.
Para seleccionar una de las otras funciones de spray, presione
el BOTÓN (3) cuando usted gira el DISCO DE SPRAY (2) a una
de las tres funciones. (Aerosol, Jet o Bruma)
WITHOUT
SHANK
SIN EL SHANK
WITH
ESCUTCHEON
CON CHAPETÓN
USE WHEN
COUNTERTOP IS
1-3/4" OR LESS
3
COLD
FRÍA
HOT
CALIENTE
2
3
1
5
Service
If Faucet Drips Proceed As Follows:
• Turn VALVE in OFF position.
• If faucet drips, operate HANDLES several times from OFF to ON position. Do not apply excessive force.
• FLOW CONTROL DEVICE may accumulate dirt. To remove the FLOW CONTROL DEVICE, unthread SPRAY AND
HOSE ASSEMBLY and rinse clean FLOW CONTROL DEVICE.
Clogged CARTRIDGE outlets or inlets may cause reduced flow.
To clean, first turn off water supply then:
• Remove INDEX BUTTON (1), loosen HANDLE SCREW (2) and remove HANDLE (3).
• Pull the CARTRIDGE CAP (4). Unthread three CARTRIDGE NUTS (5).
• Lift CARTRIDGE (6) off MANIFOLD (7) and remove CARTRIDGE SEALS (8).
• Clean MANIFOLD (7), CARTRIDGE (6) ports and SEALS (8).
• Place SEALS (8) into CARTRIDGE PORTS (6a).
• Place CARTRIDGE (6) onto MANIFOLD (7) and tighten MOUNTING SCREWS (5) alternately.
• Replace ESCUTCHEON CAP (4), HANDLE (3), tighten HANDLE SCREW (1) and install INDEX BUTTON (2).
.
Servicio
Si el grifo gotea, realice lo siguiente:
• Gire el cartucho a la posición de cerrado.
• Si la llave gotea, gire el maneral varias veces de posición de cerrado a la de abierto. No aplique fuerza excesiva.
•
El DISPOSITIVO DE CONTROL DE FLUJO
puede acumular suciedad.
Para remover el dispositivo de control de flujo,
desatornille la UNIÓN DE LA MANGUERA DEL SPRAY y enjuage para limpiar el DISPOSITIVO DE CONTROL DE FLUJO.
Las salidas o entradas obstruidas del CARTUCHO pueden hacer que disminuya el flujo del agua.
Para limpiarlo, cierre el suministro de agua, luego:
•
Retire el BOTÓN INDICADOR (1), afloje el TORNILLO DE LA MANIJA (2) y retire la MANIJA (3).
•
Desenrosque el TAPÓN DEL CHAPETÓN (4). Destornille los tres TORNILLOS DE MONTAJE (5).
•
Saque el CARTUCHO (6) del COLECTOR (7) y retire los SELLOS DEL CARTUCHO (8).
•
Coloque los SELLOS (8) en los PUERTOS DEL CARTUCHO (6a).
•
Vuelva a poner la TAPA DEL CHAPETÓN (4), la MANIJA (3), apriete el TORNILLO DE LA MANIJA (1) e instale el
•
BOTÓN INDICADOR (2).
5
6
8
3
4
7
1
2
6a
Flow Control
Devise
Spray and Hose
Assembly
Dispositivo de
Control de Flujo
Unión de la Manguera
del Spray
M965770_SP_EZ (9/16)
Transcripción de documentos
M965770_SP_EZ (9/16) 68 mm (2-11/16") 269 mm (10-5/8") 66 mm (2-5/8") 530 mm (20-7/8") 253 mm (9-15/16") 34 mm (1-5/16") 60 mm (2-3/8") 30 mm (1-3/16") Max 68 mm (2-11/16") 74 mm (2-15/16") 45 mm (1-3/4") 76 mm (3") 434 mm (17-1/16") MANUAL DEL USUARIO OWNERS MANUAL 30318000 GLOUCESTER Grifo de Cocina Extensible I 30318000 GLOUCESTER Pull Out Kitchen Faucet Características técnicas Caractéristiques techniques Es posible el funcionamiento en conjunción con: • Acumuladores de presión • Calentadores instantáneos con control térmico • Calentadores instantáneos con control hidráulico No instalar con acumuladores de baja presión (calentadores de agua sin presión). Le service est possible en combinaison avec: • Des chauffe-eau à accumulateur sous pression • Des chauffe-eau instantanés à commande thermique • Des chauffe-eau instantanés à commande hydraulique Un service avec des systèmes d'eau chaude à écoulement libre n'est pas possible. Operation is possible in conjunction with: • Pressurized storage heaters • Thermally controlled instantaneous heaters • Hydraulically controlled instantaneous heaters Operation with low-pressure storage heaters (displacement water heaters) is not possible. Français English Application Specifications • Max. flow: 6.6 L/min or 1.75 gpm/60 psi • Flow pressure - min.: 7.25 psi - recommended: 14.5 - 72.5 psi - greater than 72.5 psi, fit pressure reducing valve 145 psi • Max. operating pressure: • Test pressure: 232 psi • Temperature max. (hot water inlet): 158 °F Thermal disinfection possible • Water connection: • Deck thickness max. • Non reversible cartridge cold - RH hot - LH 2 3/8" Notes: - Major pressure differences between cold and hot water supply should be avoided. - To be installed according to local codes and regulations. - This faucet is not intended for the use with portable appliances. Replacement parts, see page 6 ( * = special accessories). Domaine d'application Parts/Assembly Español Campo de aplicación Unidad/de Partes GLOUCESTER Pull Out Kitchen Faucet Grifo de Cocina Extensible 30318000 SET SCREW & PLUG BUTTON SPRAY HOSE HANDLE KIT • Débit maxi.: 6,6 l/min ou 1,75 g/min/4,1 bar • Pression dynamique - mini.: 0,5 bar - recommandée: 1 - 5 bar - supérieure à 5 bar, mise en place d'un réducteur de pression • Pression de service maxi.: 10 bar • Pressiond d'épreuve: 16 bar • Température maxi. (admission d'eau chaude): 70 °C Désinfection thermique possible • Raccord d'eau: froide - à droite chaude - à gauche • Longueur de serrage maxi. 60mm • Cartouche non réversible Remarques: - Il convient d'éviter toute différence de pression importante entre l'alimentation en eau chaude froide et chaude. - A installer conformément aux prescriptions et réglementations locales. - Ce robinet n'est pas destiné a être utilisé dans des apareils portatif. Pièces de rechange, voir page 6 (* = accessoires spéciaux). Care Instructions for care of this faucet will be found in the Limited Warranty supplement. 282 mm (11-1/8") • • • • • • • Caudal máx.: 6.6 L/min o 1.75 gpm/60 psi Presión - mín.: 7,25 psi - recomendada: 14,5 - 72,5 psi - si la presión es superior a 72,5 psi, se deberá instalar una válvula reductora de presión Presión de utilización máx.: 145 psi Presión de verificación: 232 psi Temperatura máx. (entrada del agua caliente): 158 °F Desinfección térmica posible Acometida del agua: fria - a la derecha caliente - a la izquierda Longitud de aprieta para fijación máx. 2 3/8“ CARTRIDGE KIT CARTRIDGE CAP CARTRIDGE NUT SPRAY ASSEMBLY • Cartucho irreversible AERATOR KIT Notas: - Deberán evitarse las diferencias de presión entre las acometidas del agua fría y del agua caliente. - A ser instalado conforme a códigos y reglamentos locales. - Este mezclador no esta previsto para utilizar en enseres móuiles. KEY Componentes de sustitución, véase la página 6 (* = accesorios especiales). Entretien Vouz trouverez les instructions d'entretien de ce mitigeur dans le supplément Garantie Limitée. SHANK Cuidados periódicos En el suplemento Garantía a Limitada encontrará las instrucciones relativas al cuidado de esta batería. DECKPLATE KIT SHANK MOUNTING KIT FAUCET MOUNTING KIT USA FLOW RESTRICTOR KIT CDN +1 800 4447643 [email protected] SOAP DISPENSER +1 888 6447643 [email protected] WEIGHT www.grohe.com M965770_SP_EZ (9/16) Installation Instructions Instrucciones de Instalación RUBBER WASHER ARANDELA DE CAUCHO METAL WASHER ARANDELA DE METÁL RETAINER IGUALA SEAL SEAL SELLO SELLO PUTTY MASILLA WITH ESCUTCHEON WITHOUT SHANK CON CHAPETÓN USE WHEN COUNTERTOP IS 1-3/4" OR LESS SIN EL SHANK 1 2 UNDER SIDE OF MOUNTING SURFACE BAJO LADO SUPERFICIE DE MONAJE 24" COLD FRÍA HOT CALIENTE ASSEMBLE COUNTERWEIGHT REUNA CONTRAPESO 3 • To test the installed faucet, move the HANDLE (1) left into the OFF position and pull out the HAND SPRAY (2). Noting that the SPRAY HOSE (3) should pull out approximately 2 ft., point the spray into the sink. Move the HANDLE (1), in the cold and hot positions, flushing the water lines thoroughly. • Para probar el grifo instalado, coloque la manija (1) a la izquierda en la posición OFF y jale el rociador manual (2). Considerando que la manguera de rociado (3) debe jalarse aproximadamente 0,60 m, apunte el rociador dentro del fregadero. Mueva la manija (3) en las posiciones fría y caliente y deje que las líneas de agua se descarguen completamente. 4 SPRAY OPERATION • Lift faucet handle to start water flow. Faucet will default to an aerated stream. To select the other spray functions, press the TOGGLE BUTTON (2) as you turn to SPRAY MODE. • El grifo de levantamiento se maneja para comenzar el flujo de echar agua. Grifo mantendrá un chorro aireado. Para seleccionar una de las otras funciones de spray, presione el BOTÓN (3) cuando usted gira el DISCO DE SPRAY (2) a una de las tres funciones. (Aerosol, Jet o Bruma) Hand Spray 3 2 2 1 5 Care and Cleaning: Do: Simply rinse the product clean with clear water, dry with a soft cotton flannel cloth. Do Not: Clean the product with soaps, acid, polish, abrasives, harsh cleaners, or a cloth with a coarse surface. Para el Cuidado: Debe: Lavar el producto sólo con agua limpia. Secar con un trapo suave de algodón. No Debe: Limpiar el producto con jabones, ácido, productos para pulir, abrasivos, limpiadores duros, ni con un trapo grueso. Recommended Tools Herramientas Recomendadas Note: Supplies and P-Trap not included and must be purchased separately Nota: No están incluidos los suministros flexibles o elevadores de cabeza redonda y se deben comprar por separado. 6 7 Service If Faucet Drips Proceed As Follows: • Turn VALVE in OFF position. •. If faucet drips, operate HANDLES several times from OFF to ON position. Do not apply excessive force. • FLOW CONTROL DEVICE may accumulate dirt. To remove the FLOW CONTROL DEVICE, unthread SPRAY AND HOSE ASSEMBLY and rinse clean FLOW CONTROL DEVICE. 1 2 Clogged CARTRIDGE outlets or inlets may cause reduced flow. To clean, first turn off water supply then: • Remove INDEX BUTTON (1), loosen HANDLE SCREW (2) and remove HANDLE (3). • Pull the CARTRIDGE CAP (4). Unthread three CARTRIDGE NUTS (5). • Lift CARTRIDGE (6) off MANIFOLD (7) and remove CARTRIDGE SEALS (8). • Clean MANIFOLD (7), CARTRIDGE (6) ports and SEALS (8). • Place SEALS (8) into CARTRIDGE PORTS (6a). • Place CARTRIDGE (6) onto MANIFOLD (7) and tighten MOUNTING SCREWS (5) alternately. • Replace ESCUTCHEON CAP (4), HANDLE (3), tighten HANDLE SCREW (1) and install INDEX BUTTON (2). 6 5 6a Servicio Si el grifo gotea, realice lo siguiente: • Gire el cartucho a la posición de cerrado. • Si la llave gotea, gire el maneral varias veces de posición de cerrado a la de abierto. No aplique fuerza excesiva. • El DISPOSITIVO DE CONTROL DE FLUJO puede acumular suciedad. Para remover el dispositivo de control de flujo, desatornille la UNIÓN DE LA MANGUERA DEL SPRAY y enjuage para limpiar el DISPOSITIVO DE CONTROL DE FLUJO. Las salidas o entradas obstruidas del CARTUCHO pueden hacer que disminuya el flujo del agua. Para limpiarlo, cierre el suministro de agua, luego: • Retire el BOTÓN INDICADOR (1), afloje el TORNILLO DE LA MANIJA (2) y retire la MANIJA (3). • Desenrosque el TAPÓN DEL CHAPETÓN (4). Destornille los tres TORNILLOS DE MONTAJE (5). • Saque el CARTUCHO (6) del COLECTOR (7) y retire los SELLOS DEL CARTUCHO (8). • Coloque los SELLOS (8) en los PUERTOS DEL CARTUCHO (6a). • Vuelva a poner la TAPA DEL CHAPETÓN (4), la MANIJA (3), apriete el TORNILLO DE LA MANIJA (1) e instale el • BOTÓN INDICADOR (2). 3 4 7 8 Spray and Hose Assembly Unión de la Manguera del Spray Flow Control Devise Dispositivo de Control de Flujo M965770_SP_EZ (9/16) Gloucester Pull out Kitchen Faucet 30318000 Gloucester Grifo de Cocina Extensible 30318000-
 1
1
-
 2
2


GROHE GLOUCESTER El manual del propietario
- Categoría
- Artículos sanitarios
- Tipo
- El manual del propietario
en otros idiomas
- English: GROHE GLOUCESTER Owner's manual
Artículos relacionados
-
GROHE 30318000 GLOUCESTER El manual del propietario
-
-
-
-
-
-
-
-
-