
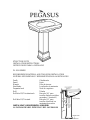
STRUCTURE SUITE
INSTALLATION INSTRUCTIONS
INSTRUCCIONES PARA LA INSTALACIÓ
FL-1950 SERIES
RECOMMENDED MATERIAL AND TOOLS FOR INSTALLATION
MATERIAL RECOMENDADO Y HERRAMIENTAS PARA LA INSTALACIÓN
Caulk Calafateador
Pencil Lápiz
Wrench Llave de tuercas
Stud finder Localizador de montantes
Carpenter level Nivel de carpintero
Drill Taladro
Drill bit of 5/8” for sheet rock Broca de 5/8” para
tornillos fiadores en tablas
enyesadas (“sheetrock”)
Drill bit of 1/8” for stud Broca de 1/8” para
tornillos (tirafondo) en
montantes de madera
INSTALLING YOUR PEDESTAL AND SINK
LA INSTALACIÓN DEL PEDESTAL Y DEL LAVAMANOS

1 – Locate proper position for pedestal and sink in your
bathroom. Be sure to have access to plumbing and drain
fittings.
1 – Ubique la posición adecuada en el baño para el pedestal
y el lavamanos. No se olvide que tiene que tener acceso
a las tuberías y a los herrajes del desagüe.
2 – Place sink on pedestal and adjust its position against the
wall. Be sure the sink is leveled using the carpenter’s
level. Mark the wall with a pencil at each mounting hole
on the underside of sink.
2 – Ponga el lavamanos en el pedestal y ajuste la posición
contra la pared. Nivele el lavamanos usando el nivel de
carpintero. Marque la pared con un lápiz, por cada
agujero de montaje en la parte de abajo del lavamanos.
3 – Carefully remove the sink from pedestal and install faucet
according to the faucet manufacturer’s instructions.
CAUTION: DO NOT OVERTIGHTEN THE NUTS. SEVERE DAMAGE MAY
OCCUR.
3 – Con cuidado, quite el lavamanos del pedestal e instale la llave de acuerdo con las
instrucciones del fabricante de la llave.
PRECAUCIÓN: NO APRIETE LAS TUERCAS DEMASIADO, YA QUE ESTO
PUEDE CAUSAR GRAN DAÑO.
4 – Use a stud finder on the pencil marks to see if there are wall
studs before drilling holes into the wall.
4 – Antes de taladrar agujeros en la pared, use un localizador de
montantes en las marcas que hizo con lápiz, para ver si hay
montantes en esa parte del entramado.
If you drill into a stud go to NO 5 and then NO 7.
Si abre los agujeros en un montante, siga al paso núm. 5 y luego el
núm. 7.
If you drill into a sheet rock go to NO 6 and then NO 7.
Si abre los agujeros en la tabla de yeso, siga con el paso núm. 6 y luego el núm. 7.
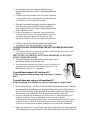
5 – If you drill into a stud – use the 1/8” drill bit to drill the holes into the stud. Place the
sink against the wall, making sure to line up the holes on the sink with the holes on
the wall. Place the metal washer followed by the rubber washer over the lag screw.
Insert the lag screw through the holes in the sink into the holes in the wall.
5 – Si abre los agujeros en un montante, use la broca de 1/8” para taladrarlos en el
montante de madera. Ponga el lavamanos contra la pared, alineando
cuidadosamente los agujeros del lavamanos con los agujeros de la pared. Ponga la
arandela de metal y luego la arandela de caucho sobre el tirafondo. Introduzca el
tirafondo en los agujeros de la pared, pasando por los agujeros del lavamanos.
6 – If drill into a sheet rock – use 5/8” drill bit to drill the holes. Place the sink against the
wall, making sure to line up the holes on the sink with the holes on the wall. Place the

metal washer followed by the rubber washer over the toggle bolts. Insert the toggle
bolts through the holes in the sink into the holes in the wall.
6 – Si abre los agujeros en una tabla enyesada, use la broca de 5/8” para taladrarlos.
Ponga el lavamanos contra la pared, alineando cuidadosamente los agujeros del
lavamanos con los agujeros de la pared. Ponga la arandela de metal y luego la
arandela de caucho sobre el tornillo fiador. Introduzca los tornillos fiadores en los
agujeros de la pared, pasando por los agujeros del lavamanos.
7 – Place the nuts and tighten alternately until the sink is snugged against the wall.
CAUTION: DO NOT OVERTIGHTEN THE NUTS. SEVERE DAMAGE MAY
OCCUR.
7 – Ponga las tuercas en los tornillos y apriételas alternado entre una y otra hasta que el
lavamanos quede bien pegado a la pared.
PRECAUCIÓN: NO APRIETE LAS TUERCAS DEMASIADO, YA QUE ESTO
PUEDE CAUSAR GRAN DAÑO.
8 – It is recommended to apply a layer of caulk between the back of sink and the wall,
where sink joints the pedestal and also between the floor and the pedestal. Remove
the excess.
8 – Se recomienda que ponga una capa de calafateador entre la parte de atrás del
lavamanos y la pared, en la parte donde su une el lavamanos y el pedestal y también
entre el piso y el pedestal. Quite el exceso.
9 – Complete the plumbing connections as required.
9 – Termine de hacer las conexiones de plomería necesarias.
LIMITED LIFETIME WARRANTY
GARANTÍA VITALICIA LIMITADA
THE HOME DEPOT warrants this product to be free from defects in materials and
workmanship for as long as the original consumer purchaser owns their home.
THE HOME DEPOT garantiza que este producto está libre de defectos en materiales y
mano de obra durante todo el tiempo en que el consumidor original sea propietario de la
casa.
THE HOME DEPOT will provide free of charge, at its option, replacement parts or
product for comparable product (if no longer available) to replace those which have
proven defective in materials or workmanship.
THE HOME DEPOT proporcionará sin costo alguno, si así lo decide, reemplazar las
piezas o el producto con productos comparables (si ya no está disponible el original)
para reemplazar los que se ha probado que tienen defecto en materiales o mano de obra.
Proof or purchase (original sales receipt) from the original Consumer Purchaser must be
made available to THE HOME DEPOT for all warranty claims. This warranty is non-
transferable. It does not apply in the event of installation error, abuse, misuse or improper
care and maintenance (whether by a contractor, Service Company or member of the
purchaser’s household).

Todas las reclamaciones bajo garantía tienen que presentársele a THE HOME DEPOT
acompañadas del comprobante de compra (el recibo original) del Consumidor que lo
compró. Esta garantía no es transferible. No corresponde en el caso de un error en la
instalación, abuso, uso indebido o cuidado y mantenimiento inadecuados (ya haya sido
de parte del contratista, Compañía de Servicio o alguna persona del hogar del
comprador).
This warranty excludes all industrial, commercial and business usage.
Esta garantía excluye todos los usos industriales, mercantiles y comerciales.
This warranty does not cover labor charges incurred and/or damage sustained in
installation, repair or replacement, not incidental or consequential damages.
Esta garantía no cubre los cargos incurridos por mano de obra o daños sufridos durante
la instalación, reparación o reemplazo, ni daños incidentales o consecuentes.
To obtain warranty service or product information call
Para obtener servicio bajo la garantía o información sobre el producto, llame al
Customer Service Center
(Centro de servicios para el cliente)
1-800-254-6023
This warranty gives the original purchaser of this product specific legal rights which may
vary from State to State or from Province to Province.
Esta garantía le proporciona al comprador original de este producto derechos legales
específicos que pueden variar de uno a otro estado o de provincia a provincia.
In some States or Provinces, the exclusion or limitation of incidental or consequential
damages is not allowed, so those exclusions may not apply to you.
En algunos estados o provincias, no se permite la exclusión o limitación por daños
incidentales o consecuentes, de modo que es posible que dichas exclusiones no le
correspondan.
-
 1
1
-
 2
2
-
 3
3
-
 4
4


