
Acerca de la impresora
Identificacióndelaimpresora
Modelos configurados
Para adquirir alguna de las siguientes opciones, vaya a www.dell.com
Impresoraderedestándar
Totalmente configurada
5210n
5310n
Capacidad de entrada
600 hojas
(bandeja de 500 hojas + alimentador multiuso de 100 hojas)
600 hojas
(bandeja de 500 hojas + alimentador multiuso de 100 hojas)
Capacidad de salida
250 hojas
250 hojas
64 MB
128 MB
576 MB
640 MB
NOTA:
Número:
Pieza:
1
2
Panel del operador
3
Alimentador multiuso (100 hojas)
4

Explicacióndelpaneldeloperador
NOTA:
Número:
Pieza:
1
Unidad de salida (650 hojas)
2
3
4
Alimentador de sobres (85 sobres)
5
6
7
PRECAUCIÓN: para las configuraciones que se vayan a colocar en el suelo se necesita un mueble adicional para proporcionar estabilidad.
Debeutilizarunsoporteobasedeimpresorasiusamásdeunaopcióndeentradaounaunidaddúplexyunaopcióndeentrada.
Número:
Utilice:
Para:
1
Indicador
operador.
l
l
l
l
2
Menú
NOTA: Lista. Si la impresora no
3
Botones de
Desplazarse hacia arriba y hacia abajo en las listas.
Al desplazarse por una lista con los botones de flecha Arriba o Abajo
Abajo
completa.

Usodelosmenúsdelpaneldeloperador
.
Izquierda o Derecha
4
Seleccionar
Seleccionar
un trabajo.
5
Atrás
NOTA: Atrás.
6
Cancelar
Cancelar, aparece el mensaje Deteniendo.
Detenido y aparece una
lista de opciones.
7
Pantalla
impresora que se deben resolver.
Menú
Elementodemenú
l Origen predeterminad
l
l Configurar multiuso
l Mejora de sobres
l
l Textura del papel
l Peso del papel
l Cargar papel
l Tipos personalizados
l
l
Informes
l
l
l
l
l Lista Perfiles
l
l Imprimir fuentes
l Imprimir directorio
Valores
l
l
l
l
l
l
l
l
Seguridad
l Caducidad de trabajo
Red/Puertos
l TCP/IP
l
l Red <x>
l
l USB <x>
l Paralelo
l Paralelo <x>
l NetWare
l AppleTalk

Apéndice
PolíticadeasistenciatécnicadeDell
Peripherals (DellWare), ReadyWare y Custom Factory Integration (CFI/DellPlus).
InformacióndecontactodeDell
support.dell.com
Puede ponerse en contacto con Dell por e-
l Internet
www.dell.com/
www.dell.com/ap/
www.euro.dell.com
www.dell.com/la/
www.dell.com/jp
l
ftp.dell.com/
-
l
[email protected]
support.euro.dell.com
http://support.jp.dell.com/jp/jp/tech/email/
l
[email protected]
l
Garantíaypolíticadedevoluciones
Dell Inc. ("Dell") fabrica estos productos de hardware a partir de piezas y componentes que son nuevos o que se consideran nuevos de acuerdo con las
Manual del propietario.

BSD License and Warranty Statements
Copyright (c) 1991 The Regents of the University of California. All rights reserved.
Redistribution and use in source and binary forms, with or without modification, are permitted provided that the following conditions are met:
1. Redistributions of source code must retain the above copyright notice, this list of conditions and the following disclaimer.
2. Redistributions in binary form must reproduce the above copyright notice, this list of conditions and the following disclaimer in the documentation and/or
other materials provided with the distribution.
3. The name of the author may not be used to endorse or promote products derived from this software without specific prior written permission.
THIS SOFTWARE IS PROVIDED BY THE AUTHOR "AS IS" AND ANY EXPRESS OR IMPLIED WARRANTIES, INCLUDING, BUT NOT LIMITED TO, THE IMPLIED
WARRANTIES OF MERCHANTABILITY AND FITNESS FOR A PARTICULAR PURPOSE ARE DISCLAIMED. IN NO EVENT SHALL THE AUTHOR BE LIABLE FOR ANY DIRECT,
INDIRECT, INCIDENTAL, SPECIAL, EXEMPLARY, OR CONSEQUENTIAL DAMAGES (INCLUDING, BUT NOT LIMITED TO, PROCUREMENT OF SUBSTITUTE GOODS OR
SERVICES; LOSS OF USE, DATA, OR PROFITS; OR BUSINESS INTERRUPTION) HOWEVER CAUSED AND ON ANY THEORY OF LIABILITY, WHETHER IN CONTRACT,
STRICT LIABILITY, OR TORT (INCLUDING NEGLIGENCE OR OTHERWISE) ARISING IN ANY WAY OUT OF THE USE OF THIS SOFTWARE, EVEN IF ADVISED OF THE
POSSIBILITY OF SUCH DAMAGE.

Búsquedadeinformación
¿Quéestábuscando?
Encuéntreloaquí
l Controladores para la impresora
l Guíadelusuario
CD Drivers and Utilities
Instalacióndelaimpresora
l
l
l
Manual del propietario
de servicio
l
impresora
l Respuestas a preguntas del servicio de
l
support.dell.com
incluyen:
l
problemas
l
l
reparaciones
l Descargas: controladores
l
l
l
1. Haga clic en Inicio®Ayudaysoportetécnico.
2.
flecha.
3. Haga clic en el tema que describa su problema.
4. Siga las instrucciones que aparecen en la pantalla.


GNU License
GENERAL PUBLIC LICENSE
Version 2, June 1991
Copyright (C) 1989, 1991 Free Software Foundation, Inc.
59 Temple Place, Suite 330, Boston, MA 02111-1307 USA
Everyone is permitted to copy and distribute verbatim copies of this license document, but changing it is not allowed.
Preamble
The licenses for most software are designed to take away your freedom to share and change it. By contrast, the GNU General Public License is intended to
guarantee your freedom to share and change free software--to make sure the software is free for all its users. This General Public License applies to most of
the Free Software Foundation's software and to any other program whose authors commit to using it. (Some other Free Software Foundation software is
covered by the GNU Library General Public License instead.) You can apply it to your programs, too.
When we speak of free software, we are referring to freedom, not price. Our General Public Licenses are designed to make sure that you have the freedom to
distribute copies of free software (and charge for this service if you wish), that you receive source code or can get it if you want it, that you can change the
software or use pieces of it in new free programs; and that you know you can do these things.
To protect your rights, we need to make restrictions that forbid anyone to deny you these rights or to ask you to surrender the rights. These restrictions
translate to certain responsibilities for you if you distribute copies of the software, or if you modify it.
For example, if you distribute copies of such a program, whether gratis or for a fee, you must give the recipients all the rights that you have. You must make
sure that they, too, receive or can get the source code. And you must show them these terms so they know their rights.
We protect your rights with two steps: (1) copyright the software, and (2) offer you this license which gives you legal permission to copy, distribute and/or
modify the software.
Also, for each author's protection and ours, we want to make certain that everyone understands that there is no warranty for this free software. If the
software is modified by someone else and passed on, we want its recipients to know that what they have is not the original, so that any problems introduced
by others will not reflect on the original authors' reputations.
Finally, any free program is threatened constantly by software patents. We wish to avoid the danger that redistributors of a free program will individually
obtain patent licenses, in effect making the program proprietary. To prevent this, we have made it clear that any patent must be licensed for everyone's free
use or not licensed at all.
The precise terms and conditions for copying, distribution and modification follow.
GNU GENERAL PUBLIC LICENSE
TERMS AND CONDITIONS FOR COPYING, DISTRIBUTION AND MODIFICATION
1.
This License applies to any program or other work which contains a notice placed by the copyright holder saying it may be distributed under the terms of
this General Public License. The "Program", below, refers to any such program or work, and a "work based on the Program" means either the Program
or any derivative work under copyright law: that is to say, a work containing the Program or a portion of it, either verbatim or with modifications and/or
translated into another language. (Hereinafter, translation is included without limitation in the term "modification".) Each licensee is addressed as "you".
Activities other than copying, distribution and modification are not covered by this License; they are outside its scope. The act of running the Program is
not restricted, and the output from the Program is covered only if its contents constitute a work based on the Program (independent of having been
made by running the Program). Whether that is true depends on what the Program does.

2. You may copy and distribute verbatim copies of the Program's source code as you receive it, in any medium, provided that you conspicuously and
appropriately publish on each copy an appropriate copyright notice and disclaimer of warranty; keep intact all the notices that refer to this License and
to the absence of any warranty; and give any other recipients of the Program a copy of this License along with the Program.
You may charge a fee for the physical act of transferring a copy, and you may at your option offer warranty protection in exchange for a fee.
3. You may modify your copy or copies of the Program or any portion of it, thus forming a work based on the Program, and copy and distribute such
modifications or work under the terms of Section 1 above, provided that you also meet all of these conditions:
a. You must cause the modified files to carry prominent notices stating that you changed the files and the date of any change.
b.
You must cause any work that you distribute or publish, that in whole or in part contains or is derived from the Program or any part thereof, to be
licensed as a whole at no charge to all third parties under the terms of this License.
c. If the modified program normally reads commands interactively when run, you must cause it, when started running for such interactive use in the
most ordinary way, to print or display an announcement including an appropriate copyright notice and a notice that there is no warranty (or else,
saying that you provide a warranty) and that users may redistribute the program under these conditions, and telling the user how to view a copy
of this License. (Exception: if the Program itself is interactive but does not normally print such an announcement, your work based on the Program
is not required to print an announcement.)
These requirements apply to the modified work as a whole. If identifiable sections of that work are not derived from the Program, and can be reasonably
considered independent and separate works in themselves, then this License, and its terms, do not apply to those sections when you distribute them as
separate works. But when you distribute the same sections as part of a whole which is a work based on the Program, the distribution of the whole must
be on the terms of this License, whose permissions for other licensees extend to the entire whole, and thus to each and every part regardless of who
wrote it.
Thus, it is not the intent of this section to claim rights or contest your rights to work written entirely by you; rather, the intent is to exercise the right to
control the distribution of derivative or collective works based on the Program.
In addition, mere aggregation of another work not based on the Program with the Program (or with a work based on the Program) on a volume of a
storage or distribution medium does not bring the other work under the scope of this License.
4.
You may copy and distribute the Program (or a work based on it, under Section 2) in object code or executable form under the terms of Sections 1 and 2
above provided that you also do one of the following:
a. Accompany it with the complete corresponding machine-readable source code, which must be distributed under the terms of Sections 1 and 2
above on a medium customarily used for software interchange; or,
b. Accompany it with a written offer, valid for at least three years, to give any third party, for a charge no more than your cost of physically
performing source distribution, a complete machine-
readable copy of the corresponding source code, to be distributed under the terms of Sections
1 and 2 above on a medium customarily used for software interchange; or,
c. Accompany it with the information you received as to the offer to distribute corresponding source code. (This alternative is allowed only for
noncommercial distribution and only if you received the program in object code or executable form with such an offer, in accord with Subsection b
above.)
The source code for a work means the preferred form of the work for making modifications to it. For an executable work, complete source code means all
the source code for all modules it contains, plus any associated interface definition files, plus the scripts used to control compilation and installation of
the executable. However, as a special exception, the source code distributed need not include anything that is normally distributed (in either source or
binary form) with the major components (compiler, kernel, and so on) of the operating system on which the executable runs, unless that component
itself accompanies the executable.
If distribution of executable or object code is made by offering access to copy from a designated place, then offering equivalent access to copy the
source code from the same place counts as distribution of the source code, even though third parties are not compelled to copy the source along with
the object code.
5.
You may not copy, modify, sublicense, or distribute the Program except as expressly provided under this License. Any attempt otherwise to copy, modify,
sublicense or distribute the Program is void, and will automatically terminate your rights under this License. However, parties who have received copies,
or rights, from you under this License will not have their licenses terminated so long as such parties remain in full compliance.
6. You are not required to accept this License, since you have not signed it. However, nothing else grants you permission to modify or distribute the
Program or its derivative works. These actions are prohibited by law if you do not accept this License. Therefore, by modifying or distributing the
Program (or any work based on the Program), you indicate your acceptance of this License to do so, and all its terms and conditions for copying,
distributing or modifying the Program or works based on it.
7. Each time you redistribute the Program (or any work based on the Program), the recipient automatically receives a license from the original licensor to
copy, distribute or modify the Program subject to these terms and conditions. You may not impose any further restrictions on the recipients' exercise of
the rights granted herein. You are not responsible for enforcing compliance by third parties to this License.
8. If, as a consequence of a court judgment or allegation of patent infringement or for any other reason (not limited to patent issues), conditions are
imposed on you (whether by court order, agreement or otherwise) that contradict the conditions of this License, they do not excuse you from the
conditions of this License. If you cannot distribute so as to satisfy simultaneously your obligations under this License and any other pertinent
obligations, then as a consequence you may not distribute the Program at all. For example, if a patent license would not permit royalty-free
redistribution of the Program by all those who receive copies directly or indirectly through you, then the only way you could satisfy both it and this
License would be to refrain entirely from distribution of the Program.
If any portion of this section is held invalid or unenforceable under any particular circumstance, the balance of the section is intended to apply and the
section as a whole is intended to apply in other circumstances.
It is not the purpose of this section to induce you to infringe any patents or other property right claims or to contest validity of any such claims; this
section has the sole purpose of protecting the integrity of the free software distribution system, which is implemented by public license practices. Many
people have made generous contributions to the wide range of software distributed through that system in reliance on consistent application of that
system; it is up to the author/donor to decide if he or she is willing to distribute software through any other system and a licensee cannot impose that
choice.
This section is intended to make thoroughly clear what is believed to be a consequence of the rest of this License.
9. If the distribution and/or use of the Program is restricted in certain countries either by patents or by copyrighted interfaces, the original copyright holder
who places the Program under this License may add an explicit geographical distribution limitation excluding those countries, so that distribution is
permitted only in or among countries not thus excluded. In such case, this License incorporates the limitation as if written in the body of this License.
10.
The Free Software Foundation may publish revised and/or new versions of the General Public License from time to time. Such new versions will be similar
in spirit to the present version, but may differ in detail to address new problems or concerns.
Each version is given a distinguishing version number. If the Program specifies a version number of this License which applies to it and "any later
version", you have the option of following the terms and conditions either of that version or of any later version published by the Free Software

Foundation. If the Program does not specify a version number of this License, you may choose any version ever published by the Free Software
Foundation.
11. If you wish to incorporate parts of the Program into other free programs whose distribution conditions are different, write to the author to ask for
permission. For software which is copyrighted by the Free Software Foundation, write to the Free Software Foundation; we sometimes make exceptions
for this. Our decision will be guided by the two goals of preserving the free status of all derivatives of our free software and of promoting the sharing
and reuse of software generally.
NO WARRANTY
12. BECAUSE THE PROGRAM IS LICENSED FREE OF CHARGE, THERE IS NO WARRANTY FOR THE PROGRAM, TO THE EXTENT PERMITTED BY APPLICABLE LAW.
EXCEPT WHEN OTHERWISE STATED IN WRITING THE COPYRIGHT HOLDERS AND/OR OTHER PARTIES PROVIDE THE PROGRAM "AS IS" WITHOUT WARRANTY
OF ANY KIND, EITHER EXPRESSED OR IMPLIED, INCLUDING, BUT NOT LIMITED TO, THE IMPLIED WARRANTIES OF MERCHANTABILITY AND FITNESS FOR A
PARTICULAR PURPOSE. THE ENTIRE RISK AS TO THE QUALITY AND PERFORMANCE OF THE PROGRAM IS WITH YOU. SHOULD THE PROGRAM PROVE
DEFECTIVE, YOU ASSUME THE COST OF ALL NECESSARY SERVICING, REPAIR OR CORRECTION.
13.
IN NO EVENT UNLESS REQUIRED BY APPLICABLE LAW OR AGREED TO IN WRITING WILL ANY COPYRIGHT HOLDER, OR ANY OTHER PARTY WHO MAY MODIFY
AND/OR REDISTRIBUTE THE PROGRAM AS PERMITTED ABOVE, BE LIABLE TO YOU FOR DAMAGES, INCLUDING ANY GENERAL, SPECIAL, INCIDENTAL OR
CONSEQUENTIAL DAMAGES ARISING OUT OF THE USE OR INABILITY TO USE THE PROGRAM (INCLUDING BUT NOT LIMITED TO LOSS OF DATA OR DATA
BEING RENDERED INACCURATE OR LOSSES SUSTAINED BY YOU OR THIRD PARTIES OR A FAILURE OF THE PROGRAM TO OPERATE WITH ANY OTHER
PROGRAMS), EVEN IF SUCH HOLDER OR OTHER PARTY HAS BEEN ADVISED OF THE POSSIBILITY OF SUCH DAMAGES.
END OF TERMS AND CONDITIONS
How to Apply These Terms to Your New Programs
If you develop a new program, and you want it to be of the greatest possible use to the public, the best way to achieve this is to make it free software which
everyone can redistribute and change under these terms.
To do so, attach the following notices to the program. It is safest to attach them to the start of each source file to most effectively convey the exclusion of
warranty; and each file should have at least the "copyright" line and a pointer to where the full notice is found.
1 April 1989
Lexmark International, Inc.
This General Public License does not permit incorporating your program into proprietary programs. If your program is a subroutine library, you may consider it
more useful to permit linking proprietary applications with the library. If this is what you want to do, use the GNU Library General Public License instead of this
License.
GNU LESSER GENERAL PUBLIC LICENSE
Version 2.1, February 1999
Copyright (C) 1991, 1999 Free Software Foundation, Inc.
59 Temple Place, Suite 330, Boston, MA 02111-1307 USA
Everyone is permitted to copy and distribute verbatim copies of this license document, but changing it is not allowed.
[This is the first released version of the Lesser GPL. It also counts as the successor of the GNU Library Public License, version 2, hence the version number
2.1.]
Preamble
The licenses for most software are designed to take away your freedom to share and change it. By contrast, the GNU General Public Licenses are intended to
guarantee your freedom to share and change free software--to make sure the software is free for all its users.

This license, the Lesser General Public License, applies to some specially designated software packages--typically libraries--of the Free Software Foundation
and other authors who decide to use it. You can use it too, but we suggest you first think carefully about whether this license or the ordinary General Public
License is the better strategy to use in any particular case, based on the explanations below.
When we speak of free software, we are referring to freedom of use, not price. Our General Public Licenses are designed to make sure that you have the
freedom to distribute copies of free software (and charge for this service if you wish); that you receive source code or can get it if you want it; that you can
change the software and use pieces of it in new free programs; and that you are informed that you can do these things.
To protect your rights, we need to make restrictions that forbid distributors to deny you these rights or to ask you to surrender these rights. These restrictions
translate to certain responsibilities for you if you distribute copies of the library or if you modify it.
For example, if you distribute copies of the library, whether gratis or for a fee, you must give the recipients all the rights that we gave you. You must make
sure that they, too, receive or can get the source code. If you link other code with the library, you must provide complete object files to the recipients, so that
they can relink them with the library after making changes to the library and recompiling it. And you must show them these terms so they know their rights.
We protect your rights with a two-step method: (1) we copyright the library, and (2) we offer you this license, which gives you legal permission to copy,
distribute and/or modify the library.
To protect each distributor, we want to make it very clear that there is no warranty for the free library. Also, if the library is modified by someone else and
passed on, the recipients should know that what they have is not the original version, so that the original author's reputation will not be affected by problems
that might be introduced by others.
Finally, software patents pose a constant threat to the existence of any free program. We wish to make sure that a company cannot effectively restrict the
users of a free program by obtaining a restrictive license from a patent holder. Therefore, we insist that any patent license obtained for a version of the library
must be consistent with the full freedom of use specified in this license.
Most GNU software, including some libraries, is covered by the ordinary GNU General Public License. This license, the GNU Lesser General Public License,
applies to certain designated libraries, and is quite different from the ordinary General Public License. We use this license for certain libraries in order to permit
linking those libraries into non-free programs.
When a program is linked with a library, whether statically or using a shared library, the combination of the two is legally speaking a combined work, a
derivative of the original library. The ordinary General Public License therefore permits such linking only if the entire combination fits its criteria of freedom. The
Lesser General Public License permits more lax criteria for linking other code with the library.
We call this license the "Lesser" General Public License because it does Less to protect the user's freedom than the ordinary General Public License. It also
provides other free software developers Less of an advantage over competing non-free programs. These disadvantages are the reason we use the ordinary
General Public License for many libraries. However, the Lesser license provides advantages in certain special circumstances.
For example, on rare occasions, there may be a special need to encourage the widest possible use of a certain library, so that it becomes a de-
facto standard.
To achieve this, non-free programs must be allowed to use the library. A more frequent case is that a free library does the same job as widely used non-free
libraries. In this case, there is little to gain by limiting the free library to free software only, so we use the Lesser General Public License.
In other cases, permission to use a particular library in non-free programs enables a greater number of people to use a large body of free software. For
example, permission to use the GNU C Library in non-free programs enables many more people to use the whole GNU operating system, as well as its variant,
the GNU/Linux operating system.
Although the Lesser General Public License is Less protective of the users' freedom, it does ensure that the user of a program that is linked with the Library
has the freedom and the wherewithal to run that program using a modified version of the Library.
The precise terms and conditions for copying, distribution and modification follow. Pay close attention to the difference between a "work based on the library"
and a "work that uses the library". The former contains code derived from the library, whereas the latter must be combined with the library in order to run.
GNU LESSER GENERAL PUBLIC LICENSE
TERMS AND CONDITIONS FOR COPYING, DISTRIBUTION AND MODIFICATION
This License Agreement applies to any software library or other program which contains a notice placed by the copyright holder or other authorized party
saying it may be distributed under the terms of this Lesser General Public License (also called "this License"). Each licensee is addressed as "you".

A "library" means a collection of software functions and/or data prepared so as to be conveniently linked with application programs (which use some of those
functions and data) to form executables.
The "Library", below, refers to any such software library or work which has been distributed under these terms. A "work based on the Library" means either
the Library or any derivative work under copyright law: that is to say, a work containing the Library or a portion of it, either verbatim or with modifications
and/or translated straightforwardly into another language. (Hereinafter, translation is included without limitation in the term "modification".)
"Source code" for a work means the preferred form of the work for making modifications to it. For a library, complete source code means all the source code for
all modules it contains, plus any associated interface definition files, plus the scripts used to control compilation and installation of the library.
Activities other than copying, distribution and modification are not covered by this License; they are outside its scope. The act of running a program using the
Library is not restricted, and output from such a program is covered only if its contents constitute a work based on the Library (independent of the use of the
Library in a tool for writing it). Whether that is true depends on what the Library does and what the program that uses the Library does.
1. You may copy and distribute verbatim copies of the Library's complete source code as you receive it, in any medium, provided that you conspicuously
and appropriately publish on each copy an appropriate copyright notice and disclaimer of warranty; keep intact all the notices that refer to this License
and to the absence of any warranty; and distribute a copy of this License along with the Library.
You may charge a fee for the physical act of transferring a copy, and you may at your option offer warranty protection in exchange for a fee.
2. You may modify your copy or copies of the Library or any portion of it, thus forming a work based on the Library, and copy and distribute such
modifications or work under the terms of Section 1 above, provided that you also meet all of these conditions:
a. The modified work must itself be a software library.
b. You must cause the files modified to carry prominent notices stating that you changed the files and the date of any change.
c. You must cause the whole of the work to be licensed at no charge to all third parties under the terms of this License.
d. If a facility in the modified Library refers to a function or a table of data to be supplied by an application program that uses the facility, other than
as an argument passed when the facility is invoked, then you must make a good faith effort to ensure that, in the event an application does not
supply such function or table, the facility still operates, and performs whatever part of its purpose remains meaningful.
(For example, a function in a library to compute square roots has a purpose that is entirely well-
defined independent of the application. Therefore,
Subsection 2d requires that any application-supplied function or table used by this function must be optional: if the application does not supply it,
the square root function must still compute square roots.)
These requirements apply to the modified work as a whole. If identifiable sections of that work are not derived from the Library, and can be reasonably
considered independent and separate works in themselves, then this License, and its terms, do not apply to those sections when you distribute them as
separate works. But when you distribute the same sections as part of a whole which is a work based on the Library, the distribution of the whole must
be on the terms of this License, whose permissions for other licensees extend to the entire whole, and thus to each and every part regardless of who
wrote it.
Thus, it is not the intent of this section to claim rights or contest your rights to work written entirely by you; rather, the intent is to exercise the right to
control the distribution of derivative or collective works based on the Library.
In addition, mere aggregation of another work not based on the Library with the Library (or with a work based on the Library) on a volume of a storage
or distribution medium does not bring the other work under the scope of this License.
3. You may opt to apply the terms of the ordinary GNU General Public License instead of this License to a given copy of the Library. To do this, you must
alter all the notices that refer to this License, so that they refer to the ordinary GNU General Public License, version 2, instead of to this License. (If a
newer version than version 2 of the ordinary GNU General Public License has appeared, then you can specify that version instead if you wish.) Do not
make any other change in these notices.
Once this change is made in a given copy, it is irreversible for that copy, so the ordinary GNU General Public License applies to all subsequent copies and
derivative works made from that copy.
This option is useful when you wish to copy part of the code of the Library into a program that is not a library.
4.
You may copy and distribute the Library (or a portion or derivative of it, under Section 2) in object code or executable form under the terms of Sections 1
and 2 above provided that you accompany it with the complete corresponding machine-readable source code, which must be distributed under the
terms of Sections 1 and 2 above on a medium customarily used for software interchange.
If distribution of object code is made by offering access to copy from a designated place, then offering equivalent access to copy the source code from
the same place satisfies the requirement to distribute the source code, even though third parties are not compelled to copy the source along with the
object code.
5. A program that contains no derivative of any portion of the Library, but is designed to work with the Library by being compiled or linked with it, is called
a "work that uses the Library". Such a work, in isolation, is not a derivative work of the Library, and therefore falls outside the scope of this License.
However, linking a "work that uses the Library" with the Library creates an executable that is a derivative of the Library (because it contains portions of
the Library), rather than a "work that uses the library". The executable is therefore covered by this License. Section 6 states terms for distribution of
such executables.
When a "work that uses the Library" uses material from a header file that is part of the Library, the object code for the work may be a derivative work of
the Library even though the source code is not. Whether this is true is especially significant if the work can be linked without the Library, or if the work is
itself a library. The threshold for this to be true is not precisely defined by law.
If such an object file uses only numerical parameters, data structure layouts and accessors, and small macros and small inline functions (ten lines or less
in length), then the use of the object file is unrestricted, regardless of whether it is legally a derivative work. (Executables containing this object code
plus portions of the Library will still fall under Section 6.)
Otherwise, if the work is a derivative of the Library, you may distribute the object code for the work under the terms of Section 6. Any executables
containing that work also fall under Section 6, whether or not they are linked directly with the Library itself.
6. As an exception to the Sections above, you may also combine or link a "work that uses the Library" with the Library to produce a work containing

portions of the Library, and distribute that work under terms of your choice, provided that the terms permit modification of the work for the customer's
own use and reverse engineering for debugging such modifications.
You must give prominent notice with each copy of the work that the Library is used in it and that the Library and its use are covered by this License. You
must supply a copy of this License. If the work during execution displays copyright notices, you must include the copyright notice for the Library among
them, as well as a reference directing the user to the copy of this License. Also, you must do one of these things:
a. Accompany the work with the complete corresponding machine-readable source code for the Library including whatever changes were used in
the work (which must be distributed under Sections 1 and 2 above); and, if the work is an executable linked with the Library, with the complete
machine-readable "work that uses the Library", as object code and/or source code, so that the user can modify the Library and then relink to
produce a modified executable containing the modified Library. (It is understood that the user who changes the contents of definitions files in the
Library will not necessarily be able to recompile the application to use the modified definitions.)
b. Use a suitable shared library mechanism for linking with the Library. A suitable mechanism is one that (1) uses at run time a copy of the library
already present on the user's computer system, rather than copying library functions into the executable, and (2) will operate properly with a
modified version of the library, if the user installs one, as long as the modified version is interface-compatible with the version that the work was
made with.
c. Accompany the work with a written offer, valid for at least three years, to give the same user the materials specified in Subsection 6a, above, for
a charge no more than the cost of performing this distribution.
d. If distribution of the work is made by offering access to copy from a designated place, offer equivalent access to copy the above specified
materials from the same place.
e. Verify that the user has already received a copy of these materials or that you have already sent this user a copy.
For an executable, the required form of the "work that uses the Library" must include any data and utility programs needed for reproducing the
executable from it. However, as a special exception, the materials to be distributed need not include anything that is normally distributed (in either
source or binary form) with the major components (compiler, kernel, and so on) of the operating system on which the executable runs, unless that
component itself accompanies the executable.
It may happen that this requirement contradicts the license restrictions of other proprietary libraries that do not normally accompany the operating
system. Such a contradiction means you cannot use both them and the Library together in an executable that you distribute.
7. You may place library facilities that are a work based on the Library side-by-side in a single library together with other library facilities not covered by
this License, and distribute such a combined library, provided that the separate distribution of the work based on the Library and of the other library
facilities is otherwise permitted, and provided that you do these two things:
a. Accompany the combined library with a copy of the same work based on the Library, uncombined with any other library facilities. This must be
distributed under the terms of the Sections above.
b. Give prominent notice with the combined library of the fact that part of it is a work based on the Library, and explaining where to find the
accompanying uncombined form of the same work.
8.
You may not copy, modify, sublicense, link with, or distribute the Library except as expressly provided under this License. Any attempt otherwise to copy,
modify, sublicense, link with, or distribute the Library is void, and will automatically terminate your rights under this License. However, parties who have
received copies, or rights, from you under this License will not have their licenses terminated so long as such parties remain in full compliance.
9.
You are not required to accept this License, since you have not signed it. However, nothing else grants you permission to modify or distribute the Library
or its derivative works. These actions are prohibited by law if you do not accept this License. Therefore, by modifying or distributing the Library (or any
work based on the Library), you indicate your acceptance of this License to do so, and all its terms and conditions for copying, distributing or modifying
the Library or works based on it.
10.
Each time you redistribute the Library (or any work based on the Library), the recipient automatically receives a license from the original licensor to copy,
distribute, link with or modify the Library subject to these terms and conditions. You may not impose any further restrictions on the recipients' exercise
of the rights granted herein. You are not responsible for enforcing compliance by third parties with this License.
11. If, as a consequence of a court judgment or allegation of patent infringement or for any other reason (not limited to patent issues), conditions are
imposed on you (whether by court order, agreement or otherwise) that contradict the conditions of this License, they do not excuse you from the
conditions of this License. If you cannot distribute so as to satisfy simultaneously your obligations under this License and any other pertinent
obligations, then as a consequence you may not distribute the Library at all. For example, if a patent license would not permit royalty-free redistribution
of the Library by all those who receive copies directly or indirectly through you, then the only way you could satisfy both it and this License would be to
refrain entirely from distribution of the Library.
If any portion of this section is held invalid or unenforceable under any particular circumstance, the balance of the section is intended to apply, and the
section as a whole is intended to apply in other circumstances.
It is not the purpose of this section to induce you to infringe any patents or other property right claims or to contest validity of any such claims; this
section has the sole purpose of protecting the integrity of the free software distribution system which is implemented by public license practices. Many
people have made generous contributions to the wide range of software distributed through that system in reliance on consistent application of that
system; it is up to the author/donor to decide if he or she is willing to distribute software through any other system and a licensee cannot impose that
choice.
This section is intended to make thoroughly clear what is believed to be a consequence of the rest of this License.
12. If the distribution and/or use of the Library is restricted in certain countries either by patents or by copyrighted interfaces, the original copyright holder
who places the Library under this License may add an explicit geographical distribution limitation excluding those countries, so that distribution is
permitted only in or among countries not thus excluded. In such case, this License incorporates the limitation as if written in the body of this License.
13. The Free Software Foundation may publish revised and/or new versions of the Lesser General Public License from time to time. Such new versions will
be similar in spirit to the present version, but may differ in detail to address new problems or concerns. Each version is given a distinguishing version
number. If the Library specifies a version number of this License which applies to it and "any later version", you have the option of following the terms
and conditions either of that version or of any later version published by the Free Software Foundation. If the Library does not specify a license version
number, you may choose any version ever published by the Free Software Foundation.
14. If you wish to incorporate parts of the Library into other free programs whose distribution conditions are incompatible with these, write to the author to
ask for permission. For software which is copyrighted by the Free Software Foundation, write to the Free Software Foundation; we sometimes make
exceptions for this. Our decision will be guided by the two goals of preserving the free status of all derivatives of our free software and of promoting the
sharing and reuse of software generally.
NO WARRANTY
15. BECAUSE THE LIBRARY IS LICENSED FREE OF CHARGE, THERE IS NO WARRANTY FOR THE LIBRARY, TO THE EXTENT PERMITTED BY APPLICABLE LAW.
EXCEPT WHEN OTHERWISE STATED IN WRITING THE COPYRIGHT HOLDERS AND/OR OTHER PARTIES PROVIDE THE LIBRARY "AS IS" WITHOUT WARRANTY
OF ANY KIND, EITHER EXPRESSED OR IMPLIED, INCLUDING, BUT NOT LIMITED TO, THE IMPLIED WARRANTIES OF MERCHANTABILITY AND FITNESS FOR A
PARTICULAR PURPOSE. THE ENTIRE RISK AS TO THE QUALITY AND PERFORMANCE OF THE LIBRARY IS WITH YOU. SHOULD THE LIBRARY PROVE DEFECTIVE,

YOU ASSUME THE COST OF ALL NECESSARY SERVICING, REPAIR OR CORRECTION.
16.
IN NO EVENT UNLESS REQUIRED BY APPLICABLE LAW OR AGREED TO IN WRITING WILL ANY COPYRIGHT HOLDER, OR ANY OTHER PARTY WHO MAY MODIFY
AND/OR REDISTRIBUTE THE LIBRARY AS PERMITTED ABOVE, BE LIABLE TO YOU FOR DAMAGES, INCLUDING ANY GENERAL, SPECIAL, INCIDENTAL OR
CONSEQUENTIAL DAMAGES ARISING OUT OF THE USE OR INABILITY TO USE THE LIBRARY (INCLUDING BUT NOT LIMITED TO LOSS OF DATA OR DATA BEING
RENDERED INACCURATE OR LOSSES SUSTAINED BY YOU OR THIRD PARTIES OR A FAILURE OF THE LIBRARY TO OPERATE WITH ANY OTHER SOFTWARE),
EVEN IF SUCH HOLDER OR OTHER PARTY HAS BEEN ADVISED OF THE POSSIBILITY OF SUCH DAMAGES.
END OF TERMS AND CONDITIONS
How to Apply These Terms to Your New Libraries
If you develop a new library, and you want it to be of the greatest possible use to the public, we recommend making it free software that everyone can
redistribute and change. You can do so by permitting redistribution under these terms (or, alternatively, under the terms of the ordinary General Public
License).
To apply these terms, attach the following notices to the library. It is safest to attach them to the start of each source file to most effectively convey the
exclusion of warranty; and each file should have at least the "copyright" line and a pointer to where the full notice is found.
1 April 1990
Lexmark International, Inc.
That's all there is to it!

GuíadelusuariodeDell™LaserPrinter5210n/5310n
.
Para solicitar suministros de Dell, haga lo siguiente:
1. Haga doble clic en el icono que aparece en el escritorio.
2. Visite el sitio Web de Dell:www.dell.com/supplies
3. Manual del propietario
etiqueta de servicio.
Notas, avisos y precauciones
Lainformaciónincluidaenelpresentedocumentoestásujetaamodificacionessinprevioaviso.
©2005DellInc.Reservadostodoslosderechos.
Marcas comerciales que se incluyen en el texto: Dell y el logotipo DELL son marcas comerciales de Dell Inc.; Microsoft y Windows son marcas registradas de Microsoft Corporation.
cualquier derecho de propiedad de los nombres y marcas comerciales que no sean los de sus propios productos.
Modelo 5210n/5310n
Agostode2005Rev.A00
NOTA: una NOTA
AVISO: un AVISO
PRECAUCIÓN: unaPRECAUCIÓNindicaquesepuedenproducirdañosmaterialesopersonalesoquepuedeexistirpeligrodemuerte.

Eliminacióndeatascos
Seleccionar para eliminar
Recuperaciónatasco
Activado o Automático; no obstante, el valor Automático
Identificacióndeatascos
(bandejas, alimentador multiuso y alimentador de sobres) y las bandejas de salida (unidades) que utilice.
atascos posibles.
Eliminacióndeatascosdelaimpresora
Número
Mensaje
Quéhacer*
1
27x Atasco de papel Comp. salida x
2
202 Atasco papel Abrir pta. post.
3
201 Atasco papel Retirar cartucho
4
200 Atasco papel Retirar cartucho
5
23x Atasco papel Abrir puerta
6
260 Atasco papel Comp. alim. sob.
7
250 Atasco papel Comp. alim. mult
8
9
24x Atasco papel Comprobar bja. x
*Despuésdeeliminarelatasco,pulseelbotónSeleccionar parareanudarlaimpresión.

aparezca en el panel del operador.
en una de las opciones de salida.
200 y 201 Atasco papel Retirar cartucho
1. Tire del pestillo situado en la parte frontal de la impresora para bajar el alimentador multiuso.
2.
3. Levante y tire del cartucho para sacarlo de la impresora.
4.
NOTA:
.
PRECAUCIÓN: elinteriordelaimpresorapodríaestarcaliente.Dejequelaimpresoraseenfríeantesdetocarningúncomponenteinterno.
AVISO: no toque el tambor del fotoconductor de la parte inferior del cartucho. Utilice la palanca del cartucho siempre que lo sujete.
NOTA:

5.
6.
7. Cierre la cubierta frontal superior.
8. Cierre el alimentador multiuso.
NOTA:
AVISO:
PRECAUCIÓN: noutiliceobjetospuntiagudosparaextraerelpapel.Podríanprovocardañospersonalesoalaimpresora.

9. Seleccionar .
202 Atasco papel Abrir pta. post.
1. Seleccionar paso 2.
2. Abra la puerta posterior de la impresora.
3. Extraiga el material atascado.
4. Cierre la puerta posterior.
5. Seleccionar .
PRECAUCIÓN: elinteriordelaimpresorapodríaestarcaliente.Dejequelaimpresoraseenfríeantesdetocarningúncomponenteinterno.
PRECAUCIÓN: noutiliceobjetospuntiagudosparaextraerelpapel.Podríanprovocardañospersonalesoalaimpresora.

23xAtascopapelAbrirpuertaposteriordeldúplex
1.
2. Extraiga el material atascado.
3. encaja en su lugar.
4. Seleccionar .
23x y 24x Atascos
1. Abra la bandeja de papel de la impresora y extraiga el papel atascado.

2.
3. Abra las bandejas opcionales empezando desde arriba y extraiga el papel atascado.
4. Seleccionar .
250 Atasco papel Comp. alim. mult
1. Extraiga el papel del alimentador multiuso.

2. Airee el papel y vuelva a apilarlo.
3.
4.
5. Seleccionar .
260 Atasco papel Comp. alim. sob.
El alimentador de sobres introduce los sobres desde la parte inferior de la pila; el sobre inferior es el que se ha atascado.
1. Levante el peso de sobres.

2. Retire todos los sobres.
Si el sobre atascado se ha introducido en la impresora y no se puede extraer, retire el alimentador de sobres.
a.
b. Extraiga el sobre de la impresora.
c. encaja en su lugar.
3. Airee y apile los sobres.
4. Cargue el alimentador de sobres.
5.
NOTA: 200 y 201 Atasco papel Retirar cartucho

6. Baje el peso de sobres.
7. Seleccionar .
27x Atasco de papel Comp. salida x
Para eliminar un atasco en la unidad de salida:
1. Seleccionar paso 2.
2. Empuje los pestillos de la puerta posterior de la bandeja de salida hacia el centro. Las puertas posteriores se abren y caen.
NOTA:

3. Extraiga el material atascado.
4.
5. Seleccionar .

Aviso de licencia
El software residente de la impresora contiene:
l Software desarrollado y con copyright de Dell o de otras marcas
l
l
l
l Licencia GNU
l Otras licencias de terceros (software)
Drivers and Utilities
haga clic en Contactar con DellManual del propietario.
\Install\licensesDrivers and Utilities.
Este producto incluye software desarrollado por Apache Software Foundation (http://www.apache.org).

Instalacióndecontroladoresparaimpresiónlocal
Windows
Macintosh
Linux/UNIX
Una impresora local es una impresora conectada a un ordenador mediante un cable paralelo o USB. Silaimpresoraestáconectadaaunaredenvezdeaun
ordenador, vaya a .
Un controlador de impresora es un software que permite que el ordenador se comunique con la impresora.
Utilice la siguiente tabla para buscar instrucciones para su sistema operativo.
Windows
Puede que algunos sistemas operativos Windows ya incluyan un controlador de impresora que sea compatible con la impresora.
Instalacióndelsoftwaredelaimpresora
1. Encienda el ordenador e inserte el CD Drivers and Utilities, que se debe
setup.exe.
2. Cuando aparezca la pantalla del CD Drivers and Utilities, haga clic en Instalaciónindividual:instalalaimpresoraparasuusoenesteordenador
solamente.
3. Seleccione la impresora en el cuadro desplegable.
4. Seleccione Instalacióntípica(recomendada)Instalar.
Enhorabuena
5. Haga clic en Finalizar
Plug-N-
Instalacióndecontroladoresdeimpresoraadicionales
Si desea instalar controladores de impresora adicionales en el ordenador, realice estos pasos.
1. Encienda el ordenador e inserte el CD Drivers and Utilities, Si aparece el CD Drivers and Utilities, haga clic en Cancelar.
2. En Windows XP, haga clic en Inicio®Panel de control®Impresoras y otro hardware®Impresoras y faxes.
Sistema operativo
Windows
Macintosh
Linux/UNIX
NOTA:
en la carpeta Impresoras.
Sistema operativo del ordenador:
Utilice este tipo de cable:
Windows XP Professional x64
Windows XP
Windows 2003 Server
Windows 2000
Windows Me
Windows 98 SE
USB o paralelo
Windows NT
Paralelo
NOTA: en Windows XP Professional x64, Windows XP Professional y Windows NT se necesita acceso administrativo para instalar los controladores de
impresora en el ordenador.

Paralosdemássistemas, haga clic en Inicio®Configuración®Impresoras.
3. Haga doble clic en Agregar impresora.
4. Haga clic en Siguiente.
5. Siguiente.
6. Siguiente.
7. Seleccione Utilizar disco.
8. Acceda a la unidad de CD y seleccione el controlador correcto para el sistema operativo.
9. Haga clic en AbrirAceptar.
10. Seleccione el tipo de controlador que desee instalar (PCL o PS) en la lista Fabricante y el modelo de impresora en la lista Impresoras
haga clic en Siguiente.
11. Siga realizando los pasos del Asistente para agregar impresorasFinalizar para instalar el controlador de impresora.
Macintosh
CreacióndeunacolaenelCentrodeImpresión/Utilidaddeinstalacióndelaimpresora
(MacOSX)
1.
a. Inserte el CD Drivers and Utilities.
b. Haga doble clic en el paquete del instalador de la impresora.
c. Haga clic en Continuar en la pantalla de bienvenida
d. Haga clic en ContinuarAceptar para aceptar las condiciones del mismo.
e. Seleccione un destino y haga clic en Continuar.
f. En la pantalla Instalaciónsimple, haga clic en Instalar.
g. Aceptar
h. Haga clic en Cerrar
2. Abra Finder, haga clic en AplicacionesUtilidades.
3. Haga doble clic en CentrodeImpresiónoUtilidaddeinstalacióndelaimpresora.
4. Realice uno de los siguientes pasos:
l Cuando la impresora conectada mediante USB aparezca en la lista de impresoras, salga del CentrodeImpresión o la Utilidaddeinstalaciónde
la impresora
l Si la impresora conectada mediante USB no aparece en la lista de impresoras
lista de impresoras, salga del CentrodeImpresión o la Utilidad de
instalacióndelaimpresora.
Creacióndeuniconodeimpresoradeescritorio(MacOS9.x)
1.
NOTA: si ha instalado los controladores de impresora desde el CD Drivers and Utilities antes de conectar la impresora al ordenador, el controlador PCL
Sistema operativo
Tipo de controlador
Nombre del controlador
Windows XP Professional x64
PCL
D:\Drivers\Print\x64\dkaatb40.inf
PS
D:\Drivers\Print\x64\dkaat940.inf
Windows XP
Windows 2003 Server
Windows 2000
PCL
D:\Drivers\Print\Win_2kXP\dkaat2da.inf
PS
D:\Drivers\Print\Win_2kXP\dkaat1da.inf
Windows NT
PCL
D:\Drivers\Print\Win_NT.40\dkaat2da.inf
PS
D:\Drivers\Print\Win_NT.40\dkaat1da.inf
Windows Me
Windows 98 SE
PCL
D:\Drivers\Print\Win_9xme\<carpeta de idioma>dkaat2da.inf
PS
D:\Drivers\Print\Win_9xme\<carpeta de idioma>dkaat1da.inf
NOTA:

a. Inserte el CD Drivers and Utilities.
b. Haga doble clic en Classic y en el paquete del instalador de la impresora.
c. Seleccione el idioma correcto y haga clic en Continuar.
d. Haga clic en Continuar
e. Haga clic en ContinuarAceptar para aceptar las condiciones del mismo.
f. En la pantalla Tipodeinstalación, haga clic en Instalar
g. Haga clic en Cerrar
2. Realice uno de los siguientes pasos:
l Mac OS 9.0: abra Apple LaserWriter.
l Mac OS 9.19.x: abra Aplicaciones y haga clic en Utilidades.
3. Haga doble clic en Utilidad Impresora Escritorio.
4. Seleccione Impresora (USB) y haga clic en OK.
5. SeleccióndeimpresoraUSB, haga clic en Cambiar.
Si la impresora no aparece en la lista SeleccióndeimpresoraUSB
6. Seleccione el nombre de la impresora y haga clic en OK. La impresora aparece en la ventana Impresora (USB) original.
7. Archivo PPD (PostScript Printer Description), haga clic en Automática
impresora.
8. Haga clic en Crear y en Guardar.
9. Especifique un nombre de impresora y haga clic en Guardar. La impresora se guarda ahora como una impresora de escritorio.
Linux/UNIX
En el CD Drivers and Utilities
de Sun.
Antesderealizarlainstalación
Realice las siguientes tareas antes de instalar los controladores de impresora:
1.
2.
3. Configure un grupo de usuarios administrativos.
impresora. El grupo administrativo predeterminado es bin.
Si dispone de un grupo administrativo en el host, puede que desee utilizarlo para los controladores de impresora. Los usuarios no administrativos no
pueden agregar o eliminar colas de impresora.
4.
Este paquete se puede instalar de varias formas. Puede instalar los controladores de impresora en:
l
l
obtener ayuda, consulte Montaje mediante NFS de controladores de impresora.
Sistemas operativos admitidos
NOTA:

l Debian GNU/Linux
l Linspire Linux
l RedHat Linux
l SuSE Linux
Requisitos del sistema Linux
InstalaciónenRedHatLinuxoSuSELinux
1. .
2. Monte el CD.
3. Cambie al directorio del archivo de paquete. Si ha montado el CD-ROM en /mnt/cdrom:
# cd /mnt/cdrom/unix/packages
4. Instale el archivo de paquete:
# rpm -ivh print-drivers-linux-glibc2-x86.rpm
5.
# /usr/local/dell/setup.dellprint
InstalaciónenLinspireoDebianGNU/Linux
1. .
2. Monte el CD.
3. Cambie al directorio del archivo de paquete. Si ha montado el CD-ROM en /mnt/cdrom:
# cd /mnt/cdrom/unix/packages
4. Instale el archivo de paquete:
# deb -i print-drivers-linux-glibc2-x86.deb
5.
# /usr/local/dell/setup.dellprint
InstalaciónenSunSolarisSPARC
1. Defina la variable de entorno NONABI_SCRIPTS como TRUE.
2. Instale el archivo de paquete:
a. Intro:
# ps -ef | grep vold
# pkgadd -d /cdrom/cdrom0/unix/packages/ print-drivers-solaris2-sparc.pkg
¡
¡ Monte el CD. Por ejemplo, si la ruta a la unidad de CD-# mount -F hsfs -o
ro /dev/dsk/c0t6d0s2 /cdrom
¡ # pkgadd -d /cdrom/unix/packages/print-drivers-solaris2-sparc.pkg
b. Siga las instrucciones de la pantalla.
3.
NOTA:
NOTA:

Intro.
Intro. Por ejemplo: 1,2,3.
4. Siga las indicaciones y responda a las preguntas que aparezcan en la pantalla:
a. Para aceptar los valores predeterminados, pulse Intro.
b. Para responder a preguntas de tipo afirmativo/negativo, escriba y, n o ?Intro.
c. q para salir.
Eliminacióndecontroladoresdeimpresión
El administrador del sistema puede eliminar los controladores de impresora mediante las utilidades enumeradas en esta tabla.
Eliminacióndelosdirectoriosrestantes
de controladores de impresora, es posible que algunos directorios tengan que ser eliminados manualmente.
Sistema operativo
Herramientadeeliminacióndepaquetes
RedHat Linux y SuSE Linux
rpm -e
Linspire Linux y Debian GNU/Linux
dpkg -r

Mantenimiento de la impresora
Desplazamiento de la impresora
Mantenimiento de los suministros de la impresora
Desplazamiento de la impresora
l
l Apague siempre la impresora utilizando el interruptor de encendido.
l Desconecte todos los cables de la impresora antes de intentar desplazarla.
l
l
Desplazamiento de la impresora dentro de la oficina
l
l
l
Preparacióndelaimpresoraparasuenvío
PRECAUCIÓN: sigaestasinstruccionesparaevitardañospersonalesodañarlaimpresora.

embalar la impresora.
Mantenimiento de los suministros de la impresora
Solicitud de suministros
Para solicitar suministros, visite el sitio Web de Dell:www.dell.com/supplies.
Almacenamiento de suministros
No exponga los suministros a:
l Luz directa del sol
l
l Alta humedad (por encima del 80%)
l Aire salado
l Gases corrosivos
l Mucho polvo
Ahorro de suministros
estos valores, consulte .
Elemento de suministro:
Cuándosolicitar:
Paraobtenermás
información,consulte:
l Cuando aparece 88Tónerbajo en la pantalla del
panel del operador.
l
Kit de mantenimiento
El kit de mantenimiento contiene todos los elementos necesarios
para sustituir los rodillos de carga, el rodillo de transferencia, los
rodillos de carga de papel y el fusor.
NOTA:
l Cuando aparece 80Mantenimientoprogramado
recomendado en la pantalla del panel del operador.
l
l
del kit de mantenimiento
Rodillos de carga
de carga
Rodillo de transferencia
transferencia
Rodillos de carga de papel
NOTA:
juego por bandeja de entrada, sin contar con el alimentador
multiuso.
Cuando el papel no se introduce correctamente desde la
bandeja.
de carga de papel
Suministro
Elementodeseleccióndelmenú
Funcióndelvalor
Intensidaddeltóner en
Valores®MenúCalidad
NOTA:
restante. Consulte

Sustitucióndelcartuchodetóner
1. Abajo hasta que aparezca junto a Estado/SuministrosSeleccionar .
2. Abajo hasta que aparezca junto a Ver suministrosSeleccionar .
Cuando aparezca el mensaje Tónerbajo
1. Tire del pestillo situado en la parte frontal de la impresora para bajar el alimentador multiuso.
2.
Material de
Impresiónmultipágina en
Valores®MenúAcabado
valores de Impresiónmultipágina son 2 en una, 3 en una, 4 en una, 6 en una, 9 en una, 12 en
Impresiónmultipágina le permite imprimir hasta
Dúplex en Valores®MenúAcabado
imprimir en ambas caras del papel.
controlador de impresora para enviar
un trabajo del tipo Verificarimpresión.
Le permite examinar la primera copia de un trabajo de varias copias para asegurarse de que es
Consulte
trabajos del tipo Verificarimpresión.

3. Tire del cartucho para sacarlo de la impresora.
4.
5.
6.
PRECAUCIÓN: alcambiaruncartuchodetóner,nodejeelnuevocartuchoexpuestoalaluzdirectadurantemuchotiempo.Unalargaexposicióna
laluzpuedeprovocarproblemasdecalidaddeimpresión.

7. Cierre la cubierta frontal superior.
8. Cierre el alimentador multiuso.
Sustitucióndeelementosdelkitdemantenimiento
Sustitucióndelosrodillosdecarga
1.
2. Tire del pestillo situado en la parte frontal de la impresora para bajar el alimentador multiuso.

3.
4. Tire del cartucho para sacarlo de la impresora.
5. Ajuste el seguro de la cubierta de cartulina al gancho de la impresora.
6.
frontal superior.
7.
8.

9. Tire del rodillo de carga hacia la derecha para extraerlo de la impresora.
10.
11.
12. Retire el embalaje del rodillo.

13. Retire el seguro de la cubierta de cartulina.
14.
15. Cierre la cubierta frontal superior.
16. Cierre el alimentador multiuso.

17.
Sustitucióndelrodillodetransferencia
1.
2. Tire del pestillo situado en la parte frontal de la impresora para bajar el alimentador multiuso.
3.
4. Tire del cartucho para sacarlo de la impresora.
5. Busque el rodillo de transferencia usado en la parte inferior del interior de la impresora.
6.

7.
8. Retire el embalaje del nuevo rodillo de transferencia.
9.
10.
abajo para conseguir que encaje correctamente.
11.

12. Cierre la cubierta frontal superior.
13. Cierre el alimentador multiuso.
14.
Sustitucióndelosrodillosdecargadepapel
1.
2.

3.
4. Extraiga el rodillo de carga de papel del brazo.
5. Repita los pasos 3 y 4 en el otro lado para extraer el otro rodillo de carga de papel.
6. Suelte suavemente el brazo del rodillo de carga de papel.
7. Deseche los rodillos de carga de papel usados.
8. Extraiga los dos rodillos de carga de papel de su embalaje.
9. Empuje el brazo del rodillo de carga de papel hacia abajo.
10.
11.
NOTA:


Explicacióndelasinstruccionesparapapelymaterialespecial
Materialdeimpresión
Se recomienda probar una muestra reducida de cualquier papel o material especial que se desee utilizar en la impresora antes de comprar grandes
cantidades.
Materialdeimpresiónadmitido
Tiposdematerialdeimpresión
Tamañosdelmaterialdeimpresión
NOTA:
Bandeja de entrada o salida
Papel
Cartulina
Transparencias
Etiqueta(devinilo,depapel,depoliéster,dedoblehojaoautoadhesiva)
Alimentador opcional de 250 hojas
Alimentador opcional de 500 hojas
Unidad de salida opcional
Alimentador multiuso
Alimentador de sobres opcional
Bandeja de entrada o salida
Tamañodelpapel
A4
210 x 297 mm (8,27 x 11,7 pulg.)
A5
148 x 210 mm (5,83 x 8,27 pulg.)
JIS B5
182 x 257 mm (7,17 x 10,1 pulg.)
Carta
216 x 279 mm (8,5 x 11 pulg.)
Legal
216 x 356 mm (8,5 x 14 pulg.)
Ejecutivo
184 x 267 mm (7,25 x 10,5 pulg.)
Folio
1
216 x 330 mm (8,5 x 13 pulg.)
Media carta
1
140 x 216 mm (5,5 x 8,5 pulg.)
Universal
2
De 140 x 210 mm a 216 x 356 mm (de 5,5 x 8,27 pulg. a 8,5 x 14 pulg.)
De 70 x 127 mm a 229 x 356 mm (de 2,75 x 5 pulg. a 9,01 x 14 pulg.)
De 148 x 182 mm a 216 x 356 mm (de 5,83 x 7,17 pulg. a 8,5 x 14 pulg.)
A4
210 x 297 mm (8,27 x 11,7 pulg.)

A5
148 x 210 mm (5,83 x 8,27 pulg.)
JIS B5
182 x 257 mm (7,17 x 10,1 pulg.)
Carta
216 x 279 mm (8,5 x 11 pulg.)
Legal
216 x 356 mm (8,5 x 14 pulg.)
Ejecutivo
184 x 267 mm (7,25 x 10,5 pulg.)
Folio
1
216 x 330 mm (8,5 x 13 pulg.)
Media carta
1
140 x 216 mm (5,5 x 8,5 pulg.)
Universal
2
De 140 x 210 mm a 216 x 356 mm (de 5,5 x 8,27 pulg. a 8,5 x 14 pulg.)
De 70 x 127 mm a 216 x 356 mm (de 2,75 x 5 pulg. a 8,5 x 14 pulg.)
De 70 x 127 mm a 229 x 356 mm (de 2,75 x 5 pulg. a 9,01 x 14 pulg.)
De 148 x 182 mm a 216 x 356 mm (de 5,83 x 7,17 pulg. a 8,5 x 14 pulg.)
98 x 191 mm (3,875 x 7,5 pulg.)
Sobre 9
98 x 225 mm (3,875 x 7,5 pulg.)
Sobre 10
105 x 241 mm (4,12 x 9,5 pulg.)
Sobre DL
110 x 220 mm (4,33 x 8,66 pulg.)
Sobre B5
176 x 250 mm (6,93 x 9,84 pulg.)
Sobre C5
162 x 229 mm (6,38 x 9,01 pulg.)
Otro sobre
1
De 98 x 162 mm a 176 x 250 mm (de 3,87 x 6,38 pulg. a 6,93 x 9,84 pulg.)
De 98 x 162 mm a 229 x 342 mm (de 3,87 x 6,38 pulg. a 9,01 x 12,76 pulg.)
Alimentador multiuso
A4
210 x 297 mm (8,27 x 11,7 pulg.)
A5
148 x 210 mm (5,83 x 8,27 pulg.)
JIS B5
182 x 257 mm (7,17 x 10,1 pulg.)
Carta
216 x 279 mm (8,5 x 11 pulg.)
Legal
216 x 356 mm (8,5 x 14 pulg.)
Ejecutivo
184 x 267 mm (7,25 x 10,5 pulg.)
Folio
1
216 x 330 mm (8,5 x 13 pulg.)
Media carta
1
140 x 216 mm (5,5 x 8,5 pulg.)
Universal
2
De 140 x 210 mm a 216 x 356 mm (de 5,5 x 8,27 pulg. a 8,5 x 14 pulg.)
De 70 x 127 mm a 216 x 356 mm (de 2,75 x 5 pulg. a 8,5 x 14 pulg.)
De 70 x 127 mm a 229 x 356 mm (de 2,75 x 5 pulg. a 9,01 x 14 pulg.)
De 148 x 182 mm a 216 x 356 mm (de 5,83 x 7,17 pulg. a 8,5 x 14 pulg.)
98 x 191 mm (3,875 x 7,5 pulg.)
Sobre 9
98 x 225 mm (3,875 x 7,5 pulg.)
Sobre 10
105 x 241 mm (4,12 x 9,5 pulg.)
Sobre DL
110 x 220 mm (4,33 x 8,66 pulg.)
Sobre B5
176 x 250 mm (6,93 x 9,84 pulg.)
Sobre C5
162 x 229 mm (6,38 x 9,01 pulg.)
Otro sobre
1
De 98 x 162 mm a 176 x 250 mm (de 3,87 x 6,38 pulg. a 6,93 x 9,84 pulg.)
De 98 x 162 mm a 229 x 342 mm (de 3,87 x 6,38 pulg. a 9,01 x 12,76 pulg.)
A4
210 x 297 mm (8,27 x 11,7 pulg.)
A5
148 x 210 mm (5,83 x 8,27 pulg.)
JIS B5
182 x 257 mm (7,17 x 10,1 pulg.)
Carta
216 x 279 mm (8,5 x 11 pulg.)
Legal
216 x 356 mm (8,5 x 14 pulg.)
Ejecutivo
184 x 267 mm (7,25 x 10,5 pulg.)
Folio
1
216 x 330 mm (8,5 x 13 pulg.)
Universal
2
De 70 x 127 mm a 229 x 356 mm (de 2,75 x 5 pulg. a 9,01 x 14 pulg.)
De 148 x 182 mm a 216 x 356 mm (de 5,83 x 7,17 pulg. a 8,5 x 14 pulg.)
Alimentador opcional de 250 hojas
A4
210 x 297 mm (8,27 x 11,7 pulg.)
A5
148 x 210 mm (5,83 x 8,27 pulg.)
JIS B5
182 x 257 mm (7,17 x 10,1 pulg.)
Carta
216 x 279 mm (8,5 x 11 pulg.)
Legal
216 x 356 mm (8,5 x 14 pulg.)
Ejecutivo
184 x 267 mm (7,25 x 10,5 pulg.)
Folio
1
216 x 330 mm (8,5 x 13 pulg.)
Media carta
1
140 x 216 mm (5,5 x 8,5 pulg.)
Universal
2
De 140 x 210 mm a 216 x 356 mm (de 5,5 x 8,27 pulg. a 8,5 x 14 pulg.)
De 70 x 127 mm a 229 x 356 mm (de 2,75 x 5 pulg. a 9,01 x 14 pulg.)

Pesosdelmaterialdeimpresión
De 148 x 182 mm a 216 x 356 mm (de 5,83 x 7,17 pulg. a 8,5 x 14 pulg.)
Alimentador opcional de 500 hojas
A4
210 x 297 mm (8,27 x 11,7 pulg.)
A5
148 x 210 mm (5,83 x 8,27 pulg.)
JIS B5
182 x 257 mm (7,17 x 10,1 pulg.)
Carta
216 x 279 mm (8,5 x 11 pulg.)
Legal
216 x 356 mm (8,5 x 14 pulg.)
Ejecutivo
184 x 267 mm (7,25 x 10,5 pulg.)
Folio
1
216 x 330 mm (8,5 x 13 pulg.)
Media carta
1
140 x 216 mm (5,5 x 8,5 pulg.)
Universal
2
De 140 x 210 mm a 216 x 356 mm (de 5,5 x 8,27 pulg. a 8,5 x 14 pulg.)
De 70 x 127 mm a 229 x 356 mm (de 2,75 x 5 pulg. a 9,01 x 14 pulg.)
De 148 x 182 mm a 216 x 356 mm (de 5,83 x 7,17 pulg. a 8,5 x 14 pulg.)
Alimentador de sobres opcional
98 x 191 mm (3,875 x 7,5 pulg.)
Sobre 9
98 x 225 mm (3,875 x 7,5 pulg.)
Sobre 10
105 x 241 mm (4,12 x 9,5 pulg.)
Sobre DL
110 x 220 mm (4,33 x 8,66 pulg.)
Sobre B5
176 x 250 mm (6,93 x 9,84 pulg.)
Sobre C5
162 x 229 mm (6,38 x 9,01 pulg.)
Otro sobre
1
De 98 x 162 mm a 176 x 250 mm (de 3,87 x 6,38 pulg. a 6,93 x 9,84 pulg.)
De 98 x 162 mm a 229 x 342 mm (de 3,87 x 6,38 pulg. a 9,01 x 12,76 pulg.)
Unidad de salida opcional
A4
210 x 297 mm (8,27 x 11,7 pulg.)
A5
148 x 210 mm (5,83 x 8,27 pulg.)
JIS B5
182 x 257 mm (7,17 x 10,1 pulg.)
Carta
216 x 279 mm (8,5 x 11 pulg.)
Legal
216 x 356 mm (8,5 x 14 pulg.)
Ejecutivo
184 x 267 mm (7,25 x 10,5 pulg.)
Folio
1
216 x 330 mm (8,5 x 13 pulg.)
Media carta
1
140 x 216 mm (5,5 x 8,5 pulg.)
Universal
2
De 140 x 210 mm a 216 x 356 mm (de 5,5 x 8,27 pulg. a 8,5 x 14 pulg.)
De 70 x 127 mm a 216 x 356 mm (de 2,75 x 5 pulg. a 8,5 x 14 pulg.)
De 70 x 127 mm a 229 x 356 mm (de 2,75 x 5 pulg. a 9,01 x 14 pulg.)
De 148 x 182 mm a 216 x 356 mm (de 5,83 x 7,17 pulg. a 8,5 x 14 pulg.)
98 x 191 mm (3,875 x 7,5 pulg.)
Sobre 9
98 x 225 mm (3,875 x 7,5 pulg.)
Sobre 10
105 x 241 mm (4,12 x 9,5 pulg.)
Sobre DL
110 x 220 mm (4,33 x 8,66 pulg.)
Sobre B5
176 x 250 mm (6,93 x 9,84 pulg.)
Sobre C5
162 x 229 mm (6,38 x 9,01 pulg.)
Otro sobre
1
De 98 x 162 mm a 176 x 250 mm (de 3,87 x 6,38 pulg. a 6,93 x 9,84 pulg.)
De 98 x 162 mm a 229 x 342 mm (de 3,87 x 6,38 pulg. a 9,01 x 12,76 pulg.)
1
2
Materialdeimpresión
Tipo
Pesodelmaterialdeimpresión
Bandejaestándar
Alimentador
opcional de 500
hojas
Alimentador opcional
de 250 hojas
Alimentador multiuso
Alimentador de
sobres
Unidad de salida
opcional
Papel
comercial
De 60 a 176 g/m2
de fibra larga
(de 16 a 47 libras de
alta calidad)
De 60 a 135 g/m2
de fibra larga
(de 16 a 36 libras de
alta calidad)
N/A
De 60 a 176 g/m2
(de 16 a 47 libras
de alta calidad)
1
Index Bristol
163 g/m2 (90 libras)
120 g/m2 (67 libras)
N/A
163 g/m2 (90
libras)
Etiqueta
163 g/m2 (100
libras)
120 g/m2 ((74 libras)
163 g/m2 (100
libras)
Cubierta
176 g/m2 (65 libras)
135 g/m2 (50 libras)
176 g/m2 (65
libras)

Seleccióndelmaterialdeimpresión
Papel
del papel que piense utilizar antes de adquirirlo en grandes cantidades.
o
Carga del alimentador multiuso para obtener instrucciones detalladas sobre la carga de la bandeja.
Característicasdelpapel
1
Index Bristol
199 g/m2 (110
libras)
163 g/m2 (90 libras)
N/A
199 g/m2 (110
libras)
Etiqueta
203 g/m2 (125
libras)
163 g/m2 (100 libras)
203 g/m2 (125
libras)
Cubierta
216 g/m2 (80 libras)
176 g/m2 (65 libras)
216 g/m2 (80
libras)
Transparencias
De 138 a 146 g/m2
(de 37 a 39 libras de
alta calidad)
De 138 a 146 g/m2
(de 37 a 39 libras de
alta calidad)
N/A
De 138 a 146
g/m2
(de 37 a 39 libras
de alta calidad)
Papel
180 g/m2
(48 libras de alta
calidad)
163 g/m2
(43 libras de alta
calidad)
NOTA: no admitido en
el alimentador multiuso.
N/A
180 g/m2
(48 libras de alta
calidad)
Papel de doble hoja
180 g/m2
(48 libras de alta
calidad)
163 g/m2
(43 libras de alta
calidad)
No admitido en el
alimentador multiuso.
180 g/m2
(48 libras de alta
calidad)
220 g/m2
(59 libras de alta
calidad)
220 g/m2
(59 libras de alta
calidad)
NOTA: no admitido en
el alimentador multiuso.
220 g/m2
(59 libras de alta
calidad)
Vinilo
300 g/m2
(soporte para
etiquetas de 92
libras)
260 g/m2
(soporte para etiquetas
de78 libras)
NOTA: no admitido en
el alimentador multiuso.
300 g/m2
(soporte para
etiquetas de 92
libras)
Papel integrado
(debe entrar primero en la
impresora)
De 140 a 175 g/m2
De 140 a 175 g/m2
N/A
De 140 a 175
g/m2
(hasta 47 libras
de alta calidad)
Base del papel (fibra larga)
De 75 a 135 g/m2
(de 20 a 36 libras de
alta calidad)
De 75 a 135 g/m2
(de 20 a 36 libras de
alta calidad)
De 75 a 135 g/m2
(de 20 a 36 libras
de alta calidad)
24 libras
Sulfito, sin madera o hasta
calidad
No recomendado
De 60 a 105 g/m2
(de 16 a 28 libras de
alta calidad)2, 3
De 60 a 105 g/m2
(de 16 a 28 libras
de alta calidad)3
De 60 a 105 g/m2
(de 16 a 28 libras
de alta calidad)
1
Para tipos de papel cuyo peso sea superior a 135 g/m
2
es aconsejable la fibra corta.
2
3

Peso del papel
Papel no recomendado
No es aconsejable utilizar con la impresora los tipos de papel siguientes:
l
l
l Tipos de papel preimpresos que se puedan ver afectados por la temperatura del fusor de la impresora.
l Tipos de papel preimpresos que necesiten un registro 2,3 mm ( 0,09 pulg.), como los
l
l
l
l Papel reciclado con un peso inferior a 60 g/m2 (16 libras).
l Formularios o documentos multicopia.
Cabecera
del papel que piense utilizar antes de adquirirlo en grandes cantidades.
Característicasdelpapel
Impresiónsímplex(aunasolacara)
Impresióndúplex(adoblecara)
En la bandeja del papel
En el alimentador multiuso

Peso del papel
Papel no recomendado
No es aconsejable utilizar con la impresora los tipos de papel siguientes:
l
l Tipos de papel preimpresos que se puedan ver afectados por la temperatura del fusor de la impresora.
l Tipos de papel preimpresos que necesiten un registro 2,3 mm ( 0,09 pulg.), como los
l
l
l
l Papel reciclado con un peso inferior a 60 g/m2 (16 libras).
Transparencias
con una muestra de las transparencias que piense utilizar antes de adquirirlas en grandes cantidades.
Al imprimir en transparencias:
l Tipo de papel en Transparencia
l Tipo de papel en TransparenciaImprimirImagen
Copiasypáginas.
l
derretirse, perder el color, desviarse o liberar emisiones peligrosas.
l
l
Seleccióndetransparencias
la transparencia utilizada. Imprima siempre muestras en las transparencias que piensa utilizar antes de adquirirlas en grandes cantidades.
El valor Tipo de papel debe estar definido en Transparencia

estas temperaturas sin derretirse, perder el color, desviarse ni liberar emisiones peligrosas.
Sobres
de los sobres que piense utilizar antes de adquirirlos en grandes cantidades. Consulte Carga del alimentador multiuso y Carga del alimentador de sobres
para
obtener instrucciones sobre la carga de sobres.
Al imprimir en sobres:
l
l Tamaño/tipodepapel en el menúPapel como Alimentador multiuso, Sobre manual o Alimentador de sobres
dependiendo del origen
que utilice. Defina el tipo de papel como Sobre
l Para obtener el mejor rendimiento, utilice sobres fabricados con papel de 75 g/m2 (20 libras de alta calidad). Puede utilizar un peso de hasta 105 g/m2
(28 libras de alta calidad) para el alimentador multiuso o de 105 g/m2 (28 libras de alta calidad) para el alimentador de sobres, siempre que el
calidad).
l
l Para obtener los mejores resultados y minimizar los atascos, no utilice sobres que:
¡ Tengan excesivos dobleces o curvaturas.
¡
¡ Contengan ventanas, agujeros, perforaciones, recortes o repujados.
¡
¡
¡ Tengan pegados sellos de correo.
¡
¡ Tengan bordes con muescas o esquinas dobladas.
¡
l
l
l
Etiquetas
Haga una prueba en la impresora con una muestra de las etiquetas que piense utilizar antes de adquirirlas en grandes cantidades.
1. Imprima cinco hojas de papel.
NOTA: al utilizar el alimentador de sobres puede que escuche un ruido explosivo. Este ruido es normal, se produce cuando el aire atrapado se fuerza

2. Espere unos cinco segundos.
3.
Al imprimir en etiquetas:
l Tamaño/tipodepapelPapel como Etiquetas. Puede definir Tamaño/tipodepapel en el panel del operador de
l Tipo de
papel en Etiquetas, Textura etiquetas en Suave y Peso etiquetas en Pesado o defina Tipo de papel en etiquetas de vinilo y la textura y el peso en
Normal.
l
l No utilice hojas de etiquetas con un material de soporte liso.
l
l
peligrosas.
l
l
l
adhesivo que no gotee.
l Elimine una franja de 1,6 mm (0,1 pulg.) del borde inicial para evitar que las etiquetas se despeguen dentro de la impresora.
l
l No utilice etiquetas que tengan el adhesivo visible.
Cartulina
La cartulina tiene una sola capa y un gran conjunto de propiedades, como el nivel de humedad, el grosor y la textura, que puede afectar de forma significativa
Material
.
Haga una prueba en la impresora con una muestra de las cartulinas que piense utilizar antes de adquirirlas en grandes cantidades.
1. Imprima cinco hojas de papel.
2. Espere unos cinco segundos.
3.
Al imprimir en cartulinas:
l Tipo de papelPapel en Cartulina desde el panel del operador, desde el controlador de impresora o desde al
l
l Procure no utilizar cartulina que pueda liberar emisiones peligrosas al calentarse.
l

l Es aconsejable el uso de cartulinas de fibra corta.
Almacenamientodelmaterialdeimpresión
l
l
l
arruguen.
l No coloque nada sobre los paquetes del papel.
l Guarde el papel en su embalaje original hasta que lo vaya a cargar en la impresora.
Cómoevitaratascos
Material de
opcionales o Carga del alimentador multiuso para obtener instrucciones detalladas sobre la carga de la bandeja.
Los siguientes consejos pueden ayudarle a evitar atascos:
l
l
l
l
alimentador multiuso.
l
l
l
l .
l
l
l
l Si se produce un atasco, despeje todo el trayecto del material. Consulte
NOTA:
cantidades.

Explicacióndelosmenúsdelpaneldeloperador
Informes
Valores
Seguridad
Red/Puertos
impresora si dispone del equipo opcional o del lenguaje de impresora concreto.
MenúPapel
Utilice el menúPapel
Origen predeterminad
Tamaño/tipodepapel
Tamaño
Tipo
NOTA: un asterisco (*) situado junto a un valor indica que dicho valor viene predeterminado.
Selecciónde
menú:
Finalidad:
Valores:
Origen
predeterminad
Identifica el origen
predeterminado del
papel.
Alimentador de
sobres
Papel manual
Sobre manual
Tamañodelpapel y Tipo de papel
NOTA:
Selecciónde
menú:
Finalidad:
Valores:
Tamaño/tipo
cada origen de papel.
NOTA:
hardware.
A4* (diferente de
Estados Unidos)
A5
JIS B5
Carta* (Estados
Unidos)
Legal
Ejecutivo
Folio
Media carta
Universal
Tamañodel
papel y Tipo de papel
tipo
<x>
Identifica el tipo de papel instalado en cada origen
de papel.
NOTA:
definidos por el usuario, aparece en la pantalla en
lugar de Tipopersonalizado<x>
tipos personalizados comparten el mismo nombre,
Tipo de
papel.
Papel normal*
Cartulina
Transparencia
Glossy
Etiquetas
Etiquetas de vinilo
Alta calidad
Cabecera
Preimpreso
Papel de color
Tipo
l
especificado.
l
Tamañodel
papel y Tipo de papel se han configurado con los valores

Configurar multiuso
Sustituirtamaño
SustituirtamañoCarta/A4
de mostrar una solicitud de cambio de papel.
correctos.
Tamaño/tipo alim
mult
alimentador multiuso.
A4* (diferente de
Estados Unidos)
A5
JIS B5
Carta* (Estados
Unidos)
Legal
Ejecutivo
Folio
Media carta
Universal
Sobre 7 3/4
Sobre 9
Sobre 10
Sobre DL
Sobre C5
Otro sobre
operador si Configurar multiusoCassette.
tipo alim
mult
Identifica el tipo del papel instalado en el
alimentador multiuso.
NOTA:
definidos por el usuario, aparece en la pantalla en
lugar de Tipopersonalizado<x>
tipos personalizados comparten el mismo nombre,
Tipo de papel.
Papel normal*
Cartulina
Transparencia
Etiquetas
Etiquetas de vinilo
Alta calidad
Sobre
Cabecera
Preimpreso
Papel de color
Tipo personalizado
<x>
operador si Configurar multiusoCassette.
Tamaño/tipo alim
sobres
cargando.
Sobre 7 3/4
Sobre 9
Sobre 10* (Estados Unidos)
Sobre DL* (diferente de Estados Unidos)
Sobre C5
Otro sobre
tipo alim
sobres
Sobre*
Tipo personalizado <x>
Tamaño/tipo pap
manual
cargando manualmente.
A4* (diferente de Estados Unidos)
A5
JIS B5
Carta* (Estados Unidos)
Legal
Ejecutivo
Folio
Media carta
Universal
tipo pap
manual
manualmente.
Papel normal*
Cartulina
Transparencia
Etiquetas
Etiquetas de vinilo
Alta calidad
Cabecera
Preimpreso
Papel de color
Tipo personalizado <x>
Tamaño/tipo
sobre manual
manualmente.
Sobre 7 3/4
Sobre 9
Sobre 10* (Estados Unidos)
Sobre DL* (diferente de Estados Unidos)
Sobre C5
Otro sobre
tipo sobre
manual
Identifica el tipo de sobre que se va a cargar
manualmente.
Sobre*
Tipo personalizado <x>
Seleccióndemenú:
Finalidad:
Valores:
Configurar multiuso
Cassette*
Manual
Primero

Textura del papel
Peso del papel
Cargar papel
trabajo se imprima correctamente.
Selecciónde
menú:
Finalidad:
Valores:
Desactivado
Media
carta/A5
Carta/A4
Todos en
lista*
l El valor Desactivado indica que no se permite la
l El valor Todos en lista indica que se permiten todas las
sustituciones disponibles.
Selecciónde
menú:
Finalidad:
Valores:
Textura normal
Identifica la textura del material cargado en un origen de
Suave
Normal*
Textura
transparencia
Textura etiquetas
Textura etiquetas
vinilo
Textura sobres
Textura cabecera
Textura preimpreso
Textura color
Textura alta calidad
Suave
Normal
Textura cartulina
Identifica la textura de la cartulina cargada en un origen de
Suave
Normal*
entrada especificado.
Textura person.
<x>
Identifica la textura del material personalizado cargado en un
Suave
Normal*
origen de entrada especificado.
Selecciónde
menú:
Finalidad:
Valores:
Peso normal
Ligero
Normal*
Pesado
Peso
transparencia
Peso etiquetas
Peso etiquetas
vinilo
Peso alta calidad
Peso sobre
Peso cabecera
Peso preimpreso
Peso color
Peso cartulina
Ligero
Normal*
Pesado
origen de entrada especificado.
Peso
personalizado <x>
Identifica el peso relativo del papel personalizado cargado en un origen
Ligero
Normal*
Pesado
en el origen de entrada especificado.

Tipos personalizados
Configuraciónuniversal
Universal. Al especificar dicha altura y anchura, la impresora
Universal
Instalacióndesalida
NOTA:
Selecciónde
menú:
Finalidad:
Valores:
Cargar etiquetas
Maneja correctamente el papel preimpreso tanto si se trata de
Desactivado*
Carga etiquetas
vinilo
Cargar alta
calidad
Cargar cabecera
Cargar
preimpreso
Cargar papel
color
Cargar cartulina
Maneja correctamente la cartulina preimpresa tanto si se trata de
Desactivado*
origen de entrada especificado.
Cargar
personaliz. <x>
Maneja correctamente el papel preimpreso personalizado tanto si se
Desactivado*
en el origen de entrada especificado.
Selecciónde
menú:
Finalidad:
Valores:
Tipo
Especifica el tipo de papel asociado a cada tipo
personalizadoTipo de
papel.
Papel*
Cartulina
Transparencia
Etiquetas
Etiquetas de
vinilo
Sobre
Para asignar un nombre definido por el usuario, se debe admitir el
tipo de material personalizado en el origen de entrada que
designe.
trunca a los 16 caracteres) en lugar de Tipo personalizado x.
Selecciónde
menú:
Finalidad:
Valores:
Unidades de
medida
Determina la unidad de medida utilizada para
introducir la altura y anchura Universal.
Pulgadas
Pulgadas es el valor predeterminado para EE.UU.; Milímetros
es el valor predeterminado internacional.
Anchura
vertical
Define la anchura vertical del material
Universal.
NOTA: si el valor definido excede la anchura
incrementos de 0,01
pulgadas
(De 76 a 360 mm en
incrementos de 1 mm)
Unidades de
medida; 8,5pulgadas es el valor predeterminado para EE.UU.
y 216mm es el valor predeterminado internacional.
Altura vertical
Define la altura vertical del material Universal.
NOTA: si el valor definido excede la altura
incrementos de 0,01
pulgadas
(De 76 a 360 mm en
incrementos de 1 mm)
Unidades de
medida; 14pulgadas es el valor predeterminado para EE.UU.
y 365mm es el valor predeterminado internacional.
Universal.
Borde corto*
Borde largo
Borde largo
que la anchurafísicamáxima de la impresora.
NOTA: Instalacióndesalida
Selecciónde
menú:
Finalidad:
Valores:
Bandeja de
salida
Especifica la bandeja de salida predeterminada para el
material impreso.
Salida <x>
l Si hay disponible un nombre definido por el
Salida<x>.
l El nombre se trunca a los 14 caracteres.
l

Informes
Págvaloresdemenú
Estadísticasdispositivo
Págconfigurac.red
Bandeja de salida.
Configurar
bandejas
impresora para un trabajo concreto.
designada para ese usuario.
Enlazar*
salida grande. Cuando una bandeja de salida enlazada
de salida enlazada adicional.
designada.
Enlace opcional
Enlaza todas las bandejas de salida opcionales como
una sola bandeja de salida grande, mientras deja que la
individualmente.
Asignar tipo
para ese tipo de papel.
Asignar
tipo/salida
NOTA: si hay disponible un nombre definido por el
Salida
personaliz.<x>. El nombre se trunca a los 14 caracteres.
aparece una vez en la lista de valores Asignar
tipo/salida.
Salida papel normal
Desactivado*
Salida 1
Salida 2
Salida 3
NOTA:
El valor predeterminado es Salidaestándar si
Configurar bandejasAsignar tipo.
Salida cartulina
Salida transparencia
Salida etiquetas
Salida etiquetas vinilo
Salida alta calidad
Salida sobres
Salida cabecera
Salida preimpreso
Salida papel color
(<x> representa un
Salida
desbordada
Salida 1
Salida 2
Salida 3
NOTA:
Si varias bandejas de salida tienen asignado el mismo
Bandeja de salida.
Selecciónde
menú:
Finalidad:
Valores:
verifica que las opciones de la impresora se han instalado correctamente.
Lista.
Seleccióndemenú:
Finalidad:
Valores:
dispositivo
de la impresora.
Lista.
Seleccióndemenú:
Finalidad:
Valores:
Págconfigurac.red<x> si
NOTA:
Lista.

PáginadeconfiguracióndeNetware
Imprimir fuentes
Valores
MenúConfiguración
Seleccióndemenú:
Finalidad:
Valores:
Netware
Págconfigurac.red<x> del
menúRed.
Lista.
Selecciónde
menú:
Finalidad:
Valores:
Imprimir
fuentes
Imprime una muestra de todas las fuentes disponibles para el
lenguaje de impresora seleccionado.
Fuentes
PCL
Imprime una muestra de todas las fuentes de impresora
Fuentes
PS
Imprime una muestra de todas las fuentes de impresora
Selección
demenú:
Finalidad:
Valores:
Idioma
Determina el idioma del texto en la pantalla del
panel del operador.
English
Deutsch
Italiano
Dansk
Norsk
Nederlands
Svenska
Suomi
Ruso
Polski
Turco
Checo
Chino
simplificado
Chino
tradicional
Coreano
NOTA:
Ahorro de
un trabajo antes de pasar a un estado de
Desactivado
Ahorrodeenergía se configure en
Desactivado.
1...240
Ahorrodeenergía. (Puede
que la impresora no admita todos los valores.)
Ahorrodeenergía depende del modelo
valor de Ahorrodeenergía
Ahorrodeenergía
Seleccione 1 para activar el modo Ahorrodeenergía de la impresora un
calentamiento. Seleccione 1
Seleccione un valor alto si se utiliza la impresora constantemente. En la
1 y 240
tiempo de calentamiento.

Alarmas
Controla si la alarma de la impresora debe
operador.
Control de
alarma:
Apagado
Simple*
Continuo
Desactivado
Sencillo
Continuo: la impresora repite tres pitidos cada 10 segundos.
Alarma de
tóner:
Desactivado*
Simple
Continuo
Tiempos de
espera
que la impresora espera para volver a la
pantalla de inicio, recibir un mensaje de fin de
trabajo o recibir bytes adicionales de datos
desde el ordenador.
NOTA: Tiempo espera
Espera de
pantalla:
15300 (30*)
Desactivado: desactiva la espera de pantalla.
15–300
volver a la pantalla de inicio.
30* es el valor predeterminado.
Espera de
impresión:
Desactivado
1255 (90*)
Desactivado
1–255
90* es el valor predeterminado.
Tiempo
espera:
Desactivado
15...65535
(40*)
Desactivado: desactiva el tiempo de espera.
15...65535
adicionales antes de cancelar el trabajo.
40* es el valor predeterminado.
Espera trabajo
de red:
1255 (90*)
1–255
de red antes de cancelar el trabajo.
Recuperac
determinados estados que la dejan fuera de
atascadas o si espera hasta que se procese la
Continuar
auto:
Desactivado*
5255
tiempo especificado.
5–255
espera.
Recuperación
atasco:
Activado
Apagado
Activado
Desactivado
Automático*
Protecciónde
página:
Desactivado*
Activado
Página
compleja.
Desactivado*
Activado
imprimirla.
NOTA: Activado
NOTA:
Activado. Cuando se selecciona Activado
Lenguaje
de
impresora
Especifica el lenguaje predeterminado de la
impresora que se utiliza para transferir datos
del ordenador a la impresora.
NOTA:
como predeterminado no evita que una
PCL*
Normal*
Ajustar a la
completa
NOTA: el valor Páginacompleta
Áreadeimpresiónnormal, la impresora
definido como normal.
Guardar
recursos
Especifica lo que hace la impresora con los
recursos cargados, como fuentes y macros
almacenadas en la memoria RAM, si la
memoria de la disponible.
Desactivado*
impresora inactivo.
Activado
La impresora mantiene todos los recursos cargados para todos los lenguajes
de impresora durante los cambios de lenguaje y el restablecimiento de la
impresora. Si la impresora se queda sin memoria, aparece el mensaje 38
Memoria llena.

MenúAcabado
Predet.
Restaura los valores predeterminados de
Restaurar
ahora
l
¡ Idioma.
¡
l Todos los recursos cargados (las fuentes, las macros y los juegos de
afecta a los recursos en la memoria flash o en el disco duro.)
No restaurar*
Se mantienen los valores definidos por el usuario.
Selecciónde
menú:
Finalidad:
Valores:
NOTA:
instalada.
NOTA: seleccione Dúplex desde el controlador
trabajos concretos.
Desactivado*
Imprime en una cara del papel.
Activado
Imprime en ambas caras del papel.
Encuadernado
(impares).
NOTA:
instalada.
Borde largo*
Borde corto
Copias
valor predeterminado de la impresora.
NOTA:
para un trabajo concreto desde el controlador
de la impresora.
1...999 (1*)
Los valores seleccionados desde el controlador de la impresora siempre
anulan los valores seleccionados desde el panel del operador.
blanco
No imprimir*
del trabajo.
Imprimir
trabajo.
copias del trabajo.
Desactivado*
Copias. Por ejemplo, si define Copias en 2 y se
Activado
Copias. Por ejemplo, si define Copias
Hojas
trabajos, entre varias copias de un trabajo o
Ninguna*
Entre copias
Clasificación,
Clasificación
Entre trabajos
Inserta una hoja en blanco entre los trabajos.
en blanco en un documento para notas.
Origen
separador
Alimentador
multiuso
NOTA: Configurar multiuso en Cassette.
Alimentador de
sobres
NOTA:
N en una o Ahorro de papel.
Desactivado*
2 en una
3 en una
4 en una
6 en una
9 en una
12 en una

MenúCalidad
MenúUtilidades
impresora.
16 en una
Orden
vertical.
Horizontal*
Vertical
Horizontal inverso
Vertical inverso
Orden
multipágina que haya seleccionado:
Vista
Borde largo
(horizontal).
Borde corto
(vertical).
Margen
Imprime un borde alrededor de cada imagen de
Ninguno*
Selecciónde
menú:
Finalidad:
Valores:
600 ppp*
Calidad de imagen 1200
1200 ppp
Calidad de imagen 2400
Intensidad del
Aclara u oscurece documentos impresos y ahorra
1 10
8* es el valor predeterminado.
Brillo
Ajusta el valor de gris de los objetos impresos.
-6
+6
0* es el valor predeterminado.
Contraste
Ajusta el contraste de los objetos impresos.
0 5
0* es el valor predeterminado.
Selecciónde
menú:
Finalidad:
Valores:
impresora.
No restaurar*
Se mantienen los valores definidos por el usuario.
Restaurar
ahora
l Idioma.
l
l Los recursos en la memoria flash o en el disco duro.
NOTA: todos los recursos cargados (las fuentes, las macros y
desaparecen.
Eliminar trab
retenidos
Elimina los trabajos confidenciales y retenidos del
disco duro de la impresora.
Confidencial
Retenido
No
restaurado
Todo
trabajos residentes en la impresora. Los marcadores y otros
seguimiento
almacenadas en el disco duro o borra todas las
Imprimir

MenúPostScript
MenúEmulaciónPCL
trabajos
Borrar
Rastreo
hexadecimal
Ayuda a aislar el origen de un problema de trabajo de
Activar
Si Rastreo hexadecimal
la impresora se imprimen en formato hexadecimal y de
NOTA: para salir de Rastreo hexadecimal, apague o
restablezca la impresora:
1. Cancelar .
2. Abajo hasta que aparezca
junto a Restablecer impresora
Seleccionar .
cobertura
Desactivado*
No se imprime el porcentaje de cobertura.
Activado
Selecciónde
menú:
Finalidad:
Valores:
Imprimir error PS
cuando se produzca.
Desactivado*
mensaje de error.
Activado
Imprime un mensaje de error antes de desechar el
trabajo.
Selección
demenú:
Finalidad:
Valores:
Origen de
fuente
Determina el conjunto de fuentes que
Fuente.
Residente*
Muestra todas las fuentes residentes en la memoria RAM de la impresora
Disco
Muestra todas las fuentes que se cargan en la memoria RAM de la
impresora.
Flash
Muestra todas las fuentes almacenadas en la memoria flash.
Carga
Muestra todas las fuentes almacenadas en el disco duro de la impresora.
NOTA: el disco duro es un elemento opcional y, por tanto, no incluido en la
para conocer la disponibilidad.
Todas
Muestra todas las fuentes disponibles para la impresora desde todos los
Fuente
origen de fuente especificado.
R0 Courier*
del origen de fuente seleccionado. La abreviatura del origen de la fuente es
R para residentes, F para flash, K para disco y D para carga.
Juego de
nombre de fuente especificado.
10U PC-8* (Estados
Unidos)
(valores
predeterminados de
admitidos para el nombre de fuente seleccionado.
12U PC-850* (diferente
de Estados Unidos)
(valores
predeterminados de
Valores de
Tamañoenpuntos:
11008 (12*)
seleccionar oscilan entre 1 y 1008 en incrementos de 0,25 puntos.
NOTA: el valor Tamañoenpuntos
Especifica el paso para fuentes de
monoespaciado escalable.
Paso:
0,08100 (10*)
horizontal de fuente. Los pasos que puede seleccionar oscilan entre 0,08 y
100 caracteres por pulgada (cpp) en incrementos de 0,01 cpp. En el caso de
fuentes de monoespaciado no escalable, el paso aparece en la pantalla,

Seguridad
pero no se puede modificar.
NOTA: Paso
Orientación:
Vertical*
Horizontal
Vertical
Horizontal
Líneasporpágina:
1255
60* (Estados Unidos)
64* (diferente de
Estados Unidos)
Líneasporpágina, Tamañodel
papel y Orientación. Seleccione los valores de Tamañodelpapel y
Orientación correctos antes de cambiar Líneasporpágina.
Ancho A4:
198 mm*
203 mm
NOTA: el valor 203 mm
suficiente para imprimir 80 caracteres de paso 10.
Especifica si la impresora introduce
CR auto tras LF:
Desactivado*
Activado
Desactivado
Activado
Especifica si la impresora introduce
retorno de carro.
LF auto tras CR:
Desactivado*
Activado
Desactivado
comando de control de retorno de carro.
Activado
comando de control de retorno de carro.
Renumerar
bandeja
Configura la impresora para que
funcione con controladores de
impresora o aplicaciones que utilicen
para las bandejas de papel.
Asignar alim multiuso:
Desactivado*
Ninguno
0199
Desactivado: la impresora utiliza las asignaciones de origen de papel
Ninguno: el origen del papel ignora el comando de selecciónde
alimentacióndelpapel.
0–199
un origen del papel.
Asignar bandeja [x]:
Desactivado*
Ninguno
0199
Desactivado: la impresora utiliza las asignaciones de origen de papel
Ninguno: el origen del papel ignora el comando de selecciónde
alimentacióndelpapel.
0–199
un origen del papel.
Asignar alimentador
sobres:
Desactivado*
Ninguno
0199
Desactivado: la impresora utiliza las asignaciones de origen de papel
Ninguno: el origen del papel ignora el comando de selecciónde
alimentacióndelpapel.
0–199
un origen del papel.
Asignar papel manual:
Desactivado*
Ninguno
0199
Desactivado: la impresora utiliza las asignaciones de origen de papel
Ninguno: el origen del papel ignora el comando de selecciónde
alimentacióndelpapel.
0–199
un origen del papel.
Asignar sobre manual:
Desactivado*
Ninguno
0199
Desactivado: la impresora utiliza las asignaciones de origen de papel
Ninguno: el origen del papel ignora el comando de selecciónde
alimentacióndelpapel.
0–199
un origen del papel.
Ver valores predet.
papel.
Restaurar valores pred.
Seleccione Sí para devolver todas las asignaciones de bandeja a los valores
Seleccióndemenú:
Finalidad:
Valores:
Caducidad de trabajo
Desactivado*
1 hora
4 horas
24 horas

Red/Puertos
TCP/IP
RedestándaryRed<x>
Redestándar o
Red<x>).
1 semana
NOTA:
Selecciónde
menú:
Finalidad:
Valores:
TCP/IP
Internet)
Activar
Activado*
Desactivado
Ver host
campos
Gateway
Activar DHCP
Activado*
Desactivado
Activar RARP
Activar BOOTP
AutoIP
Activar FTP/TFTP
Servidor HTTP activo
WINS
campos
DNS
Selecciónde
menú:
Finalidad:
Valores:
PCL
SmartSwitch
Configura la impresora para que cambie
puerto de red lo necesite,
independientemente del lenguaje
predeterminado de la impresora.
Activado*
La impresora examina los datos de la interfaz de red y selecciona la
impresora necesario.
Desactivado
La impresora no examina los datos entrantes. La impresora utiliza la
PS SmartSwitch
activado o el lenguaje de impresora predeterminado especificado en
el si PS SmartSwitchdesactivado.
PS
SmartSwitch
Configura la impresora para que cambie
mediante el puerto de red lo necesite,
independientemente del lenguaje
predeterminado de la impresora.
Activado*
lenguaje de impresora necesario.
Desactivado
La impresora no examina los datos entrantes. La impresora utiliza la
PCL SmartSwitch
activado o el lenguaje de impresora predeterminado especificado en
el si PCL SmartSwitchdesactivado.
Modo NPA
Especifica si la impresora realiza el
procesamiento especial necesario para la
convenciones definidas en el protocolo
Network Printing Alliance (NPA).
NOTA:
impresora.
Desactivado
La impresora no realiza el procesamiento NPA.
La impresora examina los datos para determinar el formato y
procesarlos adecuadamente.
Mem
intermedia
red
intermedia de entrada de red.
NOTA: Mem
intermedia red, la impresora se restablece
memoria
intermedia de red (valor recomendado).
De 3 K hasta el
permitido (en
El usuario especifica el
Guardar recursos se ha definido en Activado o Desactivado. Para
memoria intermedia de red,
puerto serie y del puerto paralelo.
PS binario
Mac
Configura la impresora para procesar los
Activado
formato de los ordenadores que utilizan el sistema operativo

USBestándaryUSB<x>
USB<x>).
Paralelo y Paralelo <x>
Paralelo
estndar o Paralelo<x>).
Macintosh.
Macintosh.
NOTA:
Windows.
Desactivado
que utilizan los sistemas operativos Windows o Macintosh.
Selecciónde
menú:
Finalidad:
Valores:
PCL
SmartSwitch
Configura la impresora para que cambie
puerto USB lo necesite, independientemente
del lenguaje predeterminado de la impresora.
Activado*
PCL si los datos indican que se trata del lenguaje de impresora necesario.
Desactivado
La impresora no examina los datos entrantes. La impresora utiliza la
PS SmartSwitch
activado o el lenguaje de impresora predeterminado especificado en el
si PS SmartSwitchdesactivado.
PS
SmartSwitch
Configura la impresora para que cambie
mediante el puerto USB lo necesite,
independientemente del lenguaje
predeterminado de la impresora.
Activado*
La impresora examina los datos de la interfaz USB y selecciona la
impresora necesario.
Desactivado
La impresora no examina los datos entrantes. La impresora utiliza la
PCL SmartSwitchactivado
o el lenguaje de impresora predeterminado especificado en el
si PCL SmartSwitchdesactivado.
Modo NPA
Especifica si la impresora realiza el
procesamiento especial necesario para la
convenciones definidas en el protocolo
Network Printing Alliance (NPA).
NOTA:
impresora.
Activado
formato NPA, se rechazan como datos incorrectos.
Desactivado
La impresora no realiza el procesamiento NPA.
La impresora examina los datos para determinar el formato y procesarlos
adecuadamente.
Mem
intermedia
USB
de entrada de USB.
NOTA: Mem
intermedia USB, la impresora se restablece
Desactivado
que se reanude el procesamiento normal de los trabajos entrantes.
memoria
intermedia USB (valor recomendado).
De 3 K hasta el
permitido
memoria intermedia de USB. El
Guardar
recursos se ha definido en Activado o Desactivado. Para maximizar el
memoria intermedia USB, desactive o reduzca el
y de red.
PS binario
Mac
Configura la impresora para procesar los
Macintosh.
Activado
de los ordenadores que utilizan el sistema operativo Macintosh.
NOTA:
Windows.
Desactivado
utilizan los sistemas operativos Windows o Macintosh.
ENA
4 campos
red ENA
Gateway
ENA
Define el gateway ENA del puerto USB.
Selecciónde
menú:
Finalidad:
Valores:
PCL
SmartSwitch
Configura la impresora para que cambie
Activado*
La impresora examina los datos de la interfaz de puerto paralelo y
lenguaje de impresora necesario.

NetWare
NetWare de la impresora.
paralelo lo necesite, independientemente del
lenguaje predeterminado de la impresora.
Desactivado
La impresora no examina los datos entrantes. La impresora utiliza la
PS SmartSwitch
activado o el lenguaje de impresora predeterminado especificado en
el si PS SmartSwitchdesactivado.
PS
SmartSwitch
Configura la impresora para que cambie
paralelo lo necesite, independientemente del
lenguaje predeterminado de la impresora.
Activado*
La impresora examina los datos de la interfaz de puerto paralelo y
lenguaje de impresora necesario.
Desactivado
La impresora no examina los datos entrantes. La impresora utiliza la
PCL SmartSwitch
activado o el lenguaje de impresora predeterminado especificado en
el si PCL SmartSwitchdesactivado.
Modo NPA
Especifica si la impresora realiza el procesamiento
protocolo Network Printing Alliance (NPA).
NOTA:
Activado
formato NPA, se rechazan como datos incorrectos.
Desactivado
La impresora no realiza el procesamiento NPA.
La impresora examina los datos y determina el formato. A
Mem
intermedia
paral
entrada del puerto paralelo.
NOTA:
Desactivado
Desactiva el almacenamiento del trabajo en memoria intermedia.
antes de que se reanude el procesamiento normal de los trabajos
entrantes.
memoria
intermedia de puerto paralelo (valor recomendado).
De 3 K hasta
permitido
memoria intermedia de puerto
de si Guardar recursos se ha definido en Activado o Desactivado.
memoria intermedia del
intermedias USB y del puerto serie.
Estado
avanzado
puerto paralelo.
Desactivado
Activado*
paralelo.
Protocolo
Especifica el protocolo de interfaz de puerto
paralelo.
Puede resolver algunos problemas de la interfaz de puerto paralelo.
Fastbytes*
interfaz de puerto paralelo existentes (valor recomendado).
Aceptar
inicial
Determina si la impresora acepta las solicitudes de
INIT en la interfaz de puerto paralelo. Muchos
vez que se apaga y se enciende el ordenador.
Desactivado*
del ordenador.
Activado
ordenador.
Modo
Determina si se realiza un muestreo de los datos del
puerto paralelo al principio o al final del cable.
Activado*
Realiza un muestreo de los datos del puerto paralelo al principio del
cable.
Apagado
Realiza un muestreo de los datos del puerto paralelo al final del cable.
PS binario
Mac
Configura la impresora para procesar los trabajos de
Activado
formato para los ordenadores que utilizan el sistema operativo
Macintosh.
NOTA:
de Windows.
Apagado
que utilizan los sistemas operativos Windows o Macintosh.
Selecciónde
menú:
Finalidad:
Valores:
Ver nombre
asignado.
Al seleccionar Vernombreconexión, se muestra el nombre NetWare en el panel del
operador.
Ver modo
asignado.
Al seleccionar Vermodoimpresión
panel del operador.
red
Al seleccionar Vernúmerodered
del operador.
Activar
Activado
Desactivado
Ethernet 802.2
Define el valor Ethernet 802.2 como Activado o
Desactivado.
Activado*
Desactivado
Ethernet 802.3
Define el valor Ethernet 802.3 como Activado o
Desactivado.
Activado*
Desactivado
Define el valor Ethernet Tipo II como Activado o
Activado*

AppleTalk
Desactivado.
Desactivado
Ethernet SNAP
Define el valor Ethernet SNAP como Activado o
Desactivado.
Activado*
Desactivado
Packet Burst
Define el valor Packet Burst como Activado o
Desactivado.
Activado
Desactivado*
Modo NSQ/GSQ
Define el valor Modo NSQ/GSQ como Activado o
Desactivado.
Activado
Desactivado*
Selecciónde
menú:
Finalidad:
Valores:
Ver nombre
Muestra el nombre AppleTalk
asignado.
Al seleccionar Ver nombre, se muestra el nombre AppleTalk en el panel del operador.
asignada.
Al seleccionar Verdirección
Activar
Activa o desactiva la
Activado
Desactivado
Definir zona *
Proporciona una lista de zonas
de la red.

Explicacióndelosmensajesdelpaneldeloperador
Mensaje
Acción
30 Relleno incorrecto, cambiar cartucho
Instale un cartucho nuevo.
.
Extraiga el cartucho e instale uno nuevo.
.
admitido
.
.
l Seleccionar
l
correctamente ajustado en la bandeja.
l
l Ajuste el valor de Tamañodelpapel al papel que utiliza.
Si Tamañoalimmultiuso se ha definido en Universal
largo para los datos formateados.
l Cancele el trabajo actual.
35 Memoria insuficiente para admitir
l Seleccionar para desactivar Guardar recursos
l Para activar Guardar recursos
¡ Automático y, a
¡ Cuando se muestre Lista, active Guardar recursos.
l .
trabajo
l Seleccionar
clasificar el resto del trabajo.
l Cancele el trabajo actual.
memoria flash
l Seleccionar
l Elimine fuentes, macros y otros datos en la memoria de la impresora.
l
de impresora.
37 Memoria insuficiente, se han eliminado
algunos trabajos retenidos
La impresora ha eliminado algunos trabajos retenidos para procesar los trabajos actuales.
Abajo hasta que aparezca junto a Continuar
Seleccionar para borrar el mensaje.
l Seleccionar
Es posible que el trabajo no se imprima correctamente.
l Cancele el trabajo actual.
l
de impresora.
imprimirse
l Seleccionar
Es posible que el trabajo no se imprima correctamente.
l Cancele el trabajo actual.
l
de impresora.

50 Error de fuente PPDS
l Seleccionar
Es posible que el trabajo no se imprima correctamente.
l Cancele el trabajo actual.
Seleccionar
consulte .
flash para recursos
l Seleccionar
Se borran las macros y fuentes cargadas que no se hayan almacenado previamente en la memoria
flash.
l Elimine fuentes, macros y otros datos almacenados en la memoria flash.
l
.
Seleccionar
Debe formatear la memoria flash antes de almacenar recursos en ella. Si el mensaje de error permanece, es
posible que la memoria flash sea defectuosa y deba sustituirla.
l Seleccionar
Es posible que el trabajo no se imprima correctamente.
l Programe nuevo firmware para la interfaz de red.
l Restaure la impresora.
1. Apague la impresora.
2.
3.
4.
5. Encienda la impresora.
l Seleccionar para borrar el mensaje.
l Desactivado.
l Seleccionar para borrar el mensaje.
l
l Seleccionar para borrar el mensaje.
l
1. Apague y desenchufe la impresora.
2. Elimine la memoria flash que sobre.
3.
58 Demasiadas bandejas salida instaladas
1. Apague y desenchufe la impresora.
2. Extraiga las bandejas adicionales.
3.
1. Apague y desenchufe la impresora.
2. Extraiga los alimentadores adicionales.
3.
l
l Seleccionar
59 Alimentador de sobres incompatible
l Extraiga el alimentador de sobres.
l Seleccionar
de sobres.
l Retire la bandeja de salida.
l Seleccionar

salida especificada.
59 Bandeja <x> incompatible
l Extraiga la bandeja especificada.
l Seleccionar
especificada.
recomendado
l Seleccionar
l Sustituya los elementos de mantenimiento y, si es necesario, restablezca el contador de mantenimiento
mantenimiento.
l
.
l Seleccionar
200.yy Atasco de papel
1. Despeje el trayecto del papel.
2. Seleccionar
201.yy Atasco de papel
1. Despeje el trayecto del papel.
2. Seleccionar
202.yy Atasco de papel
1. Despeje el trayecto del papel.
2. Seleccionar
231.yy Atasco de papel
1. Despeje el trayecto del papel.
2. Seleccionar
232.yy Atasco de papel
1. Despeje el trayecto del papel.
2. Seleccionar
233.yy Atasco de papel
1. Despeje el trayecto del papel.
2. Seleccionar
234.yy Atasco de papel
1. Despeje el trayecto del papel.
2. Seleccionar
235.yy Atasco de papel
1. Despeje el trayecto del papel.
2. Seleccionar
236.yy Atasco de papel
1. Despeje el trayecto del papel.
2. Seleccionar
237.yy Atasco de papel
1. Despeje el trayecto del papel.
2. Seleccionar
238.yy Atasco de papel
1. Despeje el trayecto del papel.
2. Seleccionar
239.yy Atasco de papel
1. Despeje el trayecto del papel.
2. Seleccionar
24x.yy Atasco de papel
1. Despeje el trayecto del papel.
2. Seleccionar
250.yy Atasco de papel
1. Despeje el trayecto del papel.
2. Seleccionar
260.yy Atasco de papel
1. Despeje el trayecto del papel.
2. Seleccionar
27x.yy Atasco de papel
1. Despeje el trayecto del papel.
2. Seleccionar
280.yy Atasco de papel
1. Despeje el trayecto del papel.
2. Seleccionar
281.yy Atasco de papel
1. Despeje el trayecto del papel.
2. Seleccionar

900999 Servicio <mensaje>
1. Apague la impresora.
2.
3. Revise todas las conexiones de los cables.
4.
5. Vuelva a encender la impresora.
Espere a que desaparezca el mensaje.
Ocupada
Calibrando
Espere a que desaparezca el mensaje.
Espere a que desaparezca el mensaje.
Cancelando
Espere a que desaparezca el mensaje.
l Seleccionar si ha cambiado el tipo de material.
l Seleccione Usar actual para imprimir en el material cargado en la impresora.
l Cancele el trabajo actual.
l
.
l Seleccionar para borrar el mensaje e imprimir sin utilizar el dispositivo.
l
.
l Seleccionar para borrar el mensaje e imprimir sin utilizar el dispositivo.
Espere a que desaparezca el mensaje.
l Cierre la puerta frontal superior.
l
Copias
Defragmentando flash
Espere a que desaparezca el mensaje.
NOTA: no apague la impresora mientras se muestre este mensaje.
Eliminar
l Seleccionar para eliminar el trabajo especificado.
l Pulse Cancelar
Eliminar todos
l Seleccionar para eliminar todos los trabajos retenidos.
l Pulse Cancelar
Elim todos los trabajos confidenciales
l Seleccionar para eliminar todos los trabajos confidenciales.
l Pulse Cancelar
Eliminando
Espere a que desaparezca el mensaje.
Desactivando DLE
Espere a que desaparezca el mensaje.
Espere a que desaparezca el mensaje.
NOTA:
impresora desde el panel del operador.
Espere a que desaparezca el mensaje.
Introduzca PIN
Intr PIN para bloquear
Desechando mem interm
Espere a que desaparezca el mensaje.
Formateando flash
Espere a que desaparezca el mensaje.
NOTA: no apague la impresora mientras se muestre este mensaje.
Rastreo hexadecimal
Rastreo hexadecimal.
Introduzca la bandeja especificada en la impresora.
l

500 hojas.
l Cancele el trabajo actual.
l
.
l Cancele el trabajo actual.
Instale alimentador
l
.
l Cancele el trabajo actual.
l
.
l Cancele el trabajo actual.
Error interno del sistema, Volver a cargar
marcadores
l Vuelva a cargar los marcadores.
l Seleccionar
Error interno del sistema, Volver a cargar
certificados de seguridad
l Vuelva a cargar los certificados de seguridad.
l Seleccionar
NOTA:
NOTA:
Introduzca el PIN correcto.
Cargar alimentador manual con
l
l Seleccionar
predeterminado.
l Cancele el trabajo actual.
Cargar alimen manual con
l
l Cancele el trabajo actual.
Mantenimiento
Sustituya los elementos de mantenimiento y, si es necesario, restablezca el contador de mantenimiento de la
impresora.
operador.
NOTA:
Red
el canal.
No hay trab retenidos
Espere a que desaparezca el mensaje.
NOTA:
l Seleccione Inténtelodenuevo para introducir otro PIN.
l Seleccione Cancelar para salir de la pantalla Introduzca PIN.
No hay trabajos
Espere a que desaparezca el mensaje.
Extraiga la pila de papel de la bandeja de salida para borrar el mensaje.
Paralelo
Paralelo <x>
l
l Seleccionar para calentar la impresora a la temperatura de funcionamiento normal y
mostrar el mensaje Lista.
El panel del operador se ha bloqueado.

Introduzca el PIN correcto.
Espere a que desaparezca el mensaje.
Espere a que desaparezca el mensaje.
Espere a que desaparezca el mensaje y a que se restablezca la impresora.
NOTA: no apague la impresora mientras se muestre este mensaje.
Programando memoria flash
Espere a que desaparezca el mensaje.
NOTA: no apague la impresora mientras se muestre este mensaje.
Lista
Reinstalar salida <x>
l Apague la impresora y vuelva a encenderla.
¡
reinicie la impresora.
¡
l Seleccionar para borrar el mensaje e imprimir sin utilizar la bandeja especificada.
Reinstalar bandejas <x> - <y>
l Apague la impresora y vuelva a encenderla.
¡
salida en la impresora y reinicie la impresora.
¡
l Seleccionar para borrar el mensaje e imprimir sin utilizar las bandejas especificadas.
Reinstalar alimentador de sobres
l Apague la impresora y vuelva a encenderla.
¡
¡
l Seleccionar para borrar el mensaje e imprimir sin utilizar el alimentador de sobres.
que no imprima ni procese trabajos en este momento.
Espere a que desaparezca el mensaje.
Retirar papel de salida <x>
Extraiga la pila de papel de las bandejas de salida especificadas.
Retirar papel de todas las bandejas
Retire el papel de todas las bandejas de salida.
Retirar papel de
Seleccionar .
Espere a que desaparezca el mensaje.
Espere a que desaparezca el mensaje.
Espere a que desaparezca el mensaje.
NOTA:
l
impresora.
l excepto:
¡
¡
"USB".
Restaurando trabajo(s) retenido(s) x/y
l Espere a que desaparezca el mensaje.
l Seleccione Salirderestauración para eliminar los trabajos de imprimir y retener no restaurados.
NOTA: xy representa el total de trabajos que se van
a restaurar.
Perdidos algunos trabajos retenidos
l Seleccionar
retenidos hasta que hay suficiente memoria en la impresora para procesar el trabajo.
l Cancele el trabajo actual.
Extraiga la pila de papel de la bandeja de salida para borrar el mensaje.
Espere a que desaparezca el mensaje.
l
l Pulse Seleccionar
Cargue papel en la bandeja para borrar el mensaje.
Cargue papel en la bandeja para que se borre el mensaje.

Introduzca la bandeja en la impresora.
USB
Ver suministros
Muestra el nivel actual de todos los suministros de la impresora.
En espera
trabajo, de avance de hoja o datos adicionales.
l Seleccionar para imprimir el contenido de la memoria intermedia.
l Cancele el trabajo actual.

Instalacióndecontroladoresparaimpresiónenred
Windows
Macintosh
Linux/UNIX
NetWare
Impresióndeunapáginadeconfiguracióndelared
1.
2. Menú en el panel del operador.
3. Abajo hasta que aparezca junto a InformesSeleccionar .
4. Abajo hasta que aparezca junto a Págconfigurac.redSeleccionar .
5. estado es "Conectado".
Si el estado
conectada a la red.
AsignacióndeunadirecciónIPalaimpresora
169.254.x.x.
1. .
2.
1. Menú en el panel del operador.
2. Abajo hasta que aparezca junto a Red/PuertosSeleccionar .
3. Abajo hasta que aparezca junto a TCP/IPSeleccionar .
Redestándar
consulte RedOpción1.
4. Abajo hasta que aparezca junto a DirecciónSeleccionar .
5. Seleccionar .
Enviandoselecciónaparece brevemente.
6. Abajo hasta que aparezca junto a MáscaraderedSeleccionar .
7. Seleccionar .
NOTA: Imp conf red 1 en la pantalla.

Enviandoselecciónaparece brevemente.
8. Abajo hasta que aparezca junto a GatewaySeleccionar .
9. Seleccionar .
Enviandoselecciónaparece brevemente.
10. Seleccionar hasta que la impresora vuelva al estado Lista.
VerificacióndelosvaloresIP
1.
son correctos. Consulte si necesita ayuda.
2. ping seguido de la nueva
192.168.0.11).
Windows
NOTA: en ordenadores Windows, haga clic en Inicio®Programas®Símbolodelsistema o en Inicio®Programas®Accesorios®Símbolodel
sistema.
Sistema operativo
Windows
Macintosh
Linux/UNIX
NetWare
Controladores de impresora admitidos
Drivers and Utilities.
Puertos admitidos para la impresora de red
l
l
l
Conexióndirectamedianteuncabledered(conunservidordeimpresión)
1. Inserte el CD Drivers and Utilities en el ordenador.
2. El CD Drivers and Utilities
Inicio®Ejecutar, introduzca D:\setup.exe

haga clic en Aceptar.
3. Drivers and Utilities, haga clic en Instalaciónenred:instalalaimpresoraparasuusoenunared.
4. Instalar la impresora en este ordenadorSiguiente.
a. Seleccione Instalar la impresora en uno o varios ordenadores remotosSiguiente.
b. Agregar.
c. Siguiente.
5. Seleccione la impresora de red que desea instalar. Si no ve la impresora en la lista, haga clic en Actualizar para actualizar la lista o en Agregar
impresora para agregar una impresora a la red.
6. Seleccione Instalando la impresora en un servidorSiguiente.
7. Seleccione la impresora en la lista. Si desea cambiar el nombre de impresora que aparece, introduzca un nombre nuevo en el campo Nombre de
impresora.
8. Compartir esta impresora con otros ordenadores
9. Haga clic en Siguiente.
10. Instalar.
11. Cuando aparezca la pantalla EnhorabuenaFinalizar.
Conexióndirectamedianteuncabledered(sinunservidordeimpresión)
conectar la impresora directamente al ordenador del cliente.
1. Inserte el CD Drivers and Utilities en el ordenador.
2. El CD Drivers and Utilities
Inicio®Ejecutar, introduzca D:\
haga clic en Aceptar.
3. Drivers and Utilities, haga clic en Instalaciónenred:instalalaimpresoraparasuusoenunared.
4. Seleccione Instalar la impresora en uno o varios ordenadores remotosSiguiente.
5. Agregar.
6. Siguiente.
7. Siguiente. Si no ve la impresora en la lista, haga clic en Actualizar
para
actualizar la lista o en Agregar impresora para agregar una impresora a la red.
8. Seleccione la impresora en la lista. Si desea cambiar el nombre de impresora que aparece, introduzca un nombre nuevo en el campo Nombre de
impresora.
9. Compartir esta impresora con otros ordenadores
10. Haga clic en Siguiente.
11. Instalar.
12.
13. Haga clic en Finalizar para salir.
ConexiónlocalmedianteuncableUSBoparalelo(conunservidordeimpresión)
Si va a conectar una impresora mediante un cable USB o paralelo y desea compartirla con varios usuarios, siga estas instrucciones para conectar la impresora
Puede que algunos sistemas operativos Windows ya incluyan un controlador de impresora que sea compatible con la impresora.
NOTA:
NOTA:
en la carpeta Impresoras.
Sistema operativo del ordenador:
Utilice este tipo de cable:
Windows XP Professional x64
Windows XP
Windows 2003 Server
Windows 2000
USB o paralelo

Instalacióndelsoftwaredelaimpresora
1. Encienda el ordenador e inserte el CD Drivers and Utilities, que se debe
setup.exe.
2. Drivers and Utilities, haga clic en Instalaciónenred:instalalaimpresoraparasuusoenunared.
3. Instalar la impresora en este ordenadorSiguiente.
a. Seleccione Instalar la impresora en uno o varios ordenadores remotosSiguiente.
b. Agregar.
c. Siguiente.
4. Seleccione la impresora de red que desea instalar. Si no ve la impresora en la lista, haga clic en Actualizar para actualizar la lista o en Agregar
impresora para agregar una impresora a la red.
5. Seleccione Instalando la impresora en un servidorSiguiente.
6. Seleccione la impresora en la lista. Si desea cambiar el nombre de impresora que aparece, introduzca un nombre nuevo en el campo Nombre de
impresora.
7. Compartir esta impresora con otros ordenadores
8. Haga clic en Siguiente.
9. Instalar.
Enhorabuena
10. Haga clic en Finalizar
Plug-N-
Instalacióndecontroladoresdeimpresoraadicionales
Si desea instalar controladores de impresora adicionales en el ordenador, realice estos pasos.
1. Encienda el ordenador e inserte el CD Drivers and Utilities. Si aparece el CD Drivers and Utilities, haga clic en Cancelar.
2. En Windows XP, haga clic en Inicio®Panel de control®Impresoras y otro hardware®Impresoras y faxes.
Paralosdemássistemas, haga clic en Inicio®Configuración®Impresoras.
3. Haga doble clic en Agregar impresora.
4. Haga clic en Siguiente.
5. Siguiente.
6. Siguiente.
7. Seleccione Utilizar disco.
8. Acceda a la unidad de CD y seleccione el controlador correcto para el sistema operativo.
Windows Me
Windows 98 SE
Windows NT
Paralelo
NOTA: en Windows XP Professional x64, Windows XP Professional y Windows NT se necesita acceso administrativo para instalar los controladores de
impresora en el ordenador.
NOTA: si ha instalado los controladores de impresora desde el CD Drivers and Utilities antes de conectar la impresora al ordenador, el controlador PCL
Sistema operativo
Tipo de controlador
Nombre del controlador
Windows XP Professional x64
PCL
D:\Drivers\Print\x64\dkaatb40.inf
PS
D:\Drivers\Print\x64\dkaat940.inf
Windows XP
Windows 2003 Server
Windows 2000
PCL
D:\Drivers\Print\Win_2kXP\dkaat2da.inf
PS
D:\Drivers\Print\Win_2kXP\dkaat1da.inf
Windows NT
PCL
D:\Drivers\Print\Win_NT.40\dkaat2da.inf
PS
D:\Drivers\Print\Win_NT.40\dkaat1da.inf
Windows Me
Windows 98 SE
PCL
D:\Drivers\Print\Win_9xme\<carpeta de idioma>\dkaat2da.inf
PS
D:\Drivers\Print\Win_9xme\<carpeta de idioma>\dkaat1da.inf

9. Haga clic en AbrirAceptar.
10. Seleccione el tipo de controlador que desee instalar (PCL o PS) en la lista Fabricante y el modelo de impresora en la lista Impresoras
haga clic en Siguiente.
11. Siga realizando los pasos del Asistente para agregar impresorasFinalizar para instalar el controlador de impresora.
Impresióncompartida
Drivers and Utilities.
Uso compartido de la impresora
1. En Windows XP, haga clic en Inicio®Panel de control®Impresoras y otro hardware®Impresoras y faxes.
Paralosdemássistemas, haga clic en Inicio®Configuración®Impresoras.
2. Seleccione la impresora.
3. Haga clic en Archivo®Compartir.
4. Seleccione Hagaclicaquísideseacompartirimpresorassinejecutarelasistenteteniendoencuentalosriesgosdeseguridadqueconlleva.
5. Seleccione Habilitar solamente el uso compartido de la impresoraAceptar.
6. Seleccione Compartir esta impresora
7. Haga clic en Controladores adicionales y seleccione los sistemas operativos de todos los clientes de la red que utilicen esta impresora.
8. Haga clic en Aceptar.
Para comprobar que la impresora se ha compartido correctamente:
l
debajo del icono de impresora.
l
Instalacióndelaimpresoracompartidaenordenadorescliente
Point and print
1. En el escritorio de Windows del ordenador cliente, haga doble clic en Mis sitios de red o en Entorno de red.
2.
3. Instalar o en Conectar.
4. Cierre Mis sitios de red o Entorno de red.
5.
6. En Windows XP, haga clic en Inicio®Panel de control®Impresoras y otro hardware®Impresoras y faxes.
Paralosdemássistemas, haga clic en Inicio®Configuración®Impresoras.
NOTA: si necesita configurar la impresora en un entorno de sistema operativo mixto de 32 y 64 bits, consulte al administrador de la red sobre el
support.dell.com.

7. Seleccione la impresora que acaba de crear.
8. Haga clic en Archivo®Propiedades.
9. En la ficha General, haga clic en Imprimir página de prueba.
De igual a igual
1. En Windows XP, haga clic en Inicio®Panel de control®Impresoras y otro hardware®Impresoras y faxes.
Paralosdemássistemas, haga clic en Inicio®Configuración®Impresoras.
2. Haga clic en Agregar impresora para iniciar el Asistente para agregar impresoras.
3. Haga clic en Servidor de impresión de red.
4.
el cuadro de texto.
Por ejemplo: \\<nombredehostdelservidordeimpresión>\<nombredeimpresoracompartida>
5. Haga clic en Aceptar.
6. Terminar.
7.
a. En Windows XP, haga clic en Inicio®Panel de control®Impresoras y otro hardware®Impresoras y faxes.
Paralosdemássistemas, haga clic en Inicio®Configuración®Impresoras.
b. Seleccione la impresora que acaba de crear.
c. Haga clic en Archivo®Propiedades.
d. En la ficha General, haga clic en Imprimir página de prueba.
Macintosh
Mac OS X
Paso1:InstalacióndeunarchivoPPDpersonalizado
1. Inserte el CD Drivers and Utilities.
2. Haga doble clic en el paquete del instalador de la impresora.
3. Haga clic en Continuar en la pantalla de bienvenida
4. Haga clic en ContinuarAceptar para aceptar las condiciones del mismo.
5. Seleccione un destino y haga clic en Continuar.
6. En la pantalla Instalaciónsimple, haga clic en Instalar.
7. Aceptar
NOTA:
UNIX o Macintosh.
NOTA:

8. Haga clic en Cerrar
Paso2:CreacióndeunacolaenelCentrodeImpresiónoUtilidaddeinstalacióndelaimpresora
UsodelaimpresiónAppleTalk
1. Abra Finder, haga clic en Aplicaciones y en Utilidades.
2. Haga doble clic en CentrodeImpresiónoUtilidaddeinstalacióndelaimpresora.
3. Seleccione Agregar impresora
4. Seleccione AppleTalk
5. Seleccione la zona AppleTalk en la lista.
6. Seleccione la nueva impresora en la lista y haga clic en Agregar.
7.
a. Abra Finder, haga clic en Aplicaciones y en TextEdit.
b. Seleccione Imprimir
c. Seleccione Resumen
¡ Si el archivo PPD que se muestra en la ventana Resumen
¡ Si no es correcto, elimine la impresora de la lista de impresoras del CentrodeImpresión o Utilidaddeinstalacióndelaimpresora y repita el
.
NOTA:
NOTA:
nombre predeterminado de la impresora.
UsodeImpresiónIP
.
1. Abra Finder, haga clic en Aplicaciones y en Utilidades.
2. Haga doble clic en CentrodeImpresiónoUtilidaddeinstalacióndelaimpresora.
3. Seleccione Agregar impresora
4. Seleccione ImpresiónIP
5. Dirección.
6.
7. Seleccione la nueva impresora en la lista y haga clic en Agregar.
8.
a. Abra Finder, haga clic en Aplicaciones y en TextEdit.
b. Seleccione Imprimir
c. Seleccione Resumen
d. Realice uno de los siguientes pasos:
¡ Si el archivo PPD que se muestra en la ventana Resumen
¡ Si no es correcto, elimine la impresora de la lista de impresoras del CentrodeImpresión o Utilidaddeinstalacióndelaimpresora y repita el
.
MacOS9.x
Paso1:InstalacióndeunarchivoPPDpersonalizado
1. Inserte el CD Drivers and Utilities.
2. Haga doble clic en Classic y en el paquete del instalador de la impresora.
3. Seleccione el idioma correcto y haga clic en Continuar.
4. Haga clic en Continuar
NOTA:

5. Haga clic en Continuar
6. En la pantalla Instalaciónsimple, haga clic en Instalar
7. Haga clic en Cerrar
Paso2:Creacióndeunaimpresoradeescritorio
1. En el Selector, seleccione el controlador LaserWriter 8.
2.
3. Seleccione la nueva impresora de la lista.
4.
predeterminado de la impresora.
5. Haga clic en Crear.
6. Selector.
7. Cierre la ventana del Selector.
8.
a.
b. Seleccione Impresión®Cambiarconfiguración.
¡ Si el archivo PPD que aparece en la parte de archivoPPD(descripcióndeimpresoraPostScript)
¡ Si el archivo PPD que aparece en la parte de archivoPPD(descripcióndeimpresoraPostScript)no es correcto para la impresora,
repita el .
Linux/UNIX
En el CD Drivers and Utilities
de Sun.
Antesderealizarlainstalación
Realice las siguientes tareas antes de instalar los controladores de impresora:
1.
2.
3. Configure un grupo de usuarios administrativos.
impresora. El grupo administrativo predeterminado es bin.
Si dispone de un grupo administrativo en el host, puede que desee utilizarlo para los controladores de impresora. Los usuarios no administrativos no
pueden agregar o eliminar colas de impresora.
4.
Este paquete se puede instalar de varias formas. Puede instalar los controladores de impresora en:
l
l
obtener ayuda, consulte Montaje mediante NFS de controladores de impresora.
Sistemas operativos admitidos
l Debian GNU/Linux
l Linspire Linux

l RedHat Linux
l SuSE Linux
Requisitos del sistema Linux
InstalaciónenRedHatLinuxoSuSELinux
1. .
2. Monte el CD.
3. Cambie al directorio del archivo de paquete. Si ha montado el CD-ROM en /mnt/cdrom:
# cd /mnt/cdrom/unix/packages
4. Instale el archivo de paquete:
# rpm -ivh print-drivers-linux-glibc2-x86.rpm
5.
# /usr/local/dell/setup.dellprint
InstalaciónenLinspireoDebianGNU/Linux
1. .
2. Monte el CD.
3. Cambie al directorio del archivo de paquete. Si ha montado el CD-ROM en /mnt/cdrom:
# cd /mnt/cdrom/unix/packages
4. Instale el archivo de paquete:
# deb -i print-drivers-linux-glibc2-x86.deb
5.
# /usr/local/dell/setup.dellprint
InstalaciónenSunSolarisSPARC
1. Defina la variable de entorno NONABI_SCRIPTS como TRUE.
2. Instale el archivo de paquete:
a. Intro:
# ps -ef | grep vold
# pkgadd -d /cdrom/cdrom0/unix/packages/ print-drivers-solaris2-sparc.pkg
¡
¡ Monte el CD. Por ejemplo, si la ruta a la unidad de CD-# mount -F hsfs -o
ro /dev/dsk/c0t6d0s2 /cdrom
¡ # pkgadd -d /cdrom/unix/packages/print-drivers-solaris2-sparc.pkg
b. Siga las instrucciones de la pantalla.
3.
Intro.
Intro. Por ejemplo: 1,2,3.
NOTA:
NOTA:

4. Siga las indicaciones y responda a las preguntas que aparezcan en la pantalla:
a. Para aceptar los valores predeterminados, pulse Intro.
b. Para respondar a pregunta de tipo afirmativo/negativo, escriba y, n o ?Intro.
c. q para salir.
EliminacióndeControladoresdeimpresión
El administrador del sistema puede eliminar los controladores de impresora mediante las utilidades enumeradas en esta tabla.
//usr/local/dell/DELLPrtDrv.unlink
Eliminacióndelosdirectoriosrestantes
de controladores de impresora, es posible que algunos directorios tengan que ser eliminados manualmente.
/usr/local/dell/unix_prt_drivers.
NetWare
NDPS/iPrint
Impresiónbasadaencolas
Interwin del CD Drivers and Utilities y abra el archivo Readme.
Sistema operativo
Herramientadeeliminacióndepaquetes
RedHat Linux y SuSE Linux
rpm -e
Linspire Linux y Debian GNU/Linux
dpkg -r

Other Third-Party Licenses (Software)
The Apache Software License, Version 1.1
Copyright (c) 2000 The Apache Software Foundation. All rights reserved.
Redistribution and use in source and binary forms, with or without modification, are permitted provided that the following conditions are met:
1. Redistributions of source code must retain the above copyright notice, this list of conditions and the following disclaimer.
2. Redistributions in binary form must reproduce the above copyright notice, this list of conditions and the following disclaimer in the documentation and/or
other materials provided with the distribution.
3. The end-user documentation included with the redistribution, if any, must include the following acknowledgment:
"This product includes software developed by the Apache Software Foundation (http://www.apache.org/)."
Alternately, this acknowledgment may appear in the software itself, if and wherever such third-party acknowledgments normally appear.
4. The names "Apache" and "Apache Software Foundation" must not be used to endorse or promote products derived from this software without prior
written permission. For written permission, please contact [email protected].
5. Products derived from this software may not be called "Apache", nor may "Apache" appear in their name, without prior written permission of the Apache
Software Foundation.
THIS SOFTWARE IS PROVIDED "AS IS" AND ANY EXPRESSED OR IMPLIED WARRANTIES, INCLUDING, BUT NOT LIMITED TO, THE IMPLIED WARRANTIES OF
MERCHANTABILITY AND FITNESS FOR A PARTICULAR PURPOSE ARE DISCLAIMED. IN NO EVENT SHALL THE APACHE SOFTWARE FOUNDATION OR ITS
CONTRIBUTORS BE LIABLE FOR ANY DIRECT, INDIRECT, INCIDENTAL, SPECIAL, EXEMPLARY, OR CONSEQUENTIAL DAMAGES (INCLUDING, BUT NOT LIMITED TO,
PROCUREMENT OF SUBSTITUTE GOODS OR SERVICES; LOSS OF USE, DATA, OR PROFITS; OR BUSINESS INTERRUPTION) HOWEVER CAUSED AND ON ANY THEORY
OF LIABILITY, WHETHER IN CONTRACT, STRICT LIABILITY, OR TORT (INCLUDING NEGLIGENCE OR OTHERWISE) ARISING IN ANY WAY OUT OF THE USE OF THIS
SOFTWARE, EVEN IF ADVISED OF THE POSSIBILITY OF SUCH DAMAGE.
This software consists of voluntary contributions made by many individuals on behalf of the Apache Software Foundation. For more information on the Apache
Software Foundation, please see http://www.apache.org/.
Portions of this software are based upon public domain software originally written at the National Center for Supercomputing Applications, University of Illinois,
Urbana-Champaign.
$Id: LICENSE.txt,v 1.11 2004/02/06 09:32:57 jhunter Exp $
Copyright (C) 2000-2004 Jason Hunter & Brett McLaughlin.
All rights reserved.
Redistribution and use in source and binary forms, with or without modification, are permitted provided that the following conditions are met:
1. Redistributions of source code must retain the above copyright notice, this list of conditions, and the following disclaimer.
2. Redistributions in binary form must reproduce the above copyright notice, this list of conditions, and the disclaimer that follows these conditions in the
documentation and/or other materials provided with the distribution.
3.
The name "JDOM" must not be used to endorse or promote products derived from this software without prior written permission. For written permission,
please contact [email protected].
4. Products derived from this software may not be called "JDOM", nor may "JDOM" appear in their name, without prior written permission from the JDOM
Project Management ([email protected]).
In addition, we request (but do not require) that you include in the end-user documentation provided with the redistribution and/or in the software itself an
acknowledgement equivalent to the following:

"This product includes software developed by the JDOM Project (http://www.jdom.org/)."
Alternatively, the acknowledgment may be graphical using the logos available at http://www.jdom.org/images/logos.
THIS SOFTWARE IS PROVIDED "AS IS" AND ANY EXPRESSED OR IMPLIED WARRANTIES, INCLUDING, BUT NOT LIMITED TO, THE IMPLIED WARRANTIES OF
MERCHANTABILITY AND FITNESS FOR A PARTICULAR PURPOSE ARE DISCLAIMED. IN NO EVENT SHALL THE JDOM AUTHORS OR THE PROJECT CONTRIBUTORS BE
LIABLE FOR ANY DIRECT, INDIRECT, INCIDENTAL, SPECIAL, EXEMPLARY, OR CONSEQUENTIAL DAMAGES (INCLUDING, BUT NOT LIMITED TO, PROCUREMENT OF
SUBSTITUTE GOODS OR SERVICES; LOSS OF USE, DATA, OR PROFITS; OR BUSINESS INTERRUPTION) HOWEVER CAUSED AND ON ANY THEORY OF LIABILITY,
WHETHER IN CONTRACT, STRICT LIABILITY, OR TORT (INCLUDING NEGLIGENCE OR OTHERWISE) ARISING IN ANY WAY OUT OF THE USE OF THIS SOFTWARE,
EVEN IF ADVISED OF THE POSSIBILITY OF SUCH DAMAGE.
This software consists of voluntary contributions made by many individuals on behalf of the JDOM Project and was originally created by Jason Hunter
([email protected]) and Brett McLaughlin (brett@jdom>org). For more information on the JDOM Project, please see http://www.jdom.org/.
GNU LIBRARY GENERAL PUBLIC LICENSE
Version 2, June 1991
Copyright (C) 1991 Free Software Foundation, Inc.
675 Mass Ave, Cambridge, MA 02139, USA
Everyone is permitted to copy and distribute verbatim copies of this license document, but changing it is not allowed.
[This is the first released version of the library GPL. It is numbered 2 because it goes with version 2 of the ordinary GPL.]
Preamble
The licenses for most software are designed to take away your freedom to share and change it. By contrast, the GNU General Public Licenses are intended to
guarantee your freedom to share and change free software--to make sure the software is free for all its users.
This license, the Library General Public License, applies to some specially designated Free Software Foundation software, and to any other libraries whose
authors decide to use it. You can use it for your libraries, too.
When we speak of free software, we are referring to freedom, not price. Our General Public Licenses are designed to make sure that you have the freedom to
distribute copies of free software (and charge for this service if you wish), that you receive source code or can get it if you want it, that you can change the
software or use pieces of it in new free programs; and that you know you can do these things.
To protect your rights, we need to make restrictions that forbid anyone to deny you these rights or to ask you to surrender the rights. These restrictions
translate to certain responsibilities for you if you distribute copies of the library, or if you modify it.
For example, if you distribute copies of the library, whether gratis or for a fee, you must give the recipients all the rights that we gave you. You must make
sure that they, too, receive or can get the source code. If you link a program with the library, you must provide complete object files to the recipients so that
they can relink them with the library, after making changes to the library and recompiling it. And you must show them these terms so they know their rights.
Our method of protecting your rights has two steps: (1) copyright the library, and (2) offer you this license which gives you legal permission to copy, distribute
and/or modify the library.
Also, for each distributor's protection, we want to make certain that everyone understands that there is no warranty for this free library. If the library is
modified by someone else and passed on, we want its recipients to know that what they have is not the original version, so that any problems introduced by
others will not reflect on the original authors' reputations.

Finally, any free program is threatened constantly by software patents. We wish to avoid the danger that companies distributing free software will individually
obtain patent licenses, thus in effect transforming the program into proprietary software. To prevent this, we have made it clear that any patent must be
licensed for everyone's free use or not licensed at all.
Most GNU software, including some libraries, is covered by the ordinary GNU General Public License, which was designed for utility programs. This license, the
GNU Library General Public License, applies to certain designated libraries. This license is quite different from the ordinary one; be sure to read it in full, and
don't assume that anything in it is the same as in the ordinary license.
The reason we have a separate public license for some libraries is that they blur the distinction we usually make between modifying or adding to a program
and simply using it. Linking a program with a library, without changing the library, is in some sense simply using the library, and is analogous to running a
utility program or application program. However, in a textual and legal sense, the linked executable is a combined work, a derivative of the original library, and
the ordinary General Public License treats it as such.
Because of this blurred distinction, using the ordinary General Public License for libraries did not effectively promote software sharing, because most
developers did not use the libraries. We concluded that weaker conditions might promote sharing better.
However, unrestricted linking of non-free programs would deprive the users of those programs of all benefit from the free status of the libraries themselves.
This Library General Public License is intended to permit developers of non-
free programs to use free libraries, while preserving your freedom as a user of such
programs to change the free libraries that are incorporated in them. (We have not seen how to achieve this as regards changes in header files, but we have
achieved it as regards changes in the actual functions of the Library.) The hope is that this will lead to faster development of free libraries.
The precise terms and conditions for copying, distribution and modification follow. Pay close attention to the difference between a "work based on the library"
and a "work that uses the library". The former contains code derived from the library, while the latter only works together with the library. Note that it is
possible for a library to be covered by the ordinary General Public License rather than by this special one.
GNU LIBRARY GENERAL PUBLIC LICENSE
TERMS AND CONDITIONS FOR COPYING, DISTRIBUTION AND MODIFICATION
This License Agreement applies to any software library which contains a notice placed by the copyright holder or other authorized party saying it may be
distributed under the terms of this Library General Public License (also called "this License"). Each licensee is addressed as "you".
A "library" means a collection of software functions and/or data prepared so as to be conveniently linked with application programs (which use some of those
functions and data) to form executables.
The "Library", below, refers to any such software library or work which has been distributed under these terms. A "work based on the Library" means either
the Library or any derivative work under copyright law: that is to say, a work containing the Library or a portion of it, either verbatim or with modifications
and/or translated straightforwardly into another language. (Hereinafter, translation is included without limitation in the term "modification".)
"Source code" for a work means the preferred form of the work for making modifications to it.
For a library, complete source code means all the source code for
all modules it contains, plus any associated interface definition files, plus the scripts used to control compilation and installation of the library.
Activities other than copying, distribution and modification are not covered by this License; they are outside its scope. The act of running a program using the
Library is not restricted, and output from such a program is covered only if its contents constitute a work based on the Library (independent of the use of the
Library in a tool for writing it). Whether that is true depends on what the Library does and what the program that uses the Library does.
1. You may copy and distribute verbatim copies of the Library's complete source code as you receive it, in any medium, provided that you conspicuously
and appropriately publish on each copy an appropriate copyright notice and disclaimer of warranty; keep intact all the notices that refer to this License
and to the absence of any warranty; and distribute a copy of this License along with the Library.
You may charge a fee for the physical act of transferring a copy, and you may at your option offer warranty protection in exchange for a fee.
2. You may modify your copy or copies of the Library or any portion of it, thus forming a work based on the Library, and copy and distribute such
modifications or work under the terms of Section 1 above, provided that you also meet all of these conditions:
a. The modified work must itself be a software library.
b. You must cause the files modified to carry prominent notices stating that you changed the files and the date of any change.
c. You must cause the whole of the work to be licensed at no charge to all third parties under the terms of this License.
d. If a facility in the modified Library refers to a function or a table of data to be supplied by an application program that uses the facility, other than
as an argument passed when the facility is invoked, then you must make a good faith effort to ensure that, in the event an application does not
supply such function or table, the facility still operates, and performs whatever part of its purpose remains meaningful.
(For example, a function in a library to compute square roots has a purpose that is entirely well-defined independent of the application.
Therefore,
Subsection 2d requires that any application-supplied function or table used by this function must be optional: if the application does not supply it,
the square root function must still compute square roots.)
These requirements apply to the modified work as a whole. If identifiable sections of that work are not derived from the Library, and can be reasonably

considered independent and separate works in themselves, then this License, and its terms, do not apply to those sections when you distribute them as
separate works. But when you distribute the same sections as part of a whole which is a work based on the Library, the distribution of the whole must
be on the terms of this License, whose permissions for other licensees extend to the entire whole, and thus to each and every part regardless of who
wrote it.
Thus, it is not the intent of this section to claim rights or contest your rights to work written entirely by you; rather, the intent is to exercise the right to
control the distribution of derivative or collective works based on the Library.
In addition, mere aggregation of another work not based on the Library with the Library (or with a work based on the Library) on a volume of a storage
or distribution medium does not bring the other work under the scope of this License.
3. You may opt to apply the terms of the ordinary GNU General Public License instead of this License to a given copy of the Library. To do this, you must
alter all the notices that refer to this License, so that they refer to the ordinary GNU General Public License, version 2, instead of to this License. (If a
newer version than version 2 of the ordinary GNU General Public License has appeared, then you can specify that version instead if you wish.) Do not
make any other change in these notices.
Once this change is made in a given copy, it is irreversible for that copy, so the ordinary GNU General Public License applies to all subsequent copies and
derivative works made from that copy.
This option is useful when you wish to copy part of the code of the Library into a program that is not a library.
4.
You may copy and distribute the Library (or a portion or derivative of it, under Section 2) in object code or executable form under the terms of Sections 1
and 2 above provided that you accompany it with the complete corresponding machine-readable source code, which must be distributed under the
terms of Sections 1 and 2 above on a medium customarily used for software interchange.
If distribution of object code is made by offering access to copy from a designated place, then offering equivalent access to copy the source code from
the same place satisfies the requirement to distribute the source code, even though third parties are not compelled to copy the source along with the
object code.
5. A program that contains no derivative of any portion of the Library, but is designed to work with the Library by being compiled or linked with it, is called
a "work that uses the Library". Such a work, in isolation, is not a derivative work of the Library, and therefore falls outside the scope of this License.
However, linking a "work that uses the Library" with the Library creates an executable that is a derivative of the Library (because it contains portions of
the Library), rather than a "work that uses the library". The executable is therefore covered by this License. Section 6 states terms for distribution of
such executables.
When a "work that uses the Library" uses material from a header file that is part of the Library, the object code for the work may be a derivative work of
the Library even though the source code is not. Whether this is true is especially significant if the work can be linked without the Library, or if the work is
itself a library. The threshold for this to be true is not precisely defined by law.
If such an object file uses only numerical parameters, data structure layouts and accessors, and small macros and small inline functions (ten lines or less
in length), then the use of the object file is unrestricted, regardless of whether it is legally a derivative work. (Executables containing this object code
plus portions of the Library will still fall under Section 6. Otherwise, if the work is a derivative of the Library, you may distribute the object code for the
work under the terms of Section 6. Any executables containing that work also fall under Section 6, whether or not they are linked directly with the
Library itself.
6. As an exception to the Sections above, you may also compile or link a "work that uses the Library" with the Library to produce a work containing
portions of the Library, and distribute that work under terms of your choice, provided that the terms permit modification of the work for the customer's
own use and reverse engineering for debugging such modifications.
You must give prominent notice with each copy of the work that the Library is used in it and that the Library and its use are covered by this License. You
must supply a copy of this License. If the work during execution displays copyright notices, you must include the copyright notice for the Library among
them, as well as a reference directing the user to the copy of this License. Also, you must do one of these things:
a. Accompany the work with the complete corresponding machine-readable source code for the Library including whatever changes were used in
the work (which must be distributed under Sections 1 and 2 above); and, if the work is an executable linked with the Library, with the complete
machine-readable "work that uses the Library", as object code and/or source code, so that the user can modify the Library and then relink to
produce a modified executable containing the modified Library. (It is understood that the user who changes the contents of definitions files in the
Library will not necessarily be able to recompile the application to use the modified definitions.)
b. Accompany the work with a written offer, valid for at least three years, to give the same user the materials specified in Subsection 6a, above, for
a charge no more than the cost of performing this distribution.
c. If distribution of the work is made by offering access to copy from a designated place, offer equivalent access to copy the above specified
materials from the same place.
d. Verify that the user has already received a copy of these materials or that you have already sent this user a copy.
For an executable, the required form of the "work that uses the Library" must include any data and utility programs needed for reproducing the
executable from it. However, as a special exception, the source code distributed need not include anything that is normally distributed (in either source
or binary form) with the major components (compiler, kernel, and so on) of the operating system on which the executable runs, unless that component
itself accompanies the executable.
It may happen that this requirement contradicts the license restrictions of other proprietary libraries that do not normally accompany the operating
system. Such a contradiction means you cannot use both them and the Library together in an executable that you distribute.
7. You may place library facilities that are a work based on the Library side-by-side in a single library together with other library facilities not covered by
this License, and distribute such a combined library, provided that the separate distribution of the work based on the Library and of the other library
facilities is otherwise permitted, and provided that you do these two things:
a. Accompany the combined library with a copy of the same work based on the Library, uncombined with any other library facilities. This must be
distributed under the terms of the Sections above.
b. Give prominent notice with the combined library of the fact that part of it is a work based on the Library, and explaining where to find the
accompanying uncombined form of the same work.
8. You may not copy, modify, sublicense, link with, or distribute the Library except as expressly provided under this License.
Any attempt otherwise to copy,
modify, sublicense, link with, or distribute the Library is void, and will automatically terminate your rights under this License. However, parties who have
received copies, or rights, from you under this License will not have their licenses terminated so long as such parties remain in full compliance.
9. You are not required to accept this License, since you have not signed it.
However, nothing else grants you permission to modify or distribute the Library
or its derivative works. These actions are prohibited by law if you do not accept this License. Therefore, by modifying or distributing the Library (or any
work based on the Library), you indicate your acceptance of this License to do so, and all its terms and conditions for copying, distributing or modifying
the Library or works based on it.

10.
Each time you redistribute the Library (or any work based on the Library), the recipient automatically receives a license from the original licensor to copy,
distribute, link with or modify the Library subject to these terms and conditions. You may not impose any further restrictions on the recipients' exercise
of the rights granted herein. You are not responsible for enforcing compliance by third parties to this License.
11. If, as a consequence of a court judgment or allegation of patent infringement or for any other reason (not limited to patent issues), conditions are
imposed on you (whether by court order, agreement or otherwise) that contradict the conditions of this License, they do not excuse you from the
conditions of this License. If you cannot distribute so as to satisfy simultaneously your obligations under this License and any other pertinent
obligations, then as a consequence you may not distribute the Library at all. For example, if a patent license would not permit royalty-free redistribution
of the Library by all those who receive copies directly or indirectly through you, then the only way you could satisfy both it and this License would be to
refrain entirely from distribution of the Library.
If any portion of this section is held invalid or unenforceable under any particular circumstance, the balance of the section is intended to apply, and the
section as a whole is intended to apply in other circumstances.
It is not the purpose of this section to induce you to infringe any patents or other property right claims or to contest validity of any such claims; this
section has the sole purpose of protecting the integrity of the free software distribution system which is implemented by public license practices. Many
people have made generous contributions to the wide range of software distributed through that system in reliance on consistent application of that
system; it is up to the author/donor to decide if he or she is willing to distribute software through any other system and a licensee cannot impose that
choice.
This section is intended to make thoroughly clear what is believed to be a consequence of the rest of this License.
12. If the distribution and/or use of the Library is restricted in certain countries either by patents or by copyrighted interfaces, the original copyright holder
who places the Library under this License may add an explicit geographical distribution limitation excluding those countries, so that distribution is
permitted only in or among countries not thus excluded. In such case, this License incorporates the limitation as if written in the body of this License.
13. The Free Software Foundation may publish revised and/or new versions of the Library General Public License from time to time. Such new versions will
be similar in spirit to the present version, but may differ in detail to address new problems or concerns.
Each version is given a distinguishing version number.
If the Library specifies a version number of this License which applies to it and "any later version",
you have the option of following the terms and conditions either of that version or of any later version published by the Free Software Foundation.
If the
Library does not specify a license version number, you may choose any version ever published by the Free Software Foundation.
14. If you wish to incorporate parts of the Library into other free programs whose distribution conditions are incompatible with these, write to the author to
ask for permission. For software which is copyrighted by the Free Software Foundation, write to the Free Software Foundation; we sometimes make
exceptions for this.
Our decision will be guided by the two goals of preserving the free status of all derivatives of our free software and of promoting the
sharing and reuse of software generally.
NO WARRANTY
15. BECAUSE THE LIBRARY IS LICENSED FREE OF CHARGE, THERE IS NO WARRANTY FOR THE LIBRARY, TO THE EXTENT PERMITTED BY APPLICABLE LAW.
EXCEPT WHEN OTHERWISE STATED IN WRITING THE COPYRIGHT HOLDERS AND/OR OTHER PARTIES PROVIDE THE LIBRARY "AS IS" WITHOUT WARRANTY
OF ANY KIND, EITHER EXPRESSED OR IMPLIED, INCLUDING, BUT NOT LIMITED TO, THE IMPLIED WARRANTIES OF MERCHANTABILITY AND FITNESS FOR A
PARTICULAR PURPOSE. THE ENTIRE RISK AS TO THE QUALITY AND PERFORMANCE OF THE LIBRARY IS WITH YOU.
SHOULD THE LIBRARY PROVE DEFECTIVE,
YOU ASSUME THE COST OF ALL NECESSARY SERVICING, REPAIR OR CORRECTION.
16.
IN NO EVENT UNLESS REQUIRED BY APPLICABLE LAW OR AGREED TO IN WRITING WILL ANY COPYRIGHT HOLDER, OR ANY OTHER PARTY WHO MAY MODIFY
AND/OR REDISTRIBUTE THE LIBRARY AS PERMITTED ABOVE, BE LIABLE TO YOU FOR DAMAGES, INCLUDING ANY GENERAL, SPECIAL, INCIDENTAL OR
CONSEQUENTIAL DAMAGES ARISING OUT OF THE USE OR INABILITY TO USE THE LIBRARY (INCLUDING BUT NOT LIMITED TO LOSS OF DATA OR DATA BEING
RENDERED INACCURATE OR LOSSES SUSTAINED BY YOU OR THIRD PARTIES OR A FAILURE OF THE LIBRARY TO OPERATE WITH ANY OTHER SOFTWARE),
EVEN IF SUCH HOLDER OR OTHER PARTY HAS BEEN ADVISED OF THE POSSIBILITY OF SUCH DAMAGES.
END OF TERMS AND CONDITIONS
Appendix: How to Apply These Terms to Your New Libraries
If you develop a new library, and you want it to be of the greatest possible use to the public, we recommend making it free software that everyone can
redistribute and change. You can do so by permitting redistribution under these terms (or, alternatively, under the terms of the ordinary General Public
License).
To apply these terms, attach the following notices to the library. It is safest to attach them to the start of each source file to most effectively convey the
exclusion of warranty; and each file should have at least the "copyright" line and a pointer to where the full notice is found.
<one line to give the library's name and a brief idea of what it does.>
Copyright (C) <year> <name of author>
This library is free software; you can redistribute it and/or modify it under the terms of the GNU Library General Public License as published by the Free
Software Foundation; either version 2 of the License, or (at your option) any later version.
This library is distributed in the hope that it will be useful, but WITHOUT ANY WARRANTY; without even the implied warranty of MERCHANTABILITY or
FITNESS FOR A PARTICULAR PURPOSE. See the GNU Library General Public License for more details.
You should have received a copy of the GNU Library General Public License along with this library; if not, write to the Free Software Foundation, Inc., 675
Mass Ave, Cambridge, MA 02139, USA.
Also add information on how to contact you by electronic and paper mail.
You should also get your employer (if you work as a programmer) or your school, if any, to sign a "copyright disclaimer" for the library, if necessary. Here is a
sample; alter the names:
Yoyodyne, Inc., hereby disclaims all copyright interest in the library `Frob' (a library for tweaking knobs) written by James Random Hacker.

<signature of Ty Coon>, 1 April 1990
Ty Coon, President of Vice
That's all there is to it!
wxWindows Library Licence, Version 3
Copyright (C) 1998 Julian Smart, Robert Roebling [, ...]
Everyone is permitted to copy and distribute verbatim copies of this licence document, but changing it is not allowed.
WXWINDOWS LIBRARY LICENCE
TERMS AND CONDITIONS FOR COPYING, DISTRIBUTION AND MODIFICATION
This library is free software; you can redistribute it and/or modify it under the terms of the GNU Library General Public Licence as published by the Free
Software Foundation; either version 2 of the Licence, or (at your option) any later version.
This library is distributed in the hope that it will be useful, but WITHOUT ANY WARRANTY; without even the implied warranty of MERCHANTABILITY or FITNESS
FOR A PARTICULAR PURPOSE. See the GNU Library General Public Licence for more details.
You should have received a copy of the GNU Library General Public Licence along with this software, usually in a file named COPYING.LIB. If not, write to the
Free Software Foundation, Inc., 59 Temple Place, Suite 330, Boston, MA 02111-1307 USA.
EXCEPTION NOTICE
1. As a special exception, the copyright holders of this library give permission for additional uses of the text contained in this release of the library as
licenced under the wxWindows Library Licence, applying either version 3 of the Licence, or (at your option) any later version of the Licence as published
by the copyright holders of version 3 of the Licence document.
2. The exception is that you may use, copy, link, modify and distribute under the user's own terms, binary object code versions of works based on the
Library.
3. If you copy code from files distributed under the terms of the GNU General Public Licence or the GNU Library General Public Licence into a copy of this
library, as this licence permits, the exception does not apply to the code that you add in this way. To avoid misleading anyone as to the status of such
modified files, you must delete this exception notice from such code and/or adjust the licensing conditions notice accordingly.
4. If you write modifications of your own for this library, it is your choice whether to permit this exception to apply to your modifications. If you do not wish
that, you must delete the exception notice from such code and/or adjust the licensing conditions notice accordingly.
Copyright (c) 1998, 1999, 2000 Thai Open Source Software Center Ltd
Permission is hereby granted, free of charge, to any person obtaining a copy of this software and associated documentation files (the "Software"), to deal in
the Software without restriction, including without limitation the rights to use, copy, modify, merge, publish, distribute, sublicense, and/or sell copies of the
Software, and to permit persons to whom the Software is furnished to do so, subject to the following conditions:
The above copyright notice and this permission notice shall be included in all copies or substantial portions of the Software.
THE SOFTWARE IS PROVIDED "AS IS", WITHOUT WARRANTY OF ANY KIND, EXPRESS OR IMPLIED, INCLUDING BUT NOT LIMITED TO THE WARRANTIES OF
MERCHANTABILITY, FITNESS FOR A PARTICULAR PURPOSE AND NONINFRINGEMENT. IN NO EVENT SHALL THE AUTHORS OR COPYRIGHT HOLDERS BE LIABLE FOR
ANY CLAIM, DAMAGES OR OTHER LIABILITY, WHETHER IN AN ACTION OF CONTRACT, TORT OR OTHERWISE, ARISING FROM, OUT OF OR IN CONNECTION WITH
THE SOFTWARE OR THE USE OR OTHER DEALINGS IN THE SOFTWARE.

Instalaciónyextraccióndeopciones
Ordendeinstalación
Instale la impresora y las opciones que haya adquirido en el siguiente orden:
l Soporte de impresora o base de la impresora
l
l
l Impresora
Instalacióndeunalimentadorde250ó500hojas
soporte. Los alimentadores de 250 hojas y de 500 hojas se instalan de la misma forma.
1. Extraiga la bandeja de la unidad de soporte. Extraiga el material de embalaje y la cinta de la unidad de soporte y de la bandeja.
NOTA:
para conocer la disponibilidad.
PRECAUCIÓN: sideseainstalaropcionesdespuésdeinstalarlaimpresora,apáguelaydesenchufeelcabledealimentaciónantesdecontinuar.
NOTA:
PRECAUCIÓN: son necesarias dos personas para levantar la impresora de forma segura.
PRECAUCIÓN: para las configuraciones que se vayan a colocar en el suelo se necesita un mueble adicional para proporcionar estabilidad.
Debeutilizarunsoporteobasedeimpresorasiusamásdeunaopcióndeentradaounaunidaddúplexyunaopcióndeentrada.
NOTA:

2. Coloque la unidad de soporte encima de los alimentadores instalados anteriormente o bien encima de la mesa o del mueble para la impresora donde
piensa utilizar la impresora.
3.
4. En Windows XP, haga clic en Inicio®Panel de control®Impresoras y otro hardware®Impresoras y faxes.
Paralosdemássistemas, haga clic en Inicio®Configuración®Impresoras.
5. Propiedades.
6. En la ficha Opciones instaladas, seleccione Bandeja de 250 hojas o Bandeja de 500 hojas en la lista Opciones disponibles.
7. Haga clic en Agregar.
8. Haga clic en Aceptar cierre la carpeta Impresoras.
Enlace de bandejas.
Instalacióndeunaunidaddúplex
NOTA:

1.
2. Acople la impresora.
3. En Windows XP, haga clic en Inicio®Panel de control®Impresoras y otro hardware®Impresoras y faxes.
Paralosdemássistemas, haga clic en Inicio®Configuración®Impresoras.
4. Propiedades.
5. En la ficha Opciones instaladasDúplexen la lista Opciones disponibles.
6. Haga clic en Agregar.
7. Haga clic en Aceptar cierre la carpeta Impresoras.
Instalacióndeunaunidaddesalida

1. Extraiga la cubierta superior de la impresora, clasificador o unidad de salida de alta capacidad.
2.
3.
4. Si va a montar la unidad de salida en la impresora u otra unidad de salida, coloque la varilla. Coloque las puntas de la varilla en los extremos de la
Número
Pieza
1
Bandeja
2
Etiquetas
3
Abrazadera y varilla
4
Soporte
AVISO:
que se desprendiera del soporte.

5.
6. encajen en las ranuras superiores.
7.
Instalacióndeunalimentadordesobres
1. Tire del pestillo situado en la parte frontal de la impresora para bajar el alimentador multiuso.
2. Levante la puerta del conector del alimentador de sobres para abrirla.
3.
alimentador de sobres en la abertura hasta que encaje.

Instalacióndememoriaenlaimpresora
Instalacióndeunatarjetadememoriadeimpresora
1. Abra la puerta lateral.
2. Abra los pestillos que hay a cada extremo del conector de la tarjeta de memoria de impresora.
3. Desembale la tarjeta de memoria.
4. Alinee las muescas de la parte inferior de la tarjeta con las muescas del conector.
5. Introduzca la tarjeta de memoria firmemente en el conector hasta que los pestillos de ambos lados encajen en su sitio.
Puede que necesite ejercer un poco de fuerza para insertar totalmente la tarjeta.
PRECAUCIÓN: sivaainstalarmemoriaenlaimpresoradespuésdehaberrealizadolainstalacióninicial,apáguelaydesenchufeelcablede
alimentaciónantesdecontinuar.
NOTA:
de impresoras de Dell para garantizar la compatibilidad.
AVISO:
antes de tocar una tarjeta de memoria.

6.
7. Cierre la puerta lateral.
Extraccióndeunatarjetadememoriadeimpresora
1. Abra la puerta lateral.
2. Abra los pestillos de la tarjeta que hay a cada extremo del conector de la tarjeta de memoria de impresora.
La tarjeta de memoria se extrae del conector conforme se abren los pestillos.
AVISO:
antes de tocar una tarjeta de memoria.

3. Extraiga la tarjeta de memoria del conector.
4. Coloque la tarjeta en su embalaje original.
5. Cierre ambos pestillos.
6. Cierre la puerta lateral.
InstalacióndeunaROMdefuentes
InstalacióndeunaROMdefuentes
1. Abra la puerta lateral.
NOTA:
conocer la disponibilidad de ROM de fuentes.
NOTA:

2. Desembale la ROM de fuentes.
3.
4.
Todo el conector de la ROM de fuentes debe tocar la placa del sistema y quedar encajado en el otro conector.
5. Cierre la puerta lateral.
NOTA:
AVISO:
tarjeta de memoria.

ExtraccióndeunaROMdefuentes
1. Abra la puerta lateral.
2. Presione las presillas de bloqueo de la ROM de fuentes.
3. Extraiga la tarjeta.
No toque las patillas de metal de la parte inferior de la tarjeta.
4. Coloque la ROM de fuentes en su embalaje original.
5.
6. Cierre la puerta lateral.
NOTA:
AVISO:
tarjeta de memoria.


Impresión
Carga del alimentador multiuso
Carga del alimentador de sobres
Enlace de bandejas
o .
Envíodeuntrabajoaimprimir
Un controlador de impresora es el software que permite al ordenador comunicarse con la impresora. Cuando selecciona Imprimir
operador de la impresora.
Tal vez tenga que hacer clic en Propiedades o ConfiguraciónImprimir
para ver todos los valores de la impresora disponibles que
1. Con el documento abierto, haga clic en Archivo®Imprimir.
2.
3. Haga clic en Preferencias, Propiedades, Opciones o ConfiguraciónAceptar.
4. Haga clic en Aceptar o en Imprimir para enviar el trabajo a la impresora seleccionada.
Cancelacióndeuntrabajodeimpresión
l

l
¡
¡
l
¡
¡
Cancelacióndeuntrabajodesdeelpaneldeloperadordelaimpresora
Cancelar un trabajo
1. Seleccionar del panel del operador.
2. Abajo hasta que aparezca Seleccionar .
Cancelando <nombredearchivo>.
CancelacióndeuntrabajodesdeunordenadorqueejecuteWindows
Cancelacióndeuntrabajodesdelabarradetareas
1. Haga doble clic en el icono de la impresora.
2. Seleccione el trabajo que desea cancelar.
3. Pulse la tecla Suprimir del teclado.
Cancelacióndeuntrabajodesdeelescritorio
1. Minimice todos los programas para ver el escritorio.
2. Haga doble clic en el icono Mi PC.
3. Haga doble clic en el icono Impresoras.
4. Haga doble clic en la impresora que ha seleccionado al enviar el trabajo.
5. Seleccione el trabajo que desea cancelar.
6. Pulse la tecla Suprimir del teclado.
CancelacióndeuntrabajodesdeunordenadorMacintosh
CancelacióndeuntrabajodeimpresióndesdeunordenadorqueejecuteMacOS9
1. Haga doble clic en el icono de la impresora en el escritorio.
2. Seleccione el trabajo que desea cancelar.
3.
NOTA: Cancelar Detenido
de flecha Abajo hasta que aparezca junto a Cancelar un trabajo Seleccionar .
NOTA: si no tiene el icono Mi PC, puede acceder a la carpeta de impresoras seleccionando Inicio®Configuración®Panel de control y, a

CancelacióndeuntrabajodesdeunordenadorqueejecuteMacOSX
1. Abra Aplicaciones®Utilidades y haga doble clic en CentrodeImpresión o Instalacióndelaimpresora.
2.
3.
4. Pulse Suprimir.
Impresióndelapáginadevaloresdemenús
han instalado correctamente.
1.
2. Menú del panel del operador.
3. Abajo hasta que aparezca junto a InformesSeleccionar .
4. Abajo hasta que aparezca junto a PágvaloresdemenúSeleccionar .
La impresora vuelve al estado Lista
Impresióndeunapáginadeconfiguracióndelared
impresora se han instalado correctamente.
1.
2. Menú del panel del operador.
3. Abajo hasta que aparezca junto a InformesSeleccionar .
4. Abajo hasta que aparezca junto a Págconfigurac.red o Págconfigurac.red<x>
Seleccionar .
La impresora vuelve al estado Lista.
Impresióndeunalistademuestrasdefuentes
Para imprimir muestras de las fuentes disponibles actualmente en la impresora:
1. Lista.
2. Menú del panel del operador.
3. Abajo hasta que aparezca junto a InformesSeleccionar .
4. Abajo hasta que aparezca junto a Imprimir fuentesSeleccionar .
5. Abajo hasta que aparezca junto a Fuentes PCL, Fuentes PostScript o Fuentes PPDS
Seleccionar .
La impresora vuelve al estado Lista.
Impresióndeunalistadedirectorios

Una lista de directorios muestra los recursos almacenados en la memoria flash. Para imprimir una lista:
1. Lista.
2. Menú del panel del operador.
3. Abajo hasta que aparezca junto a InformesSeleccionar .
4. Abajo hasta que aparezca junto a Imprimir directorioSeleccionar .
La impresora vuelve al estado Lista.
Impresióndetrabajosconfidencialesyretenidos
trabajo retenido
a la impresora, puede especificar en el controlador que desea que la impresora retenga el trabajo en la memoria. Una vez almacenado el trabajo en la
Todos los trabajos confidenciales y retenidos tienen un nombre de usuario asociado a ellos. Para acceder a trabajos confidenciales o retenidos, en primer
Impresióndeuntrabajoconfidencial
usuario de la impresora puede imprimir el trabajo sin el PIN.
Windows
1. Archivo®Imprimir.
2. Haga clic en PropiedadesPropiedades, haga clic en ConfiguraciónPropiedades).
3. Otras opciones Imprimir y retener.
4. Introduzca un nombre de usuario y un PIN.
5.
En la impresora.
Macintosh
1. Archivo®Imprimir.
2. Copiasypáginas o General seleccione Direccionamiento trabajo.
a. Preferencias de complementos®Imprimir
filtros de tiempo.
b. Imprimir filtros de tiempo y seleccione Direccionamiento trabajo.
c. Seleccione Direccionamiento trabajo
3. En el grupo de botones de radio, seleccione Impresiónconfidencial.
4. Introduzca un nombre de usuario y un PIN.
5.
En la impresora.
En la impresora:
1. Abajo hasta que aparezca junto a Trabajos retenidosSeleccionar .
2. Abajo hasta que aparezca Seleccionar .
NOTA: si tiene problemas para encontrar Imprimir y retener®Ayuda

3. Abajo hasta que aparezca junto a Trabajos confidencialesSeleccionar .
4. Introduzca su PIN pulsando los botones de flecha Arriba o Abajo
5. Abajo hasta que aparezca Seleccionar .
6. Abajo hasta que aparezca Imprimir 1 copia, Imprimir copias o Eliminar) y, a
Seleccionar .
Impresiónyeliminacióndetrabajosretenidos
Verificarimpresión
Reservarimpresión
Repetirimpresión
y lo almacena en la memoria para que pueda imprimir
Windows
1. Archivo®Imprimir.
2. Haga clic en Preferencias, Propiedades, Opciones o Configuración (dependiendo del programa o del sistema operativo).
3. Otras opcionesImprimir y retener.
4.
En la impresora.
Macintosh
1. Archivo®Imprimir.
2. Copiasypáginas o General seleccione Direccionamiento trabajo.
a. Preferencias de complementos®Imprimir
filtros de tiempo.
b. Imprimir filtros de tiempo y seleccione Direccionamiento trabajo.
c. Seleccione Direccionamiento trabajo
3.
la impresora.
En la impresora.
En la impresora
1. Abajo hasta que aparezca junto a Trabajos retenidosSeleccionar .
NOTA: cuando el trabajo se imprime, se elimina de la memoria de la impresora.
NOTA:
trabajos retenidos adicionales.
NOTA: si tiene problemas para encontrar Imprimir y retener®Trabajos retenidos, haga clic en Ayuda y consulte el tema Trabajos retenidos o Imprimir y

2. Abajo hasta que aparezca Seleccionar .
3. Abajo hasta que aparezca Seleccionar .
l Imprimir todo
l Imprimir trabajo
l Imprimir copias
l Eliminar todos
l Eliminar trabajo
Si ha seleccionado Imprimir trabajo, Eliminar trabajo o Imprimir copiasAbajo hasta que aparezca junto al trabajo
Seleccionar .
Impresiónenmaterialespecial
Se considera material papel especial. Siga estas
instrucciones para imprimir en material especial.
1. para obtener
ayuda.
2. En el panel del operador de la impresora, defina Tipo de papel y Tamañodelpapel
del papel para obtener ayuda.
3.
Windows
1. Con el documento abierto, haga clic en Archivo®Imprimir.
2. Haga clic en Preferencias, Propiedades, Opciones o Configuración (dependiendo del programa o del sistema operativo).
3. Haga clic en la ficha Papel.
4. Seleccione la bandeja que contiene el material especial.
5. Seleccione el tipo de papel (transparencias, sobres, etc.) en el cuadro de lista Tipo de papel.
6. Tipo de papel.
7. Haga clic en Aceptar
Mac OS 9
1. Seleccione Archivo®Ajustarpágina.
2. PapelAceptar.
3. Seleccione Archivo®Imprimir.
4. Con GeneralOrigen del papel y seleccione la bandeja que contenga el material
especial o el nombre del material.
5. Haga clic en Imprimir.
Mac OS X
1. Seleccione Archivo®Ajustarpágina.
2. Formato para.
3. PapelAceptar.
4. Seleccione Archivo®Imprimir.
5. Copiasypáginas, seleccione Imagen.
6. Tipo de papel.
7. Imagen, seleccione Alimentacióndepapel.
8. Todaslaspáginasdesde o Laprimerapáginadesde/Lasrestantesdesde.
9. Haga clic en Imprimir.
NOTA: si tiene problemas, haga clic en Ayuda y siga las instrucciones del controlador.

Cargadebandejasestándaryopcionales
Los pasos necesarios para cargar una bandeja de 250 hojas son los mismos que para cargar una de 500 hojas.
1.
2.
3.
4.
NOTA:
puede producir un atasco.

5.
6.
7. Introduzca la bandeja en la impresora.
Definicióndeltipoyeltamañodelpapel
Tipo de papel y Tamañodelpapel
símplex (por una cara)
NOTA:
NOTA:

Para cambiar los valores de Tipo de papel y Tamañodelpapel:
1.
2. Menú del panel del operador.
3. Abajo hasta que aparezca junto a MenúPapelSeleccionar .
4. Abajo hasta que aparezca junto a Tamaño/tipodepapelSeleccionar .
5. Abajo hasta que aparezca Seleccionar
.
6. Abajo hasta que aparezca Seleccionar
.
7. Abajo hasta que aparezca Seleccionar .
De este modo, este valor se guarda como nuevo valor predeterminado de usuario y la impresora vuelve al estado Lista.
Carga del alimentador multiuso
El alimentador multiuso puede admitir aproximadamente:
l 100 hojas de papel de 75 g/m2 (20 libras de alta calidad)
l 10 sobres
l 75 transparencias
l Anchura: 69,85-215,9 mm (2,75-8.5 pulg.)
l Longitud: 127-355,6 mm (5-14 pulg.)
Los iconos del alimentador multiuso muestran la forma de cargar papel en el mismo, de girar un sobre para imprimir y de cargar papel con cabecera para la
1. Tire del pestillo situado en la parte frontal de la impresora para bajar el alimentador multiuso.
NOTA:
NOTA:

2.
3.
4.
horizontal.
NOTA: no coloque objetos sobre el alimentador multiuso. Asimismo, evite presionarlo o empujarlo con demasiada fuerza.
NOTA:
ni dejar huellas en las transparencias.
Papel
Transparencias
Sobres

5. Cargue el material en la bandeja.
Carga de papel, transparencias o sobres
l
boca arriba.
l Cargue los sobres con la cara de la solapa hacia abajo y la zona del sello y la solapa hacia la izquierda. El extremo del sobre con la zona del sello
se introduce en el alimentador multiuso en primer lugar.
l
seriamente la impresora.
Carga de papel con cabecera o preimpreso
l
l
6.
7. Defina las opciones Tamañodelpapel y Tipo de papel para el alimentador multiuso (Tamañoalimmultiuso y Tipo alim. multiuso) con el valor correcto
a. Menú del panel del operador.
b. Abajo hasta que aparezca junto a MenúPapelSeleccionar .
c. Abajo hasta que aparezca junto a Tamaño/tipodepapelSeleccionar .
d. Abajo hasta que aparezca junto a Tamaño/tipo alim multSeleccionar .
NOTA: No
bandeja.
símplex (por una cara)
dúplex

e. Abajo hasta que aparezca
Seleccionar .
f. derecha hasta que aparezca tipo alim multSeleccionar .
g. derecha hasta que aparezca Seleccionar
.
La impresora vuelve al estado Lista.
Cierre del alimentador multiuso
1.
2.
3. Cierre el alimentador multiuso.
Carga del alimentador de sobres
Para cargar el alimentador de sobres:
1.

l
l
l Totalmente abierto (extendido por completo) para sobres grandes
2.
3.
4.
5. Cargue la pila de sobres con la cara de la solapa hacia abajo y la zona del sello y la solapa hacia la izquierda. El extremo de los sobres con la zona del
sello se introduce en el alimentador de sobres en primer lugar.
de la pila.
AVISO: no coloque objetos sobre el alimentador de sobres. Evite presionarlo o empujarlo con demasiada fuerza.
AVISO:
seriamente la impresora.
NOTA:

6.
7. Baje el peso de sobres para que toque la pila.
8. Defina las opciones Tamañodelpapel y Tipo de papel para el alimentador de sobres (Tamañoalimsobres y Tipo alim sobres) con el valor correcto
a. Menú del panel del operador.
b. Abajo hasta que aparezca junto a MenúPapelSeleccionar .
c. Abajo hasta que aparezca junto a Tamaño/tipodepapelSeleccionar .
d. Abajo hasta que aparezca junto a Tamaño/tipoalimsobresSeleccionar .
e. Abajo hasta que aparezca
Seleccionar .
f. Abajo hasta que aparezca junto a Tamaño/tipo alim sobresSeleccionar .
g. Abajo hasta que aparezca Seleccionar
.
La impresora vuelve al estado Lista.
Enlace de bandejas

bandeja.
Para hacerlo:
1. Menú del panel del operador.
2. Abajo hasta que aparezca junto a MenúPapelSeleccionar .
3. Abajo hasta que aparezca junto a Tamaño/tipodepapelSeleccionar .
4. Abajo hasta que aparezca junto a Tamaño/tipobdja<x> Seleccionar .
5. Abajo hasta que aparezca Seleccionar .
6. Abajo hasta que aparezca junto a Tamaño/tipo bdja <x>Seleccionar .
7. Abajo hasta que aparezca Seleccionar .
La impresora vuelve al estado Lista.
Para desactivar el enlace de bandejas, defina Tipo de papel
Identificaciónyenlacedebandejasdesalida
siguiente salida disponible.
Bandejas de salida disponibles
NOTA:
Nombre de la bandeja de
salida
Materialdeimpresión
Cantidad que se puede instalar en la impresora
l 250 hojas (75 g/m2) de papel
normal
l 300 transparencias
l 200 etiquetas
l 50 sobres (75 g/m2)
misma.
Unidad de salida
l 650 hojas (75 g/m2) de papel
normal
l 50 sobres (75 g/m2)
3

Enlace de bandejas de salida
del operador.
Para enlazar las bandejas de salida:
1. Menú del panel del operador.
2. Abajo hasta que aparezca junto a MenúPapelSeleccionar .
3. Abajo hasta que aparezca junto a InstalacióndesalidaSeleccionar .
4. Abajo hasta que aparezca junto a Configurar bandejasSeleccionar .
5. Abajo hasta que aparezca junto a EnlazarSeleccionar .
La impresora vuelve al estado Lista.
.
NOTA:

Avisos sobre normativas
Aviso
Aviso sobre la marca de la CE
Conformidad con ENERGY STAR
Directiva
Avisos
seguridad, o distorsiona gravemente, bloquea o interrumpe de forma repetida un
servicio de comunicaciones por radio con licencia. Los servicios de
comercial de AM/FM,
servicios autorizados, junto
con los emisores no intencionales, como son los
de
comunicaciones por radio, lo cual se puede determinar encendiendo y apagando el equipo, debe intentar corregir la interferencia mediante una o varias de las
medidas siguientes:
l Reoriente la antena receptora.
l
l Aleje el dispositivo del receptor.
l Enchufe el dispositivo a una toma de corriente distinta, de modo que el
Si fuera necesario, consulte con un representante del servicio de asistencia
sugerencias adicionales.
clasificaciones
siguientes definiciones relacionadas:
l
l
Avisosobrecablesdeseñalblindados:utiliceúnicamentecablesblindadosparalaconexióndedispositivosacualquierotrodispositivoDell,conelfin
dereducirelriesgodeinterferenciasconlosserviciosdecomunicaciónporradio.Elusodecablesblindadosgarantizalaconservacióndela
clasificaciónEMCparaelentornoconcreto.LoscablesestándisponiblesenelsitioWebde Dell en www.dell.com.
hacer que algunas configuraciones pasen a clasificarse como Clase A. Para determinar
AvisodelaCE(UniónEuropea)
indica que este dispositivo Dell cumple la directiva EMC 89/336/EEC y la directiva de
indica que el

l radiointerferencia
l - inmunidad -
l EN 61000-3-- -
l EN 61000-3-- - los
l EN 60950-
l EN 60825-
NOTA: los requisitos de emisiones de la norma EN 55022 constan de dos tipos de clasificaciones:
l Clase A, para entornos comerciales convencionales.
l
siguientes
advertencias de la Clase A:
ADVERTENCIA SOBRE INTERFERENCIAS DE RADIOFRECUENCIA: se trata de un producto declaseA.Enlosentornosdomésticos,esposiblequeel
producto causeinterferenciaderadiofrecuencia.Siseprodujeraestasituación,elusuariodeberátomarlasmedidasnecesarias.
al dispositivo le corresponden las siguientes advertencias de la Clase B:
EstedispositivodeDellestádestinadoparasuusoenentornosdomésticos convencionales de Clase B.
Products Europe BV, Limerick, Irlanda.
Aviso sobre la marca de la CE
1999/5/EC.
InformacióndeNOM(sóloMéxico)
oficiales

(NOM):
Conformidad con ENERGY STAR®
o una pantalla de inicio disponen del certificado de cumplimiento de los
requisitos ENERGY STARestablecidos por EPA (Environmental Protection Agency)
Emblema ENERGY STAR®
El programa ENERGY STARde la EPA es un esfuerzo conjunto entre la EPA y los
de productos de bajo consumo.
Puede ayudar a reducir el uso de electricidad y sus efectos colaterales apagando
especialmente por la noche y los fines de semana.
Waste Electrical and Electronic Equipment (WEEE) Directive
In the European Union, this label indicates that this product should not be disposed of with household waste. It should be deposited at an appropriate facility
to enable recovery and recycling. For information on how to recycle this product responsibly in your country, please visit: www.euro.dell.com/recycling.
Směrniceoodpadníchelektrickýchaelektronických zařízeních(WEEE)
e by tento produkt nemeba jej
za recyklovat. Informace o zodpovsobu recyklace tohoto produktu
www.euro.dell.com/recycling.
Exportador:
Dell Inc.
One Dell Way
Round Rock, TX 78682 (EE.UU.)
Importador:
Paseo de la Reforma 2620 -
Col. Lomas Altas
Enviar a:
Avenida Soles N. 55
5210n/5310n
Voltaje de entrada:
110-127 V
Frecuencia:
50/60 Hz
Consumo actual:
7,2 A / 8,0 A
Voltaje de salida:
50 VCC / 50 VCC
Corriente de salida:
5,3 A / 6,7 A

WEEE-direktiv (Waste from Electrical and Electronic Equipment)
Du
Richtlijn WEEE, afdanken van elektrische en elektronische apparaten
In de Europese Unie geeft dit label aan dit product niet via huishoudelijk afval mag worden afgedankt. Het moet gedeponeerd worden bij een daarvoor
geschikte voorziening zodat recuperatie en recyclage mogelijk zijn. Raadpleeg voor informatie over de milieuvriendelijke wijze van recyclage van dit product in
uw land: www.euro.dell.com/recycling.
WEEE-direktiivikäytöstäpoistettujenlaitteidenhävittämisestä
osoitteessa www.euro.dell.com/recycling.
Directive WEEE (Waste from Electrical and Electronic Equipment,Déchetsdes
équipementsélectroniquesetélectriques)
se sur le recyclage responsable de ce produit dans votre pays, visitez le site
www.euro.dell.com/recycling.
WEEE-Richtlinie (Waste from Electrical and Electronic Equipment =
Elektronikschrottverordnung)
entsprechenden Recycling-Einrichtung entsorgt werden. Informationen zum
www.euro.dell.com/recycling.

Direttiva WEEE (Waste from Electrical and Electronic Equipment)
Nell'Unione Europea, questa etichetta indica che il prodotto non deve essere smaltito insieme ai rifiuti solidi urbani ma va depositato in appositi impianti per il
trattamento e il riciclaggio. Per informazioni sulle normative che regola il riciclaggio del prodotto nei diversi paesi, visitare il sito Web
www.euro.dell.com/recycling.
廃電気電子機器指令(WEEE)
欧州連合において、このラベルは、この製品が生活ごみとして廃棄できないことを表します。この製品は、復元やリサイクルのために、適切な施設で処理する必要があります。この製品をリサイクル
する方法については、以下のホームページで国別の手順を参照してください。www.euro.dell.com/recycling
WEEE-direktiv (Waste Electrical and Electronic Equipment)
I EU betyr denne etiketten at dette produktet ikke skal kastes sammen med kan
gjenopprettes og resirkuleres. Hvis du vil ha informasjon om hvordan du kan
www.euro.dell.com/recycling.
Dyrektywa WEEE dotycząca zużytego sprzętu elektrycznego i elektronicznego
W Unii Europejskiej etykieta ta oznacza, e produktu nie naley wyrzucawraz z domowymi odpadkami. Produkt powinien zosta przekazany do waciwej
firmy usugowej, gdzie bdzie mo zutylizowaprodukt w danym kraju mona znalena
stronie internetowej: www.euro.dell.com/recycling.
Directivasobredesperdíciodeequipamentoeléctricoeelectrónico(WEEE- Waste
Electrical and Electronic Equipment)
www.euro.dell.com/recycling.
Инструкцияпообращениюсотходамиэлектротехническогоиэлектронного
оборудования (WEEE)

, .
.
www.euro.dell.com/recycling.
废弃电子电气设备(WEEE)指令
在欧盟各国,该标签表示此类产品不应该与日常废弃物一起处理。它应该被放入适当的设备中以废物利用和回收。如需有关在您所在的国家内如何可靠回收此类产品的信息,请访问:
www.euro.dell.com/recycling。
Directivasobredesechodeequiposeléctricosyelectrónicos (WEEE)
para
www.euro.dell.com/recycling.
WEEE-direktivet (Waste from Electrical and Electronic Equipment)
hur du

Descripcióngeneraldelsoftware
Utilidad de valores de la impresora local de Dell
Utilice el CD Drivers and Utilities
SistemadegestióndetónerdeDell™
Centro de monitor de estado
Utilice el Centro de monitor de estado para administrar varios monitores de estado.
l Haga doble clic en un nombre de impresora para abrir su monitor de estado o seleccione Ejecutar para abrir un monitor de estado para una
determinada impresora.
l Seleccione Ver para cambiar el aspecto de la lista de impresoras.
l Seleccione Ayuda
Ventanadeestadodeimpresión
l
l Hacer clic en Solicitartóner
Consulte
AplicacióndenuevasolicituddesuministrosdeimpresoradeDell
1. Haga clic en Inicio®Programas o Todos los programas®Impresoras Dell®DellLaserPrinter5210n/5310n®Aplicacióndenuevasolicitudde
suministros de impresora.
2. Si realiza el pedido desde la Web, haga clic en Visite el sitio Web de solicitud de cartuchos de Dell.
3.
NOTA:
NOTA:
NOTA:
NOTA:

Utilidad de valores de la impresora local de Dell
Utilice la Utilidad de valores de la impresora local de Dell para cambiar y guardar los valores de la impresora no disponibles desde el controlador de la
Inicio®Programas o Todos los programas®Impresoras Del l®DellLaserPrinter5210n/5310n®Utilidad de valores de la impresora local de Dell. La
Puede cambiar los siguientes valores con la Utilidad de valores de la impresora local de Dell:
UtilidadparadefinirladirecciónIP
NOTA:
Valores de Acabado
Copias
Origen separador
Valores de Papel
Origen del papel
1
Tipo de papel
1
Tipos personalizados
2
Configurar multiuso
Textura del papel
3
Peso del papel
3
Carga papel
3
Valores de Paralelo
PCL SmartSwitch
PS SmartSwitch
Mem intermedia paral
Estado avanzado
Aceptar inicial
ValoresdeEmulaciónPCL
Ancho A4
Renumerar bandeja
1
CR auto tras LF
LF auto tras CR
Valores de PostScript
Imprimir error PS
Prioridad de fuente
Valores de Calidad
PQET
PictureGrade
ValoresdeConfiguración
Lenguaje de impresora
Guardar recursos
Destino de carga
Tiempo espera
Continuar auto
Idioma
Control de alarma
Valores de USB
PCL SmartSwitch
PS SmartSwitch
Mem intermedia USB
1
2
3

1. Inicie la HerramientaWebdeconfiguracióndeimpresorasDell
2. Haga clic en Valores de la impresora.
3. En Valoresdelservidordeimpresión, haga clic en TCP/IP.
4. Introduzca los valores de direcciónIP, máscaraderedy gateway.
5. Haga clic en Enviar.
6. HerramientaWebdeconfiguracióndeimpresorasDell.
DesinstalacióndelsoftwaredelaimpresoraDell
1. En Windows XP, haga clic en Inicio®Panel de control®Impresoras y otro hardware®Impresoras y faxes.
Paralosdemássistemas, haga clic en Inicio®Configuración®Impresoras.
a. Seleccione el objeto de impresora que desea desinstalar.
b. Seleccione Desinstalacióndel software de la impresora Dell.
c. Seleccione los componentes que desea desinstalar.
d. Haga clic en Terminar.
e. Haga clic en Terminado
l Haga clic en Inicio®Programas o Todos los programas®Impresoras Dell®DellLaserPrinter5210n/5310n.
a. Seleccione Desinstalacióndel software de la impresora Dell.
b. Seleccione los componentes que desea desinstalar.
c. Haga clic en Terminar.
d. Haga clic en Terminado
Programadeconfiguracióndelcontrolador
controlador puede contener un grupo de valores de controlador de impresora guardados y otros datos como:
l
l
l
l Texto y marcas de agua
l Referencias de plantilla
l Referencias de fuente
l Asociaciones de papeles
HerramientaWebdeconfiguracióndeimpresorasDell
-mail,
-
NOTA:
NOTA: si no conoce estos valores, consulte al administrador de la red.
NOTA:

Web.
1. Menú del panel del operador.
2. Abajo hasta que aparezca junto a InformesSeleccionar .
3. Abajo hasta que aparezca junto a Págconfigurac.redSeleccionar .
.
Estado de la impresora
Valores de la impresora
Copiar los valores de la impresora
Estadísticasdeimpresión
NOTA:

Informacióndelaimpresora
actuales.
Configuracióndelaalertadee-mail
Recibir un e--
mail para recibir
Definircontraseña
Ayudaenlínea
Ayuda para visitar el sitio Web de Dell.
NOTA:

Solucióndeproblemas
Explicacióndelosmensajesdelaimpresora
imprimir y los errores no se pueden solucionar. Es posible que deba apagar y volver a encender la impresora para solucionar temporalmente el estado de
operador.
Comprobacióndeunaimpresoraquenoresponde
l
l
l
l
l
l
Una vez haya comprobado todas estas posibilidades, apague y encienda la impresora. Esto suele solucionar el problema.
Solucióndeproblemasdeimpresión
Lapantalladelpaneldeloperadorestáenblancoosólomuestradiamantes.
mensaje Lista
Los trabajos no se imprimen.
l
Lista o AhorrodeenergíaSeleccionar
para devolver la impresora al estado Lista.
l
Seleccionar .
l
Cargue papel en la bandeja.

l
¡
¡
l
l
Los trabajos retenidos no se imprimen.
l Se ha producido un error de formato o la impresora no tiene memoria suficiente.
¡
¡ Elimine el trabajo.
¡ Libere memoria de impresora adicional examinando la lista de los trabajos retenidos y eliminando los que ya haya enviado a la
impresora.
l
Elimine el trabajo.
Los PDF en varios idiomas no se imprimen.
1. Abra el documento que desea imprimir en Adobe Reader.
2. Haga clic en el icono de la impresora.
Imprimir.
3. Active la casilla Imprimir como imagen.
4. Haga clic en Aceptar.
El trabajo tarda mucho en imprimirse.
l El trabajo es demasiado complejo.
l activada la
Defina Proteccióndepágina como DesactivadoConfiguración
.
El trabajo se imprime desde la bandeja incorrecta o en el papel o material especial incorrecto.
tipo de
Se imprimen caracteres incorrectos.
l
l
Si aparece Hex. preparadoRastreo hex. antes de imprimir un trabajo. Apague y encienda la
impresora para salir del modo Rastreo hex.
No funciona el enlace de bandejas.
l
l
l Papel.
l Enlace de bandejas o .
Los trabajos grandes no se clasifican.
l
Defina Clasificación en Activada en el menúAcabado
consulte .
NOTA: si define Clasificación en DesactivadomenúAcabado.
l El trabajo es demasiado complejo.
l La impresora no posee suficiente memoria.
Agregue memoria a la impresora o un disco duro opcional.
Seproducensaltosdepáginainesperados.

Solucióndeproblemasdeopciones
l Apague la impresora, espere unos 10 segundos y vuelva a encenderla. Si con esto no resuelve el problema, desenchufe la impresora y compruebe la
l
l
Solucióndeproblemasdealimentacióndelpapel
Se ha agotado el tiempo de espera del trabajo. Defina EsperadeimpresiónConfiguración
.
Bandejas de papel
l
l para
Unidaddúplex
l
l
Alimentador de sobres
l
l TamañodelpapelPapel
l Carga del alimentador de sobres
Memoria flash
Servidordeimpresióninterno
l
correctamente a la placa del sistema de la impresora.
l
Drivers and Utilities
Unidad de salida
es posible que no se haya instalado correctamente. Vuelva a instalar todas las unidades de salida.
Memoria de impresora
El papel se atasca frecuentemente.
l
Utilice el papel y material especial recomendados. Consulte
evitar que se produzcan atascos de papel.
l Ha cargado demasiado papel o demasiados sobres.
l

Solucióndeproblemasdecalidaddeimpresión
l
Cargue papel de un paquete nuevo. Guarde el papel en su embalaje original hasta que lo vaya a cargar. Consulte Almacenamiento del
l Los rodillos de carga pueden estar desgastados.
Sustituya los rodillos de carga. Consulte
El mensaje Atasco de papelpermanecedespuésdehaberextraídoelpapelatascado.
No ha pulsado Seleccionar
Seleccionar . Consulte
Lapáginaatascadanosevuelveaimprimirtraseliminarelatasco.
Se ha desactivado la Configuración. Defina Recuperaciónatasco en Automático o Activado. Consulte
Haypáginasenblancoenlabandejadesalida.
Tipo de papel para que coincida con el tipo de material cargado. Consulte
del panel del operador
Laimpresiónesdemasiadoclara.
l
Seleccionar . Repita este procedimiento varias
.
l Cambie el valor de IntensidaddeltónerCalidad.
l Cambie el valor de BrilloCalidad.
l Cambie el valor de ContrasteCalidad.
l Peso del papel y Textura del papel
Papel.
l
Eltónersecorreolaimpresiónsesaledelapágina.
l Peso del papel y Textura del papel
Papel.
l
instrucciones para papel y material especial
Aparecetónerenlacaraposteriordelapáginaimpresa.
trabajo que se va a imprimir.
Aparecetónerborrosoomanchasdefondoenlapágina.
l
l
Todalapáginaestáenblanco.
l
l
l
Seleccionar . Repita este procedimiento varias
.
Aparecenlíneasenlapágina.
l
Seleccionar . Repita este procedimiento varias
.

l
Laimpresiónesdemasiadooscura.
l Cambie el valor de IntensidaddeltónerCalidad.
l Cambie el valor de BrilloCalidad.
l Cambie el valor de ContrasteCalidad.
NOTA:
demasiado alto.
Los caracteres tienen bordes dentados o desiguales.
l Cambie el valor de ResoluciónimpresiónCalidad
l Active Mejorarlín.finas.
l
Parteotodalapáginaseimprimeennegro.
Eltrabajoseimprime,perolosmárgeneslateralysuperiorsonincorrectos.
l TamañodelpapelPapel es correcto.
l
Aparecenimágenesfantasma.
l Tipo de papelPapel es correcto.
l Sustituya el kit del fotoconductor.
Se imprime un fondo gris.
l Puede que el valor de Intensidaddeltóner sea demasiado oscuro. Cambie el valor de IntensidaddeltónerCalidad.
l Defina el valor de Brillo
l Defina el valor de Contraste
l
Partedelaimpresiónestárecortadaenloslaterales,lapartesuperiorolaparteinferiordelmaterial.
Laimpresióntienearrugasoapareceinclinadadeformainadecuada.
Laimpresióndetransparenciases de baja calidad.
l
l Tipo de papelPapelTransparencia.

Instalacióndelatarjetainalámbricaopcional
Requisitosmínimosdeinstalación
l
l Impresora Dell Laser Printer 5210n/5310n
l
l CD Drivers and Utilities que se incluye con la impresora
l Un ordenador que ejecute uno de los siguientes sistemas operativos:
¡ Windows XP Professional x64
¡ Windows XP
¡ Windows 2003 Server
¡ Windows 2000
Valoresderedinalámbrica
l
l -hoc o infraestructura)
l
l
l Claves de seguridad
l
Instalacióndelatarjetainalámbricaopcional
l
l
l
NOTA:
conocer la disponibilidad.

1. Abra la puerta lateral.
2. Busque el conector de tarjeta en la placa del sistema.
3.
4. Desembale la tarjeta. Guarde el material de embalaje.
5.
6. Inserte los tornillos que ha guardado de la placa de la cubierta (o el tornillo adicional incluido con la tarjeta).
7. Apriete el tornillo para fijar la tarjeta.
AVISO:

8.
9.
10. Cierre la puerta lateral.
11.

Configuracióndelatarjetainalámbricaopcional(Windows)
Informacióngeneraldelaconfiguración
Drivers and Utilities
-
.
l
l Se han colocado o cerrado todos los paneles de acceso y puertas de la impresora.
l
l
l
UsodelaUtilidaddeconfiguracióninalámbrica
1.
2. Conecte la impresora al ordenador mediante un cable USB.
3. Cuando aparezca el Asistente para hardware nuevo, haga clic en Cancelar.
4. Inserte el CD Drivers and Utilities
5. Haga clic en Instalacióninalámbrica:configurarunadaptadordeimpresorainalámbrico.
6. Haga clic en Aceptar para aceptar el acuerdo de licencia.
7. Haga clic en Terminar
8. Seleccione Modo de asistente o Modo avanzado.
9. Haga clic en Siguiente y siga las instrucciones para el modo de asistente o modo avanzado.
Modo de asistente
En modo de asistente
NOTA:
examine la carpeta Tools del CD Drivers and Utilities y copie la carpeta SetupWizard en el escritorio o en el disco duro.

1. Seleccione el nombre de red (SSID) apropiado.
Sehanencontradoconfiguracionesinalámbricasenelordenador
l nombre de red (SSID) de la lista, haga clic en Siguiente
y vaya al paso 2.
l Si el nombre de red correcto no aparece en la lista, seleccione DeseoutilizarunaconfiguracióndistintaSiguiente
y vaya a .
Hayredesinalámbricasdisponiblesensuárea
l
Seleccione el nombre de red (SSID) correspondiente de la lista, haga clic en Siguiente y vaya al paso 2.
l Si el nombre de red correcto no aparece en la lista, seleccione Deseo introducir un nombre de red distinto, haga clic en Siguiente y vaya al paso
3 de .
2. Siguiente. Si no se ha detectado seguridad, vaya al paso 4.
3. Siguiente.
4. Compruebe cada atributo de red en la pantalla de resumen para asegurarse de que los valores son correctos. Si los valores son correctos, haga clic en
Siguiente
5.
l Terminar para cerrar la utilidad de
l Ver valores
Siguiente.
6. .
Introduccióndevaloresderedalternativos
1.
l
Deseoutilizarunaconfiguración
distinta, haga clic en Siguientepaso 2.
l
Deseo introducir un nombre de red distinto, haga clic en
Siguientepaso 3.
2. Deseo introducir un nombre de red distinto
Siguiente.
3. -hoc).
4. Introduzca el nombre de red (SSID) de la red que desea utilizar.
5. Seleccione el canal adecuado para la red (si corresponde).
6. Haga clic en Siguiente.
7. Siguiente.
8. Siguiente. Si no se ha seleccionado
paso 9.
9. Compruebe cada atributo de red en la pantalla de resumen para asegurarse de que los valores son correctos. Si los valores son correctos, haga clic en
Siguiente
10.
NOTA: cuando haga clic en Siguiente
No verificar
queelservidordeimpresiónpuedeaccederalared
NOTA:
NOTA: cuando haga clic en Siguiente
No verificar
queelservidordeimpresiónpuedeaccederalared

l Terminar para cerrar la utilidad de
l Ver valores
Siguiente.
11. .
Modo avanzado
Modo de
asistenteOpciones
l Seleccione Modo de asistente o Modo avanzado como modo de inicio predeterminado de la utilidad.
l Noverificarqueelservidordeimpresiónpuedeaccederalared
1. -hoc).
2. Introduzca el Nombre de red (SSID)
3. Seleccione el canal adecuado para la red.
4.
Para el modo de infraestructura:
l Abierto
l Compartida
l WPA personal
l 802.1x RADIUS
Para el modo ad-hoc: Abierto
5.
6. paso 7.
Si se ha seleccionado 802.1x Configurarautenticación y siga las instrucciones de
.
Si se ha seleccionado WPA personal como tipo de cifrado, haga clic en Configurar cifrado y siga las instrucciones de
personal.
Si se ha seleccionado WEP o WEP(clavesestáticas) como tipo de cifrado, haga clic en Configurar cifrado y siga las instrucciones de
cifrado WEP.
7. Haga clic en Aplicar.
8. Haga clic en Aceptar.
9. Haga clic en Aceptar para cerrar la utilidad.
Configuracióndelmecanismodeautenticación
NOTA:
Abierto
l
l WEP
Compartida
l WEP
WPA
personal
l TKIP
802.1x —
RADIUS
l
l
l
l WPA-TKIP
NOTA: RADIUS con EAP-TLS, se necesita una solicitud de certificado para obtener
RADIUS, vaya directamente al paso
6.

l Si se seleccionan EAP-MD5, MSCHAPv2 o LEAP
a. RADIUS.
b.
c. Haga clic en Aceptar para volver a la pantalla de inicio de Modo avanzadopaso 6 de las instrucciones del modo avanzado.
l Si se selecciona PEAP
a. RADIUS.
b.
c. Haga clic en Instalarcertificadodeautoridaddecertificación.
d. Examinar para elegir el certificado. Haga clic en Aceptar para
instalar el certificado o en Cancelar
e. Haga clic en Aceptar para volver a la pantalla de inicio de Modo avanzadopaso 6 de las instrucciones del modo avanzado.
l Si se selecciona EAP-TLS
a. RADIUS.
b. Haga clic en Instalar certificado firmado.
c. Escriba la ruta al certificado firmado correcto o haga clic en Examinar para elegir el certificado. Haga clic en Aceptar para instalar el certificado en
Cancelar
d. Haga clic en Instalarcertificadodeautoridaddecertificación.
e. Examinar para elegir el certificado. Haga clic en Aceptar para
instalar el certificado en Cancelar
f. Haga clic en Aceptar para volver a la pantalla de inicio de Modo avanzadopaso 6 de las instrucciones del modo avanzado.
l Si se selecciona EAP-TTLS
a. -TTLS.
b. RADIUS.
c.
d. Haga clic en Instalarcertificadodeautoridaddecertificación.
e. Examinar para elegir el certificado. Haga clic en Aceptar para
instalar el certificado o haga clic en Cancelar
f. Haga clic en Aceptar para volver a la pantalla de inicio de Modo avanzadopaso 6 de las instrucciones del modo avanzado.
ConfiguracióndelcifradoWEP
1. Introduzca las claves WEP adecuadas. Para el cifrado WEP se necesita al menos una clave WEP, pero puede incluir hasta cuatro.
2.
3. Haga clic en Aceptar para volver a la pantalla de inicio de Modo avanzado y vaya al paso 7 de las instrucciones del modo avanzado.
ConfiguracióndelcifradoWPApersonal
1. Introduzca la clave precompartida adecuada.
2. Haga clic en Aceptar para volver a la pantalla de inicio de Modo avanzado y vaya al paso 7 de las instrucciones del modo avanzado.
Creacióndeunasolicituddecertificado
se debe iniciar una solicitud de certificado para crear un nuevo certificado firmado.
Para crear una solicitud de certificado
1. Vaya a Certificados®Crear solicitud de certificado.
2.
3. Haga clic en Examinar
4. Haga clic en Aceptar para volver a la pantalla de inicio de Modo avanzado y vaya al paso 6 de las instrucciones del modo avanzado.
Instalacióndelaimpresoraenlared
Drivers and Utilities. Haga clic en
Instalaciónenred:instalalaimpresoraparasuusoenunared.

Instalacióndelaimpresoraderedenordenadoresadicionalesdelared
sucesivas.
Cambiodelosvaloresdelservidordeimpresióninalámbrico
impresora debe estar correctamente instalada en la red.
1.
a.
b. Menú del panel del operador.
c. Abajo hasta que aparezca junto a InformesSeleccionar .
d. Abajo hasta que aparezca junto a Págconfigurac.redSeleccionar .
e. estado es "Conectado".
Si el estado
2.
3. Enviar.
Configuraciónmanual
-
l
l
l
l
Configuracióndelservidordeimpresiónenmodoad-hoc
1.
2.
3.
NOTA: Imp conf red 1 en la pantalla.
NOTA:
Parámetrodelaredinalámbrica
Establecer en
SSID (nombre de red o identificador de grupo de servicios)

4.
5.
Por ejemplo:
operativo.
6.
7. Haga clic en el enlace Configuración
8. En Otros valores, haga clic en Red/Puertos.
9. En Red/Puertos, haga clic en Inalámbrico.
10.
l SSID
l Tipo de BSS
l -hoc)
l
l Modo de cifrado (si corresponde)
11. Haga clic en Enviar.
12.
Administracióndecertificados
RADIUS hacen necesario el uso de un certificado de autoridad de
--TLS).
Para administrar certificados para su uso con 802.1x RADIUS
1. Configuración
2. Haga clic en Administracióndecertificados.
3.
4. paso 7 de las instrucciones de -
hoc.
1. Instalarunnuevocertificadodeautoridaddecertificación.
2. Enviar.
Ad-hoc
Modo de cifrado de datos
Ninguno
Clave WEP
Ninguno
Dispositivo
DirecciónIP
Ordenador
169.254.10.40
169.254.10.41
NOTA: si se pretende que 802.1x
para establecer los certificados necesarios antes de
NOTA: si se selecciona WEP como modo de seguridad, haga clic en Valores avanzados
adicionales.

Para solicitar e instalar un nuevo certificado firmado
1. Actualizar solicitud de firma del certificado.
2.
3. Haga clic en Actualizar solicitud de firma del certificado.
4. En Solicitud de firma del certificado, haga clic en Descargar solicitud de firma del certificado.
5.
802.1x RADIUS.
6. Instalar un nuevo certificado.
Configuracióndelservidordeimpresiónutilizandoelpaneldeloperadordelaimpresora
En ciertos modelos de impresora puede configurar el valor Nombre de red (SSID) y Modo de red (ad-hoc o infraestructura) utilizando el panel del operador de
Instalacióndelaimpresoraenlared
Drivers and Utilities. Haga clic en Instalaciónenred:instalalaimpresoraparasuusoenunared.
.
Instalacióndelaimpresoraderedenordenadoresadicionalesdelared
sucesivas.
Configuracióndelatarjetainalámbricaopcional(Macintosh)
Informacióngeneraldelaconfiguración
ordenador (ad-
estaciones base) o el modo ad-
l
l Se han colocado o cerrado todos los paneles de acceso y puertas de la impresora.
l
l
NOTA:
Modo de infraestructura
Modo ad-hoc

l
Configuracióndelservidordeimpresióninalámbrico
1. En la carpeta Aplicaciones, abra la conexiónaInternet y haga clic en el icono AirPort en la barra de herramientas.
2. servidordeimpresión.
3. mostrar todos los marcadores
4. Seleccione Rendezvous o Bonjour en la columna de recopilaciones situada en el extremo izquierdo de la ventana.
5.
6. Configuración.
7. En Otros valores, haga clic en Red/Puertos.
8. En Red/Puertos, haga clic en Inalámbrico.
9.
l SSID
l Tipo de BSS
l -hoc)
l
l
10. Haga clic en Enviar.
11.
12. En la carpeta Aplicaciones, abra la conexiónaInternet y haga clic en el icono AirPort en la barra de herramientas.
13.
Administracióndecertificados
RADIUS hacen necesario el uso de un certificado de autoridad de
--TLS).
Para administrar certificados para su uso con 802.1xRADIUS
1. Configuración
2. Haga clic en Administracióndecertificados.
3.
4. paso 6 de las instrucciones .
1. Instalarunnuevocertificadodeautoridaddecertificación.
2. Enviar.
Para solicitar e instalar un nuevo certificado firmado
1. Actualizar solicitud de firma del certificado.
2.
3. Haga clic en Actualizar solicitud de firma del certificado.
4. En Solicitud de firma del certificado, haga clic en Descargar solicitud de firma del certificado.
5.
NOTA: si se pretende que 802.1x
para establecer los certificados necesarios antes de
NOTA: si se selecciona WEP como modo de seguridad, haga clic en Valores avanzados
adicionales.

802.1x RADIUS.
6. Instalar un nuevo certificado.
Configuracióndelservidordeimpresiónutilizandoelpaneldeloperadordelaimpresora
En ciertos modelos de impresora puede configurar el valor Nombre de red (SSID) y Modo de red (ad-hoc o infraestructura) utilizando el panel del operador de
Instalacióndelaimpresoraenlared
Drivers and Utilities. Haga clic en Instalaciónenred:instalalaimpresoraparasuusoenunared.
.
Instalacióndelaimpresoraderedenotrosordenadoresdelared
sucesivas.
Cambiodelosvaloresdelservidordeimpresióninalámbrico
1. mostrar todos los marcadores
2. Seleccione Rendezvous o Bonjour en la columna de recopilaciones situada en el extremo izquierdo de la ventana.
3. En la columna de la derecha, haga doble clic en el marcador de la impresora.
4. Seleccione los valores que desea modificar.
5. Enviar.
NOTA:

Informaciónsobreelfuncionamiento
Interoperabilidadinalámbrica
l -
l
l -
Seguridad
Dell 5210 / 5310 Wireless Option, al igual que otros dispositivos de radio,
el
interpretan
entornos, el uso de Dell 5210 / 5310 Wireless Option puede estar restringido por el
propietario del edificio o los representantes responsables de la
El uso de Dell 5210 / 5310 Wireless Option en cualquier otro entorno donde el riesgo de interferencia con otros dispositivos o servicios se considere o
identifique como potencialmente peligroso.
aeropuerto),
Wireless Option antes de encenderlo.
Informaciónsobrenormativas
Dell 5210 / 5310 Wireless Option se debe instalar y utilizar de acuerdo con las
Aprobaciones de radio. Dell Inc no se hace responsable de
esta tarjeta Dell 5210 / 5310 Wireless
de las interferencias causadas por dicha
de las regulaciones gubernamentales que puedan producirse si el usuario no sigue estas instrucciones.
EE.UU.ComisiónFederaldeComunicaciones(FCC,Federal Communications Commission)
DeclaracióndeexposiciónaradiacióndelaFCC
ADVERTENCIA:
frecuencia de
la FCC. Sin embargo, Dell 5210 / 5310 Wireless Option se debe utilizar de forma que quede minimizada la posibilidad de contacto humano durante el
funcionamiento normal. Para evitar la posibilidad de sobrepasar los
la antena en la
http://support.dell.com.
Requisitos de interferencias de radio frecuencia
ADVERTENCIA: Dell 5210 / 5310 Wireless Option
El uso de este dispositivo queda restringido al interior debido a que funciona en el rango de frecuencia de 5,15 GHz a 5,25 GHz. La FCC exige que este
producto se utilice en interior para el rango de frecuencia de 5,15 GHz a 5,25 GHz con el fin de reducir la posibilidad de causar interferencias con sistemas de

-canal.
Los radares de gran potencia utilizan principalmente las bandas de 5,25 GHz a 5,35 GHz y de 5,65 GHz a 5,85 GHz. Estas estaciones de radar pueden
provocar
Declaracióndeinterferencia
Estos dispositivos cumplen el apartado 15 de la normativa de la FCC. El siguientes: (1)
Los dispositivos no pueden causar interferencias perjudiciales y (2) Los dispositivos deben aceptar cualquier interferencia que pueda causar un
funcionamiento no deseado.
de la clase B, de conformidad con el apartado 15 de las normas de la FCC.
Estos interferencias perjudiciales en instalaciones residenciales. Este equipo genera,
comunicaciones
provoca interferencias en la
determinar encendiendo y apagando el equipo), el usuario debe intentar corregir
las interferencias llevando a
cabo una de estas medidas:
l
l
l Conectar el dispositivo a una toma de corriente de un circuito distinto al de
l
NOTA: Dell 5210 / 5310 Wireless Option se debe instalar y utilizar de acuerdo con las
usuario FCC.
invalidar su autoridad para utilizar el equipo.
Este dispositivo no se debe reubicar o utilizar junto con otro tipo de antena o transmisor.
Canadá.IndustryCanada(IC)
This device complies with RSS210 of Industry Canada.
Europa.DeclaracióndeconformidaddelaUE
Hereby, Dell Inc declares that this Dell 5210 / 5310 Wireless Option is in compliance with the essential requirements and other relevant provisions of Directive
1999/5/EC.
٬ﺍﺫﻫﺏﺟﻭﻣﺑﻥﻠﻌﺗ
Dell Inc
ﺍﺫﻫﻥﺃﻕﺣﻠﻣﻟﺍﻲﻛﻠﺳﻼﻟﺍﻱﺭﺎﻳﺗﺧﻻﺍ
Dell 5210 / 5310
ﻊﻣﻕﻓﺍﻭﺗﻳﺕﺎﺑﻠﻁﺗﻣﻟﺍﺔﻳﺳﻳﺋﺭﻟﺍﺕﺍﺫﻡﺎﻛﺣﻷﺍﻭﺔﻠﺻﻟﺍﻡﻗﺭﻪﻳﺟﻭﺗﻠﻟ
1999
5 /EC.
Spoleuje, e tento Dell 5210 / 5310 Wireless Option je ve shodadavky a dal
smrnice 1999/5/EC.
Hierbij verklaart Dell Inc dat deze Dell 5210/5310 optionele draadloze kaart in
bepalingen van richtlijn 1999/5/EG.
-tyyppinen laite
muiden ehtojen mukainen.
CAUTION: Exposure to Radio Frequency Radiation.
The installer of this radio equipment must ensure that the antenna is located or pointed such that it does not emit RF field in excess of Health
Canada limits for the general population; con-sult SafetyCode 6, obtainable from Health Canada's website http://www.hc-sc.gc.ca/rpb.

d
-WLAN-Optionskarte den grundlegenden Anforderungen und anderen relevanten Vorschriften der Richtlinie
1999/5/EG entspricht.
, Dell Inc Dell 5210 / 5310
1999/5/.
Dell Inc.
Dell 5210 / 5310
1999/5 /EC
.
conforme ai requisiti essenziali ed alle altre disposizioni pertinenti stabilite
dalla direttiva 1999/5/CE.
Dell Inc は、この Dell 5210/5310 ワイヤレスオプションが欧州連合指令 1999/5/EC の該当規制要件に準拠していることを宣言します。
oppfyller de sentrale kravene i og andre relevante bestemmelser til 1999/5/EC-
direktivet.
Firma Dell Inc owiadcza niniejszym, e opcjonalna karta bezprzewodowa Dell 5210 / 5310 jest zgodna z najwaniejszymi wymogami i innymi stosownymi
postanowieniami dyrektywy 1999/5/WE.
Dell , Dell 5210 / 5310
1999/5/EC.
因此,Dell Inc 宣布此 Dell 5210 / 5310 无线选件符合 1999/5/EC 指令的基本要求和其它相关规定。
Por medio de la presente Dell Inc declara que el Dell 5210 / 5310 Wireless Option cumple con los requisitos esenciales y cualesquiera disposiciones aplicables
o exigibles de la Directiva 1999/5/CE.
Dell 5210 / 5310 Wireless Option
inin 1999/5/EC saylDirektifin temel artlarna ve dierunu beyan
Francia
En todos los departamentos metropolitanos, se pueden utilizar frecuencias de LAN
condiciones:
l frecuencia de 2400-2483,5 MHz.
l -2454 MHz y de 10 mW para la banda de 2454-2483,5 MHz.
NOTA: Dell 5210 / 5310 Wireless Option transmite menos de 100 mW de potencia, pero
Aprobaciones de radio
NOTA:

http://support.dell.com.
definido
De esta forma, se garantiza el cumplimiento con las restricciones de la normativa local
la red.
-
 1
1
-
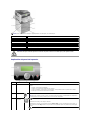 2
2
-
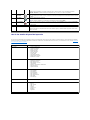 3
3
-
 4
4
-
 5
5
-
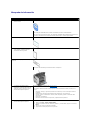 6
6
-
 7
7
-
 8
8
-
 9
9
-
 10
10
-
 11
11
-
 12
12
-
 13
13
-
 14
14
-
 15
15
-
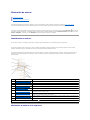 16
16
-
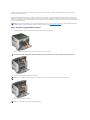 17
17
-
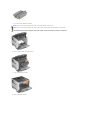 18
18
-
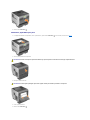 19
19
-
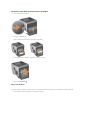 20
20
-
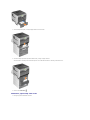 21
21
-
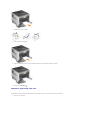 22
22
-
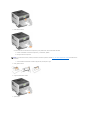 23
23
-
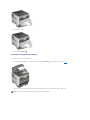 24
24
-
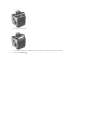 25
25
-
 26
26
-
 27
27
-
 28
28
-
 29
29
-
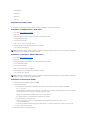 30
30
-
 31
31
-
 32
32
-
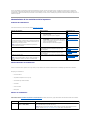 33
33
-
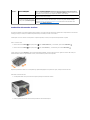 34
34
-
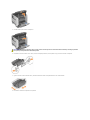 35
35
-
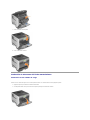 36
36
-
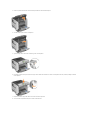 37
37
-
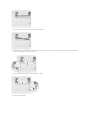 38
38
-
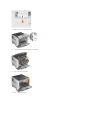 39
39
-
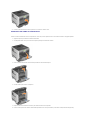 40
40
-
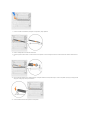 41
41
-
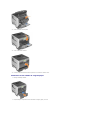 42
42
-
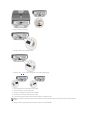 43
43
-
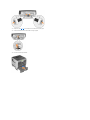 44
44
-
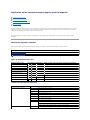 45
45
-
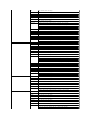 46
46
-
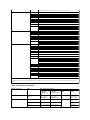 47
47
-
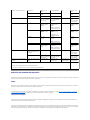 48
48
-
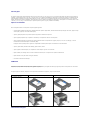 49
49
-
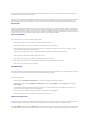 50
50
-
 51
51
-
 52
52
-
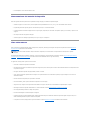 53
53
-
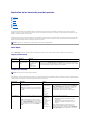 54
54
-
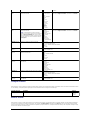 55
55
-
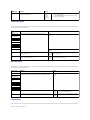 56
56
-
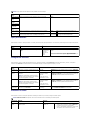 57
57
-
 58
58
-
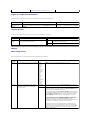 59
59
-
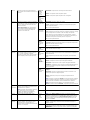 60
60
-
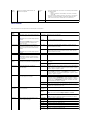 61
61
-
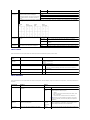 62
62
-
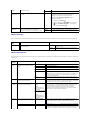 63
63
-
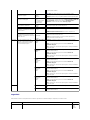 64
64
-
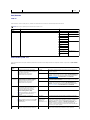 65
65
-
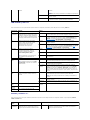 66
66
-
 67
67
-
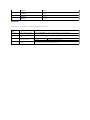 68
68
-
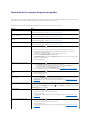 69
69
-
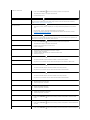 70
70
-
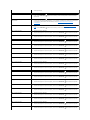 71
71
-
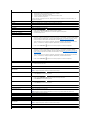 72
72
-
 73
73
-
 74
74
-
 75
75
-
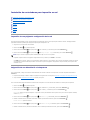 76
76
-
 77
77
-
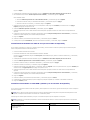 78
78
-
 79
79
-
 80
80
-
 81
81
-
 82
82
-
 83
83
-
 84
84
-
 85
85
-
 86
86
-
 87
87
-
 88
88
-
 89
89
-
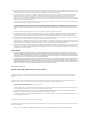 90
90
-
 91
91
-
 92
92
-
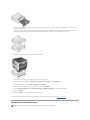 93
93
-
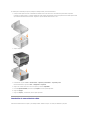 94
94
-
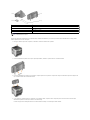 95
95
-
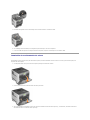 96
96
-
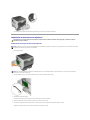 97
97
-
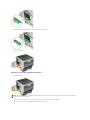 98
98
-
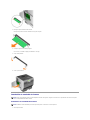 99
99
-
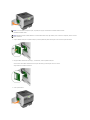 100
100
-
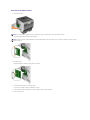 101
101
-
 102
102
-
 103
103
-
 104
104
-
 105
105
-
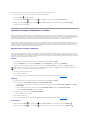 106
106
-
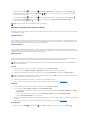 107
107
-
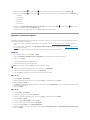 108
108
-
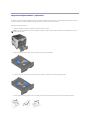 109
109
-
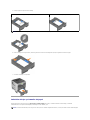 110
110
-
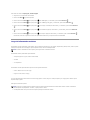 111
111
-
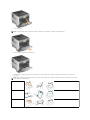 112
112
-
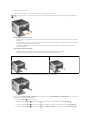 113
113
-
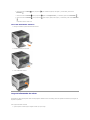 114
114
-
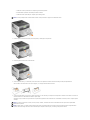 115
115
-
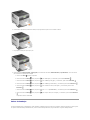 116
116
-
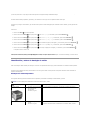 117
117
-
 118
118
-
 119
119
-
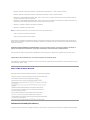 120
120
-
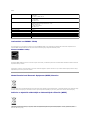 121
121
-
 122
122
-
 123
123
-
 124
124
-
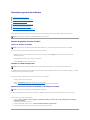 125
125
-
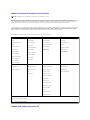 126
126
-
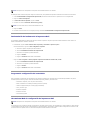 127
127
-
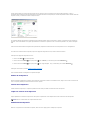 128
128
-
 129
129
-
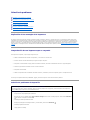 130
130
-
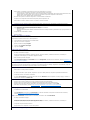 131
131
-
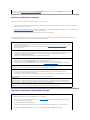 132
132
-
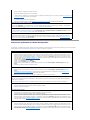 133
133
-
 134
134
-
 135
135
-
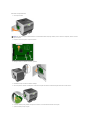 136
136
-
 137
137
-
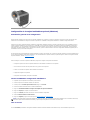 138
138
-
 139
139
-
 140
140
-
 141
141
-
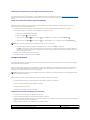 142
142
-
 143
143
-
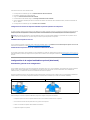 144
144
-
 145
145
-
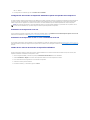 146
146
-
 147
147
-
 148
148
-
 149
149
-
 150
150


Dell 5210N Manual de usuario
- Tipo
- Manual de usuario
- Este manual también es adecuado para
En otros idiomas
- English: Dell 5210N User manual
Documentos relacionados
-
Dell 2330d/dn Mono Laser Printer Guía del usuario
-
-
-
-
-
-
-
Dell P1500 Personal Mono Laser Printer El manual del propietario
-
Dell Vostro 1720 Guía del usuario
-