
Backofen
Oven
Four
Oven
Forno
DE BETRIEBSANLEITUNG
EN GUIDE TO INSTALLATION
FR GUIDE D’UTILISATION
NL GEBRUIKSAANWIJZING
PT GUIA DE UTILIZAÇÃO
99641091 ml bio.qxp 12/01/2007 15:13 Page 1

Da wir unsere Produkte ständig verbessern möchten, behalten wir uns das Recht vor, ihre tech-
nischen, funktionellen und ästhetischen Merkmale zu verändern, damit sie mit der technischen
Weiterentwicklung Schritt halten.
Wichtig:
Bitte lesen Sie vor der Inbetriebnahme des Gerätes diese Einbau- und
Gebrauchsanleitung aufmerksam durch, damit Sie sich sehr rasch mit seinem Betrieb vertraut
machen können.
Liebe Kundin, lieber Kunde,
Sie haben soeben einen
BBRRAANNDDTT
Backofen erworben, und wir dan-
ken Ihnen dafür.
Wir haben in dieses Gerät unsere ganze Leidenschaft und unser
Know-how einfließen lassen, damit es Ihre Bedürfnisse bestmöglich
erfüllt. Es ist innovativ, leistungsfähig, und wir haben es so konzi-
piert, daß auch seine Benutzung immer einfach bleibt.
In der
BBRRAANNDDTT
Produktpalette finden Sie auch eine breite Auswahl
an Dunstabzugshauben, Mikrowellenherden, Kochfeldern,
Küchenherden, Geschirrspülern, Waschmaschinen,
Wäschetrocknern, Kühlschränken, Gefrierschränken und
Tiefkühltruhen), die Sie mit four Ihrem neuen
BBRRAANNDDTT
Backofen abs-
timmen können.
Sie können uns auch im Internet unter
wwwwww..bbrraannddtt..ccoomm
besuchen,
wo Sie unsere jüngsten Innovationen sowie nützliche und ergän-
zende Informationen finden.
BBRRAANNDDTT
2
DE
02
EN
18
NL
34
PT
50
66
FR
99641091 ml bio.qxp 12/01/2007 15:13 Page 2

INHALT
3
1 / FÜR DEN BENUTZER
• Sicherheitshinweise ________________________________________ 04
• Umwelt ___________________________________________________ 05
2 / EINBAU DES GERÄTS
• Wahl des Aufstellungsortes __________________________________ 06
• Einbau ___________________________________________________ 06
• Elektrischer Anschluss______________________________________ 07
• Austausch des Stromkabels _________________________________ 08
3 / BESCHREIBUNG DES GERÄTS
• Übersicht über den Ofen ____________________________________ 09
• Beschreibung des Zubehörs _________________________________ 10
4 / BENUTZUNG DES GERÄTS
º
Sofortiger Garvorgang __________________________________ 11
5 / ZUBEREITUNGSARTEN IM BACKOFEN __________________________ 12
6 / PFLEGE UND REINIGUNG DES GERÄTS
• Reinigung der Aussenfläche _________________________________ 13
• Reinigung des Innenraums __________________________________ 14
7 / FUNKTIONSSTÖRUNGEN ______________________________________ 15
• Wechsel der Glühbirne ______________________________________ 16
99641091 ml bio.qxp 12/01/2007 15:13 Page 3

4
SICHERHEITSHINWEISE
— Dieses Gerät ist für die Benutzung durch
Privatpersonen in ihrem Haushalt konzipiert
worden. Es ist ausschließlich für das Garen
von Lebensmitteln bestimmt. Dieser Backofen
enthält keinerlei asbesthaltige Bestandteile.
— Dieses Gerät muss von Erwachsenen
benutzt werden. Bitte darauf achten, dass
Kinder es nicht berühren und als Spielzeug
benutzen. Stellen Sie sicher, dass sie die
Bedienelemente des Geräts nicht berühren.
— Das Gerät bei Lieferung sofort auspacken
oder auspacken lassen. Sein allgemeines
Aussehen prüfen. Eventuelle Vorbehalte
schriftlich auf dem Lieferschein vermerken,
und ein Exemplar davon behalten.
— Das Gerät ist für den normalen
Haushaltsgebrauch bestimmt. Es nicht für
kaufmännische oder industrielle oder andere
Zwecke als diejenigen benutzen, für die es
konzipiert worden ist.
— Die Merkmale dieses Geräts nicht verändern
oder versuchen, sie zu verändern. Dies würde
eine Gefahr für Sie darstellen.
— Während des Gerätebetriebs Kleinkinder
fern halten. Dadurch wird vermieden, dass sie
sich durch Umkippen eines Kochgefäßes ver-
brennen. Außerdem ist die Gerätevorderseite
bei Ofenbetrieb und -reinigung (Pyrolyse) heiß.
— Das Gerät nie am Türgriff ziehen.
— Vor der ersten Nutzung des Ofens, diesen
leer 15 Minuten lang heizen. Für hinreichende
Raumbelüftung sorgen. U. U. stellen Sie einen
besonderen Geruch oder leichte
Rauchentwicklung fest. Das ist normal.
— Beim Backen darauf achten, dass die
Backofentür richtig geschlossen ist, damit die
Dichtung ihre Aufgabe richtig erfüllt.
— Das Gerät wird bei Benutzung heiß. Die
Heizelemente im Backofen nicht berühren. Sie
könnten sich schwer verbrennen.
— Wenn die Zubereitungen in den Backofen ein-
geführt oder aus dem Backofen herausgeholt
werden, die oberen Heizelemente nicht mit den
Händen berühren. Die Hände mit
Topfhandschuhen schützen.
— Kochgeräte (Rost, Spieß ...) nach dem
Zubereiten nicht mit bloßen Händen berühren.
— Nie Alu-Folie direkt auf den Backofenboden
legen (s. Kapitel Beschreibung des Ofens). Die
sich dort sammelnde Hitze könnte die
Emaillierung beschädigen.
— Keine schweren Lasten auf die offene
Backofentür stellen und sicher stellen, dass
kein Kind auf die Tür klettert oder sich darauf
setzt.
— Um Beschädigungen der Bedienknöpfe des
Geräts zu vermeiden, die Ofentür bei laufendem
oder noch heißem Ofen nicht geöffnet lassen.
— Den Ofenraum nur bei abgeschaltetem Ofen
reinigen.
— Bei intensivem und längeren Betrieb des
Geräts kann eine Zusatzbelüftung erforderlich
sein. Fenster öffnen oder Dunstabzug stärker
aktivieren.
— Abgesehen von dem mit dem Ofen gelieferten
Zubehör nur hitzebeständiges Geschirr ver-
wenden (Herstellerhinweise befolgen).
— Nach der Ofenbenutzung sicher stellen, dass
alle Schalter ausgeschaltet sind.
— Niemals Dampf- oder Hochdruckgeräte zur
Reinigung des Ofens benutzen (Anforderungen
an die elektrische Sicherheit).
— Zur erhöhten Sicherheit ist der Ofen mit
einer AUTOMATISCHEN AUSSCHALTUNG
ausgestattet, sollten Sie aus Versehen
vergessen, den Ofen auszuschalten. Nach 10
Stunden Betriebszeit wird die AS-Funktion
(Automatikstopp) aktiviert und der Ofen heizt
nicht mehr. Anstelle der Uhrzeit wird AS
angezeigt und es ertönt eine Zeit lang eine
Serie 2 aufeinanderfolgender Signaltöne.
•
Wichtig
Diese Betriebsanleitung mit dem Gerät
aufbewahren. Sollte das Gerät an eine ande-
re Person verkauft oder veräußert werden,
sichergehen, dass sie auch die
Betriebsanleitung bekommt. Vor der
Installation und Benutzung des Geräts soll-
ten diese Hinweise zur Kenntnis genommen
werden. Sie sind für die Sicherheit des
Benutzers und anderer Personen verfasst
worden.
1 / FÜR DEN BENUTZERDE
99641091 ml bio.qxp 12/01/2007 15:14 Page 4

UMWELT
•
—Die Verpackung des Gerätes kann wieder verwertet werden. Führen Sie sie der
Wiederverwertung zu und tragen Sie zum Umweltschutz bei, indem sie die Verpackung in den
dazu bestimmten Containern Ihrer Gemeinde entsorgen.
—In das Gerät wurden viele wiederverwertbare Materialien eingebaut. Dieses Logo zeigt an, dass
alte Geräte nicht mit anderen Abfällen zu mischen sind. Die von dem Hersteller organi-
sierte Wiederverwertung erfolgt unter optimalen Bedingungen unter Einhaltung der
europäischen Richtlinie 2002/96/EG zu Abfällen aus elektrischen und elektronischen
Geräten. Fragen Sie in der Gemeindeverwaltung oder bei Ihrem Händler nach den
Ihnen am nächsten gelegenen Sammelpunkten für Altgeräte.
—Wir danken für Ihren Beitrag zum Umweltschutz.
Achtung
Die Installation darf nur von qualifizierten Installateuren und Technikern vorgenommen
werden.
Dieses Gerät entspricht folgenden europäischen Richtlinien:
- Niederspannungsrichtlinie 73/23/EWG, novelliert durch die CE-Kennzeichnungsrichtlinie
93/68/EWG.
- Richtlinie zur elektromagnetischen Verträglichkeit 89/336/EWG, novelliert durch die CE-
Kennzeichnungsrichtlinie 93/68/EWG.
- Verordnung EG Nr. 1935/2004 zu Materialien und Gegenständen, die dazu bestimmt sind, mit
Lebensmitteln in Kontakt zu kommen.
1 / FÜR DEN BENUTZER
DE
5
99641091 ml bio.qxp 12/01/2007 15:14 Page 5

6
EINBAU
Hierfür:
1) Die Gummi-Schraubenabdeckungen ent-fer-
nen, um die Befestigungsbohrungen frei-zule-
gen.
2) In die Möbelwand ein Loch von 2 mm
Durchmesser bohren, um das Bersten des
Holzes zu verhindern.
3) Den Backofen anhand der 2 Schrauben befe-
stigen.
4) Die Gummi-Schraubenabdeckungen wieder
aufsetzen (sie dienen auch zur Dämpfung beim
Schließen der Backofentür).
(*) Bei einem offenen Möbel muss die Öffnung
(maximal) 70 mm groß sein.
Empfehlung
Sich von einem Fachmann für
Haushaltsgeräte die Konformität der
Installation bestätigen lassen.
•
WAHL DES AUFSTELLUNGSORTES
Aus obenstehenden Abbildungen gehen die
Maße eines Schrankes hervor, in den der Ofen
eingesetzt werden kann.
Der Backofen kann beliebig unter einer
Arbeitsfläche oder in einem Säulenmöbel
(offen* oder geschlossen) mit den passenden
Abmessungen für den Einbau installiert wer-
den (siehe nebenstehendes Schema).
Der Backofen hat eine optimierte Lüftung, und
somit werden beim Backen und Säubern
bemerkenswerte Ergebnisse erzielt, wenn fol-
gende Punkte berücksichtigt werden:
• Den Backofen mittig in das Möbel einbauen,
damit ein Mindestabstand von 5 mm zum
benachbarten Möbel eingehalten wird.
• Das Material des Einbaumöbels oder die
Beschichtung dieses Möbels muss hit-zebe-
ständig sein.
• Um die Stabilität zu erhöhen, den Ofen mit 2
Schrauben in den entsprechenden Bohrungen
in den Seitenwänden des Möbels befestigen
(Abb.1).
•
585
560
550
70
550
Abb. 01
2 / EINBAU DES GERÄTSDE
99641091 ml bio.qxp 12/01/2007 15:14 Page 6

7
•
Zähler 20 A Einphasenstrom
220-240V
~
50Hz
Steckdose
2 Pole + Erdung
IEC Norm 60083
Einphasige Leitung 220 - 240 V
~
Versorgungskabel
Länge 1,50 m
etwa
Differenzialabschalter oder
Schmelzsicherung 16 A
ELEKTRISCHER ANSCHLUSS
Die elektrische Sicherheit ist über korrekten
Einbau sicher zu stellen. Bei Einbau und
Wartungsvorgängen muss das Gerät vom
Stromnetz getrennt, die Schmelzsicherungen
müssen abgeschaltet oder herausgenommen
werden.
Der Stromanschluss wird hergestellt, bevor
das Gerät in das Möbel eingeschoben wird.
Prüfen, ob:
- die Leistung der Installation ausreicht,
- die Versorgungsleitungen in gutem Zustand
sind,
- der Drähtequerschnitt mit den Installations-
regeln übereinstimmt.
Der Backofen muss mit einem (genormten)
Stromkabel mit 3 Leitern mit 1,5 mm
2
(1 Ph +
1N + Erde) angeschlossen werden, die an das
einphasige 220 - 240 V
~
Netz über eine
Steckdose 1 ph + 1 N + Erdung nach ICE-
Norm 60083 oder über eine omnipolare
Abschaltevorrichtung oder gemäß
Installationsregeln angeschlossen sein müs-
sen.
Achtung
Der Schutzdraht (grün-gelb) ist an die
Klemme des Geräts angeschlossen und
muss mit der Erdung der Anlage verbunden
sein.
Im Falle eines Anschlusses mit Steckdose
muss diese auch nach der Installation des
Gerätes zugänglich sein.
Die Schmelzsicherung der vorhandenen
Anlage muss 16 Ampere aufweisen.
Wenn das Stromkabel beschädigt ist, muss
es durch ein Spezialkabel oder einen
besonderen Satz ersetzt werden, der bei
Hersteller oder Kundendienst erhältlich ist.
2 / EINBAU DES GERÄTS
DE
99641091 ml bio.qxp 12/01/2007 15:14 Page 7

•
Achtung
Wir übernehmen keine Haftung für Unfälle oder Zwischenfälle aufgrund nicht vorhande-
ner oder nicht ordnungsgemäßer Erdung.
Wenn die Stromanlage der Wohnung für den Anschluss des Geräts geändert werden muss,
sich an einen qualifizierten Elektriker wenden.
Wenn der Ofen irgendeine Störung aufweist, das Gerät vom Netz trennen oder diejenige
Sicherung herausnehmen, die der Anschlussleitung des Geräts entspricht.
AUSTAUSCH DES STROMKABELS
— Das Stromkabel (H05 RR-F, H05 RN-F oder H05 VV-F) muss ausreichend lang sein, damit es
an den einzubauenden und auf dem Boden vor dem Möbel stehenden Backofen angeschlossen
werden kann.
Hierfür muss das Gerät vom Netz getrennt werden:
— Das Fach unten rechts von der rückwärtigen Haube durch Losschrauben von 2 Schrauben öff-
nen und die Klappe wegschwenken.
— Jeden Draht des neuen Stromkabels über 12 mm freilegen.
— Die Adern sorgfältig verdrehen.
— Die Schrauben des Klemmenhalters lockern und das auszutauschende Stromkabel entfernen.
•
Das Stromkabel von der Seite der Haube in die Kabelklemme rechts vom Klemmenhalter ein-
führen.
— Alle Adern der Stromkabel müssen von den Schrauben erfasst werden.
— Der Draht der Phase an die Klemme L.
— Der grün-gelbe Erdungsdraht muss an die Klemme angeschlossen werden.
— Der Draht des Nulleiters (blau) an die Klemme N.
— Die Schrauben des Klemmenhalters festschrauben und den Anschluss durch Ziehen an jedem
Draht überprüfen.
— Das Kabel mit der Kabelklemme rechts des Klemmenhalters fixieren.
— Das Fach wieder mit den 2 Schrauben schließen.
2 / EINBAU DES GERÄTSDE
8
99641091 ml bio.qxp 12/01/2007 15:14 Page 8

9
3 / BESCHREIBUNG DES GERÄTS
DE
•
ÜBERSICHT ÜBER DEN OFEN
A
B
Temperaturwahlschalter
Funktionswahlschalter
C
D
Lampe
Anzeiger der Einschubleiste
Empfehlung
Diese Einbau- und Betriebsanleitung gilt für mehrere Modelle. Ihr Gerät kann leicht von
den gegebenen Beschreibungen und der Ausstattung abweichen.
55
75
100
125
150
180
210
240
270
T˚
c
D
C
A
B
99641091 ml bio.qxp 12/01/2007 15:14 Page 9

10
3 / BESCHREIBUNG DES GERÄTSDE
Hinten
Vorne
•
Kippsicheres Rost (Abb. 1)
Das Rost ist für alle Kochgeschirre und
Kuchenformen geeignet, die zu garende oder
überbackende Lebensmittel enthalten.
Es wird für Grillgerichte benutzt (sie werden
direkt daraufgelegt).
BESCHREIBUNG DES ZUBEHÖRS
•
Abb.1
Abb.2
•
Mehrzweckblech (Abb. 2)
Wenn es unter dem Rost eingeschoben wird,
fängt es Bratensaft und Fett auf. Es kann auch
zur Hälfte mit Wasser gefüllt und für
Kochvorgänge im Wasserbad genutzt werden.
Braten oder andere Fleischstücke sollten nicht
direkt auf das Mehrzweckblech gegeben wer-
den, denn dies würde automatisch zu starken
Spritzern an den Ofenwänden führen.
Empfehlung
Gefäße mit anti-haftbeschichtetem Emailledeckel abkülen lassen und von Hand
mit Spülmittel reinigen. Keine Scheuerschwämme benutzen. Nicht darauf mit einem
Messer oder einer Pizzascheibe aus Metall schneiden, sondern eher Gegenstände aus
Kunststoff oder Silikon benutzen.
•
Bratspieß (Abb. 3) modellabhängig
Für die Benutzung:
• Zum Auffangen des Bratensaftes die
Mehrzweckfettpfanne in die Einschubleiste Nr.
1 schieben oder, wenn das Fleischstück zu
groß ist, diese auf den Backofenboden stellen.
• Einen der Halter auf den Spieß setzen; das zu
bratende Fleischstück auf den Spieß schieben
und den zweiten Halter aufsetzen; Grillgut zen-
trieren und beide Halter verschrauben.
• Den Spieß auf die Halterung legen.
• Die Spitze des Spießes mit leichtem Druck in
das Antriebsloch an der Backofenrückwand
einführen.
• Den Griff abschrauben, um die Ofentür
schließen zu können. Nach dem Braten den
Handgriff wieder auf den Spieß aufschrauben,
damit er ohne Verbrennungsgefahr heraus-
genommen werden kann.
Abb.3
99641091 ml bio.qxp 12/01/2007 15:14 Page 10

11
4 / BENUTZUNG DES GERÄTS
DE
SOFORTIGER GARVORGANG
•
- Den Funktionswahlschalter auf die gewünschte
Position drehen.
Beispiel: Position „ “ (Abb. 1).
- Den Thermostat (Temperaturwähler) auf die
im Rezept empfohlene Temperatur einstellen.
Beispiel: Temperatureinstellung 210° (Abb. 1).
Nach diesen Vorgängen wird der Ofen geheizt
und der Temperaturwahlschalter schaltet sich
mit der Einstellung ein und aus.
55
75
100
125
150
180
210
240
270
T˚
c
Abb.1
Abb.2
Achtung
Keine Wäsche oder Geschirrtücher an den Ofengriff hängen.
Achtung
Garvorgänge erfolgen immer bei geschlossener Ofentür.
Achtung
Nach einem Garzyklus funktioniert die Gebläseturbine noch einige Zeit, um zuverlässi-
gen Ofenbetrieb sicher zu stellen.
99641091 ml bio.qxp 12/01/2007 15:14 Page 11

12
5 / ZUBEREITUNGSARTEN IM BACKOFENDE
TRADITIONELL
•
Das Backen erfolgt durch Heizelemente unten und oben.
•
Erfordert ein Vorheizen, bevor das Gericht in den Backofen gestellt wird.
•
Für langsame und empfindliche Garvorgänge empfohlen: saftiges Wild ... Zum Anbraten
von Rinderbraten Zum Schmoren im geschlossenen Kochtopf nach der Vorbereitung auf
dem Kochfeld (Hähnchen in Rotweinsauce, Hasenpfeffer).
GEFLÜGEL SPEZIAL
•
Das Garen erfolgt durch das obere Heizelement und dosierte Wärmeabgabe des unteren
Heizelements.
•
In dieser Position wird Energie gespart, gleichzeitig wird aber ein unverändert gutes
Ergebnis beim Garen des Geflügels erzielt.
•
Das Geflügel in einen Tontopf geben und diesen am besten auf das Rost auf der ersten
Einschubleiste stellen. Der Backofen braucht nicht vorgeheizt zu werden. Nach der Hälfte
der Garzeit kann das Geflügel umgedreht werden.
BODEN
•
Das Garen erfolgt anhand des unteren Heizelements.
•
Der Ofen sollte vorgeheizt werden. Garen durch Wärme von unten. Das Rost in die unte-
re Einschubleiste einschieben.
•
Empfohlen für feuchte Speisen (Speckkuchen, saftige Obsttorten...) Der Teig wird von
unten gut gebacken. Empfohlen für Zubereitungen, die aufgehen (Sandkuchen, Brioche,
Guglhupf …) und Soufflees, die somit nicht durch die Ausbildung einer Kruste am Aufgehen
gehindert werden.
GRILL + (SPIESS modellabhängig)
•
Das Garen erfolgt anhand des oberen Heizelements.
•
Vorheizen nicht erforderlich. Geflügel und saftige, rundum knusprige Braten.
•
Der Spieß dreht sich bis zum Öffnen der Backofentür weiter.
•
Die Fettpfanne in die untere Einschubleiste einschieben.
•
Für Geflügel oder Spießbraten empfohlen. Zum An- und Durchbraten von Lammkeule,
Rinderkoteletts. Zur Erhaltung des zarten Charakters von Fischkoteletts.
STARKER GRILL
•
Das Garen erfolgt anhand des oberen Heizelements.
• 5 Minuten vorheizen. Die Fettpfanne auf die untere Einschubleiste schieben.
• Wird für das Grillen von Koteletts,Würstchen, Brotscheiben und Gambas auf dem
Grillrost empfohlen.
* Benutzte Sequenz(en) für die Angabe auf dem Energieetikett gemäß der europäischen Norm
EN 50304 und der Europäischen Richtlinie 2002/40/EG.
*
99641091 ml bio.qxp 12/01/2007 15:14 Page 12

13
6 / PFLEGE UND REINIGUNG DES GERÄTS
DE
REINIGUNG DER AUSSENFLÄCHE
•
Die Ofentür mit einem weichen Tuch und Fensterreinigungsmittel reinigen.
Keine Scheuermittel oder harten Metallschaber zur Reinigung der Ofenglastür verwenden, da
dies zu Kratzern auf der Oberfläche und u. U. zum Platzen des Glases führen kann.
Zur Pflege des Geräts empfehlen wir Clearit Pflegeprodukte.
Clearit bietet professionelle Produkte und geeignete Lösungen für die tägliche Pflege von
Haushaltsgeräten und Küchen.
Sie werden von Ihrem Händler angeboten, ebenso wie eine ganze Palette von Produkten,
Zubehör und Verbrauchsartikeln.
Die Erfahrung der Profis
im Dienst der Verbraucher
99641091 ml bio.qxp 12/01/2007 15:14 Page 13

14
6 / PFLEGE UND REINIGUNG DES GERÄTSDE
Vor der Reinigung den Ofen abkühlen lassen und sicher stellen, dass alle Wahlschalter auf NULL
stehen.
Ganz allgemein:
* das Gerät nicht mit Wasser besprühen.
* kein Scheuermittel oder Metallschwamm verwenden.
POLIER
TE METALLFLÄCHEN
Handelsübliche Produkte zur Pflege polierter Metallflächen verwenden.
FENS
TER DER OFENTÜR
Nach einem Garvorgang mit Verschmutzungen wird empfohlen, das innere Fenster mit Seifenlauge
zu reinigen.
Verschmutzungsarten
Leicht
Ansammlung
verkrusteter
Verschmutzungen
Den Bereich reichlich mit warmem
Wasser aufweichen
Spülschwämme
30 Minuten im lauwarmen Ofen,
eine Nacht im kalten Ofen wirken
lassen.
„Spezialreinigungsspray für
Backofen“
Die Hinweise für den Gebrauch
einhalten
Vorgehensweise Geeignete Mittel
Der Ofen ist leicht zu reinigen. Nachstehend einige Ratschläge:
Pulver
Scheuerschwamm
Haushaltsschwamm speziell
für empfindliches Geschirr
REINIGUNG DES INNENRAUMS
Achtung
Den Ofenraum nur bei abgeschaltetem Ofen reinigen.
•
99641091 ml bio.qxp 12/01/2007 15:14 Page 14

15
7/ FUNKTIONSSTÖRUNGEN
DE
Empfehlung
Wenn Ihr Eingriff nicht ausreicht, auf jeden Fall sofort den Kundendienst rufen.
Wenn Sie Zweifel haben, ob der Backofen richtig funktioniert, bedeutet das nicht
unbedingt, dass eine Störung vorliegt.
Überprüfen Sie zunächst die folgenden Punkte:
Achtung
- Das Gerät ist nur von geschultem Fachpersonal zu reparieren. Unsachgemäße
Reparaturen können eine Gefahr für den Benutzer bedeuten.
SIE STELLEN FEST,
DASS...
MÖGLICHE
URSACHEN
WAS IST ZU TUN?
Der Backofen heizt
nicht.
-Der Backofen ist nicht an-
geschlossen.
- Die Schmelzsicherung der
Anlage ist außer Betrieb.
- Die gewählte Temperatur
ist zu niedrig.
- Der Thermostat ist defekt.
➡ Ofen anschließen.
➡ Die Schmelzsicherung der Stroman-
lage austauschen und ihren Wert prü-
fen (16 A).
➡ Höhere Temperatur einstellen.
➡ Den Kundendienst rufen.
Die Lampe des Back-
ofens funktioniert nicht
mehr.
- Die Lampe ist außer Be-
trieb.
- Der Backofen ist nicht an-
geschlossen oder die
Schmelzsicherung ist außer
Betrieb.
➡ Glühbirne austauschen.
➡ Ofen anschließen oder Sicherung
austauschen.
Die Temperaturanzeige
leuchtet dauerhaft.
- Thermostat defekt
➡ Den Kundendienst rufen.
Das Kühlgebläse läuft
nach Abschalten des
Backofens weiter.
- Der Ventilator läuft maximal
1 Stunde lang nach Ab-
schluss des Garvorgangs
weiter.
- Schaltet sich der Ventilator
nach 1 Stunde nicht aus,
➡ die Backofentür öffnen, um das Ab-
kühlen des Backofens zu beschleuni-
gen.
➡ Den Kundendienst rufen.
Die Ofenanzeige leuch-
tet schwach, während
der Ofen ausgeschaltet
ist.
- Der Backofen ist nicht rich-
tig angeschlossen.
➡ Den elektrischen Anschluss des
Ofens überprüfen. Der Phasenleiter L
(schwarz) ist an die Phasenklemme
des Anschlusskastens oder des Stek-
kers anzuschließen. Der Nullleiter L
(blau) ist an die Nullklemme des An-
schlusskastens oder des Steckers an-
zuschließen.
99641091 ml bio.qxp 12/01/2007 15:14 Page 15

16
Glühbirne
Losschrauben
Glasabdeckung
Die Glühbirne befindet sich an der Decke des
Ofenraums.
a) Ofen vom Strom trennen.
b) Die Glasabdeckung entfernen (Abb. 1).
c) Die Glühbirne in die gleiche Richtung her-
ausschrauben.
Merkmale der Glühbirne:
- 15 W
- 220-240 V
~
- 300°C
- Sockel E 14
d) Die Glühbirne austauschen, die Abdeckung
festschrauben und den Backofen wieder
anschließen.
WECHSEL DER GLÜHBIRNE
•
Empfehlung
Beim Herausdrehen der Glasabdeckung und der Lampe erleichtert das Tragen eines
Gummihandschuhs die Arbeit.
Achtung
-Vor jedem Eingriff an der Glühlampe den Ofen vom Netz trennen, um Stromschläge zu
vermeiden. Ggf. den Ofen abkühlen lassen.
Abb.1
7 / FUNKTIONSSTÖRUNGENDE
99641091 ml bio.qxp 12/01/2007 15:14 Page 16

17
66 //
KUNDENDIENST
DE
Any maintenance on your equipment should be undertaken by:
- either your dealer,
- or another qualified mechanic who is an authorized agent for the brand appliances.
When making an appointment, state the full reference of your equipment (model, type and serial
number). This information appears on the manufacturer's nameplate attached to your equipment.
Eingriffe an Ihrem Gerät dürfen nur:
- von Ihrem Händler oder
- von einem sonstigen Fachmann und Vertragshändler der Marke durchgeführt werden.
Geben Sie bei der Meldung einer Störung die vollständige Typenbezeichnung Ihres Gerätes an
(Modell, Typ, Seriennummer). Diese Angaben finden Sie auf einem an Ihrem Gerät angebrach-
ten Schild.
66 //
AFTER-SALES SERVICE
EN
66 //
SERVICIO TÉCNICO
ES
Qualquer intervenção no seu aparelho deve ser realizada:
- quer pelo seu revendedor,
- quer por outro profissional qualificado autorizado pela marca.
Ao chamá-los, indique a referência completa do seu aparelho (modelo, tipo e número de série).
Estas informações figuram na placa de identificação fixada no aparelho.
Las intervenciones que requiera la máquina deberán ser efectuadas:
- por el revendedor,
- o por cualquier profesional cualificado depositario de la marca.
Al llamar, mencione la referencia completa de la máquina (modelo, tipo y número de serie).
Estos datos figuran en la placa de identificación situada en la máquina.
66 //
SERVIZIO POST-VENDITA E RELAZIONI CON I CONSUMATORI
IT
66 //
SERVICEDIENST
NL
Qualquer intervenção no seu aparelho deve ser realizada:
- quer pelo seu revendedor,
- quer por outro profissional qualificado autorizado pela marca.
Ao chamá-los, indique a referência completa do seu aparelho (modelo, tipo e número de série).
Estas informações figuram na placa de identificação fixada no aparelho.
De eventuele ingrepen in de machine moeten worden uitgevoerd :
- of door uw vakhandelaar,
- of door een andere gekwalificeerd technicus van dit merk.
Tijdens het telefoneren, dient u de complete referentie op te geven van uw machine (model,
type, serienummer). Deze informatie staat op het typeplaatje op de machine.
66 //
SERVIÇO PÓS-VENDA
PT
99641091 ml bio.qxp 12/01/2007 15:14 Page 17

As part of our commitment to constantly improving our products, we reserve the right to make
changes to them based on technical advances to their technical and functional features and
appearance.
Warning:
Before installing and using your appliance, please carefully read this Guide to
Installation and Use, which will allow you to quickly familiarise yourself with its operation.
Dear Customer,
You have just acquired a
BBRRAANNDDTT
oven and we would like to thank
you.
We have invested all our dedication and know-how in this appliance
so that it would best meet your needs. With innovation and perfor-
mance, we designed it to be always easy to use.
In the
BBRRAANNDDTT
product range, you will also find a wide choice of
microwaves, cooking hobs, ventilation hoods, cookers, dishwashers,
washing machines, driers, fridges and freezers, that you can coordi-
nate with your new
BBRRAANNDDTT
oven.
Visit our website
wwwwww..bbrraannddtt..ccoomm
where you will find all of our pro-
ducts, as well as useful and complementary information.
BBRRAANNDDTT
18
DE
02
EN
18
NL
34
PT
50
66
FR
99641091 ml bio.qxp 12/01/2007 15:14 Page 18

TABLE OF CONTENTS
EN
19
1 / INFORMATION FOR THE USER
• Safety instructions
_________________________________________
20
• Environment
______________________________________________
21
2 / INSTALLING YOUR APPLIANCE
• Choice of location
__________________________________________
22
• Fitting
____________________________________________________
22
• Electric connection
_________________________________________
23
• Changing the power supply cable
_____________________________
24
3 / DESCRIPTION OF YOUR APPLIANCE
• Introduction to your oven
____________________________________
25
• Description of the accessories
_______________________________
26
4 / USING YOUR APPLIANCE
º
Instant cooking
________________________________________
27
5 / OVEN COOKING MODES
_______________________________________
28
6 / CARING FOR AND CLEANING YOUR APPLIANCE
• Cleaning the outer surfaces
__________________________________
29
• Cleaning the cavity
_________________________________________
30
7 / TROUBLESHOOTING
__________________________________________
31
• Changing the bulb
_________________________________________
32
99641091 ml bio.qxp 12/01/2007 15:14 Page 19

20
SAFETY RECOMMENDATIONS
— This oven was designed for use by private
persons in their homes. It is intended solely
for cooking foodstuffs. This oven does not
contain any asbestos-based components.
— This appliance is to be used by adults. Make
sure that children do not touch it and that
they do not treat it as a toy. Make sure that
they do not touch the appliance’s control
panel.
— When you receive the appliance, unpack or
have it unpacked immediately. Give it an over-
all inspection. Make note of any concerns or
reservations on the delivery slip and make
sure to keep a copy of this form.
— Your appliance is intended for standard
household use. Do not use it for commercial
or industrial purposes or for any other pur-
pose than that for which it was designed.
— Do not modify or attempt to modify any of
the characteristics of this appliance. This
would be dangerous to your safety.
— Keep small children away from the appli-
ance while it is in use. Thus you will prevent
them from burning themselves by tipping over
cookware. Moreover, the front of your appli-
ance is hot during use and during cleaning
(pyrolysis).
— Never pull your appliance by the door han-
dle.
— Before using your oven for the first time,
heat it up while empty for approximately
15 minutes. Ensure that the room is sufficient-
ly ventilated. You may notice a particular
odour or a small amount of smoke. All of this
is normal.
— During cooking, ensure that the door of your
oven is firmly closed so that the seal can prop-
erly fulfil its function.
— When in use, the appliance becomes hot. Do
not touch the heating elements located inside
the oven. You are at risk of incurring serious
burns.
— When inserting or removing your dishes
from the oven, do not bring your hands near to
the upper heating elements; use insulated
cooking mitts.
— After cooking, do not touch the cookware
(grid, turnspit, etc.) with bare hands
— Never place aluminium paper directly in con-
tact with the bottom element (See the
“Description of your oven” chapter), the accu-
mulated heat could cause deterioration of the
enamel.
— Do not place heavy items on the open oven
door; ensure that children cannot climb or sit
on it.
— To avoid damaging the control panel of your
appliance, do not leave the door open when
the oven is functioning or still hot.
— The oven must be turned off for all attempts
to clean the cavity.
— Intensive and prolonged use of the appliance
may require additional ventilation achieved by
opening the window or increasing the power
of the mechanical fan.
— In addition to the accessories provided with
your oven, only use dishes that are resistant to
high temperatures (follow manufacturer’s
instructions).
— After using your oven, ensure that all the
controls are in the off position.
— Never use steam or high-pressure devices to
clean the oven (requirement imposed by elec-
trical safety).
— For your safety, your oven is equipped with
an AUTOMATIC STOP, if you forget to turn off
your oven by mistake. After 10 hours of oper-
ation, the AS (Automatic Stop) feature is acti-
vated and your oven stops running. AS
appears instead of the time and a series of 2
successive beeps is emitted for a short time.
••
Warning
Keep this user guide with your appli-
ance. If the appliance is ever sold or trans-
ferred to another person, ensure that the
new owner receives the user guide. Please
become familiar with these recommenda-
tions before installing and using your oven.
They were written for your safety and the
safety of others.
11 //
NOTICES TO THE USEREN
99641091 ml bio.qxp 12/01/2007 15:14 Page 20

21
CARE FOR THE ENVIRONMENT
••
— This appliance’s packing materials are recyclable. Recycle them and play a role in protecting the
environment by depositing them in municipal containers provided for this purpose.
— Your appliance also contains many recyclable materials. It is therefore marked with this logo to
indicate that used appliances must not be mixed with other waste. Recycling of the ap-
pliances organised by your manufacturer will thus be undertaken in optimum condi-
tions,in accordance with European directive 2002/96/CE relative to electrical and elec-
tronic equipment waste. Consult your city hall or your retailer to find the drop-off points
for used appliances that is nearest to your home.
— We thank you for your help in protecting the environment.
Warning
IInnssttaallllaattiioonn sshhoouulldd oonnllyy bbee ppeerrffoorrmmeedd bbyy qquuaalliiffiieedd iinnssttaalllleerrss aanndd tteecchhnniicciiaannss..
TThhiiss aapppplliiaannccee ccoommpplli
ieess wwiitthh tthhee ffoolllloowwiinngg EEuurrooppeeaann ddiirreeccttiivveess::
-- LLooww VVoollttaaggee DDiirreeccttiivvee 7733//2233//CCEEEE mmooddiiffiieedd bbyy ddiirreeccttiivvee 993
3//6688//CCEEEE ffoorr aattttrriibbuuttiioonn ooff CCEE
aapppprroovvaall..
-- EElleeccttrroommaaggnneettiicc CCoommppaattiibbiilliittyy DDiirreeccttiivvee 8899//333366//CCEEEE mmooddiiffiieed
d bbyy ddiirreeccttiivvee 9933//6688//CCEEEE ffoorr aattttrrii--
bbuuttiioonn ooff CCEE aapppprroovvaall..
-- CCEE RReegguullaattiioonn 11993355//22000044 ccoonncceerrnniinngg mmaatteerri
iaallss aanndd oobbjjeeccttss ddeessiiggnneedd ttoo ccoommee iinnttoo ccoonnttaacctt wwiitthh
ffooooddssttuuffffss..
1 / NOTICES TO THE USER
EN
99641091 ml bio.qxp 12/01/2007 15:14 Page 21

22
provided for this purpose on either side of the
front side panels (fig.1).
BUILD-IN
To do this:
1) Remove the rubber screw covers to access
the mounting holes.
2) Drill a Ø 2 mm hole in the cabinet panel to
avoid splitting the wood.
3) Attach the oven with the two screws.
4) Replace the rubber screw covers (they also
serve to absorb the shock caused by closing
the oven door).
(*) If the cabinet is open, its opening must be
70 mm (maximum).
Tip
To be certain that you have properly
installed your appliance, do not hesitate to
call on a household appliance specialist.
••
CHOICE OF LOCATION
The diagrams above indicate the dimensions
of a cabinet that would be acceptable for your
oven.
The oven can be installed under a work top or
in a column of cabinetry (open* or closed)
having the appropriate dimensions for built-in
installation (see adjacent diagram).
Your oven has optimised air circulation that
allows it to achieve remarkable cooking and
cleaning results if the following guidelines are
respected:
• Centre the oven in the cabinet so as to
guarantee a minimum distance of 5 mm be-
tween the appliance and the neighbouring
cabinet.
• The destination cabinet must be made of or
coated with a material that is heat resistant.
• For greater stability, attach the oven in the
cabinet with two screws through the holes
••
585
560
550
70
550
Fig. 01
2 / INSTALLING YOUR APPLIANCEEN
99641091 ml bio.qxp 12/01/2007 15:14 Page 22

23
••
ELECTRICAL CONNECTION
Monophase 20A Meter
220-240V~ 50Hz
Electrical outlet
2 prong receptacle
+ ground lead
CEI Standard 60083
Monophase line 220-240 V ~
Power cable
length 1.50 m
approximately
A fuse or differential cir-
cuit breaker
Electrical safety must be provided by a cor-
rect build-in. During build-in and maintenance
operations, the appliance must be unplugged
from the electrical grid; fuses must be cut off
or removed.
The electrical connections are made before
the appliance is installed in its housing.
Ensure that:
- the electrical installation has sufficient volt-
age,
-the electrical wires are in good condition
- the diameter of the wires complies with the
installation requirements.
Your oven must be connected with a power
cord (standardised) with three 1.5 mm
2
con-
ductors (1 ph +1 N + ground) that must be
connected to a monophase 220-240 V
~ net-
work via a CEI 60083 standardised recepta-
cle (1 ph +1 N + ground lead) or an all-pole
cut-off device, in compliance with installa-
tion regulations.
Warning
The safety wire (green-yellow) is con
nected to the appliance’s terminal and
must be connected to the ground lead of the
electrical set-up.
In the case of a hook-up with electrical outlet,
it must be accessible after installation.
The fuse in your set-up must be 16 amperes.
If the power cable is damaged, it must be re-
placed by a cable or a special kit available
from the manufacturer or its After-Sales Ser-
vice Department.
2 / INSTALLING YOUR APPLIANCE
EN
99641091 ml bio.qxp 12/01/2007 15:14 Page 23

24
••
——
The power cable (H05 RR-F, H05 RN-F ou H05 VV-F) must be of sufficient length to be connect-
ed to the build-in oven while it sits on the floor in front of the cabinet.
To do this the appliance must be disconnected from the electrical network:
——
Open the inspection flap located at the lower right of the back cover by unscrewing the two
screws, then pivot the inspection flap.
——
Strip 12 mm along each wire of the new power cable.
——
Carefully twist together the strands.
——
Loosen the screws from the terminal board and remove the power cord to be replaced.
•
Introduce the power cable through the side of the cover in the cable clip located to the right of
the terminal board.
——
All the strands of the electricity wires must be captured under the screws.
——
The phase wire on the L terminal.
——
The green-yellow coloured ground wire should be connected to the terminal .
——
The neutral conductor (blue) on the N terminal.
——
Screw down tightly the screws on the terminal board and check the connection by pulling on each
wire.
——
Attach the cable with the cable clip located to the right of the terminal board.
——
Close the inspection flap using the two screws.
Warning
WWee ccaannnnoott bbee hheelldd rreessppoonnssiibbllee ffoorr aannyy aacccciiddeenntt rreessuullttiinngg ffrroomm aann iinneexxiisstteenntt,, ddeeffeeccttiivvee
oorr iinnccoorrrreecctt
ggrroouunndd lleeaadd..
IIff tthhee eelleeccttrriiccaall iinnssttaallllaattiioonn aatt yyoouurr rreessiiddeennccee rreeqquuiirreess aannyy cchhaannggeess iinn oorrddeerr ttoo hhooookk uupp yyoouurr
AApppplliiaannccee,, ccaallll uuppoonn aa pprrooffeessssiioonnaall eelleeccttrriicciiaann..
IIff tthhee oovveenn mmaallffuunnccttiioonnss iinn aannyy wwaayy,, uunnpplluug
g tthhee aapppplliiaannccee oorr rreemmoovvee tthhee ffuussee ccoorrrreessppoonnddiinngg
ttoo tthhee sseeccttoorr tthheerree tthhee oovveenn iiss hhooookkeedd uupp..
CHANGING THE POWER CORD
2 / INSTALLING YOUR APPLIANCEEN
99641091 ml bio.qxp 12/01/2007 15:14 Page 24

25
3 / DESCRIPTION OF YOUR APPLIANCE
EN
•
INTRODUCTION TO YOUR OVEN
A
B
Temperature selector switch
Function selector switch
C
D
Light
Shelf support indicator
Tip
This Guide to Installation and Use is valid for several models. Minor differences in
details and fittings may emerge between your appliance and the descriptions provided.
55
75
100
125
150
180
210
240
270
T˚
c
D
C
A
B
99641091 ml bio.qxp 12/01/2007 15:14 Page 25

26
3 / DESCRIPTION OF YOUR APPLIANCEEN
Rear
Front
•
Anti-rocking safety grid (fig.1)
The grid can be used to hold all dishes and
moulds containing foodstuffs to be cooked or
browned.
It can be used for barbecues (to be placed
directly on the grid).
DESCRIPTION OF THE ACCES-
SORIES
•
fig.1
fig.2
•
Multi-purpose dish (fig.2)
Inserted under the grill, it catches juices and
grease from the grilled food. It can also be
used half-full of water for double-boiler cook-
ing methods. Avoid placing roasts or meats
directly in the dish because this is certain to
cause significant spattering on the oven walls.
Tip
To clean dishes covered with a non-stick enamel, leave them to cool before
cleaning them by hand with dishwashing liquid. Avoid scouring sponges. Do not cut
on it with a knife or a metallic pizza cutter; use plastic or silicone utensils instead.
•
Rotisserie (fig.3) according to
model
In order to use it:
• place the hollow dish on the grid on shelf
support number 1 to catch the cooking juices
or on the bottom heating element if the item
being roasted is too big.
• slide one of the forks onto the spit; skewer
the piece of meat to be roasted; slide on the
second fork; centre and tighten by screwing
the two forks.
• place the spit in its cradle.
• push slightly to insert the point of the spit in
the guide slot located at the back of the oven.
• remove the handle by unscrewing, in order
to be able to close the door. After cooking,
screw on the spit handle once again in order
to remove the roast without burning yourself.
fig.3
99641091 ml bio.qxp 12/01/2007 15:14 Page 26

27
4 / USING YOUR APPLIANCE
EN
INSTANT COOKING
•
- Turn the function selector to the position of
your choice.
Example: position “ ” (fig.1).
- Turn the temperature selector to the temper-
ature recommended in your recipe.
Example: temperature setting 210° (fig.1).
After these steps, the oven heats up and the
temperature selector indicator lights up or
turns itself off in accordance with the rate of
temperature adjustments.
55
75
100
125
150
180
210
240
270
T˚
c
fig.1
fig.2
Warning
Do not hang a towel or cloth on the oven handle.
Warning
All types of cooking are done with the door closed.
Warning
After a cooking cycle, the cooling fan continues to operate for a period of time in order
to guarantee optimal oven reliability.
99641091 ml bio.qxp 12/01/2007 15:14 Page 27

28
5 / OVEN COOKING MODESEN
TRADITIONAL
•
Cooking controlled by the upper and lower heating elements.
•
Requires preheating before placing the dish in the oven.
•
Recommended for slow, gentle cooking: rich game... For retaining the juices in red
meat roasts. For simmering in a covered stew pan dishes that were begun on the hob (coq
au vin, stew).
SPECIAL POULTRY
•
Cooking is controlled by the upper element combined with some heat from the bottom
element.
•
This position provides energy saving while preserving the quality of the cooked poul-
try.
•
Place the poultry in a terracotta dish, preferably on the grid in the first shelf support.
There is no need to preheat the oven. You can turn the poultry half-way through cooking if
you wish.
BOTTOM HEATING
•
Cooking controlled by the lower element.
•
Requires pre-heating. Cooking heat from the bottom. Place the grid on the lowest shelf
support.
•
Recommended for moist dishes (quiches, juicy fruit tarts, etc...). The crust will be thor-
oughly cooked on the bottom. Recommended for dishes that rise (cakes, brioche, kugel-
hopf...) and for soufflés that will not be hampered by a crust formed on the top.
GRILL + (ROTISSERIE according to model)
•
Cooking controlled by the upper element.
•
Preheating is unnecessary. Roasts and poultry are juicy and crispy all over.
•
The turnspit continues to operate until the door is opened.
•
Slide the drip tray onto the bottom shelf support.
•
Recommended for all poultry or roasts on the turnspit. For sealing and thoroughly
cooking legs of lamb or sides of beef. To retain fish steaks’ moist texture.
HIGH TEMPERATURE GRILL
•
Cooking controlled by the upper element.
• Preheat the oven for five minutes. Slide the drip tray onto the bottom shelf support.
• Recommended for grilling chops, sausages, toast or prawns placed on the grid.
* Programme(s) used to obtain the results indicated on the energy label in compliance with
European standard EN 50304 and in accordance with European Directive 2002/40/CE.
*
99641091 ml bio.qxp 12/01/2007 15:14 Page 28

29
6 / CARING FOR AND CLEANING YOUR APPLIANCE
EN
CLEANING THE OUTER SURFACES
•
To clean the oven door, use a soft cloth moistened with window cleaner.
Do not use abrasive cleaning products or hard metallic scrapers for cleaning the oven’s glass
door, which could scuff the surface and cause the glass to shatter.
To preserve your appliance, we recommend that you use Clearit cleaning products.
Clearit offers you professional products and solutions designed for the daily care of your house-
hold appliances and kitchens.
They are on sale at your regular retailer, along with a complete line of accessories and consum-
able products.
Professional expertise
working for you at home
99641091 ml bio.qxp 12/01/2007 15:14 Page 29

30
6 / CARING FOR AND CLEANING YOUR APPLIANCEEN
Before you clean the cavity, let the oven cool down and confirm that all the knobs are in the OFF
position.
General guidelines:
* Do not spray water on the appliance.
* Abrasive powders and scouring pads should be avoided.
POLISHED MET
AL SURFACES
Use commercially available products designed to take care of polished metals.
O
VEN DOOR WINDOW
After cooking food that causes spattering, it is recommended that you clean the inside oven door
window with soapy water.
Type of smears
Light
Accumulation of
baked-on smears
Thoroughly wet the area with
hot water
Dish sponge
Leave on for 30 minutes on a warm
oven or overnight on a cold oven.
“Special oven cleaner”
aerosol
Follow the instructions
for use.
How to proceed
Products to use
Your oven is easy to clean; here are some guidelines to help you:
powder
abrasive sponge
Special disinfectant sponge
for delicate dishes
Warning
The oven must be turned off when cleaning inside the cavity.
CLEANING THE OUTER SURFACES
•
99641091 ml bio.qxp 12/01/2007 15:14 Page 30

31
7 / TROUBLESHOOTING
EN
Tip
In all circumstances, if your efforts are not sufficient, contact the After-Sales Service
Department without delay.
If you have a doubt about the correct functioning of your oven, this does not neces-
sarily mean that there is a malfunction.
In any event, check the following items:
Warning
- Repairs to your appliance should only be performed by professionals. Non-standard re-
pairs may be a source of danger for the user.
YOU OBSERVE
THAT…
POSSIBLE
CAUSES
WHAT SHOULD YOU DO?
The oven is not heat-
ing.
- The oven is not connected
to the power supply.
- Your fuse is out of order.
- The selected temperature
is too low.
- The thermostat is faulty
➡ Plug in your oven.
➡ Replace the fuse in your electrical
set-up and check its capacity (16A).
➡ Increase the selected temperature.
➡ Call the After-Sales Service Depart-
ment.
The oven light is not
working.
- The light is out of order.
- The oven is not connected
or the fuse is not working.
➡ Change the bulb.
➡ Plug in your oven or change the
fuse.
The temperature indi-
cator stays permanent-
ly lit.
- Defective thermostat
➡ Call the After-Sales Service Depart-
ment.
The cooling fan contin-
ues to operate after the
oven stops.
- The fan should work for
1 hour maximum after cook-
ing.
- If it does not stop after 1
hour
➡ Open the oven door to accelerate
the cooling down of the oven
➡ Call the After-Sales Service Depart-
ment.
The oven light is dimly
lit when the oven is
switched off.
- The oven is not connected
correctly.
➡ Check your oven's electrical con-
nection. The phase conductor L
(black) must be connected to the L
phase terminal of your connection box
or your power plug. The N neutral con-
ductor (blue) must be connected to the
N neutral ground lead of your connec-
tion box or your power plug.
99641091 ml bio.qxp 12/01/2007 15:14 Page 31

32
Bulb
Unscrew
Port
The bulb is located on the ceiling of your oven’s
cavity.
a) Unplug the oven.
b) Unscrew the lighting port (fig.1).
c) Unscrew the bulb in the same direction.
Bulb specifications:
- 15 W
- 220-240 V
~
- 300°C
- E 14 cap
d) Replace the bulb then reposition the port
and reconnect your oven.
CHANGING THE BULB
•
Tip
To unscrew the port and the bulb, use a rubber glove, which will make disassembly
easier.
Warning
- Disconnect your oven before performing any task on the bulb to avoid the risk of electric
shock and, if necessary, let the appliance cool down.
fig.1
7 / TROUBLESHOOTINGEN
99641091 ml bio.qxp 12/01/2007 15:14 Page 32

33
66 //
KUNDENDIENST
DE
Any maintenance on your equipment should be undertaken by:
- either your dealer,
- or another qualified mechanic who is an authorized agent for the brand appliances.
When making an appointment, state the full reference of your equipment (model, type and serial
number). This information appears on the manufacturer's nameplate attached to your equipment.
Eingriffe an Ihrem Gerät dürfen nur:
- von Ihrem Händler oder
- von einem sonstigen Fachmann und Vertragshändler der Marke durchgeführt werden.
Geben Sie bei der Meldung einer Störung die vollständige Typenbezeichnung Ihres Gerätes an
(Modell, Typ, Seriennummer). Diese Angaben finden Sie auf einem an Ihrem Gerät angebrach-
ten Schild.
66 //
AFTER-SALES SERVICE
EN
66 //
SERVICIO TÉCNICO
ES
Qualquer intervenção no seu aparelho deve ser realizada:
- quer pelo seu revendedor,
- quer por outro profissional qualificado autorizado pela marca.
Ao chamá-los, indique a referência completa do seu aparelho (modelo, tipo e número de série).
Estas informações figuram na placa de identificação fixada no aparelho.
Las intervenciones que requiera la máquina deberán ser efectuadas:
- por el revendedor,
- o por cualquier profesional cualificado depositario de la marca.
Al llamar, mencione la referencia completa de la máquina (modelo, tipo y número de serie).
Estos datos figuran en la placa de identificación situada en la máquina.
66 //
SERVIZIO POST-VENDITA E RELAZIONI CON I CONSUMATORI
IT
66 //
SERVICEDIENST
NL
Qualquer intervenção no seu aparelho deve ser realizada:
- quer pelo seu revendedor,
- quer por outro profissional qualificado autorizado pela marca.
Ao chamá-los, indique a referência completa do seu aparelho (modelo, tipo e número de série).
Estas informações figuram na placa de identificação fixada no aparelho.
De eventuele ingrepen in de machine moeten worden uitgevoerd :
- of door uw vakhandelaar,
- of door een andere gekwalificeerd technicus van dit merk.
Tijdens het telefoneren, dient u de complete referentie op te geven van uw machine (model,
type, serienummer). Deze informatie staat op het typeplaatje op de machine.
66 //
SERVIÇO PÓS-VENDA
PT
99641091 ml bio.qxp 12/01/2007 15:14 Page 33

Dans le souci d'une amélioration constante de nos produits, nous nous réservons le droit d'ap-
porter à leurs caractéristiques techniques, fonctionnelles ou esthétiques toutes modifications
liées à leur évolution.
Important :
Avant de mettre votre appareil en marche, veuillez lire attentivement ce guide d'instal-
lation et d'utilisation afin de vous familiariser plus rapidement avec son fonctionnement.
34
Chère Cliente, Cher Client,
Vous venez d'acquérir un four
BBRRAANNDDTT
et nous vous en remercions.
Nous avons mis dans cet appareil toute notre passion, notre savoir-
faire pour qu'il réponde au mieux à vos besoins. Innovant, performant,
nous l'avons conçu pour qu'il soit aussi toujours facile à utiliser.
Vous trouverez également dans la gamme des produits
BBRRAANNDDTT
, un
vaste choix de fours, de fours à micro-ondes, tables de cuisson, de
cuisinières, de lave-vaisselle, de lave-linge, de sèche-linge, de réfrigé-
rateurs et congélateurs que vous pourrez coordonner à votre nou-
velle hotte
BBRRAANNDDTT
.
Bien entendu, dans un souci permanent de satisfaire le mieux possi-
ble vos exigences vis à vis de nos produits, notre service consom-
mateurs est à votre disposition et à votre écoute pour répondre à
toutes vos questions ou suggestions (coordonnées à la fin de ce
livret).
Et connectez-vous aussi sur notre site
wwwwww..bbrraannddtt..ccoomm
où vous
trouverez tous nos produits, ainsi que des informations utiles et
complémentaires.
BBRRAANNDDTT
DE
02
EN
18
NL
34
PT
50
66
FR
99641091 ml bio.qxp 12/01/2007 15:14 Page 34

35
SOMMAIRE
FR
1 / A L’ATTENTION DE L’UTILISATEUR
••
Consignes de sécurité
______________________________________
36
••
Environnement
____________________________________________
37
2 / INSTALLATION DE VOTRE APPAREIL
••
Choix de l’emplacement
_____________________________________
38
••
Encastrement
_____________________________________________
38
••
Raccordement électrique
____________________________________
39
••
Changement de câble d’alimentation
__________________________
40
3 / DESCRIPTION DE VOTRE APPAREIL
••
Présentation de votre four
___________________________________
41
••
Description des accessoires
_________________________________
42
4 / UTILISATION DE VOTRE APPAREIL
º
Cuisson immédiate _____________________________________ 43
5 / LES MODES DE CUISSON DU FOUR_____________________________ 44
6 / ENTRETIEN ET NETTOYAGE DE VOTRE APPAREIL
••
Nettoyage de la surface extérieure
____________________________
45
••
Nettoyage de la cavité
______________________________________
46
7 / ANOMALIES DE FONCTIONNEMENT ____________________________ 47
••
Changement de l’ampoule
___________________________________
48
8 / SERVICE APRES-VENTE _______________________________________ 49
99641091 ml bio.qxp 12/01/2007 15:14 Page 35

36
CONSIGNES DE SÉCURITÉ
— Cet appareil a été conçu pour être utilisé
par des particuliers dans leur lieu d'habitation.
Il est destiné exclusivement à la cuisson des
denrées alimentaires. Ce four ne contient
aucun composant à base d'amiante.
— Cet appareil doit être utilisé par des adultes.
Veillez à ce que les enfants n'y touchent pas
et ne l'utilisent pas comme un jouet. Assurez-
vous qu'ils ne manipulent pas les commandes
de l'appareil.
— A la réception de l'appareil, déballez-le ou
faites le déballer immédiatement. Vérifiez son
aspect général. Faites les éventuelles réser-
ves par écrit sur le bon de livraison dont vous
gardez un exemplaire.
— Votre appareil est destiné à un usage
domestique normal. Ne l'utilisez pas à des
fins commerciales ou industrielles ou pour
d'autres buts que celui pour lequel il a été
conçu.
— Ne modifiez pas ou n'essayer pas de modi-
fier les caractéristiques de cet appareil. Cela
représenterait un danger pour vous.
— Eloignez les jeunes enfants de l'appareil
pendant son fonctionnement. Vous éviterez
ainsi qu'ils se brûlent en renversant un réci-
pient de cuisson. De plus la façade de votre
appareil est chaude pendant l'utilisation et le
nettoyage (pyrolyse).
— Ne tirez jamais votre appareil par la poignée
de la porte.
— Avant d'utiliser votre four pour la première
fois, chauffez le à vide pendant 15 minutes
environ. Assurez-vous que la pièce est suffi-
samment aérée. Vous constaterez peut être
une odeur particulière ou un petit dégage-
ment de fumée. Tout ceci est normal.
— Lors de la cuisson, assurez-vous que la
porte de votre four est bien fermée afin que le
joint d'étanchéité remplisse correctement sa
fonction.
— Lors de son utilisation, l'appareil devient
chaud. Ne touchez pas les éléments chauf-
fants situés à l'intérieur du four. Vous risque-
riez de graves brûlures.
— En enfournant ou en sortant vos plats du
four, n'approchez pas vos mains des éléments
chauffants supérieurs, utilisez des gants ther-
miques de cuisine.
— Après une cuisson, ne prenez pas à main
nue la casserolerie (grille, tournebroche,..),
— Ne placez jamais de papier d'aluminium
directement en contact avec la sole (voir cha-
pitre description de votre four), la chaleur
accumulée pourrait entraîner une détérioration
de l'émail.
— Sur la porte ouverte du four, ne posez pas de
charges lourdes, et assurez vous qu'un enfant
ne puisse ni monter ni s'asseoir.
— Pour éviter d'endommager les commandes
de votre appareil, ne laissez pas la porte
ouverte lorsqu'il est en fonctionnement ou
encore chaud.
— Pour toute intervention de nettoyage dans la
cavité du four, le four doit être arrêté.
— Une utilisation intensive et prolongée de l'ap-
pareil peut nécessiter une aération supplé-
mentaire en ouvrant la fenêtre ou en augmen-
tant la puissance de la ventilation mécanique.
— En plus des accessoires fournis avec votre
four, n'utilisez que des plats résistants à de
hautes températures (suivez les instructions
des fabricants).
— Après utilisation de votre four, assurez-vous
que toutes les commandes se trouvent sur la
position arrêt.
— N'utilisez jamais d'appareils à vapeur ou à
haute pression pour nettoyer le four (exigen-
ces relatives à la sécurité électrique).
— Pour votre sécurité, votre four est équipé
d’un ARRET AUTOMATIQUE, si par mégarde
vous oubliez d’éteindre votre four. Après 10
heures de fonctionnement, la fonction AS
(Automatique Stop) s’active et votre four s’ar-
rête de chauffer. AS s’affiche à la place de
l’heure et une série de 2 bips successifs est
émise pendant un certain temps.
••
Important
Conservez cette notice d'utilisation
avec votre appareil. Si l'appareil devait être
vendu ou cédé à une autre personne, assu-
rez-vous que la notice d'utilisation l'accom-
pagne. Merci de prendre connaissance de
ces conseils avant d'installer et d'utiliser
votre appareil. Ils ont été rédigés pour votre
sécurité et celle d'autrui.
11 //
A L’ATTENTION DE L’UTILISATEUR
FR
99641091 ml bio.qxp 12/01/2007 15:14 Page 36

37
RESPECT DE L’ENVIRONNEMENT
••
— Les matériaux d'emballage de cet appareil sont recyclables. Participez à leur recyclage et contri-
buez ainsi à la protection de l'environnement en les déposant dans les conteneurs municipaux
prévus à cet effet.
— Votre appareil contient également de nombreux matériaux recyclables. Il est donc marqué de ce
logo afin de vous indiquer que les appareils usagés ne doivent pas être mélangés avec d'autres
déchets. Le recyclage des appareils qu'organise votre fabricant sera ainsi réalisé dans
les meilleures conditions, conformément à la directive européenne 2002/96/CE sur les
déchets d'équipements électriques et électroniques. Adressez vous à votre mairie ou
à votre revendeur pour connaître les points de collecte des appareils usagés les plus
proches de votre domicile.
— Nous vous remercions pour votre collaboration à la protection de l'environnement.
Attention
LL''iinnssttaallllaattiioonn eesstt rréésseerrvvééee aauuxx iinnssttaallllaatteeuurrss eett tteecchhnniicciieennss qquuaalliiffiiééss..
CCeett aappppaarreeiill eesstt ccoonnffoorrmmee aau
uxx ddiirreeccttiivveess eeuurrooppééeennnneess ssuuiivvaanntteess ::
-- DDiirreeccttiivvee BBaassssee TTeennssiioonn 7733//2233//CCEEEE mmooddiiffiiééee ppaarr llaa ddiirreeccttiivvee 9933//6688//CCEEEE ppoouurr ll’’aappppoossiittiioonn dduu
mmaarrqquuaaggee CCEE..
-- DDiirreeccttiivvee CCoommppaattiibbiilliittéé EElleeccttrroommaaggnnééttiiqquuee 8899//333366//CCEEEE mmo
oddiiffiiééee ppaarr llaa ddiirreeccttiivvee 9933//6688//CCEEEE
ppoouurr ll’’aappppoossiittiioonn dduu mmaarrqquuaaggee CCEE..
-- RRèègglleemmeenntt CCEE nn°° 11993355//22000044 ccoonncceerrnnaanntt lleess mmaattéérriiaauuxx eett oobbjjeett ddeessttiinnééss àà eennttrreerr eenn ccoonnttaacctt
aavveecc ddeess ddeennrrééeess aalliimmeennttaaiirreess..
1 / A L’ATTENTION DE L’UTILISATEUR
FR
99641091 ml bio.qxp 12/01/2007 15:14 Page 37

38
meuble par 2 vis au travers des trous prévus à
cet effet sur les montants latéraux (fig.1).
ENCASTREMENT
Pour ce faire :
1) Retirez les cache vis en caoutchouc pour ac-
céder aux trous de fixation.
2) Effectuez un trou de Ø 2 mm dans la paroi
du meuble pour éviter l’éclatement du bois.
3) Fixez le four avec les 2 vis.
4) Remettez les cache vis en caoutchouc
(ceux-ci servent également à amortir la ferme-
ture de la porte du four).
(*) si le meuble est ouvert, son ouverture doit
être de 70 mm (maxi).
Conseil
Pour être assuré d’avoir une installa-
tion conforme, n’hésitez pas à faire appel à
un spécialiste électroménager.
••
CHOIX DE L’EMPLACEMENT
Les schémas ci-dessus déterminent les cotes
d'un meuble qui permettra de recevoir votre
four.
Le four peut indifféremment être installé sous
un plan de travail ou dans un meuble en co-
lonne (ouvert* ou fermé) ayant les dimensions
d’encastrement adaptées (voir schéma ci-
contre).
Votre four possède une circulation d’air optimi-
sée qui permet d’obtenir des résultats de cuis-
son et de nettoyage remarquables en respec-
tant les éléments suivants :
• Centrez le four dans le meuble de façon à
garantir une distance mini de 5 mm avec le
meuble voisin.
• La matière du meuble d’encastrement ou le
revêtement de celui-ci doit résister à la chaleur.
• Pour plus de stabilité, fixez le four dans le
••
585
560
550
70
550
Fig. 01
2 / INSTALLATION DE VOTRE APPAREILFR
99641091 ml bio.qxp 12/01/2007 15:14 Page 38

39
••
RACCORDEMENT ELECTRIQUE
Compteur 20A Mono
220-240V~ 50Hz
Prise de courant
2 pôles + terre
norme CEI 60083
Ligne Mono 220-240 V ~
Câble
d'alimentation
longueur 1,50 m
environ
Disjoncteur différentiel ou
fusible 16A
La sécurité électrique doit être assurée par un
encastrement correct. Lors de l'encastrement
et des opérations d'entretien, l'appareil doit
être débranché du réseau électrique, les fusi-
bles doivent être coupés ou retirés.
Le raccordement électrique est à réaliser
avant la mise en place de l'appareil dans le
meuble.
Vérifiez que:
- la puissance de l'installation est suffisante,
- les lignes d'alimentation sont en bon état
- le diamètre des fils est conforme aux règles
d'installation.
Votre four doit être branché avec un cordon
d'alimentation (normalisé) à 3 conducteurs de
1,5mm
2
(1ph + 1N + terre) qui doivent être rac-
cordés sur réseau 220-240V
~monophasé
par l'intermédiaire d'une prise de courant 1ph
+1 neutre + terre normalisée CEI 60083 ou
d'un dispositif à coupure omnipolaire ou
conformément aux règles d'installation.
Attention
Le fil de protection (vert-jaune)
est relié
à la borne de l'appareil et doit être relié
à la terre de l'installation.
Dans le cas d'un branchement avec prise de
courant, celle-ci doit être accessible après
installation.
Le fusible de l'installation doit être de 16 am-
pères.
Si le câble d'alimentation est endommagé, il
doit être remplacé par un câble ou un en-
semble spécial disponible auprès du fabri-
cant ou de son Service Après Vente.
2 / INSTALLATION DE VOTRE APPAREIL
FR
99641091 ml bio.qxp 12/01/2007 15:14 Page 39

••
——
Le câble d’alimentation (H05 RR-F, H05 RN-F ou H05 VV-F) doit avoir une longueur suffisante
pour être raccordé au four à encastrer posé au sol devant le meuble.
Pour cela l’appareil doit être déconnecté du réseau :
——
Ouvrez la trappe située en bas à droite du capot arrière en dévissant les 2 vis, puis faîtes pivo-
ter la trappe.
——
Dénudez chaque fil du nouveau câble d’alimentation sur 12mm.
——
Torsadez soigneusement les brins.
——
Desserrez les vis du bornier et retirez le cordon d’alimentation à changer.
•
Introduire le câble d’alimentation par le côté du capot dans le serre-câble situé à droite du
bornier.
——
Tous les brins des fils d’alimentation doivent être emprisonnés sous les vis.
— Le fil de la phase sur la borne L.
— Le fil de terre couleur vert-jaune doit être relié à la borne .
——
Le fil du neutre (bleu) sur la borne N.
——
Vissez à fond les vis du bornier et vérifiez le branchement en tirant sur chaque fil.
——
Fixez le câble au moyen du serre-câble situé à droite du bornier.
——
Refermez la trappe à l’aide des 2 vis.
Attention
NNoottrree rreessppoonnssaabbiilliittéé nnee ssaauurraaiitt êêttrree eennggaaggééee eenn ccaass dd''aacccciiddeenntt oouu dd''iinncciiddeenntt ccoonnssééccuuttiiff
àà uunnee mmiissee à
à llaa tteerrrree iinneexxiissttaannttee,, ddééffeeccttuueeuussee oouu iinnccoorrrreeccttee..
SSii ll''iinnssttaallllaattiioonn éélleeccttrriiqquuee ddee vvoottrree hhaabbiittaattiioonn n
néécceessssiittee uunnee mmooddiiffiiccaattiioonn ppoouurr llee bbrraanncchheemmeenntt
ddee vvoottrree aappppaarreeiill,, ffaaiitteess aappppeell àà uunn éélleeccttrriicciieenn qquuaalli
iffiiéé..
SSii llee ffoouurr pprréésseennttee uunnee qquueellccoonnqquuee aannoommaalliiee,, ddéébbrraanncchheezz ll''aappppaarreeiill oouu eennlleevveezz llee ffuussiibbllee ccoorr--
rr
eessppoonnddaanntt àà llaa lliiggnnee ddee bbrraanncchheemmeenntt dduu ffoouurr..
CHANGEMENT DE CABLE D’ALIMENTATION
2 / INSTALLATION DE VOTRE APPAREILFR
40
99641091 ml bio.qxp 12/01/2007 15:14 Page 40

41
3 / DESCRIPTION DE VOTRE APPAREIL
FR
••
PRESENTATION DE VOTRE FOUR
A
B
Sélecteur de température
Sélecteur de fonctions
C
D
Lampe
Indicateur de gradins
Conseil
Ce guide d’installation et d’utilisation est valable pour plusieurs modèles. De légères
différences de détails et d’équipements peuvent apparaître entre votre appareil et les des-
criptions présentées.
55
75
100
125
150
180
210
240
270
T˚
c
D
C
A
B
99641091 ml bio.qxp 12/01/2007 15:14 Page 41

42
3 / DESCRIPTION DE VOTRE APPAREILFR
AR
AV
••
Grille sécurité anti-basculement
(fig.1)
La grille peut être utilisée pour supporter tous
les plats et moules contenant des aliments à
cuire ou à gratiner.
Elle sera utilisée pour les grillades (à poser di-
rectement dessus).
ACCESSOIRES
••
fig.1
fig.2
••
Plat multi usages (fig.2)
Inséré dans les gradins sous la grille, il re-
ceuille les jus et les graisses des grillades. Il
peut aussi être utilisé à demi rempli d’eau pour
des cuissons au bain -marie. Evitez de poser
directement dans ce plat des rôtis ou des vian-
des car vous aurez automatiquement d’impor-
tantes projections sur les parois du four.
Conseil
Pour l’entretien des plats recouverts d’un émail anti-adhérant, laissez les refroi-
dir avant de les nettoyer manuellement avec un produit vaisselle. Evitez les éponges
grattantes. Ne coupez pas dessus avec un couteau ou une roulette à pizza métalli-
que, utilisez plûtot des ustensiles en plastique ou en silicone.
••
Tournebroche (fig.3) selon modèle
Pour l'utiliser :
• disposez le plat multi-usages au gradin N°1
pour recueillir les jus de cuisson ou sur la sole
si la pièce à rôtir est trop grosse.
• enfilez une des fourchettes sur la broche ;
embrochez la pièce à rôtir ; enfilez la
deuxième fourchette ; centrez et serrez en vis-
sant les deux fourchettes.
• placez la broche sur son berceau.
• poussez légèrement pour engager la pointe
de la broche dans le carré d'entraînement si-
tué au fond du four.
• retirez la poignée en la dévissant afin de
pouvoir fermer la porte. Après la cuisson, re-
vissez la poignée sur la broche pour retirer la
pièce à rôtir sans se brûler.
fig.3
99641091 ml bio.qxp 12/01/2007 15:14 Page 42

43
4 / UTILISATION DE VOTRE APPAREIL
FR
CUISSON IMMEDIATE
••
- Tournez le sélecteur de fonctions sur la
position de votre choix.
Exemple : position " " (fig.1).
- Tournez le sélecteur de température sur la
température recommandée par votre recette.
Exemple : repère de température 210°(fig.1)..
Après ces actions, le four chauffe, le voyant
de sélecteur de température s’allume et
s’éteint au rythme des régulations.
55
75
100
125
150
180
210
240
270
T˚
c
fig.1
fig.2
Attention
Toutes les cuissons se font porte fermée.
Attention
Après un cycle de cuisson, la turbine de refroidissement continue de fonctionner pen-
dant un certain temps, afin de garantir une bonne fiabilité du four.
Attention
Ne pas accrocher de linge ou de torchon à la poignée du four.
99641091 ml bio.qxp 12/01/2007 15:14 Page 43

44
4 / UTILISATION DE VOTRE APPAREILFR
TTRRAADDIITTIIOONNNNEELL
•
La cuisson s'effectue par les éléments inférieur et supérieur.
•
Nécessite un préchauffage avant d’enfourner le plat.
•
Recommandé pour
lleess ccuuiissssoonnss lleenntteess eett ddéélliiccaatteess
:
ggiibbiieerrss mmooeelllleeuuxx
...Pour saisir
rrôô--
ttiiss ddee vviiaannddee rroouuggee
. Pour mijoter en cocotte fermée plats préalablement démarrés sur
table de cuisson (
ccooqq aauu vviinn,, cciivveett
).
SS
PPEECCIIAALL VVOOLLAAIILLLLEESS
•
La cuisson s’effectue par l’élément supérieur associé à un dosage de l’élément inférieur.
•
Cette position permet de faire un gain d’énergie tout en conservant les qualités de
cuisson des
vvoollaaiilllleess
.
•
Posez les volailles dans un plat en terre, de préférence sur la grille au premier gradin.
Inutile de préchauffer le four. Vous pouvez retourner la volaille à mi-cuisson si vous le sou-
haitez.
SSOOLLEE
•
La cuisson s'effectue par l’élément inférieur.
•
Nécessite un préchauffage. Cuisson par le dessous. Placez la grille sur le gradin bas.
•
Recommandé pour les
ppllaattss hhuummiiddeess
(
qquuiicchheess,, ttaarrtteess aauuxx ffrruuiittss jjuutteeuuxx......
). La pâte sera
bien cuite dessous. Recommandé pour
lleess pprrééppaarraattiioonnss qquuii llèèvveenntt
(
ccaakkee,, bbrriioocchhee,, k
koouu--
ggllooff......
) et pour les
ssoouuffffllééss
qui ne seront pas bloqués par une croûte dessus.
GGRRIILL ++ ((TTOOUURRNNEEBBRROOCCHHEE sseelloonn mmooddèèllee))
•
La cuisson s'effectue par l’élément supérieur.
•
Préchauffage inutile. Volailles et rôtis juteux et croustillants sur toutes les faces.
•
Le tournebroche continue de fonctionner jusqu’à l’ouverture de la porte.
•
Glissez la léche frite au gradin du bas.
•
Recommandé pour toutes les
vvoollaaiilllleess
ou
rrôôttiiss
au tournebroche. Pour saisir et cuire à
coeur
ggiiggoott
,
ccôôtteess ddee bbooeeuuff
. Pour garder leur fondant aux pavés de
ppooiissssoonnss
.
GGRRIILL FFOORRTT
•
La cuissons’effectue par l’élément supérieur.
• Effectuez un préchauffage de 5 min. Glissez la léche frite sur le gradin du bas.
• Recommandé pour
ggrriilllleerr lleess ccôôtteelleetttteess,, ssaauucciisssseess,, ttrraanncchheess ddee ppaaiinn,, ggaammbbaass
posées
sur la grille.
* Séquences(s) utilisée(s) pour l’annonce écrite sur l’étiquette énergétique conformément à la
norme européenne EN 50304 et selon la directive Européenne 2002/40/CE.
*
99641091 ml bio.qxp 12/01/2007 15:15 Page 44

45
4 / UTILISATION DE VOTRE APPAREIL
FR
NETTOYAGE DE LA SURFACE EXTERIEURE
••
Pour nettoyer la porte du four, utilisez un chiffon doux, imbibé de produit à vitre.
Ne pas utiliser de produits d’entretien abrasifs ou de grattoirs métalliques durs pour nettoyer
la porte en verre du four, ce qui pourrait érafler la surface et entraîner l’éclatement du verre.
Pour préserver votre appareil, nous vous recommandons d'utiliser les produits d'entretien
Clearit.
Clearit vous propose des produits professionnels et des solutions adaptées pour l'entretien quo-
tidien de vos appareils électroménagers et de vos cuisines.
Vous les trouverez en vente chez votre revendeur habituel, ainsi que toute une ligne de produits
accessoires et consommables.
LL''eexxppeerrttiissee ddeess pprrooffeessssiioonnnneellss
aauu sseerrvviiccee ddeess ppaarrttiiccuulliieerrss
99641091 ml bio.qxp 12/01/2007 15:15 Page 45

46
Avant de procéder au nettoyage, laissez refroidir l'appareil et vérifiez que toutes les manettes
sont sur la position ARRET.
DDee ffaaççoonn ggéénnéérraallee ::
** nnee ppaass aassppeerrggeerr dd’’eeaauu ll’’aappppaarreeiill..
** lleess ppoouuddrreess aabbrraassiivveess eett lleess ééppoonnggeess mméét
taalllliiqquueess ssoonntt àà pprroossccrriirree..
SSUURRFFAACCEESS MMEETTAALLLLIIQQUUEESS PPOOLLIIEESS
Utilisez les produits du commerce prévus pour l'entretien des métaux polis.
VVIITTRREE DDEE PPOORRTTEE DDEE FFOOUURR
Après une cuisson ayant provoqué des salissures, il est conseillé de nettoyer la vitre intérieure avec
de l’eau savonneuse.
TTyyppee ddee ssaalliissssuurreess
Légères
Accumulation de
salissures recuites
Bien détremper la zone avec de l’eau
chaude
Eponges à vaisselle
Laissez agir de 30 min sur un four
tiède, à une nuit sur un four froid.
Aérosol “spécial nettoyant
pour four
”Respectez les conseils
d’ utilisation.
CCoommmmeenntt pprrooccééddeerr
PPrroodduuiittss àà uuttiilliisseerr
VVoottrree ffoouurr ssee nneettttooiiee ffaacciilleemmeenntt,, ppoouurr vvoouuss aaiiddeerr vvooiiccii qquueellqquueess ccoonnsseeiillss ::
poudre
éponge abrasive
éponge sanitaire spéciale
vaisselle délicate
NETTOYAGE DE LA CAVITE
••
Attention
Pour toute intervention de nettoyage dans la cavité, le four doit être arrêté.
6 / ENTRETIEN ET NETTOYAGE DE VOTRE APPAREILFR
99641091 ml bio.qxp 12/01/2007 15:15 Page 46

47
7 / EN CAS D’ANOMALIES DE FONCTIONNEMENT
FR
Conseil
Dans tous les cas, si votre intervention n’est pas suffisante, contactez sans attendre
le Service après-vente.
QQUUEE FFAAUUTT--IILL FFAAIIRREE ??LLEESS CCAAUUSSEESS
PPOOSSSSIIBBLLEESS
VVOOUUSS CCOONNSSTTAATTEEZZ
QQUUEE……
- Le four n’est pas branché.
- Le fusible de votre installa-
tion est hors service.
- La température sélection-
née est trop basse.
- Le thermostat est défec-
tueux
VVoottrree ffoouurr nnee cchhaauuffffee
ppaass
➡ Branchez votre four.
➡ Changez le fusible de votre installa-
tion et vérifiez sa valeur (16A).
➡ Augmentez la température sélec-
tionnée.
➡ Faîtes appel au Service Après
vente.
VVoouuss aavveezz uunn ddoouuttee ssuurr llee bboonn ffoonnccttiioonnnneemmeenntt ddee vvoottrree ffoouurr,,
ceci ne signifie pas for-
cément qu'il y a une panne.
DDaannss ttoouuss lleess ccaass,, vvéérriiffiieezz lleess ppooiinnttss ssuuiivvaannttss ::
- La lampe est hors service.
- Votre four n’est pas branché
ou le fusible est hors service.
LLaa llaammppee ddee vvoottrree ffoouurr
nnee ffoonnccttiioonnnnee pplluuss..
➡ Changez la lampe.
➡ Branchez votre four ou changez le
fusible.
- Thermostat défectueux
LL’’iinnddiiccaatteeuurr ddee tteemmppéé--
rraattuurree rreessttee aalllluumméé eenn
ppeerrmmaanneennccee..
➡ Faîtes appel au Service Après
vente.
Attention
- Les réparations sur l'appareil doivent être effectuées uniquement par des professionnels.
Les réparations non effectuées dans les règles peuvent être source de dangers pour l'utilisa-
teur.
- La ventilation fonctionne
pendant 1 heure maximum
après la cuisson.
- Si pas d’arrêt après 1
heure
LLee vveennttiillaatteeuurr ddee rreeffrrooii--
ddiisssseemmeenntt ccoonnttiinnuuee ddee
ttoouurrnneerr àà ll’’aarrrrêêtt dduu ffoouurr..
➡ Ouvrir la porte du four pour accélé-
rer le refroidissement du four
➡ Faîtes appel au Service Après
vente.
- Le four n’est pas branché
correctement.
LLee vvooyyaanntt dduu ffoouurr eesstt aall--
lluumméé ffaaiibblleemmeenntt lloorrssqquuee
llee ffoouurr eesstt aarrrrêêttéé..
➡ Vérifier le raccordement électrique
de votre four. Le conducteur de phase
L(noir) doit être raccordé à la borne
phase L de votre boîte de raccorde-
ment ou de votre fiche de prise de
courant. Le conducteur de neutre
N(bleu) doit être raccordé à la borne
neutre N de votre boîte de raccorde-
ment ou de votre fiche de prise de
courant.
99641091 ml bio.qxp 12/01/2007 15:15 Page 47

48
Ampoule
Dévissez
Hublot
L'ampoule se situe au plafond de la cavité de
votre four.
a) Débranchez le four.
b) Dévissez le hublot (fig.1).
c) Dévissez l'ampoule dans le même sens.
Caractéristiques de l'ampoule :
- 15 W
- 220-240 V
~
- 300°C
- culot E 14
d) Changez l'ampoule puis remontez le hublot
et rebranchez votre four.
CHANGEMENT DE L’AMPOULE
••
Conseil
Pour dévisser le hublot et l’ampoule, utilisez un gant de caoutchouc qui facilitera le
démontage.
Attention
- Débranchez votre four avant toute intervention sur l'ampoule pour éviter tout risque de
choc électrique et laissez refroidir si besoin l’appareil.
fig.1
7 / EN CAS D’ANOMALIES DE FONCTIONNEMENTFR
99641091 ml bio.qxp 12/01/2007 15:15 Page 48

49
Les éventuelles interventions sur votre appa-
reil doivent être effectuées par un profession-
nel qualifié dépositaire de la marque. Lors de
votre appel, mentionnez la référence complète
de votre appareil (modèle, type, numéro de
série). Ces renseignements figurent sur la pla-
que signalétique
(Fig.1).
PIÈCES D’ORIGINE
Lors d’une intervention d’entretien, deman-
dez l'utilisation exclusive de
pièces déta-
chées certifiées d’origine.
•INTERVENTIONS
•RELATIONS CONSOMMATEURS
**
Service fourni par Brandt Customer Services, société par actions simplifiée au capital de 2.5000.000 euros,
5/7 avenue des Béthunes, 95310 Saint Ouen l’Aumône - RCS Pontoise 440 303 303
BBrraannddtt AApppplliiaanncceess
- société par actions simplifiée au capital de 10.000.000 euros RCS Nanterre 440 302 347.
BRANDT APPLIANCES SAS
7 rue Henri Becquerel
92500 RUEIL MALMAISON
230V ~ 50 Hz
MADE IN FRANCE
•Pour en savoir plus sur tous les produits de
la marque :
informations, conseils, les points de vente, les
spécialistes après-vente.
•Pour communiquer :
nous sommes à l'écoute de toutes vos remar-
ques, suggestions, propositions auxquelles
nous vous répondrons personnellement.
> Vous pouvez nous écrire :
Service Consommateurs BRANDT
BP 9526
95069 CERGY PONTOISE CEDEX
> ou nous téléphoner au :
Tarif en vigueur au 1er avril 2004
fig.1
8 / SERVICE APRES-VENTE
FR
99641091 ml bio.qxp 12/01/2007 15:15 Page 49

50
Uit een voortdurend streven naar het verbeteren van onze producten, behouden we ons het recht
voor om wijzigingen aan te brengen aan de technische, functionele of esthetische eigenschap-
pen ervan, om de technische evolutie op de voet te volgen.
Belangrijk:
Alvorens het apparaat in gebruik te nemen vragen wij u eerst deze installatie- en
gebruikshandleiding aandachtig te lezen om u snel met de werking vertrouwd te maken.
Geachte Klant,
U hebt net een oven van BRANDT aangekocht. Wij willen u hier graag
voor bedanken.
Wij hebben al onze knowhow en ons enthousiasme in dit apparaat
gestopt, opdat het zo goed mogelijk aan uw behoeften zal beantwoor-
den. Deze innoverende en uitstekend presterende oven is speciaal
ontworpen voor uw gebruiksgemak.
BRANDT biedt tevens een ruime keuze aan fornuizen, magnetrons,
kookplaten, afzuigkappen, vaatwassers, droogtrommels, koelkasten
en diepvriezers die allemaal met uw oven van
BBRRAANNDDTT
kunnen wor-
den gecombineerd.
U kunt ook onze website
wwwwww..bbrraannddtt..ccoomm ,,
bezoeken voor al onze
producten en nuttige en aanvullende informatie.
BBRRAANNDDTT
DE
02
EN
18
NL
34
PT
50
66
FR
99641091 ml bio.qxp 12/01/2007 15:15 Page 50

51
1 / BESTEMD VOOR DE GEBRUIKER
• Veiligheidsaanwijzingen
_____________________________________
52
• Omgeving
________________________________________________
53
2 / INSTALLATIE VAN HET APPARAAT
• Keuze van de plaats
________________________________________
54
• Inbouw
___________________________________________________
54
• Elektrische aansluiting
______________________________________
55
• Vervanging van de voedingskabel
_____________________________
56
3 / BESCHRIJVING VAN HET APPARAAT
• Presentatie van de oven
_____________________________________
57
• Beschrijving van de oventoebehoren
__________________________
58
4 / GEBRUIK VAN HET APPARAAT
º
Onmiddellijk bakken ____________________________________ 59
5 / BAKWIJZEN VAN DE OVEN _____________________________________ 60
6 / PERIODIEK ONDERHOUD VAN HET APPARAAT
• Reiniging van de buitenkant
__________________________________
61
• Reiniging van de binnenkant
_________________________________
62
7 / PROBLEMEN EN OPLOSSINGEN________________________________ 63
• Vervanging van de ovenlamp
_________________________________
64
INHOUD
NL
99641091 ml bio.qxp 12/01/2007 15:15 Page 51

52
VEILIGHEIDSAANWIJZINGEN
— Dit apparaat is bestemd voor huishoudelijk
gebruik. Deze oven is uitsluitend ontworpen
voor het bakken van voedingsmiddelen. Deze
oven bevat geen enkel bestanddeel op basis
van asbest
— Dit apparaat dient door volwassenen te wor-
den gebruikt. Waak ervoor dat kinderen het
niet aanraken of als speelgoed gebruiken.
Zorg ervoor dat zij de bedieningen van het
apparaat niet gebruiken.
— Pak het apparaat onmiddellijk bij ontvangst
uit of laat het uitpakken. Controleer de alge-
mene staat. Schrijf eventueel voorbehoud op
de leveringsbon waarvan u een exemplaar
behoudt.
— Het apparaat is bestemd voor normaal huis-
houdelijk gebruik. Niet gebruiken voor com-
merciële of industriële doelen of andere doel-
einden waarvoor het niet is ontworpen.
— De technische gegevens van het apparaat
niet wijzigen of proberen te wijzigen. Dit kan
gevaarlijk zijn.
— Houd kinderen uit de buurt van het apparaat
wanneer het in werking is. Zo kunnen ze zich
niet verbranden aan een omvallende kookpot.
Bovendien is de voorzijde van het apparaat tij-
dens de werking en de reiniging warm (pyro-
lyse).
— Gebruik nooit het handvat van de deur om
het apparaat naar u toe te trekken.
— Vooraleer de oven voor de eerste keer te
gebruiken, moet hij ongeveer 15 minuten leeg
opwarmen. Zorg ervoor dat de ruimte vol-
doende verlucht is. U kunt hierbij een bijzon-
der geurtje of wat rook gewaarworden. Dit is
normaal.
— Let erop dat de ovendeur altijd goed geslo-
ten is. Alleen dan sluit de afdichting de oven
volledig af.
— Tijdens het gebruik wordt het apparaat
warm. Raak nooit de verwarmingselementen
binnen in de oven aan. U kunt zo ernstige
brandwonden oplopen.
— Wanneer u de gerechten in de oven plaatst
of eruit neemt, moet u de handen uit de buurt
van de bovenste verwarmende elementen hou-
den. Gebruik een ovenwant.
— Na het bakken mogen de pannen (rooster,
draaispit) nooit met de blote handen vastgeno-
men worden.
— Plaats nooit aluminiumfolie rechtstreeks in
contact met de ovenbodem (zie beschrijving
van de oven), omdat de geaccumuleerde
warmte het email kan beschadigen.
— Plaats op de open ovendeur geen zware
voorwerpen en zorg ervoor dat een kind niet
op de deur kan klauteren of erop gaat zitten.
— Om de bedieningen van uw apparaat niet te
beschadigen, de deur niet openlaten wanneer
de oven in werking is of nog warm is.
— Zet de oven altijd uit alvorens een reiniging
aan de binnenzijde van de oven uit te voeren.
— Een intensief en langdurig gebruik van het
apparaat kan een bijkomende verluchting van
de ruimte vergen. Open hiervoor het raam of
verhoog het vermogen van de mechanische
ventilatie.
— Naast de accessoires geleverd met de oven,
gebruikt u alleen schotels die bestand zijn
tegen hoge temperaturen (volg de instructies
van de fabrikant).
— Na gebruik van de oven, controleer of alle
bedieningen uit staan.
— Gebruik nooit stoom- of hoge druk appara-
ten voor het reinigen van de oven (eisen met
betrekking tot de elektrische veiligheid).
Uw oven is voorzien van een AUTOMATISCHE
STOPZETTING voor uw veiligheid, als u per
ongeluk vergeet uw oven af te zetten. Na 10
uur gebruik wordt de functie AS
(Automatische Stop) actief en zal uw oven
vanzelf uitgaan. AS wordt vertoond in plaats
van het uur en een serie van 2 opeenvolgende
pieptonen zal een korte tijd weerklinken.
•
Belangrijk
Bewaar deze gebruiksaanwijzing in de
nabijheid van het apparaat. Indien het appa-
raat aan een ander persoon wordt verkocht
of gegeven, dient u de gebruiksaanwijzing
hierbij niet te vergeten. Wij vragen u kennis
te nemen van de aanwijzingen alvorens het
apparaat te installeren en te gebruiken. Zij
zijn voor uw veiligheid en die van anderen
opgesteld.
1 / BESTEMD VOOR DE GEBRUIKERNL
99641091 ml bio.qxp 12/01/2007 15:15 Page 52

53
OMGEVING
•
— Het verpakkingsmateriaal van dit apparaat is recyclebaar. Doe mee aan de recycling en draag bij
aan de bescherming van het milieu door dit materiaal in de hiervoor bestemde gemeentecontai-
ners te deponeren.
— Uw apparaat bevat tevens vele recyclebare materialen Het apparaat is bijgevolg voorzien van dit
logo om aan te geven dat de afgedankte apparaten niet met het gewoon huishoudelijk afval die-
nen te worden weggegooid. De recyclage van de apparaten vanwege de fabrikant ge-
beurt in de beste omstandigheden, overeenkomst de Europese richtlijn 2002/96/EG in-
zake het elektrisch en elektronisch afval. Informeer bij uw gemeente of bij uw verkoper
naar de dichtstbijzijnde inzamelplaats voor uw oude apparaten.
— Wij danken u voor uw bijdrage aan de bescherming van het milieu.
Let op
De installatie dient door erkende installateurs en vaklieden te geschieden.
Dit apparaat is conform de volgende Europese richtlijnen:
- Laagspanningsrichtlijn 73/23/EEG gewijzigd door de richtlijn 93/68/EEG voor de aanbrenging
van de markering CE.
- Richtlijn betreffende elektromagnetische compatibiliteit 89/336/EEG gewijzigd door de richtlijn
93/68/EEG voor de aanbrenging van de markering CE.
- Reglement CE nr. 1935/2004 betreffende de materialen en voorwerpen bestemd voor het
gebruik met voedingsmiddelen.
1 / BESTEMD VOOR DE GEBRUIKER
NL
99641091 ml bio.qxp 12/01/2007 15:15 Page 53

54
2 / INSTALLATIE VAN HET APPARAAT
NL
INBOUW
Werkwijze:
1) Verwijder de rubberen schroefkapjes van de
schroefgaten.
2) Maak een opening met een diameter van 2
mm in de wand van het meubel om te vermijden
dat het hout gaat barsten.
3) Bevestig de oven met de 2 schroeven.
4) Plaats de rubberen schroefkapjes opnieuw
op de schroeven (de kapjes dempen tevens het
geluid bij het sluiten van de ovendeur).
(*) bij een open meubel dient de opening (maxi-
maal) 70 mm te bedragen.
Advies
Voor een installatie overeenkomstig
de wettelijke richtlijnen raden wij u aan een
beroep te doen op een erkend elektrotech-
nicus.
•
KEUZE VAN DE PLAATS
De schema’s hierboven bepalen de zijkanten
van een meubel waarin uw oven ingebouwd
kan worden.
De oven kan naar keuze worden geïnstalleerd
onder een werkblad of in een (open* of geslo-
ten) kolommeubel met de juiste afmetingen
voor de inbouw van de oven (zie schema).
Uw oven beschikt over een optimale luchtcir-
culatie die perfecte bakresultaten en een opti-
male reiniging garandeert. U dient met de vol-
gende punten rekening te houden:
• Plaats de oven centraal in het meubel met
een minimale afstand van 5 mm tussen de zij-
wanden van de oven en die van het inbouw-
meubel.
• Het materiaal van het inbouwmeubel of de
bekleding ervan moet hittebestendig zijn.
• Voor meer stabiliteit meubel met 2 schroe-
ven in de gaten in de zijwanden (fig. 1).
•
585
560
550
70
550
Fig. 01
99641091 ml bio.qxp 12/01/2007 15:15 Page 54

55
•
ELEKTRISCHE AANSLUITING
20A Mono Teller
220-240V~ 50Hz
Stopcontact
2 polen + aarding
CEI-norm 60083
Monokabel 220-240 V ~
Voedingskabel
lengte 1,50 m
ongeveer
Differentieelschakelaar of
zekering 16A
De elektrische veiligheid dient te worden ver-
zekerd door een goede inbouw. De stekker uit
het contact halen bij inbouw of onderhoud
van het apparaat, de zekeringen afsluiten of
verwijderen.
De elektrische aansluiting dient te worden uit-
gevoerd voordat het apparaat in het meubel
wordt geplaatst.
Controleer of:
-het vermogen van de installatie voldoende is,
-de voedingskabels in goede staat zijn
-de diameter van de kabels overeenkomstig
de installatieregels is.
Uw oven moet aangesloten worden met een
voedingskabel (genormaliseerd) met 3 gelei-
ders van 1,5mm
2
(1f + 1N + aarding) die ver-
bonden worden met het netwerk 220-
240V
~monofase via een stopcontact 1f +1
neutraal + aarding volgens CEI 60083 of een
omnipolaire schakelaar of overeenkomstig de
installatieregels.
Let op
De beschermingsdraad (groen-geel)
is
verbonden met de aansluitklem van
het apparaat en moet worden verbonden met
de aarding van de installatie.
Indien u kiest voor een aansluiting op een
stopcontact, dient u ervoor te zorgen dat het
stopcontact ook na de aansluiting gemakke-
lijk bereikbaar blijft.
De zekering van uw installatie moet 16 ampè-
re zijn.
Indien de voedingskabel is beschadigd,
moet deze door een kabel of een speciaal
geheel door de fabrikant of door de service-
dienst worden vervangen.
2 / INSTALLATIE VAN HET APPARAAT
NL
99641091 ml bio.qxp 12/01/2007 15:15 Page 55

56
•
— De voedingskabel (H05 RR-F, H05 RN-F of H05 VV-F) moet lang genoeg zijn om te kunnen wor-
den aangesloten op de oven wanneer de oven op de grond voor het keukenmeubel wordt
geplaatst.
Koppel daarvoor eerst de oven van het elektriciteitsnet af :
— Open het toegangsplaatje rechts onderaan de achterwand. Draai hiervoor de 2 schroeven los
en draai het plaatje weg.
— Ontbloot elke draad van de nieuwe voedingskabel over een lengte van 12mm.
— Tors de draadjes van elke draad voorzichtig ineen.
— Draai de schroeven van het klemmenbord los en verwijder de te vervangen voedingskabel.
•
Steek de voedingskabel langs de zijkant van de achterwand in de kabelklem rechts van het
klemmenbord.
— Alle draadjes van de voedingskabel dienen onder de schroeven vast te zitten.
— De fasedraad moet worden verbonden met de L-klem.
— De aardingsdraad van groen-gele kleur moet worden verbonden met de klem .
— De nulleider (blauw) moet worden verbonden met de N-klem.
— Draai de schroeven van het klemmenbord stevig vast en controleer de stevigheid van de aanslui-
ting door even aan elke draad te trekken.
— Maak de voedingskabel vast door middel van de kabelklem rechts van het klemmenbord.
— Schroef het toegangsplaatje met de 2 schroeven opnieuw vast.
Let op
Onze aansprakelijkheid vervalt bij een ongeval ten gevolge van een afwezige of foute
aarding.
Indien door de elektrische installatie van uw woning een wijziging moet worden aangebracht
voor de aansluiting van uw apparaat, dient u een beroep te doen op een erkend vakman.
Indien de magnetronoven een willekeurig probleem vertoont trek dan de stekker uit het stop-
contact of verwijder de zekering die overeenkomt met de aansluitingskabel van de magne-
tron.
VERVANGING VAN DE VOEDINGSKABEL
2 / INSTALLATIE VAN HET APPARAATNL
99641091 ml bio.qxp 12/01/2007 15:15 Page 56

57
3 / BESCHRIJVING VAN HET APPARAAT
NL
•
PRESENTATIE VAN DE OVEN
A
B
Temperatuurknop
Keuzeknop
C
D
Lamp
Weergave nummer richel
Advies
Deze installatie- en gebruiksgids is voor meerdere modellen geldig. Er kunnen kleine
verschillen bestaan tussen uw apparaat en de beschrijvingen in deze gids.
55
75
100
125
150
180
210
240
270
T˚
c
D
C
A
B
99641091 ml bio.qxp 12/01/2007 15:15 Page 57

58
Achter
Voor
•
Rooster met kantelbeveiliging
(fig.1)
Het rooster kan worden gebruikt voor alle scha-
len en vormen met gerechten die gebakken of
gegratineerd moeten worden.
Dit rooster wordt gebruikt voor grillgerechten
(plaats het gerecht op het rooster).
BESCHRIJVING VAN DE OVEN-
TOEBEHOREN
•
fig.1
fig.2
•
Multifunctionele ovenschaal (fig.2)
Dit vangt, als u het in de richel onder de grill
plaatst, het braadnat en het braadvet op bij het
roosteren. Kan ook half met water gevuld
gebruikt worden om au bain-marie te koken.
Plaats vlees niet rechtstreeks op deze plaat,
omdat dan vocht en vet tegen de wanden van
de oven zal opspatten.
3 / BESCHRIJVING VAN HET APPARAATNL
Advies
Voor het onderhoud van vaat met een antikleefemail, laten afkoelen vooraleer
ze handmatig te wassen met een product voor de vaat. Gebruik geen schuurspons-
jes. Niet op de plaat snijden met een mes of metalen pizzasnijder, gebruik alleen
plastic of silicone gerei.
•
Draaispit (fig.3) volgens model
Hoe gebruik ik het draaispit:
• plaats de multifunctionele ovenschaal op
richel nr.1 om het braadnat op te vangen of op
de bodem als het te braden stuk te groot is.
• schuif een eerste braadvork op het spit;
plaats vervolgens het te braden vlees tegen de
vork op het spit; schuif de tweede braadvork
op het spit; schuif het vlees met de twee vorken
tot in het midden van het braadspit en draai de
twee vorken vast.
• plaats het braadspit op het draagkader.
• druk de punt van het braadspit voorzichtig in
de opening achterin de oven om het spit vast te
zetten.
• verwijder het handvat door het los te schroe-
ven, om de ovendeur te kunnen sluiten. Na de
bereiding kunt u dit handvat opnieuw op het
spit vastschroeven om het braadstuk uit de
oven te halen zonder zich te verbranden.
fig.3
99641091 ml bio.qxp 12/01/2007 15:15 Page 58

59
4 / GEBRUIK VAN HET APPARAAT
NL
ONMIDDELLIJK BAKKEN
•
- Draai de keuzeknop op in de stand van uw
keuze.
Bijvoorbeeld: stand “ ” (fig. 1).
- Draai de thermostaat (temperatuurknop) op
de voor uw gerecht aanbevolen temperatuur.
Bijvoorbeeld: referentie temperatuur 210°
(fig.1).
Na deze handelingen begint de oven te werken
en gaat het thermostaatlampje aan en uit op
het ritme van de regelingen.
55
75
100
125
150
180
210
240
270
T˚
c
fig.1
fig.2
Let op
HHaanngg ggeeeenn hhaanndd-- ooff tthheeeeddooeekk aaaann hheett hhaannddvvaatt vvaann ddee oovveenn..
Let op
Alle bereidingen gebeuren met gesloten ovendeur.
Let op
Na een bakcyclus blijft de koelturbine nog enige tijd werken om een goede betrouw-
baarheid van de oven te garanderen.
99641091 ml bio.qxp 12/01/2007 15:15 Page 59

60
5 / BAKWIJZEN VAN DE OVENNL
TRADITIONEEL
•
Het bakken gebeurt met het onderste en het bovenste verwarmingselement.
•
Verwarm de oven voor.
•
Aanbevolen voor langzame en delicate bereidingen: zachte wildgerechten...Om rood
vlees aan te braden. Stoven van gerechten in een stoofpot met deksel waarvan de berei-
ding op een kookplaat is begonnen (coq-au-vin, wildragout).
SPECIAAL GEVOGELTE
•
Het bakken gebeurt met het bovenste verwarmingselement en een klein beetje met het
onderste element.
•
In deze stand kunt u energie besparen zonder de bakkwaliteit te beïnvloeden van het
gevogelte.
•
Leg het gevogelte in een aardewerken schaal, bij voorkeur op het rooster op de onder-
ste richel.
De oven hoeft niet voorverwarmd te worden. U kunt het gevogelte halverwege de baktijd
omdraaien, indien u dit wenst.
OVENBODEM
•
Het bakken gebeurt met het onderste verwarmingselement van de oven.
•
Behoeft geen voorverwarming. Bakken langs onder. Plaats het rooster op de onderste
richel.
•
Aanbevolen voor natte gerechten (quiches, taarten met saphoudend fruit...). Het deeg
zal aan de onderkant goed gaar worden. Aanbevolen voor alle bereidingen die rijzen
(cake, brioche, tilband...) en voor soufflés waarop geen korst wordt gevormd.
GRILL + (DRAAISPIT volgens model)
•
Het bakken gebeurt met het bovenste verwarmingselement van de oven.
•
Voorverwarmen niet nodig. Gevogelte en gebraad blijven sappig en krokant.
•
Het draaispit blijft draaien tot u de ovendeur opent.
•
Schuif de braadslee op de laagste richel.
•
Aanbevolen voor alle gevogelte of vlees op het draaispit. Voor het aanbraden en bak-
ken van lamsbout, runderribben aan te braden. Om stukken vis zacht te houden.
STERKE GRILL
•
Het bakken gebeurt met het bovenste verwarmingselement van de oven.
• Verwarm de oven 5 minuten voor. Zet de vetvanger op de onderste richel.
• Aanbevolen voor het roosteren van karbonade, worstjes, plakjes brood, gamba’s
rechtstreeks op het rooster.
* Bakwijzen waarnaar verwezen wordt in het energielabel overeenkomstig de Europese norm
EN 50304 en de Europese richtlijn 2002/40/EG.
*
99641091 ml bio.qxp 12/01/2007 15:15 Page 60

61
6 / PERIODIEK ONDERHOUD VAN HET APPARAAT
NL
REINIGING VAN DE BUITENKANT
•
Om de ovendeur te reinigen, gebruikt u een zachte doek bevochtigd met wat ruitenspray.
Gebruik geen bijtende reinigingsproducten of harde metalen krabbers om de glazen ovendeur
te reinigen. Dit kan het glas beschadigen en leiden tot glasbreuk.
Voor het onderhoud van het apparaat bieden wij u de Clearit-producten aan.
Clearit biedt professionele producten en oplossingen voor het dagelijks onderhoud van uw elek-
trische apparaten en van uw keuken.
Deze producten, alsmede accessoires, zijn te krijgen bij uw verkoper.
De expertise van professionals
in dienst van particulieren
99641091 ml bio.qxp 12/01/2007 15:15 Page 61

62
Voordat u begint te demonteren, het apparaat eerst laten afkoelen en controleren of de keuzeknop
op 0 staat.
Algemeen:
* sproei geen water op het apparaat.
* gebruik geen schurende poeders of metalen sponsjes.
GL
ANZENDE METALEN OPPERVLAKKEN
Gebruik de in de handel verkrijgbare producten voor het onderhoud van glanzend metaal.
GL
AS VAN DE OVENDEUR
Na een bereiding die het glas bevuild heeft, is het aangewezen het glas aan de binnenkant van de
oven schoon te maken met een zeepsopje.
Uw oven is makkelijk schoon te maken. Hier volgen enkele adviezen:
poeder
schuurspons
huishoudsponsje speciaal voor
fijn vaatwerk
Let op
Zet de oven altijd uit alvorens een reiniging aan de binnenzijde van de oven uit te voeren.
Soorten vuil
Licht
Opeenhoping van
aangebakken vuil
Het te reinigen gebied met warm
water doorweken.
Vaatsponsje
30 minuten laten inwerken in een
lauwe oven en de hele nacht in
een koude oven.
Aërosol “speciale reiniger
voor ovens”
Respecteer de tips
voor een correct gebruik.
Reinigingsmethoder
Te gebruiken producten
REINIGING VAN DE BINNENKANT
6 / PERIODIEK ONDERHOUD VAN HET APPARAATNL
•
99641091 ml bio.qxp 12/01/2007 15:15 Page 62

63
Advies
Mocht u het probleem ondanks deze tips niet kunnen oplossen, neem dan contact op
met de servicedienst.
U twijfelt over de goede werking van de oven. Dit betekent niet automatisch dat er een
defect is. Controleer in elk geval eerst de volgende punten:
Let op
- Reparaties aan het apparaat mogen alleen door professionals uitgevoerd worden. Repa-
raties die niet volgens de regels uitgevoerd worden, kunnen gevaarlijk zijn voor de gebruiker.
U MERKT DAT…
MOGELIJKE
OORZAKEN
OPLOSSINGEN
De oven wordt niet
warm
- De oven is niet aangesloten.
- De zekering van de installa-
tie is defect.
- De geselecteerde tempera-
tuur is te laag.
- De thermostaat is defect
➡ Sluit de oven aan.
➡ Vervang de zekering van uw installa-
tie en controleer de waarde ervan
(16A).
➡ Verhoog de gekozen temperatuur.
➡ Neem contact op met de service-
dienst.
De ovenlamp doet het
niet meer.
- De lamp is defect.
- De oven is niet aangesloten
of de zekering is defect.
➡ Vervang de lamp.
➡ Sluit de oven aan of vervang de ze-
kering.
De temperatuurindica-
tor blijft branden.
- De thermostaat is defect.
➡ Neem contact op met de service-
dienst.
De ventilator van de
koeling blijft draaien
zelfs als de oven niet
meer werkt.
- De ventilator werkt maxi-
mum 1 uur na de bereiding.
- Als de ventilatie niet stopt
na 1 uur.
➡ Open de ovendeur om de afkoeling
van de oven te versnellen.
➡ Neem contact op met de service-
dienst.
Het lampje van de oven
brandt zwak wanneer
de oven niet werkt.
- De oven is niet correct aan-
gesloten.
➡ Controleer de elektrische aanslui-
ting van de oven. De fasegeleider L
(zwart) moet aangesloten zijn op de fa-
seklem L van de aansluitkast of de
stekker van het stopcontact. De neu-
trale geleider N (blauw) moet aange-
sloten zijn op de neutrale klem N van
de aansluitkast of de fiche van het
stopcontact.
7 / PROBLEMEN EN OPLOSSINGENNL
99641091 ml bio.qxp 12/01/2007 15:15 Page 63

64
Lampje
Losschroeven
Venster
De ovenlamp bevindt zich bovenaan in de oven-
ruimte.
a) Trek de stekker van de oven uit het stopcon-
tact.
b) Schroef het verlichtingskapje los (fig.1).
c) Draai het lampje in dezelfde richting los.
Kenmerken van het lampje:
- 15 W
- 220-240 V
~
- 300°C
- fitting E 14
d) Plaats een nieuwe lamp, draai het venster-
kapje opnieuw dicht en sluit de oven opnieuw
aan.
VERVANGING VAN DE OVENLAMP
•
Advies
Gebruik een rubberen handschoen voor het losschroeven van het vensterkapje en het
lampje (praktisch).
Let op
- Trek altijd de stekker van de oven uit alvorens de ovenlamp te vervangen om elektri-
sche schokken te vermijden. Laat indien nodig de oven afkoelen.
fig.1
7 / PROBLEMEN EN OPLOSSINGENNL
99641091 ml bio.qxp 12/01/2007 15:15 Page 64

65
66 //
KUNDENDIENST
DE
Any maintenance on your equipment should be undertaken by:
- either your dealer,
- or another qualified mechanic who is an authorized agent for the brand appliances.
When making an appointment, state the full reference of your equipment (model, type and serial
number). This information appears on the manufacturer's nameplate attached to your equipment.
Eingriffe an Ihrem Gerät dürfen nur:
- von Ihrem Händler oder
- von einem sonstigen Fachmann und Vertragshändler der Marke durchgeführt werden.
Geben Sie bei der Meldung einer Störung die vollständige Typenbezeichnung Ihres Gerätes an
(Modell, Typ, Seriennummer). Diese Angaben finden Sie auf einem an Ihrem Gerät angebrach-
ten Schild.
66 //
AFTER-SALES SERVICE
EN
66 //
SERVICIO TÉCNICO
ES
Qualquer intervenção no seu aparelho deve ser realizada:
- quer pelo seu revendedor,
- quer por outro profissional qualificado autorizado pela marca.
Ao chamá-los, indique a referência completa do seu aparelho (modelo, tipo e número de série).
Estas informações figuram na placa de identificação fixada no aparelho.
Las intervenciones que requiera la máquina deberán ser efectuadas:
- por el revendedor,
- o por cualquier profesional cualificado depositario de la marca.
Al llamar, mencione la referencia completa de la máquina (modelo, tipo y número de serie).
Estos datos figuran en la placa de identificación situada en la máquina.
66 //
SERVIZIO POST-VENDITA E RELAZIONI CON I CONSUMATORI
IT
66 //
SERVICEDIENST
NL
Qualquer intervenção no seu aparelho deve ser realizada:
- quer pelo seu revendedor,
- quer por outro profissional qualificado autorizado pela marca.
Ao chamá-los, indique a referência completa do seu aparelho (modelo, tipo e número de série).
Estas informações figuram na placa de identificação fixada no aparelho.
De eventuele ingrepen in de machine moeten worden uitgevoerd :
- of door uw vakhandelaar,
- of door een andere gekwalificeerd technicus van dit merk.
Tijdens het telefoneren, dient u de complete referentie op te geven van uw machine (model,
type, serienummer). Deze informatie staat op het typeplaatje op de machine.
66 //
SERVIÇO PÓS-VENDA
PT
99641091 ml bio.qxp 12/01/2007 15:15 Page 65

66
Estimado(a) Cliente,
Acabou de adquirir um forno
BBRRAANNDDTT
, e estamos lhe gratos por isso.
Toda a nossa paixão e o nosso saber-fazer foram dedicados a este
aparelho, de maneira a que ele possa satisfazer o melhor possível as
suas necessidades. Inovador e eficiente, concebemo-lo a pensar na
sua permanente facilidade de utilização.
Na gama de produtos
BBRRAANNDDTT
, encontrará também uma vasta selec-
ção de fogões, microondas, placas de cozinha, exaustores, máquinas
de lavar louça, máquinas de lavar roupa, máquinas de secar roupa, fri-
goríficos e congeladores, que poderá combinar com o seu forno
BBRRAANNDDTT
.
No intuito permanente de satisfazer o melhor possível as suas exigên-
cias em relação aos nossos produtos, o nosso serviço de Apoio ao
Consumidor encontra-se, naturalmente, à sua disposição e à sua
escuta para responder a todas as suas perguntas ou sugestões
(morada e n.º de telefone no fim deste manual).
E visite o nosso sítio
wwwwww..BBRRAANNDDTT..ccoomm
onde poderá encontrar
todos os nossos produtos, bem como informações úteis e comple-
mentares.
BBRRAANNDDTT
Com a preocupação de melhorar constantemente os nossos produtos, reservamo-nos o direito
de modificar as respectivas características técnicas, funcionais ou estéticas por motivos liga-
dos à sua evolução.
Importante:
Antes de pôr o aparelho a funcionar, leia este guia de instalação e de utilização com
atenção para se familiarizar mais rapidamente com o seu funcionamento.
DE
02
EN
18
NL
34
PT
50
66
FR
99641091 ml bio.qxp 12/01/2007 15:15 Page 66

67
ÍNDICE
1 / INFORMAÇÕES DESTINADAS AO UTILIZADOR
• Instruções de segurança
____________________________________
68
• Meio Ambiente
____________________________________________
69
2 / INSTALAÇÃO DA SEU APARELHO
• Escolha do local de instalação
_______________________________
70
• Encastramento
____________________________________________
70
• Ligação eléctrica
___________________________________________
71
• Substituição do cabo de alimentação
__________________________
72
3 / DESCRIÇÃO DO SEU APARELHO
• Apresentação do seu forno
__________________________________
73
• Descrição dos acessórios
___________________________________
74
4 / UTILIZAÇÃO DO APARELHO
º
Cozedura imediata _____________________________________ 75
5 / OS MODOS DE COZEDURA DO FORNO _________________________ 76
6 / MANUTENÇÃO E LIMPEZA DO SEU APARELHO
• Limpeza da superfície exterior
_______________________________
77
• Limpeza da cavidade
_______________________________________
78
7 / ANOMALIAS DE FUNCIONAMENTO _____________________________ 79
• Substituição da lâmpada
____________________________________
80
99641091 ml bio.qxp 12/01/2007 15:15 Page 67

68
1 / INFORMAÇÕES DESTINADAS AO UTILIZADOR
PT
INSTRUÇÕES DE SEGURANÇA
— Este exaustor foi concebido para uma utili-
zação por particulares na sua habitação.
Destina-se exclusivamente à cozedura dos
géneros alimentícios. Este forno não contém
qualquer componente a base de amianto.
— A sua utilização deve ser efectuada por
adultos. Assegure-se de que as crianças não
mexem no aparelho e não o utilizam como
brinquedo. Assegure-se de que as crianças
não manipulam os comandos do exaustor.
— Quando receber o aparelho, desembale-o
ou mande-o desembalar imediatamente.
Verifique o seu aspecto geral. Aponte as
eventuais reservas por escrito na guia de
remessa e guarde um exemplar da mesma.
— Este aparelho destina-se a uma utilização
doméstica normal. Não o utilize para fins
comerciais ou industriais, nem para fins dife-
rentes daqueles para os quais ele foi conce-
bido.
— Não modifique nem tente modificar as
características deste aparelho. pois isso
poderá representar um perigo para si.
— Mantenha as crianças afastadas do apa-
relho enquanto estiver em utilização. Desta
forma, evita que se queimem se entornar um
recipiente de cozedura. Além disso, a frente
do seu aparelho fica quente durante a utiliza-
ção.
— Nunca puxe o seu aparelho através da pega
da porta.
— Antes de utilizar o seu forno pela primeira
vez, aqueça-o vazio durante cerca de
15 minutos. Certifique-se de que a peça está
suficientemente ventilada. Poderá constatar
um cheiro particular ou uma pequena liberta-
ção de fumo. Estes fenómenos são absoluta-
mente normais.
— Durante a cozedura, certifique-se de que a
porta do forno está devidamente fechada, de
modo a que a junta de vedação cumpra cor-
rectamente a sua função.
— Durante a utilização, o aparelho fica quente.
Não toque nos elementos que aquecem situa-
dos no interior do forno. Poderia sofrer quei-
maduras graves.
— Quando colocar ou retirar os pratos do
forno, não aproxime as mãos dos elementos
que aquecem superiores, utilize luvas térmi-
cas de cozinha.
— Após uma cozedura, não pegue nos acessó-
rios (grelha, espeto rotativo,..) com as mãos
sem protecção.
— Nunca coloque papel de alumínio directa-
mente em contacto com a base (ver capítulo
descrição do forno), o calor acumulado pode-
ria provocar uma deterioração do esmalte.
— Na porta de abertura do forno, não pouse
cargas pesadas e verifique que nenhuma
criança possa subir nem sentar-se.
— Para evitar danificar os comandos do apa-
relho, não deixe a porta aberta enquanto esti-
ver em funcionamento ou ainda quente.
— Para qualquer intervenção de limpeza na
cavidade do forno, este deverá estar parado.
— No caso de uma utilização intensiva e pro-
longada do aparelho pode ser necessária uma
ventilação suplementar como abrindo a janela
ou aumentando a potência da ventilação
mecânica.
— Além dos acessórios fornecidos com o
forno, utilize apenas pratos resistentes a tem-
peraturas elevadas (respeite as instruções dos
fabricantes).
— Após a utilização do forno, verifique que
todos os comandos estão na posição de para-
gem.
— Nunca utilize aparelhos a vapor ou de alta
pressão para limpar o aparelho (requisitos
relativos à segurança eléctrica).
— Para sua segurança, o seu forno vem
equipado com PARAGEM AUTOMÁTICA, para
caso se esqueça de o desligar. Após 10 horas
de funcionamento, a função AS (Paragem
automática) activa-se e o seu forno deixa de
criar calor. AS aparece no lugar da hora e é
emitida uma série de 2 sons sucessivos
durante um certo tempo.
•
Importante
Guarde este guia de utilização junta-
mente com o aparelho. Se o aparelho for
vendido ou cedido a outra pessoa, tenha o
cuidado de remeter igualmente o guia de uti-
lização. Antes de instalar e de utilizar o
exaustor, tome conhecimento dos presentes
conselhos, pois estes foram elaborados para
a sua segurança e a das outras pessoas.
99641091 ml bio.qxp 12/01/2007 15:15 Page 68

69
1 / INFORMAÇÕES DESTINADAS AO UTILIZADOR
PT
MEIO AMBIENTE
•
— Os materiais que constituem esta embalagem são recicláveis. Por isso, participe à sua recicla-
gem e coloque-os nos contentores municipais previstos para o efeito.
— Este aparelho também contém vários materiais recicláveis. A presença deste símbolo indica-lhe
que os aparelhos usados não devem ser misturados com os outros resíduos. A reciclagem dos
aparelhos organizada pelo seu fabricante realizar-se-á assim nas melhores condições,
em conformidade com a directiva europeia 2002/96/CE relativa aos resíduos de equi-
pamentos eléctricos e electrónicos. Dirija-se junto da sua junta de freguesia ou do seu
revendedor para conhecer os pontos de recolha dos aparelhos usados mais próximos
do seu domicílio.
— Obrigado pela sua colaboração na protecção do meio ambiente.
Atenção
A instalação é reservada aos instaladores e técnicos habilitados.
Este aparelho está em conformidade com as seguintes directivas europeias:
- Directiva Baixa Tensão 73/23/CEE alterada pela directiva 93/68/CEE para a colocação da
marca CE.
- Directiva Compatibilidade Electromagnética 89/336/CEE alterada pela directiva 93/68/CEE
para a colocação da marca CE.
- Regulamento CE n° 1935/2004 relativos aos materiais e objectos destinados a entrar em
contacto com os géneros alimentares.
99641091 ml bio.qxp 12/01/2007 15:15 Page 69

70
2 / INSTALAÇÃO DO SEU APARELHOPT
ENCASTRAMENTO
Para tal:
1) Retire as tampas de borracha dos parafu-
sos para aceder aos orifícios de fixação.
2) Faça um orifício com 2 mm de diâmetro na
parede do armário para evitar estalar a ma-
deira.
3) Fixe o forno com os 2 parafusos.
4) Coloque novamente os tapa-parafusos de
borracha (estes também servem para amorte-
cer o fecho da porta do forno).
(*) se o móvel for aberto, a sua abertura de-
verá ser de 70 mm (máx).
Conselho
De modo a certificar-se de que a sua
instalação está conforme, não hesite em
contactar um especialista em electrodo-
mésticos.
•
ESCOLHA DO LOCAL DE
INSTALAÇÃO
Os esquemas acima determinam as cotas de
um móvel que permitirá receber um forno.
O forno pode indiferentemente ser instalado
sob uma mesa de trabalho ou num móvel de
coluna (aberto* ou fechado) com as dimen-
sões de encastramento adaptadas (ver es-
quema ao lado).
O seu forno possui uma circulação de ar opti-
mizada que permite obter resultados de coze-
dura e de limpeza excepcionais, seguindo os
elementos seguintes:
• Centre o forno no móvel, de modo a garantir
uma distância mín. de 5 mm com o móvel vizinho.
• O material do móvel de encastramento e o
respectivo revestimento devem resistir ao calor.
• Para maior estabilidade, fixe o forno no mó-
vel utilizando 2 parafusos através dos buracos
previstos para esse fim nos pilares laterais
(fig. 1)
•
585
560
550
70
550
Fig. 01
99641091 ml bio.qxp 12/01/2007 15:15 Page 70

71
2 / INSTALAÇÃO DO SEU APARELHO
PT
•
LIGAÇÃO ELÉCTRICA
Contador 20A Mono
220-240V~ 50Hz
Tomada eléctrica
2 pólos + terra
norma CEI 60083
Linha Mono 220-240 V ~
Cabo de
alimentação
comprimento 1,50 m
aproximadamente
Disjuntor diferencial
ou fusível 16A
A segurança eléctrica deve ser assegurada
por um encastramento correcto. Durante o
encastramento e as operações de manuten-
ção, o exaustor deve ser desligado da cor-
rente eléctrica e os fusíveis devem ser corta-
dos ou retirados.
A ligação eléctrica deve ser realizada antes de
o aparelho ser instalado no armário.
Verificar se:
- a instalação tem uma potência suficiente,
- as linhas de alimentação estão em bom estado
- o diâmetro dos fios está em conformidade
com as regras de instalação.
O forno deve ser ligado com um cabo de ali-
mentação (normalizado) de 3 condutores de
1,5mm
2
(1ph + 1N + terra) devendo estes ser
ligados à rede monofásica de 220-240V
~ atra-
vés de uma tomada de corrente 1 ph + 1 neu-
tro + terra normalizada CEI 60083 ou de um
dispositivo de corte omnipolar ou em confor-
midade com as regras de instalação.
Atenção
O fio de protecção (verde-amarelo)
é
ligado ao terminal do aparelho e deve
ser ligado à terra da instalação.
No caso de uma ligação com tomada eléc-
trica, esta deverá ficar acessível após a insta-
lação.
O fusível da instalação deve ser de 16 amperes.
Se estiver danificado, o cabo de alimenta-
ção deverá ser substituído por um cabo ou
por um conjunto especial, que poderá ser
adquirido junto do fabricante ou do seu Ser-
viço Pós-Venda.
99641091 ml bio.qxp 12/01/2007 15:15 Page 71

72
2 / INSTALAÇÃO DO SEU APARELHOPT
•
— O cabo de alimentação (H05 RR-F, H05 RN-F ou H05 VV-F) deve possuir um tamanho sufi-
ciente, de modo a poder ser ligado ao forno de encastrar colocado no chão frente ao móvel.
Para tal, o aparelho deverá estar desligado da rede:
— Levante a tampa situada em baixo à direita do painel traseiro, desapertando os 2 parafusos, e
em seguida, gire-a.
— Descarne 12 mm de cada fio do novo cabo de alimentação.
— Entrance cuidadosamente os filamentos.
— Desaperte os parafusos do bloco terminal e retire o cabo a substituir.
•
Introduza o cabo de alimentação pela parte lateral do painel no aperta-cabos situado à direita
do bloco terminal.
— Todos os filamentos dos fios de alimentação devem ficar presos debaixo dos parafusos.
— O fio da fase no terminal L.
— O fio de terra de cor verde-amarela deve ser ligado ao terminal .
— O fio do neutro (azul) no terminal N.
— Aparafuse a fundo os parafusos do bloco terminal e verifique a ligação, puxando cada um dos fios.
— Fixe o cabo com o auxílio do aperta-cabo situado à direita do bloco terminal.
— Feche novamente a tampa com o auxílio dos 2 parafusos.
Atenção
Não nos responsabilizaremos em caso de acidente ou incidente resultante de uma liga-
ção à terra inexistente, defeituosa ou incorrecta.
Se a instalação eléctrica da sua residência necessitar de uma alteração para a ligação do
aparelho, contacte um electricista qualificado.
Se o forno apresentar qualquer anomalia, desligue o aparelho ou retire o fusível correspon-
dente à linha de ligação do mesmo.
SUBSTITUIÇÃO DO CABO DE ALIMENTAÇÃO
99641091 ml bio.qxp 12/01/2007 15:15 Page 72

73
3 / DESCRIÇÃO DO SEU APARELHO
PT
•
APRESENTAÇÃO DO SEU FORNO
A
B
Selector de temperatura
Selector de funções
C
D
Lâmpada
Indicador de encaixes
Conselho
Este guia de instalação e de utilização é válido para vários modelos. Por isso, é pos-
sível que constate algumas pequenas diferenças de detalhes e de equipamentos entre o
seu aparelho e as descrições apresentadas.
55
75
100
125
150
180
210
240
270
T˚
c
D
C
A
B
99641091 ml bio.qxp 12/01/2007 15:15 Page 73

74
TR
PT
•
Grelha de segurança antibascula-
mento (fig.1)
A grelha pode ser utilizada para colocar os pra-
tos e formas com alimentos a cozer ou gratinar,
ou então para fazer grelhados, colocando-os
directamente sobre a grelha.
DESCRIÇÃO DOS ACESSÓRIOS
•
fig.1
fig.2
•
Placa multiusos (fig.2)
Inserido nos encaixes, por baixo da grelha,
este recolhe os molhos e gorduras dos grelha-
dos. Também pode ser utilizado para cozedu-
ras a banho-maria, enchendo-o de água pela
metade. Evite colocar directamente neste
tabuleiro grandes peças de carne para assar,
pois produzir-se-iam automaticamente impor-
tantes projecções nas paredes do forno.
3 / DESCRIÇÃO DO SEU APARELHOPT
Conselho
Para a limpeza dos pratos recoberto com esmalte semi-aderente, deixe-os
arrefecer antes de os lavar manualmente com líquido da loiça. Evite a utilização de
esponjas duras. Não utilize facas nem cortadores de pizas metálicos, mas sim uten-
sílios de plástico ou de silicone.
•
Espeto rotativo (fig.3) consoante o
modelo
Para a sua utilização:
• coloque a placa multiusos no encaixe n.º1 de
modo a recolher o molho de cozedura, ou
então na base do forno, caso a peça para assar
seja demasiado grande.
• enfie uma das forquilhas no espeto; coloque
no espeto o alimento que deseja assar; enfie a
outra forquilha; centre e aperte, enroscando as
duas forquilhas.
• coloque o espeto no seu suporte.
• empurre ligeiramente de modo a enfiar a
ponta do espeto no quadrado de accionamen-
to situado no fundo do forno.
• retire a pega desapertando-a para poder
fechar a porta. Após a cozedura, enroscar
novamente a pega no espeto de modo a retirá-
lo sem se queimar.
fig.3
99641091 ml bio.qxp 12/01/2007 15:15 Page 74

75
4 / UTILIZAÇÃO DO APARELHO
PT
COZEDURA IMEDIATA
•
- Rode o selector de funções para a posição
pretendida.
Exemplo: posição “ ” (fig.1).
- Rode o selector de temperatura, colocando-o
na temperatura recomendada na receita.
Exemplo: indicação de temperatura 210° (fig.1).
Após estas acções, o forno aquece, o indicador
luminoso do selector de temperatura acende-se
e apaga-se em função das regulações.
55
75
100
125
150
180
210
240
270
T˚
c
fig.1
fig.2
Atenção
Não colocar tecidos ou panos na pega do forno.
Atenção
Todas as cozeduras são feitas com a porta fechada.
Atenção
Após um ciclo de cozedura, a turbina de arrefecimento continua a funcionar durante um
certo tempo, de modo a arrefecer o forno.
99641091 ml bio.qxp 12/01/2007 15:15 Page 75

76
5 / OS MODOS DE COZEDURA DO FORNOPT
TRADICIONAL
•
A cozedura efectua-se através dos elementos inferiores e superiores.
•
Necessita de um pré-aquecimento antes de colocar o prato no forno.
•
Recomendado para as cozeduras lentas e delicadas: carne de caça tenra... Para deixar
os os assados de carne vermelha tostados por fora e mal passados por dentro. Para apu-
rar em cataplanas os pratos iniciados previamente na placa de cozinha (“coq au vin”, guisa-
dos de coelho).
ESPECIAL CARNE DE AVES
•
A cozedura é efectuada através do elemento superior associado à dosagem do elemen-
to inferior.
•
Esta posição permite poupar energia, conservando ao mesmo tempo as qualidades de
cozedura das carnes de ave.
•
Colocar a carne num recipiente em barro, de preferência em cima da grelha, no primeiro
encaixe.
Não vale a pena pré-aquecer o forno. Se desejar, pode virar a carne de ave a meio da coze-
dura.
BASE
•
A cozedura é efectuada através do elemento inferior.
•
É necessário efectuar um pré-aquecimento. Cozedura por baixo. Coloque a grelha no
encaixe de baixo.
•
Recomendado para os pratos húmidos (quiches, tartes de frutos sumarentos...). A
massa ficará bem cozida por baixo. Recomendado para os preparados que levedam (bolo
inglês, brioche, folar…) e para os soufflés que não ficaram bloqueados com uma crosta por
cima.
GRELHADOR + (ESPETO ROTATIVO consoante o modelo)
•
A cozedura é efectuada através do elemento superior.
•
Pré-aquecimento inútil. Aves e assados suculentos e estaladiços em todos os lados.
•
O espeto rotativo continua a funcionar até à abertura da porta.
•
Coloque a pingadeira no encaixe inferior.
•
Recomendado para todas as carnes de ave ou assados no espeto rotativo. Para dourar
a alta temperatura ou cozer por dentro perna, costeletas de novilho. Para obter postas de
peixe tenras.
GRELHADOR FORTE
•
A cozedura é efectuada através do elemento superior.
• Efectue um pré-aquecimento de 5 minutos. Introduza a pingadeira nos encaixes inferio-
res.
• Recomendado para grelhar costeletas, salsichas, fatias de pão, gambas colocadas em
cima da grelha.
* Sequência(s) utilizada(s) para o anúncio escrito na etiqueta energética de conformidade com
a norma europeia EN 50304 e segundo a directiva Europeia 2002/40/CE.
*
99641091 ml bio.qxp 12/01/2007 15:15 Page 76

77
6 / MANUTENÇÃO E LIMPEZA DO SEU APARELHO
PT
LIMPEZA DA SUPERFÍCIE EXTERIOR
•
Para limpar a porta do forno, utilize um pano macio, embebido de produto para a limpeza de
vidros.
Não utilizar produtos de limpeza abrasivos ou escovas demasiado duras para limpar a porta de
vidro do forno; caso contrário poderá riscar a superfície e estalar o vidro.
Para preservar o seu aparelho, recomendamos a utilização de produtos de limpeza Clearit.
A Clearit propõe-lhe produtos profissionais e soluções adequadas para a limpeza diária dos
seus electrodomésticos e da sua cozinha.
Encontre no seu revendedor habitual os diversos produtos desta marca bem como uma vasta
gama de acessórios e consumíveis.
A mestria dos profissionais
ao serviço dos particulares.
99641091 ml bio.qxp 12/01/2007 15:15 Page 77

78
Antes de efectuar a limpeza, deixe arrefecer o aparelho e verifique que todos os manípulos estão
na posição DESLIGADO.
Por regra:
* não deitar água no aparelho.
* não é permitido utilizar pós abrasivos ou esponjas metálicas.
SUPERFÍCIES MET
ÁLICAS POLIDAS
Utilize os produtos à venda livre próprios para a limpeza dos metais polidos.
VIDR
O DA PORTA DO FORNO
Após uma cozedura que provocou sujidades, recomendamos que limpe o vidro interior com água
com sabão.
É fácil limpar o seu forno, eis alguns conselhos úteis:
pó
esponja abrasiva
esponja sanitária especial
para louça delicada
LIMPEZA DA CAVIDADE
•
Atenção
Para qualquer intervenção de limpeza na cavidade do forno, este deverá estar parado.
Tipo de sujidades
Sujidade ligeira
Acumulação de
sujidades reaquecidas
Demolhar convenientemente
com água quente a zona
Esponjas da loiça
Deixe actuar 30 min. em forno
tépido ou uma noite num forno
frio.
Aerossol “especial de limpeza
de forno”
Respeite os conselhos
de utilização.
Como limpar
Produtos a utilizar
6 / MANUTENÇÃO E LIMPEZA DO APARELHOPT
99641091 ml bio.qxp 12/01/2007 15:15 Page 78

Conselho
Em qualquer dos casos, se a sua intervenção não for suficiente para resolver os pro-
blemas, contacte imediatamente o Serviço de Assistência Pós-Venda.
Tem dúvidas relativamente ao bom funcionamento do seu forno, no entanto isto não
significa que haja necessariamente uma avaria.
Em todo caso, verifique os seguintes
pontos:
Cuidado
- As reparações no aparelho devem ser efectuadas apenas por profissionais. As repara-
ções não efectuadas segundo as regras pode originar perigos para o utilizador.
SE CONSTATAR
QUE…
AS CAUSAS
POSSÍVEIS
O QUE FAZER?
O forno não aquece
- O forno não está ligado.
- O fusível da sua instalação
eléctrica está fundido.
- A temperatura selecciona-
da é demasiado baixa.
- O termóstato está defeituo-
so.
➡ Ligar o forno.
➡ Substituir o fusível da sua instalação
e verificar o respectivo valor (16A).
➡ Aumentar a temperatura seleccio-
nada.
➡ Contacte o Serviço Pós-Venda.
A lâmpada do forno
deixou de funcionar.
- A lâmpada está fora de ser-
viço.
- O forno não está ligado ou
o fusível está fora de servi-
ço.
➡ Mudar a lâmpada.
➡ Ligar o forno ou mudar o fusível.
O indicador de tempe-
ratura permanece sem-
pre aceso.
- Termóstato defeituoso
➡ Contacte o Serviço Pós-Venda.
O ventilador de arrefe-
cimento continua a gi-
rar depois do forno
apagado.
- A ventilação funciona du-
rante 1 hora no máximo
após a cozedura.
- Se não parar ao fim de 1
hora
➡ Abra a porta do forno para acelerar
o arrefecimento do forno
➡ Contacte o Serviço Pós-Venda.
O indicador luminoso
do forno emite uma luz
fraca sempre que o for-
no está parado.
- O forno não está ligado co-
rrectamente.
➡ Verificar a ligação eléctrica do for-
no. O condutor de fase L (preto) deve
ser ligado ao borne fase L da caixa de
derivação ou da ficha de tomada de
corrente. O condutor de neutro N
(azul) deve ser ligado ao borne neutro
N da caixa de derivação ou da ficha de
tomada de corrente eléctrica.
79
7 / ANOMALIAS DE FUNCIONAMENTO
PT
99641091 ml bio.qxp 12/01/2007 15:15 Page 79

80
7 / ANOMALIAS DE FUNCIONAMENTOPT
Lâmpada
Desaperte
Difusor luminoso
A lâmpada está situada no tecto da cavidade
do forno.
a) Desligue o forno.
b) Desaperte o difusor luminoso (fig.1).
c) Desaperte a lâmpada no mesmo sentido.
Características da lâmpada:
- 15 W
- 220-240 V
~
- 300°C
- casquilho E 14
d) Substitua a lâmpada, monte novamente o
difusor luminoso e, em seguida, ligue o forno.
SUBSTITUIÇÃO DA LÂMPADA
•
Conselho
Para desmontar o difusor luminoso, utilize uma luva de borracha para facilitar a des-
montagem.
Cuidado
- Desligar o forno antes de efectuar qualquer tipo de intervenção sobre a lâmpada e, se
necessário, deixar arrefecer o aparelho.
fig.1
99641091 ml bio.qxp 12/01/2007 15:15 Page 80

81
66 //
KUNDENDIENST
DE
Any maintenance on your equipment should be undertaken by:
- either your dealer,
- or another qualified mechanic who is an authorized agent for the brand appliances.
When making an appointment, state the full reference of your equipment (model, type and serial
number). This information appears on the manufacturer's nameplate attached to your equipment.
Eingriffe an Ihrem Gerät dürfen nur:
- von Ihrem Händler oder
- von einem sonstigen Fachmann und Vertragshändler der Marke durchgeführt werden.
Geben Sie bei der Meldung einer Störung die vollständige Typenbezeichnung Ihres Gerätes an
(Modell, Typ, Seriennummer). Diese Angaben finden Sie auf einem an Ihrem Gerät angebrach-
ten Schild.
66 //
AFTER-SALES SERVICE
EN
66 //
SERVICIO TÉCNICO
ES
Qualquer intervenção no seu aparelho deve ser realizada:
- quer pelo seu revendedor,
- quer por outro profissional qualificado autorizado pela marca.
Ao chamá-los, indique a referência completa do seu aparelho (modelo, tipo e número de série).
Estas informações figuram na placa de identificação fixada no aparelho.
Las intervenciones que requiera la máquina deberán ser efectuadas:
- por el revendedor,
- o por cualquier profesional cualificado depositario de la marca.
Al llamar, mencione la referencia completa de la máquina (modelo, tipo y número de serie).
Estos datos figuran en la placa de identificación situada en la máquina.
66 //
SERVIZIO POST-VENDITA E RELAZIONI CON I CONSUMATORI
IT
66 //
SERVICEDIENST
NL
Qualquer intervenção no seu aparelho deve ser realizada:
- quer pelo seu revendedor,
- quer por outro profissional qualificado autorizado pela marca.
Ao chamá-los, indique a referência completa do seu aparelho (modelo, tipo e número de série).
Estas informações figuram na placa de identificação fixada no aparelho.
De eventuele ingrepen in de machine moeten worden uitgevoerd :
- of door uw vakhandelaar,
- of door een andere gekwalificeerd technicus van dit merk.
Tijdens het telefoneren, dient u de complete referentie op te geven van uw machine (model,
type, serienummer). Deze informatie staat op het typeplaatje op de machine.
66 //
SERVIÇO PÓS-VENDA
PT
99641091 ml bio.qxp 12/01/2007 15:15 Page 81

99641091 01/07
FE600*- FE601*
99641091 ml bio.qxp 12/01/2007 15:15 Page 84
-
 1
1
-
 2
2
-
 3
3
-
 4
4
-
 5
5
-
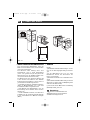 6
6
-
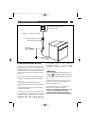 7
7
-
 8
8
-
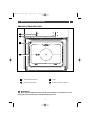 9
9
-
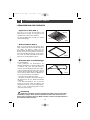 10
10
-
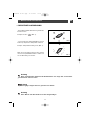 11
11
-
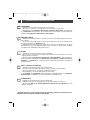 12
12
-
 13
13
-
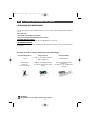 14
14
-
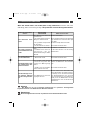 15
15
-
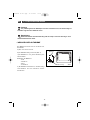 16
16
-
 17
17
-
 18
18
-
 19
19
-
 20
20
-
 21
21
-
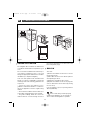 22
22
-
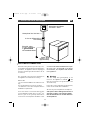 23
23
-
 24
24
-
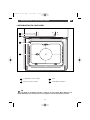 25
25
-
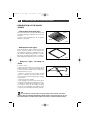 26
26
-
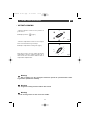 27
27
-
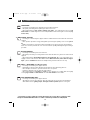 28
28
-
 29
29
-
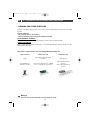 30
30
-
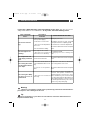 31
31
-
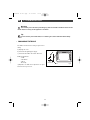 32
32
-
 33
33
-
 34
34
-
 35
35
-
 36
36
-
 37
37
-
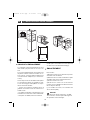 38
38
-
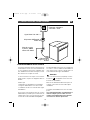 39
39
-
 40
40
-
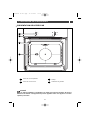 41
41
-
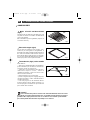 42
42
-
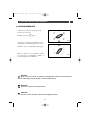 43
43
-
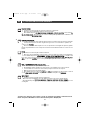 44
44
-
 45
45
-
 46
46
-
 47
47
-
 48
48
-
 49
49
-
 50
50
-
 51
51
-
 52
52
-
 53
53
-
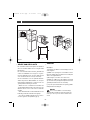 54
54
-
 55
55
-
 56
56
-
 57
57
-
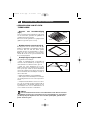 58
58
-
 59
59
-
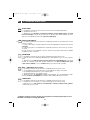 60
60
-
 61
61
-
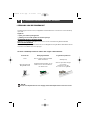 62
62
-
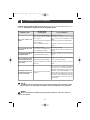 63
63
-
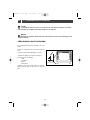 64
64
-
 65
65
-
 66
66
-
 67
67
-
 68
68
-
 69
69
-
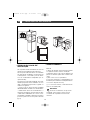 70
70
-
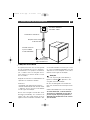 71
71
-
 72
72
-
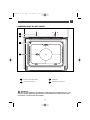 73
73
-
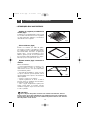 74
74
-
 75
75
-
 76
76
-
 77
77
-
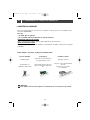 78
78
-
 79
79
-
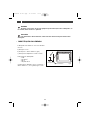 80
80
-
 81
81
-
 82
82


Groupe Brandt FE601XS1 El manual del propietario
- Tipo
- El manual del propietario
En otros idiomas
- français: Groupe Brandt FE601XS1 Le manuel du propriétaire
- English: Groupe Brandt FE601XS1 Owner's manual
- Deutsch: Groupe Brandt FE601XS1 Bedienungsanleitung
- Nederlands: Groupe Brandt FE601XS1 de handleiding
- português: Groupe Brandt FE601XS1 Manual do proprietário