
Aroma’s customer service
experts are happy to help. Call
us toll-free at 1-800-276-6286.
Instruction Manual
Induction Cooktop
AID-509
Questions or concerns
about your Induction
Cooktop?
Before returning to the store...
Answers to many common
questions and even replacement
parts can be found online. Visit
www.AromaCo.com/Support.

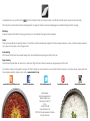
Congratulations on your purchase of the Induction Cooktop! Induction cooking is a faster, more effi cient and safer way to prepare your favorite meals.
With induction, the pan itself becomes the heating element. Cooking with induction has several advantages over traditional heating methods, including:
Effi ciency
Induction cooktops utilize 90% of the energy produced, much more effi cient than gas or electric stovetops.
Safety
There are no open fl ames produced by induction. The induction cooktop automatically recognizes if induction-ready cookware is in place. If induction-ready cookware is
not in place on the cooktop, it will not begin to heat.
Even Heating
With induction’s method of the cookware heating itself, heat is distributed evenly along the bottom of the pan.
Easy Cleaning
Since the cooktop itself does not heat, burnt on spills are a thing of the past. Cleanup is as easy as wiping away spills with a cloth.
The induction cooktop is also great for serving on its “Warm” setting. For more information on your Aroma® Induction Cooktop, or for product service, recipes and other
home appliance solutions, please visit us online at www.AromaCo.com.
Published By:
Aroma Housewares Co.
6469 Flanders Drive
San Diego, CA 92121
U.S.A.
1-800-276-6286
www.AromaCo.com
©2014 Aroma Housewares Company
All rights reserved.
www.AromaTestKitchen.com AromaHousewares AromaHousewares AromaHousewares AromaHousewares

1. Important: Read all instructions carefully before fi rst use.
2. Do not touch hot surfaces. Use handles or knobs.
3. Use only on a level, dry and heat-resistant surface.
4. To protect against electrical shock, do not immerse the cord, plug or the appliance
itself in water or any other liquid.
5. Close supervision is necessary when the appliance is used by or near children.
6. Unplug from the outlet when not in use and before cleaning. Allow unit to cool
completely before putting on or taking off parts and before cleaning.
7. If a wet sponge or cloth is used to wipe spills on a hot cooking area, exercise caution
to avoid steam burns. Some cleaners can produce noxious fumes if applied to a hot
surface.
8. Do not operate any appliance with a damaged cord or plug or after the appliance
malfunctions or has been damaged in any manner. Contact Aroma® customer service
for examination, repair or adjustment.
9. The use of accessory attachments not recommended by Aroma® Housewares may
result in fi re, electrical shock or injury.
10. Do not use outdoors.
11. Do not allow the power cord to touch hot surfaces or to hang over the edge of the
counter or table.
12. Do not place on or near a hot burner or in a heated oven.
13. Do not use the appliance for other than its intended use.
14. Extreme caution must be used when moving the appliance containing hot oil or other
hot liquids.
15. To disconnect, turn any controls to “Off,” then remove plug from the outlet.
16. Use only with a 120V AC power outlet.
17. Always unplug from the base of the wall outlet. Never pull on the cord.
18. Do not cook on the induction cooktop if any cracks in the glass surface occur.
Cleaning solutionst or spills may leak through cracks and create a risk of electric
shock. Contact Aroma® customer service immediately if this occurs.
Basic safety precautions should always be followed when using electrical appliances, including the following:
19. If the cooktop surface is cracked, turn off the appliance immediately to avoid the possibility
of electric shock and contact Aroma® customer service.
20. Metallic objects such as knives, forks, spoons and lids should not be placed on the cook top
to avoid heating.
21. This appliance is not intended to be operated with an external timer or separate control
system.
22. Changes or modifi cations not expressly approved by Aroma® Housewares may void the
user’s authority to operate this appliance.
23. Any other servicing should be performed by Aroma® Housewares or an authorized service
representative.
24. NOTE: This equipment has been tested and found to comply with the limits for a consumer
ISM equipment, pursuant to Part 18 of the FCC Rules. These limits are designed to provide
reasonable protection against harmful interference in a residential installation. This equipment
generates, uses and can radiate radio frequency energy and, if not installed and used in
accordance with the instructions, may cause harmful interference to radio communications.
However, there is no guarantee that interference will not occur in a particular installation.
25. If this equipment does cause harmful interference to radio or television reception, which can
be determined by turning the equipment off and on, the user is encouraged to try to correct
the interference by one or more of the following measures:
1) Reorient or relocate the receiving antenna.
2) Increase the separation between the equipment and receiver.
3) Connect the the equipment into an outlet on a circuit different
from that to which the receiver is connected.
4) Consult Aroma® customer service or an experienced radio/TV
technician for further help.
26. This equipment has been tested and found to comply with Part 18 of the FCC Rules.
Operation is subject to the following two conditions: (1) This device may not cause harmful
interference, and (2) this device must accept any interference received, including interference
that may cause undesired operation.
27. Although current studies have shown induction cooktops pose no health problems, persons
with pacemakers or similar medical devices should use caution and keep a minimum of at
least two feet from the induction cooktop when using as to avoid possible interference from
the magnetic fi eld. It’s advised to check with a doctor regarding your particular situation
before fi rst use.
SAVE THESE INSTRUCTIONS
IMPORTANT SAFEGUARDS
1

CAUTION: The cooking surface will remain hot after use.
Induction Cooktop
Heat
Warm
Setting
Low
High
Timer
THIS APPLIANCE IS FOR HOUSEHOLD USE ONLY.
1. A short power-supply cord is provided to reduce the risks resulting from becoming
entangled in or tripping over a longer cord.
2. Longer extension cords are available and may be used if care is exercised in their use.
3. If a longer extension cord is used:
a. The marked electrical rating of the extension cord should be at least as great as
the electrical rating of the appliance.
b. The longer cord should be arranged so that it will not drape over the counter top
or tabletop where it can be pulled by children or tripped over unintentionally.
Short Cord Instructions
IMPORTANT SAFEGUARDS
2
Polarized Plug
This appliance has a polarized plug (one blade is wider than the other); follow the instructions below:
To reduce the risk of electric shock, this plug is intended to fi t into a polarized outlet only one way. If the plug does not fi t fully into the outlet,
reverse the plug. If it still does not fi t, contact a qualifi ed electrician. Do not attempt to modify the plug in any way.
If the supply cord is damaged, it must be replaced by the manufacturer, its service agent or a similarly qualifi ed person in order to avoid a hazard.
DO NO T DRA PE C O RD!
KEEP A WA Y
FRO M C HILDREN!

CAUTION: The cooking surface will remain hot after use.
Induction Cooktop
Heat
Warm
Setting
Low
High
Timer
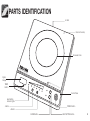
Cookware Circle
Air Vent
Control Panel
POWER Button
HEAT SETTING ButtonWARM Button
Heat Setting
Indicator Lights
TIMER
Button
Digital
Display
+ Button
- Button
PARTS IDENTIFICATION
3
Ceramic Cooktop

4
SELECTING THE RIGHT COOKWARE
Cast Iron
Enameled Cast Iron
Induction-Ready
Stainless Steel
Induction cooking will only work with
induction-ready cookware. For cookware
to be induction ready, it must be made of a
ferrous (containing iron) material. Induction is
ideal for:
CAUTION
• Induction will not work with aluminum, copper or glass cookware.
Is My Cookware Induction Ready?
A common refrigerator magnet makes a great testing tool.
Place a magnet against the bottom of the cookware.
If the magnet sticks solidly, your cookware is induction-ready.
If the magnet doesn’t stick, your cookware is not induction-ready.
1
2
3

5
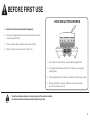
BEFORE FIRST USE
HOW INDUCTION WORKS
1. Read all instructions and important safeguards.
2. Remove all packaging materials and check that all items have been
received in good condition.
3. Tear up all plastic bags as they can pose a risk to children.
4. Wipe the ceramic cooktop clean with a damp cloth.
1. The induction cooktop produces a high-frequency magnetic fi eld.
2. The magnetic fi eld interacts with the ferrous material in the cookware,
producing heat.
3. The heat generated in the cookware is transferred to what’s being cooked.
4. Nothing outside of the cookware is affected. Once the cookware is
removed, the cooktop shuts off.
NOTE
• Do not use abrasive cleaners or scouring pads on the ceramic cooktop.
• Do not immerse the induction cooktop in liquid at any time.

6
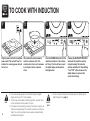
TO COOK WITH INDUCTION
CAUTION: The cooking surface will remain hot after use.
Induction Cooktop
Heat
Warm
Setting
Low
High
Timer
CAUTION: The cooking surface will remain hot after use.
Induction Cooktop
Heat
Warm
Setting
Low
High
Timer
41 32
Plug the power cord into an available
power outlet. The unit will “beep” to
indicate it is receiving power, but will
not turn on.
Pressing the HEAT SETTING button
will cause the induction cooktop
to begin heating. The induction
cooktop will default to “Heat Setting
1” and “P01” will be shown on the
digital display to represent the
current heat setting.
Press the POWER button to turn the
induction cooktop on. The cooktop
will “beep,” the fan will turn on and
the digital display will show three
fl ashing dashes.
Place induction-ready cookware
onto the cookware circle. The
cooktop will not turn on if cookware
is not in place on the cookware
circle.
NOTE
• If the cookware being used is not induction-ready, the digital
display will show an “E1” error message.
• The fan may become fairly loud during operation, however this is
normal and should not be cause for concern.
• If cookware is removed during cooking, the induction cooktop will
“beep” and cease heating. The induction cooktop will continue to
“beep” for up to 30 seconds when cookware is removed before
automatically shutting off.
HELPFUL
HINTS
• For an overview of induction-ready cookware, see “Selecting the
Right Cookware” on page 4.

7
NOTE
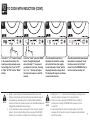
To set the “Timer,” press the TIMER
button. The digital display will
show a fl ashing “1” to represent
one minute of cook time. Pressing
the “+” or “-“ buttons will adjust
the cook time between 1 and 180
minutes.
7 865
TO COOK WITH INDUCTION (CONT.)
Once the needed cook time is
displayed, the induction cooktop
will set at that time after roughly
fi ve seconds with a “beep” and the
displayed time will no longer fl ash.
The display will begin to countdown
in one minute intervals.
Once the selected time has elapsed,
the induction cooktop will “beep”
fi ve times and set to its “Warm”
mode. Press the POWER button to
turn the induction cooktop off.
Press the “+” or “-“ button to adjust
to the needed heat setting. The
induction cooktop includes seven
heat settings from “Low” at “P01”
to “High” at “P06” and the “Warm”
setting.
• Similar to your stovetop, the temperature reached by each heat
setting will vary based upon the food being cooked and the type of
cookware being used. Because of its improved heating effi ciency,
induction will heat much faster and have more immediate temperature
changes than traditional stovetop cooking.
• It is not necessary to select a cooking time when using the induction
cooktop. To cook without setting a time, simply press the POWER
button to turn the induction cooktop off once cooking is complete.
HELPFUL
HINTS
• Holding the “+” or “-“ button down while setting a cooking time will
cause the display to increase in 10 minute increments.
• Once a time is set, pressing the POWER button will reset the
cooking time. Pressing the POWER button twice will turn the
cooktop off.
• To avoid scratching the ceramic cooktop surface, do not slide
cookware off the induction cooktop. Cookware should be lifted on
and off the cooktop.

8
CAUTION: The cooking surface will remain hot after use.
Induction Cooktop
Heat
Warm
Setting
Low
High
Timer
CAUTION: The cooking surface will remain hot after use.
Induction Cooktop
Heat
Warm
Setting
Low
High
Timer
41 32
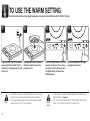
TO USE THE WARM SETTING
Plug the power cord into an available
power outlet. The unit will “beep” to
indicate it is receiving power, but will
not turn on.
Press the WARM button to begin
keeping the food warm.
Press the POWER button to turn the
induction cooktop on. The cooktop
will “beep,” the fan will turn on and
the digital display will show three
fl ashing dashes.
Place induction-ready cookware
with fully cooked food onto the
cookware circle.
NOTE
• The “Warm” setting is not intended to cook food, only to keep
food that is fully cooked warm at a food-safe temperature.
• If the cookware being used is not induction-ready, the digital
display will show an “E1” error message. HELPFUL
HINTS
• For an overview of induction-ready cookware, see “Selecting the
Right Cookware” on page 4.
• The “Timer” can also be set with the “Warm” setting. Follow steps
6 and 7 of “To Cook With Induction” to set the timer.
Your induction cooktop is also great for keeping food warm in a buffet line with its “Warm” setting.

9
CAUTION: The cooking surface will remain hot after use.
Induction Cooktop
Heat
Warm
Setting
Low
High
Timer
CAUTION: The cooking surface will remain hot after use.
Induction Cooktop
Heat
Warm
Setting
Low
High
Timer
1 32
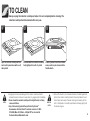
TO CLEAN
Wipe the ceramic cooktop surface
and control panel clean with a soft,
damp cloth.
If dust is present near the air outlet
areas, each may be cleaned with a
fl exible brush.
Clean around the induction cooktop
body lightly with a soft, dry cloth.
NOTE
• Sugary spills can cause damage to the ceramic cooktop surface if
allowed to cake on. Be sure to wipe clean any sugary spills immediately.
• Never clean the ceramic cooktop with a ridgid brush, as it may
cause scratches.
• Any other servicing should be performed by Aroma®
Housewares. Contact Aroma® customer service at 1-800-
276-6268, Mon-Fri 8:30am – 4:30pm PST or via email at
HELPFUL
HINTS
• Since with induction, the cookware becomes the heating element,
spills on the ceramic cooktop should not become baked on and
should wipe clean easily. If heavier cleaning is necessary, dip the
cloth in toothpaste or a neutral liquid cleaner and wipe gently until
the residue is gone.
Always unplug the induction cooktop and allow it to cool completely before cleaning. The
induction cooktop should be cleaned after every use.

10
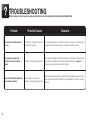
TROUBLESHOOTING
Problem Potential Causes Solutions
The induction cooktop will not
turn on.
Cookware is not placed correctly on
the induction cooktop.
As a safety protection, the induction cooktop will not turn on if cookware is not
in place within the cookware circle on the ceramic cooktop surface.
The cooktop is not able to
maintain a boil or is heating
slowly.
Improper cookware is being used.
The induction cooktop should heat quicker than a traditional stovetop if proper
cookware is used. Refer to “Selecting the Right CookWare” on page 4 to
ensure you are using induction-ready cookware.
Areas of discoloration appear on
the induction cooktop.
Food spilled on the induction
cooktop was not properly cleaned.
Remove hard-to-clean spills by scrubbing with toothpaste and a soft cloth. Any
spills should be cleaned immediately to avoid damage to the ceramic cooktop
surface.
Before calling customer service, many potential issues can be resolved by following these helpful hints:

11
TROUBLESHOOTING
Error Code Potential Causes Solutions
“E0” Circuit malfunction. Please contact Aroma® customer service toll-free at (800) 276-6286 or through email at
[email protected] for repair service.
“E1” No cookware is in place or the cookware
being used is not induction-ready.
Make sure cookware being used is induction-ready. Refer to “Selecting the Right Cookware”
on page 4 for an overview of induction-ready cookware.
“E2” Sensor may be disconnected,
over-heated or short circuited.
Please contact Aroma® customer service toll-free at (800) 276-6286 or through email at
[email protected] for repair service.
“E3” Voltage is too high.
Turn off the induction cooktop. Turn it on again and proceed as normal. If the problem
persists, please contact Aroma® customer service toll-free at (800) 276-6286 or through email
at [email protected] for repair service.
“E4” Voltage is too low.
Turn off the induction cooktop. Turn it on again and proceed as normal. If the problem
persists, please contact Aroma® customer service toll-free at (800) 276-6286 or through email
at [email protected] for repair service.
“E5” Sensor may be disconnected or short
circuited.
Please contact Aroma® customer service toll-free at (800) 276-6286 or through email at
[email protected] for repair service.
“E6” Cookware temperature is too high.
Turn off the induction cooktop and let it cool down. Once cooled, turn it on again and
proceed as normal. If the problem persists, please contact Aroma® customer service toll-free
at (800) 276-6286 or through email at CustomerService@AromaCo.com for repair service.

12
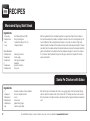
Marinated Spicy Skirt Steak
Mix the ingredients for the marinade together in a large bowl. Place the skirt steak in
the mixture and allow the steak to marinate for at least 2 hours in the refrigerator. (It will
be more fl avorful if left overnight). Heat the olive oil in a cast iron skillet on high heat.
Carefully transfer the steak to the skillet and brown both sides (approximately 3 minutes
per side). Once the steak reaches the desired doneness, remove the steak and add the
garlic and tomatoes to the skillet. Allow the tomatoes and garlic to simmer on medium
for 2 minutes. Slice the steak thinly across the grain. Serve hot, topped with tomato
sauce and cilantro.
1½ pounds skirt Steak (trimmed of fat)
2 tablespoons fi nely minced garlic
1 can crushed tomatoes (15½ oz.)
¼ cup chopped cilantro
Steak Marinade:
2 tablespoons extra virgin olive oil
2 teaspoons brown sugar
2 teaspoons fresh ground pepper
2 jalapeños
2 teaspoons ground cinnamon
2 tablespoons lime juice
Ingredients
RECIPES
For additional recipes, or even to submit your own, visit our website at www.AromaCo.com!
Pat chicken dry and marinate with lemon juice, ginger, garlic and chili powder. Bring a
cast iron skillet to medium heat. Cook chicken for 15 minutes per side or until cooked.
Slice the chicken into strips and serve with salsa, freshly chopped cilantro and steamed
corn.
Santa Fe Chicken with Salsa
4 skinless, boneless chicken breasts
½ teaspoon red chili powder and salt
1 tablespoon cumin
2 tablespoons lemon juice
½ tablespoon grated fresh ginger
½ jar medium-spicy salsa
Ingredients

13
Lime-Flavored Potato Wedges
Cut potatoes into ½-inch thick wedges. Pat dry with paper towels. Heat margarine in a
cast iron skillet at medium heat. Add potato wedges and pan-fry for roughly 10 minutes,
or until both sides are golden. Mix in mayonnaise and lime juice to coat the potatoes.
Cook another 5 minutes or until done.
2 Russet potatoes
¼ cup mayonnaise
1 teaspoon salt
1 tablespoon lime juice
1 teaspoon freshly ground black pepper
1 tablespoon margarine
Ingredients
RECIPES
For additional recipes, or even to submit your own, visit our website at www.AromaCo.com!
Wash and dry the asparagus. Using a vegetable peeler, shave the skin off of the bottom
half of each stalk. Cut the asparagus diagonally into slices roughly ½-inch wide. Wash
the sugar snap peas. Trim and remove strings. Heat 1 tablespoon of olive oil in a cast
iron skillet on medium-high heat. Sauté the shallots until they are tender. Remove the
shallots. Turn the heat to high. Add the snap peas along with ½ teaspoon of salt and
sauté until tender. Return the shallots to the skillet and add the remaining 1 tablespoon
of olive oil with the asparagus and ½ teaspoon of salt. Sauté until the asparagus is
tender. Add the corn and lima beans and stir for 1 to 2 minutes. Add lemon zest and
lemon juice. Stir to thoroughly heat.
Spring Vegetable Sauté
2 tablespoons extra virgin olive oil
3 shallots, cut crosswise into thin slices
½ pound sugar snap peas
1 pound asparagus
1 15-ounce can lima beans, drained of juices
1 15-ounce can fresh corn kernels, drained of juices
1 teaspoon lemon juice
½ teaspoon minced lemon zest
1 teaspoon salt
Ingredients

14
Aroma Housewares Company warrants its products against defects in
material and workmanship for two years from provable date of purchase in
the United States.
Within this warranty period, Aroma Housewares Company will repair or
replace, at its discretion, defective parts at no charge, provided the product
is returned, freight prepaid with proof of purchase and U.S. $20.00 for
shipping and handling charges payable to Aroma Housewares Company.
Before returning an item, please call the toll free number below for a return
authorization number. Allow 2-4 weeks for return shipping.
This warranty does not apply if the warranty period expired; the products
has been modifi ed by any unauthorized service center or personnel; the
defect was subject to abuse, improper use not conforming to product
manual instructions, or environment conditions more severe than those
specifi ed in the manual and specifi cation, neglect of the owner or improper
installation; the defect was subject to Force Majeure such as fl ood,
lightning, earthquake, other natural calamities, war, vandalism, theft,
brownouts or sags (damage due to low voltage disturbances).
This warranty gives you specifi c legal rights, which may vary from state to
state, and does not cover areas outside the United States.
AROMA HOUSEWARES COMPANY
6469 Flanders Drive
San Diego, California 92121
1-800-276-6286
M-F, 8:30 AM - 4:30 PM, Pacifi c Time
Website: www.AromaCo.com
WARRANTY
LIMITED WARRANTY SERVICE & SUPPORT
In the event of a warranty claim, or if service is required for this product, please
contact Aroma® customer service toll-free at:
1-800-276-6286
M-F, 8:30AM-4:30PM, Pacifi c Time
Or we can be reached online at CustomerService@AromaCo.com.
For your records, we recommend stapling your sales receipt to this page along with
a written record of the following:
Date of Purchase:
Place of Purchase:
• Proof of purchase is required for all warranty claims.
NOTE
Powered by TCPDF (www.tcpdf.org)Powered by TCPDF (www.tcpdf.org)Powered by TCPDF (www.tcpdf.org)Powered by TCPDF (www.tcpdf.org)Powered by TCPDF (www.tcpdf.org)Powered by TCPDF (www.tcpdf.org)Powered by TCPDF (www.tcpdf.org)Powered by TCPDF (www.tcpdf.org)Powered by TCPDF (www.tcpdf.org)Powered by TCPDF (www.tcpdf.org)Powered by TCPDF (www.tcpdf.org)Powered by TCPDF (www.tcpdf.org)Powered by TCPDF (www.tcpdf.org)Powered by TCPDF (www.tcpdf.org)Powered by TCPDF (www.tcpdf.org)Powered by TCPDF (www.tcpdf.org)Powered by TCPDF (www.tcpdf.org)Powered by TCPDF (www.tcpdf.org)Powered by TCPDF (www.tcpdf.org)Powered by TCPDF (www.tcpdf.org)Powered by TCPDF (www.tcpdf.org)Powered by TCPDF (www.tcpdf.org)Powered by TCPDF (www.tcpdf.org)Powered by TCPDF (www.tcpdf.org)
Powered by TCPDF (www.tcpdf.org)Powered by TCPDF (www.tcpdf.org)Powered by TCPDF (www.tcpdf.org)Powered by TCPDF (www.tcpdf.org)Powered by TCPDF (www.tcpdf.org)Powered by TCPDF (www.tcpdf.org)Powered by TCPDF (www.tcpdf.org)Powered by TCPDF (www.tcpdf.org)Powered by TCPDF (www.tcpdf.org)

Nos expertos de servicio al
cliente estará encantado de
ayudarle. Llámenos al número
gratuito a 1-800-276-6286.
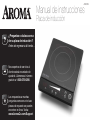
Manual de instrucciones
Placa de inducción
AID-509
¿Preguntas o dudas acerca
de su placa de inducción ?
Antes de regresar a la tienda...
Las respuestas a muchas
preguntas comunes e incluso
piezas de repuesto se pueden
encontrar en línea. Visita:
www.AromaCo.com/Support.

Felicidades en la compra de su estufa de inducción de
. El cocinar mediante inducción es una manera mas rápida, mas efi ciente y mas segura, de preparar sus
alimentos favoritos.
A través de la inducción el sartén mismo se convierte en la superfi cie caliente. El cocinar mediante Inducción ofrece diversas ventajas sobre los métodos tradicionales
para calentar alimentos; incluyendo:
Efi ciencia
Los anafes o estufas de inducción utilizan el 90% de la energía producida de una manera mas efi ciente que los de gas, o que los quemadores eléctricos.
Seguridad
La inducción no produce fl amas o llamas. La estufa de inducción automáticamente identifi ca si hay utensilios compatibles con la inducción. Si estos utensilios
compatibles con la Inducción no están en su lugar correspondiente, no se prenderá.
Calentamiento parejo
Los utensilios se calientan a si mismos mediante el sistema de inducción y el calor es distribuido equitativamente en el fondo del sartén.
De fácil lavado
Dado que la estufa no se calienta, quemadas causadas por un derrame son cosas del pasado. Su limpieza es tan fácil como quitar manchas y enjuagarlas con un trapo.
La estufa de inducción es también maravillosa para servir cuando la potencia está en su punto mas bajo. Para mayor información sobre su estufa de inducción Aroma®,
o bien para servicio del producto, recetas de cocina y otras soluciones para sus utensilios electrodomésticos, por favor visítenos en www.AromaCo.com.
Publicada Por:
Aroma Housewares Co.
6469 Flanders Drive
San Diego, CA 92121
U.S.A.
1-800-276-6286
www.AromaCo.com
©2014 Aroma Housewares Company
Todos los derechos reservados.

1. Importante: Antes de usarse por favor lea todas las instrucciones
cuidadosamente.
2. No toque las superfi cies calientes, utilice las manijas o las perillas.
3. Úsese solo en superfi cies secas, planas y resistentes al calor.
4. Para protegerse contra una descarga eléctrica, no sumerja el cordón, el
enchufe o el aparato en agua o cualquier otro líquido.
5. Si el aparato es usado por niños, o cerca de ellos, se recomienda una estrecha
supervisión.
6. Desconéctese del enchufe cuando no esté en uso y antes de lavarse. Permita
que el aparato se enfríe antes de agregarle o quitarle piezas.
7. Si una esponja o paño húmedo se utiliza para limpiar los derrames en el área
de cocina caliente, tenga cuidado para evitar quemaduras de vapor, algunos
productos de limpieza puede producir gases tóxicos si se aplica a una
superfi cie caliente.
8. No se opere ningún aparato con un cordón o enchufe dañado, o bien cuando
haya funcionado defectuosamente. Por favor contacte a servicio a clientes de
Aroma® para que lo examinen, lo repararen o lo ajusten.
9. El uso de refacciones o accesorios no recomendados por Aroma® puede
ocasionar fuego, un choque eléctrico o una lesión.
10. No se utilice a la intemperie.
11. No permitan que el cordón haga contacto con superfi cies calientes o que
cuelgue de alguna mesa o mostrador.
12. No lo coloque sobre, o cerca, de un calentador o de un horno caliente.
13. No se use el aparato para otro uso diferente al deseado.
14. Cuando utilice el aparato conteniendo arroz, aceite caliente o otros líquidos,
úselo con mucha precaución.
15. Para desconectar póngase el control en “OFF” (desconectar) y después separe
el cable del enchufe en el muro.
16. Úsese únicamente con un toma corriente AC de 120 V.
17. Siempre desenchufe del tomacorrientes del muro, nunca jale el cable.
18. No cocine en la estufa de inducción si existen grietas o cuarteadoras en la
superfi cie de cristal. Líquidos para la limpieza pudieran fi ltrarse por las grietas y
provocar un riesgo de descarga eléctrica. Si esto llegase a suceder, por favor
contacte inmediatamente nuestro Servicio a Clientes Aroma®.
19. Si la superfi cie estuviese cuarteada, apague el aparato inmediatamente para
evitar una descarga eléctrica.
Cuando se usen aparatos electricos, siempre deberán observarse las precauciones básicas de seguridad,
incluyendo las siguientes:
20. Si la superfi cie estuviese cuarteada, apague el aparato inmediatamente para evitar
una descarga eléctrica.
21. Este aparato no fue diseñado para ser operado con un cronometrador externo o un
sistema de control separado.
22. Cambios o modifi caciones sin la aprobación expresa de Aroma® Housewares puede
invalidar el uso para operar este aparato.
23. La reparación del artefacto debe hacerla solamente Aroma® Housewares.
24. AVISO: Este equipo ha sido probado y verifi cado que cumple con los límites del
equipo Clase B ISM, en conformidad con la fracción 18 de las reglas y normas de
la Comisión Federal de Comunicaciones, o FCC. Estos limites fueron diseñados
para proporcionar una protección razonable contra una interferencia dañina en
una instalación residencial. Este equipo genera usos, y puede irradiar energía de
frecuencia radial, que de no ser instalado y usado de acuerdo a las instrucciones,
puede provocar una interferencia adversa en las comunicaciones radiales;
sin embargo no se garantiza que no habrá interferencia en una instalación en
particular.
25. Si este equipo llegase a causar interferencia en la recepción de radio o televisión, lo
cual puede ser determinado prendiendo y apagando el equipo, se le pide al usuario
trate de corregir esta interferencia mediante una, o mas, de las siguientes medidas:
1) Reacomodar o re-orientar la antena de recepción
2) Aumentar la distancia que separa el equipo del receptor. Conectar el equipo
a un enchufe en un circuito diferente de donde el receptor está conectado.
3) Conectar el equipo a un enchufe en un circuito diferente de donde el receptor
está conectado.
4) Consulte con nuestro Servicio a Clientes o con un técnico para recibir ayuda.
26. Este equipo ha sido probado y cumple con la Sección 18 de las regulaciones de
FCC. La operación está sujeta a dos condiciones: (1) Este dispositivo no provoca
interferencias perjudiciales, y (2) este dispositivo recibe todas las interferencias, incluso
las que pueden causar una operación no deseada.
27. Si bien los estudios actuales han demostrado que la vitrocerámica de inducción no
representa un problema para la salud, las personas con marcapasos o dispositivos
médicos similares deben tener precaución y conservar un mínimo de 50 cm (2 pies)
de distancia al usar la vitrocerámica de inducción a fi n de evitar cualquier posible
interferencia con el campo magnético. Se recomienda consultar con el médico sobre
cualquier situación en particular antes de usar la vitrocerámica de inducción por
primera vez.
GUARDE ESTAS INSTRUCCIONES
MEDIDAS IMPORTANTES DE SEGURIDAD
1

CAUTION: The cooking surface will remain hot after use.
Induction Cooktop
Heat
Warm
Setting
Low
High
Timer
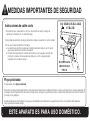
ESTE APARATO ES PARA USO DOMÉSTICO.
1. Se proporciona un cable eléctrico corto con el propósito de reducir el riesgo de
tropezarse o enredarse con un cable más largo.
2. Hay cables de extensión más largos disponibles y deben ser usados con sumo cuidado.
3. Si se usa un cable de extensión más largo:
a. La clasifi cación eléctrica marcada en el cable de extensión debe ser por lo menos
igual que la clasifi cación eléctrica del aparato.
b. El cable más largo debe ser colocado de manera que no cuelguepor el borde del
mostrador o mesa en donde pudiera ser jalado por un niño o alguien pudiera
tropezarse con el cable sin querer.
Instrucciones de cable corto
MEDIDAS IMPORTANTES DE SEGURIDAD
2
Ploya polarizada
Si este aparato tiene ploya polarizada:
Para reducir el riesgo de descarga eléctrica, este ploya intencionalmente solo debe de enchufar un lado en enchufes de luz de ploya polarisada. Si
la clavija no entra completamente, da vuelta a la clavija. Si aun la clavija no puede entrar, llame a un electricista califi cada. No intente de modifi car
la clavija, es muy peligroso.
Si esté estropeado el cordón eléctrico, hay que ser reemplazado por el fabricante o su agencia de servicio u otra persona califi cada para
hacer que se evita cualquier peligro.
¡NO DEJE Q UE EL C A BLE
C UELG UE!
¡MA NTÉNG A LO
LEJO S DE LO S
NIÑO S!

CAUTION: The cooking surface will remain hot after use.
Induction Cooktop
Heat
Warm
Setting
Low
High
Timer
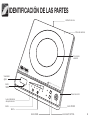
Círculo para
utensilios
Ventilación de aire
Panel de control
Botón POWER
Botón HEAT SETTINGBotón WARM
Luces indicadoras
de ajuste de calor
Botón
TIMER
Visualizador
digital
Botón +
Botón -
IDENTIFICACIÓN DE LAS PARTES
3
Placa de cerámica

4
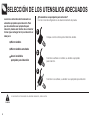
SELECCIÓN DE LOS UTENSILIOS ADECUADOS
Hierro fundido
Hierro fundido esmaltado
Acero inoxidable
apropiado para inducción
La cocina a inducción sólo funcionará con
utensilios apropiados para inducción. Para
que los utensilios sean apropiados para
inducción, deben estar hechos de un material
ferroso (que contenga hierro). La inducción es
ideal para:
CUIDADO
• La inducción no funcionará con utensilios de aluminio, cobre o vidrio.
¿Mis utensilios son apropiados para inducción?
Un imán común de refrigerador es una buena herramienta de prueba.
Coloque un imán contra la parte inferior del utensilio.
Si el imán se adhiere con solidez, su utensilio es apropiado
para inducción.
Si el imán no se adhiere, su utensilio no es apropiado para inducción.
1
2
3

ANTES DEL PRIMER USO
1. Lea todas las instrucciones y precauciones.
2. Retire todo el material de empaque y compruebe que el producto haya llegado en buenas condiciones.
3. Rompa las bolsas de plástico ya que son peligrosas para los niños.
4. Limpie la placa de cerámica con un trapo húmedo.
NOTA
• No use limpiadores abrasivos o esponjas de plástico o metal para limpiar la placa de cerámica.
• No sumerja la placa de inducción en líquido en ningún momento.
5

PARA COCINAR CON INDUCCIÓN
CAUTION: The cooking surface will remain hot after use.
Induction Cooktop
Heat
Warm
Setting
Low
High
Timer
CAUTION: The cooking surface will remain hot after use.
Induction Cooktop
Heat
Warm
Setting
Low
High
Timer
41 32
Enchufe el cable de alimentación. La
unidad hará un pitido para indicar
que está recibiendo energía, pero no
se encenderá.
Si presiona el botón HEAT
SETTING, la placa de inducción
comenzará a calentar. La placa de
inducción funcionará de manera
predeterminada en “Heat Setting
1” y en el visualizador digital
aparecerá “P01” para representar la
temperatura actual.
Presione el botón POWER para
encender la placa de inducción. La
placa hará un pitido, el ventilador se
encenderá y el visualizador digital
mostrará tres rayas titilando.
Coloque los utensilios apropiados
para inducción sobre el círculo para
utensilios. La placa no se encenderá
si los utensilios no están sobre el
círculo para utensilios.
NOTA
• Si los utensilios que se están utilizando no son apropiados para
inducción, el visualizador digital mostrará un mensaje de error “E1”.
• Es posible que el ventilador suene bastante fuerte durante la
operación; sin embargo, esto es normal y no debe preocuparse.
• Si retira los utensilios mientras está cocinando, la placa de
inducción hará un pitido y dejará de calentar. La placa continuará
haciendo el pitido durante 30 segundos como máximo cuando se
retiren los utensilios antes de apagarse en forma automática.
CONSEJOS
ÚTILES
• Para una descripción general de los utensilios apropiados para
inducción, consulte “Selección de los utensilios adecuados” en la
página 4.
6

NOTA
Para confi gurar el temporizador,
presione el botón TIMER. El
visualizador digital mostrará un “1”
titilando que representa un minuto
de tiempo de cocción. Si presiona
los botones “+” o “-“ se ajustará
el tiempo de cocción entre 1 y 180
minutos.
7 865
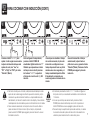
PARA COCINAR CON INDUCCIÓN (CONT.)
Una vez que se visualice el tiempo
de cocción necesario, la placa de
inducción se confi gurará en ese
tiempo después de hacer un pitido
durante unos cinco segundos y el
tiempo visualizado dejará de titilar.
El visualizador comenzará una
cuenta regresiva a intervalos de un
minuto.
Una vez transcurrido el tiempo
seleccionado, la placa hará un
pitido cinco veces y pasará al modo
“Calentar”(Warm). Presione el botón
POWER para apagar la placa de
inducción.
Presione el botón “+” o “-“ para
ajustar el calor según sea necesario.
La placa de inducción incluye siete
ajustes de calor, con “Low” en
“P01” a “High” en “P06” y el modo
“Calentar” (Warm).
• Del mismo modo que su hornalla, la temperatura alcanzada por cada
ajuste de calor variará según el alimento que esté cocinando y el tipo
de utensilio que esté utilizando. Debido a su mejorada efi ciencia de
calentamiento, la inducción calienta mucho más rápido y tiene cambios
de temperatura más inmediatos que la cocción tradicional con hornallas.
• No es necesario seleccionar un tiempo de cocción cuando utiliza la
placa de inducción. Para cocinar sin fi jar un tiempo, simplemente
presione el botón POWER para apagar la placa de inducción una vez
terminada la cocción.
CONSEJOS
ÚTILES
• Si mantiene presionado el botón “+” o “-“ mientras confi gura un
tiempo de cocción, el visualizador aumentará en incrementos de
10 minutos.
• Una vez que el tiempo es seleccionado, presione el botón
POWER para cancelar del tiempo de cocción. Si presiona el
botón POWER dos veces se apagará la placa de inducción.
• Para evitar rayar la superfi cie de la placa de cerámica, no deslice
los utensilios fuera de la placa de inducción. Debe levantar los
utensilios para colocarlos dentro o fuera de la placa. 7

CAUTION: The cooking surface will remain hot after use.
Induction Cooktop
Heat
Warm
Setting
Low
High
Timer
CAUTION: The cooking surface will remain hot after use.
Induction Cooktop
Heat
Warm
Setting
Low
High
Timer
41 32
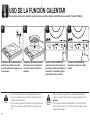
USO DE LA FUNCIÓN CALENTAR
Enchufe el cable de alimentación. La
unidad hará un pitido para indicar
que está recibiendo energía, pero no
se encenderá.
Presione el botón WARM para
comenzar a mantener la comida
caliente.
Presione el botón POWER para
encender la placa de inducción. La
placa hará un pitido, el ventilador se
encenderá y el visualizador digital
mostrará tres rayas que titilan.
Coloque los utensilios apropiados
para inducción con los alimentos
ya cocidos sobre el círculo para
utensilios.
NOTA
• La función “Calentar” (Warm) no está diseñada para cocinar
alimentos, únicamente para mantener la comida que ya está
cocinada caliente para servir.
• Si los utensilios que se están utilizando no son apropiados para
inducción, el visualizador digital mostrará un mensaje de error
“E1”.
CONSEJOS
ÚTILES
• Para una descripción general de los utensilios apropiados para
inducción, consulte “Selección de los utensilios adecuados” en la
página 4.
• El temporizador también se puede ajustar con el modo “Calentar”
(Warm). Siga los pasos 6 y 7 en “Para cocinar con inducción” para
ajustar el temporizador.
Con su placa de inducción, también puede mantener la comida caliente en buffet lineal con el modo “Calentar” (Warm).
8

CAUTION: The cooking surface will remain hot after use.
Induction Cooktop
Heat
Warm
Setting
Low
High
Timer
CAUTION: The cooking surface will remain hot after use.
Induction Cooktop
Heat
Warm
Setting
Low
High
Timer
1 32
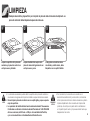
LIMPIEZA
Limpie la superfi cie de la placa de
cerámica y el panel de control con
un trapo suave y húmedo.
Si hay polvo cerca de las áreas
de entrada y salida de aire, debe
limpiarlas con un cepillo fl exible.
Limpie alrededor del cuerpo de la
placa de inducción ligeramente con
un trapo suave y seco.
NOTA
• Los derrames azucarados pueden dañar la superfi cie de la placa de cerámica si
se endurecen. Asegúrese de limpiar de inmediato cualquier derrame azucarado.
• Nunca limpie la placa de cerámica con un cepillo rígido, ya que se puede
rayar la superfi cie.
• La reparación del artefacto debe hacerla solamente Aroma® Housewares.
Contáctese con Servicio al cliente de Aroma® llamando al 1-800-276-6268
de lunes a viernes, de 8:30 a.m. a 4:30 p.m. hora estándar del Pacífi co,
o por correo electrónico a [email protected].
CONSEJOS
ÚTILES
• Con la inducción, los utensilios se convierten en el
elemento de calentamiento; por esta razón, los derrames
sobre la placa de cerámica no deben endurecerse y deben
limpiarse rápidamente. Si se necesita una limpieza más
profunda, unte el trapo con pasta dental o embébalo en
un limpiador líquido neutro y limpie suavemente hasta que
desaparezcan los restos.
Siempre desenchufe y deje enfriar por completo la placa de inducción antes de limpiarla. La
placa de inducción debe limpiarse después de cada uso.
9

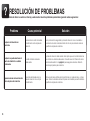
RESOLUCIÓN DE PROBLEMAS
Problema Causa potencial Solución
La placa de inducción no
enciende.
Los utensilios no están colocados
correctamente sobre la placa de
inducción.
Como protección de seguridad, la placa de inducción no se encenderá si
los utensilios no están colocados dentro del círculo para utensilios sobre la
superfi cie de la placa de cerámica.
La placa no puede mantener el
punto de ebullición o calienta
lentamente.
Se están utilizando utensilios
inadecuados.
La placa de inducción debe calentar más rápido que una hornalla tradicional
si se utilizan los utensilios adecuados. Consulte la sección “Selección de los
utensilios adecuados” en la página 4 para asegurarse de estar utilizando
utensilios apropiados para inducción.
Aparecen áreas de decoloración
sobre la placa de inducción.
La comida derramada sobre la
placa de inducción no se limpió
correctamente.
Elimine los derrames difíciles de limpiar frotando con pasta dental y un trapo
suave. Todos los derrames deben limpiarse de inmediato para evitar dañar la
superfi cie de la placa de cerámica.
Antes de llamar a servicio al cliente, puede resolver muchos problemas potenciales siguiendo estas sugerencias:
10

11
SOLUCIÓN DE PROBLEMAS
Mensaje de Error Causa Potencial Solución
“E0” Anomalía en el circuito.
Comuníquese con el Servicio al cliente de Aroma® llamando al número gratuito
(800) 276-6286 o con el servicio de reparaciones enviando un correo electrónico a
“E1”
No ha colocado un recipiente de
cocción o el recipiente no es apto
para inducción.
Compruebe que la batería de cocina que está usando sea apta para la inducción.
Consulte en “Selección de la batería de cocina apropiada” en página 4 el tipo de
batería preparada para la inducción.
“E2” El sensor puede estar
desconectado o en corto circuito.
Comuníquese con el Servicio al cliente de Aroma® llamando al número gratuito
(800) 276-6286 o con el servicio de reparaciones enviando un correo electrónico a
“E3” El voltaje es demasiado alto.
Apague la vitrocerámica de inducción y espere. Vuélvala a encender y proceda
normalmente. Si el problema continúa, comuníquese con el Servicio al cliente de Aroma®
llamando al número gratuito (800) 276-6286 o con el servicio de reparaciones enviando un
correo electrónico a CustomerService@AromaCo.com.
“E4” El voltaje es demasiado bajo.
Apague la vitrocerámica de inducción y espere. Vuélvala a encender y proceda
normalmente. Si el problema continúa, comuníquese con el Servicio al cliente de Aroma®
llamando al número gratuito (800) 276-6286 o con el servicio de reparaciones enviando un
correo electrónico a CustomerService@AromaCo.com.
“E5” El sensor principal está
desconectado o en corto circuito.
Comuníquese con el Servicio al cliente de Aroma® llamando al número gratuito
(800) 276-6286 o con el servicio de reparaciones enviando un correo electrónico a
“E6” La temperatura del recipiente de
cocción es demasiado alta.
Apague la vitrocerámica de inducción y espere a que se enfríe. Una vez que se enfríe,
vuélvala a encender y proceda normalmente. Si el problema continúa, comuníquese con el
Servicio al cliente de Aroma® llamando al número gratuito (800) 276-6286 o con el servicio
de reparaciones enviando un correo electrónico a [email protected].

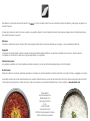
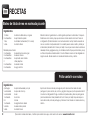
Bistec de falda de res en marinada picante
Mezcle todos los ingredientes en un tazón grande para hacer la marinada. Coloque la
falda de res en la mezcla y deje que la carne se marine durante al menos 2 horas en
el refrigerador. (Tendrá más sabor si se marina durante la noche). Caliente el aceite de
olivo en un sartén a temperatura alta. Con cuidado pase la carne al sartén y dórela por
ambos lados (alrededor de 3 minutos por lado). Una vez que la carne alcance la textura
deseada, retírela y agréguele el ajo y los tomates al sartén. Deje que los tomates y el ajo
se frían a temperatura media durante 2 minutos. Rebane la carne en tiras delgadas a lo
largo de la veta. Sírvala caliente con la salsa de tomate encima y cilantro.
1½ libras de bistec de falda de res, sin grasa
2 cucharaditas de ajo fi namente picado
1 lata de tomates machacados (15 ½ onzas)
¼ taza de cilantro fresco
Marinada para el bistec:
2 cucharadas de aceite de olivo extra virgen
2 cucharaditas de azúcar morena
2 cucharaditas de pimienta recién molida
2 chiles jalapeños
2 cucharaditas de canela molida
2 cucharadas de jugo de limón
Ingredientes
RECETAS
¡Para recibir recetas adicionales, o también para someter las suyas, visite nuestro sitio web en: www.AromaCo.com!
Exprima los limones sobre las pechugas de pollo. Sazone ambos lados de cada
pechuga con polvo de chile, sal, comino y jengibre. Deje que el pollo repose durante 30
minutos en el refrigerador. Ponga un sartén a temperatura alta y dore las pechugas de
pollo de cada lado en lotes (alrededor de 5 a 8 minutos por lado). Después de que la
carne esté cocida, retire las pechugas y córtelas en tiras. Sírvalas con la salsa encima y
cilantro.
Pollo santa fe con salsa
4 pechugas de pollo deshuesadas y sin piel
½ cucharadita de polvo de chile rojo
½ cucharadita de sal
1 cucharada de comino
2-3 limones
1 cucharada de jengibre fresco rallado
½ botella de salsa medio picante
¼ taza de cilantro fresco
Ingredientes
12

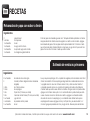
Rebanadas de papa con sabor a lim ón
Corte las papas en rebanadas gruesas de ½”. Séquelas dándoles palmadas con toallas
de papel absorbente. Caliente el aceite vegetal en un sartén a calor mediano. Agregue
las rebanadas de papas. Fría las papas durante aproximadamente 10 minutos o hasta
que ambos lados estén dorados. Mezcle la mayonesa y el jugo de limón para cubrir las
papas. Cocine otros 5 minutos o hasta que estén cocidas.
2 papas Russet
¼ de taza de mayonesa
1 cucharadita de sal
1 cucharada de jugo de limón fresco
1 cucharadita de pimienta negra recién molida
1 cucharada de margarina vegetal derretida
Ingredientes
RECETAS
¡Para recibir recetas adicionales, o también para someter las suyas, visite nuestro sitio web en: www.AromaCo.com!
Lave y seque los espárragos. Con un pelador de vegetales, retire la cáscara de la mitad
inferior de cada tallo. Corte los espárragos diagonalmente en rebanadas de cerca de
½ pulgada de ancho. Lave los chícharos dulces. Corte y retire las vetas. Caliente 1
cucharada de aceite de olivo en un sartén a temperatura de media a alta. Saltee los
chalotes hasta que estén suaves. Retire los chalotes. Ponga el calor a temperatura alta.
Agregue los chícharos dulces junto con ½ cucharadita de sal y saltee hasta que estén
suaves. Vuelva a colocar los chalotes en el sartén u agregue la cucharada restante
de aceite de oliva con los espárragos y ½ cucharadita de sal. Saltee hasta que los
espárragos estén suaves. Agregue el maíz y los frijoles lima y revuelva durante 1 a 2
minutos. Agregue las peladuras de lima y el jugo de lima. Revuelva para calentar bien.
Salteado de verduras primavera
2 cucharadas de aceite de olivo extra virgen
3 chalotes (córtelos diagonalmente en rebanadas
delgadas)
½ libra de chícharos dulces
1 libras de esparragos
1 lata frijoles lima (15 onzas, escurridos)
1 lata mazorcas de maíz frescas (15 onzas, escurridas)
1 cucharada jugo de limón
½ cucharada de peladura de lima picada
1 cucharadita de sal
Ingredientes
13

Aroma Housewares Company garantiza que este producto no tenga defectos
en sus materiales y fabricación durante un período de dos años a partir de la
fecha comprobada de compra dentro de los Estados Unidos.
Dentro de este período de garantía, Aroma Housewares Company reparará o
reemplazará, a su opción, las partes defectuosas sin ningún costo, siempre y
cuando el producto sea devuelto, con el fl ete prepagado, con comprobación
de compra y $14.00 dólares para cargos de envío y manejo a favor de Aroma
Housewares Company. Antes de devolver un producto, sírvase llamar al
número telefónico gratuito que está más abajo para obtener un número de
autorización de devolución. Espere entre 2-4 semanas para recibir el aparato
nuevamente.
Esta garantía no cubre la instalación incorrecta, el uso indebido, maltrato o
negligencia por parte del usuario. La garantía también es inválida en caso
de que el aparato sea desarmado o se le dé mantenimiento en un centro de
servicio no autorizado.
Esta garantía le da derechos legales específi cos los cuales podrán variar de
un estado a otro y no cubre áreas fuera de los Estados Unidos.
Información de la entidad responsable:
AROMA HOUSEWARES COMPANY
6469 Flanders Drive
San Diego, California 92121
1-800-276-6286
L-V, 8:30 AM - 4:30 PM, Tiempo del Pacífi co
Sitio Web: www.AromaCo.com
GARANTÍA
GARANTÍA LIMITADA SERVICIO Y SOPORTE
En la eventualidad de un reclamo de garantía, o si el servicio se requiere para este
producto, póngase en contacto con Aroma® de servicio al cliente al
número gratuito:
1-800-276-6286
L-V, 8:30AM – 4:30PM, Tiempo del Pacifi co
O podemos ser alcanzados en línea en [email protected].
Para su registro, le recomendamos grapar su recibo a esta página, junto con un
registro escrito de lo siguiente:
Fecha de compra:
Lugar de compra:
• La prueba de compra es necesaria para todos los reclamos.
NOTA
14
Powered by TCPDF (www.tcpdf.org)
Powered by TCPDF (www.tcpdf.org)
Powered by TCPDF (www.tcpdf.org)
Powered by TCPDF (www.tcpdf.org)
Powered by TCPDF (www.tcpdf.org)
Powered by TCPDF (www.tcpdf.org)Powered by TCPDF (www.tcpdf.org)Powered by TCPDF (www.tcpdf.org)
Powered by TCPDF (www.tcpdf.org)Powered by TCPDF (www.tcpdf.org)Powered by TCPDF (www.tcpdf.org)Powered by TCPDF (www.tcpdf.org)Powered by TCPDF (www.tcpdf.org)Powered by TCPDF (www.tcpdf.org)Powered by TCPDF (www.tcpdf.org)Powered by TCPDF (www.tcpdf.org)Powered by TCPDF (www.tcpdf.org)Powered by TCPDF (www.tcpdf.org)Powered by TCPDF (www.tcpdf.org)Powered by TCPDF (www.tcpdf.org)Powered by TCPDF (www.tcpdf.org)Powered by TCPDF (www.tcpdf.org)Powered by TCPDF (www.tcpdf.org)Powered by TCPDF (www.tcpdf.org)Powered by TCPDF (www.tcpdf.org)Powered by TCPDF (www.tcpdf.org)Powered by TCPDF (www.tcpdf.org)Powered by TCPDF (www.tcpdf.org)Powered by TCPDF (www.tcpdf.org)Powered by TCPDF (www.tcpdf.org)Powered by TCPDF (www.tcpdf.org)Powered by TCPDF (www.tcpdf.org)Powered by TCPDF (www.tcpdf.org)Powered by TCPDF (www.tcpdf.org)Powered by TCPDF (www.tcpdf.org)Powered by TCPDF (www.tcpdf.org)Powered by TCPDF (www.tcpdf.org)Powered by TCPDF (www.tcpdf.org)Powered by TCPDF (www.tcpdf.org)Powered by TCPDF (www.tcpdf.org)Powered by TCPDF (www.tcpdf.org)Powered by TCPDF (www.tcpdf.org)Powered by TCPDF (www.tcpdf.org)Powered by TCPDF (www.tcpdf.org)Powered by TCPDF (www.tcpdf.org)Powered by TCPDF (www.tcpdf.org)Powered by TCPDF (www.tcpdf.org)Powered by TCPDF (www.tcpdf.org)Powered by TCPDF (www.tcpdf.org)Powered by TCPDF (www.tcpdf.org)Powered by TCPDF (www.tcpdf.org)Powered by TCPDF (www.tcpdf.org)Powered by TCPDF (www.tcpdf.org)Powered by TCPDF (www.tcpdf.org)Powered by TCPDF (www.tcpdf.org)Powered by TCPDF (www.tcpdf.org)Powered by TCPDF (www.tcpdf.org)Powered by TCPDF (www.tcpdf.org)Powered by TCPDF (www.tcpdf.org)Powered by TCPDF (www.tcpdf.org)Powered by TCPDF (www.tcpdf.org)Powered by TCPDF (www.tcpdf.org)Powered by TCPDF (www.tcpdf.org)Powered by TCPDF (www.tcpdf.org)Powered by TCPDF (www.tcpdf.org)Powered by TCPDF (www.tcpdf.org)Powered by TCPDF (www.tcpdf.org)Powered by TCPDF (www.tcpdf.org)
Powered by TCPDF (www.tcpdf.org)
-
 1
1
-
 2
2
-
 3
3
-
 4
4
-
 5
5
-
 6
6
-
 7
7
-
 8
8
-
 9
9
-
 10
10
-
 11
11
-
 12
12
-
 13
13
-
 14
14
-
 15
15
-
 16
16
-
 17
17
-
 18
18
-
 19
19
-
 20
20
-
 21
21
-
 22
22
-
 23
23
-
 24
24
-
 25
25
-
 26
26
-
 27
27
-
 28
28
-
 29
29
-
 30
30
-
 31
31
-
 32
32


En otros idiomas
- English: Aroma AID-509 User manual
Documentos relacionados
Otros documentos
-
NuWave PIC TITANIUM El manual del propietario
-
-
-
 Hearthware NuWave Precision 30121 Owner's Manual, Recipes & Tips
-
 Zavor 124704 Manual de usuario
-
Fagor 962010059 Manual de usuario
-
Fagor America 2X Manual de usuario
-
Oster CKSTPIC1000-BK El manual del propietario
-
Bosch NIT8065UC/21 Manual de usuario

