Canon MAXIFY MB2020 El manual del propietario
- Tipo
- El manual del propietario

1
2
3
XXXXXXXX © CANON INC. 2014
1
2
1
1
2
2
4
3
1
2
3
3
1
2
1
2
3
ES
EN
ES
EN
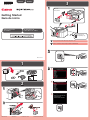
Aún no conecte el cable, excepto el cable de alimentación.
2 pulgadas (5 cm)
ESPAÑOL
Guía de inicio
Se dispone de
tutoriales en vídeo
Vista posterior
Do not yet connect the cable except the power cord.
2 inches (5 cm)
ENGLISH
Getting Started
Video Tutorials
Available
Rear View
QT6-0263-V01
PRINTED IN XXXXXXXX
RMC: K10410

4
1
2
3
4
5
6
1 2
ES
ES
ES
EN
EN
EN
ES
ES
EN
EN
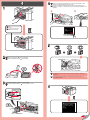
Retire el depósito de tinta del envoltorio.
Inserte el depósito de tinta
todo el recorrido y recto.
¡No toque esta pieza
hasta que se detenga!
Empuje el depósito de tinta rmemente todo el recorrido hasta que
encaje en su lugar y, a continuación, siga el mensaje que aparece en la
pantalla.
Un depósito de tinta instalado no se puede retirar hasta que aparece el
mensaje para retirarlo.
Do not touch this part until
it stops!
Remove the ink tank from the package.
Insert the ink tank
all the way and straight.
Push the ink tank rmly and all the way until it snaps into place, then
follow the message displayed on the screen.
An installed ink tank cannot be removed until the message to replace it is
displayed.

5
1
2
3
4
5
1
1
2
2
7
6
8
1
1
2
2
ES
EN
ES
EN
ES
EN
• Cargue papel con el lado de impresión hacia abajo.
• Se dispone también de papel tamaño Carta.
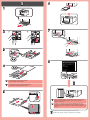
Si aparece un mensaje de error, pulse el botón OK para eliminar el
mensaje de error. Repita la Alineación de los cabezales de impresión
(Print Head Alignment). A continuación, siga el mensaje que aparece en la
pantalla.
A partir de ahí, siga el mensaje que aparece en la pantalla.
• Load paper with the print side facing down.
• Letter size paper is also available.
If an error message appears, press the OK button to remove the error
message. Redo Print Head Alignment. Then, follow the message
displayed on the screen.
Hereafter, follow the message displayed on the screen.

6
USB
1
2
1
2
ES
ES
EN
EN
EN
ES
ES
EN
LAN inalámbrica
Consulte las siguientes explicaciones de tipos de conexiones y
seleccione el método de conexión para utilizar en sus dispositivos.
A partir de ahí, siga el mensaje que aparece en la pantalla.
El CD-ROM de instalación también está disponible para
Windows PC.
Manuales
Cuando aparezca la pantalla como se muestra en la gura,
seleccione cualquiera de los dos pulsando el botón Función
(Function).
Cómo congurar el FAX
Instado en Manual en pantalla
Wireless LAN
Refer to the following explanations of connection types and select the
connection method for your devices to use.
Hereafter, follow the message displayed on the screen.
Setup CD-ROM is also available for Windows PC.
Manuals
When the screen as shown in the gure is displayed, select either
one of the two by pressing the Function button.
How to set up the FAX
Installed On-screen Manual
Transcripción de documentos
ENGLISH ESPAÑOL 3 1 Rear View Vista posterior Getting Started Guía de inicio 2 1 3 3 Vi de o Tu t o ri a ls Av a il a b l e S e d ispone de tu to r iales en vídeo 4 EN 2 inches (5 cm) ES 2 pulgadas (5 cm) EN ES 2 RMC: K10410 1 3 1 2 2 1 1 3 2 2 1 2 QT6-0263-V01 XXXXXXXX © CANON INC. 2014 PRINTED IN XXXXXXXX Do not yet connect the cable except the power cord. Aún no conecte el cable, excepto el cable de alimentación. 4 4 1 EN Push the ink tank firmly and all the way until it snaps into place, then follow the message displayed on the screen. ES Empuje el depósito de tinta firmemente todo el recorrido hasta que encaje en su lugar y, a continuación, siga el mensaje que aparece en la pantalla. 1 2 Do not touch this part until it stops! ¡No toque esta pieza ES hasta que se detenga! EN 5 2 EN Remove the ink tank from the package. ES Retire el depósito de tinta del envoltorio. EN ES 3 EN Insert the ink tank all the way and straight. ES Inserte el depósito de tinta todo el recorrido y recto. 6 An installed ink tank cannot be removed until the message to replace it is displayed. Un depósito de tinta instalado no se puede retirar hasta que aparece el mensaje para retirarlo. 5 6 1 2 1 7 2 1 3 1 2 2 8 4 EN ES 5 • Load paper with the print side facing down. • Letter size paper is also available. • Cargue papel con el lado de impresión hacia abajo. • Se dispone también de papel tamaño Carta. 1 EN 2 ES If an error message appears, press the OK button to remove the error message. Redo Print Head Alignment. Then, follow the message displayed on the screen. Si aparece un mensaje de error, pulse el botón OK para eliminar el mensaje de error. Repita la Alineación de los cabezales de impresión (Print Head Alignment). A continuación, siga el mensaje que aparece en la pantalla. EN Hereafter, follow the message displayed on the screen. ES A partir de ahí, siga el mensaje que aparece en la pantalla. EN When the screen as shown in the figure is displayed, select either one of the two by pressing the Function button. ES Cuando aparezca la pantalla como se muestra en la figura, seleccione cualquiera de los dos pulsando el botón Función (Function). 2 1 2 6 1 EN Setup CD-ROM is also available for Windows PC. ES El CD-ROM de instalación también está disponible para Windows PC. Manuals Manuales EN Refer to the following explanations of connection types and select the connection method for your devices to use. Hereafter, follow the message displayed on the screen. ES Consulte las siguientes explicaciones de tipos de conexiones y seleccione el método de conexión para utilizar en sus dispositivos. A partir de ahí, siga el mensaje que aparece en la pantalla. Wireless LAN LAN inalámbrica How to set up the FAX Cómo configurar el FAX EN Installed On-screen Manual ES Instado en Manual en pantalla USB-
 1
1
-
 2
2
-
 3
3
-
 4
4


Canon MAXIFY MB2020 El manual del propietario
- Tipo
- El manual del propietario
en otros idiomas
- English: Canon MAXIFY MB2020 Owner's manual
Artículos relacionados
-
Canon MAXIFY iB4020 El manual del propietario
-
Canon PIXMA MG7520 El manual del propietario
-
Canon PIXMA MG6620 El manual del propietario
-
Canon PIXMA MG5620 El manual del propietario
-
Canon 3747B002 Manual de usuario
-
Canon PIXMA MX860 El manual del propietario
-
Canon PIXMA TR7520 El manual del propietario
-
Canon PIXMA TR8520 El manual del propietario
-
Canon imagePROGRAF PRO-4100 Guía de instalación
-
Canon MAXIFY MB2320 El manual del propietario