
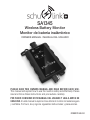
SA1345
Wireless Battery Monitor
Monitor de batería inalámbrico
OWNERS MANUAL / MANUAL DEL USUARIO
0099001846-02
PLEASE SAVE THIS OWNERS MANUAL AND READ BEFORE EACH USE.
This manual will explain how to use the monitor safely and effectively. Please
read and follow these instructions and precautions carefully.
POR FAVOR CONSERVE ESTE MANUAL DEL USUARIO Y LEALO ANTES DE
CADA USO. En este manual le explica cómo utilizar el monitor de manera segura
y confiable. Por favor, lea y siga las siguientes instrucciones y precauciones.

• 2 •
1. IMPORTANT SAFETY INSTRUCTIONS
1.1 SAVE THESE INSTRUCTIONS – This manual contains important safety and
operating instructions.
1.2 Keep out of reach of children.
1.3 While the battery monitor case is water-resistant, direct contact with water should
be avoided. Always place the rubber cap on the battery charger input port when
not in use.
1.4 Use of an attachment not recommended or sold by Schumacher
®
Electric
Corporation may result in a risk of re, electric shock or injury to persons.
1.5 For best battery life, the monitor should be used in conjunction with a battery
maintainer, such as the Schumacher SP3. Using this combination also gives you the
ability to keep track of whether or not the charger has lost connection to the battery.
1.6 IMPORTANT: Never connect a battery charger of more than 6 amps to the
monitor. Always observe the markings on the back of the case for which connector
is to go to the battery and which to the charger.
1.7 The monitor is for use only with 12V systems.
1.8 WARNING: This product contains one or more chemicals known to the State of
California to cause cancer and birth defects or other reproductive harm.
2. ASSEMBLY INSTRUCTIONS
2.1 Remove all cord wraps and uncoil the cables prior to using the battery monitor.
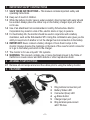
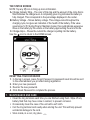
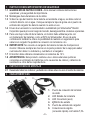
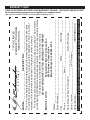
3. FEATURES
3
5
4
2
1
6
1. Ring terminal connection port
2. Battery Status LED
3. Connected (blue) LED
4.
Status button
5. Charger input port
6. Ring terminal quick-connect
with 7.5A fuse

• 3 •
STATUS BUTTON
Turns on the Battery Status LED, to provide a quick three-state level of charge.
NOTE: When the monitor is rst connected to a battery or charger, the Yellow/
Orange status LED will ash for 5 minutes. During this time, the monitor is in
access mode and its wireless network may be programmed or updated.
CONNECTED (BLUE) LED
Flashes when monitor attempts to connect to a wireless network. When a network
connection is made, the LED turns solid.
BATTERY STATUS LED
The LED will light for 8 seconds after the button is pressed.
When not charging:
Red – 50% or less charged (≤12V)
Yellow/orange – 51-74% charged (12.0-12.4V)
Green – 75% or more charged (≥12.4V)
When charging:
Red – 23% or less charged (≤12V)
Yellow/orange – 24-99% charged (12.0-14.3V)
Green – 100% charged (≥14.3V)
4. INSTALLING THE APP AND REGISTERING YOUR MONITOR
• Before you begin, have your monitor ID card on hand.
• Download and install the SchuLink+
App (Apple store or Google Play).
NOTE: For Apple devices, requires iOS 9.0 or later; Android devices, OS 5.0 or later.
Google Play and Android™ are trademarks of Google Inc.
Apple and the Apple logo are trademarks of Apple Inc., registered in the U.S. and other countries.
App Store is a service mark of Apple Inc., registered in the U.S. and other countries.
SETTING UP THE MONITOR’S CONNECTION TO A WIRELESS NETWORK
NOTE: Monitor operation requires an internet connection. Depending on your
wireless router’s location, you may need a wireless extender, to bring the signal
close enough to the vehicle for proper operation.
1. Open the App on your mobile device.
2. Press the Home icon.
3. Tap the three short horizontal bars to bring up a menu.
4. Choose SETUP.
5. Swipe screens and follow directions for setup to a wireless network.

• 4 •
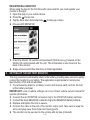
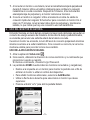
REGISTERING A MONITOR
When using the App for the rst time with a new monitor, you must register your
monitor to the App.
1. Open the App on your mobile device.
2. Press the Home icon.
3. Tap the three short horizontal bars to bring up a menu.
4. Choose ADD MONITOR.
5. Enter the Monitor ID number and password (SC30xxxxx-yy) located on the
Monitor ID card included with the unit. This information is also found on the
back of the monitor.
6. Swipe screens and follow directions to nish registration.
5. SETTING UP THE BATTERY MONITOR
The ring connectors permanently attach to the battery, providing easy access to quickly
connect the monitor to your battery. This application is appropriate for motorcycles,
lawn tractors, ATVs and snowmobiles.
1. To permanently attach to a battery, loosen and remove each nut from the bolt
at the battery terminal.
IMPORTANT: Loss of vehicle settings can occur. Check vehicle owners manual for
specic information.
2. Connect the red POSITIVE connector ring to the POSITIVE battery terminal.
3. Connect the black NEGATIVE connector ring to the NEGATIVE battery terminal.
4. Replace and tighten the nuts to secure.
5. Connect the cable to the end of the monitor output cord. Take care to keep the
wires and plug away from metal and moving parts.
6. The monitor can be secured to the vehicle with zip ties (included).

• 5 •
NOTE: To assure a good wireless signal, the monitor should be secured close
to an opening on the vehicle.
7. Upon connecting the monitor to a battery, the yellow/orange LED will ash for 5
minutes. Use your smartphone to set up the wireless connection, if not already
connected. After 5 minutes, the yellow/orange LED stops ashing, and the
monitor starts working.
8. Connect the monitor to your charger. Use only the quick connect output cable on
the Schumacher charger to plug into the monitor. Within 15 minutes, the blue LED
should change from ashing to solid, indicating a connection to a wireless network.
6. USING THE BATTERY MONITOR
The monitor operates in low power mode most of the time, to avoid drawing
excessive energy from the battery. At predetermined time intervals, it wakes to
send a battery status signal to the Cloud.
When the monitor wakes, the blue CONNECTED LED will ash while it tries to
connect to the wireless signal. When the connection is successful, the LED will light
solid for the reminder of the wake time.
USING THE SCHULINK+ APP
1. Open the SchuLink+
App.
2. Log in, using the email address and password that you provided when you
registered.
If you forget your password, select Forgot Password.
3. The HOME screen shows all connected monitors (and chargers).
• Swipe left on a monitor to bring up the screen to delete the monitor
or edit the device name.
• To add additional monitors,
select Add Monitor.
• Use one of the arrows on the right to select
the monitor you want to check.
• Press the % button to bring up the Status screen.

• 6 •
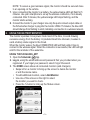
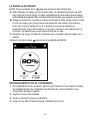
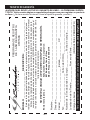
THE STATUS SCREEN
NOTE: Tap any icon to bring up more information.
A. Charge Indicator Ring – The color of this ring and the amount of the circle that is
lled indicates the charge level. A completely green ring indicates the battery is
fully charged. This corresponds to the percentage displayed in the center.
B. Battery Voltage – Shows battery voltage. This voltage varies throughout the
charging cycle, but gives an indication of the health of the battery. If the value
goes below 12.5V during Float or Maintain modes, this could indicate excessive
draw on the battery by the vehicle or the battery approaching the end of its life.
C. Charge Amps – Shows the current the charger is putting into the battery.
Use the icon to return to the HOME screen.
A
B C
RESETTING YOUR PASSWORD
1. In the log in screen, press Forgot Password. A password reset link will be sent
to the email address you provided during registration.
2. Enter your new password.
3. Reenter the new password.
4. Click Reset Password to complete the process.
7. MAINTENANCE AND CARE
• Clean the ring terminals each time you are nished using them. Wipe off any
battery uid that may have come in contact, to prevent corrosion.
• Occasionally clean the case of the unit with a soft cloth.
• Coil the ring terminal cord neatly when storing the unit. This will help prevent
accidental damage to the cord.
• Store inside, in a cool, dry place.

• 7 •
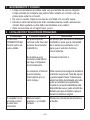
8. TROUBLESHOOTING
PROBLEM POSSIBLE CAUSE SOLUTION
The monitor’s blue
CONNECTED LED
never turns solid.
The vehicle may be out of
the range of the wireless
router.
The wireless connection
may have been set up
incorrectly.
The internet connection
may have been lost for a
short time.
You may need a wireless extender,
to bring the signal close enough to
the vehicle for proper operation.
See Section 4.
To conserve battery power, the
monitor goes into deep sleep mode
and may require up to 12 hours
before it sends battery data to the
Cloud (this will show in the App).
When the wireless connection is
again available, pressing the Status
button will put the monitor back on
its original reporting schedule.
The monitor will
not turn on when
properly connected.
Poor electrical connection
or a blown fuse.
Check battery connections
and fuse.
9. BEFORE RETURNING FOR REPAIRS
For information about troubleshooting,
contact customer service for assistance:
www.batterychargers.com
or call 1-800-621-5485, Monday-Friday 7:00am to 5:00pm CST
For REPAIR OR RETURN, contact Customer Service at 1-800-621-5485.
DO NOT SHIP UNIT until you receive a RETURN MERCHANDISE
AUTHORIZATION (RMA) number from Customer Service at Schumacher
Electric Corporation.
10. REPLACEMENT PARTS
Ring connectors (quick-connect) ...................................................2299003149Z

• 8 •
11. FCC INFORMATION
This product contains transmitter FCC ID P53-EMW3162.
WARNING: Changes or modications to this unit not expressly approved by the
party responsible for compliance could void the user’s authority to operate the
equipment.
This equipment has been tested and found to comply with the limits for a Class B
Digital Device, pursuant to Part 15 of the FCC Rules. These limits are designed
to provide reasonable protection against harmful interference in a residential
installation. This equipment generates, uses, and can radiate radio frequency
energy and, if not installed and used in accordance with the instructions, may cause
harmful interference to radio communications. However, there is no guarantee that
interference will not occur in a particular installation. If this equipment does cause
harmful interference to radio or television reception, which can be determined
by turning the equipment off and on, the user is encouraged to try to correct the
interference by one or more of the following measures:
• Reorient or relocate the receiving antenna.
• Increase the separation between the equipment and receiver.
• Connect the equipment into an outlet on a circuit different from that to which
the receiver is connected.
• Consult the dealer or an experienced radio/TV technician for help.
This equipment complies with Part 15 of the FCC Rules. Operation is subject
to the following two conditions:
1. This equipment may not cause harmful interference.
2. This equipment must accept any interference received, including interference
that may cause undesired operation.
This equipment complies with FCC radiation exposure limits set forth for an
uncontrolled environment. This equipment should be installed and operated with
minimum 20cm between the radiator and your body. This transmitter must not
be collocated or operating in conjunction with any other antenna or transmitter
unless authorized to do so by the FCC.
Modications not authorized by the manufacturer may void the user’s authority
to operate this device. This equipment complies with FCC RF radiation exposure
limits set forth for an uncontrolled environment. This transmitter must not be co-
located or operating in conjunction with any other antenna or transmitter.

• 9 •
12. LIMITED WARRANTY
WARRANTY NOT VALID IN MEXICO.
SCHUMACHER ELECTRIC CORPORATION, 801 BUSINESS CENTER DRIVE,
MOUNT PROSPECT, IL 60056-2179, MAKES THIS LIMITED WARRANTY TO
THE ORIGINAL RETAIL PURCHASER OF THIS PRODUCT. THIS LIMITED
WARRANTY IS NOT TRANSFERABLE OR ASSIGNABLE.
Schumacher Electric Corporation (the “Manufacturer”) warrants this battery monitor
for one (1) year from the date of purchase at retail against defective material or
workmanship that may occur under normal use and care. If your unit is not free
from defective material or workmanship, Manufacturer’s obligation under this
warranty is solely to repair or replace your product with a new or reconditioned unit
at the option of the Manufacturer. It is the obligation of the purchaser to forward the
unit, along with proof of purchase and mailing charges prepaid to the Manufacturer
or its authorized representatives in order for repair or replacement to occur.
Manufacturer does not provide any warranty for any accessories used with this product
that are not manufactured by Schumacher Electric Corporation and approved for use
with this product. This Limited Warranty is void if the product is misused, subjected to
careless handling, repaired, or modied by anyone other than Manufacturer or if this
unit is resold through an unauthorized retailer. Manufacturer may void this Limited
Warranty if a “warranty void if removed” label is removed from the product.
Manufacturer makes no other warranties, including, but not limited to, express,
implied or statutory warranties, including without limitation, any implied warranty
of merchantability or implied warranty of tness for a particular purpose. Further,
Manufacturer shall not be liable for any incidental, special or consequential damage
claims incurred by purchasers, users or others associated with this product, including,
but not limited to, lost prots, revenues, anticipated sales, business opportunities,
goodwill, business interruption and any other injury or damage. Any and all such
warranties, other than the limited warranty included herein, are hereby expressly
disclaimed and excluded. Some states do not allow the exclusion or limitation of
incidental or consequential damages or length of implied warranty, so the above
limitations or exclusions may not apply to you. This warranty gives you specic legal
rights and it is possible you may have other rights which vary from this warranty.
THIS LIMITED WARRANTY IS THE ONLY EXPRESS LIMITED WARRANTY
AND THE MANUFACTURER NEITHER ASSUMES OR AUTHORIZES ANYONE
TO ASSUME OR MAKE ANY OTHER OBLIGATION TOWARDS THE PRODUCT
OTHER THAN THIS WARRANTY.
Schumacher
®
is a registered trademark of Schumacher Electric Corporation.

• 10 •
1. INSTRUCCIONES IMPORTANTES DE SEGURIDAD
1.1 GUARDE ESTAS INSTRUCCIONES – Este manual contiene instrucciones
operativas y de seguridad de importancia.
1.2 Manténgase fuera del alcance de los niños.
1.3 Si bien la caja del monitor de la batería es resistente al agua, se debe evitar el
contacto directo con el agua. Coloque siempre la tapa de goma en el puerto de
entrada del cargador de batería cuando no esté en uso.
1.4 El uso de un accesorio no recomendado o suministrado por Schumacher
®
Electric
Corporation puede provocar riesgo de incendio, descarga eléctrica o lesiones a personas.
1.5 Para una mejor vida útil de la batería, el monitor debe utilizarse junto con
un mantenedor de baterías, como el SP3 de Schumacher. El uso de esta
combinación también le ofrece la posibilidad de realizar un seguimiento para
saber si el cargador ha perdido la conexión con la batería o no.
1.6 IMPORTANTE: No conecte un cargador de batería de más de 6 amperios al
monitor. Observe siempre las marcas en la parte posterior de la caja para saber
cuál conector debe ir a la batería y cuál debe ir al cargador.
1.7 El monitor debe utilizarse únicamente con sistemas de 12 V.
1.8 ADVERTENCIA: Este producto contiene una o más sustancias químicas
conocidas en el Estado de California como causantes de cáncer y defectos de
nacimiento u otros daños reproductivos.
2. INSTRUCCIONES DE MONTAJE
2.1 Desenrede todos los cordones y extienda los cables antes de usar el monitor de baterías.
3. CARACTERÍSTICAS
3
5
4
2
1
6
1. Puerto de conexión del terminal
de anillo
2. LED Estado de la batería
3. LED Conectado (azul)
4.
Botón de estado
5. Puerto de entrada del cargador
6. Conectores de argolla
(conexión rápida) con fusible 7,5A

• 11 •
BOTÓN DE ESTADO
Encienda la luz LED de estado de la batería para proporcionar un nivel rápido de
tres estados de carga.
NOTA: Cuando el monitor se conecta por primera vez a una batería o cargador,
el LED amarillo / naranja del estado de la batería parpadeará durante 5 minutos.
Durante este tiempo, el monitor está en modo de acceso y su red inalámbrica
puede ser programada o actualizada.
LED CONECTADO (AZUL)
Parpadea cuando el monitor intenta conectarse a una red inalámbrica. Cuando se
establece una conexión de red, la luz led se mantiene estable.
LED DE ESTADO DE LA BATERÍA
El LED se encenderá durante 8 segundos después de presionar el botón.
Cuando no carga:
Rojo – 50% o menos cargado (≤12V)
Amarillo/naranja – 51-74% de carga (12,0-12,4V)
Verde – 75% o más cargado (≥12,4V)
Cuando la carga:
Rojo – 23% o menos cargado (≤12V)
Amarillo/naranja – 24-99% de carga (12,0-14,3V)
Verde – 100% cargado (≥14,3V)
4. INSTALACIÓN DE LA APLICACIÓN Y REGISTRO DEL MONITOR
• Antes de comenzar, tenga su tarjeta de identicación del monitor a la mano.
• Descargue e instale la aplicación SchuLink+
(tienda de Apple o Google Play).
NOTA: Para los dispositivos de Apple, requiere iOS 9.0 o posterior; dispositivos
Android, OS 5.0 o posterior.
Google Play y Android™ son marcas comerciales de Google Inc.
Apple y el logotipo de Apple son marcas registradas de Apple Inc., registradas en los Estados Unidos y otros
países. App Store es una marca de servicio de Apple Inc., registrada en los Estados Unidos y en otros países.
CONFIGURACIÓN DE LA CONEXIÓN DEL MONITOR A LA RED
INALÁMBRICA DE INTERNET
NOTA: El funcionamiento del monitor requiere una conexión a Internet. Según
la ubicación del enrutador inalámbrico, es posible que necesite un extensor
inalámbrico para que la intensidad de la señal sea suciente como para que el
vehículo funcione correctamente.
1. Abra la aplicación en su dispositivo móvil.
2. Presiona el ícono Home.

• 12 •
3. Toque las tres barras horizontales cortas para abrir un menú.
4. Elige SETUP.
5. Deslice las pantallas y siga las instrucciones para congurar la conexión a la red
inalámbrica de internet.
REGISTRAR UN MONITOR
Cuando utilice la aplicación por primera vez con un
nuevo monitor, debe registrar su monitor a la aplicación.
1. Abra la aplicación en su dispositivo móvil.
2. Presiona el ícono Home.
3. Toque las tres barras horizontales cortas para
abrir un menú.
4. Elige ADD MONITOR.
5. Introduzca el número de identicación del monitor y
la contraseña (SC30xxxxx-yy), que se encuentran
en la tarjeta de identicación del monitor incluida
con la unidad. Esta información también se
encuentra en la parte posterior del monitor.
6. Deslizar pantallas y siga las instrucciones para
nalizar el registro.
5. CONFIGURACIÓN DEL MONITOR DE LA BATERÍA
El conector de anillos se conecta en forma permanente a la batería,
proporcionando un fácil acceso para conectar rápidamente el monitor a la batería.
Esta aplicación es apropiada para motocicletas, los tractores de jardín, vehículos
todo terreno y motos de nieve.
1. Para sujetarlos permanentemente a la batería, aójelo y retire las tuercas del
perno de los postes de la batería.
IMPORTANTE: Se puede producir la pérdida de la conguración del vehículo. Revise el
manual del propietario del vehículo para obtener información especíca.
2. Conecte el conector de argolla, rojo POSITIVO al poste POSITIVO de la batería.
3. Conecte el conector, de argolla, negro NEGATIVO al poste NEGATIVO
de la batería.
4. Reajuste y apriete las tuercas para asegurar.
5. Conecte el cable a la punta del cable de salida del monitor. Asegúrese de
mantener los cables y enchufe alejados de metal o partes móviles.
6. El monitor se puede jar al vehículo con abrazaderas plásticas (incluidas).
NOTA: Para asegurar una buena señal inalámbrica, se debe jar el monitor
cerca de un oricio en el vehículo.

• 13 •
7. Al conectar el monitor a una batería, la luz led amarilla/anaranjada parpadeará
durante 5 minutos. Utilice un teléfono inteligente para congurar la conexión
inalámbrica si no está conectada. Después de 5 minutos, la luz led amarilla/
anaranjada deja de parpadear y el monitor comienza a funcionar.
8. Conecte el monitor al cargador. Utilice únicamente el cable de salida de
conexión rápida del cargador Schumacher para conectarlo al monitor. En el
plazo de 15 minutos, la luz led azul debe dejar de parpadear y mantenerse
estable, lo que indica que hay una conexión a una red inalámbrica.
6. USO DEL MONITOR DE BATERÍA
El monitor funciona en modo de bajo consumo la mayor parte del tiempo para evitar un
consumo de energía excesivo de la batería. A intervalos de tiempo predeterminados,
se enciende para enviar una señal de estado de la batería a la nube.
Cuando el monitor se encienda, la luz LED azul de conexión parpadeará mientras
intenta conectarse a la señal inalámbrica. Si la conexión es correcta, la luz led se
mantiene estable para recordar la hora de encendido.
USO DE LA APLICACIÓN SCHULINK+
1. Abra la aplicación SchuLink+ .
2. Inicie sesión, utilizando la dirección de correo electrónico y la contraseña que
proporcionó cuando se registró.
Si olvida su contraseña, consulte Forgot Password.
3. La pantalla de HOME muestra todos los monitores conectados (y cargadores).
• Deslice a la izquierda en un monitor para mostrar la pantalla con el n de
eliminar el monitor o editar el nombre del dispositivo.
• Para añadir monitores adicionales, seleccione Add Monitor.
• Utilice la echa de la derecha para seleccionar el monitor que desea
supervisar.
• Presione el botón “xx%” para abrir la pantalla Estado.

• 14 •
LA PANTALLA DE ESTADO
NOTA: Toque cualquier ícono para que aparezca más información.
A. Anillo indicador de carga: el color de este anillo y la cantidad del círculo que está
lleno indica el nivel de carga. Un anillo completamente verde indica que la batería
está totalmente cargada. Esto corresponde al porcentaje que aparece en el centro.
B. Voltaje de la batería: muestra el voltaje de la batería. Este voltaje varía en todo
el ciclo de carga, pero proporciona una indicación del estado de la batería.
Si el valor cae por debajo de 12.5 V durante los modos de otación o
mantenimiento, esto podría indicar un excesivo consumo en la batería por el
vehículo o la batería que se aproxima al nal de su vida.
C. Amperios de carga: muestra la corriente que el cargador está poniendo en la
batería.
Utilice el ícono de la casa para volver a la pantalla de INICIO.
A
B C
RESTABLECIMIENTO DE SU CONTRASEÑA
1. En la pantalla de inicio de sesión, pulse Forgot Password. Se enviará un enlace
de restablecimiento de contraseña a la dirección de correo electrónico que
proporcionó durante el registro.
2. Ingrese su nueva contraseña.
3. Vuelva a introducir la nueva contraseña.
4. Haga clic en Reset Password para completar el proceso.

• 15 •
7. MANTENIMIENTO Y CUIDADO
• Limpie los terminales de anillos cada vez que termine de usar el cargador.
Limpie el uido de la batería que podría haber estado en contacto con las
pinzas para evitar la corrosión.
• De vez en cuando, limpie la carcasa de la unidad con un paño suave.
• Enrolle el cable del terminal del anillo cuidadosamente cuando almacenela
unidad. Esto ayudará a evitar daños accidentales a los cables.
• Debe conservarse en un lugar fresco y seco.
8. LOCALIZACIÓN Y SOLUCIÓN DE PROBLEMAS
PROBLEMA POSIBLE CAUSA SOLUCIÓN
El LED azul
CONNECTED del
monitor nunca se
vuelve sólido.
Es posible que el
vehículo esté fuera del
alcance del enrutador
inalámbrico.
Es posible que la
conexión inalámbrica
se haya congurado
incorrectamente.
La conexión a Internet
puede haberse
interrumpido por un
corto tiempo.
Es posible que necesite un extensor
inalámbrico para que la intensidad
de la señal sea suciente como
para que el vehículo funcione
correctamente.
Consulte la Sección 4.
Para conservar la energía de la batería,
el monitor se pone en modo de reposo
y puede requerir hasta 12 horas para
enviar los datos de la batería a la nube
(esto se mostrará en la aplicación).
Cuando la conexión inalámbrica esté
disponible de nuevo, pulse el botón de
Estado para que el monitor vuelva al
horario de informes original.
El cargador no se
enciende incluso
al estar bien
conectado.
Mala conexión
eléctrica o un fusible
fundido.
Revise las conexiones de la batería y
el fusible.

• 16 •
9. ANTES DE DEVOLVER A REPARACIONES
Si desea obtener más información sobre la solución de problemas,
póngase en contacto con el departamento de servicio al cliente
para recibir asistencia:
www.batterychargers.com
o llame 1-800-621-5485, lunes-viernes 7:00am to 5:00pm CST
Para REPARACIÓN O DEVOLUCIÓN, comuníquese con Servicios al
Cliente al 1-800-621-5485. NO ENVÍE LA UNIDAD hasta que usted reciba
AUTORIZACIÓN DE DEVOLUCIÓN DE MERCANCÍA (RMA) de Servicios al
Cliente de Schumacher Electric Corporation.
10. REPUESTOS
Conectores de argolla (conexión rápida) ........................................2299003149Z
11. INFORMACIÓN DE LA FCC
Este producto contiene un transmisor FCC ID P53-EMW3162.
ADVERTENCIA: Los cambios o modicaciones a esta unidad que no estén
aprobados expresamente por la parte responsable del cumplimiento podrían anular
la autoridad del usuario para operar el equipo.
Este equipo está probado y cumple con los límites para un dispositivo digital de
clase B, de acuerdo con la parte 15 de las reglas de la FCC. Estos límites están
diseñados para proporcionar una protección razonable contra las interferencias
dañinas en una instalación residencial. Este equipo genera, utiliza y puede
irradiar energía de radiofrecuencia y, si no se instala y utiliza de acuerdo con las
instrucciones, podría causar una interferencia perjudicial a las comunicaciones
radiales. Sin embargo, no existe garantía de que no se produzcan interferencias
en una instalación en particular. Si este equipo causa interferencias perjudiciales
a la recepción de radio o televisión, lo que puede determinarse al apagar y
encender el equipo, se recomienda al usuario que intente corregir la interferencia
mediante una o más de las siguientes medidas:
• Reorientar o reubicar la antena receptora.
• Aumentar la separación entre el equipo y el receptor.
• Conectar el equipo a una toma de corriente en un circuito distinto al que está
conectado el receptor.
• Consultar con el distribuidor o con un técnico de radio/TV experimentado
para obtener ayuda.

• 17 •
Este equipo cumple con la parte 15 de las reglas de la FCC. El funcionamiento
está sujeto a las dos condiciones siguientes:
1. Es posible que este equipo no cause interferencias dañinas.
2. Este equipo debe aceptar cualquier interferencia recibida, incluidas las
interferencias que puedan causar un funcionamiento no deseado.
Este equipo cumple con los límites de exposición a la radiación establecidos por
la FCC para un entorno no controlado. Este equipo debe instalarse y operarse
con un mínimo de 20 cm entre el radiador y su cuerpo. Este transmisor no debe
colocarse ni funcionar en conjunto con ninguna otra antena o transmisor, a
menos que la FCC lo autorice.
Las modicaciones no autorizadas por el fabricante pueden anular la autorización
del usuario para utilizar este dispositivo. Este equipo cumple con los límites
de exposición a la radiación RF establecidos por la FCC para un entorno no
controlado. Este transmisor no debe colocarse ni funcionar en conjunto con
ninguna otra antena o transmisor.
12. GARANTÍA LIMITADA
GARANTIA LIMITADA NO VALIDA EN MEXICO.
SCHUMACHER ELECTRIC CORPORATION, 801 BUSINESS CENTER DRIVE,
MOUNT PROSPECT, IL 60056-2179, REALIZA LA PRESENTE GARANTÍA
LIMITADA AL COMPRADOR MINORISTA ORIGINAL DE ESTE PRODUCTO. LA
PRESENTE GARANTÍA LIMITADA NO PUEDE TRANSFERIRSE NI CEDERSE.
Schumacher Electric Corporation (el “Fabricante”) otorga garantía por este monitor de
batería por un plazo de un (1) año contados a partir de la fecha de compra por menor
por la existencia de cualquier material o de mano de obra defectuosos que pudieran
surgir por su uso y cuidado normal. Si su unidad cuenta con material defectuoso o
defectos de mano de obra, la obligación de los Fabricantes, conforme a la presente
garantía, será simplemente reparar o sustituir el producto por uno nuevo o por una
unidad reparada, a elección del fabricante. Es obligación del comprador enviar la
unidad con comprobante de compra y los gastos de envío prepagos al fabricante o a
sus representantes autorizados para que ésta se pueda reparar o reemplazar.
El Fabricante no presta garantía por lo accesorios utilizados con este producto
que no sean los fabricados por Schumacher Electric Corporation y que no estén
aprobados para su uso con este producto. La presente Garantía Limitada será nula si
el producto se utiliza en forma errónea, se trata de manera inadecuada, es reparado

• 18 •
o modicado por personas que nos sean el Fabricante o si esta unidad es revendida
a través de un vendedor minorista no autorizado. El fabricante pudiera anular esta
Garantía Limitada si la etiqueta “warranty void if removed” es removida del producto.
El Fabricante no realiza ninguna otra garantía, incluidas, a título enunciativo, las
garantías expresas, implícitas o legales, incluidas, a modo de ejemplo, las garantías
implícitas de comerciabilidad o adecuación a un n especíco. Asimismo, el
Fabricante no será responsable ante reclamos por daños accidentales, especiales ni
directos en los que incurran los compradores, usuarios u otras personas asociadas
al producto, incluidas, a título enunciativo, los ingresos y ganancias no percibidos,
ventas anticipadas, oportunidades comerciales, el buen nombre, la interrupción de la
actividad comercial o cualquier otro daño que haya provocado. Todas las garantías,
excepto la garantía limitada incluida en el presente, por medio de la presente, quedan
expresamente anuladas y excluidas. Algunos estados no permiten la exclusión ni
la limitación de los daños accidentales ni directos o el plazo de garantía implícita,
por lo que las limitaciones o exclusiones mencionadas anteriormente podrían
no corresponder con su caso. La presente garantía le otorga derechos legales
especícos y es probable que usted cuente con otros derechos que podrían diferir
de los incluidos en la presente garantía.
LA PRESENTE GARANTÍA LIMITADA ES LA ÚNICA GARANTÍA LIMITADA
EXPRESA Y EL FABRICANTE NO ASUME NI AUTORIZA A NADIE A ASUMIR
O A ADQUIRIR NINGUNA OTRA OBLIGACIÓN RESPECTO DEL PRODUCTO
QUE NO SEA LA PRESENTE GARANTÍA.
Schumacher
®
y el logo Schumacher son marcas registradas
de Schumacher Electric Corporation.

• 19 •
1 YEAR LIMITED
WARRANTY PROGRAM
REGISTRATION
MODEL: _____________________DESCRIPTION: ________________________
This is the only express limited warranty, and the manufacturer neither assumes
nor authorizes anyone to assume or make any other obligation. There is no other
warranty, other than what is described in the product owner’s manual.
The warranty card should be submitted within 30 days of purchase. The customer
must keep the ORIGINAL receipt because it will be required for any warranty claims.
This warranty is not transferable. Send warranty card only.
DO NOT SEND UNIT TO THIS ADDRESS FOR REPAIR.
Mail this card to: Schumacher Electric Corporation
801 Business Center Drive
Mount Prospect, IL 60056-2179
Name ______________________________________________________________
Street Address _______________________________________________________
City ________________________________State _________ Zip Code _________
Phone _____________________Email ___________________________________
Store Name Where Purchased ___________________ Date of Purchase _________
Store Location ____________________ UPC Number ________________________
Serial Number ______________________________________ (SEE PRODUCT)
For faster warranty activation, go to www.batterychargers.com to register your product online.
SAVE ON POSTAGE! ACTIVATE YOUR WARRANTY ONLINE – THE QUICK AND EASY WAY!
Go to www.batterychargers.com to register your product online.
(No internet access? Send in the completed warranty card.)
WARRANTY CARD

• 20 •
PROGRAMA DE REGISTRO
DE 1-AÑO DE GARANTÍA
LIMITADA
MODELO: ____________________DESCRIPCIÓN: ________________________
Esta es la única garantía limitada expresa, y el productor no autoriza ni otorga a alguien a
realizar alguna otra obligación. No existe ninguna otra garantía más que la descrita en el manual
del dueño. La tarjeta de garantía debe enviarse durante los primeros 30 días después de la
compra. El cliente debe mantener el recibo de compra ORIGINAL como comprobante, el cual
le otorga todo derecho a cualquier reclamo de garantía. Esta garantía no es transferible. Envie
tarjeta de garantía solamente.
NO ENVÍE LA UNIDAD A ESTA DIRECCIÓN PARA SU REPARACIÓN.
Enviar esta tarjeta a: Schumacher Electric Corporation
801 Business Center Drive
Mount Prospect, IL 60056-2179
Nombre ____________________________________________________________
Dirección ___________________________________________________________
Ciudad __________________________Estado ____________ C.P. _____________
Tel: ________________________ Correo electrónico _________________________
Nombre de la Tienda donde se Compró ____________ Fecha de compra _________
Localización de la Tienda ____________ Numero de Serie ____________________
Código de barras ___________________________ (CONSULTE EL PRODUCTO)
Para una activación más rápida, visite nuestra página de internet en www.batterychargers.com
¡AHORRE EN EL ENVÍO! ¡ACTIVE SU GARANTÍA EN LÍNEA – LA FORMA MAS RÁPIDA
Y FÁCIL! Visite nuestra página en www.batterychargers.com para registrar su producto
en línea. (¿No tiene acceso al internet? Llene la tarjeta de garantía y envíela.)
TARJETA DE GARANTÍA
-
 1
1
-
 2
2
-
 3
3
-
 4
4
-
 5
5
-
 6
6
-
 7
7
-
 8
8
-
 9
9
-
 10
10
-
 11
11
-
 12
12
-
 13
13
-
 14
14
-
 15
15
-
 16
16
-
 17
17
-
 18
18
-
 19
19
-
 20
20


Schumacher Electric SA1345 SchuLink+ Wireless Battery Smart Monitor El manual del propietario
- Tipo
- El manual del propietario
- Este manual también es adecuado para
en otros idiomas
Artículos relacionados
-
Schumacher Electric SA1345 SchuLink+ Wireless Battery Smart Monitor El manual del propietario
-
-
Schumacher Electric SC1344 3A Wireless Charger/Maintainer SC1366 3A Wireless Charger/Maintainer SC1432 3A Wireless Charger/Maintainer El manual del propietario
-
-
-