Kenmore 116.33725 El manual del propietario
- Categoría
- Aspiradoras
- Tipo
- El manual del propietario
Este manual también es adecuado para

Owner'sManual
ManualDelPropietario
VacuumCleaner
Aspiradora
Model, Modelo
116.33725
116.33726
/
CAUTION: Read and fellow all safety
and operating instructions before first
use of this product.
CUIDADO: Lea y sigue todas las
instrucciones de operaciony seguridad
antes del uso de este producto.
Directions For Use
It is a violation of Federal law to use
this product in a manner inconsistent
with its labeling.
Direcciones de uso
Es una violacion a la ley Federal el utilizar
este producto de una manera contraria
con su etiquetado.
Seam, Roebuck and Co., Hoffman Estates, IL 60179 U.S.A.
www.sears.com
Printed in Mexico
Part No. CQIZCAH1QU_Q-KCQ1ZCAH1OU_ Impreso en M_xico

:::;:;:_:;_;r;_:::::_:_,_t_;__.____;_;__;:;r;_:_;:_,_:,:_:,:,;::,::._;.;_::,: :_:_:_r;_:;:_:;::::2;::::_::.;.::;;_:;_;_:_;r::::_:;:;_:+::.;.:.:__;_;_:_:;:_:_:::.:.::.:,::._:_._.;_;_.:._;_:;.:._.::::,:: :_:::.:.;_;;;;_;_;::_:;%:::;:;_b::;: _;.:.;_,_,;,;::._._::: ::;+..;.: _,_;;::,:w...;._ _;,;,_,;_,,.,.,......;.;._ _,;,;:.._,Y ....._ :,>_,_.;;:......;. _
: : _::;_::::::_:_:::i!:::!:i:::i:i:i_::_:_;:::___;_;;i_i_ _::_;_;:::_:_:_:_:_:::::::_::;!_:_¢:_=;:_::_::_:_::::_:::::::::_::::_=:::::;:;:::::_:_::_:;:;i!!!!!:ii:i:ii_:i _i_i_!i!!!!::!!!_:::: _E_EE i_" _ "_': -_:"&'_'i; ;_ __ .... : • ....•"i •".. '_:i;_;:::F__:!:!:!:i:i:i__i:_:_:__;_:_::::_;__;!:_:!!:!&:i:i_i:i;i:_:_:_:i'_:i:::!_!:i:!_i:i:i:i:i:i_;_;:::!:_i:__:_:i:_:i:i:i:_:i:i:_:!_::::::_;!::ii_i:i:i:_:i:
Before UsingYour New Vacuum ........ 2
KenmoreVacuum Cleaner Warranty .... 2
ImportantSafety Instructions........... 3
Pads and Features ................... 4
AssemblyInstructions ............... 54
Operating Instructions................. 7
Pile Height Selection and Setting ........ 7
Carpet/Bare Floor Selector ............ 8
Releasingthe Handle ................. 8
ON/OFF Switch ..................... 8
Attachments ..................... 9-10
Attachment Use Chart ............... 10
Vacuuming Tips .................... 11
Performance Features ............... 1t
Vacuum Cleaner Care ............... 12
Vacuum Storage ................... 12
Cleaning Exterior and Attachments ..... t2
Dust Bin Cleaning ................ 13-14
Secondary FilterCleaning ............ 14
Filter Changing/Cleaning ............. 15
Belt Changing and Agitator Cleaning ,. 16-18
Clog Removal ..................... 21
Motor Protector ..................... 19
Headlight Bulb Changing .............. 20
Agitator Servicing ................... 21
Agitator Assembly .................. 21
Troubleshooting ..................... 23
Please read this guide, tt will he_p you assemble and operate your new Kenmore vacuum in
the safest and most effective way.
For more information about vacuum cleaner care and operation, ca_l your nearest Sears store.
You will need the complete model and serial numbers when requesting information. Your vacu-
um's model and serial numbers are located on the Model and Serial Number Plate.
Use the space below to record the model number and serial number of your new Kenmore
vacuum.
Model No.
Serial No.
Date of Purchase
Keep this book and your sales check (receipt) in a safe place for future re_erence.
i i i iiiiii i i i i i ! i il i i iii iiii i ii ii iii ii i
LIMITED ONE YEAR WARRANTY ON KENMORE VACUUM CLEANER
This warranty is for one year from the date of purchase, and includes only private household
vacuum cleaner use. During the warranty year, when this vacuum cleaner is operated and
maintained according to the owner's manual instructions, Sears will repair any defects in
material or workmanship free of charge.
This warranty excludes vacuum bags, belts, light bulbs, and filters, which are expendable parts
and become worn during normal use.
Forwarranty service, returnthis vacuum cleaner to the nearest Sears Service Center inthe
UnitedStates.
This warranty applies only while this product is in use in the United States. This warranty gives
you specific legal rights, and you may also have other rights which vary from state to state.
Seam, Roebuck and Co., 13/817 WA, Hoffman Estates, IL 60179
2

Your safety is Important to us.To reducethe riskof fire, electricalshock, injury to per-
sons ordamage when using yourvacuum cleaner, follow basicsafety precautions
includingthe following:
Read this manual before assembling or
using your vacuum cleaner.
Use your cleaner only as described in
this manual. Use only with Sears recom-
mended attachments.
To reduce the risk of electrical shock -
Do not use outdoors or on wet surfaces.
Disconnect electrical supply before any
servicing or cleaning. Failure to do so
could result in electrical shock or per-
sonal injury.
Always turn cleaner off before unplug-
ging.
Do not unplug by pulling on cord. To
unplug, graspthe plug, not the cord.
Do not use with damaged cord or plug. If
cleaner is not working as it should, has
been dropped, damaged, left outdoors,
or dropped into water, return it to a
Sears Service Center.
Do not pull or carry by cord, use cord as
a handle, close door on cord, or pull
cord around sharp edges or corners.
Do not run cleaner over cord. Keep cord
away from heated surfaces.
Do not leave cleaner when plugged in.
Unplug from outlet when not in use and
before servicing.
Do not allow to be used as a toy. Close
attention is necessary when used by or
near children.
not handle plug or cleaner with wet
hands.
Do not put any objects into openings.
Do not use with any opening blocked;
keep free of dust, lint, hair and anything
that may reduce air flow.
Keep hair, loose clothing, fingers, and all
parts of body away from openings and
moving parts.
Do not use cleaner without dust bin
and/or filters in place.
Always clean the dust bin after vacuum-
ing carpet cleaners or freshener, pow-
ders and fine dust. These products clog
the filters, reduce airflow and can cause
damage to the cleaner. Failure to clean
the dust bin could cause permanent
damage to the cleaner.
Do not use the cleaner to pick up sharp
hard objects, small toys, pins, paper
clips, etc. They may damage the clean-
er or dust bin.
Do not pick up anything that is burning
or smoking, such as cigarettes, match-
es, or hot ashes.
Do not use cleaner to pick up flammable
or combustible liquids (gasoline, clean-
ing fluids, perfumes, etc.), or use in
areas where they may be present. The
fumes from these substances can create
a fire hazard or explosion.
Use extra care when cleaning on stairs.
Do not put on chairs, tables, etc. Keep
on floor.
You are responsible for making sure that
your vacuum cleaner is not used by any-
one unable to operate it properly.
SAVE THESE INSTRUCTIONS
Proper assembly and safe use of your vacuum cleaner are your responsibilities. Your
cleaner is intended only for household use. Read this Owner's Manual carefully for
important use and safety information. This guide contains safety statements under
warning and caution symbols. Please pay special attention to these boxes and follow
any instructions given. WARNING statements alert you to such dangers as fire, elec-
trical shock, burns and personal injury. CAUTION statements alert you to such dan-
gers as personal injury and/or property damage.
3

it is important to know your vacuum cleaner's parts and features to assure its proper and safe
use. Review these before using your cleaner,
Item Part No. Part No,
In U.S. In Canada
Headlight Bulb 20-5240 20-40600
Belt 20-5275 20-40096
Primary Filter 20-82720 20-82720C
Hose
Power
Cord.
Dust Bin
Release
Primary
Filter
Hose Height
Holder Adjustment
Lever (Some
uick Release
Cord Hook
\
Nozzle
Cover
Performance
Indicator
(Some
Models)
B_
Exhaust
(Inside)
Headlight
• (Some
Models)
Floor Selector
Screw
On/Off
Switch
Handle
Release
Pedal
(Some
Model/Serial
Numbers
Brush
Furniture
Wand Guard
Retainer/
Carry Handle
Tool
Motor
Short
Hose
Nozz_
Base
Noz_e Cover
Reamers
EXTENSION HOSE KITS
SOME MODELS
Extension Hose
!II[lilII[UlUWIhI
_)_ FI ...SOME MODELS
(_j Adaptor
oor BrUShan d
u D}

Before assembling vacuum, check the
PACKING LIST on the cover of the separate
Repair Parts List. Use this list to verify that
you have received all the components of
your new Kenmore vacuum.
Electrical Shock Hazard
Do not plug intothe electricalsupply
untilthe assembly iscomplete. Failure
to do so could resultin electricalshock
or injury.
HANDLE ASSEMBLY
Remove the screw located just below the
top edge of the back of the vacuum.
Position the handle as shown in the illustra-
tion below.
While holding the power cord out of the way,
slide the handle into the opening at the top
of the vacuum.
Handle
Insert the screw so it passes through the
handle into the vacuum.
Begin to tighten the screw with your fingers.
It may be necessary to adjust the handle
slightly.

Do not overtighten.
Overtighteningcouldstdpthe screw
holes.
Do notoperate the cleaner withoutthe
screw inplace,
Using a
driver, tighten
the screw.
CORD ASSEMBLY
Make sure the quick release cord hook is in
the upright position. Remove the wire tie
from the power cord.\.
Lock the cord into
place by forcing it
into the locking
notch on the body
of the quick Notch
release cord hook (,\\
as shown. This
helps keep the
power cord out
from under the cord _ilj
vacuum cleaner
agitator.
Quick
Release
Cord
Power
Core
Lower
Cord
Wrap the
power cord
around the
quick release
cord hook
and lower
cord retainer,
then lock the
power cord
plug onto the
power cord.
ATTACHMENT STORAGE
After the handle has been assembled to the
body and the power cord has been wrapped
around the cord hooks, the attachments can
be placed in their holders.
1. Snap the suction inlet end of the hose
into the back of the vacuum cleaner.
2. Place the hose behind the handle and
over the hose holder.
3. Place the hose in the front slot of the
tool holder, twisting and pushing down over
the short hose to assure a good connection.
4. Place the small end of extension wand in
the rear slot of the tool holder with larger
end up.
5. Slide the crevice tool into the slot beside
the wand.
6. Place the dusting brush or combination
brush on the wand with the brush portion
up.
Handle-
Brush
Extension
Wand
Inlet
Tool
Holder "
Tool
6

HOWTO START
Quick
_elsase
Cord Hook
1.Turnthe quick
releasecord
hook toerlher
sideand down
to releasethe
powercord.
2. Release the power cord plug from the
power cord and pull the cord off the quick
release cord hook. Check to be sure the
power cord is still locked into the locking
notch in the quick release cord hook.
NOTE: To reduce the risk of electric shock,
this vacuum cleaner has a polarized plug;
one blade is wider than the other. This plug
will fit in a polarized outlet only one way. If
the plug does not fit fully in the outlet,
reverse the plug. If it still does not fit, con-
tact a qualified technician to install the prop-
er outlet. Do not change the plug in any
way.
Personal Injury and Product
Damage Hazard
DO NOT plug in if switchis in the
position.Personal injuryor
damage could result.
DO NOT use outlets above coun-
Damage from cord to itemsin
surroundingarea could occur.
3. Plug the polarized power cord into a
120 Volt outlet located near the floor.
liiiiiiiiiiiiiiiiiiiiiiiliiiiiiiiiiiiiiii!!ii iill!;!i! i !;!iliiii!i!iiiiiii i i i ii ;!ililiiiii!i!i!i!iiii i i i ii!i!iiiiiiili !iii i i i ! i;iiiilililiiii!iiii ii ilii i!ililiiiiiiii!iii! i iii i i!i!i!iii!ii!iiiiii!iiiilliiii i i ii!i !;i ! i i iii!i!iiiiiiii i i i i iii i i i i I
SOME MODELS
To selecta pile height setting:
Turn off cleaner. Select a pile height setting
by tilting the cleaner back until front wheels
are lifted slightly off the floor as illustrated.
Slide the adjustment lever to the correct
sefling.
Models with no selector adjust automatically
for varying carpet heights.
SUGGESTED PILE HEIGHT SE'I-IINGS
You may need to raise the height to make
some jobs easier, such as scatter rugs and
longer pile carpets. Suggested settings are:
Models with two (2) positions:
HIGH: medium to long pile.
LOW: short to medium pile.
Models with four (4) positions:
HIGH: shag carpet, long pile, plush, scatter
rugs
MED: medium to long pile.
LOW: short to medium pile.
EX LOW: very low pile.
Place unit in "HIGH" when usingattach-
ments to prevent possible floor damage.
ATTENTION: Special care is required when
vacuuming certain types of carpet or floor
covering. Always check the carpet or floor
covering manufacturer's recommended
cleaning instructions before vacuuming.
7

:::::_:::::_i!!!!!!i i!!!!!! !;:i¸iiilii i"h¸_i' "":_:i:!:!:!:!:!:!:!!i:E'_:.:":':i:_:ii_:i:.:_!i:i::ii:.i:i:i::_:_:::i:!:i:i_.:y:i:;:i::_:i:i:!:!i_:ii:'_i::i:'_':y:':_:_:_:":i:i:.::_:,:.::':::::i::_¸':_.i.i.:,:::_:i_._'_'_::;_,,_:_.::.:._:"i.i_i:' ii::i:: ::::"'_":':if!_::::::::::':::iiiiii ::::::_i:_:!:iiii:I
I
SOME MODELS
Bare floor setting: Slide the carpet/bare floor
selector all the way back and down toward
the bottom of the nozzle until it locks into
place.
In this position the brush assembly does not
revolve. This setting should be used for
cleaning hardwood and tile floors and when
any attachments (tools) are used.
Carpet setting:Slide the selector all the way
forward and up to the carpetposition.
In this position the brush assembly will turn.
When carpets are being cleaned the selec-
tor should be in this position.
Attention: Refer to your carpet manufactur-
ers cleaning recommendations. Some more
delicate carpets may require that they be
vacuumed with the agitator turned off, to
prevent carpet damage.
r= . CAUTION
Do not allow vacuum cleaner to remain
in one spot for any length of time when
the agitator Is turning. Damage to carpet
may occur.
NOTE: For longer belt life, turn vacuum off
before moving selector. Failure to do so can
cause the belt to rub on the selector shaft
and may result in the belt becoming hot and
creating a burning rubber smell.
Carpet/Bare
Floor Selector
To Bare Floor
Position
\
To Carpet
Position
Release the handle by placing your foot on
the foot rest and pull back on the handle
until it releases from its upright position.
SOME MODELS
Release the handle by pressing down on
the handle release pedal with your foot and
pulling back and down on the handle with
your hand.
Foot Rest For
Handle
ReleasePedal
To start the vacuum cleaner, step on the
ON/OFF switch located on the back of the
vacuum. To stop the vacuum cleaner, step
on the switch a second time.
On/Off
8

:: : _:::: ::.:.:+::::.: : ::::: : ;;:: 4+:,: :..:_:::::: :::::: +:: : :+:+::::: :: :::: :: ::+::::.:: ::::: :::::..:/,,...,.,.. _..;; :,, ... ::, ,, ,_..... ,,,_!-.,.,....,..,.: :.::+::: ::::: ;::::: :.:: :_,::::: ,::: :.:: :::,_::+::::;; ,;:: : _.::_:::: :::E: ::.::+:+:
I
::::::::::::::::::_::::::;::::::::::::::::::::::::::::::::::::::::::::::;::::::::::::_;:: : _ _::_:::::::::_;::::t_: :::::;:::;:_ ::: :: :::::.:::::: _ : : : :_ :: : : :t;_ :: :::: :
Personal InjuryHazard and Property
Hazard
DO NOT place hands orfeet under-
neath the unitat any time. When
using attachments,the agitatorcontin-
ues rotating. Do notallow the cleaner
to remain in just one place for a period
of time as the agitator may damage
the floor surface. Avoid placingthe
cleaner on furniture, the fringed area of
rugs,deep pilecarpeting, orcarpeted
stairs. The ideal positionforthe clean-
er when usingattachments isfor the
unitto be on a levelarea with the han-
dle in the _ position.
TO USE ATTACHMENTS
Place the cleaner on a flat surface, and
move the height adjustment to HIGH.
The attachments will fit on the hose or the
wand. In addition, the dusting brush or
combination brush will also fit on the crevice
tool.
The hose can be pulled off the short hose
by grasping the cuff and twisting while
pulling up.
!• CAUTION
DO NOT pull the vacuum cleaner
around the room by the hose.
Property damage could result.
The attachments can be added to the hose
if the item to be cleaned is not far from the
cleaner. The hose on some models will
expand.
NOTE: When cleaner is turned on, the hose
on some models will have a tendency to
collapse due to suction of the cleaner.
If more reach is needed, the wand can be
attached to the hose and the attachments
can be added to the wand.
When using attachments, be careful
not to overextend the hose length
when reaching. T_ng to reach
beyond the hose reach could cause
the cleaner to tip over.
SOME MODELS
An extra wand, without tabs, is included.
This extra wand can be added to the
wand with tabs for extra reach. Insert
wand and twist a quarter of a turn to
secure fit.
DusUng Brush Wand
m}E (Some Models) =!
III! Brush(Some \- \ - T .
Models) _-_ urusn
If the dusting brush/combination brush is
being used and more distance is
needed, the crevice tool can be added to
the wand, then the dusting
brush/combination brush can be added
to the crevice tool.
TO STORE
ATTACHMENTS
Return the hose to its position on the
short hose and the attachments to their
holders.
Attachmentsused in dirtyareas, such
as undera refrigerator,shouldnot be
used on other surfacesuntilthey are
washed. They could leave marks.
9

When usingthe regular hose or with
the extensionhose attached, the
cleaner shouldbe on a solidsurface
on the same level or below the level of
the user's feet. DO NOT use the hoses
when the cleaner Is above the level of
the user's feet,
EXTENSION HOSE
SOME MODELS
Some models include an extra hose which
connects to the stretch hose on the vacuum
for a longer cleaning reach.
Unit Hose _ Extension Hose
Insert the two tabs on the end of the
extension hose into the two "J" shaped slots
on the unit hose and twist to connect,
All attachments and the wand can be
attached to the open end of the hose.
FLOOR BRUSH AND WAND
SOME MODELS
Some models have an extra brush and wand
for cleaning bare floors. Twist one end of the
adaptor into the floor brush and the other
end into the straight wand. Connect the
straight wand to the telescopic wand and
then to the vacuum hose or extension hose,
0|
Wand...._
CLEANING AREA
Between
ATTACHMENT Furniture* Cushions" Drapes* Stairs Walls
DUSTING BRUSH <_ X X X X
CREVICE TOOL _ X X X
COMBINATION BRUSH _ X X X
Handi-Mate ® Jr. (_ X x
The motor protector may open when using attachments or when cleaning new carpet due to
reduced air flow caused by the attachments themselves or by new carpet fuzz filling the bag
quickly.
*Always clean attachments before using on fabrics.
10

1
_i_!_iii_i_i_i_i_Ji_i_i_i_i_i!_!_i_i_!_i_!_ill!_ii!_i_i!_i_i_i_i_i_i_i_i_i_i_i_i_ii_i_i_i_i!_i_i_i_i_i_i_i_i_!_i!_i_i_i_!_!!i!_!_i_i_i_i_
Personal Injury Hazard
Use care if vacuum cleaner isplaced
on stairs.If it falls, personal injury or
property damage could result.
Carpet edges
Guide either side or the front of the nozzle
along a baseboard. The full length brushes
help remove trapped dirt at carpet edges.
Stairs
Put handle in full upright position. Use the
crevice tool or dusting brush. Set the On/Off
switch to ON.
MOTOR PROTECTION
SYSTEM
Thermal Protector
This vacuum has a thermal protector which
automatically trips to protect the vacuum
from overheating. If a clog prevents the
normal flow of air to the motor, the thermal
protector turns the motor off automatically to
allow the motor to cool in order to prevent
possible damage to the vacuum. During this
time the headlight remains on.
To correct problem: If this occurs, turnthe
vacuum off and unplug the power cord from
the outlet to allow the vacuum to cool and
the thermal protector to reset. Check for
and remove clogs, if necessary. Also check
and clean/replace any cloggedfilters. Wait
approximately thirty (30) minutes and plug
the vacuum in and turn back on to see if the
motor protector has reset. The motor
protector will not reset if the vacuum is not
turned off even if the vacuum has cooled
down.
PERFORMANCE
INDICATOR
SOME MODELS
When the unit is running with normal air
flow, the light on the performance indicator
isoff. The light comes on whenever the
airflow becomes blocked. If that occurs,
check the dust bin, clean/replace clogged
filters, and check other possible clog
locations shown in CLOG REMOVAL.
To correct problem: See the TROUBLE-
SHOOTING chart.
NOTE: The
light may
also come on
when using
attachments,
due to
reduced
airflow
through the
attachment.
nce
Indicator
11

Always follow all safety precautions when
cleaning and servicing the vacuum
cleaner.
Electrical Shock And Personal Injury
Hazard
Disconnectelectricalsupply before
servicingor cleaningthe unit. Failure
to do so could resultin electdcalshock
or personalinjuryfrom cleaner sud-
denlystarting.
Gather the power cord and wrap it loosely
around the quick release cord hook and
lower cord retainer.
Store the cleaner in a
dry, indoor area, on
Quick the floor with the
Release
Cord handle locked in the
Hook _ upright
Power position.
Lower
Cord
Electdcal Shock And Personal Injury
Hazard
Wrapping the cord tootightlyputs
stress onthe cord and can cause cord
damage. A damaged cordis an electri-
cal shock hazard and couldcause per-
sonal injuryor damage.
Unplug cord from wall outlet.
DO NOT drip water on cleaner.
To reduce static electricity and dust build-
up, wipe outer surface of cleaner using a
clean, soft cloth that has been dipped in a
solution of mild liquid detergent and water,
then wrung dry. Wipe dry after cleaning.
Wash attachments in warm soapy water,
rinse and air dry. Do not clean in dishwash-
er,
Do not use attachments Ifthey are
wet. Attachments used in dirty areas,
such as under a refdgerator, should
not be used on other surfaces until
they are washed. They could leave
marks.
12

Always emptythe dust binwhen dirt level
reaches the =MAX FILL"line.
TO REMOVE DUST BIN
Always unplug power cord from electri-
cal outlet before performing any ser-
vice on vacuum.
Lift dust bin han- DustBin
Release
die located at the Handle
top of the dust
bin. oust
Bin
Pull the handle for-
ward and lift dust bin
up and out of the
vacuum cleaner,
Remove any
clogs that
might be locat-
ed in the dust
bin port or the
secondary fil-
ter.
Dust Bin
Secondary
TO EMPTY DUST BIN
Turn This Direction Closed
To Open For Emptying (For Use)
Open
(For Emptying)
Rotate dust bin lid assembly counterclock-
wise as indicated on the lid and lift off.
Pour dust bin contents
into a trash container.
TO CLEAN FILTER
The filter may
be cleaned by
tapping it on a
firm surface or
by rinsing it
under a faucet.
Rinse with
water only, do
not use any
detergent or
soap. Allow the
filter to dry for
24 hours before
putting it back
into the vacuum.
Cover
13

TO REPLACE DUST BIN
Turn This Direction Open
TO Close For Use (For Emptying)
Closed
(For Use)
Place dust bin lid assembly back onto top of
dust bin. Align lid marks with bin marks as
shown above in Open (For Emptying).
Rotate lid clockwise while pressing down-
ward so that marks align as shown in
Closed (For Use).
Place dust bin /"_ /I I _tY
back into vacuum
cleaner by insert-
ing the bottom first
and tilt back with '1
the dust bin han-
dle raised.
Man_a de
sol_relcubo
dole basura--
Cubo de
la basura--
I
Push forward and
lower the dust bin
handle to lock
dust bin in place.
I !! ii i iii i!i i i iiii i i i iii ii!i!i!iii i i iiiiiii i i i iiiii iii i!i i i i iiii i i i ii !!iii!i i i ii i ii i i i i
Check secondary filter frequently and clean Secondary
when dirty.
Remove the dust bin as outlined in the
DUST BIN CLEANING section.
To clean filter screen wipe screen with a dry
cloth.
NOTE: Filter screen is not removable.
Replace the dust bin as outined in the
DUST BIN CLEANING section.
14

WARNING
ElectricalShock Hazard
Unplug powercord from electricaloutlet,
Do not operatethe cleaner withoutthe
or exhaust filters. Be sure the
'installedto
PRIMARY FILTER
Check primary filter frequently and clean
when dirty.
TO REMOVE PRIMARY FILTER
Remove the dust bin and dust bin lid
assembly as outlined in the DUST BIN
CLEANING section. While holding the pri-
mary filter over a trash container grasp filter,
rotate and lift off.
Clean primary filter by Filter-.
gently tapping over a trash
container_ Locking
Tab
Tap on several
sides to
ensure best
cleaning. Cover
Slot
Rinse with water only as needed (see Dust
Bin Cleaning).
When cleaning the filter no longer restores
vacuum suction to full power you need to
replace the filter.
TO REPLACE PRIMARY FILTER
Make sure that the slots
of the filter line up with Filter_ /_;4:_._,_k
the locking tabs on the _i,7,.. )
filter cover. Replace filter "_"_//
and rotate filter until _. _.\_
slots look onto tabs _"_
in cover. Filter.lV'_ "_ _ Slot
Cover _ _J
"__/" Locking
Tab
Note: Under normal use and care, your filter
can be expected to last up to 3 years.
Re-attach the filter cover and filter to dust
bin (see Dust Bin Cleaning). Place dust bin
back into cleaner.
EXHAUST FILTER
ELECTROSTATIC
The exhaust filter must be replaced when
dirty. It should be replaced regularly
depending on use conditions.
The filter CANNOT be washed as it willlose
itsdusttrapping ability.
Press inward on each side of I _"--
exhaust filter cover and pull out /
=
to remove from vacuum Press
cleaner. Inward
Exhaust
Filter C_f_
Remove the frame and filter.
Exhaust
Replace the
exhaust filter,
carefully position-
ing it so that it fits
into the frame.
The white side
of the filter
should be fac-
ing towards the
operator.
Filter
Frame
Filter
/
White Side
Out
Exhaust
Filter
Cover
Replace the
exhaust filter
cover by plac-
ing tabs in
slots and push-
ing in until
cover snaps
into place.
15

Electrical Shock Or Personal Injury
Hazard
Disconnectelectricalsupplybefore
servicingor cleaningthe unit. Failure
todo so could resultin electricalshock
or personal injuryfrom cleaner sud-
denlystarting,
Frequently check and remove hair, string
and lint build-up in the brush area. If build-
up becomes excessive, follow the steps
below. Should the belt become loose or
should it break, follow the Belt Removal
Instructions.
TO REMOVE NOZZLE COVER
Disconnect electrical supply.
To protect the floor surface, always place
paper under the nozzle any time the nozzle
cover is removed.
Release the nozzle c_ver by rotating the
nozzle cover retainerS; to the UNLOCK
position. Grasp back of nozzle on each side
and lift up to remove it from nozzle cover.
Cover
Carefully remove any residue that may exist
in the belt area.
Personal Injury Hazard
Always unplugthe vacuum cleaner
before cleaningthe brusharea as agi-
tator may suddenlyrestart, Failure to
doso can resultin personal injury.
TO REMOVE BELT/CLEAN
AGITATOR
Position hands on the agitator. If the belt is
still attached to the agitator, there will be
tension on it.
Carefully lift the right end of the agitator and
then lift the left end.
Remove the worn or broken belt from the
motor drive shaft.
Personal Injury Hazard
Be carefulwhen removingthe agitator
as the belt tensionis high. Failure to
doso could resultin personalinjury
from the agitator releasing quicklyand
snappingaway.
16

TO CLEAN AGITATOR
NOTE: In order to keep cleaning efficiency
high and to prevent damage to your vacu-
um, the agitator must be cleaned every time
thebelt is changed.
The agitator must be cleaned according to
the following schedule:
VacuumUse
HEAVY
(used daily)
MODERATE
(used 2-3 times/week)
Clean Aaitator
every week
every month
LIGHT
(used 1 time/week)
every 2months
Remove any dirt or debris in the belt path
area or in the agitator area.
Exploded View- Agitator
Assembly
Cap t
Belt End
Pulley Cap
End
Cap
Carefully remove
the brush end
caps and remove
any string or
debris located on
the agitator
assembly, end
caps or agitator
shaft.
NOTE: Replace the end caps. See the
exploded view for correct assembly.
TO REPLACE BELT
Make sure that the carpet/bare floor selec-
tor is in the carpet position.
Loop the new belt on the motor shaft. Loop
new belt over belt pulley on agitator.
Motor
Shaft
Belt
Carpet/Bare Floor
Belt New Selector Shaft
Pulley Belt
BELT ROUTING
Correct Routing of Belt
(Selector in CarpetPosition)
t , Carpet/Bare
Belt , ,,
Agitator / Motor
Carpet/Bare Floor Shaft
Selector Shaft
Incorrect Routing of Belt
(Belt on Selector Shaft)
Aglt :;2:r
Carpet/Bare Floor Shaft
Selector Shaft
Incorrect Routing of Belt
(Selector in Bare Floor Position)
/ _, Carpet/Bare
_"_..........._ / ,. _ Floor Pedal
Agitator Belt Carpet/Bare Floor
Selector Shaft
17

Pull right end of agitator forward and seat it
into nozzle base
Agitator Nozzle
Base
Press firmly, checking to see that each end
is completely inserted.
"Be/t
Agitator
Check to see that the belt is centered on the
belt pulley and that tire.agitator turns freely.
Make sure the nozzle cover retainers are in
the UNLOCK position. Hook the front of the
nozzle cover on to the nozzle base and
rotate downward. Once in place, rotate the
nozzle cover retainers to the LOCK position.
Nozzle
Cover
Nozzle Cover
Retainers
18

I iii! iiiiiiiiiiiiiililiiiiiiiiiiiiiiiiiliiiiEiiiiiiiii I
::::::::::::::_x ;:::_:_:_:_::!:::::::::::::x:::_:x::::x:::;_:_:_:_:_:i:_::!@!:!:::::::::::::::_:::::::::::::::::::i:_:_:_:_:_:_;_:_;i:i:__::::;::::@:::k:::_:::_:_:i:_:_:_::::: :::::_x ::':':';:;:":_:_:_x_:::::•::':';'::::::::.x+::px.:.:::_: ::x_+ _:'::.::,.,:.::':"::+%::':: :: : ;: : _H:_:_:_,:_: : :::::x:iiiiii ii ::::::;::::_::iiiiiiiii!!iii iiiiiii:::::::::::::: :_ .9.:;5:::::::::::::::;_iiiii iI::::_;:::: ::_!::::iiI_::_:: ::: : ::::: : ::_:_:_:_:B_:::::::::::::11111H!!!iiiiiii:::;:::x::::iiH::::::;:;ii!ii
!iiiiiiiiiiiii_iiiii_iii!!iiii!iliiiilSi_iiiiiiiii!iiii@!ii_Pii!iiliii_i_!_i_i_iii_i@i_i_!_!_!_i_i_i_i@i_i_i_}_i_i_i!i_iii_iii_i_i_i_i!i_i_!_@i i _ ii i i i il i
WARNING
Electrical Shock Or Personal Injury
Hazard
Disconnectelectricalsupplybefore
servicingor cleaning the unit. Failure
to do so could resultin electricalshock
or personalinjuryfrom cleaner sud-
denlystarting,
Always follow all safety precautions when
cleaning and servicing the vacuum cleaner.
If the cleaner does not seem to have ade-
quate suction, first check if the dust bin is
full or if a filter is clogged. See DUST BIN
CLEANING and FILTER CLEANING /
CHANGING.
If the dust bin and filter areas are free of
clogs, check the hose area. Remove the
suction inlet by depressing the two tabs that
secure it to the back of the vacuum and
check for clogging in this area.
Hose
Tabs
Inle!
Holder
,Short
Hose
Replace the suction inlet and remove the
other end of the hose from the tool holder.
Plug in the vacuum and turn it on. While
running the vacuum cleaner, stretch the
hose in and out to remove the clog.
Turn the unit off and unplug the unit.
If the clog still exists, pull the short hose out
of the tool holder and inspect the short
hose.
Remove any visible clogs.
Protector-- 1 -'__'_"
NOTE: Do not block motor protector.
This vacuum has a motor protector by-pass
valve which automatically opens to provide
cooling air to the motor when a clog
prevents the normal flow of air. If the by-
pass valve opens to prevent motor
overheating and possible damage to the
vacuum, a change of sound will be noticed
as air rushes through the valve opening. If
this occurs, turn the vacuum off and unplug
the power cord from the outlet. Then check
for clogs as described under the CLOG
REMOVAL section.
The motor protector by-pass valve may open
when using attachments or when cleaning
new carpet, due to reduced air flow caused
by the attachments themselves or by new
carpet fuzz filling the dust bin quickly.
19

iiii! iiiiiiiiiiiiiiiii!i
SOME MODELS
ElectricalShock Or Personal Injury
Hazard
Disconnect electdcal supply before
servicing or cleaning the unit. Failure
to do so could result in electrical shock
or personal injury from cleaner sud-
denly starting,
I
Disconnect electrical supply.
To access the light bulb, remove the screw
which secures the light lens to the vacuum.
Remove the lens.
Push Here
Remove the light bulb by pushing the bulb in
while turning counterclockwise to release
from the slot. Pull the light bulb straight out.
\
CAUTION
Do not use a bulb rated over 130 V
AC-15 W. Dudng extendeduse, heat
from the bulb could overheat surround-
ing plastic parts.
To replace the light bulb, carefully insert and
turn clockwise to tit securely into slot.
NOTE: See PARTS and FEATURES for bulb
number,
! CAUTION
Do not plug in or turn on untilcom-
pletely reassembled.
I
Position the light lens back on the vacuum.
Replace the light lens screw.
2o

iili i!i::'i:_'_i!_!i!_!i_%!ii_i_!iiii_,ii_i!i_i%._._i!iii::_i iii_.:.iii_.iiiii_iiili_ii_:.!i_.i.i_i_i=!=_'ili_:::_!i:_:_:_;_::.i_:_i_i:!:!:i_!:!!:i:i_ii_::::::::i::_:_:i:_i:i_i_i:i:i:!:i:i_i:!:i:i.:_:::_:_i:_:_':_:_:i_"ii i?i=_ _::i i!iiiii i.:.:.:iii.i._:__:::!ill_.:.i.i.iiii.i.i_i_::::::_:!i iiiiiiiiiil !iili iii iiiiii iii iiiiiiil.i._::_:.ij:i_i:_i:_::::i:.:_:,:iiiii:'i
liii!iliiiiiiiiiiiiiiii!!i!!i!i!i!!iiiiiiiiiiiiii!iiiii!ii!iiiiiiiiii!iiiii_iiii_i!i!i!iliiii_i_i_ii_iE_i_ilil!i!i_!_i_i_i_ii_F_i_iii_i_i_!i_ii!_i!_i_i_!_i_i_iiii_!i!i_ii_iii_i_!_!_i_i_iiiiiii!_i_i_i_i!!!ii_!iiiiiii!!i!!!iiiiiiiii!iiiiiiiiiiiiii!!iiii!iiiiiiii!iiiiiiill
ElectricalShockOr PersonalInjury
Hazard
Disconnect electrical supply before ser-
vicing or cleaning the unit. Failure to do
so could result in electrical shock or
personal injury from cleaner suddenly
starting.
TO CHECKAGITATOR
_T Turn the vacuum
over to check for
worn brushes.
When brushes are
worn to the level of
the base belt guard,
Base a_t _ua_ replace the agitator.
TO REPLACE AGITATOR
Remove the nozzle cover and agitator. See
BELT CHANGING AND AGITATOR
CLEANING.
Replace agitator with a new one.
Reassemble the belt, agitator and nozzle
cover. See BELT CHANGING AND
AGITATOR CLEANING.
Belt Pulley
End Cap Agitator Unit
End Cap
21

Reviewthischarttofinddo-it-yourselfsolutionsforminorperformanceproblems.Anyservice
needed,otherthanthosedescribedinthisowner'smanual,shouldbeperformedataSears
servicecenter.
so could result in electricalshock or personal injury.
Cleaner won't run.
Poorjob ofdirtpick-up.
1. Unpluggedat wall outlet,
2. Tripped circuit breaker/blown fuse
al household service panel.
3. On/off switch not turnedon.
4. Thermal protector tripped.
1. Full or clogged dust bin.
2. Wrong pile heighl setting.
3. Worn agitator.
4. Clogged nozzle or dustbin port,
5. Clogged hose.
6. Hole in hose.
7. Broken/misplaced belt.
8. Hose not inserted fully.
9. Motor proteclion system activated.
10. Dirty filters.
1. Plugin firmly,push on/off switch to on.
2. Reset circuit breaker orreplace fuse.
3, Pushon/off switch to on.
4. Reset thermal protector, (page 11)
1, Clean dust bin. (pages 13. 14).
2. Adjust setting, (page 7).
3. Replace agitator,(page 20).
4. Check CLOG REMOVAL.(page 18).
5, Check for clogs,(page 18).
6. Replacehose.
7, Replace/fix belt, (pages 16, 17).
8, Insert hose fully, (page 6).
9. Check for clogs, (page 18).
10. Clean/change filters, (page 15).
Cleaner picks up 1. Wrong pile height setting. 1, Adjust setting, (page 7),
moveable rugsor
pushes too hard.
Ught won'twork. 1. Burned out lighl bull). 1. Change light bulb. (page 19).
Agitatordoes nottam. 1. Broken belt. 1. Replace belt, (pages 16, 17).
2. Bare floorselector in bare 2. Move selector to the carpet setting,
Iloor setting. (page 7).
3. Belt installed incorrectly. 3. Check BELT CHANGING AND
AGITATORCLEANING.(pages 16, 17).
Pedormance Indicator. t. Fullor clogged dust bin. 1, Clean dust bin, (pages 13, 14).
some models, Is red. 2. Dirty tilters. 2. Clean/change filters,(page 15).
3. Clogged airflow passage. 3. Clear clog from airflow passage,
(page 18).
4. Certain attachment tools, 4. This is normal. Light should go off
when tool is removed.
Air flowrestrlctod 1. Attaehment use restricts air flow, 1, Check ATTACHMENTS. (page 9).
withattachmentuse. 2. New carpet fuzz clogged air path. 2. Check CLOG REMOVAL and clean
Soundchanges, i hose, (page 18).
22

::r:::::::::::_: ::::;;:; :_::_:;::::::::::::::::: : ::;: ,;;;_;:_:::: ;; _ _::::: ; ::;::_::: ::: : ;;; :._:.:::::r:::::; ;; : _ . _ : :. : _ ::::, : ,_ _.::: ::r:::::: :::;_:::::::::::_:::::::: ::::::
iliii iiiiTiiiTi!i !iiiii 777iiiiii ii i i i iii!iiii i! iiiiiii iiiii!!ii7 i!iiiiiiii!iii!i!ii!iiiiiiiiiii!ii!iii!i!iiiiii i !!i!iiiiiiiii!iiii i!i iiiii iiii ifiiii iiii!i!iii!ii i
i_iii_iiiiii_i_iiiiiiiiiiiiiii iiii i iiiiiiiiii _!!_ii iiiiii iiiii_i:_iii _ iiii ii_ _! _!_ _ _ _ ii
Antesde usarsuaspiradoranueva ....... 1
Garantiade la aspiradorade Kenmore..... 1
Instruccionesimportantesde
seguridad ............................. 2
Piezesycaracterfsticas................. 3
Instruccionesde ensamblamiento....... 4-5
Instruccionesde operaci_ ............... 6
Ajustey selecci6n denivel de pelode la
alfombra ............................ 6
Selectordepisoscon altombray .......... 7
sin altombra
Desprendimientodel mango .............. 7
Interruptorde encendido/apagado ......... 7
Accesorios ......................... 8-9
Cuadro de uso de los accesorios .......... 9
Sugerenciasparaaspirar ............... 10
Caracteristicas de rendimiento ........... 10
Cuidadodolaespiradora ............... 11
Almacenamiento de la aspiradora ........ 11
Umpiezadel exterior y de los accesorios ,.. 11
Limpiandoel cubo de la basura .......... 12
Limpieza del filtro secundario ........... 13
Cambio/limpie del filtros ............... 14
Cambio de la correa y limpieza del
agitador ......................... 15-17
CSmoeliminar los residues de basura
en los conductos ..................... 18
Protectorde motor .................... 18
Cambio de la bombilla .................. 19
Cuidadodel agitador .................. 20
Ensambledel agitador ................. 20
Reconocimientode problemas........... 21
Potfavor lea esta guia que le ayudara a assemblary operar su aspiradoranuevade Kenmore en una manera
m&ssegura y effectiva
Paramas informaciSnacerca del cuidado y operaci6n de esta aspirador,Ilame a su tienda Searsmas cercana.
Cuando prequntepor informaci6nustednecisitara el ndmero completode serie y modelo de la aspiradoraque
est;_Iocadoen la placa de los n_meros de modelo y serie.
Use el espacio de abajo para registrar el n0mero de modeloy serie para su nuevaaspiradora de Kenmore.
NLimerode Modelo
N0mero de Serie
Fecha de Compra
Matenga este libro y su recibo en u lugarseguro para referenciasfuturas.
GARANT[A LIMITADADE UN AI(IODE LA ASPIRADORA KENMORE
Eslagarantia es por un afio desde la fecha de compra, e incluye solamenteel uso de la aspiradora en
hogaresprivados,Durante el afio de garantfa,cuando la aspiradoraes operada y mantenidade acuerdoal
manualde instruccionesdel duefio, Sears reparara cualquierdefecto en materialeso fabricacionlibre de
cargo.
Estagarantfa excluye lasbolsas de coleccion, correas,lamparillas, yfiltros, las cuales son partes gastables
que se deterioran conel uso normal.
Para el sewiciode garantla,retome esta aspiradorael Centrode Servicio Searsm_iscercanoen los Estados
Unities.
Esta garantia se aplicasolamente mientras este producto est_ en usoen los EstadosUnidos.Esta garantia
te da a usted derechoslegales especfficos,y usted puedetenertambien otros derechosloscuales varfan de
estado a estado.
Sears, Roebuckand Co.,I)/817 WA, Hoffman Estates, IL60179
1

ADVERTENClA
Su seguridades muyimportante para nosotros.Para reducirelrisego de incendio,chequeel_trico,
lesi6ncorporalo dafiosal utilizarsu aspiradora,act_e deacuerdo conprecaucionesb_tsicasde
seguddad,entreella,s:
Lea este manual antes de armar outilizar su
aspiradora.
Use su aspiradoraL_nicamenteen la forma
descrita en este manual. Use _inicamentecon
accesorios recomendadosper Sears.
Para reducirel riesgode cheque el0ctrico, no use
su aspiradoraal aire libre ni sobre superficies
mojadas.
Desconectela fuente de electricdad antes de dar
servicioo limpiar.De Iocontrafio podria causar
un chequeel0ctrico o lesi6ncorporal.
Siempredebe apagar su aspiradoraantes de
desconectarla.
Nodesconecte la aspiradora tirandodel cord6n
electrico.Para desconectarla, hale elenchufe, no
el cord6n,
Nouse la aspiradorasi el cord6no el enchufe
est4.dafiado. Si la aspiradora no est&
funcionando adecuadamenteo si se ha dejado
caer>est_ dafiada, s_ha dejado expuesta a la
intemperieo se ha dejado caer en agua. devuel-
vala a un Centre de servicio de Sears.
No hale ni transportela aspiradora perel cordon:
no use el cord6n come mango; no cierre puertas
sobreel cordon; no hale el cordon sobre rebor-
desagudos ni esquinas.No pasela aspiradera
sobreel cord6n.Mantenga el cord6n alejado de
superficiescalientes.
Noabandone la aspiradoracuando este conec-
tada. Desconeetelacuando no la est_ usando y
antes de darle servicio.
Nopermita que sea utilizadacome juguete. Se
requieretener mayor cuidadocuando sea
utilizadaen la proximicladde nifios o per nifios.
Notoque la aspiradora ni el enchufe con ]as
manesmojadas.
No coloque objetos en las aberturas.
NOutilice la aspiradorasi alguna abertura esta
bloqueada;mant_ngala libre de polvo, pelusa,
cabe]losy cualquiera cosa que podfia disminuir
el ffujode aire.
Mantenga el cabello, ropa suelta,dedos y todas
las partes de]cuerpo alejados de las aberturas y
piezas mec_,nicas,
No use la aspiradorasin tenerinstatadala cube
de la basuray/o losfiltros.
Umpie siempreel cube de la basura despues de
aspirar de la alfombra limpiadoreso refrescant-
es, pelvesy depositosfines, Estos productos
tapan los filtros, reducenel flujo de aire y pueden
causar daho a la limpiadora.
No usela aspiradorapara levantarobjetos agu-
dos, juguetes pequefios,alfileres, sujetapapeles,
etc. Podrian dafiar la aspiradorao la cube de la
basura.
No levanteninguna cosa que seeste quemando
o emitiendo humo,come cigarrillos, cerillos o
cenizas calientes.
No use la aspiradorapara aspirar liquidos
inflamableso combustibles(gasolina, liquidos
para limpieza,perfumes, etc.)ni la use en
lugaresdonde 6stos podrian estar presentes.Los
vapores de estassustancias pueden crearun
peligrode incendioo explosion,
Tengaculdadoespecial al utilizar la aspiradora
en escalones,No la coloque sobresillas, mesas,
etc.Mant_ngalaen el piso.
Ustedes responsablede asegurarque su aspira-
dora no sea utilizada per ninguna persona que no
pueda manejarla correctamente.
GUARDE ESTAS INSTRUCClONES
El armadoy useseguro de su aspiradora son su responsabilidad,Esta aspiradoraha sidedise_ada
exclusivamentepara usedomestico. La aspiradora deber_ almacenarseen un lugar seco yen e! inte-
rior.Leaeste Manualdel propietario detenidamente,pues contiene informaci6n importantesobresegu-
ridad y use.Esta quia contiene intormaci6nsebre seguridad debajode simbolosde advertiencia
cuidado. Per favorponga atenci6n especial a estas instruccionesdadas. Advertencia: Este intormacion
le alertaracon el poligro de fuego, cheques electricos, quemadas y lesiones. Cuidado: Este
informaci6nle alertara a peligroscome lesiones y dafios de propiedad.
2

Exarninelasantes de usar su aspiradora.
[ Objeto Pieza N_ Pieza N_
en EUA en Canadd
Lamparilla 20-5240 20-40600
Correa 20-5275 20-40096
Filtro de escape 20-82720 20-82720C
Manguera
$oporto para
Tornglo
Abortura de
Interruptor de
encendldo/
apagado
Ilberacl6n
del mango
(Algunos
modalos)
Ndmeros de
series del modelo
Manija de
soltar el
cubo de la
basura --
Filtro
Palanca
para ajustar
la altura
(Algunos
modelos)
Ilboracl6n
raplde del
cord6n de la
boquilla
sacudlr
- Tubo
Protector
de meubles
Soportes de la
cubierta de boquilla
Inferior para
el cord6tVMango
pata transportor
- Herramlenta
para taplces
protector
de motor
Mangucra
corta
Indicador de
rendimiento
(Algunos
modelos)
- Cubo de
la basura
Filtro de
escape
(dentro)
LUZ
(Algunos
modelos)
Selector de
pisos CO/'t
alfombra y
sin alfombra
Base de
boqui/la
JUEGOS DE MANGUERA
DEEXTENSION
ALGUNOS MODELOS
Manguera _ extensi6n
_c ALGUNOS
_-- MODELOS
_j Adaptador
epil, o paraTPu::S
u J)
3

iiii ii iiiiiiiii iii!iiiiiiiii! iii iiiiii!iiiiii!iiiiiiiiiii
I iii! _iiiii!i!_i_i_i_i_i!ii!i!_i_!!_!_!_!_!_!_!_i_;_;_;_ii!_!ii!i_i;_i!!!_!_!_!_!i_i_i_i_i_;_iii!_!ii_i!!__!_!_!_ii_i_i_!ii_!_!_!;!_!i_i!i_i_iii!i!_!_i;_i_!_!;!;!i_i_!iiii!!ii Ji!!iiiiiii!ii!iiiiiiiiiiiiill
Antes de armar la aspiradora, chequee la LISTA
DE EMBALAJE en la cubierta separada de la Lista
de Partes para Reparaci6n. Use esta lista para veri-
ficar que ha recibido todas las componentesde su
nuevaaspiradora Kenrnore.
Peligrode choqueel_trico
No conectala aspiradora hastaquetermine
de armada.De Io contrariopodrfacausarun
choqueel_ttdcoo lesi6n corporal.
MONTAJEDELMANGO
Quite el tornillodel mango Iocalizadojusto debajo
del borde superior de la parte posterior de ]a aspi-
radora,ver ilustracionde arriba.
Coloque el mango como seve en el diagrama
abajo.
AI mantener la manguera de manera que no inter-
fera, mueva el mangoa la abertura en la parte
superiorde la aspiradora.
Or#Tclo p=ra
el tornnlo del
mango
Inserte el tornillo para que pase par el mangode la
aspiradora.
Empiece a apretar el tornillo con losdedes. Quiza
sea necesario ajustar un poeo el mango.

No apdetedemasladoel tomillo.
Si Ioaprietadernasiadopodrlaarruinarlosod-
flciosparael tomillo.
No operelaaspiradorasintener instaladoel
tomillo.
Apriete e]tornil]o con un destornillador.
COLOCACION DEL CORDON
Aseg_rese de que el sujetador superiordel cordon
de liberacionrapida se encuentre en posici6nverti-
cal. Quite el alambre conel que est,, atadoel cord6n
el_ctrico.
Fijeel cordon en
posici6n, forzandole
en la ranurade
bfoqueoubicadaen el
cuerpo del sujetador
de liberaciOnr&pida
del cord6n,como se
muestra.Esto ayuda a
que el cord6n no se
enrede debajo del
agitador de la
aspiradora.
liberacion
rapide de/
cordbn_...._
eldctrico
miento
inferior para
el cordon
AI mantener el
cordon electrico de
una maneraque
no interfera, ponga
el cordon electrico
alrededor del suje-
tador de liberaiOn
rapida del cordony
alrededor del
Compartimiento
inferiorpara el
cordon y luego
cierre el enchule
del cord6n electri-
co en el cordon
electrico.
COLOCACIONDE LOS
ACCESORIOS
Unavezque hayacolocadoel mango en la unidad,y
el cordon hayasido enrollado en los sujetadores,
podra procedera colocar los accesorios en sus
respectivosreceptaculos.
1. Cierreel fin para aspiraci6nde la mangueraen la
parte detrasera de la aspiradora.
2. Coloque la mangueradetr_s del mangoy encima
del soporte de manguera.
3. Coloque la manguera en la ranura delanteraen
el soporte de herramientas,girando y empujando
haciaabajo hacia la mangueracorta para asegurar
una conexciOnbuena.
4. Coloque el tubode extensibnen la ranura
detrasera en el soporte de herramientas.
5. Muevala herramientapara hendidurashacia la
ranuraal lado del tubo.
6. Conecteel cepillode polvo o el cepUlode usos
m=Jltiplescon el tubo con los cepillos hacia arriba.
Soporte para
manguera
Manguera
•Cepillo para
sacudir
- Tubo
®
Abertura de -Herramienta
aspiraciOn para tapices
Tenador de
herramientas
uera
corta

PARACOMENZAR
,_l._ 1. Gire el
Sujetador
de
liberaci6n sujetador del
r_pidadel cordonde
hacia abajo
para liberar
el cord6n
el_ctrico.
Peligrode lesi6npersonaly dafioal preducto
• NO conectelaa,spiradorasiel intenuptorest_
enla poslci_ ON. Podrfaresultarenlesk_
personalo da_o.
• NO useIo6enchufes Iocalizadossobrelos
muebles._ objetoscercanospodrfanresultar
da/1ados.
2. Desprenda el enchufe del cord6nel_ctrico y quite
el cord6n del sujetador superior.Compruebe que el
cord6n electricosigue fijado en la ranura de bloqueo 3. Conecteel cord6n electrico polarizado enun
del sujetador superior, enchufe de 120voltios que se encuentre cerca del
piso.
NOTA: Parareducir el riesgo de cheque electrico,
esta aspiradoracuenta con unaclavija polarizada,
unode loscontactos es m_.sancho que el otro. La
clavija s61opuede introducirsede una manera en el
enchute.Si la clavija no cabe bien en el enchufe,
inviertala.Si a0n no cabe, Ilame a un electricista
para que instale un enchufe correcto, Noaltere la
clavija de ninguna manera.
I
ALGUNOS MODF LOS SUGERENCIASDE AJUSTEDE NIVELDE PELO
ALFOMBRA
Paraeeleccionar unajustede nivel de pelo de la
a]fombra:
Apague la aspiradora.Seleccione un nivel de ajuste
inclinandola aspiradora hacia atr;_shast que las
ruedasdelanteras est_n un pose despegadas del
piso.
Deslicela palancade ajuste de nivel de pelode la
alfombraa la posici6n deseada.
Los modelos sinselector ajustan autom_.ticamente
para el pelusode alfombra de varias alturas.
Para que se le facilitenalgunas tareas de limpieza.
come per ejemplo tapetesaueltos y alfombrasde
pelo large,puede que sea necesario elevar ajuste
de nivelde pelo de la alfombra. Losajustes sugeri-
dos son los suguientes.
Losmodelosdedos (2) posiciones:
HIGH:pelo eorto o mediane.
LOW: pelo me]dane opocolarge.
Losmodelosde cuatro(4) poslciones:
HIGH:pelo _spero y lanedo,pelo largo,felpa, alfom-
braso tapetesirregulares,
MED: pelo mediano opocolargo.
LOW:peloeorteo meiano.
F..XLOW:pelomuy corto.
Ponga la unided en"HIGH" cuandouUlicelos acce-
seriesparaprevenirposiblesdafios al piso.
Atenci_: Se requiere el cuidado especial cuando
pasa la aspiradora sobreciertas clases de alfembra
o cubierta de piso.SJemprerevise las instrucciones
de la limpieza recomendada de fabricante para la
alfombrao la cubierta de piso antes de pasar la
aspiradora.
6

ALGUNOS MODELOS
Paradeseccionarel ajuste de pisodescubierto:
Oprima el bot6n de selecci6nhasta atras y debajo
de la boquilla hasta que se sienta asegurado.
Enesta posici6n el agitador no da vuiltas.Esta posi-
ci6n debe estar usadapara limpiamientode pisode
maderay mosaicoy cuandose usan algunos
atachamientos(herramlsotas).
Selecci6n de pisosconalfombra:Oprime el boton
completarnenta hastaetfrente y per arriba hasta la
posici6n de pisos con alfombra.
En esta posici6n el agitador da vueltas. Cuando se
limpia alfombras,el selector tiene que estar en esta
posici6n.
Atenci6n: Refierasealas recomendacionesdel lab*
rJcantepara limpiar su alfembra.Algunas alfombras
mas delicadas pueden requerir el use de la aspi-
radora con el agitador desconectado para prevenir
que la alfombra sea daSada.
! CUIDADO
No deJepermanecerla aspiradoraen unsolo
lugardurantening_ntiampocuandeel agita-
der est_rotando.Se puededeilar laalfornbra.
Nora:Para la vida m_s larga de la correa, apague la
aspiradora antes de mover el selector.Si usted no Io
hacede esta manera, puedecausar que la correa
frota el eje del selectory puede calentarycausar que
se quemela correa que causeria un olorquemado.
Selector de pisos
con alfombra y
sin alfombra
Hasta la
posici6n de
pisos sin
alfombra
Hasta la
posici6n de
pisos con
alfombra
Suelte el mangoper pisar en el pedal de liberacion
y tirarlo hacia atr_s hasta que libere de su posici6n
vertical.
Pedal de la
Ilberacl6n
ALGUNOS MODELOS
Suelteel mango perapretar haciaabajo con el pie
en el pedal de liberaci6ny tirar del mango hacia
atr;_sy hacia abajo con la mane.
Pedal de Ilberacl6n
del mango
Para encender la aspiradera, pise enel control de
ON/OFF colocado en la parte detrasera de la aspi-
radera. Para apagar la aspiradora, pise en etcon-
trol otra vez.
Interruptor de
encendldo/
7

i:iiiiiill!:!_i_i:i:::::::::::::_:_:i iiiiiiiiiili:i:_!:!:i:i:i:!:!_!:!:i:i:i!:i!iiil!:!_:i:i:ii!:i:i:iiiiii!i:i:i:i:i:i_i:i_iiiiiiiii:i:i:!:::i:i:i:iiiiii!!!i:i:_:i:i:i:i_i:i:i_i:iiilii:i:i:!:!:iiii!:i:!:!:!:ii iiii!:i:i:i_i:i:i:i:i:iiii!i:i:i:_::::::iiilii:i_i___i:ii_i_ii:ii_iiiiii_i:ii_i_i_:ii_i_i_i__:_i_ii_iiii_ii!_i_i_i_iiii!ii_iiiiiiii_ :_iiii::_:!:iiii:i:i:iiiii;:i:i:i:i:i:i:iiiii:i_ii:,:_i:iiiiiiiii:::::i:i;:;:;:i;i:iiiii:i_i:i:i::::_iiiiii!:!:_:i::::ii_:i:i:i:ii!i:iiii_i:::i:i:!:iiiiiiiiiii!_i:;:i:i:i:i:;_;:i:i:i_i:i:i!__::iiiiiii!:i:i:;:i:i:i:i:i!!i:i:i:i_ii::::::::_:iiI
I i!iiiiiiiiiiiii!iill !ii ! i !
Peligrode choqueel6ctdcoo lesi6ncorporal
Nopongalesmanoso lospiesdebajode la
mAquinacuandoaSadela manguera.Mientras
se usanlosaccesodos,laagitadorempiezaa
girar.Nodejeque laaspiradorase quedeen
uns61olugt=rporunperiodoextendido,porque
la agitadorpuedehacardatioa lasuperficie
delsuelo.NopongaIsaspiradoraencimade
muebles,enelflecode laalfombra, enuna
affombrade pelolargo,nienescaleras
affombradas.Laposicl6nIdealpara la
asplradoracuandoseusanlosaccesorios
estdenun dreaplanaconelmangoenla
posici6nvertical.
COMa UTILIZARLOS
ACCESORIOS
Coloquela aspiradora en unasuperficie planey pon-
ga el graduador de altura en HIGH.
Losaccesorios podran colocarse en la manguera o
en el tuba.Adem&s,el c_pillo para polvo tambien
podr_ colocarse an la boquilla pare huecos reducio
dos.
La mangueray el tuba pueden sacarse de la man-
guera corta tom_ndolosparel extremoy tirandoha-
cia arriba.
! CUIDADO
NO tirede la aspiradora pot lamangueraen
le habltacl6n.Podrfanocurrlr dat"_osa susper-
tenencias,
Losaccesorios se pueden conectarala manguerasi
el objetoque sedesea ]impiar no esta lejosde la
aspiradora La manguera, en algunos modelos, se
expandir_.
NOTA:Cuando la aspiradora este prendida, la
manguera,en algunos modeas, tendera acaerse
debido a la succiSnde la aspiradora.
Sidesea m,%extensi6n, puedeconectar el tuba ala
mangueray los accesorios al tuba.
CUIDADO
AI utilizer los accesoriospars limpiar, tenga
cuidado de no sobrepasar el alcance de la
manguera.Si Io haca,podn'aocasionarque la
aspimdorase calga.
ALGUNOS MODELOS
Se incluye on tuba extra,sin pesta_as,para un ma-
yor alcance.El tuba extra se puedeconectaral tuba
con pestaSaspare Iograrun mayor alcance.Intro-
duzca el tuba y d_le un cuarto de vuelta pare asegu-
rar!o.
Herramlentapara hendlduras
F_ (AigCeplUopara $acudlr Tubo
unosmodelos) im
E IJ Combinacl_n \ \ T
_L_ (Algunosmodelos)L._ Ceplllo
Si utilize el cepillo pare polvo/cepillopare
combinaci6n y necesita m_s alcance,puede conec-
tar la boquilla para huecos reducidosal tuba y el ce-
pillo pare polvo/cepillo pare combinacionen la boqui-
lie pare huecos reducidos.
ALMACENAJEDE LOS
ACCESORIOS
Devuelvala mangueraa su lugar en la manguera
corta y las herramientasa su soporte.
CUIDADO
AsegL_resede limpiar losaccesoriosdespuds
de utilizariosen dreassucies,debajodel
refdgemdor,antes de usadosenotrassuperfi-
cies,ya que podriandejarmarcas.
8

CUIDADO
MANGUERA DE EXTENSION
ALGUNOS MODELOS
Uno$modeios incluyen una manguera auxiliarque
conectacon la rnanguerade estirar en la aspiradora
parauna exlensi6n mas larga para limpiar.
Manguera de la unidad Manguera de extension
inserte las dos leng{Jetasen el extremo de la
manguerade extensi6nen las dosranuras tormadas
como la letraJ en la aspiradoray gire para conectar.
Se puede conectar todaslas herramientasy el tubo
conel extremo abierlo de la manguera.
CEPILLO PAPA PISOSY TUBO
ALGUNOS MODELOS
Unos modelos tienenun cepilloy untuboauxiliares
para limpiarlos suelos sin altombras.Gire el extremo
del adaptadorhacia el cepillo desuelo y el otro
extremohaciael tuborecto.Conecte el tubo recto
con el tubotelesc6pico y luegocon la mangueraen
la aspiraderao con la manguerade extensi6n.
QI
AREA A LIMPIAR
Entre
ACCESORIO Muebles* coijines* Cortinas* Escalones Paredes
CEPILLO PAPA SACUDIR <_ X X X X
HERRAMIENTA PARA
HENDIDURAS _ X X X
CEPILLO PAFIA _ X X X
COMBINACION
Handi-Mate ® Jr. _ X X
La valvulade desviaci6n puedeestar abierta mientras se usan los accesorios o para limpiaruna alfombra
nuevaa causa de un flujo reducidode aire por los accesorios mismos o por la pelusa de la alfombra que Ilene
la bolsa rapidamente.
• Siemprelimpie los accesorios antes de usar sobre telas.

liiiiiii!iiiiiiii!!iiiiii!iiii!iiiiiiiiiiiiiiiiiiiiiii!illil-i i.........................................i-ri ii....................................................!iii!il........................!iiiiiiiiiiiiiii!iiiiiiiiiiiiiiiiiiiiiiiiiil.....
................::r:.........................:d....... ::::,::i::ib:!@::ii!::::ii::::i::iii_@i!::{_::::i:::,::_:_::i:{ i l i
Peligrode lesi6n personal
Act=lecon precauci6nsicolocalaaspiradora
sobreescalones.Sise cae,podrfacausar
lesl6npersonalo datloa lapropiedad.
Orillasdealfombras.
Guie unode loscostadoso la parleanteriorde la
boquilla a Io largode!borde dela pared.Loscepi-
]los largosayudana aspirarla tierra atrapadaen las
orillasde lasallombras.
Escalones,
Coloque el mangoen la posici6nvertical. Usela
herramientapara hendiduraso el cepillo para
sacudir.Coloque el interruptor de encendido/apaga-
do en ON.
SISTEMA DE PROTECTION
DE MOTOR
ProtectorTermal
Estaaspiradoratieneun protectortermal que se
ajustaautorn_ticamentepara proteger a la
aspiradoradel sobrecalentamiento.Si una
obstrucciSnimpide el fluio normal de aire a] motor,el
protectortermal apaga el motor autom&ticamente
parapermitir que el motor se enfrle a fin de evitar
posiblesdaSosa la aspiradora. Durante este tiempo
la luz delanterase mantiene prendida.
Para corregirel problema; Si esto ocurre, apague la
aspiradoray desenchufeel cordon del tomacorriente
parapermitirque la aspiradorase enfr[e y que el
protectortermal se reajuste. Busquey saque las
obstrucciones,sies necesario.Examinetambi_n y
reemplaco/limpiecualquierfiltroobstruido.Espem
aproximadamentetrointa(30) minutosy enchufela
aspiradoray volt_elaparaver siel protectordel
motorseha reajustado.El protectordel motorno se
reajustar8sinose haapagadolaaspiradoraaun
cuandola aspiradora se hayaenfdado.
INDICADOR DE RENDIMIENTO
ALGUNOS MODELOS
Cuando la unidad este funcionando con el flujo
normal de aire, el indicador de rendimiento esta
apagado. Se enciende la luz cuando el tlujo de
aire est_ obstruido. Si eso ocurre, chequee el
cubo de la basura, limpie/reemplace filtros
tapados, y chequee otros lugares pos}bles de
atascaduras que se muestran en COMO
ELIMINAR LOS RESIDUOS DE BASURA EN
LOS CONDUCTOS.
Para corregir
el problema:
Vease el
diagrama
RECONOCI-
MIENTO DE
PROBLE-
MAS.
rendimiento
NOTA: Es posible que la luz encienda al usar
los accesorios porque el flujo de aire es
reduddo por los accesorios.
10

Sigasiempretodaslasinstruccionesdeseguridad
allimpiarydarleservicioasuaspiradora.
Peligrodechoqueek_ctd¢oo lesi6ncorporal
Dosconectelaunidadantes de Ilmpiarlao
dede servicio,De Iocontradopedria produ-
cirseun choqueel_tdco o causarlesi6n cor-
poral sila aspiradoraarrancade manera
imprevista.
Recoja el cordon electrico y p6egalo sueltamente
alrededordel soporte de liberaciSnr_,piday alrede*
dor del soporte inferior para el cordSn.
liberacibn
rapide del
cord6n._
Guarde laaspiradora bajo
techoen un lugar seco,
conel mangoen posici6n
vertical.
eldctrico
mlento
inferior para
e/cord6n
,t ADVERTENCIA
PelJgrode choquaekY3ricoolesibnCOllX_
Si enroUaelcord6nmuyapretadopuedeten-
serlo muchoy causededai_os.De daSarse,el
cordenpedda causardescargas eldctricasy le-
sioneso dai_ospersonales.
Desconecteel cord6n electricode la clavija de la
pared,NOchoreaaguasobrela aspiradora.
Limpieel exterior con un trapo suave y limpio,que
ha sido exprimido despu_s de remojaren una solu-
ci0nde agua y detergente Ifquidoligero.Seque el
exterior con un trapo seco despu_s de limpiar.
Limpiela superficieexterior del receptaculo y de los
accesoriespara reducir la electricidadest_,ticay la
acumulacionde polvo
Lavelosaccesorios en agua tibiajabonosa,
enjuague y deje secar al aire.No los laveen lava-
dora de platos,
CUIDADO
No uselos accesodes slestanmojados.
Losaccesodosque se utiliosnandraas
sucias,debajo del refdgerador,nodeben
usarseen otrassuperficiessinantesser
lavados.Podrfandejarmarcas.
11

Slemprevacfeel cubode labesuracuandoel nivel
de besuraalcanza la II'nea'MAX FILL."
PARASACAR ELCUBO DE LA BASURA:
ADVERTENCIA
Slempre desconecte el corden_lectdco antes
de repararalguna parte de la aspiradora,
Levantela mani- Manija de
ja del cubo de la soltarel cubo
basuraubicada
altopedelcubo
de la basura. Cubode
Tire de la manija
hacia adelantey lev-
ante el cubo de la
basura hacia arriba y
afuera de la aspi-
radora.
Porllllo del !
Remueva cubode la
cualquier
obst_,culoque
puedaestar
Iocalizadoen
la entradadel
cubode la
basura oen FIItro
el filtro secun- secundarlo
dario,
PARA VACIARELCUBO DE LABASURA
T ome en esta Abierto
direccibn_ara vaciar)
1
Cerrado
(Para usar)
Rote el montaje de la tapadel canasto de basura
contra las agujas del reloj como est,, indicado en la
tapa y levantela hacia afuera.
12
#
Vacie el contenido del
cubo de ]abasura adentro
deI tarro de basura.
PARA LIMPIAR EL PRE-FILTRO
El filtro puede
limpiarse
golpeandolo
solore una
superficiefirme
o enjuagandolo
bajo una Ilarede
agua. Enjuagar
con agua
solamente,no
utilizar
detergente o
jabon. Dejarque
el filtro se seque
por 24 horas
antes de poner
de relreso en la aspJrdora.
Cubierta

PARA REEMPLAZAR EL CUBO DE LA BASURA
Tome en esta Abierto
direcciOn (Para vaciar)
Cerrado
(Para usar)
Coloque latapa del canasto de basurasobre el
canastode basura.Alinee la$marcas como se
muestrabajo Abierto (Para Vaciar). Rote la tapa en
sentido de las agujasdel reloj presionandohacia
abajo hasta alinear las marcascomo se muestra
arriba de Certado (Para Usar).
Ponga elcubo de ta
basurade vuettaaden-
trode la aspiradora
insertando el rondo
primero e inclinando
atr_s con la manija del
cubo de la basura lev-
antada.
Manijade Bajela manija
soltarel cubo de[cubode la
basura para
ajustar el cubo
Cubo de de la basura en
su lugar
Revisar frecuentemente el filtro secundario y
limpiarlo cuando est_ sucio.
Remueva el cubo para basura como en la ilus-
tracidn en la seccidn de LIMPIEZA DEL CUBO
PARA BASURA.
Para limpiar la cubierta del filtro, limpiela con un
traposeco.
NOTA: La cubierta del filtro es removible.
Reemplace el cubo de basura como en la ilus-
tracion en la seccion de LIMPIEZA DEL CUBO
PARA BASURA.
secundarlo
.J
t.':1

Peligrode choqueel_:trico
Desenchufeel cablede poderdel tomacord-
ente. No operelalimpledorasin etfiltropd-
madoo el filtrode escape.Estdseguroque el
filtrosest6 insteladopropiamentepare pre-
venirfalla delmotory/o sacudidael6ctdca.
FILTRO PRIMARIO
Examineel filtro primario de vez en cuando y limpie
cuando est_ sucio.
PAPASACAR ELFILTRO PRIMARIO
Remuevael cubo de la basuray el ensemble de la
tapa delcubo de la basura como se describe en la
seccion LIMPIANDO EL CUBO DE LA BASURA.
Agarre el filtro,
rote y levan-
tese. Tabulaci6n
El Bloquear
\
Ranu_
Cub_r_
DelFil_o
Limpieel filtro primario golpe:4ndolosuavemente
con sus manos sobre un contenedor de basura.
Golpe_lo suavemente en diferentes lados para
botener mejor limpieza.Enjuague con agua solo
cuande Io neceeite (Vetpagina 13).
Unavez que haya limpiado el filtro, la aspiradora
perderala potencia maximade succi6n, nesecitara
reemplazar el filtro.
PARAREEMPLAZARELFILTRO PRIMARIO
Substituya el liltro y rotelo
hasta que las tabulaciones Filtro'._ _4/k\_\s_.,_.._A,-,
bloquean en ranuras. 2_/_//_/_/_
Chequee correderasy remueva _."_/_J_JJJ7
Cubi rt. I ""
De/Filtro _ , aDU aclon
El Bloquear
FILTRO DE ESCAPE
HEPA
Este cartucho del filtro escape setiene que cambiar
este sucio.Debecambiarse peri6dicamentesegtJn
las condicionesde uso.
El flltrono sopuedelaver pues perdeddsucapaci-
dad pareatrapar altrapar polvo.
Apriete haciaaden-
tro de cada lado de
la cubierta del filtro
de escape y tire
hacia afuera pare
remover de la aspi-
radora de polvo.
Apr/ete
hacla adenb'o
Cublerfa
del flltro
Remuevael cartucho del filtro de escape.
FIItto
Reemplace el filtrode
escape, posicionandolo
cuidadosamente pare
que quepa dentro del
marco.
Empuje_nicamenteel cartucho
de filtro,no el filtro mismo.
Reemplacela cubierta del filtro
de escape poniendo las
lengQetasen las ranurasy
empujandoadentro hasta que
la cubierta calza en sc lugar.
NOTA: Bajo use y cuidado normal, so liltro puede
Ilegara durar hasta 3 a_os.
14

ADVERTENCIA
Peligrode choquee_'trico olesidncorporal
Dessonectelaunidadantesdelimpiarla o
dadeserv_o. De Iocontmriopodrfaprodu-
cirseunchoqueel_'_tlcoocausal"lesl6ncor-
peral slla aspiradoraarranca demanera
imprevlsta.
Frecuentementereviseel _rea del cepillo y quite
todo pelo, cord6n o pelusa que se haya acumulado,
Di la acumulaciones excesiva,siga las instruc-
clones a continuaci6n. Sila correa se allojara o
rompiera, siga las instrucciones para quitar la cot-
tea.
PARAQUITAR LA CUBIERTA DE LA
BOQUILLA
Desenchufela unidad de la corriente electrica.
Paraproteger la superficiedel suelo,siempre ponga
papel debajo de la boca de la m_quinacuando se
saca la cubierta de la boquifla.
Libere la cubierta de boquilla per girar lossoportes
de la cubierta de boquilla a la poeici6nUNLOCK.
Agarre ambos lados la parte trasera de la boquillay
levante la cubierta para quitarla de la basede la
boquilla.
Cubierta
de la
Cepilleo quitecualquierresiduoque esleen al area
de correas.
ADVERTENClA
Peligro de lesi6n personal
Siempmdesonchufela aspimdoraantesde
limpiar el _ del cepillo,ya que_-te podrfa
empezara fundonafrepentinamente.No
hacerlopodrfaresoltaren unalesi_ personal.
PAFIAQUITAR LA CORREN
LIMPIAR ELAGITADOR
Coloquelas manes en el agitador. Si la correa ya
esl;_instalada en el agitador,babra tensi6n en el
agitador. Tengacuidado cuando levantael agitador
de la boquilla.
Quite la correa desgastada o rotadel eje de trans-
misi6n del motor. _
Quitetoda basurao restos del area que recorrela!
correa o del _,readel cepillo cilfndrico.
ADVERTENCIA
Peligro de lesi6npersonal
Tengacuidadoal quitar elcepillo ilindriso,
la tension de la correaes grande. SI no
tlene precaucl6n podria sufdr una lesi6n
personal si el cepillose libera rdpidamente
y sale disparade.
15

Concuidadoquitelaagitadorparaversisehart
acumuladohilosypelo.
NOTA:Paramantenerunaaltaeficienciade
Iimpiezayevitareldafioalaaspiradora,
timpi_r_1aaitadorcada vez aue se cambia la
r._L0__.
Tambienhayque Iimpiar el agitador segen el sigu-
iente horatio:
Frecuente - cada semana
(usada dirariamente)
Moderade- cada mes
(usada 2 o 3 veces
per semana)
Ugero - cada 2 meses
(usada 1 vez per semana)
Retire todoindicio de basura o suciedad de la zona
de la correa y del agitador,
Perspectivadespiezada-
Agitador
ext emo agitador PnO/ea
Tapa
del
correa extreme
Con cuidadoquite
lastapas y quiteel
hilo o los restos
ubicadosen el
agitador,en los
soportesdel cepil-
Io,o en el eje del
agitador.
no
Cambie las tapas del extreme.Yea la perspectiva
despiezadapara seguirel orden correcto de coloca-
ci(_nde las piezas.
PARA CAMBIAR LA CORREA
Asegurase que el selectorde pisos con y sin alfom-
bra este en la posici6nde piSosconalfombra. Co-
Ioquela nuevacorrea alrededor del eje de transmi-
si6ndel motor. Coloque la correa nueva sobre la
poleade] agitador.
Ejede
transmisi6n
Correa del motor
eeuva
Poles para Correa Selector de pisos
con alfombra y sin
correa neuva alfombra
CORREA SOBRE LA RANURA GUIA
Correa Est_ Centrada
Sobre la Ranura Guia
(Selector de pisos con y sin alfombra
este en la posici6n de pisos con alfombra)
• _-_ Selector
Ag#tador _ de pisos
t _ I f : _',','f=_', i bray sin
Eje del selector de Eje de
pisos con y sin transmision
alfombra delmotor
Correa No Est_ Centrada
Sobre la Ranura Guia
(correa aldrededordel ejedelselector
de pisos cony sin alfombra)
• _ _J_-4- Selector
Agttado_..,_,.__ _ de pisos
"_ "_ _ _'_" _ __, con alfom-
Eje de
Eje del selector transmisidn
depisoscony del motor
sin alfombra
Correa No Estd Centrada
Sobre la Ranura Guia
(El selector de pisos con y sin alfombra
este en la posicidn de pisos sin alfombra)
Selector de
pisos con
Agitador Correa / _ alfombra y
/ \ sm alromora
Eje de Eje del selector
transmision de pisos con
del motor y sin alfombra
16

Inserteelagitatorperinsertartaparteredondade la
tapaen la ranurade la basede la boquilla.
-Ranura de la
base de
boqullla
Agitador Base
Hagapresi6n firmemente,asegur_ndose de que ha-
yah entrado bien ambos extremes.
Agitador
Verifiqueque la correa este centrada en el polea
para correa yque el cepillo cilindrico gire libremente.
Asegurese de que lossoportes de la cubierta de la
boquilla esten en la posici6n UNLOCK. Conectela
parle delantera de cubierta de boquilla con la base
de la boquilla y gire hacia abajo. Cuando este en su
lugar apropiado,gire los seportes de la cubierta de
la boquilla a la posici6n LOCK.
Cubierta
dela
boquiU,
Soportes de la
cubierta de boquilla
@
@
17

ADVERTENCIA
Peligrodechequeeke-triceo lesi6n corporal
Desconectelaunidadantesde lirnpiarlao
darleservicio.De Iocontradopodrfaprodu-
cirseunchequeeking'triceocausarlesl6ncor-
poralsilaaspiradoraarranca dernanera
imprevista.
Procedasiempre con precaucionesde seguridad al
limpiary dar servicio la aspkadora.
Si consideraque la aspiradora no aspira bien
asegureseprimerode que la bolsa no est_ Ilenay
de que el filtro no este atascado. Consulte las ins-
truccionessobre LIMPIANDO ELCUBe DELA
BASURAy CAMBIO/LIMPIEDES FILTROS.
Silas zonas del filtro y la cube de la basura no est_.n
atascadas,examine la zona de la manguera. Quite
la aberturade aspiraci6n per apretar lasdos
leng_etasque la asegurana la parle detrasera de la
aspiradoray revise si hay residues en el _,rea.
aspiracibn
Protector herramientas
Mere
oorte
Reemplazala abertura de aspiraci6n y saque el
ottofin de la manguera delsoporte de herramien-
tas. Enchufe la aspiradora y enci_ndala. Con la
aspiradora encendida, estire la manguerapara
quitar el residue. Apague la aspiradoray des-
ench6fela.
Si todavia hayresidues, quite la mangueracerta de
su soporte y revise la mangueracorta.
Quitelos residuos visibles.
demotor
NOTE: No obstruye el protector de motor.
Esta aspiradoratiene una v&lvulade desviaci6n
que sirve come protectorde motor que seabre
automaticamente paraproveerunflu[ode aire al
motor ouando un zuecoimpida que circule el
aire al motor.Si se abre la v_,lvulabypasspara
impedir que se recalente el motor y que no
haga daSoa la aspiradora,se notar&uncambio
de sonidomientras el aire pasaper la abertura
de la valvula.Cuando ocurre,apague la
aspiradoray desenchufeel cord6n del
tomacorriente.Despu_s,inspecci6nelapara
encontrar zuecos como ss describebajo la
secei6nCOMO ELIMINARLOS RESIDUOSDE
BASURA EN LOS CONDUCTOS.
La v_,lvulade desviaei6n puedeestar abierta
mientrasse usan los accesorioso paralirnpiar
una alfombra nuevaa causa de un flujo reducido
de airs per los accesorios mismos o per la
pelusade la alfombra que liens la cube de la
basurarapidamente.
18

ALGUNOS MODELOS
ADVERTENCIA
Peligrodechoqueel6ctdcoo lesibn corporal
Desconectelaunidadentesde limpiarlao
darleservicio.De Iocontrariopodrfaprodu-
cirseunchoqueel_-'tricoocausarlesi6ncor-
poralsilaaspiradoraarranca demanera
imprevista.
Desenchufe la unidadde la corrienteel_ctrica,
Para alzar la bombilla, quite el tornillo que asegura el
lente a la aspiradora, Quite el lente.
_acar
Remuevala bombillaempujandolay valla dandola
vuelta para la izquierda parasacarla de la abertura.
Despuessaque la bombillapara aluera.
\
CUIDADO
No use unaampolletade re(isde 130 V AC-
15 W. Duranteusoextendido,el calorde la
ampolletapuedesobrecalentarlas partesde
pl_-tJcocercanas.
\
Par remplacarla bombilla, cuidadosamenteinsertey
de vueltahacia la derecha hasta aseguariaen la
abertura.
NOTA:Mirepiezasy caracteristcasparael numero
de la bombilla.
!
CUIDADO
Nola enchufenl la prendaslnohastaque la
haya vueltoa armar por
cornpleto.
Coloque otravez ellente en la aspiradora.
Coloqueotra vez el tornillo.
19

Pellgrodechoqueel_ctri¢oolesi6ncorporal
Desconects la unld_dantes de Iimp_rlao
dadeservicio.De Iocontrariopodrfaprodu-
cirseunchoqueel_-tricoocausarlesi6ncor-
poralsila ,_spiradoraarmncade manera
imprevlsta.
PARA EXAMINAR EL AGITADOR
Protectordela
€orreadela base
Coloque la
aspiradoracon la
base haciaarriba
pararevisarsi los
cepillos est_n en
malas condiciones,
Cuando los cepillos
esten gastados al
nivel del protectorde
base, reemplazca el
agitador.
PAPA QUITAR ELAGITADOR
Quite la cubierta dela boquilla y el agitador, Vease
CAMBIO DE LA CORREAY LIMPIEZA DEL
AGITADOR.
Reemplazca el agitactorcon un nuevo.
Rearme la correa, el agitador y la cubierta de la
boquilla. V_ase CAMBIO DE LA CORREAY
LIMP/EZA DEL AGITADOR.
Polea para correa
Unldad del agltador
Tapa del
ext_mo
2O

Consulte este cuadro para encontrar solucionesque usted mismopuede realizar ouandotenga problemas
menores de rendimiento. Cualquier servicioque necesite aparte de otros descritos en este manual tienenque
ser hechos per un represetante de servicio autorizado Sears.
cirse unchequeel6ctricoocausarlesiSncorporal.
ii2Eiiiiii2ii!iiiii @ ijiliFiFi2fliiiPi]
L8 a_mdet8 no fun_ona.
No a,_irasaUsf_ctoriamente.
1, Est& desconectada
2. Cortacircuilos bolado o fusible quemado en
el tablero de servicio de la _esidencia.
3, Inlerruptor c_eencendido/apagado no
est,. en la posJ¢iSn ON
4. Protector termal aciivado
1. Cube de la Ioasura!leno o atascado
2. Ajusle incorreclo de nivel de petode la alfembr_,
3. Agitador despaslado
4_ Boqui_la. o portilto c_8la ct_bo de la basura
atascada
5, Manguera atascado
6, Mangue_a mta
7. Cornea rota
8, La manguera no esta bien insertada.
9, Activac16n del sislema de pr_ection del rNoto_
10, Fi_tros de seguddad
1. Conecle bien, oprima selector de
encendiclo/apagado a la posiaibn ON.
2. Reslablezea el corlacircu_os o
camb_e el fusible.
& Coloque el inlerruptor de encendido/apagado
en la posiciSn ON.
4. Reaiuste el protector terrnaL {pagina 10)
1, Cube de la basura limpio, (p&ginas 12. 13)
2. Alusle el nivel. {pagina 6).
& Cambieel _gilador, (p&gina 19).
4, Revise COMe EUMINAR LOS RESIDUOS DE
BASURA EN LOS CONDUCTOS, (pagina 17).
5. Limpiar tube para el mugre, {p#Lgina 17).
& Cambie la mangtJera.
7. Cambie la correa, (paginas 15. 16)
8. Inserie bien _amanguera, (p_gina 6}
9. Determine si existen b!oqueos, (pAgina 17)
10, Limpie;cambJe el filtros, (pagina 14)
La aspltadors levanta tapetes 1. Ajusle incorreclo de {_ivel de pelo de la aitombla 1. Ajuste el nivet, (pagina 6).
o es dif{culempujar.
Laluznofunciona. 1. Bombilla_ur_d_da. 1. Camb_elabombilla,(pagina18)
E_ensemble del agitader 1, Correa rota 1. Cambie la correa: (paginas 14, 15).
no glta. 2- Seleclor de piso con altombra y plso sin 2. Cambie el selector an la seneca,ion
ailombra e_'_la sele_ion de piso sin alfomb=a con alI_mbra (pagina 6)
3, Correai=_staladaincorrectamen_e 3. ReViseCAMBIODELACORREAYLIMPIF-ZA
DEL CEPILLO, (paglnas 15-16).
B kldlcador de rendlmiento. 1, Cube de la basura Ileno o atascado. 1, Cube de la bas_*ra limpio (paginas 12` 13)
elg_losmodelo_,est_roJo. 2. Filtrosdesegur_dad 2. Limpie/cambieeHiltros.(p&pina!4 ).
3. Conduetodeflupdea_leatasca_o. 3. Re_ileelmalerialbloqueanfedelconducto
de aim. (paginal 7).
4. Cier_es accesorios 4. Esto es normal La luz debe apagarse al
quitar la her_amienta
Rll_t._iccll_ndel flute de el 1. El use de los ac_esodos limita el fluio de aire 1. Revise use DE LOS ACCESORIOS, (p_gJna 9).
de lOSacce,l_rlos, 2. La pelu_a de una alfembra nueva 2. Revl,_e COMe ELIMINAR LOS RESIDUes
CatT=blode sonldo, ob_lruye el paso de aide DE BASURA EN LOS CONDUCTOS
y limpie la manguera, (phgina 171.
21

_H
Your Home
For repair - in your home - of all major brand appliances
fawn and garden equipment, or heating and cooling systems,
no matter who made it, no matter who sold it!
For the replacement parts, accessories and
owner's manuals that you need to do-it-yourself.
For Sears professional installation of home appliances
and items like garage door openers and water heaters.
1.600,.4-MY-HOME _ Anytime, day or night
(1-800-469-4663) (U.S,A. _nd Canada)
Www._ear$,colTi www.se_rs.ca
Our Home
For repair of carry-in products like vacuums, lawn equipment,
and electronics, call or go on-line for the nearest
Sears Parts and Repair Center.
1_-800-488-1222 Anytime, day or night (U,S.A. one)
www,,_3r$,com
To purchase a protection agreement (U.S.A.)
or maintenance agreement (Canada) on a product serviced by Sears:
1-800-361-6665 (Canada)1.600"827-6655 (u.s_)
i i!i!,!i i!i!il
!,!,!i'_!_i,!,!i
i_i!_i_iii
i! '
i:iiii_
i_ii_ i _
Para pe_r serv_k_de reparaci_n
a domicilio,y paraordenarpiezas:
1-888-SUJ_OGAR _
1.800.LE.FOYERMC
© Se_ts,Roebud_andCo,
Registered Trademark / TM Trademark / s_ Service Mar_ ofSears, Roebuck and Co.
Marca Registr_da / TUMarca de F&brice / SMMarca de Servicio de Sears, Roebuck and Co.
a_
_ Marque _e commerce / Marque deposee de Sears, Roebuck and Co.
-
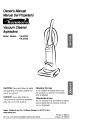 1
1
-
 2
2
-
 3
3
-
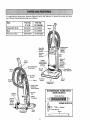 4
4
-
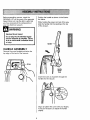 5
5
-
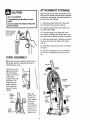 6
6
-
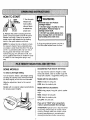 7
7
-
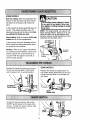 8
8
-
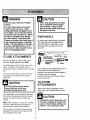 9
9
-
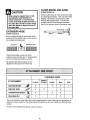 10
10
-
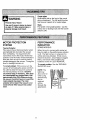 11
11
-
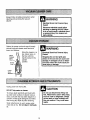 12
12
-
 13
13
-
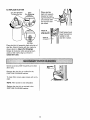 14
14
-
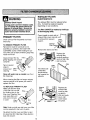 15
15
-
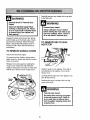 16
16
-
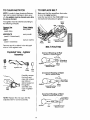 17
17
-
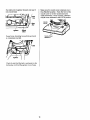 18
18
-
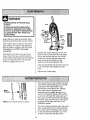 19
19
-
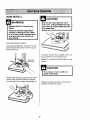 20
20
-
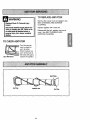 21
21
-
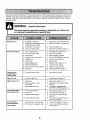 22
22
-
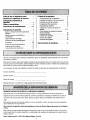 23
23
-
 24
24
-
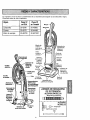 25
25
-
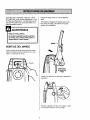 26
26
-
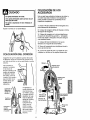 27
27
-
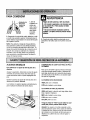 28
28
-
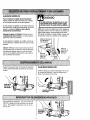 29
29
-
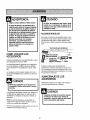 30
30
-
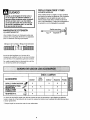 31
31
-
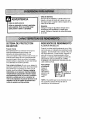 32
32
-
 33
33
-
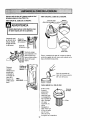 34
34
-
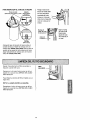 35
35
-
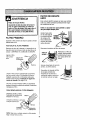 36
36
-
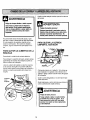 37
37
-
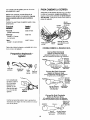 38
38
-
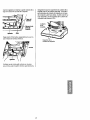 39
39
-
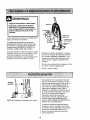 40
40
-
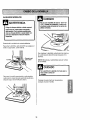 41
41
-
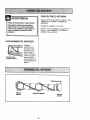 42
42
-
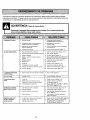 43
43
-
 44
44


Kenmore 116.33725 El manual del propietario
- Categoría
- Aspiradoras
- Tipo
- El manual del propietario
- Este manual también es adecuado para
en otros idiomas
- English: Kenmore 116.33725 Owner's manual
Artículos relacionados
-
Kenmore 116.32720 El manual del propietario
-
Kenmore 116.33720200 El manual del propietario
-
-
-
-
-
-
-
-