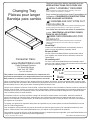
Delta Children Changing Tray Assembly Instructions
- Categoría
- Muebles de bebe
- Tipo
- Assembly Instructions
Este manual también es adecuado para
La página se está cargando...

2
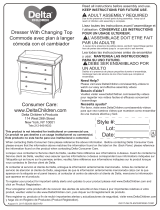
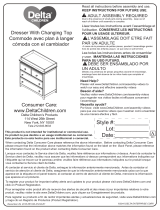
WARNING
FALL HAZARD - To prevent death or serious injury, always keep child within arm’s reach.
Read all instructions before use of the changing tray.
KEEP THESE INSTRUCTIONS IN A SAFE PLACE FOR FUTURE USE.
Inspect the changing tray periodically. Do not use the changing top if it is damaged or broken.
Contact Delta Children's Products with any questions.
Tighten all loose screws and bolts before each use.
The maximum recommended weight of the child is 30lbs for the changing tray.
This changing tray must be attached to a level, stable and structurally sound peice of furniture. The
surface must have a minimum width of 53-1/2” and a minimum depth of 17-1/8”. These
measurements should include only the flat level surface of the furniture.
The changing pad used should be 34" x 16" with a maximum thickness of 1".
RISQUE DE CHUTE – Afin de prévenir tout risque de décès ou de blessure grave, toujours
demeurer à portée de bras de l’enfant placé sur la Plateau pour langer.
Bien lire toutes les instructions avant d’utiliser la Plateau pour langer
CONSERVER CES INSTRUCTIONS DANS UN ENDROIT SÛR POUR RÉFÉRENCE
ULTÉRIEURE.
Inspecter régulièrement la Plateau pour langer. Ne pas l’utiliser si elle est endommagée ou brisée.
Si vous avez des questions contactez Delta Children's Products.
Serrer tous les boulons et vis desserrés avant chaque usage.
Le poids maximum recommandé est de 30 livres (13,6kg).
La Plateau pour langer doit être fixée à un meuble de niveau, stable et de structure solide, d’une surface
minimumde 53-1/2 po et d’au moins 17-1/8 po de profondeur. Ces mesures doivent essentiellement
correspondre à lasurface plane du meuble.
Le coussin à langer doit mesurer 34 po x 16 po et avoir une épaisseur maximale de 1 po
AVERTISSEMENT
PELIGRO DE CAIDAS - Para prevenir la muerte o lesiones graves, mantenga al niño al alcance
de sus manos.
Lea todas las instrucciones antes de usar el Bandeja para cambio.
COLOQUE ESTAS INSTRUCCIONES EN UN LUGAR SEGURO PARA SU USO FUTURO.
Inspeccione este Bandeja para cambioperiodicamente. No use el Bandeja para cambio si esta
dañado o roto. Póngase en contacto con Delta Children's Products para formular preguntas.
Apriete los tornillos y pernos flojos antes de cada uso.
El paso maximo recomendado 30 libras (13.6 g).
Este vestidor debe ser conectado a un nivel, estable y a una pieza estrúcturalmente sano de
muebles. Lasuperficies debe tener una anchura minima de 53-1/2” y una profundidad minima de
17-1/8”. Estas medidas debenincluír solo la superficié plana de los muebles.
La almohadilla usada debe ser 34 x 16 pulgadas con un grosor máximo de 1 pulgada.
ADVERTENCIA

NOTES ON ASSEMBLY:
-During the assembly process whenever using screws or bolts, check each by placing the screw/bolt on the
diagram of the item which is drawn actual size and design. Be sure to use the proper size and shape specified in
the instructions.
-To assemble this unit you may be required to place the unit on it’s side and face. It is strongly recommended that
assembly is done on a soft, non-abrasive surface to avoid damaging the finish.
NOTES ON CARE AND MAINTENANCE:
- Do not scratch or chip the finish.
- Inspect the product periodically, contact Delta Children’s Products for replacement parts or questions.
- Do not store the product or any parts in extreme temperatures and conditions such as a hot attic or a damp,
cold basement. These extremes can cause a loss of structural integrity.
-To preserve the luster of the high quality finish on your product, it is recommended to place a doily or felt pad
under any items you place on the finish.
-Clean with a damp cloth, then a dry cloth to preserve the original luster and beauty of this fine finish.
-Do not use abrasive chemicals.
-Do not spray cleaners directly onto furniture.
-Lift slightly when moving on carpeting to prevent leg breakage.
-Use of a vaporizer near furniture will cause wood to swell and finish to peel.
INFORMACIÓN SOBRE CUIDADOS Y MANTENIMIENTO:
- No arañe ni desconche el acabado.
- Inspeccione el producto con regularidad, póngase en contacto con Delta Children’s Products para el recambio de partes
o para formular preguntas.
- No guarde el producto ni ninguna de sus partes a temperaturas ni en condiciones extremas como un ático caluroso o un
sótano húmedo y frío. Estos extremos pueden provocar una pérdida de integridad estructural.
-Para preservar el brillo del acabado de alta calidad que recubre su producto, se recomienda que coloque un paño o una
almohadilla de fieltro debajo de cualquier objeto que coloque sobre el acabado.
-Límpielo con un trapo húmedo y luego con uno seco para preservar el brillo y la belleza originales de este fino acabado.
-No utilice productos químicos abrasivos.
-No pulverice limpiadores directamente sobre el mueble.
-Elévelo ligeramente cuando lo mueva sobre alfombras o moqueta para evitar que se rompan las patas.
-El uso de vaporizadores cerca de muebles puede provocar que la madera se hinche y acabe desconchándose.
REMARQUES CONCERNANT LE MONTAGE :
- Lors du montage, lorsque vous utilisez des vis ou des boulons, vérifiez chacun d’entre eux en plaçant la vis/le boulon sur le
diagramme de l’élément qui est dessiné à échelle et à forme réelle. Veillez bien à utiliser la taille et la forme adéquate
spécifiées dans les instructions.
- Pour monter assembler cette unité, vous devrez peut-être la poser sur le côté et de face. Il est fortement recommandé
d’efiectuer le montage sur une surface douce et non-abrasive afin de ne pas endommager la finition.
REMARQUES SUR LE SOIN ET L’ENTRETIEN :
- Ne rayez pas et n’écaillez pas la finition.
- Inspectez périodiquement le produit. Si vous avez des questions, ou si vous avez besoin des pièces de rechange,
contactez Delta Children’s Products.
- Ne stockez pas le produit ou des parties de celui-ci à des températures ou des conditions extrêmes telles qu’un grenier
chaud ou humide, une cave froide. De tels extrêmes peuvent provoquer une perte de l’intégrité structurale.
- Afin de préserver la qualité du lustre de la finition de votre produit, il est recommandé de placer un napperon ou un
coussinet de feutre sous les éléments que vous posez sur la finition.
- Nettoyez avec un chi on humide, puis avec un chiffion sec afin de conserver le lustre et la beauté d’origine de cette belle
finition.
- N’utilisez pas de produits chimiques abrasifs.
- Ne vaporisez pas de produits de nettoyage directement sur le meuble.
- Soulevez légèrement lors d’un déplacement sur une moquette afin de ne pas casser de pied.
- L’utilisation d’un vaporisateur à proximité du meuble provoquera un gon ement du bois qui finira par se décoller.
INFORMACIÓN SOBRE EL MONTAJE:
-Durante el proceso de montaje, ya utilice pernos o tornillos, compruebe cada uno de ellos colocando el perno/tornillo en el
diagrama del artículo donde está dibujado el tamaño y el diseño real. Asegúrese de que utiliza el tamaño y la forma
adecuada
que especifican las instrucciones.
-Para montar esta unidad, puede que se le solicite que coloque la unidad de lado y de cara. Se recomienda encarecidamente
que realice el montaje sobre una superficie no abrasiva para evitar dañar el acabado.
3

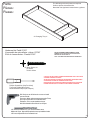
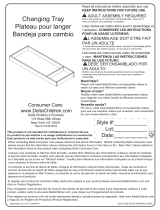
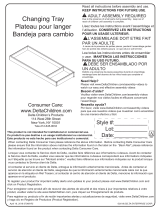
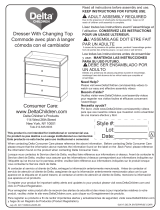
Parts:
Pièces:
Piezas:
A. Changing Tray x1
4
Phillips Screwdriver (Not Provided)
Tournevis’Phillips’(Non Prévu)
Destornillardor’Phillips’(No siempre)
B. 40mm Screw x3
Vis 40mm
Tornillo 40mm
CAUTION: DO NOT USE A POWER SCREWDRIVER THEY CAN CAUSE
SCREWS TO BREAK OR STRIP.
ATTENTION: NE PAS UTILISER UN TOURNEVIS ÉLECTRIQUE CARLE
VIS PEUVENT CASSER OU PERDRE LEURS FILETS.
PRECAUCIÓN: NO USE UN DESTORNILLADOR ELÉCTRICO PORQUE
PUEDEN HACER QUE LOS TORNILLOS SE ROMPAN O RUEDEN.
NOTE: FASTENERS ARE SHOWN FULL SIZE
REMARQUE: LES DISPOSITIFS DE FIXATION SONT
MONTRÉS EN TAILLE RÉELLE
NOTA: LOS PERNOS SE MUESTRAN EN TAMAÑO REAL
Hardware kits Part# 27067
L'ensemble de quincaillerie - pièce n°27067
El kit de herramientas - Pieza #27067
Drill: Only use to drill holes do not use to Install
screws or bolts
Perceuse : utiliser uniquement pour percer desTrous,
et non pour poser des vis ou des Boulons.
El taladro: sólo uso para taladrar hoyos.
NoUtilice instalar los tornillos ni los cerrojos
1/8” drill bit: available from your local hardware store
Mèche de 1/8 po : disponible auprès de votre quincaillerie locale.
1/8” broca: disponible de su ferretería local
The following tools and parts are required:
Outils et pièces nécessaires de:
Necesitan las siguientes herramientas y piezas:

5
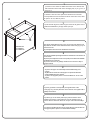
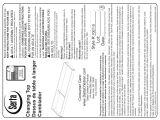
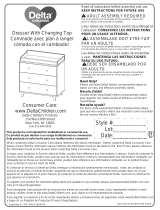
DRESSER UNIT
LA COMMODE
EL CAMBIADOR
B
A
2
2a) Set the assembled Changing Tray on the top of the dresser unit.
2b) Mark the location of the holes in the back of the Changing Tray on
the dresser unit.
2c) Drill pilot holes with a 1/8” drill bit at each location.
2
2a) Placer la Plateau pour langer maintenant assemblée sur ledessus de
la commode.
2b) Marquer l’emplacement des trous pratiqués à l’arrièrede la Plateau
pour langer sur la commode.
2c) Percer des trous de guidage à l’aide d’une mèche de 1/8po à
chaque endroit.
2
2a) Poner el equipó de ensemblaje ensima del Bandeja para
cambio.
2b) Marcar la locasión de cada agujero en la parte de atrad del
equipó del Bandeja para cambio.
2c) Hacer los agujeros pilotos con destornillador de 1/8 en cada
puesto.
1
1
1
3
3
3
1) Check to see if holes are drilled in the back of the dresser that
match the holes in the back of the Changing Tray. If yes, go to 3, if
not go to 2.
3) insert (3) 40mm screws (Part B) through the back of the
Changing Tray, into the pilot holes in the dresser unit. Tighten with a
Phillips Screwdriver.
3) Insérer (3) vis de 40mm (Pièce B) à partir de l’arrière de la
Plateau pour langer, jusque dans les trous de guidage que l’on
percer dans la commode. Serrer au moyen d’un tournevis Phillips.
3) Inserta (3) tornillos tamaño 40 mm (Pieza B) en la parte de atras en
los agujeros piloto. Apriete con destornillador Phillips.
1) Vérifiez si des trous sont perforés à l'arrière de la commode
correspondant aux trous à l'arrière du kit de commode. Si oui, allez
au point 3. Si non, allez au point 2.
1) Para insertar la gaveta, alinee la guía macho de la gaveta con la
guíahembradelmueble y empuje hasta que tope.
La página se está cargando...
Transcripción de documentos
WARNING FALL HAZARD - To prevent death or serious injury, always keep child within arm’s reach. Read all instructions before use of the changing tray. KEEP THESE INSTRUCTIONS IN A SAFE PLACE FOR FUTURE USE. Inspect the changing tray periodically. Do not use the changing top if it is damaged or broken. Contact Delta Children's Products with any questions. Tighten all loose screws and bolts before each use. The maximum recommended weight of the child is 30lbs for the changing tray. This changing tray must be attached to a level, stable and structurally sound peice of furniture. The surface must have a minimum width of 53-1/2” and a minimum depth of 17-1/8”. These measurements should include only the flat level surface of the furniture. The changing pad used should be 34" x 16" with a maximum thickness of 1". AVERTISSEMENT RISQUE DE CHUTE – Afin de prévenir tout risque de décès ou de blessure grave, toujours demeurer à portée de bras de l’enfant placé sur la Plateau pour langer. Bien lire toutes les instructions avant d’utiliser la Plateau pour langer CONSERVER CES INSTRUCTIONS DANS UN ENDROIT SÛR POUR RÉFÉRENCE ULTÉRIEURE. Inspecter régulièrement la Plateau pour langer. Ne pas l’utiliser si elle est endommagée ou brisée. Si vous avez des questions contactez Delta Children's Products. Serrer tous les boulons et vis desserrés avant chaque usage. Le poids maximum recommandé est de 30 livres (13,6kg). La Plateau pour langer doit être fixée à un meuble de niveau, stable et de structure solide, d’une surface minimumde 53-1/2 po et d’au moins 17-1/8 po de profondeur. Ces mesures doivent essentiellement correspondre à lasurface plane du meuble. Le coussin à langer doit mesurer 34 po x 16 po et avoir une épaisseur maximale de 1 po ADVERTENCIA PELIGRO DE CAIDAS - Para prevenir la muerte o lesiones graves, mantenga al niño al alcance de sus manos. Lea todas las instrucciones antes de usar el Bandeja para cambio. COLOQUE ESTAS INSTRUCCIONES EN UN LUGAR SEGURO PARA SU USO FUTURO. Inspeccione este Bandeja para cambioperiodicamente. No use el Bandeja para cambio si esta dañado o roto. Póngase en contacto con Delta Children's Products para formular preguntas. Apriete los tornillos y pernos flojos antes de cada uso. El paso maximo recomendado 30 libras (13.6 g). Este vestidor debe ser conectado a un nivel, estable y a una pieza estrúcturalmente sano de muebles. Lasuperficies debe tener una anchura minima de 53-1/2” y una profundidad minima de 17-1/8”. Estas medidas debenincluír solo la superficié plana de los muebles. La almohadilla usada debe ser 34 x 16 pulgadas con un grosor máximo de 1 pulgada. 2 NOTES ON ASSEMBLY: -During the assembly process whenever using screws or bolts, check each by placing the screw/bolt on the diagram of the item which is drawn actual size and design. Be sure to use the proper size and shape specified in the instructions. -To assemble this unit you may be required to place the unit on it’s side and face. It is strongly recommended that assembly is done on a soft, non-abrasive surface to avoid damaging the finish. NOTES ON CARE AND MAINTENANCE: - Do not scratch or chip the finish. - Inspect the product periodically, contact Delta Children’s Products for replacement parts or questions. - Do not store the product or any parts in extreme temperatures and conditions such as a hot attic or a damp, cold basement. These extremes can cause a loss of structural integrity. -To preserve the luster of the high quality finish on your product, it is recommended to place a doily or felt pad under any items you place on the finish. -Clean with a damp cloth, then a dry cloth to preserve the original luster and beauty of this fine finish. -Do not use abrasive chemicals. -Do not spray cleaners directly onto furniture. -Lift slightly when moving on carpeting to prevent leg breakage. -Use of a vaporizer near furniture will cause wood to swell and finish to peel. REMARQUES CONCERNANT LE MONTAGE : - Lors du montage, lorsque vous utilisez des vis ou des boulons, vérifiez chacun d’entre eux en plaçant la vis/le boulon sur le diagramme de l’élément qui est dessiné à échelle et à forme réelle. Veillez bien à utiliser la taille et la forme adéquate spécifiées dans les instructions. - Pour monter assembler cette unité, vous devrez peut-être la poser sur le côté et de face. Il est fortement recommandé d’efiectuer le montage sur une surface douce et non-abrasive afin de ne pas endommager la finition. REMARQUES SUR LE SOIN ET L’ENTRETIEN : - Ne rayez pas et n’écaillez pas la finition. - Inspectez périodiquement le produit. Si vous avez des questions, ou si vous avez besoin des pièces de rechange, contactez Delta Children’s Products. - Ne stockez pas le produit ou des parties de celui-ci à des températures ou des conditions extrêmes telles qu’un grenier chaud ou humide, une cave froide. De tels extrêmes peuvent provoquer une perte de l’intégrité structurale. - Afin de préserver la qualité du lustre de la finition de votre produit, il est recommandé de placer un napperon ou un coussinet de feutre sous les éléments que vous posez sur la finition. - Nettoyez avec un chi on humide, puis avec un chiffion sec afin de conserver le lustre et la beauté d’origine de cette belle finition. - N’utilisez pas de produits chimiques abrasifs. - Ne vaporisez pas de produits de nettoyage directement sur le meuble. - Soulevez légèrement lors d’un déplacement sur une moquette afin de ne pas casser de pied. - L’utilisation d’un vaporisateur à proximité du meuble provoquera un gon ement du bois qui finira par se décoller. INFORMACIÓN SOBRE EL MONTAJE: -Durante el proceso de montaje, ya utilice pernos o tornillos, compruebe cada uno de ellos colocando el perno/tornillo en el diagrama del artículo donde está dibujado el tamaño y el diseño real. Asegúrese de que utiliza el tamaño y la forma adecuada que especifican las instrucciones. -Para montar esta unidad, puede que se le solicite que coloque la unidad de lado y de cara. Se recomienda encarecidamente que realice el montaje sobre una superficie no abrasiva para evitar dañar el acabado. INFORMACIÓN SOBRE CUIDADOS Y MANTENIMIENTO: - No arañe ni desconche el acabado. - Inspeccione el producto con regularidad, póngase en contacto con Delta Children’s Products para el recambio de partes o para formular preguntas. - No guarde el producto ni ninguna de sus partes a temperaturas ni en condiciones extremas como un ático caluroso o un sótano húmedo y frío. Estos extremos pueden provocar una pérdida de integridad estructural. -Para preservar el brillo del acabado de alta calidad que recubre su producto, se recomienda que coloque un paño o una almohadilla de fieltro debajo de cualquier objeto que coloque sobre el acabado. -Límpielo con un trapo húmedo y luego con uno seco para preservar el brillo y la belleza originales de este fino acabado. -No utilice productos químicos abrasivos. -No pulverice limpiadores directamente sobre el mueble. -Elévelo ligeramente cuando lo mueva sobre alfombras o moqueta para evitar que se rompan las patas. -El uso de vaporizadores cerca de muebles puede provocar que la madera se hinche y acabe desconchándose. 3 Parts: Pièces: Piezas: The following tools and parts are required: Outils et pièces nécessaires de: Necesitan las siguientes herramientas y piezas: A. Changing Tray x1 Hardware kits Part# 27067 L'ensemble de quincaillerie - pièce n°27067 El kit de herramientas - Pieza #27067 NOTE: FASTENERS ARE SHOWN FULL SIZE REMARQUE: LES DISPOSITIFS DE FIXATION SONT MONTRÉS EN TAILLE RÉELLE NOTA: LOS PERNOS SE MUESTRAN EN TAMAÑO REAL B. 40mm Screw x3 Vis 40mm Tornillo 40mm Phillips Screwdriver (Not Provided) Tournevis’Phillips’(Non Prévu) Destornillardor’Phillips’(No siempre) CAUTION: DO NOT USE A POWER SCREWDRIVER THEY CAN CAUSE SCREWS TO BREAK OR STRIP. ATTENTION: NE PAS UTILISER UN TOURNEVIS ÉLECTRIQUE CARLE VIS PEUVENT CASSER OU PERDRE LEURS FILETS. PRECAUCIÓN: NO USE UN DESTORNILLADOR ELÉCTRICO PORQUE PUEDEN HACER QUE LOS TORNILLOS SE ROMPAN O RUEDEN. Drill: Only use to drill holes do not use to Install screws or bolts Perceuse : utiliser uniquement pour percer desTrous, et non pour poser des vis ou des Boulons. El taladro: sólo uso para taladrar hoyos. NoUtilice instalar los tornillos ni los cerrojos 1/8” drill bit: available from your local hardware store Mèche de 1/8 po : disponible auprès de votre quincaillerie locale. 1/8” broca: disponible de su ferretería local 4 1 1) Check to see if holes are drilled in the back of the dresser that match the holes in the back of the Changing Tray. If yes, go to 3, if not go to 2. 1 1) Vérifiez si des trous sont perforés à l'arrière de la commode correspondant aux trous à l'arrière du kit de commode. Si oui, allez au point 3. Si non, allez au point 2. A 1 1) Para insertar la gaveta, alinee la guía macho de la gaveta con la guíahembradelmueble y empuje hasta que tope. B DRESSER UNIT LA COMMODE EL CAMBIADOR 2 2a) Set the assembled Changing Tray on the top of the dresser unit. 2b) Mark the location of the holes in the back of the Changing Tray on the dresser unit. 2c) Drill pilot holes with a 1/8” drill bit at each location. 2 2a) Placer la Plateau pour langer maintenant assemblée sur ledessus de la commode. 2b) Marquer l’emplacement des trous pratiqués à l’arrièrede la Plateau pour langer sur la commode. 2c) Percer des trous de guidage à l’aide d’une mèche de 1/8po à chaque endroit. 2 2a) Poner el equipó de ensemblaje ensima del Bandeja para cambio. 2b) Marcar la locasión de cada agujero en la parte de atrad del equipó del Bandeja para cambio. 2c) Hacer los agujeros pilotos con destornillador de 1/8 en cada puesto. 3 3) insert (3) 40mm screws (Part B) through the back of the Changing Tray, into the pilot holes in the dresser unit. Tighten with a Phillips Screwdriver. 3 3) Insérer (3) vis de 40mm (Pièce B) à partir de l’arrière de la Plateau pour langer, jusque dans les trous de guidage que l’on percer dans la commode. Serrer au moyen d’un tournevis Phillips. 3 3) Inserta (3) tornillos tamaño 40 mm (Pieza B) en la parte de atras en los agujeros piloto. Apriete con destornillador Phillips. 5-
 1
1
-
 2
2
-
 3
3
-
 4
4
-
 5
5
-
 6
6


Delta Children Changing Tray Assembly Instructions
- Categoría
- Muebles de bebe
- Tipo
- Assembly Instructions
- Este manual también es adecuado para
en otros idiomas
- français: Delta Children Changing Tray
- English: Delta Children Changing Tray
Artículos relacionados
-
 Delta Children Avery Changing Tray (708710) Assembly Instructions
-
 Delta Children Deluxe Changing Tray Assembly Instructions
-
 Delta Children Changing Top Assembly Instructions
-
 Delta Children Skylar 3 Drawer Dresser Assembly Instructions
-
 Delta Children Serta Changing Top Assembly Instructions
-
 Delta Children Epic Signature 3 Drawer Dresser Assembly Instructions
-
 Delta Children Lancaster 3 Drawer Dresser Assembly Instructions
-
 Delta Children Dresser With Changing Top Manual de usuario
-
 Delta Children Ava Manual de usuario


