
v2.2
DECKENVENTILATOR
CEILING FAN
VENTILATEUR DE PLAFOND
VENTILATORE DA SOFFITTO
VENTILADOR DE TECHO
STROPNÍ VENTILÁTOR
PLAFONDVENTILATOR
WENTYLATOR SUFITOWY
Radio freqency 2.4 GHz
Maximum transmitting power:<10dBm
Sendefrequenz: 2,4 GHz
Maximale Sendeleistung: <10dBm
DE Montage- und Bedienungs-
anleitung GB Mounting and operating
manual
FR Instructions de montage
et de service IT Istruzioni per il
montaggio e l´uso
ES Instrucciones de
montaje y uso CZ Návod k montáži
a obsluze
NL Montage- en
bedieningshandleiding PL Instrukcja montażu
i obsługi
Eco Genuiono
Eco Airscrew

2
min. 37 kg !
min.
40 cm
min.
230 cm
max.
16°

3
INHALT
Sicherheitshinweise ...................................2, 4–6
Einzelteile ....................................................... 28–29
Montage Deckenhalter ..............................32–34
Elektrischer Anschluss .............................. 40, 41
Zusammenbau ............................................ 35–42
Inbetriebnahme....................................................43
Codierung Fernbedienung .......................44–45
Bedienung ........................................................... 46
Hilfe bei Störungen ............................................. 47
Reinigung/Wartung .............................................47
Hinweise und Tipps ........................................... 55
Entsorgungshinweise...........................59, 61, 62
INHOUD
Veiligheidsinstructies ........................... 2, 22–24
Componenten .............................................. 30–31
Montage plafondbeugel........................... 32–34
Elektrische aansluiting .............................. 40, 41
Montage ....................................................... 35–42
Inbedrijfname........................................................43
Codering afstandsbediening ................. 44–45
Bediening ............................................................. 46
Hulp bij storingen ................................................53
Onderhoud/reinigingsinstructies ...................53
Hints en tips ......................................................... 58
Verwijdering ......................................................... 60
CONTENU
Consigne de sécurité ..............................2, 10–12
Pièce détachée ........................................... 28–29
Montage du support de plafond .............32–34
Raccordement électrique ......................... 40, 41
Assemblage ..................................................35–42
Mise en service ....................................................43
Codage télécommande .............................44–45
Fonctionnement ................................................ 46
Dépannage ............................................................49
Nettoyage / Maintenance .................................49
Conseils et astuces ............................................ 56
Mise au rebut ....................................................... 59
CONTENT
Safety instructions ...................................... 2, 7–9
Parts ................................................................28–29
Installation ceiling bracket ........................32–34
Electrical connections ............................... 40, 41
Assembling ....................................................35–42
Initial operation ....................................................43
Coding remote control ...............................44–45
Operation .............................................................. 46
Troubleshooting ...................................................48
Cleaning/Maintenance ......................................48
Hints and Tips ...................................................... 55
Disposal ................................................................. 59
INDICE
Avviso di sicurezza ..................................2, 13–15
Componenti ................................................. 28–29
Montaggio della staa a sotto ............ 32–34
Collegamento elettrico .............................. 40, 41
Montaggio.................................................... 35–42
Messa in funzione................................................43
Codifica telecomando .............................. 44–45
Funzionamento ................................................. 46
Risoluzione dei problemi.................................. 50
Pulizia/Manutenzione ........................................ 50
Suggerimenti e consigli .................................... 56
Smaltimento ......................................................... 59
INDICE
Aviso de seguridad .................................. 2, 16–18
Componentes .............................................. 30–31
Montaje del soporte .................................. 32–34
Conexionado eléctrico .............................. 40, 41
Montaje ......................................................... 35–42
Puesta en servicio ...............................................43
Codificación control remoto .................. 44–45
Funcionamento .................................................. 46
Resolución de problemas ..................................51
Limpieza/Mantenimiento....................................51
Pistas y consejos .................................................57
Disposición ........................................................... 60
OBSAH
Bezpečnostní pokyny..............................2, 19–21
Součásti ventilátoru. ....................................30–31
Montáž stropní držák..................................32–34
Elektrické zapojení...................................... 40, 41
Sestavení ..................................................... 35–42
Uvedení do provozu ...........................................43
Kódování dálkového ovládání .................44–45
Ovládání ................................................................ 46
Řešení závad. ....................................................... 52
Čištění a údržba .................................................. 52
Poznámky a tipy ................................................... 57
Likvidace ............................................................... 60
TREŚCI
Instrukcje bezpieczeństwa. ................. 2, 25–27
Komponenty ................................................. 30–31
Montaż uchwytu sufitowego ....................32–34
Przyłącza elektryczne................................ 40, 41
Montaż .......................................................... 35–42
Uruchomienie .......................................................43
Kodowanie pilota ....................................... 44–45
Obsługa ................................................................ 46
Pomoc z usterkami ............................................. 54
Konserwacji/czyszczenia ................................. 54
Wskazówki i rady ................................................ 58
Utylizacja ............................................................... 60

4
Über diese Bedienungsanleitung
Bevor Sie den CasaFan-Ventilator installieren und benutzen, lesen Sie
die Montage- und Bedienungsanleitung aufmerksam durch. Für die
Sicherheit von Personen ist es wichtig, diese Anleitungen zu befolgen!
Symbolerklärung:
WARNUNG: Elektrische Spannung! ACHTUNG:
Warnt vor unmittelbarer Lebensge-
fahr.
Weist auf Gefahren zur Gesundheit und
möglichen Sachschäden hin.
Bei elektrischen Geräten besteht bei unsachgemäßer Verwendung,
fehlerhafter Installation und bei Nichtbeachtung der Sicherheitshin-
weise Lebensgefahr durch einen elektrischen Schlag!
SICHERHEITSHINWEISE
- Bewahren Sie die Bedienungsanleitung gribereit auf. Geben Sie den
Ventilator nie ohne Bedienungsanleitung an andere Personen weiter.
- Der Ventilator dient zur Umwälzung von trockener Raumluft. Der Ein-
satz in Maschinen, im Freien, in Garagen, sowie in feuchten, nassen,
feuer- und explosionsgefährdeten Räumen ist nicht gestattet.
- Dieses Gerät kann von Kindern ab 8 Jahren und Personen mit
eingeschränkten physischen, sensorischen oder geistigen Fähig-
keiten oder mangels Erfahrung und Wissen eingesetzt werden,
wenn eine angemessene Aufsicht oder ausführliche Anleitung zur
Benutzung des Geräts in einer sicheren Weise gegeben wurde
und sie verstehen, welche Gefahrenen damit verbunden sind.
- Reinigung und Wartung durch den Benutzer dürfen nicht von
Kindern ohne Aufsicht durchgeführt werden.
- Falls ungewöhnliche Pendelbewegungen oder Geräusche auftre-
ten, setzen Sie den Ventilator sofort außer Betrieb und kontaktie-
ren Sie den Hersteller, seinen Kundendienst oder eine entspre-
chend qualifizierte Person.
- Austausch von Teilen der Sicherheitsauängung darf nur durch
den Hersteller, einen Servicepartner oder einer entsprechend
qualifizierten Person und nur mit Originalersatzteilen erfolgen.
- Die Montage des Auängesystems muss durch den Hersteller,
Original Montage- und Bedienungsanleitung

5
seinen Kundendienst oder einer entsprechend qualifizierten Per-
son erfolgen.
- Vor Zugang an den Anschluss und der Montage muss der Strom
allpolig abgestellt werden (Sicherung im Sicherungskasten).
- Kinder dürfen nicht mit dem Gerät spielen.
- Bevor Sie den Ventilator reinigen oder warten, trennen Sie den
Strom durch Trennen der Sicherung im Sicherungskasten.
- Den elektrischen Anschluss und die elektrische Wartung dieses
Ventilators darf nur ein ausgebildeter Elektriker, eine Elektrofach-
kraft oder eine entsprechend qualifizierte Person durchführen.
- Die Spannungsangabe auf dem Typenschild muss mit der örtlichen
Netzspannung übereinstimmen.
- Führen Sie die Kabel nicht über scharfe Kanten und quetschen
Sie die Kabel während der Montage auf keinen Fall.
- Der Ventilator darf nur vollständig montiert betrieben werden!
- Wichtig! Der Netzanschluss benötigt einen zweipoligen Trenn-
schalter mit einer Kontaktönungsweite von mindestens 3 mm.
Die Trennvorrichtung muss in die feste Verdrahtung entsprechend
den gültigen technischen Regeln integriert sein.
- Die elektrische Sicherheit des Ventilators ist nur gewährleistet,
wenn das Erdungssystem der Hausinstallation vorschriftsmäßig
installiert und der Ventilator daran angeschlossen ist.
- Der Netzanschluss, an der der Ventilator angeschlossen ist, muss
den geltenden lokalen Normen entsprechen.
- Wählen Sie einen sicheren, ungefährlichen Montageort, an dem
keine Gegenstände in den Lauf der Flügel geraten können.
- Die Struktur der Decke muss das 5-fache Gewicht des Ventilators
(aufgrund der Bewegung) tragen können.
- Alle Flügel des Ventilators müssen einen Mindestabstand von
2,30 m zum Fußboden haben.
- Halten Sie den Ventilator von Wärmequellen fern. Der Mindestab-
stand zu Heizstrahlern und Öfen beträgt 1,5 m.
- Vor Inbetriebnahme die fachgerechte Montage sowie alle elektri-
schen Anschlüsse nochmals überprüfen, um jegliche Fall-, Feuer-
oder Stromschlag-Gefahr zu verhindern.

6
Technische Daten:
Typ Eco enuino 122 Eco Genuino 152
Eco Airscrew
Eco Genuino 180
Nennspannung 220 - 240 V ~ 50 Hz
Leistung Motor (max.) 10 W 29 W 30 W
Schutzklasse/Schutzart I/IP20
Stufen 6 (mit Fernbedienung)
Maße Ø × H (mm) ca. 1220 × 360 ca. 1520 × 360 ca. 1800 × 360
Abstand Decke – Flügel 355/275 mm 360/280 mm 365/290 mm
Gewicht (kg) ca. 6,7 ca. 7,0 ca. 7,5
Optionale Leuchte nicht verfügbar
Wartungszyklus jährlich
Technische Änderungen vorbehalten
Hinweise zur Entsorgung beachten!
Unsere Deckenventilatoren sind Qualitätsprodukte und für eine
lange Lebensdauer konzipiert.
- Entsorgen Sie ein Gerät am Ende seiner Lebensdauer und ggf.
zum Betrieb des Gerätes notwendige Batterien nicht im Hausmüll!
- Informieren Sie sich über lokale Rückgabe- und Recyclingmög-
lichkeiten und nutzen Sie zur Entsorgung die vorhandenen Sam-
melstellen in Ihrer Umgebung.
- Entsorgen Sie nicht mehr benötigtes Verpackungsmaterial um-
weltbewusst und für Kinder unzugänglich.
- Es besteht Erstickungsgefahr für Kinder durch Einatmen oder Ver-
schlucken von Teilen der Verpackung.
EINZELTEILE (Abbildung A, Seite 28)
Packen Sie den Ventilator aus und überprüfen Sie den Packungs-
inhalt auf Vollständigkeit.
Alle auf der Abbildung dargestellten Teile müssen enthalten und
unbeschädigt sein.

7
SAFETY ADVICES
- Keep the operating manual within reach. Never pass the fan onto
another person without the operating manual.
- This ceiling fan is for circulating dry room air. Their use in ma-
chines, outside, in garages, in moist or wet rooms or rooms in
danger of fire or explosion, is not permitted.
- This appliance can be used by children aged from 8 years and
above and persons with reduced physical, sensory or mental ca-
pabilities or lack of experience and knowledge if they have been
given supervision or instruction concerning use of the appliance
in a safe way and understands the hazards involved.
- Cleaning and user maintenance shall not be made by children
without supervision.
- If unusual oscillating movement is observed, immediately stop
using the ceiling fan and contact the manufacturer, its service
agent or suitably qualified persons.
- Replacement of parts of the safety suspension system device
shall be performed by the manufacturer, its service agent or sui-
tably qualified persons.
- Mounting of the suspension system shall be performed by the ma-
nufacturer, its service agent or suitably qualified persons.
About this operating manual
Before using the CasaFan fan, read the mounting and operating
manual carefully. For the safety of persons it is important to follow
these instructions!
Explanation of symbols:
WARNING: Electric voltage! ATTENTION:
Warns you of immediate danger to life. Indicates risks to health and possible
damage to property.
With electrical devices, there is a danger to life from electric
shock if used improperly, installed incorrectly or if the safety
instructions are not observed!
Translation of the original installation and operating instructions

8
- Before accessing the connection and installation, the current
must be disconnected on all poles (fuse in fuse box).
- Children shall not play with the appliance.
- Ensure that the fan is switched o from the supply mains before
service and maintenance.
- The electrical connection and electrical maintenance of this fan
may only be carried out by a trained electrician, a skilled electri-
cian or an appropriately qualified person.
- The voltage details on the rating label are to conform with the
available mains voltage.
- Do not run the cables over sharp edges and under no circum-
stances squeeze the cables during installation.
- Only operate the ceiling fan when completely assembled!
- WARNING! The mains connection requires a two-pole isolating
switch with a contact opening width of at least 3 mm. The dis-
connecting device must be integrated into the fixed wiring accor-
ding to the valid technical regulations.
- The electrical safety of the fan is only guaranteed if the earthing
system of the building installation is installed in accordance with the
regulations and the fan is connected to it.
- The mains connection to which the fan is connected must comply
with the applicable local standards.
- Choose a safe place for installation and make sure that there are
no objects within the area of rotation.
- The construction and fixture of the holder and ceiling is to be able
to bear 5 times the weight of the fan when being moved.
- None of the fan blades are to be less than 2.3 m from the ground.
- Keep the fan away from heat sources. The minimum distance to
radiant heaters and stoves is 1.5 m.
- Before first using after the setup, all electrical and mechanical
connections are to be checked in order to prevent any fall, fire or
electric shock.

9
Observe notes on disposal!
Our ceiling fans are quality products and designed for a long
service life.
- Do not dispose of a appliance at the end of its service life and
any batteries required to operate the appliance in household
waste!
- Find out about local return and recycling possibilities and use
the existing collection points in your area for disposal.
- Dispose of packaging material that is no longer required in an envi-
ronmentally friendly manner and inaccessible to children.
- There is a risk of suocation for children by inhaling or swallowing
parts of the packaging.
PARTS Figure A, page 28
Unpack the fan and compare the package contents for comple-
teness. All the parts shown in the figure are to be present and
undamaged.
Technical data:
Type Eco Genuino 122 Eco Genuino 152
Eco Airscrew
Eco Genuino 180
Mains voltage 220 - 240 V ~ 50 Hz
Power motor (max.) 10 W 29 W 30 W
Protection clas I/IP20
No of speeds 6 (with remote control)
Dimensions Ø × H (mm) 1220 × 360 1520 × 360 1800 × 360
Distance ceiling - blades 355/275 mm 360/280 mm 365/290 mm
Weight (kg): approx. 6,7 approx. 7,0 approx. 7,5
Optional light kit not available
Service interval once a year
Subject to technical modifications.

10
A propos du mode d’emploi
Lisez attentivement le mode d’emploi avant d’utiliser le ventilateur
CasaFan. Pour la sécurité des personnes, il est important de suivre
ces instructions !
Explication des symboles:
AVERTISSEMENT : Tension électrique ! ATTENTION
Vous avertit d‘un danger immédiat pour la vie. Indique les risques pour votre santé
et les éventuels risques de blessure.
Les appareils électriques présentent un danger de mort par
électrocution s‘ils sont mal utilisés, mal installés ou si les con-
signes de sécurité ne sont pas respectées !
CONSIGNES DE SÉCURITÉ
- Gardez le mode d‘emploi à portée de main. Ne donnez jamais le
ventilateur à une autre personne sans son mode d’emploi.
- Ce ventilateur sert à la circulation de l‘air ambiant sec. L’utilisation
dans des machines, à l’’extérieur, dans des garages ainsi que des
locaux humides, exposés aux risques d’explosion est interdite.
- Cet appareil peut être utilisé par des enfants de plus de 8 ans et
par des personnes ayant des capacités physiques, sensorielles
ou mentales réduites ou manquant d‘expérience et de connais-
sances, à condition qu‘une supervision appropriée ou des instruc-
tions détaillées pour utiliser l‘appareil en toute sécurité aient été
données et qu‘elles comprennent les risques encourus.
- Nettoyage et entretien utilisateur ne doit pas être fait par des en-
fants sans surveillance.
- Si un mouvement de pendule inhabituel est observé, cesser de
l‘utiliser cesse immédiatement d‘utiliser le ventilateur de plafond
et contacter le fabricant, son agent de service ou une personne
qualifiée dans le cadre.
- Le montage du système de suspension doit être installé par le fa-
bricant, son service clientèle ou des personnes dûment qualifiée.
- Les pièces de la suspension de sécurité ne peuvent être rempla-
cées que par le fabricant, un partenaire de service ou une person ne
Traduction des instructions originales d‘installation et d‘utilisation

11
dûment qualifiée et uniquement avec des pièces de rechange
d‘origine.
- Avant d‘accéder au raccordement et à l‘installation, le courant doit
être coupé à tous les pôles (fusible dans la boîte à fusibles).
- Les enfants ne doivent pas jouer avec l‘appareil.
- Avant de nettoyer ou d‘entretenir le ventilateur, éteignez-le ou
coupez le courant en coupant le fusible dans la boîte à fusibles.
- Le raccordement électrique et l‘entretien électrique de ce venti-
lateur ne peuvent être eectués que par un électricien formé, un
électricien qualifié ou une personne dûment qualifiée.
- La tension indiquée sur la plaque signalétique doit correspondre à la
tension secteur eective.
- Ne faites pas passer les câbles sur des bords tranchants et
n‘écrasez jamais les câbles pendant l‘installation.
- Ne faites fonctionner le ventilateur de plafond que lorsqu‘il est
complètement assemblé !
- AVERTISSEMENT ! Le raccordement au réseau nécessite un sec-
tionneur bipolaire dont la largeur d‘ouverture des contacts est d‘au
moins 3 mm. Le dispositif de sectionnement doit être intégré dans
le câblage fixe conformément aux règles techniques en vigueur.
- La sécurité électrique du ventilateur n‘est garantie que si le système
de mise à la terre de l‘installation du bâtiment est installé conformé-
ment à la réglementation et que le ventilateur y est connecté.
- Le branchement au réseau auquel le ventilateur est raccordé doit
être conforme aux normes locales applicables.
- Choisissez un endroit sûr et sécuritaire pour l‘assemblage et que le
site d’installation choisi permet au ventilateur de tourner librement.
- La structure de la boîte de sortie doit pouvoir supporter le poids
5fois du ventilateur (en mouvement) minimum.
- La distance entre les pales et le sol, doit être supérieure ou égale à 2,3 m.
- Tenez le ventilateur éloigné des sources de chaleur. La distance
minimale par rapport aux radiateurs et aux poêles est de 1,5 m.
- Après le montage complet de votre ventilateur, assurez-vous
que toutes les connexions sont parfaitement réalisées et serrer
bien les vis et les écrous.

12
Caractéristiques techniques :
Typ Eco Genuino 122 Eco Genuino 152
Eco Airscrew
Eco Genuino 180
Tension nominale 220 - 240 V ~ 50 Hz
Puissance moteur (max.) 10 W 29 W 30 W
Classe de protection I/IP20
Vitesses 6 (avec télécommande)
Cotes Ø × H (mm) 1220 × 360 1520 × 360 1800 × 360
Distance plafond - pales 355/275 mm 360/280 mm 365/290 mm
Poids (kg) env. 6,7 env. 7,0 env. 7,5
Lumière optionnelle non disponible
Service interval annuellement
Sous réserve de modifications techniques.
Respectez les consignes d‘élimination !
Nos ventilateurs de plafond sont des produits de qualité et
conçus pour une longue durée de vie.
- Ne jetez pas un appareil en fin de vie et les piles nécessaires à
son fonctionnement dans les ordures ménagères !
- Informez-vous sur les possibilités locales de reprise et de recycla-
ge et utilisez les points de collecte existants dans votre région
pour l‘élimination.
- Éliminez les matériaux d‘emballage qui ne sont plus nécessaires
de manière écologique et inaccessibles aux enfants.
- Il existe un risque de suocation pour les enfants par inhalation
ou ingestion de parties de l‘emballage.
PIÈCE DÉTACHÉE (Figure A, page 28)
Déballez le ventilateur et comparez le contenu de l‘emballage
pour vérifier qu‘il est complet.
Toutes les parties représentées dans l‘illustration doivent être
contenues et non endommagées.

13
Sulle istruzioni per l’uso
Prima di utilizzare il ventilatore CasaFan, leggere attentamente le
istruzioni per il montaggio e l‘uso. Per la sicurezza delle persone
è importante seguire queste istruzioni!
Significato dei simboli:
AVVERTENZA: Tensione elettrica! ATTENZIONE
Vi avverte di un pericolo immediato per la vita. Indica rischi per la salute e possibili
danni alle cose.
Con i dispositivi elettrici, c‘è pericolo di morte per scosse elett-
riche se utilizzati in modo improprio, installati in modo errato o se
non vengono rispettate le istruzioni di sicurezza!
INDICAZIONI DI SICUREZZA
- Tenere le istruzioni per l‘uso a portata di mano. In caso di trasferimento
del ventilatore a terzi, accludete sempre le relative istruzioni per l’uso.
- Il ventilatore svolge funzioni di ricircolo dell’aria nel locale. Non
è consentito l’impiego del ventilatore all’interno di macchinari,
in luoghi aperti non protetti, garage e locali umidi o con rischio
d’incendio ed esplosione.
- Questo apparecchio può essere utilizzato da bambini di età
compresa dagli 8 anni in su e le persone con ridotte capacità
fisiche, sensoriali o mentali, o mancanza di esperienza e conos-
cenza, se non siano controllati o istruiti all‘uso dell‘apparecchio
in modo sicuro e capisce l‘rischi coinvolti.
- Pulizia e manutenzione utente non deve essere fatta da bambini
senza supervisione.
- Se si osserva un movimento a pendolo insolito, smettere di usarlo
immediatamente cessare di utilizzare il ventilatore a sotto e con-
tattare il costruttore o dal suo servizio o una persona qualificata
in connessione.
- I componenti delle sospensioni di sicurezza possono essere so-
stituiti solo dal produttore, da un partner di assistenza o da una
persona adeguatamente qualificata e solo con ricambi originali.
- Il montaggio del sistema di sospensione deve essere eseguito dal
costruttore, dal suo partner di assistenza o da persone adeguata-
Traduzione delle istruzioni di montaggio e d‘uso originali

14
- mente qualificate, utilizzando pezzi di ricambio originali.
- Prima di accedere al collegamento e all‘installazione, l‘alimentazione
deve essere disinserita su tutti i poli (fusibile nella scatola dei fusibili).
- I bambini non devono giocare con l‘apparecchio.
- Accertarsi che il ventilatore sia scollegato dalla rete elettrica (Fusi-
bile!), prima di eettuare la pulizia e la manutenzione.
- Il collegamento elettrico e la manutenzione elettrica di questo
ventilatore possono essere eseguiti solo da un elettricista speci-
alizzato, da un elettricista qualificato o da una persona adeguata-
mente qualificata.
- I valori di tensione riportati sulla targhetta devono corrispondere alla
tensione di alimentazione.
- Non condurre i cavi su spigoli vivi e non spremere mai i cavi durante
l‘installazione!
- L’apparecchio può essere utilizzato solo a montaggio completato!
- AVVERTENZA ! Il collegamento alla rete elettrica richiede un se-
zionatore bipolare con un‘ampiezza di apertura dei contatti di al-
meno 3 mm. Il dispositivo di isolamento deve essere integrato nel
cablaggio fisso secondo le norme tecniche vigenti.
- La sicurezza elettrica del ventilatore è garantita solo se il sistema
di messa a terra dell‘impianto dell‘edificio è installato secondo le
norme e se il ventilatore è collegato ad esso.
- Il collegamento alla rete elettrica a cui è collegato il ventilatore
deve essere conforme alle norme locali vigenti.
- Scegliere una posizione sicura non pericolosi per l‘installazione.
Assicurarsi che non siano presenti ostacoli nel raggio di rotazione.
- La struttura del sotto deve essere in grado di sopportare 5 volte
il peso del ventilatore (a causa del movimento).
- Tenere il ventilatore lontano da fonti di calore. La distanza minima
da riscaldatori radianti e stufe è di 1,5 m.
- Nessuna delle pale del ventilatore deve trovarsi ad una distanza
da terra inferiore a 2,30 m.
- Dopo l’installazione, controllare il montaggio e tutti i collegamenti
elettrici, in modo da evitare eventuali rischi di caduta, incendio o
shock elettrico.

15
Dati tecnici:
Tipo Eco Genuino 122 Eco Genuino 152
Eco Airscrew
Eco Genuino 180
Tensione di rete 220 - 240 V ~ 50 Hz
Potenza motore (max.) 10 W 29 W 30 W
Classe di protezione I/IP20
Regolazioni velocità 6 (con telecomando)
Dimensione Ø × alt. (mm) 1220 × 360 1520 × 360 1800 × 360
Distanza sotto - pales 355/275 mm 360/280 mm 365/290 mm
Peso (kg) ca. 6,7 ca. 7,0 ca. 7,5
Luce opzionale non disponibile
Ciclo di manutenzione annulamente
Con riserva di modifiche tecniche.
Osservare le note sullo smaltimento!
I nostri ventilatori da sotto sono prodotti di qualità e progettati
per una lunga durata.
- Non smaltire l‘apparecchio al termine della sua vita utile e le bat-
terie necessarie per il funzionamento dell‘apparecchio nei rifiuti
domestici!
- Informatevi sulle possibilità di restituzione e riciclaggio locali e
utilizzate i punti di raccolta esistenti nella vostra zona per lo smal-
timento.
- Smaltire il materiale d‘imballaggio non più necessario in modo
ecologico e inaccessibile ai bambini.
COMPONENTI (Figura A, pagina 28)
Disimballare il ventilatore e confrontare il contenuto della confezio-
ne per verificarne la completezza.
Tutte le parti mostrate nell‘illustrazione devono essere contenute e
non danneggiate.

16
Sobre estas instrucciones
Antes de utilizar el ventilador CasaFan, lea las instrucciones de
uso. Para la seguridad de las personas es importante seguir estas
instrucciones!
Explicación de símbolos:
ADVERTENCIA: ¡Tensión eléctrico! ATENCIÓN
Le advierte de un peligro inmediato
para la vida.
Indica los riesgos para la salud y los posi-
bles daños a la propiedad.
En los aparatos eléctricos, existe un peligro de muerte por
descarga eléctrica si se utilizan de forma inadecuada, se in-
stalan incorrectamente o si no se observan las instrucciones
de seguridad.
INDICACIONES DE SEGURIDAD
- Mantenga el manual de instrucciones al alcance de la mano. Nunca
pase el ventilador a otra persona sin el manual de instrucciones.
- El ventilador realiza funciones de recirculación de aire en la habi-
tación. El uso del ventilador dentro de la maquinaria, en lugares
abiertos sin protección, garajes y habitaciones húmedas no está
permitido por riesgo de incendio y explosión.
- Este aparato puede ser utilizado por niños a partir de 8 años y
personas con capacidades físicas, sensoriales o mentales redu-
cidas, o falta de experiencia y conocimiento, si no están contro-
ladas o instruidas para usar el dispositivo de manera segura y
entienden los riesgos involucrados.
- La limpieza y el mantenimiento por parte del usuario no debe ser
llevada a cabo por niños sin supervisión.
- Si observa un movimiento de péndulo inusual, deje de usarlo.
Pare inmediatamente de usar el ventilador de techo y póngase
en contacto con el fabricante o su servicio o con una persona
calificada en conexión.
- Las piezas de la suspensión de seguridad sólo pueden ser susti-
tuidas por el fabricante, un socio de servicio o una persona debi-
damente calificada y sólo con piezas de repuesto originales.
- Antes de acceder a la conexión e instalación, la alimentación debe
Traducción de las instrucciones originales de instalación y funcionamiento

17
- ser desconectada en todos los polos (fusible en la caja de fusibles).
- Los niños no deben jugar con el dispositivo.
- Asegúrese de que el ventilador esté desconectado de la red eléc-
trica (¡Fusible!), antes de limpiarlo y mantenerlo.
- La conexión eléctrica y el mantenimiento eléctrico de este venti-
lador sólo puede ser realizado por un electricista capacitado, un
electricista calificado o una persona debidamente calificada.
- Los valores de voltaje que se muestran en la placa de identificaci-
ón deben corresponder a la tensión de alimentación.
- ¡No pases los cables por bordes afilados y nunca los aprietes du-
rante la instalación!
- Mantén el ventilador alejado de las fuentes de calor. La distancia
mínima a los calentadores radiantes y las estufas es de 1,5 m.
- ¡Solo trabajar con la unidad cuando esté completamente ensam-
blada!
- ¡ADVERTENCIAL! La conexión a la red eléctrica requiere un inter-
ruptor aislante bipolar con una anchura de apertura de contacto
de al menos 3 mm. El dispositivo de aislamiento debe integrarse
en el cableado fijo de acuerdo con las normas técnicas vigentes.
- La seguridad eléctrica del ventilador sólo está garantizada si el
sistema de puesta a tierra de la instalación del edificio se instala
según las normas y el ventilador está conectado a él.
- La conexión a la red eléctrica a la que se conecta el ventilador
debe cumplir con las normas locales aplicables.
- Elija una ubicación segura que no sea peligrosa para la instalaci-
ón. Asegúrese de que no haya obstáculos en el rango de rotaci-
ón.
- La estructura del soporte y de la caja de salida debe ser capaz de
soportar 5 veces el peso del ventilador (en movimiento).
- Ninguna de las aspas del ventilador debe estar a menos de 2.30
m del suelo.
- Después de la instalación, verifique la instalación y todas las
conexiones eléctricas, para evitar cualquier riesgo de caídas,
incendios o descargas eléctricas.

18
Datos técnicos:
Tipo Eco Genuino 122 Eco Genuino 152
Eco Airscrew
Eco Genuino 180
Voltaje 220 - 240 V ~ 50 Hz
Potencia del motor (máx.) 10 W 29 W 30 W
Clase de protección I/IP20
Nº de velocidades 6 (con mando)
Dimensiones Ø × H (mm) 1220 × 360 1520 × 360 1800 × 360
Distancia techo – aspas 355/275 mm 360/280 mm 365/290 mm
Peso (kg) aprox. 6,7 aprox. 7,0 aprox. 7,5
Luces opcionales no disponible
Ciclo de mantenimiento anual
Cambios técnicos reservados.
¡Observe las notas sobre la eliminación!
Nuestros ventiladores de techo son productos de calidad y dise-
ñados para una larga vida útil.
- ¡No tire el aparato al final de su vida útil y las baterías necesarias
para su funcionamiento a la basura doméstica!
- Infórmese sobre las opciones locales de devolución y reciclaje
y utilice los puntos de recolección existentes en su área para su
eliminación.
- Elimine el embalaje de forma respetuosa con el medio ambiente,
y alejado de los niños.
- Existe el peligro de que los niños se asfixien por inhalación o
ingestión de partes del envase.
COMPONENTES (Figura A, página 30)
Desembale el ventilador y compare el contenido del paquete para
ver si está completo.
Todas las partes que se muestran en la ilustración deben estar
contenidas y no dañadas.

19
O tomto návodu
Před použitím stropního ventilátoru CasaFan si pozorně přečtěte
tyto pokyny. Pro bezpečnost osob je důležité dodržovat tyto po-
kyny!
Význam symbolů
VAROVÁNÍ: Elektrické napětí! POZOR:
Varuje vás před bezprostředním
ohrožením života.
Označuje zdravotní rizika a možné škody
na majetku.
V případě elektrických zařízení může nesprávné použití, ne-
správná instalace a nedodržení bezpečnostních pokynů vést k
usmrcení elektrickým proudem!
BEZPEČNOSTNÍ INSTRUKCE
- Návod k obsluze uschovejte na dosah ruky. Nikdy nepřenechejte
druhé osobě ventilátor bez manuálu k obsluze/montáži.
- Tento stropní ventilátor slouží k cirkulaci vzduchu v místnosti.
Použití ve strojích, veku, v garážích, ve vlhkém prostředí nebo v
prostředí s rizikem výbuchu nebo požáru není dovoleno.
- Tento přístroj smí být ovládán dětmi od věku 8 let a osobami
se sníženými zrakovými, fyzickými nebo mentálními schopnost-
mi nebo nedostatkem zkušeností za dozoru zkušené osoby
nebo po důkladném poučení o používání přístroje v souladu s
bezpečnostními pokyny.
- Jeho údržbu a čištění nesvěřujte dětem bez řádného dohledu
dospělé osoby.
- Pokud se vyskytnou neobvyklé pohyby kyvadla nebo zvuky,
okamžitě vypněte ventilátor a kontaktujte výrobce, jeho zákaz-
nický servis nebo vhodně kvalifikovanou osobu.
- Díly bezpečnostního odpružení smí vyměňovat pouze výrobce,
servisní partner nebo vhodně kvalifikovaná osoba a pouze ori-
ginální náhradní díly. Před samotným začátkem zapojování musí
být veškeré dráty izolovány.
- Montáž závěsného systému musí být provedena výrobcem, jeho
zákaznickým servisem nebo příslušně kvalifikovanými osobami za
použití originálních náhradních dílů.
Překlad originálního montážního a provozního návodu

20
- Před přístupem k připojení a instalaci musí být napájení vypnuto
na všech pólech (pojistka v pojistkové skříni).
- Děti nesmějí hrát se zařízením.
- Před čištěním nebo servisem ventilátor vypněte nebo odpojte
napájení vyjmutím pojistky z pojistkové skříňky.
- Elektrické připojení a údržbu tohoto ventilátoru smí provádět pou-
ze vyškolený elektrikář, kvalifikovaný elektrikář nebo vhodně kva-
lifikovaná osoba.
- Informace o napětí na typovém štítku se musí shodovat s místním
síťovým napětím.
- Ventilátor smí být provozován pouze kompletně smontovaný!
- Veďte kabely po ostrých hranách a během instalace je nestlačujte!
VAROVÁN! Síťové připojení vyžaduje dvoupólový odpojovač s
šířkou otvoru kontaktu alespoň 3 mm. Oddělovací zařízení musí
být integrováno do pevného vedení v souladu s platnými tech-
nickými pravidly.
- Elektrická bezpečnost ventilátoru je zaručena pouze tehdy, pokud
je správně nainstalován uzemňovací systém instalace budovy a je
k němu připojen ventilátor.
- Síťové připojení, ke kterému je připojen ventilátor, musí odpovídat
platným místním normám.
- Vyberte vhodné místo k montáži a to tak, aby v dosahu rotujících
lopatek nebyla žádná překážka.
- Struktura stropu musí být schopna nést 5krát větší hmotnost
ventilátoru (kvůli pohybu).
- Všechny lopatky ventilátoru musí mít minimální vzdálenost 2,30
m od podlahy.
- Před uvedením do provozu zkontrolujte odbornou montáž a
všechna elektrická připojení, abyste předešli riziku pádu, požáru
nebo úrazu elektrickým proudem.
- Chraňte ventilátor před zdroji tepla. Minimální vzdálenost k sála-
vým ohřívačům a pecím je 1,5 m.
- Před prvním spuštěním ventilátoru důkladně zkontrolujte veškeré
elektrické zapojení a ukotvení tělesa, aby se předešlo případným
nehodám, úrazu elektrickým proudem popřípadě požáru.

21
Technické údaje:
Typ Eco Genuino 122 Eco Genuino 152
Eco Airscrew
Eco Genuino 180
Napětí 220 - 240 V ~ 50 Hz
Výkon motoru (max.) 10 W 29 W 30 W
Třída ochrany I/IP20
Počet rychlostí 6 (s dálkovým ovládáním)
Rozměry Ø × výška (mm) 1220 × 360 1520 × 360 1800 × 360
Vzdál. Lopatek od stropu 355/275 mm 360/280 mm 365/290 mm
Hmotnost (kg) cca 6,7 cca 7,0 cca 7,5
Doplňkový světelný kit není dostupný
Servisní interval 1 ročně
Technické změny vyhrazeny.
Dodržujte pokyny k likvidaci!
Naše stropní ventilátory jsou kvalitní výrobky a jsou navrženy pro
dlouhou životnost.
- Nevyhazujte zařízení a žádné baterie potřebné pro provoz zařízení
do domácího odpadu!
- Zjistěte informace o místních možnostech vracení a recyklace a k
likvidaci použijte sběrná místa ve vaší oblasti.
- Zlikvidujte obal s ohledem na životní prostředí a držte mimo dosah dětí.
- Vdechnutím nebo spolknutím částí obalu hrozí riziko udušení pro děti.
SOUČÁSTI VENTILÁTORU (obrázek A, straně 30)
Rozbalte ventilátor a porovnejte obsah balení pro úplnost.
Všechny části na obrázku musí být zahrnuty a nepoškozené.

22
VEILIGHEIDSINSTRUCTIES
- Houd de bedieningshandleiding binnen handbereik. Geef de
ventilator nooit aan een andere persoon zonder de bedienings-
handleiding.
- Deze plafondventilator is bedoeld voor het circuleren van droge
ruimtelucht. Het gebruik ervan in machines, buiten, in garages, in
vochtige of natte ruimten of in ruimten met gevaar voor brand of
explosie, is niet toegestaan.
- Dit apparaat mag worden gebruikt door kinderen van 8 jaar en
ouder en personen met beperkte fysieke, zintuiglijke of mentale
vermogens of een gebrek aan ervaring en kennis, op voorwaarde
dat zij voldoende toezicht of gedetailleerde instructies hebben
gekregen over hoe zij het apparaat op een veilige manier kunnen
gebruiken en de gevaren ervan begrijpen.
- Reiniging en gebruikersonderhoud mogen niet door kinderen
zonder toezicht worden uitgevoerd.
- Als zich ongewone oscillerende bewegingen of geluiden voordo-
en, zet de ventilator dan onmiddellijk stil en neem contact op met
de fabrikant, zijn klantendienst of een gekwalificeerd persoon.
- Vervanging van onderdelen van de veiligheidsophanging mag
alleen worden uitgevoerd door de fabrikant, een servicepartner
of een voldoende gekwalificeerd persoon en alleen met originele
reserveonderdelen.
Over deze bedieningshandleiding
Lees voor het gebruik van de CasaFan ventilator de montage- en
bedieningshandleiding zorgvuldig door. Voor de veiligheid van
personen is het belangrijk deze instructies op te volgen!
Verklaring van de gebruikte symbolen:
WAARSCHUWING: Elekr. spanning! LET OP:
Waarschuwt u voor direct levensgevaar. Wijst op gevaren voor de gezondheid en
mogelijke materiële schade.
Bij elektrische apparaten bestaat levensgevaar door elektrische
schokken bij ondeskundig gebruik, verkeerde installatie of het
niet in acht nemen van de veiligheidsvoorschriften!
Vertaling van de originele bedieningshandleiding

23
- De installatie van het veersysteem moet worden uitgevoerd door
de fabrikant, zijn klantendienst of een voldoende gekwalificeerd
persoon.
- Alvorens toegang te krijgen tot de aansluiting en de montage,
moeten alle polen van de stroomvoorziening worden uitgescha-
keld (zekering in de zekeringkast).
- Kinderen mogen niet met het apparaat spelen.
- Voordat u de ventilator reinigt of onderhoudt, moet u de stroom
uitschakelen door de zekering in de zekeringkast uit te trekken.
- De elektrische aansluiting en het elektrische onderhoud van deze
ventilator mogen alleen worden uitgevoerd door een opgeleide
elektricien, een gediplomeerd elektricien of een persoon met de
juiste kwalificaties.
- De op het typeplaatje aangegeven spanning moet overeenkomen
met de bestaande netspanning.
- Laat de kabels niet over scherpe randen lopen en knijp nooit in
de kabels tijdens de installatie.
- Het apparaat mag alleen volledig gemonteerd worden gebruikt!
BELANGRIJK! Voor de netaansluiting is een tweepolige schei-
dingsschakelaar met een contactopening van ten minste 3 mm
vereist. De uitschakelinrichting moet in overeenstemming met de
geldende technische voorschriften in de vaste bedrading worden
geïntegreerd.
- De elektrische veiligheid van de ventilator is alleen gegarandeerd
als het aardingssysteem van de huisinstallatie volgens de voor-
schriften is geïnstalleerd en de ventilator daarop is aangesloten.
- De netaansluiting waarop de ventilator wordt aangesloten, moet
voldoen aan de ter plaatse geldende normen.
- Kies een veilige, niet-gevaarlijke montageplaats waar geen voor-
werpen tussen de loop van de messen terecht kunnen komen.
- De structuur van het plafond moet 5 maal het gewicht van de ven-
tilator (ten gevolge van de beweging) kunnen dragen.
- Alle bladen van de ventilator moeten een minimumafstand van
2,30 m tot de vloer hebben.
- Houd de ventilator uit de buurt van warmtebronnen. De minimu-
mafstand tot warmtestralers en kachels bedraagt 1,5 m.

24
Technische gegevens:
Type Eco Genuino 122 Eco Genuino 152
Eco Airscrew
Eco Genuino 180
Nominale spanning 220 - 240 V ~ 50 Hz
Vermogen motor (max.) 10 W 29 W 30 W
Beschermingsklasse/-graad I/IP20
Toerentalniveaus 6 (met afstandsbediening)
Afmetingen Ø × h (mm) 1220 × 360 1520 × 360 1800 × 360
Afstand plafond – blad 355/275 mm 360/280 mm 365/290 mm
Gewicht (kg) ca. 6,7 ca. 7,0 ca. 7,5
Optioneel lichtkit Niet beschikbaar
Onderhoudscyclus jaarlijks
Onder voorbehoud van technische wijzigingen.
Volg de instructies voor verwijdering!
Onze plafondventilatoren zijn kwaliteitsproducten en ontworpen
om lang mee te gaan.
- Gooi een apparaat aan het einde van zijn levensduur en de bat-
terijen die nodig zijn voor het functioneren van het apparaat niet
bij het huisvuil!
- Informeer naar de plaatselijke inlever- en recyclingmogelijkheden
en maak voor de verwijdering gebruik van de beschikbare inza-
melpunten in uw omgeving.
- Verwijder verpakkingsmateriaal dat niet langer nodig is op een
milieubewuste manier en buiten het bereik van kinderen.
Componenten (Figuur A, pagina 30)
Pak de ventilator uit en controleer de inhoud van de verpakking
op volledigheid. Alle in de illustratie getoonde onderdelen moeten
aanwezig en onbeschadigd zijn.
- Controleer vóór de ingebruikneming nogmaals de juiste installa-
tie en alle elektrische aansluitingen om elk risico van vallen, brand
of elektrische schokken te voorkomen.

25
INSTRUKCJE BEZPIECZEŃSTWA
- Instrukcję obsługi należy przechowywać w zasięgu ręki. Nigdy nie
przekazywać wentylatora innej osobie bez instrukcji obsługi.
- Ten wentylator sufitowy przeznaczony jest do cyrkulacji suchego po-
wietrza w pomieszczeniu. Nie wolno go używać w maszynach, na
zewnątrz, w garażach, w pomieszczeniach wilgotnych lub mokrych
oraz w pomieszczeniach zagrożonych pożarem lub wybuchem.
- Z urządzenia mogą korzystać dzieci w wieku 8 lat i starsze oraz oso-
by o ograniczonych zdolnościach fizycznych, sensorycznych lub
umysłowych, a także osoby o ograniczonych możliwościach fizy-
cznych, sensorycznych lub umysłowych lub braku doświadczenia i
wiedzy, pod warunkiem, że otrzymały one odpowiedni nadzór lub
szczegółowe instrukcje dotyczące bezpiecznego korzystania z
urządzenia i zrozumienia związanych z tym zagrożeń.
- Czyszczenie i konserwacja przez użytkownika nie może być
wykonywane przez dzieci bez nadzoru.
- Jeśli wystąpią nietypowe ruchy oscylacyjne lub odgłosy, należy na-
tychmiast zatrzymać wentylator i skontaktować się z producentem,
jego serwisem lub odpowiednio wykwalifikowaną osobą.
- Wymiana części zawieszenia liny bezpieczeństwa może być dokony-
wana wyłącznie przez producenta lub partnera serwisowego i tylko
przy użyciu oryginalnych części zamiennych.
Informacje o niniejszej instrukcji obsługi
Przed uruchomieniem wentylatora CasaFan należy dokładnie zapoznać
się z instrukcją montażu i obsługi. Aby zapewnić bezpieczeństwo osób,
należy bezwzględnie przestrzegać niniejszej instrukcji!
Objaśnienie symboli:
OSTRZEŻENIE: Napięcie elektr.! UWAGA:
Ostrzega o bezpośrednim zagrożeniu
życia.
Ostrzega przed zagrożeniami dla zdrowia
i możliwymi szkodami materialnymi.
W przypadku niewłaściwego użytkowania urządzeń elektrycz-
nych, nieprawidłowej instalacji lub nieprzestrzegania instrukcji
bezpieczeństwa istnieje zagrożenie życia spowodowane porażeniem
prądem elektrycznym!
Tłumaczenie oryginalnej instrukcji obsługi

26
- Montaż systemu zawieszenia musi być przeprowadzony przez pro-
ducenta, jego serwis lub odpowiednio wykwalifikowaną osobę.
- Przed przystąpieniem do podłączenia i montażu należy wyłączyć ws-
zystkie bieguny zasilania (bezpiecznik w skrzynce bezpiecznikowej).
- Dzieci nie mogą bawić się urządzeniem.
- Przed czyszczeniem lub serwisowaniem wentylatora należy wyłączyć
zasilanie poprzez wyciągnięcie bezpiecznika w skrzynce bezpiecz-
nikowej.
- Podłączenie elektryczne i konserwacja elektryczna tego wentylatora
mogą być wykonywane wyłącznie przez wykwalifikowanego elektry-
ka, elektryka z uprawnieniami lub osobę posiadającą odpowiednie
kwalifikacje.
- Napięcie podane na tabliczce znamionowej musi odpowiadać
istniejącemu napięciu sieciowemu.
- Nie należy prowadzić przewodów przez ostre krawędzie i pod
żadnym pozorem nie ściskać przewodów podczas instalacji.
- Urządzenie może być używane tylko w pełni zmontowane!
WAŻNE! Dla przyłącza sieciowego wymagany jest dwubiegunowy
odłącznik z rozwarciem styków co najmniej 3 mm. Urządzenie
odłączające musi być wbudowane w stałe okablowanie zgodnie z
obowiązującymi przepisami technicznymi.
- Bezpieczeństwo elektryczne wentylatora jest zagwarantowane tylko
wtedy, gdy system uziemienia instalacji domowej jest prawidłowo
zainstalowany, a wentylator jest do niego podłączony.
- Przyłącze sieciowe, do którego podłączony jest wentylator, musi
spełniać obowiązujące lokalnie normy.
- Wybierz bezpieczne, niezagrażające bezpieczeństwu miejsce in-
stalacji, w którym żadne przedmioty nie mogą znaleźć się pomiędzy
ostrzami.
- Konstrukcja sufitu musi być w stanie utrzymać 5-krotną wagę wen-
tylatora (ze względu na ruch).
- Wszystkie łopatki wentylatora muszą znajdować się w odległości co
najmniej 2,30 m od podłogi.
- Trzymać wentylator z dala od źródeł ciepła. Minimalna odległość od
grzejników i pieców wynosi 1,5 m.

27
Dane techniczne:
Typ Eco Genuino 122 Eco Genuino 152
Eco Airscrew
Eco Genuino 180
Napięcie znamionowe 220 - 240 V ~ 50 Hz
Moc silnika (max.) 10 W 29 W 30 W
Klasa/stopień ochrony I/IP20
Liczba prędkości 6 (z pilotem)
Wymiary Ø × Wysokość (mm) 1220 × 360 1520 × 360 1800 × 360
Odległość sufit – łopatka 355/275 mm 360/280 mm 365/290 mm
Ciężar (kg) ok. 6,7 ok. 7,0 ok. 7,5
Opcjonalny zestaw światło Niedostępne
Cykl konserwacji coroczny
Zmiany techniczne zastrzeżone.
- Przed uruchomieniem należy ponownie sprawdzić poprawność in-
stalacji i wszystkich połączeń elektrycznych, aby uniknąć ryzyka
upadku, pożaru i porażenia prądem.
Postępować zgodnie z instrukcją utylizacji!
Nasze wentylatory sufitowe są produktami wysokiej jakości i zapro-
jektowane, aby trwać.
- Nie wolno wyrzucać urządzenia po zakończeniu okresu użytkowania
oraz baterii potrzebnych do pracy do odpadów domowych!
- Dowiedz się o lokalnych punktach zwrotu i recyklingu odpadów i
skorzystaj z dostępnych w Twojej okolicy punktów zbiórki odpadów.
- Materiały opakowaniowe, które nie są już potrzebne, należy utylizować
w sposób przyjazny dla środowiska i w miejscu niedostępnym dla
dzieci.
Komponenty (Rysunek A, strona 30)
Rozpakować wentylator i sprawdzić zawartość opakowania pod
kątem kompletności.
Wszystkie części pokazane na ilustracji muszą być obecne i nieusz-
kodzone.

28
ECO GENUINO / ECO AIRSCREW
a. b.
c. d. e.
f.

29
EINZELTEILE
Deckenhalter Anschlusskabel Fernbedienung
Lüsterklemme Sicherungsseil Baldachinschraube (4×)
Baldachin Stellschrauben (2×) Flügelschrauben (6×)
Baldachinring Motoreinheit Deckenschrauben Holz (2×)
Deckenstange mit Halbkugel Flügel Abdeckung Deckenschrauben M5 (2×)
Sicherungsstift Untere Abdeckung Haken Sicherungsseil
Sicherungssplint Flügel (3×) Innensechskantschlüssel
Obere Abdeckung Empfänger Fernbedienung
Hanger Bracket Fan Wire Remote Control
Terminal Block Safety Rope Canopy Screw (4×)
Canopy Downrod Support Screw (2×) Blade Screws (6×)
Canopy Ring Motor Assembly Bracket Screw for Wood (2×)
Downrod and Hanger Ball Blade Cover Machine Screw M5 (2×)
Clevis Pin Lower Cover Hook for Safety Rope
Hairpin Clip Blade (3×) Hex Key
Upper Cover Receiver Unit
Support de montage Câble de connexion Télécommande
Bornier de raccordement Corde de sécurité Vis de la garniture (4×)
Garniture Vis du support de tige de
plafond (2×) Vis des pales (6×)
Cercle de garniture Unité moteur Vis à bois (2×)
Tige inférieure avec balle Couverture de pales Vis de machine M5 (2×)
Goupille d‘arrêt Couverture inférieur Crochet pour corde de sécurité
Goupille de sécurité Pales (3×) Clé Allen
Couverture supérieur Récepteur distant
Staa di montaggio Cavo di ventilatore Telecomando
Blocchetto Terminali Corda di sicurezza Vite di calotta (4×)
Calotta Vite di serraggio (2×) Vite di pales (6×)
Anello di calotta Gruppo motore Viti per legno (2×)
Asta di prolunga con emisfero Copertura di pale Viti a testa cilindrica M5
Perno di bloccaggio Copertura inferiore Gancio per corda di sicurezza
Coppiglia Pale (3×) Chiave a brugola
Copertura superiore Ricevitore remoto
PARTS
PIÈCE DÉTACHÉE
COMPONENTI

30
ECO GENUINO / ECO AIRSCREW
a. b.
c. d. e.
f.

31
COMPONENTES
SOUČÁSTI VENTILÁTORU
COMPONENTEN
KOMPONENTY
Soporte de montaje Cable de conexión Control remoto
Terminal de conexión Cuerda de seguridad Tornillos de cúpula (4×)
Cúpula Tornillo de presión (2×) Tornillo del aspas (6×)
Cúpula anillo Motor Tornillos para madera (2×)
Varilla de extensión con
hemisferio Cubierta del aspas Tornillos de techo M5 (2×)
Pasador de seguridad Cubierta inferior Gancho cuerda de seguridad
Pasador de chaveta Aspa (3×) Llave Allen
Cubierta superior Receptor del control remoto
Plafondbeugel Aansluitkabel Afstandsbediening
Aansluitblok Veiligheidskabel Baldakijn Schroef (4×)
Baldakijn Stelschroef (2×) Bladschroeven (6×)
Baldakijnring Motoreenheid Hout plafondschroeven (2×)
Plafondstang met hangerbal Vleugeldeksel Plafondschroeven M5 (2×)
Borgpin Onderste deksel Haak voor veiligheidskabel
Splitpen Blad (3×) Inbussleutel
Bovenklep Ontvanger afstandsbediening
Wspornik sufitowy Kable wentylatora Pilot odbiornika
Blok zacisków Lina bezpieczeństwa Śruby baldachim (4×)
Baldachim Śruby montażowa (2×) Śruby łopatki (6×)
Pierścień baldachimu Silnik Wkręt do drewna (2×)
Pręt sufitowy z kulą do
zawieszania Pokrywa skrzydła Śruby sufitowe M5 (2×)
Sworzeń blokujący Dolna pokrywa Hak do lin bezpieczeństwa
Zawleczka spręażysta Lopatky (3×) Klucz imbusowy
Górna pokrywa Odbiornika
Montážní konzole Propojovací kabel Dálkové ovládání
Lustrová svorka Bezpečnostní lanoč Šrouby krytu (4×)
Krytka Montážní šroub (2×) Šroub lopatky (6×)
Kroužek na krytka Motor Šroub do dřeva (2×)
Prodlužovací tyč s kloubem Kryt křídla Stropní šrouby M5 (2×)
Zajišťovací kolík Spodní kryt Háček pro bezpečnostního lana
Závlačka Lopatka (3×) Allen klíč
Horní kryt Přijímač dálkového ovládání

32
min. 37 kg !
/
WARNUNG: Gefahr eines Stromschlags! Bevor Sie mit der Montage begin-
nen, schalten Sie die Stromversorgung am Hauptstromkasten aus oder trennen Sie die
Stromzufuhr durch Entfernen der Sicherung.
ACHTUNG: Alle Montagehinweise beachten. Eine unsachgemäße Montage kann
zu Verletzungen und Sachschäden führen.
- Der Montageort (Decke) muss eine Tragkraft von mindesten 37 kg aufweisen.
- Verwenden Sie nur die für Ihre Deckenart geeigneten Schrauben und Dübel (nicht im
Lieferumfang).
Befestigen Sie den Deckenhalter mit 2 Schrauben. Ziehen Sie die Schrauben fest.
Befestigen Sie den Haken für das Sicherungsseil an der Decke wie gezeigt.
Drehen Sie 2 Baldachinschrauben gegenüberliegend in den Deckenhalter,
ziehen Sie dies aber nicht fest!
WARNING: Danger of electric shock! Before commencing installation, turn o
electricity supply at the main power box or disconnect power by removing fuse.
ATTENTION: Follow all installation directions. Improper installation can lead to
injuries and material damage.
- The place of installation (ceiling) must have a load capacity of at least 37 kg.
- Use only for your type of ceiling suitable screws and plugs (not supplied).
Attach the hanger bracket with 2 screws. Tighten the screws.
Fasten the hook for the safety rope on the ceiling as shown.
Pre-install two canopy screws on the opposite sides of the hanger bracket. Do
not tighten!
fi g . 1 fi g.2

33
AVERTISSEMENT : Risque de choc électrique ! Avant de commencer
l‘installation, coupez l‘alimentation électrique au niveau du boîtier principal ou coupez le
courant en retirant le fusible.
ATTENTION : Respecter toutes les consignes de montage. Une installation incor-
recte peut entraîner des blessures et des dommages matériels.
- Le lieu d‘installation (plafond) doit avoir une capacité de charge d‘au moins 37 kg.
- Utilisez uniquement pour votre type de plafond vis et chevilles (non fournies) appropriées.
Fixez le support de plafond avec 2 vis. Serrez les vis.
Fixer le crochet pour la corde de sécurité au plafond comme indiqué.
Pré-installer deux vis de la garniture sur les côtés opposés du support de montage.
Ne serrez pas !
AVVERTENZA: Pericolo di scossa elettrica! Prima di iniziare l‘installazione,
spegnere l‘alimentazione elettrica alla scatola di alimentazione principale o scollegare
l‘alimentazion e elettrica rimuovendo il fusibile.
ATTENZIONE: Osservare tutte le indicazioni di installazione. Un‘installazione non
corretta può causare lesioni e danni materiali.
- Luogo di installazione (sotto) avere una capacità di carico di almeno 37 kg.
- Utilizzare solo per il tipo di sotto viti e tasselli (non forniti) adatti.
Fissare la staa di montaggio con 2 viti. Serrare le viti.
Attaccare il gancio per la corda di sicurezza sul sotto come illustrato.
Pre-installare due viti di calotta sui lati opposti della staa di montaggio. Non
serrare!
ADVERTENCIA: ¡Peligro de descarga eléctrica! Antes de comenzar la
instalación, apague el suministro eléctrico en la caja principal o desconecte la energía
quitando el fusible.
ATENCIÓN: Observe todas las indicaciones de montaje. Una instalación
incorrecta puede provocar lesiones y daños materiales.
- Lugar de instalación (techo) tener una capacidad de carga de al menos 37 kg.
fig.3

34
- Utilice tornillos y tacos adecuados (no incluidos) solo para el tipo de techo.
Fije el soporte de montaje con 2 tornillos. Apriete los tornillos.
Ata el gancho de la cuerda de seguridad al techo como se muestra.
Preinstale dos tornillos de cúpula en los lados opuestos del soporte de montaje.
¡No apriete!
VAROVÁNÍ: Nebezpečí úrazu elektrickým proudem! Před zahájením instalace
vypněte přívod elektřiny v hlavní skříňce nebo odpojte napájení odstraněním pojistky.
POZOR: Dodržte všechny montážní pokyny. Nesprávná instalace může vést ke
zranění a věcným škodám.
- Místo montážní (strop) musí mít nosnost nejméně 37 kg.
- Používejte pouze šrouby a hmoždinky vhodné pro váš typ stropu (nejsou součástí
dodávky).
Připevněte montážní konzole pomocí 2 šroubů. Utáhněte šrouby.
Připevněte hák bezpečnostního lano ke stropu, jak je znázorněno.
Otočte 2 šrouby krytu proti sobě do montážní konzoly. Neutahujte pevně!
WAARSCHUWING: Gevaar voor elektrische schokken! Alvorens met de installatie
te beginnen, dient u de stroomtoevoer naar de hoofdcontactdoos uit te schakelen of de
stroomtoevoer door het verwijderen van de zekering te onderbreken.
LET OP: Volg alle aanwijzingen voor de installatie. Onjuiste installatie kan leiden tot
letsel en materiële schade.
- De plaats van installatie (plafond) moet een draagvermogen van minstens 37 kg hebben.
- Gebruik alleen voor uw type plafond geschikte schroeven en pluggen (niet bij de
levering inbegrepen).
Bevestig de plafondbeugel met 2 schroeven. Draai de schroeven stevig aan.
Bevestig de haak voor de veiligheidskabel aan het plafond zoals afgebeeld.
Draai 2 baldakijnschroeven tegenover elkaar in de plafondbeugel, maar draai ze
niet vast!
OSTRZEŻENIE: Ryzyko porażenia prądem! Przed rozpoczęciem instalacji należy
wyłączyć zasilanie na głównej skrzynce zasilającej lub odłączyć zasilanie poprzez
wyjęcie bezpiecznika.
UWAGA: Należy przestrzegać wszystkich instrukcji montażu. Nieprawidłowy
montaż może prowadzić do obrażeń ciała i szkód materialnych.
- Miejsce montażu (sufit) musi mieć nośność co najmniej 37 kg.
- Stosować wyłącznie śruby i kołki odpowiednie do danego typu sufitu (nie zawarte w
dostawie).
Przymocować wspornik sufitowy za pomocą 2 śrub. Mocno dokręcić śruby.
Przymocuj hak liny bezpieczeństwa do sufitu, jak pokazano na rysunku.
Wkręć 2 śruby baldachim naprzeciwko siebie w uchwyt sufitowy, ale nie dokręcaj ich!

35
Styropor-Verpackung / styrofoam packing /
emballage styrofoam / Imballagio styrofoam
Styropor-Verpackung / styrofoam packing /
emballage styrofoam / Imballagio styrofoam
Setzen Sie die Motoreinheit zur Vormontage umgekehrt in die Styropor-Verpa-
ckung. Montieren Sie die 3 Flügel mit den 6 Innensechskantschrauben zusammen
mit der unteren Flügelabdeckung. Drehen Sie die untere Abdeckung ein!
Insert the motor unit for preassembly reversed in the styrofoam packaging. Mount
the 3 blades with blade cover using 6 allen screws. Turn the bottom decoration
plate into the motor assembly.
Insérez l‘unité de moteur pour prémontage inversé dans l‘emballage en polysty-
rène. Monter les 3 pales avec 6 vis à six pans creux, ainsi que la couverture de
l‘aile inférieure. Tourner le couvercle inférieur!
Inserire il gruppo motore per il premontaggio invertito nella confezione di polisti-
rolo. Montare il 3 pala con 6 viti a brugola, insieme con la scocca laterale inferiore.
Girare la coperchio inferiore!
Coloque el motor boca abajo en el embalaje de poliestireno para el premontaje.
Montar las 3 aspas con los 6 tornillos Allen junto con la cubierta del aspa. ¡Atornille
la cubierta inferior!
Motorovou jednotku vložte do polystyrenového obalu pro předběžnou montáž
dnem vzhůru. Namontujte 3 lopatky pomocí 6 šroubů s vnitřním šestihranem a
spodního krytu lopatek. Našroubujte spodní kryt!
Plaats de motoreenheid ondersteboven in de styropor verpakking voor de voor-
montage. Monteer de 3 bladen met de 6 inbusschroeven samen met de onderste
bladdeksel. Schroef het onderste deksel erin!
Umieścić zespół silnika w opakowaniu styropianowym do montażu wstępnego do
góry nogami. Zamontować 3 łopatki za pomocą 6 śrub z gniazdem sześciokątnym
wraz z dolną osłoną łopatek. Przykręcić dolną pokrywę!
fig.4a
fig.4b

36
Entfernen Sie die Halbkugel C von der Deckenstange, indem Sie die SchraubeA
lösen. Entnehmen Sie den Sicherungsstift B sowie den Sicherungsstift D und den
Splint E. Lösen Sie die beiden oberen Schrauben F an der Aufnahme für die De-
ckenstange. Führen Sie alle Kabel des Motors durch die Deckenstange und setzen
Sie die Deckenstange in die Aufnahme. Stecken Sie den Sicherungsstift D durch
die dafür vorgesehene Önung in der Aufnahme und durch die Deckenstange.
Sichern Sie den Sicherungsstift mit dem Splint E. Ziehen Sie die beiden oberen
Schrauben F fest an, um die Deckenstange zu arretieren.
Remove the hanger ball C from the downrod by loosening screw A. Remove the
locking pin B as well as the locking pin D and the hairpin pin E. Loosen the two upper
screws F on the bracket for the downrod. Feed all the motor cables through the down-
rod and place the downrod in the bracket. Insert the locking pin D through the hole in
the bracket and through the downrod. Secure the locking pin with the split E. Tighten
the two upper screws F to lock the rod.
Retirez le balle C de la tige de plafond en desserrant la vis A. Retirez la goupille de
verrouillage B ainsi que la goupille de verrouillage D et la goupille fendue E. Des-
serrer les deux vis supérieures F du support de la tige de plafond. Faites passer
tous les câbles du moteur par la tige du plafond et placez la tige du plafond dans
le support. Insérez la goupille de verrouillage D dans le trou du support et dans la
tige du plafond. Fixez la goupille de verrouillage avec la fente E. Serrez les deux vis
supérieures F pour bloquer la tige du plafond.
Rimuovere l‘emisfero C dall‘asta del sotto allentando la vite A. Rimuovere il perno
di bloccaggio B, il perno di bloccaggio D e il perno di separazione E. Allentare le
due viti superiori F sulla staa per l‘asta del sotto. Far passare tutti i cavi del mo-
tore attraverso l‘asta del sotto e posizionare l‘asta del sotto nella staa. Inserire
il perno di bloccaggio D attraverso il foro della staa e attraverso l‘asta del sotto.
Fissare il perno di bloccaggio con la spaccatura E. Serrare le due viti superiori F per
bloccare l‘asta del sotto.
Retire el hemisferio C de la varilla del techo aflojando el tornillo A. Retire el pasador
de bloqueo B, así como el pasador de bloqueo D y el pasador partido E. Afloja
los dos tornillos superiores F en el soporte para la barra del techo. Pasa todos los
EF
D
fig. 6
A
B
C
D
E
fig. 5

37
cables del motor a través de la barra del techo y coloca la barra del techo en el so-
porte. Inserte el pasador de bloqueo D a través del agujero del soporte y a través
de la barra del techo. Asegure el pasador de bloqueo con la hendidura E. Apriete
los dos tornillos superiores F para bloquear la barra del techo.
Odstraňte kloub C ze stropního sloupu povolením šroubu A. Demontujte zajišťovací
kolík B, zajišťovací kolík D a dělený kolík E. Povolte dva horní šrouby F na držáku
stropního sloupku. Protáhněte všechny kabely motoru skrz stropní sloup a zasuňte
stropní sloup do držáku. Zasuňte zajišťovací kolík D otvorem v držáku a stropní tyčí.
Zajišťovací kolík zajistěte štípačkou E. Utáhněte dva horní šrouby F a zajistěte krycí
lištu.
Verwijder de hangerbal C van de plafondstang door schroef A los te draaien.
Verwijder de borgpen B, alsmede de borgpen D en het splitpen E. Draai de twee
bovenste schroeven F op de beugel voor de plafondstang los. Voer alle aansluitka-
bels door de stang en plaats de stang in de beugel. Steek de borgpen D door het
gat in de beugel en door de plafondstang. Zet de borgpen vast met het splitpen E.
Draai de twee stelschroeven F vast om de plafondstang te vergrendelen.
Zdjąć kulą C z pręta sufitowego poprzez poluzowanie śruby A. Wyjąć sworzeń
blokujący B, jak również sworzeń blokujący D i zawleczkę E. Poluzować dwie górne
śruby F na uchwycie pręta sufitowego. Przeprowadź wszystkie kable połączeniowe
przez słupek i umieść słupek w uchwycie. Włożyć sworzeń blokujący D przez
otwór we wsporniku i przez pręt sufitowy. Zabezpieczyć sworzeń zabezpieczający
zawleczką E. Dokręć dwie śruby regulacyjne F, aby zablokować pręt sufitowy!
Setzen Sie die Obere Abdeckung, den
Baldachinring und den Baldachin in dieser
Reihenfolge auf die Deckenstange.
Place the upper cover, the canopy ring and the
canopy on the downrod in this order.
Placez dans cet ordre le couvercle du support
de la tige de plafond, l‘anneau de l‘auvent et
l‘auvent sur la tige de plafond.
Posizionare il coperchio del supporto dell‘asta
del sotto, l‘anello del baldacchino e il
baldacchino sull‘asta del sotto in quest‘ordine.
Coloca la cubierta del soporte de la varilla del
techo, la cúpula anillo y la cúpula en la varilla
del techo en este orden.
V tomto pořadí položte kryt držáku stropního
sloupu, kroužek na krytka a krytka na stropní
sloupek.
Plaats de bovenklep, de baldakijnring en de
baldakijn op de plafondstang in deze volgorde.
Umieść górną pokrywę, pierścień baldachimu i
baldachim na pręcie sufitowym w tej kolejności.
fig. 7

38
A
fig. 8 fig. 9
Montieren Sie jetzt die HalbkugelA
an die Deckenstange. Gehen Sie
hierzu in umgekehrter Reihenfolge
wie auf Abbildung fig. 5 gezeigt vor.
Now mount the hanger ball A on the
ceiling bar. Proceed in reverse order
as shown in figure 5.
Maintenant, montez le balle A sur
la tige du plafond. Procédez dans
l‘ordre inverse comme indiqué dans
la figure 5.
Ora montate l‘emisfero A sulla asta
del sotto. Procedere in ordine
inverso come mostrato in figura 5.
Ahora monta el hemisferio A en la
varilla del techo. Proceda en orden in-
verso como se muestra en la figura 5.
Nyní namontujte kloub A na stro-
pní tyč. To provedete v opačném
pořadí, než je uvedeno na obrázku.
5 ukázáno výše.
Monteer nu de hangerbal A op
de plafondstang. Ga hiervoor in
omgekeerde volgorde te werk als
getoond in figuur 5.
Teraz zamontuj kulą A na pręcie
sufitowym. W tym celu należy
postępować w odwrotnej kolejności,
jak pokazano na rys. 5.
1. 2.
b.
f.
Verbinden Sie das Sicherheitsseil
mit der Verschraubung zur Schlaufe.
- Ziehen Sie die Schraube fest.
Connect the safety rope with the
screw connection to a loop.
- Tighten the screw.
Raccordez la corde de sécurité
avec le raccord vissé à la boucle.
- Serrez la vis.
Collegare la corda di sicurezza con
il collegamento a vite all‘occhiello.
- Stringere la vite.
Conecte la cuerda de seguridad
con la conexión roscada al lazo.
- Apriete el tornillo.
Připojte bezpečnostní kabel se
šroubovým spojem ke smyčce.
- Utáhněte šroub.
Verbind het veiligheidstouw met
de schroefverbinding aan de lus.
- Zet de schroef vast.
Podłącz linę bezpieczeństwa za
pomocą połączenia śrubowego do
pętli.
- Dokręcić śrubę.

39
Hängen Sie den vormontierten Deckenventilator in den Deckenhalter. Führen Sie
das Sicherungsseil über den Haken und ziehen Sie dieses fest. Die „Nase“ in der
Aufnahme für die Halbkugel(A) muss UNBEDINGT in dem Schlitz der Halbkugel (B)
einrasten!
Hang the pre-assembled ceiling fan in the ceiling bracket. Feed the safety rope
over the hook and tighten it firmly. The „nose“ in the holder for the hanger ball (A)
must ABSOLUTELY engage in the loop in the hemisphere (B)!
Accrochez le ventilateur de plafond prémonté dans le support de plafond. Faites
passer la corde de sécurité sur le crochet et serrez-la fermement. Le „nez“ dans
le support pour l‘hémisphère (A) doit ABSOLUMENT s‘engager dans la boucle de
l‘hémisphère (B) !
Appendere il ventilatore da sotto premontato nella staa del sotto. Far passare
la corda di sicurezza sul gancio e stringerla saldamente. Il „naso“ nel supporto per
l‘emisfero (A) deve ASSOLUTAMENTE inserirsi nel loop dell‘emisfero (B)!
Cuelgue el ventilador de techo premontado en el soporte del techo. Alimenta la cu-
erda de seguridad sobre el gancho y apriétala firmemente. ¡La „nariz“ en el soporte
para el hemisferio (A) debe encajar ABSOLUTAMENTE en el bucle del hemisferio (B)!
Předmontovaný stropní ventilátor zavěste do držáku stropu. Veďte bezpečnostní
lano přes hák a pevně ho utáhněte. „Nos“ v záběru na polokouli (A) musí
BEZPODMÍNEČNĚ zapadnout do štěrbiny na polokouli (B)!
Hang de voorgemonteerde plafondventilator in de plafondbeugel. Steek de
veiligheidskabel over de haak en draai hem vast. De „neus“ in de houder voor de
hemisfeer (A) moet ABSOLUUT in de lus in de hangerbal (B) grijpen!
Zawiesić wstępnie zmontowany wentylator sufitowy w uchwycie sufitowym.
Przełożyć lina bezpiecznika przez hak i mocno go naciągnąć. „Nosek“ w uchwycie
pręta sufitowego (A) musi BEZWZGLĘDNIE wchodzić w szczelinę w półkuli (B)!
fig. 10
a.
A
B

40
Führen Sie den Empfänger der Fernbedienung wie auf der Abbildung gezeigt in
den Deckenhalter ein.
Place the receiver of the remote control as shown in the figure in the ceiling bracket.
Exécutez le récepteur de la télécommande comme indiqué dans la figure dans le
support de plafond.
Eseguire il ricevitore del telecomando come mostrato in figura nella staa sotto.
Coloque el receptor del control remoto como se muestra en la figura en el soporte
del techo.
Vložte přijímač dálkového ovládání do konzole dle obrázku.
Plaats de ontvanger van de afstandsbediening in de plafondbeugel zoals afgebeeld.
Włóż odbiornik pilota do konsoli, jak pokazano na rysunku.
Verbinden Sie die Stecker wie in der Abbildung fig. 12 gezeigt und schließen Sie
die Netzspannung an die Lüsterklemme an.
Connect the plugs as shown in the picture fig. 12 and connect the mains voltage at
the terminal block .
Branchez les fiches comme montré dans l‘image fig. 12 et connecter la tension
d‘alimentation sur le bornier .
Collegare le spine, come mostrato in figura 12 e collegare la tensione di rete alla
blocchetto terminali .
fig. 11
Elektrischer Anschluss
Raccordement électrique
Conexionado eléctrico
Elektrische aansluiting
Electrical connections
Collegamento elettrico
Elektrické zapojení
Przyłącza elektryczne

41
N
L
N
L
grün/
gelb
green/
yellow
vert /
jaune
verde/
giallo
verde/
amarillo
zelená/
žlutá
groen/
geel
zielony/
żółty
blau blue bleu blu azul modrý blauw niebieski
braun brown brun bruno marrón hnědý bruin brązowy
violett purple violet viola violeta fialový violet fioletowy
rot red rouge rosso rojo červeň rood czerwona
230 VAC
50 Hz
Conecte los enchufes como se muestra en la figura 12 y conecte la tensión de la
red al bloque de terminal .
Připojte zástrčky podle obrázku fig. 12 a připojte síťové napětí k terminálu .
Sluit de stekkers aan zoals afgebeeld in figuur 12 en sluit de netspanning aan op het
aansluitblok .
Podłączyć wtyczki jak pokazano na rysunku fig. 12 i podłączyć napięcie sieciowe
do blok zacisków .
fig. 12
Motor
Earth
AC IN - L
AC IN - N
PE

42
Schieben Sie den Baldachin nach oben auf den Deckenhalter. Verdrehen Sie den
Baldachin so, dass die 2 Schrauben in den Bajonett-Önungen einrasten. Ziehen Sie
diese fest und schrauben Sie die beiden anderen Schrauben ein. Drücken Sie den
Baldachinring nach oben, bis dieser fest sitzt.
Slide the canopy up to the mounting bracket and place the key hole slots on
canopy over the two screws on the mounting bracket. Rotate the canopy until
the screws head locks in place. Re-tighten the 2 screws and reinstall the other 2
screws. Install the canopy ring by pushing it up to the canopy.
Faites glisser la canopée jusqu‘au support de plafond. dévisser les deux vis dans
les ouvertures à baïonnette. Tournez la canopée de sorte que les vis sont bien
serrées. Serrer cette vis et les deux autres vis. Poussez le couvercle de la canopée
vers le haut jusqu‘à ce qu‘ils soient fermement.
Far scorrere il baldacchino fino al supporto a sotto. svitare le due viti nelle aper-
ture baionetta. Ruotare il baldacchino in modo che le viti siano aderente. Serrare
questo e avvitare le altre due viti. Spingere l‘anello baldacchino verso l‘alto fino a
quando sono saldamente.
Deslice el cúpola en el montaje del techo. Los dos tornillos deben encajar en las
aberturas de bayoneta. Gire el cúpola para que los tornillos estén en su lugar.
Apretarlos y atornillar los otros dos tornillos. Presione el anillo del cúpul hacia arri-
ba hasta que estén apretados.
Posuňte baldachýn nahoru na stropní držák. tyto dvě šrouby se musí vejít do bajo-
netových otvorů. Zatlačte baldachýn tak, aby byly šrouby na svém místě. Utáhněte
je a zašroubujte další dva šrouby. Stiskněte prstencový kryt a spodní kryt nahoru,
dokud nejsou těsní.
Schuif de baldakijn naar boven op de plafondbeugel. Draai de baldakijn zodat de
2 schroeven in de bajonetgaten grijpen. Draai ze vast en draai de andere twee
schroeven erin. Duw de baldakijnring omhoog tot hij stevig op zijn plaats zit.
Przesuń baldachim do góry na wspornik sufitowy. Przekręć daszek tak, aby 2 śruby
weszły w otwory bagnetowe. Obróć baldachimu tak, aby 2 śruby weszły w otwory
bagnetowe. Popchnij pierścień baldachim, aż znajdzie się on na swoim miejscu.
fig. 13

43
INBETRIEBNAHME
HINWEIS: Bei jedem Start „sucht“ der Motor seine Start-
position. Ein kurzes Vor- und Zurücklaufen ist hierzu, je
nach Stellung des Motors erforderlich und völlig normal.
- Setzen Sie 2 Batterien Typ AAA (1,5V) in den
Handsender der Fernbedienung.
INITIAL OPERATION
NOTE: Always when the ceiling fan is started, the motor
will “search” for its start position. Depending on the
motor position, the motor will need to briefly move for-
wards and then backwards, which is completely normal.
- Insert 2 batteries type AAA (1.5V) into the transmitter
of the remote control.
MISE EN SERVICE
REMARQUE: Toujours lorsque le ventilateur de plafond est démarré, le moteur
„cherche“ pour sa position de départ. En fonction de la position du moteur, le
moteur devra se déplacer brièvement vers l‘avant puis vers l‘arrière, ce qui est tout
à fait normal.
- Insérez 2 piles de type AAA (1,5V) comme l‘émetteur de la télécommande.
MESSA IN FUNZIONE
NOTA: Al momento dell’avvio il motore “cerca” la sua posizione di avvio. A tal fine,
a seconda della posizione del motore, un piccolo movimento in avanti e all’indietro
è completamente normale e necessario.
- Inserire 2 batterie tipo AAA (1,5V) come il trasmettitore del telecomando.
PUESTA EN SERVICIO
NOTA: En cada arranque, el motor „busca“ su posición inicial. Se requiere un avance
y retroceso cortos, dependiendo de la posición del motor y completamente normal.
- Inserte 2 pilas de tipo AAA (1,5V) en el transmisor de control remoto.
UVEDENÍ DO PROVOZU
POZNÁMKA: Při každém startu motor „hledá“ svou výchozí polohu. Krátké dopředu
a dozadu je zapotřebí v závislosti na poloze motoru a zcela normální.
- Do vysílače dálkového ovladače vložte 2 baterie typu AAA (1,5V).
INBEDRIJFNAME
OPMERKING: Bij elke start „zoekt“ de motor naar zijn startpositie. Aankelijk van
de stand van de motor is een kort heen en weer lopen noodzakelijk en volkomen
normaal.
- Plaats 2 batterijen van het type AAA (1,5V) in de handzender van de afstandsbe-
diening.
URUCHOMIENIE
WSKAZÓWKA: Przy każdym starcie silnik „szuka“ swojej pozycji startowej.
W zależności od położenia silnika, krótka jazda tam i z powrotem jest konieczna i
całkowicie normalna.
- Włóż 2 baterie typu AAA (1,5V) do ręcznego nadajnika pilota.
SET
+
+
-
-
+
-
+
-
fig. 14

44
SET
SET
+
+
-
-
Schalten Sie die beiden DIP-Schalter nach OBEN.
- Die Codierung ist abgeschlossen.
Ihr Deckenventilator und die Fernbedienung sind nach Einschalten der
Netzspannung bereit zur Verwendung. Sie können mehrere Handsender
mit der gleichen Einstellung verwenden, um den gleichen Deckenventilator
zu bedienen.
Set both DIP switches in UPPER position.
- The coding is completed.
Your ceiling fan and the remote control are ready for use after switching on
the power supply. Multiple remote control handpieces with same setting can
control the same ceiling fan.
Réglez les deux commutateurs DIP en position HAUTE.
- Le codage est terminé.
Votre ventilateur de plafond et la télécommande sont prêtes à l‘emploi
après la mise sous tension de l‘alimentation. Plusieurs handpieces de
contrôle à distance avec même réglage peuvent contrôler le même
ventilateur de plafond.
Impostare entrambi gli interruttori DIP in posizione SUPERIORE.
- La codifica è completata.
Il tuo ventilatore a sotto e il telecomando è pronto per l‘uso dopo
l‘accensione l‘alimentazione. Più manipoli di controllo remoto con la stessa
impostazione in grado di controllare lo stesso ventilatore a sotto.
Gire los dos interruptores DIP hacia ARRIBA.
- La codificación está completa.
Su ventilador de techo y el control remoto está listo para encender la
tensión de la red Utilizar. Puede usar varios transmisores de mano con la
misma entrada use el mismo ventilador de techo para operar.
Otočte dva přepínače DIP nahoru.
- Kódování je dokončeno.
Váš stropní ventilátor a Dálkové ovládání je připraveno k zapnutí síťového
napětí Použít. Můžete použít několik ručních vysílačů se stejným vstupem
používat stejný ventilátor stropu.
Zet beide DIP-schakelaars in de stand HIGH.
- De codering is voltooid.
Uw plafondventilator en de afstandsbediening zijn klaar voor gebruik na het
inschakelen van de stroomvoorziening. Meerdere afstandsbedieningen met
dezelfde instelling kunnen dezelfde plafondventilator aansturen.
Przekręć oba przełączniki DIP w górę.
- Kodowanie jest zakończone.
Wentylator sufitowy i pilot są gotowe do użycia po włączeniu zasilania.
Kilka pilotów z takimi samymi ustawieniami może sterować tym samym
wentylatorem sufitowym.
UNIVERSAL MODE
DIP
Neucodierung/Verbindung herstellen
Recodage / Établir la connexion
Recodificar / Conectar
Hercodering / Verbinding maken
Recoding/Connect
Modificare del codi/Connettere
Přepsat / Připojit
Przekodowanie / Podłączenie

45
SET
SET
+
+
-
-
Schalten Sie die beiden DIP-Schalter nach UNTEN.
Set both DIP switches in LOWER position.
Réglez les deux commutateurs DIP en position BASSE.
Impostare entrambi gli interruttori DIP in posizione BASSA.
Cambie los dos interruptores DIP hacia ABAJO.
Otočte dva přepínače DIP DOWN.
Zet de twee DIP-schakelaars OMLAAG.
Przełącz oba przełączniki DIP w DÓŁ.
LEARNING MODE
DIP
SET
5 – 10 Sek.
1.
2.
3.
BEEP
Schalten Sie die Stromzufuhr ein. Innerhalb von 60 Sekunden die
„SET“-Taste für 5 bis 10 Sekunden drücken, bis ein Bestätigungston
erfolgt.
- Ihr Deckenventilator und die Fernbedienung sind bereit zur Verwen-
dung. In diesem Modus können mehrere Ventilatoren jeweils einer
Fernbedienung zugeordnet werden.
Turn on the power. Within 60 seconds, press the „SET“ button for 5
to 10 secondsuntil a „Beep“ for confirmation sounds.
- Your ceiling fan and remote control are ready for use. Use this mode
to control several ceiling fans each with assigned remote control.
Allumez le pouvoir. Appuyez dans les 60 secondes, „SET“ pendant 5
à 10 secondes jusqu‘à ce qu‘un signal sonore se produit.
- Votre ventilateur de plafond et la télécommande sont disponibles
pour utilisation.
Attivare l‘alimentazione. Premere entro 60 secondi, il pulsante „SET“
per 5 - 10 secondi, finché si verifica un segnale accustico.
Il ventilatore a sotto e telecomando sono disponibili per l‘uso.
Conecte la fuente de alimentación. Pulse la tecla „SET“ durante 5 a
10 segundos en un plazo de 60 segundos, hasta que se oiga un tono
de confirmación.
- El ventilador de techo y el mando a distancia están listos para usar.
En este modo, se pueden asignar varios ventiladores a un mando a
distancia cada uno.
Zapněte napájení. Během 60 sekund stiskněte tlačítko „SET“ po
dobu 5 až 10 sekund, dokud se neobjeví potvrzovací tón.
- Stropní ventilátor a dálkové ovládání jsou připraveny k použití.
Vtomto režimu lze k dálkovému ovladači přiřadit více ventilátorů.
Schakel de stroom in. Druk binnen 60 seconden op de toets „SET“
gedurende 5 tot 10 seconden tot een „piep“ ter bevestiging klinkt.
- Uw plafondventilator en afstandsbediening zijn klaar voor gebruik.
Gebruik deze modus om meerdere plafondventilatoren te bedienen,
elk met een toegewezen afstandsbediening.
Włączyć zasilanie. W ciągu 60 sekund naciskać przycisk „SET“
przez 5 do 10 sekund, aż do usłyszenia sygnału dźwiękowego
potwierdzającego.
- Wentylator sufitowy i pilot zdalnego sterowania są gotowe do
użycia. Tryb ten można wykorzystać do sterowania kilkoma wentyla-
torami sufitowymi, z których każdy ma przypisanego pilota.
SET
SET
+
+
-
-

46
Bedienung Operation Foncionnement Funzionamento
Operación Obsluha Bediening Obsługa
LED-Anzeige
Ventilator
EIN/AUS
LED indication
Fan
ON/OFF
Achage LED
Ventilateur
ON/OFF
Indicazione LED
Ventilatore
ON/OFF
Indicación LED
Ventilatore
ON/OFF
Indikační LED
Ventilátor
ZAP/VYP
LED-indicatie
Ventilator
AAN/UIT
Wskazanie LED
Wentylatora
WŁ/WYŁ
LED-Anzeige
Stufe 1 - 6
LED indication
Speed 1 - 6
Achage LED
Vitesse 1 - 6
Indicazione LED
Livello 1 - 6
Indicación LED
Nivel 1 - 6
Indikační LED
Úroveň 1 - 6
LED-indicatie
Niveau 1 - 6
Wskazanie LED
Poziom 1-6
+ 1 Stufe
schneller
+ 1 Speed
faster
+ 1 Vitesse
plus rapide
+ 1 Velocità
ralentare
+ 1 Nivel
más rápido
+ 1 Úroveň
rychleji
+ 1 Niveau
sneller
+ 1 Posziom
szybciej
- 1 Stufe
langsamer
- 1 Speed
slower
- 1 Vitesse
réduite
- 1 Velocità
allentare
- 1 Nivel
más lento
- 1 Úroveň
pomalejší
- 1 Niveau
langzamer
- 1 Poziom
wolniej
Motor AUS Motor OFF Moteur OFF Arresto del
motore
Apagar el
motor Motor vypnutý Motor UIT Silnik
wyłączony
Wechsel
Drehrichtung
Forward/
Reverse
Inverser
Rotation
Cambiare
direzione di
rotazion
Cambiar
el sentido de
giro
Vpřed / Vzad Verander
draairichting
Zmień kierunek
obrotów

47
HILFE BEI STÖRUNGEN
Störung Abhilfe
Ventilator setzt
sich nicht in
Gang
- Überprüfen Sie die Sicherungen des Hauptnetzes und der anderen
Anschlüsse.
- Überprüfen Sie den Anschluss des Ventilators an den Netzanschluss.
- Wiederholen Sie die Codierung des Ventilators mit dem Handsender.
- Wechseln Sie ggf. die Batterie im Handsender.
Ventilator macht
Geräusche
- Überprüfen Sie, ob alle Schrauben festgezogen sind.
- Geben Sie dem Gerät eine Einlaufzeit von 24 Stunden. Die meisten
Geräusche verschwinden nach dieser Zeit.
Ventilator
schwingt zu
stark
- Alle Schrauben beim Zusammenbau des Ventilators, besonders
die, die die Achse betreen, haben eine wichtige Funktion. Nicht
angezogene Schrauben sind der Hauptgrund für Unwuchten. Bitte
stellen Sie sicher, dass alle Schrauben fest angezogen sind.
- Alle Flügel wurden gewogen und nach Gewicht gruppiert. Holz
ist ein natürliches Material. Die Dichte kann variieren und dadurch
Schwingungen erzeugen, selbst wenn alle Flügel das gleiche
Gewicht haben. Unter Umständen sind die Flügelschrauben unter-
schiedlich fest angezogen. Bitte korrigieren sie dies.
HINWEIS: Leichte Unwuchten bis ca. 10 mm außerhalb des Zentrums
sind bei Naturholzflügeln normal und kein Mangel.
- Überprüfen Sie, ob der Deckenhalter fest mit der Decke verankert ist
Wichtig: Das Önen des Gerätes und Reparaturen dürfen nur durch eine qualifizierte
Elektrofachkraft durchgeführt werden!
REINIGUNG/WARTUNG
WARNUNG: Gefahr eines Stromschlags! Schalten Sie den Strom am
Sicherungskasten oder Schutzschalter aus, bevor Sie Ihren Ventilator reinigen
oder warten.
- Deckenventilator nicht mit Wasser säubern! Das Gerät darf nicht nass werden.
- Verwenden Sie kein Benzin oder ein ähnlich leicht entflammbares Reinigungsmittel.
- Flügel und Motor bei Bedarf mit einem trockenen Tuch abreiben.
Regelmäßige Prüfung
- Prüfen Sie einmal jährlich alle Schrauben, insbesondere die der Deckenauängung,
auf festen Sitz, wenn nötig nachziehen.
- Prüfen Sie die elektrischen Anschlüsse auf korrekte Verbindung.

48
NOTES FOR REMOVING FAULTS
Fault Remedy
The fan does not
start
- Check the fuses/trips at the main box and other connections.
- Check the fan connection to the mains.
- Repeat coding of the fan with the handheld transmitter.
- Replace the battery in the handheld transmitter if necessary.
The fan is noisy - Check that all bolts and screws have been tightened.
- Run in the fan and the bearings for 24 hours. Most noises
disappear after this time.
The fan vibrates
too much
- All screws during assembly of the ventilator, especially those
relating to the axis, have an important function. Not tightened
screws are the main cause of imbalances. Please make sure that
all screws are tightened.
- All blades have been weighed and grouped according to weight.
Wood is a natural material. Their density can vary and therefore
cause vibration even when all blades are of the same weight. If the
blade screws of one of the blades are not tightened properly, this
could cause massive wobbling.
NOTE: Movement of up to 10 mm is quite acceptable and does not
mean a faulty ceiling fan.
- Check that the hanger bracket is firmly anchored to the ceiling.
Important:
Opening up and repairing the unit may only be carried out by a qualified electrician!
CLEANING/MAINTENANCE
WARNING: Danger of electric shock! Turn o the electricity at the fuse
box or circuit breaker before cleaning or servicing your fan.
- Never use water for cleaning your ceiling fan. The appliance must not get wet.
- Do not use petrol or any similar light flammable detergents!
- Clean the surface of the housing and the blades with a dry cleaning cloth.
Regular check
- Check once a year all the screws, especially those of the ceiling suspension, for tight-
ness, retighten if necessary.
- Check electrical connections for proper connection.

49
CONSEILS EN VUE DE REMÉDIER AUX INCIDENTS
Incident Remède
Le ventilateur ne
se met pas en
marche
- Vérifiez les fusibles du secteur et les autres connexions.
- Vérifiez si le ventilateur est correctement connecté au secteur.
- Répéter le codage de la commande à distance
- Changez la pile de l‘émetteur portatif si nécessaire.
Le ventilateur
émet des bruits
- Vérifiez si toutes les vis sont correctement serrées.
- Laissez au ventilateur et aux roulements une période de rodage
de 24 heures. La plupart des bruits disparaissent après ce lapse
de temps.
Le ventilateur
vibre trop
- Toutes les vis lors du montage du ventilateur, en particulier celles
relatives à l‘axe, ont une fonction importante. Vis Non serrés sont
la principale cause des déséquilibres. Faire S‘il vous plaît assurer
que toutes les vis sont serrées.
- Toutes les pales ont été pesées et groupées en fonction de leur
poids. Le bois est un matériau naturel. La densité peut varier et
provoquer des vibrations même si toutes les pales présentent le
même poids. Dans certaines circonstances, les vis sont diérents
serrés. S‘il vous plaît corriger cela.
REMARQUE: Faible déséquilibres jusqu‘à environ 10 mm du centre
sont normaux avec des pales en bois naturel et ne manquent pas.
- Vérifiez si le support de montage est correctement ancrée dans le
plafond.
Important :
L’ouverture de l’appareil et les réparations sont l’aaire exclusive d’un électricien qualifié !
NETTOYAGE/MAINTENANCE
AVERTISSEMENT : Risque de choc électrique ! Coupez le courant au niveau de
la boîte à fusibles ou du disjoncteur avant de nettoyer ou d‘entretenir votre ventilateur.
- N‘utilisez jamais d‘eau pour nettoyer votre ventilateur de plafond. L‘appareil ne doit
pas se mouiller.
- N‘utilisez pas d‘alcalis ou d‘essence pour le nettoyage.
- Nettoyer les pales et le moteur si nécessaire avec un chion sec.
Contrôle régulier
- Vérifiez une fois par an toutes les vis, en particulier celles de la suspension au pla-
fond, pour l‘étanchéité.
- Vérifier les connexions électriques pour une connexion correcte.

50
ISTRUZIONI PER LA RISOLUZIONE DEI GUASTI
Problema Soluzione
Il ventilatore non
parte
- Controllate le protezioni della rete principale e degli altri collegamenti.
- Controllate il collegamento del ventilatore alla rete di alimentazione.
- Ripetere la codifica del ventilatore con il trasmettitore portatile.
- Se necessario, sostituire la batteria del trasmettitore portatile.
Il ventilatore fa
rumore
- Controllate che tutte le viti siano ben serrate.
- Osservate il comportamento del ventilatore e dei cuscinetti per un
tempo d’esercizio di 24 ore. La maggior parte dei rumori tendono
a scomparire entro tale lasso di tempo.
Il movimento
oscillatorio del
ventilatore è
troppo accen-
tuato
- Tutte le viti durante il montaggio del ventilatore, in particolare
quelle relative all‘asse, hanno una funzione importante. Viti non
serrate sono la causa principale degli squilibri. Si prega di fare in
modo che tutte le viti siano serrate.
- Tutte le pale sono state pesate e raggruppate per peso. Il legno
è un materiale naturale. Tuttavia, la densità può variare e gene-
rare oscillazioni, anche quando le pale hanno lo stesso peso. In
determinate circostanze, le viti sono diverse serrati. Si prega di
correggere questo.
NOTA: Luce squilibri fino a circa 10 mm dal centro sono normali con
le pale in legno naturale e non mancano.
- Controllare che la staa di montaggio sia saldamente fissata al
sotto.
Importante: L’apparecchio può essere smontato e riparato solo ed esclusivamente da un
elettricista qualificato!
PULIZIA/MANUTENZIONE
AVVERTENZA: Pericolo di scossa elettrica! Spegnere l‘alimentazione alla
scatola dei fusibili o all‘interruttore automatico prima di pulire o fare
manutenzione al ventilatore.
- Non utilizzare mai acqua per la pulizia del ventilatore da sotto. L‘apparecchio non
deve bagnarsi.
- Non utilizzare benzina o simili detergenti facilmente infiammabili!
- Pulire le pale e il motore, se necessario, con un panno asciutto.
Controllo regolare
- Controllare una volta all‘anno tutte le viti, in particolare quelle della sospensione a
sotto, per verificarne la tenuta, se necessario serrare nuovamente.
- Controllare i collegamenti elettrici per un corretto collegamento.

51
INSTRUCCIONES DE SOLUCIÓN DE PROBLEMAS
Problema Solución
El ventilator no
enciende
- Verifique las protecciones de la red principal y otras conexiones.
- Verifique la conexión del ventilador a la red eléctrica.
- Repita la codificación del ventilador con el transmisor de mano.
- Cambie la batería del transmisor de mano si es necesario.
El ventilator
hace ruido
- Verifique que todos los tornillos estén apretados.
- Observe el comportamiento del ventilador y los cojinetes durante
un tiempo de funcionamiento de 24 horas. La mayoría de los ruidos
tienden a desaparecer dentro de este marco de tiempo.
El movimiento
oscilante del
ventilador está
demasiado
acentuado
- Todos los tornillos al montar el ventilador, especialmente el eje,
tienen una función importante. Los tornillos sin apretar son la causa
principal de los desequilibrios.Por favor, asegúrese de que todos
los tornillos estén apretados.
- Todas las aspas fueron pesadas y agrupadas por peso. La madera
es un material natural. Sin embargo, la densidad puede variar y
generar oscilaciones, incluso cuando las aspas tienen el mismo
peso. Bajo ciertas circunstancias, los tornillos son diferentes
apretados. Por favor corrige esto.
NOTA: Los desequilibrios de hasta 10 mm desde el centro son
normales con aspas de madera natural.
- Verifique que el soporte de montaje esté firmemente fijada al techo
Importante:
¡El aparato puede ser desmontado y reparado única y exclusivamente por un electricista
cualificado!
LIMPIEZA/MANTENIMIENTO
ADVERTENCIA: ¡Peligro de descarga eléctrica! Desconecte la corriente de la
caja de fusibles o del disyuntor antes de limpiar o reparar el ventilador.
- Nunca use agua para limpiar el ventilador de techo. El aparato no debe mojarse.
- ¡No use gasolina ni detergentes inflamables similares!
- Limpie las cuchillas y el motor, si es necesario, con un paño seco.
Control regular
- Revise una vez al año todos los tornillos, especialmente los de la suspensión del
techo, para comprobar que estén bien apretados, reajústelos si es necesario.
- Compruebe que las conexiones eléctricas estén bien conectadas.

52
POZNÁMKY K ŘEŠENÍ ZÁVAD
Závada Náprava
Ventilátor se
netočí
- Zkontrolujte domácí pojistky a další zapojení.
- Zkontrolujte zapojení ventilátoru.
- Opakujte kódování ventilátoru pomocí dálkového ovladače.
- V případě potřeby vyměňte baterii v ručním vysílači.
Ventilátor je
hlučný
- Zkontrolujte, že jsou všechny šrouby řádně dotaženy.
- Nechte ventilátor běžet po 24 hodin. Po této době by se měla ložiska
řádně usadit a zvuky odeznít.
Ventilátor příliš
vibruje
- Veškeré šrouby na ventilátory plní svoji funkci, obzvláště ty,
které jsou napojeny na hlavní osu přístroje a jakékoli jejich
uvolnění způsobí značnou odchylku v pohybu ventilátoru. Prosím
zkontrolujte, že jsou veškeré šrouby řádně dotaženy.
- Všechny lopatky byly zváženy a dle hmotnosti roztříděny. Dřevo
je přírodní materiál, jehož hustota se mění v průběhu jednoho
kusu a tyto rozdíly mohou způsobit vibrace ventilátoru. Jakýkoli
nedotažený šroub na lopatce může mít za důsledek značné výky-
vy celé vrtule.Opravte to prosím.
POZNÁMKA: Výkyvy do 10 mm jsou akceptovatelné a rozhodně
neznamenají poškozený ventilátor.
- Zkontrolujte, zda je montážní konzola pevně ukotven ke konstrukci
budovy.
Důležité:
Otevírání přístroje a jakékoli technické úpravy nebo opravy smí vykonávat pouze
kvalifikovaný elektrikář!
ČIŠTĚNÍ/ÚDRŽBA
VAROVÁNÍ: Nebezpečí úrazu elektrickým proudem! Před čištěním
nebo opravou ventilátoru vypněte napájení pojistkové skříňky nebo jističe.
- Nikdy nepoužívejte vodu k čištění ventilátoru. Spotřebič nesmí navlhnout.
- K čištění nikdy nepoužívejte benzín nebo podobné hořlavé čisticí prostředky.
- V případě potřeby otřete lopatek a motor suchým hadříkem.
Pravidelné kontroly
- Zkontrolujte veškeré šrouby a případně je dotáhněte. Obzvláště se zaměřte na šrouby
držící konzolu u stropu.
- Zkontrolujte, že je řádně provedeno elektrické zapojení.

53
HULP BIJ STORINGEN
Storing Oplossing
Ventilator werkt
niet
- Controleer uw huiszekeringen en andere bedrading.
- Controleer de bedrading van de ventilator.
- Herhaal de ventilatorcodering met de afstandsbediening.
- Vervang, indien nodig, de batterij in de handzender.
Ventilator maakt
lawaai
- Controleer of alle schroeven goed vastzitten.
- Laat de ventilator 24 uur draaien. Na deze tijd moeten de lagers
zich goed hebben gezet en moeten de geluiden zijn afgenomen.
Ventilator
vibreert te veel
- Alle schroeven bij de assemblage van de ventilator, vooral die
voor de as, hebben een belangrijke functie. Schroeven die niet
zijn de voornaamste reden voor onevenwichtigheden. Controleer
of alle schroeven goed vastzitten.
- Alle bladen zijn gewogen en gesorteerd op gewicht. Hout is een
natuurlijk materiaal. De dichtheid kan variëren, waardoor trillingen
ontstaan, zelfs als alle vleugels hetzelfde gewicht hebben. Het is
mogelijk dat de bladschroeven anders zijn aangedraaid. Corrigeer
dit alstublieft. .
OPMERKING: Schommelingen tot 10 mm zijn aanvaardbaar en
wijzen zeker niet op een beschadigde ventilator.
- Controleer of de beugel stevig aan de ondergrond is bevestigd.
Belangrijk:
Het openen en repareren van het apparaat mag alleen worden uitgevoerd door een
gekwalificeerde elektricien!
ONDERHOUD/REINIGINGSINSTRUCTIES
WAARSCHUWING: Gevaar voor elektrische schokken! Schakel de elektriciteit uit
via de zekeringkast of de stroomonderbreker voordat u uw ventilator schoon-
maakt of onderhoudt.
- Gebruik nooit water om uw plafondventilator schoon te maken. Het toestel mag niet
nat worden.
- Gebruik geen benzine of soortgelijke licht ontvlambare reinigingsmiddelen!
- Reinig het oppervlak van de behuizing en de bladen met een droge poetsdoek.
Regelmatige controle
- Controleer alle schroeven en draai ze zo nodig aan. Let vooral op de schroeven
waarmee de beugel aan het plafond is bevestigd.
- Controleer of de elektrische bedrading goed is uitgevoerd.

54
POMOC W PRZYPADKU AWARII
Awaria Pomoc
Wentylator nie
obraca się
- Sprawdź domowe bezpieczniki i inne przewody.
- Sprawdzić okablowanie wentylatora.
- Powtórzyć kodowanie wentylatora za pomocą pilota zdalnego
sterowania.
- W razie potrzeby wymień baterię w nadajniku ręcznym.
Wentylator jest
głośny
- Sprawdź, czy wszystkie śruby są prawidłowo dokręcone.
- Pozostawić wentylator włączony przez 24 godziny. Po tym czasie
łożyska powinny się prawidłowo osadzić i odgłosy powinny ustąpić.
Wentylator
wibruje zbyt
mocno
- Wszystkie śruby wentylatora są sprawne, szczególnie te połączone
z osią główną urządzenia, a ich poluzowanie spowoduje znaczne
odchylenia w ruchu wentylatora. Należy sprawdzić, czy wszystkie
śruby są prawidłowo dokręcone.
- Wszystkie ostrza zostały zważone i posortowane według wagi.
- Każda luźna śruba na łopatce może spowodować znaczne wychy-
lenie całego śmigła. Drewno jest materiałem naturalnym. Gęstość
może się różnić i tym samym powodować drgania, nawet jeśli ws-
zystkie skrzydła mają taką samą masę. Możliwe, że śruby łopatek
są inaczej dokręcone. Proszę to poprawić.
WSKAZÓWKA: Niewielkie dysproporcje do ok. 10 mm są normalne
w przypadku łopatek z naturalnego drewna i nie stanowią wady.
- Sprawdź, czy wspornik jest mocno przymocowany do podłoża.
Ważne: Urządzenie może być otwierane i naprawiane wyłącznie przez wykwalifikowanego
elektryka!
KONSERWACJI/CZYSZCZENIA
OSTRZEŻENIE: Niebezpieczeństwo porażenia prądem! Przed czyszczeniem lub
serwisowaniem wentylatora należy wyłączyć zasilanie elektryczne w skrzynce
bezpieczników lub wyłączniku obwodu.
- Nigdy nie używać wody do czyszczenia wentylatora. Urządzenie nie może być
zamoczone.
- Do czyszczenia nie wolno używać benzyny ani podobnych łatwopalnych środków
czyszczących.
- W razie potrzeby przetrzeć ostrza i silnik suchą szmatką.
Regularne kontrole
- Sprawdzić wszystkie śruby i w razie potrzeby dokręcić je. Zwróć szczególną uwagę
na śruby mocujące wspornik do sufitu.
- Sprawdź, czy okablowanie elektryczne jest prawidłowo wykonane.

55
Hints and tips
Lock protection: The EC/DC motor has a built-in safety feature against blade or motor
obstruction during operation. If something obstructs the fan blades or motor, the motor
will keep trying to run and then stop operation after about 30 seconds of interruption.
Please remove obstacles and reset.
To reset: Turn the fan o by remote transmitter. Turn the fan on again after 5 seconds.
Over load protection (current limit): The device will limit the maximum current output
from the receiver/drive if the fan load has increased abnormally.
Tips
1. If your fan is operates automatically after installation and power on, it is because your
fan has memorized the previous factory setting. Use the Universal Mode or the lear-
ning function and your fan will be ready for use.
2. If the fan or light isn’t working, reset power (turn the power o for at least 5 seconds
and then turn the power back on) and redo the learn function setting.
3. It is not possible to remotely operate more than one fan in the same room (in the area
where the remote signal can reach to) if they share the same power supply. Separate
power supplies (such as using individual wall switches for each fan) is required if you
want to separately control more than one fan in same room.
4. When the fan is turned on or operated using forward/reverse function, it shutters &
goes back & forth until it turns. This is normal and it will take a few seconds to run this
operation.
Hinweise und Tipps
Blockierschutz: Die Elektronik des EC/DC-Motors verfügt über eine integrierte Sicher-
heitsfunktion gegen Blockieren und Bremsen während des Betriebs. Wenn Gegenstände
die Flügel oder den Motor blockieren, hält der Motor an und versucht nach circa 30Se-
kunden wieder anzulaufen. Gelingt dies nicht, schaltet die Elektronik in den Sperrmodus.
Bitte entfernen Sie die Hindernisse und resetten Sie die Elektronik.
Reset: Schalten Sie mit dem Handsender der Fernbedienung den Motor aus. Schalten
Sie ihn nach 5 Sekunden wieder ein.
Überlastschutz (Strombegrenzung): Die Elektronik begrenzt den maximalen Stromfluss.
Steigt dieser aus unbekannten Gründen über den maximal zulässigen Wert, wird dieser
begrenzt. Diese Maßnahme dient dem Schutz des Motors und der Elektronik.
Tipps
1. Wenn Ihr Ventilator nach dem Einschalten anläuft, liegt das an der Memory-Funktion der
Elektronik. Sie merkt sich die letzte Einstellung vor dem Abschalten der Stromzufuhr.
2. Wenn der Deckenventilator oder die optionale Leuchte nicht funktionieren, schal-
ten Sie das Gerät für mindestens 5 Sekunden aus und danach wieder an. Im Zwei-
fel wiederholen Sie bitte die Codierung des Deckenventilators mit dem Handsender.
3. Zur Programmierung und zum Anlernen ist es erforderlich, dass jeder Ventilator im Emp-
fangsbereich einzeln von der Spannung zu trennen ist (z.B. mit einem Wandschalter).
4. Bei jedem Start „sucht“ der Motor seine Startposition. Ein kurzes Vor- und Zurücklaufen
ist hierzu, je nach Stellung des Motors erforderlich und völlig normal.

56
Conseils et astuces
Protection Lock: L‘électronique du moteur EC / DC a une fonction de sécurité intégrée
contre le blocage et le freinage pendant le fonctionnement. Si des objets bloquent l‘aile
ou le moteur, le moteur arrête et tente après environ 30 secondes pour exécuter. Si cela
échoue, l‘électronique commute en mode de verrouillage. S‘il vous plaît supprimer les
obstacles et réinitialiser l‘électronique.
Réinitialiser: Tourner l‘émetteur de la télécommande du moteur. Tournez après
5 secondes à nouveau.
Protection contre les surcharges (limite de courant): L‘électronique limite le débit de
courant maximum. Si des raisons inconnues respectives sur la valeur maximale, elle est
limitée. Cette mesure vise à protéger le moteur et l‘électronique.
Conseils
1. Si votre ventilateur après puissance commence, cela est dû à la fonction de mémoire de
l‘électronique. Elle se souvient du dernier réglage avant de couper l‘alimentation électrique.
2. Lorsque le ventilateur de plafond ou la lumière en option ne fonctionne pas, éteindre
l‘appareil pendant au moins 5 secondes, puis tourner à nouveau. En cas de doute, s‘il
vous plaît répéter le codage du ventilateur de plafond avec la télécommande.
3. Pour programmer le «mode d‘apprentissage», il est nécessaire que chaque ventilateur
séparé individuellement la zone de réception de la tension (par exemple, avec un
interrupteur mural).
4. En fonction de la position du moteur, le moteur devra se déplacer brièvement vers
l‘avant puis vers l‘arrière, ce qui est tout à fait normal.
Suggerimenti e consigli
Protezione di blocco: L‘elettronica del motore EC / DC dispone di una funzione di
sicurezza integrata contro il blocco e la frenata durante il funzionamento. Se gli og-
getti bloccano l‘ala o il motore, il motore si arresta e cerca dopo circa 30 secondi per
l‘esecuzione. Se questo non funziona, l‘elettronica passare in modalità di blocco. Si
prega di rimuovere gli ostacoli e ripristinare l‘elettronica.
Reset: Attivare il trasmettitore sul telecomando il motore. Girare dopo 5 secondi di nuovo.
Protezione da sovraccarico (limite di corrente): L‘elettronica limita il flusso di corrente
massima. Se rispettive ragioni sconosciute sul valore massimo, è limitata. Questa misura
è di proteggere il motore ed elettronica.
Consigli
1. Se la ventola dopo l‘avvio di potenza, questo è dovuto alla funzione di memoria
dell‘elettronica. Si ricorda l‘ultima impostazione prima di spegnere l‘alimentazione.
2. Quando il ventilatore a sotto o la luce opzionale non funziona, spegnere l‘unità per
almeno 5 secondi e poi riaccenderla. In caso di dubbio, si prega di ripetere la codifica
del ventilatore a sotto con il telecomando.
3. Per programmare la „modalità di apprendimento“, è necessario che ogni ventola
separata singolarmente la reception dalla tensione (per esempio, con un interruttore a
parete).
4. Al momento dell’avvio il motore “cerca” la sua posizione di avvio. A tal fine, a seconda
della posizione del motore, un piccolo movimento in avanti e all’indietro è completa-
mente normale e necessario.

57
Poznámky a tipy
Blokovací ochrana: Elektronika motoru EC / DC má integrovanou bezpečnostní funkci
proti blokování a brzdění během provozu. Pokud objekty blokují křídla nebo motor, mo-
tor se zastaví a pokusí se po přibližně 30 sekundách restartovat. V opačném případě se
elektronika přepne do režimu uzamčení. Odstraňte překážky a resetujte elektroniku.
Reset: Vypněte motor dálkovým ovladačem dálkového ovladače. Po 5 sekundách znovu
zapněte.
Ochrana proti přetížení (omezení proudu): Elektronika omezuje maximální proudový
proud. Pokud překročí maximální přípustnou hodnotu z neznámých důvodů, bude to
omezeno. Toto opatření slouží k ochraně motoru a elektroniky.
Tipy
1. Pokud se ventilátor po zapnutí spustí, je to kvůli paměťové funkci elektroniky. Pamatu-
je si poslední nastavení před vypnutím napájení.
2. Pokud nefunguje stropní ventilátor nebo volitelný indikátor, vypněte přístroj nejméně
po dobu 5 sekund a znovu jej zapněte. V případě pochybností zopakujte kódování
stropního ventilátoru dálkovým ovladačem.
3. Pro programování v „režimu učení“ je nutné, aby každý ventilátor v oblasti příjmu byl
oddělen od napětí (např. Pomocí vypínače na stěnu).
4. Při každém startu motor „hledá“ svou výchozí polohu. Krátké dopředu a dozadu je
zapotřebí v závislosti na poloze motoru a zcela normální.
Pistas y consejos
Protección contra bloqueo: La electrónica del motor EC/DC dispone de una función de
seguridad integrada contra bloqueo y frenado durante el funcionamiento. Si los objetos
bloquean las aletas o el motor, el motor se detiene e intenta volver a arrancar después
de aprox. 30 segundos. Si esto no funciona, el sistema electrónico cambia al modo de
bloqueo. Por favor, elimine los obstáculos y reinicie el sistema electrónico.
Reset: Apague el motor con el mando a distancia. Vuelva a encenderlo después de
5 segundos.
Protección contra sobrecarga (limitación de corriente): La electrónica limita el flujo
máximo de corriente. Si por razones desconocidas se sobrepasa el valor máximo admi-
sible, éste es limitado. Esta medida sirve para proteger el motor y la electrónica.
Pistas
1. Si su ventilador arranca después del encendido, esto se debe a la función de memo-
ria de la electrónica. Recuerda el último ajuste antes de apagar el equipo.
2. Si el ventilador de techo o la luz opcional no funcionan, apague la unidad durante al
menos 5 segundos y vuelva a encenderla. En caso de duda, repita la codificación del
ventilador de techo con el transmisor de mano.
3. Para programar en „Modo aprendizaje“, cada ventilador de la zona de recepción
debe desconectarse de la tensión individualmente (p. ej. con un interruptor de pared).
4. En cada arranque, el motor „busca“ su posición inicial. Dependiendo de la posición
del motor, es necesaria una marcha adelante y atrás corta y completamente normal.

58
Wskazówki i rady
Ochrona przed zablokowaniem: Elektronika silnika EC/DC posiada zintegrowaną funkcję
bezpieczeństwa przed zablokowaniem i hamowaniem podczas pracy. Jeśli jakiś przed-
miot zablokuje łopatki lub silnik, silnik zatrzymuje się i próbuje ponownie uruchomić
po ok. 30 sekundach. Jeśli to się nie uda, elektronika przełącza się w tryb blokowania.
Proszę usunąć przeszkody i zresetować elektronikę.
Reset: Wyłączyć silnik za pomocą ręcznego nadajnika zdalnego sterowania.
Po 5 sekundach ponownie włączyć urządzenie.
Ochrona przed przeciążeniem (ograniczenie prądu): Elektronika ogranicza maksymalny
przepływ prądu. Jeśli z nieznanych przyczyn przekroczy ona maksymalną dopuszczalną
wartość, zostanie ograniczona. Środek ten służy do ochrony silnika i elektroniki.
Rady
1. Jeśli wentylator uruchamia się po włączeniu, jest to spowodowane funkcją pamięci
elektroniki. Zapamiętuje on ostatnie ustawienie przed wyłączeniem zasilania.
2. Jeśli wentylator sufitowy lub opcjonalna lampka nie działają, należy wyłączyć
urządzenie na co najmniej 5 sekund, a następnie włączyć je ponownie. W razie
wątpliwości należy powtórzyć kodowanie wentylatora sufitowego za pomocą nadajnika
ręcznego.
3. Do programowania i nauki konieczne jest odłączenie od napięcia każdego wentyla-
tora w recepcji z osobna (np. za pomocą wyłącznika ściennego).
4. Przy każdym starcie silnik „szuka“ swojej pozycji startowej. W zależności od położenia
silnika, krótka jazda tam i z powrotem jest konieczna i całkowicie normalna.
Hints en tips
Blokkeerbeveiliging: De elektronica van de EC/DC-motor heeft een geïntegreerde
veiligheidsfunctie tegen blokkeren en afremmen tijdens bedrijf. Als voorwerpen de bla-
den of de motor blokkeren, stopt de motor en probeert na ca. 30 seconden opnieuw te
starten. Als dit niet lukt, schakelt de elektronica over op blokkeren. Verwijder alstublieft
de obstakels en reset de elektronica.
Reset: Schakel de motor uit met de handzender van de afstandsbediening. Schakel het
na 5 seconden weer in.
Overbelastingsbeveiliging (stroombegrenzing): De elektronica begrenst de maximale
stroom. Als deze om onbekende redenen boven de maximaal toelaatbare waarde komt,
wordt deze beperkt. Deze maatregel dient ter bescherming van de motor en de elektronica.
Tips
1. Als uw ventilator start na het inschakelen, is dit te wijten aan de geheugenfunctie van
de elektronica. Het onthoudt de laatste instelling voordat de stroom werd uitgeschakel.
2. Als de plafondventilator of de optionele verlichting niet werkt, schakelt u het toestel
minstens 5 seconden uit en vervolgens weer in. Herhaal in geval van twijfel de code-
ring van de plafondventilator met de handzender.
3. Voor het programmeren en inleren moet elke ventilator in de ontvangstruimte afzon-
derlijk van de spanning worden losgekoppeld (b.v. met een wandschakelaar).
4. Bij elke start „zoekt“ de motor naar zijn startpositie. Aankelijk van de stand van de
motor is een kort heen en weer lopen noodzakelijk en volkomen normaal.

59
ENTSORGUNG
- Werfen Sie das Gerät, falls es ausgedient hat, keinesfalls in den normalen Hausmüll!
Nutzen Sie bei Geräten mit dem nebenstehenden Symbol die örtlichen Sammelstellen zur Rückga-
be von Elektro-Altgeräten gemäß der eruopäischen Richtlinie WEEE, 2012/19/EU. Möglichkeiten zur
kostenfreien Rückgabe für Elektro- und Elektronik-Altgeräte erfahren Sie bei Ihrem Händler oder Ihre
Gemeindeverwaltung.
- Werfen Sie Batterien keinesfalls in den normalen Hausmüll!
Altbatterien gehören nicht in den Hausmüll, sondern müssen in der Europäischen Union – gemäß
Richtlinie 2006/66/EG – einer fachgerechten Entsorgung zugeführt werden. Informationen über die
kostenfreie Rückgabe gebrauchter Batterien erhalten Sie bei Ihrem Händler oder Ihrer Gemeindever-
waltung. Bitte entsorgen Sie Batterien gemäß den geltenden gesetzlichen Bestimmungen.
Das Gerät und die Verpackungsmaterialien sind recycelbar, entsorgen Sie diese getrennt für eine
bessere Abfallbehandlung.
DISPOSAL
- If the appliance has reached the end of its useful life, do not throw it in the normal household waste!
For appliances with the adjacent symbol, use the local collection points for the return of old electrical
appliances in accordance with the European Directive WEEE, 2012/19/EU. For information on how to
return waste electrical and electronic equipment free of charge, please contact your local authority.
- Do not throw batteries in the normal household waste!
Used batteries do not belong in household waste, but must be disposed of properly in the European
Union – in accordance with Directive 2006/66/EC. For information on how to return used batteries free
of charge, please contact your dealer or your local authority. Please dispose of batteries in accordance
with the applicable legal regulations.
The appliance and the packaging materials are recyclable. Dispose of them separately to ensure
better waste management.
RECYCLAGE
- Si l‘appareil a fait son temps, ne le jetez en aucun cas avec les déchets ménagers normaux !
Pour les appareils portant le symbole ci-contre, utilisez les points de collecte locaux pour le retour
des anciens appareils électriques, conformément à la directive européenne DEEE, 2012/19/EU. Pour
savoir comment retourner gratuitement les déchets d‘équipements électriques et électroniques, veuil-
lez contacter votre autorité locale.
L‘appareil et les matériaux d‘emballage sont recyclables, éliminez-les séparément pour un meilleur
traitement des déchets.
++
SMALTIMENTO
- Se l‘apparecchio ha raggiunto la fine della sua vita utile, non gettarlo nei normali rifiuti domestici!
Per gli apparecchi con il simbolo adiacente, utilizzare i punti di raccolta locali per la restituzione dei
vecchi apparecchi elettrici in conformità con la direttiva europea RAEE, 2012/19/EU. Per informazioni
su come restituire gratuitamente i rifiuti di apparecchiature elettriche ed elettroniche, contatta la tua
autorità locale.
- Non gettare le batterie nei normali rifiuti domestici!
Le batterie usate non appartengono ai rifiuti domestici, ma devono essere smaltite correttamente
nell‘Unione Europea – in conformità alla direttiva 2006/66/CE. Per informazioni su come restituire
gratuitamente le batterie usate, contattate il vostro rivenditore o le autorità locali. Si prega di smaltire
le batterie in conformità con le norme di legge applicabili.
L‘apparecchio e i materiali di imballaggio sono riciclabili, smaltirli separatamente per un migliore
trattamento dei rifiuti.

60
ELIMINACIÓN
- No elimine nunca el aparato ni su embalaje con la basura doméstica normal.
En el caso de los aparatos con el símbolo adyacente, utilice los puntos de recogida locales para la
devolución de aparatos eléctricos antiguos de acuerdo con la Directiva Europea RAEE, 2012/19/UE.
Para obtener información sobre cómo devolver gratuitamente los residuos de aparatos eléctricos y
electrónicos, póngase en contacto con su ayuntamiento.
- Nunca tire las pilas a la basura doméstica normal.
Las pilas usadas no deben depositarse en la basura doméstica, sino que deben eliminarse correcta-
mente en la Unión Europea, de acuerdo con la Directiva 2006/66/CE. Para obtener información sobre
cómo devolver las baterías usadas de forma gratuita, póngase en contacto con su distribuidor o con
las autoridades locales. Por favor, elimine las pilas de acuerdo con la normativa legal vigente.
El producto y los materiales de embalaje son reciclables, deséchelos por separado para un mejor
tratamiento de los residuos.
LIKVIDACE
- Spotřebič ani jeho obal nikdy nevyhazujte do běžného domovního odpadu.
U spotřebičů s vedlejším symbolem využijte místní sběrná místa pro zpětný odběr starých elektrických
spotřebičů v souladu s evropskou směrnicí WEEE, 2012/19/EU. Pro informace o tom, jak bezplatně
odevzdat vyřazená elektrická a elektronická zařízení, se obraťte na místní úřad.
- Baterie nikdy nevyhazujte do běžného domácího odpadu.
Použité baterie nepatří do domovního odpadu, ale musí být v Evropské unii řádně zlikvidovány – v
souladu se směrnicí 2006/66/ES. Informace o způsobu bezplatného vrácení použitých baterií získáte
u svého prodejce nebo na místním úřadě. Likvidujte baterie v souladu s platnými právními předpisy.
Výrobek a obalové materiály jsou recyklovatelné, pro lepší zpracování odpadu je likvidujte odděleně.
VERWIJDERING
- Gooi het apparaat of de verpakking nooit bij het normale huisvuil.
Gebruik voor apparaten met het symbool hiernaast de lokale inzamelpunten voor het inleveren van
oude elektrische apparaten in overeenstemming met de Europese richtlijn WEEE, 2012/19/EU. Voor
informatie over de manier waarop afgedankte elektrische en elektronische apparatuur gratis kan
worden ingeleverd, kunt u contact opnemen met uw gemeente.
- Gooi batterijen niet bij het normale huisvuil.
Gebruikte batterijen horen niet thuis in het huishoudelijk afval, maar moeten in de Europese Unie op
de juiste manier worden verwijderd – overeenkomstig Richtlijn 2006/66/EG. Voor informatie over het
gratis inleveren van gebruikte batterijen kunt u contact opnemen met uw dealer of de plaatselijke
overheid. Gelieve te ontdoen van batterijen in overeenstemming met de toepasselijke wettelijke voor-
schriften.
Het product en de verpakkingsmaterialen zijn recycleerbaar, gooi ze apart weg voor een betere
afvalverwerking.
UTYLIZACJA
- Nigdy nie wyrzucaj urządzenia ani jego opakowania do zwykłych odpadów domowych.
W przypadku urządzeń z sąsiednim symbolem należy skorzystać z lokalnych punktów zbiórki, w któr-
ych można oddać stare urządzenia elektryczne zgodnie z dyrektywą europejską WEEE, 2012/19/EU.
Aby uzyskać informacje na temat możliwości bezpłatnego zwrotu zużytego sprzętu elektrycznego i
elektronicznego, należy skontaktować się z władzami lokalnymi.
- Nie należy wyrzucać baterii do zwykłych odpadów domowych.
Zużyte baterie nie powinny być wyrzucane do odpadów domowych, lecz muszą być utylizowane w
Unii Europejskiej zgodnie z dyrektywą 2006/66/WE. Aby uzyskać informacje na temat możliwości
bezpłatnego zwrotu zużytych baterii, należy skontaktować się ze sprzedawcą lub władzami lokalnymi.
Proszę zutylizować akumulatory zgodnie z obowiązującymi przepisami prawnymi.
Produkt i materiały opakowaniowe nadają się do recyklingu, wyrzuć je oddzielnie w celu lepszego
przetworzenia odpadów.

61
Informationen für private Haushalte
Das Elektro- und Elektronikgerätegesetz (ElektroG) enthält eine Vielzahl von Anforde-
rungen an den Umgang mit Elektro- und Elektronikgeräten. Die wichtigsten sind hier
zusammengestellt.
1. Getrennte Erfassung von Altgeräten
Elektro- und Elektronikgeräte, die zu Abfall geworden sind, werden als Altgeräte be-
zeichnet. Besitzer von Altgeräten haben diese einer vom unsortierten Siedlungsabfall
getrennten Erfassung zuzuführen. Altgeräte gehören insbesondere nicht in den Haus-
müll, sondern in spezielle Sammel- und Rückgabesysteme.
2. Batterien und Akkus sowie Lampen
Besitzer von Altgeräten haben Altbatterien und Altakkumulatoren, die nicht vom Altgerät
umschlossen sind, sowie Lampen, die zerstörungsfrei aus dem Altgerät entnommen
werden können, im Regelfall vor der Abgabe an einer Erfassungsstelle vom Altgerät
zu trennen. Dies gilt nicht, soweit Altgeräte einer Vorbereitung zur Wiederverwendung
unter Beteiligung eines öentlich-rechtlichen Entsorgungsträgers zugeführt werden.
3. Möglichkeiten der Rückgabe von Altgeräten
Besitzer von Altgeräten aus privaten Haushalten können diese bei den Sammelstellen
der öentlich-rechtlichen Entsorgungsträger oder bei den von Herstellern oder Vertrei-
bern im Sinne des ElektroG eingerichteten Rücknahmestellen unentgeltlich abgeben.
Rücknahmepflichtig sind Geschäfte mit einer Verkaufsfläche von mindestens 400 m²
für Elektro- und Elektronikgeräte sowie diejenigen Lebensmittelgeschäfte mit einer
Gesamtverkaufsfläche von mindestens 800 m², die mehrmals pro Jahr oder dauerhaft
Elektro- und Elektronikgeräte anbieten und auf dem Markt bereitstellen. Dies gilt auch
bei Vertrieb unter Verwendung von Fernkommunikationsmitteln, wenn die Lager- und
Versandflächen für Elektro- und Elektronikgeräte mindestens 400 m² betragen oder die
gesamten Lager- und Versandflächen mindestens 800 m² betragen. Vertreiber haben
die Rücknahme grundsätzlich durch geeignete Rückgabemöglichkeiten in zumutbarer
Entfernung zum jeweiligen Endnutzer zu gewährleisten. Die Möglichkeit der unentgelt-
lichen Rückgabe eines Altgerätes besteht bei rücknahmepflichtigen Vertreibern unter
anderem dann, wenn ein neues gleichartiges Gerät, das im Wesentlichen die gleichen
Funktionen erfüllt, an einen Endnutzer abgegeben wird. Wenn ein neues Gerät an einen
privaten Haushalt ausgeliefert wird, kann das gleichartige Altgerät auch dort zur unent-
geltlichen Abholung übergeben werden; dies gilt bei einem Vertrieb unter Verwendung
von Fernkommunikationsmitteln für Geräte der Kategorien 1, 2 oder 4 gemäß § 2 Abs.
1 ElektroG, nämlich „Wärmeüberträger“, „Bildschirmgeräte“ oder „Großgeräte“ (letztere
mit mindestens einer äußeren Abmessung über 50 Zentimeter). Zu einer entsprechen-
den Rückgabe-Absicht werden Endnutzer beim Abschluss eines Kaufvertrages befragt.
Außerdem besteht die Möglichkeit der unentgeltlichen Rückgabe bei Sammelstellen der
Vertreiber unabhängig vom Kauf eines neuen Gerätes für solche Altgeräte, die in keiner
äußeren Abmessung größer als 25 Zentimeter sind, und zwar beschränkt auf drei Alt-
geräte pro Geräteart.
4. Bedeutung des Symbols „durchgestrichene Mülltonne“
Das auf Elektro- und Elektronikgeräten regelmäßig abgebildete Symbol einer
durchgestrichenen Mülltonne weist darauf hin, dass das jeweilige Gerät am
Ende seiner Lebensdauer getrennt vom unsortierten Siedlungsabfall zu er-
fassen ist.

62
Entsorgung von Batterien und Akkus
Batterie
enthält
Cadmium
Cd
Batterie
enthält
Quecksilber
Hg
Batterie
enthält
Blei
Pb
Dies ist neben der gesetzlichen Verpflichtung ein wichtiger Beitrag zum Umweltschutz
Informationspflicht gemäß Batteriegesetz (BattG)
Batterien sind mit dem Symbol einer durchgekreuzten
Mülltonne (s. l.) gekennzeichnet. Dieses Symbol weist
darauf hin, dass Batterien nicht in den Hausmüll
gegeben werden dürfen.
Bei Batterien, die mehr als 0,0005 Masseprozent Quecksilber, mehr als
0,002 Masseprozent Cadmium oder mehr als 0,004 Masseprozent Blei
enthalten, befindet sich unter dem Mülltonnen-Symbol die chemische
Bezeichnung des jeweils eingesetzten Schadstoffes – dabei steht "Cd" für
Cadmium, "Pb" steht für Blei, und "Hg" für Quecksilber.
Batterien dürfen nicht über den Hausmüll entsorgt werden!
Sie sind zur Rückgabe von Altbatterien gesetzlich verpflichtet, damit eine
fachgerechte Entsorgung gewährleistet werden kann. Sie können
Altbatterien an einer kommunalen Sammelstelle oder im Handel vor Ort
abgeben. Die Abgabe ist für Sie kostenlos.
Auch wir sind als Vertreiber von Batterien zur Rücknahme von Altbatterien
verpflichtet, wobei sich unsere Rücknahmeverpflichtung auf Altbatterien der
Art beschränkt, die wir als Neubatterien in unserem Sortiment führen oder
geführt haben. Altbatterien vorgenannter Art können Sie daher entweder
ausreichend frankiert an uns zurücksenden oder sie direkt an unserem
Versandlager unter der folgenden Adresse unentgeltlich abgeben.
Rücksendungen/Rückgabe von Batterien/Akkus sind zu richten an:
CasaFan GmbH
Senefelderstr. 8
63594 Hasselroth
Deutschland

63
EU Konformitätserklärung
EU Declaration of Conformity
Wir, die Firma CasaFan GmbH
We, the company Senefelderstr. 8
Hasselroth, 63594, Germany
erklären in alleiniger Verantwortung, dass das weiter unten genannte Produkt
declare under our sole responsibility that the following product
Geräteart/ type of product: Deckenventilator mit Funk-Fernbedienung/
ceiling fan with RF remote control
Handelsmarke/ trademark: CasaFan
Modell Artikelnummer weitere Angaben
model article-no further details
Eco Genuino #312215, 312216, 312217, 312218, 312219, 312220, 315225, 318020 315224, 315215,
315216, 315227, 315226, 315217, 315218, 315229 315228, 315213, 315214, 318015,
318016, 318017, 318018, 318019, 315240, 315241, 315242, 315243.
Eco Airscrew #315220, 315221, 315222, 315223, 315244, 315245, 315246, 315247, 315240,
315241, 315242, 315243, 315252, 315253, 315254, 315255, 315248, 315249, 315250,
315251.
Handsender/Transmitter Eco Genuino//Airscrew
die grundlegenden Anforderungen der aufgeführten EU-Richtlinien erfüllt:
2014/53/EU Funkanlagenrichtlinie [OJEU L153/62-106, 22.05.2014]
2011/65/EU Richtlinie zur Beschränkung bestimmter gefährlicher Stoffe in Elektro- und
Elektronikgeräten [OJEU L174/88-110, 01.07.2011]
2009/125/EG Richtlinie über die Anforderungen an die umweltgerechte Gestaltung
energieverbrauchsrelevanter Produkte [OJEU L285/10-35, 31.10.2009]
meets the essential requirements of the following EU-Directives:
2014/53/EC Radio Equipment Directive [OJEU L153/62-106, 22.05.2014]
2011/65/EC Directive on the restriction of the use of certain hazardous substances in electrical and
electronic equipment [OJEU L174/88-110, 01.07.2011]
2009/125/EC Ecodesign directive [OJEU L285/10-35, 31.10.2009]
angewandte Standards und Verordnungen/ applied standards and regulations:
EN 60335-1:2012+A11:2014+A13:2017 EN 61000-4-3:2006/A2:2010
EN 60335-2-80:2003+A1:2004+A2:2009
EN 62233:2008
EN 61000-4-4:2012
EN 61000-4-6:2014
EN 55014-1:2017 EN 61000-4-11:2004/A1:2017
EN 55015:2015 EN 300 440 V2.1
(
2017-03
)
EN 61000-3-2:2019 EN 62479:2010
EN 61000-3-3:2013/A1:2019 EN 61000-4-5:2014/A1:2017
EN 61000-4-2:2009
Bevollmächtigter zur Zusammenstellung der technischen Unterlagen:
Authorized person for technical documentation:
Name/ name, Position: Wolfgang Kissling, Geschäftsführer
Hasselroth, 10.09.2021
……………………………. …………………………..
Datum/ Date Unterschrift/ Signature

©CasaFan 2022
CasaFan GmbH * Senefelderstr. 8 * 63594 Hasselroth * Germany
Produktänderungen, die der Verbesserung dienen, behalten wir uns ohne besondere Ankündigung vor.
CasaFan reserves the right to make any changes to the product without prior notice.
CasaFan se réserve d´apportertous changements susceptibles d´améliorer les produits en vente.
CasaFan si riserva di apportare tutte le varianti migliorative ai prodotti in corso di vendita.
CasaFan se reserva el derecho de mejorar los cambios en los productos a la venta.
CasaFan si vyhrazuje právo provádět jakékoli změny produktu bez předchozího upozornění.
CasaFan behoudt zich het recht voor om verbeteringen aan te brengen aan de te koop aangeboden producten.
CasaFan zastrzega sobie prawo do wprowadzania zmian w produkcie bez wcześniejszego powiadomienia.
-
 1
1
-
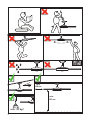 2
2
-
 3
3
-
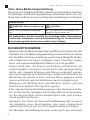 4
4
-
 5
5
-
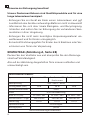 6
6
-
 7
7
-
 8
8
-
 9
9
-
 10
10
-
 11
11
-
 12
12
-
 13
13
-
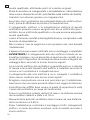 14
14
-
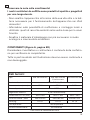 15
15
-
 16
16
-
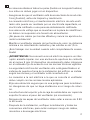 17
17
-
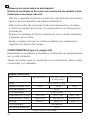 18
18
-
 19
19
-
 20
20
-
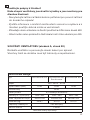 21
21
-
 22
22
-
 23
23
-
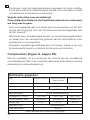 24
24
-
 25
25
-
 26
26
-
 27
27
-
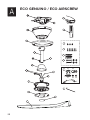 28
28
-
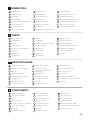 29
29
-
 30
30
-
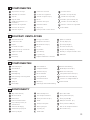 31
31
-
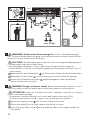 32
32
-
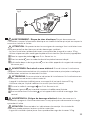 33
33
-
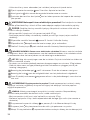 34
34
-
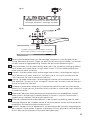 35
35
-
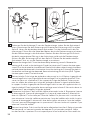 36
36
-
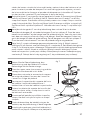 37
37
-
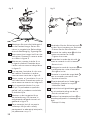 38
38
-
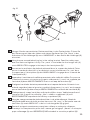 39
39
-
 40
40
-
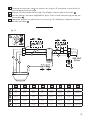 41
41
-
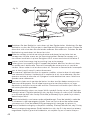 42
42
-
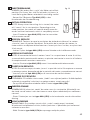 43
43
-
 44
44
-
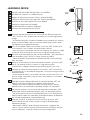 45
45
-
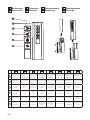 46
46
-
 47
47
-
 48
48
-
 49
49
-
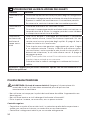 50
50
-
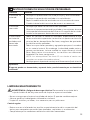 51
51
-
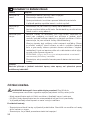 52
52
-
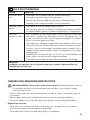 53
53
-
 54
54
-
 55
55
-
 56
56
-
 57
57
-
 58
58
-
 59
59
-
 60
60
-
 61
61
-
 62
62
-
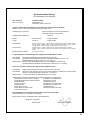 63
63
-
 64
64


en otros idiomas
- français: CaseFan Eco Airscrew Manuel utilisateur
- italiano: CaseFan Eco Airscrew Manuale utente
- Deutsch: CaseFan Eco Airscrew Benutzerhandbuch
- Nederlands: CaseFan Eco Airscrew Handleiding
- slovenčina: CaseFan Eco Airscrew Používateľská príručka
- polski: CaseFan Eco Airscrew Instrukcja obsługi
Otros documentos
-
Noaton CALLISTO Manual de usuario
-
Noaton 11055G Manual de usuario
-
Noaton 11055P Manual de usuario
-
Noaton 11055B Manual de usuario
-
Noaton 11055A Manual de usuario
-
LUCCI FUTURA ECO Installation, Operation and Maintenance Manual
-
Falcon REF 072228 Installing
-
Noaton NEBULA Manual de usuario
-
 Hunter Fan 24814 El manual del propietario
-
 Hunter Fan 50638 El manual del propietario

