KitchenAid KCMC155JBL0 El manual del propietario
- Categoría
- Microondas
- Tipo
- El manual del propietario
Este manual también es adecuado para

Model
KCMCI55J
KitchenAid
_, _ _ _,z ¸
.o
.................................................J
3828WSA 1492/8172191 www.kitchenaid.com

....._i_:_i:__'_ii,_i:ilij_,'©_i__ii}_io__"!!:::;i,__yii_ii_iii!;i:ii:!_!iii_illiiii'!iii¸¸¸¸¸¸_!::iiiiii:iiiii'iiiiiiliiii:i:i:i!iii!"',,_;ij:ii_,:,ililililiii_i3:i_¸_¸¸_¸¸_:_i_ii::::i_¸ii::;_¸I_i_i__iiY_,i::::¸_!!_,_!
KitchenAid designs the best tools for the most important room in your house. To ensure that you enjoy many
years of trouble-free operation, we developed this Use and Care Guide. It contains valuable information
concerning how to operate and maintain your new appliance properly. Please read it carefully.
Also, please complete and mail the enclosed Product Registration Card.
_::O__¸_i_t_C@ ©_ _i@_¸'¸¸¸i_i:_
Call the Customer Interaction Center toll free ........................................................................ 1-800-422-1230
If you need assistance or service, first see the "Troubleshooting" section of this book. After checking
"Troubleshooting," additional help can be found by checking the "Requesting Assistance or Service"
section, or by calling the telephone number above.
When calling, you will need to know your appliance's complete model number and serial number. You can find
this information on the model and serial number label/plate (see diagram in the "Getting to Know Your
Microwave Oven" section.)
Keep this book and the sales slip together in a safe place for future reference. You must provide proof
of purchase or installation date for in-warranty service.
Model Number
Serial Number
Date Installed
Builder/Dealer Name
Address
Phone

Your safety and the safety of others are very important.
We have provided many important safety messages in this manual and on your appliance. Always read and
obey all safety messages.
This is the safety alert symbol.
This symbol alerts you to potential hazards that can kill or hurt you and others.
All safety messages will follow the safety alert symbol and either the word "DANGER" or
"WARNING." These words mean:
You can be killed or seriously injured if you don't
immediately follow instructions.
You can be killed or seriously injured if you don't
follow instructions.
All safety messages will tell you what the potential hazard is, tell you how to reduce the chance of injury,
and tell you what can happen if the instructions are not followed.
IMPORTANT SAFETY INSTRUCTIONS
When using electrical appliances basic safety precautions should be followed, including the following:
WARNING: To reduce the risk of burns,
electric shock, fire, injury to persons or exposure
to excessive microwave energy:
• Read all instructions before using the
microwave oven.
• Read and follow the specific "PRECAUTIONS TO
AVOID POSSIBLE EXPOSURE TO EXCESSIVE
MICROWAVE ENERGY" found in this section.
• The microwave oven must be grounded. Connect
only to properly grounded outlet. See "GROUND-
ING INSTRUCTIONS" found in the "Installation
Instructions" section.
• Install or locate the microwave oven only in
accordance with the installation instructions.
• Some products such as whole eggs and sealed
containers - for example, closed glass jars -
may explode and should not be heated in the
microwave oven.
• Use the microwave oven only for its intended use
as described in this manual. Do not use corrosive
chemicals or vapors in the microwave oven. This
type of oven is specifically designed to heat,
cook, or dry food. It is not designed for industrial
or laboratory use.
• As with any appliance, close supervision is
necessary when used by children.
• Do not operate the microwave oven if it has a
damaged cord or plug, if it is not working properly,
or if it has been damaged or dropped.
• The microwave oven should be serviced only by
qualified service personnel. Call an authorized
service company for examination, repair or
adjustment.
• Do not cover or block any openings on the
microwave oven.
• Do not store the microwave oven outdoors. Do
not use the microwave oven near water - for
example, near a kitchen sink, in a wet basement,
or near a swimming pool, and the like.
• Do not immerse cord or plug in water.
• Keep cord away from heated surfaces.
• Do not let cord hang over edge of table or count-
er.
• See door surface cleaning instructions in the
"Caring for Your Microwave Oven" section.
SAVE THESE INSTRUCTIONS
continued on next page

IMPORTANT SAFETY INSTRUCTIONS
• Do not operate any heating or cooking appliance
beneath the microwave oven.
• Do not mount microwave oven over or Rear any
portion of a heating or cooking appliance.
• Do not mount over a sink.
• Do not store anything directly on top of the
microwave oven surface when the microwave
oven is in operation.
• To reduce the risk of fire in the oven cavity:
- Do not overcook food. Carefully attend the
microwave oven if paper, plastic, or other
combustible materials are placed inside the
oven to facilitate cooking.
- Remove wire twist-ties from paper or plastic
bags before placing bag in oven.
- If materials inside the oven should ignite, keep
oven door closed, turn oven off, and disconnect
the power cord, or shut off power at the fuse or
circuit breaker panel.
- Do not use the cavity for storage purposes. Do
not leave paper products, cooking utensils, or
food in the cavity when not in use.
SAVE THESE INSTRUCTIONS
PRECAUTIONS TO AVOID POSSIBLE EXPOSURE TO
EXCESSIVE MICROWAVE ENERGY
(a) Do not attempt to operate this oven with the
door open since open-door operation can result
in harmful exposure to microwave energy. It is
important not to defeat or tamper with the safety
interlocks.
(b) Do not place any object between the oven front
face and the door or allow soil or cleaner residue
to accumulate on sealing surfaces.
(c) Do not operate the oven if it is damaged. It is
particularly important that the oven door close
properly and that there is no damage to the:
(1) door (bent),
(2) hinges and latches (broken or loosened),
(3) door seals and sealing surfaces.
(d) The oven should not be adjusted or repaired by
anyone except properly qualified service personnel.

Beforeyou beginoperatingtheoven,carefullyreadthefollowinginstructions.
1.Emptythemicrowaveoven.Cleantheinsidewith
asoft,clampcloth.Checkfordamagesuchasa
doorthatisn'tlinedupcorrectly,damagearound
thedoor,ordentsinsidetheovenorontheexteri-
or.Ifthereisanydamage,donotoperatetheoven
untiladesignatedservicetechnicianhaschecked
it andmadeanyneededrepairs.
2. Puttheovenonacart,counter,table,orshelfthat
isstrongenoughtoholdtheovenandthefoodand
utensilsyouputinit.(Thecontrolsideoftheunit
istheheavyside.Usecarewhenhandlingthe
oven.)Theweightoftheovenisabout55Ibs
(25kg).Themicrowaveovenshouldbeata
temperatureabove50°F(10°C)forproperoperation.
NOTE:Youcanbuildyourmicrowaveovenintoa
wallorcabinetbyusingoneofthetrimkitslistedin
the"Built-inkits"section.
oooo_oo_ooooooo I
J_%%%%%%%%%%%%_%
°%%%%%%%%%%%%%%%%
%%%_o%%%%%%%%%%%%%%
%%%_5%%° %%%%%°d%%%%
%%%°0%° %_%%%%%%%
%%%%% 0%%%%%%%%
Air intake Exhaust vent
Power opening (in rear)
supply cord (in rear)
NOTE: Do not block the exhaust vents or air intake
openings. Allow a few inches of space at the back of
the oven where the exhaust vents are located.
Blocking the exhaust vents could cause damage to
the oven and poor cooking results. Make sure the
microwave oven legs are in place to ensure proper
airflow. If vents are blocked, a sensitive thermal safe-
ty device may automatically turn the oven off. The
oven should work properly once it has cooled.
Fire Hazard
Do not install the oven next to or over a heat
source without a UL approved trim kit.
Doing so can result in death, fire,
or electrical shock.
Observe all governing codes and ordinances. A 120
Volt, 60 Hz, AC only, 15- or 20-amp fused electrical
supply is required. (A time-delay fuse is
recommended.) It is recommended that a separate
circuit serving only this appliance be provided.
Electrical Shock Hazard
Plug into a grounded 3 prong outlet.
Do not remove ground prong.
Do not use an adapter.
Do not use an extension cord.
Failure to follow these instructions can
result in death, fire, or electrical shock.

GROUNDING INSTRUCTIONS
• For all cord connected appliances:
The microwave oven must be grounded. In the
event of an electrical short circuit, grounding
reduces the risk of electric shock by providing an
escape wire for the electric current. The
microwave oven is equipped with a cord having
a grounding wire with a grounding plug. The plug
must be plugged into an outlet that is properly
installed and grounded.
WARNING: Improper use of the grounding plug
can result in a risk of electric shock.
Consult a qualified electrician or serviceman if the
grounding instructions are not completely
understood, or if doubt exists as to whether the
microwave oven is properly grounded.
Do not use an extension cord. If the power supply
cord is too short, have a qualified electrician or
serviceman install an outlet near the microwave oven.
• For a permanently connected appliance:
The microwave oven must be connected to a
grounded, metallic, permanent wiring system, or
an equipment grounding conductor should be run
with the circuit conductors and connected to the
equipment grounding terminal or lead on the
microwave oven.
SAVE THESE INSTRUCTIONS

This section discusses the concepts behind microwave cooking. It also shows you the basics
you need to know to operate your microwave oven. Please read this information before you use
your oven.
iiiiilfi ii, ,,,
Microwave energy is not hot. It causes food to make its
own heat, and it's this heat that cooks the food.
Microwaves are likeTV waves, radio waves, or light
waves. You cannot see them, but you can see what they
do,
A magnetron in the microwave oven produces
microwaves. The microwaves move into the oven where
they contact food as itturns on the turntable.
Your oven has a multiple microwave distribution sys-
tem. Microwave energy is releasedfrom two locations,
giving you better, more even cooking.
Oven cavity Magnetron
Glass turntable Metal floor
The glass turntable of your microwave oven lets
microwaves pass through. Then they bounce off a metal
floor, back through the glass turntable, and are absorbed
by the food.
Microwaves pass through most glass, paper, and plas-
tics without heating them so food absorbs the energy.
Microwaves bounce off metal containers so food does
not absorb the energy.
Convection cooking circulates hot air through the oven
cavity with a fan. The constantly moving air surrounds the
food to heat the outer portion quickly. Your oven uses con-
vection cooking whenever you usethe Auto Convection,
Custom Convection or Combination cooking programs.
DO NOT USE THE OVEN WITHOUT THE TURNTABLE
IN PLACE.
Sometimes combination microwave-convection cooking
issuggested to get the proper cooking results. It short-
ens the cooking time for foods that normally need a long
time to cook. This cooking process also leaves meats
juicy on the inside and crispy on the outside. In combina-
tion cooking, the convection heat and microwave energy
alternate automatically. Your oven has a setting that
makes it easy to cook with both convection heat and mi-
crowave energy automatically.
m
m
Combination microwave/convection
Broiling is achieved by two radiant heating elements at
the top of the microwave oven. The hot air is circulated
through the oven cavity with a fan. The food on the broil-
ing rack is cooked by radiant heat and circulating hot air.
• Ifyou increase or decrease the amount of food you
prepare, the time ittakes to cook that food will also
change. For example, if you double a recipe, add a little
more than half the original cooking time. Check for
doneness and, if necessary, add more time in small
increments.

i!j:i!!iiiii::;_i;!ii:iiq:;iifq_i!illii:;=_i!!!!_,_iii_%l::]_4!!!!_,tq!!ii;_::;_:ii'_'_ii!!!!_,O_ii:iI_OO=_i_i::!_
• The lower the temperature of the food being put
into the microwave oven, the longer it takes to
cook. Food at room temperature will be reheated
more quickly than food at refrigerator temperature.
_i,iiiiiii0 _I__!I::)0!_:iiii:iiiiiOl'!i_O_il¸:¸ii:O0 di
• Food with a lot of fat and sugar will be heated
faster than food containing a lot of water. Fat and
sugar will also reach a higher temperature than
water in the cooking process.
• The more dense the food, the longer it takes to heat.
"Very dense" food like meat takes longer to reheat
than lighter, more porous food like sponge cakes.
• Smaller pieces of food will cook faster than larger
pieces. Also, same-shaped pieces cook more
evenly than different-shaped pieces.
• With foods that have different thicknesses, the
thinner parts will cook faster than the thicker parts.
Place the thinner parts of chicken wings and legs
in the center of the dish.
• Stirring and turning foods spreads heat quickly
to the center of the dish and avoids overcooking at
the outer edges of the food.
_i,iiiiiiiOv,_i!!!_!__i!''¸¸ii!in;_;i!i_¸_l;¸iOO_i::::l
Cover food to:
• Reduce splattering
• Shorten cooking times
• Keep food moist
You can use any covering that lets microwaves pass
through. See "Getting to Know Your Microwave
Oven" for materials that microwaves will pass
through. If you are using the Sensor function, be sure
to vent.
• Several foods (for example: baked potatoes,
sausages, egg yolks, and some fruits) are tightly
covered by a skin or membrane. Steam can build
up under the membrane during cooking, causing
the food to burst. To relieve the pressure and to
prevent bursting, pierce these foods before
cooking with a fork, cocktail pick, or toothpick.
U !; ;i!i i:ii d iii ii!!i t;ii
• Always allow food to stand after cooking. Stand-
ing time after defrosting and cooking allows the
temperature to evenly spread throughout the food,
improving the cooking results.
• The length of the standing time depends on how
much food you are cooking and how dense it is.
Sometimes it can be as short as the time it takes
you to remove the food from the oven and take it to
the serving table. However, with larger, denser food,
the standing time may be as long as 10 minutes.
For best results, place food evenly on the plate. You
can do this in several ways:
• If you are cooking several items of the same
food, such as baked potatoes, place them in a
ring pattern for uniform cooking.
• When cooking foods of uneven shapes or thick-
ness, such as chicken breasts, place the smaller
or thinner area of the food towards the center of
the dish where it will be heated last.
• Layer thin slices of meat on top of each other.
• When you cook or reheat whole fish, score the
skin - this prevents cracking.
• Do not let food or a container touch the top or
sides of the oven. This will prevent possible arcing.
Metal containers should not be used in a microwave
oven. There are, however, some exceptions. If you
have purchased food which is prepackaged in an
aluminum foil container, refer to the instructions on
the package. When using aluminum foil containers,
cooking times may be longer because microwaves
will only penetrate the top of the food. (See "Oven
Utensils Guide".)
If you use aluminum containers without package
instructions, follow these guidelines:
• Place the container in a glass bowl and add some
water so that it covers the bottom of the container,
not more than ¼in. (.64 cm) high. This ensures
even heating of the container bottom.
• Always remove the lid to avoid damage to the
oven.
• Use only undamaged containers.
• Do not use containers taller than % in. (1.9 cm).
• Container must be at least half filled.
• To avoid arcing, there must be a minimum ¼in.
(.64 cm) between the aluminum container and the
walls of the oven and also between two aluminum
containers.
• Always place the container on the turntable.
• Reheating food in aluminum foil containers usual-
ly takes up to double the time compared to reheat-
ing in plastic, glass, china, or paper containers.
The time when food is ready will vary depending
upon the type of container you use.
• Let food stand for 2 to 3 minutes after heating so
that heat is spread evenly throughout container.

• Donotdocanningoffoodsintheoven.Closed
glassjarsmayexplode,resultingindamagetothe
oven.
• Donotusethemicrowaveovento sterilizeobjects
(babybottles,etc.).Itisdifficulttokeeptheoven
atthehightemperatureneededforsterilization.
Usingyourmicrowaveovenmaycauseinterference
to yourradio,TV,orsimilarequipment.Whenthere
isinterference,youcanreduceitorremoveit by:
• Cleaningthedoorandsealingsurfacesofthe
oven.
• Adjustingthereceivingantennaoftheradioortelevi-
sion.
• Movingthereceiverawayfromthemicrowave
oven.
• Pluggingthemicrowaveovenintoadifferentoutlet
sothatthemicrowaveovenandreceiverareon
differentbranchcircuits.
• Alwayscookfoodfortheshortestcookingtime
recommended.Checktoseehowthefoodiscook-
ing.Ifneeded,touchEASYSTARTpadwhilethe
ovenisoperatingorafterthecookingcycleisover
(seethe"UsingEASYSTART"section).
• Stir,turnover,orrearrangethefoodbeingcooked
abouthalfwaythroughthecookingtimeforall
recipes.Thiswillhelpmakesurethefoodisevenly
cooked.
• If you do not have a cover for a dish, use wax
paper, or microwave-approved paper towels or
plastic wrap. Remember to turn back a corner of
the plastic wrap to vent steam during cooking.
........iii iiiiliii!ill i!i,.iii iiii
To test the oven, put 1 cup (250 mL) of cold water in
a glass container in the oven. Close the door. Make
sure it latches. Cook at 100% power for 2 minutes.
When the time is up, the water should be heated.
You can use a variety of utensils and materials in
your microwave-convection oven. To prevent dam-
age to utensils and your oven, choose appropriate
utensils and materials for each cooking method. The
list below is a general guide to help you select the
correct utensils and materials.
YES: Utensils to use
NO: Utensils to avoid
MICRO- COMBINA- CONVEC-
WAVE TION TION
MATERIAL UTENSILS COOKING COOKING COOKING
Ceramic Ceramic YES YES YES
& Glass Ovenproof, YES YES YES
Heat-
Tempered,
Micn:_vave-
Safe
Glassware
Glassware NO NO YES
with Metal
Decoration
LeadGlass NO NO YES
China Without YES YES YES
Metal
Decoration
(Ovenprcof
and Heat-
Tempered)
Pottery Ovenproof YES YES YES
.................................................p0tte_' ........................................................................................................................................
Plastic Ovenproof YES YES YES
Microwave- YES NO NO
safe plas-
ticware
Metal Bake/Roast NO NO YES
Rack
Metal NO NO YES
BakingPan
Aluminum YES
Foil
Paper Cups, YES NO NO
Plates,
Towels
sty, YES ................No No
Wicker,
* Refer to "Microwave cooking tips" and "Questions
and Answers" for proper use.

........,!!ii;i:i i i;iii i!ii!iii!iiii ili i!!iilCiiii iii i! iiiw i!!i ii i ii ii
_Ci!_Jiiii_'_''C,_:iiiiiiiiiii__Ci_!!,_iiW' _i!!:ii_:i_iiiiU__!!!!ii!!_
Test dinnerware or cookware before using. To test
a dish for safe use, put it into the oven with 1 cup
(250 mL) of water beside it. Cook at 100% cook
power for one minute. If the dish gets hot and
water stays cool, do not use it. Some dishes
(melamine, some ceramic dinnerware, etc.) absorb
microwave energy and may become too hot to han-
dle or may slow cooking times. Cooking in metal
containers not designed for microwave use could
damage the oven, as could containers with hidden
metal (twist-ties, foil lining, staples, metallic glaze or
trim).
• Never lean on the door or allow a child to swing
on it when the door is open.
• Use hot pads. Microwave energy does not heat
containers, but the heat from the food can make
the container hot.
• Do not use newspaper or other printed paper in
the oven.
• Do not dry flowers, fruit, herbs, wood, paper,
gourds, or clothes in the oven.
• Do not start a microwave oven when it is empty.
Product life may be shortened. If you practice
programming the oven, put a container of water in
the oven. It is normal for the oven door to look
wavy after the oven has been running for a while.
• Do not try to melt paraffin wax in the oven.
Paraffin wax will not melt in a microwave oven be-
cause it allows microwaves to pass through it.
• Do not operate the microwave oven unless the
glass turntable is securely in place and can rotate
freely. The turntable can rotate in either direction.
Make sure the turntable is correct-side up in the
oven. Handle your turntable with care when
removing it from the oven to avoid possibly break-
ing it. If your turntable cracks or breaks, contact
your dealer for a replacement.
• When you use a browning dish, the browning
dish bottom must be at least _0 in. (5 mm) above
the turntable. Follow the directions supplied with
the browning dish.
• Never cook or reheat a whole egg inside the
shell. Steam buildup in whole eggs may cause
them to burst, and possibly damage the oven.
Slice hard-boiled eggs before heating. In rare
cases, poached eggs have been known to
explode. Cover poached eggs and allow a stand-
ing time of one minute before cutting into them.
• For best results, stir any liquid several times
during heating or reheating. Liquids heated in
certain containers (especially containers shaped like
cylinders) may become overheated. The liquid may
splash out with a loud noise during or after heating
or when adding ingredients (coffee granules, tea
bags, etc.). This can harm the oven.
• Microwaves may not reach the center of a roast.
The heat spreads to the center from the outer,
cooked areas just as in regular oven cooking. This
is one of the reasons for letting some foods (for
example, roasts or baked potatoes) stand for a
while after cooking, or for stirring some foods dur-
ing the cooking time.
• Do not deep fry in the oven. Microwavable uten-
sils are not suitable and it is difficult to maintain
appropriate deep-frying temperatures.
• Do not overcook potatoes. At the end of the
recommended cooking time, potatoes should be
slightly firm because they will continue cooking
during standing time. After microwaving, let
potatoes stand for 5 minutes. They will finish
cooking while standing.
If your electric power line or outlet voltage is less
than 110 volts, cooking times may be longer. Have a
qualified electrician check your electrical system.

iii!"_"ii!_iili_IIZ!iiii"_'OYY'i;iii!!!_ii"_,_i''_i!!!i_i_O'_7_i!!ii!!___i_i;_ii!ii_iiii!!!i!!!,iiiii!__iiiiiiii_iii,ilii_iiii,_''_!!I!!_S
® ®
Your microwave oven is designed to make your
cooking experience enjoyable and productive. To help
get you up and running quickly, the following is a list
of the oven's basic features:
1. Door Safety Lock System. The oven will not work
unless the door is securely closed.
2. Window with Metal Shield. The shield prevents
microwaves from escaping. It is designed as a
screen to allow you to view food as it cooks.
3. Glass Turntable. This turntable turns food as it
cooks for more even cooking. It must be in the
oven during operation for best cooking results.
The turntable is sunken into the cavity floor to give
you more cooking space and better cooking
results.
4. Removable Turntable Support (under turntable).
5. Control Panel. Touch pads on this panel to
perform all functions.
6. Light (not shown). Automatically turns on when the
door is opened or when the oven is running.
7. Cooking Guide Label.
8. Model and Serial Number Plate.
9. Convection Rack. (Part No. 8172251) Use to
convection or combination cook.
10. Broiling Rack (Part No. 8172252) (shown below).
Use this rack with the drip pan for foods such as
fish steaks, chicken breasts and hamburgers.
11. Drip Pan (Part No. 8172250). The Drip Pan is
useful for catching grease from foods that drip
grease during Convection, Combination or Broil
cooking.
Convection Rack
Broiling Rack

Your microwave oven control panel lets you select a
desired cooking function quickly and easily. The
following is a list of all the Command pads located on
the control panel.
For more information on these features, see "Using
your microwave oven" section.
1. Display. This display includes a clock and
indicators to tell you the time of day, cooking time
settings, cook powers, quantities, weights, and
cooking functions.
2. AUTO SENSOR REHEAT. Touch this pad to reheat
from a variety of food categories available.
3. AUTO SENSOR COOK. Touch this pad to cook
from a variety of food categories available.
4. AUTO SENSOR POPCORN. Touch this pad to
pop a bag of popcorn in any of 3 sizes.
5. CUSTOM DEFROST. Touch this pad to defrost
frozen food by weight or quantity.
6, COOK POWER. Touch this pad to set the amount
of microwave energy released to cook the food.
The higher the number, the higher the power
wattage and the faster the "cooking speed."
7. COOK TIME. Touch this pad to set cooking time.
8. CUSTOM CONVECT. Touch this pad to cook in
Custom Convection mode. See "Convection and
Combination Cooking".
9, CUSTOM COMBI. Touch this pad to cook in
Custom Combination mode. See "Convection and
Combination Cooking".
10, CUSTOM BROIL. Touch this pad to cook in
Custom Broil mode. See "Using Your Microwave
Oven".
11, Number pads. Touch number pads to control
sound volume, weight, language, scroll speed,
clock, Demo mode, cooking times, cook powers, or
quantities.
12. TIMER. Touch this pad to set or cancel the timer
function.
13. CLOCK SET. Touch this pad to enter the correct
time of day.
14. AUTO CONVECTION pads. Touch one of these
pads to select type of food to be cooked (see
pages 21-25). Touch SPECIALTY FOODS pad once
for Warm Hold. See "Using Warm Hold" section.
15. START/EASY START. Touch this pad to start a
function you have set or to cook food for 30
seconds at 100% cook power.
16. PERSONAL CHOICE. Touch this pad to, change
sound volume to low, medium, high or off, to
change weight measurement from Ibs to kilograms,
to change the language displayed, to change scroll
speed, to change the clock from 12 hours to 24
hours, or to turn on/off, or to turn the Demo mode
on and off.
17. CANCEL/OFF. Touch this pad once to clear an
incorrect command or to cancel a program during
cooking. This pad will not erase the time of day.
Your microwave oven comes with audible signals that
can guide you when setting and using your oven:
• A programming tone will sound each time you touch
a pad.
• Three tones signal the end of a cooking cycle and five
tones signal the end of the timer function.
NOTE: The tones on your oven can be turned off. To do
so, see "Using PERSONAL CHOICE." This will only
work when the oven is in standby mode.

I::::i_¢;ii_n:i!i!_,c_::i_,o k _ii}_,D_:8:
You can stop the oven during a cycle by opening the
door. The oven stops heating and the fan stops, but
the light stays on. To restart cooking, close the door
and
Touch START.
If you do not want to continue cooking:
• Close the door and the light goes off.
OR
• Touch CANOEIJOFE
NOTE: Before setting a function, touch CANCEL/OFF
to make sure no other function is on.
You can select or change the following functions or
displays by touching PERSONAL CHOICE:
Function Choice
Sound volume Change to low, medium, high or off.
Weight Chang; to siandaid (ibsi oi
metric (kgs).
Language Change to English, French or
Spanish.
Scroll speed Change speed.
Clock Change to 12 hrs. or 24 hrs. or
turn on/off.
Demo mode Turn on or off.
;::::::::: t::
The Child Lock locks the control panel so children
cannot use the microwave when you do not want
them to. This will only work when the oven is in stand-
by mode.
To lock the control panel:
Touch and hold CANCEL!OFF until "LOCKED"
appears on display (approximately 4 seconds).
(One tone will sound.)
To unlock the control panel:
Touch and hold CANCEL!OFF until "UNLOCK"
appears on display. (Two tones will sound.)
1. Touch PERSONAL CHOICE.
The category name changes in sequence. When
the desired category appears, touch START.
For example, to change weight measurements
you see:
2. Touch PERSONAL CHOICE twice to
reach "LBS/KGS". Touch START. Touch
PERSONAL CHOICE again to select
"LBS" or "KGS".
3. Touch START.
You can build in your microwave oven by using one of the following trim kits*. These kits are available from your
dealer. If your dealer does not stock the kit you can order it, by kit model number, by calling 1-800-422-1230
and following the instructions and telephone prompts you hear.
30" (76 cm)
27" (69 cm)
30" (76 cm)
27" (69 cm)
30" (76 cm)
27" (69 cm)
30" (76 cm)
Black MK1157XJB KEBI171D KEBS177D
Black MK1150XJB KEBI101D KEBS107D
White MK1157XJQ KEBI171D KEBS177D
White MK1150XJQ KEBI101D KEBS107D
Biscuit MK1157XJT KEBI171D KEBS177D
Biscuit MK1150XJT KEBI101D KEBS107D
Stainless MK1157XJS KEBI171D KEBS177D
Stainless MK1150XJS KEBI101D KEBS107D
* Approved, electric single ovens only

Whenyoufirstpluginyourmicrowaveoven,the
displayshows" : ".Iftheelectricpowerevergoes
off,thedisplaywillagainshow" : " whenthepower
comesbackon.
NOTE:Youcancookwithoutsettingtheclock,butthe
displaywillshow" :"againafterthecookingiscom-
pleted.
1. Touch CLOCK SET.
2. Touch Number pads for time of day.
For example: For 7:00, touch "7 0 0"
3. Touch CLOCK SET.
You can use your microwave oven as a kitchen timer.
1. Touch TIMER.
2. Touch Number pads for desired time
in hours:minutes.
For example: For 10 minutes, touch "1 0"
3. Touch START, (or TIMER), or allow the
timer to start automatically after a
short delay.
4. At the end of the set time:
Timer will count down to zero, then will display
"TIMER END" and 5 tones will sound.
NOTE: To cancel timer at any time, touch TIMER.

This section gives you instructions for operating each function. Please read these instructions carefully.
1. Put the food in the oven and close the
door.
2. Touch COOK TIME.
3. Touch Number pads for desired time in
hours:minutes.
For example: For 10 minutes, touch "1 0"
4. Touch START.
5. At the end of the cooking time:
Display will show "END" and 3 tones will sound.
1. Put the food in the oven and close the
door.
2. Touch COOK TIME.
3. Touch Number pads for desired time in
hours:minutes.
4. Touch COOK POWER.
5. Select Number pad for desired power
setting.
(See the following chart.)
6. Touch START.
7. At the end of the cooking time:
Display will show "END" and 3 tones will sound.
For best results, some recipes call for different cook powers. The lower the cook power, the slower the
cooking. Each level stands for a different percentage of cook power. Many microwave cookbook recipes tell
you by number, percent, or name which cook power to use.
The following chart gives the percentage of cook power each level stands for, and the cook power name usually
used. It also tells you when to use each cook power. Follow recipe or food package instructions if available.
NOTE: Refer to a reliable cookbook for cooking times.
COOK POWER NAME WHEN TO USE IT
HI = 100% of full power High • Quick heating many convenience foods and foods
(automatic) with high water content, such as soups, beverages
and most vegetables
90 = 90% of full power • Cooking small tender pieces of meat, ground meat,
poultry pieces, and fish fillets
• Heating cream soups
80 = 80% of full power • Heating rice, pasta, or casseroles
• Cooking and heating foods that need a cook power
70 = 70% of full power Medium-High • Reheating a single serving of food
60 = 60% of full power • Cooking sensitive foods such as cheese and egg
dishes, pudding, and custards
• Cooking non-stirrable casseroles, such as lasagna

COOKPOWER NAME WHENTOUSEIT
50=50%offullpower Medium • Cookingham,wholepoultry,andpotroasts
• Simmeringstews
40=40%offullpower • Meltingchocolate
• Heatingbread,rollsandpastries
30=30%offullpower Medium-Low, • Defrostingfoods,suchasbread,fish,meats,
Defrost poultry,andprecookedfoods
20=20%offullpower • Softeningbutter,cheese,andicecream
10= 10%offullpower Low • Keepingfoodwarm
• Takingchilloutoffruit
Forbestresults,somerecipescallforonecookpower
foracertainlengthoftime,andanothercookpower
foranotherlengthoftime,Yourovencanbesetto
changefromonepowerleveltoanotherautomatically,
forupto3cyclesplusadefrostcycle,
1. Put the food in the oven and close the
door.
2. Touch COOK TIME.
3. Touch Number pads to set the cooking
time for the first cycle.
4. Touch COOK POWER.
5. Touch Number pad to set the cook
power for the first cycle.
6. Repeat steps 2 and 3 to set the
cooking time and cook power for each
additional cycle.
7. Touch START.
After each cycle is complete, 2 tones sound and
the next cycle(s) will count down.
8. At the end of the cooking time:
Display will show "END" and 3 tones will sound.
NOTES:
• You can set your chosen cook functions in any
order.
• You can set up to 3 cook cycles plus CUSTOM
DEFROST and Warm Hold.
• CUSTOM DEFROST will operate first.
• Warm Hold will operate last.
• Cooking with more than one cook cycle will not
work with AUTO SENSOR COOK or AUTO
SENSOR REHEAT functions.

Youcandefrostfoodbychoosingacategoryandset-
tingaweight.CUSTOMDEFROSThaspresettimes
andcookpowersfor6categories:Meat,Poultry,Fish,
Bagel,MuffinandButter.
1. Touch CUSTOM DEFROST.
Once for Meat, twice for Poultry, 3 times for Fish,
4 times for Bagel, 5 times for Muffin, 6 times for
Butter.
2. Touch Number pads for desired weight
(from .1 to 6.0 Ibs [45g to 2.7 kgs.]) or
quantity.
3. Touch START.
4. During defrosting, 5 tones will sound.
(for Meat, Poultry and Fish when set for more
than 1 minute)
These tones tell you when to check, turn over,
separate, or rearrange food. To restart oven,
touch START.
5. At the end of the defrosting time:
Display will show "END" and 3 tones will sound.
1. Touch CUSTOM DEFROST pad 7 times.
2. Touch Number pads to set the time for
manual defrosting.
The power is automatically set at 30 percent,
unless you change it.
3. Touch START.
4. At the end of the defrosting time"
Display will show "END" and 3 tones will sound.
You are probably used to food weights as being in
pounds and ounces that are fractions of a pound
(for example, 4 ounces equals ¼pound [113.4 g]).
If the weight on the food package is in fractions of a
pound, you can use the following chart to convert the
weight to decimals.
Equivalent Weight
OUNCES GRAMS DECIMAL WEIGHT
1.6 45.4 .10
3.2 90.7 .20
4.0 113.4 .25
4.8 136.1 .30
6.4 181.4 .40
8.0 226.8 .50
9.6 272.2 .60
11.2 317.5 .70
12.0 340.2 .75
12.8 362.9 .80
14.4 408.2 .90
16.0 453.6 1.00
One-Quarter Pound
One-Half Pound
Three-Quarters Pound
One Pound
• Before starting, make sure you have removed any of
the metal twist-ties which often come with frozen food
bags, and replace them with strings or elastic bands.
• Open containers such as cartons before they are
placed in the oven.
• Always slit or pierce plastic pouches or packaging.
• If food is foil wrapped, remove foil and place it in a
suitable container.
• Slit the skins, if any, of frozen food such as sausage.
• Bend plastic pouches of food to ensure even defrosting.
• Always underestimate defrosting time. If defrosted
food is still icy in the center, return it to the
microwave oven for more defrosting.
• The length of defrosting time varies according to
how solidly the food is frozen.
• The shape of the package affects how quickly
food will defrost. Shallow packages will defrost
more quickly than a deep block.
• As food begins to defrost, separate the pieces.
Separated pieces defrost more evenly.
• Use small pieces of aluminum foil to shield parts
of food such as chicken wings, leg tips, fish tails,
or areas that start to get warm. Make sure the foil
does not touch the sides, top, or bottom of the
oven. The foil can damage the oven lining.
• For better results, let food stand after defrosting.
(For more information on standing time, see
"Microwave cooking tips".)
• Turn food over during defrosting or standing time.
Break apart and remove food as required.

Li!liiiii; iiSiiiiii!ii!ili!:ii!!!!iiil;;'YS iiii: ........
EASY START lets you cook food for 30 seconds at
100% cook power or, during any manual program,
you can use it to add 30-second increments.
NOTES:
• Each time you touch EASY START, it will add 30
seconds up to 3 minutes, then will add 1 minute up
to a total of 10 minutes.
• You can enter Easy Start only after closing the door
or after touching CANCEL/OFR
• You can also use the pad to increase the remaining
cook time during manual programs.
1. Put the food in the oven and close the
door.
2. Touch EASY START.
(Each additional touch adds 30 seconds of cook-
ing time, up to 3 minutes, then adds 1 minute up
to a total of 10 minutes.)
3. At the end of the cooking time:
Display will show "END" and 3 tones will sound.
Food Poisoning Hazard
Do not let food sit in oven more than one hour
before or after cooking.
Doing so can result in food poisoning or
sickness.
Warm Hold keeps hot, cooked food warm in your
microwave oven.
NOTES:
• Food cooked should be covered during Warm
Hold.
• Pastry items (pies, turnovers, etc.) should be
uncovered during Warm Hold.
• Complete meals kept warm on a dinner plate
should be covered during Warm Hold.
• Do not use more than 1 complete Warm Hold
cycle. The quality of some foods will suffer with
extended time.
• Warm Hold can be used in conjunction with Stage
Cooking. (See "Cooking with more than one cook
cycle".)
1. Put hot, cooked food in the oven and
close the door.
2. Touch SPECIALTY FOODS once.
"WARM HOLD" scrolls, then "START" flashes until
you touch START.
3. Touch START.
Display will show "WARM".
4. To cancel Warm Hold, open door or
touch CANCEL/OFF.

Your microwave oven has a sensor that detects
the humidity released by the food. The amount
of humidity detected tells the oven how long to
cook or heat your food. The sensor is used by
3 special functions: AUTO SENSOR COOK,
AUTO SENSOR REHEAT, and AUTO SENSOR
POPCORN. The simple instructions for these
functions are on the following pages.
NOTES:
• If you want to cook by entering a time and cook
power, see "Cooking at different cook powers".
• The oven should be plugged in at least 5 minutes
before sensor cooking.
• Room temperature should not exceed 95°F (35°C).
• Be sure the exterior of the cooking container and
the interior of the oven are dry. Wipe off each with
a paper towel.
• The oven will not generate microwave energy for
approximately 28 seconds at the beginning of the
sensor cooking cycle.
• When covering foods, be sure to leave an opening
big enough for moisture to escape so that the
sensor can determine cooking or reheating time.
To use AUTO SENSOR COOK:
1. Put the food in the oven and close the
door.
2. Touch AUTO SENSOR COOK until
desired food type is displayed.
AUTO SENSOR COOK will start automatically
after a short delay.
(See Auto Sensor Cooking Chart.)
Baked 1 to 4 medium, • Pierce each potato several times with a fork and place
Potatoes about 10 to 13 oz on the turntable around the edge, at least 1 inch (2.5 cm)
(284 to 369 g) each apart. Let potato stand 5 minutes to finish cooking.
Frozen 1 to 4 cups • Remove from package. Place vegetables in a microwav-
Vegetables (250 mL to 1 L) able container. Cover with plastic wrap and vent.
• Most vegetables need stirring and 2-3 minutes standing
time after cooking.
Fresh 1 to 4 cups • Place moist vegetables in a microwavable
Vegetables (250 mL to 1 L) container. Cover with plastic wrap and vent.
• Most vegetables need stirring and 2-3 minutes standing
time after cooking.
Frozen Entree Works best if entree • Remove from outer package. Loosen cover on three
is 10 to 20 oz. sides. If entr6e is not in a microwave-safe container, place
(284 to 567 g) it on a plate, cover with plastic wrap and vent.
• Most entrees need 2-3 minutes standing time after cook-
ing.
Rice
to 2 cups (125 to
500 mL) of dry rice
(Use medium or long
grain rice. Cook
instant rice accord-
ing to directions on
the package.)
• Follow measurements on package for ingredient amounts.
Place rice and liquid (water or chicken or vegetable stock)
in a microwavable dish. Cover with plastic wrap and vent.
When cooking is complete, allow rice to stand 5 minutes or
until liquid is absorbed. Stir rice.

iiiljsiii i; i l!ii ;ilS!i ,Lii! Siiiiiii!!!!! ii,?,,iiiiSOiiii: i!i!il
1. Put the food in the oven and close the
door.
2. Touch AUTO SENSOR REHEAT until
desired food type is displayed.
AUTO SENSOR REHEAT will start automatically
after a short delay.
(See Auto Sensor Reheating Chart.)
NOTE: When covering foods, be sure to leave an
opening big enough for moisture to escape so that
the sensor can determine cooking or reheating time.
FOOD SERVING SIZE DIRECTIONS
Dinner About 8 to 16 oz • Place food to be
plate (227 to 454 g) heated on a dinner
plate or similar
dish. Cover with
plastic wrap and
vent.
Soup 1 to 4 cups • Place food to be
(250 mL to 1 L) heated in a
microwave con-
tainer. Cover with
plastic wrap and
vent.
Sauce 1 to 4 cups • Place food to be
(250 mL to 1 L) heated in a
microwave con-
tainer. Cover with
plastic wrap and
vent.
Casserole 1 to 4 cups • Place food to be
(250 mL to 1 L) heated in a
microwave con-
tainer. Cover with
plastic wrap and
vent.
AUTO SENSOR POPCORN lets you pop commercially
packaged microwave popcorn with just one touch.
NOTES:
• Pop only 1 package at a time.
• If you are using a microwave popcorn popper,
follow manufacturer's instructions.
1. Place the bag in the center of the
turntable and close the door.
2. Touch AUTO SENSOR POPCORN.
NOTE: The sensor will determine "popping time",
based on the size of the package.
POPCORN
3.5 oz (99 g)
3.0 oz (85 g)
1.75 oz (50 g)
• Follow package
directions.
• Use a popcorn
package which is
made especially for
microwave cooking.
• Do not try to pop
unpopped kernels.
• Pop only 1 package
at a time.
• Do not leave the
microwave OVeR
unattended while
popping popcorn.
• If you are using a
microwave popcorn
popper, follow
manufacturer's
instructions.
• How well your pop-
corn cooks will de-
pend on the brand
of popcorn and how
much fat it has in it.
Try several brands to
decide which pops
the best. For best
results, use fresh
bags of popcorn.

To preheat the oven for convection
cooking, follow steps 1-3 below.
To convection cook without preheating
the oven, skip step 3 below.
NOTE: For best results, many recipes require pre-
heating the oven before you begin cooking. Use
cooking utensils that will not melt or burn in the hot
oven. Do not use light plastic containers, plastic
wraps, or paper products during any convection or
combination cycle.
1. Touch CONVECT.
2. Touch Number pads for desired
temperature.
(If your recipe does not call for preheating, go to
step 4.)
3. Touch START to Preheat oven.
Two tones will sound when oven has reached
preheat temperature.
4. Place food in appropriate cookware on
Convection Rack.
5. Touch Number pads to enter cooking
time in hours:minutes.
For example: For 1 hour, touch "1 0 0".
6. Touch START.
NOTE: It is not necessary to preheat the oven unless
your recipe calls for it.
Recommended temperature settings may vary. Refer
to your recipe for recommended temperature
settings.
325°F (163°C)
350°F (177°C)
Refrigerated Biscuits, Fresh Pies 375°F (191°C)
Fresh Pizza, Frozen Pies 400°F (204°C)
Muffins, Fresh Fish Fillets 425°F (218°C)
Fiesh Biscuiis 450°F i232°C)
• For best results, place food on the Convection
Rack.
• Do not cover Turntable or Convection Rack with alu-
minum foil. It interferes with the flow of air that
cooks the food.
• Round pizza pans are excellent cooking utensils for
many convection-only items. Choose pans that do
not have extended handles.
• Use convection cooking for items like souffles,
breads, cookies, angel food cakes, pizza, and most
meat and fish cooking.
• You do not need to use any special techniques to
adapt your favorite oven recipes to convection cook-
ing. However, you may need to lower some temper-
atures or reduce some cooking times from the con-
vection oven cooking directions.
• When baking cakes, cookies, breads, rolls, or other
baked foods, most recipes call for preheating.
Preheat the empty oven just as you do a regular
oven. You can start heavier dense foods such as
meats, casseroles, and poultry without preheating.
• All heatproof cookware or metal utensils can be
used in convection cooking.
• Use metal utensils only for convection cooking.
Never use for microwave or combination cooking
since arcing and damage to the oven may occur.
• After preheating, if you do not open the door, the
oven will automatically hold at the preheated tem-
perature for 30 minutes.
0
NOTE: For any Convection, Combination or Broiling
cooking of foods that drip grease, such as steak or
hamburger, we recommend that you place the Drip
Pan (Part No. 8172250) under the rack to catch the
grease.

iii!::;iilliiiiiiiiii ii!i i illl iiliii:ii o:iiii ii iiil!i:i:ii ii iib
You can use your microwave oven to proof bread.
First proofing:
Place the dough in a lightly greased bowl and loose-
ly cover with waxed paper coated with shortening.
1. Place a container in the oven and fill
with 2 cups (500 mL) of boiling water.
Place the bowl on Convection Rack.
Close the oven door.
2. Touch CONVECT.
3. Touch Number pads to 100°F (38°C).
4. Touch START.
Two tones will sound when oven is preheated.
NOTE: Let dough rise until nearly doubled in size.
Proofing time may be faster and will vary depend-
ing upon the type and quantity of dough. Check
dough after 20 to 25 minutes.
5. When proofing is done, remove bowl
containing bread dough from the oven.
Empty water from container.
Second proofing:
Shape the dough and place in baking pan(s). Cover
loosely with plastic wrap sprayed with cooking spray.
Place the container in the oven and fill with 2 cups
(500 mL) of boiling water. Put the pans on
Convection Rack. Close the oven door. Follow steps
2 through 5 outlined in "First Proofing." When proof-
ing is done, remove from the oven the bread dough
and the container with the water. Reset oven to pre-
heat for baking bread. Before baking, remove plastic
wrap from the bread dough.
See the "Auto Convection Chart" section and follow
the directions.
1. Place food on Convection rack and
close the door.
2. Touch COMBI.
3. Touch Number pads for desired
temperature.
4. Touch Number pad to set desired
cooking time in hours:minutes.
For example: For 1 hour, touch "1 0 0".
5. Touch START.
When cooking time ends, display will show
"END" and 3 tones will sound.
After cooking, the display will return to the time of
day when you open the door.
• Meats may be roasted directly on the Convection
Rack.
• Less tender cuts of beef can be roasted and tender-
ized using oven cooking bags.
• Check for aloneness after cooking time is up. If not
completely done, let stand in oven for a few minutes
to complete cooking.
NOTE: During combination cooking, some cooking
utensils may cause arcing when they come in contact
with the oven walls or metal Convection Rack. Arcing
is a discharge of electricity that occurs when
microwaves come in contact with metal. If arcing
occurs, place a heatproof dish between the pan and
the Convection Rack. If arcing occurs with other cook-
ing utensils, stop using them for combination cooking.
1. Place food on Broiling rack and close
the door.
2. Touch BROIL.
3. Set broiling time in hours:minutes.
For example: For 1 hour, touch "1 0 0".
4. Touch START.
When broiling time ends, display will show "END"
and 3 tones will sound.
After cooking, the display will return to the time of
day when you open the door.

• Foodsthataresuitableforbroilingshouldbe
tender,moderatelylean,andlessthan2inches
thick.Fishsteaks,chickenbreasts,and
hamburgersareidealforbroiling.
• AlwaysusetheBroilingRackwiththeDripPan
underneath.
• Forevenbrowning,turnfoodoverhalfwaythrough
broiling.
• Donotleavethedooropenforlongperiodsoftime
whenusingthebroilelement.Thiswillcausethe
oventemperaturetodropandcouldaffectcooking
performance.
Youcanautomaticallycookawideselectionoffoods
justbytouchingoneofthe6AutoConvectionpads:
Meat,Poultry,Fish,BakedGoods,SpecialtyFoods,
OtherFoods.
Seethe"AutoConvectionChart"sectionandfollow
thedirections.
OnAutoConvectionrecipesforbakedgoods,snack
foods,otherfoods,andspecificfrozenfoods,simply
selectthefoodcategoryandtouchSTART.
AutoConvectionrecipesforcookingmeats,poultry,
andfreshfishwillpromptyouto enterthequantityto
providethebestcookingresults.
Youcanselecthowdoneyouwouldlikeyourmeats
cooked(Rare,Med-Rare,Medium,Med-Well,Well)
bytouchingtheNumberpads.Therecipeswillcook
to Mediumifyoudonotadjustthedoneness.
Youmayadjusttherecommendedtimeandtemper-
atureoftheAutoConvectionrecipesduringcooking
ifyoudesirebytouchingtheNumberpads.Then
touchSTART.
1. Place food on Convection rack and
close the oven door.
2. Touch appropriate Auto Convection
pads until desired food item appears.
3. Touch START.
When cooking time ends, display will show "END"
and 3 tones will sound.
After cooking, the display will return to the time of
day when you open the door.
Some Auto Convection recipes will prompt you to
preheat the oven prior to placing the food in the oven.
PREHEATING
TEMP
Poultry Chicken, 375°F (191°C)
Frozen Breaded
Fish Fish Fillet, Fresh 425°F (218°C)
Fish Fillet,
Frozen/Breaded 400°F (204°C)
Fish Sticks,
Frozen/Breaded 400°F (204°C)
Baked Goods Cookies 325°F (163°C)
Brownies 350°F (177°C)
Muffins 425°F (218°C)
Biscuits, Fresh 450°F (232°C)
Biscuits, 375°F (191°C)
Refrigerated
Yeast Bread 350°F (177°C)
Quick Bread 350°F (177°C)
Pie, Fresh 375°F (191°C)
Pie, Frozen 400°F (204°C)
Specialty Quiche 325°F (163°C)
Foods Souffle 350°F (177°C)
............ Angel food cake 350°F (!77°0) ...........
Other Foods Pizza, Fresh 400°F (204°C)
Pot Pie, Frozen 400°F (204°C)
1. Touch appropriate Auto Convection
pads until desired food item appears.
2. Touch START. "Preheat" is displayed.
3. When oven reaches the preheat
temperature, it will beep and "Place
Food on Rack" is displayed.
4. Open the door, place food on the
Convection Rack, and close door.
Touch START.
When cooking time ends, display will show
"END" and 3 tones will sound.
After cooking, the display will return to the time of
day when you open the door.

1. Touch MEAT pad until desired food
appears.
(See Meat chart.)
2. Select portion amount.
Touch Number pads to enter weight for Beef
Roast, Meat Loaf, Pork Roast or Ham.
Touch Number pads to enter thickness for
Steaks, Hamburgers, or Pork Chops.
3. Touch Number pads to select desired
doneness.
(See following chart.)
4. Touch START.
When cooking time ends, display will show
"END" and 3 tones will sound.
After cooking, the display will return to the time
of day when you open the door.
(.9 - 2.3 kg) Well
*After cooking, let stand for 10 minutes covered with
foil to reach desired doneness.
1. Touch POULTRY or FISH pad until
desired food appears.
(See following charts.)
2. Select portion amount.
Touch Number pads to enter weight for Chicken,
Turkey, Fish Fillet or Fish Steak.
(See following charts.)
3. Touch START.
When cooking time ends, display will show
"END" and 3 tones will sound.
After cooking, the display will return to the time
of day when you open the door.

Chicken-FrozenBreaded N/A .3- 1.5Ibs(.1- .7kg)
Chicken-Boneless .5- 2Ibs(.2-.9 kg) FishSteak-Fresh .5- 2Ibs(.2-.9 kg)
'Chicke_:w_Bo'ne........................................._:£_gs(:2:'i6 kgi ......................................................."/A..........................................................
2- 6 Ibs (.9- 2.7 kg) Fish Fillet-Frozen/Breaded N/A
Chicken-Whole* ..............................................................................................................................................................
Fish Sticks-Frozen/Breaded N/A
i
*After cooking, let stand for 10 minutes covered with
foil to reach desired doneness.

To make sure your microwave oven looks good and works well for a long time, you should
maintain it properly. For proper care, please follow these instructions carefully.
Your microwave oven has a stainless steel interior.
Unlike painted steel interiors found in most other
microwave ovens, the surface will not chip, rust, or
corrode. Over time, stains can occur on the stainless
steel surface as the result of food products splattering
during cooking. This is normal.
Do not use metal scouring pads on the inside of oven
cavity. They will scratch the surface.
For interior surfaces: Wash often with warm, sudsy
water and a sponge or soft cloth. Use only mild, non-
abrasive soaps or a mild detergent. Be sure to keep
the areas clean where the door and oven frame
touch when closed. Wipe well with clean water. Over
time, stains can occur on the surfaces as the result of
food particles spattering during cooking. This is nor-
mal.
For stubborn soil, boil a cup (250 mL) of water in the
oven for 2 or 3 minutes. Steam will soften the soil. To
get rid of odors inside the oven, boil a cup (250 mL)
of water with lemon juice or vinegar.
For exterior surfaces and control panel: Use a
soft cloth with spray glass cleaner. Apply the spray
glass cleaner to the soft cloth; do not spray directly
on the oven.
NOTE: Abrasive cleansers, steel-wool pads,
gritty wash cloths, some paper towels, etc., can
damage the control panel and the interior and
exterior oven surfaces.
For stainless steel surfaces:
• Do not use steel wool or soap-filled scouring pad.
• Rub in the direction of the grain line to avoid mar-
ring the surface.
• Always wipe dry to avoid water marks.
• If commercial cleaners are used, follow label
directions. If product contains chlorine (bleach),
wipe thoroughly with clean water and dry with a soft
lint free cloth. Chlorine is a corrosive substance.
To clean turntable and turntable support, wash in
mild, sudsy water; for heavily soiled areas use a mild
cleanser and scouring sponge. The turntable and
turntable support are dishwasher-safe.
To clean the Convection and Broiling Rack, wash
in mild sudsy water; for heavily soiled areas use a
mild cleanser and scouring sponge. Rack is dish-
washer-safe. Remove rack from oven when it is not
being used for cooking.
CLEANING TASK WHAT TO USE HOW TO CLEAN
Routine cleaning and finger- Liquid detergent/soap and Wipe with damp cloth or sponge,
prints, water, or all-purpose cleaner, then wipe with clean water and dry.
Stubborn stains and baked-on Mildly abrasive cleanser or To avoid marring the surface, rub in
residue stainless-steel cleaners the direction of grain lines with a
damp cloth or sponge and
cleanser. Wipe thoroughly with
clean water. Repeat if necessary.
Hard water spots Vinegar Swab or wipe with cloth.
Wipe with clean water and dry.

QUESTIONS ANSWERS
Can I operate my microwave oven without the No. If you remove or turn over the turntable, you
turntable or turn the turntable over to hold a will get poor cooking results. Dishes used in
large dish? your oven must fit on the turntable.
Can I use a rack in my microwave oven so that I You can use a rack only if the rack is supplied
may reheat or cook on two levels at a time? with your microwave oven. If you use a rack not
supplied with the microwave oven, you can get
poor cooking performance and/or arcing.
Can I use either metal or aluminum pans in my You can use aluminum foil for shielding (use small,
microwave oven? flat pieces), small skewers, and shallow foil trays
(if tray is not taller than _ in. [1.9 cm] deep and half
filled with food to absorb microwave energy).
Never allow metal to touch walls or door. (See
"Oven Utensils Guide".)
Is it normal for the turntable to turn in Yes. The turntable rotates clockwise or counter-
either direction? clockwise, depending on the rotation of the
motor when the cooking cycle begins.
Sometimes the door of my microwave oven ap- This appearance is normal and does not affect the
pears wavy. Is this normal? operation of your oven.
What are the humming noises that I hear when my You may hear the sound of the transformer when
microwave oven is operating? the magnetron tube cycles on.
Why does the dish become hot when I microwave As the food becomes hot it will conduct the heat
food in it? Ithought that this should not happen, to the dish. Be prepared to use hot pads to
remove food after cooking.
What does "standing time" mean? "Standing time" means that food should be
Why does steam come out of the air exhaust vent?
Can I pop popcorn in my microwave oven?
How do I get the best results?
removed from the oven and covered for additional
time to allow it to finish cooking. This frees the
oven for other cooking.
Steam is normally produced during cooking. The
microwave oven has been designed to vent this
steam out the vents.
Yes. Pop packaged microwave popcorn
following manufacturer's guidelines or use the
preset AUTO SENSOR POPCORN pad. Do not use
regular paper bags. Use the "listening test" by
stopping the oven as soon as the popping slows
to a "pop" every 1 or 2 seconds. Do not repop
unpopped kernels. Do not pop popcorn in
glass cookware.

Most cooking problems often are caused by little things you can find and fix without tools of any
kind. Check the lists below before calling for assistance or service. If you still need help, see the
"Requesting Assistance or Service" section.
• Is the microwave plugged into a live outlet with the proper voltage? (See installation instructions.)
• Have you blown a household fuse or tripped a circuit breaker?
• Has the electric company experienced a power failure?
If none of these items is causing your problem, see the "Requesting Assistance or Service" section.

To avoid unnecessary service calls, please check the "Troubleshooting" section. It may save you the
cost of a service call. If you still need help, follow the instructions below.
Call the KitchenAid Customer Interaction Center
toll free at 1-800-422-1230.
When calling:
Please provide KitchenAid with the
purchase date, and the complete
model and serial number of your
appliance (see the "A Note to You" section). This in-
formation will help us better respond to your request.
Our consultants provide assistance with:
• Features and specifications on our full line of
appliances
• Installation information
• Accessory and repair parts sales
• Specialized customer assistance (Spanish
speaking, hearing impaired, limited vision, etc.)
• Referrals to local dealers, service companies, and
repair parts distributors
KitchenAid designated service technicians
are trained to fulfill the product warranty and
provide after-warranty service anywhere in the
United States.
To locate the KitchenAid designated service
company in your area, you can also look in your
telephone directory Yellow Pages.
If you need further assistance, you can write to
KitchenAid with any questions or concerns at:
KitchenAid Brand Home Appliances
Customer Interaction Center
c/o Correspondence Dept.
MD 8020
553 Benson Road
Benton Harbor, MI 49022-2400
Please include a daytime phone number in your
correspondence.

LENGTHOF KITCHENAID KITCHENAID
WARRANTY: WILLPAYFOR: WILLNOTPAYFOR:
ONE-YEARFULL
WARRANTY
FROMDATEOF
PURCHASE
SECOND-
THROUGHFIFTH-
YEARLIMITED
WARRANTY
FROMDATEOF
PURCHASE
Replacementpartsandrepair
laborcoststocorrectdefects
inmaterialsorworkmanship.
Servicemustbeprovidedby
aKitchenAiddesignated
servicecompany.
Replacementofmagnetron
tubetocorrectdefectsin
materialsorworkmanship.
A.Servicecallsto:
1.Correcttheinstallationoftheoven.
2.Instructyouhowtousetheoven.
3.Replacehousefusesorcorrecthousewiring.
B.Repairswhenovenisusedinotherthannormal
single-familyhomeuse.
C.Damageresultingfromaccident,alteration,
misuse,abuse,fire,flood,actsofGod,improper
installation,installationnotinaccordancewith
localelectricalcodesoruseofproductsnot
approvedbyKitchenAid.
D.Anylaborcostsduringthelimitedwarranty.
E.Replacementpartsorrepairlaborcostsforunits
operatedoutsidetheUnitedStates.
F.In-homeservice.Yourmicrowaveovenmustbe
takentoaKitchenAiddesignatedservice
company,exceptwhenyourmicrowaveovenis
installedoveranapprovedKitchenAidoven
usinganapprovedbuilt-inkit.(See"Built-inkits"
inthe"GettingtoKnowYourMicrowaveOven"
sectionforalistofapprovedbuilt-inkits.)
G.Repairstopartsorsystemsresultingfromun-
authorizedmodificationsmadetotheappliance.
3/00
KITCHENAID DOES NOT ASSUME ANY RESPONSIBILITY FOR INCIDENTAL OR CONSEQUENTIAL
DAMAGES. Some states do not allow the exclusion or limitation of incidental or consequential damages, so
this exclusion or limitation may not apply to you. This warranty gives you specific legal rights and you may also
have other rights which may vary from state to state.
Outside the 50 United States, this warranty does not apply. Contact your authorized KitchenAid dealer
to determine if another warranty applies.
If you need service, first see the "Troubleshooting" section of this book. After checking "Troubleshooting,"
additional help can be found by checking the "Requesting Assistance or Service" section or by calling our
Customer Interaction Center telephone number, 1-800-422-1230, from anywhere in the U.S.A.
3828W5A1492/8172191
© 2000. All rights reserved. ® Registered TrademarWTM Trademark of KitchenAid, U.S.A.
6/O0
Printed in Korea

Modelo
KCMCI55J
KltchenAid
3828WSA 1492/8172191 www.kitchenaid.com

;;;;;;;;;;;;;;;;;;;;;;;;;;;;;;;;;;;;;;;;;;;;;;;;;;;;;;;_
KitchenAid dise_a las mejores herramientas para la habitaci6n m_.s importante de su hogar. Para
cerciorarnos de que usted disfrute muchos a_os de funcionamiento ininterrumpido, hemos elaborado este
Manual de Uso y Cuidado. Ftstecontiene informaci6n valiosa respecto al funcionamiento y mantenimiento
apropiado de su nuevo electrodom_stico. Por favor I_alo con cuidado.
Asimismo, por favor Ilene y envie la Tarjeta de Registro del Producto.
Llame al nt3mero gratuito del Centro de Interacci6n del Cliente ............................................ 1-800-422-1230
Si necesita ayuda o servicio, vea primero la secci6n "Diagn6stico y soluci6n de problemas" de este
manual. Despu_s de revisar "Diagn6stico y soluci6n de problemas," podr_, encontrar ayuda adicional
consultando la secci6n "C6mo pedir ayuda o servicio" o Ilamando al nt3mero de tel_fono arriba citado.
Siempre que Ilame, tendrA que saber el nQmero completo del modelo y de la serie de su electrodom_stico.
Usted podr_, encontrar esta informaci6n en la placa/etiqueta con el nt3mero del modelo y de la serie (vea el
diagrama en la secci6n "Conoza su homo de microondas.")
Guarde este manual y el recibo de compra juntos en un lugar seguro para consulta en el futuro.
Usted debe proporcionar un comprobante de compra o la fecha de instalacibn para obtener el
servicio de la garantia.
N6mero de modelo
N6mero de serie
Fecha de instalaci6n
Nombre del fabricante/distribuidor
Direcci6n
Tel_fono

Su seguridad y la seguridad de los demas es muy importante.
Hemos incluido muchos mensajes importantes de seguridad en este manual yen su electrodomestico.
Lea y obedezca siempre todos los mensajes de seguridad.
Este es el simbolo de advertencia de seguridad.
Este simbolo le llama la atencion sobre peligros potenciales que pueden ocasionar la muerte
o una lesion a usted y a los demas.
Todos los mensajes de seguridad iran a continuacion del simbolo de advertencia de
seguridad y de la palabra "PELIGRO" o "ADVERTENCtA". Estas palabras significan:
Si no sigue las instrucciones de inmediato,
usted puede morir o sufrir una lesion grave.
Si no sigue las instrucciones, usted puede
morir o sufrir una lesion grave.
Todos los mensajes de seguridad le diran el peligro potencial, le diran c6mo reducir las posibilidades de
sufrir una lesion y Io que puede suceder si no se siguen las instrucciones.
INSTRUCCIONES IMPORTANTES DE SEGURIDAD
Cuando se usan aparatos electrodomesticos, deben tomarse precauciones de seguridad, incluyendo las
siguientes:
ADVERTENCIA: Para reducir el riesgo de
quemaduras, electrocucion, fuego, da_os
personales o exposicion a energia excesiva de
microondas:
• Lea todas las instrucciones antes de usar el
homo de microondas.
• Lea y siga las "PRECAUCIONES PARA EVtTAR
LA POSIBLE EXPOSICION A ENERGiA
EXCESIVA DE MICROONDAS " especificas que
se encuentran en esta seccion.
• El homo de microondas debe estar conectado a
tierra. El enchufe se debe conectar a un
tomacorriente con polo a tierra. Yea
"INSTRUCCIONES PARA CONEXION A
TIERRA" en la seccion "lnstrucciones para la
instalacion".
• Instale o ubique el horno de microondas solo de
acuerdo alas instrucciones para instalacion
provistas.
• AIgunos productos tales como huevos enteros
con la cascara y recipientes hermeticos - por
ejemplo, frascos de vidrio cerrados - pueden
explotar y no deben calentarse en el homo de
microondas.
• Use el horno de microondas solamente como se
describe en este manual. No use productos
quimicos o vapores corrosivos en el homo de
microondas. Este tipo de horno esta
especificamente dise5ado para calentar, cocinar o
deshidratar comida. Este no esta dise5ado para
uso industrial o de laboratorio.
• Lo mismo que con cualquier aparato
electrodomestico, es necesario supervisar de
cerca si Io usan los ni5os.
• No opere el horno de microondas si el cable o el
enchufe estan da5ados, si el horno no funciona
correctamente o si se ha daSado o caido.
• El horno de microondas debe ser revisado y
reparado s61opor personal tecnico calificado.
Llame a una compa5ia de servicio autorizada
para el examen, reparacion y ajuste.
• No cubra o bloquee ninguna abertura en el homo
de microondas.
• No guarde el horno de microondas a la
intemperie. No use el horno de microondas cerca
del agua - por ejemplo, cerca del fregadero en la
cocina, en un s6tano hQmedo o cerca de una
alberca o lugares similares.
GUARDE ESTAS INSTRUCCIONES
contint_a en la pagina siguiente

mNSTRUCCmONESmMPORTANTES DE SEGURIDAD
® No sumerja el cable o el enchufe en agua.
® Mantenga el cable alejado de superficies
calientes.
® No deje que el cable cuelgue de1 borde de una
mesa o mostrador.
® Vea las instrucciones para limpiar la superficie de
la puerta en la secci6n "Cuidado de su homo de
microondas".
® No opere ningOn aparato eHectrodom6stico de
caHefacci6n o de cocina debajo dell homo de
microondas.
® No instaHeeHhomo de microondas pot arriba o
cerca de cuaHquier parte de un aparato
eHectrodom6stico de caHdacci6n o de cocina.
® No monte el homo sobre un fregadero.
® No ponga nada directamente sobre el techo del
homo de microondas cuando este este
funcionando.
® Para reducir el riesgo de incendio en la cavidad
del homo:
- No recocine los alimentos. Preste cuidadosa
atenci6n al homo si usa papel, pl&stico u otto
material combustible dentro del homo para
facilitar la cocci6n.
- Quite las ataduras de alambre de las bolsas de
papel o plastico antes de ponedas en el homo.
- Si algOn elemento se prende fuego dentro del
homo, mantenga la puerta cerrada, apague el
homo y desenchOfelo o corte la corriente con los
fusibles o el disyuntor.
- No use la cavidad para guardar cosas. No deje
productos de papel, utensilios de cocina o comida
en la cavidad cuando no este en uso.
GUARDE ESTAS mNSTRUCCIONES
PRECAUCIONES PARA EVITAR LA POSmBLE
EXPOSICION A ENERGiA EXCES VA DE
{a} No intente operar este homo con la puerta
abierta ya que esto puede resultar en exposici6n
nociva a energia de microondas. Es importante
no forzar o tocar las trabas de seguridad.
{b} No ponga ningOn objeto entre la cara frontal del
homo y la puerta y no permita que se acumule
polvo o residues de limpiadores en las
superficies de sellado.
(c} No opere el homo si este esta daSado. Es
particularmente importante que la puerta del
homo cierre correctamente y que no haya
daSo en:
(1) La puerta (torcida),
(2) Bisagras y seguros (rotos o flojos),
(3) Sellado de la puerta y superficies de
sellado.
(d} El homo no debe ser ajustado o reparado pot
nadie, excepto personal de servicio calificado.

Antes de comenzar a operar el homo, lea las siguientes instrucciones con cuidado.
1. Desocupe el horno de microondas. Limpie el
interior con un paso hOmedo y suave. Revise si
hay algOn daSo, por ejemplo si la puerta no est,.
correctamente alineada, daSo alrededor de la
puerta o abolladuras dentro del horno o en el
exterior. Si hay algOn daSo, no opere el homo
hasta que un t6cnico de servicio designado Io haya
revisado y haya hecho las reparaciones necesarias.
2. Coloque el horno sobre un carrito, mostrador,
mesa o estante Io suficientemente fuerte para
sostener el horno y la comida y los utensilios que
usted ponga en 61.(El lado donde estan los
controles es mas pesado. Tenga cuidado
cuando Io mueva). El peso del horno es
aproximadamente 55 Ibs (25 kg). El horno de
microondas debe estar a una temperatura superior
a los 50°F (10°C) para funcionar correctamente.
NOTA- Usted puede fijar su horno de microondas
en una pared o en una alacena usando uno de los
juegos de accesorios enumerados en la secci6n
"Juegos de accesorios para empotrar".
NOTA : No bloquee las ventilaciones o las aberturas
para toma de aire. Deje un espacio de algunas
pulgadas en la parte de atr_.s del homo donde est_.n
las aberturas para toma de aire. El bloqueo de las
ventilaciones puede resultar en daSos al horno y mala
cocci6n. AsegOrese de que las patas del horno de
microondas est6n colocadas correctamente para
permitir la circulaci6n de aire. Si los orificios de
ventilaci6n est_.n obstruidos, un dispositivo t6rmico
sensible de seguridad puede apagar el horno
automAticamente. Una vez que se haya enfriado, el
horno funcionar_, correctamente.
Peligro de Incendio
No instale el horno al lado o encima de
una fuente de calor si no dispone de
un juego de accesorios para empotrar
autorizado de UL.
No seguir esta instrucci6n puede ocasionar
la muerte, incendio o choque el_ctrico.
%%2°00%%°,2°%%%%%%%%%%
%%%00%%0%%%%%%%%%%
%%%°d%° %%%°d%%%%%
%#0°0°0% o%%°d%%_%%
Cable de
alimentacibn
Abertura para Ventilacibn
toma de aire (parte posterior)
(parte posterior)
Cumpla con todos los c6digos y 6rdenes vigentes. Se
requiere un suministro de electricidad de
120 voltios, 60 Hz, Qnicamente CAde 15 6 20
amperios con fusible. (Se recomienda un fusible de
accion retardada.) Se recomienda el uso de un circuito
dedicado exclusivamente para este aparato
electrodomestico.
Peligro de Choque Electrico
Conecte a un contacto de pared de conexi6n a
tierra de 3 terminales.
No quite el terminal de conexion a tierra.
No use un adaptador.
No use un cable electrico de extensi6n.
No seguir estas instrucciones puede ocasionar
la muerte, incendio o choque electrico.

INSTRUCCIONES PARA LA CONEXION A TIERRA
• Para todos los aparatos electrodomesticos
conectados con cable: No use un cable de extensi6n. Si el cable es muy
El homo de microondas debe estar conectado a corto, haga que un electricista o tecnico calificado
tierra. En caso de que se produzca un corto instale un tomacorriente cerca del homo de
circuito, la conexi6n a tierra reduce el riesgo de microondas.
choque electrico por medio de un alambre de • Para aparatos electrodomesticos de conexi6n
escape para la corriente electrica. El homo de permanente:
microondas esta equipado con un cable que tiene El homo de microondas debe conectarse a un
un alambre de conexi6n a tierra con un enchufe sistema de alambrado metalico permanente con
para conexi6n a tierra. El enchufe debe estar conexi6n a tierra o un conductor de conexi6n a
conectado a un tomacorriente que esta tierra para equipos debe funcionar con los
correctamente instalado y conectado a tierra, conductores del circuito y estar conectado a la
ADVERTENCIA: El uso incorrecto de la terminal o conductor de la conexi6n a tierra para
conexi6n a tierra puede resultar en riesgo de equipos en el aparato electrodomestico.
choque electrico.
Consulte con un electricista o tecnico calificado si las
instrucciones para conexi6n a tierra no se entienden
bien o si hay alguna duda con respecto a la correcta
conexi6n a tierra del homo de microondas.
;;;;;;;;;;;;;;;;;;;;;;;;;;;;;;;;;;;;;;;;;;;;;;;;;;;;;;;_
GUARDE ESTAS INSTRUCCIONES

Esta secci6n describe Jos conceptos de cocci6n con microondas. Tambi6n Remuestra RoseJementos
basicos que usted debe conocer para operar su homo de microondas. Pot favor Reaesta informaci6n
antes de usar su homo.
La energia de microondas no produce calor. Esta
energia hace que los alimentos generen su propio calor
y 6ste a su vez hace que los alimentos se cocinen.
Las microondas son como las ondas de TV, radio o luz.
Usted no las puede ver, pero puede ver Io que hacen.
Un magnetr6n produce las microondas en un horno
de microondas. Las microondas se mueven dentro del
homo donde se ponen en contacto con los alimentos
mientras 6stos giran sobre la bandeja giratoria.
Su homo dispone de un sistema de distribuci6n
ml31tiple de microondas. La energia de las
microondas se libera en dos ubicaciones, Iogrando
asi una cocci6n mejor y m_.s uniforme.
Cavidad del horno Magnetr6n
En algunas ocasiones la cocci6n combinada por
microondas/convecci6n se recomienda para obtener
los resultados de cocci6n apropiados. Acorta el
tiempo de cocci6n para alimentos que normalmente
necesitan un periodo largo de cocci6n. Este proceso
de cocci6n tambi6n deja las carnes jugosas en el
interior y crujientes en el exterior. En la cocci6n
combinada, el calor por convecci6n y la enegia por
microondas se alternan automAticamente. Su homo
tiene un ajuste que hace que sea f_.cil cocinar tanto
con calor por convecci6n como por energia por
microondas autom_.ticamente.
Bandeja giratoria de vidrio Piso de metal
La bandeja giratoria de vidrio de su homo de
microondas permite que las microondas pasen.
Luego, 6stas rebotan en el piso de metal, atraviesan
de nuevo la bandeja giratoria de vidrio y son
absorbidas por los alimentos.
Las microondas pasan a trav6s de la mayoria de los
tipos de vidrio, papel y pl_.stico sin calentarlos, de
manera que el alimento absorbe la energia. Las
microondas rebotan en los recipientes de metal, por
Io tanto los alimentos no absorben la energia.
La cocci6n por convecci6n circula aire caliente por la
cavidad del homo por medio de un ventilador. El aire
en constante movimiento rodea la comida y calienta
las partes exteriores r_.pidamente. Su homo utiliza
cocci6n por convecci6n siempre que use los
programas de cocci6n autom_.tica, cocci6n por
convecci6n manual o cocci6n combinada. NO
UTILICE EL HORNO SIN QUE LA BANDEJA
GIRATORIA ESTI_ EN SU LUGAR.
MJcroondas
+
X
Convecci6n
mCom .... /co ci6n
El asado se Iogra mediante dos elementos de
calentamiento radiantes que est_.n en la parte
superior del horno de microondas. Un ventilador
circula el aire caliente en la cavidad del horno. Los
alimentos que est_.n en la parilla para asar se cocinan
mediante el calor radiante y aire caliente que circula.

;;;;;;;;;;;;;;;;;;;;;;;;;;;;;;;;;;;;;;;;;;;;;;;;;;;;;;;i
• Si usted aumenta o disminuye la cantidad de
alimentos que prepara, el tiempo requerido para
cocinarlos tambi6n cambiar_.. Por ejemplo, si usted
usa el doble de una receta, agregue un poco m_.s
de la mitad del tiempo de cocci6n original. Verifique
si el alimento est,. cocido y, si es necesario,
agregue m_.s tiempo en incrementos peque_os.
• Cuanto m&s baja sea la temperatura del alimento
que usted coloca en el homo de microondas, mayor
ser_. el tiempo requerido para su cocci6n. Los
alimentos a temperatura ambiente se recalentar_.n
m_.s rApidamente que los alimentos que est_.n a la
temperatura del refrigerador.
• Los alimentos con mucha grasa o azt3car se
calentarAn m_.s rApido que los alimentos con alto
contenido de agua. La grasa y el azQcar alcanzan
tambi6n una temperatura m_.s alta que el agua
durante el proceso de cocci6n.
• Cuanto m&s denso es el alimento, mayor es el
tiempo requerido para calentarlo. Alimentos "muy
densos" como las carnes necesitan m_.stiempo
para recalentarse que los alimentos m_.slivianos o
m_.s porosos como pasteles esponjosos.
• Las piezas mas peque£tas de alimentos se
cocinarAn mAs r_.pido que las piezas m_.s grandes y
piezas con la misma forma se cocinar_.n en forma
m_.s pareja que los alimentos con forma diferente.
• En los alimentos con grosores diferentes, las
partes m_.s delgadas se cocinar_.n m_.s r_.pido que
las partes m_.s gruesas. Coloque las partes mAs
delgadas de las alas y piemas de polo en el centro
del plato.
• Cuando usted rota o revuelve los alimentos, el
calor se distribuye r_.pidamente al centro del plato y
evita que los hordes del alimento se recocinen.
Tape los alimentos para:
• Reducir salpicaduras
• Acortar los tiempos de cocci6n
• Retener la humedad de los alimentos
Todas lastapas que permiten pasar las microondas son
adecuadas. Para mgs informaci6n acerca de los
materiales que permiten el paso de las microondas, ver la
secci6n "Conozca su homo de microondas'L Si utiliza la
funci6n Sensor, cerci6rese de que disponga de ventilaci6n.
Diversos alimentos (por ejemplo; papas al homo,
salchichas, yemas de huevo y algunas frutas) est_.n
herm_ticamente cubiertos por una piel o
membrana. Esto puede causar que los alimentos
estallen por la acumulaci6n de vapor bajo la
membrana mientras se cocinan. Para aliviar la
presi6n y prevenir los estallidos, trinche estos
alimentos con un tenedor, un palillo para cocktail o
escarbadientes antes de cocinarlos.
• Siempre deje reposar los alimentos despu_s de
cocinar. El periodo de reposo despu_s de cocinar o
descongelar mejora el resultado ya que la
temperatura se distribuye en forma pareja a trav_s
del alimento.
• La duracibn del tiempo de reposo depende del
volumen y la densidad del alimento. A veces puede
ser tan corto como el tiempo que le Ileva sacar los
alimentos del homo y servirlos en la mesa. Sin
embargo, con alimentos m_.s voluminosos y m_.s
densos, la duraci6n de tiempo de reposo puede
durar hasta 10 minutos.
Para resultados 6ptimos, distribuya los alimentos en
forma pareja sobre el plato. Usted puede hacer esto
de varias maneras:
• Si usted esta cocinando varias piezas del mismo
tipo de alimento, como papas al homo, colbquelas
en forma de anillo para una cocci6n uniforme.
• Cuando cocine alimentos con forma o espesor
irregular, tales como pechugas de polio, coloque
las partes m_.s pequeSas y delgadas hacia el centro
del plato donde se calentarAn hasta el final.
• Apile las rodajas delgadas de came una sobre
otra.
• Cuando usted cocine o recaliente pescado
entero, haga un corte en la piel - esto evita que se
agriete.
• No deje que los alimentos o los recipientes toquen
el techo o los costados del horno. Esto evitar_, la
posible formaci6n de chispas.

Nodebenusarserecipientesdemetalenelhornode
microondas.Sinembargo,hayalgunasexcepciones.
Siustedhacompradoalimentosqueest_.npre-
empaquetadosenunrecipientedepapeldealuminio,
sigalasinstruccionesdelpaquete.Siusarecipientes
depapeldealuminio,lostiemposdecocci6npueden
serm_.slargosporquelasmicroondaspenetrar6.ns61o
lapartesuperiordelalimento.(Vealasecci6n"Guia
deutensiliosparaelhorno".)
Siustedusarecipientesdealuminioquenotienen
instruccionesenelpaquete,sigalassiguientes
indicaciones:
• Coloqueelrecipienteenuntaz6ndevidrioy
agregueunpocodeaguaparaquecubralabase
delrecipiente,anom6.sde¼pulg(6.4mm)dealto.
Estoasegurauncalentamientoparejoenlabasedel
recipiente.
• Siemprequitelatapaparaevitarqueelhornose
dafie.
• Uses61orecipientesquenoest6ndafiados.
• Nouserecipientesm_.saltosde_ pulg(19mm).
• ElrecipientedebedeestarIlenoporIomenos
hastalamitad.
• Paraevitarqueseformenchispas,debedehaber
comominimo¼pulg(6.4mm)entreelrecipientede
aluminioylasparedesdelhornoIomismoqueentre
dosrecipientesdealuminio.
• Siemprecoloqueelrecipientesobrelabandeja
giratoria.
• Elrecalentamientodealimentosenrecipientesde
papeldealuminioIlevaeldobledetiempoque
recalentarlosenrecipientesdepl_.stico,vidrio,
porcelanaopapel.Eltiemporequeridoparaquelos
alimentosest6nlistosdependedeltipode
recipientequeustedusa.
• Deje reposar los alimentos por 2 6 3 minutos
despu6s de calentar para que el calor se distribuya
en forma pareja a trav6s del recipiente.
Lo Qiiiii_Li/(!!!)Lil:!!i_O_l!!)(i]iiii%O _]:ii!,ii!_!_:!ii]_,_ii!!!i_,_i];O=_[iiiiiliii_i!_!)i¸¸_¸,_:i!!)t_i
• No envase alimentos en el horno. Los frascos de
vidrio cerrados pueden explotar, resultando en
dafios al horno.
• No use el horno de microondas para esterilizar
objetos (botellas de beb6, etc.). Es diffcil mantener
la temperatura alta requerida para una
esterilizaci6n.
El uso de su horno de microondas puede causar
interferencia con su radio, TV o equipos similares. Si
hay interferencia, usted puede reducirla o eliminarla:
• Limpiando la puerta y las superficies sellantes del
homo.
• Ajustando la antena receptora de la radio o la
televisi6n.
• Moviendo la radio/televisi6n para que est6n
alejadas del horno de microondas.
• Enchufando el horno de microondas en otro
tomacorriente para que el homo de microondas y el
radio/TV est6n en distintos circuitos el6ctricos.
• Siempre cocine los alimentos por el tiempo m_.s
corto recomendado. Revise c6mo los alimentos se
est_.n cocinando. Si es necesario, toque el bot6n
EASY START (Inicio fAcil) mientras el horno est,.
funcionando o despu6s del ciclo de cocci6n. (Vea la
secci6n "C6mo usar EASY START").
• Revuelva, rote o redistribuya los alimentos que se
est_.n cocinando a la mitad del tiempo de cocci6n
para todas las recetas. Esto le ayudar_, a
asegurarse de que los alimentos est6n cocinados
en forma pareja.
• Si usted no tiene una tapa para un plato, use
papel encerado o toallas de papel aprobadas para
uso con microondas o pelicula de pl_.stico.
Recuerde doblar una esquina de la pelicula de
pl_.stico para que el vapor salga durante la cocci6n.
..............................................................................................+
Para probar el homo, ponga 1 taza (250 mL) de agua
fria en un recipiente de vidrio dentro del homo. Cierre
la puerta. Verifique que est_ asegurada. Cocine a
100% de intensidad durante 2 minutos. Cuando el
tiempo se cumpla, el agua debe de estar caliente.

;;;;;;;;;;;;;;;;;;;;;;;;;;;;;;;;;;;;;;;;;;;;;;;;;;;;;;;_
Usted puede utilizar una variedad de utensilios y
materiales en su horno de microondas-convecci6n.
Para prevenir dahos a utensilios y a su homo, elija
utensilios y materiales apropiados para cada m6todo de
cocci6n. La lista a continuaciSn es una gufa general que le
ayudar6,a seleccionar los utensilios y materiales correctos.
S[: Utensilios que puede usar
NO: Utensilios que debe evitar
COCCION COCClON
POR COCCION POR
MICRO- COMBI- CONVEC-
MATERIALUTENSILIOS ONDAS NADA CION/ASAR
..........................................................sl.......................................................................sl............................................................sl.................................
y V_do Utensilicede Si Si Si
vidrb
templado
parayde
microondas
Utersilio$de NO NO Si
vidriocon
decoracBn
de metal
Cristalde NO NO si
plomo
Porcelana Sin si si si
decoraciSn
de metal
(templadoy
parahorno)
.......... rro...........................................................................................................................................................................................................................
homo
P, tico si ........si.........si
Uter_iliosde S NO NO
plas--lJcopara
homode
mic_ondas
Metal R_ii_;a_ ..................NO .............. ................Si
hornear/asar
Moldede NO NO S
metalpara
hornear
Pa_i de ..... : .... : ..... Si
aluminb
Pa_i ........Taza&...................................................................................................................................................................................................NO...............................
Platos,
Toallas ]
Paja; ........ ........................ NO ........NO
Mimbre,
Madera
Papel si NO NO
encerado
Envo .... si............. NO ..........NO
* Consulte "Consejos para cocinar" y "Preguntas y
Respuestas" para verificar el uso apropiado.
Pruebe la vajilla o los utensilios de cocina antes de
usarlos. Para saber si un plato se puede usar en
forma segura, coloquelo en el homo junto a 1 taza
(250 mL) de agua. Cocine a 100% de intensidad
durante un minuto. Si el plato se calienta y el agua
at_n esta fria, no Io use. AIgunos platos (melamina,
ciertas vajillas de ceramica, etc.) absorben energia de
microondas, y pueden calentarse demasiado y su
manejo puede dificultarse o hacer mas lentos los
tiempos de cocciSn. La cocciSn en recipientes de metal
que no estan dise5ados para use con microondas
puede da5ar el homo, Io mismo que recipientes con
metal escondido (ataduras de alambre revestido,
revestimiento de aluminio, grapas, esmalte o adornos
metalicos).
!i:
• Nunca se apoye sobre la puerta o permita que los
ni_os se columpien de ella mientras este abierta.
• Use guantes para homo. La energia de
microondas no calienta los recipientes, pero el calor
de los alimentos puede hacer que el recipiente se
caliente.
• No use periodicos u otros papeles impresos en el
horno.
• No seque flores, frutas, hierbas, madera, papel,
calabazas o ropa en el horno.
• No encienda un homo de microondas cuando este
vacio. La duracion del producto se puede acortar. Si
practica con la programaciSn del homo, coloque un
recipiente con agua en el horno. Es normal que la
puerta parezca ondulada cuando el homo ha estado
funcionando per un tiempo.
• No trate de fundir parafina en el horno. La parafina
no se fundira en un homo de microondas porque
permite que las microondas la atraviesen.
• No opere el homo de microondas a menos que la
bandeja giratoria este asegurada en su lugar y
pueda rotar con libertad. La bandeja giratoria puede
rotar en ambas direcciones. Asegurese de que el
lade correcto de la bandeja giratoria este hacia
arriba. Maneje su bandeja giratoria con cuidado
al sacarla del homo para evitar que se rompa. Si su
bandeja giratoria se quiebra o se astilla, Ilame a su
distribuidor para reemplazarla.
• Cuando use un plato para dorar alimentos, el
fondo del plato debe quedar a una distancia de por
Io menos _6 pulg (5 mm) per arriba de la bandeja
giratoria. Siga las instrucciones provistas con el
plato para dorar alimentos.

®Nuncacocineo recaiienteun huevoenterocon
Jacascara.Laacumulaci6ndevaporenhuevos
enterospuedehacerquerevientenyposibiemente
eJhomosedaSe.RebaneJoshuevosdurosantes
decaientados.Enrarasocasioneshaocurridoque
loshuevospochehanexpiotado.CubraJoshuevos
pochey d_jelosteposarduranteunminutoantes
decortados.
®Para6ptimosresultados,revuelvaJosliquidos
variasvecesduranteelcaJentamientoo
recatentamiento.LosJiquidoscaJentadosen
aJgunosrecipientes(especiaJmenterecipientescon
formacilindrica)sepuedencaJentarexcesivamente.
EJliquidopuedesaJpicarhaciendounruidofuerte
duranteodespuesdelcaJentamientoocuandose
agreganingredientes(granuJosdecare,boJsitasde
te,etc.).EstopuededaSarelhomo.
®LasmicroondaspuedennoJJegaraJcentrodeun
asado.ElcaJorseextiendeaJcentrodesdeJaparte
deafueracocinada,Iomismoquecuandosecocina
enunhomocom0n.Estaesunadelasrazones
paradejarqueaJgunosaJimentos(potejemplo
asadosopapashomeadas)reposenpotuntiempo
luegodecocinar,o pararevolveraJgunascomidas
mientrasseestancocinando.
®Nohagafritutasenel horno.LosutensHiospara
cocinarconmicroondasnosonapropiadosyes
dificiJmantenerJastemperaturasapropiadaspara
freir.
®NosobrecocineJaspapas.AJfinaJdeJtiempode
cocci6nrecomendado,laspapasdebendeestar
ligeramentefirmesporqueseseguirancocinando
duranteeJtiempodereposo.Luegodecocinarcon
microondas,d_jelasreposarpot5 minutos.
Estas se terminaran de cocinar durante eJtiempo de
reposo.
Los tiempos de cocci6n seran mas prolongados en
case de que su suministro de energia electrica o el
voltaje de salida sea menor a 110 voltios. Haga que
un electricista calificado compruebe su sistema
electrico.

® ®
6®®®
@®
.....................................
Su homo de microondas estA diseSado para que
su experiencia cWinaria le sea Io mas placentera y
productiva posible. Para que usted pueda
comenzar inmediatamente, a continuaci6n hay una
lista de las caracteristicas basicas del homo:
1, Sistema de traba de seguridad de la puertao
El homo no funcionara a menos que la puerta
est_ correctamente cerrada.
2, Ventana con protecci6n met_licao La
protecci6n evita que las microondas escapen.
EstA diseSada como una malla para que usted
pueda ver los alimentos mientras se cocinan.
3. Bandeja giratoria de vidrioo Esta bandeja
giratoria hace girar los alimentos mientras se
cocinan para que la cocci6n sea mas pareja.
Debe estar en el homo durante el funcionamiento
para 6ptimos resWtados en la cocci6n. La
bandeja giratoria esta empotrada en el piso de la
cavidad para darle mais espacio para cocinar y
obtener mejores resWtados en la cocci6n.
4, Soporte de la bandeja giratoria amovible
(debajo de la bandeja giratoria).
5, Panel de control. Toque los botones en este
panel para realizar todas las funciones.
6, Luz (no se muestra). Se prende automb4icamente
cuando la puerta se abre o cuando el homo estA
funcionando.
7, Etiqueta con gu_a para cocinar.
8, Placa con nQmero de modelo y de aerie.
9. Rejiila para convecci6n (Pieza No. 8172251 ).
Usela para cocinar par convecci6n o combinaci6n.
10, Parritla para asar (Pieza No. 8172252) (se
muestra a continuaci6n). Use esta parrilla con la
bandeja para recoger los jugos o grasa de
alimentos tales como trozos de pescado,
pechugas de polio y hamburguesas.
11, Plat6_ para goteo (Pieza No. 8172250). El plat6n
para goteo es Otilpara recibir grasa de alimentos
que gotean grasa durante la cocciSn pot
convecci6n o pot combinaci6n.
Rejilla para conveccion Parrilla para asar

El panel de controles de su homo de microondas le
permite seleccionar las funciones de cocci6n deseadas
en forma rapida y facil. La siguiente es una lista de
todos los botones de Comandos ubicados en el panel
de control.
Para mas informacion sobre estas caracteristicas,
vea la seccion "C6mo usar su horno de
microondas".
1. Pantalla. La pantalla incluye un reloj e indicadores
que le muestran la hora del dia, el tiempo de
coccion programado, las intensidades de coccion, la
cantidad, el peso y las funciones de coccion.
2. AUTO SENSOR REHEAT (Recalentamiento
autombtico con sensor). Toque este bot6n para
recalentar alimentos de una de las categorias de
alimentos disponibles.
3. AUTO SENSOR COOK (Coccion autom_tica con
sensor). Toque este bot6n para cocinar alimentos
de una de las categorias de alimentos disponibles.
4. AUTO SENSOR POPCORN (Palomitas de maiz
mediante sensor automatico). Toque este bot6n
para preparar una bolsa de palomitas de maiz de
cualquiera de 3 tama5os.
5. CUSTOM DEFROST (Descongelacion
personalizada). Toque este boton para descongelar
los alimentos congelados por peso o cantidad.
6. COOK POWER (Intensidad de coccion). Toque
este bot6n para fljar la cantidad de energia de
microondas liberada para cocinar los alimentos.
Cuanto mas alto el nQmero, mas alto sera el vataje
de corriente y mas rapida la "velocidad de cocci6n."
7. COOK TIME (Tiempo de coccion). Toque este
boton para fijar el tiempo de cocci6n.
8. CUSTOM CONVECT (Convecci6n
personalizada). Toque este boton para cocinar en
la modalidad de Convecci6n. Vea "Cocci6n por
Conveccion y Combinada".
9. CUSTOM COMBI (Combinacion personalizada).
Toque este bot6n para cocinar en la modalidad de
Combinacion. Vea "Coccion Combinada".
10. CUSTOM BROIL (Asado personalizado). Toque
este bot6n para cocinar en la modalidad de Asado
personalizado. Vea "C6mo utilizarsu horno de
microondas."
11. Botones numerados. Toque los botones
numerados para controlar el volumen del sonido,
peso, idioma, desplazar la velocidad en la pantalla,
reloj, modo de demostracion, tiempos de coccion,
intensidades de cocci6n o cantidades.
12. TIMER (Temporizador). Toque este bot6n para fijar
o cancelar la funci6n del temporizador.
13. CLOCK SET (Fijar el reloj). Toque este bot6n para
fijar la hora correcta del dia.
KJtchen_kid
®
@
@
@
@
14. Botones AUTO CONVECTION (Conveccion
autom&tica). Toque uno de estos botones para
seleccionar el tipo de comida que va a cocinar, (vea
p_.ginas 22 - 26). Toque el bot6n SPECIALTY
FOODS (Alimentos Especiales) una vez para
Mantener Caliente. Vea la secci6n "Como utilizar
Mantener Caliente."
15. START/EASY START (Inicio/Inicio f_cil). Toque
este bot6n para iniciar una funci6n que hubiese
fijado o para cocinar la comida al 100% de
intensidad de coccion durante 30 segundos.
16. PERSONAL CHOICE (Seleccion personal). Toque
este bot6n para cambiar el volumen a bajo, medio,
alto o apagado, para cambiar el sistema de peso de
libras a kilogramos, para cambiar el idioma utilizado,
para cambiar la velocidad de desplazamiento del
texto en pantalla, para modificar la marcaci6n del
reloj, de 12 horas a 24 horas, o para encender o
apagar el modo de demostraci6n.
17. CANCEL/OFF (Cancelar/Apagar). Toque este
bot6n una vez para borrar un comando incorrecto o
para cancelar un programa durante la coccion. Este
bot6n no borra la hora del dia.

;;;;;;;;;;;;;;;;;;;;;;;;;;;;;;;;;;;;;;;;;;;;;;;;;;;;;;;_
dii iJ!!!!!,oo iii!"iii ii:;ilyo!i! }
Su homo de microondas dispone de sefiales audibles
como una guia cuando usted esta programando y
usando su homo:
• Habra una serial audible de programacion cada vez
Usted puede seleccionar o cambiar las siguientes
funciones o indicaciones en la pantalla al oprimir
PERSONAL CHOICE (Seleccion personal)
Funcibn Seleccibn
que usted toca un bot6n. ..; ................................................................
8a BiaaBajol ediolaltoo
• Tres sefiales audibles le avisaran cuando el ciclo de VOlumenClesonido apagado.
cocci6n termina y cinco sefiales le indican que se Ilego ..........................................................................................................................................................................................................................................................................................................................................................................................
al final de la funcion del temporizador.
NOTA" Se pueden suprimir las sefiales audibles de su
homo. Para hacerlo, vea la seccion "C6mo utilizar
PERSONAL CHOICE (Seleccion personal)". Esto
funcionara Qnicamente cuando el homo este en la
modalidad de reserva.
Usted puede detener el homo durante el ciclo abriendo
la puerta. El homo deja de calentar y el ventilador se
detiene, pero la luz queda encendida. Para volver a
comenzar la cocci6n, cierre la puerta y
Toque START.
Si usted no desea continuar con la coccibn:
• Cierre la puerta y la luz se apaga.
O
• Toque CANCEL/OFF.
NOTA: Antes de programar una funci6n, toque
CANCEL/OFF para asegurar que no haya otra funci6n
programada.
El seguro para nifios traba el panel de control de
manera que los nifios no puedan utilizar el homo de
microondas cuando usted no desea que Io hagan. Esto
funcionara Onicamente cuando el homo este en la
modalidad de reserva.
C6mo trabar el panel de control:
Toque y mantenga oprimido CANCEL!OFF hasta que
aparezca "CONSEG" en la pantalla (aproximadamente
por 4 segundos). (Se escuchar_, una serial audible).
C6mo deetrabar el panel de controlee:
Toque y detenga CANCEL!OFF hasta que aparezca
"SINSEG" en la pantalla. (Se escuchar_.n dos sefiales
audibles).
Peso
Cambia al sistema est_.ndar (Ibs) o
al m_trico (kgs).
Desplazamiento
de Pantalla
espafiol.
Cambia la velocidad.
Modo de Enciende o apaga.
Demostraci6n
1. Toque PERSONAL CHOICE.
El hombre de la categoria cambia en secuencia.
Cuando la categoria deseada aparece, toque START.
Por ejemplo, para cambiar el sistema de peso usted
verA:
2. Toque PERSONAL CHOICE dos veces
para Ilegar a "LBS/KGS". Toque START.
Toque PERSONAL CHOICE de nuevo
para seleccionar "LBS" o "KGS".
3. Toque START.

Usted puede empotrar su homo de microondas utilizando alguno de los juegos de accesorios que aparecen a
continuaci6n*. Estos juegos estAn disponibles con su distribuidor. Si su distribuidor no tiene en existencia el
juego que usted desea, puede pedirlo Ilamando al 1-800-422-1230, usando el nQmero de modelo del juego y
siguiendo las instrucciones y gufas telefonicas que se escuchen.
NO. DE MODELO PARA INSTALACION ENCIMA
TAMAI_IO COLOR DEL JUEGO DEL MODELO DE HORNO
27" (69 cm) Negro MK1157XJB KEBI171D KEBS177D
30" (76 cm) Negro MK1150XJB KEBI171D KEBS177D
27" (69 cm) Blanco MK1157XJQ KEBI171D KEBS177D
30" (76 cm) Blanco MK1150XJQ KEBI101D KEBS107D
27" (69 cm) Biscuit MK1157XJT KEBI101 D KEBS107D
30" (76 cm) Biscuit MK1150XJT KEBI101D KEBS107D
27" (69 cm) Acero inoxidable MK1157XJS KEBI171 D KEBS177D
30" (76 cm) Acero inoxidable MK1150XJS KEBI101 D KEBS107D
Unicamente para los hornos individuales el@ctricos autorizados
Cuando usted enchufe su horno de microondas por
primera vez, la pantalla mostrar6. " : ". Despu@s de
una interrupci6n de suministro de energfa el@ctrica y
en cuanto se restablezca la energfa, la pantalla
mostrar_ nuevamente " : ".
NOTA" Usted puede cocinar sin poner el reloj a la
hora, pero la pantalla mostrarA nuevamente " : "
despu@s de terminar de cocinar.
1. Toque CLOCK SET.
2. Toque los botones numerados para la
hora del dia.
Per ejemplo: Para 7:00, toque "7 0 0".
3. Toque CLOCK SET.
Su horno de microondas puede usarse como un
temporizador de cocina.
1. Toque TIMER.
2. Toque los botones numerados para el
tiempo deseado en horas:minutos.
Per ejemplo: Para 10 minutos, toque "1 0".
3. Toque START (o TIMER) o deje que el
temporizador arranque
autom,_ticamente despu_s de un breve
retraso.
4. AI final de la cuenta regresiva:
El temporizador contarA hasta cero en forma
regresiva luego, la pantalla mostrarA
"TEMPORIZADOR FINALIZO" y se escucharAn 5
sefiales audibles.
NOTA" En cualquier momento que desee cancelar
el temporizador, toque TIMER.

Estasecci6nleda Rasinstruccionesparaoperarcadaunade Rasfunciones.Porfavorleaestas
instruccionescuidadosamente.
;;;;;;;;;;;;;;;;;;;;;;;;;;;;;;;;;;;;;;;;;;;;;;;;;;;;;;;_
1. Coloque los alimentos en el homo y
cierre la puerta.
2. Toque COOK TIME.
3. Toque los botones numerados para el
tiempo deseado en horas:minutos.
Por ejemplo: Para 10 minutos, toque "1 0".
4. Toque START.
5. AI final del tiempo de coccion:
La pantalla mostrar_. "TERMINAR" y se escuchar_.n
tres seSales audibles.
1. Coloque los alimentos en el horno y
cierre la puerta.
2. Toque COOK TIME.
3. Toque los botones numerados para el
tiempo deseado en horas:minutos.
4. Toque COOK POWER.
5. Seleccione el boton numerado para el
ajuste deseado de intensidad de
coccion.
(Yea el cuadro a continuaci6n.)
6. Toque START.
7. AI final del tiempo de coccion"
La pantalla mostrar_. "TERMINAR" y se
escuchar_.n tres se_ales audibles.
Para 6ptimos resultados, algunas recetas necesitan distintas intensidades de cocci6n. Cuanto m_.s baja es la
intensidad, m_.s lenta es la cocci6n. Cada nivel representa un porcentaje diferente de intensidad de cocci6n.
Muchas recetas de libros de cocina para microondas le dicen qu6 intensidad de cocci6n utilizar por nQmero,
porcentaje o nombre.
El siguiente cuadro le da el porcentaje de intensidad de cocci6n que corresponde a cada nivel y el nombre de
la intensidad de cocci6n generalmente utilizado. Tambi6n le dice cu_.ndo usar cada intensidad de cocci6n.
Siga las instrucciones de la receta o paquete de alimentos si dispone de elias.
NOTA" Consulte un libro de cocina confiable para los tiempos de cocci6n.
INTENSiDAD DE COCClON NOMBRE CUANDO USAR
o
Hi = 1O0Yode intensidad total Alta • Calentar rApidamente comida comercial preparada y alimentos
(automatica) con alto contenido de agua, como sopas, bebidas y la mayoria
de las verduras
o
90 = 90 Yode intensidad total • Cocinar trozos peque_os y tiernos de came, came molida,
piezas de polio, filetes de pescado
• Calentar sopas cremosas
o
80 = 80 Yode intensidad total • Calentar arroz, pasta o estofados
• Cocinar y calentar alimentos que necesitan una intensidad
de cocci6n menor que la alta (por ejemplo, pescado entero
y rollo de came molida)
o
.............. .........................................................uedia-A!ta ..............................Reca!en!a n porc!6 n So! de cOm!da.............................................................................................................................................................
o
60 = 60 Yode intensidad total • Cocci6n de alimentos delicados como comidas a base de
queso y huevos, budines y natillas
• Cocci6n de platillos que no pueden revolverse, como
seria lasai_a

INTENSIDAD DE COCCION NOMBRE CUANDO USAR
50 = 50% de intensidad total Media • Cocinar jam6n, ayes enteras y guisados de carne
• Cocci6n lenta de estofados
40 = 40% de intensidad total • Derretir chocolate
• Calentar pan, panecillos y pastelitos
30 = 30% de intensidad total Media-Baja, • Descongelar alimentos, tales como panes, pescado,
Descongelar carnes, aves y comida precocida
20 = 20% de intensidad total • Ablandar mantequilla, queso y helado
10 = 10% de intensidad total Baja • Mantener alimentos calientes
• Colocar la fruta a temperatura ambiente
Para 6ptimos resultados, algunas recetas necesitan
una intensidad de cocci6n por un cierto periodo de
tiempo y otra intensidad de cocci6n por otro periodo.
Su homo puede ser programado para cambiar de un
nivel de intensidad a otro automAticamente, hasta por
3 ciclos mAs un ciclo de descongelaci6n.
1. Coloque los alimentos en el horno y
cierre la puerta.
2. Toque COOK TIME.
3. Toque los botones numerados para fijar
el tiempo de coccion para el primer
ciclo.
4. Toque COOK POWER.
5. Toque el boton numerado para fijar la
intensidad de coccion para el primer
ciclo.
6. Repita los pasos 2 y 3 para programar
el tiempo y la intensidad de coccion
para cada ciclo adicional.
7. Toque START.
Una vez que concluye cada ciclo se escuchar6.n
dos seSales audibles y comenzar6, la cuenta
regresiva para el (los) siguiente(s) ciclo(s).
8. AI final del tiempo de coccion:
Sonar6.n 3 se_ales audibles y la pantalla mostrar_.
"TERMINAR".
NOTAS:
• Usted puede programar en cualquier orden las
funciones de cocci6n que desee.
• Usted puede fijar hasta 3 ciclos de cocci6n m_.s
CUSTOM DEFROST (Descongelaci6n
personalizada) y Mantener Caliente.
• CUSTOM DEFROST (Descongelaci6n
personalizada) funcionar_, primero.
• Mantener Caliente funcionar_, al final.
• Las funciones AUTO SENSOR COOK (Cocci6n
autom_.tica con sensor) o AUTO SENSOR
REHEAT (Recalentamiento autom_.tico con
sensor) no permiten cocinar con m_.s de un ciclo
de cocci6n.

;;;;;;;;;;;;;;;;;;;;;;;;;;;;;;;;;;;;;;;;;;;;;;;;;;;;;;;_
i!i:i:ii:iiiiiii_ii!ii_iili_i_i:_,_i:il_i!i;_i;_,,,,CiLjS?iiiOiiiil_,Ji
iiD',_i_ii!i!!iiii_:__;iillO Siii_'_'_iliCiii_,_i!!!__!!i;,coiiii__!iiill_:!;_!iili_ii!!ii__::;iiii_iii!i!!i_,_iii_ii
Usted puede descongelar alimentos eligiendo una
clase y fijando un peso. CUSTOM DEFROST dispone
de tiempos y de intensidades de cocci6n
predeterminadas para 6 clases: Came, Aves,
Probablemente usted est6 acostumbrado(a) al peso
de los alimentos en libras y onzas, que son fracciones
de una libra (por ejemplo, 4 onzas equivalen a ¼libra
[113.4 g]).
Si el peso que se muestra en el paquete de los
alimentos est,. expresado en fracciones de una libra,
usted puede usar la tabla siguiente para convertir el
peso a decimales.
Pescado, Rosca, Panques y Mantequilla. EquiValencia de pes0s
1. Toque CUSTOM DEFROST.
Una vez para came, dos veces para aves, tres
veces para pescado, cuatro veces para rosca,
cinco veces para panqu6s, seis veces para
mantequilla.
2. Toque los botones numerados para el
peso deseado (0.1 - 6.0 Ibs [45g - 2.7
kgs]).
3. Toque START.
4. Se escucharan 5 sehales audibles
durante la descongelaciOn.
1.6 45.4 .10
3.2 90.7 .20
4.0 113.4 .25
4.8 136.1 .30
6.4 181.4 .40
8.0 226.8 .50
9.6 272.2 .60
11.2 317.5 .70
12.0 340.2 .75
12.8 362.9 .80
14.4 408.2 .90
16.0 453.6 1.00
Un cuarto de libra
Media libra
Tres cuartos de libra
Una libra
(para came, aves y pescado cuando se fija para
m_.s de 1 minuto)
Estas se_ales le indican cu6.ndo se debe revisar,
voltear, separar o reacomodar los alimentos. !::iil
Toque START para encender nuevamente el horno
de microondas. • Antes de comenzar, asegQrese de que ha quitado
....................................................................................................................................................................................................................................................................................................................................................................................................................................todas las ataduras de alambre revestido que vienen
5. AI final del tiempo de descongelacion: con frecuencia en las bolsas de alimentos
Aparecer_. "TERMINAR" en la pantalla y se congelados y reempl_.celas con hilo o bandas
escucharAn tres seSales audibles, el_.sticas.
• Abra los recipientes, como serian las cajas, antes
de ponerlos en el horno.
• Siempre corte o perfore las bolsas o paquetes de
pl_.stico.
1. Toque el boton CUSTOM DEFROST • Si el alimente esta envuelte con papel de
7 veces, aluminio, quite el papel de aluminio y coloque el
............................................................................................................................................................................................................................................................................................................................................................................................................................................alimento en un recipiente apropiado.
2. Toque los botches numerados para fijar • Corte la piel, si hayalguna, en alimentos
el tiempo para la descongelacion congelados tales como salchichas.
manual. • Doble las bolsas pl_.sticas con alimentos para
A menos que usted la cambie, la intensidad est,. asegurar una descongelaci6n pareja.
autom_.ticamente programada al 30 por ciento. • Siempre calcule menos tiempo de descongelaci6n.
Si el alimento est,. todavia congelado en el centro,
3. Toque START. vu61valo a colocar en el homo de microondas para
continuar la descongelaci6n.
4. AI final de tiempo de descongelacion:
La pantalla mostrara'"TERMINAR" y 3 tones
audibles sonaran.

®EltiempodedescongeHac[6nvariasegOneHgrado
decongeHaci6ndellaHimento.
®LaformadelpaqueteaHteraeHtiempo de
descongeHaci6n. Los paquetes poco profundos se
descongeHan mas rapido que HosbHoques grandes.
• Separe Hasp[ezas cuando los alimentos empiezan
a descongelarse. Las p[ezas separadas se
descongeHan en forma mais pareja.
• Usted puede usar pequeSos trozos de papel de
alurninio para proteger HosaHimentos como alias de
polio, puntas de Haspiernas de polio y coHasde
pescado o aHgunas otras zonas que pueden
empezar a caHentarse. Cerci6rese de que eHpapeHde
aHuminio no toque Hoscostados, Haparte superior o
Haparte inferior dell homo. EHaHuminio puede daPiar
eHrevestimiento del homo.
• Pars 6ptimos resultados, deje reposar los
alimentos despu6s de la descongelaci6n. (Para
mayor informaci6n sobre el tiempo de reposo, vea
"Consejos para cocinar con el homo de
microondas").
• D_le vaelta a los alimentos durante Is
descongelaci6n o el periodo de reposo. Separe los
trozos y saque el alimento a medida que sea
necesario.
EASY START le permite cocinar alimentos durante 30
segundos al 100% de intensidad de cocci6n ousted
puede utilizarlo durante cualquier programaci6n
manual para agregar incrementos de 30 segundos.
NOTAS:
• Cada vez que toque el bot6n de EASY START, 6sta
agregar_. 30 segundos de tiempo de cocci6n hasta
3 minutes; luego agregar_. 1 minute hasta un total
de 10 minutes.
• Se pedrO,activar Easy Start Qnicamente despu6s de
cerrar la puerta o despu6s de tocar
CANCEL/OFR
• Usted puede utilizar el bot6n para aumentar el
tiempo de cocci6n durante una programacion
manual.
1. Coloque los alimentos en el horno y
cierre la puerta.
2. Toque EASY START.
(Cada toque adicional agrega 30 segundos de
tiempo de cocci6n hasta 3 minutos; luego agrega
1 minuto hasta un total de 10 minutos).
3. AI final del tiempo de coccion:
Sonar_.n 3 se_ales audibles y la pantalla mostrar_.
"TERMINAR".
Peligro de Intoxicacion Alimentaria
No deje sus alimentos en el horno por mas
de una hora antes o despues de su coccion.
No seguir esta instruccion puede ocasionar
intoxicacion alimentaria o enfermedad.
La opci6n Mantener Caliente conserva calientes en el
homo de microondas los alimentos que est_.n
cocinados y calientes.
NOTAS:
• Durante Mantener Caliente todos los alimentos
cocinados deber_.n mantenerse tapados.
• Los productos de reposteria (pays, empanadas,
etc.) deber_.n destaparse durante Mantener Caliente.
• Las comidas completas que se deseen mantener
calientes en un plato deber_.n mantenerse tapadas
durante Mantener Caliente.
• Nunca use m6.s de un ciclo completo de Mantener
Caliente. Si se usa per un tiempo prolongado, la
calidad de algunos alimentos puede deteriorarse.
• Mantener Caliente puede usarse conjuntamente con
Cocci6n per Etapas. (Vea "C6mo cocinar con m_.s
de un ciclo".)
1. Coloque los alimentos cocinados y que
estan calientes en el horno y cierre la
puerta.
2. Toque SPECIALTY FOODS.
"CONSERVAR CALOR" se desplaza en la pantalla,
luego "INICIAR" destellarA hasta que usted toque
START.
3. Toque START.
La pantalla mostrara "CONSERVAR".
4. Abra la puerta o toque CANCEl/OFF
para cancelar Mantener Caliente.

;;;;;;;;;;;;;;;;;;;;;;;;;;;;;;;;;;;;;;;;;;;;;;;;;;;;;;;_
Su homo de microondas dispone de un sensor que
detecta la humedad liberada por los alimentos. La
humedad detectada le indba al homo qu6 tanto deben
cocinarse o recalentarse sus alimentos. El sensor es
utilizado en 3 funciones especiales: AUTO SENSOR
COOK (Cocd6n automAtica con sensor), AUTO
SENSOR REHEAT (Recabntamiento automatico con
sensor) y AUTO SENSOR POPCORN (Palomitas de
maiz mediante sensor autom_.fico). En las pr6ximas
paginas aparecen las instrucdones sencilJas para usar
estas funciones.
NOTAS:
® Si desea cocinar ingres_ando un tbmpo y una intensidad de
coxscidn, yea la seccidn "Ccxsci6n a distintas intensidades'L
® El homo deberB estar enchufado cuando menos 5
minutos antes de la cocci6n con sensor.
® La temperatura ambiente no debe exceder de 95°F (35°C).
• Cerci6rese de que tanto el exterior del recipiente para
cocinar como el interior del homo est6n totalmente seco&
Limpie cada uno de ellos con una toalla de papeL
• AI principio del ciclo de cocci6n con sensor, el homo no
generar4 energia de microondas por 28 segundos.
• Si tapa los alimentos, cerci6rese de dqar una abertura Io
suficientemente grande para que la humedad se escape y
asi permitir que el sensor determine el tiempo de cocci6n
o de recalentamiento.
:{ ::::
Para utilizar AUTO SENSOR COOK:
1. Coloque los alimentos en el homo y cierre la
puerta.
2. Toque AUTO SENSOR COOK hasta que la
pantalla muestre el alimento deseado.
Despu6s de un breve retraso,AUTO SENSOR COOK
iniciarAel funcionamiento automAtico.
(Veael Cuadro para cocci6n automAtica con sensor.)
TAMANO DE LA
Papas al 1 a 4 medianas, de • Trinche con un tenedor cada papa varias veces y col6quelas en la
horno 10 a 13 oz (284 a bandeja giratoria, alrededor del borde, separadas entre si cuando
369 g) cada una menos 1 pulgada (2.5 cm). Deje reposar las papas 5 minutos para
terminar su cocci6n.
Verduras 1 a 4 tazas (250 mL a • S_.quelas del paquete. Coloque las verduras en un recipiente
congeladas 1L) apropiado para en homo de microondas. CQbralas con pelicula de
pl_.stico y deje un espacio de ventilaci6n.
• La mayor parte de las verduras necesitan revolverse y reposar de
2 a 3 minutos despues de la coccion.
Verduras 1 a 4 tazas (250mL a • Humedezca las verduras y col6quelas en un recipiente apropiado
frescas 1L) para homo de microondas. CQbralas con pelicula de pl_.stico y
deje un espacio de ventilaci6n.
• La mayor parte de las verduras necesitan revolverse y reposar
durante unos 2 6 3 minutos despu6s de la cocci6n.
Comidas
comerciales
congeladas
Se obtienen mejores
resultados si la
comida pesa de
10 a 20 oz (284 a
567 g).
• S_.quelas del paquete exterior. Afloje la cubierta por tres de los
lados. Si la comida no est,. en un recipiente apropiado para horno
de microondas, col6quela en un plato, cQbrala con pelicula de
pl_.stico y deje un espacio de ventilaci6n.
• La mayor parte de las comidas congeladas necesitan reposar
durante unos 2 6 3 minutos despues de la coccion.
500 mL) de arroz
seco (utilice arroz de
grano mediano o
largo. El arroz instan-
t_.neo debe cocinarse
segQn las instruc-
ciones en el paquete.)
instrucciones que aparecen en el paquete. Coloque el arroz y el
liquido (agua o caldo de polio o de verduras) en un plato
apropiado para horno de microondas. CObralo con pelicula de
pl_.stico y deje un espacio de ventilaci6n. Cuando se termine la
cocci6n, deje reposar al arroz durante 5 minutos o hasta que
absorba todo el liquido. Revuelva el arroz.

Qo:
1. Coloque los alimentos en el horno y cierre
la puerta.
2. Toque AUTO SENSOR REHEAT hasta que
la pantalla muestre el alimento deseado.
Despu6sde un breveretraso,AUTO SENSORREHEAT
iniciarAel funcionamiento automAtico.
(Veael Cuadro para recalentamientoautomAtico con
sensor.)
NOTA:AItapar losalimentoscerci6resede dejaruna abertura
Iosuficientementegrande para que la humedad seescape y
permitaasi queel sensor determine el tiempo de cocci6n o de
recalentamiento.
AUTO SENSOR POPCORN le permite preparar
palomitas de maiz empacadas comercialmente para
horno de microondas con un s61otoque.
NOTAS:
• Cocine solamente un paquete a la vez.
• Siga las instrucciones del fabricante si usa un tostador
de palomitas de maiz para horno de microondas.
1. Coloque la bolsa en el centro de la
bandeja giratoria y cierre la puerta.
2. Toque AUTO SENSOR POPCORN.
NOTA: BasAndose en el tamafio del paquete, el
sensor determinar_, el "tiempo de estallido".
Plato de Aprox. 8 a
mesa 16 oz (227 a
454 g)
TAMAI_IODE
ALIMENTO LA PORCION INSTRUCCIONES
• Coloque el alimento que
desea recalentar en un
plato de mesa o en un
plato parecido. CQbralo
con pelicula de pl_.stico y
deje un espacio de
Sopa
1 a 4 tazas
(250 mL a
1 L)
Salsa 1 a 4 tazas
(250 mL a
1 L)
• Coloque el alimento que
se desea recalentar en un
recipiente apropiado para
horno de microondas.
CObralocon pelicula de
pl_.sticoy deje un espacio
de ventilaci6n.
• Coloque el alimento que
se desea recalentar en un
recipiente apropiado para
homo de microondas.
CObralocon pelicula de
pl_.sticoy deje un espacio
de ventilaci6n.
Guisado 1 a 4 tazas • Coloque el alimento que
(250 mL a se desea recalentaren un
1 L) recipiente apropiado para
homo de microondas.
CObralocon pelicula de
pl_.sticoy deje un espacio
de ventilaci6n.
TAMANO
DE LA
PORCION INSTRUCCIONES
Palomitas 3.5 oz • Siga lasindicacionesdel
de maiz (99 g)
3.0 oz
(85 g)
1.75 oz
(50 g)
paquete.
• Useun paquetede palomitas
de maiz preparado
especialmenteparacocci6n
en homo de microondas.
• Nointenteestallargranosque
no han reventado.
• Cocine solamenteun paquete
a lavez.
• Mientrasseest_n cocinando
las palomitasde maiz no deje
el homo desatendido.
• Siga lasinstruccionesdel
fabricantesi usaun tostador
de palomitasde maiz para
homo de microondas.
• Elresultadoobtenido
dependerAde la marca de las
palomitasde maizy del
contenido de grasa.Pruebe
con variasmarcas para
decidir cuAIes laque se
cocina mejor.Usesiempre
bolsas frescasde palomitas
de maiz paraobtener6ptimos
resultados.
i

;;;;;;;;;;;;;;;;;;;;;;;;;;;;;;;;;;;;;;;;;;;;;;;;;;;;;;;i
Para precalentar el horno para la coccion por
conveccion, siga los pasos del 1 al 3, que se
indic.an a continuacion.
Para cocinar por conveccion sin precalentar,
omita el paso 3 indicado a continuacion.
NOTA:Paraobtener 6ptimos resultados muchas recetas
requieren un precalentimiento del homo antes de comenzar
a cocinar. Utiliceutensiliospara cocinar que no se derritano
quemen en el homo caliente. No use recipientesde plAstico
ligeros, envolturasde plAsticoo productos de papeldurante
ningOnciclo de combinaci6n o de convecci6n.
1. Toque CONVECT.
2. Toque los botones numerados para la
teperatura deseada.
(Sisu receta no requiere precalentamiento, prosiga al
paso 4.)
3. Toque START para precalentar el homo.
SonarAn dos tones audibles cuando el homo haya
Ilegado a la temperatura de precalentimiento.
4. Coloque los alimentos en utensilios
apropiados sobre la Rejilla de Conveccion.
5. Toque los botones numerados para
ingresar el tiempo de coccion en
horas:minutos.
Por ejemplo: Para 1 hora, toque "1 0 0".
6. Toque START.
NOTA: No es necesario precalentar el horno a menos
que su receta Io requiera.
_;iil
Los ajustes recomendados de temperatura pueden variar.
Consulte su receta culinaria para ver los ajustes de
temperatura recomendados.
........................................................................................................................................................................................................
Piiia:ffesca: Pays congeiados ........ 400°# (204°C i
Bi4ueisi;escos.........................................................................................................................................................................
• Para obtener 6ptimos resultados, coloque los
alimentos en la Rejilla de Convecci6n.
• No cubra la bandeja giratoria o la Rejilla de
Convecci6n con papel de aluminio. Esto interfiere
con el flujo del aire que cocina los alimentos.
• Los moldes redondos para pizzas son excelentes
utensilios de cocina para muchos articulos que s61o
pueden prepararse per convecci6n. Elija los moldes
que no tengan asas extendidas.
• Emplee la cocci6n per convecci6n para articulos
come sufl6s, panes, galletitas, pastel de Angel,
pizza y la mayoria de carnes y pescado.
• No tiene que usar t6cnica especial alguna para
adaptar sus recetas favoritas de horneado a la
cocci6n per convecci6n. Sin embargo, quizAs
necesite disminuir algunas temperaturas o reducir
algunos tiempos de cocci6n de las instrucciones de
cocci6n en el horno per convecci6n.
• Cuando hornee tortas, galletitas, panes, bolillos u
otro tipo de alimentos horneados, la mayoria de
recetas exigen el precalentamiento. Precaliente el
horno vacio tal come Io hace con un homo regular.
Usted puede empezar a hornear alimentos densos
tales come carnes, guisados y polio sin precalentar.
• En la cocci6n per convecci6n se pueden usar todas
las vajillas refractarias o utensilios de metal.
• Use utensilios de metal s61o para la cocci6n por
convecci6n. Nunca use para cocci6n en
microondas o de combinaci6n ya que puede dar
lugar a la producci6n de chispas o dafiar el horno.
• Despu6s de precalentar, si usted no abre la puerta,
el horno mantendrA automAticamente la
temperatura precalentada durante 30 minutes.
NOTA: Le recomendamos que coloque el Platdn de
goteo (Pieza No. 8172250) debajo de la rejila para
cualquier coccidn por conveccidn, combinada o para
asar aimentos que goteen grasa como
hamburguesas o filetes de res.

Primera fermentacion:
Coloque la masa en un taz6n ligeramente engrasado
y t_.pelo de manera holgada con papel encerado
engrasado con manteca vegetal.
1. Coloque un recipiente en el homo y
II_nelo con 2 tazas (500mL) de agua
hirviendo. Coloque el tazon sobre la
Rejilla de Conveccion. Cierre la puerta
del homo.
2. Toque CONVECT.
3. Toque los botones numerados a 100°F
(38°C).
4. Toque START.
Dos tonos audibles sonar_.n cuando el horno est6
precalentado.
NOTA: Deje que la masa se levante hasta que
duplique su tamafio original. El tiempo de
fermentaci6n puede ser menor y varia
dependiendo del tipo y cantidad de la masa.
Revise la masa despues de 20 6 25 minutos.
5. Cuando la fermentacion est_ terminada,
saque el tazon que contiene la masa de
pan del horno. Vacie el agua del
recipiente.
Segunda fermentacion:
D61eforma a la masa y col6quela en molde(s) para
hornear. Tape de manera holgada con envoltura de
pl_.stico rociada con aceite en aerosol. Coloque el
recipiente en el horno y 116nelocon 2 tazas (500 mL) de
agua hirviendo. Coloque los moldes sobre la Rejilla de
Convecci6n. Cierre la puerta del horno. Siga los pasos
2 a 5 descritos en "Primera fermentaci6n'. Cuando
termine la fermentaci6n, saque la masa de pan del
horno y tambi6n el recipiente que contiene agua. Vuelva
a programar el homo para precalentar para hornear
pan. Antes de hornear, quite la envoltura de pl_.stico de
la masa de pan. Vea la secci6n "Cuadro de Convecci6n
automAtica" y siga las instrucciones.
1. Coloque los alimentos sobre la Rejilla
de Conveccion y cierre la puerta.
2. Toque COMBI.
3. Toque los botones numerados para la
temperatura deseada.
4. Toque los botones numerados para fijar
el tiempo de coccion en horas:minutos.
Por ejemplo: Para 1 hora, toque "1 0 0".
5. Toque START.
Cuando termine el tiempo de cocci6n, la pantalla
mostrar_. "TERMINAR" y 3 tonos audibles sonar_.n.
Despu_s de cocinar y cuando abra la puerta del
homo, la pantalla regresar_, a la hora del dia.
• Las carnes pueden asarse directamente en la Rejilla
de Convecci6n.
• Los cortes de carne menos suaves pueden asarse y
ablandarse usando bolsas para cocci6n en el horno.
• AI terminar el tiempo de cocci6n, verifique si est&
bien cocido. Si no Io est,. completamente, d6jelo en
el horno unos minutos para completar la cocci6n.
NOTA: Durante la cocci6n combinada, algunos
utensilios de cocina pueden producir chispas al entrar
en contacto con las paredes del horno o la Rejilla de
Convecci6n de metal. La producci6n de chispas es
una descarga de electricidad que ocurre cuando las
microondas entran en contacto con el metal. Si se
producen chispas, coloque una vajilla refractaria entre
el recipiente de hornear y la Rejilla de Convecci6n. Si
la producci6n de chispas ocurre con otros utensilios
de cocina, deje de usarlos para la cocci6n combinada.

;;;;;;;;;;;;;;;;;;;;;;;;;;;;;;;;;;;;;;;;;;;;;;;;;;;;;;;E
:iiiiiiiiiiiiiiil)oo£ii(i!:i! i ,! ii ¸
Usted puede cocinar autom_.ticamente una amplia
selecci6n de alimentos solamente tocando uno de los
6 botones de Convecci6n AutomAtica: Meat (Came),
Poultry (Aves), Fish (Pescado), Baked Goods
(Productos horneados), Specialty Foods (Alimentos
especiales), Other Foods (Otros alimentos).
Vea la secci6n "Cuadro de Convecci6n Autom_.tica" y
siga las instrucciones.
En recetas de Convecci6n Autom6.tica para
productos horneados, botanas, otros alimentos y
alimentos congelados especificos, simplemente
seleccione la categoria del alimento y toque START.
La recetas de Convecci6n Autom_.tica para la cocci6n
de carnes, aves y pescado fresco le pedirAn que
indique la cantidad a fin de proporcionar 6ptimos
resultados de cocci6n.
Usted puede seleccionar el grado de cocci6n que
desee para sus carnes (Poco cocido, Poco
cocido/medio, Medio, Medio/Bien cocido, Bien
cocido), tocando los botones numerados. Estas
recetas se cocinar_.n a t6rmino Medio si usted no
regula el nivel de cocci6n.
Si usted Io desea, puede regular el tiempo y
temperatura recomendados de las recetas de
Convecci6n AutomAtica durante la cocci6n tocando
los botones numerados. Luego toque START.
1. Coloque los alimentos sobre la Rejilla
de Conveccion y cierre la puerta.
2. Toque los botones apropiados de
Conveccion automatica hasta que
aparezca el alimento deseado.
3. Toque START.
Cuando termine el tiempo de cocci6n, la pantalla
mostrar_. "TERMINAR" y 3 tonos audibles sonar_.n.
Despu_s de cocinar y cuando abra la puerta del
homo, la pantalla regresar_, a la hora del dia.

AlgunoshornosporConvecci6nAutom_.ticale
indicar_.nqueprecalienteelhornoantesdecolocar
losalimentosenelhorno.
Cuandotermineeltiempodecocci6n,lapantalla
mostrar_."TERMINAR"y3tonosaudiblessonar_.n.
Despu6sdecocinarycuandoabralapuertadel
homo,lapantallaregresaraalahoradeldia.
PRODUCTOS ALIMENTOS OTROS
_: HORNEADOS ESPECIALES ALIMENTOS
CATEGORIA ALIMENTO TEMP DE................................................Galletas Mantener Pizza-
PRECALENTA- caliente congelada
MIENTO .........................................
................................................... _ Pastelitos de Gallinitas Pizza-fresca
Aves Polio, Empanizado- 375 F (191°C) chocolate cornish
congelado .................................................................................................................................................................................................................................
....................................................................................................................................................................................Panqu6s Chuletas de Lasa_a
Pescado Filetes de pescado, 425°F (218°C) ..... cordero
frescos ........................................................
Filetes de pescado 400OF (204oc) Bisquets- Cabobs Guisado de
empanizados - frescos (pinchos) pasta
congelados Bisquets- Quiche Guisado de
Barritas de pescado 400°F (204°C) refrigerados verduras
empanizadas -
congeladas Panes a base Sufl6 Guisado de
................................................................delevadura
Productos Galletas 325°F (163°C)
horneados Pastelitos 350°F (177°C)
de chocolate
Panqu6s 425°F (218°C)
Bisquets, frescos 450°F (232°C)
Bisquets, 375°F (191°C)
refrigerados
Panes a base 350°F (177°C)
de levadura
Panes sin levadura 350°F (177°C)
Pay, fresco 375°F (191°C)
Pay, congelado 400°F (204°C)
Alimentos Quiche 325°F (163°C)
Especiales Sufl6 350°F (177°C)
Pastel de Angel 350°F (177°C)
Otros alimentos Pizza, fresca 400°F (204°C)
Pay de came, 400°F (204°C)
congelado
1. Toque los botones apropiados de
Conveccion autom&tica hasta que
aparezca el alimento deseado.
2. Toque START. La pantalla mostrar&
"Precalentar".
3. Una vez que el horno Ilegue a la
temperatura de precalentamiento,
sonar& un tono audible y aparecer& en
la pantalla "Poner al horno".
4. Abra la puerta, coloque los alimentos
sobre la Rejilla de Conveccion, y cierre
la puerta. Toque START.
papa
Panes sin Pastel de fingel Pay de came-
levadura congelado
Pay-fresco
Pay-congelado
1. Toque el boton MEAT hasta que el
alimento deseado aparezca.
(Yea el cuadro de Carne.)
2. Seleccione la cantidad de la porcion.
Toque los botones numerados para ingresar el
peso para asado de res, enrollado de came
molida, asado de cerdo o jam6n.
Toque los botones numerados para ingresar el
espesor de bistecs, hamburguesas o chuletas de
cerdo.
3. Toque los botones numerados para
seleccionar el grado de coccion
deseado.
(Yea el cuadro a continuaci6n.)
4. Toque START.
Cuando termine el tiempo de cocci6n, la pantalla
mostrar_. "TERMINAR" y 3 tonos audibles sonar_.n.
Despu6s de cocinar y cuando abra la puerta del
homo, la pantalla regresar_, a la hora del dia.

;;;;;;;;;;;;;;;;;;;;;;;;;;;;;;;;;;;;;;;;;;;;;;;;;;;;;;;_
PORCIONES
....................................................................................................................................................................................................................................................................cocc! ......................................................................................................................................................
Rosbif 2 a 5 libras Poco cocido, Poco empan zado
(9 - 23 kg) cocido/Medio, Medio, ...................................................................................................................................................................................................................................................................................
' ' Medio/Bien cocido Polio sin hueso .5 a 2 libras (.2 - .9 kg)
Bien cocido .......Poiio con hueso ..... :5a 3:5 iibras i:2:1:6 kgi
Bistec _ a 14 pulg Poco cocido, Poco Polio- entero* 2 a 6 libras (.9 - 2.7 kg)
(12.7- 38 mm) cocido/Medio, Medio,
Medio/Bien cocido, Pechuga de pavo 2 a 4 libras (.9 - 1.8 kg)
Bien cocido
;........................................................................ Pechuga de pavo 3 a 6 libras (1.4- 2.7 kg)
Hamburguesas _ a 1 pulg No disponible .....
(12.7- 25.4 mm) con hueso*
Rollo de came 1 a 2 libras No disponible *Uespu6s de cocinar los alimentos d6jelos en repose
(.5- .9 kg) durante 10 minutes, tapados con papel de aluminio para
Asado de 2 a 5 libras Medio, Medio/Bien alcanzar el nivel de cocci6n deseado.
cerdo* ...................................(.9-2.3 kg) c0cido, Bien cocido ..................................................................................................................................................................................................................................................................................................................................................................................................................
Chuletas de _a 1 pulg Medio, Medio/Bien
cerdo (12.7 - 25.4 mm) cocido, Bien cocido PESCADO CANTIDADES DE
Jam6n sin 2 a 5 libras Medio, Medio/Bien
hueso* (.9- 2.3 kg) cocido, Bien cocido
Jam6n con 2 a 5 libras Medio, Medio/Bien
hueso* (.9- 2.3 kg) cocido, Bien cocido
*Despu6s de cocinar los alimentos, d6jelos en repose
durante 10 minutos, tapados con papel de aluminio para
alcanzar el nivel de cocci6n deseado.
1. Toque el boton POULTRY o FISH hasta
que aparezca el alimento deseado.
(Vea los cuadros a continuacion.)
2. Seleccione la cantidad de la porcion.
Toque los botones numerados para ingresar el
peso para polio o pavo, filetes de pescado o
trozos de pescado.
(Vea los cuadros a continuaci6n.)
3. Toque START.
Cuando termine el tiempo de cocci6n, la pantalla
mostrar_. "TERMINAR" y 3 tonos audibles sonar_.n.
Despu6s de cocinar y cuando abra la puerta del
homo, la pantalla regresar_, a la hora del dia.
PORCIONES
Filetes de pescado- fresco .3 a 1.5 libras
(.1 - .7 kg)
Trozos de pescado- fresco .5 a 2 libras
(.2 - .9 kg)
Filetes de pescado- congelados N/D
Filetes de pescado N/D
em panizados-congelados
Barritas de pescado N/D
em panizadas-congeladas

Para asegurarse de que su homo de microondas Ruzcabien y funcione bien por mucho tiempo, usted debe
mantenerlo adecuadamente. Para un cuidado correcto, por favor siga estas instrucciones cuidadosamente.
Su horno de microondas tiene un interior de acero
inoxidabHe.A diferencia de Hosinteriores de acero
pintados que se encuentran en HamayoriA de hornos de
microondas, esta superficie no se desportiHara,
enmohecerb_ni oxidadarg. Con eHtiempo, pueden
aparecer manchas en Hasuperficie de acero inoxidabHea
raiz de saHpicaduras de HosaHimentosdurante Hacocci6n.
Esto es normal
No uae estropajos de metal en eHinterior de Hacavidad
dell homo ya que rayarAn la superficie.
Para superficies internaa: Lave a menudo con agua
tibia jabonosa y una esponja o paso suave. Use s61o
jabones suaves, no abrasivos o detergentes suaves.
AsegQreae de mantener limpiaa laa _reas donde la
puerta y el marco del homo ae tocan cuando 6ste
esta cerrado. Limpie bien con agua limpia. Despu6s de
un tiempo pueden aparecen manchas sobre las
superficies como resultado de salpicaduras de particulas
de alimentos durante la cocci6n. Esto es normal.
Para manchas dificiles, hierva una taza (250 mL) de
agua en el homo durante 2 6 3 minutos. El vapor
ablandar& la suciedad. Para eliminar olores dentro del
homo, hierva 1 taza (250 mL) de agua con jugo de
lim6n o vinagre.
NOTA: Limpiadorea abrasivos, esponjaa de fibra de
acero, esponjaa 8speraa, algunas toallas de papel,
etc., pueden daPiarel panel de control y las superficies
internas y externas del homo.
Para maasuperficies de acero inoxidabme:
No use almohadillas de lana de acero ni estropajos
con jab6n.
, Frote en la direcci6n de la textura para evitar
estropear la superficie.
Seque siempre para evitar las marcas del agua.
Si se utilizan productos de limpieza comerciales, hay
que seguir las instrucciones de la etiqueta. Si el
producto contiene doro (blanqueador), limpie
meticulosamente con agua limpia y seque con un
paso suave que no tenga pelusas. El doro es una
sustancia corrosiva.
Para limpiar la bandeja giratoria y el aoporte de la
bandeja giratoria, lave con una soluci6n jabonosa
suave; para Areas muy sucias use un limpiador suave y
una esponja para fregar. La band_a giratoria y el
soporte de la bandeja giratoria se pueden lavar en una
lavavajillas.
Para iimpiar la Rejiiia de convecci6n y ia parriiia para
Limpieza de rutina y huellas .............................................................Deiergenieaabon iiquido y........................................................................EimPie €on un PaSo hQmedo o una
digitales agua o producto de limpieza esponja, luego lave con agua
...........................................................................................................................................................................................................................................................................................................................................................................................................................................................................................!impia Yseque...............................................................................................................................................................................
Manchas rebeldes y residues Producto de limpieza Para evitar estropear la superficie,
de la cocci6n ligeramente abrasive o frote en direcci6n de la textura con
productos para limpiar acero un pa_o suave o una esponja y un
inoxidable producto de limpieza. Lave
meticulosamente con agua limpia.
Repita el procedimiento de ser
necesario.
Manchas del agua dura Vinagre Refriegue con estropajo o limpie
con un pa_o. Lave con agua limpia
y seque.

RESPUESTAS
_,Puedooperarmihomodemicroondassinla No.Si ustedsacaodavueltaa labandeja
bandejagiratoriaovoltearlabandejagiratoriapara giratoria,lacocci6nresultar6,inadecuada.Los
acomodarunplatom_sgrande? platosusadosensuhomodebencaberenla
bandejagiratoria.
_,Puedousarunestanteenmihomode Ustedpuedeusarunarejillas61osilamismavino
microondaspararecalentarococinarendos consuhomodemicroondas.Siusacualquier
nivelesalmismotiempo? rejillanoprovistaconelhomodemicroondas,la
cocci6npuederesultarinadecuaday/osepueden
producirchispas.
_,Puedousarbandejasdemetaloaluminioenmi Ustedpuedeusarpapeldealuminioparaprotecci6n
homodemicroondas? (usetrozospequefiosypianos),brochetaspequefias
ybandejasplanasdealuminio(silabandejatiene
unaprofundidadnomayorde_4pulg[19mm]yest,,
amedioIlenarconalimentosparaabsorberla
energiademicroondas).Nuncadejequeelmetal
toquelasparedesolapuerta.Vealasecci6n"Guia
deutensiliosparaelhomo".
_,Esnormalquelabandejagiratoriagireenambas SLLabandejagiratoriarotaenelmismosentido
direcciones? delasagujasdelrelojoensentidoinverso,
dependiendodelarotaci6ndelmotorcuando
comienzaelciclodecocci6ncomienza.
Aveceslapuertademimicroondasparece Estaaparienciaesnormalynoafectalaoperaci6n
L,Qu@son los zumbidos que escucho cuando el Usted escucha el sonido del transformador cuando
.................horno de microondas es!_ !uncionando2 ..........................................................................................................................e tub de magne!r6 €°m !enz !° c!c!os: .................................................................................
L,Por qu@el plato se calienta cuando cocino Cuando los alimentos se calientan, @stos
alimentos en 61?Yo crei que esto no pasaria, transfieren el calor al plato. Prep_,rese para usar
guantes para homo para sacar los alimentos
despu@s de la cocci6n.
L,Qu@significa "Tiempo de reposo'? "Tiempo de reposo" significa los alimentos
que
deben de ser sacados del horno y quedar tapados
por un tiempo adicional para permitir que la
cocci6n se complete. Esto libera el homo para
cocinar otras cosas.
_,Por qu@sale vapor de la rejilla de ventilacidn? El vapor se produce normalmente durante la
cocci6n. El homo de microondas ha sido disefiado
...........................................................................................................................................................................................................................................................................................................................................................................................................................................................................paravent!!ae vapopo !a rei!!!as:......................................................................................................................................
_,Puedo hacer palomitas de maiz en mi homo de Si. Haga palomitas de maiz empaquetadas
microondas? _,C6mo obtengo los mejores siguiendo las instrucciones del fabricante o use el
resultados? bot6n preprogramado AUTO SENSOR POPCORN.
No use bolsas de papel comQn. Use la "prueba de
sonido" parando el homo en cuanto los estallidos
sean m_.s espaciados hasta que haya un estallido
cada uno o dos segundos. No haga estallar granos
de maiz que no han reventado. No haga palomitas
de maiz en utensilios de vidrio.

La mayoria de los problemas al cocinar son causados por pequeSas cosas que usted puede
encontrar y arreglar sin herramientas de ningQn tipo. Revise las listas de abajo antes de pedir ayuda
o servicio. Si usted aQn necesita ayuda, vea la secci6n "C6mo pedir ayuda o servicio".
• _,Est_.el horno de microondas enchufado a un tomacorriente activo con el voltaje apropiado? (Vea
Instrucciones para la instalaci6n).
• _,Seha quemado algOn fusible en la casa o se ha disparado el disyuntor?
• _,Ha habido una interrupci6n en el suministro de electricidad?
Problema Causa
El horno de microondas • La puerta no est6. correctamente cerrada o asegurada.
no funciona. • Usted no toc6 START.
• Usted no sigui6 las instrucciones con exactitud.
• Alguna operaci6n que se program6 con anterioridad todavia est,. activa.
• Usted no ha programado el tiempo despu@s de tocar el bot6n COOK TIME.
Los tiempos de coccibn • El suministro de electricidad en su casa o en los tomacorrientes es bajo o
con microondas m_.s bajo que Io normal. Su compaSia de electricidad le puede decir si el
parecen demasiado voltaje de la linea es bajo. Su electricista o t@cnico de servicio le puede decir
largos, si el voltaje del tomacorriente es bajo.
• La intensidad de cocci6n no est,. programada correctamente.
• Cantidades m_.s grandes de alimentos necesitan m_.stiempo para cocinarse.
La bandeja giratoria no • La bandeja giratoria no estA en el lugar correcto. AsegQrese de que el lado
gira. correcto de la bandeja giratoria est@ hacia arriba y que est@asegurada en el
eje central.
• El soporte no est,. funcionando correctamente. Saque la bandeja giratoria,
verifique si el soporte de la bandeja giratoria est,. en el lugar correcto y ponga
a funcionar el homo nuevamente. Si el soporte de la bandeja no se mueve,
Ilame a un t@cnico designado para que Io repare. Si cocina sin la bandeja los
resultados ser_.n inadecuados.
La pantalla muestra la • La puerta del horno no est,. completamente cerrada.
cuenta regresiva pero el • Usted program6 los controles como temporizador. Toque TIMER para
homo no esta cocinando, cancelar el temporizador de minutos.
Usted no escucha el • El comando no es correcto.
sonido de
programacibn.
El ventilador parece • El horno ha sido guardado en un lugar fifo. El ventilador funcionar_, m_.s
funcionar mas lento de lentamente hasta que el homo se caliente a la temperatura ambiente normal.
Io normal.
La pantalla muestra • Ha habido una interrupci6n en el suministro de electricidad. Vuelva a
" : ". programar el reloj.
S[ rfinguno de estos puntos es Hacausa de[ prob[ema, vea [a secci6n "C6mo pedir ayuda o servicio'.

Para evitar visitas de servicio innecesarias, por favor revise la secci6n "Diagn6stico y soluci6n de
problemas". Esto puede ahorrarle el costo de una visita de servicio. Siga las instrucciones que
aparecen a continuaci6n si considera que aQn necesita ayuda.
Llame ai Centro de Interacci6n dei Cliente
KitchenAid ai nQrnero sin cargo
1-800-422-1230.
Cuando nos llame:
Por favor, proporcione a KitchenAid los
nQmeros de modeio y de serie
completos de su aparato electrodom6stico y la fecha
de compra (vea ia secci6n "Un mensaje para usted'%
Esta informaci6n nos ayudarA a responder
correctamente a su pedido.
Nuestros consuitores pueden ayudar con:
• hformaci6n acerca de las caracteristicas y
especificaciones de nuestra gama de productos
completa
• hformaci6n acerca de la instalaci6n
• Venta de accesorios y piezas para reparaciones
• Ayuda especializada a nuestros clientes
hispanohablantes, personas que tienen algQn
impedimento auditivo o de la vista, etc.)
• Referencias a distribuidores, compaSias de
servicio y distribuidores de piezas de repuesto
locales
Los t_cnicos designados de servicio KitchenAid
estAn entrenados para cumplir con la garantia del
producto y brindar servicio despu6s del vencimiento
de la garantia en cualquier sitio de los Estados
Unidos.
Para ubicar la compaSia de servicio KitchenAid
designada en su Area, puede usted consultar la
secci6n de PAginas Amarillas de su directorio
telef6nico.
;;;;;;;;;;;;;;;;;;;;;;;;;;;;;;;;;;;;;;;;;;;;;;;;;;;;;;;_
Si usted requiere ayuda adicional, puede consultar sus
dudas o inquietudes a KitchenAid, escribi6ndonos a:
KitchenAid Brand Home Appliances
Customer Interaction Center
c/o Correspondence Dept.
MD 8020
553 Benson Road
Benton Harbor, MI 49022-2400
Sirvase incluir en su correspondencia un nOmero
telef6nico al que le podamos Ilamar durante el dia.


VAUDEZDELA
GARANTiA
GARANTiATOTALPOR
UN ANO
DESDE LA FECHA DE
COMPRA
GARANTiA LIMITADA
POR CUATRO ANOS
DESDE EL SEGUNDO
HASTA EL QUINTO A_40
DESDE LA FECHA DE
COMPRA
KITOHENAID KITOHENAJD
PAGARA POR: NO PAGARA POR:
Repuestos y trabajo para
corregk defectos de material o
mano de obra. EHservicio debe
ser provisto por una compa¢iia
de servicio designada por
KitchenAid.
ReempHazo dell tubo dell
magnetr6n si hay defectos en
HosmateriaHes o mano de obra.
A. Visitas de servicio para:
1. Corregk HainstaHaci6n de su homo de
microondas.
2. DarHeinstrucciones para usar su homo
de microondas.
3. ReempHazar fusibHes en su casa o
corregk HainstaHaci6n eH6ctrica.
B. Reparaciones cuando eHhomo de
microondas no se usa de una forma
normaHy para uso de una soHafamilia.
0. Da¢ios a su homo de microondas causados
por accidente, alteraci6n, mal uso, abuso,
incendio, inundaci6n, catb,strofes naturales
o uso de productos no autorizados por
KitchenAid.
D. Cualquier costo de mano de obra durante
la garantia limitada.
E. Repuestos o gastos de mano de obra
para unidades utilizadas fuera de los
Estados Unidos.
F. Servicio a domicilio. Su homo de
microondas debe ser Ilevado a una
compaSia de servicio designada por
KitchenAid, exceptuando los hornos de
microondas que estAn instalados sobre
homo KitchenAid aprobado utilizando un
juego para empotrar aprobado. (Yea la
secci6n "Juegos de accesorios para
empotrar" para consultar la lista de juegos
de accesorios para empotrar autorizados.)
G. Reparaciones a piezas o sistemas
causadas por modificaciones hechas al
aparato electrodom6stico sin autorizaci6n.
5/00
KITOHENAtD NO SE HARA RESPONSABLE POR DANOS IMPREVISTOS O OONSEOUENOIALES. En
algunos estados no se permite la exdusi6n o limitaci6n de daSos imprevistos o consecuenciales, pot Io cual
esta exdusi6n o limitaci6n podria no ser aplicable en su caso. Esta garantia le da derechos legales especificos
y usted puede tenet otros derechos que varian de un estado a otto.
Esta garant_a no se aplica fuera de los 50 Estados Unidos. Para determinar si otra garant_a es aplicable
en su caso, pot favor contacte a su distribuidor KitchenAid autorizado,
Si usted necesita servicio, primero vea la secci6n "Diagn6stico y soluci6n de problemas" en este libro. Luego
de verificar "Diagn6stico y soluci6n de problemas', usted puede encontrar ayuda adicional en la secci6n
"C6mo pedir ayuda o servicio" o Ilamando a nuestro Centro de Interacci6n del Cliente al 1-800-422-1230
desde cualquier parte de los Estados Unidos.
3828W5A1492/8172191 6/00
(_:_2000 "[odos los derechos reservados, _) Marca registrada!TM Marca de comercio de KitchenAk:J, EE,UU, Illlpreso en Corea
-
 1
1
-
 2
2
-
 3
3
-
 4
4
-
 5
5
-
 6
6
-
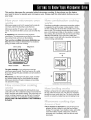 7
7
-
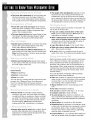 8
8
-
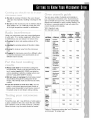 9
9
-
 10
10
-
 11
11
-
 12
12
-
 13
13
-
 14
14
-
 15
15
-
 16
16
-
 17
17
-
 18
18
-
 19
19
-
 20
20
-
 21
21
-
 22
22
-
 23
23
-
 24
24
-
 25
25
-
 26
26
-
 27
27
-
 28
28
-
 29
29
-
 30
30
-
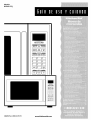 31
31
-
 32
32
-
 33
33
-
 34
34
-
 35
35
-
 36
36
-
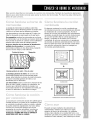 37
37
-
 38
38
-
 39
39
-
 40
40
-
 41
41
-
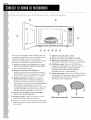 42
42
-
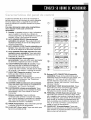 43
43
-
 44
44
-
 45
45
-
 46
46
-
 47
47
-
 48
48
-
 49
49
-
 50
50
-
 51
51
-
 52
52
-
 53
53
-
 54
54
-
 55
55
-
 56
56
-
 57
57
-
 58
58
-
 59
59
-
 60
60
-
 61
61
-
 62
62
-
 63
63
-
 64
64


KitchenAid KCMC155JBL0 El manual del propietario
- Categoría
- Microondas
- Tipo
- El manual del propietario
- Este manual también es adecuado para
En otros idiomas
Documentos relacionados
Otros documentos
-
 Kenmore Elite 79080362310 El manual del propietario
-
 Kenmore Elite 79080379310 Manual de usuario
-
 Kenmore Elite 66561684102 El manual del propietario
-
Kenmore Elite 66561689101 El manual del propietario
-
 Kenmore Elite 6790 - Elite 1.5 cu. Ft. Convection Microwave Guía del usuario
-
 Cafe CSB9120SJSS El manual del propietario
-
Kenmore 721.64663 El manual del propietario
-
 Advantium ZSC1201 El manual del propietario
-
Viking Range VCSO210 Guía del usuario


