
Instructions
Tools Required: Phillips Screwdriver, Silicone Grease (not included)
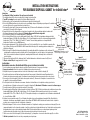
1. Read instructions in full before proceeding. Refer to Image I unless specified.
2. Turn OFF and unplug the power supply to the Kitchen Waste Disposal (A).
3. Make sure there isn’t any waste water inside the disposal leading to the drain trap (B).
4. Refer to the OEM instructions on how to safely remove your Garbage disposal. Depending on your disposal, the instructions
may vary. Below are the general instructions on how to do so.
5. Disconnect the drain trap (B) from your waste discharge tube (C). Disconnect the dishwasher or direct water
connection (D) if connected to the disposal.
6. Support the bottom of the disposal with one hand, insert screwdriver into the mounting lug and turn clockwise until
the disposal disconnects from the sink mount (E) Warning: Disposer will fall unless supported.
7. Refer to Image II. Remove the old mounting gasket (F) and discard.
8. Refer to Image III. Identify the correct mounting gasket from the Danco 12014 kit. Use standard mounting gasket with
Insinkerator® Badger®, 444, 60s, 80s, Septic Disposer, Pro 333 and Evergrind™ models. Use deluxe mounting gasket with
Insinkerator® 555ss, 777ss, 100ss, Pro SS and Pro 77 models. These mounting gaskets are not compatible with
Insinkerator® Evolution® series or E606 Disposers.
9. Insert new mounting gasket (F) into the disposal. Make sure it’s fully seated. Note: For ease of installation, spread a thin
layer of Danco Silicone grease P/N 80360 or 88693 around the bottom edge of the mounting gasket as shown prior to
installation of disposal.
10. Refer to Image IV. Reattach the disposal by aligning the 3 mounting tabs with the sloped ramps on the sink mount (E)
and turning the mounting ring counter clockwise until all 3 mounting tabs lock over the ridges on the sloped ramps.
Note: Use a screw driver as shown to help turn the mounting tabs. Make sure the discharge tube is oriented in the
correct direction.
11. Reconnect the drain trap (B) to the discharge tube (C) and the dishwasher or direct water connection (D) if used.
12. Plug in and turn ON power supply and check for leaks.
Instrucciónes
Herramientas necesarias: Destornillador Phillips, grasa de silicona (no incluido)
1. Lee las instrucciones completamente antes de continuar. Consulta la imagen I, a menos que se indique.
2. Apaga y desenchufa la fuente de corriente del triturador de desechos para cocina (A).
3. Asegúrate de que no haya agua residual en el interior del triturador que conduce al sifón de desagüe (B).
4. Consulta las instrucciones del fabricante para desmontar de forma segura el triturador de basura. Dependiendo de tu
triturador, las instrucciones pueden variar. A continuación encontrarás las instrucciones generales sobre cómo hacerlo.
5. Desconecta el sifón de desagüe (B) del tubo de descarga de residuos (C). Desconecta el lavaplatos o la conexión directa
de agua (D) si está conectada al triturador.
6. Sostén la parte inferior del triturador con una mano, introduce el destornillador en la lengüeta de montaje y gira hacia la
derecha hasta que el triturador se desconecte del soporte del fregadero (E) Advertencia: El triturador se caerá si no tiene un apoyo.
7. Consulta la imagen II. Retira la vieja junta de montaje (F) y deséchala.
8. Consulta la imagen III. Identifica la junta de montaje correcta del kit Danco 12014. Utiliza la junta de montaje estándar con los modelos
Insinkerator® Badger, 444, 60s, 80s, Septic Disposer, Pro 333 y Evergrind. Utiliza la junta de montaje de lujo con los modelos
Insinkerator® 555ss, 777ss, 100ss, Pro SS y Pro 77. Estas juntas de montaje no son compatibles con los trituradores Insinkerator®
de la serie Evolution o E606.
9. Introduce la nueva junta de montaje (F) en el triturador. Asegúrate de que está completamente asentado. Nota: Para facilitar la
instalación, extienda una capa delgada de grasa de silicona Danco N/P 80360 o 88693 alrededor del borde inferior de la junta de
montaje, como se muestra, antes de la instalación o eliminación.
10. Consulta la imagen IV. Vuelve a colocar el triturador alineando las 3 lengüetas de montaje que se muestran en la imagen (III) con las
rampas inclinadas del anillo de montaje y girando el anillo de montaje hacia la izquierda hasta que las 3 lengüetas de montaje queden
bloqueadas sobre los surcos de las rampas inclinadas. Nota: Utiliza un destornillador como se muestra para ayudar a girar las
lengüetas de montaje. Asegúrate de que el tubo de descarga está orientado en la dirección correcta.
11. Vuelve a conectar el sifón de desagüe (B) al tubo de descarga (C) y al lavaplatos o a la conexión directa de agua (D), si se utiliza.
12. Enchufa y enciende la fuente de corriente y comprueba que no haya fugas.
Warning: Disposer
will fall unless supported
at the bottom
ADVERTENCIA: El triturador se caerá si
no tiene un apoyo en la parte inferior
C
B
Mounting Lug
lengüeta de montaje
Screwdriver
D
A
E
Sink
fregadero
B
Ridges on Top
Standard Mounting Gasket
Junta de montaje estándar
Junta de montaje lujo
surcos en la
parte superior
Grease under rim
of gasket (optional)
Grasa debajo del borde
de la junta (opcional) Deluxe Mounting Gasket
F
C
D
Sloped Ramps
rampas inclinadas
Image I
Image IV
Image II Image III
Mounting Ring
anillo de montaje
Mounting Tabs
lengüetas de montaj
©2022 Manufactured for
Danco, Inc., Irving, TX 75062
Made in China/Hecho en China
12014i
INSTALLATION INSTRUCTIONS
FOR GARBAGE DISPOSAL GASKET for InSinkErator
®
-
 1
1

en otros idiomas
- English: DANCO 12014 Operating instructions
Otros documentos
-
InSinkErator SEPTIC ASSIST Manual de usuario
-
InSinkErator Badger 100 Manual de usuario
-
InSinkErator BADGER 5 W/C Manual de usuario
-
InSinkErator 79051-ISE Manual de usuario
-
-
-
-
Publications International, Ltd. Badger 900 Manual de usuario