Samsung LN-T1953H Manual de usuario
- Categoría
- Televisores LCD
- Tipo
- Manual de usuario
Este manual también es adecuado para

Owner’s
Instructions
Register your product at www.samsung.com/global/register
Record your Model and Serial number here for future reference.
· Model __________ · Serial No. ____________
LN-T1953H
LN-T1954H
TFT-LCD TELEVISION
Contact SAMSUNG WORLD-WIDE
If you have any questions or comments relating to Samsung products, please contact the SAMSUNG
customer care center.
Contacte con SAMSUNG WORLD-WIDE
Si tiene alguna pregunta o comentario referente a nuestros productos, por favor contacte con nuestro Servicio de
Atención al Cliente.
Country
Customer Care Center
Web Site Address
CANADA 1-800-SAMSUNG (7267864) www.samsung.com/ca
Samsung Electronics Canada Inc., Customer
Service 55 Standish Court Mississauga,
Ontario L5R 4B2 Canada
Samsung Electronique Canada Inc.,
Service à la Clientèle 55 Standish Court
Mississauga, Ontario L5R 4B2 Canada
U.S.A 1-800-SAMSUNG (7267864) www.samsung.com
Samsung Electronics America, Inc.
105 Challenger Road
Ridgefield Park, NJ 07660-0511
BN68-01184A-00
BN68-01184A-00-Cover.indd 1 2007-02-13 �� 1:43:03

Precautions When Displaying a Still Image
A still image may cause permanent damage to the TV screen
• Do not display a still image on the LCD panel for more than 2 hours as it can cause screen image retention.
This image retention is also known as "screen burn".
To avoid such image retention, reduce the degree of brightness and contrast of the screen when displaying a still image.
• Watching the LCD TV in 4:3 format for a long period of time may leave traces of borders displayed on the
left, right and center of the screen caused by the difference of light emission on the screen.
Playing a DVD or a game console may cause a similar effect to the screen.
Damages caused by the above effect are not covered by the Warranty.
• Displaying still images from Video games and PC for longer than a certain period of time may produce partial after-images.
To prevent this effect, reduce the ‘brightness’ and ‘contrast’ when displaying still images.
© 2007 Samsung Electronics Co., Ltd. All rights reserved.
Precauciones al mostrar en la pantalla una imagen fija
La imagen fija puede causar daños permanentes en la pantalla del televisor.
• No deje una imagen fija en la pantalla LCD durante más de dos horas ya que se podría producir una retención de la imagen en
la pantalla. Este fenómeno de retención de imágenes también se denomina “quemadura de pantalla”.
Para evitar que se produzca esa persistencia de la imagen, reduzca el nivel de luminosidad y de contraste de la pantalla
cuando muestre imágenes fijas.
• El uso del televisor LCD en formato 4:3 durante un tiempo prolongado puede dejar rastros de bordes en las
partes izquierda, derecha y central de la pantalla debido a las diferencias en la emisión lumínica de la pantalla.
La reproducción de un DVD o el uso de una consola de videojuegos pueden provocar un efecto similar en la
pantalla. Reproducir un DVD o una videoconsola puede causar un efecto similar en la pantalla. La garantía no
cubre estos daños.
• Ver imágenes fijas de videojuegos y PC durante más tiempo del indicado puede producir restos de imágenes parciales.
Para evitar este efecto, reduzca el ‘brillo’ y el ‘contraste’ cuando vea imágenes fijas.
Still.indd 1 2007-02-13 �� 1:43:50

Contents
Symbol Press Important Note One-Touch
Button
English
GENERAL INFORMATION
List of Features ................................................................. 2
Accessories ...................................................................... 2
Viewing the Control Panel ............................................... 3
Viewing the Connection Panel ......................................... 4
Remote Control ................................................................ 5
Installing Batteries in the Remote Control ........................ 6
CONNECTIONS
Connecting VHF and UHF Antennas ................................ 6
Connecting Cable TV ....................................................... 7
Connecting a VCR ............................................................ 8
Connecting a DVD Player/Set-Top Box ............................ 9
Connecting a DVD Player/Set-Top Box via HDMI ............ 9
Connecting a DVD Player/Set-Top Box via DVI ............. 10
Connecting a Digital Audio System ................................ 10
Connecting a PC .............................................................11
OPERATION
Turning the TV On and Off ............................................. 12
Plug & Play Feature ........................................................ 12
Changing Channels ........................................................ 13
Adjusting the Volume ...................................................... 14
Viewing the Display ........................................................ 14
Viewing the Menus ......................................................... 15
Memorizing the Channels ............................................... 15
To Select the Source ...................................................... 17
To Edit the Input Source Name ....................................... 17
PICTURE CONTROL
Using Automatic Picture Settings ................................... 18
Adjusting the Color Tone ................................................ 19
Setting the Film Mode ..................................................... 19
Freezing the Picture (depending on the model) ............. 19
Changing the Screen Size .............................................. 20
Viewing Picture-in-Picture .............................................. 21
HDMI Black Level ........................................................... 22
SOUND CONTROL
Customizing the Sound .................................................. 23
Using Automatic Sound Settings .................................... 23
Setting the TruSurround XT ............................................ 24
Choosing a Multi-Channel Sound (MTS) track - Digital . 24
Choosing a Multi-Channel Sound (MTS) track - Analog 25
Automatic Volume Control .............................................. 25
Selecting the Internal Mute ............................................. 26
Listening to the Sound of the Sub (PIP) Picture ............. 26
Resetting the Sound Settings to the Factory Defaults .... 27
Connecting Headphones ................................................ 27
Setting the On/Off Melody .............................................. 27
■
■
■
■
■
■
■
■
■
■
■
■
■
■
■
■
■
■
■
■
■
■
■
■
■
■
■
■
■
■
■
■
■
■
■
■
■
■
■
■
■
CHANNEL CONTROL
Selecting the Antenna ..................................................... 28
Clearing Scrambled Channels - Digital ........................... 28
Setting the Channel Lists ................................................ 29
To set-up Your Favorite Channels .................................. 30
Using the Channel Lists .................................................. 31
Viewing the Channel Lists .............................................. 31
Labeling Channels .......................................................... 32
LNA (Low Noise Amplier) .............................................. 32
Fine Tuning Analog Channels ......................................... 33
Checking the Digital-Signal Strength .............................. 33
PC DISPLAY
Using Your TV as a Computer (PC) Display ................... 34
Display Modes ................................................................ 34
Setting up the TV with your PC ...................................... 35
TIME SETTING
Setting the Clock ............................................................ 37
FUNCTION DESCRIPTION
Selecting a Menu Language ........................................... 40
Using the Game Mode .................................................... 40
Menu Transparency Level .............................................. 40
Viewing Closed Captions (On-Screen Text Messages)
- Analog ..........................................................................
41
Viewing Closed Captions (On-Screen Text Messages)
- Digital ...........................................................................
42
Setting the Function Help ............................................... 43
Setting the Light Effect ................................................... 43
Using the V-Chip ............................................................. 44
Digital Noise Reduction .................................................. 51
Upgrading the Software .................................................. 51
APPENDIX
Appendix ......................................................................... 52
Troubleshooting .............................................................. 52
Installing the Stand ......................................................... 54
Disconnecting the Stand ................................................. 54
How to Adjust the Stand ................................................. 55
Using the Decoration Covers .......................................... 55
Installing VESA compliant mounting devices .................. 55
Installing the Wall Mount Kit ........................................... 55
How to Adjust the Angle of the TV .................................. 55
Using the Anti-Theft Kensington Lock ............................ 56
Specications ................................................................. 56
■
■
■
■
■
■
■
■
■
■
■
■
■
■
■
■
■
■
■
■
■
■
■
■
■
■
■
■
■
■
■
■
■
■
■
English - 1
BN68-01184A-Eng.indd 1 2007-02-13 �� 1:33:22

English - 2
Accessories
Please make sure the following items are included with your LCD TV.
If any items are missing, contact your dealer.
Remote Control & Batteries (AAA x 2)
( LN-T1953H:BN59-00601A)
LN-T1954H:BN59-00608A
Power Cord
(3903-000085)
Wall Mount kit
(BN96-04960A)
Owner’s Instructions
Warranty Card / Registration
Card / Safety Guide Manual
(Not available in all locations)
Decoration Cover
LN-T1953H-Left: BN63-03216A,
Right: BN63-03217A
LN-T1954H-Left: BN63-03216B,
Right: BN63-03217B
Cleaning Cloth
(BN63-01798A)
The items color and shape may vary depending on the model.
General Information
List of Features
Adjustable picture settings that can be stored in the TV’s memory.
Automatic timer to turn the TV on and off.
A special sleep timer.
V-Chip function.
Excellent Digital Interface & Networking :
With a built-in HD digital tuner, non-subscription HD broadcasts can be viewed with no Set-Top Box needed.
Remote Control
The supplied remote can be used to operate the TV as well as most DVD players, Set-top boxes, Cable Boxes and
VCRs.
SRS TruSurround XT
- SRS TruSurround XT provides a virtual Dolby surround system.
BN68-01184A-Eng.indd 2 2007-02-13 �� 1:33:23

English - 3
Viewing the Control Panel
1
SOURCE
Toggles between all the available input sources
(TV, AV, S-Video, Component, PC, HDMI).
In the on-screen menu, use this button as you would
use the ENTER button on the remote control.
2
MENU
Press to see an on-screen menu of your TV’s features.
3
+ VOL -
Press to increase or decrease the volume.
In the on-screen menu, use the + VOL - buttons as you
would use the ◄ and ► buttons on the remote control.
4 CH
Press to change channels.
In the on-screen menu, use the
CH
buttons as
you would use the ▲ and ▼ butons on the remote
control.
5
(POWER)
Press to turn the TV on and off.
POWER INDICATOR
Blinks and turns off when the power is on and lights up
in stand-by mode.
6
REMOTE CONTROL SENSOR
Aim the remote control towards this spot on the TV.
7
SPEAKERS
Buttons on the Lower Part of the Panel
The buttons on the side panel control your TV’s basic features, including the on-screen menu.
To use the more advanced features, you must use the remote control.
The product color and shape may vary depending on the model.
Front Panel buttons
Touch the right side of
each button to operate.
1
2
3
4
5
6
7
BN68-01184A-Eng.indd 3 2007-02-13 �� 1:33:24

English - 4
Viewing the Connection Panel
Rear Panel Jacks
Use the rear panel jacks to connect A/V components that will be connected continuously, such as VCR or DVD players.
For more information on connecting equipment, see pages 7-11.
1
AV IN
Video and audio inputs for external devices, such as a
camcorder or VCR.
S-VIDEO
Connect an S-Video signal from a camcorder or VCR.
2
DIGITAL AUDIO OUT (OPTICAL)
Connects to a Digital Audio component.
3
SERVICE / EX-LINK
Connector for service only.
4
HDMI/DVI IN / DVI IN (AUDIO R/L)
Connect to the HDMI jack of a device with an HDMI
output. Use the HDMI/DVI IN terminal for DVI connection
to an external device. You should use the DVI to HDMI
cable or DVI-HDMI adapter (DVI to HDMI) for video
connection, and the DVI IN ‘R-AUDIO-L’ terminal for
audio.
HDMI/DVI IN terminal does not support PC.
No sound connection is needed for an HDMI to HDMI
connection
5
HEADPHONE
Connects a set of external headphones for private
listening.
6
ANT 1 IN/ANT 2 IN
Connects to an antenna or cable TV system.
7
PC IN
Connects to the video and audio output jacks on
your PC.
8
COMPONENT IN
Connects Component video/audio.
9
POWER INPUT
Connects the supplied power cord.
0
KENSINGTON LOCK
The Kensington lock (not supplied) is a device used to
physically fix the system when used in a public place.
If you want to use a locking device, contact the dealer
where you purchased the TV.
The place of the Kensington Lock may be different
depending on its model.
BN68-01184A-Eng.indd 4 2007-02-13 �� 1:33:25

English - 5
Remote Control
You can use the remote control up to a distance of about 23 feet from the TV. When using the remote, always point it directly at the
TV.
1
POWER
Turns the TV on and off.
2
NUMERIC BUTTONS
Press to change the channel.
3
–
Press to select additional channels(digital
and analog) being broadcast by the same
station. For example, to select channel
“54-3”, press “54”, then press “–” and “3”.
4
CH LIST
Used to display Channel Lists on the
screen.
5
ANTENNA
Press to select “AIR” or “CABLE”.
6
VOL / VOL
Press to increase or decrease the
volume.
7 (
MUTE)
Press to temporarily cut off the sound.
8
MENU
Displays the main on-screen menu.
9
S.MODE
Press to select the sound mode.
0
RETURN
Returns to the previous menu.
!
P.MODE
Press to select the picture mode.
@
SRS
Selects SRS TruSurround XT mode.
#
MTS
Press to choose stereo, mono or
Separate Audio Program
(SAP broadcast).
$
AUTO PROG.
Press to automatically store selected
TV/Cable channels.
%
ADD/DEL
Use to store and delete channels
to/from memory.
^
SOURCE
Press to display all of the available
video sources.
&
PRE-CH
Tunes to the previous channel.
*
FAV.CH
Press to switch to your favorite channels.
(
SLEEP
Press to select a preset time interval
for automatic ahut off.
)
CH
/ CH
Press to change channels.
a
EXIT
Press to exit the menu.
b
UP▲ / DOWN▼ / LEFT◄
/
RIGHT►
/ ENTER
Use to select on-screen menu items
and change menu values.
c
INFO
Press to display information on the TV
screen.
d
CAPTION
Controls the caption decoder.
e
STILL
Press to stop the action during a
particular scene.
Press again to resume normal video.
f
P.SIZE
Picture size selection.
g
PIP
Picture-in Picture ON/OFF.
h
CH
Displays the available channels in
sequence. (These buttons change
channels in the PIP window only.)
i
POSITION
Change the position of the PIP screen.
This is a special remote control for the visually impaired, and has Braille
points on the Power, Channel and Volume buttons.
BN68-01184A-Eng.indd 5 2007-02-13 �� 1:33:26

English - 6
1. Lift the cover at the back of the remote control upward as shown in the figure.
2.
Install two AAA size batteries.
Make sure to match the "+" and "–" ends of the batteries with the diagram inside the compartment.
3.
Replace the cover.
Remove the batteries and store them in a cool, dry place if you won’t be using the remote control for a
long time.
The remote control can be used up to about 23 feet from the TV.
(Assuming typical TV usage, the batteries should last for about one year.)
If the remote control doesn’t work, check the following:
1. Is the TV power on?
2. Are the plus and minus ends of the batteries reversed?
3. Are the batteries drained?
4. Is there a power outage, or is the power cord unplugged?
5. Is there a special fluorescent light or neon sign nearby?
Installing Batteries in the Remote Control
Connecting VHF and UHF Antennas
ANT 2 IN
(CABLE)
ANT 1 IN
(AIR)
UHF
VHF
ANT 1 IN
(AIR)
UHF
VHF
Connections
If your antenna has a set of leads that look like the diagram to the right, see "Antennas with 300
Ω Flat Twin Leads" below.
If your antenna has one lead that looks like diagram to the right, see "Antennas with 75 Ω Round
Leads".
If you have two antennas, see "Separate VHF and UHF Antennas".
1. Place the wires from the twin leads under the screws on a 300-75 Ω adapter
(not supplied).
Use a screwdriver to tighten the screws.
2.
Plug the adaptor into the ANT 2 IN (CABLE) terminal on the back of the TV.
Antennas with 300 Ω Flat Twin Leads
If you are using an off-air antenna (such as a roof antenna or "rabbit ears") that has 300 Ω twin at leads, follow the directions
below.
1.
Plug the antenna lead into the ANT 1 IN (AIR) terminal on the back of the TV.
Antennas with 75 Ω Round Leads
Separate VHF and UHF Antennas
If you have two separate antennas for your TV (one VHF and one UHF), you must combine the two antenna signals before con-
necting the antennas to the TV. This procedure requires an optional combiner-adaptor (available at most electronics shops).
1.
Connect both antenna leads to the combiner.
2.
Plug the combiner into the ANT 1 IN (AIR) terminal on the bottom of the rear panel.
BN68-01184A-Eng.indd 6 2007-02-13 �� 1:33:27

English - 7
After you have made this connection, set the A/B switch to the "A" position for normal viewing. Set the A/B switch to the "B" position to
view scrambled channels. (When you set the A/B switch to "B", you will need to tune your TV to the cable box’s output channel, which is
usually channel 3 or 4.)
Connecting to a Cable Box that Descrambles Some Channels
If your cable box descrambles only some channels (such as premium channels), follow the instructions below. You will need a two-
way splitter, an RF (A/B) switch, and four lengths of RF cable. (These items are available at most electronics stores.)
2.
Connect this cable to a two-way splitter.
3. Connect an RF cable between the OUTPUT
terminal on the splitter and the IN terminal
on the cable box.
4. Connect an RF cable between the
ANT OUT terminal on the cable box and
the B–IN terminal on the RF(A/B) switch.
1. Find and disconnect the cable that is
connected to the ANT IN terminal on your
cable box.
This terminal might be labeled "ANT IN",
"VHF IN" or simply, "IN".
5. Connect another cable between the other
OUT terminal on the splitter and the A–IN
terminal on the RF (A/B) switch.
6. Connect the last RF cable between the
OUT terminal on the RF (A/B) switch and
the ANT IN terminal on the rear of the TV.
Splitter
Incoming
cable
Splitter
Cable Box
Incoming
cable
Splitter
Cable Box
RF (A/B)
Switch
Incoming
cable
ANT IN
Splitter
Cable Box
Incoming
cable
RF (A/B)
Switch
Splitter
Cable Box
Incoming
cable
TV Rear
RF (A/B)
Switch
ANT IN
Connecting Cable TV
To connect to a cable TV system, follow the instructions below.
Cable without a Cable Box
1.
Plug the incoming cable into the ANT 2 IN (CABLE) terminal on the back of the TV.
Because this TV is cable-ready, you do not need a cable box to view unscrambled cable channels.
Connecting to a Cable Box that Descrambles All Channels
1. Find the cable that is connected to the ANT OUT terminal on your cable box.
This terminal might be labeled "ANT OUT", "VHF OUT" or simply, "OUT".
2. Connect the other end of this cable to the ANT 2 IN (CABLE) terminal on the back of the TV.
ANT OUT
ANT IN
ANT 2 IN
(CABLE)
ANT 2 IN
(CABLE)
BN68-01184A-Eng.indd 7 2007-02-13 �� 1:33:29

English - 8
Connecting a VCR
These instructions assume that you have already connected your TV to an antenna or a cable TV system (according to the
instructions on pages 6-7). Skip step 1 if you have not yet connected to an antenna or a cable system.
1.
Unplug the cable or antenna
from the back of the TV.
2.
Connect the cable or antenna
to the ANT IN terminal on the
back of the VCR.
3. Connect an RF Cable between
the ANT OUT terminal on the
VCR and the ANT 1 IN (AIR) or
ANT 2 IN (CABLE) terminal on
the TV.
4. Connect a Video Cable
between the VIDEO OUT jack
on the VCR and the AV IN 1 (or
AV IN 2) [VIDEO] jack on the
TV.
5. Connect Audio Cables
between the AUDIO OUT
jacks on the VCR and the
AV IN 1 (or AV IN 2)
[R-AUDIO-L] jacks on the TV.
If you have a “mono”
(non-stereo) VCR, use a
Y-connector (not supplied)
to hook up to the right
and left audio input jacks
of the TV. If your VCR
is stereo, you must
connect two cables.
Follow the instructions in “Viewing a VCR or Camcorder Tape” to view your VCR tape.
Each VCR has a different back panel configuration.
When connecting a VCR, match the color of the connection terminal to the cable.
TV Rear Panel
RF Cable (Not supplied)
3
VCR Rear Panel
2
Video Cable (Not supplied)
4
Audio Cable (Not supplied)
5
ANT 1 IN
(AIR)
Your Samsung TV can be connected to an S-Video signal from an VCR.
(This connection delivers a better picture as compared to a standard VCR.)
1. To begin, follow steps 1–3
in the previous section to
connect the antenna or
cable to your VCR and
your TV.
2.
Connect an S-Video Cable
between the S-VIDEO OUT
jack on the VCR and the
AV IN1 [S-VIDEO] jack on
the TV.
3.
Connect Audio Cables
between the AUDIO OUT
jacks on the VCR and the
AV IN1 [R-AUDIO-L] jacks
on the TV.
An S-Video cable may be included with a VCR. (If not, check your local electronics store.)
Each VCR has a different back panel configuration.
When connecting a VCR, match the color of the connection terminal to the cable.
VCR Rear Panel
RF Cable (Not supplied)
1
Audio Cable (Not supplied)
3
TV Rear Panel
S-Video Cable (Not supplied)
2
ANT 2 IN
(CABLE)
S-Video Connecion
Video Connecion
BN68-01184A-Eng.indd 8 2007-02-13 �� 1:33:30

English - 9
DVD Player/Set-Top Box
TV Rear Panel
Component Cable (Not supplied)
1
Audio Cable (Not supplied)
2
DVD Player Rear Panel
TV Rear Panel
HDMI Cable (Not supplied)
Connecting a DVD Player/Set-Top Box
The rear panel jacks on your TV make it easy to connect a DVD player to your TV.
1.
Connect a Component
Cable between the
COMPONENT IN(1 or 2)
[Y, PB, PR] jacks on the TV
and the COMPONENT
[Y, PB, PR] jacks on the
DVD/Set-top Box.
2.
Connect Audio Cables
between the COMPONENT
IN(1 or 2) [R-AUDIO-L]
jacks on the TV and the
AUDIO OUT jacks on the
DVD/Set-top Box
Component video separates the video into Y (Luminance (brightness)), Pb (Blue) and
Pr (Red) for enhanced video quality.
Be sure to match the component video and audio connections.
For example, if connecting the video cable to COMPONENT IN, connect the audio cable
to COMPONENT IN also.
Each DVD Player/STB has a different back panel configuration.
When connecting a DVD player/STB, match the color of the connection terminal to the
cable.
Connecting a DVD Player/Set-Top Box via HDMI
This connection can only be made if there is an HDMI Output connector on the external device.
1.
Connect an HDMI Cable
between the HDMI/DVI IN
connector on the TV and the
HDMI connector on the DVD
player/Set-Top Box
What is HDMI?
• HDMI(High-Definition Multimedia Interface), is a next-generation an interface that
enables the transmission of digital audio and video signals using a single cable.
• The difference between HDMI and DVI is that the HDMI device is smaller in size,
has the HDCP (High Bandwidth Digital Copy Protection) coding feature installed.
Each DVD player/STB has a different back panel configuration.
BN68-01184A-Eng.indd 9 2007-02-13 �� 1:33:31

English - 10
Connecting a DVD Player/Set-Top Box via DVI
This connection can only be made if there is a DVI Output connector on the external device.
1.
Connect a DVI to HDMI
Cable or DVI-HDMI Adapter
between the HDMI/DVI IN
connector on the TV and the
DVI connector on the
DVD player/Set-Top Box.
2.
Connect Audio Cables
between the DVI IN
[R-AUDIO-L] jack on the
TV and the AUDIO OUT jacks
on the DVD player/
Set-Top Box.
Each DVD player/STB has a different back panel configuration.
When connecting a DVD player/STB, match the color of the connection terminal to
the cable.
When using an HDMI/DVI cable connection, you must use the HDMI/DVI IN terminal.
TV Rear Panel
DVD Player / Set-Top Box
Audio Cable
(Not supplied)
2
DVI to HDMI Cable (Not supplied)
1
Digital Audio System
TV Rear Panel
Optical Cable (Not supplied)
Connecting a Digital Audio System
1. Connect an Optical Cable
between the “DIGITAL
AUDIO OUT (OPTICAL)”
jacks on the TV and the
Digital Audio Input jacks on
the Digital Audio System.
When a Digital Audio
System is connected to the
“DIGITAL AUDIO OUT
(OPTICAL)” terminal:
Decrease the volume
of the TV, and adjust the
volume level with the
system’s volume control.
5.1CH audio is possible when the TV is connected to an external device supporting 5.1CH.
Each Digital Audio System has a different back panel configuration. .
The rear panel jacks on your TV make it easy to connect a Digital Audio System to your TV.
BN68-01184A-Eng.indd 10 2007-02-13 �� 1:33:32

English - 11
PC
TV Rear Panel
D-Sub Cable (Not supplied)
1
PC Audio Cable (Not supplied)
2
Connecting a PC
1. Connect a D-Sub
Cable between PC IN
[PC] connector on
the TV and the PC
output connector on
your computer.
2.
Connect a PC Audio
Cable between PC IN
[AUDIO] jack on the
TV and the Audio Out
jack of the sound card
on your computer.
Each PC has a different back panel configuration.
When connecting a PC, match the color of the connection terminal to the cable.
BN68-01184A-Eng.indd 11 2007-02-13 �� 1:33:33

English - 12
Turning the TV On and Off
Press the POWER button on the remote control.
You can also use the button on the side of the panel.
Operation
Plug & Play Feature
When the TV is initially powered on, basic settings proceed automatically and subsequently:
1. Press the POWER button on the remote control.
The message “Menu language, Shop Mode, Channels and Time will be set.” is
displayed.
Press the ENTER button, then “Select the language of the OSD” menu is
automatically displayed.
2.
Press the ▲ or ▼ buttons to select language, then press the ENTER button.
The message “Select Home Mode when installing this TV at home.” is displayed.
3.
Press the ◄ or ► buttons to select “Shop” or “Home”, then press the
ENTER button.
The message “Select the antennas to memorize.” is displayed.
We recommend setting the TV to Home mode for the best picture in your
home environment.
Shop mode is only intended for use in retail environments.
If the unit is accidentally set to Shop mode and you want to return to Dynamic
(Home) mode, press any Volume button and then hold down the MENU button
for five seconds on the side panel of the TV.
4.
Press the ▲ or ▼ buttons to memorize the channels of the selected connection.
Press the ENTER button to select “Start”.
If the antenna is connected to ANT 1(AIR), select “Air” and if it is connected to
ANT 2 (CABLE), select “Cable”.
If both ANT 1 (AIR) and ANT 2 (CABLE) are connected, select the “Air + Cable”.
In Cable mode, you can select the correct signal source among STD, HRC,
and IRC by pressing the ▲ or ▼ button, then press the ENTER button.
Contact your local cable company to identify the type of cable system that
exists in your particular area.
5.
The TV will begin memorizing all of the available channels.
After all the available channels are stored, the Auto program menu reappears.
Press the ENTER button when channel memorization is complete.
The message “Select the clock mode.” is displayed.
To stop the search before it has finished, press the ENTER button with stop
selected.
6. Press the ENTER button.
Press the ▲ or ▼ buttons to select “Manual” or “Auto”, then Press the
ENTER button.
The message “Set to daylight savings time.” is displayed.
Select Home Mode when installing this TV at home.
Plug & Play
Plug & Play
35%
Clock Set
Language
Plug & Play
English
Español
Français
Move Enter Skip
Shop
Stop
Menu language, Shop Mode,
Channels and Time will be set.
Start
Select the language of the OSD.
Home
Move Enter Skip
Select the antennas to memorize.
Start
Air
Plug & Play
Cable
Air+Cable
Start
Start
Move Enter Skip
Enter Skip
Auto Program in progress.
Plug & Play
Skip
Auto Program is completed.
16 Channels were memorized.
Air : 16, Cable : 0.
Clock Mode :
Move Enter Skip
Select the clock mode.
Plug & Play
Auto
Manual
Air Channel 50
BN68-01184A-Eng.indd 12 2007-02-13 �� 1:33:36

English - 13
Changing Channels
1. Press the CH
or
CH
button to change channels.
When you press the CH
or
CH
button, the TV changes channels in
sequence.
You will see all the channels that the TV has memorized. (The TV must have
memorized at least three channels). You will not see channels that were either
erased or not memorized. See page 15 to memorize channels.
Using the Channel Buttons
1. Press the PRE-CH button.
The TV will switch to the last channel viewed.
To quickly switch between two channels that are far apart, tune to one
channel, then use the number button to select the second channel. Then
use the PRE-CH button to quickly alternate between them.
Using the PRE-CH Button to select the Previous Channel
7. Press the ▲ or ▼ buttons to select “On” or “Off”, then Press the ENTER button.
The message “Select the time zone where you are located.” is displayed.
8. Press the ▲ or ▼ buttons to highlight the time zone for your local area.
Press the ENTER button. If you have received a digital signal, the time will be set
automatically.
If not, see page 38 to set the clock.
9.
The message “Enjoy your watching.” is displayed.
When you have finished, press the ENTER button.
If you want to reset this feature...
1. Press the MENU
button to display the menu.
Press the ▲ or ▼ buttons to select "Setup", then press the ENTER button.
2. Press the ENTER
button again, to select "Plug & Play".
3. The message "Menu language, Shop Mode, Channels and Time will be set."
is displayed.
Daylight Savings Time :
Move Enter Skip
Set to daylight savings time.
Plug & Play
On
Off
Move Enter Skip
Select the time zone where you are located.
Plug & Play
Newfoundland
Atlantic
Eastern
Central
Mountain
Pacific
Alaska
Hawaii
Enjoy your watching.
OK
Setup
Plug & Play ►
Language : English ►
Time
►
Game Mode : Off ►
V-Chip ►
Caption ►
Menu Transparency : High
►
▼More
TV
Move Enter Return
Menu language, Shop Mode,
Channels and Time will be set.
Start
BN68-01184A-Eng.indd 13 2007-02-13 �� 1:33:38

English - 14
Air 7
Mono
Picture Mode : Dynamic
Sound Mode : Custom
MTS : Stereo
Caption : On
V-Chip : On
05 : 54 pm
Adjusting the Volume
1. Press the
VOL
or VOL
buttons to decrease or increase the volume.
Using Mute
At any time, you can cut off the sound using the MUTE button.
1.
Press MUTE button and the sound cuts off.
The word " " will appear in the lower-left corner of the screen.
2.
To turn mute off, press the MUTE button again, or simply press the
VOL
or VOL
buttons.
Viewing the Display
1. Press the INFO button on the remote control.
The TV will display the channel, the type of sound,
and the status of certain picture and sound settings.
Press the INFO button once more or wait approximately 10 seconds and the
display disappears automatically.
The display identies the current channel and the status of certain audio-video settings.
BN68-01184A-Eng.indd 14 2007-02-13 �� 1:33:38

English - 15
Antenna : Air ►
Auto Program ►
Clear Scrambled Channel ►
Channel List ►
Name ►
Fine Tune ►
Signal Strength ►
LNA : On ►
Channel
Move Enter Return
TV
Channel
Move Enter Return
TV
Antenna : Air
Auto Program
Clear Scrambled Channel
Channel List
Name
Fine Tune
Signal Strength
LNA : On
Air
Cable
Move Enter Return
Mode : Dynamic
►
Contrast 100
Brightness 45
Sharpness 75
Color 55
Tint G 50 R 50
Color Tone : Cool1
►
▼More
PictureTV
Viewing the Menus
1. With the power on, press the MENU button.
The main menu appears on the screen. The menu’ s left side has five icons:
Picture, Sound, Channel, Setup, Input.
2.
Use the ▲ or ▼ buttons to select one of the five icons.
Then press the ENTER
button to access the icon’s sub-menu.
3.
Press the EXIT button to exit.
The on-screen menus disappear from the screen after about one minute.
Memorizing the Channels
Your TV can memorize and store all of the available channels for both "off-air" (Air) and "Cable" channels. After the available
channels are memorized, use the CH
or
CH
buttons to scan through the channels. This eliminates the need to change
channels by entering the channels digits. There are three steps for memorizing channels: selecting a broadcast source, memoriz-
ing the channels (automatic) and adding or deleting channels (Channel Lists).
Selecting the Video Signal-source
Before your television can begin memorizing the available channels, you must specify the type of signal source that is connected to
the TV (i.e. an Air or a Cable system).
1.
Press the MENU button to display the menu.
Press the ▲ or ▼ buttons to select "Channel", then press the
ENTER
button.
2.
Press the ENTER button select “Antenna”.
Press the ▲ or ▼ buttons to select “Air” or “Cable”, then press the ENTER button.
Press the EXIT
button to exit.
BN68-01184A-Eng.indd 15 2007-02-13 �� 1:33:40

English - 16
Move Enter Return
Antenna : Air ►
Auto Program
►
Clear Scrambled Channel
►
Channel List ►
Name
►
Fine Tune
►
Signal Strength
►
LNA : On
►
Channel
Move Enter Return
TV
Move Enter Return
Select the antennas to memorize.
Auto Program
Move Enter Return
TV
Start
Air
Cable
Air+Cable
Start
Start
Plug & Play
Enter Return
Auto Program is completed.
25 Channels are memorized.
Air : 18, Cable : 7.
Auto Program
Cable 50
50%
Stop
Enter Return
Auto Program in Progress.
Move Enter Return
Selects a cable signal type for your location.
Auto Program
Move Enter Return
TV
Analog
Start
STD
HRC
IRC
Digital
Storing Channels in Memory (Automatic Method)
1.
Press the MENU button to display the menu.
Press the ▲ or ▼ buttons to select “Channel”, then press the ENTER button.
2.
Press the ▲ or ▼ buttons to select "Auto Program", then press the ENTER
button.
3.
Press the ▲ or ▼ buttons to select the antenna connection, then press the
ENTER button.
Air: “Air” antenna signal. / Cable: “Cable” antenna signal. /
Air+Cable: “Air” and “Cable” antenna signals.
4.
When selecting the Cable TV system: Press the ENTER button to start the auto
program. By default, the cable TV system is set to “STD”. If you want to select
another type of cable system, press the ▲ or ▼ button to select “STD”, “HRC” or
“IRC”.
STD, HRC and IRC identify various types of cable TV systems. Contact your
local cable company to identify the type of cable system that exists in your
particular area. At this point the signal source has been selected.
Press the ENTER
button to start the auto program.
To stop the search before it has finished, press the ENTER button with stop
selected.
5.
After all the available channels are stored, the “Auto Program” menu reappears.
Press the EXIT button to exit.
STD
HRC
IRC
BN68-01184A-Eng.indd 16 2007-02-13 �� 1:33:43

English - 17
To Select the Source
Use to select TV or other external input sources connected to the TV.
Use to select the input source of your choice.
1.
Press the MENU button to display the menu.
Press the▲ or ▼ buttons to select “Input”, then press the ENTER button.
2.
Press the ENTER
button to select "Source List".
Press the ▲ or ▼ buttons to select signal source, then press the ENTER
button.
When you connect equipment to the LCD, you can choose between the
following sets of jacks: TV, AV, S-Video, Component, PC, HDMI on the TV’s rear
panel.
HDMI input can only be selected when the external device is turned on and
connected via HDMI.
You can choose only those external devices that are connected to the TV.
Press the SOURCE button on the remote control to view an external signal source.
To Edit the Input Source Name
Name the device connected to the input jacks to make your input source selection easier.
1. Press the MENU button to display the menu.
Press the▲ or ▼ buttons to select “Input”, then press the ENTER button.
Press the ▲ or ▼ buttons to select "Edit Name", then press the ENTER
button.
2.
Press the ▲ or ▼ buttons to select "AV", "S-Video", "Component", "PC", "HDMI"
input jack, then press the ENTER
button.
3.
Press the ▲ or ▼ buttons to select "VCR", "DVD", "D-VHS", "Cable STB",
"HD STB", "Satellite STB", "PVR STB", "AV Receiver", "DVD Receiver",
"Game", "Camcorder", "DVD Combo", "DVD HDD Recoder", "PC",
"Internet TV Recv.","Interactive TV Recv.","VOD STB", "TV" input source, then
press the ENTER
button.
Press the EXIT button to exit.
Input
Source List : TV ►
Edit Name
►
TV
Move Enter Return
Source ListTV
Move Enter Return
TV
AV : ----
S-Video : ----
Component : ----
PC : ----
HDMI : ----
Input
Source List : TV ►
Edit Name
►
TV
Move Enter Return
Edit NameTV
Move Enter Return
AV
: ---- ►
S-Video : ----
Component
: ---- ►
PC
: ---- ►
HDMI : ---- ►
Edit NameTV
Move Enter Return
AV
: ---- ►
S-Video
: ---- ►
Component
: ---- ►
PC
: ---- ►
HDMI : ---- ►
----
VCR
DVD
D-VHS
Cable STB
HD STB
Satellite STB
▼
BN68-01184A-Eng.indd 17 2007-02-13 �� 1:33:45

English - 18
100
▲
Contrast
▼
Move Adjust Return
Using Automatic Picture Settings
Your TV has Three automatic picture settings ("Dynamic", "Standard", "Movie") that are preset at the factory.
You can activate either Dynamic, Standard, Movie by making a selection from the menu.
1.
Press the MENU button to display the menu.
Press the ENTER
button, to select "Picture".
2.
Press the ENTER
button to select "Mode".
Press the ▲ or ▼ buttons to select the "Dynamic", "Standard", "Movie" picture
setting. Press the ENTER
button.
Choose Dynamic to increase the clarity and sharpness of the picture.
Choose Standard for the standard factory settings.
Choose Movie for a natural Image without picture enhancements.
3. Press the ▲ or ▼ buttons to select "Contrast", "Brightness", "Sharpness",
"Color", or "Tint(G/R)", then press the ENTER
button.
4.
Press the ◄ or ► buttons to decrease or increase the value of a particular item.
For example, if you select "Contrast", pressing the ► button increases it.
Press the EXIT
button to exit.
• When you make changes to Contrast, Brightness, Sharpness, Color, Tint(G/R)
OSD will be also adjusted accordingly.
• When in PC mode, Tint, Sharpness, and Color are not available.
Picture Control
Press the P.MODE button on the remote control
repeatedly to select the desired picture mode.
Move Enter Return
Mode : Dynamic
►
Contrast 100
Brightness 45
Sharpness 75
Color 55
Tint G 50 R 50
Color Tone : Cool1
►
▼More
PictureTV
Move Enter Return
Mode : Dynamic
Contrast 100
Brightness 45
Sharpness 75
Color 55
Tint G 50 R 50
Color Tone : Cool1
▼More
PictureTV
Dynamic
Standard
Movie
Move Enter Return
Mode : Dynamic
Contrast 100
Brightness 45
Sharpness 75
Color 55
Tint G 50 R 50
Color Tone : Cool1
▼More
PictureTV
BN68-01184A-Eng.indd 18 2007-02-13 �� 1:33:47

English - 19
Move Enter Return
▲More
Size : 16 : 9
Digital NR : Off
Reset :
PictureTV
OK
Cancel
▲More
Melody : Off
►
PC
►
HDMI Black Level
: Normal ►
Film Mode : Off
►
PIP
►
Function Help : On
►
▼More
PictureTV
Move Enter Return
▲More
Melody : Off
PC
HDMI Black Level
: Normal
Film Mode : Off
PIP
Function Help : On
▼More
PictureTV
Move Enter Return
Off
On
Adjusting the Color Tone
You can change the color of the entire screen according to your preference.
1.
Press the MENU button to display the menu.
Press the ENTER
button to select "Picture".
2. Press the ▲ or ▼ buttons to select "Color Tone", then press the ENTER
button.
3. Press the ▲ or ▼ buttons to select "Cool2", "Cool1", "Normal", "Warm1",
or "Warm2".
Press the ENTER
button.
When the picture mode is set to Dynamic or Standard, Warm1 and Warm2
cannot be selected. Movie mode is only available .
This function is available in PC mode.
Resetting the Picture Settings to the Factory Defaults
1.
Press the ▲ or ▼ buttons to select "Reset", then press the ENTER
button.
Press the ▲ or▼ button to select “OK”, or “Cancel”, then press the ENTER button.
Press the EXIT
button to exit.
Each mode can be reset.
Freezing the Picture
1. Press the STILL button to freeze a moving picture.
Normal sound will still be heard. Press again to cancel.
While V-Chip is in operation, the Still function cannot be used.
Setting the Film Mode
You can: automatically senses and processes lm signals from all sources and adjusts the picture for optimum quality.
1. Press the MENU button to display the menu.
Press the ▲ or ▼ buttons to select “Setup”, then press the ENTER button.
2.
Press the ▲ or ▼ buttons to select "Flim Mode", then press the ENTER
button.
3.
Press the ▲ or ▼ buttons to select "On" or "Off", then press the ENTER
button.
Press the EXIT button to exit.
Film mode is supported in TV, VIDEO, S-VIDEO, and COMPONENT480i.
Move Enter Return
Mode : Dynamic
►
Contrast 100
Brightness 45
Sharpness 75
Color 55
Tint G 50 R 50
Color Tone : Cool1
►
▼More
PictureTV
Move Enter Return
Mode : Dynamic
Contrast 100
Brightness 45
Sharpness 75
Color 55
Tint G 50 R 50
Color Tone : Cool1
▼More
PictureTV
Cool2
Cool1
Normal
Warm1
Warm2
BN68-01184A-Eng.indd 19 2007-02-13 �� 1:33:48

English - 20
Screen size selection depends on the type of video input.
Changing the Screen Size
Zoom1
The screen size when Wide
screen is vertically enlarged.
Zoom2
The screen size when the
Zoom1 screen is vertically
enlarged.
4:3
Sets the picture to 4:3
normal mode.
Just Scan
Use the function to see the
full image without any cut-
off when HDMI 720p/1080i
signals are input.
1. Press the MENU button to display the menu.
Press the ENTER
button, to select "Picture".
2.
Press the ▲ or ▼ buttons to select "Size", then press the ENTER
button.
3.
Press the ▲ or ▼ buttons to select the screen format you want.
Press the ENTER
button.
Press the EXIT
button to exit.
• Wide : Adjusts the picture size to Wide appropriate for DVDs or wide
broadcasting.
• 16:9 : Sets the picture to 16:9 wide mode.
• Zoom1 : Magnifies the size of the picture on the screen.
• Zoom2 : Magnifies the size of the picture more than “Zoom1”.
• 4:3 : Sets the picture to 4:3 normal mode.
• Just Scan : Use the function to see the full image without any cutoff
when HDMI 720p/1080i signals are input.
Alternately, you can press the P.SIZE button on the remote control repeatedly to
change the picture size.
If you watch a still image or the 4:3 mode for a long time (over 2 hours), an
image may be burned onto the screen. View the TV in 16:9 mode as much as possible.
HD (High Definition)
16:9 - 1080i (1920x1080), 720P (1280x720)
•
In TV, VIDEO, S-VIDEO,and all COMPONENT (480i, 480p), DTV (480i, 480p) modes, all screen modes can be selected.
(Wide • 16:9 • Zoom1 • Zoom2 • 4:3).
•
You can select only the Wide, 16:9 and 4:3 screen sizes in the DTV Component (720p, 1080i) or HDMI
(720p, 1080i) mode.
•
In PC mode, only Wide & 4:3 modes can be selected.
•
You must select Zoom with P. Size button on the remote if you want to move the Zoom1 or 2 picture up or down.
•
When watching a DTV’s HD signal, you can use. Horizontal zoom sets the optical picture format by
expanding it both horizontally and vertically. For example, you can reset the picture in 4:3 format to 16:9. Does not
support all external devices (DVD, VCR etc.).
Move Enter Return
Wide
16 : 9
Zoom1
Zoom2
4 : 3
Just Scan
SizeTV
Position Reset
▼
▲
▲More
Size : 16:9
►
Digital NR : Off
►
Reset : OK
►
PictureTV
Move Enter Return
16:9
Sets the picture to 16:9 wide mode.
Wide
Adjusts the picture size to
Wide appropriate for DVDs or
wide broadcasting.
Just Scan
BN68-01184A-Eng.indd 20 2007-02-13 �� 1:33:51

English - 21
continued..
Move Enter Return
PIP
:
Position :
Channel : Air 65
PIPTV
Off
On
Move Enter Return
PIP : On
►
Position :
►
Channel : Air 65
►
PIPTV
Move Enter Return
PIP : On
Position :
Channel :
PIPTV
▲More
Melody : Off
►
PC
►
HDMI Black Level
: Normal ►
Film Mode : Off
►
PIP
►
Function Help : On
►
▼More
SetupTV
Move Enter Return
Viewing Picture-in-Picture
This product has one built-in tuner, which does not allow PIP to function in the same mode. For example, you cannot watch one TV
channel in the main screen, and a different one in the PIP screen. Please see ‘PIP Settings’below for details. You can use the PIP
feature to simultaneously watch two video sources. (See page 26 to select the PIP picture sound.)
While V-Chip (See page 44) in operation, the PIP function cannot be used.
Activating Picture-in-Picture
1. Press the MENU button to display the menu.
Press the ▲ or ▼ buttons to select “Setup”, then press the ENTER button.
Press the ▲ or ▼ buttons to select "PIP", then press the ENTER
button.
2.
Press the ENTER
button again.
Press the ▲ or ▼ buttons to select "On", then press the ENTER
button.
If you turn the TV off while watching in PIP mode and turn it on again, the PIP
window will disappear.
You can view Analog TV broadcasts on the PIP screen (sub-picture) when the
main picture is from an external device connected to PC
Changing the PIP Channel
3. Press the ▲ or ▼ buttons to select “Channel”, then press the ENTER button.
Press the ▲ or ▼ buttons to select the desired channel in the PIP window.
Press the ENTER
buttons.
MAIN: PC
PIP: TV(Analog)
The channel can be active when the sub picture is set to TV.
Alternately, you can press the PIP button on the remote control repeatedly to activate or
deactivate the PIP.
Main picture Sub picture
PC Analog TV broadcasts only
Press the PIP Channel buttons on the remote control.
▲
Air 65
▲
BN68-01184A-Eng.indd 21 2007-02-13 �� 1:33:53

English - 22
Setup
▲More
Melody : Off ►
PC ►
HDMI Black Level : Normal ►
Film Mode : Off ►
PIP
►
Function Help : Off
▼More
TV
Move Enter Return
Setup
▲More
Melody : Off
PC
HDMI Black Level : Normal
Film Mode : Off
PIP
Function Help : Off
▼More
TV
Move Enter Return
Normal
Low
Changing the Position of the PIP Window
4. Press the ▲ or ▼ buttons to select “Position”, then press the ENTER button.
Press the ENTER
buttons.
Press the EXIT
button to exit.
HDMI Black Level
1. Press the MENU button to display the menu.
Press the ▲ or ▼ buttons to select “Setup”, then press the ENTER button.
2.
Press the ▲ or ▼ buttons to select "HDMI Black Level", then
press the ENTER
button.
3.
Press the ▲ or ▼ buttons to select “Normal” or “Low”, then press the ENTER
button.
• Normal: The screen gets brighter.
• Low: The screen gets darker.
This function is active only when the an external device (DVD player, STB etc.)
is connected to the TV via HDMI.
Press the EXIT
button to exit.
You can select the black level on the screen to adjust the screen depth.
Move Enter Return
PIP : On
►
Position :
►
Channel : Air 65
►
PIPTV
Move Enter Return
PIP : On
Position :
Channel :
PIPTV
The Double ( ), Double Wide ( ) mode
cannot be selected in Position mode.
BN68-01184A-Eng.indd 22 2007-02-13 �� 1:33:54

English - 23
Sound Control
Move Adjust Return
EqualizerTV
R
L
100Hz
+
-
0
300Hz 1KHz 3KHz 10KHzBalance
Move Enter Return
Mode : Custom ►
Equalizer
►
SRS TruSurround XT
: Off ►
Multi-Track Options ►
Auto Volume : Off
►
Internal Mute : Off
►
Sound Select : Main ►
Reset
SoundTV
Move Enter Return
Mode : Custom
Equalizer
SRS TruSurround XT
: Off
Multi-Track Options
Auto Volume : Off
Internal Mute : Off
Sound Select : Main
Reset
SoundTV
Standard
Music
Movie
Speech
Custom
Move Enter Return
Mode : Custom ►
Equalizer
►
SRS TruSurround XT
: Off ►
Multi-Track Options ►
Auto Volume : Off
►
Internal Mute : Off
►
Sound Select : Main ►
Reset
SoundTV
Customizing the Sound
The sound settings can be adjusted to suit your personal preference. (Alternatively, you can use one of the "automatic"
settings.)
1. Press the MENU button to display the menu.
Press the ▲ or ▼ buttons to select "Sound", then press the ENTER
button.
2.
Press the ▲ or ▼ buttons to select "Equalizer", then press the ENTER
button.
3.
Press the ◄ or ► buttons to select a particular frequency to adjust.
Press the ▲ or ▼ buttons to increase or decrease the level of the particular frequency.
Press the ENTER
button.
Press the EXIT
button to exit.
• L/R Sound Balance Adjustment :
To adjust the sound balance of the L/R speakers.
• Bandwidth Adjustment (100Hz, 300Hz, 1KHz, 3KHz, 10KHz) :
: To adjust the level of different bandwidth frequencies.
Using Automatic Sound Settings
Your TV has automatic sound settings ("Standard", "Music", "Movie", "Speech", and "Custom") that are preset at the factory.
Or, you can select "Custom", which automatically recalls your personalized sound settings.
1. Press the MENU button to display the menu.
Press the
▲ or ▼
buttons to select "Sound", then press the ENTER
button.
2.
Press the ENTER
button to select "Mode".
Press the
▲ or ▼
buttons to select "Standard", "Music", "Movie", "Speech",
or "Custom" sound setting, then press the ENTER
button.
Press the EXIT
button to exit.
• Choose Standard for the standard factory settings.
• Choose Music when watching music videos or concerts.
• Choose Movie when watching movies.
• Choose Speech when watching a show that is mostly dialog (i.e., news).
• Choose Custom to recall your personalized settings
(see “Customizing the Sound”).
Press the S.MODE button on the remote control repeatedly to select one of the sound
settings.
BN68-01184A-Eng.indd 23 2007-02-13 �� 1:33:56

English - 24
Move Enter Return
Mode : Custom ►
Equalizer
►
SRS TruSurround XT
: Off ►
Multi-Track Options ►
Auto Volume : Off
►
Internal Mute : Off
►
Sound Select : Main ►
Reset
SoundTV
Move Enter Return
Mode : Custom
Equalizer
SRS TruSurround XT
: Off
Multi-Track Options
Auto Volume : Off
Internal Mute : Off
Sound Select : Main
Reset
SoundTV
Off
On
Move Enter Return
Mode : Custom ►
Equalizer
►
SRS TruSurround XT
: Off ►
Multi-Track Options ►
Auto Volume : Off
►
Internal Mute : Off
►
Sound Select : Main ►
Reset
SoundTV
Move Enter Return
Preferred Language
: English
Multi-Track Sound : Stereo
Multi-Track OptionsTV
English
Spanish
French
Enter Return
Preferred Language
: English ►
Multi-Track Sound : Stereo
►
Multi-Track OptionsTV
TRADEMARK & LABEL LICENSE NOTICE
TruSurround XT, SRS and
Symbol are
trademarks of SRS Labs, Inc.
TruSurround XT technology is incorporated
under license from SRS Labs, Inc.
Setting the TruSurround XT
TruSurround XT is a patented SRS technology that solves the problem of playing 5.1 multichannel content over two speakers.
TruSurround delivers a compelling, virtual surround sound experience through any two-speaker playback system, including internal
television speakers. It is fully compatible with all multichannel formats.
1. Press the MENU
button to display the menu.
Press the ▲ or ▼ buttons to select "Sound", then press the ENTER
button.
2. Press the ▲ or ▼ buttons to select "SRS TruSurround XT", then press the
ENTER
button.
3. Press the ▲ or ▼ buttons to select "On" or "Off", then press the
ENTER
button.
Press the EXIT
button to exit.
1. Press the MENU button to display the menu.
Press the ▲ or ▼ buttons to select "Sound", then press the ENTER
button.
Quick way to access the MTS menu: Just press the “MTS” button on the
remote control. You can listen in a language other than your chosen language
by pressing the MTS button.
2.
Press the ▲ or ▼ buttons to select "“Multi-Track Options", then press the ENTER
button.
3.
Press the ENTER button to select “Preferred Language”.
Press the ▲ or ▼ buttons to choose the language (English, Spanish or French) you
want, then press the ENTER button.
Press the EXIT
button to exit.
Preferred Language
Choosing a Multi-Channel Sound (MTS) track - Digital
The digital-TV transmission system is capable of simultaneous transmission of many audio tracks (for example, simultaneous
translations of the program into foreign languages). The availability of these additional “multitracks” depends upon the program.
You can listen in a language other than the favorite language by pressing the
MTS button on the remote control.
BN68-01184A-Eng.indd 24 2007-02-13 �� 1:33:58

English - 25
Move Enter Return
Preferred Language
: English
Multi-Track Sound : Stereo
Multi-Track OptionsTV
Mono
Stereo
SAP
Enter Return
Preferred Language
: English ►
Multi-Track Sound : Stereo
►
Multi-Track OptionsTV
Move Enter Return
Mode : Custom ►
Equalizer
►
SRS TruSurround XT
: Off ►
Multi-Track Options ►
Auto Volume : Off
►
Internal Mute : Off
►
Sound Select : Main ►
Reset
SoundTV
Move Enter Return
Mode : Custom
Equalizer
SRS TruSurround XT
: Off
Multi-Track Options
Auto Volume : Off
Internal Mute : Off
Sound Select : Main
Reset
SoundTV
Off
On
Automatic Volume Control
1. Press the MENU button to display the menu.
Press the ▲ or ▼ buttons to select "Sound", then press the ENTER
button.
2.
Press the ▲ or ▼ buttons to select "Auto Volume", then press the ENTER
button.
3.
Press the ▲ or ▼ buttons to set Auto Volume "On" or "Off" then press the
ENTER
button.
Press the EXIT
button to exit.
Reduces the differences in volume level among broadcasters.
1. Press the MENU button to display the menu.
Press the ▲ or ▼ buttons to select "Sound", then press the ENTER
button.
2.
Press the ▲ or ▼ buttons to select “Multi-Track Options", then press the ENTER
button.
3.
Press the ▲ or ▼ buttons to select “Multi-Track Sound”, then press the ENTER button.
Press the ▲ or ▼ buttons to select a setting you want, then press the ENTER
button.
Press the EXIT
button to exit.
• Choose Mono for channels that are broadcasting in mono, or if you are having
difficulty receiving a stereo signal.
• Choose Stereo for channels that are broadcasting in stereo.
• Choose SAP to listen to the Separate Audio Program, which is usually a
foreign-language translation.
Multi-Track Sound
Choosing a Multi-Channel Sound (MTS) track - Analog
Press the MTS buttons on the remote control repeatedly to select “Mono”,
“Stereo”, or “SAP”.
BN68-01184A-Eng.indd 25 2007-02-13 �� 1:34:00

English - 26
Move Enter Return
Mode : Custom ►
Equalizer
►
SRS TruSurround XT
: Off ►
Multi-Track Options ►
Auto Volume : Off
►
Internal Mute : Off
►
Sound Select : Main ►
Reset
SoundTV
Move Enter Return
Mode : Custom
Equalizer
SRS TruSurround XT
: Off
Multi-Track Options
Auto Volume : Off
Internal Mute : Off
Sound Select : Main
Reset
SoundTV
Off
On
Move Enter Return
Mode : Custom ►
Equalizer
►
SRS TruSurround XT
: Off ►
Multi-Track Options ►
Auto Volume : Off
►
Internal Mute : Off
►
Sound Select : Main ►
Reset
SoundTV
Move Enter Return
Mode : Custom
Equalizer
SRS TruSurround XT
: Off
Multi-Track Options
Auto Volume : Off
Internal Mute : Off
Sound Select : Main
Reset
SoundTV
Main
Sub
Selecting the Internal Mute
1. Press the MENU button to display the menu.
Press the ▲ or ▼ buttons to select "Sound", then press the ENTER
button.
2.
Press the ▲ or ▼ buttons to select "Internal Mute", then press the ENTER
button.
3.
Press the ▲ or ▼ buttons to select “On”, then press the ENTER button.
Press the EXIT
button to exit.
When Internal Mute is set to “On”, Sound menus except Multi-track Options
cannot be adjusted.
The VOL , VOL
and MUTE buttons do not operate when the Internal Mute
is set to On.
Sound output from the TV speakers is muted.
TV's Internal Speakers Audio Out (Optical, L/R Out) to Sound System
RF AV, S-Video
Component, PC, HDMI
RF AV, S-Video
Component, PC
Internal Mute Off
Speaker Output Speaker Output Speaker Output Sound Output Sound Output Sound Output
Internal Mute On
Mute Mute Mute Sound Output Sound Output Sound Output
Video No Signal
Mute Mute Mute Mute Mute Mute
When “Internal mute” is set to “On”, Sound menus except “Multi-Track Options” cannot be adjusted.
Listening to the Sound of the Sub (PIP) Picture
1. Press the MENU button to display the menu.
Press the ▲ or ▼ buttons to select "Sound", then press the ENTER
button.
2.
Press the ▲ or ▼ buttons to select "Sound Select”, then press the ENTER
button.
3.
Press the ▲ or ▼ buttons to select “Main” or “Sub”, then press the ENTER button.
Press the EXIT
button to exit.
• Main: Used to listen to the sound of the main picture.
• Sub: Used to listen to the sound of the sub picture.
You can select this option when “PIP” is set to “On”.
When the PIP feature is activated, you can listen to the sound of the sub (PIP) picture.
BN68-01184A-Eng.indd 26 2007-02-13 �� 1:34:01

English - 27
Setup
▲More
Melody : Off
►
PC
►
HDMI Black Level
: Normal ►
Film Mode : Off
►
PIP
►
Function Help : On
►
▼More
TV
Move Enter Return
Setup
▲More
Melody : Off ►
PC
►
HDMI Black Level
: Normal ►
Film Mode : Off
►
PIP
Function Help : On
▼More
TV
Move Enter Return
Off
Low
Medium
High
Mode : Custom ►
Equalizer
►
SRS TruSurround XT
: Off ►
Multi-Track Options ►
Auto Volume : Off
►
Internal Mute : Off
►
Sound Select : Main ►
Reset
SoundTV
Move Enter Return
Resetting the Sound Settings to the Factory Defaults
1. Press the MENU button to display the menu.
Press the ▲ or ▼ buttons to select "Sound", then press the ENTER
button.
2.
Press the ▲ or ▼ buttons to select "Reset”, then press the ENTER
button.
Press the EXIT
button to exit.
If Game Mode is On, the Reset Sound function is activated. Selecting the Reset function resets the equalizer setting to the factory
defaults.
Setting the On/Off Melody
DOLBY DIGITAL
Manufactured under license from Dolby Laboratories.
“Dolby” and the double-D symbol are trademarks of Dolby Laboratories.
A melody sound can be set to come on when the TV is powered On or Off.
1.
Press the MENU button to display the menu.
Press the ▲ or ▼ buttons to select "Setup", then press the ENTER
button.
2.
Press the ▲ or ▼ buttons to select "Melody", then press the ENTER
button.
3. Press the ▲ or ▼ buttons to select "Off", "Low", "Medium", "High" then press the
ENTER
button.
Off: Turns off the melody function.
Low: Sets the melody volume to low.
Medium: Sets the melody volume to medium.
High: Sets the melody volume to high.
Press the EXIT button to exit.
You can connect a set of headphones to your set if you wish to watch a TV program without disturbing the other people in the room.
Connecting Headphones
When you insert the head set jack into the corresponding port, you can operate
only “Multi track option” in Sound menu.
Prolonged use of headphones at a high volume may damage your hearing.
You will not receive sound from the speakers when you connect headphones
to the system.
The headphone volume and TV volume are adjusted differently.
Press the VOL button on the remote control repeatedly to select one of the sound
settings.
BN68-01184A-Eng.indd 27 2007-02-13 �� 1:34:03

English - 28
Channel Control
or
Antenna : Air ►
Auto Program ►
Clear Scrambled Channel ►
Channel List ►
Name ►
Fine Tune ►
Signal Strength ►
LNA : On ►
Channel
Move Enter Return
TV
Antenna : Air
Auto Program
Clear Scrambled Channel
Channel List
Name
Fine Tune
Signal Strength
LNA : On
Channel
Move Enter Return
TV
Air
Cable
60%
DTV Cable
Selecting the Antenna
1. Press the MENU button to display the menu.
Press the ▲ or ▼ buttons to select "Channel", then press the ENTER
button.
2.
Press the ENTER button to select “Antenna”.
Press the ▲ or ▼ buttons to select “Air” or “Cable”, then press the ENTER
button.
Press the EXIT
button to exit.
Press the ANTENNA button on the remote control.
If the antenna is connected to ANT 1 IN (AIR),
select “Air” and if it is connected to ANT 2 IN
(CABLE), select “Cable”.
If both ANT 1 IN (AIR) and ANT 2 IN (CABLE)
are connected, select the antenna input you want.
If the antenna input is not selected properly, noise
may appear on the screen.
Antenna : Cable ►
Auto Program
►
Clear Scrambled Channel ►
Channel List
►
Name
►
Fine Tune ►
Signal Strength ►
LNA : On ►
ChannelTV
Move Enter Return
Clear Scrambled Channel
Stop
Removing scrambled channel.
DTV Cable 3-1
50%
Enter Return
Clear Scrambled Channel
Scrambled Channel Searching is completed.
0 Channels are deleted.
Return
Clearing Scrambled Channels - Digital
1. Press the MENU button to display the menu.
Press the ▲ or ▼ buttons to select "Channel", then press the ENTER
button.
2. Press the ▲ or ▼ button to select "Clear Scrambled Channel", then press the
ENTER button. It searches scrambled channels, which are to be removed from
the list.
To stop searching scrambled channels;
Press the ENTER button to select Stop
Press the ◄ button to select Yes, then press the ENTER button.
3.
When the scrambled channel searching is completed, press the ENTER button.
Press the EXIT
button to exit.
The Clear Scrambled Channel function is used to lter out scrambled channels after Auto Program is completed.
It removes the scrambled channels from the list by tuning the digital cable channels. This process may take up to 20~30 minutes.
OK
BN68-01184A-Eng.indd 28 2007-02-13 �� 1:34:06

English - 29
All
Added
Favorite
Default List Mode : All ►
Channel List
Move Enter Return
TV
CH
Channel List / All
Move Enter Page Return
DTV Air 2-1
Air3
Air4
Air 5
Air 6
Air 7
DTV Air 7-1
Air 8
Air 9
Air 10
DTV Air 10-1
DTV Air 10-2
DTV Air 10-3
DTV Air 10-1
DTV Air 10-2
DTV Air 10-3
DTV Air 10-1
DTV Air 10-2
DTV Air 10-3
Air 12
DTV Air 13-1
DTV Air 13-2
DTV Air 13-3
DTV Air 13-4
List Mode
Delete All
Air 5 1 / 2
Watch
Add
Delete
Favorite
CH
Channel List / All
Move Enter Page Return
DTV Air 2-1
Air3
Air4
Air 5
Air 6
Air 7
DTV Air 7-1
Air 8
Air 9
Air 10
DTV Air 10-1
DTV Air 10-2
DTV Air 10-3
DTV Air 10-1
DTV Air 10-2
DTV Air 10-3
DTV Air 10-1
DTV Air 10-2
DTV Air 10-3
Air 12
DTV Air 13-1
DTV Air 13-2
DTV Air 13-3
DTV Air 13-4
List Mode
Delete All
Air 5
1 / 2
Add All
CH
Channel List / All
Move Enter Page Return
DTV Air 2-1
Air3
Air4
Air 5
Air 6
Air 7
DTV Air 7-1
Air 8
Air 9
Air 10
DTV Air 10-1
DTV Air 10-2
DTV Air 10-3
DTV Air 10-1
DTV Air 10-2
DTV Air 10-3
DTV Air 10-1
DTV Air 10-2
DTV Air 10-3
Air 12
DTV Air 13-1
DTV Air 13-2
DTV Air 13-3
DTV Air 13-4
List Mode
Delete All
Air 5 1 / 2
Channel List / All
Move Enter Return
DTV Air 2-1
Air3
Air4
Air 5
Air 6
Air 7
DTV Air 7-1
Air 8
Air 9
Air 10
DTV Air 10-1
DTV Air 10-2
DTV Air 10-3
DTV Air 10-1
DTV Air 10-2
DTV Air 10-3
DTV Air 10-1
DTV Air 10-2
DTV Air 10-3
Air 12
DTV Air 13-1
DTV Air 13-2
DTV Air 13-3
DTV Air 13-4
Air 5 1 / 2
Watch
Add
Delete
Favorite
List Mode
Delete AllAdd All
Antenna : Air ►
Auto Program ►
Clear Scrambled Channel ►
Channel List ►
Name ►
Fine Tune ►
Signal Strength ►
LNA : On ►
Channel
Move Enter Return
TV
Setting the Channel Lists
You can add or delete a channel so only channels you want are displayed.
1. Press the MENU button to display the menu.
Press the ▲ or ▼ buttons to select "Channel", then press the ENTER
button.
2.
Press the ▲ or ▼ buttons to select "Channel List", then press the ENTER
button.
3.
Press the ENTER button to select “All”.
4.
Press the ▲ or ▼ buttons to select a channel to delete, then press the
ENTER button.
Press the ▲ or ▼ buttons to select “Delete”, then press the ENTER
button to
delete the channel.
The
mark will disappear.
5.
Press the ▲ or ▼ buttons to select a channel to add, then press the
ENTER button.
Press the ▲ or ▼ buttons to select “Add”, then press the ENTER
button to
add the channel.
The
mark will appear and the channel will be added.
Press the EXIT
button to exit.
All selected channels will be shown on “Added menu”.
• Red (P.MODE) button: Press repeatedly to select “All”, “Added”, or
“Favorite”.
• Green (S.MODE) button: Press to add all channels deleted.
• Yellow (STILL) button: Press to delete all channels memorized.
BN68-01184A-Eng.indd 29 2007-02-13 �� 1:34:08

English - 30
Antenna : Air ►
Auto Program
►
Clear Scrambled Channel ►
Channel List
►
Name
►
Fine Tune
►
Signal Strength
►
LNA : On ►
Channel
Move Enter Return
TV
All
Added
Favorite
Default List Mode : All ►
Channel List
Move Enter Return
TV
CH
Channel List / All
Move Enter Page Return
DTV Air 2-1
Air3
Air4
Air 5
Air 6
Air 7
DTV Air 7-1
Air 8
Air 9
Air 10
DTV Air 10-1
DTV Air 10-2
DTV Air 10-3
DTV Air 10-1
DTV Air 10-2
DTV Air 10-3
DTV Air 10-1
DTV Air 10-2
DTV Air 10-3
Air 12
DTV Air 13-1
DTV Air 13-2
DTV Air 13-3
DTV Air 13-4
List Mode
Delete All
Air 5 1 / 2
Channel List / Added
Move Enter Return
DTV Air 2-1
Air3
Air4
Air 5
Air 6
Air 7
DTV Air 7-1
Air 8
Air 9
Air 10
DTV Air 10-1
DTV Air 10-2
DTV Air 10-3
DTV Air 10-1
DTV Air 10-2
DTV Air 10-3
DTV Air 10-1
DTV Air 10-2
DTV Air 10-3
Air 12
DTV Air 13-1
DTV Air 13-2
DTV Air 13-3
DTV Air 13-4
List Mode
Delete All
Air 5 1 / 2
Watch
Add
Delete
Favorite
To set-up Your Favorite Channels
1. Press the MENU button to display the menu.
Press the ▲ or ▼ buttons to select "Channel", then press the ENTER
button.
2.
Press the ▲ or ▼ buttons to select "Channel List", then press the ENTER
button
3.
Press the ▲ or ▼ buttons to select “Added”, then press the ENTER button.
4. Press the ▲ or ▼ buttons to select your favorite channels to watch among the
labeled channels. Then press the ENTER
button.
Press the ▲ or ▼ buttons to select “Favorite”, then press the ENTER
button.
The " " symbol will be highlighted and the channel will be set as a Favorite.
To cancel your Favorite channel selection, press the ENTER button until the
" " symbol is no longer highlighted.
Press the EXIT
button to exit.
Only memorized channels can be set as favorite channels.
All favorite channels will be shown in the “Favorite” menu.
You can set channels you watch frequently as favorites.
BN68-01184A-Eng.indd 30 2007-02-13 �� 1:34:10

English - 31
Antenna : Air ►
Auto Program ►
Clear Scrambled Channel ►
Channel List ►
Name ►
Fine Tune ►
Signal Strength ►
LNA : On ►
Channel
Move Enter Return
TV
All
Added
Favorite
Default List Mode : All ►
Channel List
Move Enter Return
TV
All
Added
Favorite
Antenna : Air ►
Auto Program ►
Clear Scrambled Channel ►
Channel List
►
Name ►
Fine Tune
►
Signal Strength ►
LNA : On ►
Channel
Move Enter Return
TV
All
Added
Favorite
Default List Mode : All ►
Channel List
Move Enter Return
TV
CH
Channel List / All
Move Enter Page Return
DTV Air 2-1
Air3
Air4
Air 5
Air 6
Air 7
DTV Air 7-1
Air 8
Air 9
Air 10
DTV Air 10-1
DTV Air 10-2
DTV Air 10-3
DTV Air 10-1
DTV Air 10-2
DTV Air 10-3
DTV Air 10-1
DTV Air 10-2
DTV Air 10-3
Air 12
DTV Air 13-1
DTV Air 13-2
DTV Air 13-3
DTV Air 13-4
List Mode
Delete All
Air 5 1 / 2
Using the Channel Lists
1. Press the MENU button to display the menu.
Press the ▲ or ▼ buttons to select "Channel", then press the ENTER
button.
2.
Press the ▲ or ▼ buttons to select "Channel List", then press the ENTER
button.
3. Press the ▲ or ▼ buttons to select “Default List Mode” (the CH.List you want to
appear when you press CH.LIST) then press the ENTER
button.
Press the ▲ or ▼ buttons to select “All”, “Added”, or “Favorite” then press the
ENTER button.
The CH.LIST you have chosen will now be set.
Press the EXIT button to exit.
Displays the channel list automatically when you press CH LIST button on the remote. (Choose All, Added, or Favorite)
Viewing the Channel Lists
1. Press the MENU button to display the menu.
Press the ▲ or ▼ buttons to select "Channel", then press the ENTER
button.
2.
Press the ▲ or ▼ buttons to select "Channel List", then press the ENTER
button.
3. Press the ▲ or ▼ buttons to select “All”, “Added” or “Favorite”, then press the
ENTER button.
4.
Press the ▲ or ▼ buttons to select “Channel”, then press the ENTER button.
To toggle between your all channels, add channels, or favorite channels,
use the red (P.Mode) button on the remote control.
• Red (P.Mode) button: Press repeatedly to select “All”, “Added”, or
“Favorite”
You can display a list of all channels, added channels or your favorite channels.
Press the CH LIST button on the remote control to bring up the Channel Lists.
BN68-01184A-Eng.indd 31 2007-02-13 �� 1:34:12

English - 32
Antenna : Air ►
Auto Program ►
Clear Scrambled Channel ►
Channel List ►
Name ►
Fine Tune ►
Signal Strength ►
LNA : On ►
Channel
Move Enter Return
TV
Name
Move Enter Return
TV
Air 2
Air 3
Air 4
Air 5
Air 6
Clear
Clear
Clear
Clear
Clear
Name
Move Adjust Return
TV
Air 2
Air 3
Air 4
Air 5
Air 6
Clear
Clear
Clear
Clear
Clear
A
▲
▼
Antenna : Air ►
Auto Program ►
Clear Scrambled Channel ►
Channel List ►
Name ►
Fine Tune ►
Signal Strength ►
LNA : On ►
ChannelTV
Move Enter Return
Antenna : Air
Auto Program
Clear Scrambled Channel
Channel List
Name
Fine Tune
Signal Strength
LNA : On
ChannelTV
Off
On
Move Enter Return
▼
▼
Labeling Channels
1. Press the MENU button to display the menu.
Press the ▲ or ▼ buttons to select “Channel”, then press the ENTER button.
Press the ▲ or ▼ buttons to select “Name”, then press the ENTER button.
2.
Press the ▲ or ▼ buttons to select the channel to be assigned a new name,
then press the ENTER button.
Press the ▲ or ▼ buttons to select a letter, a number or a blank (Results in this
sequence: A...Z, 0...9, +, -, *, /, blank).
Press the ► button to switch to the next field, which will be selected.
Select a second letter or digit by pressing the ▲ or ▼ buttons, as above.
Repeat the process to select the last three digits. When you have finished,
press the ENTER button to assign the new name.
To erase the assigned new name, select "Clear" by pressing the ◄ or ► button,
then press the ENTER button.
Press the EXIT
button to exit.
The names of digital broadcasting channels are automatically assigned and
thus cannot be assigned by users.
LNA (Low Noise Amplier)
1. Press the MENU button to display the menu.
Press the ▲ or ▼ buttons to select “Channel”, then press the ENTER button.
2.
Press the ▲ or ▼ buttons to select “LNA”, then press the ENTER
button.
3.
Press the▲ or ▼ buttons to select “On”, then press the ENTER button.
Press the EXIT
button to exit.
LNA functions when the antenna is set to Air or Cable. Settings will be stored
separately in each channel. (See “Selecting the
antenna.” on page 28.)
If the TV is operating in a weak-signal area, sometimes the LNA function can improve the reception (a low-noise preamplier
boosts the incoming signal).
Channels can be labeled so that their call letters appear whenever the channel is selected.
BN68-01184A-Eng.indd 32 2007-02-13 �� 1:34:14

English - 33
Antenna : Air ►
Auto Program ►
Clear Scrambled Channel ►
Channel List ►
Name ►
Fine Tune ►
Signal Strength ►
LNA : On ►
Channel
Move Enter Return
TV
Fine Tune
Adjust Save Return
Air 24 *
+3
Reset
Antenna : Air ►
Auto Program
►
Clear Scrambled Channel
►
Channel List
►
Name ►
Fine Tune
►
Signal Strength
►
LNA : On
►
Channel
Move Enter Return
TV
Signal Strength
Enter Return
TV
OK
Adjust Save Return
Fine Tune
Air 24
0
Reset
Adjust Save Return
Fine Tune
Air 24
+3
Reset
Move Enter Return
Fine Tune
Air 24
0
Reset
Fine Tuned
Fine Tuning Analog Channels
1. Press the MENU button to display the menu.
Press the ▲ or ▼ buttons to select "Channel", then press the ENTER
button.
2.
Press the ▲ or ▼ buttons to select "Fine Tune", then press the ENTER
button.
3.
Press the ◄ or ► buttons to adjust the fine tuning.
To store the fine tuning setting in the TV’s memory, press the ENTER
button.
If you do not store the fine-tuned channel in memory, adjustments are not
saved.
4.
To reset the fine tuning setting, press the ▼ button to select "Reset",
then press the ENTER
button.
Press the EXIT
button to exit.
"
*
" will appear next to the name of fine-tuned channels.
Use ne tuning to manually adjust a particular channel for optimal reception.
Checking the Digital-Signal Strength
1. Press the MENU button to display the menu.
Press the ▲ or ▼ buttons to select “Channel”, then press the ENTER button.
2.
Press the ▲ or ▼ buttons to select “Signal Strength”, then press the ENTER
button.
If the signal strength meter indicates that the signal is weak, physically adjust your
antenna to increase the signal strength.
Continue to adjust the antenna until you find the best position with the strongest
signal.
Press the EXIT
button to exit
Unlike analog channels, which can vary in reception quality from “snowy” to clear, digital (HDTV) channels have either perfect
reception quality or you will not receive them at all. So, unlike analog channels, you cannot ne tune a digital channel. You can,
however, adjust your antenna to improve the reception of available digital channels.
BN68-01184A-Eng.indd 33 2007-02-13 �� 1:34:17

English - 34
Using Your TV as a Computer (PC) Display
Setting Up Your PC Software (Based on Windows XP)
The Windows display-settings for a typical computer are shown below. The actual screens on your PC will probably be different,
depending upon your particular version of Windows and your particular video card. However, even if your actual screens look
different, the same basic set-up information will apply in almost all cases. (If not, contact your computer manufacturer or Samsung
Dealer.)
1.
First, click on "Control Panel" on the Windows start menu.
2.
When the control panel window appears, click on "Appearance and Themes" and a
display dialog-box will appear.
3.
When the control panel window appears, click on "Display" and a display dialog-box
will appear.
4.
Navigate to the "Settings" tab on the display dialog-box.
The correct size setting (resolution)
Optimum: 1360 x 768 pixels
If a vertical-frequency option exists on your display settings dialog box,
the correct value is "60" or "60 Hz". Otherwise, just click "OK" and exit the dialog box.
Display Modes
If the signal from the system equals the standard signal mode, the screen is adjusted automatically. If the signal from the system
doesn’t equal the standard signal mode, adjust the mode by referring to your videocard user guide; otherwise there may be no
video. For the display modes listed below, the screen image has been optimized during manufacturing.
PC Display
Mode Resolution
Horizontal
Frequency (kHz)
Vertical
Frequency (Hz)
Pixel Clock
Frequency (MHz)
Sync Polarity
(H/V)
IBM
720 X 400
640 X 480
31.469
31.469
70.087
59.940
28.322
25.175
- / +
- / -
VESA
640 x 480
640 x 480
800 x 600
800 x 600
800 x 600
1024 x 768
1024 x 768
1024 x 768
1360 x 768
37.861
37.500
37.879
48.077
46.875
48.363
56.476
60.023
47.712
72.809
75.000
60.317
72.188
75.000
60.004
70.069
75.029
60.015
31.500
31.500
40.000
50.000
49.500
65.000
75.000
78.750
85.800
- / -
- / -
+ /+
+ /+
+ /+
- / -
- / -
+ /+
+ /+
D-Sub Input
Mode Resolution
Horizontal
Frequency (kHz)
Vertical
Frequency (Hz)
Pixel Clock
Frequency (MHz)
Sync Polarity
(H/V)
IBM
720 X 400
640 X 480
31.469
31.469
70.087
59.940
28.322
25.175
- / +
- / -
VESA
800 x 600
1024 x 768
1360 x 768
37.879
48.363
47.712
60.317
60.004
60.015
40.000
65.000
85.800
+ /+
- / -
+ /+
HDMI/DVI Input
BN68-01184A-Eng.indd 34 2007-02-13 �� 1:34:17

English - 35
1. Press the MENU button to display the menu.
Press the ▲ or ▼ buttons to select "Setup", then press the ENTER
button.
Press the ▲ or ▼ buttons to select "PC", then press the ENTER
button.
Change to the PC mode first.
2. Press the ▲ or ▼ buttons to select "Auto Adjustment", then press the ENTER
button.
Press the EXIT
button to exit.
How to Auto Adjust
Use the Auto Adjust function to have the TV set automatically adjust the video signals the monitor receives.
The function also automatically ne-tunes the settings and adjusts the frequency values and positions.
This function does not work in DVI-Digital mode.
Setting up the TV with your PC
1. Press the MENU button to display the menu.
Press the ▲ or ▼ buttons to select "Setup", then press the ENTER
button.
Press the ▲ or ▼ buttons to select "PC", then press the ENTER
button.
Change to the PC mode first.
2.
Press the ENTER
button to select "Image Lock".
3.
Press the ▲ or ▼ buttons to select "Coarse" or "Fine", then press the ENTER
button.
Press the ◄ or ► buttons to adjust the screen quality.
Vertical stripes may appear or the picture may be blurry.
Press the ENTER
button.
Press the EXIT
button to exit.
Adjusting the Screen Quality
The purpose of the picture quality adjustment is to remove or reduce picture noise. If the noise is not removed by fine tuning
alone, then make the frequency adjustments to the utmost and fine tune again. After the noise has been reduced, re-adjust the
picture so that it is aligned on the center of the screen.
Setup
▲More
Melody : Off
►
PC
►
HDMI Black Level
: Normal ►
Film Mode : Off
►
PIP
►
Function Help : On
►
▼More
TV
Move Enter Return
PC
Image Lock ►
Position
►
Auto Adjustment
Image Reset
Resolution :
1360 x 768@60Hz
TV
Move Enter Return
PC
Image Lock ►
Position ►
Auto Adjustment
Image Reset
Resolution :
1360 x 768@60Hz
TV
Move Enter Return
Image Lock
Coarse 50
Fine 0
TV
Move Enter Return
Auto Adjustment in Progress.
Please Wait
50
Move Adjust Return
▲
Coarse
▼
BN68-01184A-Eng.indd 35 2007-02-13 �� 1:34:20

English - 36
Changing the Screen Position
1.
Press the MENU button to display the menu.
Press the ▲ or ▼ buttons to select "Setup", then press the ENTER
button.
Press the ▲ or ▼ buttons to select "PC", then press the ENTER
button.
Change to the PC mode first.
2. Press the ▲ or ▼ buttons to select "Position", then press the ENTER
button.
3.
Press the ▲ or ▼ buttons to adjust the V-Position.
Press the ◄ or ► buttons to adjust the H-Position.
Press the ENTER
button.
Press the EXIT
button to exit.
Initializing the Screen Position or Color Settings
You can replace all image settings with the factory default valuse.
1. Press the MENU button to display the menu.
Press the ▲ or ▼ buttons to select "Setup", then press the ENTER
button.
Press the ▲ or ▼ buttons to select "PC", then press the ENTER
button.
Change to the PC mode first.
2.
Press the ▲ or ▼ buttons to select "Image Reset", then press the ENTER
button.
Press the EXIT
button to exit.
PC
Image Lock ►
Position
►
Auto Adjustment
Image Reset
Resolution :
1360 x 768@60Hz
TV
Move Enter Return
TV
Adjust Enter Return
Position
PC
Image Lock ►
Position ►
Auto Adjustment
Image Reset
Resolution :
1360 x 768@60Hz
TV
Move Enter Return
Image Reset is completed.
Viewing the Current Resolution
You can get the resolution information of your PC.
1. Press the MENU button to display the menu.
Press the ▲ or ▼ buttons to select "Setup", then press the ENTER
button.
Press the ▲ or ▼ buttons to select "PC", then press the ENTER
button.
Change to the PC mode first.
2.
Press the ▲ or ▼ buttons to select "Resolution".
The resolution information is displayed on the screen.
Press the EXIT
button to exit.
PC
Image Lock ►
Position ►
Auto Adjustment
Image Reset
Resolution :
1360 x 768@60Hz
TV
Move Enter Return
▲
▲
▲
▲
BN68-01184A-Eng.indd 36 2007-02-13 �� 1:34:21

English - 37
Time Setting
Setup
Plug & Play ►
Language : English ►
Time ►
Game Mode : Off ►
V-Chip
►
Caption ►
Menu Transpatency
: High ►
▼More
TV
Move Enter Return
Time
Clock ►
Sleep Timer : Off ►
Timer 1 : Inactivated ►
Timer 2 : Inactivated ►
Timer 3 : Inactivated ►
TV
Move Enter Return
- - / - - / - - - - / - - : - - - -
Clock
Clock Mode : Manual ►
Clock Set ►
Time Zone ►
DST : Off ►
TV
Move Enter Return
Clock Set
Enter the current date and time.
TV
Move Adjust Return
Month
▲
▼
Day Year
Hour
Minute am/pm
Clock Set
Enter the current date and time.
TV
Month
▲
▼
Day Year
Hour
Minute am/pm
1 1 2007
12 00 am
Move Adjust Return
Setting the Clock
Setting the clock is necessary in order to use the various timer features of the TV.
Also, you can check the time while watching the TV. (Just press the INFO button.)
Option 1: Setting the Clock Manually
1. Press the MENU button to display the menu.
Press the
▲ or ▼
buttons to select "Setup", then press the ENTER button.
Press the
▲ or ▼
buttons to select "Time", then press the ENTER button.
2.
Press the ENTER button to select "Clock".
3.
Press the ENTER button to select “Clock Mode”.
Press the
▲ or ▼
buttons to select “Manual”, then press the ENTER button.
4.
Press the
▲ or ▼
buttons to select “Clock Set”, then press the ENTER button.
5.
Press the ◄ or ► buttons to move to “Month”, “Day”, “Year”, “Hour”, “Minute”,
or “am/pm”. Set the date and time you want by pressing the
▲ or ▼
buttons,
then press the ENTER button.
Press the EXIT
button to exit.
The current time will appear every time you press the INFO button.
You can set the month, day, year, hour, and minute directly by pressing the
number buttons on the remote control.
BN68-01184A-Eng.indd 37 2007-02-13 �� 1:34:23

English - 38
Setup
Plug & Play ►
Language : Off
►
Time
►
Game Mode : Off ►
V-Chip ►
Caption ►
Menu Transpatency
: High ►
▼More
TV
Move Enter Return
Time
Clock ►
Sleep Timer : Off ►
Timer 1 : Inactivated ►
Timer 2 : Inactivated ►
Timer 3 : Inactivated ►
TV
Move Enter Return
- - / - - / - - - - / - - : - - - -
Clock
Clock Mode : Manual ►
Clock Set ►
Time Zone
DST : Off
TV
Move Enter Return
Manual
Auto
Clock
Clock Mode : Auto ►
Clock Set ►
Time Zone ►
DST : Off ►
TV
Move Enter Return
Move Enter Return
Select the time zone where you are located.
Time Zone
Newfoundland
Atlantic
Eastern
Central
Mountain
Pacific
Alaska
Hawaii
Clock
Clock Mode : Auto ►
Clock Set ►
Time Zone ►
DST : On ►
TV
Move Enter Return
Clock
Clock Mode : Auto
Clock Set
Time Zone
DST : Off
TV
Move Enter Return
Off
On
Option 2: Setting the Clock Automatically
1.
Press the MENU button to display the menu.
Press the
▲ or ▼
buttons to select "Setup", then press the ENTER button.
Press the
▲ or ▼
buttons to select "Time", then press the ENTER button.
2.
Press the ENTER button to select "Clock".
3.
Press the ENTER button to select “Clock Mode”.
Press the
▲ or ▼
buttons to select “Auto”, then press the ENTER button.
4.
Press the ▲ or ▼ buttons to select “Time Zone”, then press the ENTER button.
5. Press the ▲ or ▼ buttons to highlight the time zone for your local area,
then press the ENTER button.
6.
Press the
▲ or ▼
buttons to select “DST” (Daylight Saving Time), then press
the ENTER button.
Press the ▲ or ▼ buttons to select “On” or “Off”, then press the ENTER button.
Press the EXIT button to exit.
Depending on the broadcast station and signal, the auto time may not be
set correctly. If this occurs, set the time manually.
The Antenna or cable must be connected in order to set the time automatically.
BN68-01184A-Eng.indd 38 2007-02-13 �� 1:34:25

English - 39
Setting the Sleep Timer
The sleep timer automatically shuts off the TV after a preset time (from 30,60,90,120,150 and 180 minutes).
1. Press the MENU button to display the menu.
Press the ▲ or ▼ buttons to select "Setup", then press the ENTER
button.
Press the ▲ or ▼ buttons to select "Time", then press the ENTER
button.
2.
Press the ▲ or ▼ buttons to select "Sleep Timer", then press the ENTER button.
3.
Press the ▲ or ▼ buttons to adjust “Minute”.
4.
Press the
►
button to select “Activation”.
Press the ▲ or ▼ buttons to select “On”, then press the ENTER button.
Press the EXIT
button to exit.
Simply press the SLEEP button on the
remote control for a Quick way to access the sleep timer setting.
Time
Clock ►
Sleep Timer : Off
►
Timer 1 : Inactivated
►
Timer 2 : Inactivated ►
Timer 3 : Inactivated
►
TV
Move Enter Return
1/ 1/ 2005/ 12 : 30 am
Sleep Timer
Set the Sleep Timer options.
TV
Move Adjust Return
Minute Activation
30
On
Sleep Timer
Set the Sleep Timer options.
TV
Move Adjust Return
Minute
▲
▼
Activation
Off
Time
Clock ►
Sleep Timer : Off ►
Timer 1 : Inactivated ►
Timer 2 : Inactivated ►
Timer 3 : Inactivated ►
TV
1/ 1/ 2005/ 12 : 30 am
Move Enter Return
Timer 1
On Timer
▲
▼
12 00 am
Inactivate
Off Timer
12 00 am
Inactivate
Repeat
Once
Antenna
Volume
10
Air
:
:
Move Adjust Return
Channel
3
1. Press the MENU button to display the menu.
Press the ▲ or ▼ buttons to select "Setup", then press the ENTER button.
Press the ▲ or ▼ buttons to select "Time", then press the ENTER button.
2. Press the ▲ or ▼ buttons to select "Timer 1,Timer 2,Timer 3 ", then press the
ENTER-button.
3.
Press the ▲ or ▼ buttons to adjust “Hour”, then press the
►
button to move
to the next step.
Set other items using the same method as above.
Activate or Inactivate Press the ▲or▼ button
Repeat Select a Once, Everyday, Mon-Fri,
Mon-Sat, Sat-Sun
Press the ▲or▼ button
Volume Adjust from 0~100 Press the ▲or▼ button
Antenna Select Air or Cable Press the ▲or▼ button
Channel Change the Channel
Press the ▲or▼ button
When finished, press the RETURN button to return.
• The current time will appear every time you press the INFO button.
• You can set the hour, minute, and channel by pressing the number
buttons on the remote control.
Press the EXIT
button to exit.
Setting the On/Off Timer
▲
▼
BN68-01184A-Eng.indd 39 2007-02-13 �� 1:34:27

English - 40
Function Description
Setup
Plug & Play ►
Language :
English ►
Time ►
Game Mode : Off ►
V-Chip
►
Caption
►
Menu Transpatency
: High ►
▼More
TV
Move Enter Return
Setup
Plug & Play
Language : Off
Time
Game Mode : Off
V-Chip
Caption
Menu Transpatency
: High
▼More
TV
Move Enter Return
English
Español
Français
Selecting a Menu Language
1. Press the MENU button to display the menu.
Press the ▲ or ▼ buttons to select "Setup", then press the ENTER
button.
Press the ▲ or ▼ buttons to select "Language", then press the ENTER
button.
2.
Press the ▲ or ▼ buttons to select "English", "Español", or "Français".
Press the ENTER
button.
Press the EXIT
button to exit.
Using the Game Mode
When connecting to a game console such as PlayStation
TM
or Xbox
TM
, you can enjoy a
more realistic gaming experience by selecting Game mode.
1.
Press the MENU button to display the menu.
Press the ▲ or ▼ buttons to select "Setup", then press the ENTER
button.
2.
Press the ▲ or ▼ buttons to select "Game Mode", then press the ENTER
button.
3.
Select "On" or "Off" by pressing the ▲ or ▼ buttons, then press the ENTER
button.
4.
Press the EXIT button to exit.
Restrictions on Game mode (Caution)
• To disconnect the game console and connect another external device, set
Game to Off in the setup menu.
• If you display the TV menu in Game mode, the screen shakes slightly.
• The mark (
) appears on the screen which means that Game Mode is on with the
selected source.
If Game Mode is On
• Setup Mode is automatically changed to Custom and users cannot
change the mode.
• Sound Mode in the Sound menu is deactivated. Adjust the sound using the equalizer.
• The Reset in the Sound menu is activated. Reset function initializes the Equalizer settings to
the factory default setting.
Game Mode is not available in TV mode.
If the picture is poor when external device is connected to TV, check if Game
Mode is On. Set Game Mode to Off and connect external devices.
Setup
Plug & Play ►
Language : English ►
Time ►
Game Mode : Off ►
V-Chip ►
Caption ►
Menu Transpatency
: High ►
▼More
TV
Move Enter Return
Setup
Plug & Play
Language : English
Time
Game Mode : Off
V-Chip
Caption
Menu Transpatency
: High
▼More
TV
Move Enter Return
Off
On
Setup
Plug & Play ►
Language : English
►
Time ►
Game Mode : Off ►
V-Chip ►
Caption
►
Menu Transparency : Medium
►
▼More
TV
Move Enter Return
Setup
Plug & Play
Language : English
Time
Game Mode : Off
V-Chip
Caption
Menu Transparency : Medium
▼More
TV
Move Enter Return
High
Medium
Low
Opaque
Menu Transparency Level
Adjusts the transparency of the menu screen.
1.
Press the MENU button to display the menu.
Press the ▲ or ▼ buttons to select "Setup", then press the ENTER
button.
2.
Press the ▲ or ▼ buttons to select “Menu Transparency”, then press the ENTER
button.
3.
Press the ▲ or ▼ buttons to select level, then press the ENTER button.
Press the EXIT button to exit.
BN68-01184A-Eng.indd 40 2007-02-13 �� 1:34:30

English - 41
Setup
Plug & Play ►
Language : English ►
Time ►
Game Mode : Off ►
V-Chip ►
Caption ►
Menu Transparency : Medium ►
▼More
TV
Move Enter Return
Caption
Caption : Off
Caption Mode : Default
Caption Options
TV
Move Enter Return
Off
On
Caption
Caption : Off ►
Caption Mode : Default ►
Caption Options ►
TV
Move Enter Return
Caption
Caption : On ►
Caption Mode : Default ►
Caption Options ►
TV
Move Enter Return
Caption
Caption : On
Caption Mode : Default
Caption Options : Off
TV
Move Enter Return
Default
CC1
CC2
CC3
CC4
Text1
Text2
▼
The Analog Caption function operates when watching regular analog channels or when you have an analog external component
(such as a VCR) connected.
1.
Press the MENU button to display the menu.
Press the ▲ or ▼ buttons to select “Setup”, then press the ENTER button.
2.
Press the ▲ or ▼ buttons to select “Caption”, then press the ENTER button.
3.
Press the ENTER button to select “Caption”.
Press the ▲ or ▼ buttons to select “On”, then press the ENTER button.
4. Press the ▲ or ▼ buttons to select “Caption Mode”, then press the ENTER button.
Press the ▲ or ▼ buttons to select submenu (Default, CC1~CC4 or Text1~Text4)
you want, the press the ENTER button.
Press the EXIT
button to exit.
• The default is “CC1”.
• CC1: The Primary Synchronous Caption Service. These are captions in the
primary language that must be in sync with the sound, preferably
matched to a specific frame.
• CC2: The Special Non-Synchronous Use Captions.
This channel carries data that is intended to augment information carried
in the program.
• CC3: Secondary Synchronous Caption Service.
Alternate program-related caption data, typically second language
captions.
• CC4: Special Non-Synchronous Use Captions. Similar to CC2.
• Text1: First Text Service. This may be various non-program related data.
• Text2: Second Text Service. Additional data, usually not program related.
• Text3/Text4: Third and Fourth Text Services.
These data channels should be used only if Text1 and Text2 are
not sufficient.
The Caption feature doesn’t work in COMPONENT, HDMI or PC modes.
The availability of captions depends on the program being broadcast.
Viewing Closed Captions (On-Screen Text Messages) - Analog
Press the CAPTION button repeatedly to select “On” or “Off”.
BN68-01184A-Eng.indd 41 2007-02-13 �� 1:34:32

English - 42
Caption
Caption : Off
Caption Mode : Default
Caption Options
TV
Move Enter Return
Off
On
Caption
Caption : On ►
Caption Mode : Default ►
Caption Options ►
TV
Move Enter Return
Caption
Caption : On
Caption Mode : Default
Caption Options : Off
TV
Move Enter Return
Default
Service1
Service2
Service3
Service4
Service5
Service6
▼
Caption
Caption : On ►
Caption Mode : Default ►
Caption Options ►
TV
Move Enter Return
Caption Options
Size : Default ►
Font Style : Default ►
Foreground Color : Default ►
Background Color : Default ►
Foreground Opacity : Default ►
Background Opacity : Default ►
Return to Default
TV
Move Enter Return
The Digital Captions function operates on digital channels.
1.
Press the MENU button to display the menu.
Press the ▲ or ▼ buttons to select “Setup”, then press the ENTER button.
2.
Press the ▲ or ▼ buttons to select “Caption”, then press the ENTER button.
3.
Press the ENTER button to select “Caption”.
Press the ▲ or ▼ buttons to select “On”, then press the ENTER button.
4. Press the ▲ or ▼ buttons to select “Caption Mode”, then press the ENTER button.
Press the ▲ or ▼ buttons to select submenu (Default, Service1~Service6,
CC1~CC4, or Text1~Text4) you want, then press the ENTER button.
5.
Press the ▲ or ▼ buttons to select “Caption Options”, then press the ENTER button.
“Caption Options” are available only when “Service1~Service6” can be
selected in “Caption Mode”.
Service1~6 in digital caption mode may not be available depending on the broadcast.
6. Press the ▲ or ▼ buttons to select “Size”, then press the ENTER button.
Press the ▲ or ▼ buttons to select the desired Caption option, then press the
ENTER button.
Press the ▲ or ▼ button to select the desired sub-menu options
(see options below), then press ENTER .
Press the EXIT
button to exit.
The availability of captions depends on the program being broadcast.
“Default” means to follow the standard set by the broadcaster.
• Size: This option consists of “Default”, “Small”, “Standard”, and “Large”. The
default is “Standard”.
• Font Style: This option consists of “Default”, “Style0 ~ Style 7”. You can
change the font you want. The default is “Style 0”.
• Foreground Color: This option consists of “Default”, “White”, “Black”, “Red”,
“Green”, “Blue”, “Yellow”, “Magenta”, and “Cyan”. You can
change the color of the letter. The default is “White”.
• Background Color: This option consists of “Default”, “White”, “Black”, “Red”,
“Green”, “Blue”, “Yellow”, “Magenta”, and “Cyan”. You can
change the background color of the caption. The default is
“Black”.
• Foreground Opacity: This option consists of “Default”, “Transparent”,
“Translucent”, “Solid”, and “Flashing”. You can change
the opacity of the letter.
• Background Opacity: This option consists of “Default”, “Transparent”,
“Translucent”, “Solid”,and “Flashing”. You can change
the background opacity of the caption.
• Return to Default: This option sets each of “Size”, “Font Style”, “Foreground
Color”, “Bakcground color”, “Foreground Opacity”, and
“Background Opacity” to its default.
Viewing Closed Captions (On-Screen Text Messages) - Digital
Press the CAPTION button repeatedly to select “On” or “Off”.
BN68-01184A-Eng.indd 42 2007-02-13 �� 1:34:34

English - 43
Setup
▲More
Melody : Off
►
PC
►
HDMI Black Level
: Normal ►
Film Mode : Off
►
PIP
►
Function Help : On
►
▼More
TV
Move Enter Return
Setup
▲More
Melody
PC
HDMI Black Level
Film Mode
PIP
Function Help : On ►
▼More
TV
Move Enter Return
Off
On
Setup
▲More
Light Effect :
In Watching TV
►
SW Upgrade ►
TV
Move Enter Return
Setup
▲More
Light Effect : Watch Mode
►
SW Upgrade ►
TV
Move Enter Return
Off
In Standby
In Watching TV
Always
1. Press the MENU button to display the menu.
Press the
▲ or ▼
buttons to select "Setup", then press the ENTER
button.
2.
Press the
▲ or ▼
buttons to select “Function Help”, then press the ENTER button.
3. Press the ▲ or ▼ buttons to select “On”, then press the ENTER button.
Press the EXIT
button to exit.
The predetermined value of the function help is On.
Setting the Function Help
Displays help on the menu functions.
1. Press the MENU button to display the menu.
Press the
▲ or ▼
buttons to select "Setup", then press the ENTER
button.
2.
Press the
▲ or ▼
buttons to select “Light Effect”, then press the ENTER
button.
3.
Press the
▲ or ▼
button to select “Always Off”, “Stand By On”, “Watch Mode”
or “Always On”, then press the ENTER button.
• Off: LED will not come on.
• In Standby: Turns the LED on in standby mode.
• In Watching TV: Turns the LED on while watching TV.
• Always: LED will come on after you turn the TV off.
Press the EXIT button to exit.
Setting the Light Effect
You can turn on/off the blue LED on the front of TV.
BN68-01184A-Eng.indd 43 2007-02-13 �� 1:34:36

English - 44
Setup
Plug & Play ►
Language : English ►
Time
►
Game Mode :
Off ►
V-Chip ►
Caption ►
Menu Transpatency
: High ►
▼M
ore
TV
Move Enter Return
Move Enter Return
V-Chip Lock : Off ►
T
V Parental Guidelines ►
MPAA Rating ►
Canadian English ►
Canadian French ►
Downloadable U.S. Rating ►
Change PIN ►
V-ChipTV
Enter new PIN
Confirm new PIN
Change PINTV
Enter PIN Return
1. Press the MENU button to display the menu.
Press the
▲ or ▼
buttons to select "Setup", then press the ENTER
button.
2.
Press the
▲ or ▼
buttons to select “V-Chip”, then press the ENTER button.
The message “Enter PIN” will appear. Enter your 4 digit PIN number.
The default PIN number of a new TV set is “0-0-0-0”.
3. The “V-Chip” screen will appear.
Press the ▲ or ▼ buttons to select “Change PIN”, then press the ENTER button.
The Change PIN screen will appear. Choose any 4 digits for your PIN and enter
them. As soon as the 4 digits are entered, the “Confirm new PIN” screen appears.
Re-enter the same 4 digits. When the Confirm screen disappears, your PIN has
been memorized.
Press the EXIT
button to exit.
If you forget the PIN, press the remote-control buttons in the following
sequence, which resets the pin to 0-0-0-0 : Power Off. → Mute → 8 → 2 →
4 → Power On.
Using the V-Chip
The V-Chip feature automatically locks out programs that are deemed inappropriate for children. The user must enter a PIN
(personal ID number) before any of the V-Chip restrictions are set up or changed.
When the V-chip feature is activated, the PIP features do not function.
Setting Up Your Personal ID Number (PIN)
V-Chip
Enter PIN
TV
Enter PIN Return
* ** *
BN68-01184A-Eng.indd 44 2007-02-13 �� 1:34:37

English - 45
Setup
Plug & Play ►
Language : English
►
Time
►
Game Mode : Off ►
V-Chip
►
Caption
►
Menu Transpatency
: High ►
▼More
TV
Move Enter Return
Move Enter Return
V-Chip Lock : Off
►
TV Parental Guidelines ►
MPAA Rating ►
Canadian English ►
Canadian French ►
Downloadable U.S. Rating ►
Change PIN ►
V-ChipTV
Move Enter Return
V-Chip Lock : off
TV Parental Guidelines
MPAA Rating
Canadian English
Canadian French
Downloadable U.S. Rating
Change PIN
V-ChipTV
Off
On
Setup
Plug & Play ►
Language : English ►
Time ►
Game Mode : Off ►
V-Chip ►
Caption ►
Menu Transpatency
: High ►
▼More
TV
Move Enter Return
1. Press the MENU button to display the menu.
Press the
▲ or ▼
buttons to select "Setup", then press the ENTER
button.
2.
Press the
▲ or ▼
buttons to select “V-Chip”, then press the ENTER button.
The message “Enter PIN” will appear. Enter your 4 digit PIN number.
3. The “V-Chip” screen will appear.
To enable the V-Chip feature, press the ENTER button so that the “V-Chip Lock”
field is “On”. (Pressing the ▲ or ▼ buttons will alternate between “On” and “Off”.)
Press the ENTER
button.
Press the EXIT
button to exit.
How to Enable/Disable the V-Chip
1. Press the MENU button to display the menu.
Press the
▲ or ▼
buttons to select “Setup”, then press the ENTER button.
2.
Press the
▲ or ▼
buttons to select “V-Chip”, then press the ENTER button.
The message “Enter PIN” will appear. Enter your 4 digit PIN number.
How to Set up Restrictions Using the “TV Parental Guidelines”
First, set up a personal identification number (PIN), and enable the V-Chip. (See
previous section.)
Parental restrictions can be set up using either of two methods: The TV guidelines or
the MPAA rating.
V-Chip
Enter PIN
TV
Enter PIN Return
* ** *
V-Chip
Enter PIN
TV
Enter PIN Return
* ** *
BN68-01184A-Eng.indd 45 2007-02-13 �� 1:34:39

English - 46
Move Enter Return
V-Chip Lock : On
►
TV Parental Guidelines ►
MPAA Rating ►
Canadian English ►
Canadian French ►
Downloadable U.S. Rating ►
Change PIN ►
V-ChipTV
Move Enter Return
TV-Y
TV-Y7
TV Parental GuidelinesTV
TV-G
TV-PG
TV-14
TV-MA
ALL FV V S L D
Allow All
Block All
Move Enter Return
TV-Y
TV-Y7
TV Parental GuidelinesTV
TV-G
TV-PG
TV-14
TV-MA
ALL FV V S L D
Allow All
Block All
3. The “V-Chip” screen will appear. Press the
▲ or ▼
buttons to select “TV Parental
Guidelines”, then press the ENTER button.
4.
The “TV Parental Guidelines” screen will appear.
Press the
▲ or ▼
buttons to select one of the six aged based categories:
• TV-Y: Young children
• TV-Y7: Children 7 and over
• TV-G: General audience
• TV-PG: Parental guidance
• TV-14: Viewers 14 and over
• TV-MA: Mature audience
5. At this point, one of the TV-Ratings is selected.
Press the ENTER button. Depending on your existing setup, the “ ” symbol will
be selected. (Blank = Unblocked, = Blocked)
While “ ” is selected, press the ENTER button to block or unblock the category.
To select a different TV-Rating, press the
▲ or ▼
buttons and then repeat the
process.
Allow all: Press to unlock all TV ratings. / Block all: Press to lock all TV ratings.
The TV-Y, TV-Y7, TV-G, TV-PG, TV-14 and TV-MA have additional options.
See the next step to change any of the following sub-ratings:
FV: Fantasy violence / D: Sexually Suggestive Dialog / L: Adult Language /
S: Sexual situation / V: Violence
The V-Chip will automatically block certain categories that are “more
restrictive”. For example, if you block “TV-Y” category, then TV-Y7 will
automatically be blocked. Similarly, if you block the TV-G category, then all the
categories in the “young adult” group will be blocked (TV-G, TV-PG, TV-14, and
TV-MA). The sub-ratings (D, L, S, V) work together similarly.
(See next section.)
6. How to set the FV, D, L, S and V sub-ratings.
First, select one of these TV-Ratings: TV-Y, TV-Y7, TV-G, TV-PG, TV-14, or TV-MA
(See Step 4, on previous page), and press the
►
button. The “ ”symbol will be
displayed for each sub-rating.
While “ ” is selected, press the ENTER button to go to a sub rating.
Press ENTER to block the sub rating. To select a different TV-Rating, press the
▲ or ▼
buttons and then repeat the process.
The V-chip will automatically block certain categories that are “More restrictive”.
For example, if you block “L” sub-rating in TV-PG, then the “L” sub-ratings in
TV-14 and TV-MA will automatically be blocked.
7. Press the EXIT button to clear all the screens. (Or proceed to the next section,
and set up additional restrictions based on the MPAA codes.)
These categories consist of two separate groups: TV-Y and TV-Y7 (young
children through age 7), and TV-G through TV-MA (everybody else).
The restrictions for these two groups work independently: If a household
includes very young children as well as young adults, the TV guidelines must
be set up separately for each age group. (See next step.)
BN68-01184A-Eng.indd 46 2007-02-13 �� 1:34:41

English - 47
Setup
Plug & Play ►
Language : English
►
Time
►
Game Mode : Off ►
V-Chip ►
Caption ►
Menu Transpatency
: High ►
▼More
TV
Move Enter Return
Move Enter Return
V-Chip Lock : On
►
TV Parental Guidelines ►
MPAA Rating ►
Canadian English ►
Canadian French ►
Downloadable U.S. Rating ►
Change PIN ►
V-ChipTV
Move Enter Return
MPAA RatingTV
G
PG
PG-13
R
NC-17
X
NR
Block
Allow All
Block All
Move Enter Return
MPAA RatingTV
G
PG
PG-13
R
NC-17
X
NR
Block
Allow All
Block All
How to Set up Restrictions Using the MPAA Ratings: G, PG, PG-13, R, NC-17, X, NR
The MPAA rating system uses the Motion Picture Association of America (MPAA) system, and its main application is for movies.
When the V-Chip lock is on, the TV will automatically block any programs that are coded with objectionable ratings
(either MPAA or TV-Ratings).
1. Press the MENU button to display the menu.
Press the
▲ or ▼
buttons to select “Setup”, then press the ENTER button.
2.
Press the
▲ or ▼
buttons to select “V-Chip”, then press the ENTER button.
The message “Enter PIN” will appear. Enter your 4 digit PIN number.
3.
The “V-Chip” screen will appear. Press the
▲ or ▼
buttons to select “MPAA Rating”,
then press the ENTER button.
4.
The “MPAA Rating” screen will appear. Repeatedly press the
▲ or ▼
buttons to
select a particular MPAA category. Pressing the
▲ or ▼
buttons will cycle through
the MPAA categories:
• G: General audience (no restrictions).
• PG: Parental guidance suggested.
• PG-13: Parents strongly cautioned.
• R: Restricted. Children under 17 should be accompanied by an adult.
• NC-17: No children under age 17.
• X: Adults only.
• NR: Not rated.
Allow all: Press to unlock all TV ratings. / Block all: Press to lock all TV ratings.
While a particular category is selected, press the ENTER button to activate it.
The “ ” symbol will be displayed. Press the ENTER button to block or
unblock the category.
The V-Chip will automatically block any category that is “more restrictive”.
For example, if you block the “PG-13” category, then “R”, “NC-17” and “X” will
automatically be blocked also.
Press the EXIT button to exit.
V-Chip
Enter PIN
TV
Enter PIN Return
* ** *
BN68-01184A-Eng.indd 47 2007-02-13 �� 1:34:44

English - 48
Setup
Plug & Play ►
Language : English ►
Time ►
Game Mode : Off ►
V-Chip
►
Caption ►
Menu Transpatency
: High ►
▼More
TV
Move Enter Return
Move Enter Return
V-Chip Lock : On
►
TV Parental Guidelines
►
MPAA Rating ►
Canadian English ►
Canadian French ►
Downloadable U.S. Rating ►
Change PIN ►
V-ChipTV
Move Enter Return
Canadian EnglishTV
C
C8+
G
PG
14+
18+
Block
Allow All
Block All
Move Enter Return
Canadian EnglishTV
C
C8+
G
PG
14+
18+
Block
Allow All
Block All
How to Set up Restrictions Using the ‘Canadian English’
1. Press the MENU button to display the menu.
Press the
▲ or ▼
buttons to select “Setup”, then press the ENTER button.
2.
Press the
▲ or ▼
buttons to select “V-Chip”, then press the ENTER button.
The message “Enter PIN” will appear. Enter your 4 digit PIN number.
3.
The “V-Chip” screen will appear. Press the
▲ or ▼
buttons to select
“Canadian English”, then press the ENTER button.
4.
Press the
▲ or ▼
buttons to select an appropriate restriction.
Press the ENTER button to activate the restriction selected. The “ ” symbol is
indicated.
Press the EXIT
button to exit.
Allow all: Press to unlock all TV ratings. / Block all: Press to lock all TV ratings.
• C: Programming intended for children under age 8.
• C8+: Programming generally considered acceptable for children 8 years and
over to watch on their own.
• G: General programming, suitable for all audiences.
• PG: Parental Guidance.
• 14+: Programming contains themes or content which may not be suitable for
viewers under the age of 14.
• 18+: Adult programming.
V-Chip
Enter PIN
TV
Enter PIN Return
* ** *
BN68-01184A-Eng.indd 48 2007-02-13 �� 1:34:46

English - 49
Setup
Plug & Play ►
Language : English
►
Time
►
Game Mode : Off ►
V-Chip
►
Caption
►
Menu Transpatency
: High ►
▼More
TV
Move Enter Return
Move Enter Return
V-Chip Lock : On
►
TV Parental Guidelines ►
MPAA Rating ►
Canadian English ►
Canadian French ►
Downloadable U.S. Rating ►
Change PIN ►
V-ChipTV
Move Enter Return
Canadian FrenchTV
G
8 ans+
13 ans+
16 ans+
18 ans+
Block
Allow All
Block All
Move Enter Return
Canadian FrenchTV
G
8 ans+
13 ans+
16 ans+
18 ans+
Block
Allow All
Block All
How to Set up Restrictions Using the ‘Canadian French’
1. Press the MENU button to display the menu.
Press the
▲ or ▼
buttons to select “Setup”, then press the ENTER button.
2.
Press the
▲ or ▼
buttons to select “V-Chip”, then press the ENTER button.
The message “Enter PIN” will appear. Enter your 4 digit PIN number.
3.
The “V-Chip” screen will appear. Press the
▲ or ▼
buttons to select
“Canadian French”, then press the ENTER button.
4.
Press the
▲ or ▼
buttons to select an appropriate restriction.
Press the ENTER button to activate the restriction selected. The “ ” symbol is
indicated.
Press the EXIT
button to exit.
Allow all: Press to unlock all TV ratings. / Block all: Press to lock all TV ratings.
• G: General
• 8 ans+: Programming generally considered acceptable for children 8 years
and over to watch on their own.
• 13 ans+: Programming may not be suitable for children under the age of 13.
• 16 ans+: Programming is not suitable for children under the age of 16.
• 18 ans+: Programming restricted to adults.
V-Chip
Enter PIN
TV
Enter PIN Return
* ** *
BN68-01184A-Eng.indd 49 2007-02-13 �� 1:34:49

English - 50
Setup
Plug & Play ►
Language : English ►
Time ►
Game Mode : Off ►
V-Chip
►
Caption ►
Menu Transpatency
: High ►
▼More
TV
Move Enter Return
Move Enter Return
V-Chip Lock : On
►
TV Parental Guidelines ►
MPAA Rating ►
Canadian English ►
Canadian French ►
Downloadable U.S. Rating ►
Change PIN ►
V-ChipTV
Move Enter Return
Downloadable U.S. Rating
TV
DH
MH
H
VH
EH
Humor Level
Allow All
Block All
41/2
Rating title
The number of
current rating
title
The nimber of
all rating title
1. Press the MENU button to display the menu.
Press the
▲ or ▼
buttons to select “Setup”, then press the ENTER button.
2.
Press the
▲ or ▼
buttons to select “V-Chip”, then press the ENTER button.
The message “Enter PIN” will appear. Enter your 4 digit PIN number.
3.
The “V-Chip” screen will appear. Press the
▲ or ▼
buttons to select
“Downloadable U.S. Rating”, then press the ENTER button.
If information is not downloaded from the broadcasting station, the
Downloadable U.S. Rating menu is deactivated.
Parental restriction information is automatically downloaded while watching
DTV channels. It may take several seconds.
The Downloadable U.S. Rating menu is available for use after information is
downloaded from the broadcasting station. However, depending on the
information from the broadcasting station, it may not be available for use.
4. Press the
▲ or ▼
buttons to select an appropriate restriction.
Press the ENTER button to activate the restriction selected. The “ ” symbol is
indicated.
Press the EXIT
button to exit.
Allow all: Press to unlock all TV ratings. / Block all: Press to lock all TV ratings.
Parental restriction levels differ depending on the broadcasting station.
The default menu name and Downloadable US rating changes depending on
the downloaded information.
Even if you set the On-screen display to your desired language, the
"Downloadable U.S. Rating" menu will appear in English only.
The rating will automatically block certain categories that are more restrictive.
The rating titles(For example: Humor Level..etc) and TV ratings
(For example: DH,MH,H..etc) may differ depending on the broadcasting station.
Using the V-Chip for Digital channels
Parental restriction information can be used while watching DTV channels.
V-Chip
Enter PIN
TV
Enter PIN Return
* ** *
BN68-01184A-Eng.indd 50 2007-02-13 �� 1:34:50

English - 51
SW Upgrade
Scanning for USB...
It may take up to 30 seconds.
▲More
Size : 16 : 9
►
Digital NR : Off
►
Reset : Cancel
►
PictureTV
Move Enter Return
▲More
Size : 16 : 9
Digital NR : Off
Reset : Cancel
PictureTV
Move Enter Return
Off
Low
Medium
High
Auto
TV Rear Panel
If the broadcast signal received by your TV is weak, you can activate the Digital Noise Reduction feature to help reduce any static
and ghosting that may appear on the screen.
1. Press the MENU
button to display the menu.
Press the ENTER button, to select "Picture".
2. Press the
▲
or
▼
button to select "Digital NR", then press the ENTER button.
3. Press the
▲
or
▼
button to select "Off", "Low", "Medium", "High", "Auto".
Press the ENTER button.
Off: Turns the screen noise reduction function off.
Low: Reduces screen noise at a low level.
Medium: Reduces screen noise at a medium level.
High: Reduces screen noise at a high level.
Auto: Automatically recognizes and reduces screen noise.
Press the EXIT button to exit.
Digital Noise Reduction
1. Insert a USB drive containing the firmware upgrade into the SERVICE prot
on the back of the TV.
2.
Press the MENU button to display the menu.
Press the
▲ or ▼
buttons to select "Setup", then press the ENTER
button.
3.
Press the ▲ or ▼ buttons to select SW Upgrade, then press the ENTER button.
4.
Press the ENTER button.
The message Scanning for USB... It may take up to 30 seconds. is displayed.
Please be careful to not disconnect the power or remove the USB drive while
upgrades are being applied. The TV will shut off and turn on automatically after
completing the firmware upgrade. Please check the firmware version after the
upgrades are complete.
Upgrading the Software
Samsung may offer upgrades for your TV’s firmware in the future. Please contact the Samsung call center at 1-800-SAMSUNG
(7267864) to receive information about downloading upgrades and using a USB drive. Upgrades will be possible by connecting a
USB drive to the USB port located on the back of your TV.
Setup
▲More
Light Effect : Watch Mode
►
SW Upgrade ►
TV
Move Enter Return
BN68-01184A-Eng.indd 51 2007-02-13 �� 1:34:52

English - 52
Troubleshooting
If the TV seems to have a problem, rst try this list of possible problems and solutions.
If none of these troubleshooting tips apply, call your nearest Samsung service center.
Problem Possible Solution
Poor picture Try another channel.
Adjust the antenna.
Check all wire connections.
Poor sound quality. Try another channel.
Adjust the antenna.
No picture or sound. Try another channel.
Press the SOURCE button.
Make sure the TV is plugged in.
Check the antenna connections.
No sound or sound is too low at
maximum volume.
First, check the volume of units connected to your TV (digital broadcasting receiver, DVD,
cable broadcasting receiver, VCR, etc.). Then, adjust the TV volume accordingly.
Picture rolls vertically. Check all wire connections.
The TV operates erratically. Unplug the TV for 30 seconds, then try operating it again.
The TV won’t turn on. Make sure the wall outlet is working.
Remote control malfunctions Replace the remote control batteries.
Clean the upper edge of the remote control (transmission window).
Check the battery terminals.
“Check signal cable” message. Ensure that the signal cable is firmly connected to the PC source.
“Not Supported Mode” message. Check the maximum resolution and the frequency of the Video Adapter.
Compare these values with the data in the Display Modes.
Digital broadcasting screen
problem.
Please check the digital signal strength and input antenna.
The image is too light or too dark. Adjust the Brightness and Contrast.
Adjust the Fine tuning.
Black bars on the screen. Make sure the broadcast you’re receiving is High Definition (HD).
HD channels sometimes broadcast Standard Definition (SD) programming, which can
cause black bars.
Set your cable/satellite box to stretch or widescreen mode to eliminate the bars.
Picture has a Red/Green or
Pink tint.
Make sure the Component cables are connected to the correct jacks.
Closed Captioning not working. If you are using a Cable/Satellite box, you must set Closed Captioning on the box,
not your TV.
Snowy picture Your cable box may need a firmware upgrade. Please contact your Cable company.
Ghosting on picture This is sometimes caused by compatibility issues with your cable box.
Try connecting Component cables instead.
Appendix
BN68-01184A-Eng.indd 52 2007-02-13 �� 1:34:52

English - 53
Problem Possible Solution
Horizontal bars appear to flicker,
jitter or shimmer on the image.
Adjust the Coarse tuning and then adjust the Fine tuning.
Vertical bars appear to flicker,
jitter or shimmer on the image.
Adjust the Coarse tuning and then adjust the Fine tuning.
Screen is black and power
indicator light blinks steadily.
On your computer check: Power, Signal Cable.
The TV is using its power management system.
Move the computer's mouse or press any key on the keyboard.
Image is not stable and may
appear to vibrate when you have
a computer connected to the PC
input.
If the setting is not correct, use your computer utility program to change the display settings.
Your TV supports multiscan display functions within the following frequency domain:
Horizontal frequency (kHz)
30~60
Vertical frequency (Hz) 60~75
PC Maximum refresh rate
(at 60 Hz)
1360 x 768
Image is not centered on the
screen.
Adjust the horizontal and vertical position.
The screen position must be adjusted on the output source (i.e. STB) with a digital signal.
If a still image is displayed for
an extended period of time, residual
images or blurring may appear.
When you need to leave the monitor unused for an extended period of time, adjust the
settings so that the monitor automatically goes into energy saving mode or activates the
screen saver to display moving images..
The TFT LCD panel uses a panel consisting of sub pixels (3,147,264) which require sophisticated technology to produce. How-
ever, there may be few bright or dark pixels on the screen. These pixels will have no impact on the performance of the product.
BN68-01184A-Eng.indd 53 2007-02-13 �� 1:34:52

English - 54
Installing the Stand
< 2 > < 3 >
1. Place the TV face down on a soft cloth or cushion on a table.
2.
Put the stand into the hole at the bottom of the TV.
3.
Insert screw into the hole indicated and tighten.
Disconnecting the Stand
< 2 > < 3 > < 4 >
1. Place the TV face down on a soft cloth or cushion on a table.
2.
Remove four screws from the back of the TV.
3.
Separate the stand from the TV.
4.
Cover the bottom hole with a cap.
BN68-01184A-Eng.indd 54 2007-02-13 �� 1:34:55

English - 55
How to Adjust the Stand
1. Place the front of the TV onto a soft cloth
or cushion on a table as in Figure (1).
- Align the TV bottom along the table
edge.
2.
Press on the center of the TV back.
Adjust the stand as in Figure (2) while
pressing the button on the back of the
stand.
3.
Place the TV on the table so that the TV
sits safely.
When you adjust the stand, press the button on the back of the stand.
1. Figure (1) shows the adjustment angle (-2°~14°) when you use the LCD on its stand.
Excessive tilting can turn the LCD TV over which may cause damage.
2.
Figure (2) shows the adjustment angle (14°~80°) when you convert the LCD from stand-based use to wall-mount.
3.
Figure (3) shows the adjustment angle (0°~10°) when you mount the LCD TV to a wall.
You will hear a “Click” sound when changing the angle from 1 to 2 or 3 to 2.
Wall mount items (sold separately) allow you to mount the TV on the wall. For the detailed information on installing the Wall
Mount, see the instruction in the Wall Mount items. Contact a technician for installing the wall bracket. Samsung Electronics is not
responsible for any damage to the product or injury to yourself or others if you choose to install the TV on your own.
1. Place the TV face down on a soft cloth or
cushion on a table.
2.
Adjust the stand, pressing the button on the
back of the stand.
3.
Align the mounting interface pad (not supplied)
with the holes in the stand bottom and secure
it with the four screws that come with the arm-
type base, wall mount hanger or other bases
(not supplied).
1.
When installing the TV on the wall without using
the stand, insert decoration covers into the
holes as described in the picture (1).
2.
After inserting the decoration covers, fasten
them with 4 screws as described in the picture
(2).
( 1 ) ( 2 )
Button
How to Adjust the Angle of the TV
( 1 ) Angle adjustment when using the
TV on its stand.
( 2 ) Angle adjustment when converting from
Stand to Wall mount (1→3, 3→1)
( 3 ) Angle adjustment when LCD
TV is wall-mounted
Installing the Wall Mount Kit
Installing VESA compliant mounting devices
( 1 ) ( 2 )
Button
Mounting pad
(Sold separately)
Using the Decoration Covers
( 1 ) ( 2 )
BN68-01184A-Eng.indd 55 2007-02-13 �� 1:34:57

English - 56
1. Insert the locking device into the Kensington slot on the LCD TV (Figure 1), and turn it in the locking direction (Figure 2).
2.
Connect the Kensington lock cable.
3.
Fix the Kensington lock to a desk or a heavy stationary object.
Using the Anti-Theft Kensington Lock
The Kensington lock is a device used to physically x the system when using it in a public place. The locking device has to be purchased
separately. The appearance and locking method may differ from the illustration depending on the manufacturer.
Please refer to the manual provided with the Kensington lock for proper use.
Figure 2
Figure 1
Cable
<Optional>
The place of the Kensington Lock may be different depending on its model.
Specications
Model Name LN-T1953H/ LN-T1954H
Screen Size (Diagonal)
19 inch
Power Consumption
55 W
PC Resolution
1360 x 768 @ 60 Hz
Sound
Output
3W X 2
Dimensions (WxDxH)
Body
With stand
18.9 X 2.7 X 14.2 inches
(480 X 57.5 X 360.5 mm)
18.9 X 7.1 X 15.5 inches
(480 X 180 X 393 mm)
Weight
With Stand
11.46 lbs (5.2 kg)
Environmental Considerations
Operating Temperature
Operating Humidity
Storage Temperature
Storage Humidity
50 °F to 104 °F (10 °C to 40 °C)
10% to 80%, non-condensing
-4 °F to 113 °F (-20 °C to 45 °C)
5% to 95%, non-condensing
Design and specifications are subject to change without prior notice.
This device is a Class B digital apparatus.
For the power supply, refer to the label attached to the product.
BN68-01184A-Eng.indd 56 2007-02-13 �� 1:34:57

This page is intentionally
left blank.
BN68-01184A-Eng.indd 57 2007-02-13 �� 1:34:58

Español - 1
Contenido
Símbolo Pulse Importante Nota Botón de una
pulsación
Español
INFORMACIÓN GENERAL
Listado de características ................................................. 2
Accesorios ........................................................................ 2
Aspecto general del panel de control ............................... 3
Aspecto general del panel de conexiones ........................ 4
Mando a distancia ............................................................ 5
Instalación de las pilas en el mando a distancia .............. 6
CONEXIONES
Conexión de antenas de VHF y UHF ............................... 6
Conexión de TV por cable ................................................ 7
Conexión de un reproductor de vídeo .............................. 8
Conexión de un reproductor de DVD ............................... 9
Conexión a un DVD/receptor de TV digital a través de
un HDMI ...........................................................................
9
Conexión de un DVD o un Decodicador digital
mediante DVI ..................................................................
10
Conexión de un sistema de audio digital ........................ 10
Conexión a un PC ...........................................................11
FUNCIONAMIENTO
Encendido o apagado del TV ......................................... 12
Función Plug & Play ....................................................... 12
Cambio de canales ......................................................... 13
Ajuste del volumen ......................................................... 14
Visualización de la pantalla ............................................ 14
Visualización de los menús ............................................ 15
Memorización de los canales ......................................... 15
Para seleccionar la fuente .............................................. 17
Edición del Nombre de la Fuente de entrada ................. 17
CONTROL DE LA IMAGEN
Uso de los parámetros de imagen automáticos ............. 18
Ajuste del Color del fondo .............................................. 19
Congelación de la imagen .............................................. 19
Ajuste de la función Film Mode ...................................... 19
Cambio del tamaño de la pantalla .................................. 20
Visualización Imagen en imagen .................................... 21
Conguración del Nivel de negro HDMI ......................... 22
CONTROL DE SONIDO
Personalización del sonido ............................................. 23
Uso de los parámetros de sonido automáticos .............. 23
Conguración del TruSurround XT (SRS TS XT) ........... 24
Selección de una pista de sonido multicanal (MTS) -
Digital ..............................................................................
24
Selección de una pista de sonido multicanal (MTS) ..........
- Analogo .......................................................................
25
Control automático de volumen ...................................... 25
Selección del silencio interno ......................................... 26
Escuchar el sonido de la sub imagen del PIP ................ 26
Reajuste de valores de sonido a los valores predenidos
de fábrica ........................................................................
27
Conexión de los auriculares ........................................... 27
Ajuste de la melodía de encendido/apagado ................. 27
■
■
■
■
■
■
■
■
■
■
■
■
■
■
■
■
■
■
■
■
■
■
■
■
■
■
■
■
■
■
■
■
■
■
■
■
■
■
■
■
■
CONTROL DE LOS CANALES
Selección de la antena ................................................... 28
Supresión de los canales codicados digitales .............. 28
Conguración de las listas de canales ........................... 29
Para congurar los canales favoritos ............................. 30
Manejo de la Lista de Canales ....................................... 31
Visualización de la lista de canales ................................ 31
Etiquetado de canales .................................................... 32
LNA (Low Noise Amplier - Amplicador de ruido bajo) . 32
Sintonización na de los canales analógicos ................. 33
Comprobación de la potencia de la señal digital ............ 33
PANTALLA DE PC
Uso del TV como pantalla de ordenador (PC) ................ 34
Modos de visualización .................................................. 34
Ajuste del televisor con el ordenador ............................. 35
AJUSTE DE LA HORA
Conguración del Reloj .................................................. 37
DESCRIPCIÓN DE LAS FUNCIONES
Selección del idioma de menú ........................................ 40
Uso del Modo Juego ....................................................... 40
Nivel Transparencia del menú ........................................ 40
Visión de subtítulos (mensajes de texto en pantalla) ........
- Analógico ......................................................................
41
Visión de subtítulos (mensajes de texto en pantalla)
- Digital ...........................................................................
42
Ajuste de la función de ayuda ........................................ 43
Conguración de Efecto de luz ....................................... 43
Uso de V-Chip ................................................................ 44
Reducción digital del ruido ............................................. 51
Guía de actualización del software ................................. 51
APÉNDICE
Identicación de problemas ............................................ 52
Instalación del soporte .................................................... 54
Desconexión del soporte ................................................ 54
Cómo ajustar el soporte ................................................. 55
Cómo ajustar el ángulo del televisor .............................. 55
Instalación del equipo de montaje en la pared ............... 55
Instalación de dispositivos de montaje conforme con
VESA ..............................................................................
55
Uso de las tapetas decorativas ...................................... 55
Uso del cierre antirrobo kensington ................................ 56
Especicaciones ............................................................. 56
■
■
■
■
■
■
■
■
■
■
■
■
■
■
■
■
■
■
■
■
■
■
■
■
■
■
■
■
■
■
■
■
■
■
Antes de usar el equipo lea este manual para evitarfal-
las y guarde para futuras referencias.
BN68-01184A-Spa.indd 1 2007-02-13 �� 1:41:09

Español - 2
Accesorios
Compruebe que las opciones siguientes se incluyen con su TV LCD.
Si falta alguna opción, póngase en contacto con el proveedor.
Mando A Distancia y Pilas
(AAA x 2)
( LN-T1953H:BN59-00601A)
( LN-T1954H:BN59-00608A)
Cable de alimentación
(3903-000085)
Kit de Montaje en Pared
(BN96-04960A)
Manual de
Instrucciones
Tarjeta de garantía /
Tarjetas de registro /
Guía de seguridad
(no esta disponible en todas
las localidades)
Tapetas decorativas
LN-T1953H-Left: BN63-03216A,
Right: BN63-03217A
LN-T1954H-Left: BN63-03216B,
Right: BN63-03217B
Paño de limpieza
(BN63-01798A)
El color y la forma de los elementos puede variar según el modelo.
Información General
Listado de características
Valores ajustables de la imagen que se pueden almacenar en la memoria del televisor.
Temporizador automático para encender o apagar el televisor.
Temporizador de desconexión especial.
Función V-chip.
Excelente interfaz digital y capacidad de trabajo en red:
El sintonizador digital HD incorporado permite ver las emisiones HD que no exigen una suscripción sin que sea
necesario disponer de un receptor de televisión digital.
Mando a distancia
Con el mando a distancia suministrado se puede controlar el televisor, la mayoría de reproductores de DVD, los
receptores de televisión digital y de cable y los aparatos de vídeo.
SRS TruSurround XT
- SRS TruSurround XT proporciona un sistema surround Dolby virtual.
Compruebe que las opciones siguientes se incluyen con su TV LCD.
Si falta alguna opción, póngase en contacto con el proveedor.
Mando A Distancia y Pilas
(AAA x 2)
( LN-T1953H:BN59-00601A)
( LN-T1954H:BN59-00608A)
Cable de alimentación
(3903-000085)
Paño de limpieza
(BN63-01798A)
Cubierta inferior
LN-T2353H, LN-T2653H
(BN63-03221B)
LN-T2354H (BN63-03221C)
LN-T3253H (BN63-03103B)
LN-T4053H (BN63-03113B)
Base
LN-T2353H (BN96-04663A)
LN-T2354H (BN96-04663B)
LN-T2653H (BN96-04663A)
LN-T3253H (BN96-04662A)
Soporte Tornillo
LN-T2353H, LN-T2653H,
LN-T3253H (6002-001294)
LN-T2354H (6003-001324)
Manual de
Instrucciones
Tarjeta de garantía /
Tarjetas de registro /
Guía de seguridad
(no esta disponible en todas
las localidades)
El color y la forma de los elementos puede variar según el modelo.
BN68-01184A-Spa.indd 2 2007-02-13 �� 1:41:11

Español - 3
Aspecto general del panel de control
1
SOURCE
Cambia entre todas las fuentes de entrada disponibles
(TV, AV, S-Video, Component, PC, HDMI).
En el menú de la pantalla, utilice este botón del mismo
modo que el botón ENTER del mando a distancia.
2
MENU
Pulse para ver en pantalla un menú con las
características del TV.
3
+ VOL -
Pulse para aumentar o reducir el volumen. En el menú
de la pantalla, utilice los botones + VOL - del mismo
modo que los botones ◄ y ► del mando a distancia.
4 CH
Pulse para cambiar de canal.
En el menú de la pantalla, utilice estos botones
CH
del mismo modo que los botones ▲ y ▼ del
mando a distancia.
5
(ENCENDIDO)
Pulse para encender o apagar el TV.
INDICADOR DE ALIMENTACIÓN
Parpadea y se apaga cuando se enciende el aparato y
se ilumina en el modo en espera.
6
SENSOR DEL MANDO A DISTANCIA
Dirija el mando a distancia hacia este punto del TV.
7
ALTAVOCES
Botones de la parte inferior derecha del panel
Los botones del panel inferior derecho controlan las funciones básicas del televisor, incluido el menú en pantalla.
Para usar las funciones más avanzadas, debe usar el mando a distancia.
El color y la forma del producto pueden variar según el modelo.
Botones del panel frontal
Toque el lado derecho de cada
botón para activar la función.
1
2
3
4
5
6
7
1
AUDIO OUT
Permite conectar las tomas de la entrada de audio del
amplificador/sistema de Home Cinema.
2
DIGITAL AUDIO OUT (OPTICAL)
Se conecta al componente de audio digital.
3
PC IN
Permite conectar a las tomas de salida de audio y de
vídeo de su PC.
4
HDMI IN 1,2,3 /DVI IN(HDMI1) (AUDIO R/L)
Permite conectar a la toma HDMI de un dispositivo que tenga
salida HDMI.
Use el terminal HDMI IN 1 para conectar el DVI a un
dispositivo externo. Debe usar el cable de DVI a HDMI
o el adaptador de DVI-HDMI (DVI a HDMI) para la
conexión del vídeo, y el terminal “R-AUDIO-L” de DVI-IN
para el audio.
- No se necesita ninguna conexión de sonido para una
conexión de HDMI a HDMI.
- Cuando se usa una conexión de cable HDMI/DVI, se debe
conectar en el terminal HDMI IN 1.
- El modelo de 23, 26 pulgadas sólo admite HDMI1 y HDMI2.
5
ANT 1 IN/ANT 2 IN
Permite conectar a una antena o un sistema de TV por
cable.
6
EX LINK
Conector para el ajuste de montaje en pared solamente.
(Consulte la página 83)
7
COMPONENT IN
Permite conectar el vídeo/audio de componentes.
8
SERVICE (LN-T2353H, LN-T2354H, LN-T2653H)
Conector solamente para servicio.
9
AV IN 1 / AV IN 2
Entradas de vídeo y audio para dispositivos externos,
como una videocámara o un reproductor de vídeo.
S-VIDEO
Permite conectar la señal de S-Vídeo de una cámara o
de un vídeo.
0
POWER INPUT
Permite conectar el cable de alimentación suministrado.
!
KENSINGTON LOCK
El bloqueo Kensington (opcional) es un dispositivo que
se utiliza para fijar físicamente el sistema cuando se
utiliza en un sitio público.
Si desea usar un dispositivo de bloqueo, póngase en
contacto con el distribuidor donde adquirió el televisor.
La ubicación del “Bloqueo Kensington” puede variar
según el modelo.
@
HEADPHONE
Permite conectar unos auriculares externos para
audiciones privadas.
#
WISELINK (LN-T3253H, LN-T4053H)
Se usa para conectar un dispositivo de almacenamiento
masivo USB para ver archivos de fotos (JPEG) y
reproducir archivos de audio (MP3).
BN68-01184A-Spa.indd 3 2007-02-13 �� 1:41:13

Español - 4
Aspecto general del panel de conexiones
Conectores del panel posterior
Se pueden usar para conectar componentes de A/V que estarán conectados permanentemente, como reproductores de
vídeo o de DVD. Si precisa información sobre la conexión de equipos, consulte las páginas 7 a 12.
1
AV IN
Entradas de vídeo y audio para dispositivos externos,
como una videocámara o un reproductor de vídeo.
S-VIDEO
Permite conectar la señal de S-Vídeo de una cámara o
de un vídeo.
2
DIGITAL AUDIO OUT (OPTICAL)
Se conecta al componente de audio digital.
3
SERVICE / EX-LINK
Conector solamente para servicio..
4
HDMI/DVI IN, DVI IN (AUDIO R/L)
Permite conectar a la toma HDMI de un dispositivo que tenga
salida HDMI.
Use el terminal HDMI/DVI IN para conectar el DVI a un
dispositivo externo. Debe usar el cable de DVI a HDMI
o el adaptador de DVI-HDMI (DVI a HDMI) para la
conexión del vídeo, y el terminal “R-AUDIO-L” de DVI-IN
para el audio.
El terminal HDMI/DVI IN no es compatible con el PC.
- No se necesita ninguna conexión de sonido para una
conexión de HDMI a HDMI.
5
HEADPHONE
Permite conectar unos auriculares externos para
audiciones privadas.
6
ANT 1 IN/ANT 2 IN
Permite conectar a una antena o un sistema de TV por
cable.
7
PC IN
Permite conectar a las tomas de salida de audio y de
vídeo de su PC.
8
COMPONENT IN
Permite conectar el vídeo/audio de componentes.
9
POWER INPUT
Permite conectar el cable de alimentación suministrado.
0
KENSINGTON LOCK
El bloqueo Kensington (opcional) es un dispositivo que
se utiliza para fijar físicamente el sistema cuando se
utiliza en un sitio público.
Si desea usar un dispositivo de bloqueo, póngase en
contacto con el distribuidor donde adquirió el televisor.
La ubicación del “Bloqueo Kensington” puede variar
según el modelo.
BN68-01184A-Spa.indd 4 2007-02-13 �� 1:41:13

Español - 5
Mando a distancia
Puede usar el mando a distancia desde una distancia máxima de alrededor de 7 metros desde el TV. Cuando utilice el mando a
distancia, señalé siempre directamente hacia el TV.
1 POWER
Enciende o apaga el TV.
2 NUMERIC BUTTONS
Pulsar para cambiar el canal.
3 –
Pulse este botón para seleccionar
canales adicionales (digitales
y analógicos) emitidos por la
misma emisora. Por ejemplo, para
eleccionar el canal “54-3” pulse “54”,
“-” y “3”.
4 CH LIST
Muestra el “Gestor canales” en la
pantalla.
5 ANTENNA
Pulse este botón para seleccionar
“AIRE” o “CABLE”.
6 VOL / VOL
Pulse para aumentar o reducir el
volumen.
7 (MUTE)
Pulse para desactivar
momentáneamente el sonido.
8 MENU
Muestra el menú de pantalla
principal.
9 S.MODE
Selección del modo de sonido.
0 RETURN
Vuelve al menú anterior.
! P.MODE
Selección de efectos de imagen.
@ SRS
Selecciona el modo SRS
TruSurround XT.
# MTS
Pulse para elegir estéreo, mono o
pro grama de audio independiente
(emisión SAP)..
$ AUTO PROG.
Se pulsa para memorizar
automáticamente los canales
seleccionados de TV/Cable.
% ADD/DEL
Se utiliza para almacenar y borrar
canales en la memoria.
^ SOURCE
Pulse para visualizar todos las
fuentes de vídeo.
& PRE-CH
Sintoniza el canal anterior.
* FAV.CH
Pulse este botón para sintonizar sus
canales favoritos.
( SLEEP
Pulse este botón para seleccionar
un intervalo prefijado para la
desconexión automática.
) CH / CH
Permiten cambiar de canal.
a EXIT
Pulse el botón para salir.
b
ARRIBA▲ / ABAJO▼ /
IZQUIERDA◄ /
DERECHA► / ENTER
Sirve para seleccionar los elementos
del menú en pantalla y cambiar los
valores del menú.
c INFO
Púlselo para mostrar información en
la pantalla del televisor.
d CAPTION
Controla el decodificador de
subtítulos.
e STILL
Pulse para detener la acción durante
una escena concreta. Para reanudar
la reproducción normal, vuelva a
pulsarlo.
f P.SIZE
Selección del tamaño de la imagen.
g PIP
Imagen sobre imagen Encendido/
Apagado.
h CH /
Presenta secuencialmente los
canales disponibles. (Estos botones
sólo cambian los canales de la
ventana PIP).
i POSITION
Beeldformaat teletekst selecteren
Es un mando a distancia especial para personas con discapacidades visuales; presenta puntos Braille en los botones de
encendido, de canales, volumen, Stop.
BN68-01184A-Spa.indd 5 2007-02-13 �� 1:41:14

Español - 6
1. Levante la tapa de la parte posterior del mando a distancia, como se muestra en la ilustración.
2.
Coloque dos pilas de tamaño AAA.
Compruebe que los extremos “+” y “-” de las pilas concuerdan con el diagrama del interior del
compartimiento.
3.
Vuelva a colocar la tapa.
Si no va a usar el mando a distancia durante un largo período de tiempo, extraiga las pilas y guárdelas en
un lugar fresco y seco.
El mando se puede utilizar hasta una distancia de unos 7 metros del televisor.
(Con un uso normal del TV, las pilas duran alrededor de un año).
Si el mando a distancia no funciona, haga estas comprobaciones:
1. ¿Está encendido el TV?
2. ¿Están invertidos los polos positivo y negativo de la batería?
3. ¿Se han agotado las baterías?
4. ¿Ha habido un corte de luz o el cable está desconectado?
5. ¿Hay cerca una luz fluorescente o un letrero de neón?
Instalación de las pilas en el mando a distancia
Conexión de antenas de VHF y UHF
Si su antena tiene un conjunto de cables con este aspecto, consulte “Antenas de par de cables
planos de 300 Ω” a continuación.
Si la antena tiene un cable como el que se muestra en el diagrama de la derecha, consulte
“Antenas con cables coaxiales de 75 ohmios”.
Si dispone de dos antenas, consulte “Antenas de VHF y UHF independientes”.
1. Coloque los conductores del par de cables bajo los tornillos del adaptador de 300-75 Ω
(no incluido).
Utilice un destornillador para apretar los tornillos.
2.
Conecte el adaptador en el terminal ANT 2 IN (CABLE) en la parte posterior del televisor..
ANT 2 IN
(CABLE)
Antenas de par de cables planos de 300 Ω
Si utiliza una antena externa (de techo o de “orejas de conejo”) de par de cables planos de 300 Ω, siga las indicaciones siguientes.
1. Conecte el cable de la antena en el terminal ANT 1 IN (AIR) de la parte inferior del panel
posterior.
Antenas de cable coaxial de 75 Ω
ANT 1 IN
(AIR)
Antenas de VHF y UHF independientes
Si dispone de dos antenas independientes para el TV (una de VHF y otra de UHF), debe combinar ambas señales de la antena
antes de conectarlas al TV. Este procedimiento precisa un adaptador-combinador especial (disponible en la mayoría de tiendas de
electrónica).
1.
Conecte ambos cables de antena al combinador.
2. Conecte el combinador en el terminal ANT 1 IN (AIR) de la parte inferior del panel
posterior.
UHF
VHF
ANT 1 IN
(AIR)
UHF
VHF
Conexiones
BN68-01184A-Spa.indd 6 2007-02-13 �� 1:41:15

Español - 7
Una vez hecha esta conexión, coloque el conmutador A/B en la posición “A” para la visualización normal. Coloque el conmutador A/B en
la posición “B” para ver los canales codificados. (Cuando sitúe el conmutador A/B en “B”, deberá sintonizar el TV al canal de salida del
decodificador, que normalmente es el canal 3 o 4).
Conexión a un decodicador que decodica algunos canales
Si su decodicador sólo decodica algunos canales (como los canales de pago), siga las instrucciones siguientes. Necesitará
un divisor de dos vías, un conmutador de RF (A/B) y cuatro largos de cable RF. Estas opciones se encuentran en la mayoría de
tiendas de electrónica).
2.
Conecte este cable al divisor de dos vías.
3. Conecte el cable RF entre un terminal
OUTPUT(salida) del divisor y el terminal IN
(entrada) del decodificador.
4. Conecte el cable RF entre el terminal ANT
OUT del decodificador y el terminal B.IN del
conmutador A/B.
1. Busque y desconecte el cable que está
conectado al terminal ANT IN (entrada de
antena) del decodificador.
Este terminal puede estar indicado como “ANT
IN”, “VHF IN” o “IN”.
5. Conecte otro cable RF entre el otro terminal
OUT del divisor y el terminal A.IN del
conmutador de RF (A/B).
6. Conecte el último cable RF entre el terminal
OUT del conmutador RF (A/B) y el terminal
ANT IN en la parte posterior del televisor.
Divisor
Cable
entrante
Divisor
Servicio de Cable
Cable
entrante
Divisor
Servicio de Cable
RF (A/B)
Conmutador
Cable
entrante
ANT IN
Divisor
Servicio de Cable
Cable
entrante
RF (A/B)
Conmutador
Divisor
Servicio de Cable
Cable
entrante
Antena
del
Televisor
RF (A/B)
Conmutador
ANT IN
Conexión de TV por cable
Para conectar a un sistema de TV por cable, siga estas instrucciones.
TV por cable sin decodicador
1. Conecte el cable de entrada en el terminal de la antena ANT 2 IN (CABLE) de la parte
posterior del TV.
Dado que el TV está preparado para la televisión por cable, no se necesita un decodificador para ver
canales de cable no codificados.
Conexión al decodicador que decodica todos los canales
1. Busque el cable conectado al terminal ANT OUT del decodificador.
Este terminal puede estar indicado como “ANT OUT”, “VHF OUT” o “OUT”.
2. Conecte el otro extremo del cable en el terminal ANT 2 IN (CABLE) de la parte posterior del TV.
ANT OUT
ANT IN
ANT 2 IN
(CABLE)
ANT 2 IN
(CABLE)
BN68-01184A-Spa.indd 7 2007-02-13 �� 1:41:17

Español - 8
Conexión de un reproductor de vídeo
Estas instrucciones presuponen que ya ha conectado el TV a una antena o sistema de TV por cable (siguiendo las instrucciones
de las páginas 6 a 7). Si aún no ha conectado el TV a una antena o un sistema de cable, sáltese el paso 1.
1. Desconecte el cable o la
antena de la parte posterior
del TV.
2. Conecte el cable o la antena
en el terminal ANT IN de la
parte posterior del reproductor
de vídeo.
3. Conecte el cable RF entre el
terminal ANT OUT (salida de
antena) del reproductor de
vídeo y el terminal ANT 1 IN
(AIR) o ANT 2 IN (CABLE) del
televisor.
4. Conecte un cable de vídeo
entre la toma VIDEO OUT del
reproductor de vídeo y la toma
AV IN 1 (o AV IN 2) [VIDEO]
del televisor.
5. Conecte un juego de cables
de audio entre los conectores
AUDIO OUT del reproductor
de VCR y los conectores
AV IN 1 (o AV IN 2)
[R-AUDIO-L] del TV.
Si tiene un reproductor
de vídeo “mono” (sin
estéreo), use el conector
Y (no suministrado) para
conectar los conectores de
entrada de audio izquierdo
o derecho del TV. Si el
vídeo es estéreo, tendrá
que conectar dos cables.
Siga las instrucciones de “Visualización de una cinta de vídeo o de cámara de vídeo” para
ver sus cintas.
Cada reproductor de video tiene una configuración distinta en el panel posterior.
Cuando conecte un reproductor de video, debe hacer coincidir los colores del terminal de
conexión y del cable.
Panel posterior del TV
Cable RF (No incluido)
3
Panel posterior del VCR
2
Cable de vídeo (No incluido)
4
Cable de Audio (No incluido)
5
ANT 1 IN
(AIR)
Este televisor Samsung se puede conectar a una señal S-Video procedente de un reproductor de VCR.
(Esta conexión ofrece mejor calidad de imagen con relación a un reproductor de VCR normal).
1. Para empezar, siga los
pasos 1 a 3 del apartado
anterior para conectar la
antena o el sistema de
cable al reproductor de
VCR y al TV.
2. Conecte un cable de
S-Vídeo entre la toma
de salida de S-Vídeo del
reproductor y la toma de
entrada de S-Vídeo del
televisor.
3.
Conecte un juego de
cables de audio entre los
conectores AUDIO OUT
del reproductor de VCR y
los conectores AV IN [R-
AUDIO-L] del TV.
Normalmente se incluye un cable S-Video con los reproductores de vídeo S-VHS.
(En caso contrario, consulte en la tienda de electrónica).
Cada reproductor de video S-VHS tiene una configuración distinta en el panel posterior.
Cuando conecte un reproductor de S-VHS, debe hacer coincidir los colores del terminal
de conexión y del cable.
Panel posterior del VCR
Cable RF (No incluido)
1
Cable de Audio(No incluido)
3
Panel posterior del TV
Cable de S-Video (No incluido)
2
ANT 2 IN
(CABLE)
Conexión de S-Vídeo
Conexión de vídeo
BN68-01184A-Spa.indd 8 2007-02-13 �� 1:41:18

Español - 9
Conexión de un reproductor de DVD
Los conectores del panel posterior del TV facilitan la conexión de un reproductor de DVD al TV.
1.
Conecte un cable de
componente entre las tomas
COMPONENT IN (1 o 2)
[Y, PB, PR] del televisor y las
tomas COMPONENT OUT
[Y, PB, PR] del reproductor de
DVD.
2. Conecte un cable de audio
entre las tomas
COMPONENT IN (1 o 2)
[R-AUDIO-L] del televisor
y las tomas AUDIO OUT
del reproductor de DVD.
El vídeo Componente separa el vídeo en Y (Luminancia (brillo), el Pb (azul) y el Pr (rojo)
para realzar la calidad del video. Las conexiones de audio y de vídeo componente deben
coincidir. Por ejemplo, si se conecta el cable de vídeo a Component in, conecte también
el cable de audio a la misma entrada.
Cada reproductor de DVD tiene una configuración distinta en el panel posterior.
Cuando conecte un reproductor de DVD, debe hacer coincidir los colores del terminal de
conexión y del cable.
Panel posterior del
reproductor de DVD
Panel posterior del TV
Cable de Component (No incluido)
1
Cable de Audio
(No incluido)
2
Conexión a un DVD/receptor de TV digital a través de un HDMI
Solo es aplicable si hay un conector de salida de HDMI en el dispositivo externo.
1. Conecte un cable de HDMI
entre el conector de
HDMI/DVI IN del televisor
y el conector HDMI del
reproductor de DVD/
reproductor de televisión
digital.
Panel posterior del
reproductor de DVD
Panel posterior del TV
Cable de HDMI (No incluido)
¿Qué es HDMI?
• HDMI, o interfaz multimedia de alta definición, es una interfaz de la siguiente
generación que permite la transmisión de señales digitales de audio y de vídeo
mediante un cable simple sin compresión.
• La diferencia entre los dispositivos HDMI y DVI es que el HDMI es más pequeño y
tiene instalada la función de codificación HDCP (protección alta de la copia digital del
ancho de banda).
Cada reproductor de DVD tiene una configuración distinta en el panel posterior.
BN68-01184A-Spa.indd 9 2007-02-13 �� 1:41:19

Español - 10
Conexión de un DVD o un Decodicador digital mediante DVI
Solo es aplicable si hay un conector de salida de DVI en el dispositivo externo.
1. Conecte un cable de DVI
a HDMI o un adaptador
de DVI-HDMI entre el
conector de HDMI/DVI IN
del televisor y el conector
de DVI del reproductor de
DVD/reproductor de televisión
digital.
2. Conecte un cable de audio
entre la toma de entrada
de DVI IN [R-AUDIO-L] del
televisor y las tomas AUDIO
OUT del reproductor de DVD/
reproductor de televisión
digital.
Cada reproductor de DVI tiene una configuración distinta en el panel posterior.
Cuando conecte un reproductor de DVI, debe hacer coincidir los colores del terminal
de conexión y del cable.
Cuando se usa una conexión de cable HDMI/DVI IN, se debe conectar en el terminal
HDMI/DVI IN.
Panel posterior del TV
DVD/reproductor de
televisión digital
Cable de Audio (No incluido)
2
Cable DVI a HDMI (No incluido)
1
Conexión de un sistema de audio digital
1. Conecte un cable óptico entre
las tomas DIGITAL AUDIO
OUT (OPTICAL) Salida de
audio digital, óptica) del
televisor y las tomas Digital
Audio Input Entrada de audio
digital) del sistema de audio
digital.
Cuado un sistema de audio
digital se conecta a la
terminal “DIGITAL AUDIO
OUT (OPTICAL)” terminal:
Reduzca la ganancia
volumen) del TV, y ajuste el
volumen con el control del
amplificador.
Sistema de audio digital
Panel posterior del TV
Cable óptico (No incluido)
La emision en 5.1 canales es posible si está conectado a un dispositivo externo que admita
5.1 canales.
Cada dispositivo externo de fuente de entrada tiene una configuración diferente en el panel
posterior.
Las tomas del panel posterior del televisor facilitan la conexión de un sistema de audio digital al televisor.
BN68-01184A-Spa.indd 10 2007-02-13 �� 1:41:20

Español - 11
Conexión a un PC
1. Connect a D-Sub
Cable between PC IN
[PC] connector on
the TV and the PC
output connector on
your computer.
2.
Connect a PC Audio
Cable between PC IN
[AUDIO] jack on the
TV and the Audio Out
jack of the sound card
on your computer.
Cada PC tiene una configuración distinta en el panel posterior.
Cuando conecte una PC, debe hacer coincidir los colores del terminal de conexión y del
cable.
PC
Panel posterior del TV
Cable de D-Sub (No incluido)
1
Cable de Audio de PC (No incluido)
2
BN68-01184A-Spa.indd 11 2007-02-13 �� 1:41:21

Español - 12
Función Plug & Play
Cuando se enciende el televisor por primera vez, se conguran seguidos y automáticamente dos ajustes básicos del
usuario.
1. Pulse el botón POWER en el mando a distancia.
Aparece el mensaje ““Menu language, Shop Mode, Channels and Time will be set”.
Pulse el botón ENTER y aparecerá automáticamente el menú “Select the language
of the OSD”.
2.
Pulse los botones ▲ o ▼ para seleccionar el idioma; pulse después el botón
ENTER.
Se muestra el mensaje “Seleccione el modo Domicilio si instala el TV en casa.”
3.
Pulse los botones ◄ o ► para seleccionar “Comercio” o “Domicilio” después,
pulse el botón ENTER.
Se muestra el mensaje “Seleccionar las antenas que desea memorizar.”.
Es recomendable configurar el televisor en el modo Domicilio para obtener la
mejor imagen en un entorno doméstico.
El modo Comercio sólo es necesario en los entornos comerciales.
Si la unidad se ha configurado accidentalmente en el modo Comercio y se
desea volver al modo Dinámico, se debe pulsar el botón del volumen y, a
continuación, mantener pulsado durante cinco segundos el botón MENU del
lateral del televisor.
4. Pulse los botones ▲ o ▼ para memorizar los canales de la conexión
seleccionada. Pulse el botón ENTER para seleccionar “Iniciar”.
Si la antena está conectada a ANT 2 (CABLE), seleccione “Cable"; si está
conectada a ANT 1 (AIR), seleccione “Aire”.
Si ANT 1 (AIR) y ANT 2 (CABLE) están conectadas, seleccione “Aire+Cable”.
En el modo de cable, puede seleccionar el origen de señal correcto entre STD,
HRC e IRC pulsando los botones ▲ o ▼ a continuación, pulse el botón ENTER.
Póngase en contacto con su proveedor de cable para saber el tipo de sistema de
cable existente en su zona.
5. El televisor empezará a memorizar todos los canales disponibles.
Una vez guardados todos los canales disponibles, volverá a aparecer el menú
Prog. Auto. Pulse el botón ENTER cuando se complete la memorización de
canales. Aparece automáticamente el menú “Seleccionar el modo de reloj”.
Para detener la búsqueda antes de que termine, pulse el botón ENTER con la
opción Detener seleccionada.
6. Pulse el botón ENTER
.
Pulse los botones ▲ o ▼ para seleccionar “Manual” o “Auto” después, pulse el
botón ENTER.
Se muestra el mensaje “Seleccionar si no observa el horario de verano.”.
Encendido o apagado del TV
Pulse el botón POWER del mando a distancia.
También puede usar el botón button on the front of the panel.
Funcionamiento
Language
Plug & Play
English
Español
Français
Move Enter Skip
Select the language of the OSD.
Seleccione el modo Domicilio si instala el TV en
casa.
Plug & Play
Comercio Domicilio
Mover Ingresar Omitir
Seleccione las antenas que desea
memorizer.
Iniciar
Aire
Plug & Play
Cable
Aire+Cable
Iniciar
Iniciar
Mover Ingresar Omitir
Clock Set
Modo Reloj :
Mover Ingresar Omitir
Seleccione modo reloj.
Plug & Play
Auto
Manual
Menu language, Shop Mode,
Channels and Time will be set.
Start
Plug & Play
35%
Detener
Ingresar Omitir
La programación automática está en
progreso.
Aire 50
Plug & Play
Ingresar Omitir
La programación autom
á
tica ha finalizado
Se han memorizado 16 canales.
Aire : 16, Cable : 0.
Aceptar
BN68-01184A-Spa.indd 12 2007-02-13 �� 1:41:23

Español - 13
7. Pulse los botones ▲ o ▼ para seleccionar “Sí” o “No” después, pulse el botón
ENTER.
Se muestra el mensaje “Seleccione la zona horaria en la que se encuentra.” .
8. Pulse los botones ▲ o ▼ para resaltar la zona horaria del área local.
Pulse el botón ENTER. Si ha recibido una señal digital, se ajustará la hora
automáticamente. En caso negativo, consulte la página 38 para ajustar el reloj.
9. Aparece el mensaje “Disfrutar su visión.”
Cuando termine, pulse el botón ENTER.
Cambio de canales
1. Pulse los botones CH
o CH para cambiar los canales.
Cuando pulse los botones CH
o CH el TV cambiará los canales por orden.
Verá todos los canales que ha memorizado el TV (El TV deberá haber
memorizado como mínimo tres canales). No verá los canales borrados o no
memorizados. Consulte las páginas 15 para la memorización de los canales.
Si desea reiniciar esta función...
1. Pulse el botón MENU
para ver el menú.
Pulse los botones ▲ o ▼ para seleccionar “Configuración” después, pulse el botón
ENTER.
2. Pulse de nuevo el botón ENTER
para seleccionar “Plug & Play”.
3. Aparece el mensaje “Se ajustarán idioma menú, Comercio, canales y hora.”
(Se ajustará idioma de menús, canales y hora).
Mediante los botones de canal
1. Pulse el botón PRE-CH.
El TV volverá al último canal visualizado.
Para conmutar rápidamente entre dos canales bastante distantes, sintonice
un canal y use los botones numéricos para seleccionar el segundo.
Después use el botón PRE-CH para conmutar rápidamente entre ellos.
Utilización del botón PRE-CH para seleccionar el canal anterior
Timpo Verano :
Mover Ingresar Omitir
Seleccionar si no observa el horario de verano.
Plug & Play
Apagado
Encendido
Mover Ingresar Omitir
Seleccione la zona horaria en la que se encuentra.
Plug & Play
Newfoundland
Atlántico
Este
Central
Montañas
Pacífico
Alaska
Hawaii
Disfrutar su visión.
Aceptar
Se ajustarán idioma menú,
Comercio, canales y hora.
Iniciar
Configuración
Plug & Play ►
Idioma : Español ►
Tiempo ►
Modo Juego : Apagado ►
V-Chip ►
Subtítulo ►
Transpar. Del menú : Alto
►
▼More
TV
Mover Ingresar Regresar
BN68-01184A-Spa.indd 13 2007-02-13 �� 1:41:25

Español - 14
Ajuste del volumen
1. Pulse los botones
VOL o VOL
para subir o bajar el volumen.
Mediante Silencio
Puede interrumpir el sonido en cualquier momento pulsando el botón MUTE.
1. Pulse el botón MUTE
y el sonido se desconectará.
En la esquina inferior izquierda de la pantalla aparecerá la palabra
“ ”.
2. Para recuperar el sonido vuelva a pulsar MUTE
o, simplemente, pulse los
botones
VOL o VOL
.
Visualización de la pantalla
1. Pulse el botón INFO del mando a distancia.
El TV visualizará el canal, el tipo de sonido y el estado de determinados ajustes de
sonido e imagen.
Pulse el botón INFO otra vez o espere unos 10 segundos y desaparecerá
automáticamente.
La pantalla identica el canal actual y el estado de algunos ajustes de audio-vídeo.
Aire 7
Mono
Modo de imagen : Dinámico
Modo sonido : Favorito
MTS : Estéreo
Subtítulo : Encendido
V-Chip : Encendido
05 : 54 pm
BN68-01184A-Spa.indd 14 2007-02-13 �� 1:41:26

Español - 15
Visualización de los menús
1. Con el aparato encendido, pulse el botón MENU.
En la pantalla aparece el menú principal. En el lado izquierdo del menú hay cinco
iconos: Imagen, Sonido, Canal , Configuración, Entrada
2. Pulse los botones ▲ o ▼ para seleccionar uno de los cinco iconos.
A continuación, pulse ENTER para acceder al submenú del icono.
3.
Pulse el botón EXIT para salir.
Pasado aproximadamente un minuto, los menús de la pantalla desaparecen de
ésta.
Memorización de los canales
El TV puede memorizar y almacenar todos los canales disponibles, tanto de “antena” como de cable. Una vez memorizados
los canales disponibles, use los botones CH
y CH para explorarlos. De este modo no es necesario cambiar los canales
introduciendo los dígitos. La memorización de canales tiene tres pasos: seleccionar una emisora de origen, memorizar los
canales (automático) y agregar o borrar canales (manual).
Selección del origen de la señal de vídeo
Antes de empezar a memorizar los canales disponibles, debe indicar el tipo de origen de la señal conectada al TV
(es decir, antena o sistema de cable).
1. Pulse el botón MENU
para visualizar el menú.
Pulse los botones ▲ o ▼ para seleccionar “Canal” y, después, pulse el botón
ENTER.
2. Pulse el botón ENTER
para seleccionar “Antena”.
Pulse los botones ▲ o ▼ para seleccionar “Aire” o “Cable” después, pulse el
botón ENTER.
Pulse el botón EXIT para salir.
Mover Ingresar Regresar
Modo : Dinámico
►
Contraste 100
Luminosidad 45
Definición 75
Color 55
Tinte G 50 R 50
Tono Color : Frío1
►
▼Más
ImagenTV
Antena : Aire ►
Prog. Auto ►
Borrar canal encriptado ►
Lista de canales ►
Nombre ►
Sintonia Fina ►
Intensidad señal ►
LNA : Encendido ►
Canal
Mover Ingresar Regresar
TV
Canal
Mover Ingresar Regresar
TV
Antena :
Prog. Auto
Borrar canal encriptado
Lista de canales
Nombre
Sintonia Fina
Intensidad señal
LNA : Encendido
Aire
Cable
BN68-01184A-Spa.indd 15 2007-02-13 �� 1:41:28

Español - 16
Almacenamiento de los canales en la memoria (método automático)
1. Pulse el botón MENU
para visualizar el menú.
Pulse los botones ▲ o ▼ para seleccionar “Canal” y, después, pulse el botón
ENTER.
2. Pulse los botones ▲ o ▼ para seleccionar “Prog. Auto” y, después, pulse el botón
ENTER
.
3. Pulse los botones ▲ o ▼ para seleccionar la conexión de la antena, después
pulse ENTER.
Aire.: señal de antena “Aire.”. / Cable: señal de antena de “Cable”. / Aire +
Cable: señales de antena “Aire.” y de “Cable”.
4. Al seleccionar el sistema de TV de cable: Pulse el botón ENTER para iniciar el
programa automático.De forma predeterminada, el sistema de televisión por cable
está establecido en "STD". Si desea seleccionar otro tipo de sistema de cable,
pulse los botones ▲ o ▼ para seleccionar las opciones “STD”, “HRC” o “IRC”.
STD, HRC e IRC identifican los distintos tipos de sistemas de TV por cable.
Póngase en contacto con su proveedor de cable para averiguar el tipo de
sistema de cable existente en su zona.
En este momento ya se ha seleccionado el origen de la señal.
Pulse ENTER para iniciar el programa automático.
Para detener la búsqueda antes de que termine, pulse el botón ENTER con la
opción Detener seleccionada.
5. Una vez memorizados todos los canales disponibles, el menú “Prog. Auto”, volverá
a aparecer.
Pulse el botón EXIT para salir.
Move Enter Return
Antena : Aire ►
Prog. Auto ►
Borrar canal encriptado ►
Lista de canales ►
Nombre ►
Sintonia Fina ►
Intensidad señal ►
LNA : Encendido ►
Canal
Mover Ingresar Regresar
TV
Move Enter Return
Seleccionar las antenas que desea
memorizar.
Prog. Auto
Mover Ingresar Regresar
TV
Iniciar
Air
Cable
Air+Cable
Iniciar
Iniciar
Plug & Play
Ingresar Regresar
La programación autom
á
tica ha finalizado
Se han memorizado 16 canales.
Aire : 16, Cable : 0.
Prog. Auto
Aire Canal 50
50%
Detener
Ingresar Regresar
La prog. automática está en progreso.
Move Enter Return
Selecciona un tipo de señal de cable para
su ubicación.
Prog. Auto
Mover Ingresar Regresar
TV
Analógico
Iniciar
STD
HRC
IRC
digital
STD
HRC
IRC
Prog. Auto
BN68-01184A-Spa.indd 16 2007-02-13 �� 1:41:30

Español - 17
Para seleccionar la fuente
Siga este procedimiento para seleccionar el televisor u otra fuente externa de entrada
conectada al televisor. Se usa para seleccionar la pantalla deseada.
1. Pulse el botón MENU
para ver el menú en pantalla.
Pulse los botones ▲ o ▼ buttons to select “Entrada”, then press the ENTER
button.
2. Pulse el botón ENTER
para seleccionar “Lista de Origen”.
Pulse los botones ▲ o ▼ para seleccionar la fuente de la señal, después pulse el
botón ENTER.
Cuando conecte equipos a la pantalla LCD, podrá elegir entre los siguientes
conjuntos de tomas: TV, AV, S-Video, Componente, PC, HDMI en el panel
posterior del televisor.
Sólo se puede seleccionar la entrada de HDMI si el dispositivo externo está
encendido y conectado a través del HDMI.
Puede elegir solamente los dispositivos externos que estén conectados al televisor.
Pulse el botón SOURCE del mando a distancia para ver una fuente de señal
externa.
Edición del Nombre de la Fuente de entrada
Nombre al dispositivo de entrada de información conectado con las tomas de entrada para facilitar la selección de fuente
de entrada.
1. Pulse el botón MENU para ver el menú en pantalla.
Pulse los botones ▲ o ▼ buttons to select “Entrada”, then press the ENTER
button.
Pulse los botones ▲ o ▼ para seleccionar “Editar Nombre” y pulse el botón
ENTER.
2. Pulse los botones ▲ o ▼ para seleccionar la toma de entrada “AV”,“S-Video”,
“Componente”, “PC”, o “HDMI” y, a continuación pulse el botón ENTER.
3. Pulse los botones ▲ o ▼ para seleccionar la fuente de entrada “Vídeo”, “DVD”,
“D-VHS”, “Cable STB”, “HD STB”, “Satélite STB”, “PVR STB”, “Receptor AV”,
“Receptor DVD”, “Juego”, “Filmadora”, “DVD Combo”, “PC”, “STB VOD”, o “TV” y,
a continuación pulse el botón ENTER.
Pulse el botón EXIT para salir.
Entrada
Lista de Origen : TV ►
Editar Nombre
►
TV
Mover Ingresar Regresar
Lista de OrigenTV
Mover Ingresar Regresar
TV
AV : ----
S-Video : ----
Componente : ----
PC : ----
HDMI : ----
Entrada
Lista de Origen : TV ►
Editar Nombre
►
TV
Mover Ingresar Regresar
Editar NombreTV
Mover Ingresar Regresar
AV
: ---- ►
S-Video
: ---- ►
Componente
: ---- ►
PC
: ---- ►
HDMI : ---- ►
Editar NombreTV
Mover Ingresar Regresar
AV
: ---- ►
S-Video
: ---- ►
Componente
: ---- ►
PC
: ---- ►
HDMI : ---- ►
----
Vídeo
DVD
D-VHS
Cable STB
HD STB
Satélite STB
▼
BN68-01184A-Spa.indd 17 2007-02-13 �� 1:41:32

Español - 18
Uso de los parámetros de imagen automáticos
El TV tiene cuatro valores de imagen automáticos (“Dinámico”, “Normal”, “Cine”) predeterminados de fábrica.
Puede activar el ajuste Dinámico, Normal o Película seleccionándolo en el menú.
1.
Pulse el botón MENU para ver el menú en pantalla.
Pulse el botón ENTER para seleccionar “Imagen”.
2. Pulse el botón ENTER
para seleccionar “Modo”.
Pulse de nuevo el botón ENTER.
Pulse los botones ▲ o ▼ para seleccionar el ajuste de imagen “Dinámico”,
“Normal”, o “Cine”. Pulse el botón ENTER.
Elija Dinámico para aumentar la claridad y la denición de la imagen.
• Elija Normal para volver a la conguración estándar de fábrica.
• Elija Cine para obtener una imagen natural sin mejoras.
3. Pulse los botones ▲ o ▼ para seleccionar “Contraste”, “Luminosidad”,
“Definición”, “Color”, y “Tinte” después, pulse el botón ENTER.
4. Pulse los botones ◄ o ► para aumentar o reducir el valor de una opción concreta.
Por ejemplo, si selecciona “Contraste”, pulse ► para incrementarlo.
Pulse el botón EXIT
para salir.
• Cuando haga cambios en “Contraste”, “Luminos.”, “Color”, o “Tinte”, el color
del OSD también se ajustará.
• En el modo PC, las opciones Tinte, Definición y Color no están disponibles.
Pulse repetidamente el botón P.MODE del mando a distancia para seleccionar un
modo de imagen.
Control de la Imagen
100
▲
Contraste
▼
Mover Ajustar Regresar
Mover Ingresar Regresar
Modo : Dinámico
►
Contraste 100
Luminosidad 45
Definición 75
Color 55
Tinte G 50 R 50
Tono Color : Frío1
►
▼Más
ImagenTV
Mover Ingresar Regresar
Modo : Dinámico
Contraste 100
Luminosidad 45
Definición 75
Color 55
Tinte G 50 R 50
Tono Color : Frío1
▼Más
ImagenTV
Dinámico
Normal
Cine
Mover Ingresar Regresar
Modo : Dinámico
►
Contraste 100
Luminosidad 45
Definición 75
Color 55
Tinte G 50 R 50
Tono Color : Frío1
►
▼Más
ImagenTV
BN68-01184A-Spa.indd 18 2007-02-13 �� 1:41:33

Español - 19
Ajuste del Color del fondo
Puede cambiar el color de toda la pantalla según sus preferencias.
1.
Pulse el botón MENU para ver el menú en pantalla.
Pulse el botón ENTER para seleccionar “Imagen”.
2. Pulse los botones ▲ o ▼ para seleccionar “Tono Color” y, después, pulse el botón
ENTER
.
3. Pulse los botones ▲ o ▼ para selecciona “Frío 2”, “Frío 1”, “Normal”, “Tibio1”, o
“Tibio2”. Pulse el botón ENTER.
Cuando el modo de imagen está ajustado en Dinámico o Normal, no se puede
seleccionar Tibio1 ni Tibio2. Sólo está disponible el modo Película.
Esta función no está disponible en el modo PC.
Reajuste de valores de la imagen a los valores predefinidos de fábrica
1. Pulse los botones ▲ o ▼ para seleccionar “Reiniciar” y, después, pulse el botón
ENTER
.
Pulse los botones ▲ o ▼ para seleccionar “Cancelar”, “Aceptar”.
Press the ENTER button.
Pulse el botón EXIT
para salir.
Se puede restaurar cada modo.
Mover Ingresar Regresar
▲More
Tamaño : 16 : 9
Digital NR : Apagado
Reiniciar : Aceptar
ImagenTV
Aceptar
Cancelar
Mover Ingresar Regresar
Modo : Dinámico
►
Contraste 100
Luminosidad 45
Definición 75
Color 55
Tinte G 50 R 50
Tono Color : Frío1
►
▼Más
ImagenTV
Mover Ingresar Regresar
Modo : Dinámico
Contraste 100
Luminosidad 45
Definición 75
Color 55
Tinte G 50 R 50
Tono Color : Frío1
▼Más
ImagenTV
Frío2
Frío1
Normal
Tibio1
Tibio2
Congelación de la imagen
1. Pulse el botón STILL para congelar una imagen en movimiento.
El sonido normal se oirá todavía. Pulse de nuevo el botón para cancelar.
Cuando V-Chip está funcionando, no se puede utilizar la función de imagen fija.
Ajuste de la función Film Mode
Puede automáticamente detectar y procesar las señales de las películas procedentes de todas las fuentes y ajustar la imagen
para conseguir una calidad óptima.
1. Pulse el botón MENU para ver el menú en pantalla.
Pulse los botones ▲ o ▼ para seleccionar “Configuración” y, después, pulse el
botón ENTER.
2. Pulse los botones ▲ o ▼ para seleccionar “Modo película” y, después, pulse el botón
ENTER
.
3. Pulse los botones o para seleccionar “Apagado” u “Encendido” y, a continuación,
pulse el botón ENTER.
Pulse el botón EXIT
para salir.
El Modo película se admite en TV, VIDEO, S-VIDEO, y COMPONENTE 480i.
▲More
Melodía : Apagado
►
PC
►
N.neg HDMI
: Normal ►
Modo película : Apagado
►
PIP ►
Función de Ayuda : Encendido
►
▼Más
ImagenTV
Mover Ingresar Regresar
▲More
Melodía : Apagado
PC
N.neg HDMI
: Normal
Modo película
PIP
Función de Ayuda : Apagado
▼More
ImagenTV
Mover Ingresar Regresar
Apagado
Encendido
BN68-01184A-Spa.indd 19 2007-02-13 �� 1:41:35

Español - 20
La selección del tamaño de la pantalla depende del tipo de entrada de vídeo.
Cambio del tamaño de la pantalla
1. Pulse el botón MENU para ver el menú en pantalla.
Pulse el botón ENTER
para seleccionar “Imagen”.
2. Pulse los botones ▲ o ▼ para seleccionar “Tamaño” y, después, pulse el botón
ENTER
.
3. Pulse los botones ▲ o ▼ para seleccionar el formato de pantalla que desee.
Pulse el botón ENTER.
Pulse el botón EXIT para salir.
• Ancho. :
Enlarges the aspect ratio of the picture to fit the entire screen.
• 16:9 : Establece la imagen en modo panorámico 16:9.
• Zoom1 : Aumenta el tamaño de la imagen en la pantalla.
• Zoom2 : Magnifies the size of the picture more than “Zoom1”.
• 4:3 : Establece la imagen en modo normal 4:3.
• Sólo buscar : Use esta función para ver la imagen completa sin cortes
cuando la entrada de la señal sea HDMI 720p/1080i
Alternativo, pulse el boton P.SIZE
del mando a distancia de forma repetida para
seleccionar uno de los ajustes de tamaño de imagen.
• Si observa una imagen fija o el modo 4:3 durante largo tiempo (más de 2 horas),
puede que la imagen se “queme” en pantalla. Vea siempre que pueda la televisión en modo 16:9.
• HD (alta definición)
16:9 - 1080i (1920x1080), 720P (1280x720)
•
En los modos TV, VIDEO, S-VIDEO, y COMPONENTE (480i, 480p), pueden seleccionarse todos los modos de pantalla.
(16:9 • Zoom1 • Zoom2 • 4:3).
•
Puede seleccionar únicamente los tamaños de pantalla 16:9, 4:3 y en los modos DTV, Componente (720p, 1080i) o
HDMI (720p, 1080i).
•
En el modo PC, sólo pueden seleccionarse los modos 16:9 y 4:3.
•
En Zoom1 y Zoom2, se puede ajustar el tamaño por medio de los botones arriba o abajo después de pulsar el botón
P.SIZE.
•
Cuando se ve la señal de alta definición de un televisor digital, se puede usar la opción.
La ampliación horizontal ajusta el formato óptico de la imagen ampliando ésta horizontal y verticalmente. Por ejemplo,
puede restablecer la imagen del formato 4:3 al formato 16:9. La opción no admite todos los dispositivos externos.
Mover Ingresar Regresar
Anch.
16 : 9
Zoom1
Zoom2
4 : 3
Sólo buscar
TamañoTV
Posición Reiniciar
▼
▲
ImagenTV
Mover Ingresar Regresar
▲Más
Tamaño : Ancho
►
Digital NR : Apagado
►
Reiniciar : Aceptar
►
Zoom1
Tamaño de pantalla cuando
se amplía verticalmente el
formato amplio.
Zoom2
Tamaño de pantalla cuando
se amplía verticalmente el
formato Zoom1.
4:3
Establece la imagen en
modo normal 4:3.
Sólo buscar
Use esta función para ver la
imagen completa sin cortes
cuando la entrada de la
señal sea HDMI 720p/1080i
16:9
Establece la imagen en modo
panorámico 16:9.
Ancho
Enlarges the aspect ratio of the
picture to fit the entire screen
Just Scan
BN68-01184A-Spa.indd 20 2007-02-13 �� 1:41:37

Español - 21
Visualización Imagen en imagen
Este producto lleva un sintonizador incorporado. Por ejemplo, no es posible mirar un canal de televisión en la pantalla principal y
otro en la pantalla PIP. Para mirar dos fuentes simultáneamente, puede utilizar la función PIP. (Vea la pagina 39 para seleccionar
el sonido de la imagen PIP.)
Mientras la opción V-chip activada (
Consulte la página 61)
, la función de PIP no se puede usar.
Activación de Imagen en imagen
1. Pulse el botón MENU para ver el menú en pantalla.
Pulse los botones ▲ o ▼ para seleccionar “Configuración” y, después, pulse el
botón ENTER.
Pulse los botones ▲ o ▼ para seleccionar “PIP” y, después, pulse el botón
ENTER.
2. Pulse de nuevo el botón ENTER
.
Pulse los botones ▲ o ▼ para seleccionar “Encendido” y, después, pulse el botón
ENTER.
Si mientras mira la televisión en el modo PIP, apaga el televisor y vuelve a
encenderlo, la ventana PIP desaparecerá.
Puede ver emisiones de televisión analógicas en la pantalla PIP
(imagen secundaria) cuando la imagen principal proviene de un dispositivo
externo conectado a los modos PC.
Alternativo, pulse el botón PIP del mando a distancia de forma repetida para activar o
desactivar PIP.
Continúa..
Cambio del canal PIP
3. Pulse los botones ▲ o ▼ para seleccionar “Canal de PIP” y, después, pulse el
botón ENTER.
Pulse los botones ▲ o ▼ para seleccionar el canal deseado en la ventana PIP.
Pulse el botón ENTER
.
MAIN: PC
PIP: TV(Analógico)
El canal puede estar activo cuando la imagen secundaria esté configurada
como TV.
Pulse el botón Canal de PIP del mando a distancia.
Imagen principal Imagen Secundaria
PC Sólo emisiones de televisión
analógicas
Mover Ingresar Regresar
PIP : Enc ►
Posición : ►
Canal : Cable 3 ►
PIPTV
Mover Ingresar Regresar
PIP : Enc
Posición :
Canal : Cable 3
PIPTV
▲
3
▼
Mover Ingresar Regresar
PIP :
Posición :
Canal : Aire 65
PIPTV
Apagado
Encendido
▲Más
Melodía : Apagado
►
PC
►
N.neg HDMI
: Normal ►
Modo película : Apagado
►
PIP
►
Función de Ayuda : Encendido
►
▼More
ConfiguraciónTV
Mover Ingresar Regresar
BN68-01184A-Spa.indd 21 2007-02-13 �� 1:41:39

Español - 22
Cambio de la posición de la ventana PIP
4. Pulse los botones ▲ o ▼ para seleccionar “Posición” y, después, pulse el botón
ENTER.
Pulse el botón ENTER
.
Pulse el botón EXIT
para salir.
Mover Ingresar Regresar
PIP : Enc
Posición :
Canal : Cable 3
PIPTV
Mover Ingresar Regresar
PIPTV
PIP : Enc ►
Posición : ►
Canal : Cable 3 ►
Conguración del Nivel de negro HDMI
1. Pulse el botón MENU para ver el menú en pantalla.
Pulse los botones ▲ o ▼ para seleccionar “Configuración” y después pulse el
botón ENTER.
2. Pulse los botones ▲ o ▼ para seleccionar “n.neg HDMI” y, a continuación, pulse el
botón ENTER.
3.
Pulse los botones ▲ o ▼ para seleccionar “Normal” o “ Bajo” y, a continuación, pulse
el botón ENTER.
• Normal: La pantalla adquiere más brillo.
• Bajo: La pantalla se oscurece.
Esta función sólo está operativa cuando se ha conectado un dispositivo externo
(reproductor DVD, decodificador, etc.) al televisor a través de HDMI.
Pulse el botón EXIT para salir.
Se puede seleccionar el nivel de negro en la pantalla para ajustar la profundidad de ésta.
Configuración
▲Más
Melodía : Apagado ►
PC ►
N.neg HDMI : Normal ►
Modo película : Apagado
►
PIP
►
Función de Ayuda : Apagado
▼Más
TV
Mover Ingresar Regresar
▲Más
Melodía : Apagado
PC
N.neg HDMI : Normal
Modo película :
PIP
Función de Ayuda : Apagado
▼Más
ConfiguraciónTV
Mover Ingresar Regresar
Normal
Bajo
BN68-01184A-Spa.indd 22 2007-02-13 �� 1:41:41

Español - 23
Personalización del sonido
Es posible ajustar los parámetros del sonido según sus preferencias personales.
(También puede utilizar alguno de los ajustes “automáticos”. )
1. Pulse el botón MENU para ver el menú en pantalla.
Pulse los botones ▲ o ▼ para seleccionar “Sonido” y, después, pulse el botón
ENTER.
2. Pulse los botones ▲ o ▼ para seleccionar “Ecualizador” y, después, pulse el botón
ENTER
.
3. Pulse los botones ▲ o ▼ para seleccionar una frecuencia determinada con el fin
de ajustarla.
Pulse los botones ◄ o ► para aumentar o reducir el nivel de una frecuencia
concreta.
Pulse el botón ENTER
.
Pulse el botón EXIT
para salir.
• Ajuste de balance de sonido L/R:
Para ajustar el balance de sonido de los altavoces L/R.
• Ajuste del ancho de banda (100Hz, 300Hz, 1KHz, 3KHz, 10KHz) :
Para ajustar el nivel de las diferentes frecuencias de ancho de banda.
Uso de los parámetros de sonido automáticos
El TV tiene cinco valores de sonido automáticos (“Normal”, “Música”, “Cine”, “Diálogo”, o “Favorito”) predeterminados de fábrica.
También puede seleccionar “Favorito” que recupera automáticamente sus valores de sonido personalizados.
1. Pulse el botón MENU para ver el menú en pantalla.
Pulse los botones ▲ o ▼ para seleccionar “Sonido” y, después, pulse el botón
ENTER.
2. Pulse el botón ENTER
para seleccionar “Modo”.
Pulse los botones ▲ o ▼ para seleccionar el ajuste de sonido “Normal”,
“Música”, “Cine”, “Diálogo”, o “Favorito” y pulse el botón ENTER.
Pulse el botón EXIT
para salir.
• Elija Normal si desea usar los ajustes de fábrica.
• Elija Música cuando mire vídeos musicales o conciertos.
• Elija Cine cuando mire películas.
• Elija Diálogo cuando esté visualizando contenidos de diálogos.
(p. ej. noticieros).
• Elija Favorito para recuperar sus parámetros personalizados.
(Consulte la sección “Personalización del sonido”)
Pulse el botón S.MODE del mando a distancia de forma repetida para seleccionar uno de
los ajustesde sonido estándar.
Control de Sonido
Mover Ingresar Regresar
Modo : Favorito ►
Ecualizador
►
Trusurround SRS XT
: Apagado ►
Opc. Multi-track ►
Vol.Auto : Apagado
►
SilEncendido Int : Apagado
►
Sel. Sonido : Principal ►
Reinicio del sonido
SonidoTV
Mover Ajustar Regresar
Ecualizador
TV
R
L
100Hz
+
-
0
300Hz 1KHz 3KHz 10KHzBalance
+
-
0
Mover Ingresar Regresar
SonidoTV
Modo : Favorito ►
Ecualizador
►
Trusurround SRS XT
: Apagado ►
Opc. Multi-track ►
Vol.Auto : Apagado
►
SilEncendido Int : Apagado
►
Sel. Sonido : Principal ►
Reinicio del sonido
Mover Ingresar Regresar
SonidoTV
Modo : Favorito
Ecualizador
Trusurround SRS XT
: Apag
Opc. Multi-track
Vol.Auto : Apagado
SilEncendido Int : Apagado
Sel. Sonido : Principal
Reinicio del sonido
Normal
Música
Cine
Diálogo
Favorito
BN68-01184A-Spa.indd 23 2007-02-13 �� 1:41:43

Español - 24
Conguración del TruSurround XT (SRS TS XT)
TruSurround XT es una tecnología SRS patentada que solventa el problema de reproducir contenido multicanal 5.1 en dos altavo-
ces. Trusurround proporciona una experiencia de sonido virtual convincente a través de cualquier sistema de reproducción con
dos altavoces. Es totalmente compatible con todos los formatos multicanal.
1. Pulse el botón MENU
para ver el menú en pantalla.
Pulse los botones ▲ o ▼ para seleccionar “Sonido” y, después, pulse el botón
ENTER.
2. Pulse los botones ▲ o ▼ para seleccionar “Trusurround SRS XT” y, después,
pulse el botón ENTER.
3. Pulse los botones ▲ o ▼ para seleccionar “Encendido” o “Apagado” y, después,
pulse el botón ENTER.
Pulse el botón EXIT
para salir.
1. Pulse el botón MENU para ver el menú en pantalla.
Pulse los botones ▲ o ▼ para seleccionar “Sonido” y, después, pulse el botón
ENTER.
Forma rápida de acceder al menú MTS: Pulse el botón “MTS” del mando a
distancia. Puede escuchar en un idioma distinto del elegido pulsando el botón
MTS.
2. Pulse los botones ▲ o ▼ para seleccionar “Opc. Multi-track” y, después, pulse el
botón ENTER.
3. Pulse los botones ENTER
para seleccionar “Idioma preferido”.
Pulse los botones ▲ o ▼ para elegir el idioma que desee
(English, Español, Francés) y pulse el botón ENTER.
Pulse el botón EXIT
para salir.
Pulse el botón MTS en el mando a distancia. Puede escuchar en un idioma
distinto del favorito pulsando el botón MTS del mando a distancia.
Idioma preferido
Selección de una pista de sonido multicanal (MTS) - Digital
El sistema de transmisión de TV digital permite transmitir simultáneamente muchas pistas de audio (por ejemplo, traducciones
simultáneas del programa en otros idiomas). La disponibilidad de estas “multipistas” adicionales depende del programa.
TRADEMARK & LABEL LICENSE NOTICE
TruSurround XT, SRS y el símbolo
son marcas comerciales de
SRS Labs,Inc. La tecnología
TruSurround XT está incorporada
bajo licencia de SRS Labs,Inc.
Ingresar Regresar
Opc. Multi-track
:Español ►
Sonido Multi-track : Estéreo
►
Opc. Multi-trackTV
Mover Ingresar Regresar
SonidoTV
Modo : Favorito ►
Ecualizador
►
Trusurround SRS XT
: Apagado ►
Opc. Multi-track ►
Vol.Auto : Apagado
►
SilEncendido Int : Apagado
►
Sel. Sonido : Principal ►
Reinicio del sonido
Mover Ingresar Regresar
SonidoTV
Modo : Favorito
Ecualizador
Trusurround SRS XT
: Apag
Opc. Multi-track
Vol.Auto : Apagado
SilEncendido Int : Apagado
Sel. Sonido : Principal
Reinicio del sonido
Apagado
Encendido
Mover Ingresar Regresar
SonidoTV
Modo : Favorito ►
Ecualizador
►
Trusurround SRS XT
: Apagado ►
Opc. Multi-track ►
Vol.Auto : Apagado
►
SilEncendido Int : Apagado
►
Sel. Sonido : Principal ►
Reinicio del sonido
Mover Ingresar Regresar
Opc. Multi-trackTV
Opc. Multi-track
:English
Sonido Multi-track : Estéreo
English
Español
Français
BN68-01184A-Spa.indd 24 2007-02-13 �� 1:41:45

Español - 25
Control automático de volumen
1. Pulse el botón MENU para ver el menú en pantalla.
Pulse los botones ▲ o ▼ para seleccionar “Sonido” y, después, pulse el botón
ENTER.
2. Pulse los botones ▲ o ▼ para seleccionar “Vol. Auto” y, después, pulse el botón
ENTER
.
3. Pulse los botones ▲ o ▼ para seleccionar Encendido” o “Apagado” y, después,
pulse el botón ENTER.
Pulse el botón EXIT
para salir.
Reduce las diferencias en el nivel de volumen entre las emisoras.
1. Pulse el botón MENU para ver el menú en pantalla.
Pulse los botones ▲ o ▼ para seleccionar “Sonido” y, después, pulse el botón
ENTER.
2. Pulse los botones ▲ o ▼ para seleccionar “Opc. Multi-track” y, después, pulse el
botón ENTER.
3. Pulse los botones ▲ o ▼ para seleccionar “Sonido Multi-track” y, después, pulse
el botón ENTER.
Pulse los botones ▲ o ▼ para seleccionar una configuración que desee; pulse
después el botón ENTER.
Pulse el botón EXIT
para salir.
• Elija Mono para canales que emiten en monoaural o si tiene dificultades con la
recepción de señales estereofónicas.
• Elija Estéreo para canales que emiten en estéreo.
• Elija SAP para escuchar el Programa de audio independiente, que normal-
mente es la versión en otro idioma.
Pulse varias veces los botones
MTS del mando a distancia para seleccionar
”Mono”, “Estéreo” o “SAP”.
Sonido multi-track
Selección de una pista de sonido multicanal (MTS) - Analogo
Ingresar Regresar
Opc. Multi-trackTV
Opc. Multi-track
:Español ►
Sonido Multi-track : Estéreo
►
Mover Ingresar Regresar
Opc. Multi-trackTV
Opc. Multi-track
:Español
Sonido Multi-track : Estéreo
Mono
Estéreo
SAP
Mover Ingresar Regresar
SonidoTV
Modo : Favorito ►
Ecualizador
►
Trusurround SRS XT
: Apagado ►
Opc. Multi-track ►
Vol.Auto : Apagado
►
SilEncendido Int : Apagado
►
Sel. Sonido : Principal ►
Reinicio del sonido
Mover Ingresar Regresar
SonidoTV
Modo : Favorito
Ecualizador
Trusurround SRS XT
: Apagado
Opc. Multi-track
Vol.Auto : Apag
SilEncendido Int : Apag
Sel. Sonido : Principal
Reinicio del sonido
Apagado
Encendido
BN68-01184A-Spa.indd 25 2007-02-13 �� 1:41:46

Español - 26
Selección del silencio interno
1. Pulse el botón MENU para ver el menú en pantalla.
Pulse los botones ▲ o ▼ para seleccionar “Sonido” y, después, pulse el botón
ENTER.
2. Pulse los botones ▲ o ▼ para seleccionar “SilEncendido Int” y, después, pulse el
botón ENTER.
3. Pulse los botones ▲ o ▼ para seleccionar “Encendido” y, después, pulse el botón
ENTER
.
Pulse el botón EXIT
para salir.
Cuando “SilEncendido Int” se ajusta en “Encendido”, el único menú de sonido
que se puede ajustar es “Opc. Multi-track”.
Los botones VOL +, VOL - y MUTE no funcionan si SilEncendido Int está
establecido en Encendido
Se silencia la salida de sonido desde los altavoces del televisor.
Altavoz interno Salida de audio (Optical, L/R Out)
RF AV, S-Video
Componente, PC y HDMI
RF AV, S-Video
Componente, PC
Silencio interno
desactivado
Speaker Output Speaker Output Speaker Output Sound Output Sound Output Sound Output
Silencio interno
activado
Mute Mute Mute Sound Output Sound Output Sound Output
Sin señal del
vídeo
Mute Mute Mute Mute Mute Mute
Cuando “SilEncendido Int” se ajusta en “Encendido”, el único menú de sonido que se puede ajustar es “Opc. Multi-track”.
Mover Ingresar Regresar
SonidoTV
Modo : Favorito ►
Ecualizador
►
Trusurround SRS XT
: Apagado ►
Opc. Multi-track ►
Vol.Auto : Apagado
►
SilEncendido Int : Apagado
►
Sel. Sonido : Principal ►
Reinicio del sonido
Mover Ingresar Regresar
SonidoTV
Modo : Favorito
Ecualizador
Trusurround SRS XT
: Apagado
Opc. Multi-track
Vol.Auto : Apagado
SilEncendido Int : Apag
Sel. Sonido : Principal
Reinicio del sonido
Apagado
Encendido
Escuchar el sonido de la sub imagen del PIP
1. Pulse el botón MENU para ver el menú en pantalla.
Pulse los botones ▲ o ▼ para seleccionar “Sonido” y, después, pulse el botón
ENTER.
2. Pulse los botones ▲ o ▼ para seleccionar “Sel. Sonido” y, después, pulse el
botón ENTER.
3. Pulse los botones ▲ o ▼ para seleccionar “Principal” o “Sub” y, después, pulse el
botón ENTER.
Pulse el botón EXIT
para salir.
• Principal: Se usa para escuchar el sonido de la imagen principal.
• Sub: Se usa para escuchar el sonido de la imagen secundaria.
Puede seleccionar esta opción cuando “PIP” está ajustado como “Encendido”.
Cuando la opción PIP esta activada, usted puede escuchar el sonido de la sub imagen del PIP.
SonidoTV
Mover Ingresar Regresar
Modo : Favorito ►
Ecualizador
►
Trusurround SRS XT
: Encendido ►
Opc. Multi-track ►
Vol.Auto : Encendido
►
SilEncendido Int : Encendido
►
Sel. Sonido : Principal ►
Reinicio del sonido
SonidoTV
Mover Ingresar Regresar
Modo : Favorito
Ecualizador
Trusurround SRS XT
: Encendido
Opc. Multi-track
Vol.Auto : Encendido
SilEncendido Int : Encendido
Sel. Sonido : Principal
Reinicio del sonido
Principal
Sub
BN68-01184A-Spa.indd 26 2007-02-13 �� 1:41:48

Español - 27
Reajuste de valores de sonido a los valores predenidos de fábrica
1. Pulse el botón MENU para ver el menú en pantalla.
Pulse los botones ▲ o ▼ para seleccionar “Sonido” y, después, pulse el botón
ENTER.
2. Pulse los botones ▲ o ▼ para seleccionar “Reinicio del sonido” y, después, pulse
el botón ENTER.
Pulse el botón EXIT
para salir.
Si Modo Juego está activado, la función Reiniciar sonido se activa. Si, tras congurar el ecualizador, selecciona la función Reini-
ciar, se restauran los parámetros de fábrica de la conguración del ecualizador.
Puede conectar unos auriculares al equipo si desea ver un programa de televisión sin molestar a las personas que están en la
misma habitación.
Conexión de los auriculares
Cuando se inserta el conector del conjunto del cabezal en el puerto
correspondiente, se puede trabajar sólo con las opciones “Opciones multi-track” del
menú Sonido.
El uso continúo de auriculares a un volumen elevado puede dañar la capacidad
auditiva.
No recibirá sonido de los altavoces cuando conecte los auriculares al sistema.
El volumen de los auriculares y el del televisor se ajustan de manera distinta.
Pulse el botón VOL del mando a distancia de forma repetida para seleccionar uno de los
ajustesde sonido estándar.
10
SonidoTV
Mover Ingresar Regresar
Modo : Favorito ►
Ecualizador
►
Trusurround SRS XT
: Encendido ►
Opc. Multi-track ►
Vol.Auto : Encendido
►
SilEncendido Int : Encendido
►
Sel. Sonido : Principal ►
Reinicio del sonido
Ajuste de la melodía de encendido/apagado
Puede definirse un sonido de melodía para que suene cuando se encienda o se apague el TV.
1. Pulse el botón MENU
para ver el menú en pantalla.
Pulse los botones ▲ o ▼ para seleccionar “Configuración” y, después, pulse el
botón ENTER.
2. Pulse los botones ▲ o ▼ para seleccionar “Melodía” y, después, pulse el botón
ENTER
.
3. Pulse los botones ▲ o ▼ para seleccionar “Encendido” o “Apagado” y, después,
pulse el botón ENTER.
Apagado: Apaga la función de la melodía.
Bajo: Establece el volumen de la melodía en un nivel bajo.
Medio: Establece el volumen de la melodía en un nivel medio.
Alto: Establece el volumen de la melodía en un nivel alto.
Pulse el botón EXIT para salir.
DOLBY DIGITAL
Fabricado bajo licencia de Dolby Laboratories. “Dolby” y el símbolo de la
doble D son marcas registradas de Dolby Laboratories.
Configuración
▲Más
Melodía : Apagado
►
PC
►
N.neg HDMI
: Normal ►
Modo película : Apagado
►
PIP
►
Función de Ayuda : Encendido
►
▼Más
TV
Mover Ingresar Regresar
Configuración
▲Más
Melodía : Off
►
PC
►
N.neg HDMI
: Normal ►
Modo película : Off
►
PIP
Función de Ayuda
▼Más
TV
Mover Ingresar Regresar
Apagado
Bajo
Medio
Alto
BN68-01184A-Spa.indd 27 2007-02-13 �� 1:41:50

Español - 28
Control de los Canales
Selección de la antena
1. Pulse el botón MENU para ver el menú en pantalla.
Pulse los botones ▲ o ▼ para seleccionar “Canal” y, después, pulse el botón
ENTER.
2. Pulse el botón ENTER
para seleccionar “Antena”.
Pulse los botones ▲ o ▼ para seleccionar “Aire” o “Cable” y, después, pulse el
botón ENTER.
Pulse el botón EXIT
para salir..
Pulse el botón ANTENNA del mando a distancia.
Si la antena está conectada a ANT 1 IN (AIR),
seleccione “Aire"; si está conectada a ANT 2
IN(CABLE), seleccione “Cable”.
Si las dos tomas ANT 1 IN (AIR) y ANT 2 IN
(CABLE) están conectadas, seleccione la
entrada de antena que desee. Si no se selecciona
la entrada de antena correctamente puede
aparecer ruido en la pantalla.
o
60%
DTV Cable 3-1
Canal
Mover Ingresar Regresar
TV
Antena :
Aire
►
Prog. Auto ►
Borrar canal encriptado ►
Lista de canales ►
Nombre ►
Sintonia Fina ►
Intensidad señal ►
LNA : Apagado ►
Canal
Mover Ingresar Regresar
TV
Antena :
Aire
Prog. Auto
Borrar canal encriptado
Lista de canales
Nombre
Sintonia Fina
Intensidad señal
LNA : Apagado
Aire
Cable
Supresión de los canales codicados digitales
1. Pulse el botón MENU para ver el menú.
Pulse los botones ▲ o ▼ para seleccionar “Canal” y pulse el botón ENTER.
2.
Pulse los botones ▲ o ▼ para seleccionar “Borrar canal encriptado” y pulse el
botón ENTER. Busca los canales codificados para borrarlos de la lista.
Para detener la búsqueda de canales codificados:
Pulse el botón ▼ para seleccionar Detener.
Pulse el botón ◄ para seleccionar Sí y, a continuación, pulse el botón
ENTER.
3. Una vez completada la búsqueda de los canales codificados, pulse el botón
ENTER
.
Pulse el botón EXIT para salir.
La función Borrar canales codicados se usa para ltrar los canales codicados después de realizar una búsqueda automática.
Borra los canales codicados de la lista y sintoniza los canales digitales por cable. Puede tardar de 20 a 30 minutos.
Borrar canal encriptado
Detener
Eliminando canal encriptado.
DTV Cable 3-1
50%
Ingresar Regresar
Borrar canal encriptado
Búsqueda del canal encriptado finalizada.
0 canales borrados.
Regresar
CanalTV
Mover Ingresar Regresar
Antena :
Canal
►
Prog. Auto ►
Borrar canal encriptado ►
Lista de canales ►
Nombre ►
Sintonia Fina ►
Intensidad señal ►
LNA : Apagado ►
Aceptar
BN68-01184A-Spa.indd 28 2007-02-13 �� 1:41:52

Español - 29
Conguración de las listas de canales
Puede agregar o suprimir un canal para que se muestren sólo los canales que desee.
1. Pulse el botón MENU para ver el menú en pantalla.
Pulse los botones ▲ o ▼ para seleccionar “Canal” y, después,
pulse el botón ENTER.
2. Pulse los botones ▲ o ▼ para seleccionar
“Lista de canales” y, después,
pulse el botón ENTER.
3. Pulse los botones ▲ o ▼ para seleccionar “Todos” y, después.
4. Pulse los botones ▲ o ▼ para seleccionar el canal que desee suprimir y
pulse el botón ENTER.
Pulse los botones ▲ o ▼ para seleccionar “Borrar” y pulse el botón ENTER
para suprimir el canal.
Desaparecerá la marca .
5. Pulse los botones ▲ o ▼ para seleccionar el canal que desea agregar;
a continuación pulse el botón ENTER.
Pulse los botones ▲ o ▼ para seleccionar “Agregar” y, después, pulse el
botón ENTER.
Aparece una marca y el canal se añade.
Pulse el botón EXIT para salir.
Todos los canales seleccionados se mostrarán en “Agregados”.
• Botón (P.MODE) rojo: Púlselo varias veces para seleccionar “Todos”,
“Agregados”, o “Favoritos”.
• Botón (S.MODE) verde: Púlselo para agregar todos los canales
suprimidos.
• Botón (STILL) amarillo: Púlselo para borrar todos los canales
memorizados.
Todos ►
Agregados
►
Favoritos ►
Modo Lista predeterminado:
Todos
►
Lista de canales
Mover Ingresar Regresar
TV
CH
Lista de canales
/
Todos
Mover Ingresar Página Regresar
DTV Air 2-1
Air3
Air4
Air 5
Air 6
Air 7
DTV Air 7-1
Air 8
Air 9
Air 10
DTV Air 10-1
DTV Air 10-2
DTV Air 10-3
DTV Air 10-1
DTV Air 10-2
DTV Air 10-3
DTV Air 10-1
DTV Air 10-2
DTV Air 10-3
Air 12
DTV Air 13-1
DTV Air 13-2
DTV Air 13-3
DTV Air 13-4
Aire 5 1 / 2
Modo Lista
Borrar todo
Añadir todo
CH
Lista de canales
/
Todos
Mover Ingresar Página Regresar
DTV Air 2-1
Air3
Air4
Air 5
Air 6
Air 7
DTV Air 7-1
Air 8
Air 9
Air 10
DTV Air 10-1
DTV Air 10-2
DTV Air 10-3
DTV Air 10-1
DTV Air 10-2
DTV Air 10-3
DTV Air 10-1
DTV Air 10-2
DTV Air 10-3
Air 12
DTV Air 13-1
DTV Air 13-2
DTV Air 13-3
DTV Air 13-4
Modo Lista
Borrar todo
Aire 5 1 / 2
Canal
Mover Ingresar Regresar
TV
Antena :
Aire
►
Prog. Auto
►
Borrar canal encriptado ►
Lista de canales
►
Nombre
►
Sintonia Fina
►
Intensidad señal
►
LNA : Apagado ►
Lista de canales
/
Todos
Mover Ingresar Regresar
DTV Air 2-1
Air3
Air4
Air 5
Air 6
Air 7
DTV Air 7-1
Air 8
Air 9
Air 10
DTV Air 10-1
DTV Air 10-2
DTV Air 10-3
DTV Air 10-1
DTV Air 10-2
DTV Air 10-3
DTV Air 10-1
DTV Air 10-2
DTV Air 10-3
Air 12
DTV Air 13-1
DTV Air 13-2
DTV Air 13-3
DTV Air 13-4
Aire 5 1 / 2
Observar
Agregar
Borrar
Favoritos
Modo Lista
Borrar todo
Añadir todo
CH
Mover Ingresar Página Regresar
DTV Air 2-1
Air3
Air4
Air 5
Air 6
Air 7
DTV Air 7-1
Air 8
Air 9
Air 10
DTV Air 10-1
DTV Air 10-2
DTV Air 10-3
DTV Air 10-1
DTV Air 10-2
DTV Air 10-3
DTV Air 10-1
DTV Air 10-2
DTV Air 10-3
Air 12
DTV Air 13-1
DTV Air 13-2
DTV Air 13-3
DTV Air 13-4
Modo Lista
Borrar todo
Aire 5 1 / 2
Observar
Agregar
Borrar
Favoritos
Lista de canales
/
Todos
BN68-01184A-Spa.indd 29 2007-02-13 �� 1:41:54

Español - 30
Para congurar los canales favoritos
1. Pulse el botón MENU para ver el menú en pantalla.
Pulse los botones ▲ o ▼ para seleccionar “Canal” y, después, pulse el botón
ENTER.
2.
Pulse los botones ▲ o ▼ para seleccionar “Lista de canales” y, después, pulse
el botón ENTER.
3.
Pulse los botones ▲ o ▼ para seleccionar “Agregados” y, después, pulse el
botón ENTER.
4.
Pulse los botones ▲ o ▼ para seleccionar los canales favoritos que desee
ver entre los canales etiquetados.
Pulse los botones ▲ o ▼ para seleccionar “Favoritos” y, después, pulse el
botón ENTER.
Y el simbolo “
” se sobreindicara y el canal será fijado como favorito.
Para cancelar su selección de canales Favoritos, presione el botón ENTER
hasta que el simbolo “ ” no este mas sobreindicado.
Pulse el botón EXIT
para salir.
Sólo pueden seleccionarse como favoritos los canales memorizados.
Todos los canales seleccionados se mostrarán en “Favoritos”.
Puede congurar como favoritos los canales que vea con más frecuencia.
Canal
Mover Ingresar Regresar
TV
Antena :
Aire
►
Prog. Auto ►
Borrar canal encriptado ►
Lista de canales ►
Nombre ►
Sintonia Fina ►
Intensidad señal ►
LNA : Apagado ►
Lista de canales
Mover Ingresar Regresar
TV
Todos
Agregados
Favoritos
Modo Lista predeterminado:
Todos
►
Lista de canales
/
Todos
Mover Ingresar Regresar
DTV Air 2-1
Air3
Air4
Air 5
Air 6
Air 7
DTV Air 7-1
Air 8
Air 9
Air 10
DTV Air 10-1
DTV Air 10-2
DTV Air 10-3
DTV Air 10-1
DTV Air 10-2
DTV Air 10-3
DTV Air 10-1
DTV Air 10-2
DTV Air 10-3
Air 12
DTV Air 13-1
DTV Air 13-2
DTV Air 13-3
DTV Air 13-4
Aire 5 1 / 2
Observar
Agregar
Borrar
Favoritos
Modo Lista Borrar todo
CH
Lista de canales
/
Todos
Mover Ingresar Página Regresar
DTV Air 2-1
Air3
Air4
Air 5
Air 6
Air 7
DTV Air 7-1
Air 8
Air 9
Air 10
DTV Air 10-1
DTV Air 10-2
DTV Air 10-3
DTV Air 10-1
DTV Air 10-2
DTV Air 10-3
DTV Air 10-1
DTV Air 10-2
DTV Air 10-3
Air 12
DTV Air 13-1
DTV Air 13-2
DTV Air 13-3
DTV Air 13-4
Aire 5 1 / 2
Modo Lista Borrar todo
BN68-01184A-Spa.indd 30 2007-02-13 �� 1:41:55

Español - 31
Manejo de la Lista de Canales
1. Pulse el botón MENU para ver el menú en pantalla.
Pulse los botones ▲ o ▼ para seleccionar “Canal” y, después, pulse el botón
ENTER.
2. Pulse los botones ▲ o ▼ para seleccionar “Lista de canales” y, después, pulse
el botón ENTER.
3. Pulse los botones ▲ o ▼ para seleccionar “Default List Mode” (Modo de lista
predeterminada), es decir, la lista de canales que desea que aparezca cuando
pulse el botón CH.MGR; a continuación, pulse el botón ENTER.
Pulse los botones ▲ o ▼ para seleccionar “Todos”, “Agregados” o “Favoritos” y,
después, pulse el botón ENTER.
La lista de canales que haya elegido se configurará ahora..
Pulse el botón EXIT
para salir.
Alternativo, pulse el botón CH LIST del mando a distancia para mostrar las listas de
canales.
Muestra la lista de canales automaticamente cuando pulse CH LIST del mando a distancia. (Seleccione entre “Todos”,
“Agregados” o “Favoritos”)
Visualización de la lista de canales
1. Pulse el botón MENU para ver el menú en pantalla.
Pulse los botones ▲ o ▼ para seleccionar “Canal” y, después, pulse el botón
ENTER.
2. Pulse los botones ▲ o ▼ para seleccionar “Lista de canales” y, después, pulse
el botón ENTER.
3. Pulse los botones ▲ o ▼ para seleccionar “Todos”, “Agregados” o “Favoritos” y,
después, pulse el botón ENTER.
4.
Pulse los botones ▲ o ▼ para seleccionar “Canal” y, después, pulse el botón
ENTER..
Para alternar entre todos los canales, los agregados o los favoritos pulse el
botón (P.Mode) rojo del mando a distancia.
• Botón (P.Mode) rojo: Púlselo varias veces para seleccionar “Todos”,
“Agregados”, o “Favoritos”.
Puede mostrar una lista de todos los canales, de los agregados o favoritos.
Canal
Mover Ingresar Regresar
TV
Antena :
Aire
►
Prog. Auto ►
Borrar canal encriptado ►
Lista de canales
►
Nombre
►
Sintonia Fina ►
Intensidad señal ►
LNA : Apagado ►
Lista de canales
Mover Ingresar Regresar
TV
Todos
Agregados
Favoritos
Modo Lista predeterminado:
Todos
►
Lista de canales
Mover Ingresar Regresar
TV
Todos
Agregados
Favoritos
Modo Lista predeterminado: Todos
Todos
Agregados
Favoritos
Canal
Mover Ingresar Regresar
TV
Antena :
Aire
►
Prog. Auto
►
Borrar canal encriptado ►
Lista de canales ►
Nombre ►
Sintonia Fina
►
Intensidad señal
►
LNA : Apagado ►
CH
Lista de canales
/
Todos
Mover Ingresar Página Regresar
DTV Air 2-1
Air3
Air4
Air 5
Air 6
Air 7
DTV Air 7-1
Air 8
Air 9
Air 10
DTV Air 10-1
DTV Air 10-2
DTV Air 10-3
DTV Air 10-1
DTV Air 10-2
DTV Air 10-3
DTV Air 10-1
DTV Air 10-2
DTV Air 10-3
Air 12
DTV Air 13-1
DTV Air 13-2
DTV Air 13-3
DTV Air 13-4
Aire 5 1 / 2
Modo Lista Borrar todo
BN68-01184A-Spa.indd 31 2007-02-13 �� 1:41:58

Español - 32
Etiquetado de canales
1. Pulse el botón MENU para ver el menú en pantalla.
Pulse los botones ▲ o ▼ para seleccionar “Canal” y, después, pulse el botón
ENTER.
Pulse los botones ▲ o ▼ para seleccionar “Nombre” y, después, pulse el botón
ENTER.
2. Pulse los botones ▲ o ▼ para seleccionar el canal al que se va a asignar
un nuevo nombre y pulse el botón ENTER. Pulse los botones ▲ o ▼ para
seleccionar una letra, un número o un espacio. (Se produce esta secuencia:
A...Z, 0...9, +, -, o, /, espacio).
Pulse el botón para pasar al siguiente campo, que quedará seleccionado.
Seleccione una segunda letra o dígito pulsando los botones ▲ o ▼ , como
antes.
Repita el proceso para seleccionar los tres últimos dígitos. Cuando haya
terminado, pulse el botón ENTER para asignar el nombre nuevo. Para borrar
el nuevo nombre asignado, seleccione “Supr.” pulsando los botones y pulse el
botón ENTER.
Pulse el botón EXIT
para salir.
Los nombres de los canales emitidos digitalmente están asignados
automáticamente y no pueden asignarlos los usuarios.
LNA (Low Noise Amplier - Amplicador de ruido bajo)
1. Pulse el botón MENU para ver el menú en pantalla.
Pulse los botones ▲ o ▼ para seleccionar “Canal” y, después, pulse el botón
ENTER.
2. Pulse los botones ▲ o ▼ para seleccionar “LNA” y, después, pulse el botón
ENTER
.
3. Pulse los botones ▲ o ▼ para seleccionar “Encendido” y, después, pulse el botón
ENTER
.
Pulse el botón EXIT
para salir.
LNA funciona cuando la antena seleccionada es Aire o Cable. Los ajustes se
almacenan de manera independiente para cada canal. (Consulte “Selección de
la antena” en la página 28).
Si el televisor está funcionando en una zona con señal débil, la función LNA puede mejorar la recepción (un amplicador previo de
bajo ruido refuerza la señal entrante).
Los canales se pueden etiquetar con el propósito de que cuando éstos se seleccionan se pueda ver su nombre.
Nombre
Mover Ingresar Regresar
TV
Aire 2
Aire 3
Aire 4
Aire 5
Aire 6
Supr
Supr
Supr
Supr
Supr
Nombre
Mover Ajustar Regresar
TV
Aire 2
Aire 3
Aire 4
Aire 5
Aire 6
Supr
Supr
Supr
Supr
Supr
A
▲
▼
Canal
Mover Ingresar Regresar
TV
Antena :
Aire
►
Prog. Auto ►
Borrar canal encriptado ►
Lista de canales
►
Nombre
►
Sintonia Fina ►
Intensidad señal ►
LNA : Apagado ►
CanalTV
Mover Ingresar Regresar
Antena :
Aire
►
Prog. Auto
►
Borrar canal encriptado ►
Lista de canales ►
Nombre ►
Sintonia Fina
►
Intensidad señal
►
LNA : Apagado ►
CanalTV
Mover Ingresar Regresar
Antena :
Aire
►
Prog. Auto
►
Borrar canal encriptado ►
Lista de canales ►
Nombre ►
Sintonia Fina
►
Intensidad señal
►
LNA : Apag ►
Apagado
Encendido
BN68-01184A-Spa.indd 32 2007-02-13 �� 1:42:00

Español - 33
Sintonización na de los canales analógicos
1. Pulse el botón MENU para ver el menú en pantalla.
Pulse los botones ▲ o ▼ para seleccionar “Canal” y, después, pulse el botón
ENTER.
2. Pulse los botones ▲ o ▼ para seleccionar “Sintonia Fina” y, después, pulse el
botón ENTER.
3. Pulse los botones ◄ o ► para ajustar la sintonía con precisión.
Para memorizar la sintonía fina en la memoria del televisor, pulse el botón ENTER.
Si no almacena en la memoria el canal que ha ajustado de manera precisa, los
ajustes no se guardan.
4. Para memorizar la sintonía fina en la memoria del televisor, pulse el botón ENTER
.
Para reiniciar la sintonización fina, pulse el botón ▼ para seleccionar “Reiniciar” y
pulse el botón ENTER.
Pulse el botón EXIT
para salir.
El simbolo “ * “ aparecera junto al nombre de los canales cuya sintonizacion se
haya ajustado.
Utilice la sintonización na para ajustar manualmente un determinado canal a n de que la recepción sea óptima.
Comprobación de la potencia de la señal digital
1. Pulse el botón MENU para ver el menú en pantalla.
Pulse los botones ▲ o ▼ para seleccionar “Canal” y, después, pulse el botón
ENTER.
2. Pulse los botones ▲ o ▼ para seleccionar “Intensidad señal” y, después, pulse el
botón ENTER.
Si el medidor de potencia de señal indica que la señal es débil, ajuste físicamente
su antena para incrementar la potencia de la señal. Continúe ajustando la antena
hasta que encuentre la mejor posición con la señal más potente.
Pulse el botón EXIT
para salir.
A diferencia de los canales analógicos, cuya calidad de recepción puede variar desde “nebuloso” a claro, los canales digitales
(HDTV) tienen una calidad de recepción perfecta o no se reciben en absoluto. Por tanto, a diferencia de los canales analógicos,
no puede sintonizar ningún canal digital. Puede, no obstante, ajustar la antena para mejorar la recepción de los canales digitales
disponibles.
Intensidad señal
Ingresar Regresar
TV
Aceptar
Ajustar Guardar Regresar
Sintonia Fina
Aire 24
0
Reiniciar
Ajustar Guardar Regresar
Sintonia Fina
Aire 24
+3
Reiniciar
Mover Ingresar Regresar
Sintonia Fina
Aire 24
0
Reiniciar
Canal
Mover Ingresar Regresar
TV
Antena :
Aire
►
Prog. Auto ►
Borrar canal encriptado ►
Lista de canales ►
Nombre ►
Sintonia Fina ►
Intensidad señal ►
LNA : Apagado ►
Fine Tune
Ajustar Guardar Regresar
Aire 24 *
+3
Reiniciar
Sintonia Fina
Canal
Mover Ingresar Regresar
TV
Antena :
Aire
►
Prog. Auto ►
Borrar canal encriptado ►
Lista de canales ►
Nombre ►
Sintonia Fina ►
Intensidad señal ►
LNA : Apag ►
Sintonía Fina
BN68-01184A-Spa.indd 33 2007-02-13 �� 1:42:03

Español - 34
Uso del TV como pantalla de ordenador (PC)
Instalación del software en el equipo (según Windows XP)
A continuación se muestra una pantalla de conguración normal en un ordenador con Windows. No obstante, las pantallas reales
en su PC probablemente serán diferentes, en función de su versión concreta de Windows y de su tarjeta de vídeo. Pero aunque
las pantallas reales tengan un aspecto diferente, se aplicarán los mismos ajustes básicos e información en la mayoría de los
casos. (Si no es así, póngase en contacto con el fabricante del ordenador o con un concesionario Samsung).
1. Primero, haga clic en
“Control Panel (Panel de control)” en el menú Inicio de Windows.
2. Cuando aparezca la pantalla del Panel de control, haga clic en “Appearance and
Themes (Apariencia y Temas)”
y aparecerá un cuadro de diálogo.
3. Cuando aparezca la pantalla del Panel de control, haga clic en “Display (Pantalla)”
y
aparecerá un cuadro de diálogo.
4. Seleccione la ficha “Settings (Configuración)”
en el cuadro de diálogo.
La configuración de tamaño correcto (resolución)
Modo óptimo: 1360 x 768 pixels
Si existe una opción de frecuencia vertical en el cuadro de diálogo de configuración de la
pantalla, el valor correcto es “60” o “60 Hz”.
Si no, haga clic en “Aceptar” y salga del cuadro de diálogo.
Modos de visualización
Pantalla de PC
If the signal from the system equals the standard signal mode, the screen is adjusted automatically. If the signal from the system
doesn’t equal the standard signal mode, adjust the mode by referring to your videocard user guide; otherwise there may be no
video. For the display modes listed below, the screen image has been optimized during manufacturing.
Mode Resolución
Frecuencia
horizontal (kHz)
Frecuencia
vertical (Hz)
Frecuencia del
reloj
de píxeles (MHz)
Polaridad de
sincronización
(H/V)
IBM
720 X 400
640 X 480
31.469
31.469
70.087
59.940
28.322
25.175
- / +
- / -
VESA
640 x 480
640 x 480
800 x 600
800 x 600
800 x 600
1024 x 768
1024 x 768
1024 x 768
1360 x 768
37.861
37.500
37.879
48.077
46.875
48.363
56.476
60.023
47.712
72.809
75.000
60.317
72.188
75.000
60.004
70.069
75.029
60.015
31.500
31.500
40.000
50.000
49.500
65.000
75.000
78.750
85.800
- / -
- / -
+ /+
+ /+
+ /+
- / -
- / -
+ /+
+ /+
D-Sub Entrada
Mode Resolución
Frecuencia
horizontal (kHz)
Frecuencia
vertical (Hz)
Frecuencia del
reloj
de píxeles (MHz)
Polaridad de
sincronización
(H/V)
IBM
720 X 400
640 X 480
31.469
31.469
70.087
59.940
28.322
25.175
- / +
- / -
VESA
800 x 600
1024 x 768
1360 x 768
37.879
48.363
47.712
60.317
60.004
60.015
40.000
65.000
85.800
+ /+
- / -
+ /+
HDMI/DVI Entrada
BN68-01184A-Spa.indd 34 2007-02-13 �� 1:42:03

Español - 35
1. Pulse el botón MENU para ver el menú en pantalla.
Pulse los botones ▲ o ▼ para seleccionar “Configuración” y, después, pulse el
botón ENTER.
Pulse los botones ▲ o ▼ para seleccionar “PC” y, después, pulse el botón
ENTER.
En primer lugar, cambie al modo PC.
2. Pulse los botones ▲ o ▼ para seleccionar “Ajuste Auto.” y, después, pulse el botón
ENTER.
Pulse el botón EXIT
para salir.
Cómo realizar el Ajuste automático
Utilice la función de Ajuste automático para que el aparato de TV ajuste automáticamente las señales de vídeo que el
monitor recibe. La función también ajusta automáticamente con más conguración y ajusta los valores y las posicio-
nes de la frecuencia.
Esta función no está disponible en el modo DVI-Digital.
Ajuste del televisor con el ordenador
1. Pulse el botón MENU para ver el menú en pantalla.
Pulse los botones ▲ o ▼ para seleccionar “Configuración” y, después, pulse el
botón ENTER.
Pulse los botones ▲ o ▼ para seleccionar “PC” y, después, pulse el botón
ENTER.
En primer lugar, cambie al modo PC.
2. Pulse los botones ▲ o ▼ para seleccionar “Fijar la Imagen” y, después, pulse el
botón ENTER.
3. Pulse los botones ▲ o ▼ para seleccionar “Grueso” o “Fino” y, después, pulse el
botón ENTER.
Pulse los botones ◄ o ► para ajustar la calidad de la pantalla.
Pueden aparecer rayas verticales o la imagen tener poca definición.
Pulse el botón ENTER
.
Pulse el botón EXIT
para salir.
Ajuste de la calidad de la pantalla
El propósito del ajuste de la calidad de imagen es eliminar o reducir el ruido de la imagen. Si el ruido no desaparece sólo con la
sintonización fina, realice los ajustes de frecuencia hasta el máximo y vuelva a realizar la sintonización fina.
(
consulte las páginas 45.)
Después de reducir el ruido, vuelva a ajustar la imagen para que quede alineada en el centro de la
pantalla.
Fijar la Imagen
Grueso 50
Fino 0
TV
Mover Ingresar Regresar
50
▲
Grueso
▼
PCTV
Mover Ingresar Regresar
Fijar la Imagen ►
Posición ►
Ajuste Auto ►
Reiniciar Imagen ►
Resolución :
1360 x 768@60Hz
Configuración
▲Más
Melodía : Apagado
►
PC
►
N.neg HDMI
: Normal ►
Modo película : Apagado
►
PIP
►
Función de Ayuda : Encendido
►
▼Más
TV
Mover Ingresar Regresar
PC
Fijar la Imagen ►
Posición ►
Ajuste Auto.
Reiniciar Imagen
Resolución :
1360 x 768@60Hz
TV
Mover Ingresar Regresar
Ajuste Autom. en Progreso.
Espere por favor.
BN68-01184A-Spa.indd 35 2007-02-13 �� 1:42:05

Español - 36
Cambio de la posición de la pantalla
1. Pulse el botón MENU
para ver el menú en pantalla.
Pulse los botones ▲ o ▼ para seleccionar “Configuración” y, después, pulse el
botón ENTER.
Pulse los botones ▲ o ▼ para seleccionar “PC” y, después, pulse el botón
ENTER.
En primer lugar, cambie al modo PC.
2. Pulse los botones ▲ o ▼ para seleccionar “Posición” y, después, pulse el botón
ENTER
.
3. Pulse los botones ▲ o ▼ para ajustar Posición V.
Pulse los botones ◄ o ► para ajustar Posición H.
Pulse el botón ENTER.
Pulse el botón EXIT
para salir.
Inicio de la conguración de Posición de la pantalla o del Color
Puede recuperar todos los ajustes de imagen predeterminados de fábrica.
1. Pulse el botón MENU para ver el menú en pantalla.
Pulse los botones ▲ o ▼ para seleccionar “Configuración” y, después, pulse el
botón ENTER.
Pulse los botones ▲ o ▼ para seleccionar “PC” y, después, pulse el botón
ENTER.
En primer lugar, cambie al modo PC.
2. Pulse los botones ▲ o ▼ para seleccionar “Reiniciar Imagen” y, después, pulse el
botón ENTER.
Pulse el botón EXIT
para salir.
TV
Mover Ingresar Regresar
Posición
▲
▲
▲
▲
Reinicio imagen completado.
PCTV
Mover Ingresar Regresar
Fijar la Imagen ►
Posición
►
Ajuste Auto ►
Reiniciar Imagen
►
Resolución :
1360 x 768@60Hz
PCTV
Mover Ingresar Regresar
Fijar la Imagen ►
Posición ►
Ajuste Auto ►
Reiniciar Imagen ►
Resolución :
1360 x 768@60Hz
Visualización de la resolución actual
Puede conseguir información sobre la resolución del PC.
1. Pulse el botón MENU para ver el menú en pantalla.
Pulse los botones ▲ o ▼ para seleccionar “Configuración” y, después, pulse el
botón ENTER.
Pulse los botones ▲ o ▼ para seleccionar “PC” y, después, pulse el botón
ENTER.
En primer lugar, cambie al modo PC.
2. Pulse los botones ▲ o ▼ para seleccionar “Resolución”
En la pantalla se muestra la información sobre la resolución.
Pulse el botón EXIT
para salir.
PCTV
Mover Ingresar Regresar
Fijar la Imagen ►
Posición ►
Ajuste Auto ►
Reiniciar Imagen ►
Resolución :
1360 x 768@60Hz
BN68-01184A-Spa.indd 36 2007-02-13 �� 1:42:06

Español - 37
Conguración del Reloj
Establecer el reloj es necesario para usar las distintas características de temporizador del TV. Además, puede comprobar la hora
mientras está viendo el TV. (Simplemente pulse INFO).
Opción 1: Ajuste manual del reloj
1. Pulse el botón MENU
para ver el menú en pantalla.
Pulse los botones ▲ o ▼ para seleccionar “Configuración” y, después, pulse
el botón ENTER.
Pulse los botones ▲ o ▼ para seleccionar “Tiempo” y, después, pulse el
botón ENTER.
2. Pulse el botón ENTER
para seleccionar “Reloj”
3. Pulse el botón ENTER
para seleccionar “Modo Reloj”.
Pulse los botones ▲ o ▼ para seleccionar “Manual” y, después, pulse el
botón ENTER.
4. Pulse los botones ▲ o ▼ para seleccionar “Config. Reloj” y, después, pulse el
botón ENTER.
5. Pulse los botones ◄ o ► para desplazarse a “Mes”, “Día”, “Año”, “Hora”,
“Minuto”, o “am/pm”. Seleccione la fecha y la hora que desee pulsando los
botones ▲ o ▼, pulse después el botón ENTER.
Pulse el botón EXIT
para salir..
La hora actual aparecerá siempre que se pulse el botón INFO.
Puede ajustar el mes, el día, el año, la hora y el minuto directamente
pulsando los botones numéricos del mando a distancia.
Ajuste de la Hora
Tiempo
Reloj ►
Temporizador : Apagado ►
Temporizador 1 : Desactivado ►
Temporizador 2 : Desactivado ►
Temporizador 3 : Desactivado
►
TV
Mover Ingresar Regresar
- - / - - / - - - - / - - : - - - -
Configuración
Plug & Play ►
Idioma : Españo ►
Tiempo ►
Modo Juego : Apagado ►
V-Chip ►
Subtítulo ►
Transpar. Del menú
: Alto ►
▼Más
TV
Mover Ingresar Regresar
Reloj
Modo Reloj : Manual ►
Config. Reloj ►
Zona Tiempo ►
Tiempo Verano ►
TV
Mover Ingresar Regresar
Config. Reloj
Escriba la fecha y la hora.
TV
Mover Ajustar Regresar
Mes
▲
▼
Día Año
Hora Minuto am/pm
Config. Reloj
Escriba la fecha y la hora.
TV
Mes
▲
▼
Día Año
Hora Minuto am/pm
1 1 2007
12 00 am
Mover Ajustar Regresar
BN68-01184A-Spa.indd 37 2007-02-13 �� 1:42:08

Español - 38
Opción 2: Ajuste automático del reloj
1. Pulse el botón MENU
para ver el menú en pantalla.
Pulse los botones ▲ o ▼ para seleccionar “Configuración” y, después, pulse
el botón ENTER.
Pulse los botones ▲ o ▼ para seleccionar “Tiempo” y, después, pulse el
botón ENTER.
2. Pulse el botón ENTER
para seleccionar “Reloj”.
3. Pulse el botón ENTER
para seleccionar “Modo Reloj”.
Pulse los botones ▲ o ▼ para seleccionar “Auto” y, después, pulse el botón
ENTER.
4. Pulse los botones ▲ o ▼ para seleccionar “Zona Tiempo” y, después, pulse el
botón ENTER.
5. Pulse los botones ▲ o ▼ para resaltar la zona horaria del área local, después
pulse el botón ENTER.
6. Pulse los botones ▲ o ▼ para seleccionar “Tiempo Verano"; después pulse el
botón ENTER.
Pulse los botones ▲ o ▼ para seleccionar “Encendido” o “Apagado” y,
después, pulse el botón ENTER.
Pulse el botón EXIT
para salir.
Según la estación emisora y la señal, puede que el ajuste automático
de la hora no se realice correctamente. En este caso, ajuste la hora
manualmente.
La antena o el cable debe estar conectado para que se ajuste la hora
automáticamente.
Tiempo
Reloj ►
Temporizador : Apagado
►
Temporizador 1 : Desactivado
►
Temporizador 2 : Desactivado ►
Temporizador 3 : Desactivado
►
TV
Mover Ingresar Regresar
- - / - - / - - - - / - - : - - - -
Reloj
Modo Reloj : Manual ►
Config. Reloj ►
Zona Tiempo
Tiempo Verano :
Apagado
TV
Mover Ingresar Regresar
Manual
Auto
Reloj
Modo Reloj : Auto ►
Config. Reloj ►
Zona Tiempo ►
Tiempo Verano : Apagado
►
TV
Mover Ingresar Regresar
Mover Ingresar Regresar
Seleccione la zona horaria en la que se encuentra.
Zona Tiempo
Newfoundland
Atlántico
Este
Central
Montañas
Pacífico
Alaska
Hawaii
ConfiguraciónTV
Mover Ingresar Regresar
Plug & Play ►
Idioma : Españo
►
Tiempo
►
Modo Juego : Apagado ►
V-Chip
►
Subtítulo
►
Transpar. Del menú
: Alto ►
▼Más
RelojTV
Mover Ingresar Regresar
Modo Reloj : Auto ►
Config. Reloj ►
Zona Tiempo ►
Tiempo Verano : Apagado ►
RelojTV
Mover Ingresar Regresar
Modo Reloj : Auto
Config. Reloj
Zona Tiempo
Tiempo Verano : Apag
Encendido
Apagado
BN68-01184A-Spa.indd 38 2007-02-13 �� 1:42:11

Español - 39
Conguración del Temporizador de sueño
El temporizador de desconexión apaga automáticamente el televisor después de un período prejado
(entre 30 y 180 minutos).
1. Pulse el botón MENU para ver el menú en pantalla.
Pulse los botones ▲ o ▼ para seleccionar “Configuración” y, después, pulse el
botón ENTER.
Pulse los botones ▲ o ▼ para seleccionar “Tiempo” y, después, pulse el botón
ENTER.
2. Pulse los botones ▲ o ▼ para seleccionar “Temporizador” y, después, pulse el
botón ENTER.
3. Pulse los botones ▲ o ▼ para ajustar “Minuto”.
4. Pulse el botón ► para seleccionar “Activación”.
Pulse los botones ▲ o ▼ para seleccionar “Encendido” y, después, pulse el botón
ENTER.
Pulse el botón EXIT
para salir.
Basta con que pulse el botón SLEEP del mando a distancia para acceder
rápidamente a la configuración del temporizador.
Tiempo
Reloj ►
Temporizador : Apagado ►
Temporizador 1 : Desactivado ►
Temporizador 1 : Desactivado ►
Temporizador 1 : Desactivado ►
TV
Mover Ingresar Regresar
1/ 1/ 2007/ 12 : 30 am
TemporizadorTV
Mover Ajustar Regresar
Minuto
▲
▼
Activation
30
Encemdido
Temporizador
Define las opciones del
temporizador.
TV
Mover Ajustar Regresar
Minuto
▲
▼
Activación
Apagado
Define las opciones del
temporizador.
1. Pulse el botón MENU para ver el menú en pantalla.
Pulse los botones ▲ o ▼ para seleccionar “Configuración” y, después, pulse el
botón ENTER.
Pulse los botones ▲ o ▼ para seleccionar “Tiempo” y, después, pulse el botón
ENTER.
2.
Pulse los botones ▲ o ▼ para seleccionar “Temporizador 1,
Temporizador 2, Temporizador 3” y, después, pulse el botón ENTER.
3. Pulse los botones ▲ o ▼ para ajustar “Hora” y pulse el botón ► para ir al paso
siguiente.
Ajuste otras opciones utilizando el mismo método que se indica anteriormente.
activar o inactivo Pulse los botones ▲ o ▼
Repetir Una vez, Cada día, Lun-Vie, Lun-Sáb,
Sáb-Dom
Pulse los botones ▲ o ▼
Volumen Seleccione el nivel de volumen deseado Pulse los botones ▲ o ▼
Antena Sel Aire or Cable Pulse los botones ▲ o ▼
Canal Change the Canal Pulse los botones ▲ o ▼
Cuando haya terminado, pulse el botón RETURN para volver.
• La hora actual aparecerá siempre que se pulse el botón INFO.
• Puede ajustar la hora, los minutos, el canal y el canal directamente
pulsando los botones numéricos del mando a distancia.
Pulse el botón EXIT para salir.
Activación y desactivación del temporizador
TiempoTV
1/ 1/ 2007/ 12 : 30 am
Mover Ingresar Regresar
Reloj ►
Temporizador : Apagado ►
Temporizador 1 : Desactivado ►
Temporizador 2 : Desactivado ►
Temporizador 3 : Desactivado ►
Temporizador 1TV
Hora de encendido
▲
▼
12 00 am
inactivo
Hora de apagado
12 00 am
inactivo
Repetir
Una vez
Antena
Volumen
10
Cable
:
:
Mover Ajustar Regresar
Canal
3
BN68-01184A-Spa.indd 39 2007-02-13 �� 1:42:13

Español - 40
Selección del idioma de menú
1. Pulse el botón MENU para ver el menú en pantalla.
Pulse los botones ▲ o ▼ para seleccionar “Configuración” y, después, pulse el
botón ENTER.
Pulse los botones ▲ o ▼ para seleccionar “Idioma” y, después, pulse el botón
ENTER.
2. Pulse los botones ▲ o ▼ para seleccionar el idioma apropiado:
"English”, “Español” o “Francés”.
Pulse el botón ENTER.
Pulse el botón EXIT
para salir.
Descripción de las Funciones
Configuración
Plug & Play ►
Idioma : Apagado ►
Tiempo ►
Modo Juego : Apagado ►
V-Chip ►
Subtítulo ►
Transpar. Del menú
: Alto ►
▼Más
TV
Mover Ingresar Regresar
ConfiguraciónTV
Mover Ingresar Regresar
Plug & Play
Idioma : Apag
Tiempo
Modo Juego : Apagado
V-Chip
Subtítulo
Transpar. Del menú
: Alto
▼Más
English
Español
Français
Uso del Modo Juego
Si se conecta a una consola de videojuegos como PlayStationTM o XboxTM, podrá obtener sensaciones más realistas,
seleccionando Modo juego.
1. Pulse el botón MENU
para ver el menú en pantalla.
Pulse los botones ▲ o ▼ para seleccionar “Configuración” y, después, pulse el
botón ENTER.
2. Pulse los botones ▲ o ▼ para seleccionar “Modo Juego” y, después, pulse el
botón ENTER.
3. Pulse los botones ▲ o ▼ para seleccionar “Encendido” o “Apagado” y, después,
pulse el botón ENTER.
4. Pulse el botón EXIT
para salir.
Si desea desconectarse de la consola de videojuegos y conectarse a otro dispositivo exter
no, ajuste la opción Modo del juego como Apagado en el menú de configuración.
Si ve la televisión en Modo juego, la pantalla tiembla ligeramente.
Modo juego no está disponible en el modo de TV.
ConfiguraciónTV
Mover Ingresar Regresar
Plug & Play ►
Idioma : Apagado ►
Tiempo ►
Modo Juego : Apagado ►
V-Chip ►
Subtítulo ►
Transpar. Del menú
: Alto ►
▼Más
ConfiguraciónTV
Mover Ingresar Regresar
Plug & Play
Idioma : Apagado
Tiempo
Modo Juego : Apag
V-Chip
Subtítulo
Transpar. Del menú
: Alto
▼Más
Apagado
Encendido
Nivel Transparencia del menú
Ajusta la transparencia de la pantalla del menú.
1. Pulse el botón MENU
para ver el menú en pantalla.
Pulse los botones ▲ o ▼ para seleccionar “Configuración” y, después, pulse el
botón ENTER.
2. Pulse los botones ▲ o ▼ para seleccionar “Transpar. Del menú” y, después, pulse
el botón ENTER.
3. Pulse los botones ▲ o ▼ para seleccionar el nivel y pulse después el botón
ENTER
.
Pulse el botón EXIT para salir.
ConfiguraciónTV
Mover Ingresar Regresar
Plug & Play ►
Idioma : Apagado ►
Tiempo ►
Modo Juego : Apagado ►
V-Chip ►
Subtítulo ►
Transpar. Del menú
: Alto ►
▼Más
ConfiguraciónTV
Mover Ingresar Regresar
Plug & Play
Idioma : Apagado
Tiempo
Modo Juego : Apagado
V-Chip
Subtítulo
Transpar. Del menú
: Alto
▼Más
Alto
Medio
Bajo
Opaco
BN68-01184A-Spa.indd 40 2007-02-13 �� 1:42:15

Español - 41
La función subtítulo analógico funciona en un modo de canal RF analógico o en modo de señal externa.
1. Pulse el botón MENU
para ver el menú en pantalla.
Pulse los botones ▲ o ▼ para seleccionar “Configuración” y, después, pulse el
botón ENTER.
2. Pulse los botones ▲ o ▼ para seleccionar “Subtítulo” y, después, pulse el botón
ENTER
.
3. Pulse el botón ENTER
para seleccionar “Subtítulo”. Pulse los botones ▲ o ▼ para
seleccionar “Encendido” y, después, pulse el botón ENTER.
4. Pulse los botones ▲ o ▼ para seleccionar “Modo de Subtítulo” y, después, pulse
el botón ENTER.
Pulse los botones ▲ o ▼ para seleccionar el submenú que desee (Programado,
CC1~CC4, o Texto1~Texto4); pulse después el botón ENTER.
Pulse el botón EXIT
para salir.
• El valor predeterminado es “CC1”.
• CC1: El servicio primario de subtítulos sincronizados. Son subtítulos
en el idioma principal que debe estar sincronizado con el sonido,
preferiblemente que coincida con la secuencia específica.
• CC2: Subtítulos especiales de uso no sincronizado. Este canal transporta
datos que están destinados a ampliar la información del programa.
• CC3: Servicio de subtítulos secundarios sincronizados. Datos alternativos
de subtítulos relacionados con el programa, típicamente subtítulos del
segundo idioma.
• CC4: Subtítulos especiales de uso no sincronizado. Similar a CC2.
• Texto1: Primer servicio de texto. Se puede tratar de varios datos no
relacionados con programa alguno.
• Texto2: Segundo servicio de texto. Datos adicionales, normalmente sin
relación con programa alguno.
• Texto3/Texto4: Tercer y cuarto servicios de texto. Estos canales de datos sólo
se deben usar si Texto1 y Texto2 no son suficientes.
La función Subtítulo no está disponible en los modos COMPONENTE, HDMI ni
PC.
La disponibilidad de los subtítulos depende del programa que se esté
emitiendo.
Pulse el botón CAPTION del mando a distancia varias veces para seleccionar
“Encendido”u “Apagado”
Visión de subtítulos (mensajes de texto en pantalla) - Analógico
Subtítulo
Subtítulo : Apagado ►
Modo de Subtítulo : Programado ►
Opciones - Subtítulo ►
TV
Ingresar Regresar
ConfiguraciónTV
Mover Ingresar Regresar
Plug & Play ►
Idioma : Apagado
►
Tiempo
►
Modo Juego : Apagado ►
V-Chip
►
Subtítulo
►
Transpar. Del menú
: Alto ►
▼Más
SubtítuloTV
Mover Ingresar Regresar
Subtítulo : Apag
Modo de Subtítulo : Programado
Opciones - Subtítulo
Apagado
Encendido
SubtítuloTV
Mover Ingresar Regresar
Subtítulo : Apagado
Modo de Subtítulo : Programado
Opciones - Subtítulo
CaptionTV
Mover Ingresar Regresar
Subtítulo : Apagado
Modo de Subtítulo : Programado
Opciones - Subtítulo
Programado
CC1
CC2
CC3
CC4
Texto1
Texto2
▼
BN68-01184A-Spa.indd 41 2007-02-13 �� 1:42:17

Español - 42
La función Subtítulo digital funciona en canales digitales.
1. Pulse el botón MENU
para ver el menú en pantalla.
Pulse los botones ▲ o ▼ para seleccionar “Configuración” y, después, pulse el
botón ENTER.
2. Pulse los botones ▲ o ▼ para seleccionar “Subtítulo” y, después, pulse el botón
ENTER
.
3. Pulse el botón ENTER
para seleccionar “Subtítulo”.
Pulse los botones ▲ o ▼ para seleccionar “Encendido” y, después, pulse el botón
ENTER.
4. Pulse los botones ▲ o ▼ para seleccionar “Modo de Subtítulo” y, después, pulse el
botón ENTER.
Pulse los botones ▲ o ▼ para seleccionar el submenú (Programado,
Servicio1~Servicio6, CC1~CC4 o Texto1~Texto4) que desee; pulse después el
botón ENTER.
5. Pulse los botones ▲ o ▼ para seleccionar “Opciones - Subtítulos” y, después,
pulse el botón ENTER.
La función “Opciones - Subtítulos” sólo está disponible cuando puede seleccionarse
“Servicio1~Servicio6” en el modo “Modo de Subtítulo”.
Los modos de subtitulación Servicio 1-6 pueden no estar disponibles según el tipo
de emisión.
6. Pulse los botones ▲ o ▼ para seleccionar “Tamaño” y, después, pulse el botón
ENTER
.
Pulse los botones ▲ o ▼ para seleccionar la opción deseada para el Subtítulo;
después pulse el botón ENTER.
Pulse los botones ▲ o ▼ para seleccionar las opciones de submenú que desee
(vea las opciones en la pagina siguiente) y pulse el botón ENTER.
Pulse el botón EXIT
para salir.
La disponibilidad de los subtítulos depende del programa que se esté emitiendo.
La opción “Programado” significa que se sigue el estándar establecido por el
emisor.
• Tamaño: Esta opción consta de “Programado”, “Pequeño”, “Normal” y “Grande”. El valor
predeterminado es “Normal”.
• Tipo de letra: Esta opción consta de “Programado”, “Estilo 0-Estilo 7”. Puede cambiar el
tipo de letra que desee. El valor predeterminado es “Estilo 0”.
•
Color primer plano: Esta opción consta de “Programado”, “Blanco”, “Negro”, “Rojo”,
“Verde”, “Azul”, “Amarillo”, “Magenta”, y “Cián”. Puede cambiar el
color del texto. El valor predeterminado es Blanco.
•
Color de fondo: Esta opción consta de “Programado”, “Blanco”, “Negro”, “Rojo”, “Verde”,
“Azul”, “Amarillo”, “Magenta”, y “Cián”. Puede cambiar el color del fondo
de los subtítulos. El valor predeterminado es “Negro”.
• Opacidad prim. plano: Esta opción consta de “Programado”, “Transparente”,
“Traslúcido”, “Sólido” e “Intermitente”. Puede cambiar la opacidad
de la letra.
• Opacidad del fondo: Esta opción consta de “Programado”, “Transparente”, “Traslúcido”,
“Sólido” e “Intermitente”. Puede cambiar la opacidad del fondo de
los subtítulos.
• Regresar al predeter.: Esta opción reajusta las opciones “Tamaño”, “Tipo de letra”,
“Color primer plano”, “Color de fondo”, “Opacidad prim. plano” y
“Opacidad del fondo” a sus valores predeterminados.
Pulse el botón CAPTION del mando a distancia varias veces para seleccionar
“Encendido”u “Apagado”
Visión de subtítulos (mensajes de texto en pantalla) - Digital
Opciones - Subtítulo
Tamaño : Programado ►
Tipo de Letra : Programado ►
Color Primer Plano : Programado ►
Color de Fondo : Programado ►
Opac. Primer Plano : Programado ►
Opac. de Fondo : Programado ►
Regresar al Predeter
TV
Mover Ingresar Regresar
SubtítuloTV
Mover Ingresar Regresar
Subtítulo : Apag
Modo de Subtítulo : Programado
Opciones - Subtítulo
Apagado
Encendido
SubtítuloTV
Mover Ingresar Regresar
Subtítulo : Apagado
Modo de Subtítulo : Programado
Opciones - Subtítulo
SubtítuloTV
Mover Ingresar Regresar
Subtítulo : Apagado
Modo de Subtítulo : Programado
Opciones - Subtítulo
Programado
Servicio1
Servicio2
Servicio3
Servicio4
Servicio5
Servicio6
▼
SubtítuloTV
Mover Ingresar Regresar
Subtítulo : Apagado
Modo de Subtítulo : Programado
Opciones - Subtítulo
BN68-01184A-Spa.indd 42 2007-02-13 �� 1:42:19

Español - 43
1. Pulse el botón MENU para ver el menú en pantalla.
Pulse los botones ▲ o ▼ para seleccionar “Configuración” y, después, pulse
el botón ENTER.
2. Pulse los botones ▲ o ▼ para seleccionar “Función de Ayuda” y, después,
pulse el botón ENTER.
3. Pulse los botones ▲ o ▼ para seleccionar “Encendido” y, después, pulse el
botón ENTER.
Pulse el botón EXIT
para salir.
El valor predeterminado de la Función de Ayuda es Encendido
Ajuste de la función de ayuda
Muestra la ayuda sobre las funciones del menú.
1. Pulse el botón MENU para ver el menú.
Pulse los botones ▲ o ▼ para seleccionar “Configuración” y después pulse el
botón ENTER.
2. Pulse los botones ▲ o ▼ para seleccionar “Efecto de luz” y, a continuación, pulse
el botón ENTER.
3.
Pulse los botones ▲ o ▼ para seleccionar “Apagado”, “En m. espera”,
“Viendo la TV” o “Siempre” y, después, pulse el botón ENTER.
• Apagado: El LED no se activará.
• En m. espera: Enciende el LED en modo de espera.
• Viendo la TV: Enciende el LED cuando se mira la TV.
• Siempre: El LED se encenderá una vez se haya apagado el televisor.
Pulse el botón EXIT para salir.
Conguración de Efecto de luz
Se puede apagar o encender el LED azul del frontal del televisor.
Configuración
▲Más
Melodía : Apagado
►
PC
►
N.neg HDMI
: Normal ►
Modo película : Apagado
►
PIP
►
Función de Ayuda : Encendido
►
▼Más
TV
Mover Ingresar Regresar
Configuración
▲Más
Melodía
PC
N.neg HDMI
Modo película
PIP
Función de Ayuda : On ►
▼Más
TV
Mover Ingresar Regresar
Apagado
Encendido
Configuración
▲Más
Efecto de luz : En m. espera
►
Actualiz.software
►
TV
Mover Ingresar Regresar
Configuración
▲Más
Efecto de luz : Watch Mode
►
Actualiz.software ►
TV
Mover Ingresar Regresar
Apagado
En m. espera
Viendo la TV
Siempre
BN68-01184A-Spa.indd 43 2007-02-13 �� 1:42:21

Español - 44
1. Pulse el botón MENU para ver el menú en pantalla.
Pulse los botones ▲ o ▼ para seleccionar “Configuración” y, después, pulse
el botón ENTER.
2. Pulse los botones ▲ o ▼ para seleccionar “V-Chip” y, después, pulse el botón
ENTER
.
Aparecerá el mensaje “Ingresar Código”. Escriba su código PIN de 4 dígitos.
El código PIN predeterminado para un televisor nuevo es “0-0-0-0”.
3. Aparecerá la pantalla “V-Chip”.
Pulse los botones ▲ o ▼ para seleccionar “Cambiar Código” y, después,
pulse el botón ENTER.
Aparecerá la pantalla Cambiar Código. Escriba un nuevo código PIN de 4
dígitos.
En cuanto introduzca los 4 dígitos, aparece la pantalla “Confirmar Nuevo
Código”.
Vuelva a escribir los 4 dígitos. Cuando desaparezca la pantalla de confirma-
ción, el código quedará memorizado.
Pulse el botón EXIT
para salir.
Si olvida su código, pulse los botones del mando a distancia siguiendo la
secuencia siguiente, que restablece el código a 0-0-0-0: Power Off → Mute
→ 8 → 2 → 4 → Power On.
Uso de V-Chip
La función V-Chip bloquea automáticamente la programación que se considera inadecuada para los niños. El usuario debe intro-
ducir primero un código PIN (número de identificación personal) antes de establecer o cambiar las restricciones de V-Chip.
Si se ha activado la función V-chip, las opciones de PIP no funcionan.
Ajuste del número de identicación personal (código PIN)
Mover Ingresar Regresar
Bloqueo V-Chip : Apagado
►
Guías pater. TV ►
Clas. MPAA ►
Inglés Canadiense ►
Francés Canadiense ►
Clasificación U.S. Descargable ►
Cambiar Código ►
V-ChipTV
V-Chip
Ingresar Código
TV
* * * *
Enter PIN Regresar
Ingresar Nuevo Código
Confirmar Nuevo Código
Cambiar Código
TV
Enter PIN Regresar
ConfiguraciónTV
Mover Ingresar Regresar
Plug & Play ►
Idioma : Apagado ►
Tiempo ►
Modo Juego : Apagado ►
V-Chip ►
Subtítulo ►
Transpar. Del menú
: Alto ►
▼Más
BN68-01184A-Spa.indd 44 2007-02-13 �� 1:42:22

Español - 45
1. Pulse el botón MENU para ver el menú en pantalla.
Pulse los botones ▲ o ▼ para seleccionar “Configuración” y, después, pulse
el botón ENTER.
2. Pulse los botones ▲ o ▼ para seleccionar “V-Chip” y, después, pulse el botón
ENTER
.
Aparecerá el mensaje “Ingresar Código”. Escriba su código PIN de 4 dígitos.
3. Aparecerá la pantalla “V-Chip”. Para activar la función V-Chip, pulse el botón
ENTER
para que “Bloqueo V-Chip” se ajuste en “Encendido”. (Si se pulsan
repetidamente los botones ▲ o ▼ se alterna entre “Encendido” y “Apagado”.
Pulse el botón ENTER
.
Pulse el botón EXIT
para salir.
Cómo activar/desactivar V-Chip
1. Pulse el botón MENU para ver el menú en pantalla.
Pulse los botones ▲ o ▼ para seleccionar “Configuración” y, después, pulse
el botón ENTER.
2. Pulse los botones ▲ o ▼ para seleccionar “V-Chip” y, después, pulse el botón
ENTER
.
Aparecerá el mensaje “Ingresar Código”. Escriba su código PIN de 4 dígitos.
Conguración de Restricciones usando la sección “Guías pater. TV”
Primero, establezca un número de identificación personal (PIN) y active V-Chip.
(Consulte la sección anterior). Las restricciones del bloqueo de programas se pueden
establecer mediante dos métodos: Las guía de programas o la clasificación MPAA.
V-Chip
Ingresar Código
TV
* * * *
Enter PIN Regresar
V-Chip
Ingresar Código
TV
* * * *
Enter PIN Regresar
ConfiguraciónTV
Mover Ingresar Regresar
Plug & Play ►
Idioma : Apagado ►
Tiempo ►
Modo Juego : Apagado ►
V-Chip ►
Subtítulo ►
Transpar. Del menú
: Alto ►
▼Más
Mover Ingresar Regresar
V-ChipTV
Bloqueo V-Chip : Apagado ►
Guías pater. TV ►
Clas. MPAA ►
Inglés Canadiense ►
Francés Canadiense ►
Clasificación U.S. Descargable ►
Cambiar Código ►
Mover Ingresar Regresar
V-ChipTV
Bloqueo V-Chip : Apag
Guías pater. TV
Clas. MPAA
Inglés Canadiense
Francés Canadiense
Clasificación U.S. Descargable
Cambiar Código
Apagado
Encendido
ConfiguraciónTV
Mover Ingresar Regresar
Plug & Play ►
Idioma : Apagado ►
Tiempo ►
Modo Juego : Apagado ►
V-Chip ►
Subtítulo
►
Transpar. Del menú
: Alto ►
▼Más
BN68-01184A-Spa.indd 45 2007-02-13 �� 1:42:24

Español - 46
3. Aparecerá la pantalla “V-Chip”. Pulse los botones ▲ o ▼ para seleccionar “Guías
pater. TV” y, después, pulse el botón ENTER.
4. Aparecerá la pantalla “Guías pater. TV”.
Pulse los botones ▲ o ▼ para seleccionar una de las seis categorías basadas en
la edad:
• TV-Y: Niños pequeños
• TV-Y7: Niños de más de 7 años
• TV-G: Todos los públicos
• TV-PG: Acompañados de un adulto
• TV-14: Mayores de 14 años
• TV-MA: Para adultos
5. En este punto, ya ha se seleccionado una de las clasificaciones.
Pulse el botón ENTER. Según la configuración, se seleccionará un símbolo .
(En blanco = Desbloqueada, = Bloqueada)
Mientras se selecciona “ ”, pulse el botón ENTER para bloquear o desbloquear
la categoría. Para seleccionar una clasificación de TV distinta, pulse los botones
▲ o ▼ y, después, repita el proceso.
Perm. todo: Se pulsa para desbloquear todos los programas de televisión. /
Bloq. todo: Se pulsa para bloquear todos los programas de televisión.
TV-Y, TV-Y7, TV-G, TV-PG, TV-14 y TV-MA incluyen opciones adicionales.
Consulte el paso siguiente para cambiar las subclasificaciones:
FV: Fantasía y violencia / D: Diálogos con alusiones sexuales /
L: Lenguaje adulto / S: Situaciones sexuales / V: Violencia
La opción V-Chip bloqueará automáticamente ciertas categorías que son “más
restrictivas”.
Por ejemplo, si bloquea la categoría “TV-Y”, automáticamente se bloqueará
TV-Y7.
De manera similar, si bloquea la categoría TV-G, todas las categorías en el
grupo “adolescente” quedarán bloqueadas (TV-G, TV-PG, TV-14, y TV-MA).
Las subclasificaciones (D, L, S, V) funcionan de manera similar. (Consulte la
sección siguiente).
6. Cómo establecer las subclasificaciones FV, D, L, S, y V.
Primero, seleccione una de las clasificaciones de TV: TV-Y, TV-Y7 TV-G, TV-PG,
TV-14, o TV-MA (consulte el paso 4, en la página anterior) y pulse el botón ►.
Por cada subclasificación aparecerá un símbolo “ ”.
Con el “ ” seleccionado, pulse el botón ENTER para ir a la subclasificación.
Pulse ENTER para bloquear la subclasificación.
Para seleccionar una clasificación de TV distinta, pulse los botones ▲ o ▼,
después, repita el proceso.
La opción V-chip bloqueará automáticamente ciertas categorías que son “más
restrictivas”.
Por ejemplo, si bloquea la subclasificación “L” en TV-PG, las subclasificaciones
“L” en TV-14 y TV-MA se bloquearán automáticamente.
7. Pulse el botón EXIT
para borrar todas las pantallas. (O continúe en la sección
siguiente y establezca restricciones adicionales según los códigos MPAA.)
Estas categorías se dividen en dos grupos: TV-Y y TV-Y7 (niños pequeños y
niños a partir de 7 años), y TV-G a TV-MA (todos los demás).
Las limitaciones para estos grupos funcionan de forma independiente.
Si en la familia hay niños muy pequeños y adultos jóvenes, la opción Guía de
programas debe configurarse por separado para grupo de edad. (Consulte el
siguiente paso.)
Mover Ingresar Regresar
TV-Y
TV-Y7
Guías pater. TVTV
TV-G
TV-PG
TV-14
TV-MA
ALL FV V S L D
Perm. Todo
Bloq. Todo
Mover Ingresar Regresar
TV-Y
TV-Y7
Guías pater. TVTV
TV-G
TV-PG
TV-14
TV-MA
ALL FV V S L D
Perm. Todo
Bloq. Todo
Mover Ingresar Regresar
V-ChipTV
Bloqueo V-Chip : Apagado ►
Guías pater. TV ►
Clas. MPAA ►
Inglés Canadiense
►
Francés Canadiense
►
Clasificación U.S. Descargable ►
Cambiar Código ►
BN68-01184A-Spa.indd 46 2007-02-13 �� 1:42:26

Español - 47
Conguración de las restricciones mediante las clasicaciones MPAA: G, PG, PG-13, R, NC-17, X, NR
El sistema de clasificación MPAA utiliza el sistema de la MPAA (Motion Picture Association of America, Asociación americana
de cinematografía) que se aplica principalmente en las películas. Si el bloqueo de V-Chip está activado, el televisor bloqueará
automáticamente programas que estén codificados con clasificaciones rechazables (de la MPAA o de televisión).
1. Pulse el botón MENU para ver el menú en pantalla.
Pulse los botones ▲ o ▼ para seleccionar “Configuración” y, después,
pulse el botón ENTER.
2. Pulse los botones ▲ o ▼ para seleccionar “V-Chip” y, después, pulse el botón
ENTER
.
Aparecerá el mensaje “Ingresar Código”. Escriba su código PIN de 4 dígitos.
3. Aparecerá la pantalla “V-Chip”.
Pulse los botones ▲ o ▼ para seleccionar “
Clas. MPAA
”, y, después, pulse el
botón ENTER.
4. Aparecerá la pantalla “Clas. MPAA”.
Pulse varias veces los botones ▲ o ▼ para seleccionar una categoría concreta
de MPAA. Pulsando los botones ▲ o ▼ pasará secuencialmente por todas las
categorías MPAA:
• G: Todos los públicos (sin restricciones).
• PG: Se sugiere la compañía de un adulto.
• PG-13: Menores acompañados de un adulto.
• R: Restringido. Los niños menores de 17 años deben estar acompañados por
un adulto.
• NC-17: Prohibida la entrada a menores de 17 años.
• X: Sólo adultos.
• NR: Sin clasificacion.
Perm. todo: Se pulsa para desbloquear todos los programas de televisión.
Bloq. todo: Se pulsa para bloquear todos los programas de televisión.
Con una determinada categoría seleccionada, pulse el botón ENTER para
activarla.
En la pantalla aparecerá un símbolo “ ” seleccionado.
Pulse el botón ENTER para bloquear o desbloquear la categoría.
La opción V-chip bloqueará automáticamente cualquier categoría que sea “más
restrictiva”.
Por ejemplo, si bloquea la categoría “PG-13”, también se bloquearán
automáticamente “R”, “NC-17” y “X”.
Pulse el botón EXIT para salir.
V-Chip
TV
* * * *
Enter PIN Regresar
ConfiguraciónTV
Mover Ingresar Regresar
Plug & Play ►
Idioma : Apagado ►
Tiempo ►
Modo Juego : Apagado ►
V-Chip ►
Subtítulo ►
Transpar. Del menú
: Alto ►
▼Más
Mover Ingresar Regresar
V-ChipTV
Bloqueo V-Chip : Apagado ►
Guías pater. TV ►
Clas. MPAA ►
Inglés Canadiense ►
Francés Canadiense ►
Clasificación U.S. Descargable ►
Cambiar Código ►
Mover Ingresar Regresar
Clas. MPAATV
G
PG
PG-13
R
NC-17
X
NR
Bloq
Perm. Todo
Bloq. Todo
Mover Ingresar Regresar
Clas. MPAATV
G
PG
PG-13
R
NC-17
X
NR
Bloq
Perm. Todo
Bloq. Todo
BN68-01184A-Spa.indd 47 2007-02-13 �� 1:42:28

Español - 48
Cómo congurar las restricciones en el idioma “Inglés Canadiense”
1. Pulse el botón MENU para ver el menú en pantalla.
Pulse los botones ▲ o ▼ para seleccionar “Configuración” y, después, pulse
el botón ENTER.
2. Pulse los botones ▲ o ▼ para seleccionar “V-Chip” y, después, pulse el botón
ENTER
.
Aparecerá el mensaje “Ingresar Código”. Escriba su código PIN de 4 dígitos.
3. Pulse los botones ▲ o ▼ para seleccionar “Inglés Canadiense” y, después,
pulse el botón ENTER.
4. Pulse los botones ▲ o ▼ para seleccionar la restricción apropiada.
Pulse el botón ENTER para activar la restricción seleccionada.
Está resaltada la “ ”.
Pulse el botón EXIT
para salir.
Perm. todo: Se pulsa para desbloquear todos los programas de televisión.
Bloq. todo: Se pulsa para bloquear todos los programas de televisión.
• C: Programación para niños menores de 8 años.
• C8+: Programación generalmente considerada aceptable para niños mayores
de 8 años sin acompañamiento de adultos.
• G: Programación general, ideal para todas las audiencias.
• PG: Supervisión paterna.
• 14+: La programación contiene temas y contenidos que puede que no sean
adecuados para menores de 14 años.
• 18+: Programación para adultos.
V-Chip
Ingresar Código
TV
* * * *
Enter PIN Regresar
ConfiguraciónTV
Mover Ingresar Regresar
Plug & Play ►
Idioma : Apagado
►
Tiempo
►
Modo Juego : Apagado ►
V-Chip
►
Subtítulo
►
Transpar. Del menú
: Alto ►
▼Más
Mover Ingresar Regresar
V-ChipTV
Bloqueo V-Chip : Apagado ►
Guías pater. TV ►
Clas. MPAA ►
Inglés Canadiense ►
Francés Canadiense ►
Clasificación U.S. Descargable ►
Cambiar Código ►
Mover Ingresar Regresar
Inglés CanadienseTV
C
C8+
G
PG
14+
18+
Bloq
Perm. Todo
Bloq. Todo
Mover Ingresar Regresar
Inglés CanadienseTV
C
C8+
G
PG
14+
18+
Bloq
Perm. Todo
Bloq. Todo
BN68-01184A-Spa.indd 48 2007-02-13 �� 1:42:30

Español - 49
Cómo congurar las restricciones en el idioma ‘Francés Canadiense’
1. Pulse el botón MENU para ver el menú en pantalla.
Pulse los botones ▲ o ▼ para seleccionar “Configuración” y, después, pulse
el botón ENTER.
2. Pulse los botones ▲ o ▼ para seleccionar “V-Chip” y, después, pulse el botón
ENTER
.
Aparecerá el mensaje “Ingresar Código”. Escriba su código PIN de 4 dígitos.
3. Pulse los botones ▲ o ▼ para seleccionar “Francés Canadiense” y, después,
pulse el botón ENTER.
4. Pulse los botones ▲ o ▼ para seleccionar la restricción apropiada.
Pulse el botón ENTER para activar la restricción seleccionada.
Está resaltada la “ ”.
Pulse el botón EXIT
para salir.
Perm. todo: Se pulsa para desbloquear todos los programas de televisión.
Bloq. todo: Se pulsa para bloquear todos los programas de televisión.
• G: General.
• 8 ans+: No recomendada para niños pequeños.
• 13 ans+: Es posible que la programación no sea adecuada para niños meno-
res de 13 años.
• 16 ans+: Es posible que la programación no sea adecuada para niños meno-
res de 16 años.
• 18 ans+: Programación restringida para adultos.
V-Chip
Ingresar Código
TV
* * * *
Enter PIN Regresar
ConfiguraciónTV
Mover Ingresar Regresar
Plug & Play ►
Idioma : Apagado
►
Tiempo ►
Modo Juego : Apagado ►
V-Chip
►
Subtítulo
►
Transpar. Del menú
: Alto ►
▼Más
Mover Ingresar Regresar
V-ChipTV
Bloqueo V-Chip : Apagado ►
Guías pater. TV ►
Clas. MPAA ►
Inglés Canadiense ►
Francés Canadiense ►
Clasificación U.S. Descargable ►
Cambiar Código ►
Mover Ingresar Regresar
Francés CanadienseTV
G
8 ans+
13 ans+
16 ans+
18 ans+
Bloq
Perm. Todo
Bloq. Todo
Mover Ingresar Regresar
Francés CanadienseTV
G
8 ans+
13 ans+
16 ans+
18 ans+
Bloq
Perm. Todo
Bloq. Todo
BN68-01184A-Spa.indd 49 2007-02-13 �� 1:42:32

Español - 50
1. Pulse el botón MENU para ver el menú en pantalla.
Pulse los botones ▲ o ▼ para seleccionar “Configuración” y, después, pulse
el botón ENTER.
2. Pulse los botones ▲ o ▼ para seleccionar “V-Chip” y, después, pulse el botón
ENTER
.
Aparecerá el mensaje “Ingresar Código”. Escriba su código PIN de 4 dígitos.
3. Pulse los botones ▲ o ▼ para seleccionar “Clasificación U.S. Descargable” y,
después, pulse el botón ENTER.
Si la información no se descarga desde la emisora, el menú
"Clasificación U.S. Descargable” está desactivado.
La información de la restricción de bloqueo se puede descargar automáti-
camente mientras se ven los canales DTV. Esto puede tardar algunos seg-
undos.
El menú “Clasificación U.S. Descargable” está disponible después de que
la información se haya descargado desde la emisora. Sin embargo, según
el tipo de información de la emisora, el menú podría no estar disponible
para su uso.
4. Pulse los botones ▲ o ▼ para seleccionar la restricción apropiada.
Pulse el botón ENTER para activar la restricción seleccionada.
Está resaltada la “ ”.
Pulse el botón EXIT
para salir.
Allow All (Perm. Todo): Se pulsa para desbloquear todos los programas de
televisión.
Block All (Bloq. Todo): Se pulsa para bloquear todos los programas de tel-
evisión.
Los niveles de restricción de bloqueo difieren según la emisora.
El nombre de menú predeterminado y “Clasificación U.S. Descargable”
cambian según la información descargada.
Aunque configure la visualización en pantalla en su propio idioma, el menú
“Clasificación U.S. Descargable” siempre lo verá en inglés.
La clasificación bloqueará automáticamente ciertas categorías que son
“más restrictivas”.
Los títulos de clasificación (por ejemplo, Humor Level (Nivel humor), etc) y
las clasificaciones de televisión (por ejemplo, DH,MH,H, etc) pueden diferir
según la emisora.
Uso de V-Chip (V-Chip) con los canales digitales
La información de la restricción de bloqueo se puede usar mientras se ven los canales DTV (DTV).
Mover Ingresar Regresar
Clasificación U.S. Descargable
TV
DH
MH
H
VH
EH
Humor Level
Perm. Todo
Bloq. Todo
41/2
Título de clasificación
El número del título
de clasificación
actual
El número de
todos los títulos
de clasificación
V-Chip
Ingresar Código
TV
* * * *
Enter PIN Regresar
ConfiguraciónTV
Mover Ingresar Regresar
Plug & Play ►
Idioma : Apagado
►
Tiempo ►
Modo Juego : Apagado ►
V-Chip
►
Subtítulo
►
Transpar. Del menú
: Alto ►
▼Más
Mover Ingresar Regresar
V-ChipTV
Bloqueo V-Chip : Apagado ►
Guías pater. TV ►
Clas. MPAA ►
Inglés Canadiense ►
Francés Canadiense ►
Clasificación U.S. Descargable ►
Cambiar Código ►
BN68-01184A-Spa.indd 50 2007-02-13 �� 1:42:33

Español - 51
Guía de actualización del software
Actualización del software
Explorando USB...
Puede tardar hasta 30 segundos.
Panel lateral del TV
Unidad USB
1. Inserte una unidad USB que contenga las actualizaciones de firmware en las
conexiones SERVICE de la parte posterior del televisor.
2.
Pulse el botón MENU para ver el menú. Pulse los botones ▲ o ▼ para
seleccionar Configuración y después pulse el botón ENTER.
3.
Pulse los botones ▲ o ▼ para seleccionar Actualización software
(Actual. software) y después pulse ENTER.
4.
Pulse los botones ▲ o ▼ para seleccionar la actualización por
USB y después pulse ENTER. Aparece el mensaje Scanning for USB...
It may take up to 30 seconds (Buscando USB... Puede tardar 30 segundos).
No desconecte la alimentación ni retire la unidad USB mientras se aplican las
actualizaciones. El televisor se apagará y se encenderá automáticamente
después de completar la actualización de firmware. Después de realizar la
actualización compruebe la versión del firmware.
Samsung puede ofrecer actualizaciones para el firmware del televisor en el futuro. Póngase en contacto con el centro de llama-
das de Samsung en 1-800-SAMSUNG(7267864) para recibir información acerca de la descarga de las actualizaciones y del uso
de un controlador USB. Las actualizaciones se pueden realizar conectando una unidad USB al puerto USB situado en la parte
posterior del televisor.
Configuración
▲Más
Efecto de luz : En m. espera
►
Actualiz.software ►
TV
Mover Ingresar Regresar
ImagenTV
Mover Ingresar Regresar
▲More
Tamaño : 16 : 9
►
Digital NR : Apagado
►
Reiniciar : Cancelar
►
▲More
Tamaño : 16 : 9
Digital NR : Off
Reiniciar : Cancel
ImagenTV
Mover Ingresar Regresar
Apagado
Bajo
Medio
Alto
Auto
Si la señal de emisión que recibe el televisor es débil, puede activarse la función de reducción digital del ruido (Digital Noise
Reduction) para reducir la estática y las imágenes superpuestas que pueden aparecer en la pantalla.
1. Pulse el botón MENU
para ver el menú en pantalla.
Pulse el botón ENTER para seleccionar “Imagen”.
2. Pulse los botones ▲ o ▼ para seleccionar “Digital NR” y, después, pulse el botón
ENTER.
3. Pulse los botones ▲ o ▼ para seleccionar “Desactivado”, “Bajo”, “Medio”, “Alto”,
"Automático”. y, después, pulse el botón ENTER.
Apagado : Apaga la función de la reducción del ruido de la pantalla.
Bajo: Reduce el ruido de la pantalla a un nivel bajo.
Medio: Reduce el ruido de la pantalla a un nivel medio.
Alto: Reduce el ruido de la pantalla a un nivel alto.
Automático: Reconoce y reduce el ruido de la pantalla automáticamente.
Pulse el botón EXIT para salir.
Reducción digital del ruido
BN68-01184A-Spa.indd 51 2007-02-13 �� 1:42:35

Español - 52
Identicación de problemas
Si parece que el TV no funciona correctamente, en primer lugar compruebe esta lista de posibles problemas y soluciones.
Si no funciona ninguno de estos consejos, llame al centro de servicio más cercano.
Problema Posible Solución
Imagen deficiente. Intente sintonizar otro canal.
Ajuste la antena.
Compruebe las conexiones de todos los cables.
Calidad de sonido deficiente. Intente sintonizar otro canal.
Ajuste la antena.
No hay imagen o sonido. Intente sintonizar otro canal.
Pulse el botón SOURCE.
Compruebe que el TV esté conectado.
Compruebe las conexiones de la antena.
No se percibe ningún sonido,
o muy bajo, con el volumen al
máximo.
Primero, compruebe el volumen de los aparatos conectados al TV (por ejemplo, un
receptor digital, DTV, DVD, receptor de cable, VCR, etc.). A continuación, ajuste el
volumen del TV según sea más conveniente.
La imagen rueda verticalmente. Compruebe todas las conexiones de cable.
El TV funciona de forma irregular. Desconecte el TV durante 30 segundos y, después, intente que funcione otra vez.
El televisor no se enciende. Compruebe que la toma de la pared funciona.
Anomalías del mando a
distancia.
Remplace las pilas del mando a distancia.
Limpie el borde superior del mando a distancia (ventana de transmisión).
Compruebe los terminales de la pila.
Mensaje “Verificar cable señal”. Compruebe que el cable de señal esté conectado firmemente con las fuentes del PC.
Mensaje “Modo no compatible”. Compruebe la resolución máxima y la frecuencia del adaptador de vídeo.
Compare estos valores con los datos de los modos de Pantalla.
Problema en pantalla con la
emisión digital.
Compruebe la potencia de la señal digital y la antena de entrada.
La imagen es demasiado clara o
demasiado oscura.
Ajuste Luminos. y Contraste.
Ajuste la función Fino.
Barras negras en la pantalla. Compruebe que la emisión que se está recibiendo es de alta definición (HD).
Los canales HD en ocasiones emiten una programación en SD (definición estándar) que
puede dar lugar a la aparición de barras negras.
Para eliminar las barras configure el decodificador de cable o satélite en los modos
Alargar o Panorámica.
Las imágenes tienen un tono
rojo-verde o rosa.
Compruebe que los cables de los componentes estén conectados en los terminales
correctos.
Los subtítulos para sordos no
funcionan.
Cuando se usa un decodificador de cable o satélite, la opción de los subtítulos para
sordos se debe configurar en el decodificador, no en el televisor.
Las imágenes se ven con nieve Quizás se necesite actualizar el firmware. Póngase en contacto con el proveedor de
cable.
Se ven imágenes superpuestas Quizás haya problemas de compatibilidad con el decodificador de cable.
Intente conectarse a través de los cables de los componentes.
Apéndice
BN68-01184A-Spa.indd 52 2007-02-13 �� 1:42:35

Español - 53
Problema Posible Solución
Unas barras horizontales
parpadean, tiemblan u oscilan en
la imagen.
Ajuste la función Grueso y después ajuste la función Fino.
Unas barras verticales
parpadean, tiemblan u oscilan en
la imagen.
Ajuste la función Grueso y después ajuste la función Fino.
La pantalla está negra y
el indicador luminoso de
alimentación parpadea
constantemente.
Compruebe lo siguiente en el equipo: Alimentación, Cable de señal.
El TV utiliza su sistema de gestión de energía.
Mueva el ratón del equipo o pulse una tecla del teclado.
La imagen no es estable y
parece vibrar cuando se conecta
el ordenador en la entrada de
PC.
Si el ajuste no es correcto, use la utilidad del ordenador para cambiar los ajustes de
pantalla.
El televisor admite funciones de visualización multiscan dentro del siguiente rango de
frecuencias:
Frecuencia horizontal (kHz)
30~60
Frecuencia vertical (Hz) 60~75
Índice de barrido máximo (60 Hz) 1360 x 768
La imagen no está centrada en
la pantalla.
Ajuste la posición horizontal y vertical.
La posición de la pantalla se debe ajustar respecto a la fuente de salida (por ejemplo, STB)
con una señal digital.
Si se muestra una imagen
inmóvil durante un período de
tiempo prolongado, pueden
aparecer imágenes residuales o
borrosas.
Cuando tenga que dejar el monitor sin utilizar por un período de tiempo prolongado, ajuste
la configuración de modo que el monitor entre automáticamente en modo de ahorro de
energía o active el protector de pantalla para visualizar imágenes móviles.
El panel LCD TFT utiliza un panel que consta de muchos píxeles de ínmo tamaño (3,147,264) que requieren de una tec-
nología altamente sosticada para su fabricación. Sin embargo, pueden haber unos pocos píxeles poco iluminados u oscuros
en pantalla. Estos píxeles no suponen una anomalia en el funcionamiento del producto.
BN68-01184A-Spa.indd 53 2007-02-13 �� 1:42:35

Español - 54
Instalación del soporte
< 2 > < 3 >
1. Coloque hacia abajo el TV sobre un paño suave o un almohadón sobre una mesa.
2.
Coloque el soporte en el orificio de la parte inferior del televisor.
3.
Inserte el tornillo en el orificio indicado y apriételo.
Desconexión del soporte
< 2 > < 3 > < 4 >
1. Coloque hacia abajo el TV sobre un paño suave o un almohadón sobre una mesa.
2.
Desmonte los 4 tornillos de la parte posterior del TV.
3.
Separe el soporte del TV.
4. Cubra con una tapa el orificio inferior.
BN68-01184A-Spa.indd 54 2007-02-13 �� 1:42:37

Español - 55
Cómo ajustar el soporte
1. Coloque el frontal del televisor sobre un
paño suave o una almohadilla encima
de una mesa tal como se muestra en la
figura (1).
- Alinee la parte inferior del televisor con el
borde de la mesa.
2.
Presione el centro de la parte posterior del
televisor. Ajuste el soporte como se indica
en la figura (2) mientras pulsa el botón
que se encuentra en la parte posterior del
soporte.
3.
Coloque el televisor sobre la mesa, de
manera que se asiente firmemente.
Cuando ajuste el soporte, pulse el botón que se encuentra en la parte posterior del soporte.
1. La Figura (1) muestra el ángulo de ajuste (-2°~14°) cuando utiliza la pantalla LCD en su soporte.
Una inclinación excesiva puede hacer que el TV LCD vuelque y que se produzcan daños.
2. La Figura (2) muestra el ángulo de ajuste (14°~80°) cuando la pantalla LCD pase del soporte al montaje en la pared.
3. La Figura (3) muestra el ángulo de ajuste (0°~10°) cuando monta la pantalla LCD en una pared.
Oirá un "clic" cuando cambie el ángulo de 1 a 2 o de 3 a 2.
Los elementos del montaje en la pared (se venden por separado) permiten instalar el televisor en una pared. Si desea más
información sobre la instalación de los componentes para montaje en la pared, consulte las instrucciones que se facilitan con
dichos elementos. Para la instalación del soporte mural, póngase en contacto con un técnico. Samsung Electronics no se hace
responsable de los daños causados al producto o al usuario si éste ha efectuado la instalación del televisor.
1. Sitúe el televisor boca abajo sobre un paño
suave o un cojín, encima de una mesa.
2.
Ajuste el soporte presionando el botón de la
parte posterior.
3.
Alinee el adaptador de montaje (no
suministrado) con los orificios de la parte
inferior del soporte y sujételo con los cuatro
tornillos que se suministran con el brazo
basculante, el soporte de montaje en pared
o cualquier otro mecanismo de soporte (no
suministrado).
1.
Cuando instale el televisor en una pared
sin utilizar el soporte, inserte las tapetas
decorativas como se describe en la ilustración
(1).
2.
Una vez insertadas, afírmelas con los cuatro
tornillos como se describe en la ilustración (2).
( 1 ) ( 2 )
Button
Instalación del equipo de montaje en la pared
Instalación de dispositivos de montaje conforme con VESA
( 1 ) ( 2 )
Botón
Protector de
montaje
(Se vende por
separado)
Uso de las tapetas decorativas
( 1 ) ( 2 )
( 1 ) Ajuste del ángulo del televisor
sobre el soporte.
( 2 ) Ajuste del ángulo cuando pase del so-
porte al montaje en la pared (1→3, 3→1)
( 3 ) Ajuste del ángulo cuando el televisor
LCD esté montado en la pared.
Cómo ajustar el ángulo del televisor
BN68-01184A-Spa.indd 55 2007-02-13 �� 1:42:40

Español - 56
1. Inserte el dispositivo de bloqueo en la ranura Kensington del TV LCD (Figura 1) y gírelo en el sentido del bloqueo (Figura 2).
2.
Conecte el cable del bloqueo Kensington.
3.
Fije el bloqueo Kensington a un mueble o a un objeto pesado que no se mueva.
Uso del cierre antirrobo kensington
El bloqueo Kensington es un dispositivo que se usa para jar físicamente el sistema cuando se usa en un lugar público.
El dispositivo de bloqueo debe adquirirse por separado. La apariencia y el método de bloqueo pueden diferir de la ilustración según los
fabricantes. Consulte el manual proporcionado con el bloqueo Kensington para usarlo correctamente.
Figura 2
Figura 1
Cable
<Opcional>
La ubicación del “Bloqueo Kensington” puede variar según el modelo.
Especicaciones
Nombre del Modelo
LN-T1953H/ LN-T1954H
Tamaño de pantalla (Diagonal) 19 pulg.
Consumo de energía 55 W
PC Resolución 1360 x 768 @ 60 Hz
Sonido
Salida
3W X 2
Dimensiones (An x Pr x Al)
Cuerpo principal
Con soporte
480 X 57.5 X 360.5 mm
(18.9 X 2.7 X 14.2 pulgadas)
480 X 180 X 393 mm
(18.9 X 7.1 X 15.5 pulgadas)
Peso
Con el soporte
11.46 lbs (5.2 kg)
Factores medioambientales
Temperatura de funcionamiento
Humedad de funcionamiento
Temperatura de almacenamiento
Humedad de almacenamiento
Entre 10 °C y 40 °C (50 °F a 104 °F)
Del 10 % al 80 %, sin condensación
Entre -20 °C y 45 °C (-4 °F a 113 °F)
Del 5 % al 95 %, sin condensación
El diseño y las especificaciones están sujetos a cambios sin previo aviso.
Este dispositivo es un aparato digital de la Clase B.
Para la fuente de alimentación, consulte la etiqueta pegada al producto.
BN68-01184A-Spa.indd 56 2007-02-13 �� 1:42:40

Esta pagina se ha dejado en
blanco expresamente.
BN68-01184A-Spa.indd 57 2007-02-13 �� 1:42:40
-
 1
1
-
 2
2
-
 3
3
-
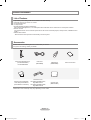 4
4
-
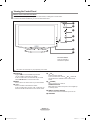 5
5
-
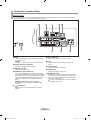 6
6
-
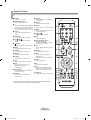 7
7
-
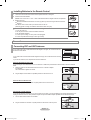 8
8
-
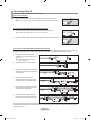 9
9
-
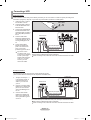 10
10
-
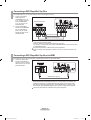 11
11
-
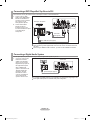 12
12
-
 13
13
-
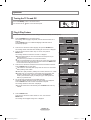 14
14
-
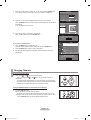 15
15
-
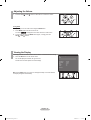 16
16
-
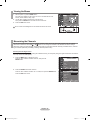 17
17
-
 18
18
-
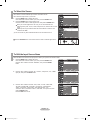 19
19
-
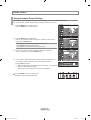 20
20
-
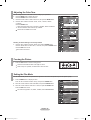 21
21
-
 22
22
-
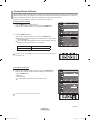 23
23
-
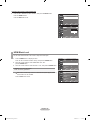 24
24
-
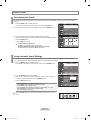 25
25
-
 26
26
-
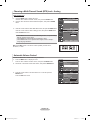 27
27
-
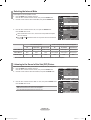 28
28
-
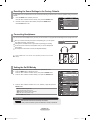 29
29
-
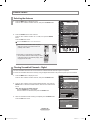 30
30
-
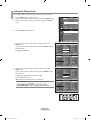 31
31
-
 32
32
-
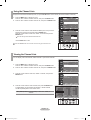 33
33
-
 34
34
-
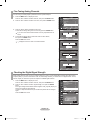 35
35
-
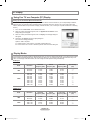 36
36
-
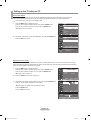 37
37
-
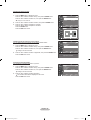 38
38
-
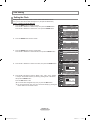 39
39
-
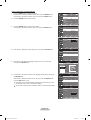 40
40
-
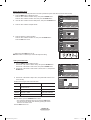 41
41
-
 42
42
-
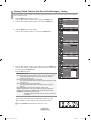 43
43
-
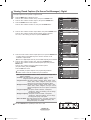 44
44
-
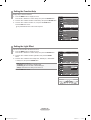 45
45
-
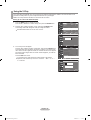 46
46
-
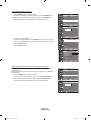 47
47
-
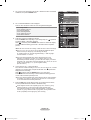 48
48
-
 49
49
-
 50
50
-
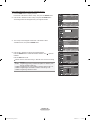 51
51
-
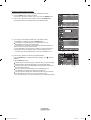 52
52
-
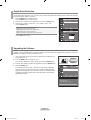 53
53
-
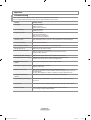 54
54
-
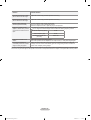 55
55
-
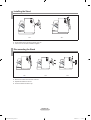 56
56
-
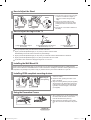 57
57
-
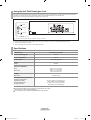 58
58
-
 59
59
-
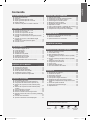 60
60
-
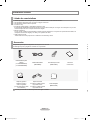 61
61
-
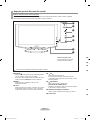 62
62
-
 63
63
-
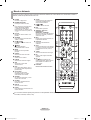 64
64
-
 65
65
-
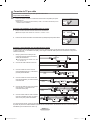 66
66
-
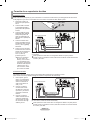 67
67
-
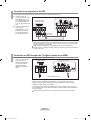 68
68
-
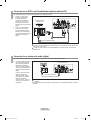 69
69
-
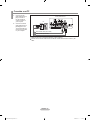 70
70
-
 71
71
-
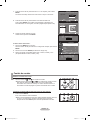 72
72
-
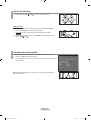 73
73
-
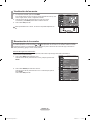 74
74
-
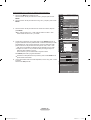 75
75
-
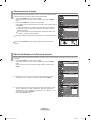 76
76
-
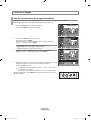 77
77
-
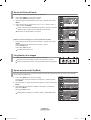 78
78
-
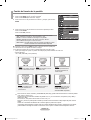 79
79
-
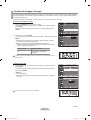 80
80
-
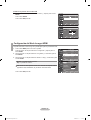 81
81
-
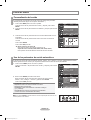 82
82
-
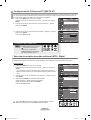 83
83
-
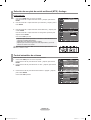 84
84
-
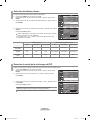 85
85
-
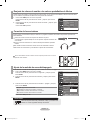 86
86
-
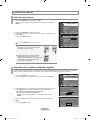 87
87
-
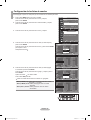 88
88
-
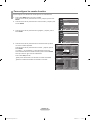 89
89
-
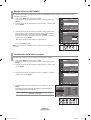 90
90
-
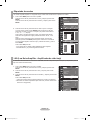 91
91
-
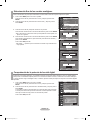 92
92
-
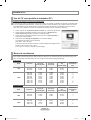 93
93
-
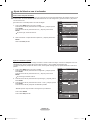 94
94
-
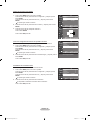 95
95
-
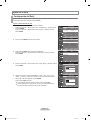 96
96
-
 97
97
-
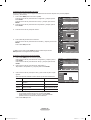 98
98
-
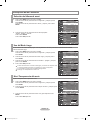 99
99
-
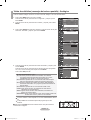 100
100
-
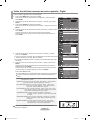 101
101
-
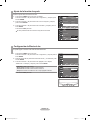 102
102
-
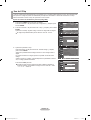 103
103
-
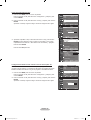 104
104
-
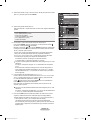 105
105
-
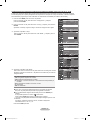 106
106
-
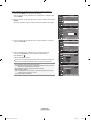 107
107
-
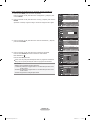 108
108
-
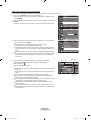 109
109
-
 110
110
-
 111
111
-
 112
112
-
 113
113
-
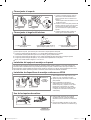 114
114
-
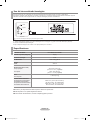 115
115
-
 116
116


Samsung LN-T1953H Manual de usuario
- Categoría
- Televisores LCD
- Tipo
- Manual de usuario
- Este manual también es adecuado para
en otros idiomas
- English: Samsung LN-T1953H User manual
Artículos relacionados
-
Samsung LN19R81BD Manual de usuario
-
-
-
-
-
-
-
-
-