Signature Hardware 447797 Guía de instalación
- Categoría
- Fregaderos de cocina
- Tipo
- Guía de instalación
Este manual también es adecuado para

1
1.800.221.3379
APRON FRONT SINK
STAINLESS STEEL
FREGADERO DE ACERO INOXIDABLE CON FALDÓN DELANTERO
SKU: 948499, 948497, 948498
REVISED 10/9/2019
CODES: SHWORK1BZA, SHSK3321ZA, SHSKURB3421A
GETTING STARTED
BEFORE YOU BEGIN
We recommend consulting a professional if you are
unfamiliar with installing plumbing fixtures. Signature
Hardware accepts no liability for any damage to the
sink, countertop, or for personal injury during
installation.
Observe all local plumbing and building codes.
Unpack and inspect the sink for shipping damage. If
any damage is found, contact our Customer
Relations team at 1-800-221-3379.
Ensure that you have gathered all the required
materials that are needed for the installation.
Please use assistance when lifting the sink in order
to avoid personal injury.
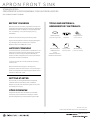
TOOLS AND MATERIALS:
HERRAMIENTAS Y MATERIALES:
ANTES DE COMENZAR
Le recomendamos que consulte a un profesional si no
sabe cómo instalar accesorios de plomería. Signature
Hardware no asume ninguna responsabilidad por
daños causados al fregadero, encimera o por lesiones
personales durante la instalación.
Cumpla con todas las normas locales de plomería y
construcción.
Retire el inodoro del empaque y verifique si se
produjeron daños durante el envío. Si encuentra algún
daño, comuníquese con nuestro equipo de Servicio al
cliente al 1-800-221-3379.
CÓMO COMENZAR
Asegúrese de haber reunido todos los materiales
necesarios para la instalación. Pida apoyo cuando
levante el fregadero para evitar lesiones personales.
Tape Measure
Cinta métrica
Safety Glasses
Gafas de seguridad
Level
Nivelador
Wood Shims
Cuñas de madera
Silicone Sealant
(100% Neutral
Cure)
Sellador de silicona
(100% curado neutro)
Damp Cloth
Paño húmedo

2
1.800.221.3379
FLUSH MOUNT & BUILT-UP
INSTALLATION
INSTALACIÓN DE MONTAJE
EMPOTRADO Y EMPOTRADA
INSTALLATION OPTIONS
OPCIONES DE INSTALACIÓN
1. The supporting frame should be positioned so that
the top of the sink rim (when placed inside the cabinet)
is level and flush with the top of the tile/countertop
material at the cut out area.
Note: For Built-up installation, raise rim of sink to
desired height using supporting frame. Proceed with
remaining instructions once built-up height is
achieved. The supporting frame should be positioned
so that the top of the sink rim (when placed inside the
cabinet) is level. Adjust or shim between the sink and
the support if needed to obtain proper fit
1. La estructura de soporte debe estar ubicada de forma
tal que la parte superior del borde del fregadero (cuando
está colocado dentro del gabinete) esté nivelada y
alineada con la parte superior del azulejo/material del
área recortada.
Nota: para la instalación empotrada, eleve el borde del
fregadero a la altura deseada utilizando la estructura de
soporte. Una vez que logre la altura de empotre continúe
con las instrucciones restantes. La estructura de soporte
debe estar ubicada de forma tal que la parte superior del
borde del fregadero (cuando está colocado dentro del
gabinete) esté nivelada. Acomode o coloque una cuña
entre el fregadero y el soporte si es necesario para
obtener el ajuste perfecto.
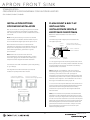
Reference below illustration for flush mount
installation.
Consulte la siguiente imagen para la instalación de
montaje empotrado.
We recommend consulting an experienced cabinet
maker for assistance. Providing the cabinet maker
with the actual sink that is to be installed will ensure a
custom fit.
Note: It may be necessary to custom scribe the
cabinet sides or, if needed, add wood filler strips to
accommodate the slight taper of the apron front.
Recomendamos consultar a un fabricante de
gabinetes con experiencia para obtener asesoría. Al
proporcionar el fregadero real que se va a instalar al
fabricante de gabinetes, garantizará un ajuste
personalizado.
Nota: Podría ser necesario trazar de forma
personalizada los costados del gabinete o, si fuera
necesario, agregar tiras de relleno de madera para
adaptar el chaflán delgado del faldón delantero.
Farmhouse sinks offer installation options depending
on your design.
Los fregaderos Farmhouse ofrecen opciones de
instalación que dependen de su diseño.
APRON FRONT SINK
STAINLESS STEEL
FREGADERO DE ACERO INOXIDABLE CON FALDÓN DELANTERO
SKU: 948499, 948497, 948498
undermount installation
instalación bajo la encimera
flush mount installation
instalación de montaje empotrado
built-up installation
instalación empotrada
fig. 1 fig. 2
fig. 3
cabinet
gabinete
support frame
estructura de soporte
mortar or adhesive
mortero o adhesivo
sealant
sellador
sink
fregadero
tile/countertop material
material de la encimera/azulejo

3
1.800.221.3379
UNDERMOUNT INSTALLATION
INSTALACIÓN BAJO LA ENCIMERA
2. Apply a thin layer of silicone sealant at each corner
of the supporting frame where it will contact the sink.
2. Aplique una delgada capa de sellador de silicona en
cada esquina de la estructura de soporte que tendrá
contacto con el fregadero.
3. Gently position the sink within the frame, placing
the sink in the center of the cabinet.
3. Ubique cuidadosamente el fregadero dentro de la
estructura y coloque el fregadero en el centro del
gabinete.
4. Make sure the sink rim is level and flush with the
countertop. Adjust or shim between the sink and the
support if needed to obtain proper fit.
4. Asegúrese de que el borde del fregadero esté nivelado
y al mismo nivel de la encimera. Adapte o coloque una
cuña entre el fregadero y el soporte si es necesario para
obtener el ajuste apropiado.
5. Once sink is installed, assemble and attach the
strainer or garbage disposal to the sink according to
the manufacturer’s directions.
5. Una vez que el fregadero esté instalado, ensamble o
fije el escurridor o triturador de basura al fregadero de
acuerdo con las instrucciones del fabricante.
6. Using silicone sealant between the sink and the
cabinet is recommended.
6. Se recomienda utilizar un sellador de silicona entre el
fregadero y el gabinete.
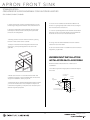
Reference below illustration for undermount
installation.
Consulte la siguiente imagen para la instalación bajo la
encimera.
APRON FRONT SINK
STAINLESS STEEL
FREGADERO DE ACERO INOXIDABLE CON FALDÓN DELANTERO
SKU: 948499, 948497, 948498
sealant
sellador
sink
fregadero
cabinet
gabinete
support frame
estructura de soporte
countertop
encimera

4
1.800.221.3379
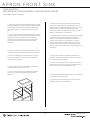
1. The supporting frame should be positioned so that
the top of the sink rim (when placed inside the cabinet)
is level and flush with the top surface of the cabinet
perimeter support or underlayment at the cut out
area.
1. La estructura de soporte debe estar ubicada de forma
tal que la parte superior del borde del fregadero (cuando
está colocado dentro del gabinete) esté nivelada y
alineada con la superficie superior del perímetro del
soporte del gabinete o del recubrimiento del área
recortada.
4. Make sure the sink rim is level and flush with the
cabinet perimeter. Adjust or shim between the sink
and the support if needed to obtain proper fit. The top
of the sink rim must be flush with the top of the
cabinet perimeter in order to obtain proper contact
with the underside of the countertop.
4. Asegúrese de que el borde del fregadero esté nivelado
y alineado con el perímetro del gabinete. Adapte o
coloque una cuña entre el fregadero y el soporte si es
necesario para obtener el ajuste perfecto. La parte
superior del borde del fregadero debe estar al mismo
nivel que la parte superior del perímetro del gabinete
para lograr el contacto adecuado con la parte inferior de
la encimera.
5. Once sink is installed, assemble and attach the
strainer or garbage disposal to the sink according to
the manufacturer’s directions.
5. Una vez que el fregadero esté instalado, ensamble o
fije el escurridor o triturador de basura al fregadero de
acuerdo con las instrucciones del fabricante.
2. Apply a thin layer of silicone sealant at each corner
of the supporting frame where it will contact the sink.
2. Aplique una delgada capa de sellador de silicona en
cada esquina de la estructura de soporte que tendrá
contacto con el fregadero.
3. Gently position the sink within the frame, placing
the sink in the center of the cabinet.
3. Ubique cuidadosamente el fregadero dentro de la
estructura y coloque el fregadero en el centro del
gabinete.
APRON FRONT SINK
6. Using silicone sealant between the sink, countertop,
and cabinet is recommended.
6. Se recomienda utilizar sellador de silicona entre el
fregadero, la encimera y el gabinete.
STAINLESS STEEL
FREGADERO DE ACERO INOXIDABLE CON FALDÓN DELANTERO
SKU: 948499, 948497, 948498
Transcripción de documentos
APRON FRONT SINK STAINLESS STEEL FREGADERO DE ACERO INOXIDABLE CON FALDÓN DELANTERO SKU: 948499, 948497, 948498 TOOLS AND MATERIALS: HERRAMIENTAS Y MATERIALES: BEFORE YOU BEGIN We recommend consulting a professional if you are unfamiliar with installing plumbing fixtures. Signature Hardware accepts no liability for any damage to the sink, countertop, or for personal injury during installation. Safety Glasses Gafas de seguridad Observe all local plumbing and building codes. Level Nivelador Tape Measure Cinta métrica Unpack and inspect the sink for shipping damage. If any damage is found, contact our Customer Relations team at 1-800-221-3379. ANTES DE COMENZAR Damp Cloth Silicone Sealant Paño húmedo (100% Neutral Cure) Sellador de silicona (100% curado neutro) Le recomendamos que consulte a un profesional si no sabe cómo instalar accesorios de plomería. Signature Hardware no asume ninguna responsabilidad por daños causados al fregadero, encimera o por lesiones personales durante la instalación. Wood Shims Cuñas de madera Cumpla con todas las normas locales de plomería y construcción. Retire el inodoro del empaque y verifique si se produjeron daños durante el envío. Si encuentra algún daño, comuníquese con nuestro equipo de Servicio al cliente al 1-800-221-3379. GETTING STARTED Ensure that you have gathered all the required materials that are needed for the installation. Please use assistance when lifting the sink in order to avoid personal injury. CÓMO COMENZAR Asegúrese de haber reunido todos los materiales necesarios para la instalación. Pida apoyo cuando levante el fregadero para evitar lesiones personales. REVISED 10/9/2019 CODES: SHWORK1BZA, SHSK3321ZA, SHSKURB3421A 1 1.800.221.3379 APRON FRONT SINK STAINLESS STEEL FREGADERO DE ACERO INOXIDABLE CON FALDÓN DELANTERO SKU: 948499, 948497, 948498 INSTALLATION OPTIONS OPCIONES DE INSTALACIÓN FLUSH MOUNT & BUILT-UP INSTALLATION INSTALACIÓN DE MONTAJE EMPOTRADO Y EMPOTRADA We recommend consulting an experienced cabinet maker for assistance. Providing the cabinet maker with the actual sink that is to be installed will ensure a custom fit. Reference below illustration for flush mount installation. Note: It may be necessary to custom scribe the cabinet sides or, if needed, add wood filler strips to accommodate the slight taper of the apron front. Consulte la siguiente imagen para la instalación de montaje empotrado. Recomendamos consultar a un fabricante de gabinetes con experiencia para obtener asesoría. Al proporcionar el fregadero real que se va a instalar al fabricante de gabinetes, garantizará un ajuste personalizado. sink fregadero support frame estructura de soporte cabinet gabinete 1. The supporting frame should be positioned so that the top of the sink rim (when placed inside the cabinet) is level and flush with the top of the tile/countertop material at the cut out area. Farmhouse sinks offer installation options depending on your design. Los fregaderos Farmhouse ofrecen opciones de instalación que dependen de su diseño. Note: For Built-up installation, raise rim of sink to desired height using supporting frame. Proceed with remaining instructions once built-up height is achieved. The supporting frame should be positioned so that the top of the sink rim (when placed inside the cabinet) is level. Adjust or shim between the sink and the support if needed to obtain proper fit flush mount installation instalación de montaje empotrado fig. 1 tile/countertop material material de la encimera/azulejo mortar or adhesive mortero o adhesivo Nota: Podría ser necesario trazar de forma personalizada los costados del gabinete o, si fuera necesario, agregar tiras de relleno de madera para adaptar el chaflán delgado del faldón delantero. undermount installation instalación bajo la encimera sealant sellador 1. La estructura de soporte debe estar ubicada de forma tal que la parte superior del borde del fregadero (cuando está colocado dentro del gabinete) esté nivelada y alineada con la parte superior del azulejo/material del área recortada. fig. 2 built-up installation instalación empotrada Nota: para la instalación empotrada, eleve el borde del fregadero a la altura deseada utilizando la estructura de soporte. Una vez que logre la altura de empotre continúe con las instrucciones restantes. La estructura de soporte debe estar ubicada de forma tal que la parte superior del borde del fregadero (cuando está colocado dentro del gabinete) esté nivelada. Acomode o coloque una cuña entre el fregadero y el soporte si es necesario para obtener el ajuste perfecto. fig. 3 2 1.800.221.3379 APRON FRONT SINK STAINLESS STEEL FREGADERO DE ACERO INOXIDABLE CON FALDÓN DELANTERO SKU: 948499, 948497, 948498 5. Once sink is installed, assemble and attach the strainer or garbage disposal to the sink according to the manufacturer’s directions. 2. Apply a thin layer of silicone sealant at each corner of the supporting frame where it will contact the sink. 2. Aplique una delgada capa de sellador de silicona en cada esquina de la estructura de soporte que tendrá contacto con el fregadero. 5. Una vez que el fregadero esté instalado, ensamble o fije el escurridor o triturador de basura al fregadero de acuerdo con las instrucciones del fabricante. 3. Gently position the sink within the frame, placing the sink in the center of the cabinet. 6. Using silicone sealant between the sink and the cabinet is recommended. 3. Ubique cuidadosamente el fregadero dentro de la estructura y coloque el fregadero en el centro del gabinete. 6. Se recomienda utilizar un sellador de silicona entre el fregadero y el gabinete. UNDERMOUNT INSTALLATION INSTALACIÓN BAJO LA ENCIMERA Reference below illustration for undermount installation. Consulte la siguiente imagen para la instalación bajo la encimera. countertop encimera 4. Make sure the sink rim is level and flush with the countertop. Adjust or shim between the sink and the support if needed to obtain proper fit. sink fregadero 4. Asegúrese de que el borde del fregadero esté nivelado y al mismo nivel de la encimera. Adapte o coloque una cuña entre el fregadero y el soporte si es necesario para obtener el ajuste apropiado. support frame estructura de soporte 3 sealant sellador cabinet gabinete 1.800.221.3379 APRON FRONT SINK STAINLESS STEEL FREGADERO DE ACERO INOXIDABLE CON FALDÓN DELANTERO SKU: 948499, 948497, 948498 4. Make sure the sink rim is level and flush with the cabinet perimeter. Adjust or shim between the sink and the support if needed to obtain proper fit. The top of the sink rim must be flush with the top of the cabinet perimeter in order to obtain proper contact with the underside of the countertop. 1. The supporting frame should be positioned so that the top of the sink rim (when placed inside the cabinet) is level and flush with the top surface of the cabinet perimeter support or underlayment at the cut out area. 1. La estructura de soporte debe estar ubicada de forma tal que la parte superior del borde del fregadero (cuando está colocado dentro del gabinete) esté nivelada y alineada con la superficie superior del perímetro del soporte del gabinete o del recubrimiento del área recortada. 4. Asegúrese de que el borde del fregadero esté nivelado y alineado con el perímetro del gabinete. Adapte o coloque una cuña entre el fregadero y el soporte si es necesario para obtener el ajuste perfecto. La parte superior del borde del fregadero debe estar al mismo nivel que la parte superior del perímetro del gabinete para lograr el contacto adecuado con la parte inferior de la encimera. 2. Apply a thin layer of silicone sealant at each corner of the supporting frame where it will contact the sink. 5. Once sink is installed, assemble and attach the strainer or garbage disposal to the sink according to the manufacturer’s directions. 2. Aplique una delgada capa de sellador de silicona en cada esquina de la estructura de soporte que tendrá contacto con el fregadero. 5. Una vez que el fregadero esté instalado, ensamble o fije el escurridor o triturador de basura al fregadero de acuerdo con las instrucciones del fabricante. 3. Gently position the sink within the frame, placing the sink in the center of the cabinet. 3. Ubique cuidadosamente el fregadero dentro de la estructura y coloque el fregadero en el centro del gabinete. 6. Using silicone sealant between the sink, countertop, and cabinet is recommended. 6. Se recomienda utilizar sellador de silicona entre el fregadero, la encimera y el gabinete. 4 1.800.221.3379-
 1
1
-
 2
2
-
 3
3
-
 4
4


Signature Hardware 447797 Guía de instalación
- Categoría
- Fregaderos de cocina
- Tipo
- Guía de instalación
- Este manual también es adecuado para